Skip to content
DisclaimerTerms Of UseGDPR PolicyCookie Policy

greenmealmap

  • Home
  • Drinks
  • Appetizers
  • Dinner
  • Dessert
  • About
  • Contact
  • Privacy Policy
DisclaimerTerms Of UseGDPR PolicyCookie Policy

NO-ING-IMG

- Oats: Rolled oats are the base of these protein bites. They add texture and fiber, making them filling and nutritious. - Nut Butter Options: You can use almond butter or peanut butter. Both provide healthy fats and a creamy texture, adding richness to the bites. - Dried Cherries and Other Add-ins: Chopped dried cherries give a sweet and tart flavor. You might add mini dark chocolate chips for extra sweetness or flavor. - Vegan Options: For a vegan choice, use maple syrup instead of honey. Opt for almond butter or sunflower seed butter to keep it plant-based. - Gluten-Free Alternatives: Ensure your oats are labeled gluten-free. This way, everyone can enjoy these tasty bites safely. - Sweetener Choices: You can substitute honey with agave syrup or any other liquid sweetener to fit your preference. - Calories per Serving: Each bite has about 100 calories, making them a great snack for energy. - Protein Content: With protein powder added, each bite contains around 5 grams of protein, perfect for muscle recovery. - Dietary Fiber and Sugars: Each bite offers 2-3 grams of dietary fiber and about 5 grams of sugar, mainly from the dried cherries and sweetener. These ingredients combine to make a healthy and easy snack that you can enjoy anytime! For the full recipe, check the section above. Mixing Dry Ingredients Start by gathering your dry ingredients. In a large bowl, add 1 cup of rolled oats, 1/2 cup of protein powder, chopped dried cherries, a pinch of salt, and 1/4 teaspoon of cinnamon. Mix these well until they are evenly combined. This step is key for flavor. Combining Wet Ingredients Next, take another bowl. Mix together 1/2 cup of almond butter and 1/4 cup of honey or maple syrup. Stir until smooth. This mixture adds sweetness and binds the dry ingredients. Molding and Shaping Pour the wet mixture into the dry mix. Stir until everything is blended. The mix should feel thick but not crumbly. If it seems dry, add 1 tablespoon of water at a time until you get the right consistency. Once mixed, use your hands to form small bites, about the size of a tablespoon. Roll them into balls and place them on a lined baking sheet. Adjusting Moisture Levels The amount of moisture can change based on your ingredients. If your mixture is too dry, add water slowly. This helps you find the perfect texture for rolling. Using Hands vs. Tools Using your hands gives you more control over the size and shape of each bite. Tools can work too, but hands help you feel the texture better. Required Chilling Time Place the formed bites in the fridge for at least 30 minutes. This helps them firm up and makes them easier to handle. Chilling also brings out the flavors. Display Suggestions To serve, you can pack the bites in an airtight container. They are great for snacks on the go. For a pretty presentation, arrange them on a platter with fresh cherries. It adds color and makes your snack look inviting. For the complete recipe, check the [Full Recipe]. Best Containers for Storage Store your Cherry Oatmeal Protein Bites in an airtight container. Glass containers work well. They keep the bites fresh and tasty. Shelf Life and Freezing Options These protein bites last about one week in the fridge. For longer storage, freeze them. They can stay good for up to three months in the freezer. Just thaw them in the fridge before eating. Flavor Variations You can change the flavor easily. Try adding chopped nuts or seeds for crunch. You can also swap dried cherries for other dried fruits like cranberries or apricots. This keeps your snacks exciting! Protein Powder Choices Use any protein powder you like. Vanilla and chocolate are great, but you can also try plant-based options. Choose what fits your taste and diet best. Pairing with Other Snacks Serve these bites with fresh fruit or yogurt. They create a balanced snack. You can also pair them with nut butter for an added protein boost. Incorporating into Meals Add these bites to your breakfast or lunch. Crumble them over oatmeal or mix them into smoothies. They add flavor and nutrition to any meal. {{image_2}} Adding nuts or seeds can boost the taste and crunch. Try almonds, walnuts, or pumpkin seeds. They add healthy fats and protein. You will enjoy the added texture. You can also use different dried fruits. Try cranberries, apricots, or even raisins. Each fruit will change the flavor. Mix and match to find your favorite blend. Making it low-carb is simple. Replace oats with coconut flour or almond flour. This swap keeps the bites tasty but lowers carbs. You can also create high-fiber versions. Add chia seeds or flaxseeds to the mix. These seeds pack in more fiber. They help keep you full longer. Bulk making is smart for snacks. You can double or triple the recipe. Store them in an airtight container. This way, you will always have a quick snack ready. Portioning for on-the-go is easy too. Roll the bites into small balls. Place them in small bags for a grab-and-go option. You can enjoy them anywhere! These bites can last up to one week in the fridge. For best results, store them in an airtight container. You can also freeze them for up to three months. Just make sure to label the container with the date. Thaw them in the fridge overnight for a quick snack. You can use fresh cherries, but they change the texture. Fresh cherries have more moisture. This can make your bites too soft or soggy. If you choose fresh, chop them small and reduce other liquids in the recipe. This helps keep a good balance of flavors. To make nut-free bites, use sunflower seed butter or soy nut butter. These options still give a nice creamy texture. You can also try pumpkin seed butter for a unique flavor. Just keep the same amount as the nut butter in the recipe. This way, you keep the consistency right. These cherry oatmeal protein bites are a great snack. They are healthy, tasty, and easy to make. You only need fifteen minutes to prep them. After that, they chill for thirty minutes. This recipe makes about twelve to fifteen bites. Making snack bites at home has many benefits. First, you control the ingredients. You can avoid additives and extra sugars. Second, you can customize flavors to match your taste. Want more chocolate? Just add more chips! Third, they are cost-effective. Buying snacks can add up quickly. Making them at home saves money and time. Plus, they are fresh and delicious. For your photos, show them on a bright plate. Add fresh cherries around the bites for color. You can also stack a few bites high for a fun look. This makes the snack more inviting and shareable. You learned how to make tasty and healthy Cherry Oatmeal Protein Bites. We covered key ingredients like oats and nut butter, along with tasty add-ins. You can always swap ingredients for vegan or gluten-free options. Remember, the right prep steps keep textures on point. These bites are great for snacks or meals. With smart storage, they last long. You can also change flavors or get creative with your ingredients. I hope you enjoy making these bites at home for a fun, healthy treat!

Cherry Oatmeal Protein Bites Healthy and Easy Snack

Are you searching for a quick and healthy snack? Look no further! Cherry Oatmeal Protein Bites are perfect for busy

- 2 boneless, skinless chicken breasts - 1 cup dill pickles, chopped - 1/2 cup ranch dressing - 1 cup quinoa, rinsed and drained - 2 cups vegetable broth (or water) - 1 cup cherry tomatoes, halved - 1 cucumber, diced - 1 cup shredded carrots - 2 cups mixed greens (spinach, arugula, etc.) - Optional: 1/4 cup feta cheese, crumbled - Salt and pepper to taste - Fresh dill for garnish - Additional toppings or variations - Different types of greens - Calories per serving - Macronutrient breakdown When I create a Pickle Ranch Chicken Buddha Bowl, I focus on fresh ingredients. The chicken breasts soak up the flavor from the dill pickles and ranch dressing. This adds tanginess and zest. The quinoa serves as a hearty base. It absorbs the broth well and gives a great texture. Each bite offers a mix of flavors. The cherry tomatoes bring sweetness while the cucumber adds crunch. Shredded carrots provide color and a slight earthiness. The mixed greens give a refreshing balance. You can even add feta cheese for a salty kick. This dish is not just tasty but also nutritious. It is filled with proteins, good fats, and fiber. You can adjust the greens and toppings to your liking. This makes it versatile for all eaters. For the full recipe, check out the detailed instructions. This will guide you step by step for a delicious meal. Start by marinating the chicken. In a bowl, mix chopped dill pickles and ranch dressing. Add the chicken breasts and coat them well. Cover the bowl and place it in the fridge for at least 30 minutes. This step infuses the chicken with great flavor. While the chicken marinates, cook the quinoa. In a saucepan, bring 2 cups of vegetable broth (or water) to a boil. Once boiling, add 1 cup of rinsed and drained quinoa. Reduce the heat, cover, and let it simmer for 15-20 minutes. The quinoa is done when it is fluffy and the liquid is absorbed. To check doneness, taste a small spoonful. It should be tender but not mushy. After cooking, fluff it with a fork and set it aside. Next, preheat your grill or grill pan over medium-high heat. Take the marinated chicken out of the fridge and shake off any extra dressing. Place the chicken on the grill. Cook each side for about 6-7 minutes. The chicken is ready when it reaches an internal temperature of 165°F (75°C). Once cooked, remove it from the grill and let it rest for a few minutes before slicing. This resting period keeps the chicken juicy. For all the details, check the Full Recipe. To make your bowl pop, use large, shallow bowls. Start with a base of quinoa. Then, layer each ingredient neatly. Place the mixed greens first, followed by grilled chicken, cherry tomatoes, cucumber, and carrots. This way, every bite has a bit of everything. Top it off with a sprinkle of fresh dill. It adds color and flavor. For the best flavor, marinate your chicken well. Mix the chopped dill pickles and ranch dressing in a bowl. Coat your chicken breasts evenly. Marinate for at least 30 minutes. If you have time, try to marinate for a few hours. This gives the chicken time to soak up all the flavors. To avoid dry chicken, ensure your grill is hot before cooking. Grill the chicken for about 6-7 minutes on each side. Use a meat thermometer to check the internal temperature. It should reach 165°F (75°C). For the quinoa, bring vegetable broth to a boil, then reduce heat and cover. Cook until fluffy, about 15-20 minutes. Fluff it with a fork for the best texture. {{image_2}} If you want to mix things up, try different dressings instead of ranch. You can use yogurt-based dressings or a homemade vinaigrette. These will give your bowl a fresh twist. For protein, chicken is great, but you can also use tofu or shrimp. Tofu absorbs flavors well, making it a perfect match for your bowl. Shrimp adds a nice seafood touch and cooks quickly. If you follow a low-carb or keto diet, swap quinoa for cauliflower rice. Cauliflower rice is low in carbs and still provides a nice base. You can also use leafy greens instead of grains for a lighter option. For a vegan twist, replace chicken with chickpeas or a plant-based protein. Use vegan ranch dressing to keep the flavors. This way, everyone can enjoy a tasty meal. To boost the taste, add spices or herbs. Paprika, garlic powder, or fresh parsley will elevate the dish. You can also try adding some red pepper flakes for a little heat. If you want to change the sauce, go for a tahini dressing or a spicy sriracha sauce. These can add depth and excitement to your bowl. With these variations, you can make each meal unique and tasty. For the full recipe, check out [Full Recipe]. You can keep Pickle Ranch Chicken Buddha Bowls in the fridge for up to four days. To store them properly, place the chicken and veggies in separate airtight containers. This keeps everything fresh and tasty. Always let the food cool to room temperature before sealing it. This helps avoid moisture buildup, which can spoil your meal faster. If you want to freeze these bowls, it’s best to separate the components. Cooked chicken and quinoa freeze well. Place them in freezer-safe bags or containers. Be sure to squeeze out as much air as possible before sealing. You can freeze them for up to three months. To reheat, simply thaw in the fridge overnight. Then, warm the chicken and quinoa in a microwave or skillet until hot. To save time, you can prep the ingredients ahead. Cook the quinoa and grill the chicken in advance. Both keep well in the fridge for a few days. Store the quinoa and chicken in separate containers. Use clear glass containers for easy viewing. Chopped veggies like cucumber and carrots can also be prepped and stored. This makes it easy to mix and match for quick meals. Yes, you can use many proteins. Try tofu for a vegetarian option. Grilled shrimp adds a nice touch too. If you prefer beef, thin strips of flank steak work well. You can also use pork tenderloin for a different flavor. Each of these proteins pairs nicely with the pickle ranch flavors. To add heat, consider these options: - Mix in some cayenne pepper or chili powder with the ranch dressing. - Add sliced jalapeños to the bowl for fresh heat. - Use spicy ranch dressing instead of the regular kind. These tweaks will bring a kick to your Pickle Ranch Chicken Buddha Bowls. Pair these bowls with a light side salad for a fresh crunch. Roasted veggies also make a great match. For something heartier, serve warm bread or artisan rolls. You can add a glass of iced tea or lemonade to complete the meal. Each of these sides enhances the main dish's bright flavors. For the full recipe, check out the details above. This blog post covered a delicious chicken buddha bowl recipe packed with flavor and nutrients. We explored the required ingredients, tips for cooking, and creative variations. You learned how to prepare and cook the chicken and quinoa perfectly. Remember, you can adapt this dish to fit your tastes. Feel free to switch ingredients or adjust flavors. This recipe offers endless possibilities and easy meal prep. Enjoy your cooking adventure and make it your own!

Pickle Ranch Chicken Buddha Bowls Easy and Flavorful Meal

Are you ready to spice up your meals? My Pickle Ranch Chicken Buddha Bowls are the perfect blend of flavor

To make Sweet Potato Avocado Toast, you will need: - 1 large sweet potato - 2 ripe avocados - 1 tablespoon olive oil - Salt and pepper to taste - 1 teaspoon chili flakes (optional) - 2 tablespoons lemon juice - Fresh cilantro or parsley, for garnish - Whole grain or sourdough bread (2 slices) Sweet potatoes are packed with vitamins. They are high in fiber and low in fat. This makes them great for digestive health. Avocados are also nutrient-rich. They contain healthy fats that help your heart. They provide vitamins C, E, and K, which are good for skin health. Olive oil adds more healthy fats and brings flavor. It can help reduce inflammation too. Lemon juice adds a fresh taste and vitamin C. Fresh herbs like cilantro or parsley add flavor and nutrients. If you don’t have sweet potatoes, regular potatoes work well. You can also use pumpkin or butternut squash. If you want a creamier spread, try Greek yogurt instead of avocado. If you need a gluten-free option, use gluten-free bread. For those who like spice, you can add jalapeños in place of chili flakes. The goal is to enjoy your meal while fitting your taste and needs. For the complete recipe, check the Full Recipe here! Start by preheating your oven to 400°F (200°C). This step is key. Wash one large sweet potato well. Then, peel it and slice it into ½-inch thick rounds. You want even slices for even cooking. Place these slices on a baking sheet. Drizzle them with 1 tablespoon of olive oil. Add salt and pepper to taste. Toss the slices gently so they are well coated. Spread them out evenly on the sheet. Roast the sweet potato for about 20-25 minutes. Flip them halfway through. They should become tender and slightly caramelized. While the sweet potatoes roast, take two ripe avocados. Cut them in half and remove the pits. Scoop the green flesh into a bowl. Use a fork to mash the avocado. Add 2 tablespoons of lemon juice for flavor. Season with salt, pepper, and chili flakes if you like spice. Mix until everything is combined but still chunky. This will create a creamy topping for your toast. Next, take two slices of whole grain or sourdough bread. Toast them to your preferred level of crispiness. I like to use a toaster or a grill for that nice crunch. Once your sweet potatoes are done roasting, it’s time to assemble your toast. Start with a layer of the mashed avocado on each slice of bread. Then, add a few sweet potato slices on top. Finish with fresh cilantro or parsley for garnish. You can even add more chili flakes if you want a little kick. Enjoy! When picking avocados, look for ones that feel slightly soft. Press gently near the stem. If it gives a little, it's ripe. Avoid any that are too mushy or have dark spots. You want bright green flesh inside. If you find hard avocados, buy them and let them ripen at room temperature. They will be ready in a few days. To get crispy sweet potato slices, slice them evenly, about ½ inch thick. This helps them cook at the same rate. Toss them in olive oil, salt, and pepper to coat. Spread them out on the baking sheet without crowding. When they roast in the oven, the heat will help them crisp up nicely. Flip them halfway for even cooking and browning. For the best toast, use whole grain or sourdough bread. Both options have great flavor and texture. I like to toast them until they are golden brown. This adds crunch and holds the toppings well. You can use a toaster or a skillet for toasting. If using a skillet, heat it on medium and toast each side for a minute or two. With these tips, your Sweet Potato Avocado Toast will turn out perfect every time. For the full recipe, check out the detailed instructions above. {{image_2}} You can make this sweet potato avocado toast vegan by simply sticking to the base recipe. All the ingredients listed are plant-based. Use fresh herbs for extra flavor. Try adding nutritional yeast for a cheesy taste without dairy. You can also top it with slices of radish or cucumber for crunch. If you need a gluten-free option, choose gluten-free bread. Many brands offer tasty choices made from rice, almond, or coconut flour. You can also use sweet potato rounds as the base instead of bread. Just slice the sweet potato into thicker rounds and roast them. They make a great gluten-free base. Mix things up by adding different toppings. Here are some tasty ideas: - Sliced tomatoes give a fresh burst. - Feta cheese adds creaminess and a salty bite. - Balsamic glaze brings a sweet tang. - Smoked paprika adds a smoky kick. - Sriracha gives heat for spice lovers. Feel free to experiment with these flavors. Each combo brings a new twist to your sweet potato avocado toast. For the full recipe, click here! To keep your Sweet Potato Avocado Toast fresh, store the leftovers in an airtight container. Place the sweet potato slices and avocado mixture in separate containers. This keeps the toast from getting soggy. You can store them in the fridge for up to three days. If you want to keep the bread fresh, wrap it in foil or plastic wrap. When you're ready to enjoy your leftovers, reheat the sweet potato slices in the oven. Preheat your oven to 350°F (175°C). Place the sweet potato slices on a baking sheet and heat for about 10 minutes. This way, they stay crispy. You can also toast the bread again to make it crunchy. You can freeze the sweet potato slices, but avoid freezing avocado. It does not thaw well. To freeze sweet potatoes, let them cool completely. Place them in a freezer bag. They will last for up to three months in the freezer. When you’re ready to eat them, thaw overnight in the fridge and reheat as mentioned before. For the best taste, prepare the avocado fresh each time. You can find the Full Recipe for more details. Yes, you can use regular potatoes. They will change the flavor and texture. Sweet potatoes add a rich sweetness and creaminess. Regular potatoes are more starchy and less sweet. If you choose regular potatoes, try adding spices for extra flavor. There are many great toppings for sweet potato avocado toast! Here are a few ideas: - Sliced radishes for crunch - Cherry tomatoes for freshness - Feta cheese for saltiness - Poached eggs for protein - Nuts for a nice crunch These toppings add different tastes and textures to your meal. To make this recipe meal prep-friendly, you can do a few simple things: - Roast extra sweet potato slices to use later. - Mash the avocado just before serving to keep it fresh. - Prepare toppings in advance and store them separately. This way, you can enjoy quick and easy meals throughout the week! For the full recipe, check out the Sweet Potato Avocado Toast section. This blog post covered key ingredients and their benefits, plus simple steps to make your dish. You learned how to prep sweet potatoes and create a tasty avocado mix. I shared tips on choosing ripe avocados and making crispy slices. As you try variations, remember to explore vegan and gluten-free options. Store leftovers well to keep them fresh. With these insights, you’re ready to enjoy a healthy meal anytime. Happy cooking!

Sweet Potato Avocado Toast Nutritious and Easy Meal

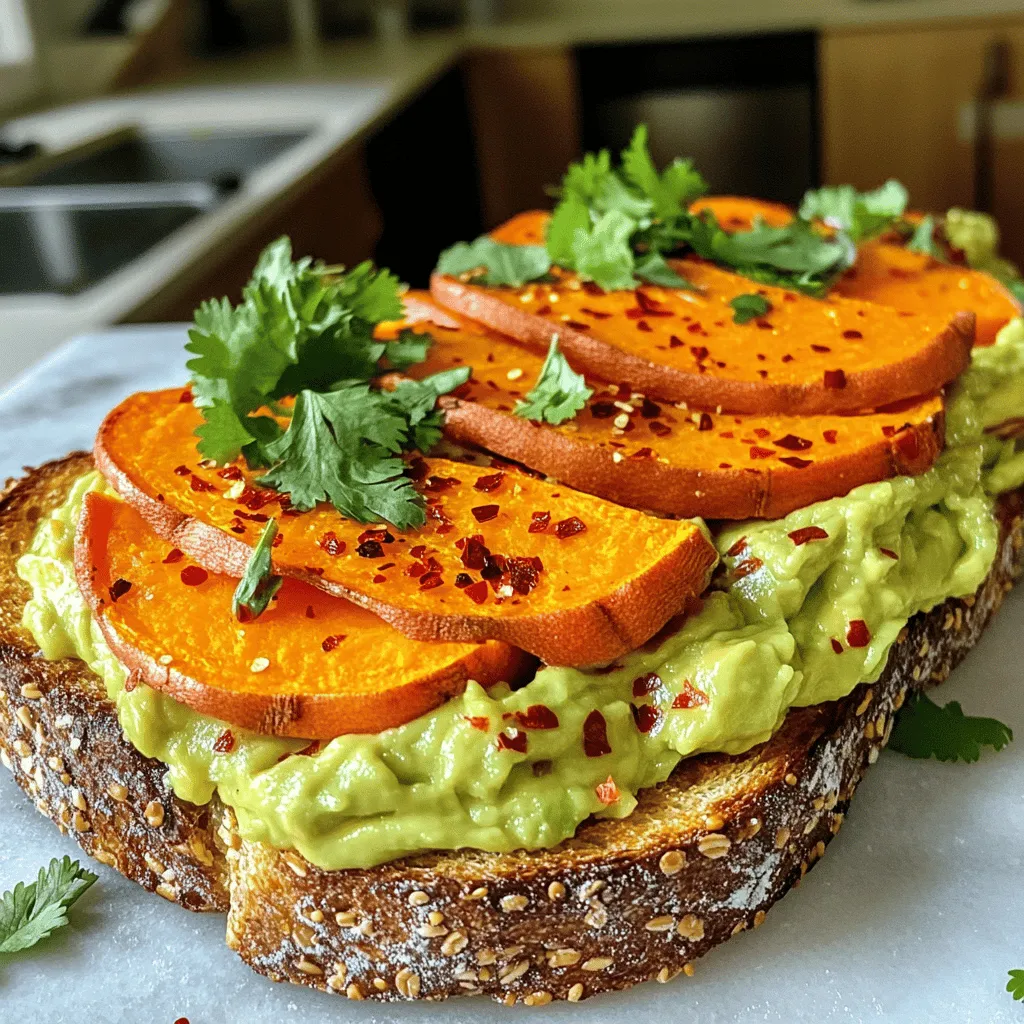
Looking for a delicious and healthy meal? Sweet Potato Avocado Toast is your answer! This quick dish combines creamy avocados

To make the best chili lime roasted chickpeas, you need simple ingredients. Here's what you'll need: - 2 cans (15 oz each) chickpeas, drained and rinsed - 2 tablespoons olive oil - 1 teaspoon chili powder - 1 teaspoon smoked paprika - 1/2 teaspoon garlic powder - 1/2 teaspoon onion powder - 1/4 teaspoon cayenne pepper (adjust for spice preference) - Zest and juice of 1 lime - Salt to taste - Fresh cilantro for garnish (optional) These ingredients come together to create a tasty snack. The spices give a nice kick, and the lime adds brightness. Having the right tools makes cooking easier. Here’s what I recommend: - Baking sheet - Parchment paper - Mixing bowl - Clean kitchen towel - Measuring spoons These tools help you prepare and cook the chickpeas perfectly. A baking sheet lined with parchment paper ensures easy cleanup. If you want to enhance the taste, try these optional ingredients: - Cumin for a deeper flavor - Lime zest for extra citrus - Dried herbs like oregano or thyme These options allow you to customize your roasted chickpeas. Feel free to mix and match based on your taste. For the full recipe, check the section above. First, I rinse the chickpeas well under cold water. This step is vital. It helps remove excess salt and any canning liquid. Once rinsed, I drain them thoroughly. Then, I spread them out on a baking sheet. I use a clean kitchen towel to pat them dry. This step removes moisture, which helps them crisp up later. Next, I make the marinade in a large bowl. I add 2 tablespoons of olive oil. Then, I mix in 1 teaspoon of chili powder and 1 teaspoon of smoked paprika. After that, I sprinkle in 1/2 teaspoon of garlic powder and 1/2 teaspoon of onion powder. For a kick, I add 1/4 teaspoon of cayenne pepper. I adjust this based on how spicy I want it. I also add the zest and juice of 1 lime. Finally, I season with salt to taste. I stir this mixture until it is well combined. Now it’s time to roast the chickpeas. I toss the dried chickpeas into the marinade. I make sure each chickpea gets coated well. Then, I spread them back onto the baking sheet. I arrange them in a single layer. This prevents them from steaming. I roast them in a preheated oven at 400°F (200°C) for 25-30 minutes. Halfway through, I shake the pan to ensure even cooking. When they turn golden brown, I know they're done. After roasting, I let them cool for a few minutes. They will crisp up more as they cool. I enjoy these chickpeas warm or at room temperature. For a fresh touch, I like to garnish them with cilantro. You can find the full recipe above. To get your chickpeas nice and crunchy, start by drying them well. After rinsing, use a clean towel to pat them dry. Any extra water will steam the chickpeas instead of roasting them. Spread them out in a single layer on the baking sheet. This helps them cook evenly and get that perfect crispiness. If you love heat, add more cayenne pepper to the mix. For a milder flavor, cut back on it. You can also switch up the spices. Try adding cumin or paprika for a twist. Taste the marinade before adding the chickpeas. This way, you can adjust the flavors to fit your taste. Shake the pan halfway through roasting. This helps the chickpeas cook evenly. If you notice some are browning faster, move them around. Keep an eye on them as they roast. They can go from perfect to burnt quickly. Let them cool briefly after roasting; they’ll get even crispier as they cool. For more details, check the Full Recipe. {{image_2}} You can mix up the flavors with different spices. Try adding cumin for warmth. Paprika adds a sweet touch, while nutritional yeast gives a cheesy flavor. For a kick, use curry powder or a dash of hot sauce. You can even try a mix of sweet and savory by adding cinnamon and nutmeg. Chili lime roasted chickpeas make a great snack on their own. You can also sprinkle them on salads for added crunch. They are perfect in wraps or as a topping for soups. Pair them with dips like hummus or guacamole for a fun twist. Serve them as party snacks to impress your friends. Want to try something different? You can make a sweet version too. Use maple syrup or honey as your base. Replace chili powder with cinnamon and a pinch of salt. Toss in some vanilla extract for a tasty treat. Roast as usual, and enjoy a unique snack that satisfies your sweet tooth. For the full recipe, check out the section above. To keep your Chili Lime Roasted Chickpeas fresh, store them in an airtight container. Use a glass or plastic container with a tight lid. They stay best at room temperature for up to three days. If you want them crisp, avoid refrigerating them. Cold air can make them soggy. If you have leftovers, you can reheat them to regain some crispiness. Preheat your oven to 350°F (175°C). Spread the chickpeas on a baking sheet. Heat them for about 10 minutes. Check them often to avoid burning. This way, they taste almost as fresh as when you first made them. You can freeze the chickpeas if you want to save them for later. Place them in a freezer-safe bag. Remove as much air as possible to keep them fresh. They can last up to three months in the freezer. When you're ready to eat them, just bake them directly from frozen. This keeps the flavor and texture nice. For the full recipe, check the earlier section on ingredients and instructions. Chili lime roasted chickpeas can last up to one week when stored properly. Keep them in an airtight container at room temperature. This helps maintain their crunch. If they become soft, you can re-crisp them in the oven for a few minutes. Yes, you can use dried chickpeas! However, you'll need to cook them first. Soak the dried chickpeas overnight, then boil them until tender. After that, follow the same steps in the full recipe to roast them. The flavor will still shine through. Chili lime roasted chickpeas make a great snack on their own. They also add a tasty crunch to salads and grain bowls. You can serve them as a topping for soups or mix them into wraps. Their zesty flavor complements many dishes! Chili lime roasted chickpeas make a tasty snack or dish. We covered the key ingredients, tools, and optional flavors. I guided you through easy steps to prepare and roast your chickpeas to perfection. You learned tips for crispiness and adjusting spice levels. We also explored variations and best storage methods. Enjoy your flavorful snacks, and don't hesitate to get creative with your ingredients! Remember, the fun is in trying new things. Happy cooking!

Chili Lime Roasted Chickpeas Flavorful Snack Idea

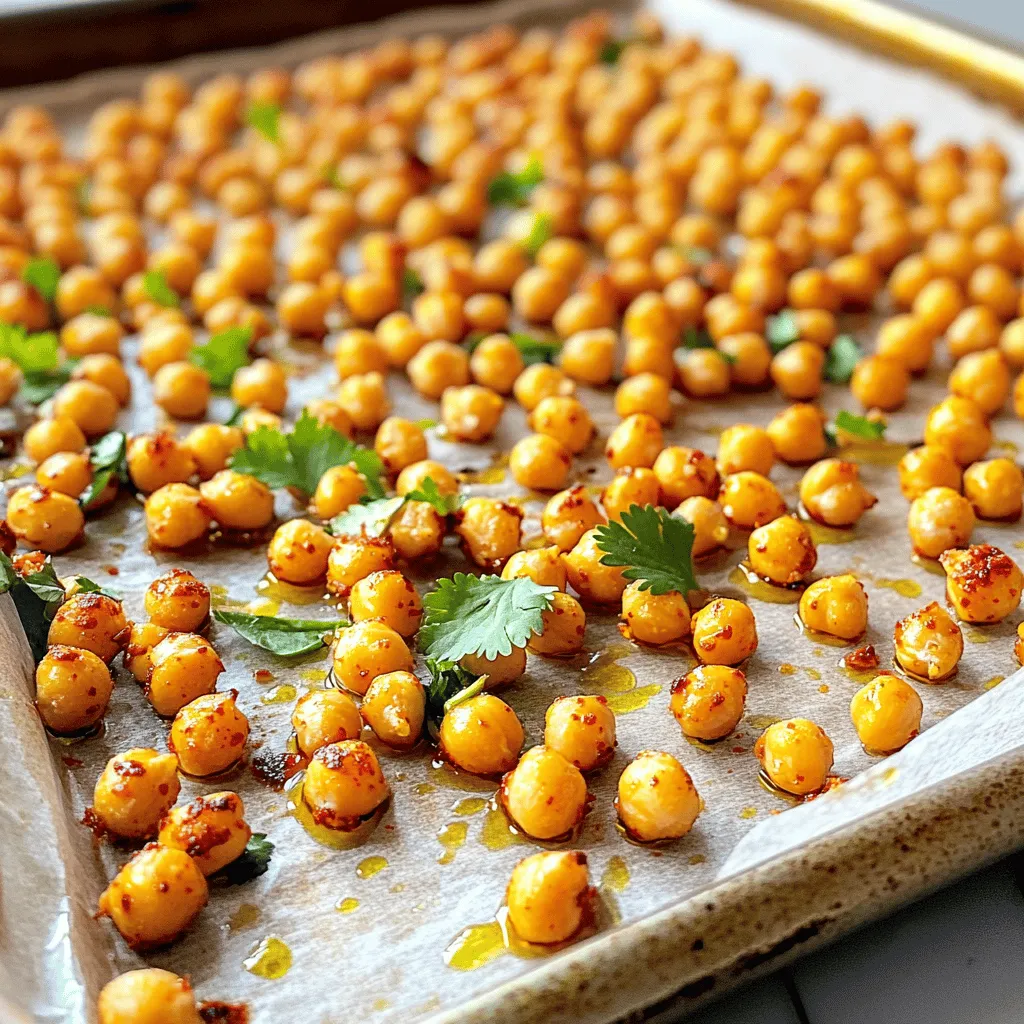
Looking for a tasty snack that packs a punch? Chili Lime Roasted Chickpeas are the answer. They are crunchy, flavorful,

For these tasty muffins, you will need: - 1 cup rolled oats - 1 cup all-purpose flour - 1/2 cup brown sugar - 2 teaspoons baking powder - 1/2 teaspoon baking soda - 1/4 teaspoon salt - 1 teaspoon cinnamon - 2 ripe bananas, mashed - 1/2 cup Greek yogurt (or applesauce for a lighter option) - 1/4 cup honey or maple syrup - 1/4 cup vegetable oil or melted coconut oil - 1 teaspoon vanilla extract - 1 cup fresh strawberries, hulled and diced - Optional: 1/2 cup chopped nuts (walnuts or pecans) You can easily swap some ingredients for a healthier or different taste. Here are some ideas: - Use whole wheat flour instead of all-purpose flour for more fiber. - Replace brown sugar with coconut sugar for a lower glycemic index. - Try almond milk instead of Greek yogurt for a dairy-free option. - Use mashed apples instead of bananas if you want a different flavor. - Maple syrup can be replaced with agave nectar if you prefer. These muffins are not only yummy but also packed with nutrients. Here is an overview of the nutrition per muffin: - Calories: About 150 - Protein: 4 grams - Carbohydrates: 25 grams - Fat: 5 grams - Fiber: 2 grams - Sugar: 7 grams These muffins offer a healthy balance of carbs, protein, and healthy fats, making them a great snack or breakfast option. You can find the full recipe mentioned earlier to create these nutritious treats. First, set your oven to 350°F (175°C). This is the perfect temperature for baking. While the oven warms up, prepare your muffin tin. You can line it with paper liners or lightly grease it. This helps the muffins come out easily once they are baked. In a large bowl, mix together the dry ingredients. Add 1 cup of rolled oats, 1 cup of all-purpose flour, and 1/2 cup of brown sugar. Next, sprinkle in 2 teaspoons of baking powder, 1/2 teaspoon of baking soda, 1/4 teaspoon of salt, and 1 teaspoon of cinnamon. Stir these ingredients well. This step ensures that your muffins have great texture and flavor. For the wet mix, take another bowl. Mash 2 ripe bananas and add them. Then, mix in 1/2 cup of Greek yogurt, or use applesauce for a lighter option. Sweeten it up with 1/4 cup of honey or maple syrup. Pour in 1/4 cup of vegetable oil or melted coconut oil, then add 1 teaspoon of vanilla extract. Mix these until smooth and creamy. This will make your muffins moist and tasty. Now, it’s time to combine the mixtures. Pour the wet ingredients into the bowl of dry ingredients. Gently fold them together, being careful not to overmix. Next, add in 1 cup of fresh strawberries that you have hulled and diced. If you like nuts, you can also fold in 1/2 cup of chopped walnuts or pecans. This adds a nice crunch to your muffins. Spoon the batter into your muffin cups. Fill each one about 2/3 full. This allows space for the muffins to rise. Place the muffin tin in the preheated oven. Bake for 18-20 minutes. To check if they are done, insert a toothpick into the center of a muffin. If it comes out clean, your muffins are ready. Let them cool in the tin for 5 minutes before moving them to a wire rack. Enjoy your warm, delicious muffins! For the full recipe, refer to the earlier section. To get the best muffin texture, measure your flour correctly. Use the spoon-and-level method. This helps avoid dense muffins. Mix dry and wet ingredients gently. Overmixing can lead to tough muffins. You want your batter to be slightly lumpy. This ensures a light and airy texture. Bake them at the right temperature, 350°F (175°C). The time should be about 18-20 minutes. Keep an eye on them during the last few minutes. A toothpick should come out clean when they’re done. One common mistake is not using ripe bananas. Choose bananas that are very soft and spotty. They add more flavor and sweetness. Another mistake is skipping the lining of the muffin tin. This can make your muffins stick and break apart. Don't forget to fold in the strawberries gently. If you crush them, your muffins will turn pink. Lastly, avoid opening the oven too early. This can cause your muffins to sink in the middle. To enhance flavor, try adding spices like nutmeg or ginger. These spices pair well with the fruits. You can also mix in chocolate chips for a sweet treat. For presentation, dust the muffins with powdered sugar. Serve them warm with fresh strawberries on the side. This adds color and freshness to your dish. For a more gourmet touch, top them with a dollop of Greek yogurt. You can find the full recipe for these delicious muffins above. {{image_2}} You can make these muffins gluten-free easily. Just swap the all-purpose flour with a gluten-free blend. Look for a mix that includes xanthan gum, as it helps with texture. You can also use almond flour or oat flour instead. Both options keep the muffins soft and tasty. To make these muffins vegan, replace the Greek yogurt with unsweetened plant yogurt. You can use applesauce, but banana adds more flavor. For the eggs, use flaxseed meal. Mix one tablespoon of flaxseed with three tablespoons of water. Let it sit for a few minutes to thicken. This mixture acts like one egg. You can make these muffins even more fun with extra flavors. Consider adding chocolate chips for a sweet treat. Mix in 1/2 cup of dark or semi-sweet chips. Spices can enhance the taste too. Try adding a pinch of nutmeg or ginger for a warm flavor. You can also add 1/2 cup of chopped nuts like walnuts or pecans for some crunch. For the full recipe, check out the detailed instructions above. To keep your strawberry banana oat muffins fresh, store them in an airtight container. This helps retain moisture and flavor. If you plan to eat them within a few days, keep them at room temperature. For longer storage, the fridge is a good option. Just remember to let them cool completely before sealing them. Freezing muffins is a great way to save them for later. Allow the muffins to cool fully first. Then, wrap each one in plastic wrap. After that, place them in a freezer bag. Label the bag with the date. Muffins can last up to three months in the freezer. When you’re ready to enjoy, just take one out and thaw it at room temperature. To reheat your muffins, remove them from their wrapping. You can use the microwave for quick warming. Heat for about 15-20 seconds. For a crispier texture, consider using your oven. Preheat it to 350°F (175°C) and warm the muffins for about 5-10 minutes. This brings back their fresh-baked taste. Enjoy your muffins warm! For the full recipe, check the earlier section. Yes, you can use frozen strawberries. Just thaw them first. Drain any extra juice. This keeps your muffins from getting too wet. Frozen strawberries also work well and taste great. To reduce the sweetness, cut back on the brown sugar. You can use half of what the recipe calls for. You might also skip the honey or maple syrup. If you like, add more mashed banana for natural sweetness. To ripen bananas fast, place them in a brown paper bag. This traps the ethylene gas, which helps them ripen. You can also place them in a warm spot in your kitchen. If you need them really quick, bake them at 300°F for 15-20 minutes. Check the muffins at 18 minutes. Insert a toothpick into the center of one. If it comes out clean, they are done. If it has wet batter on it, bake for a few more minutes. Watch them closely to avoid overbaking. This blog post covered everything you need for making strawberry banana oat muffins. We talked about the ingredients you need and their substitutions. Then, I shared step-by-step instructions and tips for a perfect texture. I explored fun variations to customize the muffins and gave you storage advice. Baking is all about trying new things. Use these methods to make muffins you'll love. Enjoy your baking journey!

Strawberry Banana Oat Muffins Healthy and Tasty Treat

Are you ready to whip up a delicious treat that’s both healthy and satisfying? Strawberry Banana Oat Muffins are your

When making rainbow veggie pinwheels, it's all about bright colors and fresh flavors. Here’s what you need: - 4 large whole wheat tortillas - 1/2 cup cream cheese, softened - 1/4 cup hummus (any flavor you prefer) - 1 cup spinach leaves, washed and dried - 1 medium carrot, grated - 1 red bell pepper, thinly sliced - 1 cup cucumber, julienned - 1/2 cup purple cabbage, shredded - Salt and pepper to taste - Optional: Fresh herbs (like dill or parsley) for garnish Each ingredient plays a key role in taste and nutrition. Whole wheat tortillas serve as a great base, adding fiber. Cream cheese and hummus provide a creamy texture. The veggies bring color and crunch. Spinach is rich in iron, while carrots add sweetness. Red bell peppers give a fresh, juicy bite, and cucumbers add a refreshing coolness. Purple cabbage not only looks pretty but is packed with vitamins. Feel free to add your favorite herbs as a garnish. They can elevate the flavor and add a gourmet touch. These ingredients make the pinwheels not just a snack, but a fun, healthy treat. For the full recipe, check out the details provided earlier. Start by making your spreads. Take a small bowl and mix the softened cream cheese with salt and pepper. This mix should be smooth and creamy. You can also add fresh herbs for a tasty twist. Next, set aside your hummus. You can use any flavor you like, but I love roasted garlic. It adds great depth to the pinwheels. Now, let’s build our pinwheels. Lay a whole wheat tortilla on a clean surface. Spread that creamy cheese mix all over the tortilla, reaching the edges. This base keeps everything from falling out. Now, start layering your veggies. First, place spinach leaves. Then, add grated carrot, red bell pepper slices, cucumber, and purple cabbage. Be sure to mix the colors for a beautiful rainbow. Next, spread a thin layer of hummus over the veggies. This adds flavor and ties everything together. You want to keep it thin so the pinwheel rolls tightly. It's time to roll it up. Starting from one end with the fillings, roll the tortilla tightly. Keep the filling secure as you roll. Once you reach the other end, you should have a nice, tight roll. Use a sharp knife to slice the pinwheel into bite-sized pieces, about 1 to 2 inches wide. For a clean cut, wipe the knife with a damp cloth after each slice. Arrange your colorful pinwheels on a platter, and if you want, sprinkle some fresh herbs on top for flair. Enjoy these tasty bites! For the complete recipe, check out the Full Recipe section. To create a stunning rainbow effect, use a variety of colorful veggies. Start with spinach for a vibrant green base. Next, add grated carrot for orange, red bell pepper for red, cucumber for a fresh green, and purple cabbage for a pop of purple. Layer each veggie in a way that shows off their colors. This will make your pinwheels look fun and inviting. Remember, the more colors, the better! When it’s time to slice your pinwheels, use a sharp knife. This helps you get clean cuts without squishing the veggies. Aim for slices that are about 1 to 2 inches wide. If you slice too thick, the pinwheels may fall apart. If you slice too thin, you lose some of that colorful effect. A gentle sawing motion works best to keep everything intact. Serve your rainbow veggie pinwheels on a big platter. You can arrange them in a circular pattern or stack them upright in a jar. This makes for a fun display. Pair them with extra hummus or a tangy yogurt dip for added flavor. You can also add some fresh herbs on top for a nice touch. This makes your snack look even more appealing and tasty. For the full recipe, check out the detailed instructions. {{image_2}} You can change up the spreads for more flavor. Instead of cream cheese, try using avocado or a spicy bean dip. These options add creaminess and extra taste. You can also mix cream cheese with herbs like chives or basil. This gives a fresh twist. For dips, pair your pinwheels with ranch dressing, tzatziki, or a spicy salsa. These dips provide zing and keep it fun! Feel free to mix and match veggies to your liking. Try adding sliced radishes for crunch or roasted red peppers for sweetness. Zucchini ribbons can add a fun texture. You can even add some fruit, like thin apple slices, for a sweet touch. Just remember to keep the colors bright for that rainbow look. The more colors, the more fun—and healthy! To make these pinwheels vegan, swap cream cheese for a plant-based cream cheese or hummus. Make sure your tortillas are dairy-free too. You can use a variety of veggies like bell peppers, carrots, and sprouts. Add a spread of guacamole for creaminess. These changes keep your pinwheels just as tasty and colorful. Enjoy experimenting with flavors and textures! For the full recipe, check out the Rainbow Veggie Pinwheels. To keep your Rainbow Veggie Pinwheels fresh, wrap each one in plastic wrap. This helps prevent them from drying out. You can also place them in an airtight container. Make sure to store them in the fridge. They can last for up to three days if stored properly. For the best taste, eat your pinwheels within the first day. The veggies stay crisp and colorful. If you have leftovers, keep the ingredients separate. Store the tortillas, cream cheese, and veggies in different containers. This way, they won’t get soggy. These pinwheels are best enjoyed cold, but you can warm them up if you like. To reheat, place them in a microwave for about 10-15 seconds. This softens the cream cheese without making the veggies wilt. Avoid overheating, as it can change the texture and taste. For the full recipe, check out the instructions above. Yes, you can make these pinwheels ahead of time. I recommend wrapping them tightly in plastic wrap. This keeps them fresh and helps maintain their shape. Store them in the fridge for up to two days. If you slice them too early, they may dry out. I suggest slicing just before serving. Whole wheat tortillas work great for Rainbow Veggie Pinwheels. They add nutrition and a nice texture. You can also try spinach or tomato tortillas for extra color. These options not only taste good but make your pinwheels look even more vibrant. You can change the spreads to match your taste. Instead of cream cheese, try guacamole or a bean spread. You can also mix different veggies. Try adding avocado, radishes, or even cooked sweet potatoes. Be playful and create your own unique flavor combinations! Absolutely! Adding proteins can make these pinwheels a more filling snack. You can include sliced turkey, chicken, or tofu. Just make sure to keep the flavors balanced. You want the veggies to shine through, so don’t overload them with protein. To enhance the color, use a variety of veggies. Try yellow bell peppers, purple carrots, or even beets. Each color adds its own flavor and nutrients. When you stack the veggies, aim for a rainbow effect. It makes the pinwheels more fun and appealing. Yes! Rainbow Veggie Pinwheels are perfect for parties. They look great and are easy to grab. Just arrange them on a platter for a colorful display. You can also serve them with dips like ranch or tzatziki to add more flavor. You can pair your pinwheels with a variety of dips. Hummus, salsa, or yogurt-based dips work well. You could also serve fresh fruit or a light salad on the side. This adds more color and keeps the meal light and healthy. I don’t recommend freezing them. The fresh veggies will lose their crunch and texture. It’s best to enjoy them fresh. If you want to prepare in advance, store them in the fridge as mentioned earlier. For the full recipe, check out the detailed instructions and ingredient list above. Enjoy making your Rainbow Veggie Pinwheels! You learned how to make tasty Rainbow Veggie Pinwheels with simple steps. We covered the ingredients, from whole wheat tortillas to fresh veggies. You now know how to prepare spreads, layer your ingredients, and slice pinwheels like a pro. I shared tips for rainbow colors and storage tricks, ensuring your pinwheels stay fresh. Remember, these snacks are fun to customize. Get creative with spreads and veggies you love. Enjoy making and sharing these healthy treats with others!

Rainbow Veggie Pinwheels Colorful and Healthy Snack

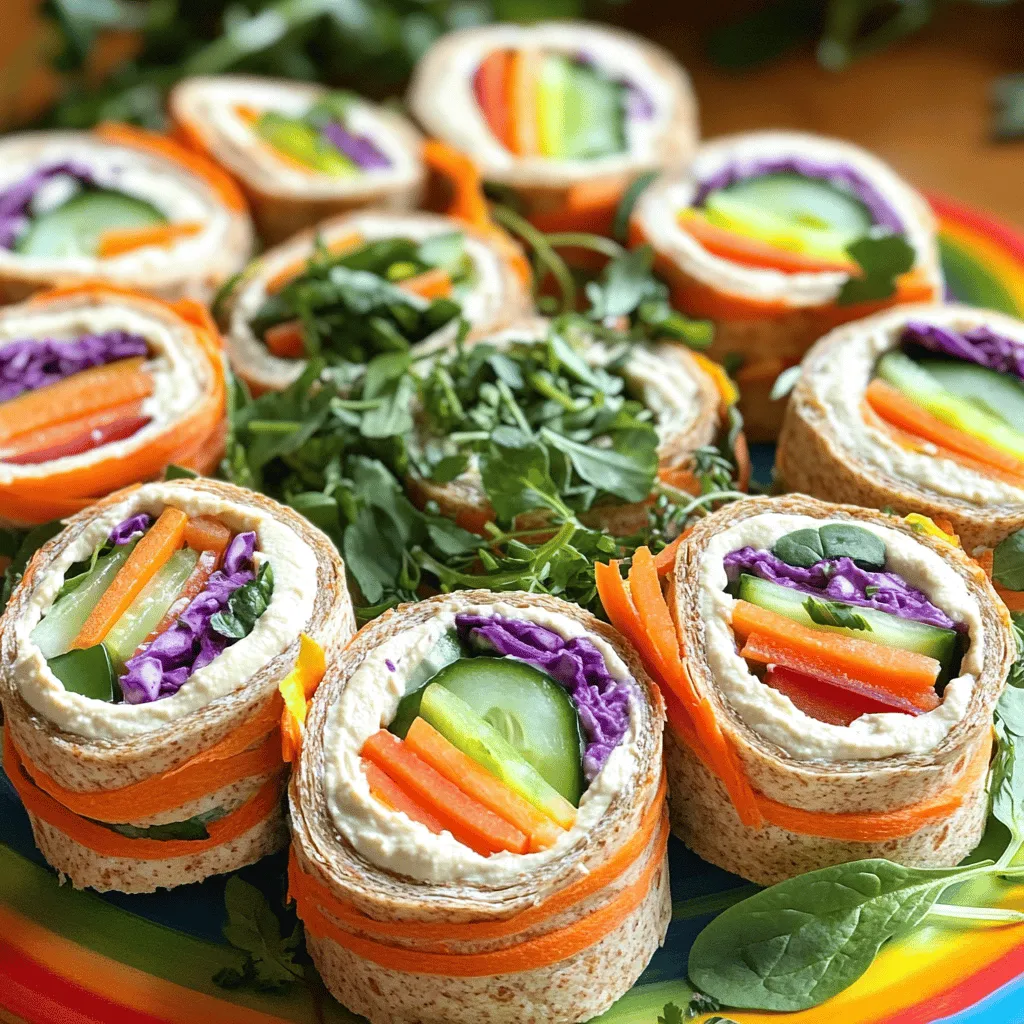
Looking for a fun and healthy snack? Rainbow Veggie Pinwheels are a colorful twist on your usual fare! With vibrant

- 4 medium zucchinis, sliced into 1/4 inch rounds - 1 cup grated Parmesan cheese - 1 cup breadcrumbs (panko for extra crunch) - 2 large eggs, beaten - 2 tablespoons olive oil To make baked Parmesan crusted zucchini, you need fresh zucchinis. Select medium-sized ones for the best texture. Parmesan cheese gives a rich flavor. Breadcrumbs add crunch. Use panko for an extra crispy crust. Eggs help the coating stick. Olive oil adds moisture and flavor. - 1 teaspoon garlic powder - 1 teaspoon dried oregano - 1 teaspoon paprika - Salt and pepper to taste Seasonings bring life to this dish. Garlic powder adds depth. Oregano gives an earthy note. Paprika adds a hint of warmth and color. Adjust salt and pepper to your taste. These spices make the zucchini shine. - Fresh parsley for serving Fresh parsley looks great and adds color. It also gives a hint of freshness. Sprinkle it on top just before serving. This small touch makes your dish even more inviting. You can find the full recipe for baked Parmesan crusted zucchini to easily follow the steps and enjoy this tasty dish! First, set your oven to 425°F (220°C). This high heat helps the zucchini turn golden and crispy. Next, line a baking sheet with parchment paper. This keeps the zucchini from sticking and makes cleanup easy. In a shallow bowl, mix these items well: - 1 cup breadcrumbs (panko for extra crunch) - 1 cup grated Parmesan cheese - 1 teaspoon garlic powder - 1 teaspoon dried oregano - 1 teaspoon paprika - Salt and pepper to taste This mixture gives the crust its great flavor. Take your zucchini and slice it into 1/4 inch rounds. In another bowl, beat 2 large eggs with 2 tablespoons of olive oil. Dip each zucchini slice into the egg mix first. Let any excess egg drip off. Then, coat it in the breadcrumb mixture, pressing gently so it sticks well. Place the coated zucchini rounds in a single layer on your baking sheet. Bake them for 20-25 minutes. Keep an eye on them as they cook. You want them tender with a golden crust. When they are done, take them out and let them cool for a bit. You can find the full recipe in the earlier section. To get that nice crunch on your baked zucchini, use panko breadcrumbs. They are lighter and crispier than regular breadcrumbs. Preheat your oven to 425°F (220°C) for the best results. Make sure each zucchini slice is coated well. Press the crumbs onto the slices to help them stick. Bake until they are golden brown and crispy. This method gives a satisfying bite. You can boost the flavor of your zucchini with extra seasonings. Try adding some Italian herbs like basil or thyme. You can also mix in some grated mozzarella or cheddar cheese with the Parmesan for a different taste. A pinch of red pepper flakes can add some heat if you like spice. Experiment with these options to find your favorite flavors. For a complete meal, serve your baked zucchini with a protein. Grilled chicken or fish pairs nicely. You can also place them on a bed of quinoa or rice for added texture. A fresh salad on the side can add color and balance to your dish. For a fun twist, serve with a yogurt or ranch dip for extra flavor. For the full recipe, check out Baked Parmesan Crusted Zucchini. {{image_2}} You can change up the coating for baked Parmesan crusted zucchini. For a gluten-free option, use gluten-free breadcrumbs. They give a nice crunch too. You can also try crushed nuts or seeds for a unique flavor. Play with the seasonings. Add Italian herbs or chili powder for a kick. Each change makes the dish new. To make this dish heartier, add extra veggies or proteins. You can mix in sliced bell peppers or cherry tomatoes. Grated carrots also add color and sweetness. For protein, try adding cooked chicken or shrimp. This makes your meal more filling and tasty. You can cook zucchini in different ways. Use an air fryer for a quicker option. It cooks fast and keeps the zucchini crispy. Just follow the same steps. Set the air fryer to 400°F (200°C) and cook for about 12-15 minutes. If you prefer the stovetop, heat some olive oil in a skillet. Cook the coated zucchini rounds until golden brown, about 3-4 minutes per side. Each method gives a different taste and texture to your dish. To store your baked zucchini, let them cool first. Place them in an airtight container. Make sure to keep them in the fridge. They stay fresh for up to three days. If you want the best taste, eat them sooner. Reheat your baked zucchini in the oven for the best results. Preheat the oven to 350°F (175°C). Place the zucchini on a baking sheet for 10-15 minutes. This keeps the crust crispy. You can also use a toaster oven if you want a quicker option. If you want to freeze zucchini, let them cool completely first. Place the slices in a single layer on a baking sheet. Freeze them for about an hour, then transfer to a freezer bag. They can last up to three months in the freezer. When you're ready to use them, bake directly from frozen. Bake zucchini for 20 to 25 minutes at 425°F (220°C). This time gives you tender zucchini with a crispy crust. Keep an eye on them. If they look golden brown, they are likely done. You want that nice crunch! Yes, you can! Try eggplant, sweet potatoes, or even mushrooms. These veggies also taste great with the Parmesan crust. Slice them into even rounds, just like the zucchini. The cooking time may vary, so check them often. Zucchini is low in calories and packed with nutrients. It has vitamins A and C, which help your skin and immune system. It also has fiber, which is good for digestion. This makes zucchini a healthy choice for any meal. To make this dish vegan, replace the eggs. You can use flax eggs or aquafaba as a binder. For cheese, try nutritional yeast or vegan Parmesan. These swaps keep the flavor while making the dish plant-based. Enjoy your vegan Baked Parmesan Crusted Zucchini with these easy changes! For the complete details, check the Full Recipe. In this post, we explored making crispy baked zucchini. We covered essential ingredients, spices, and optional garnishes. I shared easy steps for preparation and baking. You learned tips for perfect crunch and flavor boosts. We even discussed variations and storage methods. Embrace this recipe to enjoy a tasty side or snack. Let your creativity shine with flavors and cooking methods. Enjoy your cooking adventure with zucchini!

Baked Parmesan Crusted Zucchini Tasty and Simple Dish

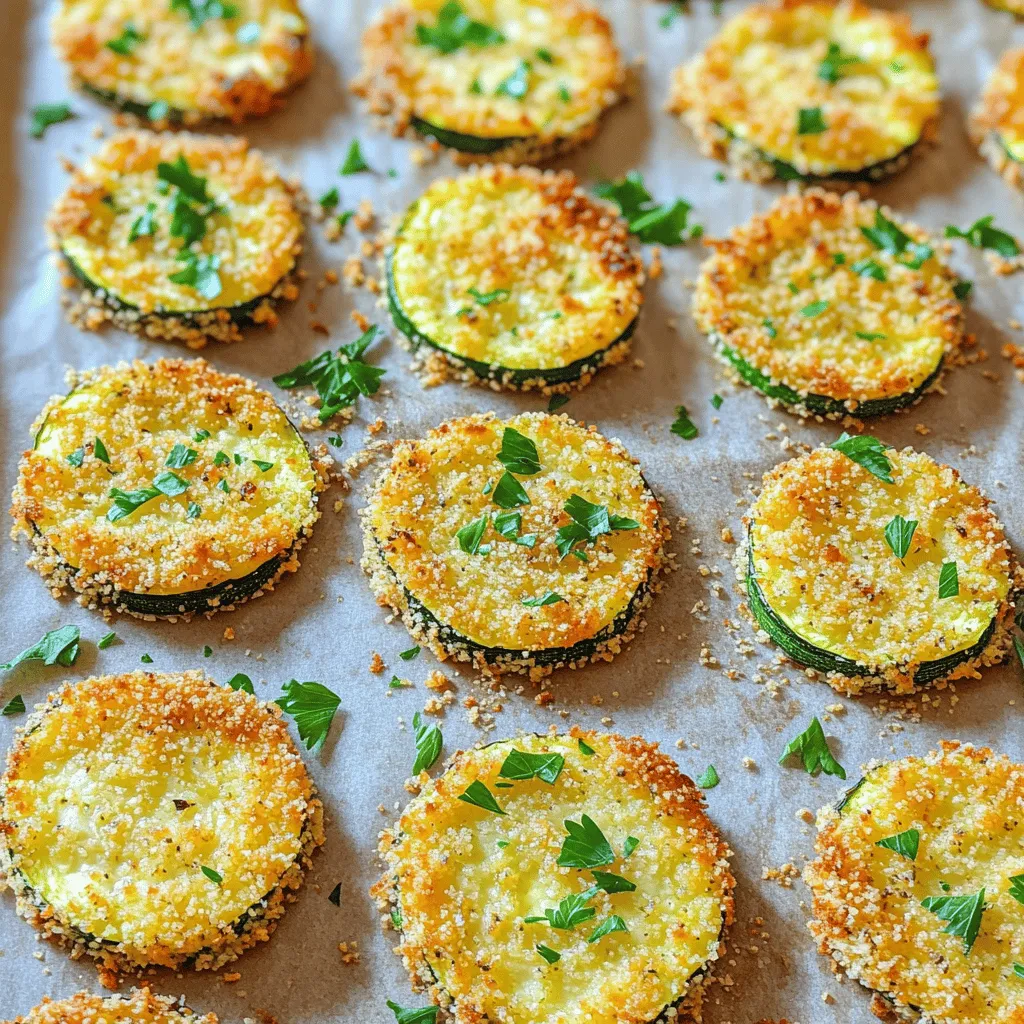
If you’re looking for a tasty, simple dish that’s sure to impress, you’ve found it! Baked Parmesan crusted zucchini is

To make Lemon Garlic Roasted Asparagus, you need these simple and fresh ingredients: - 1 pound fresh asparagus, trimmed - 3 tablespoons olive oil - 4 garlic cloves, minced - Zest of 1 lemon - 2 tablespoons fresh lemon juice - Salt and pepper to taste - 1 tablespoon grated Parmesan cheese (optional) - Fresh parsley, chopped for garnish These ingredients work together to create a bright and tasty dish. The asparagus gives crunch, while the garlic adds savory depth. The lemon zest and juice bring a refreshing zing. You can also add Parmesan for richness, but it is not necessary. When choosing asparagus, look for firm stalks with bright green tips. This ensures you have fresh and tasty asparagus. If you can't find fresh asparagus, you can use frozen. Just adjust the cooking time a bit. For a fun twist, think about adding your favorite herbs or spices. This dish is versatile and easy to customize. The Full Recipe will guide you through the cooking process step by step. Enjoy cooking! - Preheat the oven to 425°F (220°C). - Rinse the asparagus under cool water. - Trim the tough ends of the asparagus. - In a large bowl, mix olive oil, minced garlic, lemon zest, and lemon juice. - Add the asparagus to the bowl. - Toss until the asparagus is evenly coated. - Spread the coated asparagus on a baking sheet. - Make sure they are in a single layer. - Season with salt and pepper to taste. - Roast the asparagus for 15-20 minutes. - Shake the pan halfway through for even cooking. - If you like cheese, sprinkle grated Parmesan over the asparagus. - Do this during the last 3 minutes of roasting. - Once done, remove from the oven. - Garnish with fresh parsley before serving. For the complete process, check the Full Recipe. Even coating is key for great flavor. When you mix the asparagus with oil and spices, make sure every piece gets some love. This helps each bite taste amazing. To avoid soggy asparagus, don’t crowd the pan. Spread the pieces out in a single layer. If they touch, they will steam instead of roast, making them soft. You can add spices or herbs to change the taste. Try red pepper flakes for heat or thyme for a fragrant touch. If you want a cheesy twist, go for alternatives like feta or goat cheese. They add a lot of flavor without overpowering the lemon. Serving suggestions are important for impressing guests. Place the asparagus on a nice platter and drizzle with extra lemon juice. You can also sprinkle more cheese on top before serving for a gourmet touch. Pair this dish with proteins like grilled chicken or fish. It also goes well with grains like quinoa or rice for a complete meal. For the full recipe, check out the details above. {{image_2}} You can change how you cook lemon garlic asparagus for new flavors. - Grilled Lemon Garlic Asparagus Grilling adds a smoky flavor. Brush the asparagus with olive oil and season with salt and pepper. Place them on a hot grill for about 5-7 minutes. Flip them halfway for even cooking. The grill marks and char will enhance the taste. - Sautéed Lemon Garlic Asparagus Sautéing is quick and keeps the asparagus crisp. Heat olive oil in a pan over medium heat. Add minced garlic first for flavor. Then, toss in the asparagus. Stir for 5-7 minutes until bright green and tender. This method retains a nice crunch. You can easily swap ingredients based on what you have or prefer. - Olive oil alternatives If you don't have olive oil, try avocado oil or melted butter. Both add rich flavor and work well with lemon and garlic. - Fresh herb variations Want to mix things up? Use fresh thyme, rosemary, or basil instead of parsley. Each herb brings its unique taste, making the dish interesting. Making the dish fit your diet is simple. - Vegan modifications Leave out the Parmesan cheese for a vegan dish. You can add nutritional yeast for a cheesy flavor without dairy. - Gluten-free options This recipe is naturally gluten-free. Enjoy it without any modifications. It’s a great side dish for anyone avoiding gluten. For the full recipe, check out the detailed instructions. To store leftovers, let the asparagus cool first. Place it in an airtight container. This keeps it fresh for up to 3 days. Use glass or plastic containers with tight lids for best results. The best methods for reheating asparagus are in the oven or on the stovetop. Preheat your oven to 350°F (175°C). Place the asparagus on a baking sheet and heat for about 10 minutes. You can also use a skillet on medium heat. Just add a tiny bit of oil and heat for 3-5 minutes. Avoid overcooked asparagus by watching it closely. You want it warm but still crisp. Yes, you can freeze Lemon Garlic Roasted Asparagus. To freeze it, first, let it cool completely. Spread the asparagus out on a baking sheet and freeze until solid. Then, transfer it to a freezer bag. Remove as much air as possible to prevent freezer burn. When ready to eat, thaw it in the fridge overnight and reheat as mentioned above. This keeps the flavor intact while saving time for future meals. The best way to prepare asparagus is to trim it first. Cut off the tough ends. Then, wash the asparagus under cold water. Pat it dry with a clean towel. Next, toss the asparagus with olive oil, minced garlic, lemon zest, and lemon juice. This mix adds flavor and helps it roast well. Follow the steps in the [Full Recipe] for perfect results. Yes, you can make Lemon Garlic Roasted Asparagus ahead of time. Prepare the asparagus and toss it with the olive oil and seasonings. Store it in your fridge for up to 24 hours. When ready to eat, roast it as directed. This way, you save time on busy days. Roasted asparagus lasts about 3 to 5 days in the refrigerator. Store it in an airtight container to keep it fresh. When you want to eat it again, simply reheat it. Enjoy it warm, or add it cold to salads. Frozen asparagus can work, but fresh is best. If you use frozen, thaw it first. Pat it dry to remove excess moisture. Roasting frozen asparagus may take a bit longer. Keep an eye on it while it cooks. If you don’t have fresh garlic, you can use garlic powder. Use about 1/4 teaspoon for each clove. Mix it in with the olive oil and other ingredients. The flavor won’t be the same, but it will still taste good. Yes, you can add other vegetables. Try bell peppers, cherry tomatoes, or baby potatoes. Just chop them to similar sizes. Toss them in the same mix of olive oil and seasonings. Be sure to adjust the cooking time as needed. Lemon Garlic Roasted Asparagus is simple to make and full of flavor. The steps are easy: prep your ingredients, roast the asparagus, and add tasty touches. With tips on cooking and storage, you can enjoy this dish any time. Try different cooking methods or ingredients to keep things fresh. This dish pairs well with many meals, making it versatile. Follow these steps and enjoy a healthy side that impresses. Your kitchen will become the go-to for delicious asparagus.

Lemon Garlic Roasted Asparagus Simple and Flavorful

Asparagus lovers, get ready for a treat! My Lemon Garlic Roasted Asparagus is simple yet bursting with flavor. With just

- Fettuccine pasta (8 oz) - Olive oil (1 tablespoon) - Minced garlic (2 cloves) - Artichoke hearts (1 can, 14 oz) - Fresh spinach (4 cups) - Cream cheese (1 cup, softened) - Vegetable broth (1 cup) - Grated Parmesan cheese (1/2 cup) - Red pepper flakes (1/4 teaspoon, optional) - Salt and black pepper to taste - Fresh basil for garnish For this creamy spinach artichoke pasta, fresh ingredients matter. The fettuccine adds a nice bite, while the olive oil gives a smooth texture. Minced garlic brings warmth and flavor, making the dish more inviting. Artichoke hearts are a star here. They add a unique taste that pairs well with spinach. Fresh spinach, of course, is vital. It wilts down and adds color and nutrients. Cream cheese makes the sauce rich and creamy. The vegetable broth helps thin it out, creating a perfect mix. Grated Parmesan cheese enhances flavor, adding a salty kick. Red pepper flakes can give a hint of heat, making every bite exciting. Lastly, season with salt and black pepper to balance all flavors. You can find the full recipe details above, so gather your ingredients and get ready to cook! To start, you need to boil salted water in a large pot. Once the water boils, add in your fettuccine pasta. Cook it until it is al dente, which takes about 8-10 minutes. This texture keeps your pasta firm yet tender. After cooking, drain the pasta, but remember to save about half a cup of that cooking water. This water is useful later for adjusting the sauce. Next, grab a large skillet and heat a tablespoon of olive oil over medium heat. Once the oil is hot, add your minced garlic. You want to sauté the garlic for about one minute. Keep an eye on it; you don’t want it to burn. The goal is to make your kitchen smell amazing. Now it’s time to add the fun stuff! Toss in the chopped artichoke hearts first. Let them cook for 2-3 minutes. Then, add in your fresh spinach. Stir everything together and let the spinach wilt down, which should take about 2 more minutes. Once the veggies are ready, lower the heat. Add in the softened cream cheese, stirring until it melts into the vegetables. Gradually pour in the vegetable broth while you stir. This mixture should become smooth and creamy. Finally, add your cooked fettuccine to the skillet. Toss everything together to coat the pasta well in the creamy sauce. If you find the sauce too thick, use a bit of the reserved pasta water to achieve your desired consistency. For a tasty finish, stir in some grated Parmesan cheese and, if you like, a pinch of red pepper flakes for extra kick. Season with salt and black pepper to taste. For the full recipe, you can check the earlier section. Enjoy a wholesome and tasty meal! To make the sauce creamy, add the vegetable broth slowly. This helps blend everything well. Stir it in while the cream cheese melts. If the sauce gets too thick, use the reserved pasta water to thin it out. Just a little at a time until you reach your desired creaminess. Fresh herbs can boost the taste of your dish. Adding basil or thyme will make it pop. For a touch of brightness, consider lemon zest. This simple step can bring a fresh twist to the flavors. Serving your pasta in deep bowls looks great. Drizzle a bit of olive oil on top for shine. Sprinkle extra Parmesan cheese for a nice finish, and add fresh basil to make it colorful. This not only looks appealing but also adds more flavor. For the full recipe, check the designated section. {{image_2}} You can easily boost this dish with protein. Include grilled chicken or shrimp for a hearty meal. Both options add great flavor and texture. If you're looking for a different pasta, swap fettuccine for whole wheat or gluten-free pasta. These choices keep the meal healthy while still being filling. If you want to make this dish vegan, there are simple swaps. Use cashew cream in place of cream cheese. It gives a rich texture without dairy. For a cheesy flavor, opt for nutritional yeast instead of Parmesan. This keeps the taste while meeting plant-based needs. Adding seasonal ingredients can make your meal even better. Incorporate cherry tomatoes or zucchini for freshness. These veggies add color and a burst of flavor. You can also experiment with different cheese types. Try goat cheese or feta for a new taste twist. Each variation will keep this creamy spinach artichoke pasta exciting and delicious. For the full recipe, check out the ingredients and steps provided. You should store your creamy spinach artichoke pasta in airtight containers. This helps keep the flavors fresh. It's best to eat it within 3-4 days for the best taste. Before you freeze the pasta, allow it to cool completely. Place it in freezer-friendly containers. You can keep it in the freezer for up to 2 months. Just remember to label your containers with the date. When you’re ready to eat, reheat the pasta gently on the stove. Add a splash of broth to keep it creamy. Avoid the microwave, as it can change the texture of the dish. This way, your creamy spinach artichoke pasta stays delicious! For the full recipe, check out the details above. For this creamy spinach artichoke pasta, I recommend fettuccine, penne, or rotini. Each type holds the sauce well. Fettuccine offers a flat surface, letting the sauce cling nicely. Penne's tubes trap the sauce inside, creating a delightful bite. Rotini’s spirals twist the sauce, making every forkful flavorful. Yes, you can make this dish ahead of time. Prepare each component separately. Cook the pasta and make the sauce, then store them in the fridge. Combine everything just before serving to keep it fresh and creamy. This way, you save time on busy days. To add some heat, increase the red pepper flakes. A pinch more can make a difference. You can also add crushed red pepper for an extra kick. Just be sure to taste as you go to get the right spice level. Enjoy the bold flavors! This dish is simple and delicious. We covered the key ingredients like fettuccine, artichokes, and cream cheese. You can adjust the sauce for a creamier texture and add protein for more flavor. seasonal veggies and herbs can give extra taste. Store leftovers well in the fridge or freezer for later. Enjoy making and sharing this tasty meal! It’s great for gatherings or a cozy night in. Keep it fun and experiment with flavors that you love!

Creamy Spinach Artichoke Pasta Wholesome and Tasty Meal

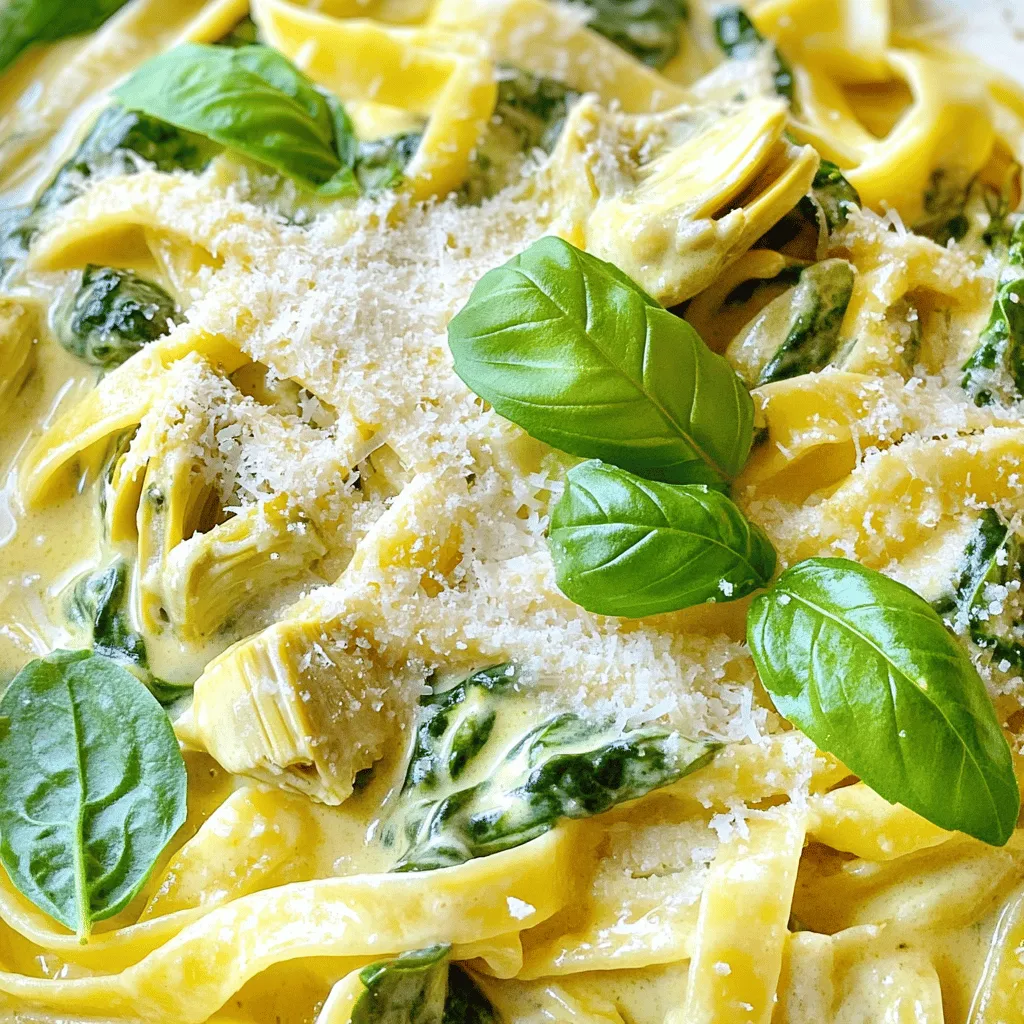
Craving a creamy, wholesome meal that’s easy to make? Look no further! My Creamy Spinach Artichoke Pasta is loaded with

To make One Pan Honey Garlic Chicken, you need a few key ingredients. Here’s the list: - Chicken: bone-in and skin-on chicken thighs - Oils & Seasonings: olive oil, salt, and pepper - Honey & Sauces: honey, soy sauce (or coconut aminos), apple cider vinegar - Aromatics: minced garlic, grated fresh ginger - Vegetables: broccoli florets, red bell pepper, additional options for variety - Garnish: fresh parsley, optional red pepper flakes These ingredients blend to create a dish that sings with flavor. The chicken brings protein, while honey adds sweetness. Garlic and ginger give it a warm kick. The vegetables make it bright and nutritious. This recipe is all about balance. Using fresh veggies not only enhances the taste but adds color to your plate. If you want to learn how to put this all together, check out the Full Recipe. Cooking should be fun and easy, and this dish is a great example of that! 1. Preheat the oven and prepare the skillet Start by preheating your oven to 400°F (200°C). While it warms, grab a large oven-safe skillet. Pour in 2 tablespoons of olive oil and heat it over medium-high heat. 2. Seasoning the chicken thighs Take 4 chicken thighs, bone-in and skin-on. Sprinkle salt and pepper on both sides. This simple step adds great flavor to your chicken. 1. Searing the chicken thighs Once the oil is hot, place the chicken thighs skin-side down in the skillet. Sear them for about 5 to 7 minutes. You want the skin to turn crispy and golden brown. Then, flip the chicken thighs over and lower the heat to medium. 2. Whisking together the honey garlic sauce In a small bowl, mix together 1/2 cup of honey, 4 cloves of minced garlic, 2 tablespoons of soy sauce, 1 tablespoon of apple cider vinegar, and 1 teaspoon of grated fresh ginger. If you like a little heat, add 1/4 teaspoon of red pepper flakes. Drizzle this sauce over the chicken in the skillet. 3. Baking in the oven Add 1 cup of broccoli florets and 1 sliced red bell pepper around the chicken. Make sure the veggies get coated in the sauce. Now, transfer the skillet to your preheated oven. Bake for 20 to 25 minutes. The chicken should reach an internal temperature of 165°F (75°C), and the veggies should be tender. 1. Garnishing and serving suggestions Once the chicken is cooked, take the skillet out of the oven. Let it rest for a few minutes. Spoon some of the sauce over the chicken and veggies. For a fresh touch, sprinkle chopped fresh parsley on top before serving. 2. Adjusting rest time for optimal flavor Letting the chicken rest allows the juices to settle. This makes each bite juicy and full of flavor. Enjoy your delicious, easy dish! To get crispy skin, start by drying the chicken with paper towels. This helps the skin crisp up when searing. Season both sides with salt and pepper. A hot skillet is key. Sear the chicken skin-side down for 5-7 minutes. Flip to cook the other side. Always check the internal temperature; it should reach 165°F (75°C) for safety. You can boost the flavor by adding fresh herbs. Try thyme or rosemary for a fragrant touch. If you want a kick, consider adding a pinch of smoked paprika. For personal taste, swap the soy sauce for coconut aminos. This makes the dish gluten-free and adds a sweet note. Using one pan makes clean-up a breeze. It also lets the flavors mix well. The chicken absorbs the sauce, and the veggies soak up all that goodness. Make sure to use an oven-safe skillet. This way, you can start on the stove and finish in the oven. It’s efficient and keeps everything warm until serving. {{image_2}} To make this dish fit your needs, feel free to swap ingredients. If you need a gluten-free option, use coconut aminos instead of soy sauce. This alternative gives a similar flavor without gluten. For vegetables, you can mix and match based on what you have. Try snap peas, carrots, or asparagus. Each adds a unique taste and color to your meal. Seasonal veggies like zucchini or bell peppers also work well. You can use a slow cooker to make honey garlic chicken. Simply place the chicken and sauce ingredients in the cooker. Set it on low for 6-8 hours or high for 3-4 hours. This method gives you tender chicken with a rich flavor. If you're short on time, an Instant Pot is a great choice. Cook the chicken on high pressure for about 10-12 minutes. Make sure to let the steam release naturally for a juicy result. Pair honey garlic chicken with rice, quinoa, or noodles for a complete meal. These starches soak up the tasty sauce, making each bite delightful. You can also serve it with a simple green salad for a fresh contrast. For meal prep, this dish is a winner. Cook a big batch and divide it into containers. It keeps well in the fridge and is easy to reheat on busy nights. You’ll have a delicious dinner ready in no time! For the full recipe, check out the One Pan Honey Garlic Chicken. To keep your leftover honey garlic chicken fresh, follow these steps: - Refrigeration: Place the chicken in an airtight container. Store it in the fridge for up to 3 days. - Freezing: For long-term storage, wrap the chicken in plastic wrap and foil. Store it in the freezer for up to 3 months. Reheating chicken can be tricky. Here are some tips: - Oven Method: Preheat your oven to 350°F (175°C). Place the chicken in a baking dish. Cover it with foil to keep it moist. Heat for about 15-20 minutes. - Stovetop Method: Heat a skillet over medium heat. Add a splash of water or broth. Cover the skillet and heat for about 8-10 minutes. This helps keep the chicken juicy. - Vegetable Texture: To maintain the crispness of the veggies, add them back to the pan for the last few minutes of reheating. It's important to know how long your food lasts: - Refrigerator Shelf Life: Keep leftover honey garlic chicken in the fridge for no more than 3 days. - Freezer Shelf Life: If frozen, use it within 3 months for the best taste. - Signs of Spoilage: Look for changes in color, smell, or texture. If it smells off or feels slimy, discard it. How do I know when chicken is fully cooked? Chicken is fully cooked when it reaches an internal temperature of 165°F (75°C). Use a meat thermometer to check the thickest part of the chicken. This ensures it's safe to eat. Remember, the juices should run clear, not pink. Can I use boneless chicken instead? Yes, you can use boneless chicken. Boneless thighs or breasts work well. They cook faster, so check them a bit earlier. Adjust cooking time to about 15-20 minutes. What sides go well with honey garlic chicken? Honey garlic chicken pairs nicely with rice, quinoa, or mashed potatoes. You can also serve it with a fresh salad or steamed vegetables. These sides soak up the delicious sauce. Can I double the recipe for a bigger crowd? Absolutely! You can double the recipe. Just make sure your skillet is big enough. If not, use two pans. Adjust cooking time slightly if using more chicken. Is this recipe suitable for meal prep? Yes, this recipe is great for meal prep! It keeps well in the fridge for up to four days. Just store the chicken and veggies in airtight containers. Reheat when you’re ready to eat. What can I use instead of honey? You can use maple syrup or agave nectar if you want a different flavor. Both options add sweetness. They work well in this recipe and keep it tasty. Can I add other vegetables to this dish? Yes, feel free to add other vegetables. Carrots, snap peas, or zucchini are great choices. Just cut them into similar sizes for even cooking. This adds color and more nutrients to your meal. You can make delicious one-pan honey garlic chicken at home with ease. We explored essential ingredients, step-by-step cooking instructions, and handy tips. We also discussed variations and proper storage. With this recipe, you enjoy crispy chicken, flavorful sauce, and minimal cleanup. Remember, you can customize to your taste. Try different veggies or spices to make it your own. This dish is perfect for busy nights or special occasions. Enjoy your cooking journey and savor every bite!

One Pan Honey Garlic Chicken Easy and Tasty Dinner

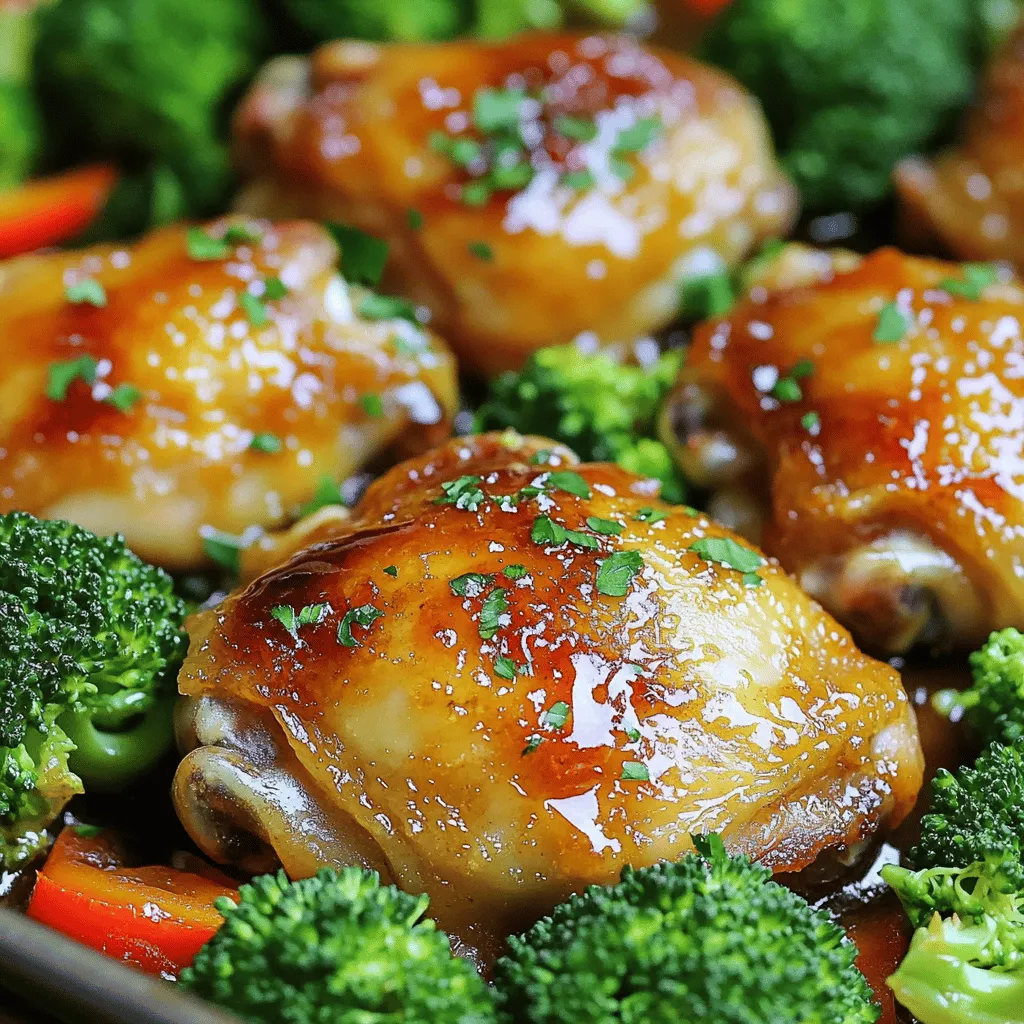
Looking for an easy and tasty dinner? You’ve found it! This One Pan Honey Garlic Chicken has everything you need

Older posts
Newer posts
← Previous Page1 … Page56 Page57 Page58 … Page85 Next →

dsad

© 2026 greenmealmap • Built with GeneratePress

Our Policies

  • Copyright Policy
  • Cookie Policy
  • GDPR Policy
  • Privacy Policy
  • Disclaimer
  • Terms Of Use

More Information

  • Home
  • About
  • Contact
  • Appetizers
  • Dessert
  • Dinner
  • Drinks
©2026, greenmealmap About Back To Top