Looking for a tasty snack that packs a nutritious punch? Peanut Butter Cup Protein Balls are the perfect choice! They combine rich peanut butter flavor with healthy ingredients to keep you fueled and satisfied. In this guide, I’ll share easy steps to make these protein-packed treats, tips for perfecting their texture, and tasty variations to suit your taste. Let’s get started on making your next favorite snack!
Ingredients
List of Ingredients
– 1 cup natural peanut butter
– ½ cup honey or maple syrup
– 1 cup rolled oats
– ½ cup protein powder (chocolate or vanilla)
– ¼ cup cocoa powder
– 1 teaspoon vanilla extract
– ½ cup dark chocolate chips
– A pinch of sea salt
– Optional: Chopped nuts or seeds for added crunch
Nutritional Benefits of Each Ingredient
– Natural peanut butter: Packed with protein and healthy fats, it helps you feel full.
– Honey or maple syrup: These natural sweeteners give energy and enhance flavor.
– Rolled oats: A great source of fiber, oats support digestion and heart health.
– Protein powder: Boosts protein intake, which is key for muscle repair and growth.
– Cocoa powder: Rich in antioxidants, it may improve mood and heart health.
– Vanilla extract: Adds flavor with minimal calories, making your snack tastier.
– Dark chocolate chips: Provide healthy fats and antioxidants for a sweet touch.
– Sea salt: Enhances the taste and balances the sweetness of other ingredients.
– Chopped nuts or seeds: Add crunch and extra nutrients like omega-3s.
Suggestions for High-Quality Ingredients
– Choose natural peanut butter with no added sugar or oils for the best taste.
– Opt for raw honey or pure maple syrup for a natural sweetness.
– Select organic rolled oats to ensure they are free from pesticides.
– Pick a high-quality protein powder with minimal additives for better health.
– Use unsweetened cocoa powder for a rich chocolate flavor without extra sugar.
– Select pure vanilla extract instead of imitation for a natural taste.
– Go for dark chocolate chips with at least 70% cocoa for health benefits.
– When using nuts or seeds, choose raw or roasted options without added salt.
Step-by-Step Instructions
Preparation Steps
First, gather your ingredients. You need:
– 1 cup natural peanut butter
– ½ cup honey or maple syrup
– 1 cup rolled oats
– ½ cup protein powder (chocolate or vanilla)
– ¼ cup cocoa powder
– 1 teaspoon vanilla extract
– ½ cup dark chocolate chips
– A pinch of sea salt
– Optional: Chopped nuts or seeds
Start by taking a mixing bowl. Add the natural peanut butter and honey (or maple syrup). Mix them together until they are smooth and creamy. This step is key for a great texture.
Mixing and Combining Techniques
Next, it’s time to add the dry ingredients. Add the rolled oats, protein powder, cocoa powder, vanilla extract, and sea salt. Use a sturdy spatula to mix everything well. The mixture should become thick and sticky. This means it’s well combined.
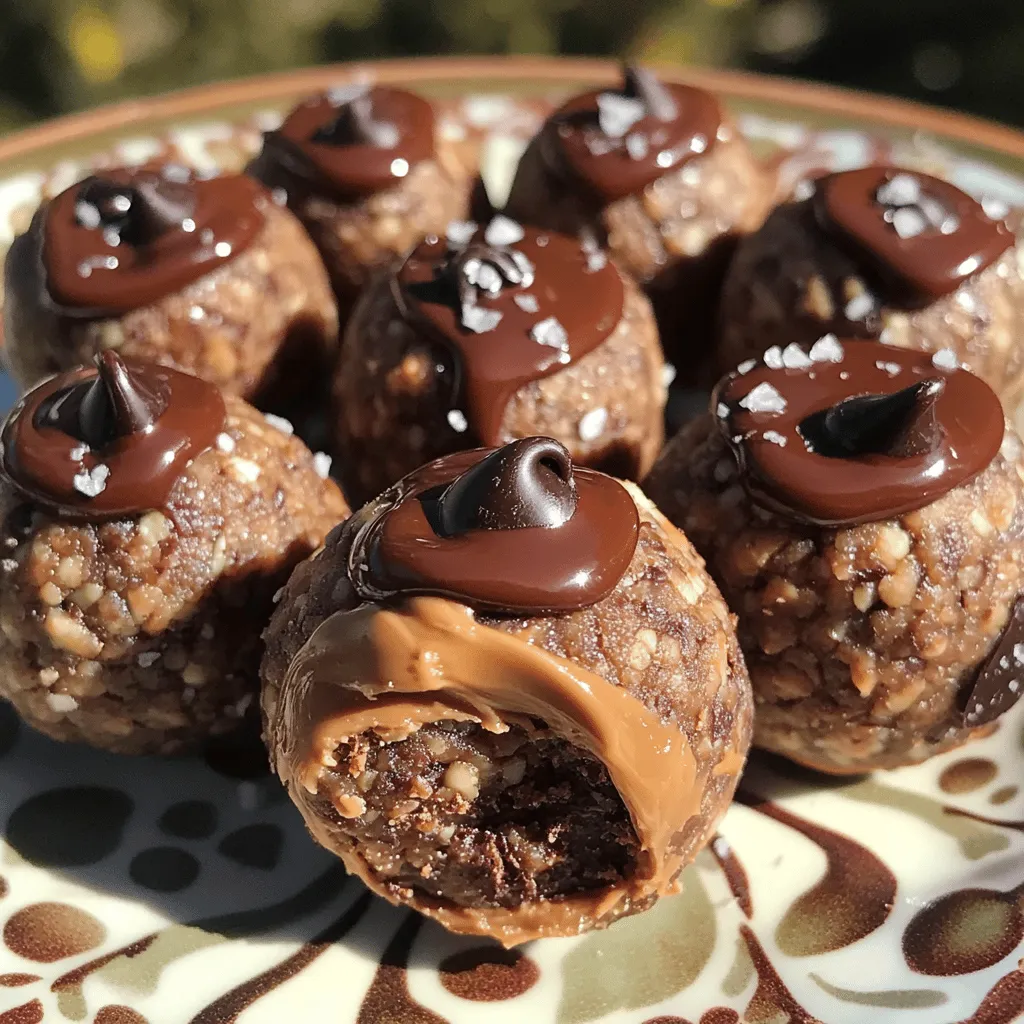
Now, gently fold in the dark chocolate chips. If you want extra crunch, add chopped nuts or seeds at this stage. This adds both texture and flavor.
Shaping and Firming the Protein Balls
After mixing, it’s time to shape the protein balls. Scoop out tablespoon-sized portions of the mixture. Roll each portion into a ball using your hands. The mixture should hold together well.
Place the balls on a baking sheet lined with parchment paper. Make sure they are spaced out. This allows them to firm up without sticking together.
Refrigerate the protein balls for at least 30 minutes. This helps them solidify. Once firm, store them in an airtight container. Keep them in the fridge for up to a week. Enjoy your healthy snack!
Tips & Tricks
Common Mistakes to Avoid
Making Peanut Butter Cup Protein Balls is fun, but some mistakes can happen. Here are a few to watch for:
– Using the wrong peanut butter: Always choose natural peanut butter without added sugar. It helps keep the balls healthy.
– Not measuring ingredients: Precision is key. Too much honey can make the mix too sticky.
– Skipping the fridge time: Don’t skip chilling the balls. This helps them firm up nicely.
How to Achieve Optimal Texture
The right texture makes the protein balls taste great. Here’s how to get it just right:
– Mix the peanut butter and honey well until smooth. This is your base.
– Add dry ingredients slowly. This helps avoid clumps in your mix.
– If the mix feels too dry, add a splash of water or more honey.
– For a chewier texture, include chopped nuts or seeds. They add a nice crunch!
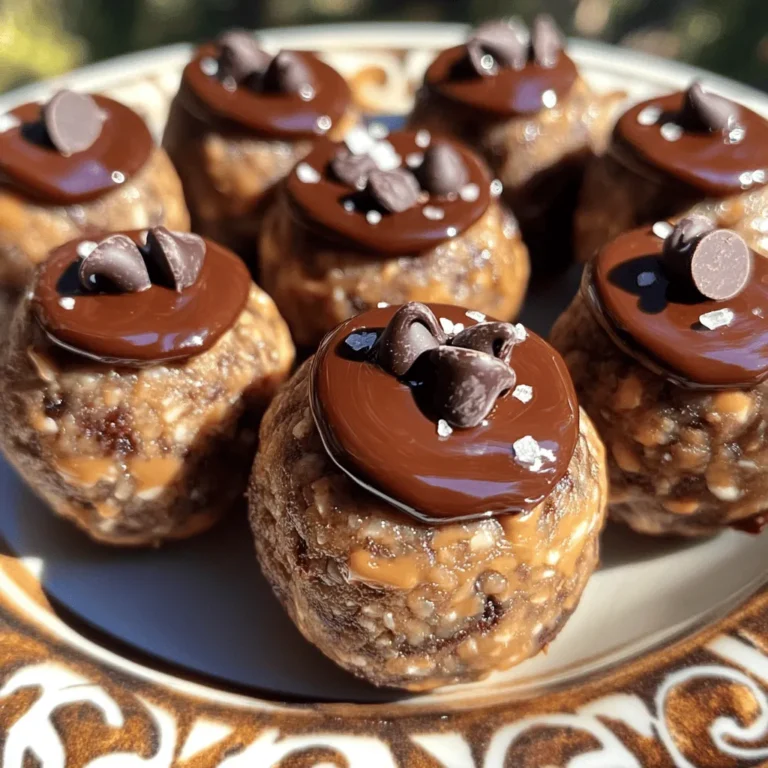
Suggestions for Serving and Presentation
How you serve these protein balls matters. Here are some fun ideas:
– Use small cups for each ball. This adds a playful touch.
– Place them on a colorful plate. A bright plate makes the snack pop.
– Drizzle melted dark chocolate on top for extra flair. It makes them look fancy too!
– Pair them with fresh fruit for a balanced snack. Slices of banana or apple work well.
Variations
Flavor Variations (like almond butter or coconut)
You can switch up the flavor of these protein balls with ease. For a nutty twist, try almond butter instead of peanut butter. The taste changes but stays yummy. You can also add shredded coconut for a tropical touch. This gives a nice chewiness and a hint of sweetness. Feel free to experiment until you find your favorite mix!
Add-ins for Extra Nutrition (like superfoods)
Want to boost nutrition? Add superfoods to your protein balls! Consider mixing in chia seeds or flaxseeds. Both are rich in fiber and omega-3s. You can also use hemp seeds for protein and healthy fats. These little additions make your snack even better for you without much effort.
Customizing for Dietary Needs
Dietary needs vary, and that’s okay! If you need a nut-free option, try sunflower seed butter instead. For a vegan choice, replace honey with maple syrup. You can also find protein powders that fit your diet, like plant-based ones. This way, everyone can enjoy these tasty protein balls without worry!
Storage Info
How to Store for Freshness
To keep your peanut butter cup protein balls fresh, store them in an airtight container. Place the container in the refrigerator. This way, the balls stay cool and firm. They will taste great and maintain their texture. If you want to take them on the go, pack them in a small cooler bag.
Freezing Instructions
You can also freeze these protein balls for longer storage. First, place them on a baking sheet in a single layer. Freeze them for about an hour until they are firm. Then, transfer the balls to a freezer-safe bag or container. Label the bag with the date. They can last for up to three months in the freezer. Just thaw them in the fridge before enjoying.
Shelf Life and Best Practices
In the fridge, these protein balls last for about a week. To enjoy them at their best, eat them within this time. Always check for any off smells or changes in texture before eating. If you notice anything strange, it’s best to toss them out. Enjoy your snack and keep it fresh!
FAQs
Can I use a different nut butter?
Yes, you can use a different nut butter. Almond butter or cashew butter work well. Just keep the same amount. The taste will change a bit, but it will still be tasty!
Are these protein balls gluten-free?
Yes, these protein balls are gluten-free. Use certified gluten-free oats to ensure safety. This makes them a great snack for everyone, even those with gluten issues.
How long do they last in the fridge?
These protein balls last about one week in the fridge. Store them in an airtight container for best results. If you want them to last longer, consider freezing them for up to three months.
In this post, we covered key ingredients, their benefits, and tips for making protein balls. You learned how to mix, shape, and store them for the best taste and texture. Don’t forget to try different flavors and add-ins to fit your needs. Avoid common mistakes to enjoy a perfect snack every time. With these tips, you can create delicious, healthy protein balls that everyone will love. Enjoy making them!

