Go Back
- 4 ripe bananas, sliced - 1 cup heavy cream - 1 cup sweetened condensed milk - 1 cup whole milk - 1 package (3.4 oz) vanilla instant pudding mix - 1 teaspoon vanilla extract - 1 cup vanilla wafers - 1/2 cup toasted coconut flakes (optional) - Fresh mint leaves for garnish (optional) For a lighter option, you can use half-and-half or a mix of yogurt and cream. If you want a dairy-free or vegan version, try coconut milk or almond milk as a base. Use dairy-free whipped cream for a creamy texture. You can also swap vanilla wafers for gluten-free cookies or graham crackers for a different taste. These substitutions let you enjoy the best banana pudding ever while catering to dietary needs. I love to experiment and find new flavors! If you want to see the full recipe, it's packed with steps to guide you. First, grab a mixing bowl. Add 1 cup of sweetened condensed milk, 1 cup of whole milk, and 1 teaspoon of vanilla extract. Whisk them together until smooth. This mix is the base for your pudding. Next, open a package of vanilla instant pudding mix. Pour it into the milk mixture. Whisk for about 2 minutes. You want it thick and creamy. Set this pudding aside for now. Now, it’s time to whip the cream. Take 1 cup of heavy cream and pour it into a clean bowl. Use an electric mixer to whip the cream. Watch for stiff peaks. This means the cream holds its shape and is not runny. Once you have stiff peaks, gently fold the whipped cream into the pudding. Be careful not to deflate the cream. This step adds lightness and fluffiness to your dessert. Now for the fun part—layering! Start with a 9x13 inch dish. Place a layer of vanilla wafers at the bottom. Make sure they are evenly spread out. Next, add a layer of sliced bananas on top of the wafers. Use about 4 ripe bananas, sliced. Then, spoon a layer of the pudding mixture over the bananas and wafers, smoothing it out. Repeat this process. Add another layer of wafers, then more bananas, and more pudding. Finish with a layer of pudding on top. If you like, sprinkle toasted coconut flakes for extra flavor. Cover your dish with plastic wrap. Place it in the fridge for at least 4 hours. Overnight is best. This waiting time helps the flavors blend and the wafers soften. Enjoy the creamy goodness of your banana pudding! Using room temperature ingredients helps blend better. Cold ingredients can make mixing hard. I recommend letting your cream and milk sit out for about 30 minutes before using. This small step can improve the texture of your pudding. Adjust the sweetness to fit your taste. Some may like it sweeter, while others prefer less sugar. You can add more sweetened condensed milk for a sweeter treat. Taste as you go, and find your perfect balance. For a lovely presentation, serve banana pudding in individual cups. This adds a nice touch for parties. Garnish each cup with a slice of banana and a mint sprig. It makes the dessert look fresh and inviting. Pair banana pudding with coffee or tea. The warm drinks balance the cool pudding. This makes for a delightful experience. You can also enjoy it with cookies or a slice of pie for a fun dessert trio. Overmixing the whipped cream can ruin your texture. Stop mixing as soon as you see stiff peaks. If you mix too long, the cream may turn into butter. Not allowing enough time for chilling is another common mistake. For the best flavor, chill the pudding for at least four hours. Overnight is even better! This lets the flavors meld and the wafers soften, giving you the creamy delight you crave. {{image_2}} You can make banana pudding even more exciting by adding flavors. Try mixing in some chocolate pudding for a rich twist. You can also layer in chocolate wafers instead of vanilla ones. If you love fruit, add berries or peaches to the mix. These fruits can brighten the dish and add fresh flavors. You can even use a touch of peanut butter for a nutty taste that pairs well with bananas. The possibilities are endless! If you need a gluten-free option, look for gluten-free vanilla wafers. Many brands offer these, allowing you to enjoy the same great taste without the gluten. For a low-sugar version, opt for sugar-free pudding mix and use less condensed milk. You can also swap heavy cream for a lighter option like Greek yogurt. This keeps your dessert creamy while cutting down on sugar. Toppings can really change your banana pudding game. Instead of mint, try crushed cookies or nuts for a crunchy topping. You can also drizzle caramel or chocolate sauce on top before serving. This adds a sweet finish that enhances the overall flavor. Another fun idea is to use whipped coconut cream as a topping. It gives a tropical vibe that pairs perfectly with your pudding. Enjoy experimenting with different garnishes! To keep your banana pudding fresh, use an airtight container. Glass containers work well. They keep the pudding cold and prevent odors from other foods. If you stack layers, use parchment paper between layers. This method protects the layers and keeps the presentation intact. Banana pudding lasts about 3 to 4 days in the fridge. Always store it in the fridge to prevent spoilage. Signs that banana pudding has gone bad include a sour smell or discoloration. If it looks watery or has a strange texture, it’s best to toss it. You can freeze banana pudding, but it may change texture. To freeze, put it in a freezer-safe container. Leave space at the top for expansion. Thaw it in the fridge overnight before eating. Avoid microwaving, as it may make the pudding runny. Enjoy this treat later by following these simple steps! For the Full Recipe, check out the complete guide. Yes, you can use other pudding mixes. Chocolate pudding adds a rich taste. Butterscotch pudding gives a sweet twist. You can even try banana pudding for an extra banana boost. Each mix will change the flavor, but it will still be tasty. Just make sure to follow the same steps in the recipe. You should chill banana pudding for at least 4 hours. This time allows the flavors to blend well. For the best taste, let it chill overnight. The longer it chills, the softer the wafers become. This creates a nice, creamy texture that everyone loves. Yes, you can make banana pudding ahead of time. Just prepare the dessert and store it in the fridge. It will stay fresh for up to 3 days. To keep the bananas from browning, cover the top with plastic wrap. This helps keep it fresh and tasty for your event. The best way to serve banana pudding is in individual cups. This makes it easy for guests to grab and enjoy. You can also serve it in a large dish for a family-style option. Be sure to add a slice of banana and a mint leaf on top for a pretty look. Banana pudding has a rich history in American cuisine. It became popular in the South during the 19th century. The dish reflects the fusion of different cultures. It combines layers of vanilla wafers, bananas, and creamy pudding. This dessert has evolved over time, but its charm remains. You can find many variations, each adding its special flavor. If you want to learn more, check the full recipe for ideas! In this post, we discussed how to make delicious banana pudding. We covered ingredients, step-by-step instructions, and tips to perfect your dessert. I shared ways to modify the recipe for different diets and tastes. Remember to store your banana pudding properly to keep it fresh. With these tips, you can impress friends and family. Enjoy your banana pudding adventures!

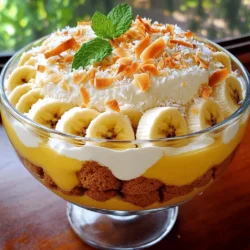
The Best Banana Pudding Ever

Get ready to impress your friends and family with the best banana pudding ever! This delicious dessert recipe combines ripe bananas, creamy pudding, and vanilla wafers in a delightful layered treat that will have everyone coming back for more. With easy steps and ingredient variations for every diet, this recipe is perfect for any occasion. Click through now to explore the full recipe and discover how to create this irresistible banana pudding!

Ingredients
  

4 ripe bananas, sliced

1 cup heavy cream

1 cup sweetened condensed milk

1 cup whole milk

1 package (3.4 oz) vanilla instant pudding mix

1 teaspoon vanilla extract

1 cup vanilla wafers

1/2 cup toasted coconut flakes (optional)

Fresh mint leaves for garnish (optional)

Instructions
 

In a mixing bowl, combine the sweetened condensed milk, whole milk, and vanilla extract. Whisk until smooth.

    Add the vanilla instant pudding mix to the milk mixture and whisk for about 2 minutes until thickened. Set aside.

      In a separate bowl, whip the heavy cream until stiff peaks form. Gently fold the whipped cream into the pudding mixture until fully incorporated.

        In a 9x13 inch dish, start layering: place a layer of vanilla wafers on the bottom, followed by a layer of sliced bananas.

          Spoon a layer of the pudding mixture over the bananas and wafers, smoothing it out evenly.

            Repeat the layering process (wafers, bananas, pudding) until the dish is filled, finishing with a layer of pudding on top.

              If using, sprinkle toasted coconut flakes over the top layer for added texture and flavor.

                Cover the dish with plastic wrap and refrigerate for at least 4 hours, or preferably overnight, to allow the flavors to meld and the wafers to soften.

                  Before serving, garnish with fresh mint leaves for a pop of color and freshness.

                    Prep Time: 20 minutes | Total Time: 4 hours (plus chilling) | Servings: 8-10

                      - Presentation Tips: Serve chilled in individual cups or glasses for a sophisticated touch, garnished with a slice of banana and a sprig of mint on top.