Go Back
- 1 cup all-purpose flour - 1/2 teaspoon baking powder - 1/4 teaspoon salt - 1/2 cup unsalted butter, softened - 3/4 cup granulated sugar - 1 large egg - 1 tablespoon pure vanilla extract - 1/4 teaspoon almond extract (optional for a unique twist) When making homemade vanilla wafers, using the right ingredients is key. Each item plays a role in the flavor and texture of the cookies. You can swap all-purpose flour for gluten-free flour if needed. This keeps the recipe friendly for those avoiding gluten. Use coconut oil or applesauce to replace butter and eggs for a vegan version. These options work well and maintain great taste. Choose a high-quality pure vanilla extract. This makes a big difference in flavor. Look for brands that do not use artificial ingredients. Room temperature butter is important for creaming. It blends better with sugar, creating a light and fluffy mix. With these ingredients and tips, you can make delicious vanilla wafers. Follow the Full Recipe to see how easy it is! 1. Preheating and preparing the baking sheets Start by preheating your oven to 350°F (175°C). This step is key for even baking. While the oven warms up, line two baking sheets with parchment paper. This will prevent the wafers from sticking and make cleanup easy later. 2. Mixing dry ingredients In a medium bowl, whisk together the flour, baking powder, and salt. Make sure to mix well so all the dry ingredients blend evenly. Set this bowl aside for now. 1. Creaming butter and sugar In a large mixing bowl, cream the softened butter and granulated sugar. Use an electric mixer for about 3-4 minutes. You want the mixture to be light and fluffy. This step adds air and helps your wafers rise. 2. Adding wet ingredients and combining Next, add one large egg, the pure vanilla extract, and almond extract if you choose to use it. Beat everything together until it is fully mixed. This creates a smooth batter that will hold your dry ingredients. 1. Portioning the dough Using a small scoop or a spoon, drop rounded tablespoons of dough onto your prepared baking sheets. Keep them about 2 inches apart. This spacing allows the wafers to spread as they bake. 2. Baking time and signs of done-ness Bake your wafers in the preheated oven for 10-12 minutes. Watch for the edges to turn lightly golden. This is a good sign that your wafers are ready. Once baked, let them cool on the sheets for about 5 minutes before moving them to a wire rack for full cooling. Wafer spread and uneven baking If your wafers spread too much, try chilling the dough for 30 minutes. This helps firm it up. Make sure to space the dough balls at least 2 inches apart on the baking sheet. Uneven baking can happen if your oven temperature is off. Use an oven thermometer to check the heat. Rotating the baking sheets halfway can also help. Overmixing and its effects on texture Mixing too much can make your wafers tough. Once you add the dry ingredients, mix just until combined. You want to see some lumps. This keeps the wafers light and crispy. Adding spices or citrus zest For a fun twist, add a pinch of cinnamon or nutmeg to the batter. Lemon or orange zest can brighten the flavor. Just a teaspoon makes a big difference. Adjusting baking time for different crispiness If you like your wafers crispier, bake them a minute longer. Watch them closely to avoid burning. For softer wafers, take them out when they are just lightly golden. Best ways to serve homemade vanilla wafers Stack your wafers in a clear jar for a fun look. You can also arrange them on a colorful plate. Dust with powdered sugar for a sweet touch. Serve with whipped cream or fresh fruit for dipping. Storing and keeping wafers fresh To keep your wafers fresh, store them in an airtight container. They will stay crunchy for about a week. You can also freeze them for longer storage. Just make sure they are cool before you freeze them. {{image_2}} You can get creative with your vanilla wafers. One fun idea is to make chocolate-dipped vanilla wafers. Simply melt some dark or milk chocolate. Dip half of each cooled wafer into the chocolate. Set them on parchment paper to harden. It's a sweet twist that adds a rich flavor. Another option is to infuse your vanilla wafers with citrus. You can use lemon or orange zest in the dough. This adds a fresh and tangy taste. The bright notes really complement the vanilla. Homemade vanilla wafers can do more than stand alone. You can also make a tasty vanilla wafer crust for desserts. Crush the wafers and mix them with melted butter. Press this mixture into a pie pan. Add your favorite filling, and you have a delicious dessert base. You can also use vanilla wafers in other recipes. Try layering them in a trifle with pudding and fruit. You can crumble them over ice cream or yogurt for an added crunch. The possibilities are endless! If you need to avoid sugar, there are ways to make sugar-free vanilla wafers. Use sugar alternatives like erythritol or stevia. These can give you the sweetness without the sugar. For low-carb versions, you can swap all-purpose flour with almond flour. This keeps the texture nice and light. If you have allergies, you can customize the recipe, too. Use nut-free butter if you're allergic to nuts. You can replace the egg with a flaxseed egg for a dairy-free option. Just mix one tablespoon of ground flaxseed with three tablespoons of water. Let it sit for a few minutes to thicken. With these variations, you can enjoy homemade vanilla wafers in many ways! Check out the Full Recipe for all the details. To keep your homemade vanilla wafers fresh, store them in an air-tight container. This helps block out air and moisture. You can use a glass jar or a plastic container with a tight seal. If you want to extend freshness, place a small piece of bread in the container. The bread will absorb moisture and keep the wafers crisp. Freezing is a great option if you want to save some wafers for later. Let the baked wafers cool completely before freezing. Place them in a single layer on a baking sheet. Once frozen, transfer them to an air-tight freezer bag. When you’re ready to enjoy them, thaw the wafers at room temperature. For the best taste, eat them within three months. Homemade vanilla wafers last about one week at room temperature. Store them in a cool, dry place. Check for signs of spoilage, like a stale smell or a change in texture. If they feel soft or chewy, they are past their prime. Always trust your senses; if they look or smell off, it’s best to toss them. Can I use different extracts for flavoring? Yes, you can! Feel free to swap vanilla with other extracts. Almond, lemon, or coconut extracts can add unique flavors. Just use the same amount as the recipe calls for. What can I do with leftover wafers? You can get creative! Use leftover wafers for ice cream sandwiches or crumble them for a dessert topping. They also make great snacks on their own. Store them in an airtight container for freshness. Why are my wafers soft instead of crunchy? If your wafers come out soft, you may have underbaked them. Make sure to bake until the edges are golden. Overmixing can also lead to softer wafers, so mix just until combined. Can I double the recipe easily? Yes, doubling the recipe is simple! Just multiply each ingredient by two. Make sure to have enough space on your baking sheets. You may need to adjust the baking time slightly. What’s the role of baking powder in the recipe? Baking powder helps the wafers rise slightly. It creates a light texture. Too much can make them puffy, so stick to the recipe amount for best results. Why is almond extract recommended? Almond extract adds a nice depth of flavor. It's optional, but it can enhance the vanilla taste. It gives your wafers a unique twist that many people enjoy. You now have all you need to make perfect homemade vanilla wafers. We covered the ingredients, how to mix and bake them, and tips for success. You also learned about fun variations and the best ways to store your wafers. Remember, using quality ingredients makes a big difference. With these steps, you’ll create delicious wafers to enjoy whenever you like. Happy baking!

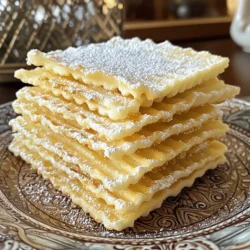
Homemade Vanilla Wafers

Delight in the sweetness of homemade vanilla wafers with this simple and tasty recipe! With easy-to-follow steps, you'll create crunchy treats perfect for snacking or dipping. Discover tips for ingredient swaps to cater to gluten-free or vegan diets, and learn creative flavor enhancements for a unique twist. Click through to explore the full recipe and enjoy these delicious cookies that everyone will love!

Ingredients
  

1 cup all-purpose flour

1/2 teaspoon baking powder

1/4 teaspoon salt

1/2 cup unsalted butter, softened

3/4 cup granulated sugar

1 large egg

1 tablespoon pure vanilla extract

1/4 teaspoon almond extract (optional for a unique twist)

Instructions
 

Preheat your oven to 350°F (175°C) and line two baking sheets with parchment paper.

    In a medium bowl, whisk together the flour, baking powder, and salt. Set aside.

      In a large mixing bowl, cream the softened butter and granulated sugar together using an electric mixer until the mixture is light and fluffy, about 3-4 minutes.

        Add the egg, vanilla extract, and (if using) almond extract to the butter and sugar mixture. Beat well until fully incorporated.

          Gradually add the dry ingredient mixture to the wet ingredients, mixing until just combined. Avoid overmixing.

            Using a small scoop or spoon, drop rounded tablespoons of dough onto the prepared baking sheets, spacing them about 2 inches apart to allow for spreading.

              Flatten each dough ball slightly with the back of a fork or your fingers to form round wafers.

                Bake in the preheated oven for 10-12 minutes, or until the edges are lightly golden.

                  Remove from the oven and allow to cool on the baking sheets for 5 minutes before transferring them to a wire rack to cool completely.

                    Prep Time: 15 minutes | Total Time: 30 minutes | Servings: About 24 wafers

                      - Presentation Tips: Stack the wafers in a clear jar or on a decorative plate to showcase their beautiful texture. You can also dust them lightly with powdered sugar or serve with a side of freshly whipped cream for dipping!