Go Back
To make these Greek yogurt cheesecake jars, you will need a few key ingredients: - 2 cups Greek yogurt (preferably full-fat for creaminess) - 8 oz cream cheese, softened - 1/2 cup honey or maple syrup (adjust to taste) - 1 teaspoon vanilla extract - 1 tablespoon lemon juice - 1/4 teaspoon salt - 1 cup graham cracker crumbs - 1/4 cup unsalted butter, melted - Fresh berries (strawberries, blueberries, or raspberries) for topping These ingredients work together to create a creamy, flavorful dessert. The Greek yogurt gives it a rich taste while keeping the protein high. You can choose between honey and maple syrup for sweetening. Honey adds a floral note and is very thick. Maple syrup is thinner and has a unique taste. Both work well, so it depends on your preference. If you want a lighter sweetness, use less than half a cup. Always taste as you mix to find your perfect balance! Fresh berries make a great topping. They add color and a fruity kick. You can use strawberries, blueberries, or raspberries. Each brings a different flavor to the dish. For extra zest, consider adding a sprig of mint on top. It looks great and adds a fresh taste. You can also drizzle a bit more honey or maple syrup for added sweetness. To start, gather your graham cracker crumbs and melted butter. In a medium bowl, mix the crumbs and butter. You want the crumbs to be well coated. Once mixed, take about two tablespoons of the mixture for each jar. Press it down lightly to form a nice base. This crust gives a great crunch and flavor. Now, let’s make the filling. In a large mixing bowl, add the softened cream cheese and Greek yogurt. Beat them together until smooth. It’s important to mix well, so there are no lumps. Then, add in the honey or maple syrup, vanilla extract, lemon juice, and salt. Blend everything until it’s creamy. This filling is rich and packed with protein, thanks to the Greek yogurt. Next, you’ll layer the jars. Spoon the cheesecake filling over the crust in each jar. Fill them about three-quarters full. This allows some space for toppings. Once filled, cover the jars and place them in the fridge. Let them chill for at least two hours. This helps the flavors meld and the cheesecake set. Before serving, top each jar with fresh berries for a burst of color and taste. Enjoy your delightful creation! To make your cheesecake creamy, use full-fat Greek yogurt. This yogurt has a rich flavor and smooth texture. Soften the cream cheese before mixing. It blends easier and gives a nice creaminess. Beat the two together well until smooth. Avoid lumps for the best outcome. Yes, you can prepare these jars ahead of time. Make the cheesecake filling and crust the day before. Assemble the jars and chill them overnight. This waiting time helps the flavors mix well. It also allows the cheesecake to set nicely. Presentation matters! Use clear jars to show off the layers. Top each jar with fresh berries. This adds color and flavor. You can also add a sprig of mint for a touch of green. The jars look even more fun this way! {{image_2}} You can easily change the flavor of your Greek yogurt cheesecake jars. Try adding citrus zest or juice for a fresh twist. Lemon or orange zest brightens the taste. Just add one to two teaspoons to the filling. For a rich chocolate flavor, mix in cocoa powder. Start with two tablespoons and adjust to your taste. Both options keep your dessert fun and exciting! This recipe is easy to adapt for different diets. You can make it gluten-free by using gluten-free graham crackers. Look for brands that offer this option for the crust. To make it vegan, swap cream cheese for a plant-based cream cheese. Use maple syrup as your sweetener. Make sure your yogurt is dairy-free. These changes let everyone enjoy this tasty treat! Seasonal fruits and spices can enhance your cheesecake jars. In summer, fresh berries like strawberries or blueberries add sweetness. In fall, try adding pumpkin spice or cinnamon. You can also layer in sliced peaches or apples in spring. These additions not only boost flavor but also make your jars look beautiful. To keep your Greek yogurt cheesecake jars fresh, cover them tightly. I recommend using plastic wrap or a lid. Store them in the fridge for up to five days. This keeps the cheesecake creamy and delicious. If you notice any moisture inside, it’s best to eat them soon. Freezing is a great option if you have extra jars. First, allow them to cool completely. Then, cover each jar with plastic wrap and foil. This helps prevent freezer burn. You can freeze them for up to three months. When you’re ready to enjoy, move them to the fridge overnight to thaw. Reheating cheesecake may seem odd, but it’s easy. If you want to warm your cheesecake slightly, remove the lid and microwave it. Heat in short bursts, about 10 seconds at a time. This keeps the texture nice. Avoid overheating, as this can make it grainy. Enjoy your treat warm or cold! Each jar of Greek yogurt cheesecake packs around 15-20 grams of protein. Greek yogurt is rich in protein, making it a great choice. The cream cheese adds more protein, too. This dessert is not just tasty; it’s a healthy treat that fills you up. Yes, you can use non-fat Greek yogurt. However, the texture will be less creamy. Full-fat Greek yogurt adds richness and flavor. If you prefer a lighter version, non-fat yogurt works well. Just keep in mind that it may change the taste slightly. You can store cheesecake jars in the fridge for about 3-5 days. Make sure to cover them well to keep them fresh. If you want to keep them longer, consider freezing them. Just be aware that freezing may affect the texture. This blog post explored making Greek yogurt cheesecake jars from start to finish. We discussed key ingredients, like sweeteners and toppings. You learned step-by-step instructions for the crust and filling. We also covered tips for a creamy texture and how to store leftovers. Finally, variations included flavors and dietary options. Making these jars is fun and flexible. Enjoy experimenting with different tastes and sharing your creations!

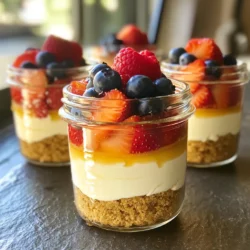
Greek Yogurt Cheesecake Jars High Protein

Indulge in a delightful treat with these Greek Yogurt Cheesecake Jars that are as delicious as they are simple to make! With creamy Greek yogurt, rich cream cheese, and a sweet graham cracker crust, these dessert jars are perfect for any occasion. Just layer the ingredients, chill, and enjoy topped with fresh berries. Click through to explore this easy recipe and impress your guests with a beautiful and tasty dessert!

Ingredients
  

2 cups Greek yogurt (preferably full-fat for creaminess)

8 oz cream cheese, softened

1/2 cup honey or maple syrup (adjust to taste)

1 teaspoon vanilla extract

1 tablespoon lemon juice

1/4 teaspoon salt

1 cup graham cracker crumbs

1/4 cup unsalted butter, melted

Fresh berries (strawberries, blueberries, or raspberries) for topping

Instructions
 

Prepare the Crust: In a medium bowl, combine the graham cracker crumbs and melted butter. Mix until the crumbs are evenly coated.

    Layer the Crust: Divide the graham cracker mixture into the bottom of your jars (about 2 tablespoons each). Press down lightly to form a crust base.

      Make the Cheesecake Filling: In a large mixing bowl, beat together the softened cream cheese and Greek yogurt until smooth and creamy.

        Sweeten the Mixture: Add the honey (or maple syrup), vanilla extract, lemon juice, and salt to the yogurt mixture. Blend until everything is well combined and creamy.

          Assemble the Jars: Spoon the cheesecake filling on top of the graham cracker crust in each jar, filling to about 3/4 full.

            Chill: Refrigerate the jars for at least 2 hours to allow the cheesecake to set and flavors to meld.

              Serve: Before serving, top the cheesecake jars with fresh berries for added flavor and color.

                Prep Time: 15 minutes | Total Time: 2 hours 15 minutes | Servings: 4 (in individual jars)

                  - Presentation Tips: Use clear jars to showcase the beautiful layers. You can also add a sprig of mint on top for a pop of color!