Go Back
- Main Ingredients: - 2 cups cooked chicken, shredded - 1 cup cream cheese, softened - 1 cup shredded cheddar cheese - 1 cup shredded Monterey Jack cheese - 1 cup enchilada sauce (red or green) - 8 small flour tortillas - 1/2 cup black beans, drained and rinsed - 1/2 cup corn kernels (fresh or frozen) - 1 teaspoon ground cumin - 1 teaspoon chili powder - 1/2 teaspoon garlic powder - Salt and pepper to taste - Additional Items for Garnish and Serving: - Chopped fresh cilantro - Sliced jalapeños for optional heat - Sour cream for serving - Potential Substitutions for Dietary Needs: - Swap shredded chicken for shredded beef or beans for a vegetarian option. - Use dairy-free cream cheese and cheese for a dairy-free version. - Corn tortillas can replace flour tortillas for a gluten-free meal. These ingredients work together to create a dish that is both tasty and satisfying. Each one plays a vital role in building layers of flavor. You can easily adjust some items to meet different dietary needs or preferences. This flexibility makes the recipe enjoyable for everyone at the table. If you want more ideas, check the Full Recipe for tips on variations! 1. Preheating the oven Start by preheating your oven to 375°F (190°C). This step is key. A hot oven helps the cheese melt and brown perfectly. 2. Mixing the filling ingredients In a large bowl, combine: - 2 cups cooked chicken, shredded - 1 cup cream cheese, softened - 1/2 cup shredded cheddar cheese - 1 teaspoon ground cumin - 1 teaspoon chili powder - 1/2 teaspoon garlic powder - 1/2 cup black beans, drained and rinsed - 1/2 cup corn kernels (fresh or frozen) - Salt and pepper to taste Mix everything until well combined. The cream cheese makes the filling creamy and rich. 3. Assembly process for the enchiladas Spread 1/4 cup of enchilada sauce on the bottom of a 9x13 inch baking dish. This prevents sticking. Take a flour tortilla and add a generous amount of the chicken mixture in the center. Roll it tightly and place it seam-side down in the dish. Repeat until all tortillas are used. Pour the remaining enchilada sauce over the rolled tortillas and sprinkle with the remaining cheese. 1. Important baking tips for optimal results Cover the baking dish with aluminum foil. This prevents the cheese from browning too quickly. Bake for 25 minutes. 2. Covering techniques to prevent browning After 25 minutes, remove the foil and bake for an extra 15 minutes. This allows the cheese to bubble and turn golden brown. 3. Time management for baking Keep an eye on the enchiladas during the last few minutes. The bubbly cheese indicates they are ready. Let them cool for a few minutes before serving. Using these steps, you'll create a dish that's not just tasty but also fun to make. Enjoy the process! For the complete recipe, check out the Full Recipe section. - Best practices for rolling tortillas: Warm your tortillas before filling. This makes them soft and easy to roll. Use a hot pan or microwave for a few seconds. Place the filling in the center and fold the sides over. Roll tightly from one end to the other. - Ensuring the filling is perfectly seasoned: Taste your filling before you assemble the enchiladas. Season it well with salt, pepper, and spices. The chicken and cheese mix should burst with flavor, so don’t skip this step. - Cheese tips for extra creaminess: Mix different kinds of cheese for depth. Cheddar gives a sharp taste, while Monterey Jack adds creaminess. Use freshly shredded cheese for the best melt and texture. - Overfilling the tortillas: Use just enough filling to roll the tortillas without bursting them. Too much filling leads to messy enchiladas and makes them hard to roll. - Skipping the resting time after baking: Let your enchiladas rest for at least five minutes after baking. This helps the cheese set, making it easier to serve and enjoy. - Incorrect oven temperatures: Always preheat your oven to 375°F (190°C). Baking at the right temperature ensures the cheese melts evenly and the enchiladas turn golden brown. {{image_2}} You can change this dish to fit your needs. For a vegetarian option, use cooked lentils or mushrooms instead of chicken. This keeps the dish hearty and satisfying. You can also add black beans or diced bell peppers. These will add nutrition and flavor without changing the essence of the dish. If you need a cheese alternative, consider using vegan cheese or a nut-based option. This keeps the recipe friendly for various diets. You can also mix different types of cheese for a richer taste. Try using pepper jack for a spicy kick! You can adapt this recipe to a slow cooker or instant pot. This makes it easy and hands-off. Just combine the filling ingredients and cook on low for several hours. For an instant pot, cook it under pressure for about 10 minutes. This results in a tender filling and a great flavor. If you need gluten-free tortillas, many brands offer good options. These are often made from corn or other grains. They work well in this recipe, so you won't miss the wheat. Want some heat? Use spicy enchilada sauce or add fresh jalapeños to the filling. This will give your dish an exciting twist. You can even add chipotle peppers for a smoky flavor. To keep your enchiladas fresh, store them in the fridge. Use an airtight container. This method helps maintain their taste and texture. They can last up to four days in the fridge. If you want to keep them longer, consider freezing. For freezing, wrap the enchiladas tightly in plastic wrap. Then place them in a freezer-safe bag. This keeps out air and prevents freezer burn. They can last up to three months in the freezer. When you're ready to eat, just thaw in the fridge overnight. For the best taste, reheat your enchiladas in the oven. Preheat the oven to 350°F (175°C). Place the enchiladas in a baking dish. Add a splash of enchilada sauce on top to keep them moist. Cover the dish with foil to avoid drying out. Heat for about 20 minutes or until warmed through. If you need a quick method, use the microwave. Place your enchiladas on a microwave-safe plate. Cover with a damp paper towel. Heat for 2-3 minutes, checking every minute. This method is faster but may change the texture a bit. For the best experience, choose the oven method. It keeps the cheese gooey and the tortillas soft. Enjoy your delicious Chicken and Cheese Enchiladas Bake again! Can I use leftover rotisserie chicken? Yes, you can use leftover rotisserie chicken. It saves time and adds great flavor. Just shred the chicken and mix it into your filling. How long can these enchiladas be stored in the fridge? You can store these enchiladas in the fridge for about three to four days. Make sure to cover them well to keep them fresh. What sides pair well with enchiladas? Enchiladas go well with rice, beans, or a fresh salad. You can also serve sour cream and guacamole for extra flavor. Can I prepare this dish ahead of time? Yes, you can prepare enchiladas a day ahead. Assemble them, cover, and store in the fridge. Just bake when you're ready to serve. What if I don’t have flour tortillas? If you don’t have flour tortillas, you can use corn tortillas. They add a nice texture, but be careful; they can tear easily. Can this recipe be made dairy-free? Yes, you can make this recipe dairy-free. Use dairy-free cream cheese and cheese alternatives. How to ensure the enchiladas don’t get soggy? To prevent soggy enchiladas, do not overfill them. Also, use a baking dish that allows for even heat. Enjoy the Full Recipe for more tips! Now you have all the tools to make perfect chicken and cheese enchiladas. We covered the key ingredients, preparation steps, and baking tips. I shared expert tricks to enhance flavor and avoid common mistakes. You can even switch ingredients to suit your needs. Get creative with variations for different diets and preferences. Proper storage and reheating ensure your leftovers stay delicious. Enjoy making this dish and impress your family and friends! Happy cooking!

Chicken and Cheese Enchiladas Bake

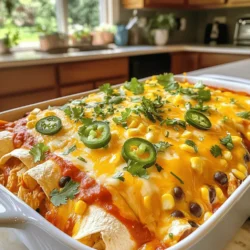
Satisfy your cravings with this easy Cheesy Chicken Enchiladas Bake! Made with tender chicken, creamy cheeses, and a zesty enchilada sauce, this dish is perfect for family dinners or gatherings. Whether you like it mild or spicy, it’s customizable to fit your taste. Ready in just 45 minutes, this recipe will impress your guests. Click through to explore the full recipe and bring this delicious meal to your table!

Ingredients
  

2 cups cooked chicken, shredded

1 cup cream cheese, softened

1 cup shredded cheddar cheese

1 cup shredded Monterey Jack cheese

1 cup enchilada sauce (red or green)

8 small flour tortillas

1/2 cup black beans, drained and rinsed

1/2 cup corn kernels (fresh or frozen)

1 teaspoon ground cumin

1 teaspoon chili powder

1/2 teaspoon garlic powder

Salt and pepper to taste

Chopped fresh cilantro for garnish

Sliced jalapeños for optional heat
Instructions
 

Preheat your oven to 375°F (190°C).

    In a large mixing bowl, combine the shredded chicken, softened cream cheese, 1/2 cup of cheddar cheese, cumin, chili powder, garlic powder, black beans, corn, salt, and pepper. Mix until well combined.

      Spread 1/4 cup of enchilada sauce on the bottom of a 9x13 inch baking dish to prevent sticking.

        Take a flour tortilla and spoon a generous amount of the chicken mixture into the center. Roll the tortilla tightly and place it seam-side down in the baking dish. Repeat this process for all tortillas.

          Once all the tortillas are in the dish, pour the remaining enchilada sauce over the top, spreading it evenly over the tortillas.

            Sprinkle the remaining cheddar and Monterey Jack cheese on top of the enchiladas.

              Cover the baking dish with aluminum foil (to prevent excessive browning) and bake for 25 minutes.

                After 25 minutes, remove the foil and bake for an additional 15 minutes or until the cheese is bubbly and golden brown.

                  Let it cool for a few minutes before serving.

                    Prep Time, Total Time, Servings: 15 mins | 45 mins | Serves 6

                      - Presentation Tips: Garnish with chopped fresh cilantro and sliced jalapeños for added freshness and heat. Serve with a side of sour cream and a simple green salad for a complete meal.