Skip to content
DisclaimerTerms Of UseGDPR PolicyCookie Policy

greenmealmap

  • Home
  • Drinks
  • Appetizers
  • Dinner
  • Dessert
  • About
  • Contact
  • Privacy Policy
DisclaimerTerms Of UseGDPR PolicyCookie Policy

NO-ING-IMG

To make your easy chickpea salad wraps, you will need these key items: - 1 can (15 oz) chickpeas, drained and rinsed - 1/2 red bell pepper, diced - 1/2 cucumber, diced - 1 small red onion, finely chopped - 1 carrot, grated - 1/4 cup fresh cilantro, chopped - 3 tablespoons tahini - 2 tablespoons lemon juice - 1 tablespoon olive oil - Salt and pepper to taste - 4 large lettuce leaves or wraps (tortillas or pita) These ingredients pack flavor and nutrients, making your wraps both tasty and healthy. You can add a few items to enhance your wraps even more: - Avocado slices for creaminess - Feta cheese for a salty bite - Cherry tomatoes for extra sweetness - Spices like cumin or paprika for warmth These extras let you customize the dish to fit your taste. Here are the tools that make this recipe easy: - A large mixing bowl for combining ingredients - A fork or potato masher for mashing chickpeas - A small mixing bowl for the tahini dressing - A whisk for smooth dressing mixing - A knife and cutting board for chopping veggies Having these tools on hand will make your cooking process simple and fun! You can find the full recipe in the linked article. Start with your chickpeas. Open a can and drain them well. Rinse them under cold water. In a big bowl, use a fork or potato masher to mash the chickpeas. Leave some pieces whole for texture. This makes the wrap tasty. Next, chop your vegetables. Dice the red bell pepper and cucumber finely. Finely chop the red onion. Grate the carrot. Finally, add the fresh cilantro. Mix these veggies into the bowl with the chickpeas. Now it's time for the dressing. Grab a small bowl and add tahini. Then, squeeze in some fresh lemon juice. Drizzle in olive oil for richness. Whisk these together until smooth. If the mix feels too thick, add a tablespoon of water. This will help get the right consistency. Once smooth, pour this dressing over the chickpea mix. Stir well until everything is coated. Taste it now! You can add salt and pepper as needed. If you want more zing, add extra lemon juice. Now for the fun part: assembling the wraps. Take a large lettuce leaf or a tortilla. Place a big scoop of the chickpea mix in the center. Fold the sides over the filling. Then, roll it up from the bottom to secure everything inside. If you use a tortilla, slice it in half. If you use lettuce, you can serve it whole. Stick it with a toothpick to hold it together. Serve these wraps on a colorful platter for a nice touch. You can find the Full Recipe for more details. To mash chickpeas well, use a fork or potato masher. Mash until coarsely mixed. Leave some whole for a nice bite. This mix gives your salad wraps a great texture. If you over-mash, it may become too smooth. The balance of smooth and chunky makes it tasty. You can add or swap ingredients easily. Love spice? Toss in some diced jalapeños. Want more crunch? Try adding shredded cabbage or radishes. Each person can make their wrap just how they like it. This salad is flexible. Use different veggies or dressings to keep it fresh and exciting. These wraps work for many events. Serve them for lunch, dinner, or picnics. They are quick to prepare and easy to share. For a party, cut them into smaller pieces. Serve with dips like hummus or tzatziki. They are colorful and fun, making them a hit at any meal. Check out the Full Recipe for more details! {{image_2}} You can easily make this wrap vegan and gluten-free. The main ingredients are already plant-based and gluten-free. Use gluten-free wraps or lettuce leaves. Many wraps are made with rice flour or corn, which are great choices. If you need a creamy dressing, try a smooth avocado blend instead of tahini. This way, you keep it rich and tasty. If you want more protein, try using other legumes. Black beans or lentils work great in this wrap. They add a different flavor and texture. You can mix them with chickpeas for a hearty meal. You can also use white beans; they are soft and creamy. Just remember to rinse and drain them well before adding. Don’t be afraid to change the veggies! You can add spinach for extra greens or corn for sweetness. Diced tomatoes add juiciness, while radishes give a nice crunch. You can even mix in some shredded cabbage for a fresh twist. The key is to use what you love and what’s in season. This keeps your wraps exciting and colorful. For the full recipe, check out Chickpea Crunch Wraps. To store leftover wraps, place them in an airtight container. This helps keep them fresh. You can also wrap them in plastic wrap. Keep the wraps in the fridge for up to two days. If you have extra filling, store it separately in another container. This prevents the wraps from getting soggy. To keep your ingredients fresh, store them in a cool, dark place. For vegetables, use the crisper drawer of your fridge. This drawer keeps moisture in, which helps. If you have leftover tahini dressing, store it in a sealed jar in the fridge. It can last for about a week. Remember to give it a good shake before using. If you want to reheat the wraps, do it gently. Use a pan over low heat. This warms them without making them too soft. You can also use a microwave. Just cover them with a damp paper towel. Heat in short bursts of 15 seconds to prevent drying out. Enjoy your wraps warm for the best flavor. For the full recipe, check out the [Full Recipe]. Each wrap contains about 7 grams of fiber. Chickpeas are rich in fiber. They help keep you full and support digestion. The veggies add more fiber, too. For a healthy meal, fiber is key! Yes, you can make these wraps ahead of time. Prepare the chickpea salad a day before. Store it in an airtight container in the fridge. When ready to eat, just assemble the wraps. This saves time and gives you a tasty meal. You can use peanut butter or almond butter instead of tahini. These options add creaminess and flavor. If you want a lighter option, use plain yogurt. Each substitute will give a different taste but will still be delicious. For more ideas, check out the Full Recipe. This blog post covered making easy chickpea salad wraps. We highlighted essential and optional ingredients, along with tools needed. Then, I shared step-by-step instructions for preparing the salad, making the dressing, and assembling the wraps. You learned tips for texture, customization, and serving ideas. Variations include vegan options and alternative veggies. Lastly, I offered storage practices and answers to common questions. These wraps are fun to make and perfect for any meal. Enjoy experimenting with flavors and sharing your creations!

Easy Chickpea Salad Wraps Quick and Flavorful Meal

Looking for a quick and tasty meal? Try these Easy Chickpea Salad Wraps! They’re packed with flavor and are simple

- 2 cups cheese tortellini - 1 cup cherry tomatoes, halved - 1 cup cucumber, diced - 1/2 cup red bell pepper, diced - 1/4 cup red onion, finely chopped - 1/2 cup kalamata olives, pitted and sliced - 1/4 cup fresh basil, chopped - 1 tablespoon lemon zest - 3 tablespoons olive oil - 2 tablespoons balsamic vinegar - 1 teaspoon Dijon mustard - Salt and pepper to taste Fresh ingredients hold more flavor and nutrients. Fresh vegetables make your salad bright and full of life. They add crunch and color that dried items cannot match. If you can't find fresh veggies, you can use canned options. Just rinse them well to cut the salt. Fresh basil gives a unique flavor. If you can't find it, dried basil works in a pinch but use less. This salad is not only tasty but also good for you. Here’s the breakdown: - Calories: About 300 per serving - Key Nutrients: - Protein from tortellini - Vitamins A and C from vegetables - Healthy fats from olive oil - Antioxidants from olives Understanding these facts helps you make smart choices while enjoying your meal. You can find the full recipe to get started on this zesty delight. First, fill a large pot with salted water. Bring it to a boil. This step is key. The salt adds flavor to the pasta. Once boiling, add 2 cups of cheese tortellini. Cook the tortellini until al dente. This usually takes about 3-5 minutes. Check the package for exact times. When done, drain the tortellini. Rinse it under cold water. This stops the cooking process. It also helps to keep the pasta from sticking. Next, it’s time to chop the vegetables. Use a sharp knife for easy cutting. Start with 1 cup of cherry tomatoes. Cut them in half. Then, take 1 cup of cucumber and dice it into small pieces. Cut 1/2 cup of red bell pepper and 1/4 cup of red onion the same way. Mixing these fresh veggies makes the salad colorful and healthy. Now, combine all the chopped veggies in a large bowl. This helps to create a lovely mix. To make the dressing, grab a small bowl. Add 1 tablespoon of lemon zest, 3 tablespoons of olive oil, and 2 tablespoons of balsamic vinegar. Then, include 1 teaspoon of Dijon mustard. Use a whisk to blend everything together. This helps to combine the flavors well. Taste the dressing. If you want, add salt and pepper to improve the taste. You can also adjust the lemon juice if needed. A little tweak can make a big difference! Now you’re ready to enjoy a fresh and flavorful Zesty Tortellini Salad. Don’t forget to check the full recipe for further details! To cook tortellini al dente, boil it in salted water. This cooking method keeps the pasta firm and tasty. Check the package for timing, usually around 2-4 minutes. After cooking, drain and rinse the tortellini under cold water. This step stops the cooking process and helps it hold its shape. Mixing the salad without mushiness is key. I suggest adding ingredients gently. Use a large spoon to fold the mixture. This way, the tortellini and veggies stay intact and appealing. Adding spices can really boost the taste. Try a pinch of red pepper flakes for heat. You can also mix in some garlic powder or Italian herbs for extra depth. Don’t forget the salt and pepper to enhance all the flavors. Balancing acidity is important for a zesty salad. The lemon zest and balsamic vinegar do this well. If it tastes too tart, add a touch of honey or more olive oil. This adjustment will round out the flavors nicely. For the best accompaniments, serve the salad with grilled chicken or fish. This adds protein and makes it a full meal. You can also pair it with garlic bread or a light soup. For dish presentation ideas, use a large, colorful bowl. Layer the tortellini and veggies for a vibrant look. You can also sprinkle fresh basil on top for a pop of green. A drizzle of extra dressing adds a nice finish. {{image_2}} You can boost your Zesty Tortellini Salad with protein. Try adding grilled chicken for a hearty choice. Just cut it into bite-sized pieces and mix it in. Chickpeas are a great vegetarian option. They add texture and nutrition without meat. You can even use canned chickpeas for ease. Just rinse and toss them in. The dressing can change the whole salad. A citrus vinaigrette brings a bright taste. Mix fresh lemon juice with olive oil for a simple twist. If you prefer creamy dressings, try a yogurt-based one. It adds a rich flavor without being heavy. Just whisk yogurt with lemon juice and a bit of salt. You can adapt the salad to the seasons. In summer, swap in fresh zucchini or sweet corn. These veggies add a nice crunch. In winter, consider roasted vegetables like butternut squash. They add warmth and heartiness. This way, your salad stays fresh and exciting all year. To keep your Zesty Tortellini Salad fresh, store it in the fridge. Use an airtight container to prevent air from drying out the salad. This salad will stay good for about three days. If you notice any wilted veggies or dry tortellini, remove them before eating. You can freeze this salad for longer storage. Just place it in a freezer-safe container. Make sure it is sealed tight to avoid freezer burn. The salad can freeze well for about one month. To thaw, move it from the freezer to the fridge for a few hours or overnight. This keeps the flavors intact and makes it easy to enjoy later. To reintroduce the salad without losing its texture, avoid microwaving it. Instead, let it sit at room temperature for about 20 minutes. This brings back its fresh taste. You can also add a splash of olive oil or a squeeze of lemon juice for extra flavor before serving. Enjoy your salad as if it was just made! Zesty Tortellini Salad lasts about three to five days in the fridge. To keep it fresh, store it in an airtight container. This helps prevent it from drying out and keeps the flavors bright. Before serving leftovers, check for any off smells or changes in texture. If everything seems good, give it a quick stir to mix those tasty flavors again. Yes, you can make this salad ahead of time! I suggest making it up to a day before you need it. This way, the flavors blend together nicely. Just remember to keep it in the fridge until you are ready to serve. If you plan to add fresh ingredients like basil, wait until just before serving. This keeps them vibrant and tasty. Zesty Tortellini Salad pairs well with many dishes. You could serve it with grilled chicken or fish for a hearty meal. It also goes great with crusty bread or garlic knots as a side. For a lighter option, try it with a simple soup like tomato or minestrone. This salad adds a fresh touch to any meal! For the complete instructions and ingredients, check out the [Full Recipe](#). Zesty Tortellini Salad combines fresh tortellini, colorful veggies, and a tasty dressing. We discussed using fresh ingredients and their importance for flavor. Nutritional info showed how this salad fits a healthy diet. You can mix your favorite proteins or try different dressings to make it unique. Remember, proper storage keeps it fresh, and reheating tips help maintain great texture. Enjoy crafting your own version of this delightful dish!

Zesty Tortellini Salad Fresh and Flavorful Delight

Looking for a fresh and easy dish? Try my Zesty Tortellini Salad! You’ll love this colorful mix of pasta, crisp

- 1 medium zucchini, diced - 1 red bell pepper, diced - 1 yellow bell pepper, diced - 1 red onion, cut into wedges - 1 cup cherry tomatoes, halved - 1 eggplant, diced - 4 cloves garlic, minced - 3 tablespoons olive oil - 1 teaspoon dried oregano - 1 teaspoon smoked paprika - Salt and pepper to taste - 1 cup quinoa, rinsed - 2 cups vegetable broth - Fresh parsley, chopped for garnish - Feta cheese (optional) The key to a great roasted Mediterranean veggie bowl is fresh ingredients. Each vegetable brings its own flavor and texture. I love using zucchini, bell peppers, onions, cherry tomatoes, and eggplant. These veggies roast well, becoming tender and sweet. For seasoning, garlic, olive oil, oregano, and smoked paprika add depth. The olive oil helps the veggies caramelize, making them flavorful. Don't forget salt and pepper to bring out all the tastes. Quinoa serves as a perfect base for this bowl. It cooks fluffy and adds protein. Using vegetable broth instead of water enhances its taste. For a finishing touch, fresh parsley adds color and brightness. If you like cheese, sprinkle feta on top for creaminess. Gather all these ingredients for a delicious meal. You can find the full recipe above for complete instructions. - Preheat oven to 425°F (220°C). - Prepare and dice all vegetables as per the ingredients list. Getting the oven hot is key. It helps the veggies roast nicely. I like to chop my vegetables into small, even pieces. This ensures they cook at the same time. - Combine vegetables in a bowl, add olive oil and seasonings, and mix well. - Spread the mixture on a baking sheet and roast for 25-30 minutes. In a large bowl, mix all your diced veggies. Drizzle olive oil over them. Add the garlic, oregano, smoked paprika, salt, and pepper. Stir well so every piece gets coated. Next, spread the mixture on a baking sheet. Make sure they are in a single layer for even cooking. Roast them for 25-30 minutes. They should be tender and slightly caramelized when done. - In a saucepan, combine rinsed quinoa and vegetable broth. - Bring it to a boil, then simmer on low until fluffy (15-20 minutes). While the veggies roast, it's time to cook the quinoa. First, rinse the quinoa under cold water. This helps remove any bitterness. In a saucepan, mix the rinsed quinoa with vegetable broth. Bring it to a boil, then lower the heat. Cover and let it simmer for 15-20 minutes. The quinoa should be fluffy and all the broth absorbed when ready. This simple method gives you a great base for your roasted Mediterranean veggie bowl. For the full recipe, check the earlier section. To get tender and caramelized veggies, cut them into even sizes. This helps them cook evenly. Use a high temperature, like 425°F (220°C). Spread the veggies out on the baking sheet. If they are too close, they will steam instead of roast. Stir them halfway through cooking. This ensures even browning. For zucchini and bell peppers, roast for about 25 minutes. For denser veggies like eggplant and onion, you might need up to 30 minutes. Rinsing quinoa is key. It removes a bitter coating called saponin. Use a fine mesh strainer and rinse under cold water. This step makes your quinoa taste great. To know when quinoa is done, look for tiny white tails. This means it is cooked perfectly. It should be fluffy and not mushy. Cook it in vegetable broth for extra flavor. Simmer on low for about 15-20 minutes. Garnish your bowl with fresh parsley for a pop of color and taste. You can also add feta cheese if you like. For more flavor, drizzle some olive oil on top. A squeeze of lemon brightens everything up. Serve the veggies in deep bowls. This makes it look nice and lets the flavors shine. You might add a side of whole grain pita for extra crunch. For a fun twist, use a colorful mix of bowls. This adds to the dish's appeal. For the full recipe, you can check out the detailed instructions provided. {{image_2}} You can add many seasonal vegetables for variety. Try using asparagus, carrots, or butternut squash. These veggies bring new tastes and colors to your bowl. You can also explore different textures with sweet potatoes or cauliflower. Mixing in these options keeps your meals fresh and exciting. Adding protein makes your veggie bowl more filling. You can use chickpeas or grilled chicken for a tasty boost. If you prefer plant-based options, consider black beans or lentils. Tofu or tempeh also works well and soaks up flavors nicely. These protein sources make your meal hearty and satisfying. To make your bowl extra special, try adding fresh herbs like basil or mint. These herbs give bright flavors that enhance the dish. You can also sprinkle in spices like cumin or coriander for a warm kick. For dressings, a simple lemon vinaigrette or tahini sauce pairs perfectly. These options let you customize your bowl to suit your taste. For the full recipe, check out the details above! To keep your roasted Mediterranean veggie bowl fresh, let it cool first. Store leftovers in an airtight container. This helps maintain flavor and texture. Place the container in the refrigerator. Use it within three to four days for the best taste. For meal prep, glass containers work great. They are sturdy and help keep your food fresh. When you reheat, aim to keep the taste and texture intact. Use the oven for even heating. Set it to 350°F (175°C) and heat for about 10-15 minutes. Stir the veggies halfway through for even warmth. If you use a microwave, reheat in short bursts. This helps avoid soggy veggies. To keep quinoa fluffy, add a splash of water before reheating. Stir it gently to fluff it up. To freeze parts of your meal, let everything cool down first. Divide the roasted veggies and quinoa into portions. Use freezer-safe bags or containers. Squeeze out as much air as possible to prevent freezer burn. They can last up to three months in the freezer. When you want to eat them, thaw overnight in the fridge. Reheat using the oven or microwave as mentioned above. Enjoy the taste of summer, even in winter! A Mediterranean veggie bowl is a colorful dish that highlights fresh veggies. You usually find ingredients like zucchini, bell peppers, onions, tomatoes, and eggplant in these bowls. The veggies are roasted to bring out their flavors. They often sit on a base of quinoa or other grains. You can top it with herbs and cheese for extra flavor. This dish is both healthy and filling. It celebrates the simple, bright flavors of the Mediterranean diet. Yes, you can use other grains in this dish. Rice is a common swap. Brown or white rice works great. Couscous is another quick option. It cooks fast and adds a nice texture. Bulgur is also a healthy choice. Each grain adds its own unique flavor. Just make sure to adjust the cooking time and liquid amounts based on what you choose. To make this dish vegan, skip the feta cheese. Instead, you can use a dairy-free cheese or leave it out. You can also add more herbs to enhance the flavor. Consider using nutritional yeast for a cheesy taste without dairy. This way, the bowl stays tasty and plant-based. Just follow the Full Recipe for all the steps! This blog post covers a delicious Mediterranean veggie bowl. We discussed fresh vegetables, seasonings, grains, and tips for perfect preparation. You learned how to roast veggies, cook quinoa, and garnish your dish beautifully. In the end, this bowl is not just easy to make—it’s versatile too. Feel free to add your favorite veggies or proteins. With these tips, you can enjoy a healthy, tasty meal anytime. Start cooking and enjoy the flavors!

Roasted Mediterranean Veggie Bowl Flavorful and Nutritious

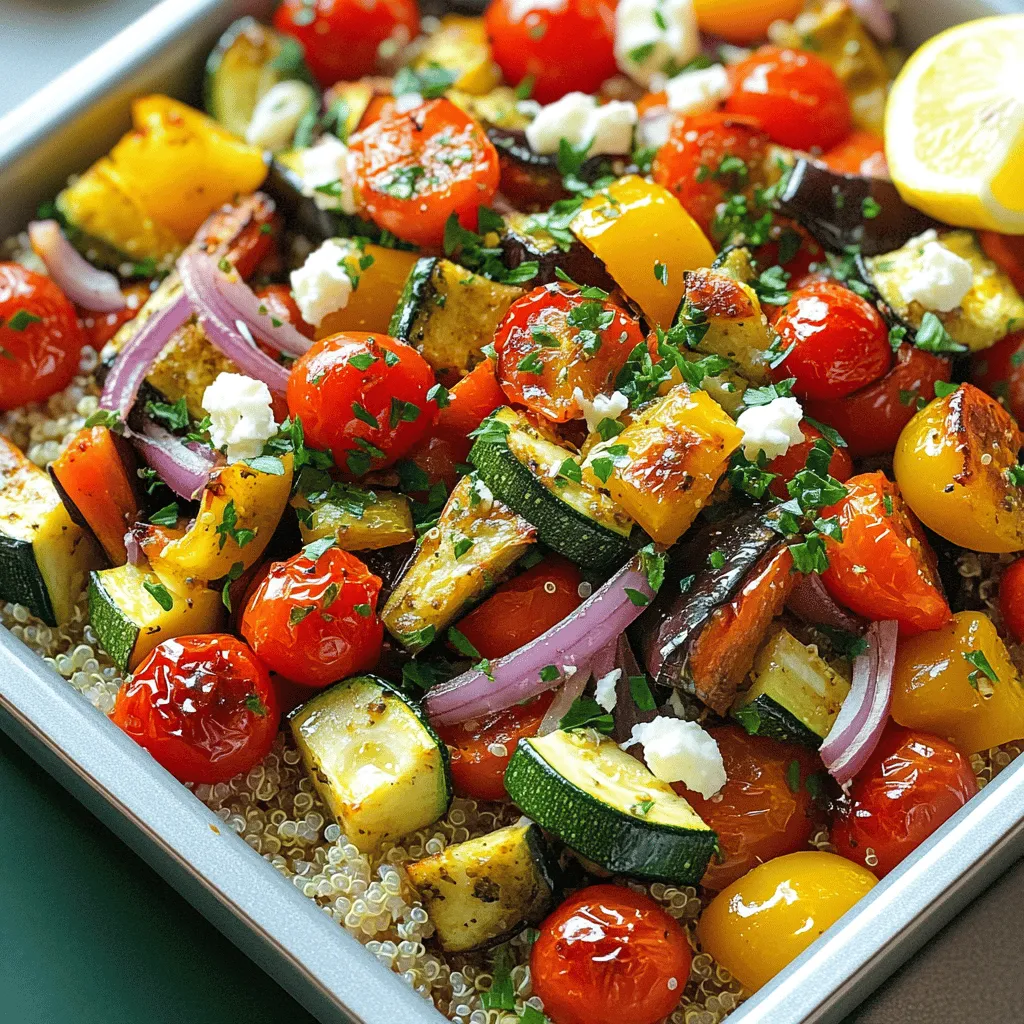
Looking for a dish that’s both tasty and healthy? Try my Roasted Mediterranean Veggie Bowl! This vibrant meal combines fresh

To make the no-bake strawberry cheesecake, gather these key ingredients. This sweet treat is simple yet tasty. Each item brings a unique flavor and texture to the dish. Here’s a closer look at each ingredient: - 1 ½ cups graham cracker crumbs: These form the base of your crust. They add crunch and sweetness. - ½ cup unsalted butter, melted: This binds the crumbs together, giving the crust richness. - 2 cups cream cheese, softened: This is the main filling. It offers a creamy texture and tangy taste. - 1 cup powdered sugar: This sweetens the cream cheese, making it delightful. - 1 teaspoon vanilla extract: This adds warmth and depth to the flavor. - 1 cup heavy whipping cream: This creates a light, airy texture in the filling. - 2 cups fresh strawberries, sliced: These provide the fresh fruit topping. Their natural sweetness shines through. - ¼ cup granulated sugar (for the strawberries): This enhances the strawberries' flavor. It helps them release their juices. - Fresh mint leaves for garnish (optional): This adds a pop of color and a fresh taste for presentation. You can easily adjust the recipe for different diets. Here are some ideas: - For a gluten-free option, use gluten-free graham crackers. - If you want a vegan version, swap cream cheese for a plant-based alternative. - Use maple syrup instead of powdered sugar for a healthier sweetener. - Coconut cream can replace heavy whipping cream for a dairy-free treat. These substitutions make the cheesecake more inclusive for everyone! To start, gather your ingredients for the crust. You will need: - 1 ½ cups graham cracker crumbs - ½ cup unsalted butter, melted In a medium bowl, mix the graham cracker crumbs with the melted butter. Stir until all the crumbs are fully coated. This helps the crust hold together. Next, press this mixture firmly into the bottom of a 9-inch springform pan. Make sure it is even and compact. Place the pan in the refrigerator while you make the filling. This keeps the crust firm. Now, let’s make the filling. Collect these ingredients: - 2 cups cream cheese, softened - 1 cup powdered sugar - 1 teaspoon vanilla extract - 1 cup heavy whipping cream In a large bowl, beat the softened cream cheese using an electric mixer. Mix until smooth and creamy. Gradually add the powdered sugar and vanilla extract. Blend these until well combined. In a separate bowl, whip the heavy cream until soft peaks form. This step adds lightness to your filling. Gently fold the whipped cream into the cream cheese mixture. Be careful not to deflate it. Your filling should be fluffy and smooth. Next, let’s bring it all together. Spread the cream cheese filling evenly over the crust in the springform pan. Use a spatula to smooth out the top. Now, prepare the strawberries: - 2 cups fresh strawberries, sliced - ¼ cup granulated sugar (for the strawberries) In a small bowl, toss the sliced strawberries with the granulated sugar. Let them sit for about 10 minutes. This helps draw out their juices. Once ready, layer the sweetened strawberries over the cheesecake filling. Cover the pan with plastic wrap. Refrigerate for at least 4 hours, or overnight if possible. This allows the cheesecake to set properly. When ready, carefully remove the sides of the springform pan. Slice and serve chilled for a delightful treat! Enjoy your no-bake strawberry cheesecake! For the complete recipe, check the Full Recipe section. For a smooth and creamy cheesecake, make sure your cream cheese is soft. Leave it out for about 30 minutes before mixing. Use an electric mixer to blend the cream cheese well. This step helps avoid lumps. When folding in the whipped cream, do it gently. This keeps the mixture light and airy. One common mistake is not chilling the crust long enough. If the crust is warm, it won't hold the filling well. Make sure to press the crust down firmly. Another mistake is overmixing the filling. This can make it too dense. Lastly, don’t skip letting the cheesecake set in the fridge. It's crucial for the right texture. When choosing strawberries, look for bright red ones. They should be firm and plump. Avoid berries with bruises or white tips. If possible, smell them; ripe strawberries have a sweet scent. For the best flavor, buy strawberries in season. This is usually late spring to early summer. Fresh strawberries truly elevate your no-bake strawberry cheesecake. {{image_2}} You can make a vegan version of this cheesecake. Swap the cream cheese for soaked cashews. Use coconut cream for the whipped cream. The taste stays rich and creamy. Blend soaked cashews with a bit of lemon juice and maple syrup. This gives a nice flavor. Follow the same steps as the original recipe for assembly. For a gluten-free cheesecake, use gluten-free graham crackers. You can also use almond flour or oats for the crust. Just mix them with melted coconut oil instead of butter. This keeps the crust tasty and crunchy. The filling stays the same and is still delicious. You can get creative with flavors! Try adding cocoa powder for a chocolate cheesecake. Mix in lemon zest and juice for a fresh lemon twist. You can even fold in crushed cookies like Oreos for a fun touch. Each variation makes the cheesecake unique and tasty. Enjoy experimenting and find your favorite! To keep your no-bake strawberry cheesecake fresh, cover it tightly. Use plastic wrap or aluminum foil. You can also place it in an airtight container. This will help keep the taste and texture intact. Store it in the fridge for best results. If you want to freeze your cheesecake, slice it first. Wrap each slice in plastic wrap. Then, place them in a freezer-safe bag. This way, you can easily grab a slice when you crave it. When ready to eat, let it thaw in the fridge overnight. Your cheesecake will last about 3 to 4 days in the fridge. If you freeze it, it can last up to 2 months. Just remember, the longer it stays, the more the texture may change. Enjoy it fresh for the best taste! Yes, you can use frozen strawberries. Just thaw them first. Drain off any extra juice. This way, your cheesecake won't get too watery. Frozen berries may change the texture slightly. But they will still add great flavor! The cheesecake needs at least four hours to set. If you can, let it chill overnight. This longer time helps it firm up nicely. The waiting may be hard, but it is worth it for a perfect slice. You can use mascarpone or Greek yogurt as a substitute. Softened tofu is also a good choice for a dairy-free version. Each option will give a different taste. Experiment to find the one you enjoy most! This blog covered how to make a no-bake strawberry cheesecake. We looked at core ingredients and explored smart swaps for dietary needs. We gave step-by-step instructions, from crust prep to filling assembly. The tips highlighted how to avoid common mistakes and pick great strawberries. You have options for vegan, gluten-free, and flavorful twists. Lastly, we discussed how to store leftovers and answered common questions. Follow these steps, and you'll create a delicious dessert that everyone can enjoy. Happy baking!

No-Bake Strawberry Cheesecake Delightful and Easy Treat

Looking for a delightful dessert that’s both easy to make and sure to impress? This No-Bake Strawberry Cheesecake is the

To make your Spicy Pineapple Chicken Kabobs, you need: - 1 pound boneless, skinless chicken breasts, cut into 1-inch cubes - 1 cup fresh pineapple, cut into 1-inch chunks - 1 red bell pepper, cut into 1-inch pieces - 1 yellow bell pepper, cut into 1-inch pieces - 1 small red onion, cut into wedges These ingredients bring together a sweet and spicy flavor that makes each bite satisfying. For the marinade, gather these items: - 3 tablespoons olive oil - 2 tablespoons soy sauce - 2 tablespoons honey - 1 tablespoon sriracha (adjust to taste) - 2 cloves garlic, minced - 1 teaspoon ground ginger - 1 teaspoon black pepper This marinade adds depth and excitement to your kabobs. The honey and sriracha mix perfectly for a sweet and spicy kick. You will also need: - Wooden or metal skewers - Fresh cilantro and lime wedges for garnish If you use wooden skewers, soak them in water for 30 minutes. This step helps prevent burning while grilling. The garnishes make your dish look stunning and fresh. For the full recipe, check out the Full Recipe section! To start, I mix the marinade in a large bowl. I add 3 tablespoons of olive oil, 2 tablespoons of soy sauce, and 2 tablespoons of honey. Next, I stir in 1 tablespoon of sriracha, 2 cloves of minced garlic, 1 teaspoon of ground ginger, and 1 teaspoon of black pepper. I whisk this all together until it blends well. This marinade adds great flavor to the chicken. Once the marinade is ready, I add 1 pound of chicken cubes. I make sure every piece is coated in the marinade. Then, I cover the bowl and put it in the fridge. I let it marinate for at least 30 minutes. For a deeper flavor, I often marinate it for up to 2 hours. This step is key for tasty kabobs. While the chicken marinates, I prepare my skewers. If I use wooden skewers, I soak them in water for at least 30 minutes. This helps prevent burning on the grill. After soaking, I take the chicken out of the fridge. I thread the chicken, fresh pineapple, red bell pepper, yellow bell pepper, and red onion onto the skewers. I alternate the ingredients for color and taste. Next, I preheat the grill to medium-high heat. Once it's hot, I place the kabobs on the grill. I cook them for about 12 to 15 minutes. I turn them occasionally to cook evenly. I know they are done when the chicken is cooked through and has a nice char. After grilling, I let the kabobs rest for a few minutes before serving. This keeps them juicy and delicious. For the full recipe, check out the details above. To get the best kabobs, start with even cuts. Make sure the chicken and veggies are all about the same size. This helps them cook evenly. Use a hot grill to get a good char. When you place the kabobs on the grill, keep an eye on them. Turn them every few minutes. This way, every side gets nice and crispy. Aim for a golden color on the chicken. It means they are cooked through and ready to eat. If you like it hot, add more sriracha. Start with a tablespoon, then taste the marinade. If it’s not spicy enough for you, add a bit more. You can also adjust the black pepper. If you prefer a milder flavor, cut back on the sriracha. Always remember, you can add more spice but can't take it out once mixed. So, start small and taste as you go. For a great presentation, use a large platter. Arrange the kabobs in a circle for a colorful display. Add fresh cilantro on top for a pop of green. Lime wedges on the side add color and a zesty flavor. You can also serve the kabobs with rice or a salad for a complete meal. Drizzle some extra marinade over the top for added taste. Enjoy your beautiful and tasty creation! {{image_2}} You can easily switch up the protein in your kabobs. If you want a plant-based option, try tofu. Tofu absorbs flavors well and adds a nice texture. For seafood lovers, shrimp works great too. Shrimp cooks fast and brings a sweet taste that pairs well with pineapple. Use these swaps to match your taste or dietary needs. Feel free to get creative with your marinades. Teriyaki adds a sweet and savory twist. It has soy sauce, sugar, and ginger, giving the kabobs a lovely glaze. Barbecue sauce is another tasty option. It gives a smoky flavor that complements the sweetness of the pineapple. Try different marinades to find your favorite flavor. Use fresh, seasonal veggies to enhance your kabobs. In spring, asparagus or zucchini adds a nice crunch. In summer, corn or cherry tomatoes can bring bright flavor. Seasonal ingredients not only taste better but also make your kabobs more colorful and fun. Adjust your veggie choices based on what’s available to keep things exciting. For the full recipe, check the details above. To store leftover kabobs, let them cool to room temperature. Place them in an airtight container. You can keep them in the fridge for up to three days. Make sure to separate the chicken from the veggies if you want them to stay fresh longer. This helps maintain the texture and flavor of each ingredient. To reheat kabobs without drying them out, use the oven or a skillet. For the oven, preheat to 350°F. Place the kabobs on a baking sheet and cover them with foil. Heat for about 10-15 minutes. If using a skillet, heat it over medium-low. Add a splash of water and cover. This steam helps keep the kabobs moist while warming them through. You can freeze kabobs for future meals. First, let the cooked kabobs cool completely. Place them in a freezer-safe bag or container. Be sure to remove as much air as possible. These kabobs can last for up to three months in the freezer. If you want to freeze marinated chicken, do so before cooking. Just combine the chicken and marinade in a freezer bag. When ready to cook, thaw in the fridge overnight before grilling. To make Spicy Pineapple Chicken Kabobs, follow these steps: 1. Marinate the Chicken: In a bowl, mix olive oil, soy sauce, honey, sriracha, garlic, ginger, and black pepper. Add chicken cubes and coat well. Cover and chill for 30 minutes. 2. Prep the Skewers: Soak wooden skewers in water for 30 minutes. This helps prevent burning. 3. Assemble the Kabobs: Thread chicken, pineapple, bell peppers, and red onion onto the skewers. Alternate the ingredients for a colorful look. 4. Grill the Kabobs: Preheat your grill to medium-high. Grill kabobs for 12-15 minutes, turning them often until the chicken is fully cooked. 5. Serve: Let kabobs rest for a few minutes. Serve with fresh cilantro and lime for a burst of flavor. This recipe creates a tasty balance of sweet and spicy flavors that will impress your guests. For the full recipe, check below. Grilling chicken kabobs well requires attention to detail: - Preheat the Grill: Always preheat your grill for even cooking. - Use Medium-High Heat: This heat level helps achieve a nice char without burning. - Don’t Crowd the Skewers: Give each piece space for even cooking and proper heat circulation. - Turn Regularly: Rotate the kabobs every few minutes for consistent cooking. - Check for Doneness: Use a meat thermometer. Chicken should reach 165°F internally for safety. Following these tips will give you juicy, flavorful kabobs every time. Yes, you can prepare kabobs ahead of time! Here’s how: - Marinate in Advance: Marinate the chicken a few hours or the night before. This makes the chicken more flavorful. - Skewering: You can thread the kabobs a few hours before grilling. Cover them and keep them in the fridge. - Storage: Keep the kabobs in an airtight container until you’re ready to grill. By prepping early, you save time and can focus on other dishes or enjoy your guests. To make delicious pineapple chicken kabobs, use key ingredients like chicken, pineapple, and veggies. Mix a tasty marinade with simple pantry items. Skewering is easy with wooden or metal sticks. After marinating, grill the kabobs for the best flavor. Keep in mind tips to perfect your cooking. Feel free to swap ingredients or try new marinades for variety. Store leftovers properly and reheat them right to enjoy later. Making kabobs should be fun and tasty, so experiment and share with friends!

Spicy Pineapple Chicken Kabobs Savory and Satisfying

Looking for a dish that bursts with flavor? You’ve come to the right place! These Spicy Pineapple Chicken Kabobs combine

- 1 pound broccoli florets - 4 cloves garlic, minced - 3 tablespoons olive oil - 1/2 cup grated Parmesan cheese - 1 teaspoon lemon juice - 1 teaspoon red pepper flakes (optional) - Salt and black pepper to taste - Zest of 1 lemon (for garnish) When I make Roasted Garlic Parmesan Broccoli, I love using fresh ingredients. The star of this dish is the broccoli. It gives a vibrant color and a satisfying crunch. I use garlic for its rich flavor. It enhances the dish, making it more savory. Olive oil adds depth and helps the broccoli roast perfectly. Parmesan cheese brings a salty, creamy taste. It melts beautifully and forms a lovely crust on the broccoli. Lemon juice brightens the dish and adds a zesty kick. Optional red pepper flakes give it a bit of heat, which I enjoy. I like to season the broccoli with salt and black pepper. These simple seasonings make a big difference. Finally, the lemon zest adds a fresh aroma, making the dish even more appealing. For the full recipe, check out the details above! 1. Preheat the oven: Start by setting your oven to 425°F (220°C). This high heat helps the broccoli get nice and crispy. 2. Mix broccoli and garlic: In a large bowl, add 1 pound of broccoli florets and 4 minced garlic cloves. This mix brings a strong flavor to the dish. 3. Add olive oil and seasonings: Drizzle 3 tablespoons of olive oil over the broccoli and garlic. Sprinkle salt, black pepper, and red pepper flakes if you like heat. Toss everything well so each piece gets coated. 1. Spread on baking sheet: Take a baking sheet and spread the broccoli mix in a single layer. This helps them roast evenly. 2. Initial roast time: Place the baking sheet in the oven and roast for about 15 minutes. Turn the broccoli halfway through to ensure even cooking. 3. Adding cheese: After 15 minutes, take the baking sheet out and sprinkle 1/2 cup of grated Parmesan cheese over the hot broccoli. The cheese melts and creates a delicious crust. 1. Squeeze lemon juice: Once roasted, take the broccoli out of the oven and squeeze 1 teaspoon of fresh lemon juice over the top. This adds a bright flavor to balance the richness of the cheese. 2. Garnishing tips: For a fancy look, sprinkle some lemon zest on top before serving. This adds color and a fresh aroma. For the complete recipe, check out the Full Recipe. Enjoy your delicious Roasted Garlic Parmesan Broccoli! Even coating is key for great flavor. When you toss the broccoli, make sure every floret gets oil and seasoning. This will help each bite be tasty. To get crispy broccoli, spread it in a single layer on the baking sheet. Avoid crowding the pan. If the florets touch, they will steam instead of roast. Roasted Garlic Parmesan Broccoli pairs well with many main dishes. Try it with grilled chicken or seared fish for a balanced meal. For a fun twist, serve it alongside pasta. To make it look fancy, use a rustic wooden platter. Add extra lemon zest and a dash of black pepper on top for color and taste. Overcooking can ruin your broccoli. Keep an eye on it while roasting. Check for tenderness at the 15-minute mark. For the best flavor, use fresh Parmesan cheese. Pre-grated cheese often lacks that rich taste. Grate it fresh for the best results. {{image_2}} You can change the cheese for a new taste. Try mozzarella or cheddar. Each cheese brings its own flavor. You can also add spices. Consider garlic powder or smoked paprika for a twist. These spices add warmth and depth. If you want a dairy-free option, use nutritional yeast instead of Parmesan. It gives a cheesy flavor without the dairy. To lower calories and fats, use less olive oil. You can also skip the cheese for a lighter dish. This keeps the dish healthy and tasty. Seasonal veggies can enhance this dish. Add bell peppers or cherry tomatoes for color and taste. You can also change the recipe for special occasions. For a holiday meal, try adding roasted nuts. They add crunch and a festive feel. Each variation keeps the dish exciting and fresh. To store leftover Roasted Garlic Parmesan Broccoli, let it cool first. Place the broccoli in an airtight container. This keeps it fresh and prevents strong odors. In the fridge, your leftovers stay good for about 3 to 4 days. Just remember to reheat only what you need each time. To freeze Roasted Garlic Parmesan Broccoli, use a freezer-safe bag or container. Make sure to remove as much air as possible. This helps prevent freezer burn. The broccoli can last for up to 3 months in the freezer. When you want to eat it, thaw in the fridge overnight. For quick results, you can microwave it on low for a few minutes. Reheat in an oven or skillet to get that crispy texture back. Enjoy this tasty side dish again without losing flavor! Can I use frozen broccoli? Yes, you can use frozen broccoli. Just thaw and drain it well. This helps avoid excess water. Roasting may take a few more minutes. Look for a tender texture. How long does it take to roast? It typically takes about 20 minutes. Roast for 15 minutes first, then add cheese. Roast again for 5 minutes until golden. What can I serve with this dish? This dish pairs well with grilled chicken or fish. It also complements pasta and rice dishes. Serve it on a rustic wooden platter for style. How to make it in an air fryer? To make this dish in an air fryer, preheat it to 375°F (190°C). Toss the broccoli and garlic with olive oil and seasonings. Arrange them in the air fryer basket. Cook for 10-12 minutes, shaking halfway through. Add the cheese and cook for another 2-3 minutes. Can I steam the broccoli instead? Yes, you can steam the broccoli. Steaming keeps it tender but may not give the same crispy texture. After steaming, mix with garlic and oil. Then, roast it briefly to add flavor. What can I use instead of Parmesan? If you don’t have Parmesan, try Pecorino Romano or nutritional yeast for a vegan option. Both add a nice, cheesy flavor. Alternatives for garlic lovers If you love garlic, add roasted garlic cloves or garlic powder. You can also use garlic oil for a stronger flavor. Mix it into the olive oil for a tasty twist. For the full recipe, refer to the detailed instructions above. Roasting garlic Parmesan broccoli is simple and rewarding. We explored the best ingredients, preparation steps, and tips to enhance flavor. Remember, even coating is key for crispiness. Feel free to try different cheeses or add seasonal veggies. Storing leftovers properly will help you enjoy this dish later. Whether you prefer it fresh or frozen, this recipe is versatile. Embrace your creativity and share this delightful side with family and friends. Happy cooking!

Roasted Garlic Parmesan Broccoli Flavorful Side Dish

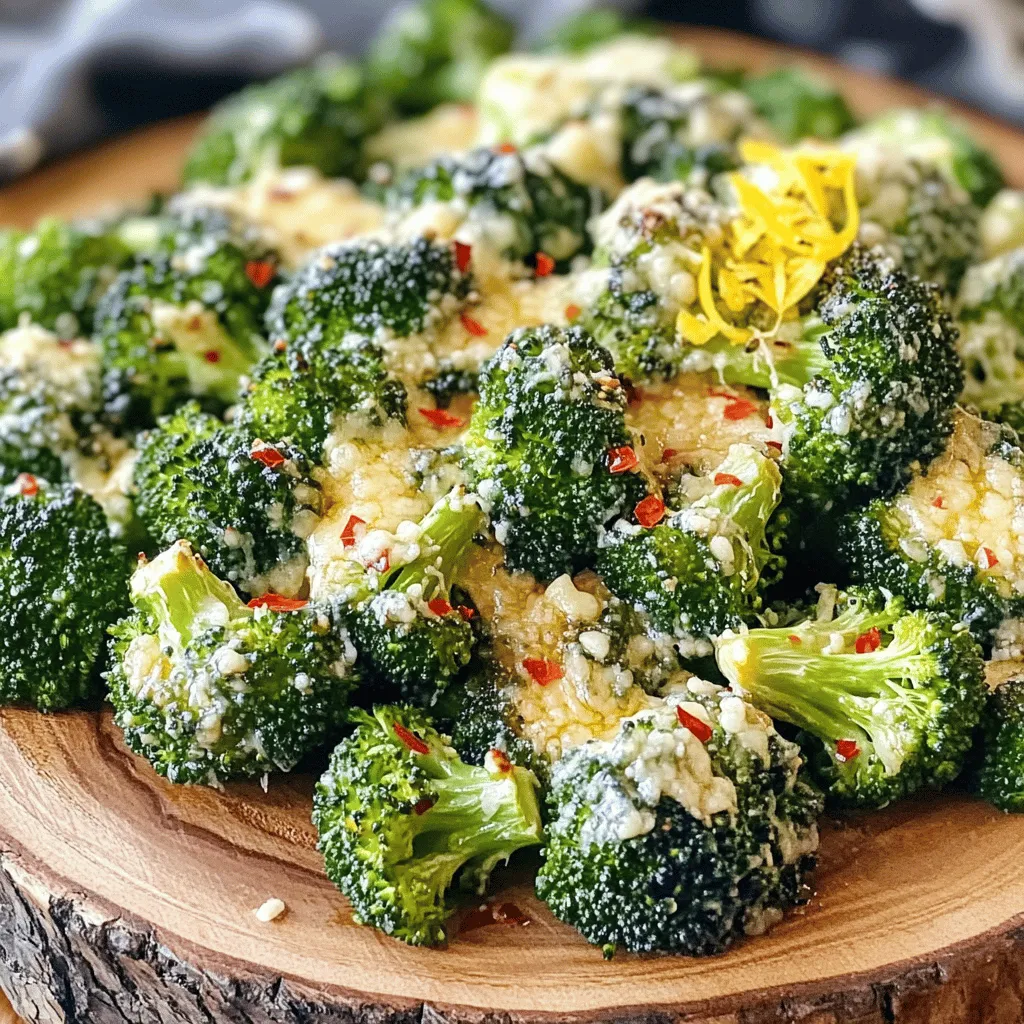
Are you ready to transform your mealtime with a side dish that packs a punch? Roasted Garlic Parmesan Broccoli is

- 12 large portobello or cremini mushrooms, stems removed - 1 cup fresh spinach, chopped - 1 cup cream cheese, softened - 1/2 cup grated Parmesan cheese - 1/2 cup shredded mozzarella cheese - 2 garlic cloves, minced - 1/4 teaspoon red pepper flakes (optional) - Salt and pepper to taste - 2 tablespoons olive oil - Fresh parsley, chopped (for garnish) Gathering fresh ingredients is key for great flavor. Start with the mushrooms. You want large portobello or cremini mushrooms. Their size makes them perfect for stuffing and they hold up well during baking. Next, fresh spinach adds a nice, vibrant color and flavor. I always chop it finely for even distribution in the filling. Cream cheese is your base. It gives that creamy texture you crave. Parmesan cheese adds a nice salty kick, while mozzarella gives a gooey texture on top. Minced garlic is a must. It brings out the earthy flavors of the mushrooms. If you like a bit of heat, red pepper flakes can add a nice touch. Don’t forget salt and pepper to enhance the overall taste. Finally, olive oil helps with cooking the spinach and adds depth. You can garnish with fresh parsley for a pop of color. This full recipe lets you create a dish that is sure to impress. - Calories per serving: Approximately 250 - Macronutrient breakdown: - Fats: 18g - Carbohydrates: 8g - Protein: 10g Knowing the nutritional content helps you plan meals better. Each serving offers a good balance of flavors and nutrients. You get healthy fats from the cheeses and olive oil, while spinach provides vitamins. Enjoy these tasty bites guilt-free! To start, preheat your oven to 375°F (190°C). This helps the mushrooms cook evenly. Next, grab a baking sheet and line it with parchment paper. This prevents sticking and makes clean-up easy. In a skillet, heat 2 tablespoons of olive oil over medium heat. Add 2 minced garlic cloves and sauté for about 1 minute until they smell great. Then, add 1 cup of chopped fresh spinach. Cook for about 2-3 minutes until the spinach wilts. Season with salt and pepper to taste. If you like a bit of heat, sprinkle in 1/4 teaspoon of red pepper flakes. Remove the skillet from heat and let it cool slightly. Now it's time to make the cheesy filling. In a mixing bowl, combine 1 cup of softened cream cheese, 1/2 cup of grated Parmesan cheese, and 1/2 cup of shredded mozzarella cheese. Mix until all the cheeses blend together nicely. Then, fold the sautéed spinach into the cheese mixture. Ensure it’s evenly mixed. This filling is rich and tasty, perfect for our mushrooms. Take your prepared mushroom caps and fill them with the cheesy mixture. Use a spoon to pack it down lightly. This helps the filling stay in place. Once filled, place the stuffed mushrooms on your lined baking sheet. Now, sprinkle the remaining mozzarella cheese over the top of each mushroom. This will give them a lovely golden crust when they bake. Now, it’s time to bake! Place the baking sheet in your preheated oven. Bake the stuffed mushrooms for 20-25 minutes. You want them to be tender and the cheese to be bubbly and golden. Once they look perfect, remove them from the oven and let them cool for a few minutes. This step is important, as it helps avoid burns when you take a bite. Enjoy your delicious Cheesy Spinach Stuffed Mushrooms! For the full recipe, refer back to the initial section. To make the best stuffed mushrooms, choose portobello or cremini. Their large caps hold the filling well. These mushrooms also have a rich taste that complements the cheese and spinach. To keep the filling moist, sauté the spinach in olive oil. This step adds flavor and helps the spinach retain moisture. Mix in cream cheese while it’s warm. This keeps the cheese easy to spread and creamy. For extra flavor, add herbs like thyme or oregano. They pair nicely with spinach and cheese. You can also try garlic powder or onion powder for a savory kick. If you want to add protein, consider crispy bacon or cooked chicken. These ingredients add texture and depth to your dish. Just chop them small before mixing with the cheese filling. Serve these stuffed mushrooms with a tangy dip, like ranch or tzatziki. They enhance the flavors of the mushrooms. A fresh salad also works well as a side. For a beautiful presentation, arrange the mushrooms on a platter. Sprinkle fresh parsley over the top for a pop of color. You can also add lemon wedges for guests to squeeze over their mushrooms. This adds a bright, zesty finish. You can find the Full Recipe to learn more about making these delicious appetizers. {{image_2}} You can switch up the filling in Cheesy Spinach Stuffed Mushrooms. Try using different veggies like bell peppers, zucchini, or artichokes. Each one adds its own taste and texture. If you want a dairy-free version, use vegan cream cheese and nutritional yeast. This still gives you a cheesy flavor without dairy. To change the flavor, think about using smoked cheeses like gouda or cheddar. Mixing different cheeses can also create a unique taste. You can add sun-dried tomatoes or olives for a pop of flavor. These additions bring a savory twist to each bite. Making bite-sized stuffed mushrooms is a fun idea. Use small mushroom caps for easy one-bite snacks. Just remember to adjust the cooking time. Smaller caps will only need about 15-20 minutes in the oven. This way, you get a tasty treat that is perfect for parties or gatherings. For the full recipe, check out the [Full Recipe]. To keep your cheesy spinach stuffed mushrooms fresh, follow these steps: - Allow mushrooms to cool to room temperature. - Place them in an airtight container. - Separate layers with parchment paper if stacking. - Store in the fridge for up to 3 days. For the best results, use glass or BPA-free plastic containers. These materials help keep the mushrooms fresh without altering their flavor. When you're ready to enjoy your leftovers, reheating is key. The best methods include: - Preheat your oven to 350°F (175°C). - Place the mushrooms on a baking sheet. - Cover with foil to keep moisture in. - Heat for about 10-15 minutes until warm. You can also use a microwave, but be careful. Heat on medium power for 1-2 minutes. This way, the mushrooms stay soft and do not dry out. Enjoy them warm for the best flavor! For the full recipe, check the earlier section. Yes, you can prep these mushrooms ahead. First, you can make the filling and stuff the mushrooms. Once filled, cover them with plastic wrap. Store in the fridge for up to 24 hours. When ready to eat, just bake them as instructed. This saves time and keeps the dish fresh. If you need a swap for cream cheese, there are good choices. You can use goat cheese for a tangy flavor. Ricotta cheese offers a light texture. For a dairy-free option, try cashew cream or tofu blended until smooth. These options make the recipe fit different diets. To check if the mushrooms are done, look for a few signs. The mushrooms should be tender and the cheese bubbly. You can also check for a golden top on the cheese. If they look and smell great, they are ready to eat! Yes, Cheesy Spinach Stuffed Mushrooms can be gluten-free. The main ingredients, like mushrooms and cheese, do not contain gluten. Just ensure any added seasonings or toppings are gluten-free. This makes the dish safe for those with gluten sensitivities. You can freeze these stuffed mushrooms! To do this, prepare them as usual but do not bake them. Place them on a baking sheet and freeze until solid. Then, transfer to a freezer bag. When ready to cook, bake from frozen, adding extra time to the oven. In this post, I shared how to make Cheesy Spinach Stuffed Mushrooms. You learned about the key ingredients, like fresh spinach and cream cheese. I also shared step-by-step instructions to prepare, fill, and bake the mushrooms. These stuffed mushrooms are tasty and easy to customize. You can swap ingredients to match your tastes. With a few tips, these make a great snack or appetizer. Enjoy crafting your perfect version, and don't forget to share your results!

Cheesy Spinach Stuffed Mushrooms Flavorful Appetizer

Looking for a tasty and easy appetizer? Cheesy Spinach Stuffed Mushrooms are the perfect choice! Packed with creamy cheeses, fresh

To make Lemon Dill Tuna Salad, gather these simple ingredients: - 2 cans (5 oz each) of tuna in water, drained - 1/4 cup mayonnaise - 2 tablespoons Greek yogurt - 1 tablespoon Dijon mustard - Juice and zest of 1 lemon - 1/4 cup celery, finely chopped - 1/4 cup red onion, finely chopped - 2 tablespoons fresh dill, chopped (or 1 tablespoon dried dill) - Salt and pepper to taste - Optional: 1/4 cup capers, rinsed (for a briny kick) - Lettuce leaves (for serving) You can swap some ingredients to fit your taste or diet: - Use avocado instead of mayonnaise for a creamy texture. - Replace Greek yogurt with sour cream if you prefer. - Choose fresh herbs like parsley if you can’t find dill. - For a kick, add a splash of hot sauce or sriracha. This tuna salad is packed with nutrients. Each serving (about 1/2 cup) offers: - Calories: 250 - Protein: 27g - Fat: 15g - Carbohydrates: 5g - Fiber: 1g - Sugar: 1g This makes a healthy meal, great for lunch or a light dinner. Enjoy this fresh and flavorful Lemon Dill Tuna Salad as a balanced dish that keeps you satisfied! For the full recipe, check out the details above. Start by gathering your ingredients. You need two cans of tuna, mayonnaise, Greek yogurt, and Dijon mustard. The lemon juice and zest add bright flavor. Don’t forget the celery, red onion, and dill for crunch and taste. 1. In a large bowl, mix the drained tuna, mayonnaise, Greek yogurt, and Dijon mustard. Stir until everything blends well. 2. Add the lemon juice and zest. Mix again until the tuna is coated nicely. 3. Now, fold in the chopped celery, red onion, and fresh dill. If you like a briny taste, add capers now. 4. Season with salt and pepper. Taste and adjust if needed. Cover the bowl with plastic wrap. Place it in the fridge for at least 30 minutes. Chilling helps the flavors blend. This wait makes the salad even tastier. When ready to serve, place lettuce leaves on a plate. Spoon the chilled tuna salad on top. For a nice touch, add a slice of lemon and a sprig of dill to each plate. You can also serve it with whole grain crackers or pita for a nice crunch. Enjoy your fresh and flavorful lemon dill tuna salad! For the full recipe, check the details above. To boost the taste of your lemon dill tuna salad, think about adding a few extra ingredients. You can use fresh herbs like parsley or chives for more flavor. A splash of hot sauce can add a kick. If you love crunch, try adding chopped pickles or bell peppers. Each adds a new layer of taste that makes the salad pop. If you're short on time, you can make the salad even quicker. Use pre-chopped vegetables from the grocery store. They save you time and effort. Also, mix your salad while the tuna is draining. This way, every step goes faster. You can chill the salad while you clean up, making it a breeze. Make your salad look as good as it tastes. Serve it on crisp lettuce leaves for a fresh touch. Add a slice of lemon and a sprig of dill on top for color. You can also serve it with whole grain crackers or pita. This makes it easy to enjoy and adds a nice crunch. Check out the Full Recipe for more serving ideas! {{image_2}} You can switch up the protein in this lemon dill tuna salad. Try canned salmon or shredded chicken. Both options bring new flavors and textures. If you want a vegetarian twist, use chickpeas instead of tuna. Just mash them lightly before mixing with the other ingredients. This keeps the salad creamy while adding a nice crunch. Feel free to get creative with flavor add-ins. You can toss in diced pickles for a tangy bite. Sun-dried tomatoes add a rich, sweet taste. For some heat, chopped jalapeños or a dash of hot sauce works well. You could also add capers, as noted in the full recipe, for a briny kick that enhances each bite. Experiment and find your favorite mix! If you want a lighter meal, use low-fat mayonnaise or Greek yogurt. This keeps the salad creamy without all the fat. You can also skip the mayo altogether. Instead, use a mashed avocado for a creamy texture and healthy fats. If you need a gluten-free option, serve the salad in lettuce wraps instead of bread or crackers. These changes make the dish fit your needs without losing flavor. Store leftover tuna salad in an airtight container. Make sure the lid is tight. This keeps the salad fresh and safe to eat. Place it in the fridge right away. Tuna salad tastes best cold. You can enjoy it for lunch or dinner later. Freezing tuna salad is not the best option. The texture may change when thawed. If you must freeze it, use a freezer-safe container. Leave some space at the top since it may expand. To use, thaw in the fridge overnight before eating. Tuna salad lasts about 3-5 days in the fridge. Check for any signs of spoilage. If it smells off or looks different, throw it away. Always trust your senses. Enjoy your lemon dill tuna salad fresh for the best taste. Yes, you can use fresh tuna. Just cook it first. Grill or sear it until it's flaky. Then, chop it into pieces. Use it just like canned tuna. The flavor will be fresher and richer. The tuna salad stays good for about three to four days in the fridge. Keep it covered in an airtight container. Always check for any off smells before eating it. Absolutely! In fact, making it ahead of time helps the flavors blend. Prepare it a day in advance and chill it. Just remember to stir it well before serving. Yes, feel free to get creative! You can add diced pickles or chopped bell peppers for extra crunch. Just ensure they complement the lemon and dill flavors. Serving it cold is best. Chilling enhances the flavors and makes it refreshing. If you prefer room temperature, let it sit for a few minutes before serving. You can serve it with lettuce, crackers, or pita bread. It also goes well on a sandwich or in a wrap. Pair it with fresh veggies for a complete meal. Yes, it can be quite healthy! Tuna is high in protein and omega-3 fatty acids. Using Greek yogurt instead of more mayo cuts extra calories while adding creaminess. I do not recommend freezing the salad. The texture changes when thawed. It’s best to enjoy it fresh. However, you can freeze the tuna before mixing it into the salad. One mistake is over-mixing, which can make the salad mushy. Another is skimping on the seasoning. Don't forget to taste and adjust salt and pepper. This step is key to great flavor! For the full recipe, check out the Lemon Dill Tuna Salad Delight. This blog post covered all you need for a great tuna salad. We discussed ingredients, step-by-step instructions, and tips to boost flavor. You learned about variations and how to store leftovers properly. Tuna salad can be customized to fit your taste and needs. Keep exploring different options to make it your own. Enjoy making your perfect dish!

Lemon Dill Tuna Salad Fresh and Flavorful Recipe

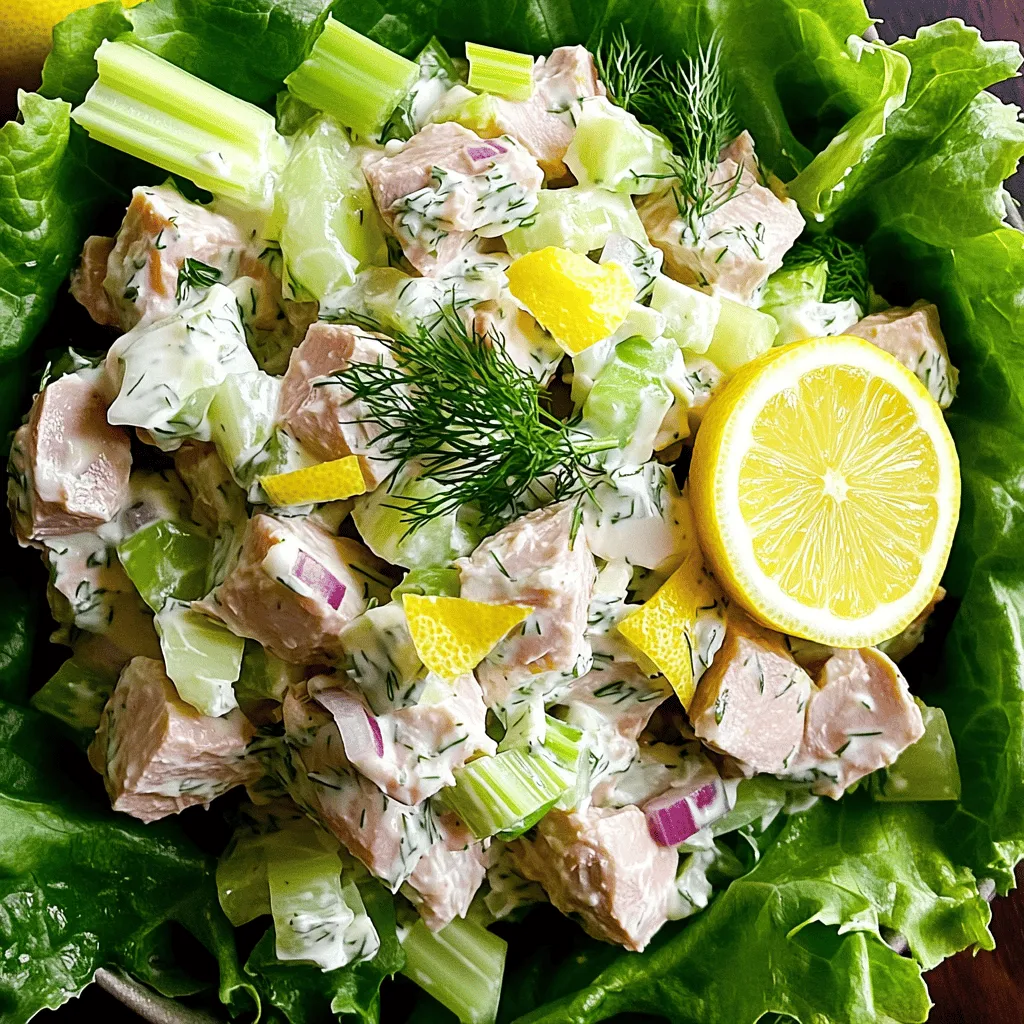
Are you ready to mix up your lunch routine? My Lemon Dill Tuna Salad is fresh, tasty, and easy to

- 1 block firm tofu - 2 cups cooked jasmine rice - 1 cup broccoli florets - 1 red bell pepper, sliced - 1 carrot, julienned - 2 green onions, chopped For this recipe, we use firm tofu. This type gives the best texture. It holds shape when cooked. I love jasmine rice for its aroma and flavor. The fresh vegetables add color and crunch. Broccoli, bell pepper, and carrots are my top choices. Green onions add a nice finish. - 2 tablespoons cornstarch - 2 tablespoons soy sauce - 1 tablespoon sesame oil - 1 tablespoon rice vinegar Cornstarch is key for making tofu crispy. It creates a nice crust during baking. Soy sauce adds depth and umami. Sesame oil brings a nutty flavor. Rice vinegar balances the dish with a slight tang. - Sesame seeds - Additional soy sauce Garnishes can elevate your dish. Sesame seeds add crunch and visual appeal. A drizzle of extra soy sauce can enhance flavor. These toppings are not required, but they make the meal special. For the full recipe, check the detailed steps to create your Crispy Tofu Rice Bowls. First, drain the tofu. Use a clean towel to press it. This helps remove excess water. Water can make the tofu soggy. After pressing, cut the tofu into cubes. Aim for bite-sized pieces for easy eating. Next, place the tofu cubes in a bowl. Add soy sauce and toss well. Make sure every piece gets coated. This step adds flavor to the tofu. Now it’s time to make the tofu crispy. Sprinkle cornstarch over the marinated tofu. Gently toss the cubes until they are fully coated. The cornstarch creates a crunchy layer. Preheat your oven to 400°F (200°C). Line a baking sheet with parchment paper. Place the tofu in a single layer on the sheet. Bake for about 25-30 minutes. Flip the tofu halfway through. This ensures even crispiness. While the tofu bakes, heat sesame oil in a large skillet. Use medium heat for this step. Add the broccoli florets, sliced bell pepper, and julienned carrot. Stir-fry the veggies for 5-7 minutes. You want them tender but still crisp. Season with salt and black pepper to taste. This mix of colors and flavors adds freshness to your rice bowl. Once the tofu is golden and crispy, your meal is almost ready. You can find the Full Recipe for all the details. To get crispy tofu, pressing is key. Pressing removes excess water. Less water means better crispiness. Use a clean towel or a tofu press for this. After pressing, cut the tofu into cubes. Then, marinate the cubes in soy sauce. This adds flavor and helps the cornstarch stick. Cornstarch is your best friend here. Coat each tofu piece in cornstarch. This will create that delightful crunch when baked. Place the cubes on a parchment-lined baking sheet. Bake them at 400°F for 25-30 minutes. Turn them halfway through for even browning. To boost flavor, try adding garlic powder or smoked paprika. These spices bring warmth and depth. For extra zing, add a splash of lime juice. You can also mix in a bit of chili powder for heat. When it comes to sauces, soy sauce is a classic. But you can switch it up with teriyaki sauce. A drizzle of sriracha or a sesame-ginger dressing can elevate the dish. For rice, jasmine is my top choice. It has a lovely aroma and fluffy texture. You can also use brown rice for a nutty flavor. When serving, arrange the rice first. Then, layer the sautéed veggies atop the rice. Finally, add the crispy tofu. This makes the bowl visually appealing. Don’t forget to sprinkle sesame seeds for that finishing touch. For the full recipe, check out Crispy Tofu Rice Bowls. {{image_2}} You can swap out tofu for other plant-based proteins. Tempeh and seitan are great choices. They both add unique flavors and textures. If you want something lighter, try chickpeas or lentils. For different textures, consider how you prepare the tofu. You can use soft tofu for a creamier feel. Just remember to adjust cooking times since soft tofu cooks faster. Crispy tofu is fantastic for added crunch. Mix up your vegetables based on what’s in season. Instead of broccoli, try asparagus or green beans. You can use zucchini or snap peas instead of bell peppers. Don’t forget to add legumes or grains to boost nutrition. Quinoa, black beans, or peas can enhance the dish. They add protein and fiber, making your meal even more filling. You can easily turn this recipe into a wrap or salad. Just take your crispy tofu and veggies, and wrap them in lettuce leaves or tortillas. To make a bowl with different sauces, use peanut sauce, teriyaki, or sriracha. Drizzle the sauce over your rice and toppings. This adds a fun twist and extra flavor to your meal. For the full recipe, check the complete guide on crispy tofu rice bowls. To keep your crispy tofu nice and crunchy, store it properly. I recommend placing the tofu in an airtight container. Make sure the lid seals well to prevent moisture. If you have leftover rice, store it in a separate container. This helps keep the tofu from getting soggy. Portion your leftovers into meal-sized servings. This way, you can grab a quick meal later without fuss. When it's time to enjoy your leftovers, reheating is key. I suggest using an oven or an air fryer. These methods help maintain the crispy texture. Simply preheat your oven to 375°F (190°C). Spread the tofu evenly on a baking sheet and heat for about 10 minutes. If using an air fryer, set it to 350°F (175°C) for the same time. Avoid using the microwave. It makes the tofu soft and chewy, which isn’t ideal. You can also freeze your crispy tofu and rice. To do this, first freeze the tofu and rice separately. Place the tofu in a single layer on a baking sheet and freeze until solid. Then transfer it to a freezer-safe bag, removing excess air. For rice, let it cool first. Then, pack it in an airtight container. To thaw, place the tofu in the fridge overnight. Reheat it as mentioned before for crispy results. For rice, you can microwave it directly from frozen. Just add a splash of water to keep it moist. To keep tofu crispy in stir fries, start with firm tofu. Press it to remove excess water. Cut the tofu into small cubes. Coat the cubes in cornstarch before cooking. This helps create a crunchy texture. Heat your pan until it’s very hot. Add oil, then your tofu. Stir-fry the tofu until golden brown. Don't overcrowd the pan; this helps it stay crispy. Yes, you can use many types of rice. Jasmine rice is great for its aroma. Brown rice adds fiber and a nutty flavor. Sushi rice is sticky and works well, too. If you prefer a low-carb option, try cauliflower rice. Each type has a different cooking time. Follow the package instructions for best results. You can serve your rice bowls with simple sides. Steamed green beans or snap peas add color and crunch. A fresh cucumber salad brings a nice, cool contrast. You can also add a miso soup for warmth. For extra flavor, top with pickled vegetables or kimchi. These sides round out your meal perfectly. For the full recipe, check out the details above! Crispy tofu rice bowls are simple and fun to make. You learned about key ingredients and pantry staples like tofu, jasmine rice, and soy sauce. We covered step-by-step instructions for preparing tofu and cooking fresh veggies. I shared tips for perfecting your crispy tofu and offered storage advice. Remember, using fresh ingredients and following these steps makes a big difference. With a little practice, you'll create delicious meals that impress everyone. Enjoy making your crispy tofu rice bowls!

Crispy Tofu Rice Bowls Flavorful and Easy Recipe

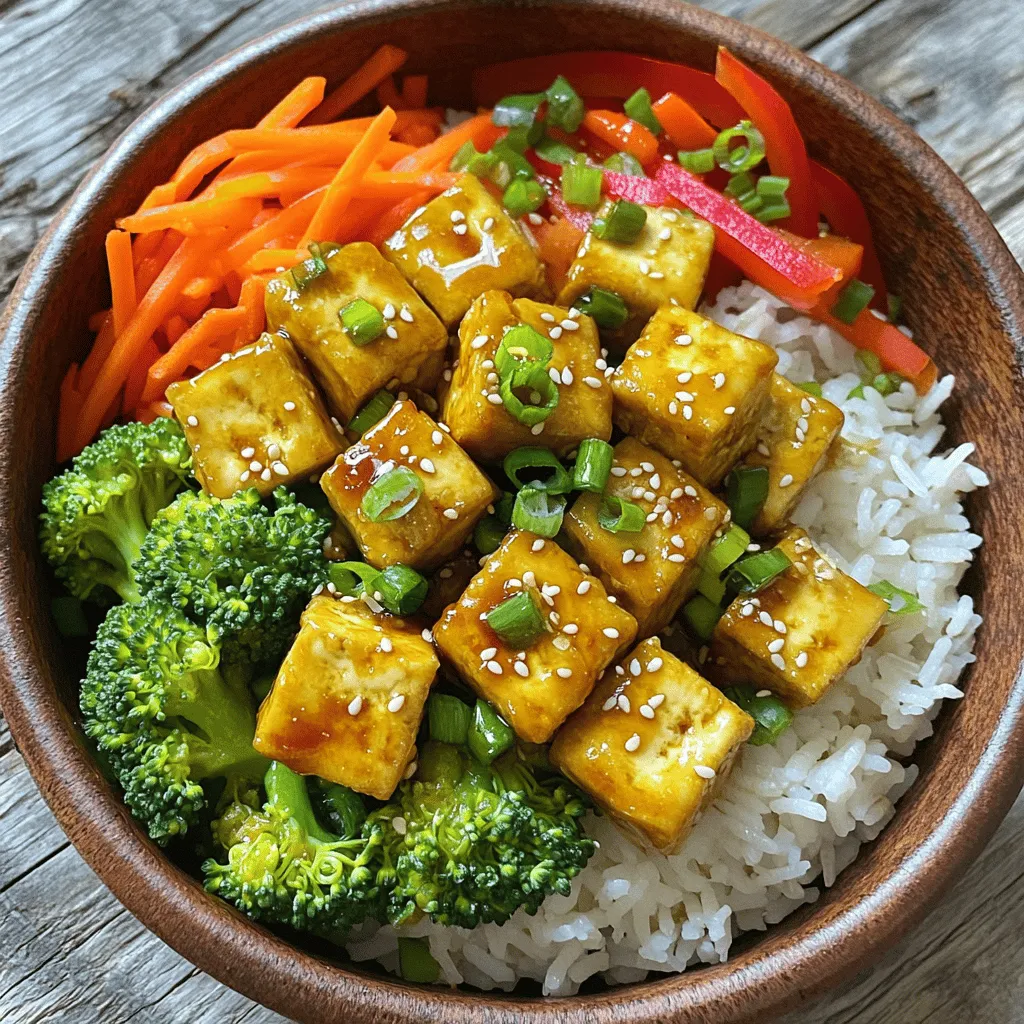
Ready to elevate your dinner game? These Crispy Tofu Rice Bowls are not just tasty; they’re easy to make and

- 1 cup green or brown lentils - 2 tablespoons olive oil - 1 medium onion, diced - 2 cloves garlic, minced - 2 carrots, diced - 2 celery stalks, diced - 1 red bell pepper, diced - 1 zucchini, diced - 1 can (14 oz) diced tomatoes - 6 cups vegetable broth - 1 teaspoon ground cumin - 1 teaspoon dried thyme - 1 teaspoon smoked paprika - Salt and pepper to taste - Fresh parsley or cilantro for garnish I love using lentils in my soup. They are packed with protein and fiber. They make this soup filling and healthy. I often choose green or brown lentils. Both types work great and cook well. Olive oil adds a lovely flavor. I heat it up in a pot and sauté the onion. The smell of cooking onion is so inviting! I add garlic, carrots, and celery next. This mix gives the soup a nice base. I also like to add a red bell pepper and zucchini. They add color and nutrition. The diced tomatoes bring in some sweetness and acidity. They help balance the flavors. Vegetable broth is key for a rich taste. I use about six cups. Then, I add spices like cumin, thyme, and smoked paprika. These spices give the soup a warm, earthy flavor. I always season with salt and pepper to taste. For garnish, I love using fresh parsley or cilantro. It adds a fresh touch and makes the soup look pretty. - Fresh herbs (e.g., basil, dill) - Additional spices (e.g., turmeric, coriander) If you want to switch things up, try adding fresh herbs. Basil and dill can add a new twist. You can also mix in spices like turmeric or coriander. They bring unique flavors and health benefits. - Calories: 180 - Protein: 10g - Fiber: 8g - Fats: 7g - Carbohydrates: 25g This soup is not only tasty but also nutritious. Each serving gives you a good amount of protein and fiber. It's a great choice for a healthy meal. Check out the Full Recipe to get started today! - Rinse lentils and chop vegetables - Measure out all ingredients To start this delicious soup, rinse your lentils under cold water. This step cleans them and helps remove any dust. Next, chop your onion, garlic, carrots, celery, bell pepper, and zucchini. You can use a sharp knife to make this easy. Measure out all your ingredients so you have everything ready to go. This makes cooking smooth and fun. - Heat olive oil and sauté onions - Add garlic, followed by carrots and celery - Incorporate bell pepper and zucchini - Mix in tomatoes and lentils - Pour in vegetable broth and spices, then simmer Now, grab a large pot and heat the olive oil on medium heat. Add the diced onion and sauté for about 3-4 minutes until it turns soft. This brings out the flavor. Next, add the minced garlic, diced carrots, and celery. Cook for about 5 more minutes. You'll smell a lovely aroma! After that, toss in the bell pepper and zucchini. Stir them for another 3 minutes until they soften. Then, pour in the canned tomatoes with their juice and mix in the rinsed lentils. Now comes the fun part! Add the vegetable broth, ground cumin, dried thyme, smoked paprika, salt, and pepper. Bring the soup to a boil. Once it starts boiling, lower the heat, cover the pot, and let it simmer for 25-30 minutes. You want the lentils to become tender and full of flavor. - Checking lentil tenderness - Adjust seasoning and consistency As the soup cooks, check the lentils for tenderness. You want them soft but not mushy. If the soup tastes a bit bland, adjust the seasoning with salt and pepper. If it’s too thick, add a little more broth or water to get the right consistency. This simple soup is all about making it just how you like it! If you want the full recipe, you can find it in the article. Enjoy your cooking! To boost the health benefits of your soup, try these ideas: - Add leafy greens: Spinach or kale blends well. - Use low-sodium vegetable broth: This cuts down on salt. - Incorporate more vegetables: Carrots, peas, or sweet potatoes add flavor and nutrition. Choosing the right pot makes a big difference. - Optimal pot types: A Dutch oven is great for even cooking. A stock pot works too. - Best practices for stovetop cooking: Keep the heat moderate. Stir often to prevent sticking, and cover the pot to keep moisture in. Enhance your meal with these tasty ideas: - Accompaniments: Serve with whole grain bread or a fresh salad. - How to garnish effectively: Use fresh parsley or cilantro for color and taste. Sprinkle a little on top just before serving. Try these tips to make your Healthy Lentil Veggie Soup even more delightful! For the full recipe, check out the Lively Lentil Veggie Delight 🥦. {{image_2}} You can make this soup even more filling by adding plant-based proteins. Try using chickpeas or black beans. They not only boost the protein but add great texture. You can also toss in some tofu for a hearty bite. For broth, you have options too. You could use a homemade veggie broth for a fresh taste. If you want more flavor, a mushroom broth works well. It gives a nice depth to the soup. Herbs and spices can change the whole soup. Try adding fresh basil or dill for a bright taste. A pinch of turmeric can give it a warm glow. For a kick, add red pepper flakes or a splash of hot sauce. You can also explore regional flavors. For a Mediterranean twist, use oregano and lemon. If you want Indian vibes, add cumin and coriander. These changes make each bowl unique. Seasonal veggies can make your soup even better. In summer, use fresh corn or green beans for a sweet crunch. In winter, add root vegetables like parsnips or sweet potatoes for warmth. Using what's in season not only tastes great but is also good for the planet. Fresh vegetables bring out the best flavors. So, check your local market for the best picks! To keep your soup fresh, follow these steps: - Cool the soup to room temperature. - Transfer it to airtight containers. - Store in the fridge for up to five days. Using glass containers helps avoid spills and keeps flavors intact. You can freeze this soup for later use. Here’s how: - Portion the soup into freezer-safe containers. - Leave space at the top for expansion. - Label each container with the date. To reheat, thaw the soup in the fridge overnight. Then, heat it on the stove. Stir occasionally for even warming. In the fridge, your soup lasts about five days. If you freeze it, it stays good for up to three months. Always check for any off smells or changes before eating. When in doubt, throw it out! Yes, you can use dried lentils. Just remember to soak them first. Soaking helps them cook faster. If using dried lentils, cook the soup for about 40-45 minutes. This will allow enough time for the lentils to become tender. You have a few great options for broth alternatives. You can use water with added herbs and spices for flavor. Another choice is to use chicken broth for a non-vegetarian option. Bouillon cubes or homemade broth can also work well. Yes, this soup is gluten-free. The main ingredients, like lentils and vegetables, do not contain gluten. Just make sure the vegetable broth you use is labeled gluten-free. If you want to add some heat, try adding red pepper flakes. You can also use diced jalapeños or a dash of hot sauce. Start with a little and taste as you go. This way, you can get the spice level just right for you. For the complete cooking guide, check out the Full Recipe. This blog post covered a hearty lentil veggie soup recipe. You learned about key ingredients, cooking steps, and helpful tips. I shared ways to customize the flavor and nutrition. Storing the soup properly can keep it fresh longer. Enjoy the process of making this soup. Experiment with flavors and seasonal veggies. With these guides, you can create a delicious, healthy dish. Dive in, and happy cooking!

Healthy Lentil Veggie Soup Nourishing and Simple Meal

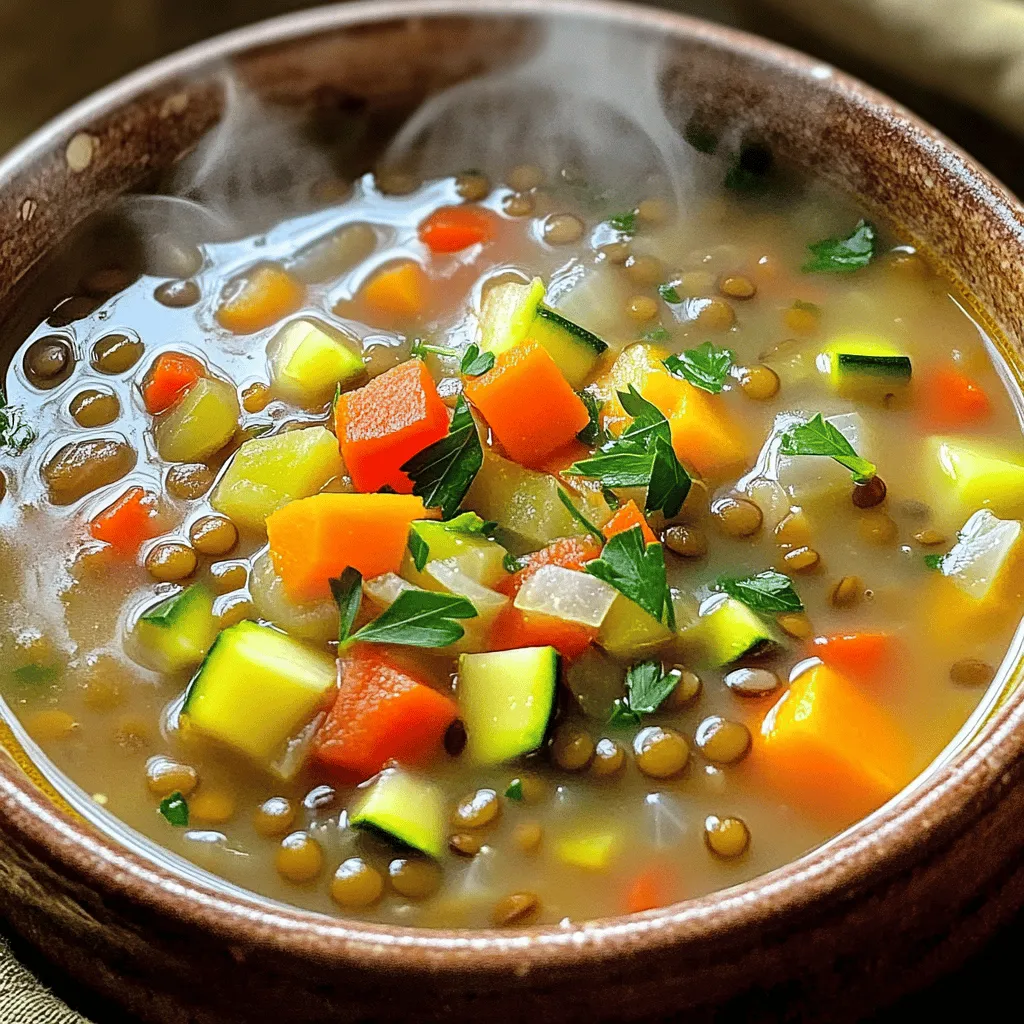
Looking for a tasty and healthy meal? This Healthy Lentil Veggie Soup is your answer. Packed with nutrients and full

Older posts
Newer posts
← Previous Page1 … Page63 Page64 Page65 … Page85 Next →

dsad

© 2026 greenmealmap • Built with GeneratePress

Our Policies

  • Copyright Policy
  • Cookie Policy
  • GDPR Policy
  • Privacy Policy
  • Disclaimer
  • Terms Of Use

More Information

  • Home
  • About
  • Contact
  • Appetizers
  • Dessert
  • Dinner
  • Drinks
©2026, greenmealmap About Back To Top