Skip to content
DisclaimerTerms Of UseGDPR PolicyCookie Policy

greenmealmap

  • Home
  • Drinks
  • Appetizers
  • Dinner
  • Dessert
  • About
  • Contact
  • Privacy Policy
DisclaimerTerms Of UseGDPR PolicyCookie Policy

NO-ING-IMG

- Fresh Strawberries - Chia Seeds - Sweeteners: Honey or Maple Syrup - Lemon Juice - Salt You need fresh strawberries for this jam. Go for ripe ones for the best flavor. They should be bright red and fragrant. Chia seeds are key too. They help thicken the jam and add fiber. Next, choose your sweetener. You can use honey or maple syrup. Adjust the amount based on your taste. A splash of lemon juice brings brightness. It helps balance the sweetness. Don’t forget a pinch of salt. It enhances all the flavors in the jam. - Vanilla Extract - Other Berries or Fruits You can add vanilla extract for a warm flavor. This makes the jam taste richer. Mixing in other berries or fruits can also be fun. Try blueberries or raspberries for a twist. Chia seeds are small but mighty. They are full of fiber, protein, and omega-3 fatty acids. These nutrients can help with digestion and heart health. Strawberries are low in calories and high in vitamins. They provide vitamin C and antioxidants. These help boost your immune system. Eating strawberries can also support healthy skin. Using fresh ingredients makes this jam not only tasty but also healthy. For the full recipe, check the section above. - Hulled and Halved Strawberries Start with 2 cups of fresh strawberries. Remove the green tops and cut them in half. This helps the strawberries cook evenly. - Sweetener Addition and Initial Cooking Place the halved strawberries in a medium saucepan. Add 2 tablespoons of honey or maple syrup. Turn the heat to medium and cook for 5-7 minutes. Stir often until the strawberries soften and release their juices. - Mashing Strawberries for Desired Consistency Use a fork or potato masher to mash the strawberries. You can mash them to your liking. For a smoother jam, mash more thoroughly. - Adding Chia Seeds and Simmering Once mashed, add 2 tablespoons of chia seeds, 1 tablespoon of lemon juice, and a pinch of salt. Mix well. Lower the heat and let it simmer for 5 minutes. Stir frequently. This helps the jam thicken nicely. - Letting the Jam Cool After cooking, remove the saucepan from heat. Let the jam cool for about 10 minutes. It will continue to thicken as it cools. - Transferring to a Jar Pour the jam into a clean glass jar. Store it in the fridge. Your jam will keep fresh for up to 2 weeks. Enjoy your strawberry chia seed jam on toast or yogurt! For the full recipe, check the details above. To thicken the jam, let it simmer longer. Chia seeds absorb liquid and help create a thick texture. If the jam is too runny, add more chia seeds. Start with one extra tablespoon, then stir well. Adjusting sweetness is easy. Taste the jam before it cools. If it's not sweet enough, add more honey or maple syrup. Stir it in while the jam is warm. This ensures an even mix. You don’t need fancy tools to make this jam. A medium saucepan works well for cooking. A fork or potato masher helps mash the strawberries. Using an immersion blender can create a smoother jam. Just blend it briefly until you reach your desired texture. This method is quick and easy. Pair this jam with breakfast items like toast or pancakes. Spread it on bagels for a tasty treat. You can also top yogurt or oatmeal with it. In desserts, use the jam as a filling for cakes or pastries. It adds a fruity burst to your favorite desserts. You can even swirl it into ice cream for a fun twist. For the full recipe, check out the link provided. {{image_2}} You can make your strawberry chia seed jam even more exciting. Adding citrus zest brings a fresh twist. Try lemon or orange zest. Just a teaspoon adds great flavor. You can also mix in other fruits. Blueberries or raspberries work well. Just mash them with the strawberries. This adds depth and makes the jam unique. Want a sugar-free jam? You can use alternative sweeteners. Stevia or erythritol are good choices. They provide sweetness without calories. To reduce sugar, cut the honey or maple syrup. You can use just a bit. The natural sweetness from fresh strawberries helps a lot. Do you prefer a chunky jam? Simply mash the strawberries less. This keeps more pieces whole. If you like a smooth jam, mash well. You can also make a spreadable sauce. Just add a bit more water and chia seeds. This works great as a topping for pancakes or yogurt. To keep your jam fresh, store it in the fridge. Always use a clean jar. This helps prevent germs from getting in. Fill the jar, but leave some space at the top. This allows for expansion. Your jam will stay good for up to two weeks in the fridge. Can You Freeze Chia Seed Jam? Yes, you can freeze chia seed jam. It freezes well and keeps its flavor. Use an airtight container to prevent freezer burn. Leave some space in the container for the jam to expand as it freezes. Thawing Instructions When you're ready to use your frozen jam, thaw it in the fridge overnight. This method keeps it safe and tasty. If you're in a hurry, you can thaw it in a bowl of warm water. Avoid using the microwave, as it can change the texture. Understanding Expiration and Freshness Homemade strawberry chia seed jam lasts about two weeks in the fridge. If frozen, it can stay good for three to six months. Always check for signs of spoilage before using. If it smells off or looks strange, throw it out. Enjoy your jam while it’s fresh for the best taste! Chia seed jam is a simple spread made with fruit and chia seeds. Unlike regular jam, it uses chia seeds as a thickener instead of pectin. This gives it a unique texture and makes it healthier. Chia seeds are packed with nutrients, like fiber and omega-3s. They also absorb liquid, forming a gel-like consistency when mixed with fruit. This means you can enjoy the fruity flavor without all the added sugar found in regular jams. Homemade Strawberry Chia Seed Jam can last up to two weeks in the fridge. To keep it fresh, store it in an airtight glass jar. Make sure to let it cool before sealing the jar. If you see any mold or it smells off, it's best to toss it out. Yes, you can use frozen strawberries for this recipe. Just thaw them first and drain any excess liquid. Frozen strawberries are a great option when fresh ones aren't available. The jam will still taste delicious, and you can enjoy it any time of year. Strawberry Chia Seed Jam can be suitable for diabetics if you adjust the sweetener. Use less honey or maple syrup or choose a sugar-free sweetener. The chia seeds add healthy fiber, which can help manage blood sugar levels. Always check with your doctor to ensure it fits your diet. To adjust the recipe, change the amount of strawberries and chia seeds while keeping the ratios the same. For instance, if you want to make more jam, double the amount of strawberries, chia seeds, and sweetener. This method keeps the flavor and texture consistent. You can also check the [Full Recipe] for more details! Making Strawberry Chia Seed Jam is simple and fun. We covered the main ingredients, the step-by-step process, and storage tips. You can mix in other fruits or adjust the sweetness to fit your taste. Also, remember that this jam is healthy and tasty. Now you can enjoy this delicious treat on breakfast items or desserts. Get creative with flavors and share with friends. You’ll feel great making something fresh and homemade!

Strawberry Chia Seed Jam Easy and Healthy Recipe

Want to make a healthy jam that tastes great? My Strawberry Chia Seed Jam is simple, delicious, and loaded with

- 4 large Russet potatoes, washed and cut into wedges - 1/4 cup olive oil - 3 tablespoons fresh lemon juice - 2 teaspoons dried oregano - 1 teaspoon garlic powder - 1 teaspoon onion powder - 1 teaspoon salt - 1/2 teaspoon black pepper - 1/4 cup grated Parmesan cheese (optional) - Fresh parsley, chopped (for garnish) The main ingredients in this recipe are simple yet vital. Fresh, quality potatoes make a big difference. I prefer Russet potatoes for their fluffy texture. Olive oil is key for crispiness and flavor. Fresh lemon juice adds a bright, zesty kick. Dried oregano and garlic powder give a wonderful aroma and taste. Always choose high-quality olive oil for the best results. You can try other potatoes too, like Yukon Gold or red potatoes. Both will bring different textures and tastes. Adding cheese can take these wedges to the next level. I love to use Parmesan for a nutty flavor. You can also try feta cheese for a salty touch. For herbs, consider adding fresh rosemary or thyme. Both herbs will boost the aroma. Dried basil works too if you don't have fresh herbs. Spices can create a unique twist. Try adding paprika for heat or cumin for warmth. A pinch of chili flakes can add a nice kick. Feel free to mix and match these suggestions! How to properly wash and cut potatoes Start by washing your potatoes under cold water. Scrub them to remove dirt. You can leave the skin on for added texture. Cut each potato in half lengthwise, then slice each half into wedges. Aim for uniform sizes to ensure even cooking. Mixing the marinade for flavor infusion In a big bowl, combine olive oil, fresh lemon juice, dried oregano, garlic powder, onion powder, salt, and black pepper. Whisk this mixture until it blends well. This marinade gives the wedges a bright, zesty flavor. Tips for even coating of wedges Add the potato wedges to the marinade. Toss them gently to coat each wedge evenly. Make sure all sides get the marinade. This step is key for maximum flavor. Ideal oven settings for optimal cooking Preheat your oven to 425°F (220°C). A hot oven helps the wedges crisp up nicely. This temperature is perfect for roasting potatoes. Importance of spacing on the baking sheet Line a baking sheet with parchment paper. Arrange the wedges in a single layer, leaving space between them. Avoid overcrowding. This helps them cook evenly and become crispy. Guidelines for checking doneness Bake the wedges for 30-35 minutes. Flip them halfway through to ensure all sides brown. They are done when they turn golden brown and feel crispy to the touch. Best ways to serve Greek Lemon Potato Wedges Once out of the oven, let the wedges cool for a few minutes. Serve them warm, garnished with chopped fresh parsley for a pop of color. Pairing suggestions with dips or sauces These wedges pair well with tzatziki or a creamy garlic dip. A simple yogurt sauce can also enhance their flavor. Ideal accompaniments for a complete meal Serve Greek lemon potato wedges as a side dish with grilled chicken or fish. They also work well with salads or roasted vegetables. Enjoy these tasty wedges with your favorite main dish! For a complete guide, refer to the Full Recipe. To make your Greek lemon potato wedges extra crispy, follow these tips: - Choose the Right Potatoes: Use starchy potatoes like Russets. They give the best texture. - Cut Evenly: Cut your wedges into similar sizes. This helps them cook evenly. - Soak in Water: Soak the cut wedges in cold water for 30 minutes. This removes excess starch. - Dry Thoroughly: After soaking, dry the wedges well with a towel. Moisture can make them soggy. - Oil Generously: Coat the wedges in olive oil. This helps them crisp up nicely. - Flipping is Key: Flip the wedges halfway through baking. This ensures all sides get golden. For faster results, try using an air fryer. Preheat it to 400°F. Cook for about 20 minutes, shaking halfway through. You can prepare these wedges in advance for parties or family meals: - Prep Ahead: Cut and marinate the wedges the day before. Store them in the fridge. - Storage: Place cooked wedges in an airtight container. They last about three days. - Reheating: To keep them crispy, reheat in the oven at 375°F for 10-15 minutes. Avoid the microwave, as it can make them soggy. Greek lemon potato wedges fit well into meal preps: - Pair with Proteins: Add chicken or fish for a balanced meal. - Store Smart: Use glass containers for easy heating. They keep the wedges fresh. - Flavor Variations: Change up the spices for different meals. Try adding smoked paprika or fresh herbs to keep things exciting. For the full recipe, check out the entire section on Greek Lemon Potato Wedges. {{image_2}} You can change the flavor of Greek lemon potato wedges easily. For a Mediterranean twist, try adding some dried thyme or basil. They add a nice herbal note. Want some heat? Sprinkle chili flakes or paprika for a spicy kick. It really wakes up the dish! You can also infuse fresh herbs like rosemary or thyme. Just chop them finely and mix them into the marinade. Each choice will make your wedges feel new and exciting. If you need gluten-free options, check your seasoning. Many are naturally free of gluten. Just read the labels carefully. For a vegan dish, skip the Parmesan cheese. The wedges are still tasty without it! If you're watching carbs, consider using cauliflower instead of potatoes. You can cut cauliflower into similar shapes. It will still soak up the lemon flavor and bake nicely. These potato wedges are not just a side dish. You can turn them into a salad topping. Just chop the wedges and mix them with greens. They add a crunchy texture and great taste. They also pair well with grilled meats or fish. Serve them alongside chicken or salmon for a full meal. For brunch, place the wedges on a plate with eggs and bacon. They make a fun addition to your breakfast spread. For more ideas, check out the Full Recipe. To keep your Greek lemon potato wedges fresh, follow these tips: - Allow the wedges to cool completely before storing them. - Place them in an airtight container or wrap them tightly in foil. - Store in the fridge at 40°F (4°C) or lower. - You can freeze them for longer storage, but they may lose some crispiness. These wedges stay good in the fridge for about 3-5 days. If you freeze them, aim to use them within a month. Look for signs of spoilage, like a strange smell or slimy texture. If you see these, it’s best to throw them out. To enjoy your Greek lemon potato wedges again, reheating properly is key: - The oven is the best method. Preheat it to 400°F (200°C) and warm the wedges for about 10-15 minutes. - Using the oven helps keep them crispy. - If you use a microwave, place a paper towel under the wedges to absorb moisture. This may help reduce sogginess. The oven method gives the best taste and texture. You can find the full recipe for these wedges and more tips on how to enjoy them. Greek Lemon Potato Wedges can last about 3 to 5 days in the fridge. Make sure to keep them in an airtight container. To check for spoilage, look for changes in texture or smell. If they feel mushy or smell off, it’s best to toss them. Yes, you can make these wedges in an air fryer! Start by spraying the basket with oil. Toss the wedges in the lemon-olive oil mix as usual. Arrange them in a single layer in the basket. Set the air fryer to 400°F (200°C) and cook for 20 to 25 minutes. Shake the basket halfway through for even crispiness. Some great dips for these wedges include tzatziki, hummus, and garlic aioli. Tzatziki adds a fresh, cool taste, while hummus brings creaminess. If you want convenience, store-bought options work well. Homemade dips can taste even better, so try making your own for a special touch! Greek Lemon Potato Wedges are fun and simple to make. Quality ingredients, like fresh herbs and good potatoes, really boost flavor. You can customize with different spices or cheeses. Remember to follow the steps for prep and baking to get that perfect crispness. These wedges fit well into meal prep, making meals easy. Store extras properly and reheat with care for tasty snacks later. Enjoy making and sharing these delicious wedges with family and friends!

Greek Lemon Potato Wedges Crispy and Flavorful Treat

Are you ready to elevate your snack game? Greek Lemon Potato Wedges are the crispy, zesty treat you’ve been craving.

To make Healthy Apple Nachos, gather these simple items: - 2 large apples (like Granny Smith or Honeycrisp), thinly sliced - 1/4 cup almond butter (or your favorite nut butter) - 2 tablespoons honey or maple syrup - 1/4 cup granola (homemade or store-bought) - 1/4 cup dark chocolate chips (optional) - 1/4 cup chopped nuts (e.g., walnuts, pecans, or almonds) - 1 teaspoon cinnamon - A pinch of sea salt - Fresh fruits (like berries or banana slices) for garnish (optional) You can change things up to fit your taste. Here are some ideas: - Nut Butters: Try peanut butter or cashew butter instead of almond butter. - Sweeteners: Use agave syrup or coconut nectar in place of honey or maple syrup. - Granola: Choose a flavored granola, like cinnamon or chocolate chip, for extra fun. - Fruits: Add slices of kiwi or mango for a tropical twist. These Healthy Apple Nachos are not just tasty; they pack a punch nutritionally. Here’s a quick look: - Calories: About 300-350 per serving - Protein: Roughly 8-10 grams, depending on nut butter used - Fiber: Around 5-7 grams, thanks to the apples and nuts - Fat: About 15-20 grams from nut butter and nuts, mostly healthy fats This snack is a great way to enjoy apples while getting healthy fats and protein. Start by washing the apples well. I like to use Granny Smith or Honeycrisp apples. They give a nice sweet and tart taste. After washing, cut the apples into thin slices. Be sure to remove the core. Lay the apple slices flat on a big plate or platter. This makes the nachos look great. Next, grab a small bowl. Add the almond butter to this bowl. Mix in the honey or maple syrup. Stir until it becomes smooth and creamy. If it feels thick, warm it a bit in the microwave. This helps it drizzle nicely over the apples. Now it’s time to put everything together. Drizzle the almond butter mixture over the apple slices. Use a spoon for even coverage. Sprinkle granola on top for some crunch. If you want, add dark chocolate chips and chopped nuts for extra flavor. Finally, dust the plate with cinnamon and a pinch of sea salt. If you like, top with fresh fruits like berries or banana slices. Serve right away, and enjoy this fun, healthy snack! I love using Granny Smith or Honeycrisp apples. Granny Smith apples add a nice tartness. Honeycrisp apples are sweet and crunchy. Both types work well in Healthy Apple Nachos. You can also try Fuji or Gala apples for a sweeter option. Choose apples that are firm and fresh. If you have any nachos left, store them in a container. Use an airtight container to keep them fresh. Keep leftover nachos in the fridge for up to one day. The apples may brown a bit, but they will still taste good. You can add a little lemon juice to the apples to slow browning. Healthy Apple Nachos are great for any event! Serve them as a snack during movie night. They are fun for kids’ parties or as a light dessert. You can also offer them at a brunch with friends. Add a scoop of yogurt on the side for a tasty dip. They are perfect for sharing and enjoying together. For the full recipe, check the section above! {{image_2}} You can switch almond butter for other nut butters. Peanut butter works well too. Cashew butter adds a creamy texture. Sunflower seed butter is great for nut-free diets. Each choice gives a unique taste to the nachos. Try different nut butters to find your favorite. The toppings can change your apple nachos a lot. You can add dried fruits like raisins or cranberries. Fresh fruits, such as sliced strawberries or kiwi, brighten the dish. For crunch, try sunflower seeds or pumpkin seeds. You can also use yogurt for a creamy touch. Get creative and mix toppings you love! Use seasonal fruits for a fun twist. In fall, add sliced figs or pears. In spring, top with fresh berries or cherries. You can also sprinkle cinnamon in winter for a warm flavor. Each season brings new tastes, so adapt your nachos accordingly. Enjoy the fun of changing flavors! To keep your apples fresh, store them in the fridge. Apples can turn brown when cut. To slow this, squeeze lemon juice on the slices. This keeps them crisp and tasty. If you have leftover almond butter, keep it in a cool place. Make sure it is sealed tight. You can slice apples a day ahead. Just remember to add lemon juice. This will help them stay fresh. You can also mix the almond butter and honey ahead of time. Place it in a small jar. When you are ready to eat, just assemble everything quickly. Use airtight containers for storing your ingredients. Glass jars work well for almond butter. For apple slices, use a container with a lid. This keeps them from getting squished. If you have leftovers, keep them in a separate container. Enjoy your Healthy Apple Nachos later! Yes, you can prepare some parts ahead of time. Slice the apples and store them in water with lemon juice. This keeps them fresh and bright. However, I recommend waiting to drizzle the almond butter and add toppings. This way, they stay crunchy and tasty. You have many choices! Here are some of my favorites: - Granola for crunch - Dark chocolate chips for sweetness - Chopped nuts like walnuts or almonds - Fresh fruits like berries or bananas - A sprinkle of cinnamon for warmth Mix and match to find your perfect flavor! To make Healthy Apple Nachos vegan, just swap honey for maple syrup. Use any nut butter that fits your diet. Almond butter or peanut butter works great. All other ingredients are already vegan, so it’s simple! For the full recipe, check out the ingredients and steps above. Enjoy making this fun and tasty snack! Healthy apple nachos are fun and easy to make. We covered the best ingredients and how to prepare them. You learned how to make a tasty almond butter drizzle and assemble your nachos. I shared storage tips and fun variations to keep it interesting. Keep this recipe handy for snacks or parties. With these simple steps, you'll impress your friends and family. Enjoy your delicious, healthy treat!

Healthy Apple Nachos Delectable and Easy Snack Idea

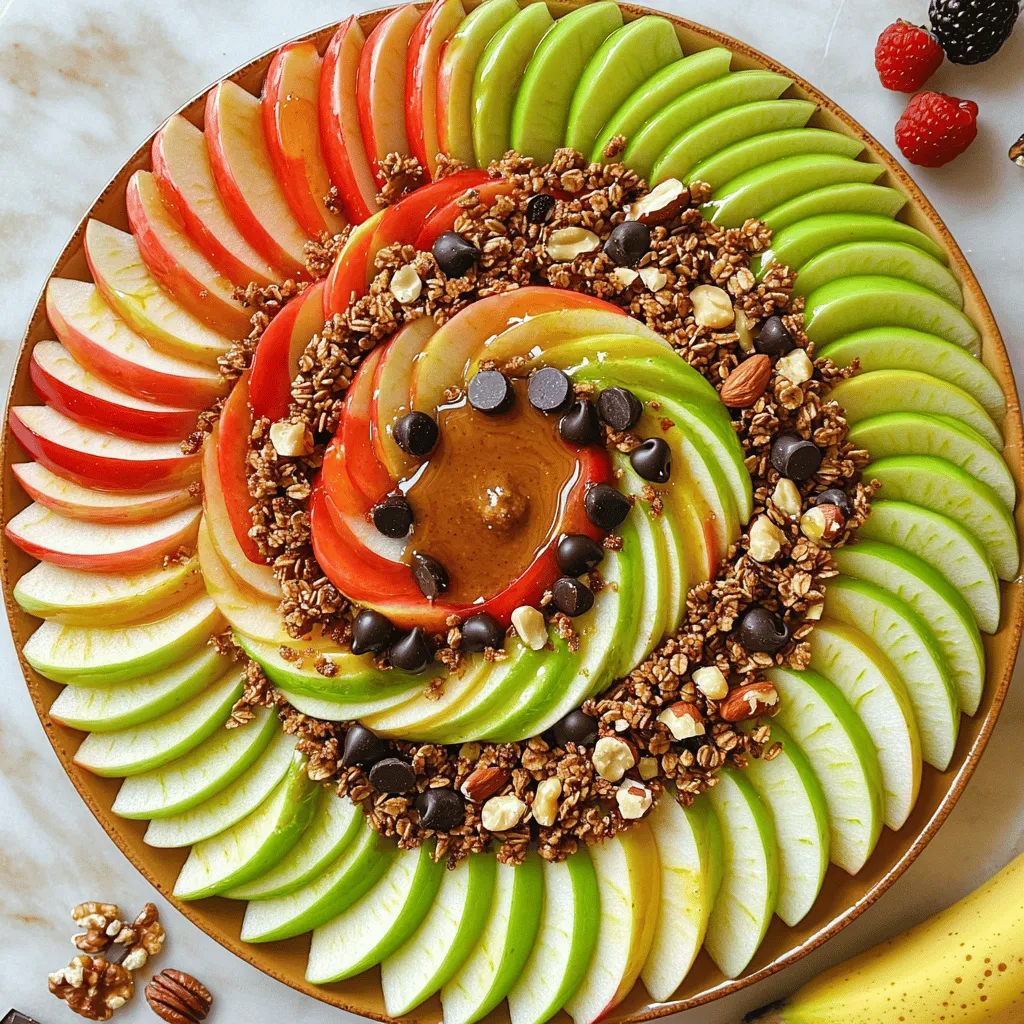
Looking for a fun and tasty snack? Healthy Apple Nachos are the perfect choice! They’re simple to make and full

For these no-bake energy bites, you need these key ingredients: - 1 cup rolled oats - 1/2 cup almond butter (or your favorite nut butter) - 1/4 cup honey or maple syrup - 1/2 cup ground flaxseed - 1/3 cup mini chocolate chips - 1/4 cup shredded coconut (optional) - 1 teaspoon vanilla extract - Pinch of sea salt These simple ingredients blend well together. They create a tasty, energy-filled snack. You can easily swap some ingredients based on your taste or what you have at home. Here are a few ideas: - Use peanut butter instead of almond butter for a stronger flavor. - Maple syrup can replace honey if you want a vegan option. - Use sunflower seed butter if you have nut allergies. - Swap mini chocolate chips for dark or white chocolate chips. - Omit shredded coconut if you don’t like it. These swaps keep the bites delicious and fun! Each ingredient in the energy bites brings unique health benefits: - Rolled oats are great for fiber, helping you feel full. - Almond butter provides healthy fats and protein for energy. - Honey or maple syrup adds natural sweetness and quick energy. - Ground flaxseed is rich in omega-3 fatty acids and fiber. - Chocolate chips add taste and a little joy to your snack. - Shredded coconut offers healthy fats and a tropical flavor. - Vanilla extract enhances the taste without extra sugar. - Sea salt balances sweetness and brings out flavors. These ingredients make your no-bake energy bites not just tasty but also good for you. To make no-bake energy bites, start with the dry ingredients. In a large bowl, mix 1 cup of rolled oats and 1/2 cup of ground flaxseed. These two ingredients provide a great base and add fiber. In another bowl, blend 1/2 cup of almond butter with 1/4 cup of honey or maple syrup. This creates a smooth, sweet mix. Add in 1 teaspoon of vanilla extract and a pinch of sea salt for flavor. Now, pour the wet mix into the dry mix. Stir until everything is well combined. It should look thick and sticky. Next, fold in 1/3 cup of mini chocolate chips and 1/4 cup of shredded coconut if you like. This adds a nice touch of sweetness and texture. When shaping the bites, use your hands. Roll the mixture into small balls, about 1 inch in size. If it feels too sticky, slightly wet your hands. This helps shape them better. Make sure the bites are evenly sized for a nice look and easy eating. If you want to get creative, try adding nuts or seeds to the mix. You can customize these bites to fit your taste. Once you’ve shaped all the bites, place them on a baking sheet lined with parchment paper. Refrigerate them for at least 30 minutes. This helps them firm up and hold their shape. After chilling, store them in an airtight container in the fridge. They can last up to a week or be frozen for longer storage. Enjoy your bites as a quick snack or a tasty treat! To get the right texture for your energy bites, use the right amount of wet and dry ingredients. The oats should be moist but not soggy. You want a mix that holds together but is not too sticky. If it feels dry, add a bit more nut butter or honey. This helps bind everything together. If it feels too wet, add a touch more oats or flaxseed. One common mistake is not measuring ingredients correctly. This can change the texture and taste. Another mistake is skipping the refrigeration step. Chilling the bites helps them firm up. If you skip this, your bites may fall apart. Lastly, don’t rush the mixing process. Make sure everything is evenly combined for the best flavor. When rolling your energy bites, keep your hands slightly wet. This prevents the mixture from sticking to your hands. Aim for bite-sized balls, about one inch in diameter. Use a small cookie scoop for even sizing. It makes the process quicker and easier. If you want a fun twist, roll the bites in shredded coconut or cocoa powder for extra flavor and look. For full recipe details, check out the Full Recipe section. {{image_2}} You can make no-bake energy bites in many fun flavors. Start with the base recipe and switch up a few things. Try peanut butter for a nutty punch. You can also add cocoa powder for a chocolate boost. Mixing in spices like cinnamon or nutmeg adds warmth. Want a tropical twist? Use coconut and pineapple chunks instead. The options are endless. Each flavor brings a new delight to your snack time. You can easily make these bites fit your diet. For a gluten-free option, use certified gluten-free oats. If you want a vegan version, swap honey for maple syrup. You can also use a plant-based butter instead of nut butter. These small changes keep the snacks tasty and healthy for everyone. Always check labels to ensure your ingredients are safe for your needs. Adding superfoods is a great way to boost nutrition. Try tossing in chia seeds for extra fiber and protein. Hemp seeds are another great choice for healthy fats. You can also mix in unsweetened cocoa nibs for antioxidants. Each superfood you add enhances the bites while keeping them delicious. These little changes can make a big impact on your health. After making your no-bake energy bites, you want to store them right. Place the bites in an airtight container. Keep the container in the fridge. This helps them stay fresh. You can also layer them with parchment paper to avoid sticking. If you want, you can keep them in a bowl covered with plastic wrap. Both methods work well. Freezing is a great option for longer storage. To freeze, lay the bites on a baking sheet. Make sure they do not touch each other. Freeze for about an hour until firm. After that, transfer them to a zip-top freezer bag. Squeeze out the air and seal it tight. When you want to eat them, take them out and let them thaw in the fridge. You can also enjoy them straight from the freezer for a cold treat. When stored in the fridge, your energy bites last about a week. If you freeze them, they can last up to three months. Just remember to label your bags with the date. This way, you know when to eat them. Enjoy your tasty snacks whenever you want! No-bake energy bites are small snacks packed with nutrients. They often include oats, nut butter, and sweeteners. These bites need no baking, making them quick to prepare. You mix the ingredients, roll them into balls, and chill. They’re perfect for a quick energy boost. Yes, you can use any nut butter you like! Almond, peanut, or cashew butter all work well. Each nut butter brings its own flavor and texture. Just choose what you enjoy most. To make no-bake energy bites sugar-free, replace honey or maple syrup with sugar-free sweeteners. You can use stevia or erythritol. These options add sweetness without the sugar. Absolutely! Kids love the sweet taste and fun shapes. They are also healthy, full of protein and fiber. You can involve kids in making them. It’s a fun way to get them into the kitchen. Your energy bites are ready after chilling for 30 minutes. They should feel firm to the touch. If they are too soft, let them chill a bit longer. Once set, they are perfect for snacking. To make Nutty Chocolate Bliss Energy Bites, gather these ingredients: - 1 cup rolled oats - 1/2 cup almond butter (or your favorite nut butter) - 1/4 cup honey or maple syrup - 1/2 cup ground flaxseed - 1/3 cup mini chocolate chips - 1/4 cup shredded coconut (optional) - 1 teaspoon vanilla extract - Pinch of sea salt 1. In a large bowl, mix the rolled oats and flaxseed. 2. In another bowl, combine almond butter, honey, vanilla, and sea salt until smooth. 3. Pour the wet mix into the dry ingredients. Stir well. 4. Fold in the mini chocolate chips and coconut. 5. Use your hands to shape the mixture into balls. 6. Place on a parchment-lined baking sheet. 7. Chill for at least 30 minutes. 8. Store bites in an airtight container in the fridge. Enjoy your nutritious snack! No-bake energy bites are easy and fun to make. You learned about key ingredients, substitutions, and their nutritional benefits. I shared tips for mixing, shaping, and storing your bites, ensuring they hold together well. Don't forget about flavor variations and dietary needs—there's something for everyone. Now you can enjoy tasty snacks that fit your lifestyle. Keep experimenting and stay creative with your no-bake energy bites!

No-Bake Energy Bites Simple and Nutritious Snack

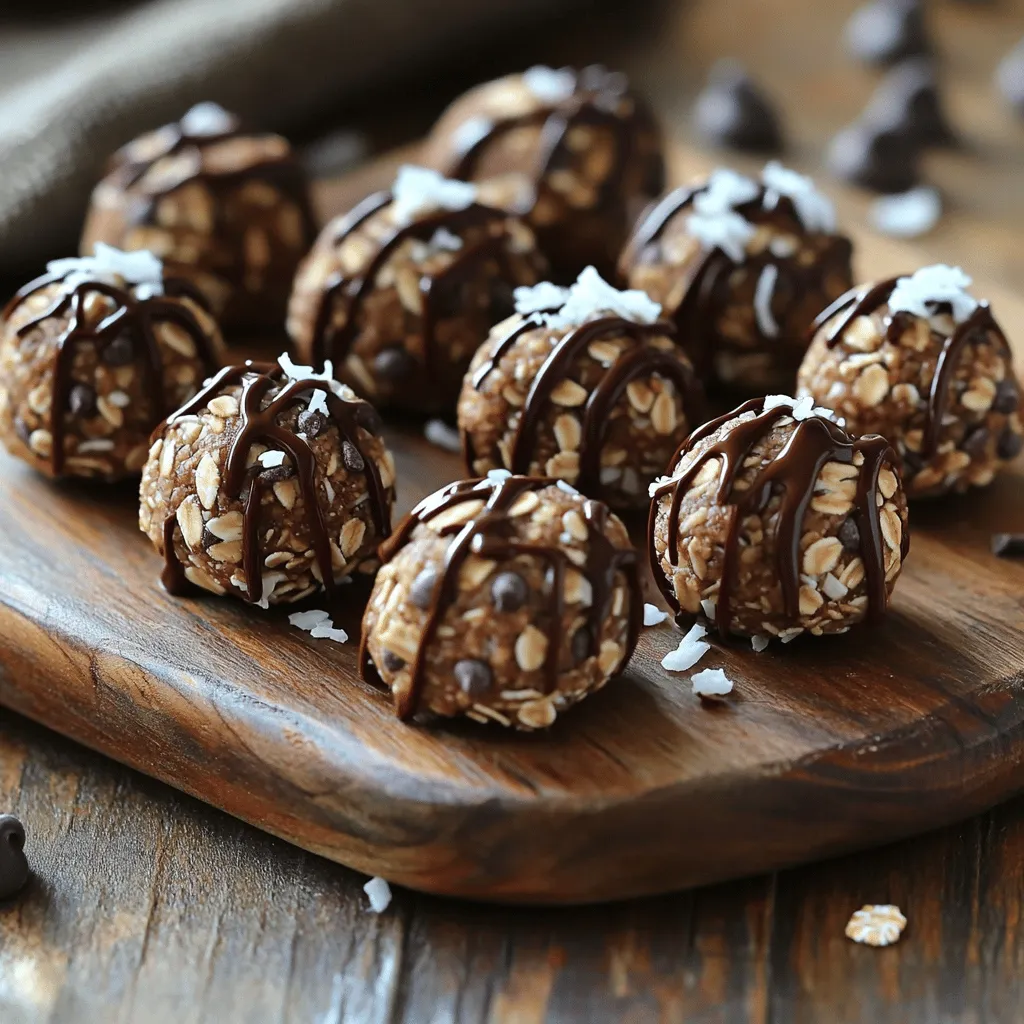
Looking for a quick and healthy snack? No-Bake Energy Bites are the answer! In this post, I’ll share simple ingredients

For a tasty veggie stir fry, you need fresh, colorful vegetables. Here’s what I use: - 1 cup broccoli florets - 1 red bell pepper, sliced - 1 yellow bell pepper, sliced - 1 cup snap peas - 1 medium carrot, julienned - 1 zucchini, sliced These veggies add crunch, color, and nutrients to your meal. You can pick any mix you like. Just remember to cut them into similar sizes for even cooking. The right seasonings and oils make the dish shine. Here’s what I recommend: - 2 tablespoons soy sauce (or tamari for gluten-free) - 1 tablespoon sesame oil - 2 cloves garlic, minced - 1 teaspoon ginger, grated - Salt and pepper to taste These ingredients bring out the natural flavors of the veggies. Sesame oil adds a lovely nutty taste. Garlic and ginger give a punch of flavor. Garnishes add a nice touch to your dish. You can use: - 1 tablespoon sesame seeds (for garnish) Sprinkling sesame seeds on top makes the stir fry look pretty. You can also add some chopped green onions for extra color and taste. For the full recipe, check out the details above. Enjoy your cooking! Start by washing your vegetables well. Cut the broccoli into small florets. Slice the red and yellow bell peppers. Next, julienne the carrot into thin strips. Finally, slice the zucchini into rounds. Make sure all your veggies are ready before you cook. This step saves time and helps you stay organized. Heat the sesame oil in a large wok or skillet over medium-high heat. Once the oil is hot, add the minced garlic and grated ginger. Sauté them for about 30 seconds. You want to smell the great aroma without burning them. Now, add the broccoli, bell peppers, and carrot. Stir-fry these for 3-4 minutes until they are tender-crisp. Then, add the snap peas and zucchini. Stir-fry for another 2-3 minutes. This keeps the veggies bright and crunchy. Drizzle the soy sauce over the vegetables. Stir for one more minute. Taste and add salt and pepper to your liking. Turn off the heat and transfer the stir fry to a serving bowl. Sprinkle sesame seeds on top for a nice touch. You can serve this colorful dish over steamed rice or quinoa. This not only looks good but adds flavor and texture. Enjoy your vibrant veggie stir fry! For the full recipe, check the earlier section. To get the best texture, cut your veggies evenly. This helps them cook at the same time. Start with the harder vegetables, like broccoli and carrots. They need more time to cook. Add softer veggies, like zucchini and snap peas, later. Stir them quickly to keep them crisp. Don't overcrowd the pan; this can cause steaming instead of frying. A hot wok or skillet helps achieve that nice, tender-crisp bite. A common mistake is not prepping your veggies first. Always wash and cut them before you start cooking. Another mistake is cooking at low heat. Stir frying needs high heat to cook fast and keep the veggies bright. Be careful not to let the garlic burn. It can make your stir fry taste bitter. Lastly, don't skip the seasoning. A splash of soy sauce adds depth to your dish. You can easily boost flavors with a few extras. Add a splash of rice vinegar for a tangy kick. Toasted sesame oil can deepen the flavor as well. If you like a spicy kick, try adding red pepper flakes or sliced chili peppers. Fresh herbs, like cilantro or basil, can add a nice touch at the end. For a richer flavor, add a spoonful of peanut butter or miso paste while cooking. These tips can make your stir fry even more delicious. For the full recipe, check out the vibrant veggie stir fry above! {{image_2}} You can easily add protein to your veggie stir fry. Chicken, shrimp, or tofu work great. For chicken, cut it into small pieces. Cook it first in the hot oil before adding veggies. If you use shrimp, add them after the garlic and ginger. Tofu should be cubed and cooked until golden. This gives a nice texture and flavor. Feel free to mix and match your favorite vegetables. Green beans, carrots, and mushrooms are all fantastic choices. You can also try bok choy or eggplant for more variety. Just remember to cut them into similar sizes. This helps them cook evenly. The more colors you add, the more fun it looks! You can change up the flavors easily. Try adding chili paste for some heat. A splash of lime juice can brighten the dish. You can also use different sauces like teriyaki or oyster sauce. Each sauce will give a unique twist. Experiment and find what you like best! For the full recipe, check out the "Vibrant Veggie Stir Fry" section. After enjoying your veggie stir fry, let it cool to room temperature. Place leftovers in an airtight container. Store the container in the fridge for up to three days. This keeps your meal fresh and tasty. To reheat, use a skillet or wok. Add the stir fry and a splash of water. Heat over medium until warm, stirring often. You can also use the microwave. Place in a microwave-safe dish, cover, and heat for 1-2 minutes. If you want to save some stir fry for later, freezing works well. First, let it cool completely. Then, pack it in freezer-safe bags or containers. Make sure to remove as much air as possible. It can stay in the freezer for up to three months. When ready to eat, thaw in the fridge overnight. Reheat as described above for a quick meal. Enjoy your easy veggie stir fry anytime! For the complete recipe, check out the Full Recipe. The best oil for stir frying is one with a high smoke point. I recommend using sesame oil or canola oil. These oils work well at high heat. You can also try avocado oil. It adds a nice flavor without burning. Yes, you can use frozen vegetables for stir fry. They save time and still taste good. Just remember to thaw them first. Pat them dry with a towel. This step keeps your stir fry from getting too watery. Making a vegan version is easy! Simply swap out any non-vegan ingredients. Use soy sauce or tamari for seasoning. You can add tofu for protein too. Just cube it and stir-fry with the veggies. For the full recipe, check out the vibrant veggie stir fry! This blog post covers everything you need to know about making a great stir-fry. You learned about key ingredients, step-by-step cooking instructions, and tips to improve your dish. I highlighted how to customize flavors and store leftovers for later use. Remember, practice makes perfect! Try different veggies, sauces, and proteins to find your favorite mix. With these easy steps and tricks, you'll become a stir-fry master in no time. Enjoy your cooking journey!

Easy Veggie Stir Fry Quick and Healthy Meal Idea

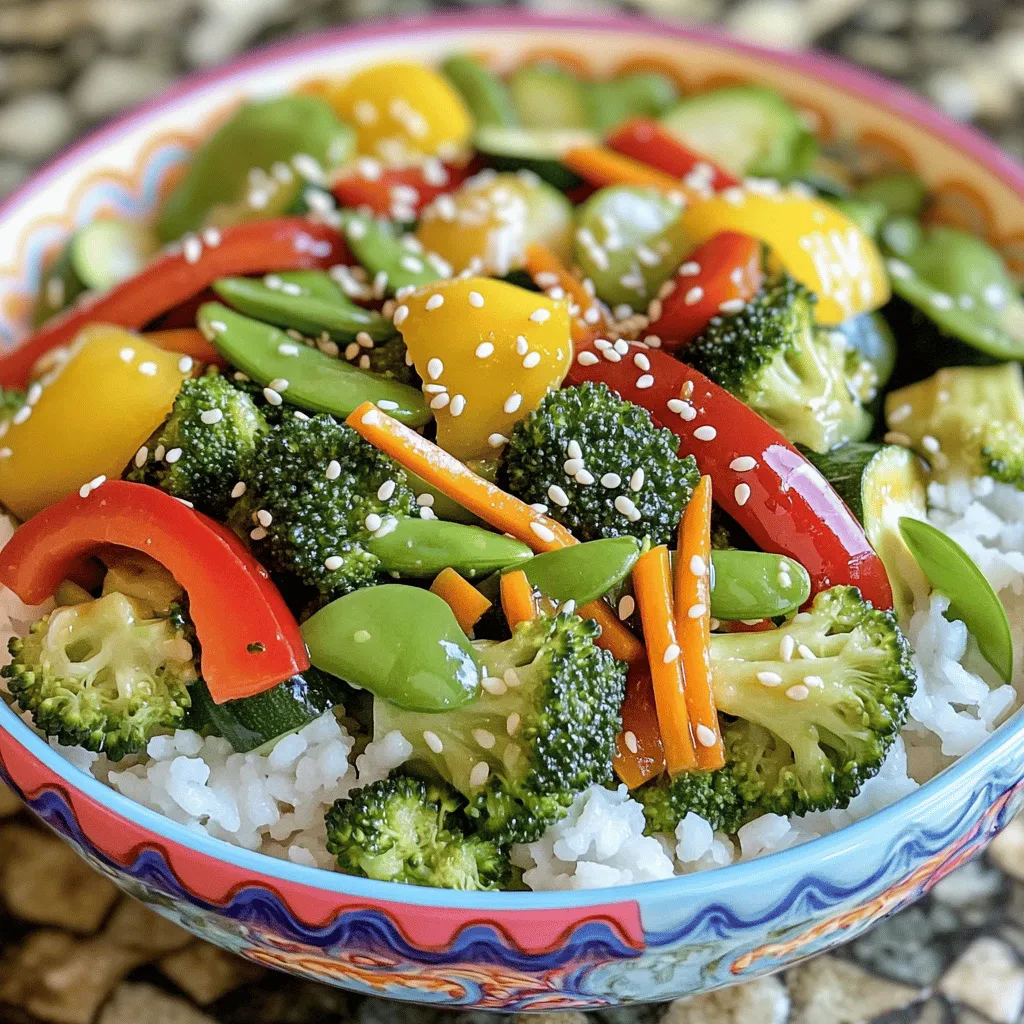
Looking for a quick and healthy meal? You’re in the right place! This Easy Veggie Stir Fry is not only

- 2 pounds baby potatoes (red or yellow), halved - 3 tablespoons olive oil - 1 teaspoon garlic powder - 1 teaspoon onion powder - 1 teaspoon smoked paprika - ½ teaspoon dried rosemary - ½ teaspoon dried thyme - Salt and pepper to taste To make crispy roasted potatoes, you need a few key items. I love baby potatoes because they cook evenly and get crisp. Olive oil is vital for that golden brown look and flavor. I always use spices like garlic and onion powder for a savory boost. Smoked paprika adds a smoky touch. Dried rosemary and thyme bring a lovely herbal note. Finally, season with salt and pepper to enhance all the flavors. - Fresh parsley for garnish - Alternative herbs and spices (e.g., oregano, chili powder) If you want to take it up a notch, fresh parsley makes a lovely garnish. You can also experiment with other herbs like oregano or spices like chili powder for a kick. These options can add more depth and excitement to your crispy roasted potatoes. Try mixing and matching to find your favorite flavor! For the complete list of ingredients and instructions, check out the Full Recipe. 1. Start by preheating your oven to 425°F (220°C). This heat makes the potatoes crispy. 2. Next, wash the baby potatoes well under cold water. Dirt can stick to them, so clean them thoroughly. 3. Cut each potato in half. This helps them cook evenly and get more crispy edges. 1. In a large bowl, mix the halved potatoes with olive oil, garlic powder, onion powder, smoked paprika, dried rosemary, dried thyme, salt, and pepper. 2. Toss everything together well. You want every potato to be coated with the seasoning. This ensures each bite is packed with flavor. 1. Spread the seasoned potatoes on the baking sheet in a single layer. Place them cut side down. This helps them get that golden brown color. 2. Roast the potatoes for 25-30 minutes. Halfway through, flip them over. This step is key for even crispiness on both sides. 3. Once golden and crispy, take them out and let them cool a bit. Then, sprinkle with fresh parsley for a nice finish. For the full recipe, check out the detailed instructions to ensure perfect results! When making crispy roasted potatoes, choose between red and yellow baby potatoes. Red potatoes have a smooth texture. Yellow potatoes offer a rich, buttery taste. Both types work well in this recipe. The size of your potatoes matters too. Smaller potatoes roast better. They cook evenly and become crispier. Aim for baby potatoes that are similar in size. This helps them cook at the same rate. Oil plays a big role in crispiness. I recommend using olive oil. It adds a nice flavor and helps the potatoes brown. Use about three tablespoons for two pounds of potatoes. For the best results, roast at a high temperature. Preheat your oven to 425°F (220°C). This heat makes the outside crunchy and the inside soft. Keep an eye on them as they roast. Flipping them halfway through helps get an even crisp. When serving, presentation is key. Place the roasted potatoes in a rustic bowl. Garnish with fresh parsley for color. This adds a pop of green that looks great. Pair your crispy potatoes with a dip or sauce. They go well with garlic aioli or a spicy ketchup. These options enhance the flavor and make them even more enjoyable. For the full recipe, refer to the earlier section. {{image_2}} You can change the taste of your crispy roasted potatoes in fun ways. Adding fresh herbs makes a big difference. Try using dill or tarragon for a fresh twist. These herbs bring a new flavor that brightens your dish. You can also add cheese or spices. Grated Parmesan adds a rich, salty kick. If you like heat, sprinkle some cayenne pepper on top. This gives your potatoes a nice, spicy bite. Feel free to experiment with other flavors too. Each choice can create a unique dish. You can cook these potatoes in different ways. The air fryer is a great option if you want crispy results fast. It uses hot air to make the potatoes crunchy without much oil. Just set the fryer to 400°F (200°C) and cook for about 20 minutes. Shake the basket halfway through for even crispiness. If you want to grill them, cut the potatoes into larger pieces. This helps them hold up on the grill. Toss the seasoned potatoes in a grill basket and cook over medium heat. Grill for 15-20 minutes, turning often, until they are crispy and tender. Each method gives a different taste and texture. Both are delicious! To keep leftover crispy roasted potatoes tasty, store them in the fridge. Place them in an airtight container. This keeps moisture out and helps them stay fresh. Use them within three days for the best taste. When you reheat them, aim for the oven instead of the microwave. The oven helps regain that crunchy texture. Set your oven to 400°F (200°C). Spread the potatoes on a baking sheet. Heat them for about 10-15 minutes until they are crispy again. If you want to save your crispy roasted potatoes for later, you can freeze them. First, let them cool completely. Then, spread them out on a baking sheet in a single layer. Freeze them for about an hour. This step prevents them from sticking together. Once frozen, transfer them to a freezer bag. Remove as much air as you can before sealing. When you want to eat them, thaw in the fridge overnight. Reheat in the oven as mentioned earlier. Be aware that freezing may change their texture. They can become softer and less crispy. But with the right reheating, they still taste great. Enjoy these potatoes from the Full Recipe any time! To make your roasted potatoes crispy, you need the right oil and techniques. Use olive oil, as it helps in achieving the perfect crunch. Make sure to coat your potatoes evenly. A single layer on the baking sheet is vital. This allows hot air to reach all sides. Flip them halfway through cooking. This helps them brown evenly on all sides. Yes, you can use larger potatoes. However, you need to cut them into smaller pieces. This ensures they cook evenly. Larger pieces will need more time to roast. Check for doneness by poking with a fork. If it goes in easily, they are ready. Crispy roasted potatoes pair well with many sides. Try serving them with grilled chicken or fish. They also go great with a fresh salad. Roasted veggies or a creamy dip can enhance the meal. These combinations create a balanced plate. For the full recipe, check out the Crispy Roasted Potatoes Delight section. To sum up, making crispy roasted potatoes is simple and fun. You need baby potatoes, olive oil, and seasonings like garlic powder and smoked paprika. Following the steps helps you achieve perfection. Remember to choose the right potatoes and use oil wisely for the best crispiness. You can even try different flavors with herbs and cheese or switch cooking methods. Enjoy your delicious, homemade crispy roasted potatoes with tasty dips or sides. Happy cooking!

Crispy Roasted Potatoes Perfectly Crunchy Delight

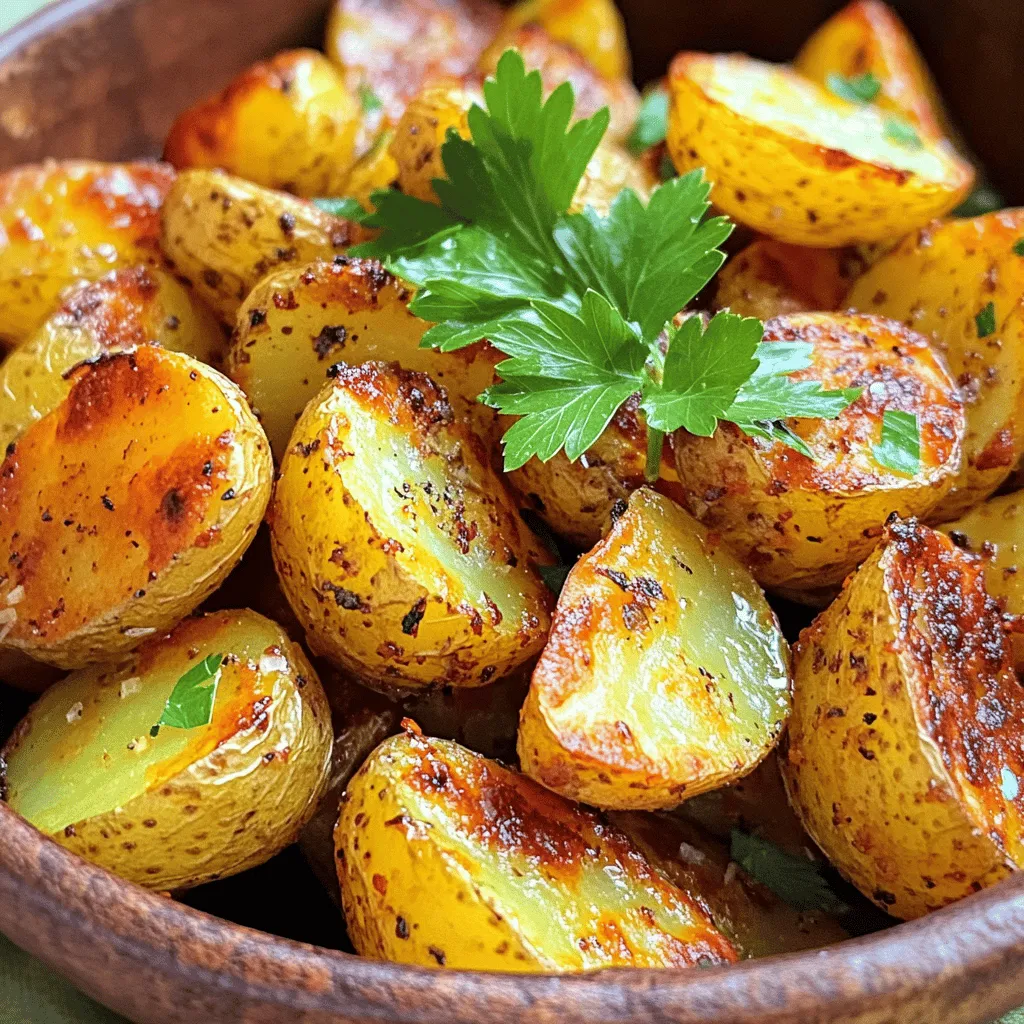
If you crave that perfect crunch in your roasted potatoes, you’ve come to the right place! In this post, I’ll

- 1 lb (450g) chicken breast, cubed - 2 tablespoons Cajun seasoning - 2 tablespoons olive oil - 1 small onion, diced - 3 cloves garlic, minced - 1 bell pepper (red or green), diced - 1 can (14 oz) diced tomatoes, with juice - 4 cups chicken broth - 12 oz (340g) penne pasta - 1 cup heavy cream - 1 cup shredded cheddar cheese - 1 cup fresh spinach - Salt and pepper to taste - Fresh parsley, chopped (for garnish) The chicken breast is the star of this dish. It soaks up the Cajun spices and makes each bite flavorful. The Cajun seasoning adds a nice kick. I love using bell peppers and onions because they add sweetness and crunch. Diced tomatoes give a nice base, and chicken broth keeps everything moist. Penne pasta holds the sauce well, and heavy cream makes it rich. Cheddar cheese adds creaminess, while fresh spinach gives a pop of color and nutrition. - Large pot or skillet - Wooden spoon or spatula - Measuring cups and spoons A large pot is key for this meal. It allows all the ingredients to cook together. A wooden spoon helps to mix things without scratching your pot. Measuring cups and spoons ensure you get the right amount of each ingredient. - Fresh parsley - Additional cheese - Crusty bread for serving Garnishes can make your dish shine. Fresh parsley adds a lovely green touch. Extra cheese can make it even cheesier. Crusty bread is perfect for scooping up the pasta and sauce. You can serve it all straight from the pot for a fun meal. For the full recipe, check the earlier section! Start by heating olive oil in a large pot over medium heat. Add the cubed chicken breast to the pot. Sprinkle Cajun seasoning over the chicken. Sauté for about 5-7 minutes until the chicken is brown and cooked through. Remove the chicken and set it aside. In the same pot, add the diced onion and bell pepper. Sauté them for about 3-4 minutes until they soften. Then, add minced garlic and cook for 1 more minute until it smells great. Next, pour in the canned diced tomatoes with juice and the chicken broth. Stir to mix everything well. Bring the mixture to a gentle boil. Once it boils, add the penne pasta. Reduce the heat to medium-low, cover the pot, and let it simmer for 10-12 minutes. Stir occasionally until the pasta is cooked al dente. Once the pasta is ready, stir in the heavy cream, shredded cheddar cheese, cooked chicken, and fresh spinach. Mix until the cheese melts and the spinach wilts. Season with salt and pepper to taste. If the dish is too thick, add a bit more chicken broth to reach your desired consistency. Serve hot, garnished with chopped parsley for a lovely touch. For the full recipe, check the link. How to achieve perfect pasta consistency To get pasta just right, cook it until it's al dente. This means it should be firm but not hard. Stir it often while it cooks to prevent sticking. Keep an eye on the time, as different brands may cook differently. If the pasta absorbs too much liquid, add a splash of chicken broth to keep it creamy. Tips for evenly cooking chicken For even cooking, cut the chicken into uniform cubes. This helps each piece cook at the same rate. Sauté the chicken in a hot pot with olive oil. Avoid crowding the pot; if needed, cook in batches. This way, your chicken will brown nicely and stay juicy. Recommended spices to elevate the dish Cajun seasoning is the star here, but you can add more! Try a pinch of smoked paprika for depth or a dash of cayenne for heat. Fresh herbs like thyme or oregano can also boost the flavor. Experiment to find what you love best! Adding extra ingredients for variation You can mix in veggies like zucchini or mushrooms for more nutrition. Feel free to toss in some sweet corn or black beans for added texture. If you want a fresh twist, squeeze in some lemon juice just before serving. Creative plating ideas For a fun presentation, serve the pasta in bowls. Top each bowl with extra cheese and fresh parsley. You can also sprinkle some crushed red pepper flakes on top for color. If you want a rustic look, serve right from the pot. Suggested side dishes that pair well This pasta goes great with a simple green salad. A side of garlic bread or crusty rolls complements the meal nicely. For a refreshing touch, serve with a light fruit salad or coleslaw. {{image_2}} You can switch the chicken for shrimp or sausage. Shrimp cooks fast and adds a nice flavor. Just sauté it in the pot like the chicken. Sausage brings a rich taste. Choose your favorite type, like andouille or smoked sausage. If you're looking for a vegetarian option, try plant-based protein. Cook it just as you would the chicken. This keeps the dish hearty and satisfying without meat. You can use tofu, tempeh, or your favorite meat substitute. If you want a different type of pasta, there are many options. You can use fusilli, bowtie, or even spaghetti. Each pasta shape gives a unique texture. Just make sure to adjust the cooking time as needed. For gluten-free options, use gluten-free pasta. Many brands offer great alternatives that hold up well in this dish. Look for brown rice or chickpea pasta for added nutrition. If you love spice, try adding more Cajun seasoning. You can also toss in some red pepper flakes for extra heat. This will give the dish a nice kick that heat lovers will enjoy. For kids or those who prefer milder flavors, cut back on the seasoning. You can also add a bit of cream to balance the heat. This makes it creamy and smooth, perfect for sensitive palates. Each variation lets you make this dish your own. Experiment and find what you love best! For the full recipe, check out the details above. To keep your One Pot Cajun Chicken Pasta fresh, store leftovers in the fridge. Place the pasta in an airtight container. This helps keep it safe and tasty for a few days. I recommend using glass containers as they do not stain and are easy to clean. Make sure the lid fits snugly to avoid any spills. For the best taste, reheat your pasta on the stovetop. Place the pasta in a pan over medium heat. Add a splash of water or broth to keep it moist. Stir often until it’s heated through. You can also use the microwave for quick reheating. Transfer a portion to a microwave-safe bowl. Cover it loosely with a lid or plate. Heat it in short bursts, stirring in between, until it’s hot. If you want to save some for later, freezing is a great option. Let the pasta cool completely before freezing. Then, portion it into airtight containers or freezer bags. Make sure to remove as much air as possible. Label the bags with the date. When you're ready to eat, thaw the pasta in the fridge overnight. To reheat, follow the stovetop method or use the microwave. This way, you can enjoy your Cajun Chicken Pasta again! For the full recipe, check the recipe section above. Can I make this without heavy cream? Yes, you can. If you want a lighter dish, use milk or a plant-based cream. This will change the texture a bit but still taste great. How long does it take to cook from scratch? It takes about 30 minutes. You can prepare everything in one pot, which saves time. Is this recipe suitable for meal prep? Absolutely! This dish stores well in the fridge for up to four days. Just reheat it in a pot. Caloric content per serving Each serving has roughly 600 calories. This includes healthy protein from chicken and carbs from pasta. Breakdown of macronutrients - Protein: 40g - Carbohydrates: 60g - Fat: 25g These values may vary based on ingredient brands or portion sizes. How to make it more or less spicy To increase spice, add more Cajun seasoning or some cayenne pepper. For a milder dish, reduce the seasoning. Recommendations for Cajun seasoning brands I recommend using brands like Tony Chachere’s or Slap Ya Mama. Both have great flavor and heat. This blog post guides you through making One Pot Cajun Chicken Pasta. You learned about key ingredients, cooking tools, and optional garnishes. I provided clear step-by-step instructions to make the dish tasty and fun. Plus, you discovered tips for great texture and flavor. Whether you follow my suggested variations or create your own, this recipe is versatile. Enjoy storing and reheating leftovers to savor later. Dive into this easy meal anytime you want a quick and satisfying dish!

One Pot Cajun Chicken Pasta Easy and Flavorful Meal

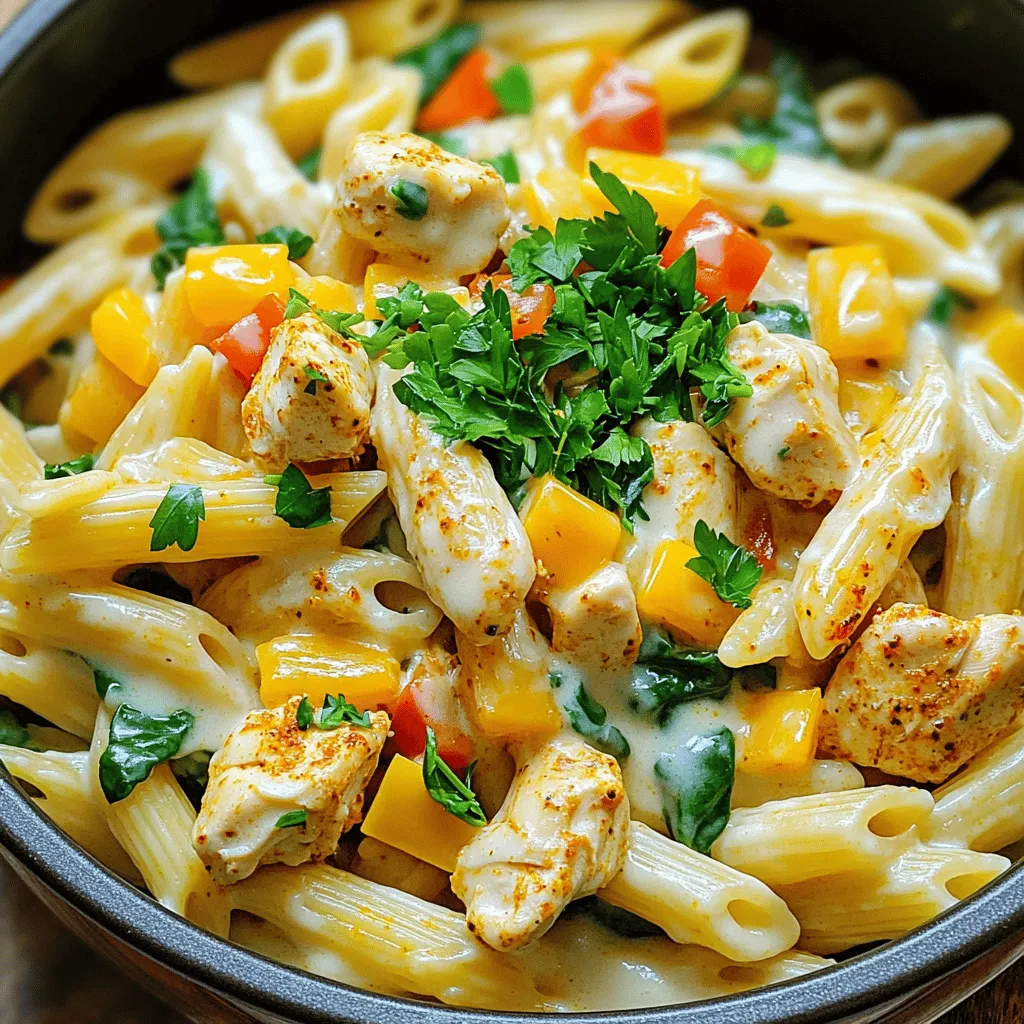
Looking for a meal that’s easy, quick, and loaded with flavor? Dive into my One Pot Cajun Chicken Pasta recipe!

To create a tasty spinach artichoke dip, gather these key ingredients: - 1 cup fresh spinach, chopped - 1 can (14 oz) artichoke hearts, drained and chopped - 1 cup cream cheese, softened - 1/2 cup sour cream - 1/2 cup mayonnaise - 1 cup shredded mozzarella cheese - 1/2 cup grated Parmesan cheese - 2 cloves garlic, minced - 1 teaspoon lemon juice - Salt and pepper to taste - 1/4 teaspoon red pepper flakes (optional, for a little kick) These items combine to make a creamy, savory dip that everyone loves. The spinach adds color and nutrients, while artichokes bring a unique taste and texture. If you want to add more depth to your dip, consider these optional ingredients: - One teaspoon of Worcestershire sauce for umami - A dash of hot sauce for extra spice - Fresh herbs like parsley or basil for brightness - Chopped olives for a briny touch These extras can make your dip unique and cater to your taste buds. You can mix and match to find your favorite flavor profile. Need to adjust for dietary needs? Here are some easy swaps: - Use a dairy-free cream cheese for a vegan dip. - Swap sour cream with Greek yogurt for a healthier option. - Choose a gluten-free mayonnaise if needed. - Use nutritional yeast instead of cheese for a cheesy flavor without dairy. These substitutions help you enjoy the dip while meeting dietary requirements. You don’t have to miss out on the fun! For the complete recipe, check out the Full Recipe. To start, gather your ingredients. You will need fresh spinach, artichoke hearts, and cheeses. The recipe is simple and quick. First, preheat your oven to 350°F (175°C). This step is key for a good bake. In a large mixing bowl, combine the softened cream cheese, sour cream, and mayonnaise. Mix these until smooth. This creamy base is what makes the dip rich and tasty. Next, add the chopped spinach and artichokes. Don't forget to include the minced garlic and lemon juice. If you like a bit of spice, toss in red pepper flakes. Mix everything well to blend the flavors. Once your mixture is ready, fold in the shredded mozzarella and grated Parmesan. These cheeses melt perfectly, adding great flavor. Now, season with a pinch of salt and pepper to taste. Transfer the mixture to a baking dish. Spread it out evenly for even cooking. Bake in your preheated oven for about 25-30 minutes. You want the top to be golden and bubbly. When it’s done, take it out and let it cool for a few minutes. This cooling time helps the dip set slightly. For serving, I recommend warm dip with toasted bread slices or pita chips. Fresh vegetable sticks like carrots and celery also work well. They add crunch and freshness. You can garnish the dip with more Parmesan or a sprinkle of paprika. This adds a nice color and extra flavor. For the full recipe, check out the detailed steps above! To make your dip super creamy, start with softened cream cheese. It blends easily. Mix it with sour cream and mayonnaise for a smooth base. Use fresh spinach for a light texture. If you want it creamier, add more cream cheese. The key is to mix well until no lumps remain. Seasoning is key to a great dip. Use fresh garlic for an aromatic kick. A splash of lemon juice brightens the flavors. Don't skip the salt and pepper; they bring out the taste. If you like some heat, add red pepper flakes. Taste your mix before baking to adjust the flavors. You can make this dip lighter if you want. Substitute low-fat cream cheese and sour cream. You can also use Greek yogurt for added protein. For a vegan version, swap the cheeses for cashew cheese. These changes keep the flavor but cut down on fat. {{image_2}} Cheese is key to the taste of spinach artichoke dip. You can try different cheeses for fun. Instead of mozzarella, use gouda for a smoky flavor. For a sharper taste, add cheddar cheese. Cream cheese gives a nice base, but goat cheese adds tang. Mixing cheeses can create a unique dip that surprises your guests. If you like heat, spice up your dip! Add jalapeños for a kick. You can also use cayenne pepper or hot sauce. Mix in crushed red pepper flakes for a milder touch. Adjust the spice level based on your taste. Spicy spinach artichoke dip pairs well with tortilla chips or crunchy veggies. You can make a tasty vegan version too! Replace cream cheese with cashew cream or tofu. For a creamy texture, use coconut milk instead of sour cream. Nutritional yeast adds a cheesy flavor without dairy. You can find many plant-based cheeses that work well too. This way, everyone can enjoy the dip, even those with dietary restrictions. For the full recipe, check out the instructions above! To store leftover spinach artichoke dip, let it cool first. Then, transfer it to an airtight container. This keeps the dip fresh and tasty. Place it in the fridge. You can enjoy it for up to three days. Always use a clean spoon to avoid germs. When you're ready to eat the dip again, preheat your oven to 350°F (175°C). Place the dip in a baking dish. Heat it for about 15 to 20 minutes. Stir it halfway to warm it evenly. You can also use a microwave. Heat it in short bursts of 30 seconds, stirring in between. This helps keep it creamy and delicious. If you want to save the dip for later, freezing works great. First, let it cool completely. Then, place it in a freezer-safe container. Make sure to leave some space at the top, as it may expand. You can freeze it for up to two months. To enjoy, thaw it in the fridge overnight before reheating. Follow the reheating steps for the best taste. This makes it easy to enjoy your creamy spinach artichoke delight anytime! For the full recipe, check out the earlier sections. Yes, you can make Spinach Artichoke Dip ahead of time. Just mix all your ingredients as the recipe shows. Place the dip in a baking dish and cover it well. Store it in the fridge for up to 24 hours. When you're ready, bake it as directed. This way, you save time and still enjoy a hot dip. You have many tasty options for serving this dip. Here are some ideas: - Toasted bread slices - Pita chips - Fresh vegetable sticks like carrots and celery - Tortilla chips - Crackers All these choices pair well with the creamy texture of the dip. They make for a fun and easy snack. Spinach Artichoke Dip lasts about 3 to 4 days in the fridge. Make sure to store it in an airtight container. If you want to enjoy it later, you can also freeze it. Just remember, the texture may change a bit after freezing. For best results, reheat it slowly in the oven. For the full recipe, check out the details above. You learned how to make delicious spinach artichoke dip. We covered essential and optional ingredients, plus great substitutions. Step-by-step instructions ensured your dip turns out perfectly every time. You also got tips for creaminess and flavor. Explore fun variations to keep things fresh. Proper storage and reheating advice help maintain flavor. With these insights, you can impress friends and family at your next gathering. Enjoy making and sharing this tasty dip!

Savory Spinach Artichoke Dip Easy and Flavorful Recipe

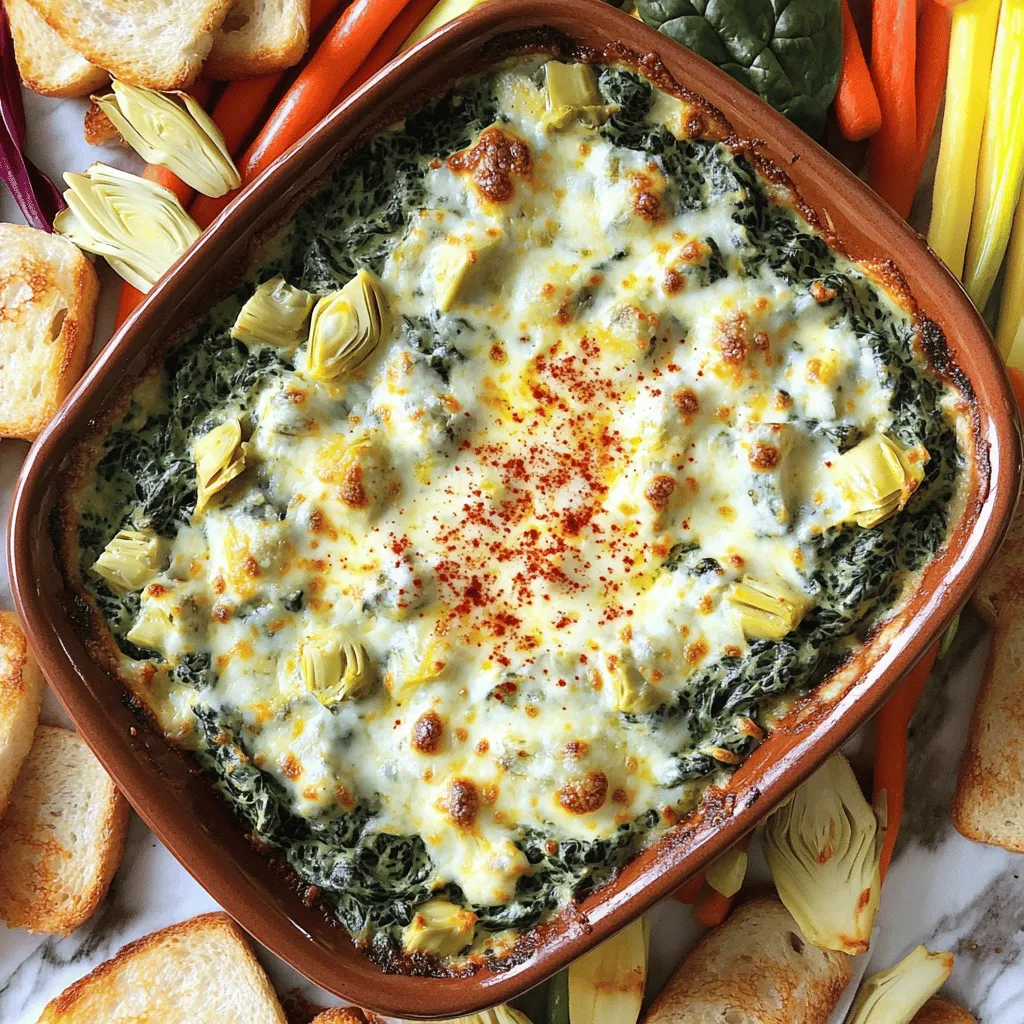
Are you ready for a creamy, savory treat that everyone loves? This easy spinach artichoke dip is perfect for parties,

To make a tasty roasted chickpea snack mix, you need a few key items: - 2 cans (15 oz each) chickpeas, drained and rinsed - 2 tablespoons olive oil - 1 teaspoon garlic powder - 1 teaspoon smoked paprika - 1 teaspoon ground cumin - ½ teaspoon cayenne pepper (adjust to taste) - Salt to taste These ingredients create a rich flavor base. The chickpeas provide protein and fiber, while the spices add a warm, savory kick. Olive oil helps to crisp them up nicely in the oven. You can boost the flavor and texture with some fun extras: - 1 cup mixed nuts (almonds, walnuts, pecans) - ½ cup pretzel sticks - ½ cup dried cranberries or raisins - 2 tablespoons honey or maple syrup (optional, for sweetness) These add-ins make your snack mix even more exciting. The nuts add crunch, while the dried fruit brings a touch of sweetness. A drizzle of honey or maple syrup can tie it all together. Each ingredient packs its own benefits: - Chickpeas: Great source of protein and fiber. - Olive Oil: Rich in healthy fats that help heart health. - Garlic Powder: Good for boosting immunity. - Smoked Paprika: Offers antioxidants and a unique taste. - Cumin: Aids digestion and adds warmth. - Cayenne Pepper: Boosts metabolism and adds heat. - Mixed Nuts: Full of vitamins, minerals, and healthy fats. - Pretzel Sticks: Provide a satisfying crunch with fewer calories. - Dried Cranberries/Raisins: Add vitamins and a sweet twist. This snack mix is not just tasty; it's good for you, too! Start with two cans of chickpeas. Drain and rinse them well under cold water. This step helps wash away any canning liquid. After rinsing, pat them dry with a paper towel. Removing moisture is key to getting crispy chickpeas. Place the dried chickpeas in a large bowl. Preheat your oven to 400°F (200°C). While the oven heats, toss the chickpeas in olive oil. Add garlic powder, smoked paprika, ground cumin, cayenne pepper, and salt. Mix well to coat every chickpea evenly. Spread them on a baking sheet in a single layer. Bake for 25-30 minutes, stirring halfway through. Keep a close watch to avoid burning. The goal is golden and crispy chickpeas. While the chickpeas roast, prepare the other snacks. In a large bowl, mix together your choice of nuts and pretzel sticks. If you like a touch of sweetness, drizzle honey or maple syrup over the nuts. Toss everything to coat well. Once the chickpeas finish roasting, let them cool for a few minutes. Add them to the nut and pretzel mix. Fold in dried cranberries or raisins last. Mix gently until all the snacks combine well. Now, your roasted chickpea snack mix is ready to enjoy! For the full recipe, check out the details. To get the best crunch from your chickpeas, start by drying them well. Use paper towels to pat them dry after rinsing. This step removes moisture that can make them soggy. Preheat your oven to 400°F (200°C) and spread the chickpeas in a single layer on the baking sheet. Stir them halfway through cooking to help them crisp evenly. Keep an eye on them, as oven times can vary. Spice is key in making this snack mix exciting. The recipe suggests cayenne pepper, but you can adjust to your taste. If you like it milder, use less cayenne or skip it altogether. For a bolder flavor, add more garlic powder or smoked paprika. Taste as you mix to find your perfect balance of spice. To keep your roasted chickpea snack mix fresh, store it in an airtight container. This will prevent moisture and keep it crunchy. The mix can last up to a week at room temperature. If you want it to last longer, consider freezing it in a sealed bag. Just remember to let it thaw and re-crisp in the oven before enjoying again. {{image_2}} You can mix different spices to change the taste of your snack. Try adding curry powder for a warm, earthy flavor. Or, mix in some Italian herbs like oregano and basil for a fresh twist. I love using lemon zest for a bright, zesty kick. You can also switch between sweet and spicy by adding cinnamon or chili powder. Feel free to experiment! Changing your nuts and dried fruits can create new flavors. Almonds, cashews, and pecans all work well. For dried fruits, try apricots or figs for a sweet touch. Walnuts add a rich flavor, while macadamia nuts bring creaminess. Mixing different textures makes your snack even more fun! You can choose between sweet or savory mixes. For a sweet treat, add a drizzle of honey or maple syrup. Toss in mini chocolate chips or coconut flakes for extra sweetness. For savory, stick with spices like garlic and onion powder. Mixing both can create a unique, balanced snack. Just follow my Full Recipe for a great base and get creative! To keep your roasted chickpeas crisp, store them in an airtight container. I like to use a glass jar with a tight lid. This helps keep air out and maintains their crunch. Always let the chickpeas cool completely before sealing them. Warm moisture can make them soggy. For the best flavor, keep your snack mix in a cool, dry place. Avoid sunlight and heat. If you mix nuts, pretzels, and dried fruit, store them separately. This prevents sogginess in the pretzels and keeps nuts fresh. When ready to eat, combine them again for a tasty snack. If you have leftover roasted chickpeas, you can reheat them. Spread them on a baking sheet and bake at 350°F (175°C) for about 10 minutes. This brings back their crunch. Stir them halfway through to ensure even heating. Enjoy them as a crispy treat any time! Yes, you can use dry chickpeas. However, they need some prep work. First, soak them overnight in water. Then, boil them until they are tender. This will take about an hour. After cooking, drain and rinse them. They will be ready for roasting just like canned chickpeas. Roasted chickpeas are very healthy! They are high in protein and fiber. This makes them a great snack choice. They are also low in fat if you use less oil. Plus, they are packed with vitamins and minerals. Each crunchy bite supports your health goals. When stored properly, your snack mix can last up to one week. Keep it in an airtight container at room temperature. This helps keep the mix crunchy. If you want to keep it longer, you can freeze it. Just remember to let it thaw before enjoying. For the full recipe, check out the earlier section. Roasted chickpea snack mix is tasty and easy to make. We covered essential ingredients, optional add-ins, and their health benefits. You learned how to prepare and roast chickpeas for crunch. Plus, we shared tips for flavor and storage. Try different flavors and nuts for fun variations. Remember to store your snack mix well to keep it fresh. Enjoy creating your own custom mix, and share it with your friends! Healthy snacking never tasted so good.

Roasted Chickpea Snack Mix Crispy and Flavorful Treat

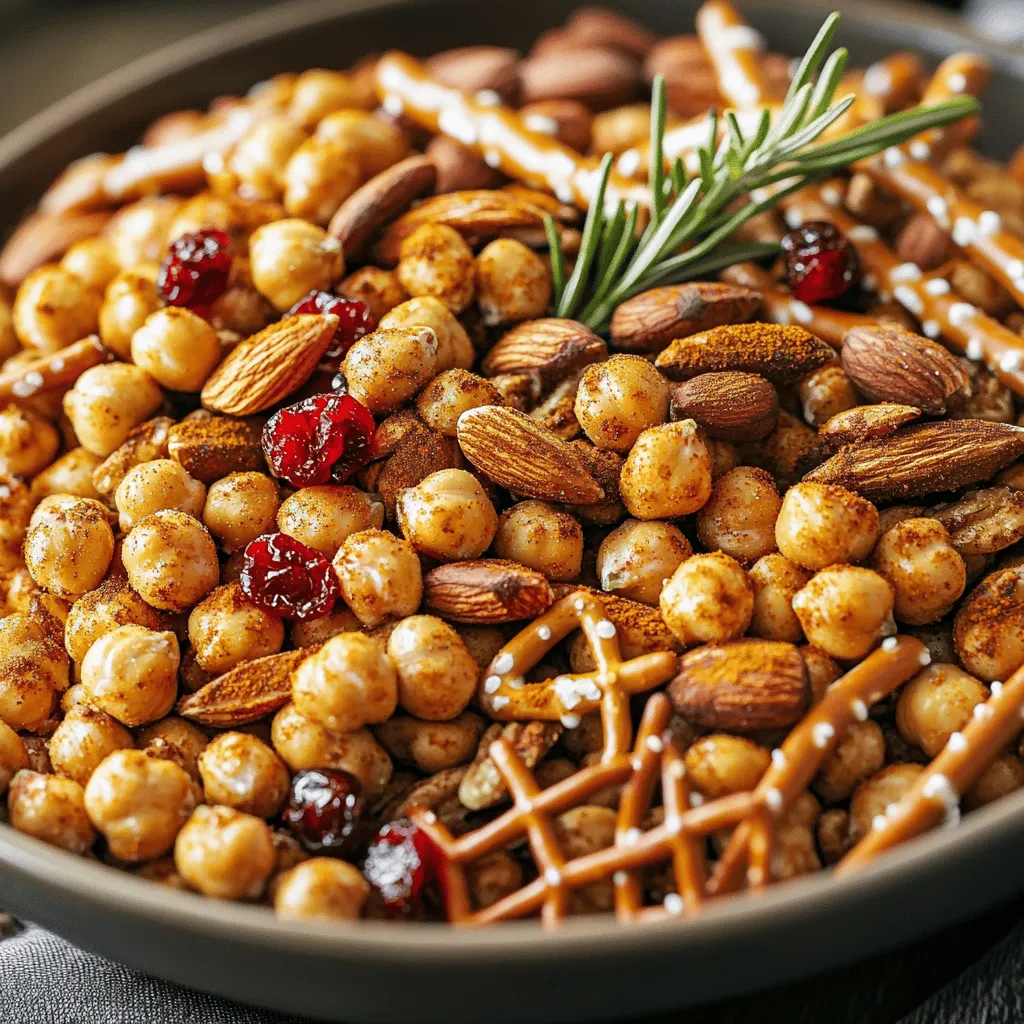
Craving a tasty snack that’s both crispy and healthy? Look no further! My Roasted Chickpea Snack Mix is the perfect

- 2 boneless, skinless chicken breasts - 1 cup breadcrumbs (preferably Italian-seasoned) - 1/2 cup grated Parmesan cheese - 1 cup marinara sauce - 1 cup shredded mozzarella cheese For this Easy Chicken Parmesan, you need fresh chicken breasts. They make the dish tender. Italian-seasoned breadcrumbs give a nice flavor. Grated Parmesan cheese adds a salty touch. A good marinara sauce is key for moisture and taste. Finally, the shredded mozzarella cheese creates that lovely melty layer on top. - 2 eggs, beaten - 1 teaspoon garlic powder - 1 teaspoon Italian seasoning - Olive oil for frying - Salt and pepper to taste Eggs help the breadcrumbs stick to the chicken. Garlic powder boosts the flavor. Italian seasoning adds a mix of herbs that make it taste great. Olive oil is perfect for frying and gives a rich taste. Don’t forget salt and pepper; they bring out the flavors in the dish. - Fresh basil leaves - Optional extra cheese For a bright finish, fresh basil leaves are wonderful. They add color and a fresh taste. If you love cheese, sprinkle some extra on top before baking. It makes the dish even creamier and more delicious. You can find the full recipe [here](#). First, you need to pound the chicken breasts. Take two boneless, skinless chicken breasts and place them between two sheets of plastic wrap. Use a meat mallet or rolling pin to gently pound them to an even thickness of about 1/2 inch. This step helps the chicken cook evenly. Next, set up your dredging station. In a shallow dish, mix breadcrumbs, grated Parmesan cheese, garlic powder, Italian seasoning, salt, and pepper. In another dish, beat the eggs. This station makes coating the chicken easy and quick. Now, let’s cook the chicken! Heat a generous amount of olive oil in a large skillet over medium-high heat. Once the oil is hot, dredge each chicken breast first in the beaten eggs, letting the excess drip off. Then, coat them well in the breadcrumb mixture. Carefully place the breaded chicken in the skillet. Brown each side for about 4-5 minutes until golden. This step adds a nice crunch and flavor to your chicken. After browning, transfer the chicken breasts to a baking dish. Pour marinara sauce evenly over each chicken breast. Make sure they are well covered. Then, sprinkle shredded mozzarella cheese on top. This adds creaminess and flavor. Now, it's time to bake! Place the dish in the preheated oven at 375°F (190°C) for 20 minutes. The cheese should be bubbly and lightly golden when ready. Once done, let the chicken rest for a few minutes. Garnish your dish with fresh basil leaves for a pop of color and flavor. This final touch makes your meal look amazing and inviting. For the full recipe, check out the details above. Enjoy your easy chicken parmesan! Ensuring Even Thickness Pound your chicken breasts to 1/2 inch thick. This helps them cook evenly. It also keeps the meat juicy. Use a meat mallet or a rolling pin to gently pound the chicken. Always place the chicken between plastic wrap to avoid mess. Getting Crispy Coating For a crispy coating, press the breadcrumbs firmly onto the chicken. Make sure you cover all sides well. Fry in hot olive oil for that golden crunch. If the oil is not hot enough, the coating can get soggy. Using Different Cheeses While mozzarella is classic, you can mix it up. Try provolone or fontina for a unique taste. You can also layer different cheeses for a rich flavor. Just remember, the more cheese, the better! Adding Spices Spices can bring more life to your chicken. Consider adding paprika for a smoky flavor. A pinch of red pepper flakes can add a nice kick. Don’t be afraid to experiment with herbs too! Pairing with Side Dishes Chicken Parmesan goes well with many sides. Serve it with a fresh salad for balance. Pasta is another classic choice, especially with marinara sauce. Garlic bread makes a great addition too! Making it Ahead of Time You can prepare Chicken Parmesan a day in advance. Coat the chicken and store it in the fridge. Bake it just before serving. This saves time and keeps the flavors fresh. Check out the Full Recipe for more tips! {{image_2}} You can switch up the main protein in Chicken Parmesan. Try using eggplant for a tasty vegetarian option. Slice it thinly and bread it like chicken. If you're craving something lighter, use turkey breast instead. Turkey is lean but still delivers great flavor. If you need a gluten-free option, you can use gluten-free breadcrumbs. Many brands offer tasty alternatives. You can also crush gluten-free crackers or oats for a homemade version. When it comes to the sauce, you can choose between homemade and store-bought marinara. Homemade sauce has a fresh taste, while store-bought saves time. If you want a kick, add red pepper flakes to your marinara. It gives the dish a nice spicy twist without overpowering the flavor. Cheese is key to a great Chicken Parmesan. While mozzarella is classic, try using provolone or fontina cheese for a unique taste. Mixing different cheeses can also enhance the depth of flavor. For example, blend mozzarella with a bit of Parmesan for that cheesy goodness. For more ideas, check out the Full Recipe to explore different flavors! In the Refrigerator After you enjoy your Easy Chicken Parmesan, let it cool. Place it in an airtight container. Store it in the fridge for up to three days. This keeps the chicken fresh and tasty. Freezing for Later Use If you want to save it longer, freezing works great. Wrap each piece tightly in plastic wrap. Then, put them in a freezer-safe bag. You can store it for up to three months. This helps keep the flavors locked in. Best Methods for Keeping Chicken Crispy To keep your Chicken Parmesan crispy, use the oven or an air fryer. Preheat the oven to 350°F (175°C). Place the chicken on a baking sheet. Heat for about 15 minutes. If using an air fryer, set it to 350°F and cook for 5-7 minutes. This method makes it crunchy again. Microwaving Tips for Even Heating You can also use the microwave. Place the chicken on a microwave-safe plate. Cover it with a damp paper towel. Heat for 1-2 minutes. Check if it is warm throughout. If not, heat in 30-second bursts. How Long Does Chicken Parmesan Last? Chicken Parmesan lasts three days in the fridge. In the freezer, it can last up to three months. Proper storage is key to keeping it safe. Signs of Spoilage Look for a change in color or smell. If it looks gray or has a sour odor, throw it away. Always trust your senses to avoid eating spoiled food. Can I make Chicken Parmesan in advance? Yes, you can make Chicken Parmesan in advance. Prepare the chicken and sauce. Once cooked, let it cool. Store it in the fridge for up to two days. When you're ready to eat, reheat it in the oven until hot. This saves time on busy nights. Is there a vegetarian version of Chicken Parmesan? Absolutely! You can swap the chicken for eggplant or zucchini. Slice the veggies thick and bread them like chicken. They will soak up the sauce and cheese well. This makes a delicious, meat-free option. How can I ensure my chicken stays juicy? To keep your chicken juicy, pound it evenly before cooking. This helps it cook evenly, preventing dryness. Fry it on medium heat until golden on both sides. Finally, bake it with marinara and cheese. This keeps moisture in while adding flavor. What can I substitute for breadcrumbs? You can use crushed crackers or panko for a crunchy texture. If you need a gluten-free option, try almond flour or ground oats. These alternatives work well and add their own unique flavor. What sides go well with Chicken Parmesan? Chicken Parmesan pairs well with many sides. Try a fresh green salad or garlic bread for a classic meal. You can also serve it with roasted vegetables. These add color and nutrients to your plate. Can I serve it over pasta or salad? Yes, serving Chicken Parmesan over pasta is common. The marinara sauce complements the noodles nicely. You can also place it on a salad for a lighter option. This adds freshness and crunch to your meal. For more details, check the Full Recipe. This post shared a simple guide for making easy chicken Parmesan. We covered key ingredients, from chicken to marinara. You learned how to cook chicken perfectly and add great flavors. Experiment with sauce and cheese types to find your favorite. Remember to store leftovers correctly for fresh meals later. With these tips, you’ll impress anyone at the dinner table. Enjoy your cooking journey!

Easy Chicken Parmesan Flavorful and Simple Recipe

Craving a dish that’s both easy to make and bursting with flavor? You’re in the right place! This Easy Chicken

Older posts
Newer posts
← Previous Page1 … Page60 Page61 Page62 … Page85 Next →

dsad

© 2026 greenmealmap • Built with GeneratePress

Our Policies

  • Copyright Policy
  • Cookie Policy
  • GDPR Policy
  • Privacy Policy
  • Disclaimer
  • Terms Of Use

More Information

  • Home
  • About
  • Contact
  • Appetizers
  • Dessert
  • Dinner
  • Drinks
©2026, greenmealmap About Back To Top