Skip to content
DisclaimerTerms Of UseGDPR PolicyCookie Policy

greenmealmap

  • Home
  • Drinks
  • Appetizers
  • Dinner
  • Dessert
  • About
  • Contact
  • Privacy Policy
DisclaimerTerms Of UseGDPR PolicyCookie Policy

NO-ING-IMG

To make Simple Veggie Sushi Rolls, you need fresh and tasty ingredients. Here’s what you'll need: - 2 cups sushi rice - 2 1/2 cups water - 1/4 cup rice vinegar - 1 tablespoon sugar - 1 teaspoon salt - 4 sheets of nori (seaweed) - 1 small cucumber, julienned - 1 medium carrot, julienned - 1 avocado, sliced - 1 small red bell pepper, julienned - 1/2 cup cooked edamame (shelled) - Soy sauce (for dipping) - Sesame seeds (optional, for garnish) These ingredients make your sushi rolls colorful and healthy. Each item adds its unique taste and texture. The sushi rice is the base, while the nori holds everything together. Fresh veggies give crunch and flavor. You can mix and match your favorites too! Feel free to explore. If you want the full recipe, check out the Rainbow Veggie Sushi Rolls. 1. Rinsing the rice: Start by rinsing the sushi rice. Rinse it under cold water. Do this until the water runs clear. This helps remove excess starch. Clean rice cooks better and has the right texture. 2. Cooking the rice: After rinsing, add the rice and water to a medium saucepan. Bring it to a boil on high heat. Once it boils, lower the heat and cover it. Let it simmer for 18 to 20 minutes. The water should absorb fully. 3. Mixing in vinegar, sugar, and salt: While the rice cooks, mix rice vinegar, sugar, and salt in a small bowl. Stir until dissolved. Once the rice is done, let it sit covered for 10 minutes. Then, transfer it to a large bowl. Gently fold in the vinegar mixture, fluffing the rice with a fork. Allow it to cool to room temperature. 1. Preparing the nori and rice: Place a bamboo sushi mat on a clean surface. Lay a sheet of nori on the mat, shiny side down. Wet your hands to prevent sticking. Take about 1/2 cup of sushi rice. Spread it evenly across the nori. Leave a 1-inch border at the top. 2. Adding vegetables: Next, add your vegetables. Arrange strips of cucumber, carrot, avocado, red bell pepper, and edamame horizontally across the rice. Feel free to mix and match your favorites. 3. Rolling technique: Start rolling the mat from the bottom. Roll tightly and tuck the filling as you go. Use gentle, firm pressure to keep the roll intact. Once you reach the top, moisten the edge of the nori with a bit of water. Press gently to seal the roll. 1. Slicing the rolls: Use a sharp knife to slice the roll into 6-8 pieces. Wipe the knife with a damp cloth between cuts for clean edges. This helps keep each piece looking nice. 2. Presentation tips: To serve, place the sushi rolls on a bamboo platter. You can sprinkle sesame seeds on top for flair. Include small bowls of soy sauce for dipping. Add pickled ginger and wasabi on the side for extra flavor. For the full recipe, refer to the earlier section. Enjoy your delicious veggie sushi rolls! - Preventing rice from sticking: Wet your hands before touching the rice. This keeps it from sticking to your fingers. You can also add a little vinegar to your hands for extra help. This small trick makes rolling much easier. - Achieving tight rolls: Start rolling from the bottom. Use a bamboo mat to help you. Press gently but firmly as you roll. This keeps the filling safe and snug inside. - Using sharp knives for clean cuts: A sharp knife makes all the difference. It helps you slice through the roll without squishing it. Wipe the knife with a damp cloth between cuts for neat pieces. - Bamboo sushi mat: This is a must-have tool. It helps you roll sushi tightly and evenly. You can find one at most kitchen stores or online. - Rice cooker vs. stove cooking: A rice cooker makes cooking sushi rice easy. It takes the guesswork out of cooking times. If you use the stove, keep an eye on the pot. It can burn if not watched closely. - Using too much water: Too much water makes mushy sushi rice. Stick to the right rice-to-water ratio for perfect rice every time. - Not cooling the rice properly: Sushi rice needs to cool to room temp. If it’s too hot, it won’t roll well. Give it time to cool before you start rolling. - Overstuffing the rolls: It’s tempting to add lots of filling. But too much makes rolling hard. Keep it simple for the best results. For the full recipe, check out the Rainbow Veggie Sushi Rolls. {{image_2}} You can change the veggies based on what's in season. Fresh produce makes your sushi fun. Try adding thinly sliced radishes, spinach, or sweet potatoes. These add color and nutrients. If someone has allergies, pick safe options. Use cooked zucchini or bell peppers instead of raw ones. Always check for allergies first! Dipping sauces can change the taste. Spicy mayo is a great choice. Mix mayo with sriracha for a kick. You can also use ponzu sauce. This sauce is tangy and adds depth. Each sauce makes your sushi unique and flavorful. Feel free to try different sauces until you find your favorite! For those who want protein, consider adding cooked shrimp or crab. You can also use tofu for a plant-based option. Another fun idea is the sushi burrito. Instead of rolling tight, wrap it loosely like a burrito. Stuff it with your favorite veggies and proteins. This style is great for a hearty meal. You can customize it to your taste! To keep your sushi fresh, refrigerate it. Wrap each roll in plastic wrap. This keeps the air out and moisture in. Place the wrapped rolls in an airtight container. They will stay fresh for up to 24 hours. If you have leftover rice, store it in a separate container. Keep it covered to prevent drying. Best practices for keeping sushi fresh: - Use plastic wrap to seal each roll. - Store sushi in the fridge, not at room temperature. - Eat leftover sushi within one day for best taste. Can sushi rolls be frozen? Yes, you can freeze sushi rolls. However, the texture may change. The rice may become a bit mushy after thawing. How to thaw and serve: 1. Remove the sushi from the freezer. 2. Place it in the fridge to thaw overnight. 3. For best taste, eat it the next day. To make sushi rice sticky, you need the right water-rice ratio. Use 1.25 cups of water for every cup of sushi rice. Rinse the rice until the water runs clear. This removes excess starch, which helps with stickiness. After cooking, let the rice sit covered for about 10 minutes. This extra steam keeps it warm and sticky. You can use brown rice, but there are pros and cons. Brown rice is more nutritious. It has more fiber and vitamins. However, it takes longer to cook and may not stick as well. When using brown rice, soak it for a few hours before cooking. This helps it cook evenly and become softer. Yes, homemade sushi is often healthier than store-bought options. You can control the ingredients and portions. Store-bought sushi can have added sugars, preservatives, and unhealthy fats. Making your sushi allows you to choose fresh, high-quality vegetables. You can also lower sodium by using less soy sauce. The full recipe for Rainbow Veggie Sushi Rolls shows how easy it is to make your healthy sushi at home. Making Simple Veggie Sushi Rolls is fun and easy. We covered the key ingredients, preparation, and tips to create great rolls. Remember to rinse your rice and use fresh veggies for the best taste. Don't be afraid to try new flavors or sauces. You can store leftovers safely in the fridge or even freeze them. With practice, you’ll master delicious homemade sushi. Enjoy experimenting and have fun rolling your own unique creations!

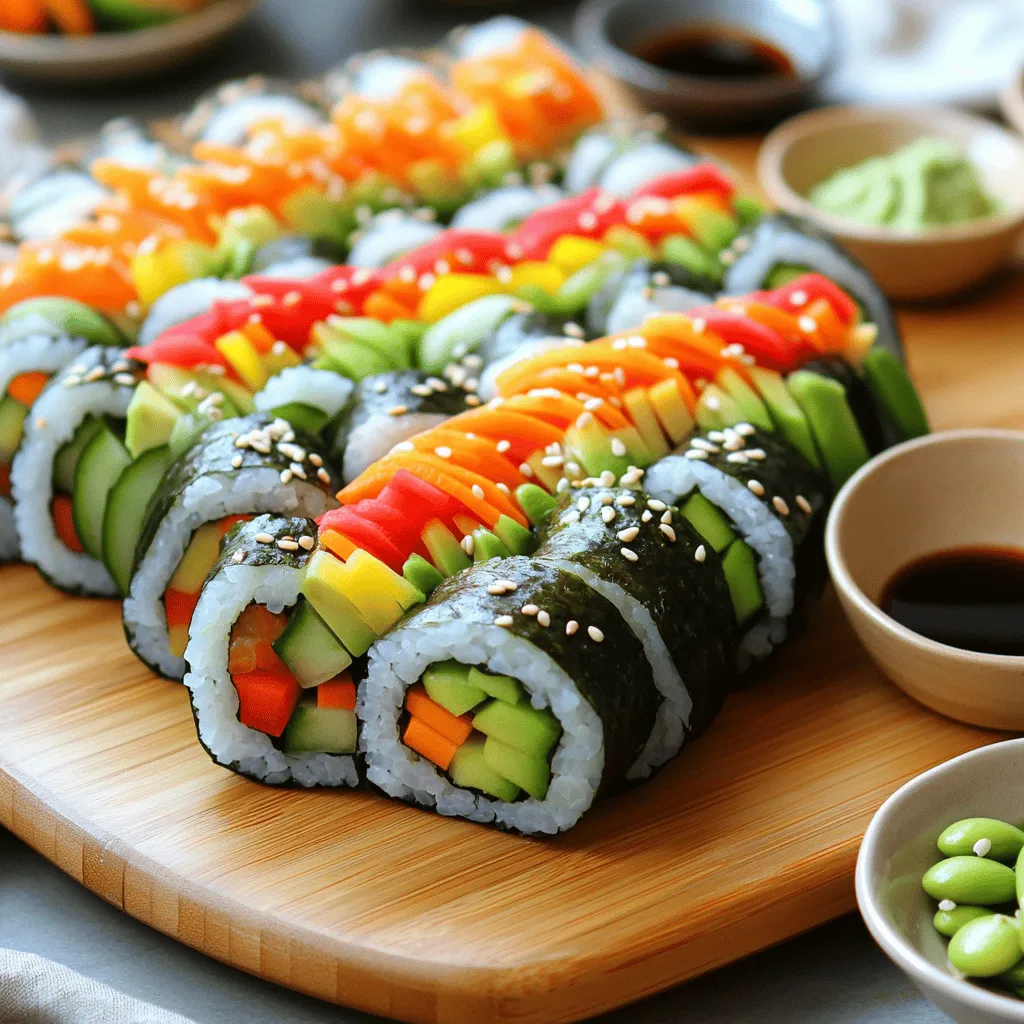
Simple Veggie Sushi Rolls Easy and Healthy Recipe

Ready to impress your friends with a fun and tasty treat? Making Simple Veggie Sushi Rolls is easier than you

For a hearty vegan chili mac, gather these key ingredients: - 2 cups elbow macaroni - 1 can (15 oz) black beans, rinsed and drained - 1 can (15 oz) kidney beans, rinsed and drained - 1 can (15 oz) diced tomatoes with green chilies - 1 tablespoon olive oil - 1 medium onion, diced - 3 cloves garlic, minced - 2 teaspoons chili powder - 1 teaspoon cumin - 1 teaspoon smoked paprika - Salt and pepper to taste - 1 cup vegetable broth - 1 cup corn (fresh, frozen, or canned) - 1 cup nutritional yeast (for creamy texture) These ingredients work together to create a bold and filling dish. The beans add protein, while the spices bring warmth and depth. To make your chili mac even better, consider these garnishes: - Chopped fresh cilantro - Chopped green onions These add color and fresh flavor. They also enhance the dish's appeal, making it look inviting. This vegan chili mac serves four and is packed with good nutrients. Each serving has: - Calories: Approximately 350 - Protein: 20 grams - Fiber: 15 grams - Fat: 6 grams - Carbohydrates: 60 grams This dish offers a balanced meal with protein, fiber, and healthy carbs. You can enjoy it guilt-free. For the full recipe, check out the detailed instructions. Start by boiling water in a large pot. Make sure to add salt for flavor. Once the water boils, add 2 cups of elbow macaroni. Cook it according to the package instructions until it is al dente. This usually takes about 7 to 9 minutes. After cooking, drain the macaroni and set it aside. It will be added later to the chili. In the same pot, pour in 1 tablespoon of olive oil. Heat it over medium heat. Add 1 medium diced onion and sauté for about 5 minutes. You want the onion to be soft and translucent. Next, mix in 3 minced garlic cloves. Cook this for 1 to 2 minutes more. Now, it’s time to add flavor. Stir in 2 teaspoons of chili powder, 1 teaspoon of cumin, and 1 teaspoon of smoked paprika. Add salt and pepper to taste. Cook this mixture for 1 minute to bring out the spice flavors. Pour in 1 can of diced tomatoes with green chilies and 1 cup of vegetable broth. Make sure to include the liquid from the tomatoes. Bring this mixture to a boil. It will smell amazing! Once boiling, add 1 can of black beans and 1 can of kidney beans, both rinsed and drained. Also, add 1 cup of corn. Lower the heat and let it simmer for about 10 to 15 minutes. Stir occasionally to keep it from sticking. Now, stir in the cooked macaroni. Then add 1 cup of nutritional yeast. This will make your chili mac creamy and rich. Mix it well until everything is heated through. Taste it and adjust the seasonings if needed. Serve your Vegan Chili Mac hot. You can garnish it with fresh cilantro or green onions for a nice touch. For the full recipe, check out the main article. To get that perfect creamy texture in your vegan chili mac, use nutritional yeast. This ingredient adds a cheesy flavor without dairy. If you want even more creaminess, try adding a splash of plant-based milk. Just stir it in slowly after mixing the noodles and chili. You can also blend some of the beans to create a smooth base. The blend gives a nice thickness to the dish. For extra flavor, consider adding more spices. A pinch of cayenne can make it spicy. You might also try adding some fresh herbs, like oregano or basil. They add great depth. You can even include a dash of lime juice before serving for a bright finish. Don't forget to taste and adjust the salt and pepper. This will help balance all the flavors. Cooking time can vary based on your stove and pot size. Keep an eye on the macaroni; you want it al dente. If you like softer pasta, cook it a minute longer. For the chili to develop rich flavors, let it simmer longer if you have time. You can also make it ahead of time. Just reheat and add a splash more broth to keep it moist. For the full recipe, check out the Vegan Chili Mac section. {{image_2}} To make a gluten-free version, swap the elbow macaroni with gluten-free pasta. Many brands offer great choices that taste good. Brown rice or quinoa pasta works well. Check the label to confirm they are gluten-free. Want to pack in more nutrition? It’s easy! Add diced bell peppers, zucchini, or spinach to your chili mac. Just toss them in when you add the onion. They will cook down and blend into the dish. This adds color and boosts the flavor. If you like heat, add more chili powder or a dash of cayenne. You can also mix in jalapeños for a spicy kick. For a milder version, reduce the chili powder and skip the jalapeños. Adjust to your taste! To keep your Vegan Chili Mac fresh, store it in an airtight container. Place it in the fridge for up to four days. Make sure it cools to room temperature first. This helps prevent extra moisture. When you're ready to enjoy your leftovers, reheat them on the stove. Add a splash of water or vegetable broth to keep it moist. Heat gently over medium heat, stirring often. You can also use the microwave. Heat in short bursts, stirring in between, until hot. If you want to save some for later, freeze Vegan Chili Mac. Use a freezer-safe container or bag. Leave some space at the top, as it expands when frozen. It can last up to three months in the freezer. Thaw it overnight in the fridge before reheating. For the best flavor, eat it within a month. Check out the Full Recipe for more tips on making this dish! Yes, you can make Vegan Chili Mac ahead of time. It keeps well in the fridge. Make it, let it cool, and store it in an airtight container. When you're ready to eat, just heat it up on the stove or in the microwave. If you need a substitute for nutritional yeast, try using tahini or cashew cream. Both add creaminess and a nutty flavor. Another option is to mix in a bit of soy sauce for a savory taste. Yes, Vegan Chili Mac is a complete meal. It has protein from beans and carbs from pasta. Plus, it includes veggies and healthy fats. This dish gives you a well-rounded meal in one bowl. Vegan Chili Mac lasts about 3 to 5 days in the fridge. Store it in a sealed container to keep it fresh. Always check for any off smells before eating leftovers. Yes, you can freeze Vegan Chili Mac. Let it cool completely, then portion it into freezer-safe containers. It can last for about 2 to 3 months in the freezer. Thaw it in the fridge before reheating. Absolutely! You can add crumbled tempeh or vegan sausage for extra protein. Just cook them with the onion and garlic before adding other ingredients. This adds texture and flavor. You can use any pasta shape you like instead of elbow macaroni. Penne, fusilli, or even gluten-free pasta works great. Just be sure to follow the cooking time on the package. The spice level of Vegan Chili Mac depends on the chili powder and diced tomatoes you use. If you like it mild, choose mild chili powder. For more heat, use spicy chili powder or add jalapeños. If you want to add a cheesy flavor, use vegan cheese or cashew cheese. Sprinkle it on top before serving. This adds creaminess and pairs well with the chili flavors. You can find the full recipe for Vegan Chili Mac in this article. It has all the steps and ingredients you need for a tasty meal. In this post, we covered how to make Vegan Chili Mac. We went over the main ingredients, cooking steps, and tips for great flavor. You can adjust the recipe to fit your taste with variations like extra veggies or spicy options. Don't forget to store leftovers properly for later meals. Making this dish ahead saves time and is fun! Enjoy creating your Vegan Chili Mac, and get ready to impress your taste buds.

Vegan Chili Mac Flavorful and Satisfying Dish

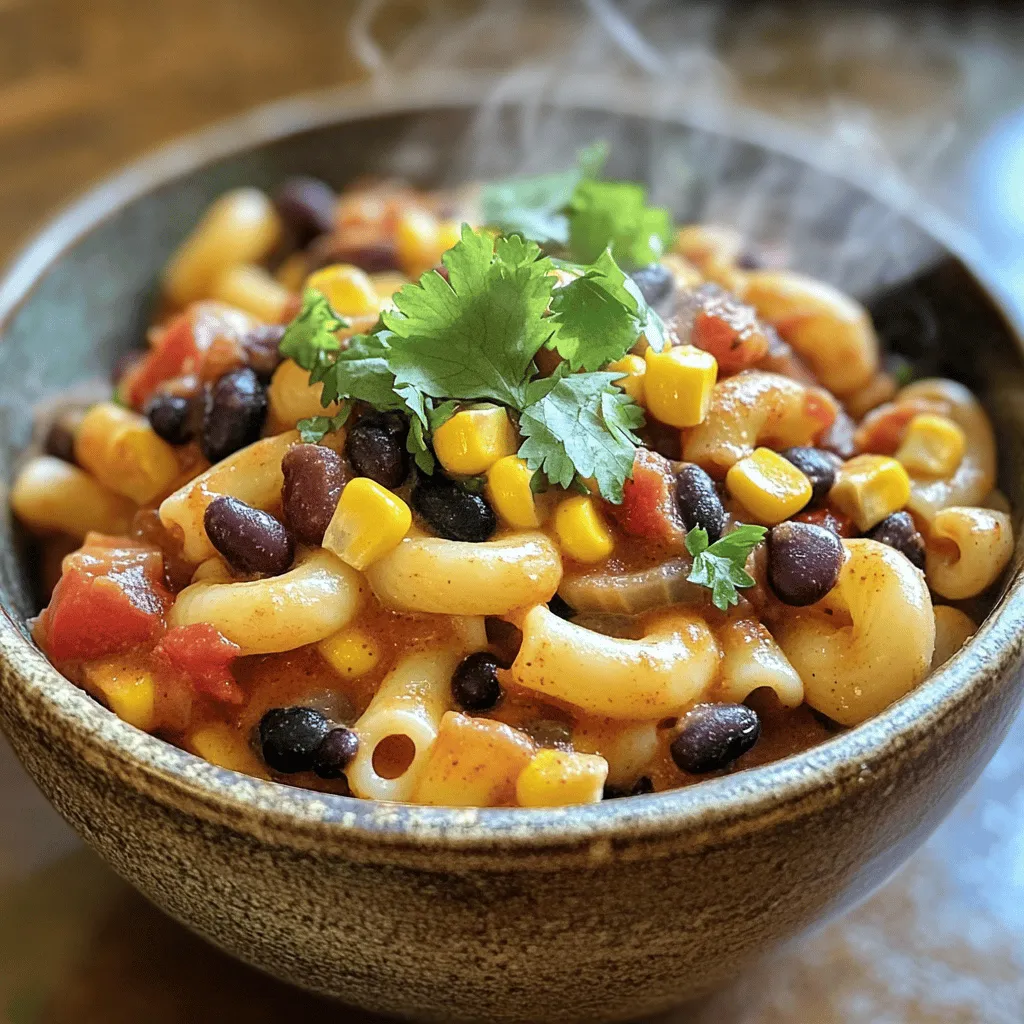
Imagine a warm bowl of Vegan Chili Mac, bursting with flavor and comfort. This dish blends hearty chili with creamy

- 1 cup Arborio rice - 4 cups vegetable broth - 1 cup mushrooms (button or cremini), sliced - 1 small onion, finely chopped - 2 cloves garlic, minced - 2 tablespoons olive oil - 1/2 cup grated Parmesan cheese (or nutritional yeast for a vegan option) - 2 tablespoons fresh parsley, chopped - 1/2 teaspoon black pepper - Salt to taste - Arborio rice: 1 cup provides a creamy texture. - Vegetable broth: 4 cups give rich flavor. - Mushrooms: 1 cup adds earthiness. - Onion: 1 small onion brings sweetness. - Garlic: 2 cloves enhance aroma. - Olive oil: 2 tablespoons help sauté. - Parmesan cheese: 1/2 cup adds creaminess. - Parsley: 2 tablespoons give freshness. - Black pepper: 1/2 teaspoon adds warmth. - Salt: To taste balances flavors. - Asparagus: Adds crunch and color. - Peas: For sweetness and bright green. - Spinach: For a nutrient boost. - Truffle oil: For a fancy touch. - Lemon zest: Brightens flavors. - Other herbs: Like thyme or basil for extra taste. You can find the full recipe at the end of this article. This dish is fun to customize! Start by heating the vegetable broth in a saucepan over medium heat. You want it warm, not boiling. Keeping your broth warm helps the rice cook evenly. This step is key to a creamy risotto. In a large skillet or pot, add the olive oil. Heat it over medium heat. Once hot, toss in the chopped onion. Sauté until the onion turns soft, about 3 to 4 minutes. Next, add minced garlic and sliced mushrooms. Cook for about 5 minutes. The mushrooms will soften and release their tasty juices. Now, it’s time for the Arborio rice. Add it to the skillet with the sautéed mix. Stir well, so the rice gets coated with oil. Let it toast for about 2 minutes. This will add a nice flavor to your risotto. Take a ladleful of your warm broth and pour it over the rice. Stir continuously as the rice absorbs the broth. This process is important. It helps release the starches in the rice, making it creamy. Keep adding broth one ladle at a time until the rice is cooked. This will take about 20 to 25 minutes. When your risotto is creamy and the rice is al dente, it’s time for the final touches. Stir in the grated Parmesan cheese or nutritional yeast. Add the chopped parsley, black pepper, and salt to taste. Mix everything well until it’s creamy. Let it sit for a minute before serving. For a beautiful finish, serve it in shallow bowls. Add extra parsley and a sprinkle of Parmesan on top. You can find the full recipe for mushroom bliss risotto to make this dish shine. To make your risotto creamy, use Arborio rice. This rice has a high starch content. The starch creates a smooth texture. Always stir the rice as it cooks. Stirring helps release more starch, making it creamier. Add warm broth slowly, one ladle at a time. This helps the rice absorb the liquid properly. You’ll know it’s done when the rice is al dente. It should have a slight bite but be soft. One common mistake is using cold broth. Always warm your broth before adding it. This keeps the cooking temperature steady. Another mistake is rushing the process. Risotto needs time and patience. Don’t dump all the broth in at once. This leads to uneven cooking. Also, avoid overcooking the rice. It should be creamy, not mushy. To boost flavor, use fresh ingredients. Fresh mushrooms and herbs make a big difference. Sauté the onions and garlic first. This step brings out their natural sweetness. Don’t forget to season well. Add salt and pepper gradually, tasting as you go. A splash of white wine can add depth. If you want a richer flavor, use homemade broth. Lastly, finish with Parmesan cheese or nutritional yeast. This gives it a savory kick. For more details, check the Full Recipe. {{image_2}} You can easily change some ingredients for different diets. If you want a vegan risotto, swap Parmesan for nutritional yeast. This gives a cheesy taste without dairy. Use gluten-free broth if you need to avoid gluten. You can also switch out Arborio rice for quinoa for a healthy twist. This adds a nutty flavor and changes the texture. Feel free to mix in other veggies. Spinach, peas, or asparagus can add color and nutrients. Just add them in the last few minutes of cooking. If you want protein, consider adding cooked chicken or shrimp. You can also use chickpeas for a plant-based option. They add protein and a nice bite to the risotto. You can make your risotto even tastier with herbs and spices. Add thyme or rosemary for a fragrant flavor. A pinch of saffron gives a rich, golden hue and unique taste. Use mushroom broth instead of vegetable broth for more depth. This enhances the mushroom flavor and makes it richer. For more options and ideas, check the Full Recipe for Easy Mushroom Risotto! After enjoying your mushroom risotto, you may have some left. To store it, let the risotto cool first. Then, place it in an airtight container. This keeps it fresh for about three to four days in the fridge. Always label the container with the date. When you're ready to eat the leftover risotto, you can reheat it easily. The best way is to use a stove. Add a splash of vegetable broth or water to the risotto. Stir it gently over low heat. This helps restore its creamy texture. You can also use a microwave. Place the risotto in a microwave-safe bowl. Add a little broth or water, cover it, and heat in short bursts. Stir after each burst to avoid hot spots. You can freeze mushroom risotto, but it may change slightly in texture. To freeze, let the risotto cool completely. Then, scoop it into freezer bags or containers. Remove as much air as possible before sealing. It can stay frozen for up to three months. When you want to use it, thaw it overnight in the fridge. Reheat using the instructions above for the best taste. For the full recipe, check out the details above. The best rice for mushroom risotto is Arborio rice. This rice has a high starch content. It creates that creamy texture we all love. Arborio rice absorbs liquid well and cooks evenly. Other options like Carnaroli or Vialone Nano work too. However, Arborio is my go-to for its perfect creaminess. To make your risotto vegan, simply swap out the cheese. Use nutritional yeast instead of Parmesan. This adds a nice cheesy flavor without dairy. Also, make sure to use vegetable broth. This keeps your dish entirely plant-based. You can also add vegan butter for richness. Yes, you can make mushroom risotto ahead of time. However, it’s best served fresh. If you make it early, store it in an airtight container. Keep it in the fridge for up to three days. When you’re ready to serve, reheat it slowly. Add a splash of broth to restore creaminess. Mushroom risotto pairs well with many sides. A fresh green salad is always a great choice. You can also serve it with grilled vegetables for a colorful plate. If you want protein, add sautéed shrimp or chicken. For a lighter touch, a lemon wedge on the side brightens the dish. Enjoy your meal with a glass of white wine too! For the complete instructions, check out the Full Recipe. Mushroom risotto is easy to make with the right ingredients and steps. We covered how to prepare the broth, sauté aromatics, and cook the rice for creaminess. You learned tips to perfect your risotto and avoid common mistakes. You can customize your dish with variations and tips for storage. With practice, you’ll create great risotto every time. Enjoy this delicious dish with friends and family!

Easy Mushroom Risotto Creamy Comfort Food Recipe

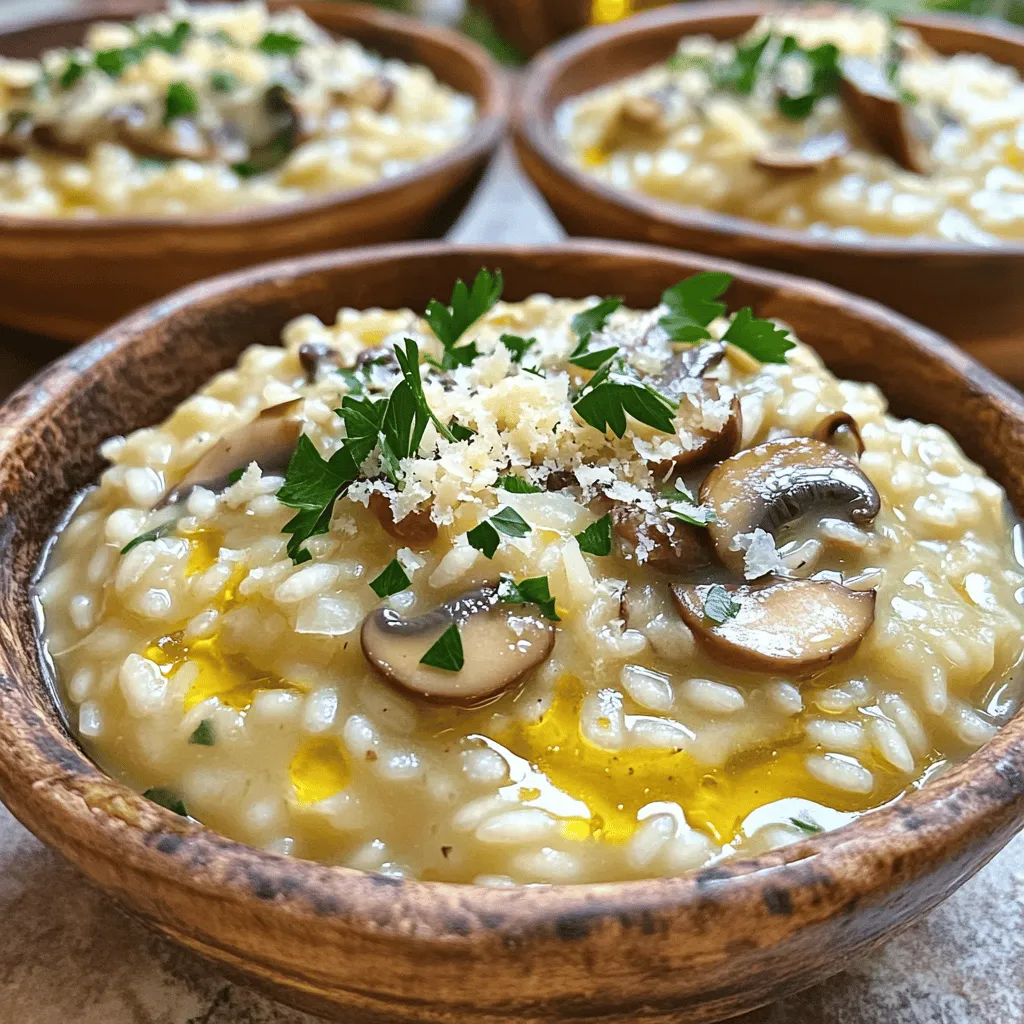
Creamy mushroom risotto is the heart of comfort food. It’s simple to make, yet full of rich flavor. In this

To make crispy baked zucchini coins, gather these ingredients: - 2 medium zucchinis, sliced into ½-inch thick coins - 1 cup breadcrumbs (preferably panko for extra crunch) - ½ cup grated Parmesan cheese - 1 teaspoon garlic powder - 1 teaspoon dried oregano - 1 teaspoon smoked paprika - 1 large egg, beaten - Salt and pepper to taste - Olive oil spray (or a light drizzle) You can swap ingredients based on your taste or what you have at home. If you want a gluten-free version, try gluten-free breadcrumbs. You can also use nutritional yeast instead of Parmesan for a vegan twist. For a spicier kick, add cayenne pepper to the breadcrumb mix. If you don’t have smoked paprika, regular paprika works too. Fresh zucchini is key for this recipe. It gives the coins a nice crunch and rich flavor. Look for firm zucchinis with smooth skin. Avoid ones that are soft or have blemishes. Fresh zucchini also has more nutrients. When you use fresh produce, your dish tastes better and is healthier. To get the best results, choose zucchinis that are about 6 to 8 inches long. If they are too big, they may have larger seeds and a watery texture. Enjoy the process of selecting your zucchini; it sets the stage for a tasty snack! For the full recipe, check the earlier section. To start, gather your ingredients. You will need: - 2 medium zucchinis, sliced into ½-inch thick coins - 1 cup breadcrumbs (preferably panko for extra crunch) - ½ cup grated Parmesan cheese - 1 teaspoon garlic powder - 1 teaspoon dried oregano - 1 teaspoon smoked paprika - 1 large egg, beaten - Salt and pepper to taste - Olive oil spray (or a light drizzle) First, preheat your oven to 425°F (220°C). Line a baking sheet with parchment paper. This helps with easy cleanup. Next, grab a shallow bowl. Mix the breadcrumbs, Parmesan cheese, garlic powder, oregano, smoked paprika, salt, and pepper. In a separate bowl, beat the egg until smooth. This egg will help the coating stick. Now, take each zucchini coin. Dip it into the egg, letting any extra drip off. Then, coat it with the breadcrumb mix. Press gently to help it stick. Arrange the coated zucchini coins in a single layer on your baking sheet. Make sure not to overcrowd them. This step is key for getting them crispy! Lightly spray or drizzle olive oil over the coins. This helps them brown nicely. Bake them in the preheated oven for about 20-25 minutes. Flip them halfway through for even cooking. They should turn golden brown and crispy. Once done, remove them from the oven and let them cool slightly. To get the best crunch, use panko breadcrumbs. They add extra texture. Also, ensure the coins are spaced out on the baking sheet. This allows hot air to circulate around them. If you have a wire rack, place it on the baking sheet. This helps air flow under the coins too. Lastly, don’t skip the olive oil. It is crucial for that golden brown finish. For the full recipe, check the main article! If your zucchini coins are not crispy, check a few things. First, ensure you sliced the zucchini evenly. Uniform thickness helps them cook the same way. Second, don’t overcrowd the baking sheet. If they touch, they will steam instead of crisp. Lastly, use enough oil. A light spray or drizzle helps achieve that golden crunch. To enhance the flavor, try adding different spices. For a kick, mix in some cayenne pepper or chili powder. If you love herbs, fresh basil or parsley adds a nice touch. You can also swap the Parmesan for other cheeses. Try using cheddar or a dairy-free cheese for a new taste. These crispy baked zucchini coins shine when served hot. Pair them with marinara sauce for dipping, or serve with a cool yogurt dip. You can also place them on top of a fresh salad for added crunch. For a twist, use them as a side with grilled chicken or fish. For the full recipe, check out the complete instructions above. {{image_2}} You can switch up the coating for your zucchini coins. Instead of breadcrumbs, try crushed cornflakes for a fun crunch. You can also use almond flour for a gluten-free option. If you want a spicy kick, use seasoned tortilla chips instead. Mix things up to find your favorite! Adding spices can change the game. Try cayenne pepper for heat. You can also use Italian seasoning for a classic flavor. Fresh herbs like basil or thyme add freshness. Experiment with different spice blends to create your unique taste. Don't be afraid to get creative! Serve your crispy zucchini coins in fun ways. Try stacking them with layers of cheese and tomato sauce for a mini zucchini parmesan. You can also use them as a crunchy topping on salads. Pair them with a zesty dipping sauce, like ranch or spicy mayo, for an extra kick. Your guests will love the surprise! After you enjoy your crispy baked zucchini coins, let them cool. Place them in an airtight container. Keep them in the fridge. They stay fresh for up to three days. If you want to keep them longer, consider freezing. To bring back the crispiness, reheat the zucchini coins in the oven. Preheat your oven to 350°F (175°C). Place the coins on a baking sheet. Heat them for about 10 minutes. This helps restore their crunch. Avoid using the microwave, as it makes them soggy. You can freeze the zucchini coins before baking. Arrange them in a single layer on a baking sheet. Freeze them until solid, then transfer to a freezer bag. They can last up to three months in the freezer. When ready to eat, bake them straight from the freezer. Just add a few extra minutes to the baking time. For the full recipe, check the section above. To make zucchini coins crispy, you need to remove excess moisture. Start by slicing your zucchini into ½-inch thick coins. Then, sprinkle salt on them and let them sit for 10-15 minutes. This draws out water. Afterward, pat them dry with a paper towel. For the coating, use panko breadcrumbs for extra crunch. Make sure you evenly coat each coin and do not overcrowd the baking sheet. This allows hot air to circulate, which helps them crisp up nicely. Yes, you can easily make this recipe gluten-free. Just swap regular breadcrumbs for gluten-free panko breadcrumbs. Many stores offer a variety of gluten-free options. Check the label to ensure they fit your dietary needs. The rest of the recipe remains the same. You won't lose any flavor or texture with this simple change. Crispy baked zucchini coins pair well with many dips. Consider serving them alongside marinara sauce for a classic taste. You can also try a yogurt dip, which adds a cool touch. For a twist, add hot sauce or a spicy aioli. They also work well as a side dish with grilled chicken or fish. You can find more ideas in the Full Recipe section to inspire your meal. In this article, we explored the key ingredients and steps for making crispy baked zucchini coins. Fresh zucchini is essential for the best taste. I shared tips for prep, baking, and serving to help you succeed. We also discussed variations and storage tips for leftovers, ensuring you enjoy them later. Remember, the right spices can enhance the flavor. Don't hesitate to experiment and find what you love. Enjoy your cooking journey with these delicious zucchini coins!

Crispy Baked Zucchini Coins Easy and Flavorful Snack

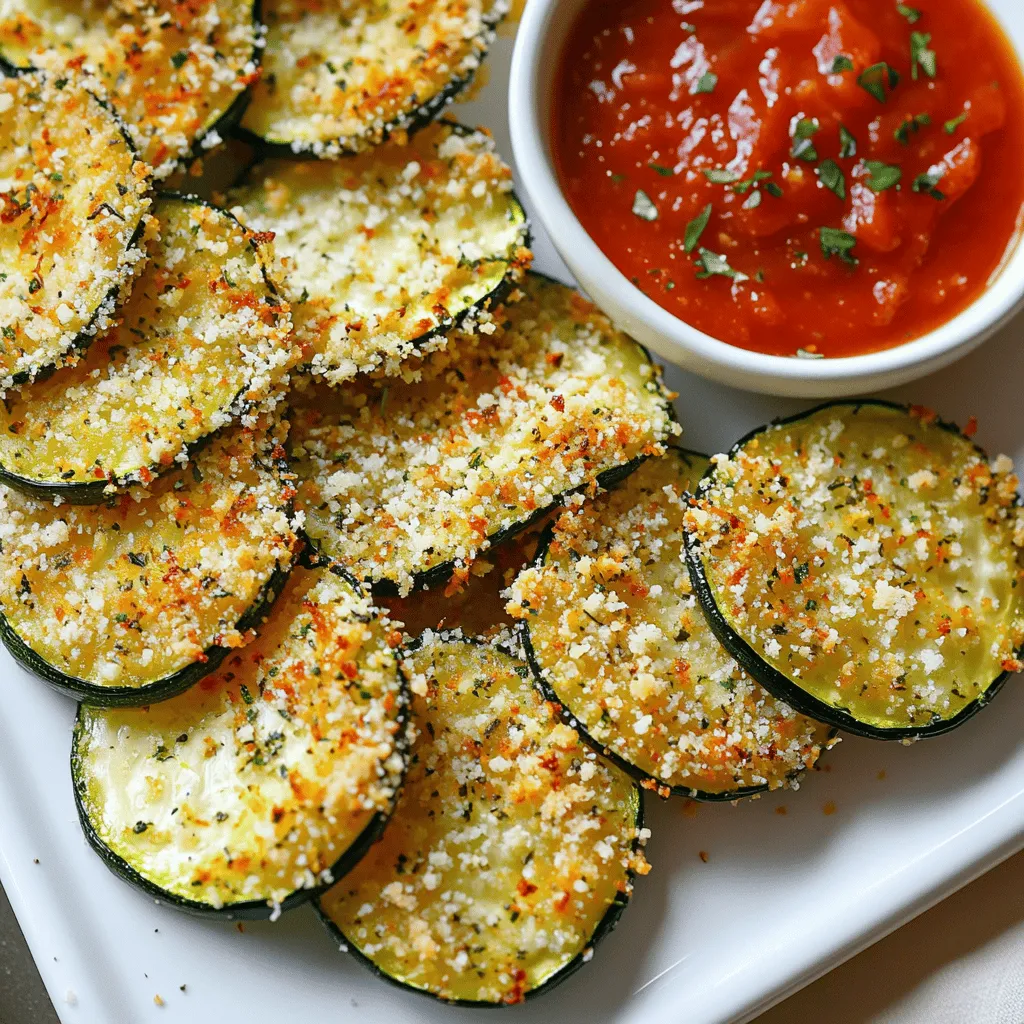
Looking for a quick and tasty snack? You’ll love these crispy baked zucchini coins! They’re easy to make and bursting

To make chocolate covered pretzel bites, you need a few simple ingredients. Here’s what you’ll need: - Mini pretzel twists - Semi-sweet chocolate chips - White chocolate chips - Crushed pretzels - Sea salt - Coconut oil (optional) - Sprinkles (optional) These ingredients create a delightful mix of sweet and salty. The mini pretzel twists give a perfect crunch. Semi-sweet chocolate chips melt into a rich coating. White chocolate chips can add a nice drizzle on top. Crushed pretzels provide extra texture. A sprinkle of sea salt rounds out the flavors nicely. If you want a smoother chocolate, add coconut oil. This ingredient helps the chocolate melt evenly. Sprinkles are fun for decoration, especially for parties or holidays. Gather these ingredients for a fun and tasty treat. Check the full recipe for all the steps to create these irresistible bites! - Preheat the oven to 350°F (175°C). - Line a baking sheet with parchment paper. - Spread mini pretzels on the baking sheet. - Toast for 5 minutes. Toasting makes the pretzels crispier. This extra crunch is key to the texture. - Combine chocolate chips and coconut oil. - Heat in intervals until smooth. Heating in short bursts helps prevent burning. Stir after each interval for even melting. - Dip pretzels in melted chocolate. - Sprinkle crushed pretzels and drizzle white chocolate. Make sure to coat each pretzel well. Shake off any excess chocolate. The toppings add crunch and flair. - Allow pretzels to cool at room temperature or refrigerate for faster hardening. Cooling lets the chocolate set perfectly. For quick results, the fridge is your friend. You can enjoy these treats in no time! For the full recipe, check out the detailed instructions above. To coat your pretzel bites well, use a fork for dipping. This helps to cover each pretzel evenly. Shake off any extra chocolate before placing them on the baking sheet. If you want a smooth finish, add a teaspoon of coconut oil to your chocolate. This makes the chocolate melt better and coat the pretzels nicely. For a fun serving idea, arrange the pretzel bites on a colorful plate. You can use a tiered stand for a festive look. Add sprinkles on top for a burst of color. If you want to impress guests, place some pretzel bites in small treat bags tied with ribbons. Store your chocolate-covered pretzel bites in an airtight container. This keeps them fresh and tasty. Place parchment paper between layers to avoid sticking. They can last up to a week at room temperature. For longer storage, you can freeze them. Just make sure to keep them in a sealed bag. {{image_2}} You can choose different types of chocolate for your pretzel bites. Dark chocolate brings a rich taste. Milk chocolate adds a sweet touch. Both options work well. You can also try flavored chocolate. Mint chocolate gives a fresh burst. Orange chocolate adds a hint of citrus. Just melt and dip! Toppings make your pretzel bites even more fun. Crushed nuts add crunch and flavor. Try almonds or peanuts for a nutty taste. You can also use candies like M&Ms or crushed Oreos. For special occasions, create themed bites! Use red and green sprinkles for Christmas or pastel hues for Easter. The options are endless! Seasonal spices can bring new life to your treats. Adding a sprinkle of cinnamon gives warmth. Nutmeg brings a cozy vibe, perfect for fall. You could even mix in pumpkin spice for a festive twist. These flavors make your pretzel bites stand out all year. For a complete guide on making these treats, check out the Full Recipe. To keep your chocolate-covered pretzel bites fresh, use an airtight container. Glass or plastic containers work best. Make sure the container has a tight seal. This helps keep out air and moisture. Store them at room temperature in a cool, dry place. Avoid areas near heat sources like ovens or direct sunlight. At room temperature, these tasty treats last about one week. If you want to keep them longer, freezing is a great option. To freeze them, place the pretzel bites in a single layer on a baking sheet. Freeze until solid, then transfer them to a freezer-safe bag. They can stay fresh for up to three months in the freezer. For the full recipe, check out Choco-Salty Pretzel Delights. To make these sweet treats, follow these simple steps: 1. Gather your ingredients: You need mini pretzel twists, semi-sweet and white chocolate chips, crushed pretzels, sea salt, coconut oil, and optional sprinkles. 2. Preheat and prepare: Set your oven to 350°F (175°C). Line a baking sheet with parchment paper. 3. Toast the pretzels: Spread the mini pretzels on the baking sheet. Toast them for about 5 minutes to enhance their crunch. 4. Melt the chocolate: In a microwave-safe bowl, mix the semi-sweet chocolate chips with coconut oil. Heat in 30-second intervals, stirring until smooth. 5. Dip the pretzels: Using a fork, dip each pretzel into the melted chocolate. Shake off the extra chocolate. 6. Decorate: Place the dipped pretzels on the parchment-lined sheet. While the chocolate is still soft, sprinkle crushed pretzels on top. 7. Add white chocolate: Melt the white chocolate chips and drizzle over the pretzels for a pretty touch. 8. Cool and harden: Let the pretzels cool at room temperature or refrigerate for about 15 minutes until the chocolate hardens. This recipe is perfect for any gathering. You can find the complete instructions in the Full Recipe. Yes, you can use different pretzels! Here are some ideas: - Pretzel rods: These offer a fun twist on the classic shape. - Thin pretzel sticks: They give a nice crunchy bite. - Chocolate-covered pretzels: For a quick option, use store-bought chocolate pretzels as a base. Feel free to experiment with shapes and sizes. Each type adds its unique crunch and flavor. Not all chocolate-covered pretzels are gluten-free. If you want to make gluten-free versions, here’s what to do: - Choose gluten-free pretzels: Look for brands that specifically label their pretzels as gluten-free. - Check chocolate labels: Ensure the chocolate you use does not contain any gluten ingredients. With these tips, you can enjoy chocolate-covered treats without gluten concerns. Always read labels to be safe. This blog post covered how to make delicious chocolate-covered pretzel bites. You learned about the key ingredients, step-by-step instructions, and useful tips. I shared fun variations to try, how to store your treats, and answers to common questions. These sweet and salty snacks are easy to make and customize. Enjoy your creations, and remember to share them with others!

Chocolate Covered Pretzel Bites Irresistible Treats

Are you ready for a quick and tasty treat? Chocolate Covered Pretzel Bites are just what you need! These sweet

For this dish, you can use a mix of tasty vegetables. Here’s what I like to use: - 2 cups Brussels sprouts, halved - 1 medium sweet potato, peeled and cubed - 1 red bell pepper, chopped - 1 yellow zucchini, sliced - 1 red onion, cut into wedges These vegetables roast beautifully and soak up the balsamic glaze. Their natural sweetness shines through. You need a few basic items from your pantry to bring this dish to life: - 3 tablespoons olive oil - 4 tablespoons balsamic vinegar - 1 tablespoon maple syrup - 2 teaspoons garlic powder - Salt and pepper to taste These ingredients create the rich, tangy glaze that makes this dish special. The maple syrup adds a gentle sweetness. To make your dish even prettier, consider these garnishes: - Fresh basil leaves Garnishing with basil adds a pop of color and a fresh taste. It enhances the overall presentation. For the full recipe, you can refer to the detailed steps. Enjoy making this amazing side dish! Start by washing all your vegetables well. This step is key to keeping them fresh. Next, halve the Brussels sprouts and cube the sweet potato. Chop the red bell pepper and slice the yellow zucchini. Cut the red onion into wedges. Place all these in a large mixing bowl. This mix brings a variety of colors and flavors together. In a small bowl, combine the olive oil, balsamic vinegar, maple syrup, garlic powder, salt, and pepper. Whisk these ingredients until they blend well. This glaze adds a sweet and tangy taste to your veggies. Make sure every ingredient is mixed nicely. The flavors will soak into the veggies during roasting. Preheat your oven to 425°F (220°C). Line a large baking sheet with parchment paper for easy cleanup. Spread the mixed vegetables on the sheet in a single layer. Pour the balsamic glaze over them and toss gently. This way, every piece gets coated. Roast in the oven for 25-30 minutes. Stir halfway to ensure even cooking. The vegetables should be tender and caramelized when done. If you want, drizzle with more balsamic vinegar after roasting. Add fresh basil leaves on top for a lovely finish. For the full recipe, check out the details provided earlier. Enjoy your tasty Balsamic Glazed Roasted Vegetables! To get the best roast, start with the right temperature. Preheat your oven to 425°F (220°C). This heat helps caramelize the natural sugars in the veggies. Make sure to cut your vegetables into even sizes. This way, they cook at the same time. Use a large baking sheet. Spread the veggies in a single layer. This prevents steaming and helps them brown well. You can boost the flavor of your balsamic glazed roasted vegetables with simple seasonings. I love using garlic powder, salt, and pepper. They add depth without overpowering the dish. For a hint of sweetness, maple syrup works wonders. Add fresh herbs like basil after roasting. This adds a bright finish and a pop of color. If you're short on time, prep vegetables ahead. You can cut them and store them in the fridge for a day. This saves you time on cooking day. You can also use a large bowl for tossing the veggies with the glaze. This makes cleanup easier. Lastly, consider roasting more than you need. Leftovers make great additions to salads or wraps. For the full recipe, check out the Balsamic Bliss Roasted Veggies. {{image_2}} You can switch up the veggies in your balsamic glazed roasted vegetables. Use what you love or what you have on hand. Carrots, broccoli, or cauliflower work great. You can even try butternut squash for a sweet twist. Just make sure to cut all the vegetables into similar sizes. This way, they cook evenly and get tender. Want to make your dish heartier? Add proteins. Chickpeas, black beans, or lentils pair well with roasted veggies. For meat lovers, try adding chicken or shrimp. Simply toss in your chosen protein with the vegetables. This makes a well-rounded meal that fills you up. This recipe is already vegan and gluten-free! The balsamic glaze is tasty and safe for all diets. If you want to change flavors, try adding herbs like thyme or rosemary. These herbs enhance the taste without adding gluten. Enjoy this dish knowing it fits many dietary needs. For the full recipe, check out the detailed instructions. After enjoying your balsamic glazed roasted vegetables, let any leftovers cool. Place them in an airtight container. Store them in the fridge for up to four days. This keeps them fresh and tasty for your next meal. When you want to eat your leftovers, there are a few ways to reheat them. The best method is to use an oven or toaster oven. Preheat to 350°F (175°C) and heat for about 10-15 minutes. This keeps the veggies crispy. You can also use a microwave. Heat in short bursts of 30 seconds. Stir in between to avoid overcooking. If you want to save your roasted veggies for later, freezing is a great option. First, let them cool completely. Spread them in a single layer on a baking sheet. Freeze until solid, about two hours. Then, transfer the veggies to a freezer-safe bag or container. They can last up to three months in the freezer. When you’re ready, thaw in the fridge overnight before reheating. For detailed cooking steps, check out the Full Recipe. Yes, you can use other vinegars. Try apple cider vinegar or red wine vinegar. Both add a nice tang. Adjust the amount to taste, as some may be stronger. Each vinegar gives a unique flavor to your dish. Experiment and find your favorite! You can use many seasonings. Italian herbs like oregano or thyme work well. Paprika adds warmth, while chili flakes bring heat. You might even try fresh herbs like rosemary or dill. Each option changes the flavor profile. Mix and match to suit your taste! Check the vegetables for tenderness. They should be soft but not mushy. A fork should easily pierce them. Look for a nice caramel color on the edges. Roasting usually takes about 25-30 minutes. Stir halfway to ensure even cooking. Enjoy the aroma as they roast! This blog post covered all you need for a tasty roasted vegetable dish. We explored the key ingredients, step-by-step cooking, and helpful tips. You learned how to adapt the recipe to fit your needs. Now, you can store leftovers and reheat them easily. Enjoy great meals without stress. Use the tips to make it your own. Happy cooking!

Balsamic Glazed Roasted Vegetables Flavorful Side Dish

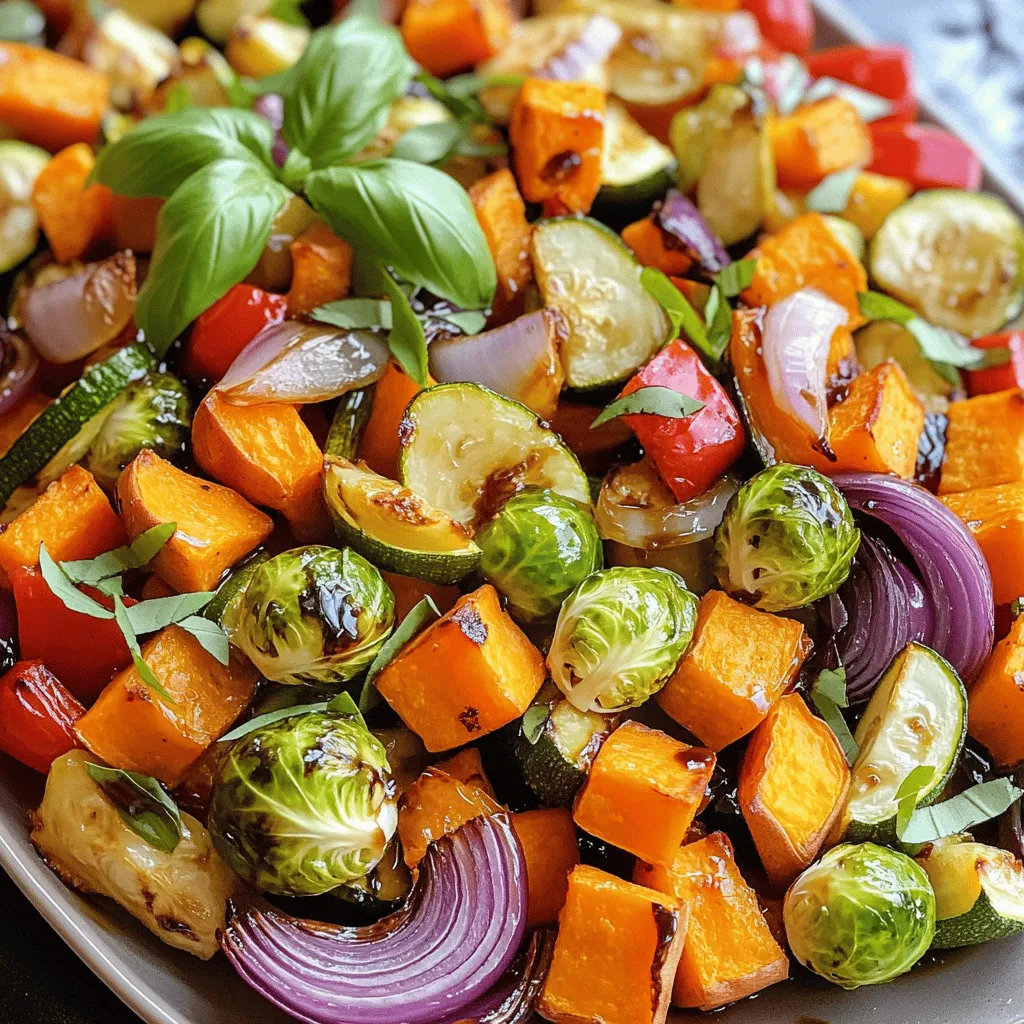
Looking to spice up your dinner table? My Balsamic Glazed Roasted Vegetables recipe is your answer! This tasty side dish

- 1 pound boneless, skinless chicken breasts, diced - 2 tablespoons Cajun seasoning - 1 onion, chopped - 1 bell pepper, diced - 3 cloves garlic, minced The chicken adds protein to this meal. Cajun seasoning gives it a spicy kick. The onion and bell pepper bring sweetness and crunch. Garlic adds depth and flavor. - 1 cup chicken broth - 1 can diced tomatoes (14 oz) - 8 ounces penne pasta The chicken broth makes the dish rich and savory. Diced tomatoes give a juicy texture. Penne pasta holds all the flavors well and cooks just right. - 1 cup heavy cream - Fresh parsley, chopped - Grated Parmesan cheese Heavy cream makes the sauce creamy and smooth. Fresh parsley adds a pop of color and freshness. Parmesan cheese brings a salty finish that ties everything together. This dish is easy and quick to make. You can find the full recipe [here](#). It’s perfect for busy weeknights. - Seasoning Process To start, take your diced chicken breasts and place them in a bowl. Sprinkle the Cajun seasoning over the chicken. Toss the chicken until it is evenly coated. This step adds a great flavor base. - Cooking the Chicken Next, heat the olive oil in a large skillet over medium-high heat. Once the oil is hot, add the seasoned chicken. Cook it for about 5-7 minutes, stirring occasionally. The chicken should turn golden brown. After cooking, remove the chicken from the skillet and set it aside. - Softening Onions and Peppers In the same skillet, add the chopped onion and bell pepper. Sauté these for about 3-4 minutes. You want them to soften but not lose their color. - Adding Garlic After the onions and peppers have softened, add the minced garlic. This will bring a lovely aroma to your dish. Cook for about 30 seconds until the garlic is fragrant. - Adding Liquids and Pasta Pour in the chicken broth and the diced tomatoes with their juices. Stir well to mix everything. Then, add the penne pasta. Bring the mixture to a boil, then reduce the heat. Let it simmer for about 10-12 minutes, stirring occasionally. - Finishing with Heavy Cream Once the pasta is al dente and most of the liquid is absorbed, return the cooked chicken to the skillet. Then, pour in the heavy cream. Mix everything well and cook for an additional 2-3 minutes until it is heated through. Adjust the taste with salt and pepper as needed. Enjoy your One-Pan Cajun Chicken Pasta! For more details, check the Full Recipe. Achieving Perfectly Cooked Pasta To get the best pasta, use a big pot of salted water. Bring it to a boil. Add the penne and stir. Cook until it's al dente, which means it has a slight bite. This usually takes about 10-12 minutes. In the one-pan method, the pasta cooks with the sauce. Stir it often so it doesn't stick. This gives the pasta great flavor. Avoiding Overcooked Chicken To keep your chicken juicy, cut it into even pieces. This helps it cook evenly. Sear the chicken for 5-7 minutes until it's brown. Then take it out of the pan. This prevents it from overcooking. When you add it back in, it will soak up all the great flavors. Customizing Spice Level Cajun seasoning can be spicy. If you like heat, add more seasoning. If you prefer mild, start with less. You can also add some cayenne pepper for extra kick. Taste as you go to find your perfect balance. Adding Extra Vegetables Feel free to mix in more veggies. Zucchini, spinach, or mushrooms work well. Add them when you sauté the onions and peppers. This not only boosts nutrition but also adds color and texture. Pairing with Side Dishes One-Pan Cajun Chicken Pasta is filling. Pair it with a simple salad or garlic bread. A fresh green salad adds crunch and brightness. Garlic bread is perfect for soaking up the sauce. Ideal Garnishes Garnish your dish with fresh parsley for color. Grated Parmesan cheese adds creaminess and saltiness. You can also squeeze a bit of lemon juice on top for a fresh zing. It makes the dish look and taste amazing. For a full recipe, check out the [Full Recipe]. {{image_2}} Using Shrimp You can swap chicken for shrimp. Shrimp cooks fast and adds a nice flavor. Just sauté the shrimp until pink, then follow the same steps as for chicken. This change makes the dish lighter and adds a seafood twist. Vegetarian Options For a vegetarian version, use tofu or chickpeas. Tofu absorbs flavors well and gives protein. Chickpeas add a hearty feel. Cook them the same way and enjoy a rich, flavorful meal without meat. Gluten-Free Pasta If you are gluten-sensitive, try gluten-free pasta. It works great in this dish. Just follow the package instructions for cooking time, as it may differ from regular pasta. Whole Wheat Options Whole wheat pasta is a healthy swap. It has more fiber and nutrients. Use it in the same amount as regular pasta for a wholesome meal. Cajun vs. Creole Seasoning Cajun seasoning is spicy and bold. Creole seasoning has more herbs and is milder. You can switch them based on your spice level preference. Experiment to find your favorite flavor! Adding Different Herbs Fresh herbs like thyme or basil add depth. Just sprinkle some in while cooking. They bring a fresh taste and brighten the dish, making it even more enjoyable. For the full recipe, check out the One-Pan Cajun Chicken Pasta. - Storing Leftovers: Keep the leftover One-Pan Cajun Chicken Pasta in an airtight container. Make sure to let it cool down before sealing. This keeps it fresh and tasty. - How Long It Lasts: In the fridge, your leftovers last about 3 to 4 days. If you want to enjoy them later, freezing could be a better option. - Freezing Instructions: To freeze, place the cooled pasta in a freezer-safe container. You can also use freezer bags. Remove as much air as you can to prevent freezer burn. - Best Practices for Thawing: When you are ready to eat, move the pasta to the fridge overnight. This allows it to thaw slowly and safely. For a quicker method, you can thaw it in the microwave, but do it in short bursts. - Stovetop vs. Microwave: For the best taste and texture, reheat on the stovetop. Add a splash of broth or cream to keep it creamy. Stir until heated through. The microwave is faster but may dry it out. - Maintaining Texture: If using the microwave, cover the bowl with a lid or plate. This traps steam and helps keep the pasta moist. Stir halfway through heating for even warmth. You can make this dish easier with meal prep. Here are some tips: - Prep the Chicken: Season your chicken ahead of time. Store it in the fridge. - Chop Veggies: Dice your onion and bell pepper before cooking. This saves time. - Cook Pasta Early: You can cook the penne pasta a bit ahead. Just undercook it for the best texture. For time-saving techniques, try these ideas: - Use Pre-Cooked Chicken: Shredded rotisserie chicken works great. Just add it in the last steps. - One-Pan Cooking: Stick to the one-pan method. It cuts down on clean-up time. - Frozen Veggies: Use frozen bell peppers and onions. They cook quickly and taste good. Yes, you can use different pasta types. Here are some good options: - Fusilli: Twists hold sauce well. - Rigatoni: Great for a hearty bite. - Spaghetti: Classic choice but may need extra cooking time. Adjust cooking times for substitutes: - Fusilli and Rigatoni: Cook for the same time as penne. - Spaghetti: Keep an eye on it. It may cook faster or slower than penne. Here are some tasty side dishes to try: - Garlic Bread: Perfect for soaking up sauce. - Caesar Salad: Fresh greens balance the meal. - Roasted Vegetables: Add color and flavor to your plate. For dessert pairings, consider these options: - Chocolate Mousse: A rich, creamy finish. - Fruit Salad: Light and refreshing after a spicy meal. - Pecan Pie: A sweet treat to end your feast. For the full recipe, check out the One-Pan Cajun Chicken Pasta. This blog showed how to make One-Pan Cajun Chicken Pasta. You learned about the main ingredients and key steps, from preparing the chicken to blending flavors. We also discussed helpful tips, variations, and storage options. Cooking can be fun and easy with the right guide. So, gather your ingredients and follow these steps. You’ll enjoy a tasty meal that suits your taste and needs. Happy cooking!

One-Pan Cajun Chicken Pasta Simple and Tasty Meal

Are you ready to spice up your dinner routine? One-Pan Cajun Chicken Pasta is a simple, tasty meal that packs

- 4 tilapia fillets - 4 cloves garlic, minced - 1/4 cup fresh lemon juice (about 2 lemons) - 2 tablespoons olive oil - 1 teaspoon lemon zest - 1 teaspoon dried oregano - 1/2 teaspoon salt - 1/4 teaspoon black pepper - Fresh parsley, chopped (for garnish) - Lemon wedges (for serving) When I make Easy Lemon Garlic Tilapia, I focus on fresh, bright flavors. The main ingredients are simple yet effective. The tilapia fillets provide a mild base. Garlic adds a punch, while lemon juice brings brightness. The combination makes for a tasty dish. For extra flavor, I like to use lemon zest. It gives a nice aroma and tang. Olive oil keeps the fish moist and helps the flavors mix. Dried oregano adds a hint of earthiness. When it comes to seasoning, I keep it straightforward. A little salt and black pepper work wonders. These enhance the natural taste of the fish without overpowering it. For garnish, I love fresh parsley. It adds color and freshness. Don’t forget the lemon wedges for serving. They add an extra burst of flavor when squeezed over the fish. You can find the full recipe and all the details to make this dish at home. - Preheat the oven to 375°F (190°C). - Prepare a baking dish with olive oil. Start by heating your oven. This helps the tilapia cook evenly. Next, grab your baking dish and coat it with olive oil. This step keeps the fish from sticking and adds flavor. - Whisk together garlic, lemon juice, olive oil, lemon zest, oregano, salt, and black pepper. Now it’s time to mix your ingredients. In a small bowl, add minced garlic, fresh lemon juice, and olive oil. Then, add lemon zest, oregano, salt, and black pepper. Whisk them until they blend well. This mixture will give your fish a zesty kick. - Arrange tilapia in the baking dish and coat with the lemon garlic mixture. - Bake for 15-20 minutes and check for doneness. Next, place the tilapia fillets in your baking dish. Spread them out in a single layer. Pour the lemon garlic mixture over the fish, ensuring each piece gets coated. Bake the tilapia for about 15 to 20 minutes. You can check if it’s done by poking it with a fork. The fish should be opaque and flake easily. For the full recipe, don’t forget to check the ingredients and detailed instructions! To keep the tilapia juicy and tasty, follow a few key steps. First, always use fresh fish. Fresh tilapia has a mild taste and will soak up flavors well. Make sure to season the fish well with the lemon garlic mix. This step is important for flavor. To check if the tilapia is done, look for two signs. The fish should be opaque, meaning it is cooked through. Also, it should flake easily when you poke it with a fork. If it does not flake, it needs more time. Pair your lemon garlic tilapia with light and fresh side dishes. Here are a few great options: - Steamed broccoli - Roasted asparagus - Quinoa salad - Garlic bread For a lovely touch, garnish the dish with fresh parsley. It adds color and taste. You can also add lemon wedges on the side. This gives your guests a zesty option. Baking fish can be tricky. Here are some common mistakes to avoid: - Overcooking: Fish can dry out quickly. Keep an eye on the time. - Skipping the marinade: Marinating adds flavor. Let the tilapia soak for at least 15 minutes. The marinating time is key. It allows the fish to absorb all those tasty lemon and garlic flavors. Don’t rush this step; it makes a big difference. For the full recipe, check the section above. {{image_2}} For this recipe, tilapia shines, but you can swap in other fish. Cod, haddock, or even salmon work well. Each fish has its own taste, but the lemon garlic mix enhances them all. If you prefer seafood, shrimp or scallops can also be great choices. To adapt this for chicken, use boneless, skinless chicken breasts. Cook them the same way, but make sure they reach a safe temperature. Lemon garlic is a classic combo, but you can add more flavor. Fresh herbs like thyme or basil can make it pop. You can also try spices like paprika or cayenne for some heat. Want to get colorful? Toss in vegetables! Asparagus, bell peppers, or zucchini can roast alongside the fish. This not only adds flavor but also makes your dish look beautiful. Grilling tilapia gives it a nice smoky flavor. Just make sure your grill is oiled to prevent sticking. Baking is simple and keeps the fish moist. If you want a quick option, try pan-searing. Heat a skillet, add olive oil, and cook the fillets for about 3-4 minutes on each side. This method gives a nice crust while keeping the inside tender. No matter the method, you’ll enjoy the same great lemon garlic flavor. To freeze leftover lemon garlic tilapia, follow these simple steps: - Let the fish cool to room temperature. - Wrap each fillet tightly in plastic wrap. - Place the wrapped fillets in a freezer-safe bag. - Label the bag with the date. This method keeps your tilapia fresh for about three months. When you're ready to eat, thaw the fish in the fridge overnight. For reheating, place it in a preheated oven at 350°F (175°C) for 10-15 minutes. This helps keep the flavor and texture intact. Store leftover lemon garlic tilapia in the fridge for up to two days. - Use an airtight container to keep it fresh. - Place a paper towel inside to absorb excess moisture. This will help maintain the fish's flavor and texture. Be sure to check for any off smells before eating. Lemon garlic tilapia is great for meal prep. You can use it in various ways: - Flake the fish and add it to tacos with fresh veggies. - Serve it on a bed of rice or quinoa for a healthy meal. - Mix it into a salad with greens and a light dressing. Combining it with other ingredients makes it easy to create quick, tasty meals throughout the week. For the full recipe, check out the Zesty Lemon Garlic Tilapia. You can tell tilapia is cooked when it looks opaque. The flesh should flake easily with a fork. Another sign is when it reaches an internal temperature of 145°F (63°C). If you see these signs, your tilapia is ready. Cooking it too long can make it dry, so watch it closely. You can use bottled lemon juice, but fresh juice is better. Fresh lemons have a bright flavor that bottled juice lacks. Bottled juice can have added preservatives, which may change the taste. If you want the best flavor, stick with fresh lemons when making this recipe. Lemon garlic tilapia pairs well with many sides. Here are some great options: - Steamed broccoli - Garlic mashed potatoes - Quinoa salad - Roasted asparagus - Rice pilaf These sides will enhance the dish and make your meal even more enjoyable. You can also add a fresh salad for a light touch. This recipe showcases simple ingredients like tilapia, garlic, and lemon. We covered how to prep, bake, and serve it. I shared tips for juicy fish, suggested side dishes, and common mistakes to avoid. You can also try variations with other fish or enhance flavors with herbs. Store any leftovers properly to enjoy later. This dish offers many options and is easy to make. With these steps, you can create a delicious meal every time. Enjoy cooking!

Easy Lemon Garlic Tilapia Tasty and Quick Recipe

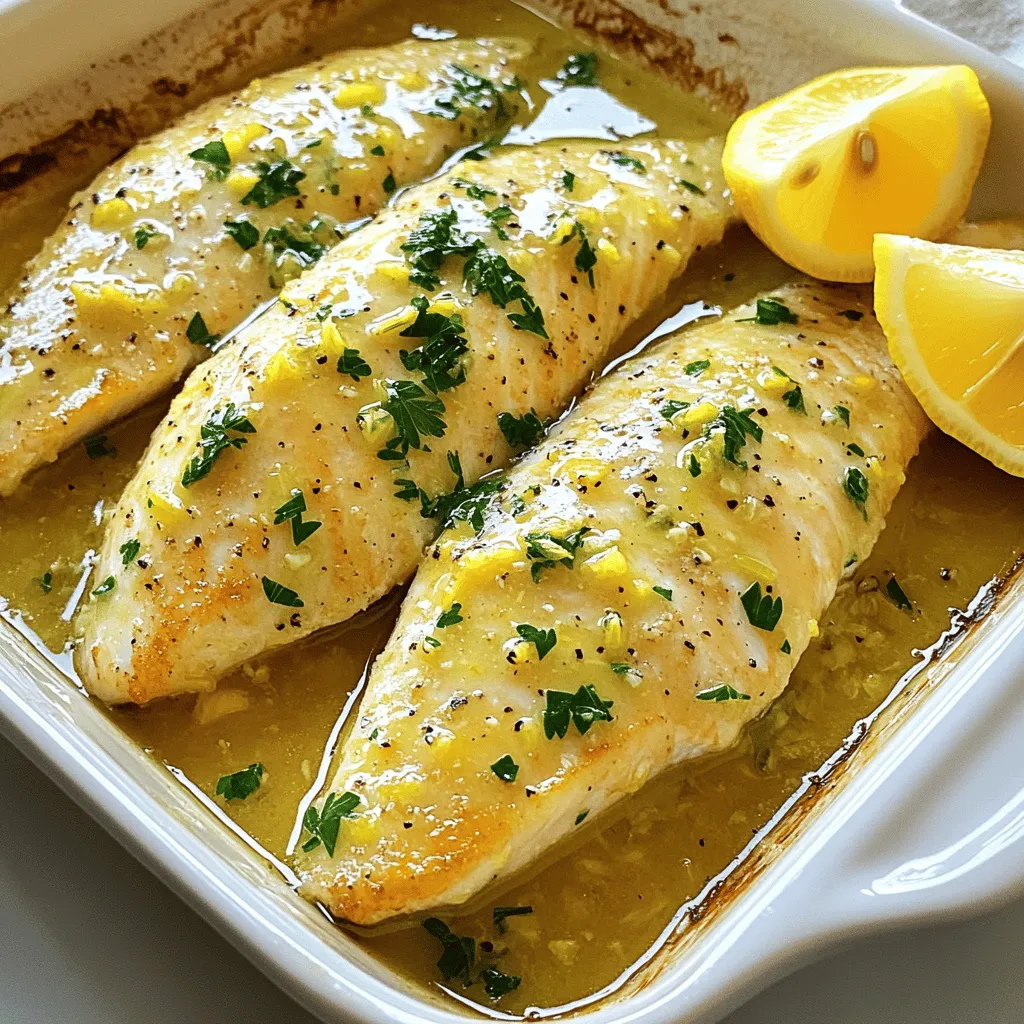
Are you ready to whip up a quick and tasty meal? This Easy Lemon Garlic Tilapia recipe brings together fresh

- 1 cup rolled oats - 1 ripe banana - 1 cup almond milk (or any preferred milk) - 2 tablespoons honey or maple syrup - 1 teaspoon baking powder - 1/2 teaspoon cinnamon - 1/4 teaspoon salt - 1 teaspoon vanilla extract - Coconut oil or cooking spray for frying These ingredients make your Healthy Banana Oat Pancakes both tasty and nutritious. The rolled oats give a nice texture. A ripe banana adds sweetness and moisture. Almond milk keeps it dairy-free, but you can use any milk you like. Honey or maple syrup adds a touch of natural sweetness. For extra fluffiness, consider adding baking powder. A pinch of cinnamon gives warmth and flavor. Salt enhances all the tastes and balances the sweetness. Vanilla extract adds a lovely aroma. For cooking, use coconut oil or spray to prevent sticking. This is key for perfect pancakes. First, take 1 cup of rolled oats. Use a blender or food processor to pulse the oats until they look like flour. This helps create a nice texture in your pancakes. Next, add in 1 ripe banana and 1 cup of almond milk. You can use any milk you like. Then, include 2 tablespoons of honey or maple syrup, 1 teaspoon of baking powder, 1/2 teaspoon of cinnamon, 1/4 teaspoon of salt, and 1 teaspoon of vanilla extract. Blend everything until it is smooth. If the batter seems thick, add a splash more milk. Now, heat a non-stick skillet over medium heat. Lightly grease it with coconut oil or cooking spray. Pour about 1/4 cup of batter onto the skillet for each pancake. Cook for 2-3 minutes until you see bubbles on the surface. This means it's time to flip! Carefully turn the pancakes and cook for another 2-3 minutes until they are golden brown. To serve your Healthy Banana Oat Pancakes, stack them high on a plate. Drizzle with honey or maple syrup. For extra flair, sprinkle fresh berries on top and dust with powdered sugar. This makes your meal not just tasty but also pretty! Achieving the right batter consistency is key. You want it thick but pourable. If your batter is too thick, add a little more almond milk. Aim for a smooth blend without any lumps. Avoiding overmixing keeps your pancakes fluffy. Once you mix in the wet ingredients, stop when everything looks combined. A few small lumps are okay. Overmixing can make pancakes tough. Temperature control on the skillet matters a lot. Preheat your skillet on medium heat. If it’s too hot, pancakes can burn on the outside and stay raw inside. A drop of water should sizzle when the skillet is ready. Flipping pancakes smoothly takes practice. Use a thin spatula to slide under the pancake. Make sure the edges look set before you flip. A gentle flip helps keep them intact. If you want alternatives for oats or sweeteners, there are many options. You can use almond flour or whole wheat flour instead of oats. For sweeteners, try agave syrup or stevia. For dairy-free and gluten-free options, use almond milk or coconut milk. Ensure your oats are labeled gluten-free if needed. These swaps keep your pancakes tasty and healthy. For the Full Recipe, be sure to check the main article for all details! {{image_2}} You can boost your pancakes with healthier add-ins. Adding nuts or seeds gives a nice crunch. Chopped walnuts or almonds work well. You can also sprinkle in chia seeds or flaxseeds for extra fiber. Adding fruits like blueberries or chocolate chips makes them sweeter. Blueberries burst with flavor, while chocolate chips add a fun touch. Want to switch things up? Try making savory pancakes. You can add herbs like parsley or chives to the batter. Spices like garlic powder or smoked paprika give a unique flavor. These savory pancakes pair well with eggs or avocado. They make a great brunch dish when you crave something different. Toppings can change the whole meal. Try adding yogurt for creaminess. Nut butter adds protein and flavor. Fresh fruit like banana slices or strawberries makes it fresh. A drizzle of honey or maple syrup adds sweetness. You can even sprinkle some nuts on top for a crunchy finish. These simple changes keep your pancakes exciting every time. To keep your pancakes fresh, store any leftovers in the fridge. Place them in an airtight container. This method keeps them from drying out. If you want to save them for longer, freeze them. Stack the pancakes with parchment paper between each one. Wrap them tightly in plastic wrap before putting them in a freezer bag. You can reheat pancakes in two ways: the microwave or a skillet. The microwave is quick but may make them a bit chewy. Heat them for about 30 seconds. For a fluffier result, use a skillet. Heat it on low and warm the pancakes for a few minutes on each side. This method keeps them soft and golden. In the fridge, these pancakes last about 3 to 4 days. If you freeze them, they can last up to 2 months. Just remember to label your containers with the date. This helps you keep track of how long they’ve been stored. Enjoy your Healthy Banana Oat Pancakes whenever you like! Yes, you can make these pancakes without a blender. You can mash the banana with a fork in a bowl. Then, add the rolled oats. Use a whisk or a fork to combine the oats with the mashed banana and other wet ingredients. This method may take a bit more effort, but it works well. Yes, you can use quick oats instead of rolled oats. Rolled oats are thicker and give a heartier texture. Quick oats are smaller and blend faster. If you use quick oats, your pancakes might be a bit softer and less chewy. Both options are nutritious and tasty. These pancakes are healthy and packed with nutrients. Each pancake has about 120 calories. They contain protein, fiber, and healthy carbs. Here’s a quick breakdown: - Calories: 120 per pancake - Protein: 4g - Fiber: 3g - Carbohydrates: 20g - Fat: 2g This makes them a great choice for breakfast! For the complete details on how to make Healthy Banana Oat Pancakes, check out the [Full Recipe]. Healthy Banana Oat Pancakes are simple to make and great for any meal. We covered the ingredients, preparation, cooking, and storage tips. Customization options allow you to make them your own. Consider adding fruits or nuts for extra fun. If you follow the steps and tips, you'll enjoy fluffy pancakes every time. These pancakes are not only tasty but also a healthy choice. Now, you can enjoy your cooking with these easy recipes. Give them a try! You'll love how they turn out.

Healthy Banana Oat Pancakes Simple and Delicious Meal

Looking for a tasty and healthy breakfast option? You’ve come to the right place! In this article, I’ll share my

For great zucchini oat pancakes, you need simple and wholesome ingredients. Here’s what you will use: - 1 medium zucchini, grated - 1 cup rolled oats - 1/2 cup all-purpose flour (or whole wheat flour) - 1 teaspoon baking powder - 1/4 teaspoon baking soda - 1/2 teaspoon cinnamon - 1/4 teaspoon salt - 1 cup buttermilk (or milk of choice) - 2 large eggs - 1 tablespoon maple syrup (optional) - 1 tablespoon olive oil or melted coconut oil - Cooking spray or additional oil for the pan These ingredients work together to create a fluffy and tasty pancake. The zucchini adds moisture and nutrition. Oats give a nice texture and a good boost of fiber. You can make these pancakes even more fun by adding some tasty extras. Here are a few ideas: - Chocolate chips for a sweet twist - Chopped nuts like walnuts or pecans for crunch - Fresh herbs like basil or mint for a unique flavor - Blueberries or other berries for a fruity touch Feel free to mix and match. These add-ins can make breakfast more exciting and delicious. To make your zucchini oat pancakes, you will need some basic kitchen tools: - Large mixing bowl - Whisk or fork - Non-stick skillet or griddle - Measuring cups and spoons - Grater for the zucchini - Spatula for flipping pancakes Having the right tools makes cooking easier and more fun. With these items, you’ll be ready to whip up a batch of pancakes in no time. For the full recipe, check out the details above. Start by taking a large mixing bowl. Add 1 cup of rolled oats, 1/2 cup of all-purpose flour, 1 teaspoon of baking powder, 1/4 teaspoon of baking soda, 1/2 teaspoon of cinnamon, and 1/4 teaspoon of salt. Mix these dry ingredients well. This blend gives the pancakes their tasty base. In another bowl, whisk together 1 cup of buttermilk, 2 large eggs, and 1 tablespoon of maple syrup if you like it sweet. Add 1 tablespoon of olive oil or melted coconut oil for a rich flavor. Mixing these ingredients well ensures a smooth batter. Now, add the grated zucchini to your wet mixture. Stir until combined. Next, pour the wet mix into the dry ingredients. Gently stir until just combined. Be careful not to overmix, or your pancakes may turn out tough. The batter should be thick but pourable. Heat a non-stick skillet or griddle over medium heat. Lightly grease it with cooking spray or oil. Pour about 1/4 cup of batter onto the skillet for each pancake. Cook until bubbles form on the surface and the edges look set. This usually takes about 3-4 minutes. Flip the pancakes and cook for another 2-3 minutes until golden brown on both sides. Keep the pancakes warm in a low oven while cooking the remaining batter. Enjoy your delicious zucchini oat pancakes! For a detailed guide, check out the Full Recipe. To make amazing zucchini oat pancakes, follow a few key tips. First, use fresh, firm zucchini. Grate it just before using for the best flavor. Squeeze out excess moisture using a clean kitchen towel. This step helps avoid a watery batter. Mix the dry and wet ingredients separately. This keeps the pancakes fluffy. When you combine the two, stir gently. Overmixing makes pancakes tough. Aim for a thick, pourable batter. If it feels too thick, add a splash of milk. Soggy pancakes can ruin your breakfast. To avoid this, ensure the skillet is hot before pouring in the batter. A medium heat cooks the pancakes evenly. If your pan is too cool, the pancakes soak up oil and become soggy. Cook the pancakes until bubbles form on the surface. This usually takes about 3-4 minutes. Flip them only when the edges look set. If you flip too soon, they may fall apart. Serving zucchini oat pancakes is fun! Stack them high on a plate for a nice look. Drizzle with maple syrup for sweetness. Add a dollop of yogurt for creaminess and extra protein. A sprinkle of fresh herbs or crushed nuts adds crunch and flavor. For a twist, serve with fresh fruit. Sliced bananas, berries, or apples work well. You can even add a dusting of powdered sugar for a special touch. Try these ideas for a tasty and healthy breakfast treat. For the full recipe, check the earlier section. {{image_2}} You can make gluten-free zucchini oat pancakes easily. Use gluten-free oats and a gluten-free flour blend instead of regular flour. This swap keeps the pancakes fluffy while making them safe for those with gluten intolerance. You can find many gluten-free flour options at your local store. To create a vegan version, swap the eggs and buttermilk. Use ground flaxseed mixed with water as an egg substitute. One tablespoon of flaxseed with three tablespoons of water works well. For buttermilk, use almond milk mixed with a tablespoon of vinegar. This keeps the pancakes moist and adds a nice tang. You can add fun flavors to these pancakes. Try mixing in chocolate chips for a sweet treat. Chopped nuts, like walnuts or pecans, add crunch and richness. You can also add spices like nutmeg for a warm flavor. Experiment with what you like best to make these pancakes your own. For the full recipe, click here. To store leftover zucchini oat pancakes, let them cool first. Place them in a single layer on a plate. Cover the plate with plastic wrap or a clean kitchen towel. This keeps them fresh for up to three days in the fridge. If you stack them, place parchment paper between each pancake to prevent sticking. Freezing pancakes is easy and keeps them tasty. Once cooled, place them in a single layer on a baking sheet. Freeze them for about an hour. After they are solid, transfer them to an airtight container or freezer bag. Label it with the date. You can freeze them for up to three months. This way, you have quick meals ready for busy mornings! Reheating zucchini oat pancakes is simple. For the best texture, use a skillet or griddle. Heat it over medium-low heat. Place the pancakes in the skillet and warm for about 2-3 minutes on each side. You can also use a microwave if you are in a hurry. Heat them for about 20-30 seconds, checking them to avoid overheating. Enjoy your pancakes warm, just like when they were fresh! Yes, you can use different flours. Whole wheat flour works great. It adds fiber and a nutty taste. Almond flour is also a good option for gluten-free pancakes. Just remember that each flour has a unique texture and flavor. To lower calories, you can reduce the oil in the recipe. You can also use unsweetened applesauce instead of oil. Replace buttermilk with a low-fat version or almond milk. Consider cutting back on maple syrup or omitting it altogether. Zucchini is low in calories and high in vitamins. It adds moisture to the pancakes. Oats are full of fiber, which helps digestion. They can keep you full longer. Together, they create a balanced meal with nutrients that fuel your day. Watch for bubbles on the surface. When bubbles form, it's time to flip. The edges will look set, too. Cook for about 2-3 minutes on the second side. The color should be golden brown. This way, you will have perfectly cooked pancakes every time. For the full recipe, check the earlier section. Zucchini oat pancakes are easy and fun to make. We explored key ingredients, helpful tips, and delicious variations. Remember to use the right equipment and follow the steps for perfect results. Feel free to mix in different flavors or adapt for special diets. Store leftovers well, and enjoy them later. With this guide, you'll create tasty pancakes your family will love. Now, get cooking and enjoy your delicious creations!

Zucchini Oat Pancakes Tasty and Healthy Breakfast Treat

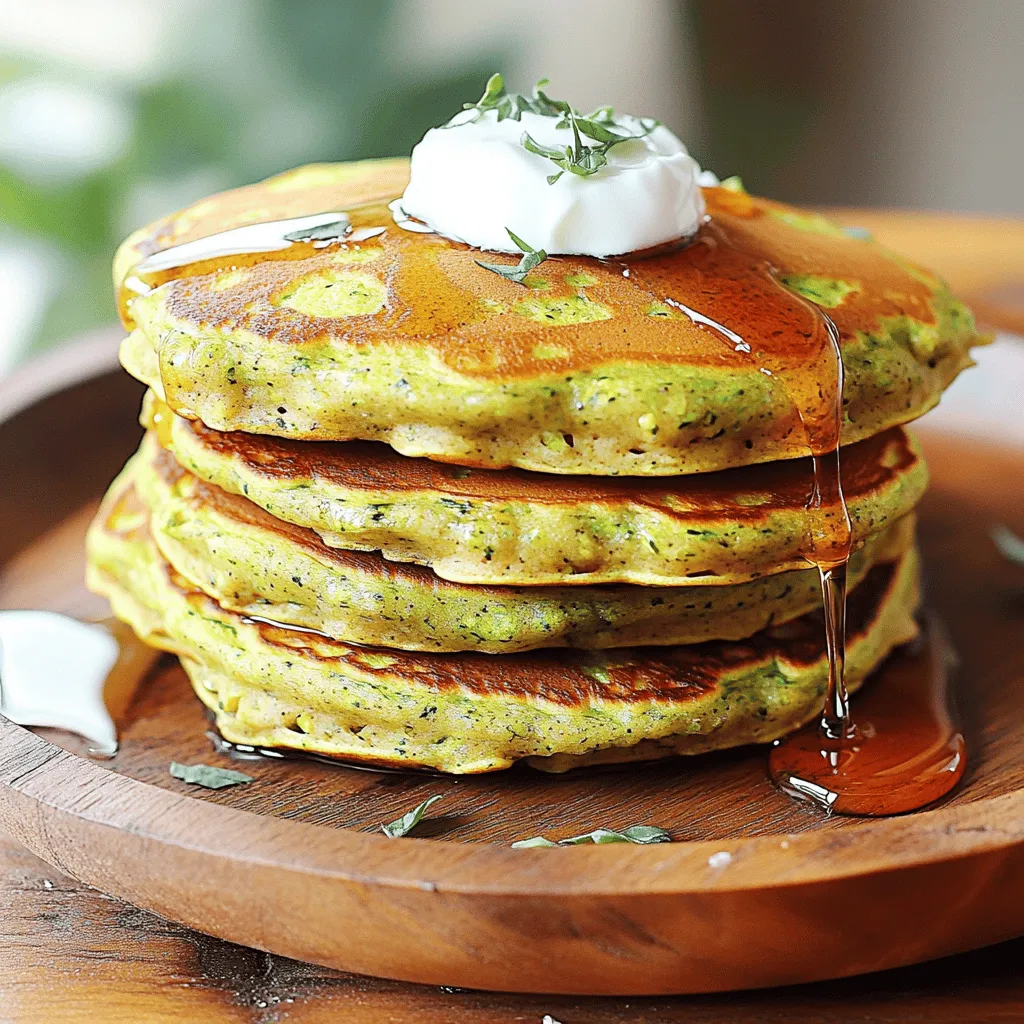
Looking for a fun and healthy breakfast option? Try these Zucchini Oat Pancakes! Packed with nutrients, they’re perfect for you

Older posts
Newer posts
← Previous Page1 … Page58 Page59 Page60 … Page85 Next →

dsad

© 2026 greenmealmap • Built with GeneratePress

Our Policies

  • Copyright Policy
  • Cookie Policy
  • GDPR Policy
  • Privacy Policy
  • Disclaimer
  • Terms Of Use

More Information

  • Home
  • About
  • Contact
  • Appetizers
  • Dessert
  • Dinner
  • Drinks
©2026, greenmealmap About Back To Top