Skip to content
DisclaimerTerms Of UseGDPR PolicyCookie Policy

greenmealmap

  • Home
  • Drinks
  • Appetizers
  • Dinner
  • Dessert
  • About
  • Contact
  • Privacy Policy
DisclaimerTerms Of UseGDPR PolicyCookie Policy

NO-ING-IMG

To make Minute Teriyaki Shrimp Noodle Bowls, you need simple ingredients. I love how each one adds flavor and nutrition. Here’s what you will need: - 8 oz rice noodles - 1 lb large shrimp, peeled and deveined - 1 cup broccoli florets - 1 cup snap peas, trimmed - 1 red bell pepper, thinly sliced - 2 green onions, chopped - 3 tablespoons teriyaki sauce - 1 tablespoon sesame oil - 1 tablespoon fresh ginger, grated - 1 garlic clove, minced - 1 tablespoon sesame seeds for garnish - Salt and pepper to taste Rice noodles are quick to cook and soak up the sauce well. The shrimp adds protein, making this dish filling. Broccoli and snap peas give crunch and color. Red bell pepper brings sweetness, while green onions add a fresh bite. Teriyaki sauce ties everything together with its sweet and savory flavor. Sesame oil, ginger, and garlic boost the taste. Finally, sesame seeds make a lovely garnish. Each ingredient plays a role in this tasty meal. To start, cook the rice noodles. Follow the package instructions closely. This usually takes about 4-6 minutes. Once they are soft, drain the noodles in a colander. Set them aside for later. The noodles will soak up all the great flavors in the dish. Next, heat the sesame oil in a large skillet. Use medium-high heat for the best results. Add minced garlic and grated ginger. Sauté them for about 30 seconds. This step makes your kitchen smell amazing! Now, add the shrimp to the skillet. Cook them for 2-3 minutes. You will know they are ready when they turn pink and opaque. Don’t forget to season with salt and pepper. Then toss in the broccoli, snap peas, and red bell pepper. Stir everything well. Cook for another 3-4 minutes. This keeps the veggies tender and crisp. Pour the teriyaki sauce over the shrimp and veggies. Stir gently to coat everything evenly. Let it cook for another minute. This helps the flavors blend together. Finally, add the cooked rice noodles to the skillet. Gently mix everything until the noodles are hot and covered in sauce. Remove from heat. Garnish with chopped green onions and sesame seeds before serving. Enjoy your meal! When choosing shrimp, look for large, firm, and shiny pieces. Fresh shrimp should smell like the sea, not fishy. Check the color; it should be a nice pink or gray. If buying frozen, ensure they are well-packaged and free from ice crystals. Always peel and devein your shrimp before cooking for the best texture and taste. To cook rice noodles, follow the package instructions closely. Boil water and add the noodles, stirring gently. Cook until they are tender but still firm. This usually takes about 3 to 5 minutes. Once done, drain the noodles and rinse them under cold water. This stops the cooking and keeps them from sticking together. You want your noodles to be soft but not mushy. You can change the taste of your teriyaki shrimp noodle bowls easily. Try adding more ginger or garlic for a stronger flavor. For a spicy kick, toss in some red pepper flakes or a dash of sriracha. If you like sweetness, add a touch of honey to the teriyaki sauce. You can also swap the vegetables. Use carrots, bell peppers, or snap peas based on your taste. Be creative and make it your own! {{image_2}} You can switch the shrimp for other proteins. Chicken works well in this dish. Thinly slice chicken breast and cook it the same way as shrimp. Tofu is a great plant-based option. Just cube firm tofu and sauté until golden. You can also try beef or pork for a different taste. Each protein adds its own flavor and texture. Feel free to mix up the veggies. Carrots add color and crunch. You can slice them thin and toss them in with the other vegetables. Zucchini is another great choice. Chop it into half-moons and add it to the mix. Spinach or bok choy can add a nice green touch. Just cook these for a short time to keep them crisp. If you're not a fan of teriyaki sauce, try soy sauce instead. It gives a salty kick that pairs well with shrimp. You can also use sweet chili sauce for a spicy twist. For a creamy texture, mix in peanut sauce. Each sauce choice changes the flavor and makes the dish unique. Experiment and find your favorite! After enjoying your Minute Teriyaki Shrimp Noodle Bowls, you may have some leftovers. To store them, let the dish cool down first. Then, place it in an airtight container. This method helps keep the shrimp and noodles fresh. Store the container in the fridge. Your leftovers will stay good for up to three days. When you're ready to eat the leftovers, reheating is simple. You can use a microwave or a skillet. If you choose the microwave, put the noodles in a bowl. Cover them with a damp paper towel to keep moisture in. Heat them for 1-2 minutes. If using a skillet, add a splash of water and heat over medium heat. Stir often until warm. This keeps the noodles from drying out. If you want to store your dish for a longer time, freezing is an option. First, let the dish cool completely. Then, portion it into freezer-safe containers. Leave some space in each container to allow for expansion. Seal them tightly and label with the date. You can freeze the noodle bowls for up to three months. When you're ready to eat, thaw them overnight in the fridge. Reheat as mentioned earlier for a quick meal. It takes about 20 minutes to prepare Minute Teriyaki Shrimp Noodle Bowls. You need 10 minutes to prep your ingredients and another 10 minutes to cook. This quick meal fits perfectly into a busy day. You can enjoy a tasty dinner without spending too much time in the kitchen. Yes, you can use frozen shrimp for this recipe. Just remember to thaw them first. Place frozen shrimp in cold water for about 15 minutes to speed up the process. Using frozen shrimp makes this dish even easier and faster. It’s a great way to keep shrimp on hand for quick meals. You can serve a simple side salad with greens and a light dressing. Steamed edamame also pairs well with the shrimp noodles. For a warm option, consider serving miso soup. These sides add variety and balance to your meal. They are quick to prepare, keeping your cooking time short. You learned how to make Minute Teriyaki Shrimp Noodle Bowls. We covered the right ingredients, from rice noodles to shrimp and fresh veggies. I shared steps to cook your dish perfectly and some handy tips to choose the best shrimp. We explored variations for added flavor and how to store your leftovers. Enjoying this dish can be easy and fun. Now you can create a tasty meal anytime!

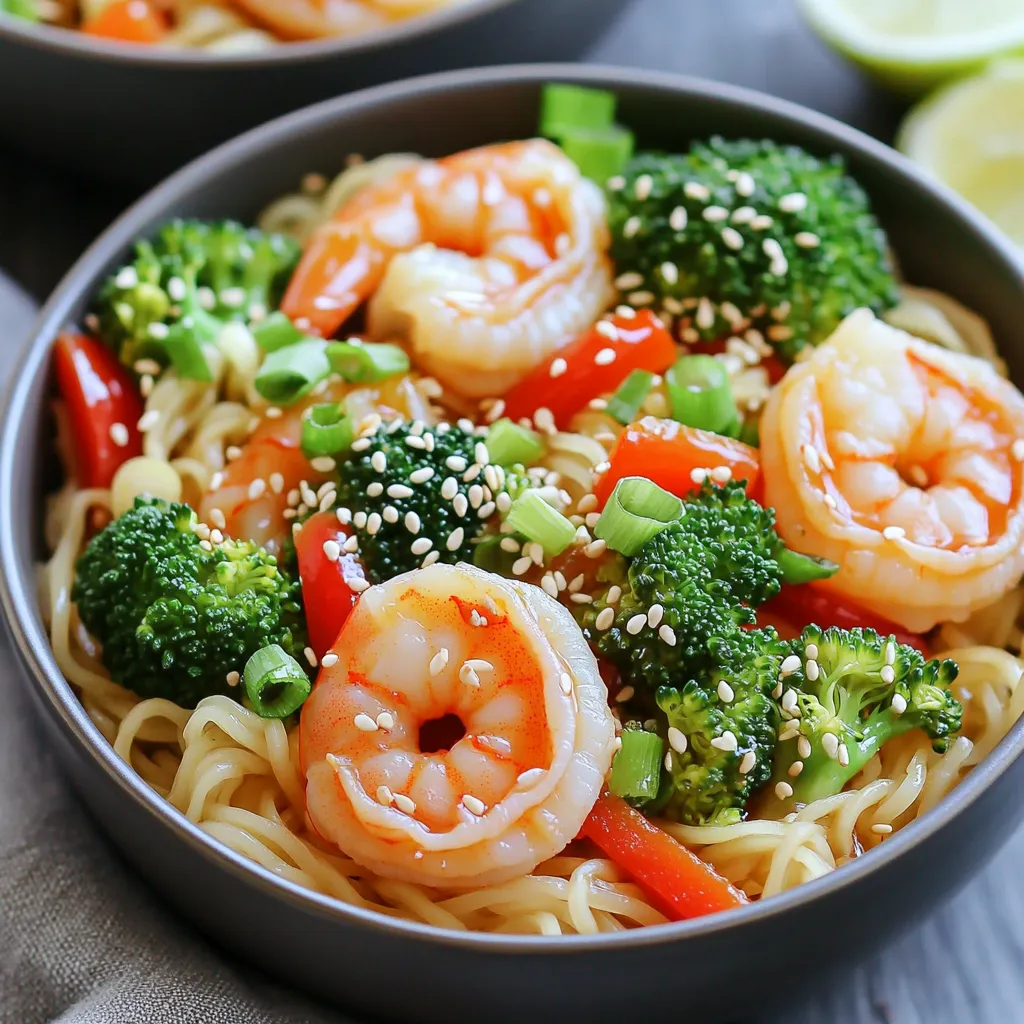
Minute Teriyaki Shrimp Noodle Bowls Quick and Easy Meal

Looking for a quick and tasty dinner? You’ll love these Minute Teriyaki Shrimp Noodle Bowls. They come together in under

To make these delicious blondies, you need a few key ingredients. Here’s what you will need: - 1 cup unsalted butter, melted - 1 cup brown sugar, packed - 1/2 cup granulated sugar - 2 large eggs - 2 teaspoons pure maple extract - 2 cups all-purpose flour - 1 teaspoon baking powder - 1/2 teaspoon baking soda - 1/4 teaspoon salt - 1 cup pecans, chopped These ingredients create a rich base. The butter gives a nice texture, while the sugars add sweetness. Maple extract brings a warm flavor, and the pecans offer a delightful crunch. You can add some optional ingredients to make your blondies even better. Try these if you like: - 1/2 cup chocolate chips Chocolate chips add a sweet twist. They melt during baking, creating pockets of gooey goodness. If you prefer a nut-free version, feel free to skip them. Choosing the right ingredients makes a big difference. Here are some tips: - Use fresh, high-quality butter for the best flavor. - Look for pure maple extract, not imitation. It adds a richer taste. - Select pecans that are fresh and crunchy. They should smell nutty, not stale. - For flour, go for unbleached all-purpose for a better texture. By picking quality ingredients, you ensure your blondies taste amazing. Trust me, it’s worth the extra effort! Start by preheating your oven to 350°F (175°C). This ensures even baking. Next, grease a 9x13-inch baking pan. You can also line it with parchment paper. This makes removing the blondies easier later. In a mixing bowl, add 1 cup of melted unsalted butter. Then, add 1 cup of packed brown sugar and 1/2 cup of granulated sugar. Mix these together until smooth. Next, crack in 2 large eggs, adding them one at a time. Stir well after each egg. Finally, pour in 2 teaspoons of pure maple extract. This adds rich flavor. In another bowl, whisk together 2 cups of all-purpose flour, 1 teaspoon of baking powder, 1/2 teaspoon of baking soda, and 1/4 teaspoon of salt. Make sure to mix them well. This helps the blondies rise and taste great. Gradually add the dry mix to the wet mix. Stir gently so everything combines without overmixing. Fold in 1 cup of chopped pecans and 1/2 cup of chocolate chips if you like. Once mixed, pour the batter into your prepared pan. Spread it evenly with a spatula. Bake for 25-30 minutes. The edges should turn golden. Insert a toothpick in the center; it should come out clean. After baking, remove the pan from the oven. Let the blondies cool in the pan for about 10 minutes. Then, transfer them to a wire rack to cool completely. Once cooled, cut them into squares. For a sweet touch, serve on a rustic wooden board. Dust with powdered sugar or drizzle with extra maple syrup. Enjoy your treats! To achieve the perfect texture, use melted butter. It adds moisture and richness. Mix the wet ingredients well, but don’t overmix. This keeps your blondies soft. Let them cool slightly before cutting. This helps them hold their shape better. Avoid overbaking the blondies. Check them at 25 minutes. If a toothpick comes out clean, they are done. Don’t skip the parchment paper or greasing the pan. This makes removal easier. Also, be careful not to overmix when adding dry ingredients. This can lead to tough blondies. For a bakery-style look, serve blondies on a rustic wooden board. Dust them with powdered sugar for a nice touch. You can also drizzle some extra maple syrup on top. Cut them into even squares for a neat appearance. Enjoy them with a scoop of vanilla ice cream for a special treat! {{image_2}} You can swap pecans for other nuts. Walnuts or almonds work well in this recipe. Each nut gives a unique taste and texture. You can even use hazelnuts for a fun twist. Just chop them up like the pecans and mix them in. This simple change makes each batch special. Maple extract is great, but you can try other extracts too. Vanilla extract adds warmth and depth. Almond extract brings a nutty flavor that pairs nicely. You can mix and match these extracts for a unique taste. Just use the same amount as the maple extract. This little change can make your blondies exciting. You can make vegan maple pecan blondies easily. Replace the eggs with flaxseed meal. Mix 1 tablespoon of flaxseed with 2.5 tablespoons of water. Let it sit for a few minutes until it gets thick. Use a vegan butter alternative instead of regular butter. This way, you can enjoy the same great taste without eggs or dairy. To keep your maple pecan blondies fresh, store them in an airtight container. Place a piece of parchment paper between layers to avoid sticking. Keep them at room temperature for up to three days. If you want to store them longer, the fridge is a good option. They should last about a week in the fridge. Always let them cool completely before storing to ensure they stay soft. Freezing is a great way to save your blondies for later. First, cut them into squares. Then, wrap each piece in plastic wrap. After wrapping, place them in a freezer bag. Squeeze out the air and seal it tight. Your blondies will stay fresh in the freezer for up to three months. When you're ready to enjoy them, thaw the pieces in the fridge overnight. To bring back the fresh-baked taste, reheat your blondies. You can use the microwave or an oven. For the microwave, heat each square for about 10-15 seconds. Check to avoid overheating. For the oven, preheat it to 350°F (175°C). Place the blondies on a baking sheet and heat for 5-10 minutes. This method keeps them soft and gooey, just like fresh from the oven! Blondies and brownies are both delicious treats. The main difference is in their flavor and color. Blondies use brown sugar, giving them a light, caramel-like taste. Brownies use cocoa powder, which makes them chocolatey and darker. Blondies are sweeter and less dense than brownies. They also have a chewy texture, often with nuts or chocolate chips. To make your blondies chewier, try these tips: - Use more brown sugar and less granulated sugar. - Add an extra egg or just the yolk of an egg. - Avoid overmixing the batter; mix until just combined. - Bake them for a shorter time. Check for doneness a few minutes early. Yes, you can use different sugars! Brown sugar gives a rich taste, but you can mix in some white sugar for balance. You can also try coconut sugar for a unique flavor. Just remember that the sweetness and texture may change slightly. You can find bakery-style maple pecan blondies at local bakeries or specialty shops. Some grocery stores also carry them in the baked goods section. If you want to try a unique flavor, check online bakeries that ship. Homemade blondies can last up to one week at room temperature. Store them in an airtight container to keep them fresh. If you want to keep them longer, you can freeze them for up to three months. Just wrap them well and label the bag. You learned about key ingredients for making tasty maple pecan blondies. I shared how to mix, bake, and serve them. Tips helped you avoid common mistakes and achieve the best texture. We explored variations like using different nuts and making vegan versions. Lastly, we discussed storage and reheating to keep them fresh. Now, you are ready to impress friends and family with your baking skills. Enjoy every bite of your delicious blondies!

Maple Pecan Blondies Bakery Style Irresistible Treat

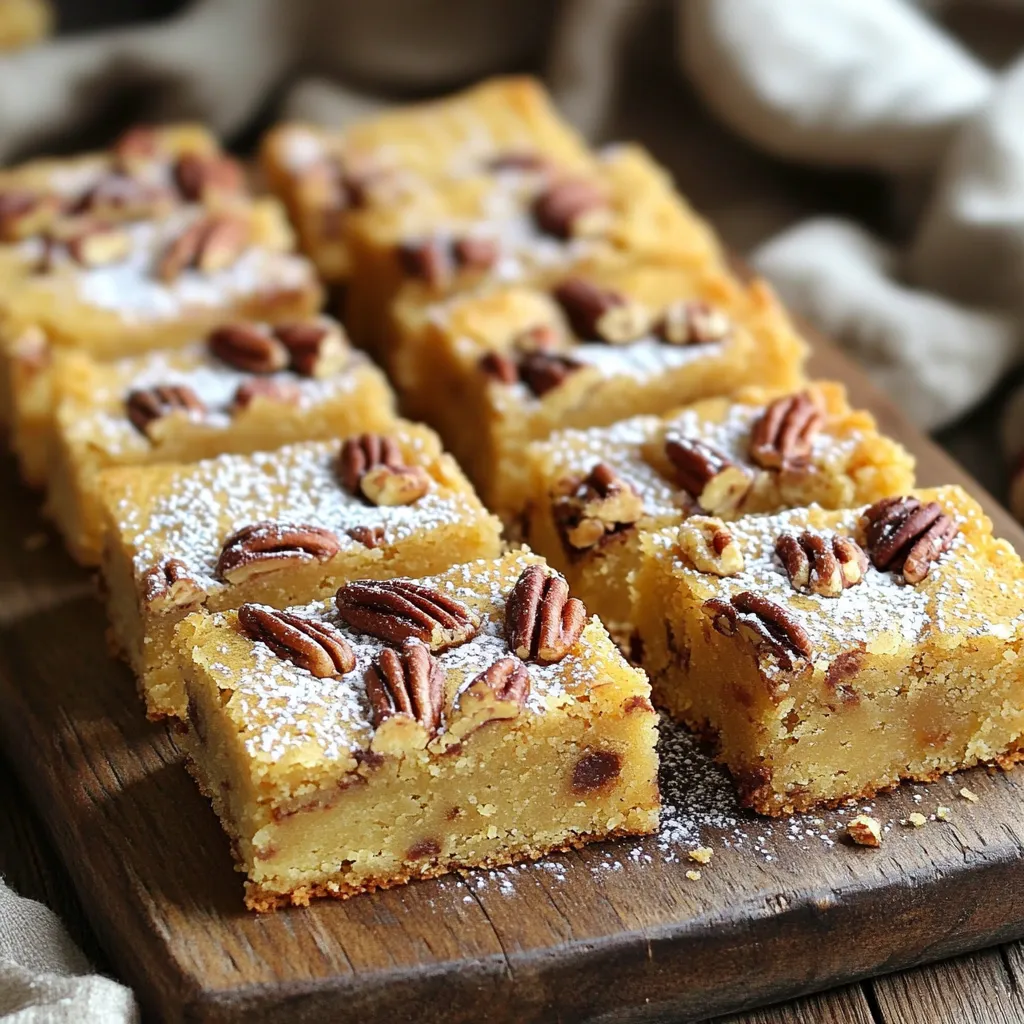
If you crave a sweet treat that stands out, these Maple Pecan Blondies are for you! With a rich maple

- 2 cups all-purpose flour - 1 teaspoon baking powder - 1 teaspoon baking soda - 1 teaspoon ground cinnamon - ½ teaspoon ground nutmeg - ½ teaspoon salt - 1 cup granulated sugar - ½ cup unsalted butter, softened - 2 large eggs - 1 cup canned pumpkin puree - 1 teaspoon vanilla extract - 8 oz cream cheese, softened - ¼ cup powdered sugar - 1 tablespoon orange zest (optional) - ½ cup chopped pecans I love how simple yet tasty this pumpkin cream cheese coffee cake is. The dry ingredients, like flour and baking soda, form the base. They give the cake its fluffy structure. The spices, like cinnamon and nutmeg, add warmth and flavor. You can smell them as they bake. For wet ingredients, you have sugar, butter, and eggs. They mix together to create a sweet and rich batter. Canned pumpkin puree brings moisture and a lovely orange hue. Vanilla extract brightens the flavor. Cream cheese adds a creamy layer that makes each bite special. If you want a bit of crunch, consider adding chopped pecans. They give a nice texture and taste. The orange zest is optional, but it adds brightness. You can skip it if you want a more traditional flavor. Gather these ingredients, and you’re ready to create something delicious! - Preheat your oven to 350°F (175°C). - Grease a 9x13 inch baking pan or line it with parchment paper. - In a medium bowl, whisk together: - 2 cups all-purpose flour - 1 teaspoon baking powder - 1 teaspoon baking soda - 1 teaspoon ground cinnamon - ½ teaspoon ground nutmeg - ½ teaspoon salt - In a large mixing bowl, cream together: - 1 cup granulated sugar - ½ cup unsalted butter, softened - Mix these until fluffy, about 3 minutes. - Add 2 large eggs, one at a time, mixing well after each. - Then, stir in: - 1 cup canned pumpkin puree - 1 teaspoon vanilla extract - Gradually add the dry ingredients from the medium bowl. - Stir until just combined. Do not overmix. - In a small bowl, mix: - 8 oz cream cheese, softened - ¼ cup powdered sugar - 1 tablespoon orange zest (optional) - Mix until smooth and creamy. - Pour half of the pumpkin batter into the prepared pan. - Smooth it out evenly. - Dollop spoonfuls of the cream cheese mixture over the pumpkin layer. - Pour the remaining batter on top to cover it. - If you like, sprinkle ½ cup chopped pecans on top for added crunch. - Bake in the preheated oven for 30-35 minutes. - Check for doneness by inserting a toothpick into the center. - If it comes out clean, your cake is done! - Let the cake cool in the pan for about 10 minutes. - Then transfer it to a wire rack to cool completely. To get a fluffy cake, avoid overmixing. Mix the wet and dry ingredients just until combined. This keeps the cake light and airy. For the cream cheese filling, use room temperature cream cheese. Cold cream cheese does not blend well. It can cause lumps in the filling. Serve slices on a pretty plate. Dust the top with extra powdered sugar for a clean look. Add a dollop of whipped cream or a scoop of vanilla ice cream. These make each slice more inviting. You can also sprinkle chopped pecans on top for a crunchy finish. One common mistake is overbaking the cake. Check for doneness by inserting a toothpick into the center. If it comes out clean, it’s done. Another mistake is not letting the cake cool before slicing. This can make the slices fall apart. {{image_2}} You can make this cake even better by adding more flavors. Think about adding spices like ginger or allspice to boost the warmth. These spices add a nice kick and make the cake feel cozy. You can also mix in different nuts or chocolate chips. Pecans add a lovely crunch, while chocolate chips give a sweet surprise. Feel free to be creative! If you need gluten-free options, you can easily switch the flour. Use a gluten-free blend that works well for baking. This will keep the cake light and fluffy. For vegan options, replace eggs with flax eggs or applesauce. You can also swap cream cheese with a dairy-free version. These changes keep the taste delicious while fitting your diet. This cake works great for holidays too! For a fun twist, add cranberries for a tart flavor. You can also mix in chocolate for a rich treat. These seasonal additions can turn your coffee cake into a festive dessert. It’s a great way to enjoy the flavors of the season! To keep your pumpkin cream cheese coffee cake fresh, store it at room temperature. Use a cake dome or wrap it in plastic wrap. This helps keep moisture in. The cake tastes best within three days. If you have leftover cake, keep it in a cool, dry place. Avoid putting it in direct sunlight to maintain its flavor. For longer storage, you can freeze the cake. Cut it into serving-sized pieces. Wrap each piece tightly in plastic wrap. Then, place the wrapped pieces in a freezer-safe bag. This will help prevent freezer burn. The cake can last up to three months in the freezer. When you’re ready to enjoy it, thaw the cake in the fridge overnight. To reheat, place the thawed cake in a preheated oven at 350°F (175°C) for about 10 minutes. This will warm it up and bring back its soft texture. You can also use the microwave for quick reheating. Heat a slice for 15-20 seconds. In general, pumpkin cream cheese coffee cake lasts about three days at room temperature. If you store it in the fridge, it can last up to a week. When frozen, the cake maintains its best taste for about three months. After that, it may lose some flavor and texture but is still safe to eat. Always check for any signs of spoilage before consuming. Yes, you can use fresh pumpkin. Just cook and puree it first. The texture will be different but still tasty. If you use fresh pumpkin, aim for about 1 cup of pureed pumpkin. You can use Greek yogurt or ricotta cheese. Both options will keep the creaminess. For a dairy-free option, try silken tofu blended until smooth. This will change the flavor slightly, but it will still be good. Yes, you can double or halve this recipe. Just adjust the ingredient amounts. Use a larger pan if you double it, or a smaller one if you halve it. Keep an eye on the baking time, as it may change. To check if the cake is done, insert a toothpick in the center. If it comes out clean, the cake is ready. If it has batter on it, bake for a few more minutes. Yes, you can make this cake ahead of time. Bake it and let it cool, then store it in the fridge. It will stay fresh for up to three days. You can also freeze it for longer storage. Just wrap it well to avoid freezer burn. This blog post covered all you need to make a delicious pumpkin cream cheese coffee cake. Remember to mix the dry and wet ingredients carefully and avoid overmixing. Try out different spices or nuts for flavor twists. Store your cake properly so it stays fresh. With these tips, you’ll bake a tasty treat everyone will love. Enjoy your baking journey and share your results!

Pumpkin Cream Cheese Coffee Cake Simple and Delicious

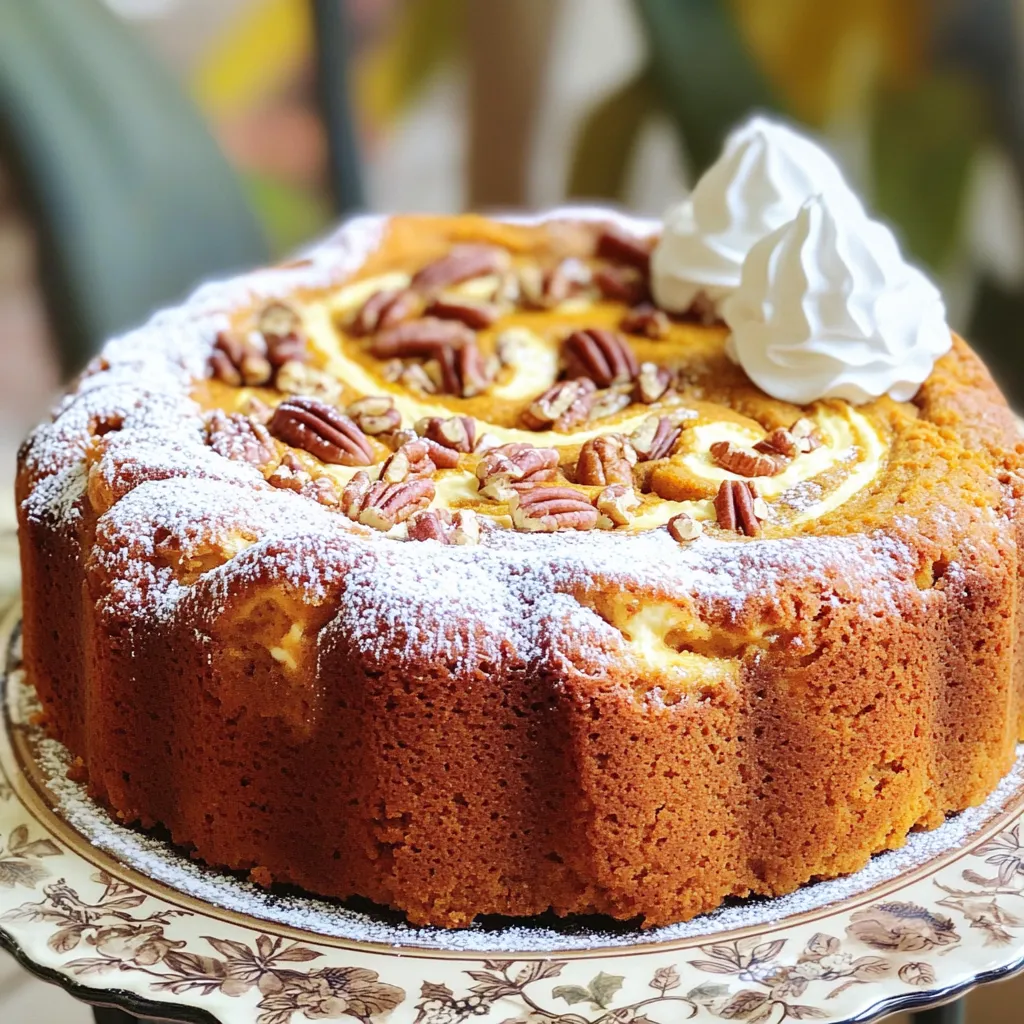
Craving something warm and delicious? This Pumpkin Cream Cheese Coffee Cake checks all the boxes. It’s moist, flavorful, and packed

- 1 lb (450g) flank steak, thinly sliced - 3 cloves garlic, minced - 2 tablespoons fresh ginger, minced - 1 red bell pepper, sliced - 1 green bell pepper, sliced - 1 cup broccoli florets - 1 tablespoon soy sauce - 1 tablespoon oyster sauce - 1 tablespoon chili garlic sauce (adjust to taste) - 2 tablespoons vegetable oil - Salt and pepper to taste When you gather your ingredients, remember that flank steak is the star. This cut is tender and cooks quickly, making it perfect for stir-frying. Minced garlic and ginger add a punch of flavor. The bell peppers and broccoli bring color and crunch. For sauces, soy sauce and oyster sauce add depth, while chili garlic sauce gives that spicy kick. - Green onions, chopped - Sesame seeds Garnishes make your dish pop. Chopped green onions add freshness, while sesame seeds give a nice crunch. These simple touches elevate your meal, making it not just tasty but also beautiful. You will love how easy it is to create a dish that looks gourmet! - Marinating the flank steak: Start by taking 1 pound of thinly sliced flank steak. Place it in a bowl. Add 1 tablespoon of soy sauce, 1 tablespoon of oyster sauce, and a pinch of salt. Mix it well. Let it sit for about 5 minutes. This helps the beef soak up flavor. - Preparing vegetables: While the beef marinates, get your veggies ready. Slice 1 red bell pepper and 1 green bell pepper. Cut 1 cup of broccoli into small florets. Mince 3 cloves of garlic and 2 tablespoons of fresh ginger. Keep these close; you will use them soon. - Heating the oil: Grab a large skillet or wok. Pour in 2 tablespoons of vegetable oil. Heat it over high heat until it shimmers. This means it’s ready for cooking. - Stir-frying the beef: Add the marinated beef to the hot oil. Stir-fry for about 3 to 4 minutes. Cook until the beef is browned and nearly done. Once cooked, remove the beef from the skillet and set it aside. - Sautéing the vegetables: In the same skillet, add the minced garlic and ginger. Stir quickly for about 30 seconds. This will release their strong aromas. Then, add the sliced bell peppers and broccoli. Stir-fry for another 2 to 3 minutes. You want them to stay tender-crisp. - Combining ingredients and finishing: Return the cooked beef to the skillet. Pour in the chili garlic sauce to your taste. Stir everything together for another 2 minutes. This will heat it all through and mix the flavors well. Serve hot and enjoy your meal! - Cooking time tips: Cook the beef for just 3-4 minutes. High heat helps sear it fast. This keeps the meat juicy and tender. Avoid overcooking; it can become tough. - Slice thickness recommendations: Cut the flank steak very thin, about 1/4 inch. This helps it cook evenly and quickly. Thin slices absorb flavors better too. - Adjusting spice levels: If you like heat, add more chili garlic sauce. Start with one tablespoon and taste. You can always add more, but you can't take it out! - Recommended sauces combinations: Combine soy sauce and oyster sauce for depth. These pair well with the garlic and chili flavors. You can also try adding a splash of rice vinegar for brightness. {{image_2}} You can switch out the vegetables in this stir-fry for more flavor. Try using snap peas, carrots, or mushrooms. These veggies add nice crunch and color. You can also use seasonal vegetables. In spring, add asparagus. In fall, use squash or sweet potatoes. The goal is to keep it fresh and tasty. If you want to change the protein, chicken works well. Thinly slice boneless chicken breasts and follow the same steps. For a vegetarian option, use tofu. Press and cube the tofu, then add it at the same time as the beef. This way, it absorbs the sauce and flavors. Both options give you variety while keeping the meal quick and easy. After you enjoy your Garlic Chili Beef Stir-Fry, store your leftovers safely. - Refrigeration instructions: Place the stir-fry in an airtight container. Keep it in the fridge for up to 3 days. Make sure it cools before sealing the container. - Freezing tips: If you want to save it longer, freeze the stir-fry. Use freezer-safe bags or containers. It can last up to 2 months in the freezer. When you're ready to eat, just thaw it overnight in the fridge. To enjoy your stir-fry again, you need to reheat it well. - Best methods to retain flavor and texture: The best way to reheat is in a skillet. Heat it over medium heat, adding a splash of water or soy sauce. Stir it often. This keeps it juicy and tasty. You can also use a microwave. Put it in a bowl, cover it loosely, and heat for a minute or two, stirring halfway. Enjoy your meal! You can pair Garlic Chili Beef Stir-Fry with several side dishes. Here are some great options: - Steamed jasmine rice - Fried rice with peas and carrots - Quinoa for a healthy twist - Noodles tossed in sesame oil - A simple green salad with dressing These sides will balance the bold flavors of the stir-fry. You can also serve it with pickled vegetables for a crunchy, tangy touch. To adjust the spice level, you have several choices: - For a milder dish, reduce the chili garlic sauce to one teaspoon. - Add a splash of coconut milk or more soy sauce to cool the heat. - If you love spice, increase the chili garlic sauce. You can also add sliced fresh chilies. Taste as you go to find the right heat for you. This way, everyone can enjoy the meal. Yes, you can prep some parts in advance: - Slice the beef and veggies a day before. Store them in airtight containers in the fridge. - Marinate the beef for up to 24 hours for deeper flavor. - Cook the stir-fry fresh when you are ready to eat. This keeps it crisp and tasty. You can also double the recipe for meal prep. Just store leftovers in the fridge for up to three days. Reheat on the stove for best results. This blog post covered a simple and tasty garlic chili beef stir-fry. We discussed key ingredients, cooking steps, and tips for perfect meals. You can switch up veggies or proteins based on your taste. Storing leftovers? It’s easy with proper refrigeration or freezing. Flavor adjustments are simple, making this meal your own. With the right prep, you can create a dish that’s both delicious and fun to make. Enjoy experimenting in the kitchen!

Garlic Chili Beef Stir-Fry in 15 Minutes Fast Meal

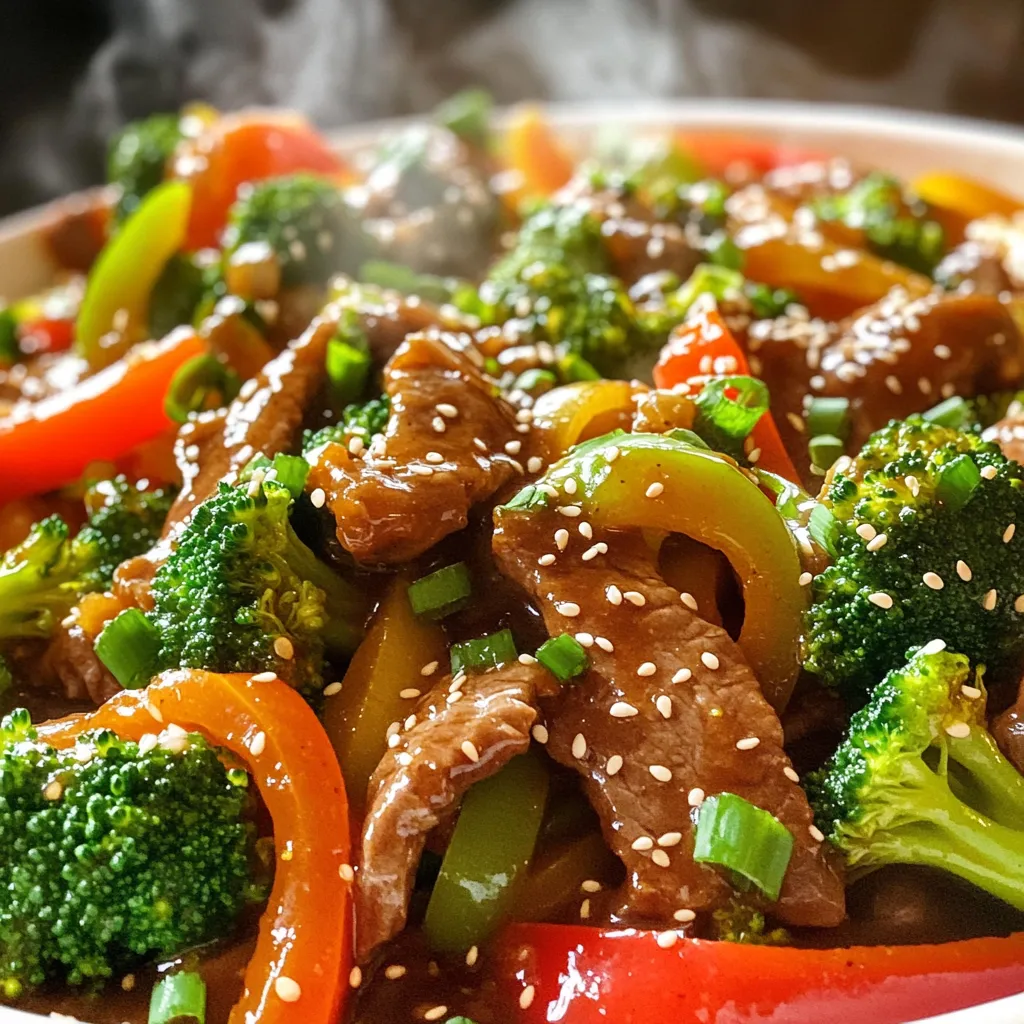
Craving a tasty meal but short on time? Garlic Chili Beef Stir-Fry delivers big flavor in just 15 minutes! You’ll

To make this creamy chicken and rice soup, you will need the following main ingredients: - 1 pound boneless, skinless chicken breasts - 1 cup long-grain white rice - 4 cups chicken broth - 1 cup carrots, diced - 1 cup celery, diced - 1 medium onion, chopped - 3 cloves garlic, minced - 1 cup heavy cream These ingredients come together to create a rich, hearty soup. The chicken adds protein, while the rice gives it a nice texture. The veggies bring freshness and flavor. Spices and herbs elevate the taste of your soup. Here are the must-haves: - 1 teaspoon dried thyme - 1 teaspoon dried parsley - Salt and pepper to taste Thyme adds an earthy note, while parsley brightens the dish. Adjust the salt and pepper to fit your taste preferences. Garnishes and add-ins can make your soup even better. Consider these options: - Fresh parsley for garnish (optional) You can also think about adding other items, like: - Cooked bacon for crunch - Lemon juice for a tangy kick - Extra veggies, such as peas or corn These add-ins can provide a fun twist to the classic recipe. Enjoy experimenting with different flavors! Start by heating 2 tablespoons of olive oil in a skillet over medium heat. Add 1 medium chopped onion, 1 cup of diced carrots, and 1 cup of diced celery. Sauté these for about 5 minutes. You want them to soften a bit but not brown. Next, add 3 cloves of minced garlic and cook for another minute. The garlic should smell nice but not burn. Now, get your slow cooker. Place 1 pound of boneless, skinless chicken breasts in the bottom. Add the sautéed vegetables on top. Then, pour in 4 cups of chicken broth and 1 cup of long-grain white rice. Sprinkle in 1 teaspoon of dried thyme and 1 teaspoon of dried parsley. Stir everything gently to mix well. Cover your slow cooker. If you set it to low, let it cook for 6 to 8 hours. If you’re in a hurry, you can cook it on high for 3 to 4 hours. The chicken should be fully cooked, and the rice should be tender when done. Once the cooking time is up, carefully remove the chicken. Use two forks to shred the chicken into bite-sized pieces. This step adds texture and makes the soup more enjoyable. Return the shredded chicken back into the slow cooker. Now, it’s time for the cream. Pour in 1 cup of heavy cream to make your soup rich and creamy. Stir well to combine. Taste the soup and add salt and pepper as needed. If the soup feels too thick, you can add an extra cup of broth or water. This will help reach the perfect consistency. Let the soup simmer on low for another 10 to 15 minutes. This ensures everything is hot and mixed well. Once ready, serve it hot. If you want, garnish with fresh parsley for a nice touch. Enjoy your creamy chicken and rice soup! To make your soup creamy, use heavy cream. Stir it in at the end. This gives the soup a rich taste. If it's too thick, add more broth or water to reach your desired creaminess. Cooking times may vary by your slow cooker. For most, cook on low for 6-8 hours. If you're in a hurry, cook on high for 3-4 hours. Always check the chicken. It should shred easily when done. You can boost flavor by adding more veggies. Try peas, corn, or bell peppers. Fresh herbs like basil or cilantro add a nice touch too. A squeeze of lemon juice can brighten the soup. Experiment to find your favorite mix! {{image_2}} You can make this creamy chicken and rice soup healthier with a few simple swaps. Try using low-fat milk instead of heavy cream. This change cuts calories but keeps the soup creamy. Another option is to use whole grain rice instead of white rice. This swap adds fiber and nutrients. Feel free to switch up the protein. Shredded rotisserie chicken works well if you’re short on time. You can also use diced turkey or even tofu for a plant-based option. If you want to change the grains, try quinoa or barley. They both add a nice texture and flavor. Adding more veggies boosts nutrition and flavor. You could toss in chopped spinach or kale for a green boost. Peas or corn add sweetness and color. You could also add bell peppers for a crunch. These additions make the soup more vibrant and filling. To store leftovers of creamy chicken and rice soup, let it cool first. Transfer the soup to an airtight container. Make sure to leave some space at the top. This allows for expansion when freezing. Label the container with the date. You can keep it in the fridge for up to three days. When you're ready to enjoy your soup again, reheat it gently. Pour the soup into a pot over low heat. Stir it often to prevent sticking. If the soup seems too thick, add a bit of chicken broth or water. Heat until it’s warm all the way through. You can also use a microwave. Place the soup in a microwave-safe bowl. Heat it in short bursts, stirring in between. For long-term storage, freezing is a great option. Pour the cooled soup into freezer-safe bags or containers. Make sure to remove as much air as possible. Seal tightly and label with the date. You can freeze the soup for up to three months. When you're ready to eat, thaw it overnight in the fridge. Then, reheat as mentioned above for the best flavor and texture. Yes, you can use brown rice. Brown rice is heartier and takes longer to cook. Adjust the cooking time to about 8-10 hours on low or 4-5 hours on high. Keep in mind that the soup may have a different texture and flavor with brown rice. You can store the soup in the fridge for up to 4 days. Make sure to keep it in an airtight container. The flavors may deepen as it sits, making it even better on the second day! Absolutely! You can skip the cream for a lighter soup. Use more broth for a thinner texture or add a splash of milk for creaminess. You can also mix in some pureed vegetables to achieve a creamy feel without cream. This blog post covers the essential ingredients for making Creamy Chicken and Rice Soup. You learned how to prepare the chicken and vegetables, followed by a step-by-step slow cooking process. I shared tips for achieving a creamy texture and suggested variations for customization. Finally, I provided storage info and answered key FAQs. Now, you have the knowledge to make this comforting soup your own. Enjoy the process and share it with others!

Creamy Chicken and Rice Soup Slow Cooker Recipe

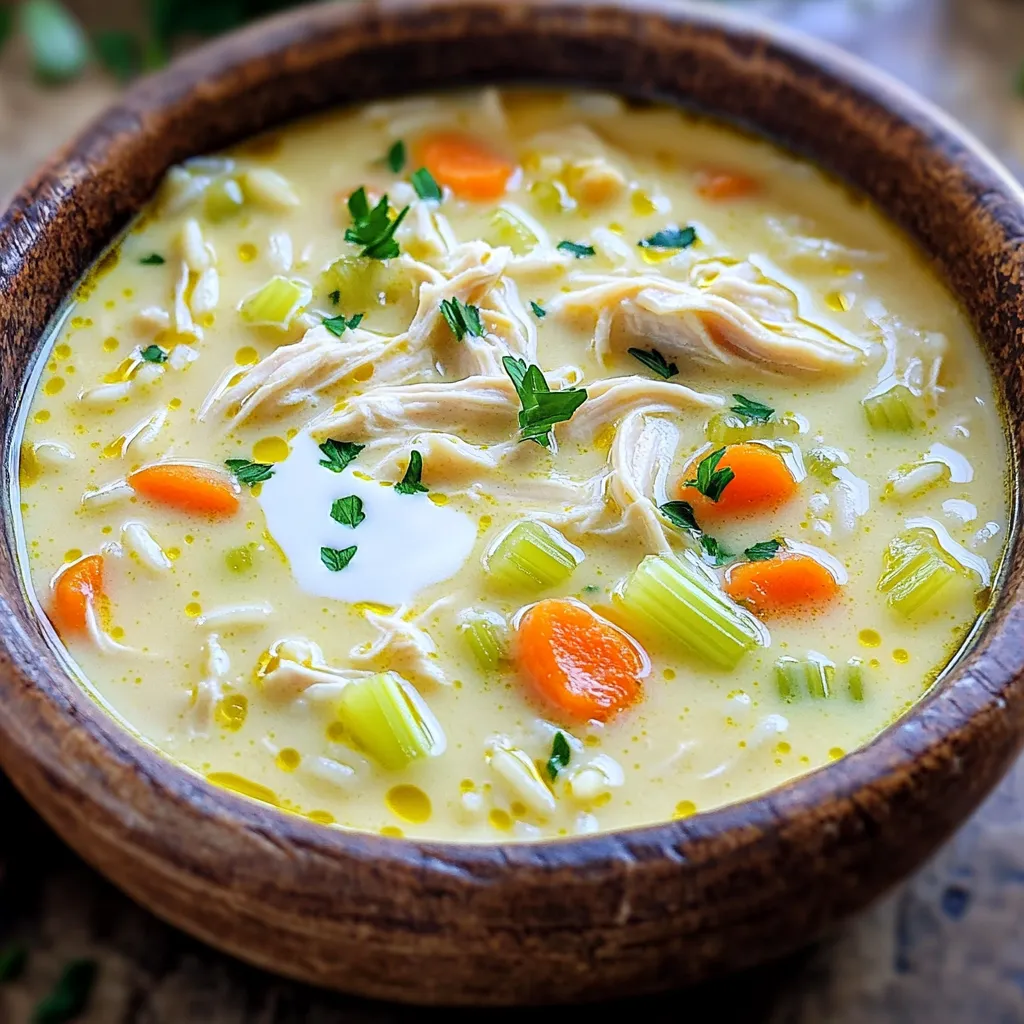
Looking for a warm and comforting meal? My Creamy Chicken and Rice Soup Slow Cooker Recipe is just what you

To make these tasty Apple Pie Energy Balls, gather the following ingredients: - 1 cup rolled oats - 1 cup almond butter (or peanut butter) - 1/2 cup finely chopped dried apples - 1/4 cup honey or maple syrup - 1 teaspoon cinnamon - 1/2 teaspoon nutmeg - 1/4 cup ground flaxseed - 1/4 cup chopped walnuts (optional) - A pinch of salt You can swap out some ingredients if needed: - For nut allergies, use sunflower seed butter instead of almond or peanut butter. - If you want a vegan option, replace honey with maple syrup. - You can use any dried fruit, like raisins or cranberries, instead of dried apples. - If you don’t have flaxseed, try chia seeds for a similar texture and nutrition. Each ingredient brings unique benefits: - Rolled oats are great for fiber. They help keep you full and aid digestion. - Almond butter adds healthy fats and protein, which fuel your body. - Dried apples provide natural sweetness and are rich in vitamins. - Honey or maple syrup offers natural sweetness and can boost energy. - Cinnamon adds flavor and may help regulate blood sugar. - Nutmeg is fragrant and can aid digestion. - Ground flaxseed is high in omega-3 fatty acids, which support heart health. - Chopped walnuts give a crunchy texture and are full of antioxidants. - Salt enhances the flavors of the other ingredients, balancing sweetness. Now you know what goes into these delicious and healthy snacks! Let’s get started on making Apple Pie Energy Balls. First, gather all your ingredients. You will need rolled oats, almond butter, dried apples, honey or maple syrup, cinnamon, nutmeg, flaxseed, walnuts, and a pinch of salt. This will make sure you have everything ready. 1. Take a large mixing bowl. Add 1 cup of rolled oats. 2. Next, add 1 cup of almond butter. You can also use peanut butter if you prefer. 3. Pour in 1/4 cup of honey or maple syrup. This will sweeten your energy balls. 4. Mix these three ingredients well until they combine into a thick paste. 5. Now, add 1/2 cup of finely chopped dried apples. These add a nice chewy texture. 6. Sprinkle in 1 teaspoon of cinnamon and 1/2 teaspoon of nutmeg. These spices give that apple pie flavor. 7. Add 1/4 cup of ground flaxseed. This will boost the health benefits. 8. If you like, toss in 1/4 cup of chopped walnuts. They add crunch. 9. Finish by adding a pinch of salt. This helps balance the sweetness. 10. Stir the mixture until all ingredients are mixed evenly. 1. Now it’s time to form the energy balls. Use your hands to scoop out the mixture. 2. Roll the mixture into small balls, about 1 inch in diameter. 3. If the mixture feels too sticky, just wet your hands slightly with water. This makes rolling easier. 4. Place the formed balls on a lined baking sheet or plate. 5. Once all balls are formed, put them in the fridge. Chill them for at least 30 minutes. 6. After chilling, you can enjoy these tasty snacks right away. 7. If you have leftovers, store them in an airtight container in the fridge for up to a week. To keep your apple pie energy balls fresh, store them in an airtight container. Place them in the fridge for up to one week. If you want to keep them longer, freeze them. Wrap each ball in parchment paper and put them in a freezer bag. They can last for about three months in the freezer. You can boost the flavor of your energy balls with a few extras. Try adding a splash of vanilla extract for sweetness. Chopped pecans or almonds can give a nice crunch. If you like spice, include a bit of ginger or allspice. You can also add a few chocolate chips or dried cranberries for a fun twist. One mistake is not measuring the ingredients correctly. This can change the taste and texture. Make sure you use fresh dried apples for the best flavor. Also, avoid skipping the chilling step. Chilling helps the energy balls hold their shape. Lastly, don’t overmix the dough. This can make your energy balls tough instead of soft and chewy. {{image_2}} You can switch out some ingredients for a healthier version. Instead of almond butter, try sunflower seed butter. This swap is great for nut allergies. If you want less sugar, use mashed bananas instead of honey. They add natural sweetness and moisture. You can also replace rolled oats with quinoa flakes for a gluten-free option. These swaps keep the energy balls tasty and nutritious. Mix up the flavors by adding different spices. Instead of nutmeg, try ginger for a spicier kick. You can also add cocoa powder for a chocolate twist. For a tropical flair, toss in dried pineapple or coconut flakes. Each flavor change gives a new taste. This way, you can enjoy these energy balls any day! Feel free to add more nut butters or seeds. Sunflower seed butter adds a nutty flavor. You could also use cashew butter for a creamier texture. Adding chia seeds boosts fiber and omega-3s. These additions not only change the taste but increase nutrition too. Get creative and find your favorite mix! To keep your Apple Pie Energy Balls fresh, store them in an airtight container. This helps lock in moisture and flavor. Place a piece of parchment paper between layers to prevent sticking. I recommend putting them in the fridge. The cold will keep them firm and tasty. If you want to keep these energy balls longer, freezing is a great option. First, place them on a baking sheet in a single layer. Freeze for about an hour until they are firm. Then, transfer the energy balls to a freezer-safe bag or container. It’s best to label the bag with the date. They can last up to three months in the freezer. Stored in the fridge, these energy balls will last about one week. If you freeze them, they stay fresh for three months. Always check for signs of spoilage. If they smell off or look strange, it’s best to toss them. Enjoying them fresh will give you the best taste and texture. Yes, you can easily change the flavors! You can swap dried apples for other dried fruits like cranberries or apricots. Try adding chocolate chips or coconut for a fun twist. You can also play with spices. If you love ginger, add a pinch to the mix. The options are endless, and it makes the recipe fun! Absolutely! To keep these energy balls vegan, simply use maple syrup instead of honey. Almond butter or peanut butter is also a great vegan choice. All other ingredients, like oats and spices, are plant-based. This way, you can enjoy a tasty snack that fits your diet! These energy balls stay fresh in the fridge for up to a week. Store them in an airtight container. If you want them to last longer, consider freezing them. They freeze well for about three months. Just thaw them before eating for a quick snack! Apple Pie Energy Balls are easy to make and fun to eat. We explored the key ingredients, the mixing steps, and tips for keeping your treats fresh. Remember, you can switch ingredients for a healthier twist or better taste. These energy balls are great for a quick snack. Feel free to customize your flavors as you like. With proper storage, they can last long and stay tasty. Enjoy making and sharing your energy balls!

Apple Pie Energy Balls No Bake Easy Healthy Snack

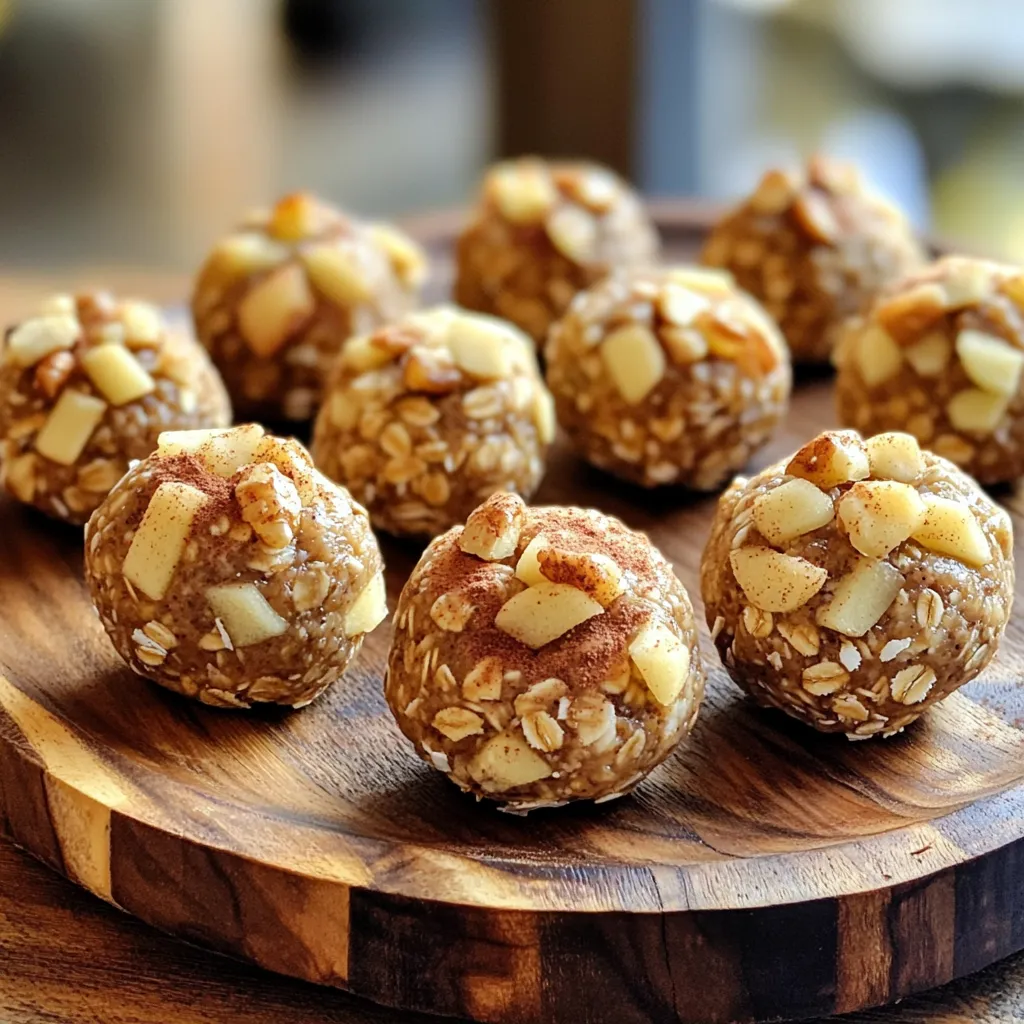
Looking for a quick, healthy snack that satisfies your sweet tooth? Try these no-bake Apple Pie Energy Balls! These bites

- 4 salmon fillets - 2 tablespoons olive oil - 2 tablespoons lime juice - 1 tablespoon chili powder - 1 teaspoon garlic powder - 1 teaspoon paprika - 1 teaspoon salt - 1/2 teaspoon black pepper The main star of this dish is the salmon. It’s rich in healthy fats and protein. The olive oil adds a smooth texture, while lime juice gives a fresh, zesty kick. The seasoning blend creates a bold flavor profile. Chili powder brings the heat, garlic powder adds depth, and paprika imparts a sweet touch. - 1 red bell pepper, sliced - 1 yellow bell pepper, sliced - 1 zucchini, sliced - 1 red onion, cut into wedges The vegetables add color and crunch. Red and yellow bell peppers are sweet and juicy. Zucchini brings a mild flavor and soft texture. Red onion adds a slight sharpness, balancing the dish. Together, they soak up the chili lime mixture well. - Fresh cilantro Cilantro is optional, but it adds a bright, fresh taste. It enhances the dish's overall flavor. You can sprinkle it on top just before serving. This little touch makes your meal look even more inviting. 1. First, preheat your oven to 400°F (200°C). This will help cook the salmon and veggies evenly. 2. Next, line a large baking sheet with parchment paper. This makes cleanup easy. 3. In a small bowl, whisk together olive oil, lime juice, chili powder, garlic powder, paprika, salt, and black pepper. Mix until smooth. 1. Place the salmon fillets on one side of the prepared baking sheet. 2. Brush half of the chili lime mixture over the salmon fillets. Make sure they are well coated. 3. In a large bowl, combine the sliced red and yellow bell peppers, zucchini, and red onion. 4. Drizzle the remaining chili lime mixture over the veggies. Toss them until they are fully coated. 5. Spread the seasoned vegetables on the other side of the baking sheet. Keep them evenly spaced for even cooking. 1. Bake your dish in the preheated oven for 15-18 minutes. 2. Check the salmon after 15 minutes. It should flake easily with a fork. The veggies should be tender and slightly caramelized. 3. Once done, take the baking sheet out of the oven. Let it rest for a few minutes before serving. To make great salmon, avoid overcooking. Salmon cooks quickly. Check for doneness after 15 minutes. The fish should flake easily with a fork. If it looks dry, it may be overcooked. Choose the right thickness for fillets. Fillets about 1 inch thick cook best. Thinner fillets can dry out faster. If your salmon is thicker, add a few minutes to the cooking time. You can mix up the veggies. Try broccoli, asparagus, or carrots. These choices add color and taste. For best texture, cut vegetables into even pieces. This helps them cook at the same rate. Spread them out on the sheet pan. Overcrowding leads to steaming instead of roasting. Add herbs and spices for extra flavor. Fresh cilantro adds a nice touch after cooking. You can also try dill or parsley. For a kick, add some red pepper flakes. Serving suggestions can elevate your meal. Serve with rice or quinoa for a complete dish. A side salad can balance flavors and textures. Enjoy your Chili Lime Salmon with family and friends! {{image_2}} You can switch up the fish. Trout and tilapia work well. They have a nice texture and flavor. If you want something different, try chicken or tofu. Both options absorb the chili lime mix well. This keeps the meal tasty and fun. Want more heat? Add fresh chili or a splash of hot sauce. You can mix in diced jalapeños too. If you like it milder, reduce the chili powder. Adjust it to fit your taste. This makes the dish perfect for everyone. Grilling adds a smoky flavor to the salmon and veggies. Just preheat your grill. Place everything on a grill pan to avoid mess. Another easy method is using foil packets. This keeps all the juices in and makes clean-up a breeze. Both techniques give a nice twist to the dish. Store the leftover chili lime salmon and veggies in an airtight container. Place it in the fridge right away. This will keep it fresh and safe to eat. It lasts about 3 to 4 days. Make sure to cool the dish before sealing it. This helps prevent moisture buildup. You can freeze the salmon and veggies for longer storage. Wrap each piece in plastic wrap, then place them in a freezer bag. This keeps them from getting freezer burn. It can stay in the freezer for up to 3 months. When you are ready to eat, thaw it in the fridge overnight. To reheat, place the salmon and veggies on a baking sheet. Bake at 350°F (175°C) for about 15 minutes. You want them warm but not dried out. Prepare the ingredients in advance for quick meals. Chop the veggies and store them in separate bags. You can also mix the chili lime marinade and keep it ready. On busy weeknights, assembling is easy. Just lay the salmon and veggies on the baking sheet, brush with the marinade, and bake. This saves time and effort while keeping dinner delicious. You can try several fish if you don’t want salmon. Here are some good options: - Trout - Tilapia - Cod If you want a non-fish option, chicken works well. Just adjust the cooking time. Tofu is also a great choice for a plant-based dish. It absorbs flavors well and cooks quickly. Yes, you can prepare this dish ahead of time. Here are some tips: - Marinate the salmon: You can mix the chili lime sauce and coat the salmon a few hours before cooking. - Chop the veggies: Slice the peppers, zucchini, and onion a day before. Store them in the fridge in an airtight container. When you’re ready to cook, just assemble and bake. This makes weeknight meals easy. Using parchment paper is not a must, but it has benefits: - Easy cleanup: It prevents food from sticking to the pan. - Even cooking: It helps distribute heat evenly. If you don’t have parchment paper, you can use a non-stick spray or oil the pan. Just keep an eye on the salmon and veggies to avoid sticking. This blog post offers a simple recipe for tasty salmon with veggies. You learned about the key ingredients, like salmon, olive oil, and spices. I shared step-by-step instructions for preparation, cooking, and tips to perfect the dish. You also discovered how to store leftovers and meal prep for busy nights. Incorporate these insights into your cooking. Experiment with different proteins and spices. Enjoy making this dish your own with your favorite flavors!

Chili Lime Salmon and Veggies Sheet Pan Delight

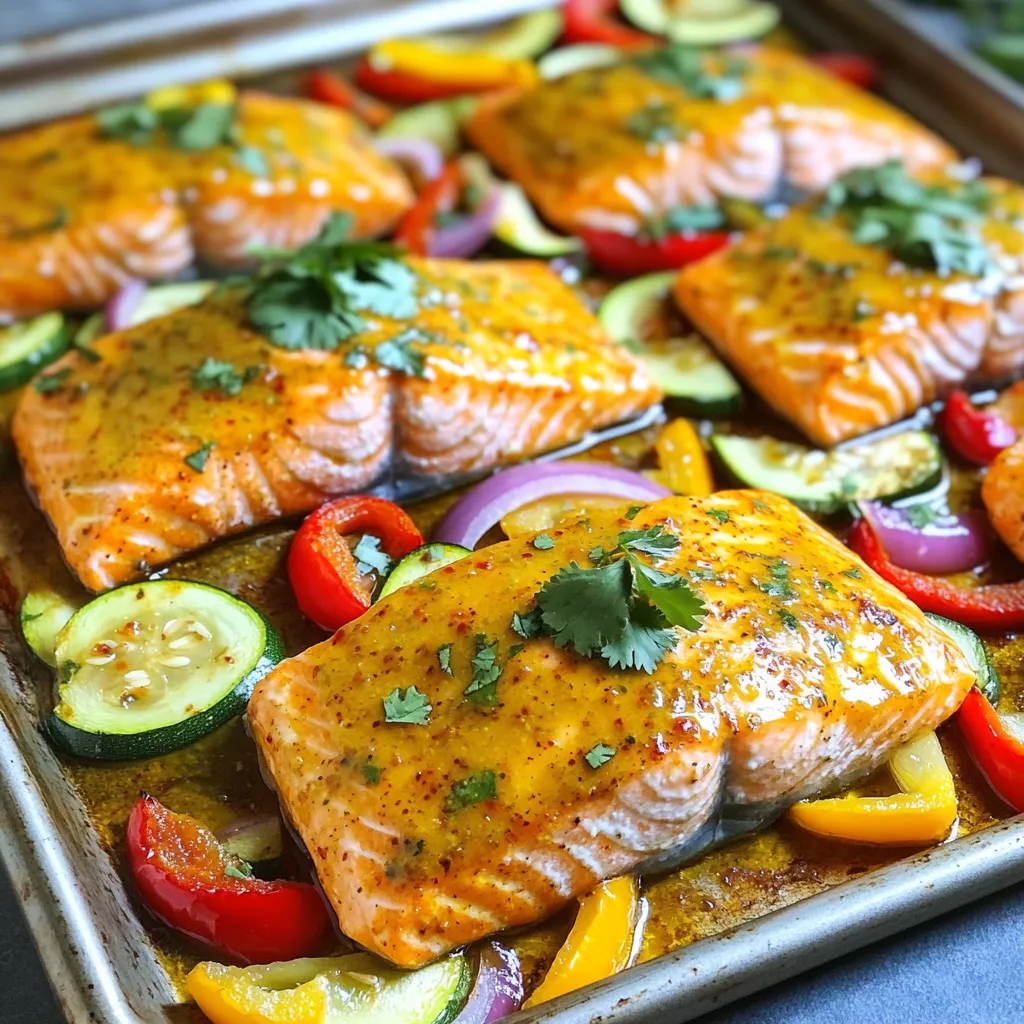
Ready to impress your taste buds? My Chili Lime Salmon and Veggies Sheet Pan Delight is an easy, healthy meal

- 500g of fresh button or cremini mushrooms, cleaned and stems trimmed - 4 tablespoons unsalted butter - 4 cloves garlic, minced - 1 tablespoon fresh parsley, finely chopped - 1 teaspoon salt - 1/2 teaspoon black pepper - 1/2 teaspoon smoked paprika (optional for a hint of smokiness) - Lemon wedges for serving When choosing fresh mushrooms, look for smooth, firm caps. Make sure they are dry and not slimy. Fresh mushrooms should smell earthy, not sour. Avoid any that have dark spots or wrinkles. Always check the stems, too; they should be white and firm. If you can, buy local mushrooms for the best flavor. You can try adding a splash of soy sauce for depth. A sprinkle of cheese, like Parmesan, gives a nice touch. For heat, consider red pepper flakes. Fresh herbs like thyme or rosemary can add a lovely aroma. Each option enhances the dish with new flavors. First, take a small saucepan. Melt 4 tablespoons of unsalted butter over low heat. Once the butter melts, add 4 cloves of minced garlic. Stir it gently for 1-2 minutes. Watch closely so the garlic does not burn. You want it fragrant, not browned. This garlic butter will give great flavor to our mushrooms. Now, grab a mixing bowl. Add 500 grams of cleaned button or cremini mushrooms. Pour in the garlic butter. Next, sprinkle in 1 teaspoon of salt, 1/2 teaspoon of black pepper, and 1/2 teaspoon of smoked paprika if you like a hint of smokiness. Toss everything gently. Make sure each mushroom is coated well in the garlic butter and spices. Preheat your air fryer to 200°C (390°F) for about 5 minutes. Once it’s hot, place the mushrooms in the air fryer basket in a single layer. Cook them for 10-12 minutes. Remember to shake the basket halfway through. This helps the mushrooms cook evenly. When they turn golden brown and tender, they are ready. After cooking, remove them from the air fryer. Sprinkle fresh parsley on top for garnish. Serve with lemon wedges for a fresh kick. To get the best texture, choose fresh mushrooms. Button or cremini work great. Clean them well and trim the stems. When you mix the garlic butter with the mushrooms, coat them evenly. This helps them cook nicely. Air frying them at 200°C (390°F) will give you a soft inside and a golden outside. Shake the basket midway to ensure even cooking. One common mistake is overcooking the mushrooms. Watch the clock! Cook them for just 10-12 minutes. If you cook them too long, they can become rubbery. Another mistake is not shaking the basket. This step is key to even cooking. Also, don’t forget to melt the butter slowly. High heat can burn the garlic, ruining the flavor. Cleaning up after cooking can be easy. First, soak any stuck bits in warm water. This softens them for quick removal. Use a non-stick spray in the air fryer basket next time to prevent sticking. Wipe down the air fryer with a damp cloth after it cools. This keeps it clean and ready for your next meal. {{image_2}} You can use many types of mushrooms for this recipe. Button and cremini mushrooms work great. Shiitake mushrooms add a unique flavor. Portobello mushrooms bring a meaty texture. You can even mix different types for more depth. Each mushroom type has its own taste and texture. Experiment and find your favorite! While garlic and butter are classic, other flavors can shine too. Try adding herbs like thyme or rosemary. A splash of soy sauce gives a savory twist. You can also add chili flakes for heat. For a fresh note, consider lemon zest. Each seasoning can change the dish, so get creative! This recipe is simple to adapt for vegetarians and vegans. Use plant-based butter instead of regular butter. You can also try olive oil for a lighter option. Swap out garlic butter with vegan garlic oil for a fresh taste. These changes keep the dish delicious and friendly for all diets! To keep your garlic butter mushrooms fresh, let them cool first. Place them in an airtight container. This helps seal in flavor and moisture. Store the container in the fridge. The mushrooms will stay good for about 3 days. To reheat, I suggest using the air fryer. Set it to 180°C (350°F). Heat the mushrooms for about 5 minutes. This method keeps them crispy and tasty. You can also use a microwave, but they may get soggy. You can freeze garlic butter mushrooms if you have extra. First, cool them completely. Spread them in a single layer on a baking sheet. Freeze them for 1-2 hours. Once frozen, transfer them to a freezer bag. They can last up to 2 months in the freezer. When ready to eat, thaw in the fridge and reheat in the air fryer. Garlic butter mushrooms can last up to three days in the fridge. Store them in an airtight container. Always check for any off smell or change in texture before eating. This way, you ensure they stay fresh for your next meal. Yes, you can use olive oil or coconut oil. These fats add unique flavors. Olive oil gives a nice richness, while coconut oil adds a hint of sweetness. Just make sure they have a high smoke point for best results in the air fryer. Garlic butter mushrooms pair well with many dishes. You can serve them with steak, chicken, or pasta. They also mix well in salads or on top of rice. Adding a squeeze of lemon brightens the flavors even more. Yes, you can cook frozen mushrooms in the air fryer. Just remember to add a few extra minutes to the cooking time. Make sure they are spread out in a single layer for even cooking. In this blog post, we explored how to make delicious garlic butter mushrooms. I shared a list of fresh ingredients and tips for selection. You learned step-by-step instructions for preparing, mixing, and air frying mushrooms. We covered tips for perfect texture and avoiding common mistakes. You can also try different mushroom types and seasonings for variety. Finally, I provided storage and reheating tips. Enjoy your cooking and don’t forget to share your tasty results!

Garlic Butter Mushrooms Air Fryer Quick and Tasty Recipe

If you’re craving a quick and tasty side dish, garlic butter mushrooms in the air fryer are a must-try! With

To make these Greek yogurt cheesecake jars, you will need a few key ingredients: - 2 cups Greek yogurt (preferably full-fat for creaminess) - 8 oz cream cheese, softened - 1/2 cup honey or maple syrup (adjust to taste) - 1 teaspoon vanilla extract - 1 tablespoon lemon juice - 1/4 teaspoon salt - 1 cup graham cracker crumbs - 1/4 cup unsalted butter, melted - Fresh berries (strawberries, blueberries, or raspberries) for topping These ingredients work together to create a creamy, flavorful dessert. The Greek yogurt gives it a rich taste while keeping the protein high. You can choose between honey and maple syrup for sweetening. Honey adds a floral note and is very thick. Maple syrup is thinner and has a unique taste. Both work well, so it depends on your preference. If you want a lighter sweetness, use less than half a cup. Always taste as you mix to find your perfect balance! Fresh berries make a great topping. They add color and a fruity kick. You can use strawberries, blueberries, or raspberries. Each brings a different flavor to the dish. For extra zest, consider adding a sprig of mint on top. It looks great and adds a fresh taste. You can also drizzle a bit more honey or maple syrup for added sweetness. To start, gather your graham cracker crumbs and melted butter. In a medium bowl, mix the crumbs and butter. You want the crumbs to be well coated. Once mixed, take about two tablespoons of the mixture for each jar. Press it down lightly to form a nice base. This crust gives a great crunch and flavor. Now, let’s make the filling. In a large mixing bowl, add the softened cream cheese and Greek yogurt. Beat them together until smooth. It’s important to mix well, so there are no lumps. Then, add in the honey or maple syrup, vanilla extract, lemon juice, and salt. Blend everything until it’s creamy. This filling is rich and packed with protein, thanks to the Greek yogurt. Next, you’ll layer the jars. Spoon the cheesecake filling over the crust in each jar. Fill them about three-quarters full. This allows some space for toppings. Once filled, cover the jars and place them in the fridge. Let them chill for at least two hours. This helps the flavors meld and the cheesecake set. Before serving, top each jar with fresh berries for a burst of color and taste. Enjoy your delightful creation! To make your cheesecake creamy, use full-fat Greek yogurt. This yogurt has a rich flavor and smooth texture. Soften the cream cheese before mixing. It blends easier and gives a nice creaminess. Beat the two together well until smooth. Avoid lumps for the best outcome. Yes, you can prepare these jars ahead of time. Make the cheesecake filling and crust the day before. Assemble the jars and chill them overnight. This waiting time helps the flavors mix well. It also allows the cheesecake to set nicely. Presentation matters! Use clear jars to show off the layers. Top each jar with fresh berries. This adds color and flavor. You can also add a sprig of mint for a touch of green. The jars look even more fun this way! {{image_2}} You can easily change the flavor of your Greek yogurt cheesecake jars. Try adding citrus zest or juice for a fresh twist. Lemon or orange zest brightens the taste. Just add one to two teaspoons to the filling. For a rich chocolate flavor, mix in cocoa powder. Start with two tablespoons and adjust to your taste. Both options keep your dessert fun and exciting! This recipe is easy to adapt for different diets. You can make it gluten-free by using gluten-free graham crackers. Look for brands that offer this option for the crust. To make it vegan, swap cream cheese for a plant-based cream cheese. Use maple syrup as your sweetener. Make sure your yogurt is dairy-free. These changes let everyone enjoy this tasty treat! Seasonal fruits and spices can enhance your cheesecake jars. In summer, fresh berries like strawberries or blueberries add sweetness. In fall, try adding pumpkin spice or cinnamon. You can also layer in sliced peaches or apples in spring. These additions not only boost flavor but also make your jars look beautiful. To keep your Greek yogurt cheesecake jars fresh, cover them tightly. I recommend using plastic wrap or a lid. Store them in the fridge for up to five days. This keeps the cheesecake creamy and delicious. If you notice any moisture inside, it’s best to eat them soon. Freezing is a great option if you have extra jars. First, allow them to cool completely. Then, cover each jar with plastic wrap and foil. This helps prevent freezer burn. You can freeze them for up to three months. When you’re ready to enjoy, move them to the fridge overnight to thaw. Reheating cheesecake may seem odd, but it’s easy. If you want to warm your cheesecake slightly, remove the lid and microwave it. Heat in short bursts, about 10 seconds at a time. This keeps the texture nice. Avoid overheating, as this can make it grainy. Enjoy your treat warm or cold! Each jar of Greek yogurt cheesecake packs around 15-20 grams of protein. Greek yogurt is rich in protein, making it a great choice. The cream cheese adds more protein, too. This dessert is not just tasty; it’s a healthy treat that fills you up. Yes, you can use non-fat Greek yogurt. However, the texture will be less creamy. Full-fat Greek yogurt adds richness and flavor. If you prefer a lighter version, non-fat yogurt works well. Just keep in mind that it may change the taste slightly. You can store cheesecake jars in the fridge for about 3-5 days. Make sure to cover them well to keep them fresh. If you want to keep them longer, consider freezing them. Just be aware that freezing may affect the texture. This blog post explored making Greek yogurt cheesecake jars from start to finish. We discussed key ingredients, like sweeteners and toppings. You learned step-by-step instructions for the crust and filling. We also covered tips for a creamy texture and how to store leftovers. Finally, variations included flavors and dietary options. Making these jars is fun and flexible. Enjoy experimenting with different tastes and sharing your creations!

Greek Yogurt Cheesecake Jars High Protein Delight

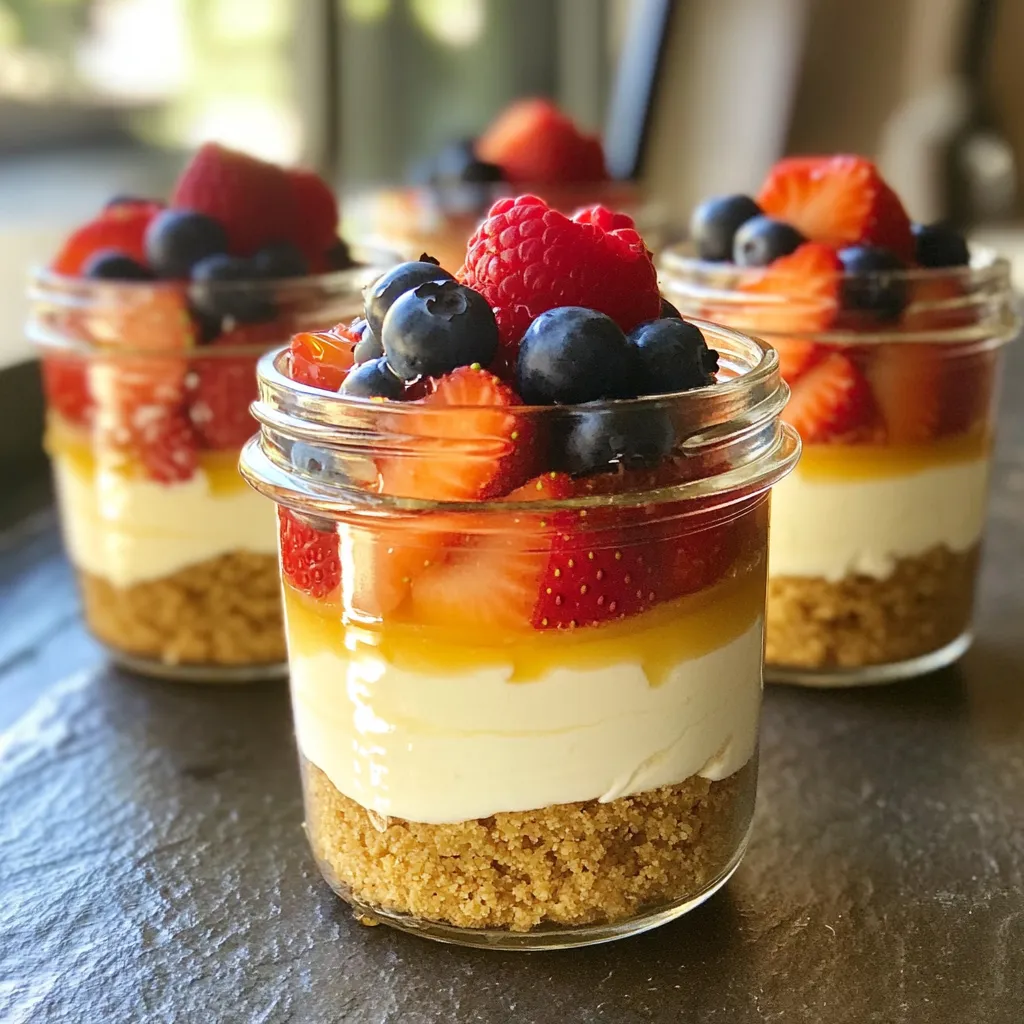
Are you ready for a sweet treat that won’t ruin your diet? Greek Yogurt Cheesecake Jars are the answer! Packed

- 4 cups Rice Krispies cereal - 1 cup mini marshmallows - 1/2 cup unsalted butter - 1 cup caramel sauce The main ingredients make this snack special. Rice Krispies give the treats their crunch. Mini marshmallows add a soft, chewy texture. Butter helps everything stick together and adds flavor. Caramel sauce is the star of the show, giving these treats their sweet and gooey goodness. - 1 large apple, diced (preferably Granny Smith for tartness) - 1/2 teaspoon cinnamon - 1/2 teaspoon vanilla extract These extra flavorings make your treats pop! Diced apples add a fresh crunch. I recommend Granny Smith apples for their tartness. Cinnamon gives a warm, cozy taste. Vanilla extract adds depth and richness, making every bite more enjoyable. - 1/4 cup chopped pecans - A pinch of salt You can add these optional ingredients for more texture and flavor. Chopped pecans add a nice crunch. A pinch of salt balances the sweetness of the caramel. These tiny tweaks can take your treats to the next level! To start, you need to grease your baking dish. Use a 9x13 inch dish for the best results. You can use butter or non-stick spray to coat the bottom and sides. This step helps the treats come out easily later. Make sure you cover every corner for a smooth release. Next, it’s time to melt the butter and marshmallows. Use a large saucepan and set the heat to medium-low. This heat is key. It prevents burning and gives you a smooth mix. Add 1/2 cup of unsalted butter first. Once it melts, add 1 cup of mini marshmallows. Stir continuously until it is all melted and smooth. After melting, take the pan off the heat. Now, it’s time to add flavor. Stir in 1/2 teaspoon of vanilla extract and a pinch of salt. Don’t forget to add 1/2 teaspoon of cinnamon. These flavors bring warmth and depth to your treats. Mix well until everything blends together. Now, let’s add the Rice Krispies. Measure out 4 cups of Rice Krispies cereal. Gradually pour them into the melted mixture. Use a spatula to gently fold the cereal in. This technique helps ensure every piece gets coated evenly without crushing them. Next, fold in the diced apples. Use 1 large Granny Smith apple for a nice tartness. Also, pour in 3/4 cup of caramel sauce. Gently mix to combine the apples and caramel without breaking them apart. If you want, you can add 1/4 cup of chopped pecans for a crunchy texture. Finally, transfer your mixture into the greased dish. Press down firmly to level it out. It should be even throughout the dish. Drizzle the remaining 1/4 cup of caramel sauce on top. Use a spatula to lightly swirl it into the surface. This creates a nice, gooey topping. Now, let it cool for about 30 minutes at room temperature. You can chill it in the fridge for 15 minutes if you want to speed things up. To achieve gooeyness without stickiness, use fresh marshmallows. Stale marshmallows can make your treats hard. When melting, keep your heat low. Stir gently to blend the butter and marshmallows smoothly. After mixing in the Rice Krispies, don't overwork the mixture. This helps keep the treats soft and chewy. Using tart apples like Granny Smith adds a nice contrast to the sweet caramel. Their crisp texture holds up well in the treats. Plus, they balance the sweetness and enhance the overall flavor. You can also try other tart varieties, but Granny Smith is my top choice. To boost flavor, consider adding a pinch of nutmeg or allspice along with cinnamon. You can also mix in some chopped dried fruit for extra sweetness. Try adding a splash of lemon juice to the apples. This keeps them fresh and adds a zesty kick. Experiment with different spices to find your favorite twist! {{image_2}} You can change the topping to make it fun. Try using: - Chocolate chips - Crushed graham crackers - Sprinkles - Shredded coconut These toppings add a new taste and texture. You can mix and match them too. This way, everyone can find their favorite! Switching flavors can make your treat special. You can use different types of caramel. Here are some ideas: - Sea salt caramel for a sweet and salty mix - Apple pie caramel for extra spice - Butterscotch caramel for a richer flavor You might also try different nuts. Almonds or walnuts can add crunch. Just remember to chop them small! You can make these treats fit your diet. To make them gluten-free, use gluten-free Rice Krispies. For nut-free treats, skip the nuts or use sunflower seeds. These swaps let you enjoy the fun without worry. Everyone can dig in and enjoy! To keep your Caramel Apple Rice Krispie Treats fresh, store them in an airtight container. This will prevent them from getting hard or stale. Place parchment paper between layers if stacking, to avoid sticking. Keep the treats at room temperature for the best taste and texture. Avoid putting them in the fridge, as this can make them too firm. Yes, you can freeze Caramel Apple Rice Krispie Treats! Wrap them tightly in plastic wrap and then place them in a freezer-safe bag. Make sure to remove as much air as possible to avoid freezer burn. When you want to eat them, let them thaw at room temperature for a few hours before enjoying. These treats can last for about a week at room temperature when stored properly. If frozen, they can last up to three months. Always check for any signs of spoilage before eating, such as changes in smell or texture. Enjoy your treats while they’re fresh for the best flavor! Yes, you can use homemade caramel sauce. Homemade caramel can offer a richer flavor. However, it requires more time and skill to make. Store-bought caramel is quick and easy. It saves you time and gives you a smooth texture. If you want to try homemade, go for it! Just make sure it cools before mixing. Granny Smith apples are the best choice. They add a nice tartness to the treat. Tart apples contrast well with sweet caramel. Other good options include Honeycrisp and Fuji apples, but they are sweeter. You can mix different apples for a fun twist! To keep your treats from sticking, grease your pan well. Use butter or non-stick spray. Another tip is to wet your hands when pressing the mixture. This helps prevent sticking while you shape the treats. You can also store them in layers with parchment paper in between. Yes, you can make these treats ahead of time. They stay fresh for about three days at room temperature. You can also store them in the fridge for a firmer texture. Just cover them well to keep them soft. This blog post detailed how to make delicious Caramel Apple Rice Krispie Treats. We covered the main ingredients, from Rice Krispies to caramel sauce, and added flavorful options like apples and cinnamon. I shared step-by-step instructions for perfecting the recipe, along with tips for great texture and storage practices. Remember, you can adjust flavors and toppings to suit your taste. Enjoy making these treats! They'll be a hit at any gathering or as a sweet snack for yourself. Happy cooking!

Caramel Apple Rice Krispie Treats Easy and Fun Snack

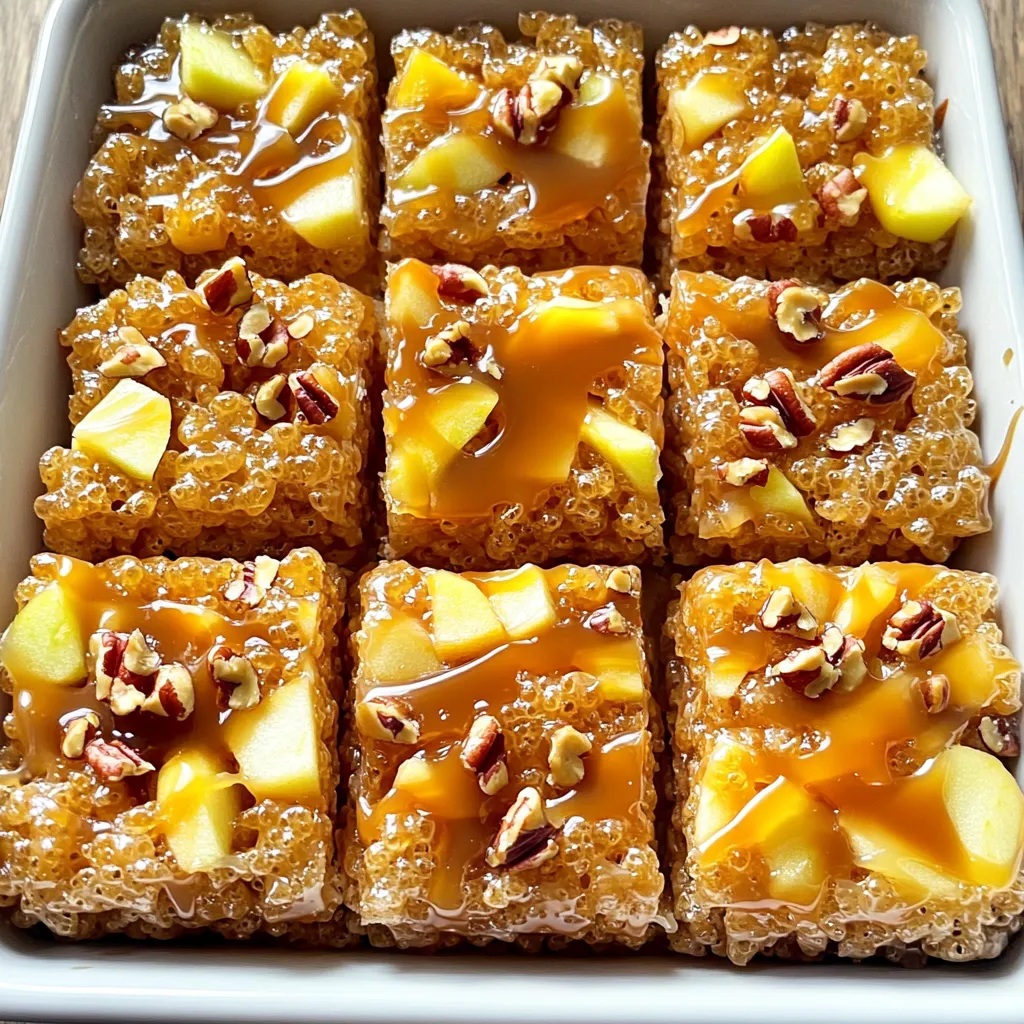
Looking for a fun and easy snack that combines sweet and tart flavors? You’ll love these Caramel Apple Rice Krispie

Older posts
Newer posts
← Previous Page1 … Page15 Page16 Page17 … Page85 Next →

dsad

© 2026 greenmealmap • Built with GeneratePress

Our Policies

  • Copyright Policy
  • Cookie Policy
  • GDPR Policy
  • Privacy Policy
  • Disclaimer
  • Terms Of Use

More Information

  • Home
  • About
  • Contact
  • Appetizers
  • Dessert
  • Dinner
  • Drinks
©2026, greenmealmap About Back To Top