Skip to content
DisclaimerTerms Of UseGDPR PolicyCookie Policy

greenmealmap

  • Home
  • Drinks
  • Appetizers
  • Dinner
  • Dessert
  • About
  • Contact
  • Privacy Policy
DisclaimerTerms Of UseGDPR PolicyCookie Policy

NO-ING-IMG

To create these delightful chocolate marshmallow cookies, gather the following ingredients: - 1 cup all-purpose flour - 1/2 cup unsweetened cocoa powder - 1/2 teaspoon baking soda - 1/4 teaspoon salt - 1/2 cup unsalted butter, softened - 1/2 cup granulated sugar - 1/4 cup brown sugar, packed - 1 large egg - 1 teaspoon vanilla extract - 1 cup chocolate chips (semi-sweet or dark) - 1 cup mini marshmallows - 1/2 cup chopped nuts (optional) - 1/4 teaspoon espresso powder (for depth of flavor) Each ingredient plays a key role in the cookie's taste and texture. The flour gives structure, while cocoa adds rich flavor. Baking soda helps the cookies rise, and salt enhances sweetness. Butter brings moisture and creaminess. The sugars create sweetness and contribute to the cookie's chewy texture. An egg binds everything together, and vanilla adds a lovely aroma. Chocolate chips bring a delightful melt, and mini marshmallows add fun and fluffiness. Nuts can add crunch, and espresso powder boosts the chocolate taste without being too strong. All these elements combine to create a sweet treat that is both soft and chewy. {{ingredient_image_1}} - Preheat and Prepare the Oven Start by preheating your oven to 350°F (175°C). This step is key for even baking. Line a baking sheet with parchment paper to prevent sticking. - Mix Dry Ingredients In a medium bowl, whisk together 1 cup of all-purpose flour, 1/2 cup of cocoa powder, 1/2 teaspoon of baking soda, 1/4 teaspoon of salt, and 1/4 teaspoon of espresso powder. Espresso adds depth to the chocolate flavor. - Cream Butter and Sugars In a large bowl, cream together 1/2 cup of softened butter, 1/2 cup of granulated sugar, and 1/4 cup of brown sugar. Beat them until light and fluffy. This mix will give your cookies a nice texture. - Incorporating Egg and Vanilla Beat in 1 large egg and 1 teaspoon of vanilla extract. This adds moisture and flavor to the cookie dough. - Add Dry Ingredients Gradually Gradually mix the dry ingredients into the wet mix. Stir until just combined. Be careful not to overmix; this keeps your cookies tender. - Fold in Chocolate Chips and Marshmallows Gently fold in 1 cup of chocolate chips and 1 cup of mini marshmallows. If you like, add 1/2 cup of chopped nuts for an extra crunch. - Dropping Cookie Dough onto Baking Sheet Use a spoon to drop dollops of cookie dough onto your prepared baking sheet. Space them about 2 inches apart to allow for spreading. - Baking Time and Observations Bake the cookies for 10-12 minutes. Look for set edges and soft middles. This is the perfect time to enjoy that chocolate aroma! - Cooling Instructions Once baked, remove the cookies from the oven. Let them cool on the baking sheet for 5 minutes. After that, transfer them to a wire rack to cool completely. This helps them firm up nicely. - Ensuring Perfect Cookie Consistency: To get soft and chewy cookies, do not overmix the dough. Mix until just combined. This keeps the cookies tender. Also, use room temperature butter. It helps create a light and fluffy texture. - Recommended Oven Settings: Preheat your oven to 350°F (175°C). This temperature is ideal for baking these cookies. Always use an oven thermometer to check the heat. An accurate temperature guarantees even baking. - Flavor Enhancements with Espresso: Adding 1/4 teaspoon of espresso powder gives the cookies a rich flavor. It enhances the chocolate taste without making them taste like coffee. You can also try using flavored extracts, like almond or mint, for a twist. - Substituting Ingredients for Dietary Needs: If you need to make these cookies gluten-free, use a 1-to-1 gluten-free flour mix. For dairy-free options, substitute the butter with coconut oil or vegan butter. These swaps maintain a similar taste and texture. - Creative Serving Suggestions: Serve your cookies on a colorful plate for a fun look. You can stack them high for a delightful display. Add a few fresh berries for a pop of color and freshness. - Drizzling and Dusting Ideas: Melt some chocolate and drizzle it over the cookies after they cool. This adds a nice touch and makes them look fancy. A light dusting of powdered sugar also gives a cheerful look, perfect for any occasion. Pro Tips Chill the Dough: For thicker cookies, refrigerate the dough for at least 30 minutes before baking. This helps them maintain their shape and prevents spreading. Use Quality Chocolate: Opt for high-quality chocolate chips for a richer flavor. Dark chocolate or semi-sweet chips will enhance the overall taste of the cookies. Experiment with Flavors: Feel free to add a pinch of cinnamon or a splash of almond extract for a unique twist on the traditional chocolate flavor. Storage Tips: Store the cookies in an airtight container at room temperature for up to a week. You can also freeze them for longer storage; just thaw before serving. {{image_2}} Using different types of chocolate can change your cookie flavor. Semi-sweet chocolate chips offer a classic taste. They balance sweetness and richness well. Dark chocolate chips provide a bolder flavor. They add depth and a slight bitterness. If you want a sweeter cookie, try white chocolate chips. They melt creamy and sweet. White chocolate pairs nicely with the cocoa. It creates a fun contrast with the dark cookie base. You can mix in various nuts for texture. Chopped walnuts or pecans add crunch. Almonds can lend a nice sweetness. Seeds, like sunflower or pumpkin, are also great. They give a healthy twist and extra flavor. For sweetness, consider using alternative sweeteners. Honey or maple syrup can work well. They add a unique taste and moisture. Just be sure to adjust the other ingredients to keep your dough right. Changing up your cookies for the season is fun! For holidays, add festive sprinkles. You can use red and green for Christmas. Or, use pastel colors for Easter. It makes your cookies look special. For birthdays, top them with colorful icing. You can also add fun shapes to your cookies. Cookie cutters can create stars, hearts, or other fun designs. This makes them perfect for celebrations! To keep your cookies fresh, use an airtight container. This helps prevent air from making them stale. Line the bottom with parchment paper. Place the cookies in a single layer. You can add a slice of bread in the container. This helps keep the cookies moist. Freezing cookie dough is easy. Scoop the dough into balls and place them on a baking sheet. Freeze them for about one hour. Once firm, transfer the dough balls to a freezer bag. Remove as much air as you can before sealing. To bake frozen dough, you don’t need to thaw it first. Preheat your oven and bake the cookies for an extra 2-3 minutes. This helps them stay soft and gooey. These cookies last for about one week at room temperature. You can also keep them in the fridge for up to two weeks. Look for signs of spoilage, like an off smell or hardness. If they feel dry or crumbly, it’s best to toss them out. How do I make cookies softer? To make cookies softer, use less flour. You can also add an extra egg yolk. Chilling the dough helps too. Bake them just until the edges are set, but the centers stay soft. Can I replace the marshmallows with something else? Yes, you can replace marshmallows with chocolate chunks or dried fruits. Both will add great flavor. You can also try using peanut butter chips for a fun twist. What can I use instead of espresso powder? If you don't have espresso powder, use instant coffee granules. You can also skip it if you prefer. Just know it adds a nice depth of flavor to the cookies. Best substitutes for unsalted butter? You can use salted butter in a pinch. Just reduce the added salt by a pinch. Coconut oil or vegan butter also work well for a dairy-free option. Are there gluten-free options for this recipe? Yes, you can use a gluten-free flour blend. Look for one that has xanthan gum. This will help mimic the texture of all-purpose flour. What to do if cookies are too crumbly? If your cookies are too crumbly, add a little more butter or a splash of milk. Mix it in slowly until the dough comes together nicely. Why are my cookies spreading too much? Cookies spread too much if the butter is too warm. Chill the dough before baking. Make sure to measure your flour correctly to avoid using too little. Baking cookies from scratch is fun and rewarding. We explored ingredients, step-by-step instructions, and tips. You learned how to customize the recipe, add variations, and store your cookies. Remember, the right baking techniques make a big difference. Enjoy experimenting with flavors and sharing your delicious results. Happy baking!

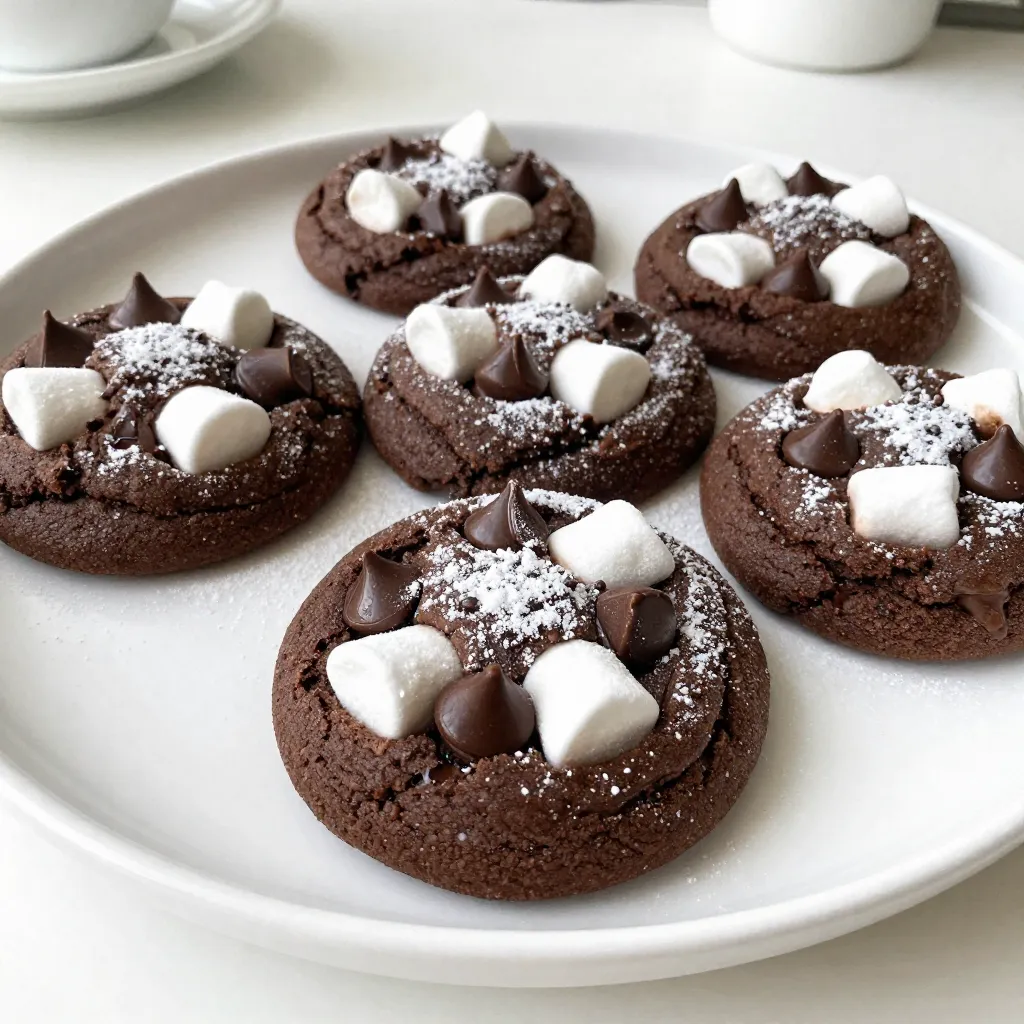
Chocolate Marshmallow Cookies Delightful Sweet Treat

Chocolate Marshmallow Cookies are a sweet dream come true! These cookies are gooey, rich, and full of chocolatey goodness. I’ll

- 1 cup jasmine rice, cooked and cooled - 1 pound large shrimp, peeled and deveined - 2 tablespoons vegetable oil - 3 cloves garlic, minced - 1 small onion, finely chopped - 1 cup mixed bell peppers, diced (red, yellow, and green) - 1 cup frozen peas and carrots mix - 3 tablespoons soy sauce (low sodium preferred) - 2 tablespoons sriracha (adjust based on heat preference) - 2 green onions, chopped - Salt and black pepper to taste - Fresh cilantro, for garnish (optional) To make spicy shrimp fried rice, gather these fresh and tasty ingredients. The jasmine rice gives the dish a nice texture. Use large shrimp for a hearty bite. Vegetable oil helps fry the rice, making it crispy and delicious. Next, gather your aromatics. Garlic and onion add a strong flavor base. The mix of bell peppers adds sweetness and color. Frozen peas and carrots bring in some nutrients and help the dish pop with color. For seasoning, soy sauce gives that umami taste we love. Sriracha adds heat, so adjust it depending on your spice level. Don’t forget salt, pepper, and green onions for extra flavor. Fresh cilantro can be a great touch if you enjoy its taste. With these ingredients, you’ll create a vibrant and tasty meal in under 30 minutes. {{ingredient_image_1}} To start, you need jasmine rice. Cook it according to the package instructions. Once it’s done, spread the rice on a baking sheet. This helps it cool. Let it cool completely. Cooling prevents sticking when you fry it later. Next, grab a large skillet. Heat 1 tablespoon of vegetable oil over medium-high heat. Add 3 cloves of minced garlic and 1 small chopped onion. Cook until fragrant, about 2 to 3 minutes. The onion should turn translucent. Now, raise the heat to high. Add 1 pound of large shrimp. Season with salt and black pepper. Cook for 2 to 3 minutes until the shrimp turn pink and opaque. When ready, remove the shrimp from the skillet. Set them aside. In the same skillet, add the last tablespoon of oil. Toss in 1 cup of diced mixed bell peppers and 1 cup of frozen peas and carrots. Stir-fry for about 3 minutes. You want the veggies to be tender but still crisp. Next, push the vegetables to one side. Pour 2 lightly beaten eggs into the other side. Scramble the eggs until they are fully cooked. Mix everything together in the skillet. Now, it’s time to combine it all. Add the cooled rice to the skillet. Then, add the cooked shrimp, 3 tablespoons of soy sauce, and 2 tablespoons of sriracha. Stir-fry everything together for another 3 to 4 minutes. This warms up the rice and mixes all the flavors. Finally, stir in 2 chopped green onions. Taste and adjust the seasoning if needed. If you want more heat, add extra sriracha. Your spicy shrimp fried rice is now ready to serve! To turn up the heat, adjust the sriracha amount. You can add more if you love spice. If you want even more kick, try adding chili flakes or fresh peppers. Slice up some jalapeños for a bold touch. The heat level is all about your taste! To keep your fried rice from sticking, cool the rice before frying. Spread it on a baking sheet to let it chill. This step makes a big difference. Also, use a non-stick skillet or wok. It helps the rice slide around easily while cooking. Make sure your shrimp are cooked through. They should turn pink and opaque, which takes about 2-3 minutes. Don’t overcook them, or they can become tough. For the veggies, aim for tender-crisp. Stir-fry them for about 3 minutes. This keeps their bright color and crunch! Pro Tips Use Day-Old Rice: For the best fried rice, use rice that has been cooked and cooled the day before. This helps to firm up the grains, preventing them from becoming mushy during stir-frying. Customize Your Veggies: Feel free to swap in your favorite vegetables! Broccoli, snap peas, or corn can all make delicious additions to this dish. Adjust the Heat: If you prefer a milder flavor, start with less sriracha and adjust to taste. You can always add more heat at the end! Fresh Herbs for Flavor: Adding fresh cilantro or basil as a garnish not only enhances the presentation but also adds a burst of fresh flavor to your fried rice. {{image_2}} You can change up the protein in your spicy shrimp fried rice. Chicken is a great swap. Use cooked, diced chicken breast instead of shrimp. It adds a nice flavor. You can also use tofu. Press and cube it, then stir-fry until golden. This option is great for a meat-free meal. If you want more seafood, try adding scallops or crab. Both will give you a unique taste. Just cook them the same way as shrimp. This way, you add variety while keeping the dish tasty. Feel free to mix in different vegetables. Broccoli, snap peas, or carrots add color and crunch. You can use any mix of veggies you like. Fresh vegetables make the dish healthy and bright. Consider seasonal options too. In summer, try zucchini or corn. In fall, add squash or kale. Fresh veggies not only taste better but also enhance the meal's nutrition. Making this dish gluten-free is simple. Use tamari instead of soy sauce. It gives the same rich flavor without the gluten. For a vegan twist, skip the shrimp and eggs. Use more tofu or a plant-based protein. You can also add extra veggies to boost flavor. This way, everyone can enjoy a delicious meal. To store your spicy shrimp fried rice, let it cool first. Spread it out on a baking sheet. This helps cool it fast. Once cool, place it in an airtight container. Make sure to seal it well. This keeps the dish fresh. Fried rice stays good in the fridge for up to four days. If you want to keep it longer, freeze the rice. First, cool it, just like before. Then, put it in freezer-safe bags or containers. Remove as much air as you can. This helps avoid freezer burn. When you want to eat it, thaw it overnight in the fridge. Reheat it in a pan or microwave. Add a bit of water or oil to keep it moist. This will help keep the flavor and texture. Refrigerated spicy shrimp fried rice lasts about four days. After that, check for signs of spoilage. Look for any off smells or change in color. If it smells sour or looks weird, throw it away. Always prioritize your health and safety when storing food. Yes, you can use leftover rice. Day-old rice works best for fried rice. It dries out a bit in the fridge, making it less sticky. Here are some best practices for using it: - Use rice that has been cooled and stored in the fridge. - Break up any clumps before cooking. - If rice is too dry, add a splash of water when frying. To make this dish vegetarian, replace shrimp with tofu or tempeh. Here are some tips: - Use firm tofu, cubed, and sauté until golden. - If you want seafood flavor, try seaweed or vegan shrimp. - Replace eggs with scrambled chickpea flour for a vegan option. You can serve this dish with several sides and drinks: - Pair it with a light soup, like miso or hot and sour. - Serve with a fresh cucumber salad for crunch. - A cold beer or iced tea makes a great drink choice. To reduce the heat, adjust the sauce and seasonings. Here’s how: - Use less sriracha in the recipe. - Substitute sriracha with sweet chili sauce for a milder flavor. - Add a splash of soy sauce for umami without the heat. Absolutely! Adding more veggies boosts nutrition and flavor. Here are some great options: - Try adding carrots, broccoli, or snap peas. - Spinach or kale can be added for extra greens. - Just chop and stir-fry them along with bell peppers. This article covered how to make spicy shrimp fried rice. We explored the main ingredients like shrimp, rice, and key vegetables. I shared step-by-step instructions to ensure you cook it perfectly. Helpful tips on spice levels, cooking times, and storage options were included. Try different proteins and veggies to make it your own. You now have everything you need for a delicious dish. Get cooking and enjoy your spicy shrimp fried rice!

Spicy Shrimp Fried Rice Flavorful Delight Under 30 Minutes

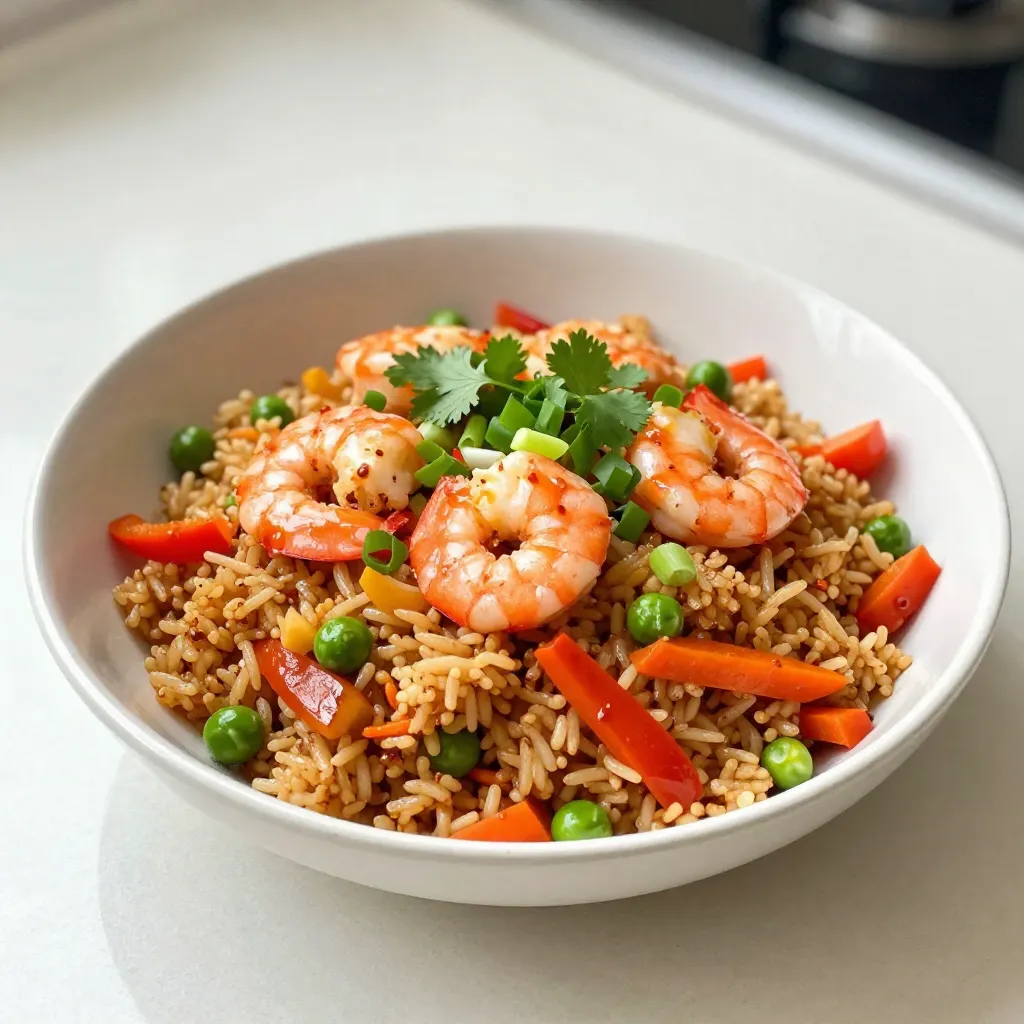
Looking for a quick and tasty meal? This Spicy Shrimp Fried Rice is the perfect solution! In just under 30

To make Garlic Herb Roasted Cauliflower, you need these ingredients: - 1 large head of cauliflower, cut into florets - 4 tablespoons olive oil - 6 cloves garlic, minced - 1 tablespoon fresh rosemary, finely chopped - 1 tablespoon fresh thyme leaves - 1 teaspoon smoked paprika - Salt and pepper to taste - Zest of 1 lemon - 2 tablespoons lemon juice - Fresh parsley, chopped for garnish Each ingredient brings its own flavor to the dish. The cauliflower is the star. It has a mild taste and a great texture. Olive oil helps it roast well and adds richness. Garlic gives a nice kick. Fresh herbs like rosemary and thyme add depth. Smoked paprika brings warmth and a hint of smoke. Lemon zest and juice brighten the dish. They add freshness and a bit of tang. Finally, parsley makes a lovely garnish. Its bright green color adds visual appeal. Gather all these ingredients for a successful cooking experience. Make sure everything is fresh for the best flavor. {{ingredient_image_1}} - First, preheat your oven to 425°F (220°C). This helps the cauliflower roast evenly. - Next, line a large baking sheet with parchment paper. This makes cleanup simple. - In a big mixing bowl, add your cauliflower florets. Pour in the olive oil. - Add minced garlic, chopped rosemary, thyme leaves, smoked paprika, salt, and pepper. - Toss all the ingredients well. Make sure every floret is coated with the mix. - Now, spread the cauliflower in a single layer on the baking sheet. - Place the baking sheet in the oven. Roast the cauliflower for 25-30 minutes. - Stir the cauliflower halfway through cooking. This helps achieve even roasting. - Watch for a golden brown color. This shows the cauliflower is done and tender. - Once roasted, remove it from the oven. Drizzle lemon juice over the hot cauliflower. - Add lemon zest and gently toss to mix. This brightens the flavors nicely. - Finally, garnish with chopped parsley before serving. This adds a lovely touch. To get the best flavor and texture, coat the cauliflower evenly with oil and seasonings. This helps every bite taste great. Use enough olive oil to make the florets shine, but don’t drown them. Aim for a light coating. Roasting at 425°F (220°C) is key. This high heat cooks the cauliflower quickly and gives it a nice golden color. It also enhances the flavors. Be sure to preheat your oven fully before putting in the cauliflower. You can boost the flavor by adding more herbs or spices. Try adding basil or oregano for a different twist. A pinch of red pepper flakes can add a nice kick, too. For garlic variations, you can roast whole cloves alongside the cauliflower. They become soft and sweet when roasted. You could also use garlic powder for a milder flavor. Experiment to find what you like best! Pro Tips Cut Evenly: Ensure all cauliflower florets are cut to a similar size for even roasting. Marinate for Flavor: Allow the seasoned cauliflower to sit for 10-15 minutes before roasting to enhance the flavor. Use Fresh Herbs: Fresh herbs like rosemary and thyme will provide a more vibrant flavor than dried options. Check for Doneness: Roast until golden brown and tender; use a fork to test if the cauliflower is cooked through. {{image_2}} You can switch up how you cook garlic herb roasted cauliflower. Try using an air fryer. It cooks fast and gives a nice crisp. Set your air fryer to 400°F (200°C) and cook for about 15-20 minutes. Shake the basket halfway to cook evenly. Grilling is another fun way to make this dish. Cut the cauliflower into larger pieces to prevent them from falling through the grill. Brush the florets with olive oil and season with garlic and herbs. Grill over medium heat for about 10-15 minutes. Turn them often for even cooking. You can change herbs to fit your tastes. Instead of rosemary and thyme, use basil or oregano. Each herb brings a new flavor twist to the dish. Experiment with what you have on hand. If you want a creamy texture but need a dairy-free option, try using tahini or coconut cream. Both add richness without any dairy. Just mix it in with the olive oil and seasonings before tossing with the cauliflower. To keep your garlic herb roasted cauliflower fresh, store it in the fridge. Place the cooled cauliflower in an airtight container. It will stay good for about 3 to 5 days. If you want to freeze it, allow the cauliflower to cool completely. Then, spread it on a baking sheet to freeze in a single layer. This step helps to prevent clumping. Once frozen, transfer it to a freezer bag. It will keep well for up to 3 months. Reheating cauliflower can be tricky, but I have some tips. The best way is to use the oven. Preheat the oven to 350°F (175°C). Spread the cauliflower on a baking sheet and heat for about 10 to 15 minutes. This method helps keep the texture nice. You can also use the microwave for quick reheating. Just warm it on medium power for 1 to 2 minutes. Stir halfway through to heat evenly. Can I use frozen cauliflower for this recipe? Yes, you can use frozen cauliflower. Just thaw it first. Pat it dry to remove extra moisture. This will help it roast better and avoid being soggy. What can I serve with garlic herb roasted cauliflower? You can serve this dish with grilled chicken, fish, or a tasty grain like quinoa. It also pairs well with salads or as part of a veggie platter. How long will leftovers last in the fridge? Leftovers can last about 3 to 5 days in the fridge. Store them in an airtight container to keep them fresh. Is roasted cauliflower healthy? Yes, roasted cauliflower is very healthy. It is low in calories and high in fiber. Plus, it is filled with vitamins and minerals, making it a great side dish. How many calories are in garlic herb roasted cauliflower? One serving has about 120 calories. This can vary slightly based on the amount of oil you use. Can I make it vegan? Yes! This dish is already vegan-friendly. It has no animal products, so you can enjoy it as is. How can I adjust the spice level? To change the spice level, add more paprika for heat or skip it for a milder taste. You can also add a pinch of cayenne pepper for an extra kick. We explored how to make garlic herb roasted cauliflower, covering ingredients, steps, and tips. Roasting this veggie brings out its yummy flavor. Remember to coat well with oil and spices for the best taste. You can try different cooking methods or herbs to switch it up. Storing and reheating leftovers is easy, so enjoy your dish later. With a few simple tweaks, this recipe fits many diets. Embrace this healthy treat and impress your friends at the dinner table.

Garlic Herb Roasted Cauliflower Flavorful Side Dish

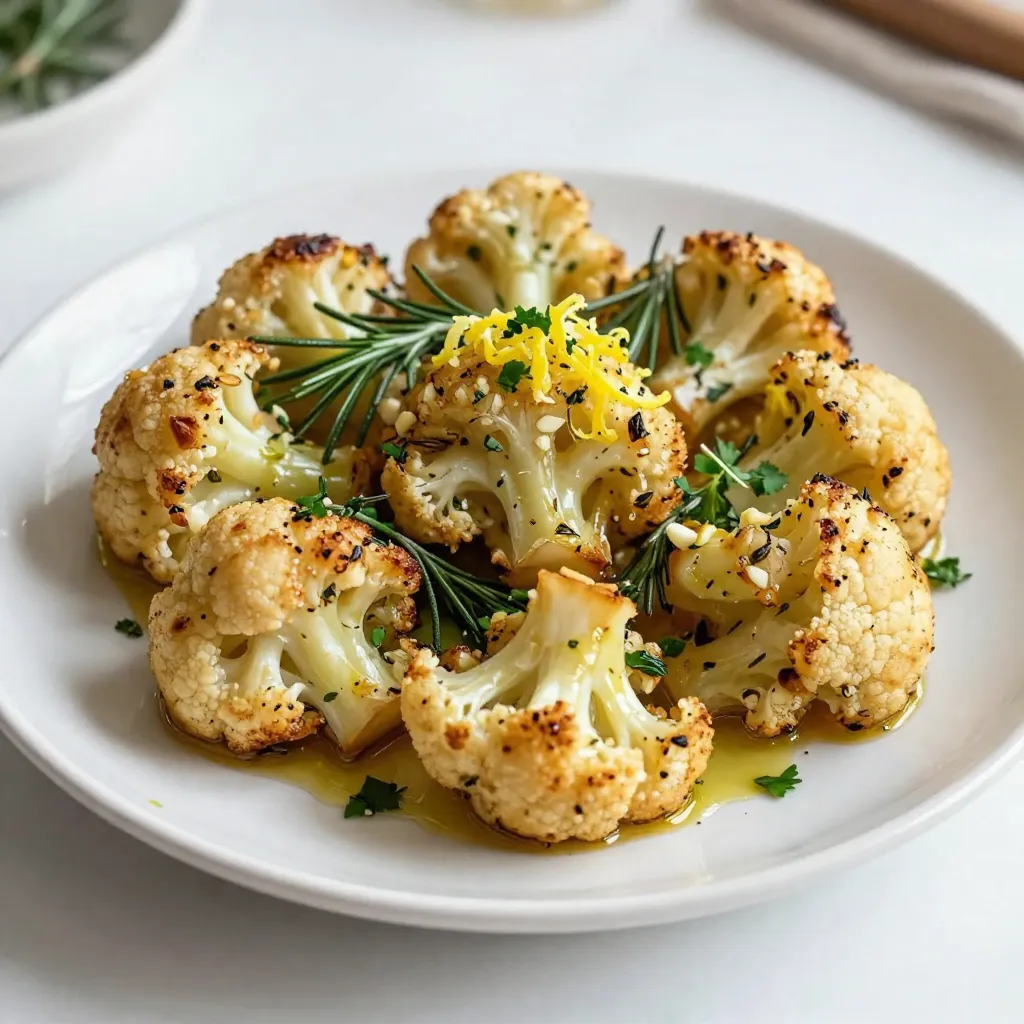
Looking for a simple, tasty side dish? Garlic Herb Roasted Cauliflower is the answer! This dish combines the earthy flavors

To make Pepper Jack Stuffed Chicken, gather these key ingredients. Each one adds flavor and texture to your dish. - 4 boneless, skinless chicken breasts - 1 cup pepper jack cheese, shredded - 1/2 cup cream cheese, softened - 1/2 cup roasted red peppers, chopped - 2 cloves garlic, minced - 1 teaspoon smoked paprika - Salt and pepper to taste - 2 tablespoons olive oil - Fresh cilantro for garnish (optional) These ingredients are easy to find and combine well. The pepper jack cheese brings a nice kick. Cream cheese adds creaminess, and roasted red peppers give a sweet touch. Garlic and smoked paprika deepen the flavor. You can adjust salt and pepper to your taste. Olive oil is perfect for searing the chicken. Don't forget fresh cilantro for a pop of color. Grab these items, and you are ready to create a savory meal! {{ingredient_image_1}} - Preheat Oven and Prepare Ingredients Start by preheating your oven to 375°F (190°C). This ensures the chicken cooks evenly. Gather all your ingredients. You will need boneless, skinless chicken breasts, pepper jack cheese, cream cheese, roasted red peppers, garlic, smoked paprika, salt, and pepper. - Make the Stuffing Mixture In a mixing bowl, combine the shredded pepper jack cheese, softened cream cheese, chopped roasted red peppers, minced garlic, smoked paprika, salt, and pepper. Mix everything well until you have a creamy filling. This mixture gives the chicken a rich and spicy flavor. - Prepare Chicken Breasts for Stuffing Take each chicken breast and slice a pocket into it. Be careful not to cut all the way through. You want enough space to hold the stuffing. Spoon the cheese mixture into each pocket. Make sure to fill them well. If the openings are too wide, use toothpicks to keep the stuffing inside. - Sear Stuffed Chicken in Skillet Heat two tablespoons of olive oil in an oven-safe skillet over medium heat. Once hot, add the stuffed chicken breasts. Sear them for about 4-5 minutes on each side. This step gives the chicken a nice golden color and enhances the flavor. - Bake Chicken in Oven After searing, transfer the skillet to the preheated oven. Bake the chicken for 20-25 minutes. Cook until the chicken is no longer pink and juices run clear. Use a meat thermometer if you want to be sure. The internal temperature should reach 165°F (75°C). - Resting and Serving Tips Once baked, remove the skillet from the oven. Let the chicken rest for 5 minutes. This helps the juices settle. After resting, remove any toothpicks. Slice the stuffed chicken and serve it hot. If you like, add fresh cilantro on top for a burst of color and flavor. Enjoy this savory dish! Ensuring Even Cooking To cook your chicken evenly, choose breasts of similar size. If some pieces are thick, use a meat mallet to pound them thinner. This helps them cook at the same rate. Always check the internal temperature. It should reach 165°F (75°C) for safe eating. Achieving the Perfect Sear For a great sear, heat your skillet before adding oil. Add the olive oil and let it shimmer. Place the chicken in the skillet gently, and do not move it for at least 4-5 minutes. This creates a nice crust. Flip it carefully to avoid losing the stuffing. Suggested Add-ins for the Stuffing You can make the stuffing even tastier by adding some extras. Try chopped spinach for color and nutrition. Sun-dried tomatoes add a sweet, tangy flavor. You can also mix in some cooked bacon bits for a smoky taste that pairs well with the cheeses. Adjusting Spiciness Level If you want more heat, add a pinch of cayenne pepper to the stuffing. For less spice, use mild cheese or skip the pepper jack. You can also serve the chicken with a cool dip, like sour cream or yogurt, to balance the flavors. Pro Tips Choose the Right Cheese: For an extra kick, try adding a bit of cheddar or Monterey Jack cheese to the filling along with the pepper jack. Don’t Overstuff: Make sure to fill the chicken pockets generously but avoid overstuffing, as this can cause the filling to leak out during cooking. Perfect Sear: Ensure your skillet is hot enough before adding the chicken to achieve that beautiful golden-brown crust. Rest the Chicken: Always let the chicken rest for a few minutes after baking; this helps the juices redistribute for a juicier bite. {{image_2}} You can use many cheeses for this dish. If you want a milder flavor, try mozzarella. For a creamier texture, go with ricotta. If you crave a stronger taste, use sharp cheddar. Each cheese brings its own charm to the dish. Mixing cheeses can also create fun flavor profiles. Just make sure the cheese melts well. Adding veggies is a great way to enhance the stuffing. Spinach adds color and nutrients. Mushrooms bring an earthy taste. Even diced tomatoes can add freshness. You can also mix in corn for a bit of sweetness. Just chop them small so they fit well in the chicken pockets. Spice up your stuffing to match your taste. If you love heat, add jalapeños or cayenne pepper. For a smoky flavor, include some chipotle powder. Mix in herbs like oregano or basil for a fresh twist. Experimenting with spices can make each meal unique and exciting. Refrigeration Tips After you enjoy your Pepper Jack stuffed chicken, store leftovers in an airtight container. Make sure to place it in the fridge within two hours of cooking. The chicken will stay fresh for up to three days. For best taste, try to eat it sooner rather than later. Freezing Instructions If you want to save some for later, freezing is a great option. Wrap the stuffed chicken tightly in plastic wrap or foil. Then, place it in a freezer-safe bag. This way, it can last for up to three months. Just remember to label the bag with the date for easy tracking. Best Methods for Reheating To reheat your stuffed chicken, the oven works best. Preheat it to 350°F (175°C). Place the chicken in a baking dish and cover it with foil. Heat for about 20-25 minutes, or until it's warmed through. You can also use a microwave, but it may lose some of its crispiness. If using the microwave, heat it for 2-3 minutes, checking often to avoid overcooking. Enjoy your flavorful meal! You can serve Pepper Jack Stuffed Chicken with many sides. Some great options include: - Steamed broccoli - Mashed potatoes - Rice pilaf - Fresh salad - Roasted vegetables These sides add color and flavor to your meal. They complement the cheese and spices well. You can mix and match based on your taste. Yes, you can prepare this dish ahead of time. You can make the stuffing and fill the chicken breasts. Store them in the fridge for up to 24 hours. Just remember to cover them well. When ready to cook, sear and bake as usual. This saves time on busy days. Yes! You can use other meats. Turkey breasts work well for this recipe. Pork tenderloin is another tasty option. Just adjust cooking times based on the meat. Ensure it is cooked through for food safety. This way, you can enjoy different flavors while still savoring the delicious stuffing. This blog discussed key ingredients for making Pepper Jack stuffed chicken. You learned how to prepare, cook, and store the dish. I shared cooking tips to ensure great flavor and texture. You saw options for variations to fit your taste. I hope this guide inspires you to try new recipes and enjoy cooking. Each step is simple, making it easy to create a great meal. Dive in and let your kitchen creativity shine!

Pepper Jack Stuffed Chicken Savory and Easy Dish

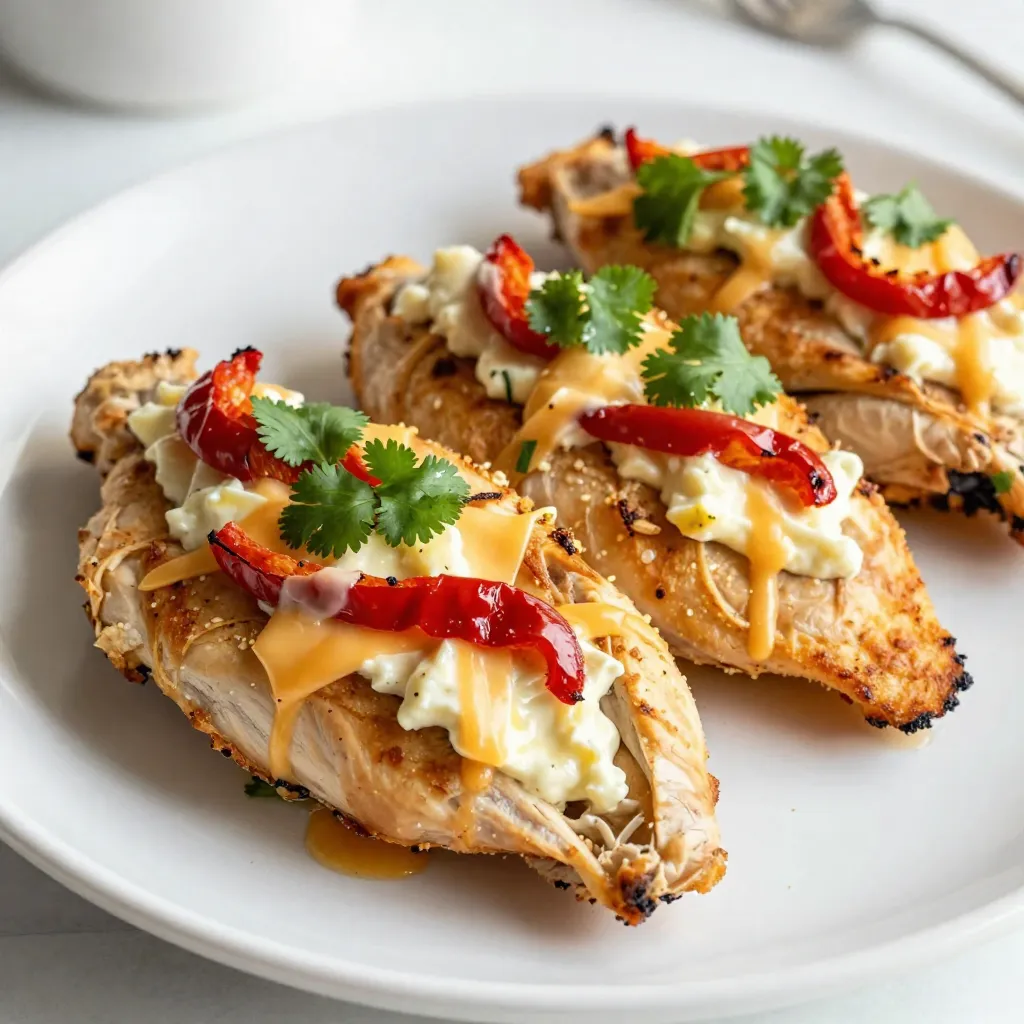
Looking for a dinner that packs a punch? This Pepper Jack Stuffed Chicken is both savory and easy to make.

This soup mixes great flavors and textures. Here is what you need: - 1 tablespoon olive oil - 1 medium onion, diced - 3 cloves garlic, minced - 1 pound boneless, skinless chicken breast, cubed - 4 cups chicken broth - 1 cup heavy cream - 1 cup basil pesto - 1 pound gnocchi (store-bought or homemade) - 2 cups fresh spinach, roughly chopped - Salt and pepper to taste - Grated Parmesan cheese for garnish - Fresh basil leaves for garnish Each ingredient plays a key role. The chicken adds protein, while the gnocchi gives a satisfying bite. The pesto brings green goodness and flavor. You will need a few tools to make this soup: - Large pot - Wooden spoon or spatula - Knife and cutting board - Measuring cups and spoons - Ladle for serving These tools help you cook and serve the soup easily. Feel free to mix things up! Here are some fun ideas: - Add vegetables like carrots or bell peppers for extra crunch. - Use different greens like kale instead of spinach. - Swap chicken for shrimp or tofu for a new twist. Customizing the soup makes it your own. Enjoy experimenting with flavors! {{ingredient_image_1}} - Gather your ingredients: - 1 tablespoon olive oil - 1 medium onion, diced - 3 cloves garlic, minced - 1 pound boneless, skinless chicken breast, cubed - 4 cups chicken broth - 1 cup heavy cream - 1 cup basil pesto - 1 pound gnocchi - 2 cups fresh spinach, roughly chopped - Salt and pepper - Grated Parmesan cheese for garnish - Fresh basil leaves for garnish - Start by dicing the onion. Chop it into small pieces. This helps it cook faster. - Mince the garlic cloves. You want them very small for good flavor. - Cube the chicken breast into bite-sized pieces. Make sure they are even for cooking. - Heat a large pot over medium heat. Add the olive oil and let it get warm. - Add the diced onion. Sauté it for about 3-4 minutes until it looks clear. - Stir in the minced garlic. Cook it for 30 seconds to bring out the smell. - Add the cubed chicken to the pot. Season it with salt and pepper. Cook it for about 5-7 minutes. Stir often so it cooks evenly. - Pour in the chicken broth. Bring it to a boil. Once boiling, turn the heat down to simmer. - Mix in the heavy cream and basil pesto. Let it cook for 3-5 minutes to thicken. - Gently add the gnocchi. Cook according to the package for 2-3 minutes. They will float when done. - Fold in the fresh spinach. Let it cook for about 2 minutes until it wilts. - Taste the soup. Add more salt and pepper if needed. - Serve the soup in warm bowls. - Garnish with grated Parmesan cheese and fresh basil leaves for a lovely touch. To make your soup creamier, use heavy cream. It adds a rich taste. You can also mix in some cream cheese for extra thickness. If you want a lighter option, try using half-and-half. Just remember, adding cream at the end helps keep its texture smooth. Cooking gnocchi is simple. Always follow the package instructions for timing. Gnocchi cooks quickly, usually in 2-3 minutes. When they float, they are ready. Don't overcrowd the pot; cook in batches if needed. This way, they will have a nice texture. You can also sauté them in a pan for a crispy exterior. Seasoning is key for great flavor. Start with salt and pepper when cooking the chicken. Taste the soup before serving and adjust accordingly. You can add garlic powder or onion powder for more depth. Fresh herbs like basil or parsley can brighten the dish. A squeeze of lemon at the end adds a nice zing. Pro Tips Use Fresh Ingredients: Fresh basil and high-quality chicken broth will elevate the flavor of your soup significantly. Customize the Pesto: Experiment with different types of pesto, such as sun-dried tomato or arugula, for a unique twist. Don’t Overcook Gnocchi: Gnocchi should be cooked until they float to the top, which indicates they are done. Overcooking can make them mushy. Make it Ahead: This soup can be made ahead of time and stored in the refrigerator. Just add the spinach right before serving to keep it fresh. {{image_2}} If you want to switch the chicken, try shrimp or turkey. Both cook fast and add great flavor. You can also use rotisserie chicken for a quick fix. Just shred it and add it near the end of cooking. Tofu is another option. It absorbs flavors well and works great in this soup. For a vegetarian take, skip the chicken and use vegetable broth. Add more veggies like carrots, bell peppers, or mushrooms for texture. Chickpeas can add protein and a nice bite. You still get that creamy goodness from the heavy cream and pesto. It’s just as filling and tasty. To make this soup low-carb, swap gnocchi for zucchini noodles or cauliflower rice. Both options keep the soup light and healthy. You can also reduce the heavy cream or use a low-carb cream alternative. Adding more leafy greens like kale can boost nutrients without extra carbs. To store your leftover creamy pesto chicken gnocchi soup, let it cool first. Once it's cool, transfer it to an airtight container. This helps keep the soup fresh and tasty. You can store it in the fridge for up to three days. Just make sure you seal it well to prevent it from absorbing other fridge smells. You can freeze this soup for longer storage. Use freezer-safe containers or bags. Leave some space at the top, as the soup will expand when frozen. The soup can last up to three months in the freezer. When ready to eat, thaw it overnight in the fridge before reheating. Avoid freezing the gnocchi if you want to keep their texture nice. To reheat your creamy pesto chicken gnocchi soup, pour it into a pot over low heat. Stir gently until it warms up. You can also use a microwave-safe bowl for quick heating. Heat in short intervals, stirring in between, to avoid hot spots. Add a splash of water or cream if the soup gets too thick during reheating. Enjoy your delicious meal again! To make Creamy Pesto Chicken Gnocchi Soup gluten-free, you need to choose the right gnocchi. Look for gluten-free gnocchi made with ingredients like potato or rice flour. Most store-bought brands offer gluten-free options. You can also make your own using gluten-free flour for a fun twist. Just follow the same cooking steps, and you'll have a delicious, gluten-free soup! Absolutely! Using homemade pesto can enhance the flavor of your soup. When you make pesto at home, you control the ingredients. Blend fresh basil, garlic, pine nuts, Parmesan cheese, and olive oil. This mix gives your soup a fresh and vibrant taste. Feel free to adjust the garlic and nuts to fit your taste. This soup is filling and tasty on its own, but you can pair it with many sides. A simple green salad with a light vinaigrette works well. You can also serve crusty bread or garlic bread to soak up the soup. For a fun twist, try adding a side of roasted vegetables. They add color and flavor to your meal! This blog post guides you through making creamy pesto chicken gnocchi soup. We covered ingredients, tools, and optional choices for your soup. I shared easy steps for prep and cooking, plus tips for creaminess and flavor. You learned about variations and how to store your leftovers. Remember, you can adjust the recipe to fit your needs. Enjoy your cooking adventure and savor every bite of this delicious soup!

Creamy Pesto Chicken Gnocchi Soup Easy Weeknight Meal

Looking for a quick and tasty dinner idea? This Creamy Pesto Chicken Gnocchi Soup is the perfect solution! It’s rich,

- 4 lobster tails - 1/2 cup unsalted butter - 6 cloves garlic, minced - 1 tablespoon fresh lemon juice - 1 tablespoon fresh parsley, chopped - 1 teaspoon smoked paprika - Salt and pepper to taste - Lemon wedges for garnish When I cook garlic butter lobster tails, I start with the main ingredients. The lobster tails are the star. I choose fresh, meaty tails for the best flavor. Unsalted butter adds richness, while garlic gives a punch. I like to use six cloves of garlic, minced finely. This makes the butter sauce aromatic and tasty. Next, I add a few flavor boosters. Fresh lemon juice brightens the dish. It adds a lovely zing. I also use fresh parsley for color and freshness. Smoked paprika adds a warm, smoky flavor. It enhances the overall taste. Don’t forget to use salt and pepper to season properly. For serving, I always include lemon wedges. They look nice and add extra flavor. You can squeeze them over the lobster before eating. This dish is a true treat, ready for any special occasion! {{ingredient_image_1}} To start, preheat your oven to 425°F (220°C). This high heat helps cook the lobster tails quickly and evenly. Next, grab your kitchen shears. Carefully cut the top of the lobster tails down the middle. Make sure you stop at the end of the tail to keep it intact. This way, you avoid cutting all the way through. Then, gently pull the lobster meat out from the shell. Keep it attached at the base. Lay the meat on top of the shell for a beautiful presentation. Now, let’s prepare the garlic butter sauce. In a small saucepan over medium heat, melt the butter. Once melted, add the minced garlic. Sauté it for about 1-2 minutes. You want the garlic to be fragrant but not burnt. After that, stir in the fresh lemon juice, chopped parsley, smoked paprika, and season with salt and pepper. This mix will enhance the flavor of the lobster tails. Next, take your garlic butter mixture and brush it generously over the lobster meat and inside the shell. Make sure to save some for basting later. Place the lobster tails on a baking sheet. Bake them in the preheated oven for about 12-15 minutes. The meat should turn opaque and be cooked through. Halfway through, baste the lobster with the remaining garlic butter. This adds extra flavor and moisture. After baking, let the lobster tails rest for a couple of minutes before serving. Enjoy your tasty treat! To cook lobster tails just right, aim for 12-15 minutes in the oven at 425°F (220°C). The meat should turn opaque and firm. Overcooking can make it tough, so check it often. Use a meat thermometer if you have one. Lobster is done at 140°F (60°C). Basting is key to moist and flavorful lobster tails. Brush the garlic butter mixture on the lobster meat before baking. Halfway through cooking, use the leftover butter to baste again. This keeps the meat juicy and packed with flavor. A pastry brush works best for this task. Want to kick up the flavor? Try adding fresh herbs like thyme or dill. You can also use Old Bay seasoning for a unique twist. A pinch of red pepper flakes adds heat, if you like spice. Experiment with different flavors to find your favorite combo! Pro Tips Fresh Ingredients: Always use the freshest lobster tails you can find. Fresh seafood has a better flavor and texture, making your dish more enjoyable. Butter Temperature: Allow the butter to cool slightly before adding the garlic to prevent burning. This ensures a smooth and rich garlic flavor without bitterness. Basting Technique: Baste the lobster tails halfway through cooking for an even flavor distribution. This enhances the richness of the butter and garlic mixture. Resting Time: Let the lobster tails rest for a couple of minutes after baking. This allows the juices to redistribute, ensuring tender and succulent meat. {{image_2}} You can grill lobster tails for a smoky flavor. Start by preheating your grill to medium-high. Cut the shells as before. Brush the lobster meat with garlic butter. Place the tails on the grill, meat side down. Grill for about 5-7 minutes. Flip them and baste with more garlic butter. Cook until the meat is opaque. Broiling is another great method. Preheat your broiler to high. Place the lobster tails on a baking sheet, meat side up. Brush with garlic butter and broil for 6-8 minutes. Baste halfway through for extra flavor. Keep an eye on them to avoid burning. You can change up the flavors by adding herbs and spices. Try using Old Bay seasoning for a classic seafood taste. Mix it into the garlic butter for added zest. Fresh thyme or tarragon can also add a nice touch. You can even use chili flakes for a spicy kick. Experimenting with flavors keeps the dish fresh. Pair your garlic butter lobster tails with various sides. Rice is a simple choice and soaks up the garlic butter. Steamed vegetables add color and nutrition. You might also enjoy crusty bread to mop up any leftover sauce. A fresh salad can balance the richness of the lobster. Choose sides that complement the dish well. To keep your leftover lobster tails fresh, store them in the fridge. Place them in an airtight container. This helps keep the meat moist and tasty. Use them within two days for the best flavor. If you let them sit too long, they may lose their great taste. When it's time to enjoy your leftovers, reheating is key. The best way is to use the oven. Preheat it to 350°F (175°C). Place the lobster tails in a baking dish. Cover them with foil to keep them moist. Heat for about 10 minutes. You can also use a microwave, but be careful. Heat in short bursts to avoid overcooking. Check often to keep the texture nice. If you want to freeze cooked lobster tails, follow these steps. First, let them cool completely. Then, wrap each tail tightly in plastic wrap. This helps prevent freezer burn. Place the wrapped tails in a freezer bag. Remove as much air as you can. You can store them in the freezer for up to three months. When ready to eat, thaw in the fridge overnight before reheating. To cut lobster tails, use kitchen shears. This tool makes the task easy and safe. Start by placing the tail on a cutting board. Hold it steady with one hand. With the shears, cut down the middle of the shell. Stop just before the end of the tail. This keeps the meat attached. Once cut, gently pull the lobster meat out. Lay it on top of the shell for a beautiful presentation. You can tell lobster is cooked by looking for a few signs. First, the meat should turn opaque. It should also be firm to the touch. Another sign is the color change. Cooked lobster meat turns white or pale pink. If you cut into it, there should be no clear or translucent spots. Finally, the tail should curl slightly. These signs show you have perfectly cooked lobster. Yes, you can use frozen lobster tails. Start by thawing them before cooking. The best way to thaw is to place them in the fridge overnight. If you're short on time, you can run cold water over them for about 30 minutes. Once thawed, follow the same cooking steps as fresh tails. This way, you still enjoy that rich garlic butter flavor. You've learned how to prepare and cook lobster tails. Start with fresh ingredients like lobster, garlic, and butter. The garlic butter sauce adds a great flavor. I shared tips on cooking techniques, storage, and serving ideas. Lobster tails can be easy and fun to cook at home. With the right method, you can impress anyone. Enjoy your delicious meal, and don’t forget to try new flavors and methods!

Garlic Butter Lobster Tails Savory Delicious Treat

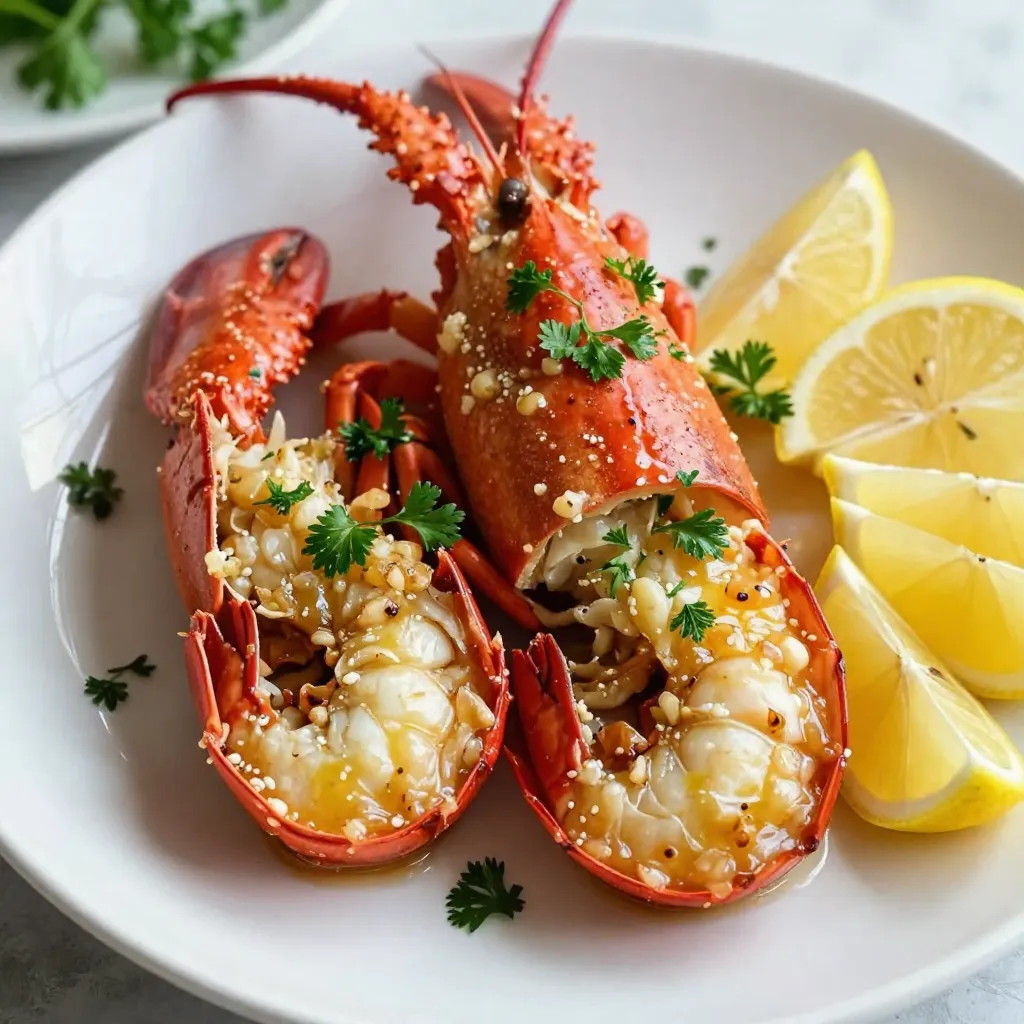
If you crave a tasty seafood dish, look no further than garlic butter lobster tails. This easy recipe delivers rich

- 2 cups milk chocolate chips - 1 cup creamy peanut butter - 1/2 cup unsweetened cocoa powder - 1/4 cup sweetened condensed milk - 1 teaspoon vanilla extract - Pinch of salt The main ingredients create a rich and creamy fudge. Milk chocolate chips offer sweet flavor. Creamy peanut butter gives a smooth texture and nutty taste. Unsweetened cocoa powder deepens the chocolate flavor. Sweetened condensed milk adds sweetness and creaminess. Vanilla extract enhances the overall taste. A pinch of salt balances all the flavors. - Chopped peanuts - Drizzle of melted chocolate Optional toppings can elevate your fudge. Chopped peanuts add a crunchy texture. A drizzle of melted chocolate looks beautiful and tastes great. You can mix and match toppings based on your mood. Enjoy making this treat your own! {{ingredient_image_1}} - Line an 8x8-inch baking dish with parchment paper. - Make sure to leave some paper hanging over the sides. - Gather all your ingredients and measure them out. This helps keep things neat. - Place the milk chocolate chips in a medium saucepan. - Melt the chips over low heat. Stir continuously until the chocolate is smooth. - Once melted, remove the pan from the heat. - Stir in the creamy peanut butter. Mix until fully combined. - Add the unsweetened cocoa powder and sweetened condensed milk. - Add the vanilla extract and a pinch of salt. - Mix the entire mixture until it is completely smooth. - Pour the mixture into the lined baking dish. - Use a spatula to smooth out the top. - If you want, sprinkle chopped peanuts on top for extra crunch. - Place the fudge in the refrigerator. Let it chill until set, about 2 hours. - Once firm, lift the fudge out using the parchment paper. - Cut it into squares for serving. Enjoy your delicious treat! To get a smooth fudge, always melt chocolate on low heat. High heat can burn the chocolate. Stir often while melting. This helps to mix the chocolate evenly. Once melted, quickly mix in the peanut butter until it blends well. If you see lumps, keep stirring until it's smooth. You can try different flavors in your fudge. Add a pinch of cinnamon for warmth. You can also try adding a bit of sea salt on top. This makes the sweet taste pop! For toppings, consider using crushed nuts or colorful sprinkles. They add a fun look and crunch to your fudge. Serve fudge squares on a nice plate. You can drizzle melted chocolate on top for flair. Pair these treats with a cold glass of milk or coffee. They make a great snack for any time of day. You can even cut them into fun shapes for parties! Pro Tips Use Quality Chocolate: Opt for high-quality milk chocolate chips for the best flavor and smooth texture in your fudge. Cool Thoroughly: Ensure the fudge is completely set in the refrigerator, which enhances its texture and makes cutting easier. Experiment with Mix-ins: Feel free to add ingredients like mini marshmallows or dried fruit to customize your fudge. Storage Tips: Keep the fudge in an airtight container in the refrigerator to maintain its freshness for up to two weeks. {{image_2}} You can change the chocolate in your fudge for fun twists. - Dark chocolate fudge version: Use dark chocolate chips for a richer taste. Dark chocolate adds depth and pairs well with peanut butter. - White chocolate option: Swap in white chocolate chips for a sweeter fudge. This version tastes like a creamy treat and looks beautiful. You can also play with the nut flavors in your fudge. - Replacing peanut butter with almond or cashew butter: Almond or cashew butter can give your fudge a different taste. Both options are creamy and add unique flavors. - Adding different nuts or seeds: Try mixing in chopped almonds, walnuts, or sunflower seeds. These add crunch and extra nutrients to your fudge. Adding special flavors can make your fudge even better. - Adding a dash of coffee or espresso: A little coffee can enhance the chocolate flavor. Just a teaspoon can make a big difference. - Infusing with flavored extracts: You can add vanilla, almond, or even mint extract. These flavors mix well with chocolate and peanut butter for a tasty surprise. To keep your fudge fresh, store it in the fridge. Place it in an airtight container. This helps prevent it from drying out. If you don’t have an airtight container, cover a dish tightly with plastic wrap. Both methods work well, but airtight containers are best. You can freeze fudge if you want to save some for later. Cut it into squares first. Wrap each piece in plastic wrap, then place them in a freezer bag. Make sure to remove as much air as you can. To thaw, simply take out a piece and let it sit in the fridge overnight. This keeps the fudge creamy and tasty. In the fridge, this fudge stays fresh for about two weeks. After that, it may start to lose flavor and texture. Watch for signs that it has gone bad. If you see any discoloration or it smells off, it’s best to throw it away. Always trust your senses when checking for freshness. Fudge typically takes about 2 hours to set in the fridge. You want it firm enough to hold its shape. If you want to be sure, leave it in for a bit longer. The cooler it gets, the better it will slice. Yes, you can use other nut butters. Almond, cashew, or sunflower butter all work well. Each type will change the taste and feel of the fudge. Almond butter gives a milder flavor, while sunflower adds a unique twist. To cut fudge neatly, use a sharp knife. First, warm the knife under hot water, then dry it. This helps create clean cuts. Always cut the fudge when it is fully set. You can make squares or rectangles, whatever you prefer! You can substitute with coconut cream or a mix of milk and sugar. This will give you a creamy texture. You can also use yogurt for a tangy taste, but it might change the fudge's texture slightly. Absolutely! Feel free to mix in mini marshmallows, nuts, or chocolate chips. You can even try cookie crumbs for extra crunch. Just be careful not to overload the fudge. A little goes a long way, and you want to keep it smooth and tasty! This blog post covered making delicious fudge with simple ingredients like chocolate and peanut butter. We explored helpful steps for melting, mixing, and setting your fudge. Tips can enhance its texture and flavor. You can even customize it with various chocolates and nut alternatives. Proper storage keeps your fudge fresh longer. Whether serving or sharing, follow these steps for great results. Enjoy your sweet treat with friends and family!

Chocolate Peanut Butter Fudge Simple and Sweet Treat

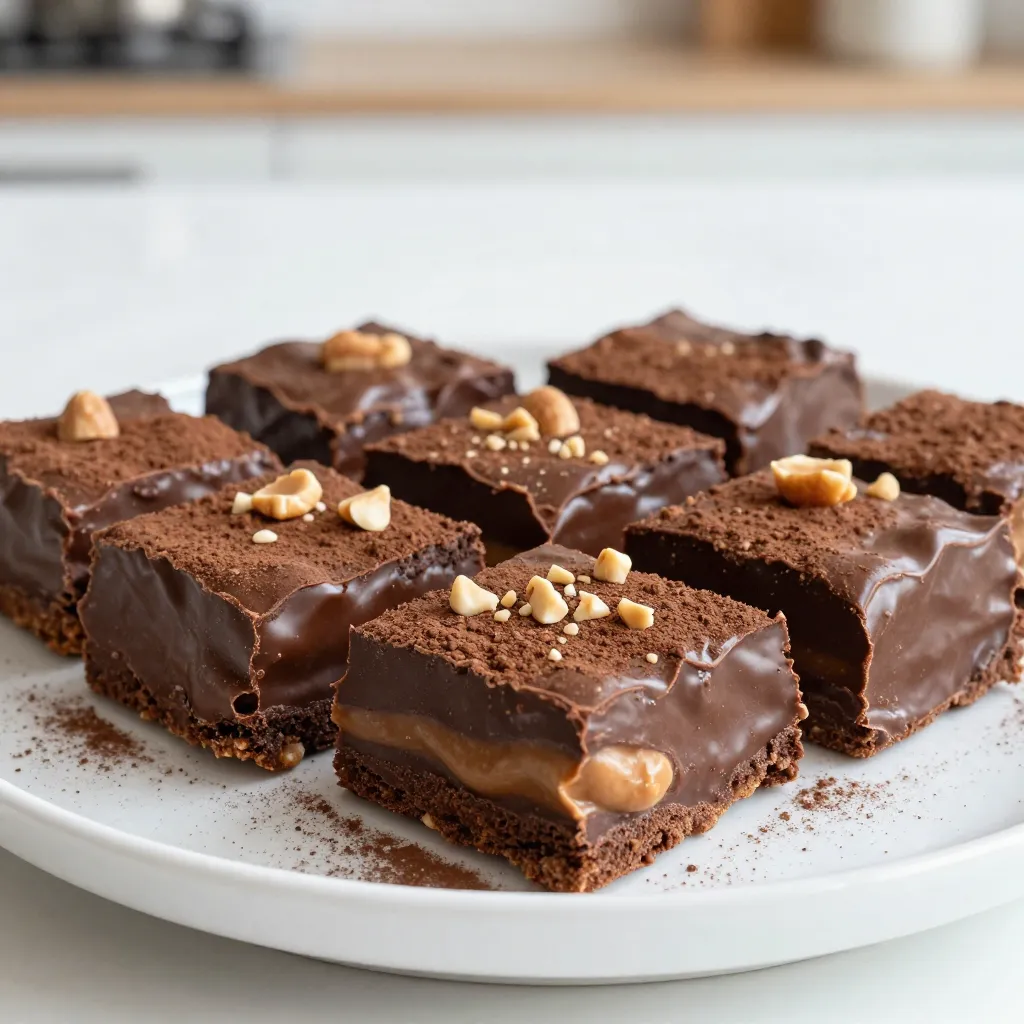
Are you ready to indulge in a rich and creamy dessert? In this article, I’ll guide you through making Chocolate

- Lentils: I recommend using green or brown lentils. They hold their shape well and cook evenly. - Vegetables: You can use fresh vegetables like onion, carrots, celery, and red bell pepper. Canned options, like diced tomatoes, also work great. - Essential spices and seasonings: Key spices include ground cumin, smoked paprika, and ground coriander. These give the soup its unique flavor. - Additional vegetables: Feel free to add spinach or kale for extra nutrients. Zucchini or sweet potatoes also work well. - Protein additions: You can add cooked chicken or sausage for more protein. This makes the soup heartier. - Garnishes and toppings: Fresh parsley adds color and freshness. Lemon wedges bring brightness when squeezed over the soup. {{ingredient_image_1}} 1. Gather your ingredients: You need: - 1 cup green or brown lentils, rinsed - 1 medium onion, diced - 2 cloves garlic, minced - 2 carrots, diced - 2 celery stalks, diced - 1 red bell pepper, diced - 1 can (14 oz) diced tomatoes with juice - 4 cups vegetable broth - 1 teaspoon ground cumin - 1 teaspoon smoked paprika - 1/2 teaspoon ground coriander - 1/4 teaspoon cayenne pepper (optional) - 2 tablespoons olive oil - Salt and black pepper to taste - Fresh parsley, chopped (for garnish) - Lemon wedges (for serving) 2. Prepare your tools: You will need a large pot and a cutting board. A sharp knife helps with chopping. 1. Sauté the base ingredients: Heat the olive oil in a large pot over medium heat. Add the diced onion, carrots, and celery. Cook them for 5-7 minutes until they soften. This step builds a great flavor base. 2. Add spices and more vegetables: Stir in the minced garlic, red bell pepper, cumin, smoked paprika, coriander, and cayenne pepper if you like heat. Cook for another 2-3 minutes. You want to smell those spices! 3. Combine and simmer the soup mixture: Add the rinsed lentils, diced tomatoes with juice, and vegetable broth to your pot. Stir everything well and bring it to a boil. Then, lower the heat. Let the soup simmer uncovered for about 25-30 minutes. Stir occasionally and add more broth if the soup gets too thick. 4. Adjust consistency and flavor: Once the lentils are tender, season your soup with salt and pepper to taste. If you want it creamier, use an immersion blender to puree part of the soup. This gives it a nice texture. 5. Serve: Ladle the soup into bowls. Garnish with fresh parsley and add lemon wedges on the side. Squeeze the lemon over the soup for a bright finish. To get the best texture in your lentils, rinse them well. This removes dirt and helps with cooking. Use green or brown lentils. They hold their shape well. Cook them for about 25 to 30 minutes until tender. If they get mushy, you've cooked them too long. For maximum flavor, add spices early. After sautéing the onions and veggies, mix in the spices. Cook them for a few minutes to release their oils. Then add the lentils, broth, and tomatoes. This method layers the flavors and gives a richer taste. Pair your Mediterranean lentil soup with crusty bread. It soaks up the soup nicely, making each bite better. You can also serve it with a fresh salad. A side of greens adds crunch and lightness to the meal. For a fun twist, try ladling the soup over rice or quinoa. It makes a filling dish that feels hearty. Sprinkle some fresh parsley on top for color and taste. Don't forget lemon wedges! A squeeze of lemon brightens the soup beautifully. Pro Tips Use Fresh Herbs: Adding fresh herbs like thyme or basil towards the end of cooking can elevate the flavor profile of your soup. Store Leftovers Properly: Allow the soup to cool before transferring it to an airtight container. It can be refrigerated for up to 5 days or frozen for later use. Adjust Texture: If you prefer a smoother consistency, blend a portion of the soup with an immersion blender and mix it back in for a creamy texture. Spice It Up: Feel free to customize the spice level by adjusting the cayenne pepper or adding a splash of hot sauce before serving. {{image_2}} You can easily make this soup vegetarian or vegan. Just use vegetable broth. This soup is naturally gluten-free, so you don’t have to worry about that. To change the flavor, try adding different spices or herbs. You could use thyme, oregano, or basil. Each spice brings a new taste to the soup. You can also customize your soup with local ingredients. If you have fresh veggies, toss them in. Zucchini or spinach can add great flavor and nutrition. For storing Mediterranean lentil soup, use airtight containers. Glass or BPA-free plastic works best. Let the soup cool to room temperature before sealing. You can keep it in the fridge for up to five days. This way, it stays fresh and tasty. If you want to save it for later, freezing works great. Portion the soup into smaller containers. This makes it easy to thaw just what you need. Leave some space in the container for the soup to expand. When you're ready to eat, thaw it overnight in the fridge. To reheat, warm it on the stove over low heat. Stir often to keep it smooth. If it's too thick, add a splash of water or broth. You can also microwave it in a safe dish. Just heat in short bursts, stirring in between. Enjoy the flavors of your Mediterranean lentil soup any time! Can I use different types of lentils? Yes, you can use different lentils. Green and brown lentils work well. Red lentils cook faster and become softer. They will change the soup's texture but still taste great. How do I make this soup spicier? To add spice, use more cayenne pepper. You can also add crushed red pepper flakes. For a unique kick, try adding hot sauce or diced jalapeños. Calories and macro breakdown per serving This soup has around 180 calories per serving. It has about 10 grams of protein and 30 grams of carbs. The fat content is low, around 5 grams, mainly from olive oil. Health benefits of the ingredients Lentils are high in protein and fiber. They help with digestion and keep you full. The vegetables add vitamins and minerals. Tomatoes provide antioxidants, which are good for your health. Olive oil has healthy fats that support heart health. Overall, this soup is nutritious and delicious. This blog post covered the key ingredients and preparations for a tasty lentil soup. You learned about the main and optional ingredients, cooking steps, and helpful tips. Variations let you adapt the soup to your tastes or dietary needs. Proper storage can keep your soup fresh for longer. Enjoy making this healthy meal, and don't forget to try the different spices and toppings. Customizing your soup adds fun and flavor. Dive into your cooking, and impress your friends with your new recipe!

Mediterranean Lentil Soup Flavorful and Nutritious Dish

If you’re looking for a warm, comforting dish, Mediterranean Lentil Soup is the answer. Packed with flavor and nutrition, this

To make Greek Lemon Roasted Potatoes, you need these simple ingredients: - 2 lbs baby potatoes, halved - 1/4 cup olive oil - 3 tablespoons fresh lemon juice - Zest of 1 lemon - 4 cloves garlic, minced - 1 teaspoon dried oregano - 1 teaspoon fresh thyme leaves - Salt and pepper to taste - Fresh parsley, chopped for garnish This list gives you all you need for a bright and zesty side dish. Each ingredient plays a role in building flavor. If you don’t have an ingredient, don’t worry! Here are some easy swaps: - You can use regular potatoes instead of baby potatoes. Just cut them into smaller pieces. - Instead of olive oil, try avocado oil for a different taste. - If you lack fresh lemon juice, use bottled juice. But fresh is best for flavor. - Dried thyme works if you don’t have fresh thyme. Use half as much. - For a kick, add a pinch of red pepper flakes. These swaps still keep the dish tasty and fresh. For the best flavor, choose fresh ingredients. Here are some tips: - Select firm, smooth baby potatoes. Avoid any with dark spots or wrinkles. - Fresh lemons should feel heavy for their size. Look for bright yellow skin. - Check garlic cloves. They should be plump and firm, not sprouted. - If you use dried herbs, check the expiration date for potency. Using high-quality ingredients makes your Greek Lemon Roasted Potatoes shine! {{ingredient_image_1}} Start by washing 2 pounds of baby potatoes. Halve each potato to help them cook evenly. This size gives a nice balance of soft inside and crispy outside. In a large mixing bowl, combine the halved potatoes with: - 1/4 cup olive oil - 3 tablespoons fresh lemon juice - Zest of 1 lemon - 4 cloves garlic, minced - 1 teaspoon dried oregano - 1 teaspoon fresh thyme leaves - Salt and pepper to taste Toss everything well. You want each potato to be coated fully. This mix gives the potatoes a zesty and aromatic flavor. Preheat your oven to 400°F (200°C). Spread the coated potatoes in a single layer on a baking sheet lined with parchment paper. This helps with easy cleanup and crispiness. Roast the potatoes for about 40 to 45 minutes. Turn them halfway through for even cooking. They should turn golden brown and crispy on the outside. After roasting, let them cool for a few minutes. Garnish with chopped fresh parsley before serving. Enjoy the bright flavors! To get that perfect crispy potato, start with baby potatoes. Halve them for even cooking. Toss them well with olive oil, lemon juice, and spices. A hot oven makes a big difference. Set it to 400°F (200°C). Spread the potatoes in a single layer on the baking sheet. This helps them brown nicely. Turn them halfway through cooking for even crispness. To boost flavor, consider adding more herbs. Fresh rosemary or dill works well. You can also add a pinch of red pepper flakes for heat. For a tangy twist, mix in some feta cheese before serving. This adds creaminess and depth. A sprinkle of lemon zest at the end brings that fresh zing. These lemon roasted potatoes shine as a side dish. They pair great with grilled meats or fish. Serve them alongside a fresh Greek salad for a full meal. You can also enjoy them as a snack. Drizzle some extra lemon juice over them before serving to elevate the taste. Don't forget to garnish with fresh parsley; it looks and tastes fantastic! Pro Tips Choose the Right Potatoes: For the best texture, use waxy baby potatoes that will hold their shape while roasting. Don't Skip the Zest: Adding lemon zest enhances the citrus flavor and creates a more aromatic dish. Adjust Cooking Time: Depending on your oven, check the potatoes a few minutes early to prevent over-roasting. Garnish for Freshness: Adding fresh parsley not only enhances presentation but also adds a burst of freshness to the dish. {{image_2}} You can change the herbs in Greek lemon roasted potatoes to suit your taste. Instead of oregano, try rosemary or dill for a fresh twist. Parsley adds a nice touch, too. Just mix in your favorite herbs when you prepare the potatoes. This way, you can explore new flavors each time you cook. Adding vegetables can make this dish even better. Toss in some sliced bell peppers or red onions for more color and taste. Carrots or zucchini can also work well. Just make sure they cook evenly with the potatoes. You want them tender and tasty, just like the potatoes. These potatoes are already vegan and gluten-free, which is great! If you want to make them even healthier, use less oil or add more lemon juice. You can also swap in sweet potatoes for a sweeter flavor. This way, everyone can enjoy this delicious side dish. After you enjoy your Greek Lemon Roasted Potatoes, let them cool. Place them in an airtight container. They will stay fresh in the fridge for up to three days. Make sure to store them without any extra sauce. This helps keep their texture. When you’re ready to eat the leftovers, preheat your oven to 350°F (175°C). Spread the potatoes on a baking sheet. Heat them for about 15-20 minutes. This will make them warm and crispy again. You can also use a microwave, but the oven gives better results. If you want to save some for later, you can freeze them. Place cooled potatoes in a freezer-safe bag. Squeeze out as much air as you can before sealing. They will last for about a month in the freezer. When you’re ready to eat them, thaw overnight in the fridge. Then reheat as mentioned above. You can prepare Greek Lemon Roasted Potatoes a day before. Simply mix the ingredients and coat the potatoes. Cover the bowl and place it in the fridge. When ready to cook, preheat your oven. Spread the potatoes on a baking sheet and roast. If you want, let them sit at room temperature for 15 minutes before baking. This will help them cook evenly. Yes, you can use different potatoes. Yukon Gold and red potatoes also work well. They have a creamy texture and absorb flavors nicely. Just ensure they are cut into similar sizes for even cooking. You may need to adjust the cooking time based on the potato type. Always check for doneness by poking them with a fork. Greek Lemon Roasted Potatoes pair great with grilled chicken or lamb. They also complement fish dishes nicely. A fresh Greek salad adds a nice crunch and balances the meal. For a vegetarian option, serve them with roasted vegetables. These potatoes also work well with tzatziki sauce for extra flavor. Enjoy experimenting with different pairings! This article covered how to make delicious Greek Lemon Roasted Potatoes. We explored each step, from ingredient selection to roasting methods. I shared tips for achieving perfect crispiness and flavorful variations. Storing and reheating leftovers is simple. Don’t forget the answers to common questions about preparation and serving. Now, you can create tasty dishes that impress everyone at your table. Happy cooking!

Greek Lemon Roasted Potatoes Flavorful Side Dish

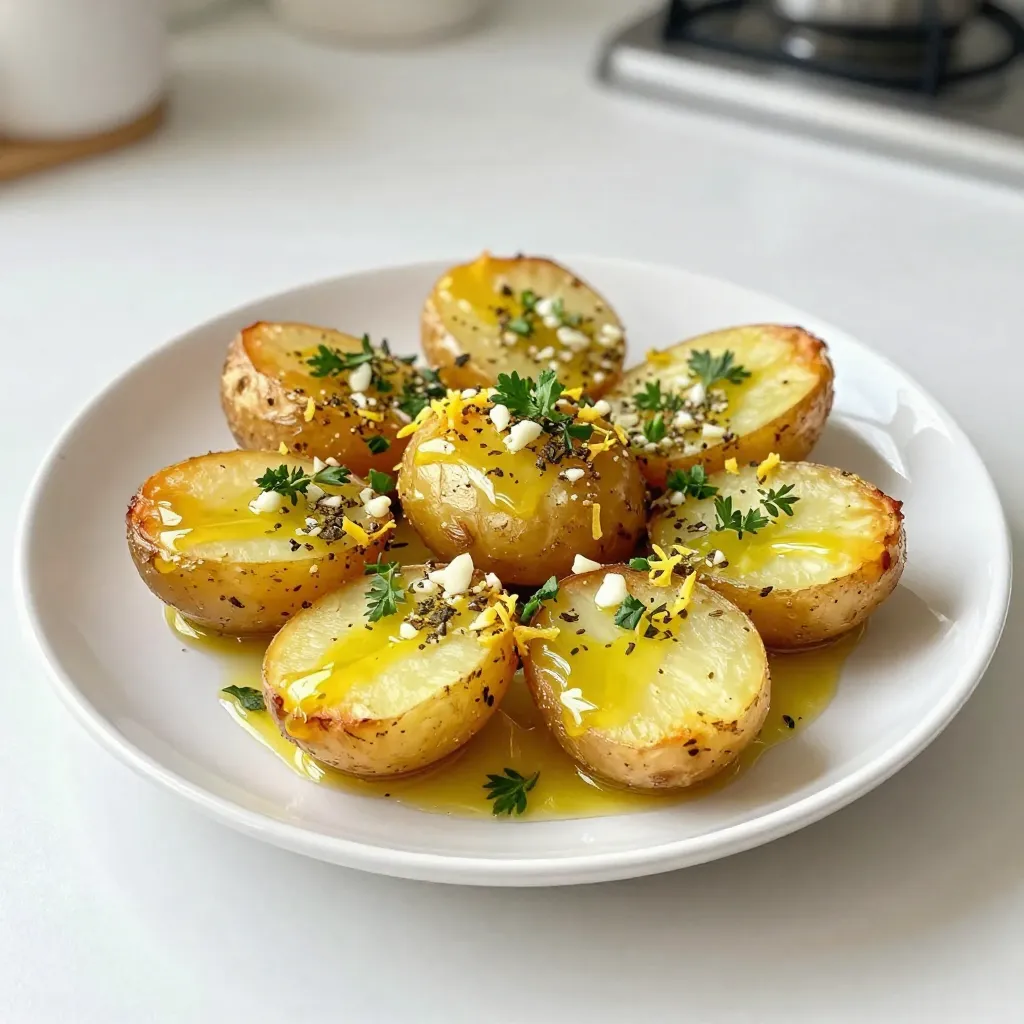
If you’re looking for a tasty side dish, Greek Lemon Roasted Potatoes are a must-try! These potatoes shine with a

- 4 ripe bananas, sliced and frozen - 2 tablespoons unsweetened cocoa powder - 1 tablespoon maple syrup (adjust for sweetness) - 1 teaspoon vanilla extract - Pinch of sea salt You need ripe bananas for this recipe. They should be soft and sweet. Slice them and freeze them. This gives the nice cream a creamy texture. Next, you add unsweetened cocoa powder. It gives a rich chocolate flavor. You can adjust the sweetness with maple syrup. Use one tablespoon to start. If you like it sweeter, add more. A teaspoon of vanilla extract adds a nice touch. The sea salt helps balance the flavors. Just a pinch is enough. - Chopped nuts - Dark chocolate chips - Fresh berries Toppings make your nice cream extra fun. Chopped nuts add crunch. Dark chocolate chips bring more chocolate flavor. Fresh berries add freshness and color. You can mix and match these toppings. They make each bite exciting. {{ingredient_image_1}} To make Chocolate Banana Nice Cream, start by freezing your bananas. Here’s how: - Peel and slice 4 ripe bananas. - Place the slices in a single layer on a baking sheet. - Freeze the bananas for at least 2 hours. This method keeps the bananas from sticking together. Next, measure your dry ingredients carefully: - Scoop 2 tablespoons of unsweetened cocoa powder. - Add 1 tablespoon of maple syrup. Adjust if you want it sweeter. - Don't forget to grab 1 teaspoon of vanilla extract and a pinch of sea salt. Now, it’s time to blend! Use a food processor for the best results. Here’s how: 1. Add your frozen banana slices to the processor. 2. Pour in the cocoa powder, maple syrup, vanilla extract, and sea salt. 3. Process on high speed. You may need to pause and scrape down the sides. This ensures everything mixes well. For a smooth texture, keep blending until it’s creamy. If you want it sweeter, taste the mix and add more maple syrup. Blend again if you do. You can serve this nice cream in two ways: - For a soft-serve texture, enjoy it right after blending. - For a firmer texture, cover and freeze for 1-2 hours. When ready to serve, scoop portions into bowls. To make it look pretty, add toppings like chopped nuts, dark chocolate chips, or fresh berries. This adds both flavor and color to your treat! You can adjust the sweetness of your nice cream easily. Just add more maple syrup if needed. Start with one tablespoon, then taste. Add more until it’s just right for you. Another fun way to boost flavor is with spices. A sprinkle of cinnamon or nutmeg can add warmth. These spices work well with chocolate and banana. Getting the right texture is key to great nice cream. First, freeze the bananas well. Use ripe bananas and slice them before freezing. This helps them blend smoothly. When you blend, keep the food processor on high speed. Stop to scrape down the sides if needed. This ensures everything mixes well and becomes creamy. You can pair nice cream with other desserts for fun treats. Try it with brownies or on top of pancakes. This adds a nice twist. For serving, think outside the bowl! Use fun plates or cups. You can even scoop it into cones for a sweet surprise. Add your favorite toppings like nuts or berries for extra flair. Pro Tips Use Overripe Bananas: The riper the bananas, the sweeter and creamier your nice cream will be. Look for bananas with a few brown spots for the best flavor. Experiment with Add-ins: Feel free to customize your nice cream by adding a spoonful of nut butter or a pinch of cinnamon for extra flavor. Chill Your Bowl: For an even creamier texture, chill your food processor bowl in the freezer for about 15 minutes before blending. Make Ahead: You can prepare the mixture and store it in the freezer for up to a week. Just let it sit at room temperature for a few minutes before scooping if it becomes too hard. {{image_2}} You can easily make this nice cream vegan. Instead of maple syrup, use agave syrup. Agave syrup has a lovely sweetness. It blends well with the chocolate and banana flavors. For toppings, try dairy-free options like nuts or dark chocolate chips. Fresh berries are also a great choice. They add a nice pop of color and flavor. Check labels on all your ingredients to ensure they are gluten-free. Most of the ingredients here are naturally gluten-free. When serving, use gluten-free toppings like nuts or fruit. This keeps your treat safe for everyone! Want to spice it up? Add nut butters like almond or peanut for a creamy twist. A tablespoon works well. You can also try different flavor extracts. Almond or hazelnut extract can bring new life to this nice cream. Just a drop will do! To keep your Chocolate Banana Nice Cream fresh, use an airtight container. A glass or plastic container works well. Make sure it seals tightly. This keeps out air and helps prevent ice crystals. Ice crystals can ruin the smooth texture. To further avoid them, press a piece of plastic wrap directly onto the surface of the nice cream before sealing the lid. This creates an extra barrier against ice. If you have leftover nice cream, scoop it into a clean container. Make sure it is airtight. This helps maintain the flavor and texture. To soften the nice cream before serving, let it sit at room temperature for about 5 to 10 minutes. You can also microwave it for a few seconds if you want a quicker option. Just be careful not to melt it! Enjoy your nice cream with your favorite toppings after softening. Chocolate Banana Nice Cream is a creamy, dairy-free dessert made from frozen bananas and cocoa powder. This treat is both delicious and healthy. It has a rich chocolate flavor, and it is simple to make. You only need five main ingredients. This nice cream is great for hot days or as a fun snack. It is vegan and full of nutrients. Enjoying this treat can satisfy your sweet tooth without guilt. Using fresh bananas will not give you the same texture. Frozen bananas blend into a creamy, ice-cream-like consistency. Fresh bananas are soft but will not create that smooth, cold treat you want. For the best results, freeze your bananas first. Peel and slice them, then place them in the freezer until solid. This step is crucial for perfect nice cream. Nice cream can last up to two weeks in the freezer. To keep it fresh, store it in an airtight container. Make sure to cover it well to prevent ice crystals. If you notice it getting too hard, you can let it sit out for a few minutes before scooping. This will help soften it for serving. If you want to change the flavor, you can use carob powder instead of cocoa. Carob has a similar taste but is slightly sweeter. You can also use melted dark chocolate for a richer flavor. If you like fruit, try adding peanut butter or almond butter for a nutty twist. Adjust the sweetness based on your choice. This blog post covered how to make delicious chocolate banana nice cream. You learned about the main ingredients, like ripe bananas and cocoa powder, and optional toppings, like nuts and berries. I shared step-by-step instructions, helpful tips, and fun variations to try. Remember, your nice cream choice is endless. Enjoy creating your frozen treat!

Chocolate Banana Nice Cream Delightful Frozen Treat

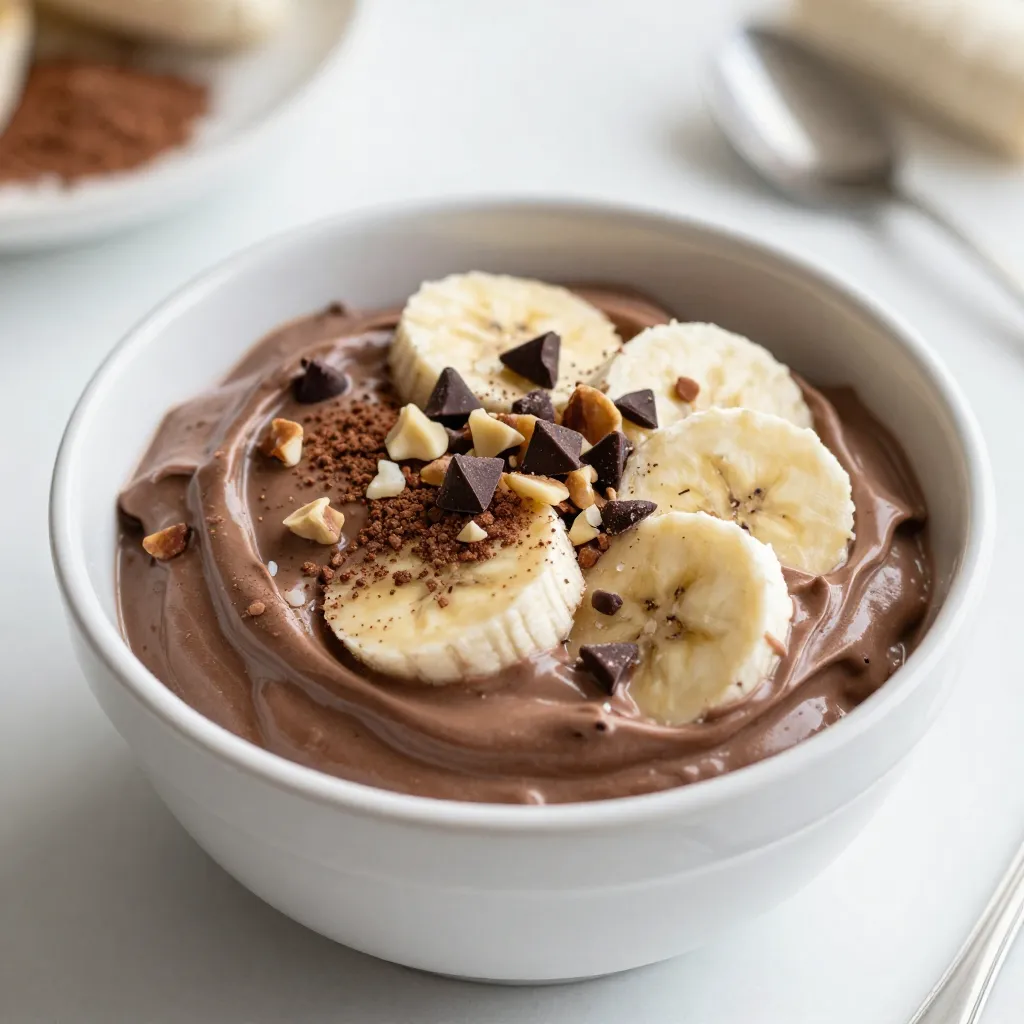
Are you ready to treat yourself to a delicious frozen delight? Chocolate Banana Nice Cream is your answer! This easy

Older posts
Page1 Page2 … Page85 Next →

dsad

© 2026 greenmealmap • Built with GeneratePress

Our Policies

  • Copyright Policy
  • Cookie Policy
  • GDPR Policy
  • Privacy Policy
  • Disclaimer
  • Terms Of Use

More Information

  • Home
  • About
  • Contact
  • Appetizers
  • Dessert
  • Dinner
  • Drinks
©2026, greenmealmap About Back To Top