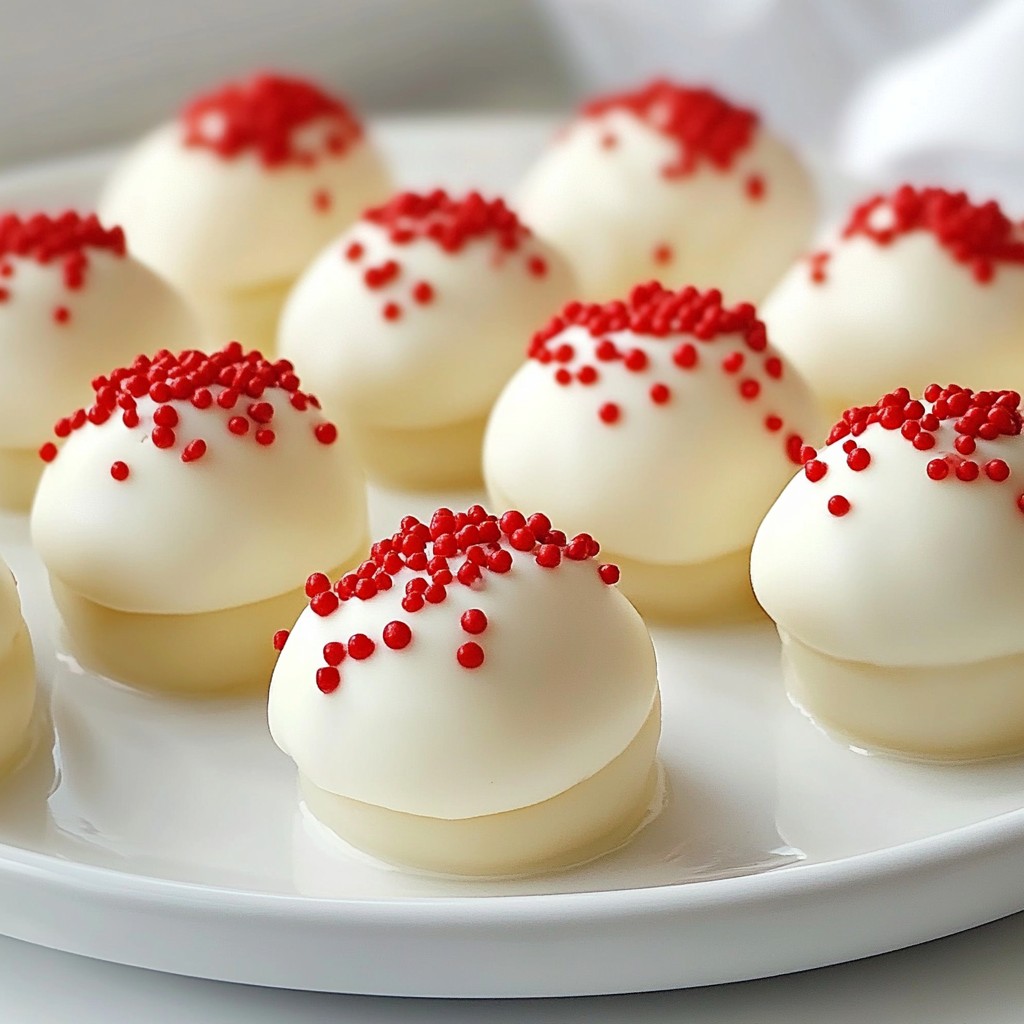
Get ready to impress your friends and family with my delicious Red Velvet Cheesecake Bites! These sweet treats are perfect for any occasion, from birthdays to holiday parties. You’ll love their rich flavor and creamy texture. I’ll take you step by step through the easy process of making these bites. Let’s dive into the ingredients and get started on your new favorite dessert!
Why I Love This Recipe
- Decadent Flavor: These Red Velvet Cheesecake Bites combine the rich taste of red velvet cake with the creamy texture of cheesecake, creating a delightful dessert that’s hard to resist.
- Easy to Make: With simple ingredients and straightforward steps, this recipe is perfect for bakers of all skill levels, allowing anyone to whip up these treats in no time.
- Perfect for Any Occasion: Whether it’s a holiday party, birthday celebration, or just a sweet treat for yourself, these bites are versatile and always impress.
- Beautiful Presentation: The elegant red sprinkles and white chocolate coating make these bites not only delicious but also visually appealing, making them a stunning addition to any dessert table.
Ingredients
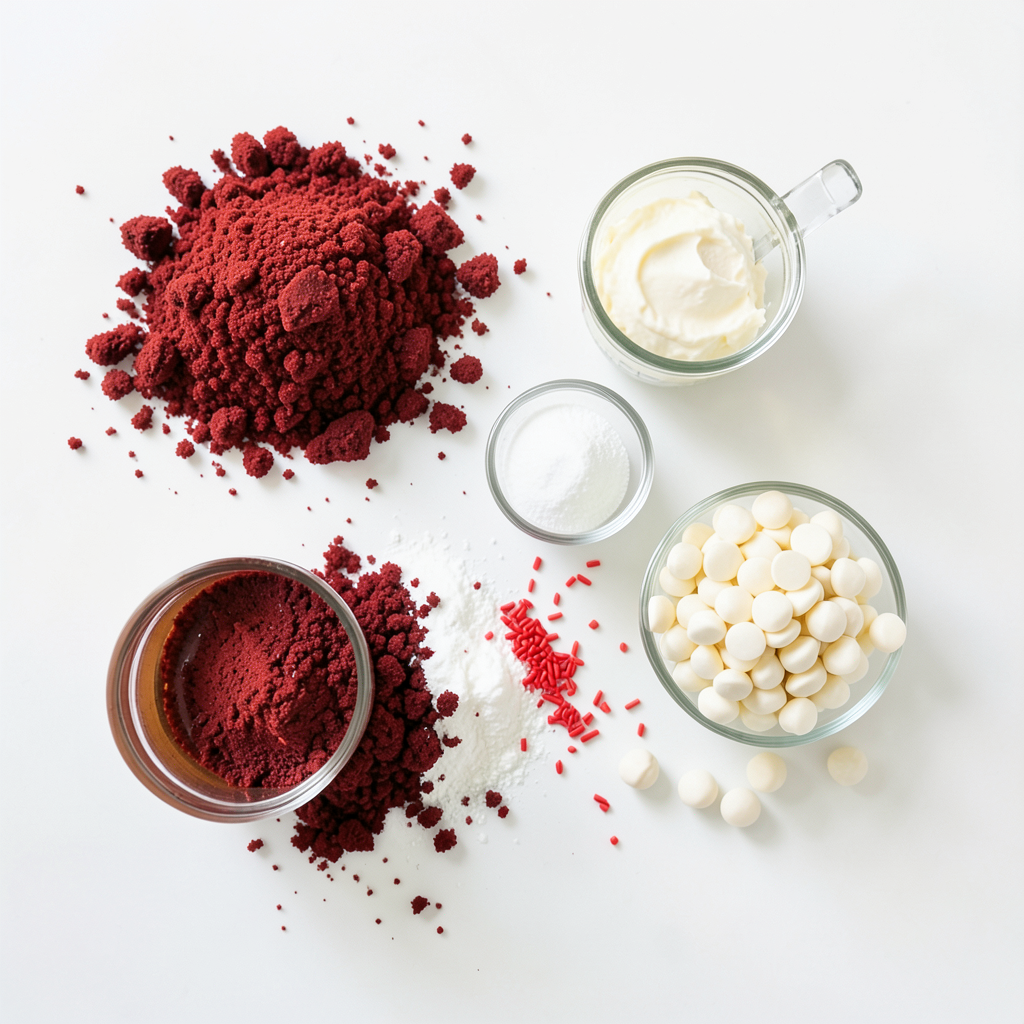
List of Ingredients
- 1 1/2 cups red velvet cake crumbs (store-bought or homemade)
- 8 oz cream cheese, softened
- 1/2 cup powdered sugar
- 1 teaspoon vanilla extract
- 1/2 cup white chocolate chips
- 1 tablespoon coconut oil
- Red sprinkles for garnish
Quantity and Measurement
When making Red Velvet Cheesecake Bites, precise measurements help. You need 1 1/2 cups of red velvet cake crumbs. This can be from a store or baked at home. Next, use 8 oz of cream cheese. Make sure it’s soft so it mixes well. For sweetness, add 1/2 cup of powdered sugar. A teaspoon of vanilla extract adds flavor. For the chocolate coating, you’ll need 1/2 cup of white chocolate chips. Lastly, 1 tablespoon of coconut oil helps the chocolate melt smoothly. Red sprinkles make them fun and festive!
Ingredient Substitutions
If you don’t have red velvet cake crumbs, you can use chocolate cake crumbs. Cream cheese can be swapped with mascarpone for a different taste. Instead of powdered sugar, you might use granulated sugar, but it will be less sweet. If you want a dairy-free option, try vegan cream cheese. Use any vegetable oil if you lack coconut oil. For the sprinkles, you can use any color or type to match your event.
Step-by-Step Instructions
Preparation of the Cheesecake Mixture
To start, grab a mixing bowl. Combine 1 1/2 cups of red velvet cake crumbs, 8 oz of softened cream cheese, 1/2 cup of powdered sugar, and 1 teaspoon of vanilla extract. Mix everything until it is smooth and creamy. This step is crucial for the perfect texture.
Forming the Bites
Next, use a small cookie scoop. Form 1-inch balls from the mixture. Place these balls on a parchment-lined baking sheet. Make sure they are spaced out. Once you finish scooping, refrigerate the bites for about 30 minutes. This helps them firm up nicely.
Melting and Dipping in White Chocolate
While the bites chill, melt the white chocolate chips. Use a microwave-safe bowl with 1/2 cup of chips and 1 tablespoon of coconut oil. Heat in 30-second intervals, stirring in between, until smooth. Dip each chilled cheesecake bite into the melted chocolate. Use a fork to lift them out, letting excess chocolate drip off. Place the bites back on the parchment paper. Before the chocolate sets, sprinkle red sprinkles on top. Finally, refrigerate the dipped bites for another 15-20 minutes to let the chocolate harden.
Tips & Tricks
Ensuring a Creamy Texture
To get a smooth and creamy texture, start with softened cream cheese. It mixes better. I recommend letting it sit at room temperature for about 30 minutes. Mix it well with the cake crumbs. This helps avoid lumps. Blend until smooth and creamy. If you mix too fast, it can get too airy. Slow and steady wins here!
Best Practices for Melting Chocolate
Melting chocolate can be tricky. I prefer using a microwave for ease. Place the white chocolate chips in a microwave-safe bowl. Add coconut oil to help it melt smoothly. Heat in 30-second intervals. Stir after each interval until fully melted. This prevents burning. If you see any lumps, keep stirring. They will dissolve as you stir.
How to Garnish Effectively
Garnishing adds fun and flair. After dipping the cheesecake bites in chocolate, sprinkle red sprinkles on top. Do this while the chocolate is still wet. This helps the sprinkles stick well. Use a small spoon or your fingers for easy sprinkling. For an extra touch, you can also add a drizzle of melted chocolate on top.
Pro Tips
- Chill for Better Dipping: Make sure your cheesecake bites are well-chilled before dipping them in chocolate. This will help the chocolate coating stick better and create a smoother finish.
Variations
Different Decorations and Toppings
You can have fun with how you decorate these bites. Try using different sprinkles, such as gold or silver. You could also drizzle chocolate on top. Use dark chocolate for a richer taste. Another option is crushed nuts, like pecans or almonds. They add a nice crunch and flavor. You can even use edible glitter for a festive touch. Choose what fits your occasion best!
Altering Flavors
Red velvet is a classic, but you can mix it up. Add a bit of almond extract for a nutty flavor. You can also mix in some crushed cookies for a unique twist. Try using flavored cream cheese, like strawberry or chocolate. This gives a new taste to each bite. Get creative and see what flavors you enjoy most!
Gluten-Free and Vegan Options
To make these bites gluten-free, use gluten-free cake crumbs. Check labels carefully to ensure they are safe. For a vegan version, swap the cream cheese for a plant-based alternative. Use vegan chocolate and coconut oil for dipping. You can even use maple syrup instead of powdered sugar. These simple changes let everyone enjoy this treat!
Storage Info
Best Way to Store Red Velvet Cheesecake Bites
To keep your red velvet cheesecake bites fresh, store them in an airtight container. This helps prevent them from drying out. You can layer parchment paper between the bites to avoid sticking. Place the container in the fridge. This keeps them cool and tasty.
Freezing Instructions
If you want to save some for later, freezing works well. First, freeze the bites on a baking sheet for about an hour. Once they are firm, transfer them to a freezer-safe bag. Label the bag with the date. They can stay in the freezer for up to three months. When you are ready to enjoy them, let them thaw in the fridge overnight.
How Long They Last in the Fridge
These delightful bites last about five days in the fridge. Make sure to check for any signs of spoilage. If you notice any changes in smell or texture, it's best to toss them. Enjoy them while they're fresh for the best taste!
FAQs
Can I use store-bought red velvet cake?
Yes, you can use store-bought red velvet cake. It saves time and effort. Just crumble it into fine pieces. Make sure to measure out 1 ½ cups. This will blend nicely with the cream cheese mixture.
How to avoid chocolate clumping?
To avoid clumping, melt the white chocolate slowly. Use a microwave-safe bowl and heat in 30-second bursts. Stir well between each burst. If the chocolate gets too thick, add a bit more coconut oil. This keeps it smooth and easy to dip.
Can these bites be made ahead of time?
Yes, you can make these bites ahead. Prepare the cheesecake mixture and form the bites. Then, chill them for 30 minutes. You can store them in the fridge for up to two days. Dip them in chocolate just before serving for the best taste and look.
We covered how to make tasty red velvet cheesecake bites. First, I shared the main ingredients and their measurements. Then, I walked you through the steps of mixing, forming, and dipping. I also gave tips for creaminess and melting chocolate. Then, I shared fun variations and how to store them.
These bites are easy to make and delicious. Enjoy experimenting with flavors and toppings to make them yours!