Are you ready to treat yourself to a dessert that’s both yummy and easy? My Key Lime Cheesecake Bars are the perfect option for any occasion! With a creamy filling and a zesty kick, these treats will wow your taste buds. In this article, I'll guide you through the simple steps to make them. Let’s dive in and create something delicious together!
Why I Love This Recipe
- Refreshing Flavor: The combination of key lime juice and zest gives these cheesecake bars a bright and tangy flavor that is perfect for warm weather.
- Easily Shareable: These bars are cut into perfect squares, making them easy to serve at gatherings and parties.
- Simple Ingredients: With just a handful of ingredients, this recipe is straightforward and accessible for bakers of all levels.
- Make-Ahead Dessert: These cheesecake bars can be made in advance and stored in the refrigerator, making them a convenient dessert option.
Ingredients
Key Ingredients for Key Lime Cheesecake Bars
To make these tasty bars, gather these key ingredients:
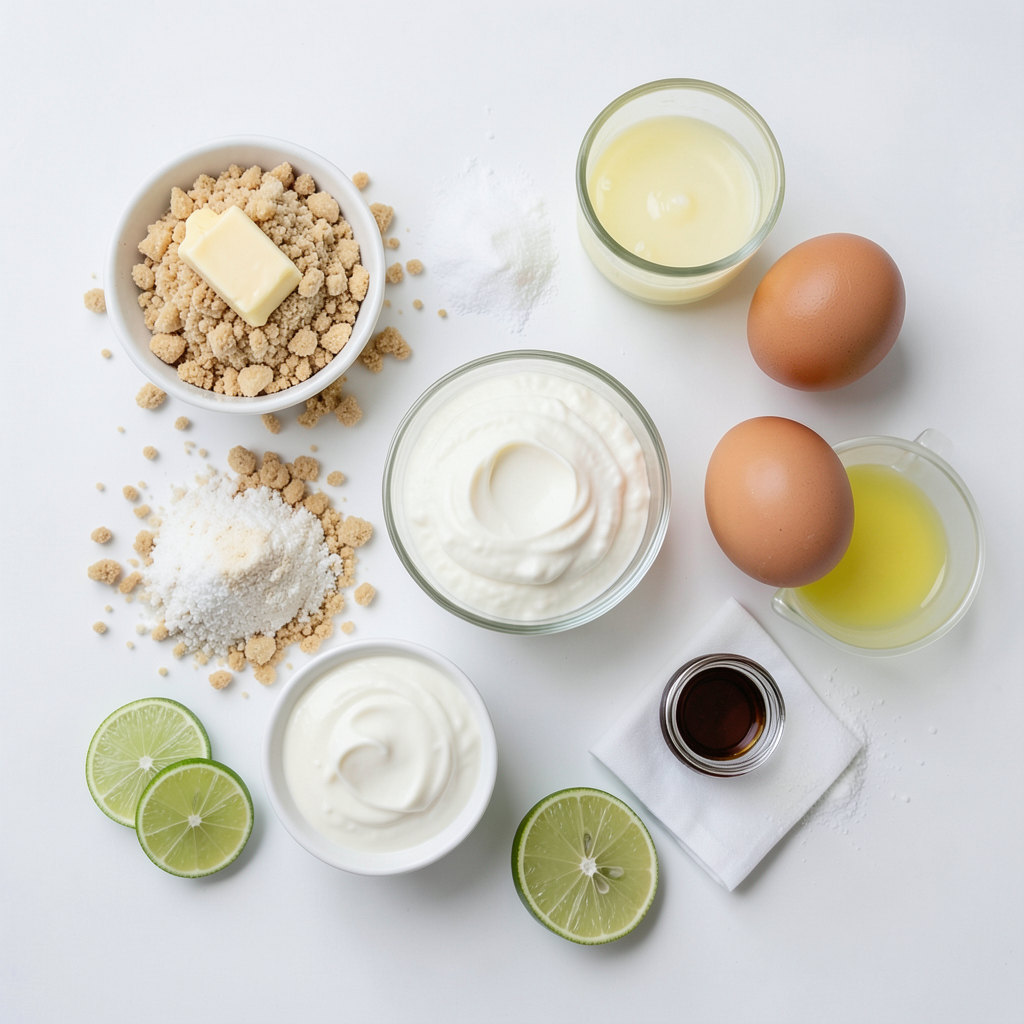
- 1 ½ cups graham cracker crumbs
- ½ cup unsalted butter, melted
- ¾ cup granulated sugar, divided
- 16 oz cream cheese, softened
- ½ cup sour cream
- 2 large eggs
- ½ cup key lime juice (freshly squeezed if possible)
- 1 tablespoon key lime zest
- 1 teaspoon vanilla extract
- Pinch of salt
These ingredients bring the zesty flavor to life. The graham cracker crumbs form a crunchy base. Cream cheese and sour cream create a rich filling. Don't forget the key lime juice; it gives the bars their signature tang!
Optional Toppings and Garnishes
You can add a few fun toppings to make your bars even better:
- Whipped cream, for topping (optional)
- Lime slices, for garnish (optional)
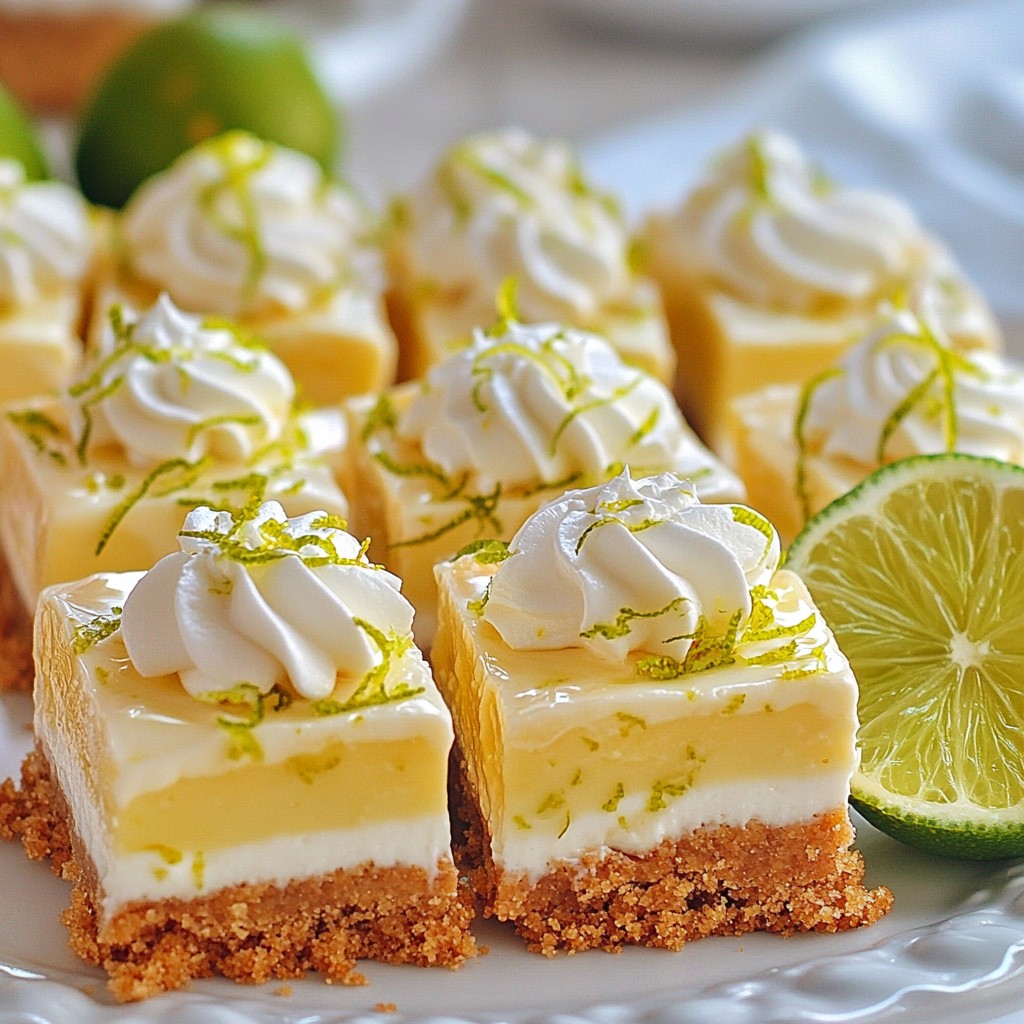
These toppings add a nice touch. Whipped cream brings creaminess, while lime slices add color and flair. They make your dessert look great and taste even better!
Equipment Needed
You will need some tools for this recipe:
- 9x9-inch baking pan
- Medium mixing bowl
- Large mixing bowl
- Electric mixer
- Spatula
This equipment helps you prepare and bake your cheesecake bars easily. A good electric mixer makes mixing the ingredients quick and simple. The spatula helps spread the filling evenly on the crust.
Step-by-Step Instructions
Prepping the Crust
Start by preheating your oven to 350°F (175°C). In a medium bowl, mix 1 ½ cups of graham cracker crumbs with ½ cup of melted unsalted butter. Stir until the crumbs look like wet sand. This will hold the crust together.
Next, press this mixture firmly into the bottom of a 9x9-inch baking pan. Make sure it is even. Bake the crust for 8 to 10 minutes until it turns lightly golden. Once done, remove it from the oven and let it cool completely. This crust is the perfect base for your cheesecake bars.
Making the Cheesecake Filling
In a large mixing bowl, beat 16 oz of softened cream cheese with ¾ cup of granulated sugar using an electric mixer. Mix until it is smooth and creamy. Then, add ½ cup of sour cream, 2 large eggs, ½ cup of freshly squeezed key lime juice, 1 tablespoon of key lime zest, 1 teaspoon of vanilla extract, and a pinch of salt.
Beat everything together until the mixture is smooth and well combined. This step is key to getting a creamy filling. Pour the cheesecake filling over the cooled crust. Spread it evenly with a spatula to get a nice finish.
Baking and Cooling Tips
Now, bake the cheesecake bars for 25 to 30 minutes. You want the edges to be set, while the center has a slight jiggle. When they are done, turn off the oven and crack the door open. Let the bars cool in the oven for about 1 hour to help prevent cracking.
After cooling, refrigerate them for at least 4 hours or ideally overnight. This allows the flavors to meld and the texture to set. When ready, cut into bars and enjoy!
Tips & Tricks
How to Achieve the Perfect Texture
To get the best texture for your key lime cheesecake bars, focus on your ingredients. Make sure your cream cheese is soft. This helps it blend smoothly. Beat it well with sugar until creamy. This step is key to a light and fluffy filling. Don't rush when adding eggs. Mix them in one at a time. This gives your bars a nice, smooth texture.
Let the bars cool slowly in the oven. After baking, crack the oven door and let them sit for an hour. This step helps prevent cracks. Chill the bars for at least 4 hours or overnight. Cold bars always taste better!
Common Mistakes to Avoid
Avoid overmixing your filling. If you mix too much, air gets in. This can cause cracks while baking. Be careful with baking time too. If you overbake, the bars may turn dry. Check for a slight jiggle in the middle to know when they are done.
Don't skip the chilling step. Cutting warm bars can lead to messy slices. Also, make sure to press your crust firmly. A loose crust can crumble apart when serving.
Best Practices for Slicing and Serving
For clean slices, use a sharp knife. Dip the knife in warm water before cutting. This helps create neat edges. Wipe the knife with a towel after each cut.
Serve the bars chilled. Add whipped cream and lime slices for a fresh touch. This makes each bite even more delightful. You can also serve them on a colorful plate to impress your guests. Enjoy your zesty creation!
Pro Tips
- Choose Fresh Limes: For the best flavor, use fresh key limes instead of bottled juice. Fresh limes will provide a brighter and more zesty taste to your cheesecake bars.
- Cool Gradually: Allow the cheesecake bars to cool in the oven with the door slightly ajar. This helps prevent cracks from forming on the surface as they cool down.
- Chill Overnight: For the best texture and flavor, let the cheesecake bars chill in the refrigerator overnight. This allows the flavors to meld beautifully and results in a firmer dessert.
- Customize Your Toppings: Get creative with your toppings! While whipped cream and lime slices are classic, consider adding fresh berries or a drizzle of chocolate for an extra special touch.
Variations
Flavored Variants of the Cheesecake Bars
You can switch up the flavor of your cheesecake bars easily. Instead of key limes, try using lemons for a bright twist. This classic swap gives a tart and zesty flavor. Or, you can use fresh berries like strawberries or blueberries for a fruity touch. Blend the berries into the filling for a colorful and tasty dessert.
Ingredient Substitutions
If you're missing an ingredient, don't worry! You can use other options. For the graham cracker crust, try crushed cookies like Oreos or vanilla wafers. If you want a lighter version, replace cream cheese with Greek yogurt. This will change the texture but adds protein. You can also swap sour cream for plain yogurt. Each change offers a new taste.
Serving Suggestions for Different Occasions
These cheesecake bars fit any event. For casual get-togethers, serve them chilled with whipped cream and lime slices. They look pretty and taste great! If you're hosting a formal dinner, add a drizzle of berry sauce on top. This gives a touch of elegance. For summer picnics, cut the bars into smaller bites for easy sharing. No matter the occasion, they are sure to impress.
Storage Info
How to Store Key Lime Cheesecake Bars
To store your Key Lime Cheesecake Bars, first let them cool completely. After cooling, cover the bars tightly with plastic wrap or place them in an airtight container. This helps keep them fresh. Store the bars in the refrigerator. They taste best when chilled.
Freezing Instructions for Long-Term Storage
If you want to keep these bars for longer, freezing is a great option. First, cut the cheesecake into individual bars. Wrap each bar in plastic wrap. Then, place them in a freezer-safe bag or container. Be sure to label the bags with the date. These bars can stay in the freezer for up to three months.
Shelf Life and Safety Tips
Key Lime Cheesecake Bars last about one week in the fridge. After a week, they may start to lose their taste. If you notice any changes in smell or texture, it's best to throw them away. Always check for signs of spoilage before eating. When thawing frozen bars, place them in the fridge overnight. This keeps them from becoming too soft. Enjoy your delicious cheesecake bars safely!
FAQs
How do I know when Key Lime Cheesecake Bars are done?
You can tell when your Key Lime Cheesecake Bars are done by looking for a few signs. The edges should be set, while the center may still have a slight jiggle. This jiggle means your bars will remain creamy. You can also insert a toothpick into the bars. If it comes out clean, your bars are ready.
Can I use bottled key lime juice instead of fresh?
Yes, you can use bottled key lime juice. It saves time and is easy to find. However, fresh juice gives a brighter taste. If possible, try to use fresh juice for the best flavor. The zest also adds a nice touch. So, if you can, grab some fresh limes.
Is there a gluten-free option for the crust?
Absolutely! You can make a gluten-free crust by using gluten-free graham crackers. Many stores sell them now. Crush them just like regular graham crackers. Mix with melted butter and press it into the pan. This way, everyone can enjoy your delicious Key Lime Cheesecake Bars!
In this post, we explored how to make delicious key lime cheesecake bars. We covered essential ingredients, step-by-step instructions, and tips for perfect texture. You learned about variations and storage options to enjoy them later. Remember, avoiding common mistakes leads to a better treat. Use fresh lime juice for the best taste, and feel free to get creative with toppings. Making these bars can be fun and rewarding. Enjoy sharing them with friends and family at your next gathering!