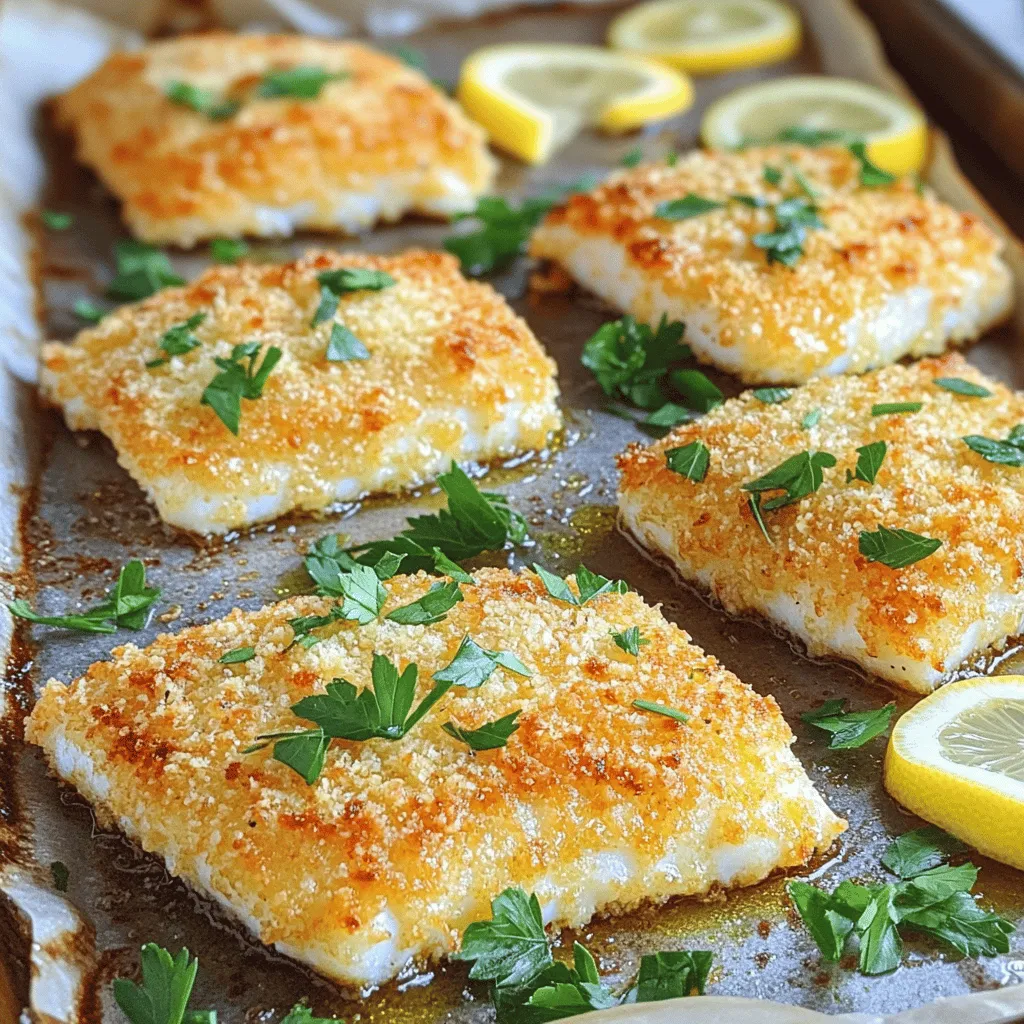
Parmesan Crusted Tilapia Flavorful Dinner Delight
Are you ready to impress your family with an easy and tasty meal? This Parmesan Crusted Tilapia recipe is a
Are you ready to impress your family with an easy and tasty meal? This Parmesan Crusted Tilapia recipe is a
. How to peel and dice mango: Start by cutting off the top and bottom of the mango. Hold it upright and slice off the skin with a knife. Next, cut the mango flesh away from the pit. Dice the mango into small cubes. Cutting pineapple into chunks: If you have a whole pineapple, slice off the top and bottom. Stand it upright and cut off the skin in strips. Cut the pineapple into quarters and remove the core. Finally, chop the fruit into bite-sized chunks. Slicing the banana: Peel the banana and lay it on a cutting board. Use a knife to slice it into thin rounds. This helps the banana blend easily with the other fruits. Combining fruits in the blender: Place the diced mango, pineapple chunks, and sliced banana into the blender. Make sure to add them in this order for the best blending. Adding liquid base: Pour in one cup of coconut milk or almond milk. This liquid helps the fruits blend smoothly and makes your smoothie creamy. Incorporating creaminess with yogurt: Add half a cup of Greek yogurt to the blender. This will give your smoothie a rich texture and add some protein. Sweetening and adding chia seeds: If you like your smoothie sweeter, drizzle in a tablespoon of honey or agave syrup. Then, sprinkle in a tablespoon of chia seeds for extra nutrition. Adjusting thickness with ice: Add a handful of ice cubes to the blender. This will make your smoothie cool and thick. You can adjust the amount based on your preference. Blending to desired consistency: Blend on high speed until everything is smooth. Stop the blender, taste your smoothie, and adjust sweetness or thickness if needed. Blend again if necessary. Now you're ready to enjoy this Tropical Mango Pineapple Smoothie! For the complete recipe, check out the [Full Recipe]. To make the best smoothie, you need ripe fruits. Signs of a ripe mango: - Look for a mango that feels slightly soft when you press it. - The skin should have a rich, golden color. - A sweet aroma near the stem is a good sign. Choosing fresh pineapples: - Pick a pineapple that feels heavy for its size. - The leaves should be green and fresh-looking. - Smell the base; it should have a sweet scent. Blending the right way makes all the difference. Achieving the right smoothie texture: - Start with the liquids first. This helps the blades move freely. - Add the soft fruits next, like banana and mango. - Finally, add hard fruits like pineapple and ice last. Avoiding common blending mistakes: - Don’t overload the blender; too much can cause uneven blending. - If it’s too thick, add more liquid slowly. - Stop blending occasionally to scrape down the sides. How you serve your smoothie can wow your guests. Garnishing tips for smoothies: - Add a slice of mango or pineapple on the glass rim. - Sprinkle chia seeds on top for texture and style. Using chilled glasses for serving: - Chill your glasses in the freezer for a few minutes. - This keeps your smoothie cold and refreshing longer. These tips will help you create a delicious Tropical Mango Pineapple Smoothie every time! For a complete guide, check out the Full Recipe. {{image_2}} You can boost your Tropical Mango Pineapple Smoothie with fun flavors. Adding spinach or kale gives it a green twist. This adds nutrients without changing the taste much. You can also mix in other fruits. Try strawberries for sweetness or kiwi for a tangy kick. Each fruit brings its own special touch. If you follow a vegan diet, use coconut yogurt instead of Greek yogurt. This keeps the creaminess while staying plant-based. You can also lower the sugar. Use ripe fruits, which are sweet on their own. You might skip honey or agave syrup. This keeps your smoothie tasty and healthy. Fruits change with the seasons, so why not mix things up? In summer, use fresh berries. In winter, try oranges or apples. Each season offers new flavors to explore. You can also create smoothie bowls. Pour your smoothie into a bowl and top it with nuts, seeds, or fresh fruit. This makes for a fun and filling meal. For the complete recipe, check the Full Recipe section. How do you store leftover smoothies? Pour your smoothie into a clean, airtight container. Glass jars work well. If you have extra, fill it to the top. This helps keep air out. Store your smoothie in the fridge. It stays fresh for up to two days. Which containers maintain freshness? Use containers with tight lids. Avoid plastic wrap. It can let air in. A mason jar is a great choice. It seals well and keeps flavors strong. How do you freeze fruits for smoothie prep? Cut your fruits into small pieces first. Then, spread them on a baking sheet. Freeze them for about two hours. This way, they won’t stick together. After freezing, put the fruits in a bag. Label it with the date for easy use. How do you thaw frozen smoothies for later? The best way is to leave it in the fridge overnight. This keeps it safe and tasty. If you need it fast, microwave it in short bursts. Blend again to mix well after thawing. What is the difference between fresh and frozen fruit? Fresh fruit lasts a few days. Use it quickly to enjoy the best flavor. Frozen fruit can last for months. It's picked at peak ripeness, keeping nutrients intact. How do you keep dairy products fresh? Always check the expiration date. Store yogurt and milk in the fridge. Keep them at the back, where it’s coldest. For Greek yogurt, use it within a week of opening. This ensures your smoothie stays creamy and delicious. To make your smoothie thicker, try these tips: - Add more frozen fruits, like bananas or mango. - Use less liquid. Start with half a cup. - Include Greek yogurt or avocado for creaminess. - Blend in chia seeds. They expand when wet. - Add ice cubes. They chill and thicken your drink. Yes, frozen fruits work great! Here are some benefits: - They make your smoothie cold and refreshing. - Frozen fruits are often picked at peak ripeness. - They blend smoothly and help create a thick texture. - Using frozen fruits can cut down on prep time. This smoothie has many health perks: - Mangoes are high in vitamins A and C. - Pineapples aid digestion with bromelain. - Both fruits contain antioxidants that fight free radicals. - The Greek yogurt adds protein and probiotics. - Chia seeds offer fiber and omega-3 fatty acids. These fruits make an excellent base for a healthy smoothie. Yes, adding protein powder is great! Here are some best practices: - Use a scoop of protein powder in each smoothie. - Blend it in well to avoid clumps. - Choose a flavor that complements your fruits, like vanilla or plant-based. Recommended types include whey protein and pea protein. They mix well and boost nutrition. For a full recipe, check out the Tropical Mango Pineapple Smoothie. In this post, I covered how to make a delicious mango-pineapple smoothie. We explored the key ingredients like fresh fruits, coconut milk, and optional add-ins. I provided step-by-step instructions for prepping and blending, along with tips for selecting ripe fruits and serving ideas. Experimenting with variations and storage tips can enhance your smoothie experience. Smoothies are fun, healthy, and easy to make! Enjoy creating your perfect blend and savoring the goodness of these flavors.](https://greenmealmap.com/wp-content/uploads/2025/07/17aac556-6b4a-4e96-b0be-660619c07fdd.webp)
Ready to transport your taste buds to a tropical paradise? In my Tropical Mango Pineapple Smoothie Refreshing Blend, you’ll discover

There’s nothing quite like a warm bowl of creamy chicken and wild rice soup on a chilly day. This delightful
![- Brussels Sprouts: Use 1 lb, trimmed and halved. This helps them cook evenly. - Honey: Choose a mild honey, like clover. It adds sweetness and depth. - Garlic: Use 4 cloves, minced. Fresh garlic gives a rich flavor. - Olive Oil: Use 3 tablespoons. Extra virgin adds the best taste. - Balsamic Vinegar: Just 1 teaspoon adds a tangy kick. It balances the sweetness of honey. - Salt and Pepper: Use to taste. They enhance all the other flavors. - Red Pepper Flakes: Optional, but 1/4 teaspoon gives a spicy touch. Adjust based on your taste. - Chopped Nuts: Add 1/4 cup of walnuts or pecans for crunch. They provide healthy fats. - Fresh Herbs: Use chopped parsley for garnish. It adds freshness and color. For the full recipe, check out the [Full Recipe]. To start, you need to trim and halve the Brussels sprouts. This step is key for even cooking. Cut off the tough ends and slice each sprout in half. You want them to be uniform in size. This helps them roast evenly, giving you that nice, crispy texture. Next, mix the honey garlic sauce ingredients. In a small bowl, combine honey, minced garlic, balsamic vinegar, salt, pepper, and red pepper flakes if you like a bit of heat. Whisk it together until smooth. This sauce adds a sweet and savory kick to your sprouts. Now, let’s talk about preheating the oven. Set it to 400°F (200°C). This temperature is perfect for roasting. It caramelizes the sugars, enhancing flavors while keeping the Brussels sprouts tender. When your oven is ready, it’s time to roast the Brussels sprouts. Spread them out on a baking sheet lined with parchment paper. Make sure they are in a single layer. This prevents steaming and helps them get crispy. Roast for about 20-25 minutes. Stir them halfway through to ensure even cooking. For added crunch, toast the nuts during cooking. In the last 5 minutes, sprinkle chopped walnuts or pecans on top of the sprouts. They will toast lightly and add a great texture to your dish. The best way to serve this dish is warm. You can plate the Brussels sprouts as a side dish or even as a main course. Drizzle some extra honey garlic sauce on top for more flavor. Pair these sprouts with roasted chicken or grilled salmon for a complete meal. They also go well with quinoa or rice for a vegetarian option. For more ideas, check out the Full Recipe for inspiration. To ensure even roasting, spread the Brussels sprouts in one layer. This lets hot air circulate and cook them well. Stir them halfway through to brown all sides. For perfect caramelization, use a high oven temperature. Roasting at 400°F (200°C) helps the natural sugars in the sprouts turn golden and sweet. If you want different sweeteners, try maple syrup or agave. Both add a unique flavor that pairs well with Brussels sprouts. For nut allergies, use seeds like pumpkin or sunflower. They give a nice crunch without the risk of allergies. Marinating Brussels sprouts can boost their taste. Let them soak in the honey garlic mixture for 30 minutes before roasting. This helps the flavors soak in deeper. You can also add herbs and spices. Fresh thyme or rosemary can add a nice touch. A sprinkle of lemon zest can brighten the dish too. For the full recipe, check the section above. {{image_2}} For a fresh twist, consider adding seasonal vegetables. You can mix in diced sweet potatoes or carrots. These add flavor and color to your dish. If you want some sweetness, try including fruits. Dried cranberries or chopped apples work well. They bring a nice tartness that balances the honey. If you follow a vegan diet, use maple syrup instead of honey. It gives that sweet kick without any animal products. For those with gluten issues, this recipe is already gluten-free. Just ensure the balsamic vinegar is certified gluten-free. You can switch up your cooking method for Brussels sprouts. Air frying makes them crispy with less oil. Just set your air fryer to 375°F (190°C) and cook for about 15-20 minutes. If you prefer, you can cook them on the stovetop. Just sauté in a pan until tender. Grilling is another fun option. It adds a smoky flavor that enhances the dish. Toss the Brussels sprouts in a grill basket and cook on medium heat for about 10-15 minutes. The char adds a nice touch! These variations keep your Honey Garlic Roasted Brussels Sprouts exciting and fun. Give them a try! For the full recipe, check out the earlier sections. To store leftovers of Honey Garlic Roasted Brussels Sprouts, let them cool first. Place them in an airtight container. This keeps them fresh for about 3 to 4 days in the fridge. I prefer glass containers as they are durable and do not stain. They also allow you to see what’s inside easily. You can freeze Brussels sprouts before or after cooking. If you freeze them raw, blanch them for 3 minutes in boiling water. This helps maintain their color and texture. After blanching, cool them in ice water, then drain and pack in freezer bags. If you freeze them after cooking, make sure they cool completely. Place them in freezer-safe bags and remove as much air as possible. Thaw frozen sprouts overnight in the fridge for the best results. To reheat your Brussels sprouts without losing their crispy texture, use an oven or air fryer. Preheat the oven to 350°F (175°C). Spread the sprouts on a baking sheet and heat for about 10-15 minutes. This keeps them crispy and warm. If using an air fryer, set it to 350°F (175°C) for 5-7 minutes. Stir them halfway through to ensure even heating. Enjoy your leftovers without losing that tasty crunch! Brussels sprouts are tiny powerhouses of nutrition. They are low in calories and packed with vitamins. They provide a good amount of vitamin C, vitamin K, and fiber. These nutrients support your immune system and help with digestion. Brussels sprouts also contain antioxidants. These help fight off harmful free radicals in your body. Eating Brussels sprouts may reduce the risk of chronic diseases. They can also improve heart health by lowering cholesterol levels. Yes, you can prep Brussels sprouts in advance. Trim and halve them a day before. Store them in a sealed container in the fridge. You can also mix the honey garlic sauce ahead of time. Just keep it in the fridge until you are ready to cook. On cooking day, toss the sprouts with the sauce and roast. This makes your meal quick and easy. To add some heat, use red pepper flakes. Just sprinkle them in when mixing the sauce. You can also try adding chili powder or cayenne pepper. For more spice, add a dash of hot sauce before serving. This will give your dish a nice kick and enhance the flavor. Enjoy your spicy twist! Honey Garlic Roasted Brussels Sprouts is a tasty dish. You learned about ingredients, preparation steps, and serving tips. We explored different variations and storage methods. This makes cooking easy and fun. Feel free to tweak the recipe to your liking. Add your favorite spices or nuts. Enjoy the health benefits while savoring every bite. You can impress your friends and family with this delightful dish. Happy cooking!](https://greenmealmap.com/wp-content/uploads/2025/07/574b2ba9-fb51-475f-9c2f-af2326c649c6.webp)
If you’re looking for an easy, tasty, and nutritious side dish, you’ve found it! Honey Garlic Roasted Brussels Sprouts are
![- 2 cups Greek yogurt - 1/2 cup fresh lemon juice - 1/2 cup honey or maple syrup - Zest of 2 lemons - 1 teaspoon vanilla extract - A pinch of salt - Optional: Fresh mint leaves for garnish Greek yogurt lemon popsicles need fresh, simple ingredients. The Greek yogurt gives a creamy base. For the tart flavor, fresh lemon juice is key. Honey or maple syrup adds sweetness. The zest of lemons brings out more flavor. You can also add vanilla extract for depth. A pinch of salt helps balance the taste. If you want to add a touch of color, fresh mint leaves make a great garnish. This combination creates a refreshing treat. You’ll enjoy every bite, especially on warm days. For the full recipe, check the instructions above. To start, you need to mix your Greek yogurt with fresh lemon juice and sweetener. I love using honey or maple syrup for this recipe. They both add a nice sweetness. In a mixing bowl, combine: - 2 cups Greek yogurt - 1/2 cup fresh lemon juice - 1/2 cup honey or maple syrup Next, add some lemon zest, a splash of vanilla extract, and a pinch of salt. The zest gives a bright flavor. Whisk everything together until smooth. Taste the mix and adjust the sweetness if needed. Now it’s time to pour the mixture into your popsicle molds. Leave a little space at the top for the mixture to expand as it freezes. This step is key! After pouring, insert the popsicle sticks into each mold. If you have flexible molds, wait a few minutes before inserting. This makes it easier to insert the sticks. Place the molds in the freezer for 4-6 hours. This allows your popsicles to freeze solid. If you want easy removal, run the molds under warm water for a few seconds. This helps loosen them up. Enjoy your Greek yogurt lemon popsicles right away or store them in a freezer bag for later. Don’t forget to check the full recipe for more details! Taste is key! Start with the recipe and mix Greek yogurt, lemon juice, and sweetener. After mixing, taste it. If it’s too tart, add more honey or maple syrup. Just a little goes a long way. Keep tasting until it's just right for you. A smooth texture makes the popsicles nice. To achieve this, whisk the mixture well. Make sure there are no lumps. If you want to avoid ice crystals, freeze the mixture quickly. This helps keep the pops soft. You can also blend the mixture for an even finer texture. Presentation matters! When serving your popsicles, remove them from molds and place them on a plate. You can drizzle some honey over them for extra sweetness. Add fresh mint leaves for a nice touch. They add color and flavor. You can also cut a lemon in half and place it beside the pops for a fun look. These little details make your popsicles pop! For the complete recipe, check the [Full Recipe]. {{image_2}} You can easily change the flavor of your Greek yogurt lemon popsicles. Try adding fruits like berries or peaches. They mix well and add a sweet touch. Just chop the fruit into small pieces and stir them in. You can also use herbs like basil or mint for a fresh twist. Sweeteners are another way to change the taste. Instead of honey, try agave syrup or coconut sugar. Each brings a unique flavor to your pops. You can even mix sweeteners to find the perfect taste. If you need a vegan option, swap the Greek yogurt for a plant-based yogurt. Almond or coconut yogurt works well. These options keep the pops creamy and delicious. For a sugar-free version, use a sugar substitute like stevia or erythritol. These options keep your pops sweet without the added sugar. Just make sure to test the sweetness as you mix. Make your popsicles look fun with some creative ideas. Layer different flavors in your molds for a colorful treat. For example, pour lemon yogurt, then add a layer of berry mix. This creates a beautiful striped effect. Using unique molds can also add fun. Try star or heart-shaped molds for a festive look. You can even use ice cube trays for mini pops. Just adjust the freezing time as needed. To store your popsicles, place them in a freezer-safe bag or container. Make sure the popsicles are completely frozen before moving them. This keeps them from sticking together. If you use a plastic mold, cover it with plastic wrap. This helps prevent freezer burn. These Greek yogurt lemon popsicles stay fresh for about 2 months in the freezer. After that, they may lose flavor or texture. For best taste, enjoy them within the first month. Always check for ice crystals before eating them. When you’re ready to enjoy a popsicle, run warm water over the mold for a few seconds. This helps loosen the popsicles for easy removal. You can also leave them at room temperature for about 5 minutes. This way, they soften just enough to enjoy without melting too fast. Greek Yogurt Lemon Popsicles can last for up to two months in the freezer. They stay tasty and fresh if stored properly. I recommend sealing them in a freezer bag or container. This helps prevent freezer burn. Yes, you can. If you prefer, try agave syrup or coconut sugar. Both add sweetness with unique flavors. Just keep in mind to adjust the amount based on your taste. Honey and maple syrup work well, but you can experiment! If you lack lemon juice, use lime juice instead. The flavor will change, but it will still taste great. You can also use citric acid dissolved in water if you want a tart flavor. Remember, the goal is to keep it refreshing! Absolutely! Use coconut yogurt or almond yogurt for a dairy-free version. The texture may change slightly, but the flavor remains delightful. This option is perfect for those who avoid dairy or follow a vegan diet. To achieve a creamier texture, try adding a banana or avocado to the mixture. Blend it well with the yogurt. This will give your popsicles a smooth and rich feel, making them even more enjoyable. Yes! You can add berries, mango, or diced peaches to the mix. These fruits add flavor and color. Just blend them into the yogurt mixture or layer them in the molds for a fun look. Popsicles are ready when they feel solid to the touch. Typically, they need at least 4-6 hours in the freezer. If you’re unsure, just check after a few hours. You want them fully frozen for the best experience. Definitely! Just skip the popsicle molds and keep the mixture smooth. Pour it into a bowl and top with your favorite fruits, nuts, or seeds. It makes a refreshing and healthy breakfast or snack. For the full recipe, check out the details above and get started on these tasty treats! You now know how to make Greek yogurt lemon popsicles. We explored the main and optional ingredients and their different roles. I shared step-by-step instructions, tips for the best texture, and ideas for keeping it fresh. You also learned simple variations to suit your taste. Enjoy creating these tasty treats. They are easy to make and perfect for hot days. With your newfound skills, enjoy sharing these popsicles with family and friends!](https://greenmealmap.com/wp-content/uploads/2025/07/13899d3e-f07d-4ea7-9fb7-e03371e2fc63.webp)
Looking for a cool and creamy treat this summer? Greek Yogurt Lemon Popsicles are the perfect way to beat the
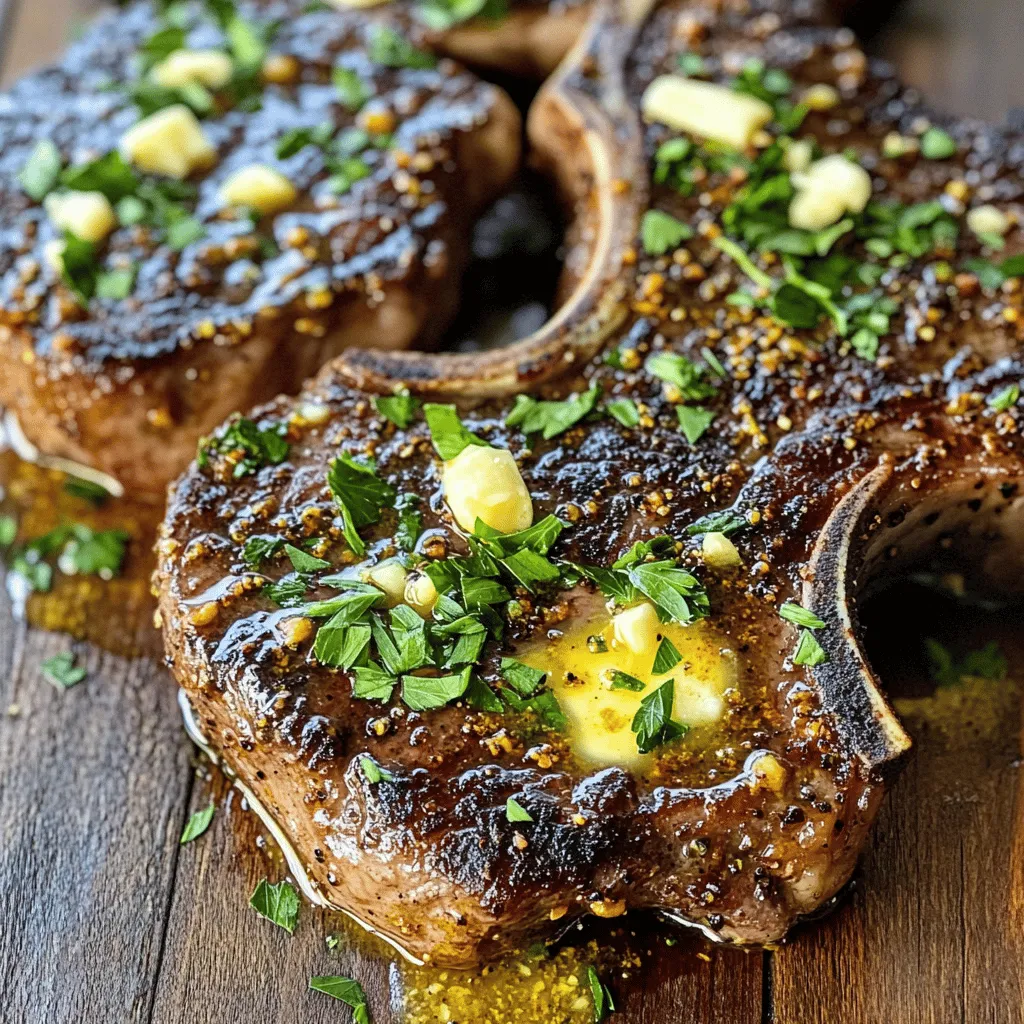
Are you ready to transform your dinner with a mouthwatering dish? This Cajun Garlic Butter Steak is simple yet bursting
![To make easy chicken fried rice, you need the following key items: - 2 cups cooked jasmine rice (preferably day-old) - 1 cup chicken breast, diced - 2 tablespoons soy sauce - 1 tablespoon sesame oil - 1 cup mixed vegetables (peas, carrots, and corn) - 2 green onions, chopped - 2 cloves garlic, minced - 2 large eggs, lightly beaten - Salt and pepper to taste These ingredients create a tasty base for your dish. Using day-old rice helps it fry better. Fresh rice may clump together. You can add these items to boost taste: - 1 teaspoon sriracha sauce for heat - Fresh ginger, minced for a zesty touch - A sprinkle of sesame seeds for crunch These extras make your fried rice unique. Feel free to mix and match based on what you like. Here are the tools you will need: - A large skillet or wok for stir-frying - A spatula or wooden spoon for mixing - A sharp knife for chopping These tools help you cook quickly and efficiently. They make the process smooth, so you enjoy your meal sooner. For the full recipe, check out the detailed instructions above. To start, gather your ingredients. You will need: - 2 cups cooked jasmine rice (preferably day-old) - 1 cup chicken breast, diced - 2 tablespoons soy sauce - 1 tablespoon sesame oil - 1 cup mixed vegetables (peas, carrots, and corn) - 2 green onions, chopped - 2 cloves garlic, minced - 2 large eggs, lightly beaten - Salt and pepper to taste - Optional: 1 teaspoon sriracha sauce for heat Make sure your rice is cold. This helps it fry better. Cut your chicken into small pieces. Chop the green onions and mince the garlic. Now, heat the sesame oil in a large skillet or wok over medium-high heat. Add the diced chicken and stir-fry for about 3-4 minutes. Cook until the chicken is no longer pink. Remove it from the skillet and set it aside. In the same skillet, toss in the minced garlic. Stir-fry for about 30 seconds until it smells great. Next, add the mixed vegetables and stir-fry for 2-3 minutes. You want them tender but still bright in color. Push the veggies to one side of the skillet. Pour the beaten eggs into the other side. Scramble the eggs until they are fully cooked. Then, add the cold rice to the skillet. Mix everything together well. Pour the soy sauce and optional sriracha sauce over the rice. Add the cooked chicken back in. Stir everything until it’s well coated. Season with salt and pepper to your liking. Lastly, toss in the chopped green onions. To make great fried rice, use day-old rice. It has less moisture and fries better. Keep your heat high to get that nice, crispy texture. Stir often but not too much. Let the rice sit to get crispy bits. Experiment with different veggies or proteins. You can add shrimp or tofu for a twist. Keep it simple and enjoy! For a full recipe, check the provided link to create your own masterpiece. To keep your fried rice from being sticky, use day-old rice. Freshly cooked rice has moisture, which can cause clumping. If you have no day-old rice, spread fresh rice on a tray. Let it cool for 30 minutes before using it. This helps the grains firm up. Day-old rice is perfect for fried rice. It firms up in the fridge, making it easy to stir-fry. When using it, break up any clumps before cooking. This helps it mix well with the chicken and veggies. You can also plan ahead. Cook extra rice when you make a meal. Store it in the fridge for your next fried rice dish. Soy sauce is key for flavor in fried rice. It adds saltiness and depth. Sesame oil gives a nutty taste. You can also use oyster sauce for a rich flavor. For heat, add sriracha sauce. Mix in garlic for a great aroma. Try adding fresh herbs like cilantro for a fresh twist. For the full recipe, check out the [Full Recipe]. {{image_2}} You can easily make this dish vegetarian. Simply swap the chicken for tofu or tempeh. Both options add protein and texture. Use the same cooking steps as the original recipe. Keep the soy sauce and sesame oil for flavor. Add extra veggies like bell peppers or mushrooms. This gives it a fresh taste and vibrant color. If you enjoy heat, add sriracha or chili flakes. Include one teaspoon of sriracha sauce right before serving. You can also try adding sliced jalapeños during cooking. This will give your fried rice a spicy twist. Adjust the spice to your liking. The heat pairs well with the savory chicken and veggies. Feel free to play with proteins and vegetables. Shrimp or beef can be great substitutes for chicken. Just make sure to cook them well. For veggies, consider broccoli, snap peas, or zucchini. You can mix and match based on what you have on hand. This keeps your dish exciting and new each time. Check the Full Recipe for more ideas and inspiration. To keep your chicken fried rice fresh, let it cool first. Place it in an airtight container. Store it in the fridge. It will last for up to three days. This helps keep the rice from drying out. Avoid stacking too much on top of each other to preserve texture. When reheating, use a skillet for best results. Add a splash of water or oil to the pan. This adds moisture and prevents sticking. Heat over medium heat, stirring often until hot. You can also use a microwave. Cover the bowl with a damp paper towel to keep it moist. Heat in short bursts, stirring in between. You can freeze chicken fried rice for later. First, cool the rice completely. Then, portion it into freezer-safe bags. Flatten them for easy storage. Label the bags with the date. It can last up to three months. When ready to eat, thaw it in the fridge overnight. Reheat it on the stove or microwave. Enjoy your delicious meal anytime! I find that jasmine rice works best for fried rice. It has a nice aroma and fluffy texture. Day-old rice is ideal because it dries out a bit. This helps prevent clumping. If you don't have jasmine rice, use basmati or long-grain rice. Avoid sticky rice, as it can turn mushy in the pan. It is best to use cooked chicken for this recipe. Raw chicken takes longer to cook. This can lead to uneven cooking. If you want to use uncooked chicken, cut it into small pieces. Stir-fry it first until fully cooked, about 3 to 4 minutes. Then, remove it from the pan before adding the veggies. To get that restaurant flavor, use high-quality soy sauce. You can also add a dash of oyster sauce for depth. Fresh garlic and ginger can boost the taste too. Cook on high heat for a nice sear. Finally, finish with a drizzle of sesame oil right before serving. This adds a lovely finish to your dish. For the full recipe, check out the previous sections! In this blog post, we explored making easy chicken fried rice. We covered the essential and optional ingredients you can use, plus the tools to cook it. You learned step-by-step instructions and tips for great results. We also discussed fun variations, storage tips, and answered common questions. By following these guidelines, you can create delicious fried rice at home. With practice, your dish can rival restaurant meals. Enjoy your cooking journey with this tasty recipe!](https://greenmealmap.com/wp-content/uploads/2025/07/0c82f2b2-436a-4260-b832-30ab59c0f957.webp)
Looking for a quick and tasty meal? This Easy Chicken Fried Rice recipe is just what you need! With simple
 for detailed instructions on how to bring all these ingredients together. 1. First, preheat your oven to 325°F (160°C). Line an 8x8 inch baking pan with parchment paper. Leave some paper hanging over the sides for easy removal. 2. In a medium bowl, mix 1 ½ cups of graham cracker crumbs, ½ cup of melted butter, and 1 tablespoon of granulated sugar. Stir until it looks like wet sand. 3. Press this mixture evenly into the bottom of the prepared pan to form the crust. Bake for 10 minutes, then take it out and let it cool. 1. In a large mixing bowl, beat 16 ounces of softened cream cheese until it is smooth. This step is key for a creamy texture. 2. Gradually add 1 cup of granulated sugar and mix well. The sugar should blend in fully. 3. Beat in 2 large eggs, one at a time. Mix well after each egg to make sure they are fully combined. 4. Add the zest of 1 lemon and ¼ cup of fresh lemon juice. Don’t forget the 1 teaspoon of vanilla extract. This will add great flavor. Mix until everything is fully combined. 1. Gently fold in 1 cup of fresh raspberries. Be careful not to break them too much; you want some whole berries in the filling. 2. Pour the cream cheese mixture over the cooled crust. Spread it evenly across the crust. 3. Bake in the preheated oven for 30 to 35 minutes. The edges should be set, but the center can be slightly jiggly. 4. Remove the pan from the oven and let it cool at room temperature for about an hour. Then, refrigerate for at least 4 hours or overnight for best results. 5. After chilling, lift the cheesecake out of the pan using the parchment paper. Cut it into bars. Enjoy! For the topping, mix ½ cup of sour cream with 2 tablespoons of powdered sugar. Spread it over the bars and garnish with extra raspberries. You can find the complete process in the [Full Recipe]. To keep your cheesecake bars smooth, avoid cracks. Mix the cream cheese slowly. Do not rush it. After adding eggs, mix just until combined. Overmixing can add air and lead to cracks. When baking, check for doneness without opening the oven door. The edges should be set, but the center should jiggle slightly. Want more zing? Add extra lemon zest or lemon extract. This small change boosts the taste. You can also try different flavors. For a twist, infuse your cheesecake with vanilla bean or almond extract. These flavors pair nicely with lemon and raspberries. Serving these bars can be fun! Use a decorative platter for an elegant touch. Drizzle raspberry sauce over the bars for color and flavor. Garnish with fresh lemon slices and extra raspberries. This adds a pop of brightness and makes the dish look fancy. For the full recipe, check the details above. {{image_2}} You can easily change the flavor of these bars. Swap raspberries for strawberries or blueberries for a fresh twist. Each fruit brings its unique taste and color to the bars. You can also add chocolate chips or swirls for a rich, sweet addition. Just fold them in gently to keep the bars creamy. For vegan options, use plant-based cream cheese and eggs. You can blend silken tofu with lemon juice as a substitute. For low-carb diets, try almond flour for the crust and a sugar alternative like erythritol. This keeps the dessert tasty while fitting your needs. Get creative based on the season! For holidays, add spices like cinnamon or nutmeg. Incorporate seasonal fruits like peaches in summer or cranberries in winter for added flair. These simple adjustments make the bars feel new and exciting all year round. To keep your Lemon Raspberry Cheesecake Bars fresh, store them in the fridge. Place the bars in an airtight container. This helps maintain their creamy texture. They last up to five days. If you want longer storage, freezing is a great option. Wrap each bar in plastic wrap, then put them in a freezer-safe container. They can stay frozen for up to three months. Just remember to label them with the date! When you want to enjoy a bar, take it out of the fridge or freezer. If frozen, let it thaw overnight in the fridge first. To reheat, use the oven. Preheat it to 300°F (150°C). Place the bars on a baking sheet. Heat them for about 10 minutes. This method warms them without making them soggy. After reheating, let them cool for a few minutes before serving. This way, they taste fresh and delightful! To check if the cheesecake bars are done, look for a few key signs. The edges should set firmly, while the center remains slightly jiggly. This slight jiggle means it will firm up as it cools. You can also insert a toothpick into the center. If it comes out mostly clean, they are done. Yes, you can make these bars gluten-free! Use gluten-free graham crackers for the crust. You can also substitute almond flour or crushed nuts for a different texture. Ensure all other ingredients are gluten-free, like the cream cheese and sugar. This way, everyone can enjoy these tasty bars! Lemon Raspberry Cheesecake Bars can last in the fridge for about five days. To keep them fresh, store them in an airtight container. Avoid leaving them out too long to ensure the best taste and texture. Absolutely! Making these cheesecake bars ahead is a great idea. You can prepare them a day or two before serving. Just bake, cool, and chill them in the fridge. This helps the flavors develop and makes your day of serving much easier. For the best results, top them just before serving. For the Full Recipe, check back to the main section. You now have all the tools to make delicious Lemon Raspberry Cheesecake Bars. From gathering essential ingredients to perfecting the texture and flavor, you can craft a treat that impresses. Remember, you can adjust ingredients for dietary needs and choose fun variations. Storing and reheating your bars properly ensures they stay fresh. Enjoy your baking journey, and don't hesitate to experiment with this recipe. Your cheesecake bars will surely be a hit with family and friends!](https://greenmealmap.com/wp-content/uploads/2025/07/13c526c2-cc66-4315-bc65-e4d99a8d6b53.webp)
Looking for a bright and tangy treat? My Lemon Raspberry Cheesecake Bars are just the dessert you need! With a
![To make garlic herb roasted baby potatoes, gather these key items: - 1 lb baby potatoes, halved - 4 cloves garlic, minced - 3 tablespoons olive oil - 1 teaspoon fresh rosemary, chopped - 1 teaspoon fresh thyme, chopped - 1 teaspoon fresh parsley, chopped - Salt and pepper to taste - Zest of 1 lemon These ingredients create a lovely mix of flavors. The baby potatoes provide a soft, creamy texture. Garlic adds rich depth, while fresh herbs brighten each bite. Fresh herbs make a big difference in this dish. Rosemary brings a piney, earthy taste. Thyme offers a warm, slightly sweet flavor. Parsley adds freshness and a pop of color. You can use dried herbs if fresh ones are not available. However, fresh herbs give the best taste. If you can’t find baby potatoes, use regular potatoes. Just cut them into smaller pieces. For olive oil, you can switch to avocado oil or melted butter. If you want a different taste, try other herbs like oregano or basil. They will change the flavor but still taste great. You can find the full recipe for these delicious garlic herb roasted baby potatoes at the end of this article. First, preheat your oven to 400°F (200°C). This step is key for crispy potatoes. While the oven heats, gather your ingredients. You will need baby potatoes, garlic, olive oil, fresh herbs, salt, and pepper. Make sure to wash the potatoes well. Halve each potato to allow for even cooking. In a large bowl, add the halved potatoes. Next, mix in the minced garlic and olive oil. Add the chopped rosemary, thyme, and parsley. These herbs will bring lots of flavor. Season the mix with salt and pepper. Then, add the lemon zest for a fresh touch. Stir everything together until the potatoes are fully coated. Spread the coated potatoes onto a baking sheet. Make sure they are in a single layer. This helps them roast evenly. Place the baking sheet in the oven. Roast the potatoes for about 25-30 minutes. Halfway through, toss the potatoes to ensure even cooking. They will turn golden brown and tender. Once done, remove them from the oven and let them cool slightly. Enjoy your garlic herb roasted baby potatoes! For the full recipe, check out the provided link. To get crispy and tender potatoes, choose small, even-sized baby potatoes. Halve them to ensure they cook evenly. Preheat your oven to 400°F (200°C) for the best results. Lay the potatoes in a single layer on the baking sheet. This step helps them roast well and avoids steaming. Toss them halfway through cooking to brown all sides. Garlic is key for flavor. Use fresh minced garlic for the best taste. Combine it with fresh herbs like rosemary, thyme, and parsley. These herbs add brightness and depth. Lemon zest brings a lovely zing, balancing the richness. Feel free to adjust the herbs to your liking. More garlic can deepen the flavor, while a mix of herbs can create a unique twist. Serve garlic herb roasted baby potatoes with grilled meats or fish. They pair perfectly with roasted chicken or a fresh salad. For a fun twist, add them to a brunch spread alongside eggs. You can also garnish with extra herbs or lemon wedges for a beautiful touch. Check out the Full Recipe for a complete guide to making these delicious potatoes. {{image_2}} You can make your garlic herb roasted baby potatoes even better by adding other veggies. Carrots, bell peppers, or zucchini work great. Simply chop them into bite-sized pieces. Mix them in with the potatoes before roasting. This adds color and flavor. Plus, it boosts the health factor of your meal. While garlic and herbs shine in this dish, you can change things up easily. Try adding smoked paprika for a warm flavor. Or, use Italian seasoning for a different twist. You might even sprinkle in some Parmesan cheese before serving. Each change can make the dish feel new and exciting. If you love heat, add some spice to your roasted potatoes. You can toss in red pepper flakes or cayenne pepper. Just a little can go a long way. Mix the spice with the other seasonings for even coverage. This adds a kick that many will love. You can enjoy your garlic herb roasted baby potatoes with a fiery touch. For the full recipe, check out the [Full Recipe]. To keep your garlic herb roasted baby potatoes fresh, let them cool first. Place them in an airtight container. Store them in the fridge for up to three days. If you have a lot left, you can separate them into smaller containers. This helps with quick access when you want to eat them again. When you are ready to enjoy the leftovers, preheat your oven to 375°F (190°C). Spread the potatoes on a baking sheet in a single layer. Heat them for about 10-15 minutes or until they are warm and crispy again. You can also use a microwave but they may not be as crispy. Place them on a microwave-safe plate and heat for 1-2 minutes. If you want to store the potatoes for longer, freezing is a great option. Make sure the potatoes are completely cool. Place them in a freezer-safe bag or container. Remove as much air as possible to prevent freezer burn. They can last up to three months in the freezer. To reheat, bake from frozen at 400°F (200°C) for 20-25 minutes, or until heated through. For the best taste, eat them fresh, but this is a good backup plan! For the full recipe, check out the detailed cooking steps and tips. Yes, you can use different types of potatoes. For example, Yukon Gold or red potatoes work well. They both have a creamy texture. Just cut them into similar sizes. This helps them cook evenly. Keep in mind, the flavor may change slightly. Garlic herb roasted baby potatoes pair well with many dishes. You can serve them with grilled chicken or fish. They also match nicely with roasted veggies. A fresh salad adds a crisp touch. For a special meal, try them with steak. The potatoes balance rich flavors perfectly. You can tell when the potatoes are done by their color and texture. They should be golden brown and tender. To check, pierce a potato with a fork. If it goes in easily, they are ready. If not, give them a few more minutes in the oven. Enjoy the full recipe for precise cooking times! This article covered the key steps to making tasty roasted potatoes. We discussed essential ingredients and fresh herbs to boost flavor. You learned various cooking methods, tips for perfection, and fun variations. Storing leftovers and reheating options help reduce waste. Roasted potatoes can easily become a family favorite. Play with flavors and find what you enjoy most. Happy cooking!](https://greenmealmap.com/wp-content/uploads/2025/07/132d756e-7841-4f5d-99c0-c9d96b6822ad.webp)
If you want a side dish that wows, try garlic herb roasted baby potatoes. This simple delight is full of

Ready to elevate your dinner game? Coconut Lime Chicken Skewers are the perfect mix of flavors! This dish is simple,
