Are you ready for a dessert that brings fun to your Easter table? My Easter Dirt Cake Casserole is not just delicious but also super easy to make! With layers of chocolate cake, creamy pudding, and crushed Oreos, this cake will wow your family and friends. Plus, it’s a great way to get kids involved in the kitchen. Let’s dive into this sweet adventure together!
Ingredients
To make the Easter Dirt Cake Casserole, you will need these tasty ingredients:
– 1 package (15.25 oz) chocolate cake mix
– 3 cups milk
– 2 packages (3.4 oz each) instant vanilla pudding mix
– 1 container (8 oz) whipped topping (such as Cool Whip)
– 1 package (20 oz) crushed Oreo cookies
– 1 cup gummy worms
– Edible grass (found in stores or homemade)
– Fresh berries for garnish (optional)
This list gives you a mix of flavors and textures that kids and adults love. The chocolate cake provides a rich base. The vanilla pudding adds creaminess. Gummy worms and crushed Oreos bring fun and whimsy. You can also add fresh berries for a burst of color.
Each ingredient plays a role in making this dish a hit at your Easter gathering. The cake mix is easy to prepare and provides a soft base. Instant pudding saves time while keeping the dessert creamy. The whipped topping adds airiness, making the whole dish light and fun.
When you gather these ingredients, pick fresh berries that are in season. They will add not just flavor but also a nice pop of color. The edible grass can be homemade or bought. It gives a playful touch to the final look of the casserole.
With this list, you are ready to start your Easter Dirt Cake Casserole adventure.
Step-by-Step Instructions
Preparing the Cake
– First, preheat your oven to 350°F (175°C).
– Grease a 9×13 inch baking dish with butter or cooking spray.
– Next, mix the chocolate cake according to the package instructions.
– Pour the batter into the greased baking dish.
– Bake the cake for 30-35 minutes. Use a toothpick to check for doneness.
– Let the cake cool completely before moving on.
Making the Pudding Layer
– In a large bowl, whisk the instant vanilla pudding mix with 3 cups of milk.
– Keep whisking until the pudding is smooth and thick.
– Let the pudding sit for about 5 minutes.
– Now, fold in the whipped topping gently until you see no streaks.
Assembling the Casserole
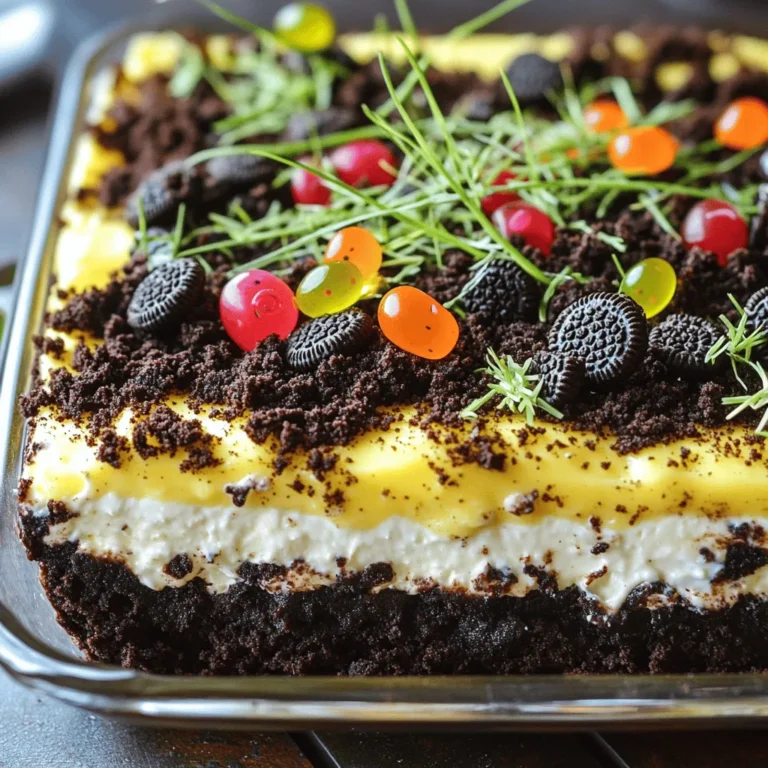
– Crumble the cooled cake into large pieces in the baking dish.
– Spread the pudding mixture evenly over the crumbled cake.
– Sprinkle the crushed Oreo cookies on top to mimic dirt in a garden.
– For a fun touch, place gummy worms and edible grass on top.
– Chill the casserole in the fridge for at least 2 hours before serving.
Tips & Tricks
Perfecting the Cake Texture
To get a great cake texture, start by ensuring even baking. Make sure your oven is preheated to 350°F (175°C) before you bake the cake. This helps the cake rise evenly. Use a toothpick to check if the cake is done. When you insert it in the center, it should come out clean.
After baking, cooling is key. Let your cake cool completely before you assemble the casserole. This keeps the layers from mixing and helps the flavors stay distinct. If you rush this step, your pudding layer could melt into the cake.
Enhancing the Flavor
To make the pudding layer even better, consider adding flavors. You can swap out the vanilla pudding for chocolate or butterscotch pudding. This can give a nice twist to your cake.
For toppings, think beyond just crushed Oreos. You could use chocolate sprinkles or even mini marshmallows. These add fun textures and tastes. They also make the dish look more appealing for your guests.
Serving Suggestions
Easter is a perfect time to serve this dish. It’s fun, festive, and sure to impress. You can also serve it at birthday parties or family gatherings. The fun colors and textures will be a hit with kids and adults alike.
Pair your casserole with milk or a light fruit punch. Both drinks complement the rich flavors of the cake. If you want something lighter, fresh fruit on the side works well too. It adds a refreshing touch to the meal.

Variations
Ingredient Swaps
You can make this recipe work for different diets. If you need a gluten-free option, try using a gluten-free chocolate cake mix. This swap keeps the taste and texture great. You can also change the pudding. Use chocolate pudding instead of vanilla for a richer flavor.
Seasonal Twists
Easter is a fun time to get creative! You can add seasonal candies for extra fun. Think about using pastel M&M’s or chocolate eggs. They can make your casserole look festive. You can also adapt this dish for other holidays. For Halloween, swap gummy worms for candy corn. For Christmas, use crushed peppermint candies on top.
Dietary Modifications
If you want a healthier treat, consider low-sugar pudding. You can find sugar-free options at most stores. For a dairy-free version, use almond or coconut milk. Replace whipped topping with coconut cream for a rich taste.
Storage Info
Storing Leftovers
Store any leftovers in an airtight container. This keeps the casserole fresh. Place it in the fridge right after serving. It will last up to 3 days. After that, it may lose its taste and texture.
Freezing Guidelines
You can freeze the casserole, but it’s best to avoid it. The texture may change when thawed. If you still want to freeze, wrap it tightly in plastic wrap. Then, place it in a freezer-safe bag. It can last up to 2 months in the freezer.
When you’re ready to serve, thaw it in the fridge overnight. Once it’s soft, you can serve it cold or let it sit at room temp for 30 minutes. This will make the flavors pop again. Enjoy your Easter Dirt Cake Casserole!
FAQs
Commonly Asked Questions
How to make Easter Dirt Cake Casserole?
To make Easter Dirt Cake Casserole, start by baking a chocolate cake. Use a chocolate cake mix, follow the package directions, and bake it in a greased dish. After it cools, mix instant vanilla pudding with milk. Fold in whipped topping, then crumble the cooled cake. Layer the pudding mix over the crumbled cake. Top with crushed Oreos, gummy worms, and edible grass. Chill it for two hours before serving.
Can I use homemade whipped cream?
Yes, you can use homemade whipped cream in this recipe. It will add a fresh taste. Just whip heavy cream until it forms soft peaks. Then, gently fold it into the pudding mix. This swap gives the dessert a lovely texture.
What can I substitute for gummy worms?
You can use other candies instead of gummy worms. Try chocolate-covered raisins, jelly beans, or even candy insects. These options can add fun and color to your Easter Dirt Cake Casserole.
Recipe Troubleshooting
Why did my cake not rise?
If your cake did not rise, check if your baking powder is fresh. Old baking powder can cause flat cakes. Also, ensure you mixed the batter well. Over-mixing can lead to dense cakes, while under-mixing can cause uneven rising.
How can I fix a runny pudding layer?
If your pudding layer is runny, it may need more time to set. Refrigerate it longer to thicken. For the next time, use less milk when mixing the pudding. This will help achieve a firmer texture.
Serving Size & Yield
What is the number of servings?
This recipe typically serves 12 people. It’s a great dessert for a gathering. Each serving offers a fun and tasty treat for everyone.
How to scale the recipe for larger gatherings?
To scale the recipe, you can double the ingredients. Use a larger baking dish, like a 12×18 inch pan. Adjust the baking time as needed. Check for doneness with a toothpick. This way, you can share more delicious dirt cake with friends and family.
This blog post covered how to create a fun Easter Dirt Cake Casserole. We discussed the key ingredients and provided step-by-step instructions. Tips and variations helped you think outside the box. Proper storage info ensures your leftovers stay fresh.
Enjoy making this dessert for your next gathering! It’s simple, tasty, and always a hit. Don’t hesitate to experiment with flavors and decorations. Have fun creating and sharing this special treat!

