Skip to content
DisclaimerTerms Of UseGDPR PolicyCookie Policy

greenmealmap

  • Home
  • Drinks
  • Appetizers
  • Dinner
  • Dessert
  • About
  • Contact
  • Privacy Policy
DisclaimerTerms Of UseGDPR PolicyCookie Policy

NO-ING-IMG

- 1 pound large shrimp, peeled and deveined - 4 cloves garlic, minced - 2 tablespoons olive oil The main ingredients in this dish are simple. You need fresh shrimp, garlic, and olive oil. The shrimp should be large, peeled, and deveined. This makes cooking and eating easier. The garlic adds a strong flavor. Olive oil helps cook the shrimp evenly. - Juice and zest of 1 lemon - 1 teaspoon red pepper flakes (optional for heat) Adding lemon juice and zest gives a bright taste. The lemon enhances the shrimp's natural flavor. If you like heat, add red pepper flakes. They give a nice kick without overpowering the dish. - 2 cups cooked quinoa or brown rice - 1 cup cherry tomatoes, halved - 1 cup spinach, roughly chopped - Salt and pepper to taste - Fresh parsley for garnish For the base, you can use quinoa or brown rice. Both are healthy and filling. Cherry tomatoes add sweetness, while spinach brings in some greens. Use salt and pepper to season. Finish with fresh parsley for color and flavor. This blend of ingredients makes a perfect bowl! Start by peeling and deveining the shrimp. Use fresh shrimp for the best taste. If you buy frozen shrimp, thaw it in cold water first. Next, mince the garlic. A sharp knife helps you cut it fine. Finally, prep your base. Cook 2 cups of quinoa or brown rice. This will soak up the flavors. Heat 2 tablespoons of olive oil in a large skillet over medium-high heat. Add the minced garlic and sauté for about 30 seconds. You want it fragrant but not burnt. Then, add the shrimp to the skillet. Season with salt, pepper, and red pepper flakes if you like heat. Cook for 2-3 minutes. The shrimp should turn pink and opaque. Pour in the juice and zest of 1 lemon. Stir to coat the shrimp evenly and cook for one more minute. In a separate bowl, mix the cooked quinoa or rice with 1 cup of chopped spinach and 1 cup of halved cherry tomatoes. Stir until everything is well combined. Now, divide the mixture into bowls. Top each bowl with your lemon garlic shrimp. Finish with fresh parsley for a nice touch. Enjoy your delicious meal! To get the best shrimp, check for doneness. Cook the shrimp until they turn pink and opaque. This usually takes about 2-3 minutes. You want them tender, not rubbery. If needed, adjust the seasoning. Add a pinch of salt or pepper for a bolder taste. Fresh herbs can boost the dish. Try adding chopped parsley or basil. These add color and freshness. You can also add extra vegetables or spices. Bell peppers or zucchini work great here. A dash of smoked paprika can add depth, too. Using pre-cooked shrimp saves time. You can skip the cooking step and just heat them. Also, prepare quinoa or rice in advance. Cook it the night before and store it in the fridge. This makes assembly quick and easy on busy days. {{image_2}} You can switch shrimp for chicken or tofu. Chicken gives a nice, juicy bite. Just grill or sauté it until cooked. For tofu, use firm or extra-firm. Cut it into cubes and sauté until golden. This adds a lovely texture. Both options work well with the lemon and garlic flavors. Try using couscous or barley instead of quinoa or rice. Couscous cooks super fast. It makes a light, fluffy base. Barley is chewy and adds a nutty taste. You can also choose brown rice for a hearty feel. White rice is softer and absorbs flavors well. Both are tasty options! Feel free to swap in seasonal veggies. In spring, use asparagus or peas. In summer, try zucchini or bell peppers. Fall brings great squash, while winter is perfect for kale or Brussels sprouts. Fresh herbs also make a big difference. Basil or cilantro can brighten up your dish. Use what’s fresh to make your bowls pop! To store leftovers, let them cool first. Place the shrimp bowls in the fridge within two hours. Use covered containers to keep them fresh. This keeps the flavors and textures intact. The shrimp bowls stay good for up to three days. Reheat shrimp bowls in the microwave or on the stove. If using a microwave, cover the bowl to keep moisture. Heat in short bursts, stirring in between. This helps avoid overcooking the shrimp. For the stove, use low heat and stir gently until warm. You can freeze the shrimp bowls for later. Pack them in airtight containers or freezer bags. Remove as much air as possible to prevent freezer burn. When ready to eat, thaw in the fridge overnight. Reheat gently to keep those lovely shrimp tender. Yes, you can make this dish ahead of time. Here are some tips for meal prep: - Cook the shrimp and store it in the fridge. - Prepare the quinoa or rice and keep it in a separate container. - Chop the garlic and veggies in advance. - Store everything in airtight containers for freshness. - Reheat before serving to enjoy the best flavors. You can tell shrimp is done when it turns pink and opaque. Here are some indicators of doneness: - Cook shrimp for about 2-3 minutes on each side. - Look for a firm texture. - If the shrimp curls into a C shape, it is usually ready. - Avoid overcooking to keep shrimp tender and juicy. You can serve lemon garlic shrimp bowls with many tasty sides. Here are some side dish ideas: - A fresh green salad with a light dressing. - Steamed or roasted vegetables for added color. - Garlic bread for a crunchy, buttery addition. - A side of corn or avocado salad for extra flavor. - You can also pair it with a light soup for a cozy meal. This blog post covered a delicious shrimp bowl recipe, including ingredients and steps. You learned how to prepare shrimp, blend flavors, and assemble a tasty meal. With variations, storage tips, and answers to common questions, you now have the tools to create a great dish. Enjoy experimenting with different proteins and grains. Make it your own by adding seasonal veggies or herbs. Cooking can be fun and simple, and you are now ready to impress!

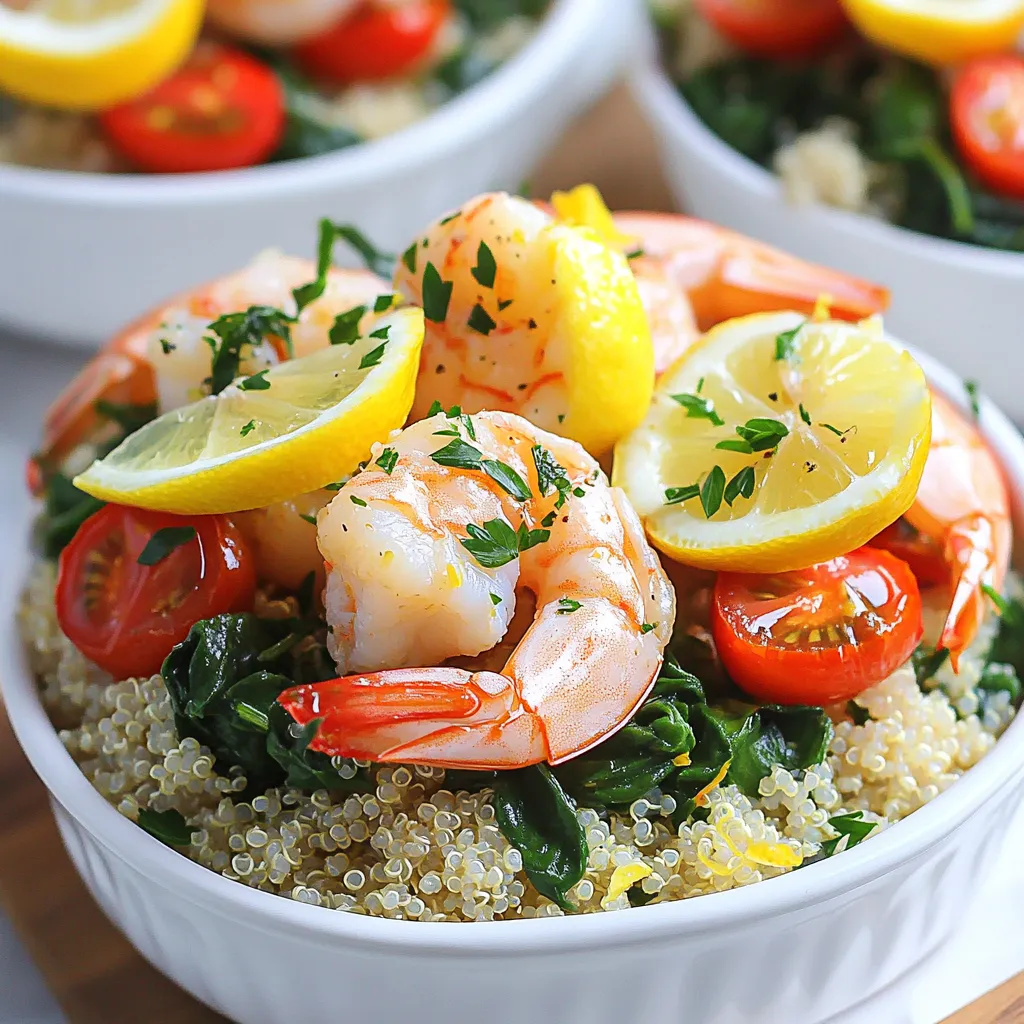
Minute Lemon Garlic Shrimp Bowls Flavorful and Quick

Are you ready to whip up a meal that is quick, tasty, and simple? Minute Lemon Garlic Shrimp Bowls are

Let’s dive into the key ingredients for bakery-style maple brown sugar donut holes. Each item plays a big role in making these treats delicious. - All-purpose flour: This forms the base of our donut holes. It gives them structure. - Brown sugar: Packed brown sugar adds sweetness and a rich flavor. It gives a lovely caramel touch. - Baking powder and baking soda: These help the donut holes rise and get fluffy. They create that perfect texture. - Spices: Salt, cinnamon, and nutmeg give warmth and depth to the flavor. They make each bite exciting. - Wet ingredients: The egg binds everything. Buttermilk adds a nice tang. Maple syrup brings sweetness, and melted butter enriches the dough. - Frying oil: You’ll need enough to submerge the donut holes for frying. It’s key for that crispy exterior. - Optional powdered sugar: Dusting with powdered sugar gives a sweet finish. It makes them look and taste extra special. Gather these ingredients, and you're ready to make some delightful donut holes! Start by mixing your dry ingredients. In a large bowl, whisk together: - 2 cups all-purpose flour - 1 cup brown sugar, packed - 1 tablespoon baking powder - ½ teaspoon baking soda - ½ teaspoon salt - 1 teaspoon ground cinnamon - ½ teaspoon nutmeg Proper measurement is key. Use a spoon to scoop flour into your measuring cup. Level it off with a knife for accuracy. This ensures your donut holes rise and taste great. Now, let’s prepare the wet ingredients. In a separate bowl, beat one large egg. Then, mix in: - ¾ cup buttermilk - ½ cup maple syrup - 3 tablespoons unsalted butter, melted Mix until smooth. A smooth mixture helps blend flavors well. It also makes your donut holes light and fluffy. Next, combine the dry and wet mixtures. Pour the wet ingredients into the dry ones. Stir gently until just combined. It’s okay if the batter is a bit lumpy. Overmixing can make your donut holes tough. Now for the fun part: frying! Heat oil in a deep fryer or heavy pot to 350°F (175°C). Use enough oil to cover the donut holes. When the oil is hot, use a small cookie scoop or tablespoon. Carefully drop spoonfuls of batter into the oil. Fry in batches to avoid overcrowding. Each donut hole needs space to puff up. Cook for 2-3 minutes on each side. They should turn golden brown. Use a slotted spoon to remove them, and let them drain on paper towels. Once your donut holes cool, it’s time to finish them. You can toss them in powdered sugar for sweetness. Alternatively, drizzle them with more maple syrup for extra flavor. Enjoy the deliciousness of your bakery-style maple brown sugar donut holes! Temperature control is key to great donut holes. Your oil should be around 350°F (175°C). This heat helps them puff up and cook evenly. If the oil is too cool, the donut holes can turn out greasy. If it’s too hot, they can burn quickly. To check if they’re done, look for a golden brown color. They should also feel light and airy. If they are dark brown, they may taste burnt. Aim for that sweet spot! A good deep fryer or heavy pot is essential. This helps maintain the right oil temperature. A thermometer can ensure accuracy. A slotted spoon makes it easy to lift the donut holes out of the oil. For perfect scoops, use a small cookie scoop or a tablespoon. This keeps the sizes uniform. It makes frying simple and fun! You can add fun mix-ins to your donut holes. Try chocolate chips or chopped nuts for a twist. You can also roll them in cinnamon sugar instead of powdered sugar for a spicy kick. For flavor variations, consider adding a splash of vanilla extract or even orange zest. These tiny changes can make a big difference. Don’t be afraid to get creative! {{image_2}} You can have fun with flavors. Try adding chocolate chips for a sweet twist. Vanilla extract can also enhance the taste. Want a spice kick? Use more cinnamon or add ginger. Lemon zest gives a fresh taste too. You can make these donut holes gluten-free. Use a 1:1 gluten-free flour blend. For vegan options, swap the egg with a flax egg. Use almond milk instead of buttermilk. Maple syrup works as a sweetener. These choices keep the flavor strong. You can serve these donut holes warm. Pair them with coffee or tea for a treat. For a fun twist, add a scoop of ice cream on top. You can also drizzle chocolate sauce for extra sweetness. Donut holes are great for parties, too! To keep your donut holes fresh, you should store them in an airtight container. This helps prevent them from drying out. A simple plastic or glass container works well. You can also use a resealable plastic bag. Just make sure to remove as much air as possible before sealing. Store them at room temperature for up to two days. If you want them to last longer, consider freezing them. Freezing donut holes is a great choice for longer storage. First, let them cool completely. Then, place them on a baking sheet in a single layer. Freeze them for about one hour. Once frozen, transfer them to a freezer-safe bag or container. This helps keep their shape. Donut holes can be frozen for up to three months. To thaw, simply leave them at room temperature for a few hours. To enjoy warm donut holes again, you can reheat them easily. The best method is to use an oven. Preheat the oven to 350°F (175°C). Place the donut holes on a baking sheet and heat for about 5-10 minutes. This keeps them soft and tasty. You can also use a microwave, but it may make them a bit chewy. Heat in short bursts, about 10 seconds at a time, until warm. Enjoy your delicious treats! The best oil for frying donut holes is vegetable oil or canola oil. These oils have a high smoke point, which means they can heat well without burning. This helps your donut holes fry evenly and stay fluffy inside. Yes, you can bake these donut holes! Preheat your oven to 350°F (175°C). Grease a mini muffin pan and drop in the batter. Bake for about 10-12 minutes until they are golden. They won’t be as crispy, but they still taste great. To check if the oil is hot enough, use a thermometer. It should be around 350°F (175°C). If you don't have a thermometer, drop a small piece of batter into the oil. If it sizzles and rises, the oil is ready! You can mix the dry ingredients ahead of time and store them. Just wait to add the wet ingredients until you are ready to fry. This helps keep the batter fresh and fluffy. Homemade donut holes taste best on the first day. They can last for 1-2 days in an airtight container. For longer storage, you can freeze them for up to a month. Just reheat in the oven for a few minutes before enjoying! This guide covered everything you need to make delicious donut holes. From choosing the right ingredients to mixing the batter, each step is key to great results. Remember to control the temperature while frying for the perfect texture. Don’t hesitate to try different flavors or dietary options for a twist. Proper storage ensures your treats stay fresh. Now, get cooking and enjoy your homemade donut holes!

Bakery-Style Maple Brown Sugar Donut Holes Delight

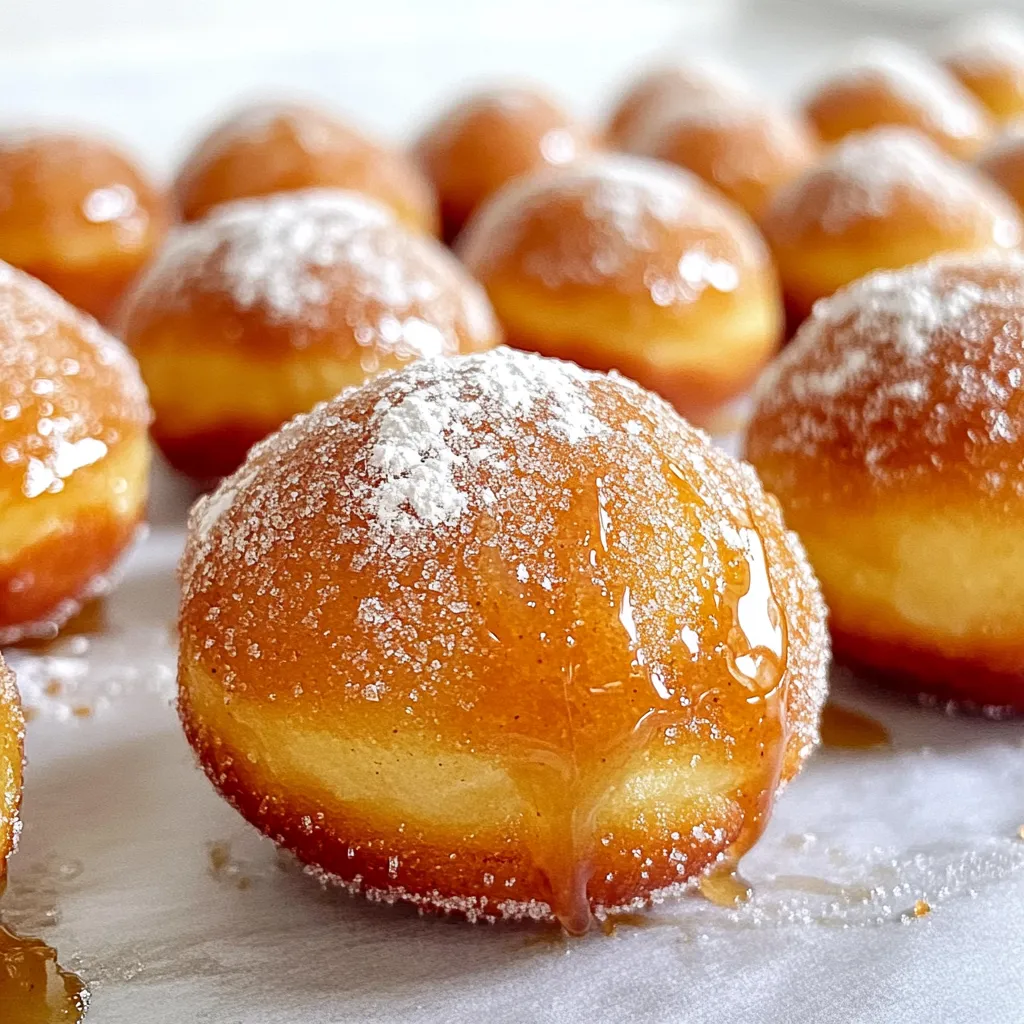
Are you ready to indulge in the perfect treat? In this post, I’ll show you how to whip up Bakery-Style

- 1 lb (450g) potato gnocchi - 1 can (14 oz) diced tomatoes, with juices - 2 cups fresh spinach, washed and chopped - 1 cup heavy cream - 1 tablespoon olive oil - 2 cloves garlic, minced - ½ teaspoon onion powder - ½ teaspoon dried basil - ½ teaspoon dried oregano - Salt and pepper to taste - ½ cup grated Parmesan cheese (plus extra for serving) - Fresh basil leaves for garnish Gathering the right ingredients is key for this creamy tomato spinach gnocchi. First, you need potato gnocchi. This soft pasta cooks quickly and soaks up flavor well. You will also need a can of diced tomatoes. Make sure to choose one with juices for a rich sauce. Fresh spinach adds color and nutrients. Heavy cream gives the dish its creamy texture. Next, you will need olive oil for sautéing. Garlic adds a warm flavor. Onion powder, dried basil, and oregano give a lovely herbal note. Don't forget salt and pepper to enhance all the flavors. Finally, Parmesan cheese adds a salty finish. You can sprinkle more on top for extra flavor. Fresh basil leaves make a nice garnish and add freshness when serving. These ingredients come together to create a delightful meal in one pot. Enjoy the process of cooking and savor the results! This recipe is easy and fun to make. You will create a creamy dish in one pot. The steps are simple, and the flavors mix well. You’ll love how fast it comes together. - Heating olive oil and sautéing garlic Start by heating 1 tablespoon of olive oil in a large pot. Use medium heat. Once hot, add 2 cloves of minced garlic. Sauté the garlic for about 1 minute. You want it fragrant, not brown. - Adding tomatoes and spices Next, stir in 1 can of diced tomatoes. Make sure to add the juices too. Add ½ teaspoon of onion powder, ½ teaspoon of dried basil, ½ teaspoon of dried oregano, salt, and pepper to taste. Let this mixture simmer for about 5 minutes. This helps the flavors blend well. - Incorporating heavy cream and gnocchi After that, pour in 1 cup of heavy cream. Mix it until it becomes creamy. Now, add 1 pound of potato gnocchi. Make sure all the gnocchi are submerged in the sauce. Cook for about 5-7 minutes. The gnocchi will float when they are done. - Finishing with spinach and Parmesan Finally, stir in 2 cups of chopped spinach and ½ cup of grated Parmesan cheese. Let the spinach wilt and the cheese melt for about 2-3 minutes. Taste the dish and adjust the seasoning if needed. Remove it from heat and let it sit for a few minutes. This will help it thicken slightly. To cook gnocchi just right, boil them until they float. This shows they are done. If you overcook them, they will turn mushy. For the sauce, balance flavors by tasting as you go. If it tastes too acidic, add a pinch of sugar. This helps to round out the flavors. If the sauce is too thick, add a splash of water or broth. Avoid common mistakes by keeping an eye on the garlic. It can burn quickly. If it does, the sauce will taste bitter. Also, don’t skip the seasoning. Salt and pepper can make or break the dish. Serve the gnocchi in deep bowls for a cozy look. Top with extra grated Parmesan for a creamy feel. A drizzle of olive oil adds shine and flavor. Garnish with fresh basil leaves for color and aroma. You can also sprinkle a bit of black pepper on top for an extra kick. These small touches make your dish look and taste gourmet. {{image_2}} You can change the dish to fit your taste. Want more greens? Use kale instead of spinach. Kale blends nicely with the creamy sauce. You can also try mushrooms for a hearty twist. They add a nice texture and flavor. If you want a dairy-free option, swap the heavy cream with coconut cream. This gives a rich, creamy taste while keeping it light. You can also use cashew cream for a nutty flavor. Both swaps keep the dish delicious and creamy. For a gluten-free version, look for gluten-free gnocchi. Many brands offer this option now. Just check the package to make sure it fits your needs. For vegan adaptations, skip the Parmesan cheese. You can use nutritional yeast for a cheesy flavor. It adds a nice depth without any animal products. This way, everyone can enjoy this dish! To store leftovers, first let the gnocchi cool. Use an airtight container to keep them fresh. Place a piece of parchment paper between layers if you stack them. This helps avoid sticking. Store in the fridge for up to three days. When reheating, use a skillet over medium heat. Add a splash of water or cream to keep it moist. Stir gently until heated through. You can also microwave it, but add a little liquid to prevent drying out. Cover with a lid or a paper towel to trap steam. To freeze the dish, first let it cool completely. Use a freezer-safe container or bag. Divide into single servings for easy meals later. Make sure to remove as much air as possible to avoid freezer burn. When you want to enjoy it again, thaw in the fridge overnight. Reheat in a skillet, adding a splash of cream or broth for creaminess. You can also microwave it, stirring every couple of minutes until hot. Enjoy your creamy tomato spinach gnocchi anytime! How to make the dish spicier? You can add red pepper flakes to the sauce. Start with a pinch. Taste and add more if needed. You can also use spicy sausage in place of garlic for a kick. Can I use fresh tomatoes instead of canned? Yes, you can use fresh tomatoes. Dice about 3-4 medium ripe tomatoes. Cook them down until they break apart. This adds bright flavor but may take longer. What is the best way to store unused gnocchi? Store unused gnocchi in a sealed container in the fridge. Use them within 2-3 days for best taste. You can also freeze uncooked gnocchi. Spread them on a tray, freeze, and then transfer to a bag. This blog post shared a tasty gnocchi recipe packed with flavor and easy steps. You learned about the key ingredients, like fresh spinach and rich cream, that create a creamy sauce. We covered a simple cooking method to prevent common mistakes and suggested fun variations for diets. Don’t forget storage tips for leftovers and answers to your common questions. Enjoy making this simple, yet delicious dish that will surely impress anyone you serve it to!

Creamy Tomato Spinach Gnocchi One Pot Delight

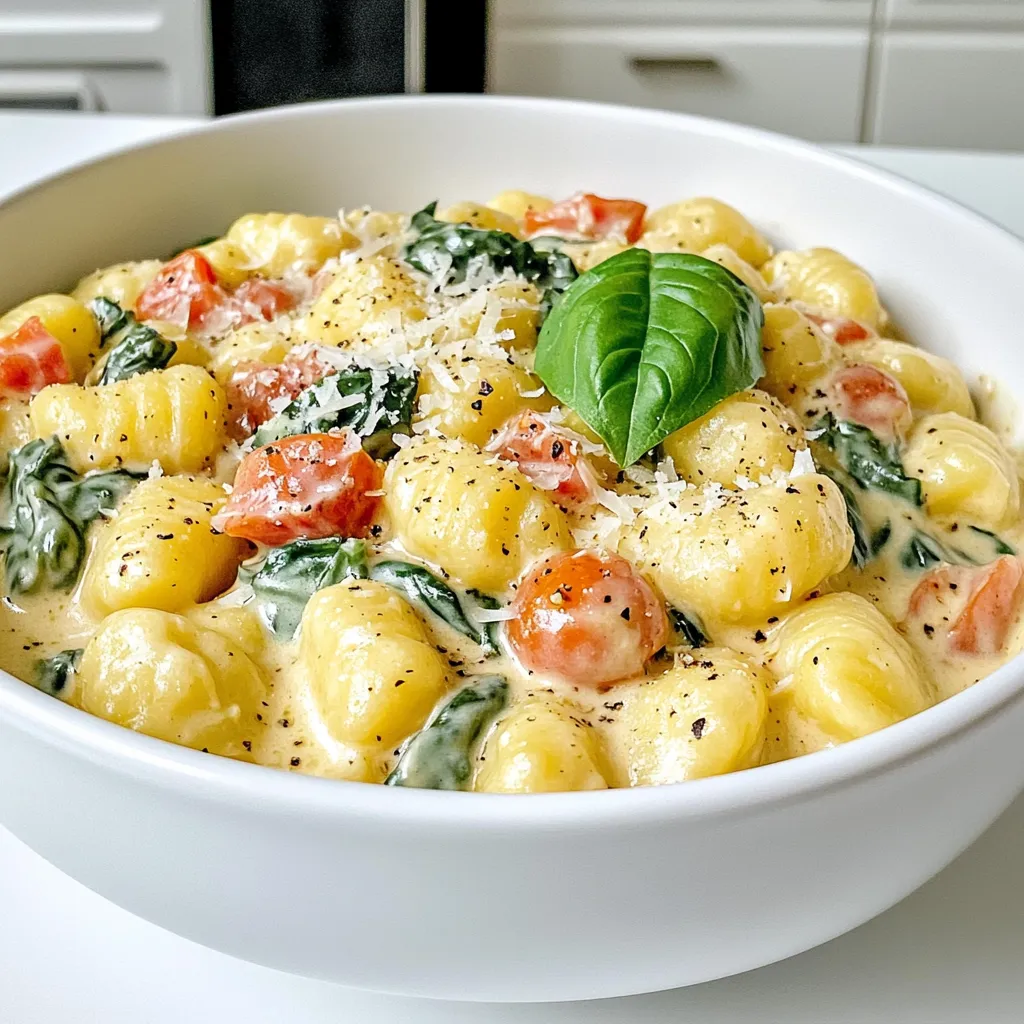
Welcome to my kitchen! Today, I’m excited to share my creamy Tomato Spinach Gnocchi that you can make in just

- 1 pound large shrimp, peeled and deveined - 4 tablespoons unsalted butter, melted - 4 cloves garlic, minced - 1 teaspoon paprika - 1 tablespoon lemon juice - Salt and pepper, to taste - 1 teaspoon fresh parsley, chopped - Lemon wedges, for serving Gathering your ingredients is key to making garlic butter shrimp in the air fryer. First, I use large shrimp. They are sweet and juicy, perfect for this dish. I peel and devein them to make eating easy. Next, I melt unsalted butter. It adds richness and flavor. I finely mince garlic. Fresh garlic brings an aromatic punch to the dish. I combine the garlic with paprika, lemon juice, salt, and pepper. Paprika gives a warm color and a slight kick. The lemon juice brightens the entire dish. For the finishing touch, I chop fresh parsley to sprinkle on top. It adds a fresh taste and a nice pop of color. Finally, I serve lemon wedges on the side. They add a zesty twist when squeezed over the shrimp. With these simple ingredients, you can create a flavorful delight that impresses everyone! - In a large bowl, combine melted butter, minced garlic, paprika, lemon juice, salt, and pepper. - Mix well until all ingredients blend smoothly. - Add the peeled and deveined shrimp to the bowl. Toss them in the garlic butter mixture until they are evenly coated. - Let the shrimp marinate for about 15 minutes to soak in the flavors. - Preheat your air fryer to 400°F (200°C) for about 5 minutes. - Once it is hot, arrange the marinated shrimp in a single layer in the air fryer basket. - Avoid overcrowding; you may need to cook in batches. - Cook the shrimp for 6-8 minutes. - Shake the basket halfway through to ensure even cooking. - The shrimp will turn pink and opaque when done. - Remove them from the air fryer and sprinkle with chopped fresh parsley for added flavor. - Serve immediately with lemon wedges on the side. Letting shrimp marinate for 15 minutes is key. This step allows the shrimp to soak up the flavors. The garlic and butter blend with the shrimp, making every bite tasty. If you don’t have lemon juice, try vinegar or lime juice. Both add a fresh kick without losing flavor. When cooking shrimp, spread them in a single layer in the air fryer basket. This helps them cook evenly. If the shrimp are crowded, they may steam instead of fry. Adjust the cooking time based on shrimp size. Larger shrimp may need a minute or two more. Garlic butter shrimp pairs well with many side dishes. Try serving it with rice, pasta, or a simple salad. You can also get creative with garnishing. Fresh herbs like parsley or chives add color and flavor. A sprinkle of paprika or a squeeze of lemon juice can enhance the dish even more. {{image_2}} You can spice things up in many ways. For a kick, try adding red pepper flakes. This will give your garlic butter shrimp some heat. If you crave a different flavor, go for an Asian twist. Use soy sauce instead of salt for a unique taste. Both options bring new life to this classic dish. If you want a lighter meal, swap butter for olive oil. It still tastes great and makes it healthier. Now, let’s talk about shrimp. You can use fresh or frozen shrimp. Fresh shrimp often taste better, but frozen shrimp are super convenient. Both types work well, so choose what fits your needs. Get creative with how you serve your shrimp! You can make tasty tacos with the garlic butter shrimp. Just add some fresh veggies and a drizzle of sauce. If you prefer something heartier, serve the shrimp over rice or pasta. This makes a full meal that is satisfying and delicious. To store leftover garlic butter shrimp, let them cool first. Place the shrimp in a shallow, airtight container. This helps keep them fresh. You can also use a resealable bag. Squeeze out any extra air before sealing. Store the shrimp in the fridge for up to three days. The best way to reheat garlic butter shrimp is in the air fryer. Set the air fryer to 350°F (175°C). Heat for about 4-5 minutes, shaking halfway. This keeps the shrimp tender and juicy. You can also use a microwave. Heat in short bursts to avoid overcooking. A skillet works, too; just heat gently over low heat. You can freeze garlic butter shrimp, but there are some tips. Make sure to store them in a freezer-safe container. Use a vacuum sealer if you have one. This helps avoid freezer burn. For best results, eat the shrimp within three months. When you’re ready to eat, thaw the shrimp in the fridge overnight. This helps keep the flavor intact. Avoid using hot water for thawing, as it can change the texture. It takes about 6-8 minutes to cook shrimp in an air fryer at 400°F (200°C). The time can change based on the size of the shrimp. Larger shrimp might take a bit longer, while smaller shrimp will cook faster. It’s key to check them at the 6-minute mark. They should be pink and opaque when done. Yes, you can use frozen shrimp! Just make sure to thaw them first. To thaw, place the shrimp in a bowl of cold water for about 15-20 minutes. After thawing, drain and pat them dry. This step ensures the garlic butter mixture sticks well to the shrimp. Garlic butter shrimp pairs well with many sides. Consider serving it with: - Steamed rice for a simple base. - Garlic bread for a flavorful touch. - A fresh salad for crunch. - Zucchini noodles for a lighter option. - Roasted vegetables for added nutrition. These sides enhance the meal and make it even more delicious! In this blog post, we explored how to make delicious garlic butter shrimp. We covered the key ingredients, preparation steps, and air frying techniques. I shared tips on marinating, cooking, and serving to enhance flavor. You can also try variations or make healthy alternatives. Remember, storing and reheating shrimp properly keeps it fresh. Enjoy your tasty shrimp, paired perfectly with your favorite sides. Simple steps lead to a great meal that everyone will love. Happy cooking!

Garlic Butter Shrimp Air Fryer Flavorful Delight

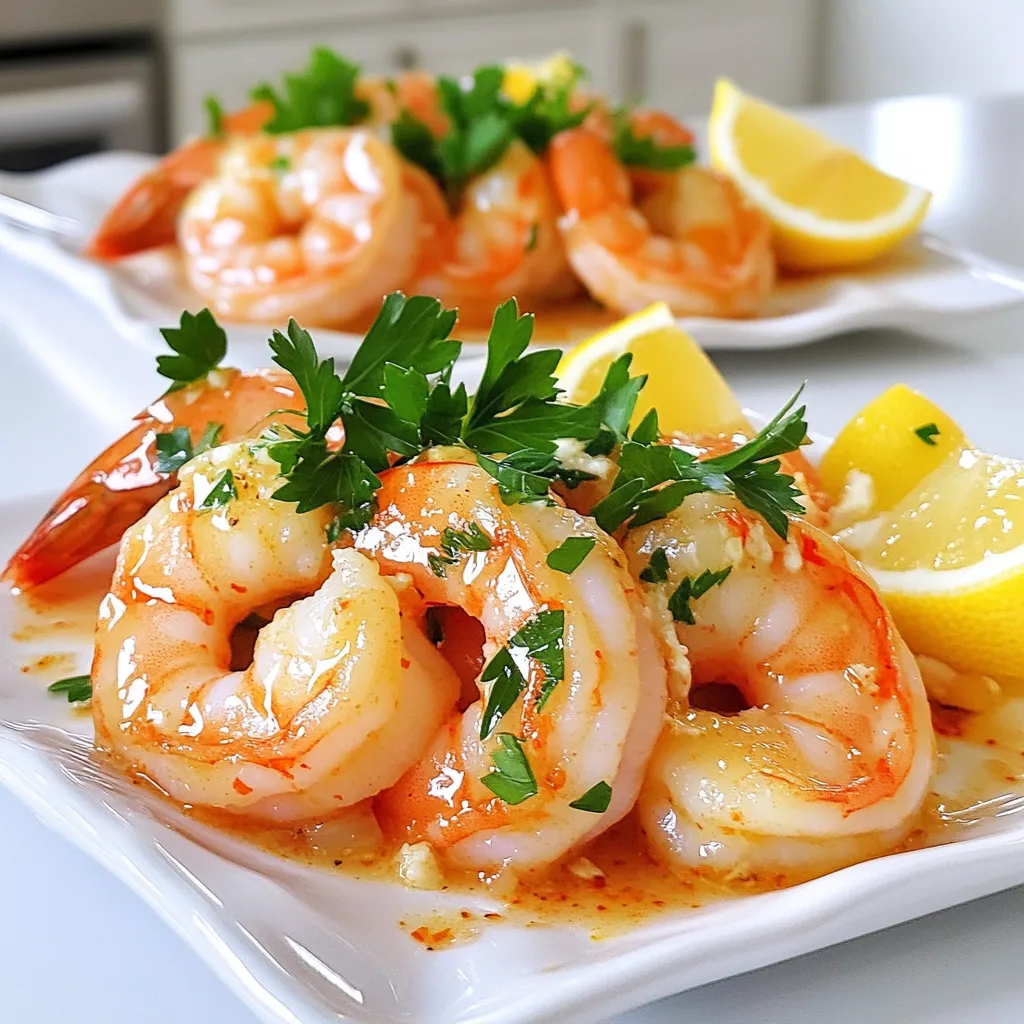
If you crave a meal that’s quick, tasty, and sure to impress, you’ve found it! Garlic Butter Shrimp made in

To make this tasty Broccoli Cheddar Mac, you need: - 2 cups elbow macaroni - 4 cups broccoli florets (fresh or frozen) - 2 cups sharp cheddar cheese, shredded - 1 cup cream cheese, softened - 3 cups vegetable broth - 1 cup milk - 1 teaspoon garlic powder - 1 teaspoon onion powder - Salt and pepper to taste - 1/2 cup breadcrumbs (optional for topping) - 2 tablespoons olive oil When measuring dry ingredients like macaroni and cheese, use a dry measuring cup. Spoon the ingredient into the cup and level it off with a straight edge. For liquids, use a clear measuring cup. Pour until the liquid reaches the right line. This way, you get the right amount for your dish. Accurate measurements help your mac and cheese turn out just right! If you need to swap some ingredients, here are a few ideas: - You can use gluten-free elbow macaroni if you want a gluten-free version. - Any cheese works if you want a different flavor. Try gouda or mozzarella! - For a creamier sauce, you can add more cream cheese or use sour cream. - If you do not have vegetable broth, chicken broth works too. These swaps still keep the dish delicious! First, cook the elbow macaroni. Follow the package directions. Boil water in a large pot. Add the macaroni and cook until al dente. This means it should still have a slight bite. Drain the macaroni well and set it aside. Next, grab your slow cooker. Pour in the vegetable broth and milk. Add the cream cheese, garlic powder, and onion powder. Stir well until the cream cheese blends nicely. Now, it’s time for the macaroni! Add the cooked macaroni and broccoli florets. Sprinkle in half of the shredded cheddar cheese. Mix everything together until it's well combined. Season with salt and pepper to taste. Cover the slow cooker and set it on low. Cook for 2-3 hours. Stir once halfway through for even cooking. In the last 30 minutes, add the remaining cheddar cheese on top. Cover the slow cooker again to let it melt. If you want a crunchy topping, toast the breadcrumbs in olive oil. Once done, gently stir the mac and cheese. Serve in bowls and top with breadcrumbs for extra texture. Enjoy your creamy broccoli cheddar mac! To boost the taste of your Broccoli Cheddar Mac, use seasonings wisely. Garlic powder and onion powder add depth. You can also try adding a pinch of smoked paprika for a smoky flavor. If you like a little heat, sprinkle in some red pepper flakes. Always taste and adjust the seasoning as you cook. This will help you find the right balance for your palate. Both frozen and fresh broccoli work well in this recipe. Fresh broccoli gives a crisp bite and vibrant color. Frozen broccoli is convenient and cooks down nicely. If you use frozen broccoli, no need to thaw it first. Just add it straight to the slow cooker. This saves time and keeps the dish easy. Choose what suits your needs best. One common mistake is overcooking the macaroni. Cook it al dente before adding it to the slow cooker. This way, it won’t turn mushy. Another tip is not to skip the salt and pepper. They enhance all the flavors in the dish. Lastly, be sure to stir halfway through cooking. This helps mix everything well and avoids sticking. Following these tips will lead you to a creamy, delicious meal every time. {{image_2}} You can easily add protein to your Broccoli Cheddar Mac. Chicken or sausage works great. Cook the chicken first. Dice it into small pieces. Add it to the slow cooker with the other ingredients. If you use sausage, try Italian sausage for a tasty kick. Brown it in a pan before adding. This step adds rich flavor and makes it more filling. Switching up the cheese can change the taste. Try using Gouda for a smoky flavor. Mozzarella gives a creamy texture. You can even mix different cheeses. Use half cheddar and half Monterey Jack. This mix will melt beautifully and add depth. Experiment with what you like. Cheese lovers will enjoy this creativity! You can make this dish vegetarian or vegan easily. For a vegetarian option, skip the meat and add more veggies. Peas, spinach, or bell peppers pair well. For vegan mac, use plant-based cheese and cream. Substitute the cream cheese with a vegan spread. Use almond milk or oat milk instead of regular milk. This way, you keep the creamy texture and enjoy a plant-based meal. To keep your Broccoli Cheddar Mac fresh, store it in an airtight container. Make sure it cools down before sealing. Place it in the fridge within two hours of cooking. It will stay fresh for about 3-5 days. Always label the container with the date to track freshness. When you reheat, use the microwave or stovetop. For the microwave, put it in a bowl and add a splash of milk. Heat it for 1-2 minutes, stirring halfway. For stovetop, warm it in a pan over low heat. Again, add a bit of milk to keep it creamy. Stir often to prevent sticking. If you want to freeze it, let it cool completely. Then, portion it out into freezer-safe bags or containers. Remove excess air before sealing. It can last up to 3 months in the freezer. To thaw, place it in the fridge overnight before reheating. You can store Broccoli Cheddar Mac in the fridge for about 3 to 5 days. Make sure to keep it in an airtight container to maintain its freshness. If you want to enjoy it later, just reheat it on the stove or in the microwave. Stir in a little milk if it seems dry. Yes, you can make this recipe without a slow cooker! Just cook the macaroni as directed. Then, in a large pot, combine the vegetable broth, milk, cream cheese, and spices over medium heat. Stir until smooth, then mix in the broccoli and macaroni. Cook until heated through, adding cheese at the end. This method takes about 20 minutes. Broccoli Cheddar Mac pairs well with many sides. You can serve it with a simple green salad for freshness. Garlic bread adds a nice crunch. For protein, grilled chicken or baked fish make great options. You can also serve it alongside roasted vegetables for a colorful plate! We explored everything you need for making Broccoli Cheddar Mac. We reviewed ingredients, listed measuring tips, and offered substitutions. I shared clear steps for cooking and included tips to boost flavor. You learned ways to adapt the recipe, manage leftovers, and reheat properly. Now, you have all the tools to create a delicious meal. Enjoy your cooking, and remember to experiment with flavors. Happy eating!

Broccoli Cheddar Mac Slow Cooker Delightful Recipe

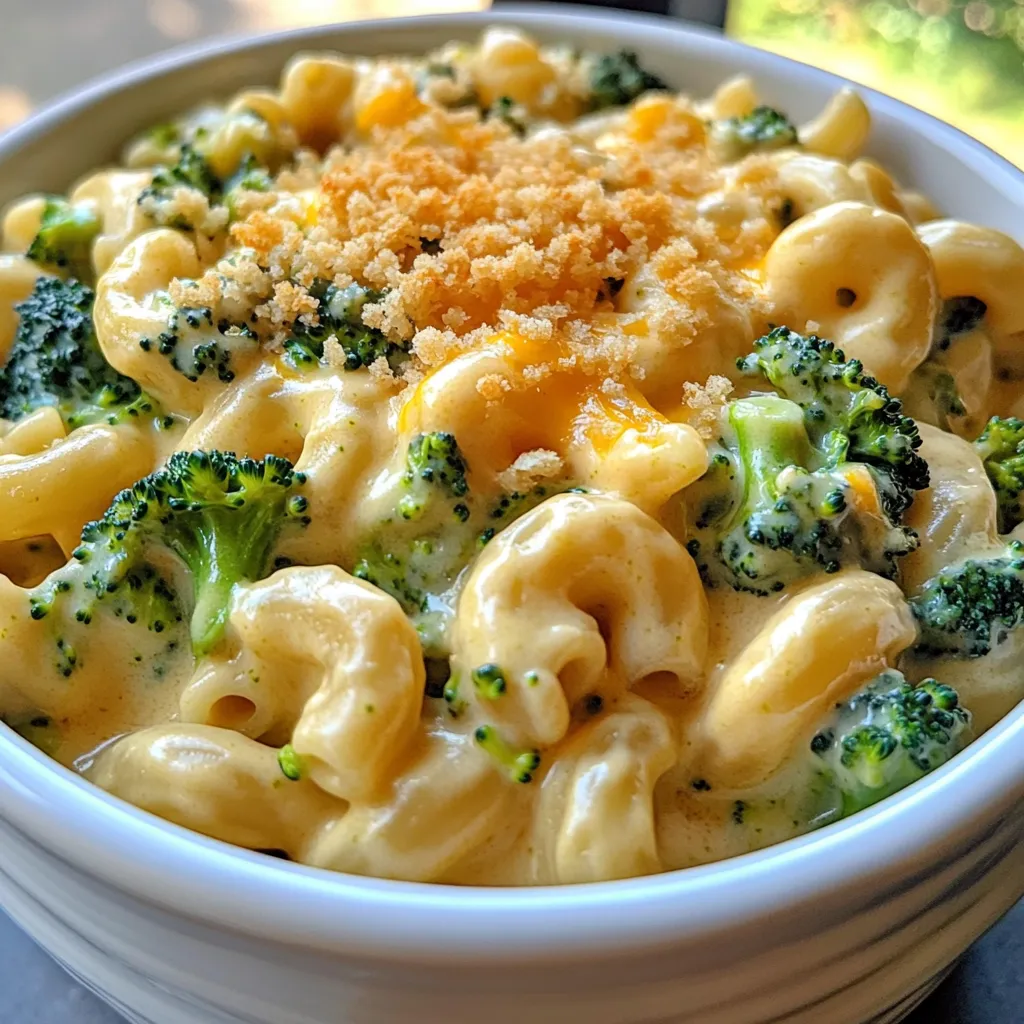
If you’re craving a creamy, dreamy dish that’s easy to make, you’re in the right place! My Broccoli Cheddar Mac

To make Beef Teriyaki Noodles, you need fresh and tasty ingredients. Each one plays a key role in the dish’s flavor and texture. - 400g beef sirloin, thinly sliced - 200g egg noodles - 2 tablespoons vegetable oil - 1 red bell pepper, sliced - 1 cup snap peas - 3 green onions, chopped - 3 cloves garlic, minced - 1 tablespoon ginger, grated - ¼ cup soy sauce - 2 tablespoons honey - 1 tablespoon rice vinegar - 1 teaspoon sesame oil - Sesame seeds for garnish - Salt and pepper to taste When you shop, look for bright colors in your vegetables. The bell pepper should be firm and shiny. Snap peas should snap easily when bent. For beef, choose sirloin with a rich red color and good marbling. This fat gives flavor and keeps the meat juicy. Always check the sell-by date for freshness. First, bring a large pot of salted water to a boil. This step is key. Add 200g of egg noodles to the pot. Cook them according to the package instructions. Usually, this takes about 5-7 minutes. Once cooked, drain the noodles. Rinse them under cold water to stop the cooking process. This keeps them from getting mushy. Set them aside while you prepare the other ingredients. In a small bowl, mix together the teriyaki sauce. Combine ¼ cup of soy sauce, 2 tablespoons of honey, 1 tablespoon of rice vinegar, and 1 teaspoon of sesame oil. Stir well until all the ingredients blend. This sauce will give your dish that rich, sweet flavor. Set it aside for later use. Now, it’s time to cook the beef. Heat 1 tablespoon of vegetable oil in a large skillet or wok over medium-high heat. Add 400g of thinly sliced beef sirloin. Cook it for about 2-3 minutes, until it browns nicely. Season it with salt and pepper for flavor. Once cooked, remove the beef from the skillet and set it aside. Next, add the remaining tablespoon of oil to the same skillet. Add 3 cloves of minced garlic and 1 tablespoon of grated ginger. Sauté for about 30 seconds. Then, add 1 sliced red bell pepper and 1 cup of snap peas. Cook for another 3-4 minutes. You want them tender but still crisp. Now, return the cooked beef to the skillet. Add the reserved noodles next. Pour the teriyaki sauce over the beef and noodles. Toss everything well to combine. Cook for an additional 2-3 minutes. This allows the sauce to heat through and thicken slightly. Finally, remove the dish from heat. Garnish with 3 chopped green onions and sesame seeds before serving. Enjoy your delicious meal that’s better than takeout! To keep your beef tender, slice it thinly against the grain. This breaks down the muscle fibers. Marinating the beef for 15-30 minutes in soy sauce can also help. The salt in the soy sauce works to soften the meat. Use a hot skillet to quickly sear the beef. This locks in juices and keeps it moist. Avoid overcooking; just a few minutes on each side is enough. For perfectly cooked egg noodles, follow the package instructions closely. Start with boiling salted water. This adds flavor to the noodles. Cook them until they are al dente, which means firm to the bite. Drain the noodles and rinse them under cold water. This stops the cooking process and prevents sticking. Toss them with a little oil if you like. This helps keep them separate. You can add more flavor by including different veggies. Try mushrooms, broccoli, or carrots for extra crunch and taste. Adding chili flakes gives a spicy kick. You can also mix in sesame seeds for a nutty flavor. If you love a bit of sweetness, throw in pineapple chunks. This balances well with the salty teriyaki sauce. Adjust these add-ins based on your taste. Feel free to get creative! {{image_2}} You can switch out the beef for other proteins. Chicken, shrimp, or tofu work great. Just slice them thin for even cooking. Each option gives a unique flavor. For example, shrimp adds a sweet taste. Tofu brings a soft texture that soaks up the sauce well. Feel free to change the veggies based on what you like. Broccoli, carrots, or zucchini can fit perfectly. You can even toss in mushrooms for an earthy flavor. Make sure to cut them into bite-sized pieces. This keeps the stir-fry quick and easy. To make this dish gluten-free, swap the soy sauce for tamari. Tamari has a similar taste but is safe for gluten-free diets. You can also use rice noodles instead of egg noodles. This keeps the dish tasty and healthy for everyone. To keep your beef teriyaki noodles fresh, store them in an airtight container. Let the dish cool to room temperature before sealing. This helps avoid moisture build-up, which can make your noodles soggy. Place the container in the fridge. Your leftovers will stay good for up to three days. When you’re ready to enjoy your leftovers, use a skillet for best results. Heat a bit of oil over medium heat, then add the noodles. Stir them gently to warm through. This way, you keep the texture nice and avoid overcooking. You can also add a splash of water for steam if needed. Microwaving is fine too; just cover the dish and heat in short bursts, stirring in between. If you want to make extra for later, freezing is a good option. First, let the dish cool. Then, portion it into freezer-safe bags or containers. Remove as much air as possible from the bags to prevent freezer burn. Label each bag with the date. Beef teriyaki noodles can last in the freezer for about three months. When you’re ready to eat, thaw overnight in the fridge and follow the reheating tips above. Yes, you can use other noodles. Rice noodles or soba noodles work great. Each type adds a unique taste and texture. Just remember to adjust the cooking time. Always check the package for instructions. Making teriyaki sauce is simple. You need soy sauce, honey, rice vinegar, and sesame oil. - Ingredients: - ¼ cup soy sauce - 2 tablespoons honey - 1 tablespoon rice vinegar - 1 teaspoon sesame oil Mix these in a bowl and stir until combined. This sauce adds a sweet and savory taste to your dish. You can serve many sides with beef teriyaki noodles. Here are a few ideas: - Steamed broccoli - Fried rice - A fresh cucumber salad These sides add color and balance to your meal. You can easily change this recipe for different diets. Here are some tips: - Gluten-Free: Use gluten-free soy sauce. - Low-Carb: Swap noodles for zucchini noodles or cauliflower rice. - Vegetarian/Vegan: Replace beef with tofu or tempeh. These changes still keep the dish tasty and satisfying. To make beef teriyaki noodles, I shared key ingredients, cooking steps, and storage tips. You learned how to pick fresh beef and veggies. I covered noodle cooking, sauce prep, and stir-frying techniques. You can enjoy fun variations with different proteins or gluten-free options. If you store and reheat leftovers right, your dish stays tasty. Now, get cooking! Enjoy this simple yet delicious meal at home. Happy eating!

Beef Teriyaki Noodles Better Than Takeout Delight

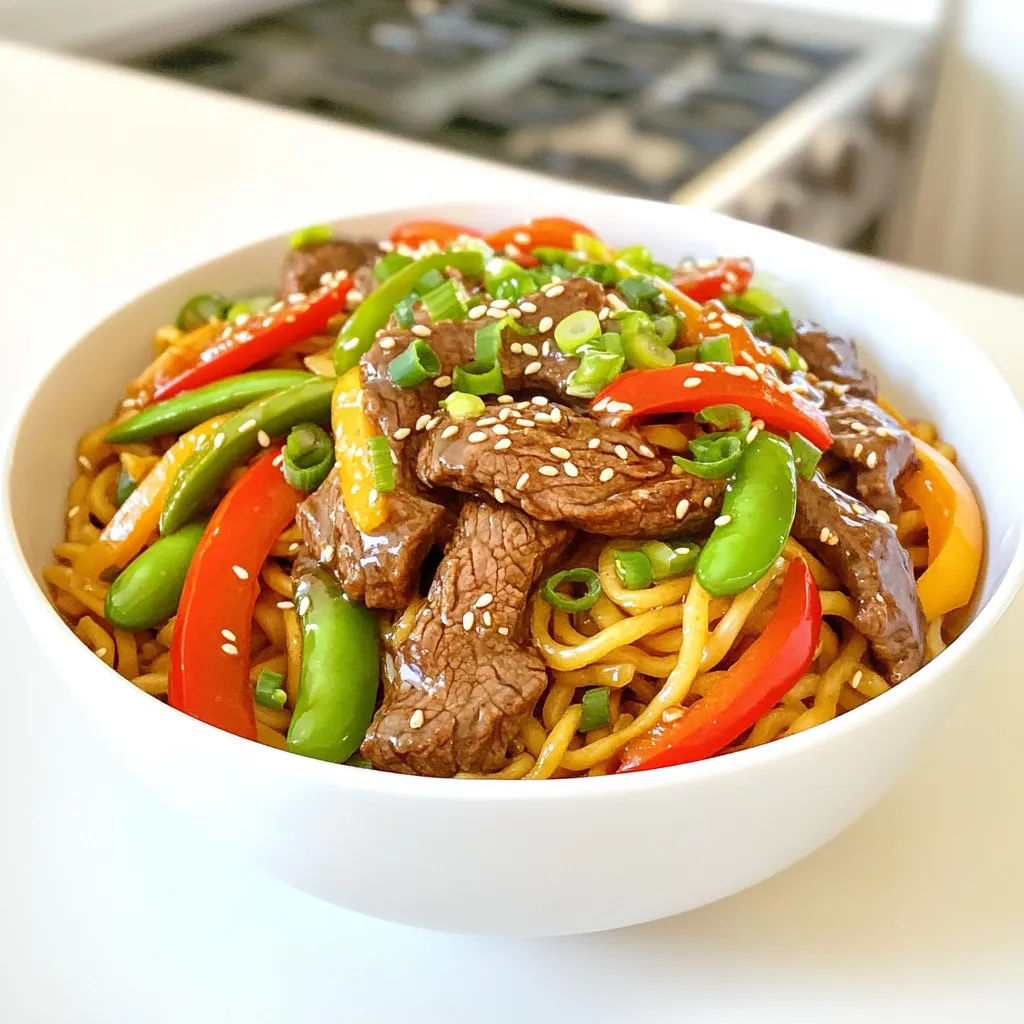
Craving a delicious meal that rivals your favorite takeout? Look no further! My Beef Teriyaki Noodles Better Than Takeout Delight

- 4 chicken thighs, bone-in and skin-on - 4 medium potatoes, diced into cubes - 6 cloves garlic, minced - 3 tablespoons olive oil Chicken thighs give a rich flavor. I love the crispy skin when cooked right. Potatoes add heartiness and soak up all the tasty juices. Garlic brings a punch of flavor that makes this dish shine. Olive oil helps with cooking and adds a nice finish. - 2 teaspoons dried thyme - 2 teaspoons dried rosemary - 1 teaspoon paprika - 1 lemon, zested and juiced Thyme and rosemary add a lovely herbal note. Paprika gives a hint of warmth and color. Lemon zest and juice brighten the dish, balancing the rich flavors. This mix creates a flavorful harmony that makes every bite special. - Fresh parsley, chopped (for garnish) - Salt and pepper, to taste Fresh parsley not only adds color but also freshness. Adjust salt and pepper to your taste. This final touch makes the dish pop and enhances the overall experience. Enjoy the burst of flavors in every bite! - Preheat your oven to 425°F (220°C). - Dice the potatoes into small cubes. This helps them cook evenly. - In a bowl, combine chicken thighs with lemon zest and juice. - Add salt and pepper to the chicken. Mix well to coat it fully. - Spread the seasoned potatoes evenly across a large sheet pan. - Place the chicken thighs on top of the potatoes, skin side up. - Roast the pan in the oven for 30 to 35 minutes. The chicken should reach 165°F (75°C) internally, and the potatoes should be golden and tender. To ensure even cooking, cut your potatoes into uniform cubes. This helps them cook at the same rate. Arrange the chicken thighs on top of the potatoes. This way, the chicken drips its juices down, adding flavor. For crispy skin, start with dry chicken thighs. Pat them with paper towels before seasoning. The dry skin will crisp up nicely in the oven. Baking at a high temperature of 425°F (220°C) also helps achieve that golden brown finish. You can boost flavor by adding more herbs. Try fresh thyme or rosemary if you have them. You can also add spices like onion powder or black pepper for extra depth. Balancing acidity is key, so use lemon wisely. The zest adds brightness, while the juice cuts through the richness. This balance makes every bite taste fresh and lively. For the best results, use a heavy-duty sheet pan. It helps with heat distribution and browning. If you have a rimmed baking sheet, that works great too. You can also use a baking dish if you prefer. A shallow dish allows for better air flow, helping the chicken and potatoes to roast evenly. Whichever you choose, make sure it fits all your ingredients without crowding. {{image_2}} You can easily swap chicken thighs for chicken breast or drumsticks. Chicken breast cooks faster, so check it early. Drumsticks give a juicy bite and add flavor. For a vegetarian option, try tofu. Press and cube firm tofu. Marinate it like chicken for a tasty meal. Feel free to add more veggies. Carrots, bell peppers, and zucchini work great. They roast nicely and soak up flavor. You can also swap in seasonal vegetables. In fall, use butternut squash. In summer, toss in fresh corn. Each swap brings new flavors and colors. Mix up the seasonings for a twist. An Italian herb blend adds a nice touch. Use basil, oregano, and thyme for a fresh taste. For heat, try adding chili flakes. This spicy version wakes up the dish and adds depth. Feel free to play with flavors to match your mood! To store leftovers, let them cool completely. Place the chicken and potatoes in a shallow dish. Cover it tightly with plastic wrap or a lid. You can also use airtight containers. This keeps out air and moisture. Use glass or plastic containers that seal well. This helps the food last longer in the fridge. You can store them for up to three days. If you want to save some for later, freezing is a great option. Divide the meal into portions. Use freezer-safe bags or containers. Remove as much air as possible to prevent freezer burn. Thaw the chicken and potatoes in the fridge overnight before cooking. To reheat, use the oven or microwave. Make sure the food is heated to 165°F (75°C) before eating. For the best taste, eat leftovers within three days. When freezing, use within three months. Always check for signs of spoilage. Look for any off smells or changes in color. If the chicken feels slimy or the potatoes look brown, throw them away. Keeping food in good condition is key to enjoying your meal later. Yes, you can use boneless chicken thighs. They cook faster than bone-in thighs. Reduce the cooking time to about 25-30 minutes. Always check the chicken for doneness to be safe. You can check if the chicken is cooked through by using a meat thermometer. The internal temperature should reach 165°F (75°C). This ensures the chicken is safe to eat. If you don’t have a thermometer, make a cut in the thickest part. The juices should run clear, not pink. Many sides go well with this dish. Try steamed green beans or roasted carrots. A fresh salad adds a nice crunch. For salads, consider a simple mixed green salad. You can also serve dips like tzatziki or hummus on the side for extra flavor. This recipe for Garlic Herb Chicken and Potatoes is simple yet satisfying. We explored key ingredients like chicken thighs, potatoes, and herbs that add flavor. I shared step-by-step instructions to guide you through the cooking process. Tips for perfecting the dish and ideas for variations help keep things fresh. Don't forget to store leftovers properly to enjoy later. Happy cooking! You’ll impress yourself and others with this meal.

Garlic Herb Chicken and Potatoes Sheet Pan Delight

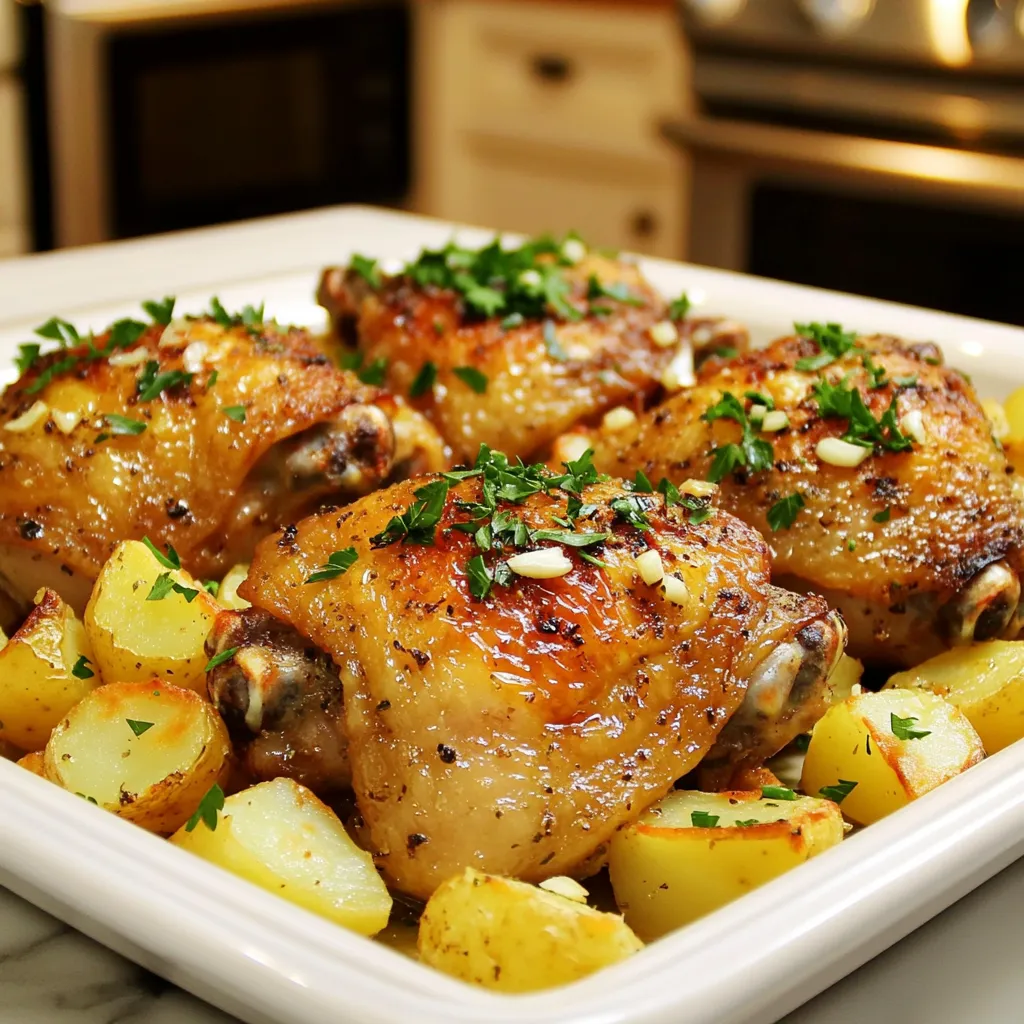
Craving a simple yet flavorful meal? Look no further than my Garlic Herb Chicken and Potatoes Sheet Pan Delight! This

- 1 ½ cups all-purpose flour - 1 teaspoon baking powder - 1 teaspoon baking soda - ½ teaspoon salt - 1 teaspoon ground cinnamon - ½ teaspoon ground nutmeg - ½ teaspoon ground ginger - ½ cup granulated sugar - ½ cup brown sugar, packed - ½ cup vegetable oil - 3 large eggs - 1 cup pumpkin puree (canned or fresh) - 1 teaspoon vanilla extract - 8 oz cream cheese, softened - ½ cup unsalted butter, softened - 3 cups powdered sugar - 1 teaspoon vanilla extract - A pinch of salt Gathering your ingredients is key for success. I love to lay everything out before I start. This way, I know I have all I need. For dry ingredients, you mix flour, baking powder, baking soda, salt, and spices. These give your cupcakes flavor and rise. Next, for the wet ingredients, grab your sugars, oil, eggs, pumpkin puree, and vanilla. The pumpkin adds moisture and that lovely fall taste. Lastly, for the cream cheese frosting, you need cream cheese, butter, powdered sugar, vanilla, and a pinch of salt. This frosting is rich and pairs perfectly with the pumpkin cupcakes. Make sure your cream cheese and butter are soft. This helps them mix well. Now you're ready to create something delightful! Start by preheating your oven to 350°F (175°C). This step is key for even baking. Line a muffin tin with cupcake liners. This makes it easier to take out the cupcakes later. In a medium bowl, whisk together the dry ingredients. This includes 1 ½ cups of all-purpose flour, 1 teaspoon of baking powder, 1 teaspoon of baking soda, and ½ teaspoon of salt. Add in 1 teaspoon of ground cinnamon, ½ teaspoon of ground nutmeg, and ½ teaspoon of ground ginger. Mix this well and set it aside. In a large bowl, whisk together the sugars and oil. You need ½ cup of granulated sugar and ½ cup of packed brown sugar. Then, add ½ cup of vegetable oil. Mix until well combined. Add 3 large eggs, one at a time. Stir well after each egg. Then, mix in 1 cup of pumpkin puree and 1 teaspoon of vanilla extract until smooth. Gradually add the dry mix to the wet mix. Fold it in gently until just combined. Be careful not to overmix; some lumps are fine. This helps keep the cupcakes light and fluffy. Evenly pour the batter into the muffin tin. Fill each cup about two-thirds full. This allows room for the cupcakes to rise while baking. Place the muffin tin in your preheated oven. Bake for 18-20 minutes. A toothpick should come out clean when inserted into the center. After baking, let them cool in the pan for 5 minutes. Then, transfer them to a wire rack to cool completely. In another bowl, mix together the softened cream cheese and unsalted butter. Use a hand mixer or stand mixer for the best results. Add 8 oz of cream cheese and ½ cup of softened butter. Mix until smooth. Gradually add 3 cups of powdered sugar. Beat on low speed to avoid a sugar cloud. Add 1 teaspoon of vanilla extract and a pinch of salt. Mix until fluffy. Once the cupcakes are cool, frost each one generously. Use a spatula or a piping bag for a nice look. The cream cheese frosting adds a rich flavor that pairs perfectly with the pumpkin. Serve the cupcakes fresh for a delightful treat. They are great for fall or any special occasion. To get the best texture for your cupcakes, focus on mixing. Mix wet and dry ingredients gently. Overmixing can make them tough. It's fine if some lumps remain. Use room-temperature eggs for a smoother batter. This helps blend everything well. And don't forget to measure your flour correctly. Too much flour will lead to dry cupcakes. Spoon the flour into your measuring cup, then level it off. Frosting can make or break your cupcakes. Start with softened cream cheese and butter. This makes blending easy and avoids lumps. Use a hand mixer for a light and airy frosting. If you want a fancy touch, use a piping bag. Try a star tip for beautiful swirls. Always frost after cupcakes cool completely. Warm cupcakes will melt the frosting. How you present your cupcakes can wow your guests. Add a sprinkle of ground cinnamon on top for flavor and flair. Use colorful cupcake liners to enhance the look. Arrange cupcakes on a decorative platter. Place small pumpkins around for a festive vibe. This simple touch makes a big impact. Get creative and enjoy the process! {{image_2}} To make these cupcakes gluten-free, swap the all-purpose flour for a gluten-free blend. Use a 1:1 mix that includes xanthan gum. This helps mimic the texture of regular flour. The rest of the recipe stays the same. You will still enjoy moist and tasty cupcakes. For a vegan version, replace eggs with flax eggs. Mix 1 tablespoon of ground flaxseed with 2.5 tablespoons of water for each egg. Use plant-based milk in place of vegetable oil. You can also swap cream cheese with a vegan cream cheese alternative for the frosting. This way, everyone can enjoy these delightful treats. You can add fun flavors to your cupcakes. Chocolate chips add sweetness and richness. Nuts, like walnuts or pecans, add crunch. Consider dried fruit, like cranberries, for a tangy touch. Just fold these into the batter before pouring it into the muffin tin. This will give each bite a tasty surprise. You can store pumpkin cream cheese cupcakes at room temperature for up to two days. Place them in an airtight container. If you want to keep them fresh, store them in the fridge. They will last about a week in the fridge. Just make sure to cover them well to keep them moist. For longer storage, freezing is a great option. First, let the cupcakes cool completely. Wrap each cupcake in plastic wrap. Then, place them in a freezer bag or a container. They can last for up to three months in the freezer. This method helps keep their flavor and texture. When you're ready to eat your frozen cupcakes, take them out of the freezer. Leave them in the fridge overnight to thaw. If you're in a hurry, you can set them at room temperature for about an hour. After they thaw, frost them if you want. Enjoy your delicious cupcakes anytime! Yes, you can use fresh pumpkin. Just make sure to cook it first. Bake the pumpkin until it is soft, then scoop it out and mash it. Use the same amount as you would for canned pumpkin. Fresh pumpkin gives a nice flavor to your cupcakes. To avoid overmixing, mix gently. After adding the dry ingredients, fold them into the wet mix. You want to combine them until just mixed. A few lumps are okay. Overmixing can make your cupcakes tough, so be careful! Store leftover cupcakes in an airtight container. Keep them in the fridge if you have cream cheese frosting. They stay fresh for about a week. You can also let them come to room temp before serving again. Yes, you can make the frosting ahead of time. Store it in the fridge in a sealed container. When you're ready to use it, just let it sit at room temp for a bit. Then, mix it again to make it smooth. In this blog post, we covered the steps to make delicious cupcakes. You learned about the dry and wet ingredients, how to mix them, and bake the cupcakes. I shared tips for perfect texture and presentation, plus options for gluten-free and vegan diets. Knowing how to store your cupcakes helps keep them fresh. Use this guide to create tasty treats for yourself or loved ones. Enjoy baking and sharing your cupcakes!

Pumpkin Cream Cheese Cupcakes Delightful and Simple

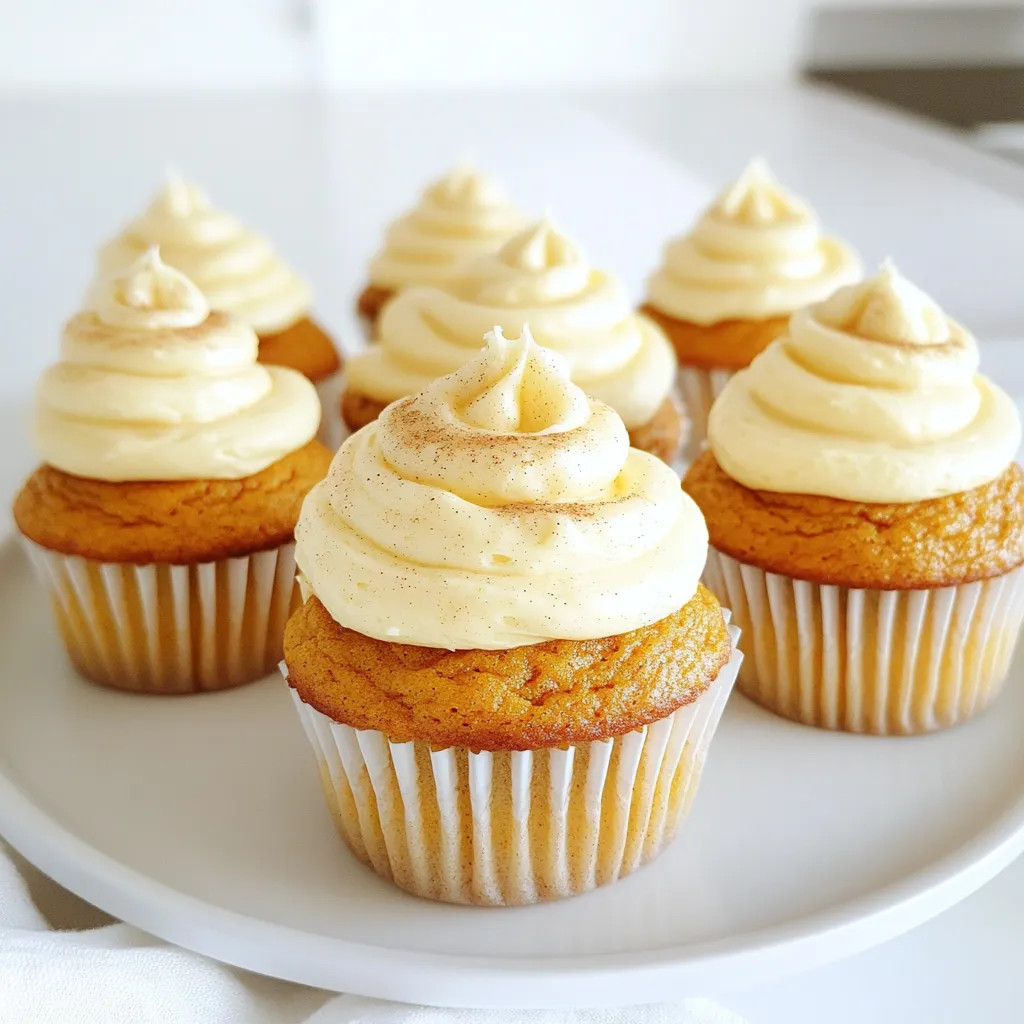
Fall is here, and that means it’s pumpkin time! You’ll love these Pumpkin Cream Cheese Cupcakes. They are easy to

For this dish, you will need: - 4 boneless chicken thighs - 2 large oranges (juiced and zested) - 3 tablespoons honey - 2 tablespoons low sodium soy sauce - 1 tablespoon olive oil - 1 teaspoon ground ginger - 1 teaspoon garlic powder - 1 teaspoon salt - ½ teaspoon black pepper These main ingredients create a tasty orange glaze. The chicken thighs bring moisture and flavor. The orange juice and zest add a bright touch that makes this dish shine. I love using colorful vegetables for this recipe. They not only taste great but also look nice on the plate. Here’s what I choose: - 2 cups broccoli florets - 1 red bell pepper, sliced - 1 yellow bell pepper, sliced - 1 medium red onion, cut into wedges These veggies cook perfectly alongside the chicken. Broccoli adds a nice crunch, while the bell peppers provide sweetness. The red onion adds depth to the flavor. To make your dish even better, consider these garnishes: - 1 tablespoon sesame seeds (optional) Sprinkling sesame seeds on top adds a nutty flavor and a bit of crunch. It also makes the dish look fancy. You can skip this step if you prefer a simpler meal. Start by washing your vegetables. Cut the red onion into wedges. Slice the red and yellow bell peppers. Then, cut the broccoli into small florets. The more colorful your veggies, the better your dish will look. This also adds great flavor. Next, gather your chicken thighs. Trim any excess fat. Make sure they are about the same size for even cooking. This prep helps everything cook well together. In a medium bowl, you will create the glaze. First, juice the two oranges. Be sure to catch any seeds. Then, add the orange zest to the juice. This adds a bright taste. Next, mix in honey, soy sauce, olive oil, ground ginger, garlic powder, salt, and black pepper. Whisk everything until it is smooth. This glaze will give your chicken and veggies a sweet and tangy flavor. Line a large baking sheet with parchment paper. This helps with easy cleanup. Place the chicken thighs on one side of the sheet. Pour half of the orange glaze over the chicken. Make sure each piece is well-coated. Now, move to the veggies. Place the broccoli, bell peppers, and onion on the other side of the sheet. Drizzle the rest of the glaze over them. Toss the veggies to coat them well. This setup makes sure every bite is packed with flavor. Now, you are ready to bake! To cook chicken just right, use boneless thighs. They stay juicy and tender. Make sure to check the internal temperature. It should reach 165°F (74°C). This ensures your chicken is safe to eat. If you want crispy skin, bake it skin side up. I recommend basting the chicken with glaze in the last few minutes for extra flavor. To boost your glaze, try adding more orange zest. Zest gives a bright flavor. You can also add a splash of rice vinegar. This adds acidity and balances the sweetness. For a bit of heat, mix in red pepper flakes. This small change can make a big difference. Keep your workspace neat while cooking. Gather all your ingredients before starting. This saves time and reduces mess. Use a large baking sheet and parchment paper for easy cleanup. After chopping veggies, place them in bowls. This keeps everything ready for the next steps. Enjoy a smooth cooking process and save time for a delicious meal! {{image_2}} You can swap chicken thighs for other proteins. Try using chicken breasts for a leaner dish. Pork tenderloin also works well; it cooks fast and absorbs flavors nicely. If you prefer a vegetarian option, tofu is a great choice. Press the tofu first to remove extra moisture. This way, it will soak up all the tasty glaze. You can change the veggies to suit your taste. Carrots add a nice sweetness when roasted. Snap peas bring a crisp texture to the dish. Zucchini slices can add a fresh flavor and cook quickly. Feel free to mix in your family’s favorite veggies. Just keep the cooking time in mind so everything cooks evenly. To change the spice level, add a pinch of red pepper flakes for heat. If you want a milder flavor, skip them altogether. You can also mix in a bit of chili sauce or Sriracha for a spicy kick. Always taste the glaze before pouring it over the chicken and veggies. Adjust it to fit your spice preference. To store leftovers, let the food cool first. Then, place the chicken and veggies in an airtight container. This keeps them fresh and safe. You can keep them in the fridge for up to three days. Make sure to label the container with the date. This way, you know when to eat it. When it's time to eat your leftovers, you can reheat them easily. The best way is to use an oven. Preheat the oven to 350°F (175°C). Place the chicken and veggies on a baking sheet. Heat for about 15-20 minutes. If you want to use a microwave, cover the dish to keep moisture in. Heat in short bursts, checking often. If you want to save the dish for later, freezing is a great option. Make sure the chicken and veggies are cool before freezing. Place them in a freezer-safe container or bag. Squeeze out as much air as possible to prevent freezer burn. You can freeze them for up to three months. When you're ready to eat, thaw them in the fridge overnight before reheating. Yes, you can use chicken breasts. They will work well, but they may dry out faster. Chicken thighs stay moist and tender. If you choose breasts, watch the cooking time closely. Cook them until they reach 165°F. You can serve this dish with rice or quinoa for a hearty meal. A fresh salad also pairs nicely. Try a simple green salad with a light dressing. It adds a crisp, refreshing touch. You can store leftovers in the fridge for up to 3 days. Just place them in an airtight container. If you want to keep them longer, consider freezing them. They can last for about 2 months in the freezer. Yes, this recipe is great for meal prep. You can make it ahead and store it in portions. It reheats well, saving you time on busy days. Just remember to cool it before storing. In this blog post, we explored how to make delicious orange glazed chicken. We looked at key ingredients, cooking steps, and helpful tips. You learned how to choose fresh veggies and add tasty garnishes. I shared variations to switch up the recipe and storage tips to save leftovers. Making this dish is simple, fun, and offers many ways to enjoy it. Get ready to make the perfect meal that brings smiles at your table!

Sheet-Pan Orange Glazed Chicken and Veggies Delight

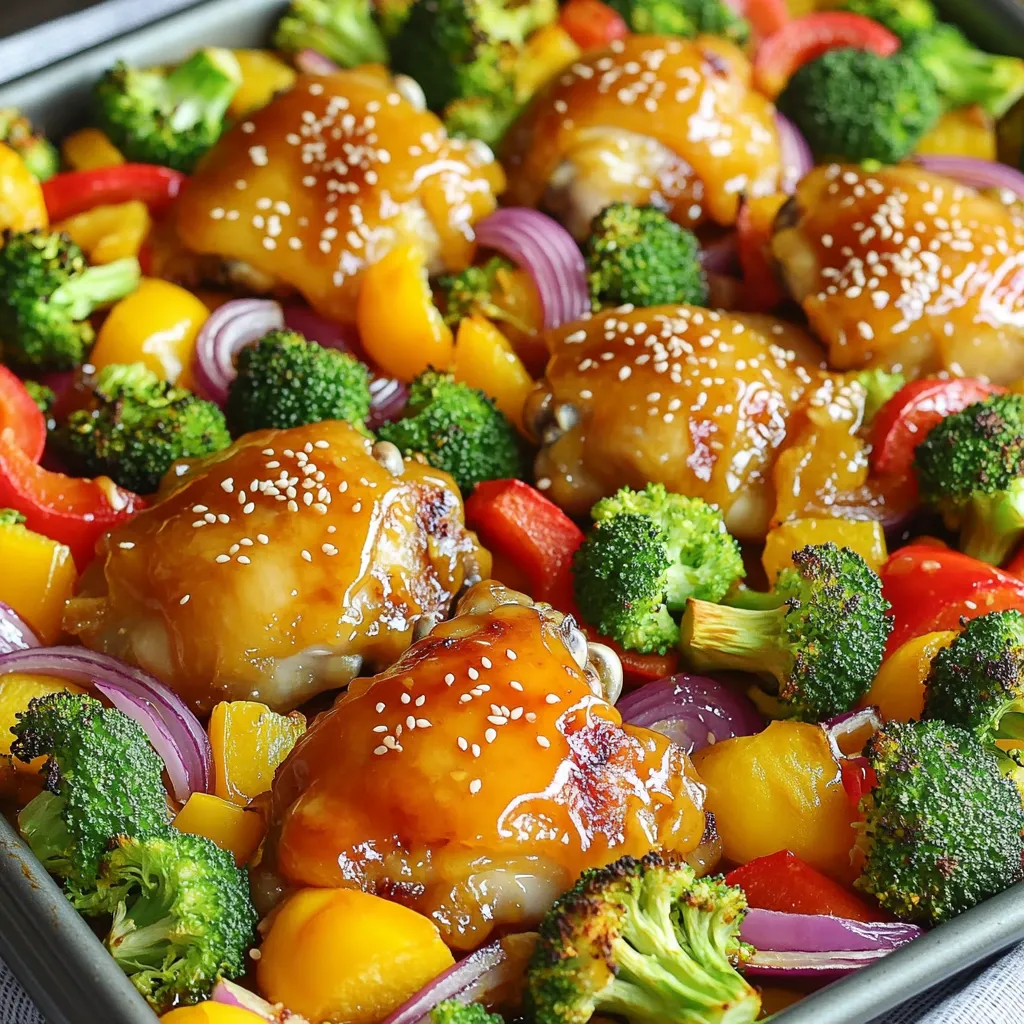
If you’re looking for a quick and tasty dinner, I’ve got just the recipe for you! My Sheet-Pan Orange Glazed

- 1 cup graham cracker crumbs - 1/4 cup unsalted butter, melted - 8 oz cream cheese, softened - 1/2 cup powdered sugar - 1 teaspoon vanilla extract - 1 cup fresh blueberries, plus extra for garnish - 1 tablespoon lemon juice - 1 cup whipped cream (store-bought or homemade) Gathering the right ingredients is key to making no-bake blueberry cheesecake bites. I love using fresh blueberries for their sweet and tangy flavor. They add brightness to the creamy filling. The graham cracker crumbs give a nice crunch, while the melted butter helps bind the crust together. Cream cheese is the heart of the filling. It creates a rich, smooth texture. Powdered sugar sweetens the mix without grittiness. A touch of vanilla extract enhances the flavor, and lemon juice adds a zing that balances the sweetness. Whipped cream makes the filling light and fluffy, giving each bite a delightful feel. - Mini muffin tin - Mixing bowls - Electric mixer or whisk - Measuring cups and spoons Having the right tools makes cooking easier and more fun. A mini muffin tin is perfect for shaping these bites. Mixing bowls help keep things organized as you prepare the crust and filling. An electric mixer or whisk is essential for blending the cream cheese and sugar until creamy and smooth. Measuring cups and spoons ensure you use the right amounts. This is crucial for getting the flavors just right. With these ingredients and tools, you are set to create a treat that everyone will love. - In a medium bowl, combine 1 cup of graham cracker crumbs and 1/4 cup of melted butter. - Mix until the crumbs look like wet sand. - Line a mini muffin tin with paper liners or spray it lightly with cooking spray. - Press about 1 tablespoon of the mixture into each muffin liner. Make sure to press down firmly to compact the crust. Set the tin aside. - In another bowl, beat 8 oz of softened cream cheese, 1/2 cup of powdered sugar, and 1 teaspoon of vanilla extract until smooth. - Next, gently fold in 1 cup of fresh blueberries and 1 tablespoon of lemon juice, keeping a few blueberries for garnish. - Finally, fold in 1 cup of whipped cream until it is fluffy and well mixed. - Spoon or pipe the cream cheese mixture evenly over the crusts in the muffin tin. - Place the tin in the refrigerator for at least 2 hours or until the bites are firm. - Once set, remove the bites from the tin and top with the reserved blueberries. Serve chilled and enjoy! To prevent cracks on the surface of your cheesecake bites, keep a few things in mind. First, mix your filling gently. Overmixing can add air, leading to cracks. Second, make sure your cream cheese is fully softened. Cold cream cheese doesn't blend well and can cause uneven texture. Lastly, chill your bites slowly. Rapid temperature changes can also lead to cracking. For optimal chilling time, I recommend refrigerating the cheesecake bites for at least two hours. This time allows the filling to set perfectly. If you can wait longer, even better! Chilling them overnight gives a firmer texture and richer flavor. Garnishing and serving your cheesecake bites can elevate their appeal. A simple way to garnish is to place a fresh blueberry on top of each bite. You can also add a sprig of mint for color and freshness. Another idea is to drizzle blueberry sauce around the platter for a touch of elegance. To enjoy the best taste, serve these bites cold. They are delightful straight from the fridge. If they sit out too long, they may lose their creamy texture. Keep them chilled until you are ready to serve for the best experience. {{image_2}} You can change the flavor of your cheesecake bites easily. Try using different fruits like strawberries or raspberries. These fruits add unique tastes and colors. You can also top your bites with chocolate or caramel. Just drizzle it on top before serving. This adds extra sweetness and a fun look. If you need a gluten-free option, switch to alternative crusts. Use crushed nuts or gluten-free cookies to make the base. This keeps the bites tasty while meeting dietary needs. For a vegan version, replace the cream cheese with plant-based cream cheese. You can still enjoy the creamy texture and flavor without dairy. To keep your cheesecake bites fresh, store them in the refrigerator. Place them in an airtight container. This helps maintain their taste and texture. If you made a big batch, you can freeze some for later. Use a freezer-safe container or wrap them tightly in plastic wrap. This keeps them from getting freezer burn. These cheesecake bites taste best within five days when stored in the fridge. If frozen, they can last up to three months. Just remember to thaw them in the fridge before enjoying. Can I use different types of cheese? Yes, you can! Cream cheese works best for this recipe. However, you can try mascarpone for a creamier taste. Just keep in mind that the texture and flavor may change. How to make it less sweet? To reduce sweetness, cut back on the powdered sugar. Start with 1/4 cup and taste as you mix. You can also add a bit of lemon juice for a fresh, tangy flavor. What meals pair well with these bites? These cheesecake bites are great as a dessert after a light meal. They go well with grilled chicken or a fresh salad. They also make a fun addition to a picnic spread. Can I make these ahead of time? Absolutely! These bites are perfect for meal prep. You can make them a day or two in advance. Just keep them in the fridge until you are ready to serve. Cheesecake bites won’t set: what to do? If they don't set, they may need more chilling time. Place them back in the fridge for another hour or two. If they still don’t firm up, check that you used enough whipped cream. Tips for fixing runny filling If your filling is too runny, add a bit more cream cheese. Mix it well. You can also try adding more whipped cream to lighten it up without making it runny. These delicious cheesecake bites are easy to make and full of flavor. Start with a graham cracker crust and blend in a creamy filling with blueberries. Follow the steps to chill and present your treats perfectly. You can even try different fruits or dietary options for variety. Always store them properly for the best taste. Enjoy making these bites for your next gathering or treat. They are fun, tasty, and sure to impress anyone who tries them. Don't hesitate to experiment and have fun in the kitchen!

No-Bake Blueberry Cheesecake Bites Delightful Treat

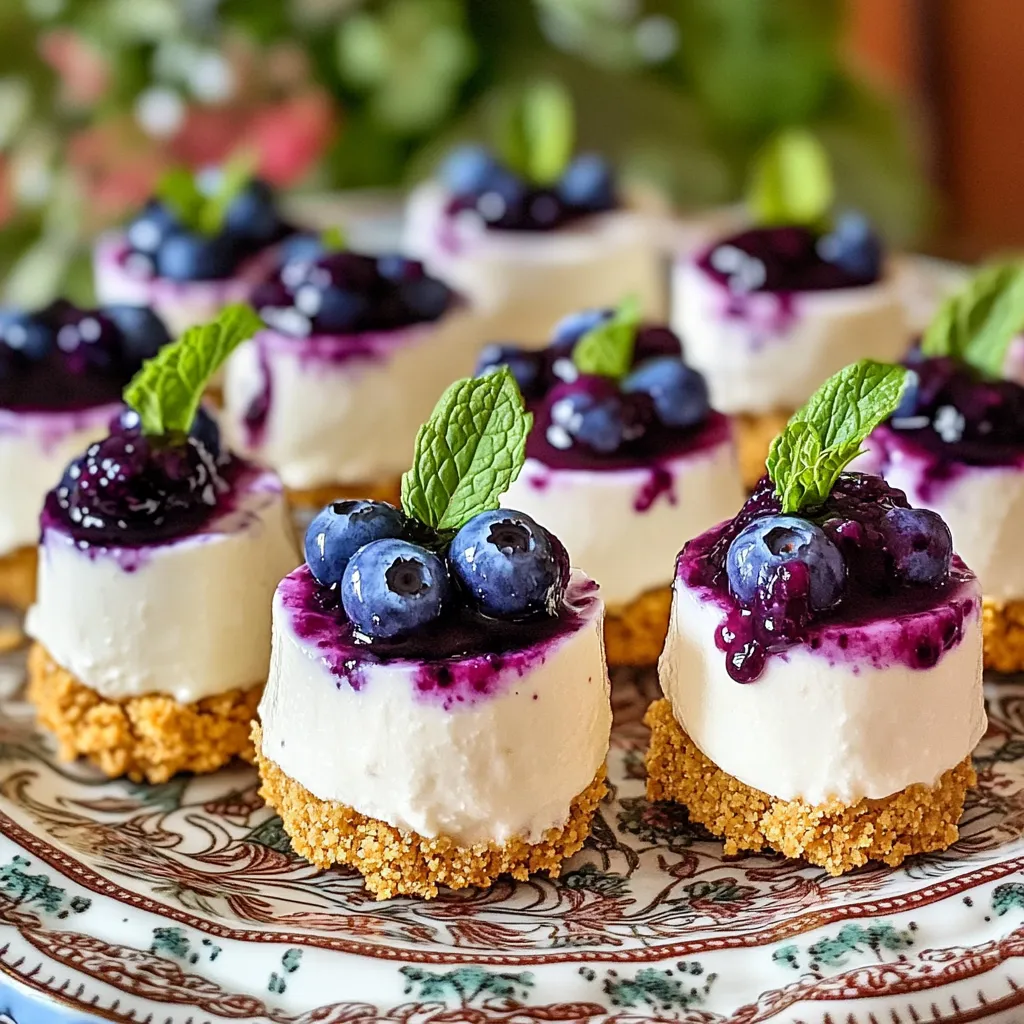
Indulge in a dreamy dessert without the hassle of baking! My No-Bake Blueberry Cheesecake Bites are the perfect sweet treat

Older posts
Newer posts
← Previous Page1 … Page8 Page9 Page10 … Page85 Next →

dsad

© 2026 greenmealmap • Built with GeneratePress

Our Policies

  • Copyright Policy
  • Cookie Policy
  • GDPR Policy
  • Privacy Policy
  • Disclaimer
  • Terms Of Use

More Information

  • Home
  • About
  • Contact
  • Appetizers
  • Dessert
  • Dinner
  • Drinks
©2026, greenmealmap About Back To Top