Skip to content
DisclaimerTerms Of UseGDPR PolicyCookie Policy

greenmealmap

  • Home
  • Drinks
  • Appetizers
  • Dinner
  • Dessert
  • About
  • Contact
  • Privacy Policy
DisclaimerTerms Of UseGDPR PolicyCookie Policy

NO-ING-IMG

To make delicious homemade breadsticks, gather these simple ingredients: - 2 cups all-purpose flour - 1 tablespoon baking powder - 1 teaspoon salt - 1 tablespoon sugar - 1 cup milk (or plant-based milk) - 1/4 cup olive oil - 1 teaspoon garlic powder - 1 teaspoon dried oregano - Grated Parmesan cheese (for topping) - Olive oil or melted butter (for brushing) These ingredients work together to create a soft, flavorful breadstick that pairs well with many dishes. The flour gives structure, while baking powder helps them rise. The milk and olive oil add moisture and richness. Garlic powder and oregano bring a savory taste that shines through in every bite. Using quality ingredients matters, especially when making breadsticks. Fresh herbs will elevate the flavor. If you want a special touch, try using freshly grated Parmesan. You can also swap in plant-based milk for a dairy-free option without losing taste. For the full recipe and instructions, check the Easy Homemade Breadsticks section. This recipe is fun to make and perfect for sharing with friends and family! 1. Preheat the oven and prepare the baking sheet Start by preheating your oven to 400°F (200°C). Line a baking sheet with parchment paper. This step ensures even baking and easy cleanup. 2. Combine dry ingredients in a mixing bowl In a large mixing bowl, whisk together 2 cups of all-purpose flour, 1 tablespoon of baking powder, 1 teaspoon of salt, and 1 tablespoon of sugar. Mixing these dry ingredients well helps to evenly distribute the baking powder. 3. Add wet ingredients and form the dough Next, pour in 1 cup of milk and 1/4 cup of olive oil. Mix until a soft dough forms. If the dough seems too sticky, sprinkle in a little more flour. 1. Kneading the dough Place the dough on a lightly floured surface. Knead it gently for 1-2 minutes. This helps to develop the gluten, giving the breadsticks a nice texture. 2. Rolling out the dough Roll the dough into a rectangle that is about 1/2 inch thick. Try to keep the thickness even for uniform cooking. 3. Cutting into strips Use a sharp knife or pizza cutter to cut the dough into strips. Each strip should be about 1 inch wide and 6 inches long. This size will give you the perfect breadstick shape. 1. Placing on the baking sheet Arrange the strips on the prepared baking sheet. Make sure to space them slightly apart to allow for rising and baking. 2. Adding seasonings and cheese In a small bowl, mix 1 teaspoon of garlic powder and 1 teaspoon of dried oregano. Sprinkle this mixture over the breadsticks. Then, brush the tops with olive oil or melted butter. Finish by adding grated Parmesan cheese on top. 3. Baking time and temperature Bake the breadsticks in the preheated oven for 12-15 minutes or until they turn golden brown. Keep an eye on them to prevent over-baking. Enjoy the warm aroma as they cook! For the full recipe, check out the Easy Homemade Breadsticks section. To achieve the perfect dough consistency, focus on moisture. Your dough should feel soft but not sticky. If it feels too dry, add a little more milk. If it's too wet, sprinkle in more flour. For kneading, put your hands on the dough and push down, then fold it over. Repeat this for about 1-2 minutes. You want the dough to be smooth and elastic. When rolling, use a light touch. Roll it out gently to about 1/2 inch thick. Add herbs and spices to boost flavor. Try adding rosemary, thyme, or even red pepper flakes to the dough. You can mix these in as you combine the dry ingredients. For cheese variations, consider cheddar or mozzarella. You can also top the breadsticks with different cheeses before baking. This will give you a nice, cheesy crust. Serve your breadsticks with dips like marinara or garlic butter. They also pair well with soups and salads. For a fun presentation, arrange them in a tall glass. This makes them look great on the table. For a twist, you can wrap them in prosciutto or bacon before baking. This adds a savory touch that everyone will love. For the full recipe, check out the Easy Homemade Breadsticks section above. {{image_2}} You can still enjoy breadsticks if you need a gluten-free option. Just swap the all-purpose flour for a gluten-free blend. Look for blends that contain xanthan gum to help with texture. Combine the flour with the other dry ingredients as normal. The rest of the steps stay the same. This makes it easy for everyone to enjoy these tasty treats! Flavors can take your breadsticks to the next level. You can add cheese, herbs, or spices right into the dough. Try mixing in shredded mozzarella or cheddar for cheesy goodness. Herbs like rosemary or thyme work well too. If you want stuffed breadsticks, roll out the dough and place your favorite fillings inside. Some great options are pepperoni, cheese, or even pesto. Roll them up and bake as usual for a fun twist! Transform your breadsticks into a dessert! You can do this by adding sugar and cinnamon to the dough. After baking, drizzle with icing made from powdered sugar and milk. You can also top them with chocolate or caramel sauce. Think of sweet breadsticks as a fun treat for dessert or a special snack. They are sure to please anyone with a sweet tooth. For a full recipe, check the Easy Homemade Breadsticks section. To keep your breadsticks fresh, store them in an airtight container. This method helps prevent them from drying out. Place a piece of parchment paper between layers if you stack them. If you want to refrigerate them, they can last up to four days. For longer storage, freezing is a great option. Wrap each breadstick in plastic wrap, then put them in a freezer bag. They will stay good for up to three months. When you're ready to enjoy leftover breadsticks, reheating them is simple. For the best texture, use an oven. Preheat it to 350°F (175°C). Place the breadsticks on a baking sheet and heat for about 5-7 minutes. This method keeps them crisp and warm. If you're short on time, you can use a microwave. Place the breadsticks on a microwave-safe plate. Cover them with a damp paper towel to keep moisture in. Heat them for 15-20 seconds. While this method is quick, it may make them a bit softer. For the full recipe, be sure to check the Easy Homemade Breadsticks section. Enjoy your delicious treats! Homemade breadsticks can last for about 2 to 3 days at room temperature. Store them in an airtight container to keep them fresh. If you want them to last longer, place them in the fridge for up to a week. For even longer storage, freeze them for up to 3 months. Just make sure to wrap them well in plastic wrap or foil. Yes, you can use whole wheat flour in this recipe. However, it may change the texture and flavor. Whole wheat flour makes the breadsticks denser and gives a nuttier taste. You might want to mix it with all-purpose flour to balance the texture. A 50-50 mix works well for a good result. Breadsticks pair well with many dishes. You can serve them with marinara sauce for dipping. They also go great with soups like tomato soup or minestrone. For a light meal, try them with a fresh salad. You can even enjoy them with cheese spreads or hummus. To make softer breadsticks, try a few simple tips. First, do not over-knead the dough; just mix until combined. Second, use milk instead of water for a richer taste. Lastly, brush them with olive oil or melted butter before baking. This adds moisture and helps keep them soft inside. You learned how to make delicious breadsticks from scratch. We covered ingredients, step-by-step instructions, and tips for best results. You also discovered fun variations and storage methods. Remember, feel free to experiment with flavors and toppings. Homemade breadsticks can be a great addition to any meal. Enjoy your baking journey and share your tasty creations with family and friends!

Easy Homemade Breadsticks Quick and Tasty Recipe

Imagine biting into warm, fresh-out-of-the-oven breadsticks that are easy to make! In this post, I’ll share my quick and tasty

To make this dish, you need a few key items: - 1 lb Brussels sprouts, trimmed and halved - 3 tablespoons olive oil - 2 tablespoons honey or maple syrup - Zest of 1 orange - Juice of 1 orange - 1 teaspoon garlic powder - Salt and pepper to taste These ingredients create a tasty base. The olive oil helps the sprouts crisp up nicely. Honey or maple syrup adds a touch of sweetness. The orange zest and juice give a bright, fresh flavor. Garlic powder adds a savory depth. You can take your Brussels sprouts even further with these extras: - 1/4 cup pecans, roughly chopped (optional) - 2 tablespoons freshly grated Parmesan cheese (optional) Adding pecans gives a nice crunch. Parmesan cheese adds a rich, creamy finish. Both options enhance the flavor and texture. For this recipe, you will need a few tools: - A large mixing bowl - A baking sheet - Parchment paper - A sharp knife for trimming the sprouts - A measuring spoon for accurate amounts Using a baking sheet lined with parchment paper makes cleanup easy. It also helps with even roasting. Having the right tools ensures a smooth cooking experience. For the full recipe, you can refer to the detailed instructions above. Start by washing your Brussels sprouts. Remove any yellow leaves and trim the ends. Then, cut each sprout in half. This helps them cook evenly and get crispy. In a large bowl, toss the halved Brussels sprouts with olive oil. Add honey or maple syrup, orange zest, and orange juice. Next, sprinkle in garlic powder, salt, and pepper. Mix well so every sprout gets coated. This is key for flavor. Preheat your oven to 400°F (200°C). Spread the Brussels sprouts cut-side down on a lined baking sheet. This helps them brown nicely. Roast for 20-25 minutes. Stir halfway to ensure even cooking. If you want, add pecans during the last five minutes. They will toast well! When done, sprinkle with Parmesan cheese for extra taste. Let them cool a bit before serving. Enjoy your tasty dish! For the full recipe, check the section above. To get the best roast on your Brussels sprouts, follow these steps: - Cut them right: Halve each sprout to expose more surface area. - Use high heat: Set your oven to 400°F (200°C). This helps them crisp up. - Don't crowd the pan: Spread the sprouts out in a single layer. This ensures even cooking. - Check for doneness: Look for deep golden color and crispy edges. This takes about 20-25 minutes. Want to boost the flavor of your Brussels sprouts? Try these tips: - Citrus zest: Adding orange zest gives a bright, fresh taste. - Sweetness: Honey or maple syrup adds a nice touch of sweetness. - Crunch factor: Toss in chopped pecans for a delightful crunch. - Cheese: Freshly grated Parmesan makes a tasty finish. Here are some common pitfalls to watch out for: - Not trimming properly: Always trim and halve the sprouts for even cooking. - Skipping the oil: Oil is key for crispiness. Don’t skip it! - Overcooking: Keep an eye on the time. You want them crispy, not mushy. - Ignoring the toss: Stir halfway through to ensure all sides get roasted. These tips and tricks will help you create the perfect Oven-Roasted Brussels Sprouts. For a full guide, check out the Full Recipe! {{image_2}} You can change the taste by adding different seasonings. Try chili powder for heat. You can use cumin for a warm, earthy flavor. Smoked paprika gives a nice depth. Season them with a pinch of nutmeg for a warm twist. Just mix these spices with your olive oil before tossing the sprouts. Brussels sprouts pair well with many veggies. Try adding carrots for sweetness or bell peppers for crunch. Cauliflower works great for a tasty mix. You can even add sweet potatoes for a hearty dish. Just cut them to the same size as the sprouts. This way, they roast evenly. If you want a different sweetness, try agave syrup or brown sugar. Maple syrup adds a unique flavor. You can also use coconut sugar for a lower glycemic option. Each sweetener gives a different taste, so feel free to experiment. Just be sure to adjust the amount to your liking. Check out the Full Recipe for the base ingredients to get started! To store leftover Brussels sprouts, first let them cool. Place them in an airtight container. Keep the container in the fridge. Try to use them within three days for the best taste. If they are still warm, they may create steam. This steam can make the sprouts soggy, which you want to avoid. When reheating Brussels sprouts, use the oven for the best results. Preheat your oven to 350°F (175°C). Spread the sprouts on a baking sheet in a single layer. Heat them for about 10-15 minutes, or until they are warm. This method keeps them crispy. If you use a microwave, they might turn soft. You can freeze Brussels sprouts, but they need some prep. Blanch the sprouts in boiling water for three minutes. Then, quickly place them in ice water. Drain them and dry them well. Pack them in freezer bags, squeezing out the air. They can last up to six months in the freezer. When you are ready to use them, thaw in the fridge overnight before cooking. For a great dish, try them using the full recipe! Yes, you can use frozen Brussels sprouts. However, fresh sprouts give better results. Frozen sprouts often hold extra water. This can lead to steaming instead of roasting. If you choose frozen, thaw and drain them well. Pat them dry with a towel. This step helps them crisp up when roasted. Brussels sprouts are done when they are golden brown and crispy outside. They should also feel tender when pierced with a fork. A good way to check is to look for a nice caramelized color. If they look dark and crispy, they are perfectly roasted. Oven-roasted Brussels sprouts pair well with many dishes. I love to serve them with roasted chicken or fish. They also go great with quinoa or rice. For a hearty meal, try them with steak or pork chops. You can even toss them into a salad for a crunchy texture. For the full recipe, check out the detailed steps above. Oven-roasted Brussels sprouts are simple but full of flavor. We covered key ingredients, tools, and steps for making them perfectly. I shared tips to enhance taste and avoid common pitfalls. You can even explore fun variations and ways to store leftovers. In the end, these sprouts can be a delicious side for any meal. Try these methods and enjoy this healthy dish!

Oven-Roasted Brussel Sprouts Crunchy and Flavorful Dish

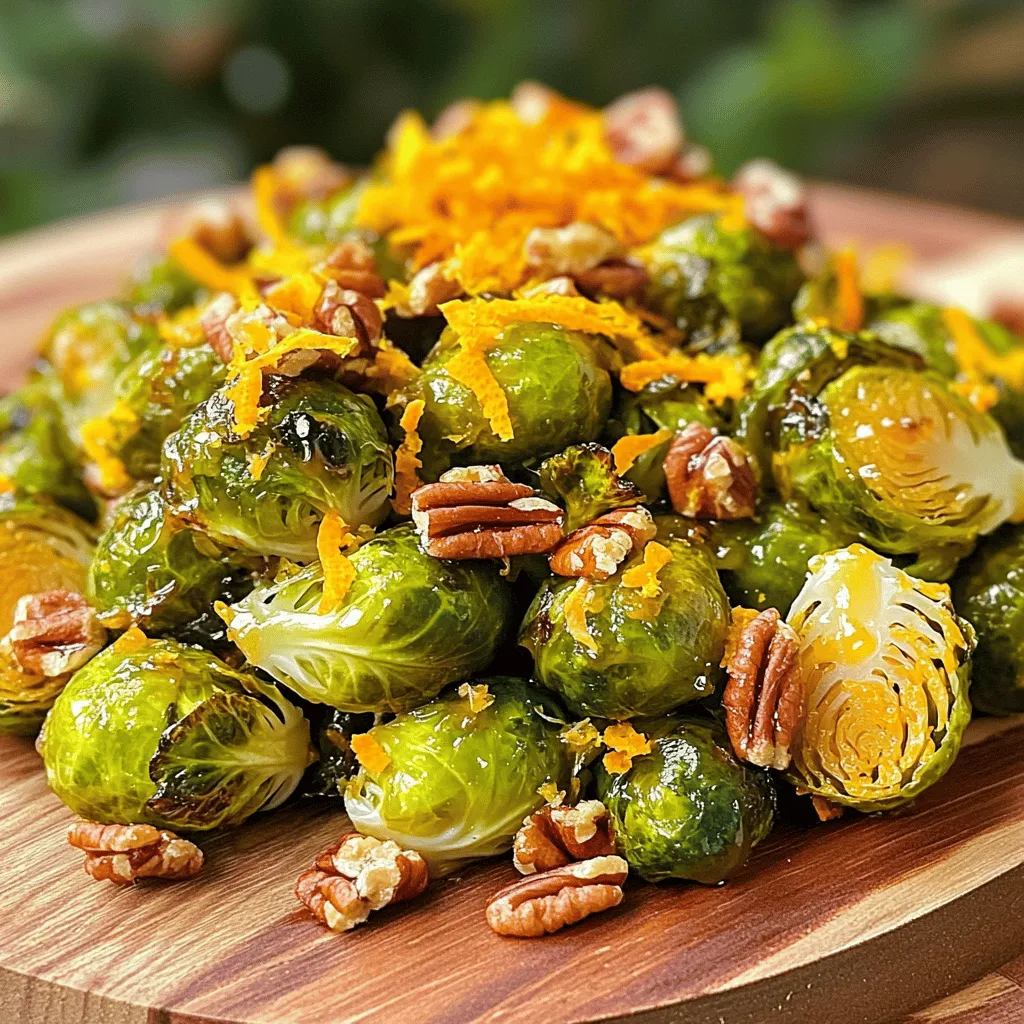
Looking for a delicious and healthy side dish? Try my oven-roasted Brussels sprouts! These little green gems turn crunchy and

- 4 cups ripe tomatoes, chopped (or 2 cans of whole peeled tomatoes) - 1 medium onion, diced - 2 cloves garlic, minced - 2 tablespoons olive oil - 1 teaspoon dried basil - 1 cup vegetable broth - 1 teaspoon sugar (to balance acidity) - Salt and pepper to taste - 1/2 cup heavy cream (optional for creaminess) I love using ripe, fresh tomatoes if they are in season. They add a rich depth. If not, canned tomatoes work well too. The onion and garlic give the soup a great base flavor. Olive oil adds healthy fat and richness. Dried basil brings a nice aroma and taste, while vegetable broth adds depth. If the soup is too acidic, a teaspoon of sugar helps balance it out. For a creamy texture, heavy cream is perfect but not required. - 4 slices of your favorite bread - 4 slices of cheddar cheese (or cheese of choice) - Butter for grilling I enjoy using sourdough or whole grain bread for grilled cheese. These options add flavor and texture. Cheddar cheese is classic, but I love mixing in other cheeses too. Butter is key for grilling; it creates that golden crust. You can also use olive oil if you prefer. For the full recipe, check out the Comforting Tomato Bliss with Grilled Cheese. To start, I heat olive oil in a large pot over medium heat. I add the diced onion and sauté it until it turns soft and clear, about five minutes. The smell of onion cooking makes the kitchen feel warm and inviting. Then, I add minced garlic and cook it for one more minute. Stirring is key here to keep the garlic from burning. Next, I add the chopped ripe tomatoes or canned tomatoes to the pot. I also toss in dried basil and sugar. The sugar helps balance the soup's acidity. I stir everything well and let it simmer for about ten minutes. This lets the flavors mix and deepen. After that, I pour in vegetable broth and bring the mix to a gentle boil. Once it boils, I reduce the heat and let it simmer for another fifteen minutes. This gives the soup a rich flavor. Using an immersion blender, I puree the soup until it’s smooth. If I want a creamier texture, I stir in heavy cream after blending. Finally, I season the soup with salt and pepper. I keep it warm on low heat while I prepare the grilled cheese. For the grilled cheese, I take a skillet and heat a bit of butter over medium heat. I place a slice of bread in the skillet. Next, I put a slice of cheese on top. Then, I add another slice of bread to form a sandwich. I grill the sandwich for about three to four minutes on each side. I want it to be golden brown and the cheese to melt just right. The smell of toasting bread and melting cheese fills the air. I repeat this with the other slices of bread and cheese. When everything is ready, I serve the warm tomato soup in bowls with the grilled cheese sandwiches cut diagonally. This meal is a classic comfort that warms hearts. For a special touch, I drizzle a bit of olive oil on the soup and add fresh basil leaves for garnish. You can find the full recipe and more tips to enjoy this dish even more! Using fresh herbs can make your soup pop. I love adding basil or thyme. They add bright notes that lift the dish. You can also use a pinch of oregano for a warm flavor. Spices like paprika can add a nice kick, too. To balance the soup's acidity, I often add a teaspoon of sugar. This small tip can make a big difference. If you prefer a creamier soup, stir in some heavy cream after blending. It gives a nice richness to the soup. Choosing the right bread and cheese matters. For bread, I suggest sourdough or whole grain. They both hold up well to grilling. For cheese, cheddar is classic. But you can also try Gruyère or mozzarella for a twist. To get that perfect crispy texture, heat your skillet on medium. Use enough butter to coat the pan. Grill each sandwich for about 3-4 minutes on each side. Keep an eye on it. You want it golden brown, with melted cheese inside. For more details, check out the Full Recipe for a detailed guide. {{image_2}} You can easily make tomato soup your own. Try adding vegetables like carrots or celery. These can boost flavor and nutrition. Fresh herbs like basil or parsley make the soup taste bright and fresh. You can also choose between creamy or chunky soup. A creamy soup is smooth and rich. Blend in some heavy cream for extra comfort. A chunky soup has bits of tomatoes and vegetables for texture. Each style offers a unique experience. Grilled cheese is fun to customize. You can use different types of cheese. Cheddar, mozzarella, or gouda each bring a different taste. Try mixing cheeses for a tasty twist. Adding extras can make your sandwich special. Slice up some avocado for creaminess. Crispy bacon adds a salty crunch. You can even add a touch of hot sauce for a kick. These small changes can turn a simple meal into a gourmet delight. If you're curious about how to make the perfect pair, check out the Full Recipe for inspiration! To keep your tomato soup fresh, use airtight containers. Glass jars or plastic containers work well. Make sure the soup is cool before sealing it. Store it in the fridge for up to five days. If you want to keep it longer, freeze it. Pour the soup into freezer bags and lay them flat. This saves space and makes thawing easier. When reheating, use a pot over low heat. Stir often to avoid sticking. You can also microwave it in a safe bowl. Heat in short bursts, stirring in between. Check the temperature. It should be hot but not boiling. Grilled cheese sandwiches are best eaten fresh. However, if you have leftovers, store them in a cool place. Wrap them in foil or place them in a container. Keep them in the fridge for up to three days. To reheat, use a skillet for the best results. Heat it over medium heat. Add a little butter or oil to the pan. Place the sandwich in the skillet and grill for a few minutes on each side. This will help the cheese melt again and keep the bread crispy. You can also use a toaster oven for a quick reheat. Enjoy your classic flavors even after the first meal! Tomato soup can last about 3 to 5 days in the fridge. Store it in an airtight container. Make sure it cools down before sealing. Check for any off smells or changes in color before eating. Yes, you can freeze classic tomato soup. Use a freezer-safe container or bag. Leave some space for expansion. It can last up to 3 months in the freezer. Thaw it in the fridge overnight before reheating. Cheddar cheese is the classic choice for grilled cheese. It melts well and has a rich flavor. You can also try Gouda, Swiss, or mozzarella for a twist. Mix different cheeses for a fun taste. Absolutely! Fresh tomatoes work great in this recipe. Use ripe, juicy tomatoes for the best flavor. Just chop them up and follow the same steps. You may need to cook them a bit longer to soften. The best way to cut grilled cheese is diagonally. This gives you two triangles that are easy to hold. It also looks nice on the plate. Serve them with your warm tomato soup for a perfect meal. Be sure to check out the Full Recipe for more details on how to make this comforting dish! You can create a delicious meal with simple ingredients. In this post, we covered how to make classic tomato soup and a perfect grilled cheese sandwich. We discussed key ingredients like ripe tomatoes, fresh herbs, and the best cheese choices. I also shared tips for enhancing flavors and storing leftovers. This comforting meal is easy to customize and share. Enjoy experimenting with your favorite flavors in both the soup and the sandwich. Your taste buds will thank you!

Classic Tomato Soup with Grilled Cheese Delight

When you crave comfort food, nothing beats Classic Tomato Soup with Grilled Cheese. This duo brings warmth and satisfaction to

For a flavorful quick and easy chicken stir fry, you need a few key ingredients. Here’s the detailed list: - Chicken breast: Use 1 pound of boneless, skinless chicken breast. Slice it into thin strips. This will cook quickly and soak up the flavors well. - Vegetables: Grab a bell pepper, broccoli florets, and a carrot. Slice the bell pepper and julienne the carrot. These add color and crunch. - Sauces and seasonings: You’ll need 2 tablespoons of soy sauce, 1 tablespoon of sesame oil, 2 cloves of minced garlic, and 1 inch of grated ginger. These give the dish its rich flavor. - Cooking fats: Use 2 tablespoons of vegetable oil. This helps cook the chicken and vegetables evenly. - Serving options: Serve your stir fry over cooked rice or noodles. Both options complement the dish nicely. You can find the full recipe at the end of this section. Start with one pound of boneless, skinless chicken breast. Slice it into thin strips. In a medium bowl, mix the chicken with two tablespoons of low-sodium soy sauce and one tablespoon of cornstarch. This step helps make the chicken tender. Let it marinate for about ten minutes while you prep the veggies. Heat one tablespoon of vegetable oil in a large skillet or wok over medium-high heat. Once the oil is hot, add the marinated chicken. Stir-fry for about five to seven minutes. You want the chicken to cook through and turn golden brown. Once done, remove the chicken and set it aside. In the same skillet, add the remaining tablespoon of vegetable oil. Toss in the sliced bell pepper, one cup of broccoli florets, and a julienned carrot. Stir-fry these vegetables for three to four minutes. They should look bright and slightly tender. This step keeps the veggies crisp and fresh. Add two cloves of minced garlic and one inch of grated ginger to the veggies. Stir for another minute until you smell the aroma. Return the cooked chicken to the skillet. Mix everything well. Drizzle one tablespoon of sesame oil over the stir-fry. Season with salt and pepper to your taste. Stir again and cook for another one to two minutes. Serve the stir-fry over cooked rice or noodles. For extra flair, you can garnish with sesame seeds or chopped green onions. For the full recipe, refer to the earlier section. To get the best texture in your stir-fry, focus on a few key steps. First, cut the chicken into thin strips. This helps it cook fast and evenly. Second, use high heat. A hot pan helps the chicken sear well. This gives it a nice brown color. Third, don’t overcrowd the pan. Cook in batches if needed. This lets the chicken brown better. Finally, stir often. This keeps the chicken and veggies cooking evenly. A wok is great for stir-frying. It has a large surface area and high sides. This helps you toss the food easily. If you don’t have a wok, a large skillet works too. Just ensure it heats well. You can also try an electric skillet. It allows for even heat and a large cooking space. Both options give good results. Try them out and see what you like best! Garnishing adds a fun touch to your dish. Try sprinkling sesame seeds on top. They add a nice crunch. Chopped green onions also work well. They bring a fresh flavor. You can serve your stir-fry in a bowl or on a plate. For a colorful look, arrange the food neatly. Adding a wedge of lime gives a pop of color and flavor. Get creative with your presentation; it makes the meal more enjoyable! For more ideas, check the Full Recipe for tips. {{image_2}} You can swap chicken for tofu to create a tasty vegetarian dish. Use firm tofu for the best texture. Cut it into cubes and press it to remove extra water. Marinate the tofu just like the chicken. Then, fry it until golden before adding vegetables. This method keeps the tofu crispy and flavorful. Feel free to mix and match your vegetables. You can use snow peas, bell peppers, or zucchini. Broccoli and carrots are great, but don’t stop there. Try adding mushrooms for an earthy flavor. You can even use leafy greens like spinach or bok choy. Just adjust cooking time as needed for different veggies. You can switch up the flavors by using different sauces. Teriyaki sauce adds sweetness, while oyster sauce gives a rich flavor. For a spicy kick, try sriracha or chili garlic sauce. You can also use hoisin sauce for a hint of sweetness. Experiment to find your favorite combination. These choices make your stir fry new and exciting every time! For the full recipe, check out the Quick and Easy Chicken Stir Fry. To keep your stir-fry fresh, let it cool first. Then, place it in an airtight container. Store it in the fridge. Make sure you eat it within three days for the best taste. This keeps the chicken and veggies safe to eat. When you're ready to eat, take the stir-fry out of the fridge. You can reheat it in a skillet over medium heat. Stir it often for even warming. You can also use the microwave. Heat in short bursts, stirring in between. This way, your meal stays tasty and doesn't dry out. If you want to save some for later, freezing is a great option. Place the cooled stir-fry in a freezer-safe bag. Squeeze out as much air as you can before sealing. Label it with the date. It can last up to three months in the freezer. To eat, just thaw it overnight in the fridge. Then, reheat it just like before. Enjoy this quick and easy chicken stir fry anytime! For the full recipe, check the earlier sections. To make this stir fry, start with fresh ingredients. First, slice your chicken breast into thin strips. Marinate this chicken in soy sauce and cornstarch for about 10 minutes. While it marinates, chop your vegetables like bell pepper, broccoli, and carrot. Heat vegetable oil in a skillet over medium-high heat. Cook the chicken for 5-7 minutes until it's golden and cooked. Remove the chicken and stir-fry the veggies for 3-4 minutes. Add garlic and ginger for flavor, then return the chicken. Mix everything well, and drizzle with sesame oil before serving over rice or noodles. You can find the Full Recipe above. Yes, you can use frozen vegetables. Just remember to thaw them first. Frozen veggies can save time, but they may release more water. This can change the texture of your stir fry. Cook them for a little longer to ensure they heat through. Add them after the chicken so they don’t overcook. Pair your chicken stir fry with rice or noodles. Both options soak up the sauce well. You can also serve it with a side of spring rolls or a simple salad. These sides add a nice crunch and extra flavor to your meal. To adjust the spice level, add red pepper flakes or chili paste. Start with a little and taste as you go. You can also use a spicy sauce like sriracha if you want more heat. If you prefer less spice, skip these ingredients or use mild sauces. In this article, we covered how to make a tasty chicken stir-fry. We explored the key ingredients, like chicken, colorful veggies, and yummy sauces. I shared step-by-step instructions, tips for great texture, and fun variations, including a vegetarian option. Remember, you can store leftovers well and customize spices to suit your taste. Stir-frying is quick and fun, so enjoy experimenting in the kitchen! Embrace these ideas to create meals you'll love.

Quick and Easy Chicken Stir Fry Flavorful Weeknight Meal

Looking for a quick and easy meal that packs big flavor? My Quick and Easy Chicken Stir Fry is just

- 6 large eggs - 1/2 cup milk - 1 cup diced bell peppers (red, green, or yellow) - 1 cup baby spinach, chopped - 1 cup cooked black beans (canned, drained, and rinsed) - 1/2 cup shredded cheddar cheese - 4 large flour tortillas - 1 avocado, sliced - 1/4 cup salsa - Salt and pepper to taste - Olive oil for cooking When making breakfast burritos, fresh ingredients make a big difference. The eggs create a fluffy base. The milk adds creaminess. Bell peppers provide crunch and color, while spinach adds nutrition. Black beans give protein and texture. Cheddar cheese melts into gooey goodness. Warm tortillas wrap everything together, making it easy to eat. - Calories per serving: About 400 calories - Macronutrient breakdown: - Protein: 20g - Carbohydrates: 40g - Fats: 15g Knowing the nutrition helps you enjoy breakfast burritos guilt-free. They are filling and balanced, making them a great start to your day. - Non-stick skillet - Medium bowl - Spatula Using the right tools is key to making your preparation smooth. A non-stick skillet prevents sticking. A medium bowl is perfect for whisking eggs. A spatula helps you mix and serve easily. For the full recipe, check out the detailed instructions. - In a medium bowl, whisk together 6 large eggs and 1/2 cup milk. - Season with a pinch of salt and pepper. - Heat 1 tablespoon of olive oil in a non-stick skillet over medium heat. - Add 1 cup of diced bell peppers. Sauté for 3-4 minutes until soft. - Toss in 1 cup of chopped baby spinach. Cook for 1-2 minutes until wilted. - Pour the egg mixture into the skillet with the veggies. - Cook while stirring until the eggs are fluffy, about 5-6 minutes. - Remove from heat and stir in 1 cup of cooked black beans and 1/2 cup of shredded cheddar cheese. - Warm 4 large flour tortillas in a skillet or microwave. - Place a generous scoop of the egg mixture in the center of each tortilla. - Top with slices of 1 avocado and 1/4 cup of salsa. - Roll the tortillas tightly, folding in the sides as you go. - Place seam-side down on a plate. - For a crispy finish, grill the burritos in the skillet for 1-2 minutes on each side. This quick and tasty meal idea can be ready in 20 minutes. Enjoy your Sunrise Breakfast Burritos! For the full recipe, check the earlier sections. To save time in the morning, prep your ingredients the night before. Chop the bell peppers and spinach, and store them in a sealed container in the fridge. You can also whisk the eggs and milk together, adding salt and pepper. This mix can sit in the fridge overnight. If you assemble the burritos ahead of time, wrap them in foil. Store them in the fridge for easy access. Fluffy eggs make your breakfast burritos great. To get that fluff, whisk the eggs and milk well. This adds air and makes them light. Cook the eggs over medium heat and stir gently. Season them with salt and pepper while they cook. This helps the flavors pop! Grilling gives your burritos a nice crunch. Heat a grill pan over medium-high heat. Place the burritos seam-side down and grill for 1-2 minutes. Flip them to grill the other side. This adds crispiness and a tasty finish to your burritos. {{image_2}} You can make tasty vegetarian breakfast burritos by swapping out ingredients. Instead of black beans, try using pinto beans or lentils. For cheese, consider using a dairy-free option or crumbled feta. Add more veggies for crunch and flavor. Chopped zucchini, mushrooms, or corn work great. Mixing in fresh herbs like cilantro or parsley adds a nice touch. For a heartier meal, consider adding protein. Cooked sausage or crispy bacon can enhance flavor and texture. Turkey sausage is a leaner choice too. If you want something different, try diced ham or chorizo. These meats give your burritos a savory kick. Spices can change the game for your breakfast burritos. Add cumin, paprika, or chili powder for warmth. Fresh herbs like chives or dill bring brightness. Pair your burritos with different salsas. A chunky tomato salsa adds freshness, while a spicy green salsa can bring heat. Experiment with flavors to find your perfect mix. To store cooked burritos, wrap them tightly in foil or plastic wrap. This keeps them fresh and tasty. You can also place them in an airtight container. I recommend eating them within 3 to 4 days for the best taste. For freezing, let the burritos cool first. Then, wrap each one in foil or freezer-safe bags. This helps prevent freezer burn. You can freeze them for up to 3 months. When you’re ready to eat, remove the wrapping and microwave them for about 2-3 minutes. This keeps them warm and soft. In the fridge, burritos last about 3 to 4 days. In the freezer, they can stay good for 3 months. Always check for any odd smells or changes in texture before eating. Enjoy your Sunrise Breakfast Burritos from the Full Recipe knowing how to store them! Yes, you can make breakfast burritos ahead of time. Just cook and assemble them. Wrap each burrito tightly in foil or plastic wrap. Store them in the fridge for up to three days. For longer storage, freeze them for up to three months. When you're ready to eat, just reheat them. Breakfast burritos pair well with many sides. Here are some ideas: - Fresh fruit salad - Crispy hash browns - Yogurt with granola - A side of salsa or guacamole - A simple green salad To add heat to your breakfast burritos, try these tips: - Include diced jalapeños or serrano peppers in the filling. - Use spicy salsa or hot sauce. - Mix in some cayenne pepper or chili powder with the eggs. - Add pepper jack cheese instead of cheddar for extra kick. Reheating breakfast burritos can be done in several ways: - Microwave: Wrap in a damp paper towel and heat for 1-2 minutes. - Oven: Preheat to 350°F (175°C) and bake for 10-15 minutes. - Skillet: Heat in a non-stick skillet over medium heat for 3-4 minutes on each side. Each method keeps the burritos warm and tasty. These breakfast burritos are simple and tasty. We covered ingredients, cooking steps, and how to store them. You can make them ahead or customize them with your favorite veggies and proteins. Remember to try different spice blends or salsas for extra flavor. With these tips, you’ll enjoy perfect burritos every time. Enjoy cooking, sharing, and savoring your delicious creations!

Easy Breakfast Burritos Quick and Tasty Meal Idea

Start your day right with my easy breakfast burritos! These quick and tasty meals combine eggs, veggies, and beans for

- 2 cups cooked white rice - 2 cups cooked shredded chicken - 1 cup broccoli florets - 1 cup cheddar cheese, shredded - 1 cup cream of chicken soup - 1/2 cup milk - 1 tablespoon olive oil - 1 teaspoon garlic powder - 1 teaspoon onion powder - Salt and pepper to taste - 1/2 cup breadcrumbs (optional) When I make my cheesy chicken and rice casserole, I ensure I have all the right ingredients. This dish is creamy, cheesy, and packed with protein. The rice acts as a base, while the chicken provides great flavor. Broccoli adds a nice crunch and color. If you need to change things up, here are some easy swaps: - Use rotisserie chicken instead of cooking your own. - Try dairy-free cream of chicken soup and cheese for a lighter dish. - If broccoli isn't your favorite, you can use spinach or peas instead. These substitutions keep the dish tasty while fitting your needs. For the full recipe, you can check out the details that follow. - Preheat oven to 350°F (175°C). - Prepare casserole dish with olive oil. First, turn on your oven to 350°F (175°C). This temperature helps the casserole cook evenly. Next, take a 9x13 inch casserole dish and drizzle olive oil inside. This step helps prevent sticking. - Combine rice, chicken, broccoli, cheese, soup, and milk. - Season with garlic powder, onion powder, salt, and pepper. In a large bowl, mix 2 cups of cooked white rice, 2 cups of cooked shredded chicken, and 1 cup of broccoli florets. Then, add 1 cup of shredded cheddar cheese, 1 cup of cream of chicken soup, and 1/2 cup of milk. This mix gives the casserole a creamy texture. Season everything with garlic powder, onion powder, salt, and pepper. Stir until well combined. - Transfer mixture to prepared casserole dish. - Optional: Top with breadcrumbs. - Cover with foil and bake for 20 minutes. - Uncover and bake for an additional 10-15 minutes. Now, pour the mixture into the prepared casserole dish, spreading it evenly. If you like a crunchy top, sprinkle 1/2 cup of breadcrumbs over the casserole. Cover the dish with foil to keep moisture in. Bake for 20 minutes. Then, remove the foil and bake for another 10 to 15 minutes. This step lets the top get golden brown and bubbly. Once it’s done, let it cool for a few minutes. Enjoy your comforting Cheesy Chicken and Rice Casserole! For the full recipe, check the earlier section. To ensure even cooking of the casserole, mix all ingredients well. This helps the flavors blend. Spread the mixture evenly in the dish. Cover it with aluminum foil before baking. This traps steam and keeps everything moist. For a golden breadcrumb topping, add the breadcrumbs right before the last baking phase. Bake uncovered for 10 to 15 minutes. This allows the breadcrumbs to crisp up. You can also drizzle a little olive oil over the top for extra crunch. When serving, garnish the casserole with chopped parsley or green onions. This adds color and freshness. Serve slices hot on plates. You can place a lemon wedge on the side for a zesty touch. Pair the casserole with a simple salad. A fresh green salad balances the richness of the dish. You could also serve steamed vegetables for extra nutrition. The prep time for this dish is about 15 minutes. Cooking the casserole takes around 30 minutes. Overall, you’ll spend about 45 minutes from start to finish. This recipe serves six hearty portions, making it perfect for family meals. {{image_2}} You can change the flavor of your cheesy chicken and rice casserole easily. For a spicy kick, add jalapeños or a splash of hot sauce. This will give your dish a fun and fiery twist. If you prefer Italian flavors, swap out the cream of chicken soup for marinara sauce and use mozzarella cheese instead. This makes the dish rich and comforting with a touch of zest. You can also adapt this casserole to fit different diets. For vegetarian options, replace chicken with cooked lentils or chickpeas. This keeps the dish hearty while making it meat-free. If you are watching carbs, use cauliflower rice instead of white rice. This change keeps the flavor while reducing carbs, making it a healthier choice. You can cook this casserole in several ways to make it fit your schedule. If you want a slow-cooked version, combine all the ingredients in your slow cooker. Cook on low for about 6 hours for a warm, comforting meal. For those short on time, try using an Instant Pot. Cook on high pressure for 10 minutes and let it naturally release for 5 minutes. This method saves time while still delivering that classic cheesy goodness. For the full recipe, check out the complete instructions. To keep your Cheesy Chicken and Rice Casserole fresh, follow these tips: - Cool Down: Let the casserole cool to room temperature before storing. - Refrigeration: Place the leftovers in an airtight container. Store them in the fridge. - Time Limit: Use the leftovers within 3 to 4 days for the best taste. - Labeling: Write the date on the container for easy tracking. If you want to save some for later, freezing is a great option. Here’s how to do it: - Freeze Leftovers: Portion the casserole into smaller containers. This helps with easy serving. - Wrap Well: Use plastic wrap or aluminum foil to cover the containers tightly. - Label and Date: Don’t forget to label each container with the date. When you’re ready to eat, follow these reheating tips: - Thawing: Take the casserole out of the freezer and let it thaw overnight in the fridge. - Reheat: Place the casserole in the oven at 350°F (175°C) for about 20-30 minutes. You want it hot all the way through. - Check for Doneness: Make sure it’s heated well before serving. Enjoy your meal! For the complete recipe, check the [Full Recipe]. How do I make Cheesy Chicken and Rice Casserole from scratch? You can make this dish by mixing cooked rice, shredded chicken, broccoli, cheese, soup, and milk. After seasoning with garlic powder, onion powder, salt, and pepper, you bake it. This method ensures a hearty meal that everyone loves. Can I use brown rice instead of white? Yes, you can use brown rice. It adds a nutty flavor and more fiber. Just remember, brown rice takes longer to cook. Adjust your cooking time if you use it. How long can I store leftovers in the fridge? You can store leftovers for about 3 to 5 days. Keep them in an airtight container for best results. Always check for freshness before eating. What can I substitute for cream of chicken soup? You can use homemade cream of chicken soup or a can of cream of mushroom soup. For a lighter option, mix milk with flour and seasonings. This works well too. Is this casserole freezer-friendly? Yes, this casserole is great for freezing. Just let it cool, then wrap it tightly. It can last for up to 3 months in the freezer. Can I make this recipe ahead of time? Absolutely! You can prep it a day in advance. Just mix the ingredients and keep it in the fridge. Bake it the next day for a fresh meal. For the full recipe, check out the earlier section. This blog post provided a clear recipe for Cheesy Chicken and Rice Casserole. It included ingredients, step-by-step instructions, and tips for success. You learned about ingredient substitutions and various cooking methods, which can make this dish your own. In closing, this casserole is simple and versatile. You can adapt it to suit your tastes or dietary needs. Enjoy making this dish and sharing it with friends and family!

Cheesy Chicken and Rice Casserole Easy Family Meal

Looking for a simple, delicious meal that the whole family will love? Cheesy Chicken and Rice Casserole is your answer!

- 1 tablespoon olive oil - 1 medium onion, diced - 3 garlic cloves, minced - 1 jalapeño, diced (seeds removed for less heat) - 1 teaspoon ground cumin - 1 teaspoon smoked paprika - 1 can (14.5 oz) diced tomatoes - 4 cups chicken broth - 2 cups cooked chicken, shredded - 1 can (15 oz) black beans, rinsed and drained - 1 cup corn kernels (fresh or frozen) - Salt and pepper to taste - Juice of 1 lime - 1 avocado, diced - Fresh cilantro, chopped, for garnish - Tortilla strips for topping You can swap ingredients based on your needs. For a vegetarian version, use vegetable broth and skip the chicken. You can also replace black beans with pinto beans. If you want less heat, skip the jalapeño or use a milder pepper. This way, you can make the soup suit your taste and diet. Enjoy the classic flavors of this comforting dish! For the complete recipe, check the [Full Recipe]. To start, gather your kitchen tools. You will need a large pot, a cutting board, and a sharp knife. A ladle will help serve your soup. 1. Heat 1 tablespoon of olive oil in the large pot over medium heat. 2. Dice 1 medium onion and add it to the pot. Sauté for about 5 minutes. The onion should turn soft and clear. 3. Mince 3 garlic cloves and dice 1 jalapeño (make sure to remove the seeds if you want less heat). Add them to the pot and cook for 2-3 minutes. Stir until fragrant. 4. Now, add 1 teaspoon of ground cumin and 1 teaspoon of smoked paprika. Stir them in well. Cook for 1 minute to toast the spices. 5. Pour in 1 can of diced tomatoes and 4 cups of chicken broth. Stir to combine and bring to a gentle simmer. Next, add the main ingredients to build flavor. 1. Add 2 cups of shredded, cooked chicken, 1 can of rinsed black beans, and 1 cup of corn kernels. 2. Season with salt and pepper to taste. 3. Let the soup simmer for about 15 minutes. This time allows all the flavors to meld and create a rich taste. 4. Before you serve, squeeze the juice of 1 lime into the soup. This adds a fresh zing. Now, it’s time to serve your creation. 1. Ladle the hot soup into colorful bowls for a vibrant look. 2. Top each bowl with diced avocado, chopped fresh cilantro, and crispy tortilla strips. 3. For an extra touch, add a lime wedge on the side. This makes the dish more inviting and fun. For the full recipe, refer to the detailed instructions above. Enjoy your tasty Classic Chicken Tortilla Soup! To boost the taste of your chicken tortilla soup, focus on fresh ingredients. Fresh lime juice adds a bright kick. Try adding a splash of hot sauce for heat. You can also use fresh herbs like cilantro or parsley to enhance the soup's flavor. For spices, consider adding more ground cumin or smoked paprika. These spices deepen the flavors. You can also try a pinch of cayenne for extra warmth. If you like it smoky, add a bit of chipotle chili powder. This will give your soup a nice depth. One common mistake is overcooking the soup. Simmer just long enough for flavors to mix. If you cook it too long, the chicken can become dry. Another pitfall is not seasoning at each step. Taste as you go. Adding salt and pepper at the end may not give you the best flavor. Another mistake is skipping the lime juice. Adding it right before serving brightens the soup. Lastly, don’t forget the toppings! Fresh avocado, crispy tortilla strips, and cilantro make the dish pop. These finishing touches make your soup more appealing and flavorful. For a full recipe, check out the details above. {{image_2}} You can make Classic Chicken Tortilla Soup lighter by using low-sodium broth. Swap regular chicken for skinless breast. Choose fresh veggies like zucchini or bell peppers. Instead of corn, you can add more beans for fiber. Use Greek yogurt instead of sour cream for a creamy touch with fewer calories. Try using turkey or tofu instead of chicken for a new taste. You can also switch black beans for pinto beans or chickpeas. For veggies, add spinach or kale for a nutrition boost. If you like spice, toss in more jalapeños or some hot sauce. Experimenting with different ingredients can give a fresh twist to your soup. Chicken Tortilla Soup changes across Mexico. In some areas, people add cheese and cream for richness. Others might put in roasted peppers or fresh corn. Each region has unique spices and methods. Explore these variations to find your favorite style. You’ll discover new flavors that make this dish even more special. To store your leftover chicken tortilla soup, let it cool first. Once cooled, transfer it to an airtight container. This helps keep it fresh. Store it in the fridge for up to three days. Remember to label your container with the date. When you're ready to enjoy it again, just take it out! You can freeze this soup, too! To do this, pour the cooled soup into freezer-safe bags or containers. Leave some space at the top, as soup expands when frozen. Label the bags with the date and type. Your soup can last up to three months in the freezer. Just make sure it cools completely before freezing. When it’s time to eat your soup, take it out of the fridge or freezer. If frozen, let it thaw overnight in the fridge. For reheating, use a pot on the stove over medium heat. Stir it often to avoid burning. You can also use the microwave. Heat it in short bursts, stirring in between. This helps keep the flavor and texture just right. Enjoy your warm, comforting bowl of chicken tortilla soup! To thicken Chicken Tortilla Soup, you can use a few simple methods. Here are some common thickeners: - Cornstarch: Mix equal parts cornstarch and cold water. Stir this mixture into the soup and simmer until thickened. - Mashed Beans: Use a portion of the black beans. Mash them and mix them back into the soup for a creamy texture. - Tortilla Strips: Add crushed tortilla strips to the soup. Let them soak for a few minutes to thicken the broth. These options help create a hearty soup that feels rich and satisfying. Yes, you can make Chicken Tortilla Soup ahead of time. Here are some tips: - Cook and Cool: Make the soup and let it cool down before storing. This helps prevent bacteria growth. - Store in the Fridge: Place the cooled soup in an airtight container. It will stay fresh for about 3-4 days. - Reheat Before Serving: When ready to eat, reheat the soup on the stove over low heat. Stir occasionally until warm. Making it ahead saves time and lets the flavors blend even more. You can get creative with toppings for Chicken Tortilla Soup. Here are some fun ideas: - Sour Cream: A dollop adds creaminess and balances heat. - Cheese: Shredded cheese like Monterey Jack or cheddar gives a nice melt. - Radishes: Thinly sliced radishes add crunch and a fresh taste. - Green Onions: Chopped green onions bring a mild onion flavor. - Lime Wedges: Squeeze fresh lime juice over the soup for a zesty kick. Feel free to mix and match toppings to suit your taste! For the full recipe, check out the link. This blog post guides you through making Chicken Tortilla Soup. We covered key ingredients, precise steps, and expert tips. You learned how to enhance flavor and avoid common mistakes. We explored variations, healthier swaps, and storage tips. Finally, we answered FAQs for deeper understanding. Now, with these insights, you can create a fantastic soup. Enjoy experimenting and making it your own!

Classic Chicken Tortilla Soup Flavorful Comfort Dish

If you’re craving a bowl of warmth and comfort, Classic Chicken Tortilla Soup is the answer. This dish is not

To make Lemon Garlic Roasted Broccoli, gather these ingredients: - 1 large head of broccoli, cut into florets - 4 cloves of garlic, minced - 2 tablespoons olive oil - Zest of 1 lemon - 2 tablespoons fresh lemon juice - 1 teaspoon red pepper flakes - Salt and pepper to taste - ¼ cup grated Parmesan cheese (optional) - Fresh parsley, chopped for garnish These ingredients bring bright flavors and great texture to your dish. Broccoli is crunchy and full of nutrients. Garlic adds a warm, savory touch. Olive oil helps the broccoli roast perfectly, giving it a nice golden color. Lemon zest and juice create a fresh, zesty flavor that brightens the dish. Red pepper flakes add a kick, but you can adjust this to your taste. If you like cheese, the Parmesan is a tasty option. It melts into the broccoli, making it rich and creamy. The fresh parsley adds a lovely color and a hint of earthiness. Each ingredient plays a role in creating a simple yet delightful dish. For the full recipe, check out the [Full Recipe]. Start by preheating your oven to 425°F (220°C). This high heat helps the broccoli roast perfectly. Line a baking sheet with parchment paper. This makes cleanup easy and keeps the broccoli from sticking. In a large mixing bowl, combine the broccoli florets with minced garlic, olive oil, lemon zest, lemon juice, and red pepper flakes. Toss everything together well. Make sure the broccoli gets a nice coat of the mixture. You want every floret to soak up those bright flavors! Spread the broccoli mixture onto your prepared baking sheet. Lay it out in a single layer for even roasting. Season with salt and pepper to taste. Roast in the preheated oven for 20-25 minutes. Halfway through, give the broccoli a toss to cook it evenly. You want it to be tender and slightly charred for maximum flavor. Once the broccoli is done, take it out of the oven and let it sit for a few minutes. If you like, sprinkle some grated Parmesan cheese on top during the last 5 minutes of roasting for a cheesy twist. Finally, garnish the broccoli with freshly chopped parsley. Serve it warm and enjoy this delightful side dish! For the full recipe, check the details above. To get broccoli just right, start with dry florets. Moisture prevents crispiness. Cut the broccoli into uniform pieces. This helps them cook evenly. Use high heat for roasting. I set my oven to 425°F (220°C). This temperature gives broccoli a nice char. Toss the florets with oil and seasoning. Spread them out on the baking sheet. Crowding the pan will steam the broccoli. Roast for 20 to 25 minutes for tender, golden edges. I love a little kick in my dishes. Red pepper flakes add heat, but you can adjust them. Use less for mild flavor or more for bold taste. If you want even more spice, try adding cayenne pepper. Note that fresh chili peppers work too. Just chop them small and mix them in. Always taste as you go. This way, you can find your perfect spice balance. Fresh broccoli has a bright flavor and crisp texture. It's great for roasting. However, frozen broccoli is a good choice too. It’s convenient and often pre-cut. If you use frozen broccoli, thaw it first. Pat it dry to remove excess water. This will help it roast properly. Both options can be delicious, but the fresh version shines in flavor. For the best taste, I recommend using fresh broccoli when you can. For the full recipe, follow the steps above! {{image_2}} You can make this dish even better by adding more veggies. Try carrots, bell peppers, or cauliflower. Just cut them into similar sizes as the broccoli. This way, they will cook evenly. Toss them in the same lemon-garlic mix. The flavors will blend nicely, making each bite exciting. You can even add cherry tomatoes for a sweet twist. Just keep an eye on cooking time. Softer veggies might need less time in the oven. If you want a vegan version, skip the Parmesan cheese. You can use nutritional yeast instead. It gives a cheesy flavor without dairy. Simply sprinkle it on before serving. You can also add a splash of balsamic vinegar for extra depth. This will enhance the taste and keep it plant-based. Feel free to change the flavor with different herbs and spices. You can use thyme or rosemary for a fresh taste. If you like heat, add more red pepper flakes or even cayenne. For a smoky flavor, sprinkle some smoked paprika. You can also swap lemon for lime or orange for a fruity twist. Each choice will give your broccoli a unique flair. Try these variations to keep the dish exciting. Each change brings new tastes to your table. For the full recipe, refer to the beginning of this article. After enjoying your Lemon Garlic Roasted Broccoli, let it cool down. Place the leftovers in an airtight container. This keeps the broccoli fresh for up to three days in the fridge. Make sure to store it away from strong-smelling foods to avoid any unwanted flavors. To reheat, I suggest using your oven or a skillet. Preheat your oven to 350°F (175°C). Spread the broccoli on a baking sheet and warm it for about 10 minutes. If you use a skillet, add a splash of water to help steam it. Heat over medium for about five minutes, stirring often. This method keeps the broccoli tender and tasty. If you have extra broccoli, you can freeze it! First, let it cool completely. Then, place it in a freezer-safe bag. Remove as much air as you can before sealing. You can freeze it for up to three months. When you're ready to eat, thaw it overnight in the fridge. Reheat using the methods mentioned above. This way, you’ll have a quick side dish ready to go! For the full recipe, check out the details above. Enjoy your cooking! Yes, you can! This recipe works well with other veggies. Try using cauliflower, asparagus, or Brussels sprouts. Just cut them into similar sizes to ensure even cooking. Toss them with the same lemon and garlic mix for a fresh taste. Each vegetable brings its own flavor and texture. Roasting broccoli takes about 20-25 minutes at 425°F (220°C). You want it tender and a bit charred. Make sure to toss halfway through cooking. This helps it roast evenly and adds a nice crunch to each bite. Keep an eye on it to avoid overcooking. Yes, you can prep the ingredients ahead of time. Chop the broccoli and mix the lemon garlic blend. Store them in the fridge until you're ready to roast. This makes it easy to have a quick side dish. Just pop it in the oven when you're ready. For the full recipe, check the detailed instructions above. This recipe for lemon garlic roasted broccoli is simple and tasty. We learned how to prepare fresh ingredients, mix them, and roast broccoli until golden. I shared tips to adjust spice levels and how to use fresh or frozen broccoli. We explored ways to add new veggies or make it vegan. Lastly, I provided storage tips to keep leftovers fresh. Enjoy this dish as a healthy side or main feature. It's easy to make and perfect for any meal.

Lemon Garlic Roasted Broccoli Delightful and Simple

If you’re craving a tasty side dish, look no further than Lemon Garlic Roasted Broccoli! This simple recipe blends fresh

To make these salted caramel mocha brownies, gather these key ingredients: - 1 cup unsalted butter - 1 1/4 cups granulated sugar - 1 cup packed brown sugar - 4 large eggs - 1 teaspoon vanilla extract - 3/4 cup all-purpose flour - 1 cup cocoa powder - 1 teaspoon baking powder - 1/2 teaspoon salt - 1 tablespoon instant coffee granules - 1/2 cup semisweet chocolate chips - 1/2 cup salted caramel sauce - Sea salt flakes for garnish These ingredients create a rich and flavorful brownie. The unsalted butter gives a creamy base. The mix of granulated and brown sugar adds sweetness and depth. Eggs provide moisture and structure. Vanilla extract enhances the overall flavor profile. The dry ingredients play a crucial role too. All-purpose flour gives the brownies a sturdy texture. Cocoa powder adds that essential chocolate flavor. Baking powder makes them rise and stay fluffy. Salt balances the sweetness, while instant coffee granules deepen the mocha taste. Adding semisweet chocolate chips gives a delightful melt-in-your-mouth experience. The salted caramel sauce takes these brownies to the next level. Finally, a sprinkle of sea salt flakes offers a finishing touch, making every bite irresistible. {{ingredient_image_1}} First, grab a 9x13 inch baking pan. You can grease it well or line it with parchment paper. This makes it easy to lift the brownies out later. Preheat your oven to 350°F (175°C). This step is key to baking them evenly. Next, melt 1 cup of unsalted butter in a medium saucepan over low heat. Once melted, take it off the heat. Stir in 1 1/4 cups of granulated sugar and 1 cup of packed brown sugar until they blend well. Add 4 large eggs, one at a time, mixing well after each. Finally, stir in 1 teaspoon of vanilla extract. This mixture will give your brownies a rich flavor. In a separate bowl, whisk together 3/4 cup of all-purpose flour, 1 cup of cocoa powder, 1 teaspoon of baking powder, 1/2 teaspoon of salt, and 1 tablespoon of instant coffee granules. Mixing these dry ingredients well is crucial. It helps to evenly distribute the flavors throughout the brownies. Now, slowly add the dry mix to the wet mix. Stir until just combined; don’t overmix. Next, fold in 1/2 cup of semisweet chocolate chips. Pour half of this brownie batter into your prepared pan. Spread it evenly. Drizzle half of the 1/2 cup of salted caramel sauce over this layer. Pour the remaining brownie batter on top and swirl it gently with a knife. This creates a lovely marbled effect. Drizzle the rest of the caramel sauce on top and sprinkle sea salt flakes for a nice finish. Bake your brownies for 25-30 minutes. Check doneness with a toothpick. It should come out with a few moist crumbs, not wet batter. Once baked, let the brownies cool in the pan for at least 15 minutes. This cooling time makes cutting easier and helps the flavors settle. Enjoy the sweet aroma wafting through your kitchen! To make the best brownies, you need the right texture. Start by melting the butter gently. This keeps the brownies moist and soft. Mix the sugars well with the melted butter. This step is key for a smooth batter. When adding eggs, mix each one in fully before adding the next. This helps create a rich, fudgy texture. Use cocoa powder for a deep chocolate flavor. If you want more chew, let the brownies cool longer before cutting. Swirling caramel into brownies makes them look fancy and taste divine. Start by pouring half of the brownie batter into the pan. Then, drizzle half of the salted caramel sauce on top. Use a knife to gently swirl it in. Move the knife in a figure-eight motion for a beautiful pattern. After that, add the rest of the batter on top. Repeat the drizzling and swirling with the remaining caramel. This technique creates a stunning marbled effect. How you serve these brownies can make a big difference. Place them on a rustic wooden platter for a nice touch. Drizzle more salted caramel sauce on top before serving. A light sprinkle of sea salt adds a nice contrast. If you want, you can add a scoop of ice cream next to each brownie. This makes a great dessert for family or friends. Enjoying them warm is a must for that gooey goodness. Pro Tips Use Room Temperature Ingredients: For a smoother batter, ensure your eggs and butter are at room temperature before mixing. Don’t Overmix: Mix the batter until just combined to keep the brownies fudgy and avoid a cake-like texture. Chill for Better Cutting: Allow the brownies to cool completely before cutting; chilling them in the fridge for an hour makes slicing easier. Customize Your Toppings: Experiment with different toppings like nuts, drizzled chocolate, or whipped cream for added texture and flavor. {{image_2}} You can make your salted caramel mocha brownies even better by adding nuts. Walnuts or pecans add a nice crunch. Chop them up and mix them in with the chocolate chips. You can also sprinkle some on top before baking. For a sweet twist, try adding mini marshmallows or crushed candy bars. These toppings can make each bite a fun surprise. If you want to make gluten-free brownies, it’s easy! Just swap the all-purpose flour for a gluten-free blend. Many brands work well in brownie recipes. This change keeps the taste and texture nice. Just follow the same steps as the original recipe, and you’ll have tasty gluten-free brownies. For a vegan version, you can replace the eggs with flax eggs. To make a flax egg, mix one tablespoon of ground flaxseed with three tablespoons of water. Let it sit for five minutes until it thickens. Use dairy-free butter and chocolate chips to keep it vegan. The rest of the recipe stays the same. You will still enjoy the rich flavor of the brownies! To keep your salted caramel mocha brownies fresh, store them in an airtight container. Place a piece of parchment paper between layers to prevent sticking. Keep them at room temperature for up to four days. If you want to enjoy them longer, refrigeration is a good option. Just remember, cold brownies can be a bit firmer. Freezing brownies is easy and a great way to save leftovers. First, let the brownies cool completely. Cut them into individual squares for easy serving. Wrap each square tightly in plastic wrap. Then, place the wrapped brownies in a freezer-safe bag or container. They can last up to three months in the freezer. When you’re ready to enjoy, just thaw them in the fridge overnight. If you want to enjoy warm brownies, reheating is simple. Preheat your oven to 350°F (175°C). Place the brownies on a baking sheet. Heat them for about 10 minutes, or until warm. For a quick fix, you can also use the microwave. Heat each square for about 15-20 seconds. Just don’t overdo it, or they might dry out. Enjoy your gooey treat! You can use applesauce for eggs. Use 1/4 cup per egg. Another option is mashed banana. Use 1/4 cup per egg. Silken tofu is also a good choice. Replace each egg with 1/4 cup of blended tofu. These substitutes work well in brownies, keeping them moist. Yes, you can use any chocolate you like. Dark chocolate adds a rich flavor. Milk chocolate gives a sweeter taste. You can even mix chocolates for a fun twist. Just make sure to keep the same amount. This way, the texture stays perfect. To make salted caramel, start with sugar in a pan. Heat it on medium until melted. Stir gently until it turns amber. Add butter and cream slowly. Mix until smooth. Then, add a pinch of sea salt. Let it cool before using in your brownies. Check the brownies around 25 minutes. Insert a toothpick in the center. If it comes out with a few moist crumbs, they are ready. If it comes out clean, they may be overbaked. Let them cool for 15 minutes before cutting. Yes, you can make brownies ahead of time. After baking, let them cool completely. Store them in an airtight container. They last up to a week. You can also freeze them for up to three months. Just thaw before serving. This blog post covered all you need for perfect brownies. We explored each ingredient, from unsalted butter to salted caramel sauce. I shared clear steps on baking, mixing, and cooling. Plus, I added tips for perfecting the texture and serving. You can also try different variations, like gluten-free or vegan brownies. Overall, follow these steps, and you'll impress everyone with your baking. Enjoy your tasty treats and share them with friends!

Salted Caramel Mocha Brownies Irresistible Treat

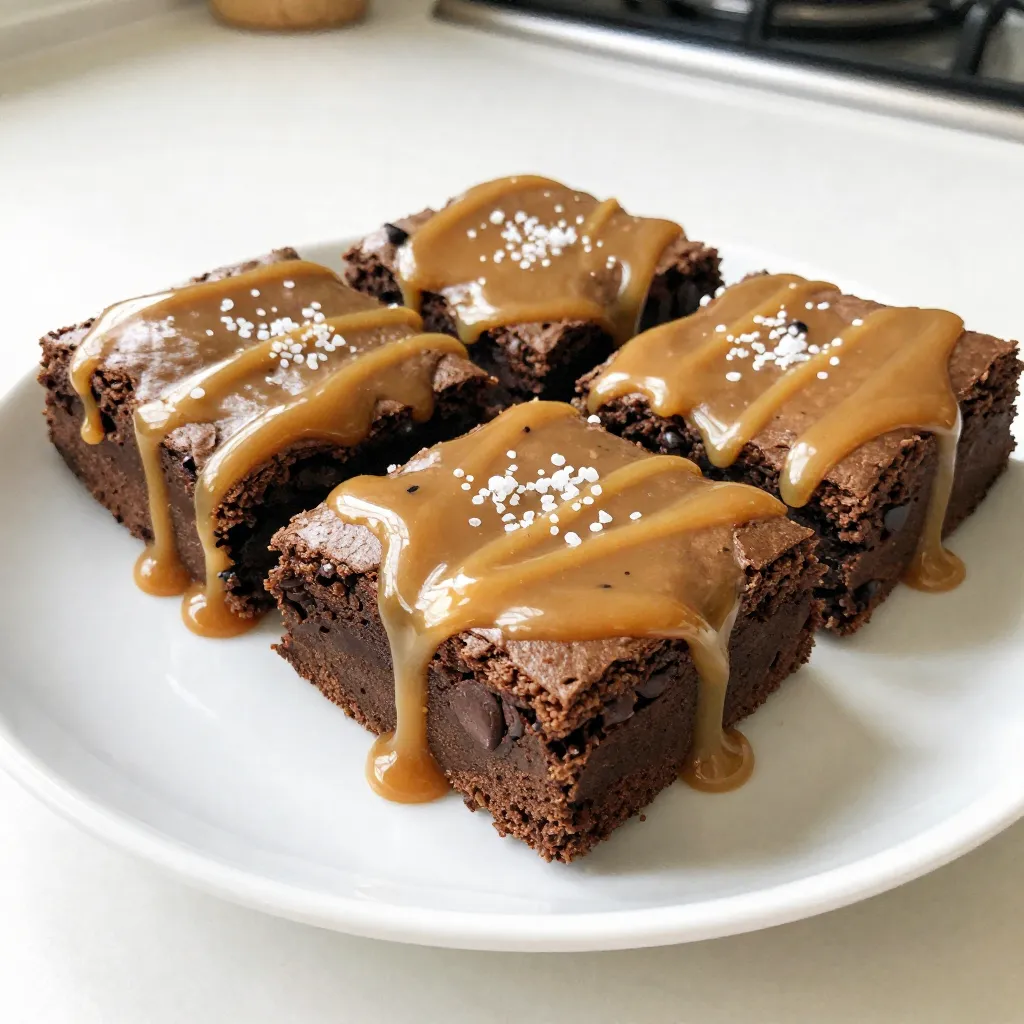
Indulge your sweet tooth with my Salted Caramel Mocha Brownies! These brownies combine rich chocolate, smooth coffee, and a touch

To make this delightful no bake strawberry cheesecake, gather these simple ingredients: - 1 ½ cups graham cracker crumbs - ½ cup unsalted butter, melted - 2 cups cream cheese, softened - 1 cup powdered sugar - 1 teaspoon vanilla extract - 1 cup heavy whipping cream - 1 cup fresh strawberries, pureed - 1 cup fresh strawberries, sliced (for topping) - 2 tablespoons lemon juice You can swap ingredients based on your taste or what you have at home. - Graham cracker crumbs: Use digestive biscuits or vanilla wafers. - Unsalted butter: Coconut oil or margarine work well too. - Cream cheese: Try Greek yogurt for a lighter option. - Powdered sugar: Use honey or maple syrup for a natural sweetener. - Heavy cream: Substitute with coconut cream for a dairy-free version. - Fresh strawberries: Use other fruits like raspberries or blueberries for a twist. When choosing strawberries, look for bright red ones. They should feel firm and plump. Check for any green or white spots, as those berries may not be ripe. Smell the strawberries; a sweet aroma means they are fresh and flavorful. Choose strawberries that are free of blemishes or mold. To keep them fresh longer, store strawberries in the fridge and wash them only before use. Enjoy the taste of summer with every bite of your cheesecake! First, you need to make the crust. Gather your graham cracker crumbs and melted butter. In a medium bowl, mix the crumbs and butter well. The mix should feel like wet sand. Next, take a 9-inch springform pan and press the mixture into the bottom. Use your hands or a spatula to pack it tightly. This step is key for a firm crust. Once done, place the pan in the refrigerator. Let it chill for about 30 minutes to set. Now, it's time for the filling. Begin with softened cream cheese in a large bowl. Beat it with an electric mixer until it’s smooth and creamy. This takes just a couple of minutes. Slowly add in the powdered sugar while mixing. Make sure it’s well combined. Then, stir in vanilla extract and lemon juice. These ingredients add great flavor. In a separate bowl, whip the heavy cream until you see soft peaks. This will make the filling light and airy. Gently fold the whipped cream into the cream cheese mixture. Finally, pour in the strawberry puree and fold until you see a lovely pink color. Take your chilled crust out of the fridge. Pour the strawberry cheesecake filling over the crust. Use a spatula to smooth the top. Cover the cheesecake with plastic wrap. Place it back in the refrigerator to set. You should wait at least 4 hours, or overnight if you can. When it's ready, remove the cheesecake from the pan. Top it with fresh slices of strawberries for a beautiful finish. Enjoy this sweet treat! For the full recipe, check out the earlier section. To make a smooth cream cheese mixture, use softened cream cheese. Cold cream cheese will clump. Beat it with an electric mixer until it is creamy. Slowly add the powdered sugar while mixing. This helps avoid lumps. Add the vanilla and lemon juice next. Mix until all is well combined. This mixture should feel light and fluffy. For perfect whipped cream, start with cold heavy cream. Use a chilled bowl and beaters for best results. Whip the cream on medium speed. Stop when you see soft peaks. Don't overbeat; it can turn into butter. Gently fold this whipped cream into your cheese mixture. This keeps your cheesecake light and airy. To serve your cheesecake beautifully, slice it into even pieces. Use a sharp knife for clean cuts. Place each slice on a plate. Drizzle some extra strawberry puree on top. Add fresh strawberry slices for color. A sprig of mint can make it pop! These small touches make your dessert look stunning. Find the Full Recipe for all the details! {{image_2}} You can easily change the flavor by using other fruit purees. Try mango, blueberry, or raspberry for a twist. Each fruit brings its unique taste and color. Mix the puree into the cream cheese mixture just like you do with strawberries. This gives you a fun way to enjoy different flavors all year round. Graham crackers are classic, but they are not your only choice. You can use crushed cookies like Oreos or vanilla wafers. For a gluten-free option, try almond flour or gluten-free cookies. Just mix them with melted butter and press them into your pan. Each crust option adds a new layer of taste to your cheesecake. If you love chocolate, you can add cocoa powder to the cheesecake mix. Just mix in about a quarter cup of cocoa powder for a rich chocolate flavor. For a vanilla twist, use vanilla bean paste instead of extract. This makes your cheesecake taste even more special. These small changes create new and exciting desserts you will love. For the Full Recipe, check the main article to see how to make this tasty treat! To keep your no bake strawberry cheesecake fresh, store it in the fridge. Use a tight lid or plastic wrap to cover it. This helps avoid any odor from other foods. Always place it on a flat surface. The cheesecake should stay cold and firm. If you plan to eat it within a few days, this method works best. You can freeze your cheesecake for later. First, let it chill in the fridge for at least four hours. Once it has set, wrap it tightly in plastic wrap. Then, place it in a freezer-safe container. This helps protect it from freezer burn. It can last up to three months in the freezer. When ready to enjoy, move it to the fridge to thaw overnight. Leftover no bake strawberry cheesecake lasts about five days in the fridge. Be sure to keep it covered well. After five days, check for any signs of spoilage. If it looks or smells off, it’s safer to discard it. Using fresh ingredients helps maintain its quality and taste for as long as possible. Yes, you can make this cheesecake ahead of time. I often prepare it the night before. This allows the flavors to blend well and the cheesecake to set properly. Store it in the fridge, covered. This way, you have a tasty dessert ready for any occasion. If you want a swap for cream cheese, try mascarpone cheese. It has a smooth texture and rich flavor. You can also use Greek yogurt for a lighter option. Keep in mind that the taste will change a bit, but it can still be delicious. To keep your crust crisp, make sure to press the graham cracker mixture firmly. Bake it for 10 minutes at 350°F before adding the filling. This slight baking helps to firm it up. Finally, cool the crust completely before adding the filling to avoid sogginess. You now have a clear guide to making a delicious no-bake strawberry cheesecake. We covered all the steps, from gathering ingredients to storage tips. You learned how to choose fresh strawberries and swap ingredients if needed. Perfecting your cheesecake filling and presentation will impress everyone. Remember, variations can make your cake unique. Enjoy your sweet creation knowing you can store and serve it with ease. Now, get baking and treat yourself!

No Bake Strawberry Cheesecake Simple and Tasty Treat

Craving a sweet treat that’s easy to make? The No Bake Strawberry Cheesecake is perfect! With a creamy filling and

Older posts
Newer posts
← Previous Page1 … Page82 Page83 Page84 Page85 Next →

dsad

© 2026 greenmealmap • Built with GeneratePress

Our Policies

  • Copyright Policy
  • Cookie Policy
  • GDPR Policy
  • Privacy Policy
  • Disclaimer
  • Terms Of Use

More Information

  • Home
  • About
  • Contact
  • Appetizers
  • Dessert
  • Dinner
  • Drinks
©2026, greenmealmap About Back To Top