Skip to content
DisclaimerTerms Of UseGDPR PolicyCookie Policy

greenmealmap

  • Home
  • Drinks
  • Appetizers
  • Dinner
  • Dessert
  • About
  • Contact
  • Privacy Policy
DisclaimerTerms Of UseGDPR PolicyCookie Policy

NO-ING-IMG

- Pizza Dough Options: You can use store-bought or make homemade dough. Store-bought saves time. Homemade gives you control over texture and taste. - Chicken and Buffalo Sauce Combination: Start with cooked chicken. Shred it and mix with buffalo sauce. This adds great flavor and heat. Adjust the sauce based on how spicy you like it. - Cheeses: For this pizza, mozzarella cheese gives that gooey texture. Blue cheese adds a tangy taste. You can use more mozzarella if you prefer a milder flavor. - Vegetables: Red onion adds sweetness and color. Celery gives a nice crunch. Together, they balance the rich flavors of the pizza. These ingredients come together to create a mouthwatering dish. For the full recipe, check out the details above. 1. Preheat your oven and prepare the baking surface. Start by setting your oven to 475°F (245°C). You can use a pizza stone or a baking sheet. Place it in the oven to heat while you work on the pizza. 2. Mix the chicken with buffalo sauce. In a bowl, take 1 cup of cooked, shredded chicken. Pour in 1/2 cup of buffalo sauce. Stir well until the chicken is coated evenly. This mix adds a spicy kick to your pizza. 3. Roll out the pizza dough. Use either store-bought or homemade dough. Dust your surface with flour. Roll the dough into a circle about 12 inches wide. Aim for your desired thickness, keeping it even. 4. Assemble the pizza with toppings. Carefully take your hot baking surface from the oven. Brush it with 2 tablespoons of olive oil to stop the dough from sticking. Place the rolled dough on the surface. Spread the buffalo chicken mix over the dough, leaving a small edge. Top it with 1 cup of shredded mozzarella cheese, 1/2 cup of crumbled blue cheese, and 1/4 cup of thinly sliced red onion. Finish with a dash of salt and pepper. - How long to bake and at what temperature? Place your assembled pizza in the oven. Bake for 12-15 minutes, or until the crust is golden and the cheese is bubbling. - Signs of readiness. Look for a nice golden crust and bubbling cheese. When you see these signs, your pizza is ready to come out! For the complete recipe, check out the Full Recipe. Enjoy the fun of making Buffalo chicken pizza! How to prevent sticking To keep your dough from sticking, use flour. Dust your work surface and your rolling pin lightly. If the dough sticks, lift it, add a bit more flour, and roll again. This helps you keep the dough smooth and manageable. Rolling techniques for the perfect crust When rolling out your dough, start from the center. Press down gently and roll outward to the edges. Turn the dough a quarter turn after a few rolls. This keeps the shape round and helps it rise evenly. Aim for a thickness of about a quarter inch for a crispy crust. Using different sauces or spice levels You can switch up the flavor by using different sauces. Try a garlic or ranch sauce for a milder taste. If you want more heat, add extra hot sauce or a spicy sauce blend. This lets you customize your pizza for your taste. Recommended garnishes for extra flavor Garnishing adds a nice touch to your pizza. I like to use chopped celery and parsley for freshness. You can also add sliced jalapeños for heat or more blue cheese for creaminess. These small additions make a big difference in taste. For a full recipe, check out the Spicy Buffalo Chicken Pizza recipe. {{image_2}} You can switch up the cheese to change the taste. Cheddar cheese adds a sharp kick. Pepper jack gives a spicy twist. Both options work well with buffalo chicken. They melt nicely and enhance the flavor. Try mixing different cheeses for more depth. You can also swap the protein in this dish. If you want a different taste, use pulled pork. It pairs well with the buffalo sauce. Tofu is a great choice for a vegetarian option. Just marinate the tofu in buffalo sauce before cooking. This keeps the flavors strong and satisfying. For those who need gluten-free options, you are in luck. Many stores sell gluten-free pizza dough. You can also make your own using almond flour or cauliflower. Both options work well and taste great. If you follow a vegan diet, you can still enjoy buffalo pizza. Use plant-based chicken alternatives. These mimic the taste and texture of chicken. For cheese, try vegan mozzarella. It melts well and adds creaminess. You can even use a cashew-based cheese for a richer flavor. These options let everyone enjoy this savory dish. For the full recipe, make sure to check out the complete section above. To keep your Buffalo chicken pizza fresh, store it properly. First, let the pizza cool to room temperature. Then, wrap it tightly in plastic wrap or aluminum foil. You can also place it in an airtight container. This method helps keep moisture in and air out. How long does Buffalo chicken pizza last in the fridge? When stored well, it can last about 3 to 4 days in the fridge. If you want to keep it longer, consider freezing it. Just make sure to use a freezer-safe container or wrap it tightly. In the freezer, it can last up to 2 months. To enjoy your pizza again, reheating is key. The best method is using the oven. Preheat your oven to 350°F (175°C). Place the pizza on a baking sheet and heat for about 10-15 minutes. This method keeps the crust crispy and the cheese melty. If you're short on time, you can use the microwave. Just place a slice on a microwave-safe plate. Heat for 30 seconds to 1 minute. However, this might make the crust a bit soggy. For an even better taste, try the oven method. Enjoy your Buffalo chicken pizza just like fresh! How to make Buffalo chicken pizza spicy? To boost the heat, add more buffalo sauce. You can also mix in chopped jalapeños or crushed red pepper flakes. For a smoky twist, try adding chipotle chili powder. Adjust the spice level to suit your taste. Can I use raw chicken for this recipe? I do not recommend using raw chicken. Always cook the chicken first for safety. Shredded or diced cooked chicken works best. This ensures the pizza cooks evenly and the chicken stays tender. Overview of calories and macros for one serving One slice of Buffalo chicken pizza has about 250 calories. It contains around 12 grams of protein and 10 grams of fat. These numbers can change based on the dough and toppings you choose. Healthier alternatives or modifications for the recipe To make this dish lighter, use whole wheat pizza dough. You can also replace mozzarella and blue cheese with low-fat cheese. Adding more veggies, like bell peppers or spinach, boosts nutrition. For a gluten-free option, choose a cauliflower crust. Buffalo chicken pizza mixes tasty flavors and fun prep steps. You can use store-bought or homemade dough. The right chicken and sauce mix is key for flavor. Adding quality cheese and fresh veggies makes it even better. Now you have tips for perfect dough, different variations, and storage. Experiment with flavors to find what you love. This dish is great for parties or a cozy night in. Enjoy making your own delicious buffalo chicken pizza!

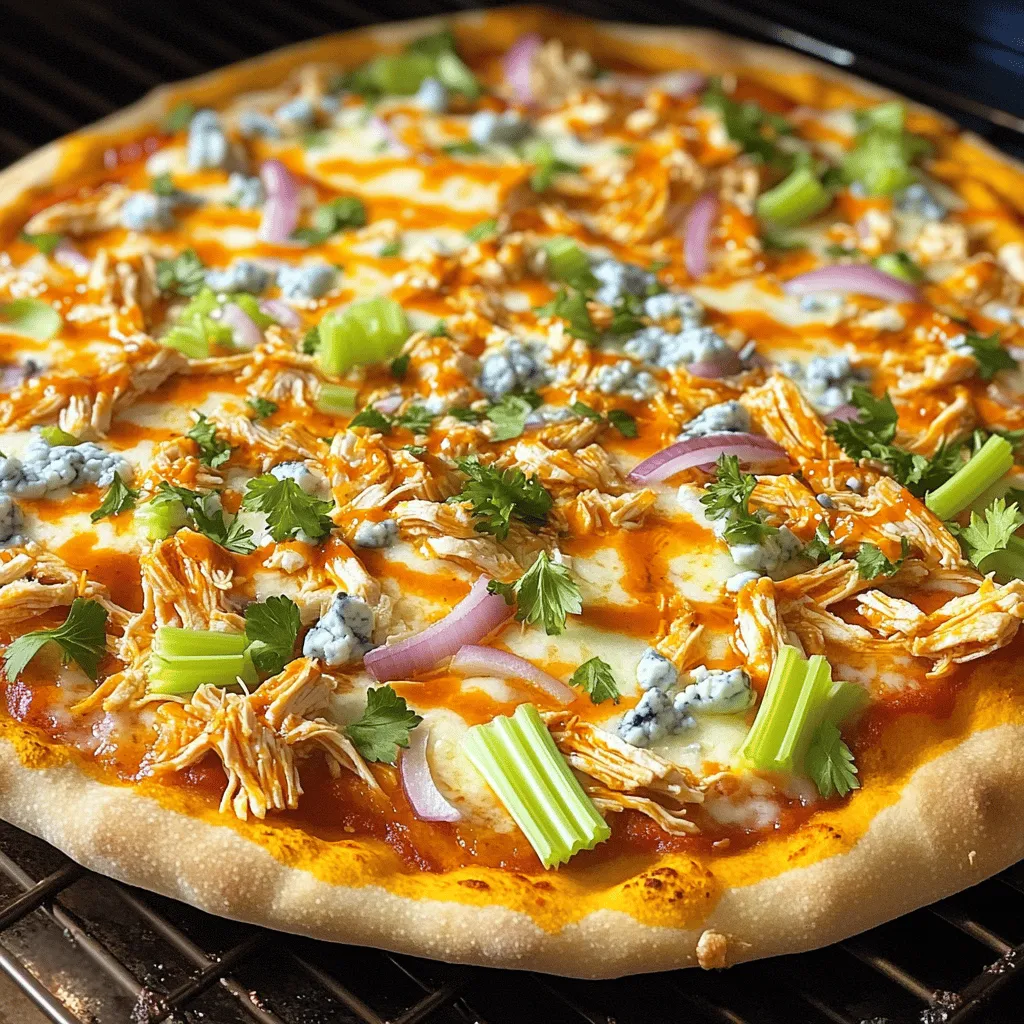
Buffalo Chicken Pizza Savory and Flavorful Delight

Are you ready to take pizza night to the next level? Buffalo chicken pizza is a mouthwatering blend of spicy

- 4 boneless, skinless chicken breasts - 1 cup all-purpose flour - 1 teaspoon salt - 1/2 teaspoon black pepper - 2 tablespoons olive oil - 2 tablespoons butter - 8 oz cremini or button mushrooms, sliced - 2 cloves garlic, minced - 1 cup chicken broth - 1 tablespoon balsamic vinegar - 1 teaspoon dried oregano - 1/4 teaspoon red pepper flakes (optional) - Fresh parsley, chopped, for garnish The main stars of this dish are the chicken breasts. They soak up the sauce and stay juicy. The flour mixture gives them a nice coating. Mushrooms bring a rich flavor, while garlic adds a punch. - 1 tablespoon balsamic vinegar - 1/4 teaspoon red pepper flakes - Fresh parsley, chopped Optional ingredients can enhance the dish. Balsamic vinegar adds sweetness and tang. Red pepper flakes give it a kick. Fresh parsley not only adds color but also freshness. If you want to try this recipe, check the Full Recipe for more details. Flattening the chicken breasts Start by placing the chicken breasts between two sheets of plastic wrap. Use a meat mallet to pound them to an even thickness. This step helps the chicken cook evenly and stay juicy. Dredging in the flour mixture In a shallow dish, mix the flour, salt, and black pepper. Take each chicken breast and coat it in the flour mixture. Shake off any extra flour to avoid a heavy crust. Heating the skillet Grab a large skillet and heat olive oil and butter over medium heat. Wait until the butter melts and bubbles before adding the chicken. Cooking time and technique Add the chicken to the skillet. Cook for about 4-5 minutes on each side. Look for a golden brown color to know it's done. Once cooked, remove the chicken and set it aside. Sautéing mushrooms and garlic In the same skillet, add sliced mushrooms. Sauté them for about 5 minutes until they brown and soften. Then, add minced garlic and cook for another minute until the smell fills the air. Adding broth and vinegar Pour in the chicken broth and balsamic vinegar. Make sure to scrape any brown bits off the bottom of the pan. These bits add great flavor. Stir in oregano and optional red pepper flakes for a bit of heat. Simmering and final cooking steps Bring the sauce to a gentle simmer. Let it cook for about 3-4 minutes to reduce slightly. Return the cooked chicken to the skillet, spooning sauce over the top. Cook together for another 2-3 minutes to warm it through. For the full recipe, check out the Easy Chicken Marsala section! To make sure your chicken cooks evenly, flatten the breasts to the same thickness. Use a meat mallet or rolling pin. This step helps your chicken cook at the same rate. - Cook in batches if your pan is small. This keeps the heat up and ensures nice browning. - Use a meat thermometer. Aim for an internal temperature of 165°F (75°C) for safe eating. For enhancing flavor, consider these tips: - Add fresh herbs like thyme or rosemary for a fragrant touch. - Deglaze the pan with white wine before adding broth for extra depth. Pair your Chicken Marsala with simple sides. Some great options include: - Mashed potatoes or creamy polenta for a comforting base. - Steamed vegetables like green beans or broccoli for color and crunch. For garnishing, use fresh parsley. Sprinkle it on top just before serving for a pop of color. You can also add a squeeze of fresh lemon juice for brightness. For a full recipe, check out Easy Chicken Marsala . {{image_2}} You can make this dish healthier by swapping some ingredients. Try using whole wheat flour instead of all-purpose flour. This change adds fiber and nutrients to your meal. You can also use low-sodium chicken broth. This option helps cut back on salt without losing flavor. If you want a vegetarian twist, you can replace chicken with tofu or eggplant. Both options soak up the sauce well. For a gluten-free version, use almond flour or a gluten-free flour mix. You can adjust the spice levels to suit your taste. If you love heat, add more red pepper flakes. Start with a little, then taste as you go. You can also use black pepper for more warmth without the spice. For mushrooms, you can try different varieties. Cremini mushrooms give a rich, earthy taste. Button mushrooms are milder but still delicious. If you want something unique, use shiitake or portobello mushrooms. They add a different layer of flavor. Experimenting with these substitutions and flavor profiles makes Easy Chicken Marsala fun and exciting. You can find the full recipe to guide you further in your cooking adventure. - Refrigeration: Place leftover Chicken Marsala in an airtight container. This helps keep it fresh. It’s best to eat it within 3-4 days. - Freezing: If you want to freeze it, use a freezer-safe container. You can store it for up to 2 months. Just remember to label it with the date. - Microwave: For quick reheating, use the microwave. Place the chicken in a safe dish and cover it. Heat for 1-2 minutes. Check that it’s hot throughout. - Stovetop: For better taste, reheat on the stovetop. Place chicken in a skillet over medium heat. Add a splash of chicken broth to keep it moist. Stir it often until heated through. This storage info helps you enjoy your Easy Chicken Marsala later. For the full recipe, check out the details above. This dish takes about 30 minutes to make. The prep time is around 10 minutes. Cooking time is about 20 minutes. You can serve it hot and fresh in no time. Yes, you can use various mushrooms. Cremini, button, or shiitake all work well. Each has a unique flavor. Feel free to mix them for extra taste. Absolutely! To make it kid-friendly, reduce the garlic and spice. You might skip the red pepper flakes. Kids often like milder flavors. Serve with pasta or rice for a fun twist. Yes, you can prepare it ahead of time. Cook the chicken and sauce, then cool them. Store in the fridge for up to two days. Reheat gently before serving. This makes weeknight meals easier. Check the [Full Recipe] for details. Easy Chicken Marsala is simple to make with just a few key ingredients. You learned about choosing the right chicken, flavorful mushrooms, and spices to enhance the dish. Following the steps helps you create a delicious meal quickly. Remember, you can adjust flavors and use substitutes to fit your taste. This recipe keeps well, making it perfect for leftovers. Enjoy serving it with your favorite sides for a complete experience. Happy cooking, and may your meals always delight your taste buds!

Easy Chicken Marsala Flavorful Dinner in Minutes

Ready to impress your family with a tasty meal? Let’s dive into Easy Chicken Marsala! This dish bursts with flavor

To make a great Southwest Chicken Salad, gather these main ingredients: - 2 cups cooked chicken breast, shredded - 1 cup black beans, rinsed and drained - 1 cup corn, fresh or frozen - 1 red bell pepper, diced - 1 avocado, diced - 1 cup cherry tomatoes, halved - 1/4 cup red onion, finely chopped These ingredients add a mix of protein, fiber, and vibrant colors. Cooked chicken breast gives the salad its protein kick, while black beans add fiber. Fresh or frozen corn brings sweetness, and the red bell pepper adds crunch. The avocado adds creaminess, cherry tomatoes offer juiciness, and red onion gives a sharp bite. For the dressing, you will need: - Juice of 2 limes - 1 tablespoon olive oil - 1 teaspoon ground cumin - 1 teaspoon smoked paprika - Salt and pepper to taste The lime juice adds brightness, while olive oil provides richness. Cumin gives a warm, earthy flavor. Smoked paprika adds a nice smokiness, and salt and pepper enhance everything. Together, these ingredients make a simple yet flavorful dressing. For a finishing touch, use: - 1/2 cup chopped cilantro - Tortilla strips for garnish Chopped cilantro adds a fresh herb taste that brightens the salad. The tortilla strips give it a crunchy texture. These garnishes make your salad look appealing and add more flavor. For the complete recipe, check out the [Full Recipe]. 1. Start by taking a large mixing bowl. Add 2 cups of cooked chicken breast, shredded. 2. Next, add 1 cup of black beans. Make sure to rinse and drain them first. 3. Add 1 cup of corn. You can use fresh corn or frozen corn, whichever you prefer. 4. Now, toss in 1 diced red bell pepper, 1 diced avocado, and 1 cup of halved cherry tomatoes. 5. Finally, sprinkle in 1/4 cup of finely chopped red onion. This gives the salad a nice crunch. 6. In a small bowl, whisk together the dressing. Use the juice of 2 limes, 1 tablespoon of olive oil, 1 teaspoon of ground cumin, and 1 teaspoon of smoked paprika. Add salt and pepper to taste. 7. Pour the dressing over your chicken and vegetable mix. Then, add 1/2 cup of chopped cilantro. 8. Gently toss everything together. You want each piece coated with the dressing. - After mixing, let the salad chill in the fridge for at least 20 minutes. Chilling helps the flavors blend nicely. - Before you serve, toss the salad lightly again. This keeps it fresh and well-mixed. - Top it off with tortilla strips for a crunchy texture. You can also add more cilantro for color. For the full recipe, check out the detailed instructions above. Enjoy your fresh and flavorful Southwest Chicken Salad! To make your Southwest Chicken Salad shine, adjust the seasoning to fit your taste. I always recommend starting with the basics and then adding more salt, pepper, or lime juice as needed. This way, you get the best flavor for your palate. You can also add some fun ingredients. For example, try diced jalapeños for heat or some diced mango for sweetness. These small changes can really elevate your salad. When serving your salad, presentation matters. Use a large, colorful bowl to show off all the fresh ingredients. Top with extra cilantro and a sprinkle of tortilla strips for a pop of color and crunch. Pair your salad with a side of tortilla chips or a light soup. This makes for a complete meal. A refreshing drink, like iced tea or lemonade, complements the flavors nicely. If you have a busy schedule, meal prep can save you time. Cook the chicken ahead of time, and store it in the fridge. You can even chop the veggies a day in advance. Just mix everything together when you are ready to eat. For shortcut ingredients, canned black beans and frozen corn work great. They save time and still taste delicious in your salad. This way, you can enjoy a fresh meal without all the fuss. For the full recipe, check out the Southwest Fiesta Chicken Salad 🥑. {{image_2}} When making this Southwest Chicken Salad, you can easily switch things up. If you want a vegetarian dish, use chickpeas or grilled tofu instead of chicken. They add protein and taste great! For different protein options, think about shrimp, steak, or even turkey. These swaps keep the dish fresh and exciting. You can try smoked salmon for a unique flair too! You can use homemade or store-bought dressings for this salad. Making your own dressing is simple and lets you control the flavors. The lime and cumin combo is fantastic! If you're in a hurry, grab a store-bought dressing. Look for something with a Southwest or ranch flavor to match the salad. You can also try other dressings like ranch, honey mustard, or even a spicy chipotle vinaigrette for a kick. Each option gives the salad a different taste. Using seasonal produce can add fresh twists to your salad. In summer, mix in ripe peaches or cucumbers for a juicy bite. In fall, consider adding roasted butternut squash or apples for sweetness. You can also tailor the salad for holiday gatherings. For a festive touch, add pomegranate seeds or roasted nuts. These add color and crunch, making your salad stand out! Remember, you can find the full recipe above to explore all these delicious variations! To keep your Southwest Chicken Salad fresh, store it in an airtight container. This helps maintain flavor and texture. I suggest eating leftovers within three days for the best taste. If you wait too long, the ingredients may lose their crunch. Can you freeze Southwest Chicken Salad? Yes, but it’s not the best idea because of the avocado. It can turn brown and mushy when thawed. If you want to freeze it, leave out the avocado and add it fresh later. For best results, freeze only the chicken, beans, and corn. When you’re ready to enjoy leftovers, keep it simple. Do not reheat the salad; serve it cold. If it seems dry, add a splash of lime juice or a drizzle of olive oil. This will enhance the flavor. Toss it gently and enjoy the freshness straight from the fridge. What is the best way to make Southwest Chicken Salad? The best way to make this salad is to use fresh ingredients. Start with cooked chicken breast. Shred it into bite-size pieces. Add black beans, corn, bell pepper, avocado, cherry tomatoes, and red onion to a large bowl. Can I make this salad ahead of time? Yes, you can prepare this salad ahead of time. Mix the chicken and veggies without the dressing. Cover and chill it in the fridge for up to 24 hours. When ready to serve, add the dressing and toss. How nutritious is Southwest Chicken Salad? Southwest Chicken Salad is very nutritious. It contains lean protein from the chicken and fiber from the black beans. The veggies add vitamins and minerals, making it a well-rounded meal. Caloric breakdown and healthy benefits This salad is low in calories but high in nutrients. One serving has about 300 calories. It provides healthy fats from avocado and olive oil, promoting heart health. Can I use canned chicken instead of cooked chicken breast? Yes, you can use canned chicken. Drain and rinse it well before adding it to the salad. Canned chicken is convenient and saves time. What can I substitute for black beans? You can use pinto beans or kidney beans instead of black beans. These options still add protein and fiber. You can also use corn for a sweet crunch. In this blog post, we explored the tasty world of Southwest Chicken Salad. We covered essential ingredients, from cooked chicken to colorful veggies. The dressing adds zest, and garnishes like cilantro make it pop. I shared tips for flavor and storage to help you enjoy this dish longer. Remember, you can mix ingredients and flavors to make it your own. You now have all you need to create this salad fresh and fun. Enjoy your cooking and impress your friends and family!

Southwest Chicken Salad Flavorful and Fresh Recipe

Looking for a fresh and tasty meal that’s easy to make? You’re in the right place! My Southwest Chicken Salad

To make Hawaiian Chicken Skewers, you need: - 1 lb chicken breast, cut into 1-inch cubes - 1 cup pineapple chunks (fresh or canned) - 1 bell pepper (red or yellow), cut into 1-inch pieces - 1 red onion, cut into wedges - 2 tablespoons soy sauce - 2 tablespoons honey - 1 tablespoon olive oil - 1 teaspoon garlic powder - 1 teaspoon ginger powder - 1 teaspoon ground black pepper - Skewers (soak wooden skewers in water for 30 minutes before use) These ingredients combine to create a tasty dish. The chicken cooks well with sweet pineapple and crunchy veggies. You can swap a few items to fit your taste. Try using chicken thighs for a juicier bite. If you want a vegan option, use tofu or tempeh instead of chicken. For the veggies, zucchini or cherry tomatoes work well too. Feel free to play with the flavors. Using fresh ingredients can make a big difference in taste. Fresh chicken, pineapple, and veggies add bright flavors and better textures. Canned pineapple is fine if fresh is not available. Just remember, fresh ingredients often give that homemade touch that everyone loves. To start, gather your ingredients for the marinade. You will need soy sauce, honey, olive oil, garlic powder, ginger powder, and black pepper. In a medium bowl, mix these items well. Whisk until everything blends smoothly. This marinade gives the chicken its sweet and savory flavor. After mixing the marinade, cut your chicken breast into 1-inch cubes. Place the chicken into the bowl with the marinade. Mix the chicken well to coat every piece. Cover the bowl and chill in the fridge. Let it marinate for at least 30 minutes. If you have more time, marinate for up to 2 hours. This adds great taste. Now, let’s prepare to grill. Preheat your grill to medium-high heat. Soak wooden skewers in water for 30 minutes before using them. This helps prevent burning. Thread the marinated chicken, pineapple chunks, bell pepper pieces, and onion wedges onto the skewers. Alternate the pieces for color and flavor. Place the skewers on the grill. Cook for about 10-15 minutes. Turn them occasionally until the chicken is fully cooked and shows grill marks. Enjoy your meal! For the full recipe, check the earlier section. To get those great grill marks, heat your grill well. A hot grill makes the chicken sizzle. Place the skewers on the grill without moving them for a few minutes. This helps form those nice lines. After a few minutes, flip them over. Keep an eye on the time to avoid overcooking. To keep your chicken juicy, marinate it well. The soy sauce and honey help with moisture. Avoid cooking on high heat for too long. A medium heat gives a nice cook without burning. If you see the chicken turning dark too fast, move it to a cooler part of the grill. This way, you get tender chicken every time. Hawaiian Chicken Skewers taste great with rice or quinoa. You can also serve them with a fresh salad. For a fun twist, add some coconut rice on the side. Fresh fruit like mango or watermelon pairs well too. For extra flavor, try a dipping sauce like teriyaki or sweet chili sauce. Check out the Full Recipe for more ideas! {{image_2}} You can swap chicken for many proteins. Shrimp is a great choice. It cooks quickly and absorbs flavors well. Tofu is another option for a plant-based meal. Press and cube the tofu before marinating. This helps it soak up the marinade. Both shrimp and tofu will make your skewers unique and tasty. Skewers are fun because you can mix and match veggies. Try zucchini, mushrooms, or cherry tomatoes. They all add color and flavor. You can even use asparagus or squash for a twist. Just cut them into uniform pieces for even cooking. The more veggies, the more flavors! You can change the marinade for different tastes. Try adding lime juice for a zesty kick. You can also mix in spicy sriracha for heat. For a sweet twist, add orange juice or coconut milk. Experimenting with herbs like cilantro or basil can also add fresh flavor. These changes keep your skewers exciting and delicious! Check out the Full Recipe for more ideas. To keep your Hawaiian Chicken Skewers fresh, store them in an airtight container. Allow the skewers to cool down first. This helps prevent moisture build-up. If you have extra marinade, you can drizzle some over the skewers before sealing. This adds flavor and keeps them juicy. Always refrigerate leftover skewers within two hours of cooking to ensure safety. When reheating, I suggest using the oven or a skillet. Preheat your oven to 350°F (175°C). Place the skewers on a baking sheet and cover them with foil. Heat for about 10-15 minutes. If using a skillet, warm them over medium heat for about 5-7 minutes. This method helps keep the chicken moist. Avoid microwaving as it can make the chicken rubbery. You can freeze Hawaiian Chicken Skewers if you have leftovers. Wrap each skewer tightly in plastic wrap, then place them in a freezer bag. Make sure to remove as much air as possible. For best results, consume them within three months. To thaw, place the skewers in the fridge overnight. If you're in a hurry, you can use the microwave's defrost feature. Once thawed, reheat them as mentioned above for the best taste. You should marinate the chicken for at least 30 minutes. This helps the chicken soak up all the tasty flavors. If you have more time, marinate for up to 2 hours. A longer marination time makes the chicken even more flavorful and juicy. Yes, you can make Hawaiian Chicken Skewers in the oven. Preheat your oven to 400°F. Place the skewers on a baking sheet lined with foil. Bake them for about 15-20 minutes, turning halfway through. This way, you still get that nice cooked look and taste, even without a grill. The best dipping sauce for Hawaiian Chicken Skewers is a sweet chili sauce. This sauce adds a nice sweet and spicy kick. You could also try a tangy teriyaki sauce or a simple soy sauce mix. Both pair well with the flavors of the chicken and pineapple. For more options, check the Full Recipe for ideas. Hawaiian Chicken Skewers are fun and easy to make. We covered key ingredients, cooking steps, and tips for success. Use fresh ingredients for the best flavor. Consider variations like shrimp or tofu to mix things up. Store leftovers properly for great taste later. Remember, marination time enhances flavor, and your grill settings matter. Enjoy experimenting with tasty sides and sauces. Now, you’re ready to impress your friends with these delicious skewers!

Hawaiian Chicken Skewers Flavorful and Easy Recipe

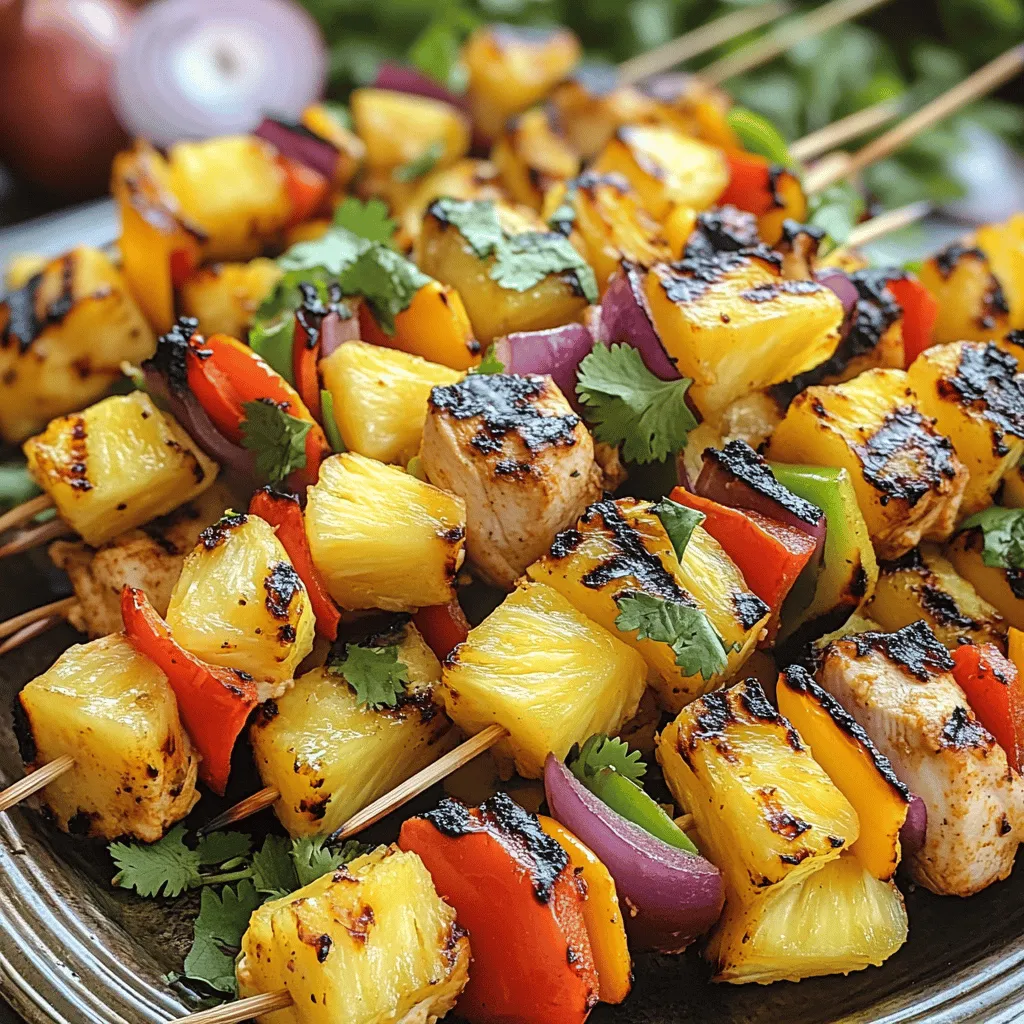
Looking for a flavorful meal that’s also easy to make? You’ve found it! Hawaiian Chicken Skewers bring a taste of

To make these tasty brownies, gather these key ingredients: - 1 cup unsalted butter, melted - 1 ½ cups granulated sugar - 1 cup brown sugar, packed - 4 large eggs - 1 teaspoon vanilla extract - 1 cup all-purpose flour - ½ cup cocoa powder - 1 teaspoon baking powder - ½ teaspoon salt - 1 cup dark chocolate chips - 1 cup fresh strawberries, hulled and sliced - 1 cup milk chocolate chips (for drizzling) These ingredients work together to create a rich and fudgy base, topped with sweet strawberries. You can add some optional ingredients to boost flavor: - ½ cup chopped nuts like walnuts or pecans - 1 teaspoon espresso powder for depth - A pinch of sea salt to enhance sweetness Adding these optional items can make your brownies even more delicious and unique. You’ll need a few handy tools to make this recipe: - 9x13 inch baking pan - Mixing bowls - Whisk or electric mixer - Rubber spatula - Measuring cups and spoons - Parchment paper (for easy removal) - Microwave-safe bowl for melting chocolate Having these tools ready will help you create these brownies with ease. For the full recipe, check out the details above. Start by gathering all your ingredients. You need: - 1 cup unsalted butter, melted - 1 ½ cups granulated sugar - 1 cup brown sugar, packed - 4 large eggs - 1 teaspoon vanilla extract - 1 cup all-purpose flour - ½ cup cocoa powder - 1 teaspoon baking powder - ½ teaspoon salt - 1 cup dark chocolate chips - 1 cup fresh strawberries, hulled and sliced - 1 cup milk chocolate chips (for drizzling) Measure each ingredient carefully. This makes sure your brownies turn out great. Prepare your baking pan by greasing it. Preheat the oven to 350°F (175°C) so it's hot and ready. In a large bowl, mix the melted butter with granulated sugar and brown sugar. Stir until it's smooth. Add in the eggs one at a time. Mix well after each egg. Then, stir in the vanilla extract. In another bowl, whisk together the flour, cocoa powder, baking powder, and salt. Gradually mix this dry mix into the wet mix. Stir until it just comes together. Be careful not to overmix. Fold in the dark chocolate chips gently. Pour half of the brownie batter into your greased pan and spread it evenly. Layer the sliced strawberries on top of the batter. Make sure they are spread out well. Now, pour the other half of the brownie batter over the strawberries. Cover them completely. Bake in the oven for 30 to 35 minutes. Check doneness by inserting a toothpick in the middle. It should come out with a few moist crumbs. After baking, let the brownies cool for about 15 minutes in the pan. For the drizzle, melt your milk chocolate chips. Use a microwave-safe bowl and heat it in 30-second bursts, stirring in between. Once melted, drizzle it over the brownies in a zigzag pattern. Allow the brownies to cool completely before cutting them into squares. For the full recipe, refer to the earlier section. To get the best brownie texture, you want them fudgy, not dry. Start by mixing your wet ingredients well. The melted butter and sugars need to blend smoothly. Adding eggs one by one gives a nice, rich base. When you mix in the dry ingredients, do it gently. Overmixing can make them tough. Pull them out of the oven when a toothpick shows a few moist crumbs. This keeps them soft and chewy. Melting chocolate can be tricky, but I have some simple tips. Use a microwave-safe bowl for chocolate chips. Heat in short bursts of 30 seconds. Stir after each burst to avoid burning. If you prefer, you can use a double boiler. Just make sure the bowl does not touch the water. Stirring often will help keep the chocolate smooth. Once melted, use it right away for drizzling. Presentation matters! Serve your brownies on a nice platter. You can add extra strawberry slices on the side. A sprinkle of powdered sugar gives a nice touch. For an added layer of flavor, serve with whipped cream or vanilla ice cream. You can even add a drizzle of caramel for a sweet surprise. These small details make your brownies stand out. For the full recipe, check out the details above. {{image_2}} You can enhance your brownies by adding nuts or other fruits. Chopped walnuts or pecans pair well with chocolate. They add a nice crunch and rich flavor. You can also use dried fruits, like cherries or blueberries. These fruits bring a burst of sweetness and extra moisture. Just chop them up and mix them in with the dark chocolate chips. This adds texture and makes your brownies even more special. If you need a gluten-free option, you can easily swap the flour. Use a gluten-free flour blend instead of all-purpose flour. Make sure it has a good binding agent, like xanthan gum, to help with texture. The rest of the recipe stays the same. You’ll get rich, fudgy brownies that everyone can enjoy. This way, no one has to miss out on this decadent treat! The chocolate drizzle can change with your taste. While I love using milk chocolate, dark chocolate works great too. You can even mix in some white chocolate for a sweet twist. Try adding a pinch of sea salt on top for a salty contrast. For a fun flavor, mix in a bit of orange zest or mint extract into the melted chocolate. These small changes can make a big impact on your brownies. Explore different combinations to find your favorite! For the full recipe, check out the Chocolate Covered Strawberry Brownies . Once you bake these chocolate covered strawberry brownies, they are hard to resist. If you have leftovers, store them in an airtight container. This keeps them fresh for up to four days. Place a piece of parchment paper between layers to avoid sticking. You want each bite to be just as good as the first. If you want to save some for later, freezing is a great option. Cut the brownies into squares before freezing. Wrap each square tightly in plastic wrap. Then, place them in a freezer bag or container. They stay good for up to three months. When you need a sweet treat, just thaw them in the fridge overnight. When you’re ready to enjoy your brownies again, reheating is easy. Place a brownie on a microwave-safe plate. Heat it for about 10-15 seconds. This makes it warm and gooey again. If you prefer, you can also warm them in the oven at 350°F (175°C) for about 5-10 minutes. Enjoying a brownie that tastes fresh is always a delight! Yes, you can use frozen strawberries. Just thaw and drain them well. This step helps avoid extra moisture in your brownies. Frozen strawberries can lose some texture but still taste great. They add a nice fruity flavor to the brownies. The best way to check if the brownies are done is to use a toothpick. Insert it into the center of the brownies. If it comes out with a few moist crumbs, they are ready. If the toothpick is clean, the brownies might be overcooked. Keep an eye on them during the last few minutes of baking. The difference lies in the ingredients and ratios used. Fudgy brownies have more fat and less flour. They tend to be denser and moister. Cakey brownies have more flour and less fat, leading to a lighter texture. For fudgy brownies, stick to the recipe for Chocolate Covered Strawberry Brownies. It has the right balance for a rich, fudgy treat. - Full Recipe: Chocolate Covered Strawberry Brownies You learned how to make tasty chocolate covered strawberry brownies. I covered the key ingredients, step-by-step instructions, and helpful tips. You can also explore variations and storage methods to enjoy them longer. Remember, you can use frozen strawberries and adjust textures between fudgy and cakey. With this guide, you can bake brownies that impress. Enjoy your sweet treats, and happy baking!

Chocolate Covered Strawberry Brownies Decadent Treat

Get ready to indulge in a treat that’s both chocolaty and fruity! Chocolate Covered Strawberry Brownies are the perfect way

To make Quick Shrimp Scampi Pasta, gather these fresh and simple ingredients. They create a tasty meal that is easy to make. - 8 ounces linguine or spaghetti - 1 pound large shrimp, peeled and deveined - 4 tablespoons unsalted butter - 4 cloves garlic, minced - 1/2 teaspoon red pepper flakes (adjust to taste) - 1 lemon, juiced - 1/4 cup chicken broth - 1/4 cup fresh parsley, chopped - Salt and pepper to taste - Zest of 1 lemon (for garnish) - Optional: Grated Parmesan cheese for serving Each ingredient plays a key role. The pasta provides a base that holds the sauce well. Shrimp adds protein and flavor, while garlic and red pepper bring warmth. Butter creates a rich sauce, and lemon juice adds brightness. Fresh parsley gives a pop of color and flavor. Using quality ingredients makes a big difference. Fresh shrimp is best for taste and texture. If you want to save time, you can use frozen shrimp. Just thaw them first. For a special touch, consider adding Parmesan cheese on top. It adds creaminess and depth. You can find the full recipe in the recipe section. Start by boiling a large pot of salted water. This step adds flavor to the pasta. Once the water boils, add 8 ounces of linguine or spaghetti. Cook according to the package instructions until al dente, which usually takes about 8 to 10 minutes. Al dente means the pasta is firm but not hard. After cooking, drain the pasta and remember to reserve a cup of pasta water. This water will help adjust the sauce later. In a large skillet, melt 2 tablespoons of unsalted butter over medium heat. Add 4 cloves of minced garlic and 1/2 teaspoon of red pepper flakes. Sauté these for about 1 minute until you smell the garlic. Then, add 1 pound of large shrimp, peeled and deveined. Cook the shrimp for about 2 to 3 minutes on each side. Look for a pink and opaque color to know they are done. Season with salt and pepper to taste. Once the shrimp are ready, add 1/4 cup of chicken broth and the juice of 1 lemon to the skillet. This will create a fresh and tangy sauce. Scrape any bits from the bottom of the pan with a spatula. Let the mixture simmer for about 2 minutes to enhance the flavor of the dish. Next, reduce the heat to low and gently mix the drained pasta with the shrimp. Toss everything together to coat the pasta well with the sauce. If the pasta seems dry, add a bit of the reserved pasta water until the sauce reaches your desired consistency. Now it’s time for the final touches. Add the remaining 2 tablespoons of butter and 1/4 cup of chopped fresh parsley. Toss the mixture again until everything is well coated and the butter melts. For a nice presentation, plate the pasta and garnish with lemon zest and extra parsley. You can also sprinkle some grated Parmesan cheese if you like. For the full recipe, check out the complete instructions. To make a great sauce, scrape the skillet. This pulls up tasty bits stuck to the pan. These bits add depth and flavor to your dish. If you want it a bit spicy, adjust the red pepper flakes. Start with half a teaspoon and add more if you like heat. Cook the shrimp for about 2 to 3 minutes on each side. They should turn pink and opaque when done. If they curl up tightly, that's a sign they are overcooked. Keep an eye on them to ensure they stay juicy and tender. To avoid sticky pasta, use plenty of salted water. Stir the pasta while it cooks to prevent clumping. To keep pasta warm, toss it with a little olive oil after draining. This keeps it nice and ready to serve. For the best results, always reserve some pasta water. You can use it to adjust the sauce later. For the full recipe, refer to the [Full Recipe]. {{image_2}} You can easily add vegetables to your shrimp scampi for more flavor and nutrients. Spinach works great because it wilts down quickly. Just toss it in during the last minute of cooking. Cherry tomatoes are another tasty option. They add a burst of sweetness and color. You can also try bell peppers, zucchini, or asparagus for a crunchy texture. These veggies not only enhance the dish but also make it more colorful and appealing. If you want to switch things up, try using scallops instead of shrimp. They cook quickly and have a sweet flavor. Chicken is another solid choice. Just cut it into bite-sized pieces and cook until golden brown. For those who prefer a meatless option, you can use chickpeas or tofu. Both options will soak up the delicious sauce, making your meal satisfying and tasty. Don’t be afraid to play with flavors in your shrimp scampi. Fresh herbs can elevate your dish. Basil, oregano, or thyme all add unique notes. You can also drizzle a bit of cream for a richer sauce. If you want a kick, consider adding a splash of Worcestershire sauce or a bit of white wine. These enhancements make your dish more complex and exciting. For the full recipe, check out the Quick Shrimp Scampi Pasta section. To store leftovers, let the pasta cool first. Place it in an airtight container. This keeps it fresh and prevents drying. Stored well, the pasta lasts 3 to 4 days in the fridge. Make sure to check for any off smells before eating. If you want to freeze it, portion the pasta in freezer-safe bags. Remove as much air as possible to avoid freezer burn. This method keeps the pasta good for about 2 months. When you want to eat it, take it out and thaw it overnight in the fridge. To reheat, use a skillet on low heat. Add a splash of water or broth for moisture. Stir gently to keep the shrimp from overcooking. This helps maintain the texture. You can also use a microwave. Heat it in short bursts, stirring often to heat evenly. It takes about 20 minutes to make Quick Shrimp Scampi Pasta. The prep time is about 10 minutes. Cooking the pasta and shrimp takes around 10 minutes. This fast recipe is perfect for busy nights. Yes, you can use frozen shrimp. Just make sure to thaw them first. I suggest placing them in cold water for about 15 minutes. This helps them cook evenly. Fresh shrimp taste great, but frozen shrimp work well too. You can pair this dish with several sides. Here are some ideas: - Garlic bread for a crunchy side. - A simple green salad for freshness. - Steamed vegetables for color and nutrition. These sides balance the meal nicely. Yes, this recipe is great for meal prep. You can cook it ahead and store it. Just keep it in an airtight container in the fridge. It will stay fresh for up to three days. When ready to eat, just reheat in a skillet. Add a splash of broth to keep it moist. In this blog post, we explored a simple and tasty shrimp scampi pasta. We covered every step, from gathering the right ingredients to cooking the pasta perfectly. I shared tips for enhancing the sauce and alternatives for proteins and veggies. Remember, you can store leftovers properly to enjoy later. With these insights, you can impress friends and family. Enjoy your cooking adventure and try new flavors. Your homemade shrimp scampi will surely delight everyone at the table.

Quick Shrimp Scampi Pasta Flavorful and Easy Dinner

Looking for a delicious meal that won’t take hours to prepare? This Quick Shrimp Scampi Pasta recipe is your answer!

To make a tasty spinach bacon quiche, you need these key ingredients: - 1 pre-made pie crust - 2 cups fresh spinach, chopped - 4 large eggs - 1 cup heavy cream - 1 cup shredded cheese (cheddar or mozzarella) - 1 small onion, finely chopped - 2 cloves garlic, minced - Salt and pepper to taste - 1/4 teaspoon nutmeg (optional for warmth) - 1 tablespoon olive oil These ingredients blend well to create a rich and creamy filling. The pie crust holds everything together and adds a nice crunch. You can customize your quiche with these extra ingredients: - Cooked bacon or ham for added flavor - Bell peppers for sweetness and color - Mushrooms for earthiness - Fresh herbs like basil or thyme for a burst of flavor Feel free to mix and match these options. They allow you to make the quiche your own. Here are some nutritional insights for key ingredients: - Spinach: High in vitamins A and C, plus iron, spinach boosts health. - Eggs: A great source of protein and B vitamins. - Heavy cream: Adds richness but contains more calories and fat. - Cheese: Offers calcium and protein, but choose low-fat for lighter meals. Using fresh ingredients not only enhances taste but also brings health benefits. For the complete method to prepare this dish, check the Full Recipe. To start, gather your ingredients. You need fresh spinach, bacon, and some aromatics. First, cook the bacon in a skillet. Use medium heat and let it crisp up. When done, remove it and chop it into smaller pieces. In the same skillet, add a bit of olive oil if needed. Then, add finely chopped onion and minced garlic. Sauté these for about three to four minutes. The onion should get soft and clear. Next, toss in the chopped spinach. Cook until it wilts, which takes around two to three minutes. Combine the bacon with the spinach mixture after it cools. Now, grab a large bowl. Crack four large eggs into it. Pour in one cup of heavy cream. Whisk them together until smooth. Season the mix with salt and pepper. If you like, add a pinch of nutmeg for extra warmth. This step adds depth to your quiche. Once done, stir in the spinach and bacon mixture along with shredded cheese. Mix everything well until combined. Preheat your oven to 375°F (190°C). Take a pre-made pie crust and pour the filling into it. Spread the mix evenly so every slice has balanced flavors. Bake in the oven for 35 to 40 minutes. Check if it’s done by inserting a toothpick into the center. If it comes out clean, your quiche is ready. Allow it to cool for about ten minutes before slicing. This helps it set and makes serving easier. For the best presentation, cut into wedges and serve on a colorful plate. Garnish with parsley or extra cheese to make it extra appealing. For the full recipe, including all the ingredients and detailed instructions, refer to the Full Recipe link. When making quiche, avoid these common mistakes to get the best results: - Skipping the pre-bake: Always pre-bake your crust. This helps keep it crisp. - Overfilling the crust: Too much filling can make the quiche soggy. Fill it just right. - Not cooling sautéed veggies: Adding hot veggies to the egg mix can cook the eggs. Let them cool. - Underseasoning: Don’t forget to season with salt and pepper. It enhances the flavors. A great crust makes a tasty quiche. Here are some tips to perfect it: - Use a pre-made pie crust: It's easy and saves time. Look for quality brands. - Thaw properly: If using frozen crust, thaw it fully. A cold crust can crack. - Dock the crust: Poke small holes in the bottom with a fork. This prevents bubbling. - Bake until golden: Bake until the crust is lightly golden. It will hold up better. Having the right tools makes quiche-making easier. Here’s what you need: - 9-inch pie dish: A standard size for most quiche recipes. - Mixing bowl: Use a large bowl for mixing eggs and cream. - Whisk: A good whisk helps blend eggs smoothly. - Skillet: A non-stick skillet works well for sautéing veggies. - Knife: A sharp knife is great for chopping onions and garlic. These tips and tools can help you create a perfect spinach bacon quiche. For the exact recipe, check out the Full Recipe. {{image_2}} You can change the protein in your quiche to fit your taste. If you love bacon, try ham or sausage. Both add a nice, savory kick to the dish. If you want a smokier flavor, use smoked turkey or chorizo. These meats mix well with the spinach and cheese. Just cook the meat first, then add it to the egg mixture. For a vegetarian twist, skip the meat altogether. You can still enjoy a hearty quiche. Add mushrooms or bell peppers for extra flavor. Artichokes and sun-dried tomatoes also work well. These options provide a fresh taste and a colorful look. You can even add more cheese or tofu for protein. This way, everyone can enjoy the quiche! Herbs and spices can transform your quiche into something special. Fresh herbs like basil, thyme, or dill add bright flavors. Try adding a pinch of cayenne pepper for some heat. A dash of paprika can give it a nice color too. If you want warmth, add nutmeg, as mentioned in the Full Recipe. These simple additions boost the taste and make each slice a delight. To keep your quiche fresh, store it in an airtight container. Let it cool before sealing. You can also cover it tightly with plastic wrap. This method helps keep moisture in and prevents drying. Quiche stays tasty in the fridge for about 3 to 4 days. If you want to keep it longer, freezing is a great option. Reheating quiche is easy. Preheat your oven to 350°F (175°C). Place the quiche on a baking sheet. Heat for about 15 to 20 minutes. This method warms it evenly. You can also use a microwave for a quick fix. Heat it on medium for 1 to 2 minutes. However, the oven gives a better texture. Freezing quiche lets you enjoy it later. First, let it cool completely. Wrap it tightly in plastic wrap and then in aluminum foil. This double wrap prevents freezer burn. Quiche can stay frozen for up to 2 months. When ready to eat, thaw it in the fridge overnight. Then, reheat it in the oven for the best results. For the full recipe, check out the main article. I enjoy serving Spinach Bacon Quiche warm, fresh from the oven. You can slice it into wedges and place them on a colorful plate. Add a sprig of fresh parsley on top for a nice touch. This adds color and makes it look fancy. You can pair it with a simple salad or some fruit for a balanced meal. Yes, you can! If you like, try using feta, goat cheese, or even Swiss cheese. Each type adds a unique flavor to the quiche. Just remember to keep the amount around one cup, like the Full Recipe suggests. This way, your quiche will stay creamy and delicious. Spinach Bacon Quiche lasts about three to four days in the fridge. Make sure to cover it well with plastic wrap or place it in an airtight container. This keeps it fresh and tasty. If you want to keep it longer, consider freezing it. Just remember to thaw it in the fridge before reheating. Spinach bacon quiche combines tasty ingredients and easy steps. You learned about the key elements, tips to avoid mistakes, and how to customize your quiche. I shared methods to store and reheat leftovers so you waste less food. For detailed instructions, refer to the Full Recipe in the FAQs. Enjoy creating your quiche! Cook with joy and experiment with flavors to make it your own.

Spinach Bacon Quiche Easy Breakfast Delight Recipe

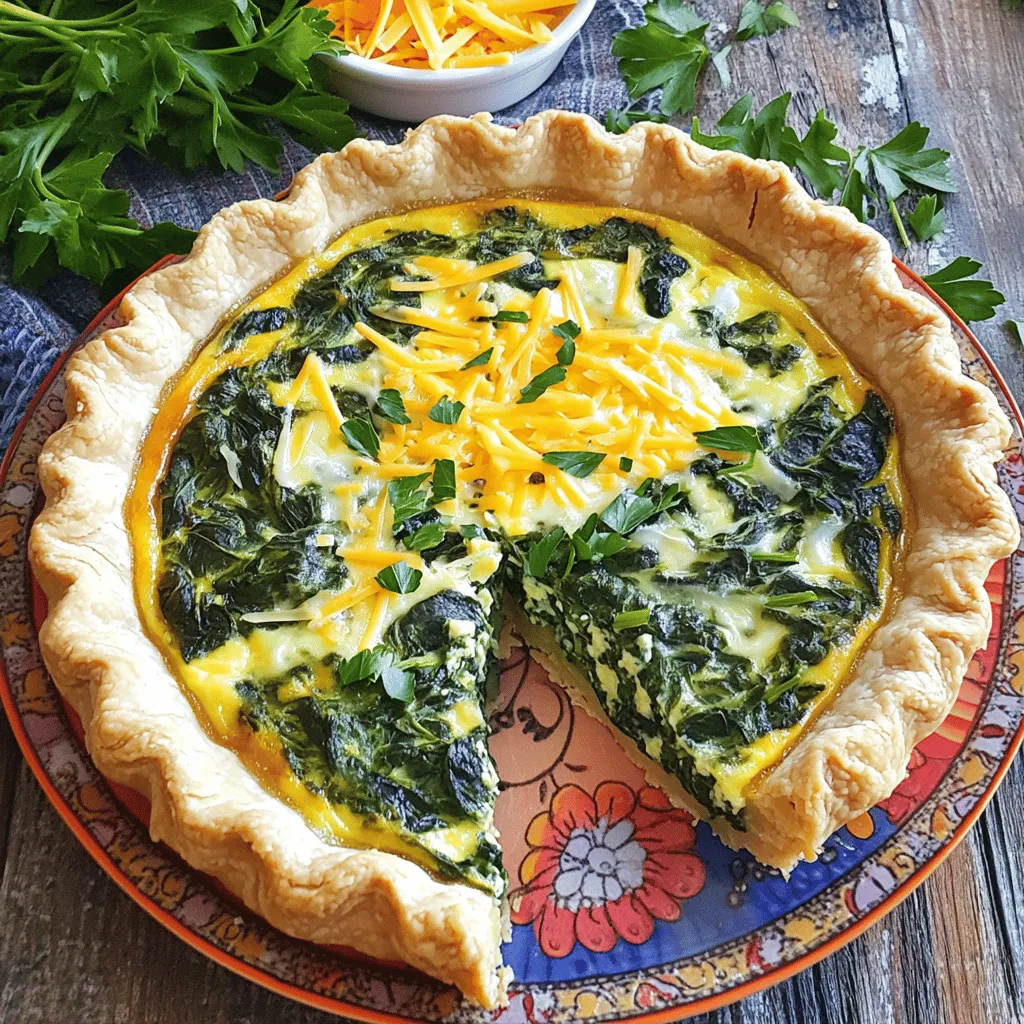
Are you looking for a simple and delicious breakfast idea? My Spinach Bacon Quiche is the perfect solution for busy

- 1 lb ground turkey - 1 medium onion, chopped - 2 cloves garlic, minced - 1 bell pepper (red or green), diced The main ingredients form the heart of your chili. Ground turkey is lean and tasty. It absorbs all the flavors you add. Chopped onion gives a nice base flavor. Minced garlic adds a punch that wakes up your taste buds. The diced bell pepper adds sweetness and color to the dish. - 1 can (15 oz) black beans, drained and rinsed - 1 can (15 oz) kidney beans, drained and rinsed - 1 can (28 oz) crushed tomatoes Canned ingredients make your chili easy and quick. Black beans add protein and texture. Kidney beans are hearty and filling. Crushed tomatoes bring a rich, tangy base. These ingredients blend well, making each bite a delight. - 2 tablespoons chili powder - 1 tablespoon cumin - 1 teaspoon smoked paprika - Salt and pepper to taste Spices are key to great flavor. Chili powder gives heat and depth. Cumin adds a warm, earthy taste. Smoked paprika brings a subtle smokiness that rounds out the dish. Adjust salt and pepper to fit your taste. For the full recipe, check out the details above. This chili is easy and fun to make! To start, heat 1 tablespoon of olive oil in a large pot over medium heat. The oil should shimmer but not smoke. Next, add 1 medium chopped onion and 1 diced bell pepper to the pot. Sauté them for about 5 minutes. You want the onion to turn soft and clear. After the veggies are ready, stir in 2 minced garlic cloves. Cook for 1 more minute. The garlic should smell great! Now, add 1 pound of ground turkey to the pot. Break it up with a spoon and brown it for about 5-7 minutes. Make sure the turkey is fully cooked. Once the turkey is browned, it’s time to spice things up. Stir in 2 tablespoons of chili powder, 1 tablespoon of cumin, and 1 teaspoon of smoked paprika. Mix it well to coat the turkey and veggies evenly. Then, pour in 1 can of crushed tomatoes and 1 cup of chicken broth. Stir everything together until well combined. Next, add 1 can of black beans and 1 can of kidney beans. Be sure to drain and rinse the beans first. This adds great flavor and texture. Now, bring the chili to a simmer. You will see small bubbles forming on the surface. Lower the heat to medium-low and let it cook uncovered for 20-30 minutes. Stir it occasionally to avoid sticking. The chili will thicken up nicely during this time. Once it's done, taste it and adjust the seasoning if needed. Enjoy this hearty meal! For the full recipe, check out the details provided. To adjust spices, start small and add more as needed. Chili powder and cumin can change the taste quickly. If you want more heat, try adding cayenne pepper or hot sauce. Wait until the end of cooking to taste and adjust salt and pepper. This way, you keep the flavors balanced. For thickness, let your chili simmer for 20-30 minutes. The longer it cooks, the thicker it becomes. Stir it occasionally to keep it from sticking to the pot. If you want it thicker sooner, mash some beans against the pot’s side to create a creamier texture. To present your chili, serve it in deep bowls. This makes it look hearty and inviting. You can also sprinkle fresh cilantro on top for color and flavor. For toppings, shredded cheese adds a creamy touch. A dollop of sour cream can cool down the spice. You can even add avocado slices for a fresh twist. You will need a large pot or Dutch oven for this chili. It helps cook everything evenly. A wooden spoon or a spatula will help you stir the mixture easily. For chopping, a sharp knife and cutting board are essential. Measuring cups and spoons will ensure you add the right amount of spices and liquids. All these tools make cooking simple and fun. For the full recipe, check out the details above. Enjoy cooking! {{image_2}} Using a crockpot is a great way to make Easy Ground Turkey Chili. Start by browning the turkey in a pan. This step adds flavor. Then, add all the ingredients to your slow cooker. You can use: - 1 lb ground turkey - 1 medium onion, chopped - 2 cloves garlic, minced - 1 bell pepper, diced - 1 can black beans - 1 can kidney beans - 1 can crushed tomatoes - 2 tablespoons chili powder - 1 tablespoon cumin - 1 teaspoon smoked paprika - Salt and pepper - 1 cup chicken broth Set the crockpot on low for 6 to 8 hours. If you are short on time, use high for 3 to 4 hours. Stir it a few times to mix the flavors. The Instant Pot can speed up your cooking. First, use the sauté mode to brown the turkey. Add the onion, garlic, and bell pepper, just like before. After that, add the remaining ingredients to the pot. For cooking, seal the lid and set it to high pressure for 10 minutes. Once the timer goes off, let it naturally release for 5 minutes. Then, release the rest of the steam. Your chili will be ready to enjoy! If you want a gluten-free meal, check your spice labels. Most spices are safe, but some might have gluten. For a vegetarian option, swap turkey for lentils or textured vegetable protein. Both options add great texture and protein. You can also adjust the heat. Want it spicy? Add more chili powder or some diced jalapeños. If you prefer mild, use less spice. You can always taste and adjust as you cook. This makes the chili perfect for everyone! To store leftover chili in the fridge, let it cool first. Use an airtight container for best results. You can keep it for up to four days. When you're ready to eat, reheat it on the stove or in the microwave. Stir well to ensure even heating. If you find it too thick, add a splash of broth or water. If you want to freeze chili, let it cool completely. Pour it into freezer-safe bags or containers. Squeeze out extra air to prevent freezer burn. You can store it for up to three months. To thaw, move it to the fridge overnight. For quick thawing, use the microwave on the defrost setting. Incorporating chili into meal prep is simple. Portion it out for easy lunches or dinners. You can serve it with rice, cornbread, or tortilla chips. For a fun twist, top it with cheese, sour cream, or cilantro. This makes each meal feel fresh and exciting. Enjoy your Easy Ground Turkey Chili throughout the week! For the complete recipe, check the Full Recipe. The cooking time for Easy Ground Turkey Chili is quick and easy. You need about 10 minutes to prep all the ingredients. Cooking the chili takes around 30 minutes. So, the total time comes to about 40 minutes. This makes it a great choice for busy days! Yes, you can use ground beef instead of turkey. The taste will be richer and a bit fattier. Ground turkey is leaner, while ground beef has more flavor. You may want to adjust the cooking time. Cook ground beef until it is browned, just like turkey. To add heat, you can use a few different methods. Add more chili powder or include some cayenne pepper. Chopped jalapeños or diced green chilies also work well. For a unique twist, try hot sauce or pepper flakes. Be careful, as it can get very spicy! Absolutely! Adding vegetables can boost the flavor and nutrition. Good options include corn, zucchini, or diced carrots. You can also toss in some spinach or kale for extra greens. Just chop them small and add them when you cook the turkey. Enjoy creating your custom mix! This blog post covered a simple ground turkey chili recipe. We looked at ingredients, cooking steps, and useful tips. You learned about methods like the crockpot and Instant Pot. We also discussed storage and meal prep ideas. Chili is versatile and easy to make. You can adapt it to fit your taste or diet. Enjoy your cooking process, and don't be afraid to try new twists on this recipe.

Easy Ground Turkey Chili Flavorful and Hearty Meal

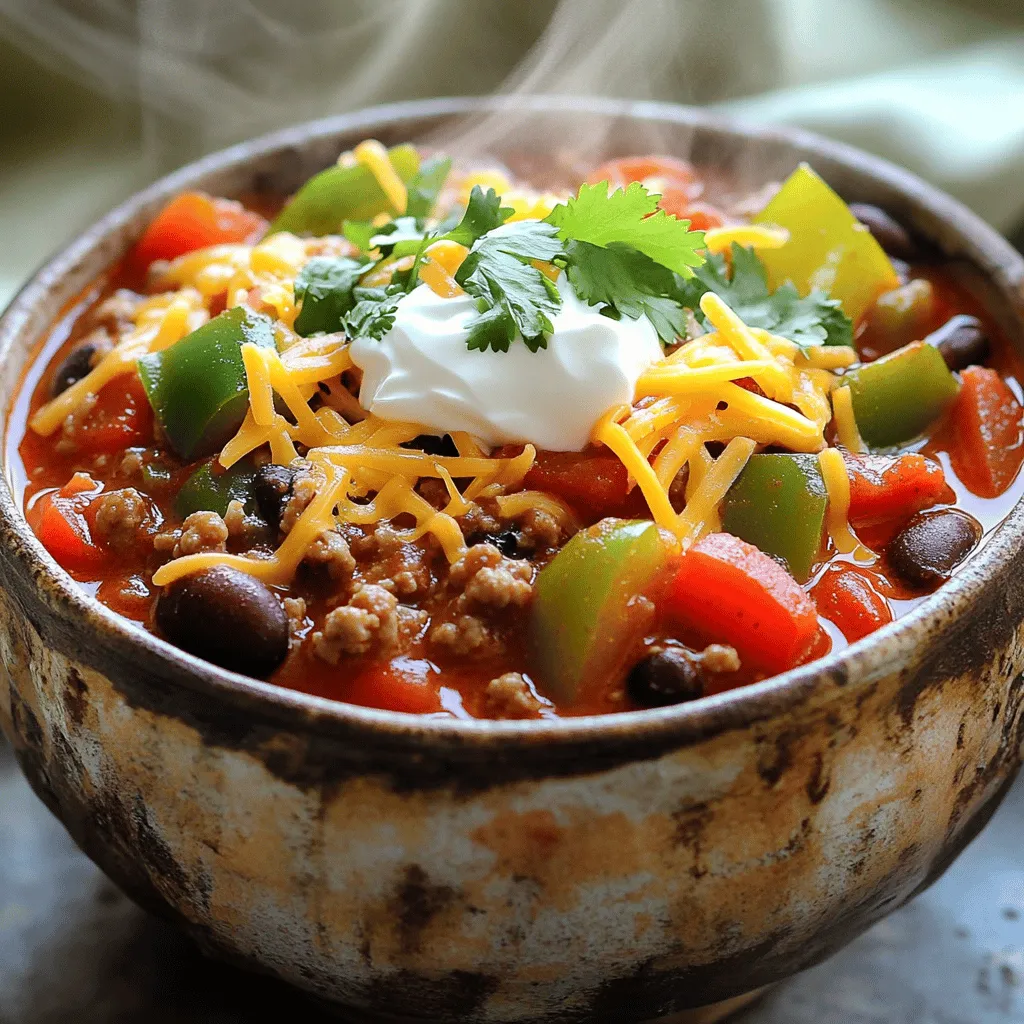
Looking for a hearty meal that’s quick to make? My Easy Ground Turkey Chili fits the bill perfectly. With simple

- 8 ounces elbow macaroni - 2 cups cooked chicken, shredded - 1 cup BBQ sauce (your favorite brand) - 2 cups shredded sharp cheddar cheese - 1 cup shredded mozzarella cheese - 1/2 cup cream cheese, softened - 1 teaspoon garlic powder - 1 teaspoon onion powder - Salt and pepper to taste - 1/2 cup panko breadcrumbs - 2 tablespoons parsley, chopped (for garnish) In this dish, the elbow macaroni serves as the perfect base. You want it to be tender but not mushy. The cooked chicken adds protein and pairs well with the BBQ sauce. Choose a BBQ sauce that you love; this really makes the dish pop. The blend of cheddar and mozzarella cheese gives a rich, creamy texture. Cream cheese adds extra creaminess to the mix. For seasonings, garlic powder and onion powder elevate the flavor. A pinch of salt and pepper is all you need for balance. Panko breadcrumbs bring a delightful crunch on top, while fresh parsley brightens the dish with color and freshness. If you want to explore more about the recipe, check out the Full Recipe for details. Start by boiling a large pot of water. Once it starts to bubble, add 8 ounces of elbow macaroni. Cook until it is al dente, which usually takes about 7 to 9 minutes. After the pasta cooks, drain it in a colander and set it aside. In a large mixing bowl, combine 2 cups of shredded chicken with 1 cup of your favorite BBQ sauce. Stir well until the chicken is fully coated in sauce. This adds great flavor to the dish. In a large saucepan, over medium heat, mix 1/2 cup of softened cream cheese, 1 cup of shredded cheddar cheese, and 1 cup of shredded mozzarella cheese. Stir until the cheese melts and the mixture is smooth. Add 1 teaspoon each of garlic powder and onion powder, along with salt and pepper to taste. This makes your cheese sauce rich and delicious. Now, add the cooked macaroni and the BBQ chicken mixture to your cheese sauce. Mix everything well until the pasta is evenly coated and the chicken is spread throughout. This step is key to getting all those tasty flavors in every bite. Next, preheat your oven to 350°F (175°C). Transfer the mac and cheese mixture to a greased 9x13 inch baking dish. Top with the remaining 1 cup of cheddar cheese and sprinkle 1/2 cup of panko breadcrumbs over it for a crunchy topping. Bake for 20 to 25 minutes until the cheese is bubbly and the breadcrumbs are golden brown. For the full recipe, check the link above. Enjoy your meal! To make a smooth cheese sauce, use low heat. Start with cream cheese. It melts well and helps bind the other cheeses. Stir in shredded cheddar and mozzarella. Keep stirring until it melts completely. If you notice clumps, keep stirring. Adding a splash of milk can help smooth it out too. Your choice of BBQ sauce can change the dish. Try sweet, tangy, or spicy BBQ sauces to find your favorite. You can even mix different sauces for a unique taste. For extra heat, add chili powder or cayenne pepper. Just a pinch can make it pop! BBQ Chicken Mac and Cheese is a great main dish. Pair it with a simple green salad for freshness. For a heartier meal, serve it with garlic bread. You can also use it as a side dish at barbecues or potlucks. This dish is sure to please any crowd! For the full recipe, check out the detailed instructions above. {{image_2}} You can switch up the protein in your BBQ Chicken Mac and Cheese. Try using pulled pork instead of chicken. The smoky flavor pairs well with the cheese and BBQ sauce. You can also use ground beef for a hearty twist. For vegetarians, consider using jackfruit as a meat substitute. It has a great texture and absorbs flavors well. Cheese is key in this dish. You can mix and match different cheeses for unique flavors. Consider using gouda or pepper jack for a fun kick. Adding cream sauces can also create a rich, creamy texture. This gives your mac and cheese a gourmet touch, making it stand out. If you want a lighter version, try whole grain pasta. It adds fiber and nutrients. You can also reduce the amount of cheese for a healthier dish. This still keeps the creamy feel without being too heavy. You can use Greek yogurt instead of cream cheese for added protein. To keep your BBQ Chicken Mac and Cheese fresh, store it in the fridge. Place it in an airtight container. It can stay good for about three to four days. If you want to keep it longer, consider freezing it. Use a freezer-safe container or bag. Make sure to remove as much air as possible. It can last up to three months in the freezer. When you're ready to eat, just thaw it in the fridge overnight. When it's time to enjoy your leftovers, reheating them right is key. The best way is to use the oven. Preheat it to 350°F (175°C) and place the mac and cheese in a baking dish. Cover with foil to keep it moist. Bake for about 20 minutes, or until hot. You can also use the microwave, but it may dry out. If you choose the microwave, heat it in short bursts. Stir it often to keep it creamy and delicious. The best BBQ sauce often depends on your taste. Here are some options you might enjoy: - Sweet BBQ sauce adds a nice glaze. - Spicy BBQ sauce brings heat and flavor. - Smoky BBQ sauce adds depth. Try different ones to find your favorite! Yes, you can make BBQ Chicken Mac and Cheese ahead of time. Here are some tips: - Prepare the dish up to the baking step. - Cover it and store it in the fridge for up to 24 hours. - When ready to bake, just add a few extra minutes to the cooking time. Absolutely! Most kids love cheese and chicken. Here are some ways to make it even more appealing: - Use mild cheese for a softer taste. - Cut the chicken into smaller pieces for easy eating. - Offer extra BBQ sauce on the side for dipping. This dish lasts about 3 to 5 days in the fridge when stored well. Here are some storage tips: - Use an airtight container to keep it fresh. - Reheat it gently to maintain texture. If you want to keep it longer, consider freezing it! BBQ Chicken Mac and Cheese combines classic flavors for a tasty dish. You start with elbow macaroni, cooked chicken, and a rich cheese sauce. Mix in BBQ sauce and seasonings for added flavor. Baking brings it all together, topped with breadcrumbs and more cheese. Try different proteins or cheeses to make it your own. Store leftovers properly to enjoy later. This dish is fun and easy for everyone, even picky eaters. Enjoy your cooking adventure!

BBQ Chicken Mac and Cheese Easy Comfort Food Recipe

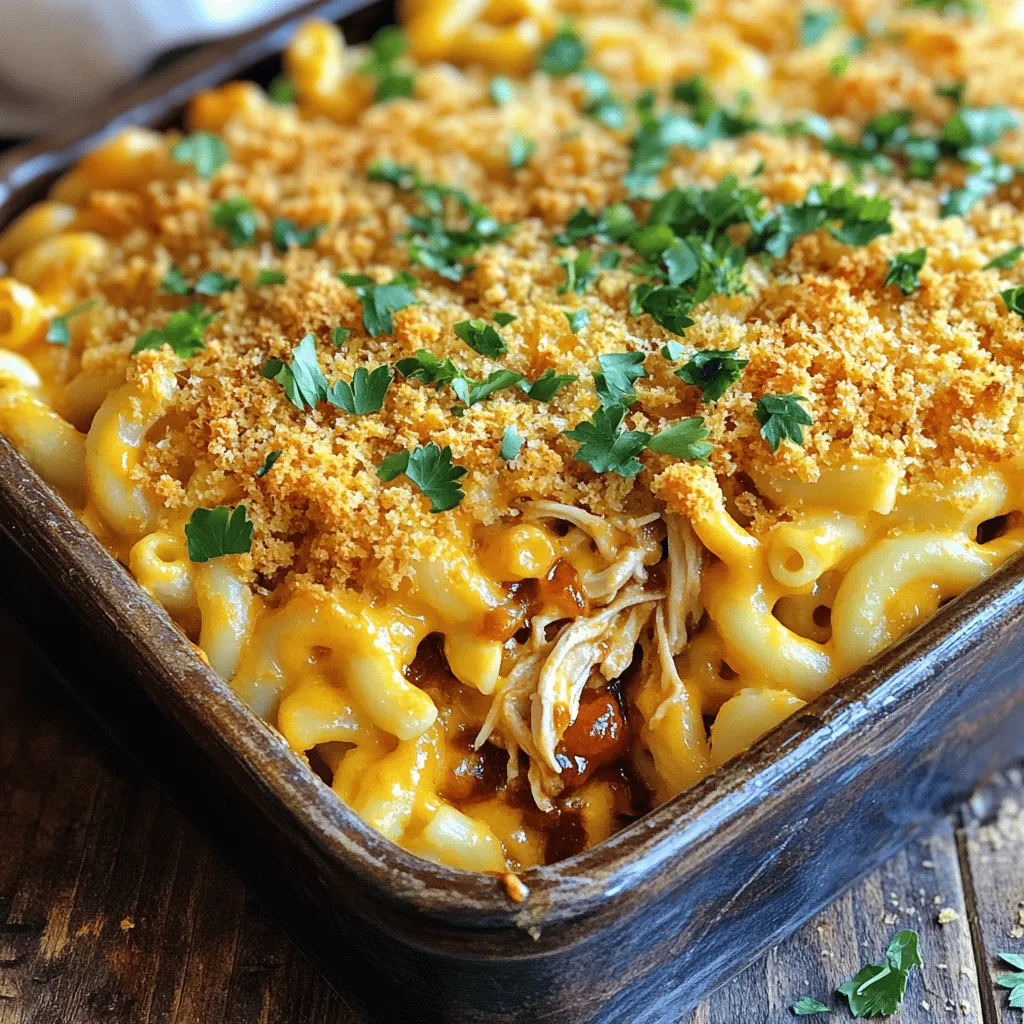
Craving a dish that combines the smoky goodness of BBQ with creamy comfort? Look no further! My BBQ Chicken Mac

- 4 large russet potatoes - 2 tablespoons olive oil - 1 teaspoon garlic powder - 1 teaspoon onion powder - 1 teaspoon paprika - Salt and pepper to taste - Fresh parsley, chopped (for garnish) Choosing the right type of potatoes I always recommend using russet potatoes for fries. They have a high starch content. This starch helps make your fries crispy and fluffy inside. Look for potatoes that are firm and smooth. Avoid any with soft spots or blemishes. Alternatives to olive oil for seasoning Olive oil is great, but you can also use avocado oil. It has a high smoke point, making it perfect for air frying. Canola oil is another option that works well, but it lacks flavor. Recommended seasonings for added flavor You can get creative with seasonings! Try adding cayenne pepper for heat or Italian herbs for a twist. Parmesan cheese sprinkled on top after cooking can add a savory touch. Even a squeeze of lemon juice can brighten the flavors. Experiment and see what you like best! For the full recipe, check out the cooking instructions I mentioned earlier. Start by peeling the russet potatoes. If you like the skin, wash them well. Cut the potatoes into sticks about 1/4 inch thick. This size helps them cook evenly. After cutting, place the potato sticks in a large bowl. Cover them with cold water. Soak the potatoes for at least 30 minutes. This step removes extra starch and helps make the fries crispy. Next, preheat your air fryer to 400°F (200°C) for about 5 minutes. This step is key to getting that crispy texture. When the air fryer is hot, take the soaked potato sticks out of the water. Drain and pat them dry with a clean towel. Moisture can make your fries soggy. In a mixing bowl, toss the dried potato sticks with olive oil and seasonings like garlic powder, onion powder, paprika, salt, and pepper. Make sure they are evenly coated for great flavor. Place the seasoned potato sticks in the air fryer basket in a single layer. Avoid overcrowding, as this can lead to uneven cooking. If needed, cook in batches. Air fry the potatoes for 15-20 minutes. Shake the basket halfway through. This ensures they cook evenly. Look for that golden-brown color, which means they are ready. Once done, remove the fries and set them on a paper towel. This helps absorb any extra oil. To serve your fries, sprinkle them with freshly chopped parsley for a pop of color. You can pair them with various dips or meals. Ketchup is a classic choice, but try ranch or garlic aioli for a twist. These crispy fries make a great side for burgers, salads, or any meal. Enjoy every bite! For the complete recipe, check out the Full Recipe section. To get the crispiest fries, you must dry the potatoes well. After soaking them, use a clean kitchen towel. This step removes moisture, which leads to soggy fries. Drying is key! When air frying, follow these best practices: - Preheat the air fryer to 400°F (200°C). This helps cook fries evenly. - Shake the basket halfway through cooking. This ensures all sides get crispy. - Cook in a single layer. Avoid stacking fries to keep them from steaming. Overcrowding the air fryer basket is a common mistake. If you pile too many fries in, they won’t cook evenly. Always leave space for air to flow around each fry. Another mistake is misjudging the cooking time. Each air fryer is different, so check your fries early. Look for a golden-brown color and a crunchy texture. This way, you won’t end up with undercooked or burnt fries. For the full recipe, check out the Crispy Air Fryer French Fries section. {{image_2}} You can change the flavor of your fries in many ways. Here are some fun spice blends to try: - Cajun Spice: Mix paprika, cayenne pepper, and oregano for a kick. - Italian Blend: Use dried basil, oregano, and thyme for a fresh taste. - Chili Lime: Add chili powder and lime zest for a zesty twist. For dipping sauces, I recommend: - Classic Ketchup: A timeless favorite. - Garlic Aioli: Creamy and rich, it pairs well with fries. - Ranch Dressing: Cool and tangy, great for a dip. If you want to try other ways to cook fries, here are two options: - Making Fries in the Oven: Preheat your oven to 425°F (220°C). Spread the seasoned potato sticks on a baking sheet in a single layer. Bake for 30-35 minutes, flipping halfway through for even cooking. - Deep-Frying for Comparison: Heat oil in a deep fryer to 350°F (175°C). Fry the potato sticks in small batches for about 3-5 minutes until golden brown. Drain on paper towels to remove excess oil. These methods offer different textures and flavors. Each one can be fun to explore! For the full recipe, check out the detailed instructions above. To keep your fries crispy, store them in an airtight container. This method helps reduce moisture. You can also place a paper towel at the bottom of the container. It absorbs extra moisture and keeps the fries from getting soggy. You can store leftover fries in the fridge for up to three days. After that, they may lose their taste and texture. If you think you won’t eat them soon, consider freezing them. Place fries in a freezer bag and remove as much air as possible. They can last up to three months in the freezer. To bring back the crispiness, reheat fries in the air fryer. Set it to 350°F (175°C) and cook for about 5-7 minutes. Shake the basket halfway through to ensure even heat. You can also use an oven for reheating. Preheat the oven to 400°F (200°C) and spread fries on a baking sheet. Bake for about 10 minutes, turning them halfway. Avoid using a microwave, as it can make fries soggy. To make your air fryer fries crispy, soak the cut potatoes in cold water for at least 30 minutes. This helps remove excess starch. After soaking, dry the potatoes well with a towel. Moisture is the enemy of crispiness. Toss the dry potato sticks in olive oil and seasonings. This adds flavor and helps them crisp up in the air fryer. Make sure not to overcrowd the basket; this allows hot air to circulate around the fries evenly. Flip or shake the basket halfway through the cooking time for even browning. Yes, you can use other types of potatoes! While russet potatoes are ideal for fries, Yukon Gold or sweet potatoes work too. Yukon Golds give a creamier texture, while sweet potatoes add a unique flavor. Just keep in mind that the cook time might differ slightly. Cut them into similar-sized sticks for even cooking. Olive oil is a great choice for air frying. It has a high smoke point and adds a nice flavor. You can also use canola or avocado oil. Both have high smoke points too. Avoid oils that are low in smoke points like sesame or flaxseed oil. Using high-quality oil enhances the taste of your fries while ensuring they crisp up nicely. In this blog post, we explored how to make perfect air fryer fries. We covered the best ingredients, like russet potatoes, olive oil, and tasty seasonings. I shared step-by-step instructions, important tips for crispiness, and ways to avoid common mistakes. You learned about storage, reheating techniques, and variations. Now you have the tools to create delicious fries at home. Enjoy experimenting with flavors and serving them with your favorite meals!

Crispy Air Fryer French Fries Easy and Flavorful Recipe

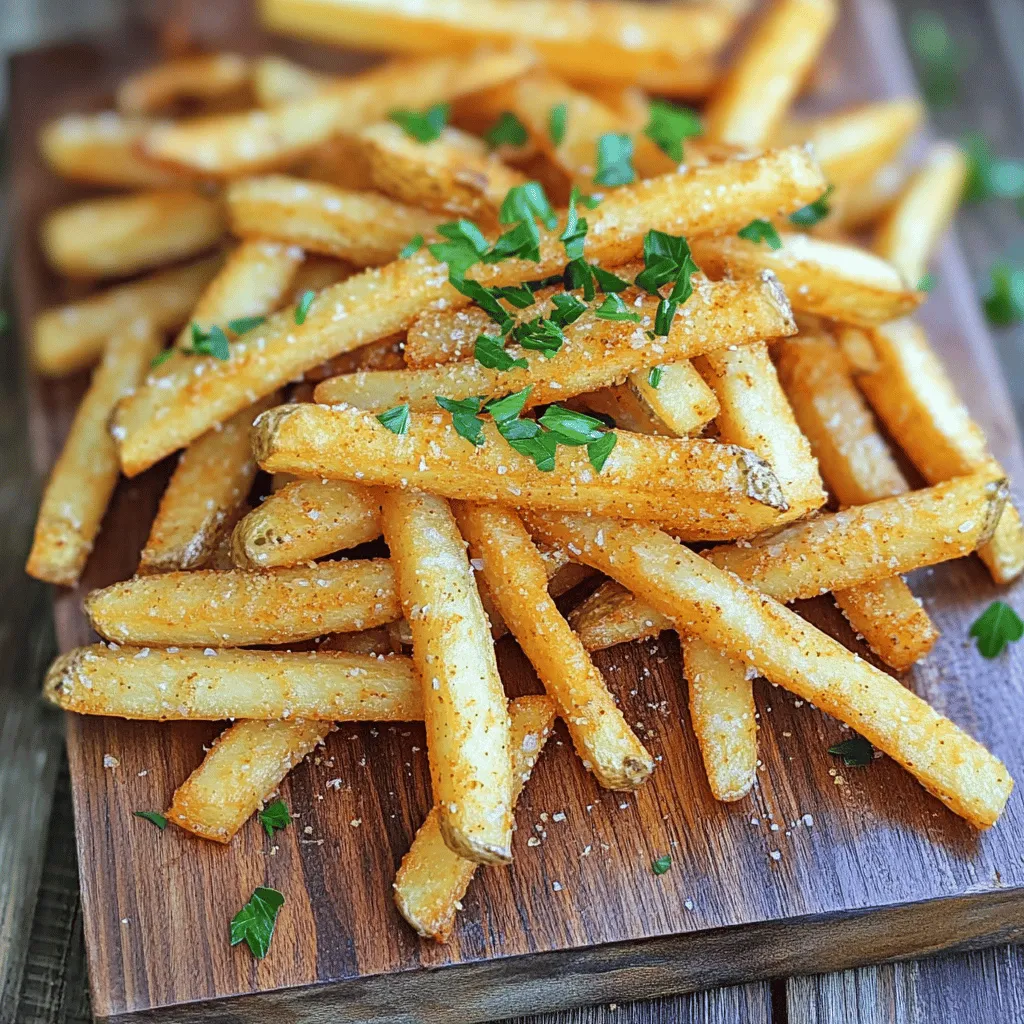
Are you ready to enjoy crispy, delicious French fries without the guilt? In this post, I’ll show you how to

Older posts
Newer posts
← Previous Page1 … Page81 Page82 Page83 … Page85 Next →

dsad

© 2026 greenmealmap • Built with GeneratePress

Our Policies

  • Copyright Policy
  • Cookie Policy
  • GDPR Policy
  • Privacy Policy
  • Disclaimer
  • Terms Of Use

More Information

  • Home
  • About
  • Contact
  • Appetizers
  • Dessert
  • Dinner
  • Drinks
©2026, greenmealmap About Back To Top