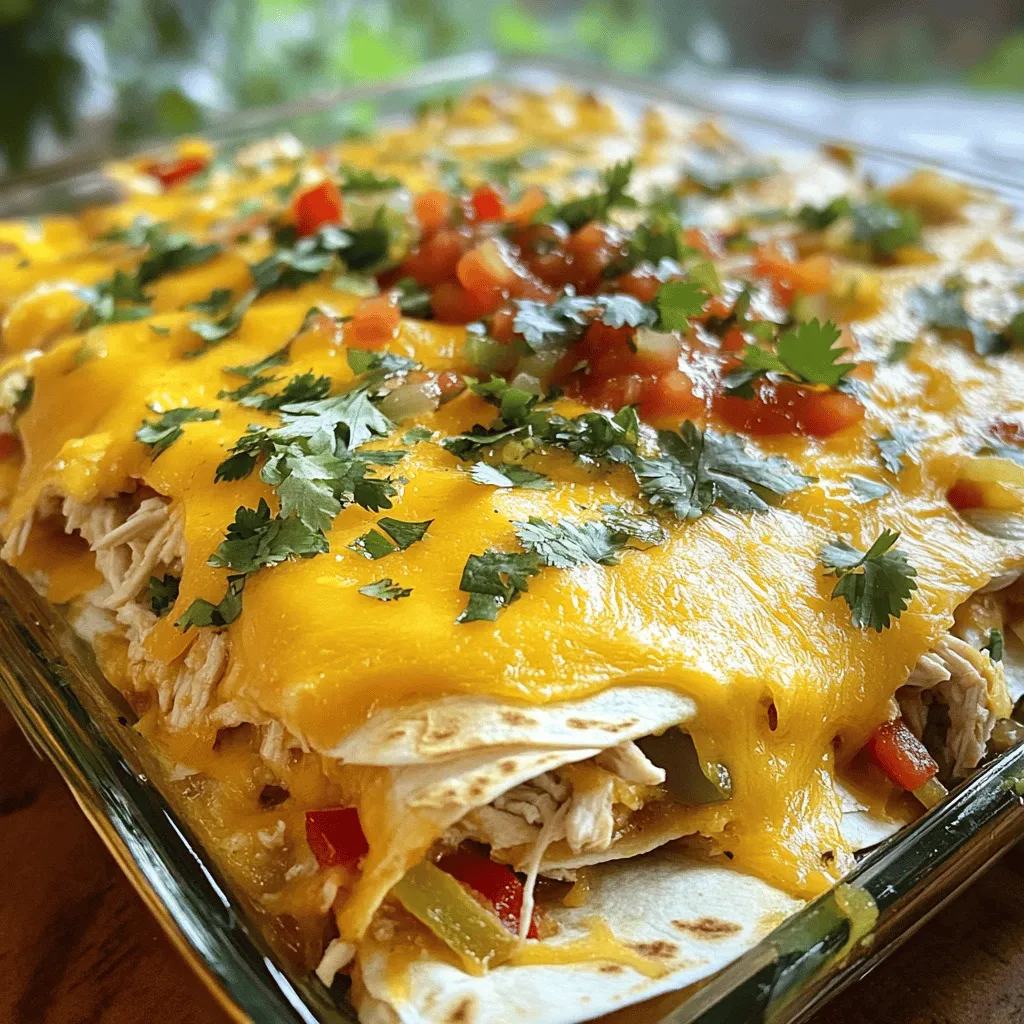
Skip to content
DisclaimerTerms Of UseGDPR PolicyCookie Policy

greenmealmap

  • Home
  • Drinks
  • Appetizers
  • Dinner
  • Dessert
  • About
  • Contact
  • Privacy Policy
DisclaimerTerms Of UseGDPR PolicyCookie Policy

NO-ING-IMG

- 2 cups cooked chicken, shredded - 1 cup shredded cheddar cheese - 1 cup shredded mozzarella cheese - 1 cup bell peppers, diced (red, yellow, and green) - 1 small onion, finely chopped - 1 cup black beans, rinsed and drained - 1 teaspoon cumin - 1 teaspoon paprika - ½ teaspoon garlic powder - ½ teaspoon chili powder - 8 large flour tortillas - ½ cup sour cream (optional for serving) - Fresh cilantro, for garnish - Cooking spray or olive oil Gather these ingredients to create a dish full of flavor. The cooked chicken gives the quesadillas a hearty base. The blend of cheddar and mozzarella cheese adds a creamy and gooey texture. The bell peppers and onion bring color and crunch, while black beans add protein and fiber. The spices—cumin, paprika, garlic, and chili powder—add warmth and depth. Lastly, the flour tortillas hold everything together, making each bite a delight. For the full recipe, check out the detailed instructions to create this cheesy goodness. Enjoy your cooking adventure! - Preheat the oven to 375°F (190°C). - Spray the baking dish with cooking spray or olive oil. Start by warming up your oven. This step ensures your quesadillas bake evenly and get that perfect crispy edge. While the oven heats, prepare your baking dish. A quick spray of cooking spray or a light brush of olive oil keeps your quesadillas from sticking. - Combine chicken, cheeses, vegetables, beans, and spices in a mixing bowl. In a large mixing bowl, toss together your cooked chicken, cheddar cheese, mozzarella cheese, diced bell peppers, chopped onion, black beans, cumin, paprika, garlic powder, and chili powder. Mix well until everything is coated in cheesy goodness. This step is key. Each bite should be packed with flavor. - Distribute the mixture over tortillas and fold. - Arrange folded tortillas in the baking dish. Lay out your tortillas flat. Spoon a generous amount of the chicken and cheese mix onto each tortilla, leaving a little space at the edges. Fold each tortilla in half, creating a half-moon shape. Place them seam-side down in your baking dish. This arrangement helps them cook evenly. - Bake with foil for 20 minutes, then uncovered for an additional 10-15 minutes. - Let cool and cut into triangles for serving. Cover the dish with foil before baking. This keeps the moisture in, making the tortillas soft and tasty. After 20 minutes, remove the foil. Let the quesadillas bake for another 10-15 minutes. You want them golden and crispy. Once done, take them out and let them cool a bit. Cut them into triangles for easy serving. These bites are perfect for sharing. Enjoy your flavorful Chicken and Cheese Quesadillas Bake! For the complete recipe, check the Full Recipe section. Mixing cheeses boosts the taste of your quesadillas. I like using cheddar and mozzarella together. Cheddar adds sharpness, while mozzarella brings creaminess. If you want more spice, adjust the chili powder. Start with a little and taste as you go. You can always add more! When placing quesadillas in the dish, space them evenly. This helps them cook through and get crispy. For a crispy top, broil the quesadillas for a few minutes at the end. Just watch them closely so they don’t burn. Serve your quesadillas with sides like guacamole or salsa for extra flavor. You can also garnish with more cheese and fresh herbs, like cilantro. This makes your dish look pretty and adds taste. For a creamy touch, don’t forget the sour cream on the side. For the full recipe, check out the [Full Recipe]. {{image_2}} You can swap proteins in this recipe. Try using beef or turkey instead of chicken. Each option brings a unique flavor. For a vegetarian twist, leave out the chicken. Add more beans or colorful veggies like zucchini or corn. This keeps it hearty and delicious. Boost the taste of your quesadillas with spices. Taco seasoning adds a nice kick. You can also mix up your cheeses. Try pepper jack for heat or gouda for smokiness. Each cheese offers a different experience. This is a fun way to personalize your bake. If you want to skip dairy, there are great alternatives. Look for dairy-free cheese brands made from nuts or soy. Many melt well and taste good. You can also customize your quesadillas without cheese. Just load them with extra veggies or beans for a filling meal. For the complete details on how to make this dish, check out the Full Recipe. To keep your chicken and cheese quesadillas fresh, store them in the fridge. Place them in an airtight container. This method helps prevent air from making them soggy. You can also wrap them tightly in plastic wrap. This keeps them safe from smells in the fridge. For best taste, eat them within 3 to 4 days. You can freeze quesadillas before or after baking. If you freeze them before baking, assemble the quesadillas as usual. Then, place them in a single layer on a baking sheet. Freeze them for about an hour, then wrap them in foil or plastic wrap. If you freeze them after baking, let them cool completely first. Wrap them tightly and store in a freezer-safe bag. To thaw, move them to the fridge overnight before reheating. To reheat quesadillas, the oven is best. Preheat it to 350°F (175°C). Place quesadillas on a baking sheet and cover with foil. Heat for about 10 to 15 minutes. This method helps keep them crispy. If using a microwave, place a paper towel under the quesadilla. This helps absorb moisture. Heat for about 1 to 2 minutes. Be careful not to overheat, as this can make them soggy. Enjoy your meal warm and delicious! Yes, you can prep this dish in advance. You can prepare the filling a day before. Just store it in the fridge. You can assemble the quesadillas and keep them covered until you are ready to bake. This helps save time on busy days. To give your quesadillas a kick, add jalapeños to the filling. You can also use hotter spices like cayenne pepper or chili flakes. You can mix in some hot sauce into the chicken for extra heat. Adjust the amount to match your taste. Pair these quesadillas with sides like guacamole, salsa, or fresh salad. A dollop of sour cream adds creaminess. You can also serve rice or corn for a complete meal. These sides enhance the flavors and make the meal fun. Absolutely! You can freeze leftovers for later. Make sure they cool completely before wrapping them in plastic wrap. Store them in an airtight container or a freezer bag. When you're ready to eat, thaw them in the fridge and reheat in the oven for the best taste. This blog post covered how to make delicious Chicken and Cheese Quesadillas. We went through the key ingredients, step-by-step instructions, and helpful tips to enhance your dish. You learned about ingredient substitutions and how to store leftovers properly. In closing, these quesadillas are easy to make and customizable. Enjoy them with your favorite sides. You’ll create a meal that pleases everyone. Get cooking and have fun!

Chicken and Cheese Quesadillas Bake Flavorful Delight

Are you ready to whip up a dish that combines cheesy goodness with savory chicken? Let’s dive into my Chicken

- 2 boneless, skinless chicken breasts, sliced thinly - 1 red bell pepper, sliced - 1 yellow bell pepper, sliced - 1 medium zucchini, sliced - 1 cup snap peas - 2 carrots, julienned - 3 garlic cloves, minced - 1-inch piece of ginger, grated - 3 tablespoons soy sauce (or tamari for gluten-free) - 1 tablespoon sesame oil - 2 tablespoons vegetable oil The main ingredients create a colorful and healthy dish. The chicken gives protein, while the veggies add crunch and nutrients. Garlic and ginger bring warmth and depth to the flavors. Soy sauce adds saltiness, and sesame oil gives a nice nutty taste. - 1 tablespoon cornstarch (optional, for thickening) - Sesame seeds for garnish - Sliced green onions for garnish Adding cornstarch can help make your sauce thicker. It gives the dish a nice glaze. Sesame seeds and green onions add a pop of color and flavor. They make your stir fry look fancy and appealing. - Steamed rice or noodles - Additional side dishes for a complete meal You can serve this stir fry over hot steamed rice or soft noodles. This makes the meal filling and satisfying. You can also add side dishes like spring rolls or a fresh salad for extra flavor and balance. Check out the Full Recipe to get started on this vibrant Chicken and Vegetable Stir Fry. To start, slice your chicken breasts into thin strips. This helps them cook evenly. Next, chop your vegetables. Cut the red and yellow bell peppers into strips, slice the zucchini, and julienne the carrots. Use a sharp knife for clean cuts. For snap peas, just trim the ends. If you want a thicker sauce, mix the sliced chicken with cornstarch. In a medium bowl, toss the chicken with salt, pepper, and cornstarch until it’s coated well. This step is optional but adds a nice texture. Now, heat a large wok or skillet over medium-high heat. Add one tablespoon of vegetable oil. When the oil is hot, add the chicken in a single layer. Cook for about 3-4 minutes, turning occasionally. Look for a nice golden color before removing the chicken from the pan. Next, in the same pan, add the remaining vegetable oil. Toss in the minced garlic and grated ginger. Stir-fry these for about 30 seconds until you smell their great aroma. Then, add your colorful vegetables to the pan. Stir-fry the bell peppers, zucchini, carrots, and snap peas for 4-5 minutes. You want them to be tender but still crisp. Finally, return the cooked chicken to the pan. Pour in the soy sauce and sesame oil. Toss everything together and stir-fry for another 2 minutes. Taste and adjust the salt and pepper as needed. Once done, remove the pan from heat. For a lovely finish, sprinkle sesame seeds and sliced green onions on top. This adds color and flavor. Serve your stir-fry in a large bowl or plate. Pair it with steamed rice or noodles for a complete meal. Enjoy your vibrant Chicken and Vegetable Stir Fry! For the complete recipe, refer to the Full Recipe. To keep chicken tender, always slice it thin. Thin pieces cook faster and stay juicy. Marinate the chicken with salt and cornstarch. This adds flavor and keeps it moist. For perfect vegetable texture, cut them into similar sizes. This ensures even cooking. Stir-fry each type of vegetable separately if you want to control their textures. Add heartier veggies like carrots first, then add softer ones like bell peppers. Prep your ingredients ahead of time. Slice the chicken and chop the vegetables before cooking. This makes the cooking process quick and easy. Use high heat for fast cooking. A hot pan cooks food quickly, which helps keep flavors bright. Stir your ingredients often to avoid burning and to cook evenly. A wok or a large skillet works best for stir-frying. These pans allow for even heat distribution and room for tossing. Use a sharp knife for prepping your ingredients. A cutting board is essential, too. This will help you cut safely and quickly. A spatula or wooden spoon makes stirring easy and fun. {{image_2}} You can switch up the protein in your stir fry. If you want a meatless option, use tofu. For a seafood twist, try shrimp. Beef is another tasty choice that works well. Each protein brings its own flavor and texture. Feel free to mix and match your vegetables. Instead of bell peppers, try broccoli or asparagus. You can also add mushrooms or bok choy for extra crunch and taste. If you like it spicy, throw in some sliced jalapeños or chili peppers. If you're on a gluten-free diet, use tamari instead of soy sauce. This keeps your dish safe while still delicious. For low-carb options, skip the cornstarch. Instead, use cauliflower rice as a base. It’s a great way to cut carbs without losing flavor. To elevate your stir fry, try adding spices or sauces. A splash of hoisin sauce brings a sweet twist. For a kick, mix in Sriracha or chili garlic sauce. If you want a taste of the tropics, use coconut aminos instead of soy sauce. Experiment with marinades too. Marinate your chicken in ginger soy sauce for at least 30 minutes. This adds depth to the flavor. You can also try a citrus marinade with lime or orange juice. It brightens the dish and makes it more refreshing. For the full recipe, check out the Colorful Chicken and Vegetable Stir Fry 🥡. After enjoying your Chicken and Vegetable Stir Fry, it's important to store any leftovers properly. First, let it cool down to room temperature. This helps keep the dish fresh. - Use airtight containers for best results. - Glass or BPA-free plastic containers work great. - Keep the leftovers in the fridge for up to three days. When you're ready to enjoy the leftovers, reheating is key. You want to keep the texture and flavor. - The stovetop is best for reheating. Just add a little oil to a pan. - Heat it on medium. Stir often to warm it evenly. - If using a microwave, cover the dish with a damp paper towel. This helps keep moisture in. Freezing is a smart way to save your stir fry for later. It’s easy and keeps the meal tasty. - Let the stir fry cool completely before freezing. - Portion it into freezer-safe bags or containers. Remove as much air as possible. - Label with the date. You can freeze it for up to three months. For thawing, place it in the fridge overnight. You can also use the microwave on defrost mode. This way, you keep the texture nice. For the full recipe, check out the main section. Chicken and Vegetable Stir Fry lasts about 3 to 4 days in the fridge. Make sure to store it in an airtight container. This keeps your stir fry fresh and safe to eat. To enjoy the best taste, eat it within this time frame. Yes, you can make Chicken and Vegetable Stir Fry in advance. It is great for meal prep. Cook it fully and let it cool. Then, store it in airtight containers. When you are ready to eat, just reheat it on the stove or in the microwave. For best results, heat it slowly to keep the chicken tender. If you need a soy sauce alternative, try tamari or coconut aminos. Both options have a similar taste and are gluten-free. You can also use liquid aminos for a tasty choice. If you want a different flavor, mix in some Worcestershire sauce or a bit of balsamic vinegar. To add spice, use chili paste or sriracha. You can mix these in with your sauces. Another option is to add red pepper flakes when cooking. Adjust the amount based on your heat preference. For a deeper flavor, try using spicy sesame oil or adding fresh chopped chili peppers. This blog post explored how to make a tasty chicken and vegetable stir fry. We covered key ingredients, preparation steps, and helpful tips to enhance flavor and save time. You can customize your dish with different proteins or sauces to suit your taste. Remember, proper storage keeps leftovers fresh and delicious. Enjoy cooking and experimenting in your kitchen. This dish is quick, healthy, and a great way to bring color to your meals. Happy stir-frying!

Chicken and Vegetable Stir Fry with Flavor Boosts

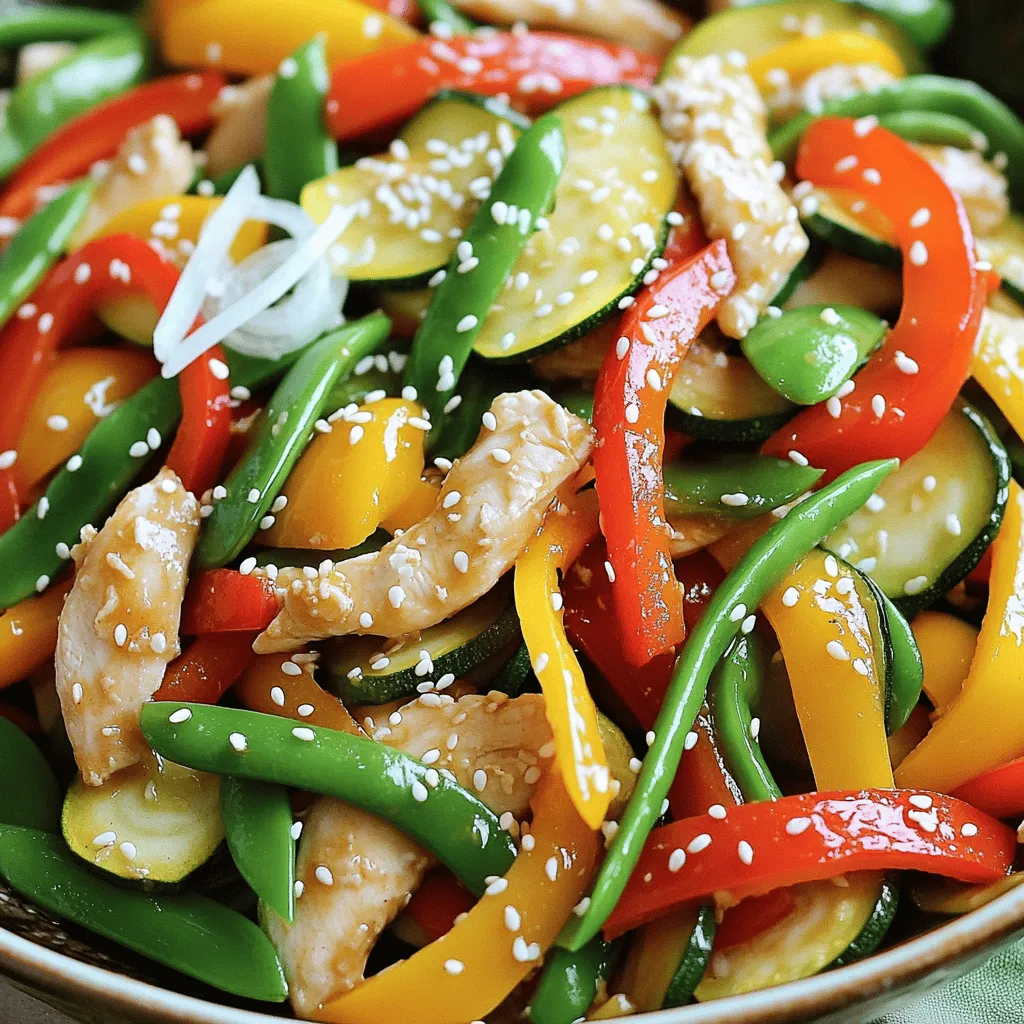
Looking to spice up your dinner routine? My Chicken and Vegetable Stir Fry with Flavor Boosts will delight your taste

- Main Ingredients: - 2 cups cooked chicken, shredded - 1 cup cream cheese, softened - 1 cup shredded cheddar cheese - 1 cup shredded Monterey Jack cheese - 1 cup enchilada sauce (red or green) - 8 small flour tortillas - 1/2 cup black beans, drained and rinsed - 1/2 cup corn kernels (fresh or frozen) - 1 teaspoon ground cumin - 1 teaspoon chili powder - 1/2 teaspoon garlic powder - Salt and pepper to taste - Additional Items for Garnish and Serving: - Chopped fresh cilantro - Sliced jalapeños for optional heat - Sour cream for serving - Potential Substitutions for Dietary Needs: - Swap shredded chicken for shredded beef or beans for a vegetarian option. - Use dairy-free cream cheese and cheese for a dairy-free version. - Corn tortillas can replace flour tortillas for a gluten-free meal. These ingredients work together to create a dish that is both tasty and satisfying. Each one plays a vital role in building layers of flavor. You can easily adjust some items to meet different dietary needs or preferences. This flexibility makes the recipe enjoyable for everyone at the table. If you want more ideas, check the Full Recipe for tips on variations! 1. Preheating the oven Start by preheating your oven to 375°F (190°C). This step is key. A hot oven helps the cheese melt and brown perfectly. 2. Mixing the filling ingredients In a large bowl, combine: - 2 cups cooked chicken, shredded - 1 cup cream cheese, softened - 1/2 cup shredded cheddar cheese - 1 teaspoon ground cumin - 1 teaspoon chili powder - 1/2 teaspoon garlic powder - 1/2 cup black beans, drained and rinsed - 1/2 cup corn kernels (fresh or frozen) - Salt and pepper to taste Mix everything until well combined. The cream cheese makes the filling creamy and rich. 3. Assembly process for the enchiladas Spread 1/4 cup of enchilada sauce on the bottom of a 9x13 inch baking dish. This prevents sticking. Take a flour tortilla and add a generous amount of the chicken mixture in the center. Roll it tightly and place it seam-side down in the dish. Repeat until all tortillas are used. Pour the remaining enchilada sauce over the rolled tortillas and sprinkle with the remaining cheese. 1. Important baking tips for optimal results Cover the baking dish with aluminum foil. This prevents the cheese from browning too quickly. Bake for 25 minutes. 2. Covering techniques to prevent browning After 25 minutes, remove the foil and bake for an extra 15 minutes. This allows the cheese to bubble and turn golden brown. 3. Time management for baking Keep an eye on the enchiladas during the last few minutes. The bubbly cheese indicates they are ready. Let them cool for a few minutes before serving. Using these steps, you'll create a dish that's not just tasty but also fun to make. Enjoy the process! For the complete recipe, check out the Full Recipe section. - Best practices for rolling tortillas: Warm your tortillas before filling. This makes them soft and easy to roll. Use a hot pan or microwave for a few seconds. Place the filling in the center and fold the sides over. Roll tightly from one end to the other. - Ensuring the filling is perfectly seasoned: Taste your filling before you assemble the enchiladas. Season it well with salt, pepper, and spices. The chicken and cheese mix should burst with flavor, so don’t skip this step. - Cheese tips for extra creaminess: Mix different kinds of cheese for depth. Cheddar gives a sharp taste, while Monterey Jack adds creaminess. Use freshly shredded cheese for the best melt and texture. - Overfilling the tortillas: Use just enough filling to roll the tortillas without bursting them. Too much filling leads to messy enchiladas and makes them hard to roll. - Skipping the resting time after baking: Let your enchiladas rest for at least five minutes after baking. This helps the cheese set, making it easier to serve and enjoy. - Incorrect oven temperatures: Always preheat your oven to 375°F (190°C). Baking at the right temperature ensures the cheese melts evenly and the enchiladas turn golden brown. {{image_2}} You can change this dish to fit your needs. For a vegetarian option, use cooked lentils or mushrooms instead of chicken. This keeps the dish hearty and satisfying. You can also add black beans or diced bell peppers. These will add nutrition and flavor without changing the essence of the dish. If you need a cheese alternative, consider using vegan cheese or a nut-based option. This keeps the recipe friendly for various diets. You can also mix different types of cheese for a richer taste. Try using pepper jack for a spicy kick! You can adapt this recipe to a slow cooker or instant pot. This makes it easy and hands-off. Just combine the filling ingredients and cook on low for several hours. For an instant pot, cook it under pressure for about 10 minutes. This results in a tender filling and a great flavor. If you need gluten-free tortillas, many brands offer good options. These are often made from corn or other grains. They work well in this recipe, so you won't miss the wheat. Want some heat? Use spicy enchilada sauce or add fresh jalapeños to the filling. This will give your dish an exciting twist. You can even add chipotle peppers for a smoky flavor. To keep your enchiladas fresh, store them in the fridge. Use an airtight container. This method helps maintain their taste and texture. They can last up to four days in the fridge. If you want to keep them longer, consider freezing. For freezing, wrap the enchiladas tightly in plastic wrap. Then place them in a freezer-safe bag. This keeps out air and prevents freezer burn. They can last up to three months in the freezer. When you're ready to eat, just thaw in the fridge overnight. For the best taste, reheat your enchiladas in the oven. Preheat the oven to 350°F (175°C). Place the enchiladas in a baking dish. Add a splash of enchilada sauce on top to keep them moist. Cover the dish with foil to avoid drying out. Heat for about 20 minutes or until warmed through. If you need a quick method, use the microwave. Place your enchiladas on a microwave-safe plate. Cover with a damp paper towel. Heat for 2-3 minutes, checking every minute. This method is faster but may change the texture a bit. For the best experience, choose the oven method. It keeps the cheese gooey and the tortillas soft. Enjoy your delicious Chicken and Cheese Enchiladas Bake again! Can I use leftover rotisserie chicken? Yes, you can use leftover rotisserie chicken. It saves time and adds great flavor. Just shred the chicken and mix it into your filling. How long can these enchiladas be stored in the fridge? You can store these enchiladas in the fridge for about three to four days. Make sure to cover them well to keep them fresh. What sides pair well with enchiladas? Enchiladas go well with rice, beans, or a fresh salad. You can also serve sour cream and guacamole for extra flavor. Can I prepare this dish ahead of time? Yes, you can prepare enchiladas a day ahead. Assemble them, cover, and store in the fridge. Just bake when you're ready to serve. What if I don’t have flour tortillas? If you don’t have flour tortillas, you can use corn tortillas. They add a nice texture, but be careful; they can tear easily. Can this recipe be made dairy-free? Yes, you can make this recipe dairy-free. Use dairy-free cream cheese and cheese alternatives. How to ensure the enchiladas don’t get soggy? To prevent soggy enchiladas, do not overfill them. Also, use a baking dish that allows for even heat. Enjoy the Full Recipe for more tips! Now you have all the tools to make perfect chicken and cheese enchiladas. We covered the key ingredients, preparation steps, and baking tips. I shared expert tricks to enhance flavor and avoid common mistakes. You can even switch ingredients to suit your needs. Get creative with variations for different diets and preferences. Proper storage and reheating ensure your leftovers stay delicious. Enjoy making this dish and impress your family and friends! Happy cooking!

Chicken and Cheese Enchiladas Bake Savory Delight

Craving a warm, cheesy dish that’s quick to make? Our Chicken and Cheese Enchiladas Bake is the perfect answer! I’ll

To make this tasty chicken and rice casserole bake, you need a few key items. These ingredients work together to create a warm and comforting dish. Here’s what you will need: - 2 cups cooked white rice - 2 cups cooked chicken, shredded (can use rotisserie chicken) - 1 cup frozen mixed vegetables (peas, carrots, corn) - 1 can (10.5 oz) cream of mushroom soup - 1 cup chicken broth - 1 cup shredded cheddar cheese - 1 teaspoon garlic powder - 1 teaspoon onion powder - Salt and pepper to taste - 1 teaspoon olive oil - 1/2 cup panko breadcrumbs These main ingredients create a creamy, rich base for the casserole. The cooked rice and chicken give it heartiness, while the cream of mushroom soup adds flavor. You can add a few optional ingredients to give your casserole an extra kick. Consider trying these: - 1/2 cup diced onions for sweetness - 1/2 cup diced bell peppers for crunch - 1 teaspoon dried thyme for a herbal touch - 1/2 teaspoon paprika for a smoky flavor - A splash of hot sauce for heat These optional ingredients can make your dish more unique. Feel free to mix and match based on your taste. Once your casserole is baked to perfection, garnishing can make it even more appealing. Here are some suggestions: - Fresh parsley, chopped for color - A sprinkle of extra cheese on top for richness - Sliced green onions for a fresh crunch These garnishes not only enhance the look of the dish but also add more flavor. Enjoy the delightful presentation before serving! If you want the full recipe, check the details above. Start by gathering all your ingredients. You will need: - 2 cups cooked white rice - 2 cups cooked chicken, shredded - 1 cup frozen mixed vegetables (peas, carrots, corn) - 1 can (10.5 oz) cream of mushroom soup - 1 cup chicken broth - 1 cup shredded cheddar cheese - 1 teaspoon garlic powder - 1 teaspoon onion powder - Salt and pepper to taste - 1 teaspoon olive oil - 1/2 cup panko breadcrumbs - Fresh parsley for garnish Next, preheat your oven to 350°F (175°C). Grease a 9x13-inch baking dish with olive oil. This helps prevent sticking and makes cleanup easy. In a large mixing bowl, combine the cooked rice, shredded chicken, and frozen mixed vegetables. Then, add the cream of mushroom soup and chicken broth. Mix well until all items are coated. This step ensures that every bite is creamy and full of flavor. Next, add the garlic powder, onion powder, salt, and pepper. Stir again to blend these spices into the mixture. This will enhance the taste of your casserole. Transfer the mixture into your greased baking dish. Spread it out evenly to ensure even cooking. Sprinkle the shredded cheddar cheese on top. This will give a nice cheesy crust when baked. In a small bowl, mix the panko breadcrumbs with a bit of olive oil. This makes them crispy when baked. Sprinkle the breadcrumb mixture evenly over the cheese layer. Cover the baking dish with aluminum foil. Bake in your preheated oven for 25 minutes. After that, remove the foil and bake for another 15-20 minutes. Keep an eye on it. The top should be golden and bubbly. Once it is done, let it cool for a few minutes. This helps the flavors settle. Garnish with fresh parsley for a pop of color. Now you have a delightful chicken and rice casserole ready to serve! To make the best chicken for your casserole, start with cooked chicken. You can use rotisserie chicken for ease. If you prefer, boil or bake chicken breasts. Ensure the chicken is fully cooked to avoid any health risks. Shred the chicken into small pieces for even mixing. This helps each bite be tasty and tender. For a creamy casserole, use cream of mushroom soup. This soup adds great flavor and texture. Mix in chicken broth to thin the soup slightly. You can also add sour cream or cream cheese for extra creaminess. Stir your mixture well to combine all the ingredients smoothly. This ensures a rich, decadent dish that melts in your mouth. Oven temperatures can vary. Always check your casserole as it bakes. If your oven runs hot, reduce the baking time. For a cooler oven, you might need to bake longer. Cover the dish with foil for the first half of baking. This keeps the moisture in. Remove the foil to let the top brown and crisp up. Checking the casserole often will help you get the perfect bake. {{image_2}} You can easily make this dish vegetarian. Swap the chicken for cooked lentils or chickpeas. Use vegetable broth instead of chicken broth. You can add diced tofu for extra protein. This keeps the dish hearty and filling. Don't forget to add more veggies, like bell peppers or spinach, for color and taste. If you want a different protein, consider turkey or ham. Both pair well with the rice and cheese. For seafood lovers, shrimp works great too. Just cook them briefly before mixing them into the casserole. These options give you fun ways to change the flavors while keeping the dish comforting. Spice up your casserole with different seasonings. Try adding cumin or paprika for a warm kick. You can also swap the cream of mushroom soup for cream of chicken or a homemade version. For a cheesy twist, mix in different cheeses like mozzarella or pepper jack. Experimenting with flavors can make this classic dish feel new each time you make it. For the full recipe, check below. Storing leftover casserole is easy. First, let it cool to room temperature. Then, transfer it to an airtight container. You can also use plastic wrap. Make sure to seal it tightly. This keeps the dish fresh. Store it in the fridge for up to four days. When you want to reheat, just take it out of the fridge. Place the casserole in an oven-safe dish. Cover it with foil to keep it moist. Heat the oven to 350°F (175°C). Bake for about 20-25 minutes. Check if it's hot all the way through. You can also use a microwave, but the oven gives the best results. Freezing is a great way to save leftovers. Cut the casserole into serving-sized pieces. Wrap each piece in plastic wrap. Then place them in a freezer bag. This helps avoid freezer burn. You can freeze it for up to three months. To reheat, let it thaw overnight in the fridge. Then follow the reheating instructions. This dish stays tasty even after freezing. Enjoy your Chicken and Rice Casserole Bake again with ease! For the full recipe, check the earlier section. Yes, you can. Prepare the casserole as directed, but do not bake it. Cover it tightly and store it in the fridge. You can bake it the next day. This makes dinner easy and quick. I recommend using cooked white rice. It gives a soft texture and blends well with the sauce. You can also use jasmine rice for a fragrant twist. Yes, but it will change the cooking time. Brown rice takes longer to cook. If you use it, cook the rice first before mixing it in. It adds a nutty flavor and more nutrients. Use gluten-free cream of mushroom soup and check the chicken broth label. You can swap panko breadcrumbs for gluten-free ones. This way, everyone can enjoy this tasty dish. This casserole pairs well with fresh salad or steamed veggies. You can also serve it with crusty bread or garlic bread. These sides add color and flavor to your meal. For the full recipe, check the above section. You learned how to make a tasty Chicken and Rice Casserole Bake. We covered main and optional ingredients and how to prep and cook them. I shared tips for creamy results and cooking times. You can try different variations, store leftovers, and reheat them easily. Remember, this dish is flexible and fun! Play with flavors and ingredients to make it your own. Enjoy making a comforting meal that everyone will love.

Chicken and Rice Casserole Bake Delightful Comfort Dish

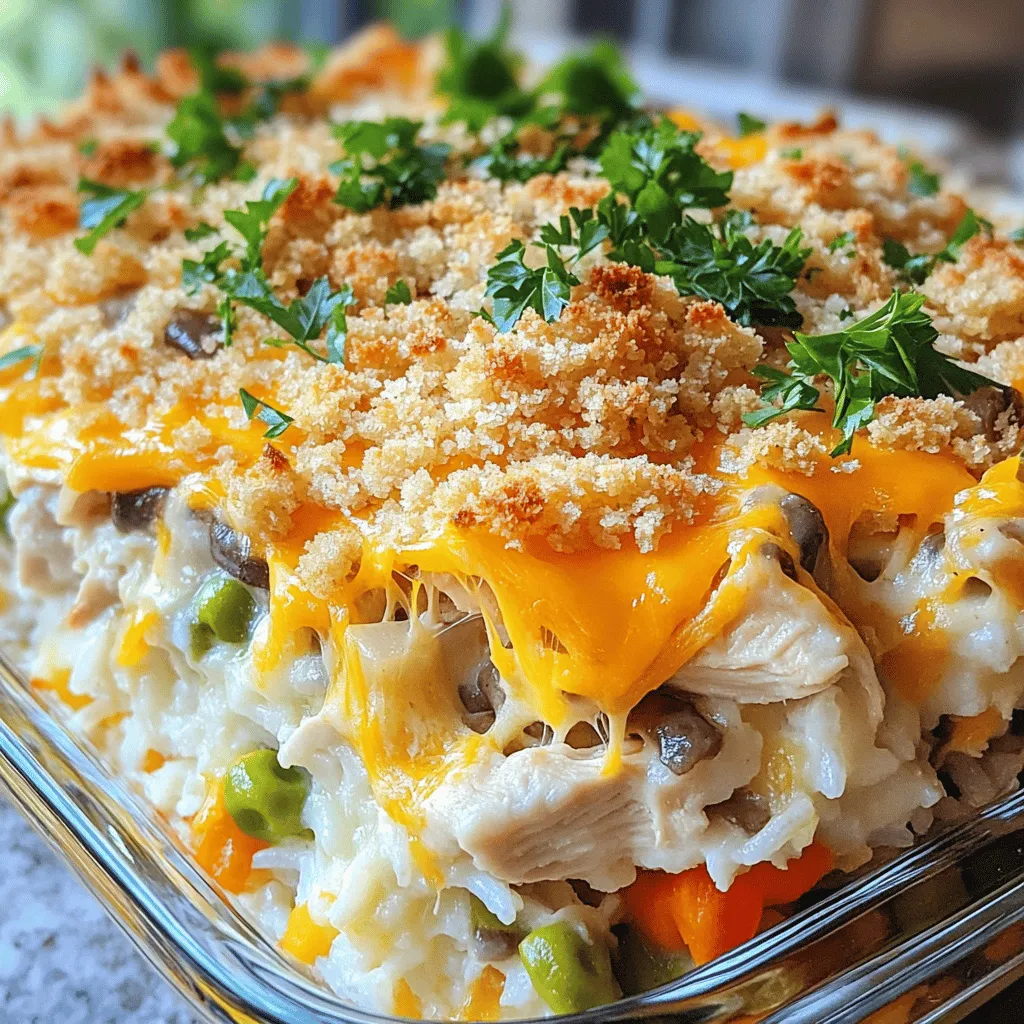
Chicken and Rice Casserole Bake is a warm hug in a dish. You’ll love how simple it is to prepare

- Chicken and Broccoli - 2 boneless, skinless chicken breasts - 1 cup broccoli florets - Fettuccine Pasta - 8 oz fettuccine pasta - Alfredo Sauce Components - 2 tablespoons olive oil - 3 cloves garlic, minced - 1 cup heavy cream - 1 cup grated Parmesan cheese - Seasonings and Garnish - Salt and pepper to taste - 1 teaspoon Italian seasoning - Fresh parsley, chopped (for garnish) To make Chicken and Broccoli Alfredo, these ingredients are key. Start with fresh chicken breasts and vibrant broccoli. The fettuccine pasta acts as the perfect base. For the sauce, heavy cream and Parmesan cheese create that rich, creamy texture we love. Don't forget the garlic for flavor. Seasonings like salt, pepper, and Italian herbs enhance the dish. Lastly, parsley adds a fresh touch on top. This full recipe brings it all together in a delicious meal. To cook the fettuccine, start with a large pot. Fill it with salted water and bring it to a boil. I suggest using about 1 tablespoon of salt. This adds flavor right to the pasta. Add the fettuccine and cook according to the package instructions. Usually, it takes about 8 to 10 minutes to reach al dente. Now, here’s a great tip. In the last 3 minutes of cooking, toss in the broccoli florets. This method makes sure your broccoli stays bright and crisp. Once done, drain the pasta and broccoli together. Always remember to save about 1/2 cup of pasta water. We might need it later for the sauce. Next, let's focus on the chicken. Start by seasoning the chicken breasts with salt, pepper, and Italian seasoning. I recommend using a good amount to enhance the taste. Heat your skillet over medium-high heat and add 2 tablespoons of olive oil. This will help the chicken brown nicely. Cook the chicken for about 6 to 7 minutes on each side. You want it to reach an internal temperature of 165°F (75°C). The chicken should look golden brown. After cooking, let it rest for a few minutes before slicing. This helps keep the juices in. For the Alfredo sauce, we need to sauté the garlic first. In the same skillet where you cooked the chicken, reduce the heat to medium. Add the minced garlic and sauté for about 30 seconds. You want it to smell fragrant but not brown. Next, pour in the heavy cream. Bring it to a gentle simmer. Stir in the grated Parmesan cheese until it melts. This is where the magic happens! If the sauce feels too thick, add a splash of the reserved pasta water. This will help you reach the perfect sauce consistency. Now it’s time to combine everything. Add the cooked fettuccine and broccoli to the skillet with the Alfredo sauce. Toss gently to coat all the pasta and broccoli evenly. If it needs more flavor, sprinkle in some salt and pepper to taste. Before serving, slice the cooked chicken and place it on top of the pasta. This adds a nice touch. Don’t forget to garnish with freshly chopped parsley for a pop of color. Enjoy your creamy Chicken and Broccoli Alfredo! For more details, check the Full Recipe. - Use of Fresh Herbs: Fresh herbs add a bright taste. I love adding parsley or basil. Chop them finely and sprinkle on top before serving. This adds color and freshness to your dish. - Alternative Seasonings: While Italian seasoning is great, feel free to mix things up. Try adding a pinch of red pepper flakes for heat. Lemon zest can also brighten the flavor. - Skillet Tips for Chicken: When cooking chicken, use medium-high heat. This gives a nice brown crust. Let the chicken rest after cooking. This keeps it juicy and tender. - Pasta Cooking Hacks: For perfect pasta, always salt your water. This enhances the pasta's flavor. Remember to reserve some pasta water. You can use it to adjust your sauce later. - Adjusting Sauce Thickness: If your Alfredo sauce is too thick, add reserved pasta water. Start with a tablespoon and mix. Keep adding until it reaches your desired creaminess. - Preventing Separation: To avoid sauce separation, don’t boil it once you add the cheese. Keep the heat low and stir gently. This helps the cheese melt smoothly into the sauce. {{image_2}} You can switch up your chicken choice. Chicken thighs bring a richer taste. They remain moist and tender. You can also try shrimp for a seafood twist. Just cook them until they turn pink for best results. For a dairy-free version, use coconut cream. It adds a nice flavor while keeping it creamy. Almond milk can also work, but it may not be as rich. Be sure to add some nutritional yeast for a cheesy flavor. Adding spinach or peas can enhance the dish. Spinach cooks quickly and adds color. Peas bring sweetness and a pop of green. You can toss them in during the last few minutes of cooking. Seasonal veggies like asparagus or bell peppers also shine here. They add crunch and flavor. Just remember to chop them small for even cooking. Fettuccine is classic, but you can try other pasta types. Penne or rigatoni can bring fun shapes. They hold the sauce well and add texture. If you need gluten-free options, use rice or quinoa pasta. These options work great and taste good. Just follow the package's cooking instructions for best results. For the full recipe, check the details above. To keep your Chicken and Broccoli Alfredo fresh, follow these tips. First, let the dish cool to room temperature. Then, place it in an airtight container. This helps to keep moisture in and air out. Store it in the fridge for up to three days. For longer storage, you can freeze it. Just use a freezer-safe container. Be sure to label it with the date. When you're ready to enjoy leftovers, reheating is key. Use a skillet over low heat for the best results. Add a splash of milk or cream to help the sauce stay smooth. Stir often to keep everything from sticking. Avoid using the microwave if you can. It can make the pasta mushy and the chicken dry. In the fridge, your Chicken and Broccoli Alfredo lasts about three days. Check for signs it has spoiled. If it smells sour or has a strange color, it’s best to toss it out. Always trust your senses. Keeping your food safe is important. How can I make it spicier? You can add red pepper flakes or a pinch of cayenne. Both will give it heat. Start with a small amount. You can always add more later. Can I add more vegetables to this dish? Yes! You can add bell peppers, carrots, or snap peas. Just steam them lightly before mixing. It adds color and taste. What can I use instead of heavy cream? Try using half-and-half or coconut cream for a lighter option. You can also use a blend of milk and flour to thicken. How to make the best Alfredo sauce? Start with fresh garlic for flavor. Use quality Parmesan cheese for richness. Stir well to avoid lumps. Adjust the thickness with reserved pasta water as needed. Can I prepare this in advance? Yes, you can cook the chicken and pasta ahead. Store them in the fridge separately. Make the sauce fresh when you’re ready to serve. What to serve with Chicken and Broccoli Alfredo? Serve it with a crisp green salad or garlic bread. Both complement the creamy sauce well. Ideal wines or beverages to pair with this dish A light white wine like Pinot Grigio works great. Sparkling water with lemon is also refreshing. This blog post covered the key steps to making Chicken and Broccoli Alfredo. We explored the ingredients you need, cooking tips, and ways to keep your dish creamy. I shared variations to fit your taste and tips for storing leftovers. By following these steps, you can create a delicious meal. Enjoy trying new flavors and variations. Cooking should be fun and satisfying, so make it your own!

Chicken and Broccoli Alfredo Creamy Comfort Dish

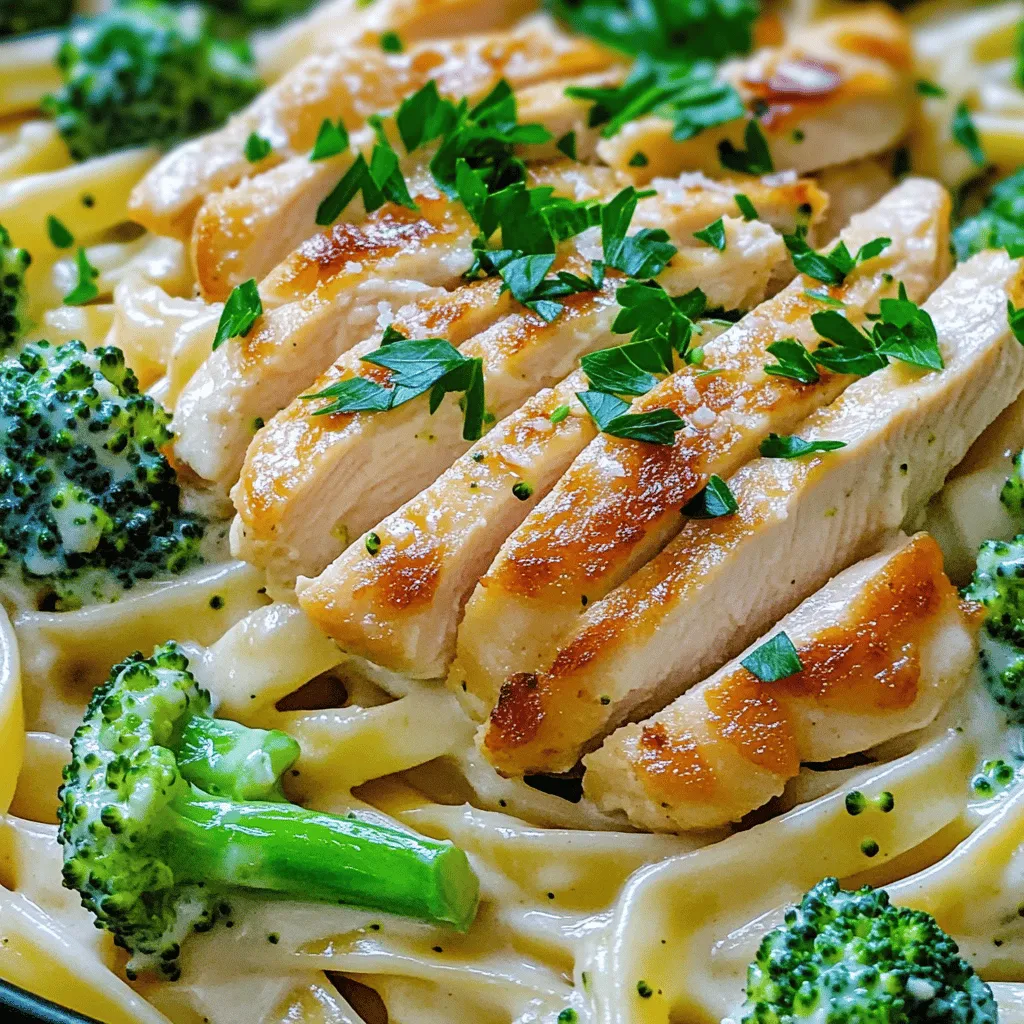
Looking for a creamy comfort dish that warms the soul? You’ve found it! Chicken and Broccoli Alfredo is the perfect

- 2 cups cooked chicken, shredded - 1 cup shredded cheddar cheese - 1 cup shredded Monterey Jack cheese The main ingredients bring flavor and texture to your quesadilla bake. Shredded chicken makes it hearty, while the cheddar and Monterey Jack cheeses create a rich, gooey filling. - 1 medium red bell pepper, diced - 1 medium onion, diced - Salsa and seasonings The red bell pepper and onion add sweetness and crunch. Seasonings like garlic powder and cumin deepen the flavor. Don’t forget salsa; it ties everything together with a zesty kick. - 8 flour tortillas - Olive oil for sautéing Flour tortillas hold all the tasty filling. Olive oil is key for sautéing the veggies, making them tender and delicious. This blend of ingredients creates the perfect base for your Chicken and Cheese Quesadilla Bake. For the complete list of ingredients and instructions, check the Full Recipe. - Preheat the oven to 375°F (190°C). - In a large skillet, heat 1 tablespoon of olive oil over medium heat. Add 1 medium diced onion and 1 medium diced red bell pepper. Sauté for about 5 minutes. The onion should be soft and clear. - In the same skillet, stir in 2 cups of shredded cooked chicken. Add 1 teaspoon of garlic powder, 1 teaspoon of cumin, and salt and pepper to taste. Mix well and cook for 2-3 more minutes. - Take a flour tortilla and layer it with a scoop of the chicken mixture and a sprinkle of both cheeses (1 cup of cheddar and 1 cup of Monterey Jack). Fold the tortilla in half and place it in the baking dish. Repeat this with the remaining tortillas until the dish is full. - Spread half of the salsa (1 cup) evenly across the bottom of a large baking dish. - Pour the remaining salsa over the top of the quesadillas. Sprinkle the rest of the cheese on top. - Bake in the preheated oven for 20-25 minutes. Look for the cheese to melt and bubble. It should be golden and delicious when done. This simple process leads to a tasty Chicken and Cheese Quesadilla Bake. You can find the full recipe in the section above. To make your quesadilla bake shine, ensure the filling spreads evenly. If you stuff too many ingredients in one spot, some bites may taste bland. Mix well so every tortilla gets a good balance of chicken and cheese. Adjust seasoning to your liking. Taste the filling before using it. You can add more salt, cumin, or garlic powder for a bolder flavor. Bake your quesadilla until the cheese melts and turns slightly golden. This step gives it a nice, crispy edge. If you bake it too long, the tortillas can become hard. After you take it out, let it rest for 5 minutes. This helps the cheese set and makes cutting easier. You want neat squares instead of a gooey mess! Garnish your bake with fresh cilantro for a pop of color and flavor. This adds a fresh taste that contrasts well with the cheese and chicken. You can also pair it with sour cream or guacamole. Both dips bring a creamy texture that complements the bake. Try serving it with some chips on the side for extra crunch. For the full recipe, check the details above. {{image_2}} You can change the protein in this dish easily. Substitute chicken with beef or black beans for a tasty twist. Shredded pork works well too. If you're looking for a vegetarian option, try using tofu. Tofu absorbs flavors nicely, making it a great choice. Cheese is a key part of this bake. Incorporate pepper jack cheese if you want some spice. It adds a nice kick! If you prefer a milder flavor, use mozzarella. It melts beautifully and pairs well with other ingredients. You can amp up the flavor with a few simple additions. Add jalapeños if you like heat. They bring a nice zing! You can also include corn or olives for extra texture. Both add a fresh crunch that makes every bite enjoyable. To keep your Chicken and Cheese Quesadilla Bake fresh, store leftovers in an airtight container. This helps to lock in moisture and flavor. I recommend eating it within 3-4 days for the best taste. After that, the quality might drop. You can freeze this dish for later enjoyment. First, allow it to cool completely. Then, wrap it tightly in plastic wrap or aluminum foil. Place it in an airtight container or freezer bag. For the best results, thaw it overnight in the fridge before reheating. This keeps the texture nice and helps the flavors stay fresh. To reheat, I suggest using the oven. Preheat your oven to 350°F (175°C). Place the quesadilla bake in an oven-safe dish and cover it with foil. Heat for about 20 minutes or until it’s warmed through. If you need a quick option, you can use the microwave. Just place a piece on a microwave-safe plate. Heat it for 1-2 minutes, but check often to avoid overcooking. Enjoy your meal just like it was fresh out of the oven! Yes, you can prepare this dish ahead of time. I suggest cooking the filling and assembling the quesadillas the day before. Store the assembled quesadillas in the fridge. When you're ready to bake, just add the salsa and cheese on top. Bake it straight from the fridge. This saves time and gives you a tasty meal on busy nights. To reheat quesadillas, the oven is best. Preheat your oven to 350°F (175°C). Place the quesadillas on a baking sheet and bake for about 10-15 minutes. This keeps them crispy. If you need a quicker option, use the microwave. Heat them for 30-60 seconds, but they may get soft. The oven gives better texture. Yes, you can use corn tortillas. They add a nice flavor. However, corn tortillas are more fragile. You may need to double-layer them to keep the filling inside. Adjust the baking time if needed. Make sure to keep an eye on them while baking. Enjoy the unique taste they bring to the dish! This blog post showed you how to make a delicious Chicken and Cheese Quesadilla Bake. We covered the key ingredients, from cooked chicken to cheese and spices. You learned step-by-step instructions, tips for perfecting the dish, and fun variations to try. Finally, I shared storage tips to keep your leftovers fresh. Enjoy creating your version of this tasty dish. It’s easy, fun, and sure to please!

Chicken and Cheese Quesadilla Bake Simple and Tasty

Craving a dish that’s both simple and full of flavor? Look no further than my Chicken and Cheese Quesadilla Bake!

- 2 cups cooked brown rice - 1 pound boneless, skinless chicken breasts, diced - 1 tablespoon olive oil - 1 tablespoon taco seasoning - 1 can (15 oz) black beans, drained and rinsed - 1 cup corn kernels (fresh or frozen) - 1 red bell pepper, diced - 1 small red onion, diced - 1 avocado, sliced - 1 cup salsa - 1 cup shredded cheddar cheese - Fresh cilantro, for garnish - Salt and pepper to taste - Lime wedges for serving The Chicken and Rice Burrito Bowl comes together beautifully with these simple ingredients. You start with brown rice, which is healthy and filling. Then, you add diced chicken for protein. Olive oil adds a nice touch when you cook the chicken. For extra flavor, taco seasoning makes the chicken shine. Black beans and corn add a great texture and flavor. Fresh veggies like red bell pepper and red onion bring color and nutrients to your bowl. Finally, toppings make this dish fun. Sliced avocado adds creaminess, while salsa and cheddar cheese give it a zesty kick. Fresh cilantro brightens it up, and lime wedges add a burst of freshness. With the Full Recipe, you can create a hearty meal that everyone will love! - Heat 1 tablespoon of olive oil in a skillet over medium heat. - Add 1 pound of diced chicken breasts to the skillet. - Season the chicken with taco seasoning, salt, and pepper. - Cook the chicken for about 6-8 minutes. Stir it occasionally until it turns golden brown. - Once cooked, remove the chicken from the skillet and set it aside. - In the same skillet, add 1 small diced red onion and 1 diced red bell pepper. - Sauté these veggies for about 3-4 minutes. You want the onion to be soft and see-through. - Next, add 1 can of drained black beans and 1 cup of corn. - Cook everything for an additional 2-3 minutes until heated through. - In a large bowl, start by layering 2 cups of cooked brown rice at the bottom. - Next, add the cooked chicken mixture on top of the rice. - Spoon 1 cup of salsa over the chicken. - Add sliced avocado for creaminess. - To finish, sprinkle shredded cheddar cheese and fresh cilantro on top. - Serve with lime wedges on the side for a zesty kick. Check out the Full Recipe for more tips and details! - Make sure your chicken is fully cooked. This means it should reach an internal temp of 165°F. - Taste as you cook. Adjust the seasoning to fit your preference. If you like it spicier, add more taco seasoning. - Use colorful veggies. Red bell peppers, corn, and avocado make the bowl pop. - Layer the ingredients. Start with rice, then the chicken, and top with salsa and cheese. This makes it look nice and inviting. - If you want a low-carb meal, swap brown rice for cauliflower rice. - For extra protein, use quinoa instead of brown rice. It adds a nice nutty flavor too. For the full recipe, check out the Zesty Chicken and Rice Burrito Bowl. {{image_2}} If you want a meat-free meal, swap chicken for grilled tofu or tempeh. Both options give a nice texture. Tofu absorbs flavors well, making it a great choice. Tempeh has a nutty taste that adds depth. Season them with taco spices to match the dish. You can change up the protein in your burrito bowl. Shrimp works great if you want seafood. Just cook shrimp until pink and firm. For a beef option, use diced steak or ground beef. Season them with taco seasoning, just like the chicken. Add a kick to your bowl by including jalapeños. They bring heat and flavor at the same time. If you want to mix it up, try different salsas. Pineapple salsa gives a sweet twist, while tomatillo salsa adds a fresh taste. Each option makes your bowl exciting and unique. For the full recipe, check out the Zesty Chicken and Rice Burrito Bowl. You can store your leftover Chicken and Rice Burrito Bowl in an airtight container. It stays fresh for up to 3 days. Just make sure the lid is tight to keep out air and moisture. If you want to save some for later, freeze individual portions. They will last for up to 2 months. Use freezer-safe containers or bags. Label them with the date so you know when you made them. To reheat, you have two easy options. You can use the microwave or the stovetop. Heat until everything is hot all the way through. Stir occasionally to help it warm evenly. Enjoy your tasty meal again! You can add fresh jalapeños or use spicy salsa. Slice the jalapeños thin. Mix them in with the chicken and veggies. This adds heat and flavor. If you like a kick, choose a salsa with a higher spice level. You can even make your own salsa for extra flair. I love serving it with tortilla chips or a fresh side salad. Tortilla chips add a nice crunch. You can dip them in salsa or guacamole. A side salad gives a refreshing contrast to the warm bowl. Try a simple mix of greens, tomatoes, and lime dressing. Yes, it's perfect for meal prep. You can store it in individual servings. Just keep the toppings separate until you're ready to eat. This way, the avocado stays fresh and green. You can easily grab a bowl for lunch or dinner during the week. Enjoy your tasty meal anytime! For the full recipe, check out the Zesty Chicken and Rice Burrito Bowl. This blog post covered a tasty Chicken and Rice Burrito Bowl. We discussed key ingredients like chicken, brown rice, and colorful veggies. You learned step-by-step instructions for preparing and assembling the bowl. We also shared tips for cooking and presentation, plus fun variations to try. Remember, this dish works well for meal prep, making it quick and easy. Enjoy making this bowl at home. You can customize it to fit your taste.

Chicken and Rice Burrito Bowl Flavorful Easy Meal

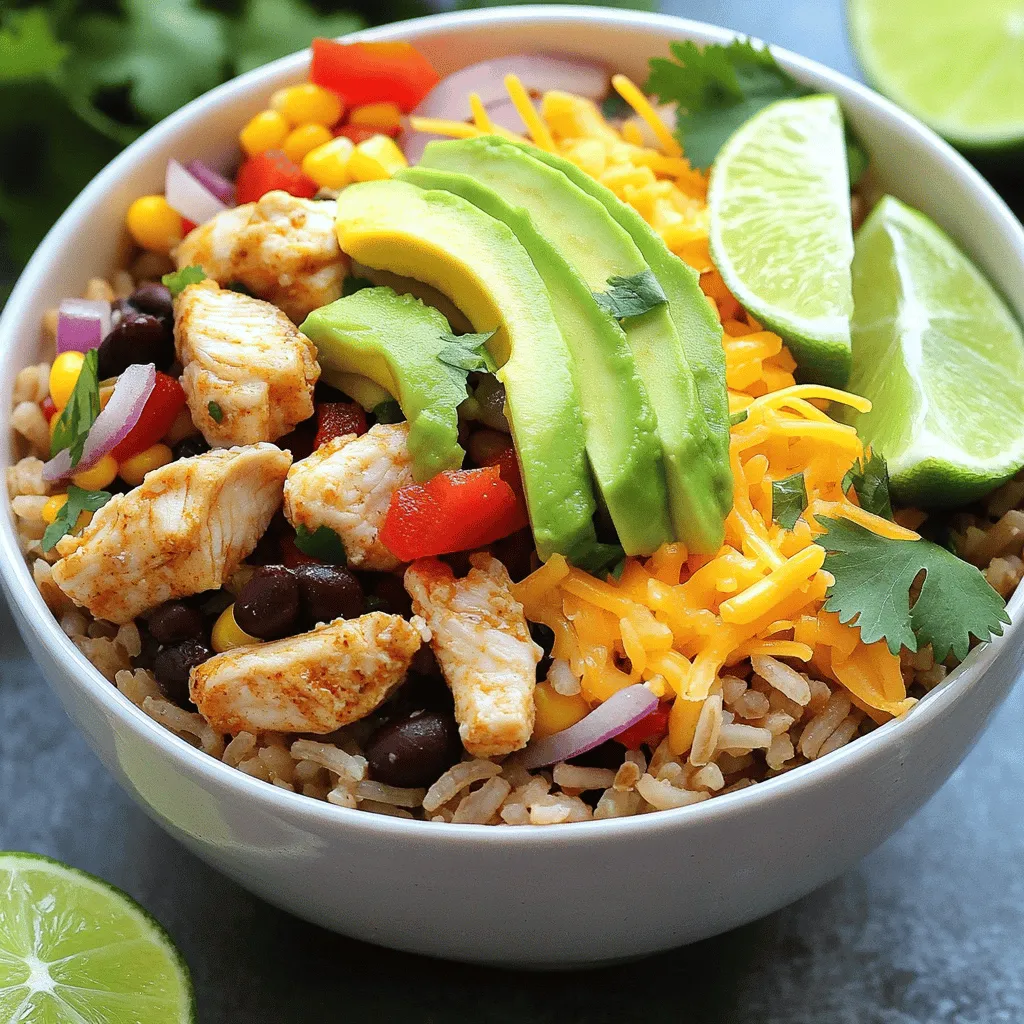
Looking for an easy and tasty dinner idea? The Chicken and Rice Burrito Bowl is packed with flavor and nutrients.
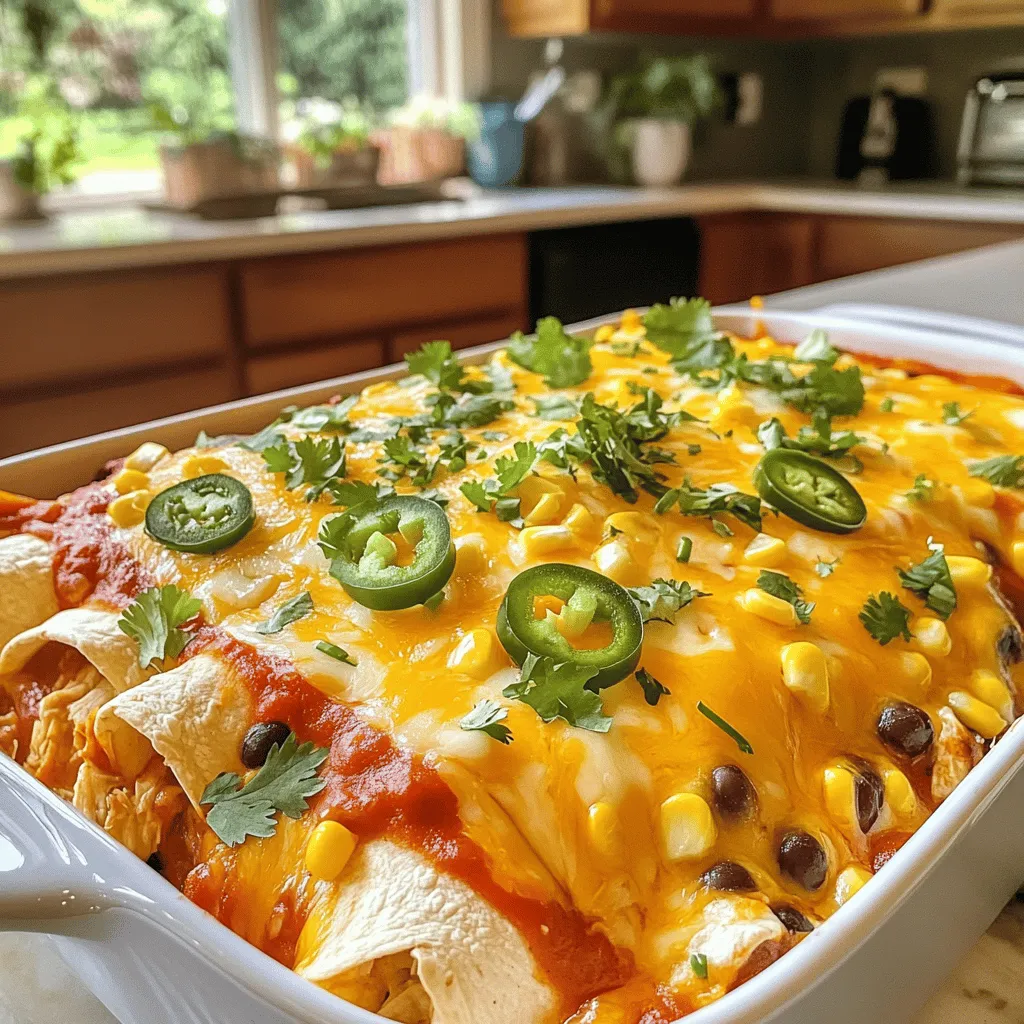
- 2 cups cooked chicken, shredded - 1 can (10 oz) enchilada sauce - 1 cup corn kernels (frozen or fresh) To make a great Chicken and Cheese Enchilada Casserole, you need three key items. First, you need cooked chicken. It adds protein and flavor. I recommend using shredded chicken for easy mixing. Next is enchilada sauce. It brings in that rich, spicy taste that enchiladas are known for. Lastly, corn kernels give a nice crunch and sweetness. You can use frozen or fresh corn based on what you have. - Fresh cilantro - Additional cheese varieties Optional ingredients can enhance your dish. Fresh cilantro adds a pop of green and a fresh taste. It works well as a garnish. You can also mix in other cheese types like Monterey Jack or pepper jack. This will give your casserole even more flavor and creaminess. Feel free to experiment with what you like! - 1 teaspoon cumin - 1 teaspoon chili powder - Salt and pepper to taste Spices are crucial for a flavorful casserole. Cumin gives a warm, earthy taste. Chili powder adds a bit of heat and depth. Don’t forget salt and pepper to bring all the flavors together. Adjust the spice levels to suit your taste. Spice blends can change a simple dish into something special. For the full recipe, you can check the [Full Recipe] link. 1. Preheat the oven: Set your oven to 350°F (175°C). This step ensures even cooking. 2. Sauté vegetables: In a skillet, add a splash of olive oil over medium heat. Add diced onion and bell peppers. Stir and cook until they soften, about 5 minutes. This makes the dish more flavorful. 1. Combine all filling ingredients: In a large bowl, mix shredded chicken, corn, black beans, sautéed vegetables, cumin, chili powder, salt, pepper, and half of the cheese. 2. Ensure even mixing: Use a spatula or spoon to mix well. This helps every bite have the same great taste. 1. Layering in the baking dish: Spread a thin layer of enchilada sauce at the bottom of a 9x13-inch baking dish. Place 4 tortillas at the base, overlapping if needed. 2. Important layering tips: Add half of the chicken mixture over the tortillas. Pour half of the remaining enchilada sauce on top and sprinkle some cheddar cheese. Repeat this step with the rest of the ingredients. 1. Covering and baking time: Cover the dish with aluminum foil and bake for 25 minutes. 2. The importance of checking doneness: Remove the foil and bake for an extra 10-15 minutes. Look for bubbly and golden cheese. This means your casserole is ready! For the complete recipe, refer to the [Full Recipe]. To shred chicken easily, use two forks. Hold the chicken with one fork and pull apart with the other. This method works well for cooked chicken. You can also use a stand mixer with a paddle attachment. Just mix for a few seconds until the chicken shreds. To enhance flavors, consider adding lime juice or fresh herbs. A squeeze of lime brightens the dish. Fresh cilantro adds a pop of flavor, too. You can also try adding a pinch of smoked paprika for a subtle smokiness. For accompaniments, serve with a side of rice or fresh salad. A simple green salad balances the richness of the casserole. You can also add guacamole or sour cream for extra creaminess. Best side dishes include refried beans or Mexican corn. These sides complement the casserole well. You can also serve tortilla chips for a crunchy texture. To adjust servings, simply double the recipe. Use a larger baking dish if needed. This casserole is great for gatherings. Make-ahead options are easy. You can prepare the casserole a day before. Just cover it and store it in the fridge. When ready to bake, add a few extra minutes to the cooking time. For the full recipe, check out the complete guide. {{image_2}} You can easily customize your Chicken and Cheese Enchilada Casserole. Here are some swaps: - Vegetables to add or omit: Try adding zucchini or spinach for extra nutrition. You can skip black beans if you prefer. - Alternative protein options: Use shredded beef or turkey instead of chicken. For a lighter dish, try cooked shrimp. You can adapt this recipe to fit your dietary needs: - Gluten-free options: Use corn tortillas instead of flour. Always check the enchilada sauce for gluten-free labels. - Vegetarian adaptations: Replace chicken with beans or lentils. Add more veggies, like mushrooms or sweet potatoes, for texture. Scaling this recipe is simple and handy: - Cooking for fewer servings: Halve all ingredients. Use a smaller baking dish for better cooking. - Doubling the recipe for larger groups: Just double the ingredients. Ensure you have a larger baking dish and adjust baking time as needed. For the full recipe, check out the detailed steps and ingredient list. To keep your Chicken and Cheese Enchilada Casserole fresh, store it in an airtight container. Place it in the fridge. It will last about 3 to 4 days. For best taste, eat it within this time frame. If you want to save it longer, freezing is a great option. To freeze the casserole, let it cool first. Cover it tightly with plastic wrap and then foil. This helps prevent freezer burn. You can freeze it for about 2 to 3 months. When ready to eat, thaw it in the fridge overnight. When reheating, I suggest using the oven for the best results. Preheat your oven to 350°F (175°C). Place the casserole in an oven-safe dish. Cover it with foil to keep it moist. Heat for about 20 to 30 minutes, or until it’s hot all the way through. If you prefer a quicker method, use the microwave. Place a slice on a microwave-safe plate. Heat it in short bursts of 1 to 2 minutes. Check often to avoid overheating. This keeps the texture and flavor nice. Enjoy your meal! Yes, you can prepare this casserole in advance. To make it ahead, layer the ingredients as usual. Cover the dish tightly with plastic wrap or foil. Store it in your fridge for up to 24 hours before baking. You can also freeze it for longer storage. If frozen, let it thaw overnight in the fridge before baking. Adjust the baking time, as you may need a bit more time to heat it through. If you need alternatives to tortillas, consider these options: - Zucchini slices: Thinly slice zucchini and layer them in the casserole. - Cauliflower rice: Spread cooked cauliflower rice for a low-carb option. - Polenta: Use cooked polenta as layers. It adds a nice flavor. These substitutions can give your dish a unique twist while keeping it delicious. Look for a few signs to check if your casserole is ready: - The cheese should be melted and bubbly. - The edges should be slightly golden. - A knife inserted in the center should come out hot. If you see these signs, your casserole is good to go! Enjoy the wonderful flavors in each bite. You have learned how to make a tasty Chicken and Cheese Enchilada Casserole. We covered essential and optional ingredients, as well as spices and seasonings to boost flavor. Step-by-step, we walked through prepping, mixing, and baking the dish. Tips for serving and variations make this recipe even better. Don't forget about storage and reheating for leftovers. Use these insights to create a meal everyone will enjoy. Happy cooking!

Chicken and Cheese Enchilada Casserole Delight

Ready for a delicious twist on a classic dish? My Chicken and Cheese Enchilada Casserole Delight combines tender chicken, rich

- 1 ½ cups whole wheat flour - ½ cup rolled oats - ½ cup dried cranberries - 1 tablespoon baking powder - ½ teaspoon baking soda - ½ teaspoon salt - 1 teaspoon ground cinnamon - ½ cup honey or maple syrup - 1 large egg - ½ cup Greek yogurt - ⅓ cup fresh orange juice - Zest of 1 orange - ⅓ cup unsweetened applesauce - ½ cup chopped walnuts or almonds (optional) Whole wheat flour adds fiber and keeps you full longer. It also gives the muffins a nutty taste. Rolled oats provide energy and help with digestion. They make the muffins hearty. Dried cranberries add a sweet and tart flavor while offering antioxidants. Honey or maple syrup sweetens the muffins naturally. Greek yogurt gives protein and moisture, making them soft. Fresh orange juice and zest bring a bright flavor and vitamin C. Applesauce helps keep the muffins moist and cuts down on sugar. Nuts add healthy fats and a crunchy texture. You can swap whole wheat flour for all-purpose flour if you prefer. Use almond milk or coconut yogurt instead of Greek yogurt for a dairy-free option. If you want a vegan version, replace the egg with a flax egg. Just mix 1 tablespoon of flaxseed meal with 2.5 tablespoons of water. For a sweeter muffin, you could use agave syrup instead of honey. If you dislike nuts, you can leave them out or use seeds like sunflower. {{ingredient_image_1}} First, gather all your ingredients. This will make cooking easy and fun. I love using fresh orange juice and zest for a bright flavor. Preheat your oven to 350°F (175°C). Prepare a 12-cup muffin tin with paper liners or a light spray of cooking oil. In a large bowl, mix the dry ingredients. Combine 1 ½ cups of whole wheat flour, ½ cup of rolled oats, and ½ cup of dried cranberries. Add 1 tablespoon of baking powder, ½ teaspoon of baking soda, ½ teaspoon of salt, and 1 teaspoon of ground cinnamon. Stir well to blend all the dry ingredients evenly. In another bowl, whisk together your wet ingredients. Start with ½ cup of honey or maple syrup. Then add 1 large egg, ½ cup of Greek yogurt, ⅓ cup of fresh orange juice, and the zest of 1 orange. Don’t forget to mix in ⅓ cup of unsweetened applesauce. Whisk until everything is smooth and creamy. Now, it’s time to combine the wet and dry ingredients. Gradually pour the wet mix into the dry mix. Stir gently until just combined; small lumps are okay! If you want a nutty touch, fold in ½ cup of chopped walnuts or almonds. Divide the batter into the muffin tin, filling each cup about ¾ full. Bake for 18-20 minutes. Check with a toothpick in the center of a muffin. If it comes out clean, you’re ready! Once done, cool in the tin for 5 minutes. Then transfer to a wire rack to cool completely. Enjoy your muffins warm or at room temperature! To make sure your muffins stay moist, use Greek yogurt. It adds creaminess and flavor. Applesauce also helps keep moisture. Don’t overmix your batter. Mix until just combined for fluffy muffins. For that nice dome shape, fill each cup about ¾ full. This gives them room to rise. Bake at the right temperature, 350°F. If you want a golden top, wait until the muffins are lightly browned. Store your muffins in an airtight container. They stay fresh for up to a week. If you want to keep them longer, freeze them. To reheat, microwave for 15-20 seconds. Enjoy them warm for the best taste. Pro Tips Use Fresh Ingredients: For the best flavor, use fresh orange juice and zest. This enhances the citrusy aroma and taste of the muffins. Customize Your Sweetener: Feel free to adjust the sweetness by using more or less honey or maple syrup, depending on your preference. Don’t Overmix: When combining wet and dry ingredients, mix just until combined. Overmixing can lead to dense muffins. Experiment with Add-ins: Try adding different nuts or seeds, such as pecans or chia seeds, for added texture and nutrition. {{image_2}} To make these muffins gluten-free, swap the whole wheat flour for a gluten-free blend. Look for a blend that includes xanthan gum. This helps mimic the structure of wheat flour. You can also use almond flour or oat flour. Both options add a nice flavor and texture. Ensure your rolled oats are gluten-free too. This way, you can enjoy these muffins without worry. For a vegan version, replace the egg with a flax egg. To make one, mix one tablespoon of flaxseed meal with three tablespoons of water. Let it sit for about five minutes until it thickens. Substitute Greek yogurt with a plant-based yogurt. Maple syrup works well as a sweetener, too. This keeps the muffins sweet and moist without using animal products. You can boost the flavor of your muffins with easy add-ins. Consider adding chocolate chips or chopped nuts for extra crunch. Dried cherries or blueberries can also work beautifully with cranberries. A splash of vanilla extract brightens the taste as well. For a fun twist, try adding some lemon zest or ginger for warmth. These enhancements keep your muffins exciting and full of flavor. Cranberry Orange Energy Muffins are a smart snack choice. Each muffin has about 150 calories. They are packed with whole grains and healthy fats. You get fiber from whole wheat flour and oats. Each muffin contains around 5 grams of protein, thanks to Greek yogurt and egg. The dried cranberries add natural sweetness and antioxidants. - Whole Wheat Flour: This flour has more fiber than white flour. Fiber helps with digestion and keeps you full. - Rolled Oats: Oats are great for heart health. They lower cholesterol and stabilize blood sugar. - Dried Cranberries: These berries are rich in vitamins and antioxidants. They can boost your immune system. - Greek Yogurt: Greek yogurt is high in protein and probiotics. Probiotics support gut health. - Fresh Orange Juice and Zest: Oranges provide vitamin C. This vitamin fights off colds and supports skin health. - Nuts (Optional): Walnuts or almonds add healthy fats and extra protein. Store-bought muffins often have added sugars and unhealthy fats. They can pack over 300 calories each. In contrast, my Cranberry Orange Energy Muffins are made with wholesome ingredients. They are lower in calories and higher in nutrients. Plus, you control the sweetness. Homemade muffins give you a healthier snack full of flavor. Enjoy these muffins fresh, knowing you're making a better choice! Yes, you can freeze these muffins. Let them cool completely first. Then, wrap each muffin in plastic wrap. Place the wrapped muffins in a freezer bag. They will stay fresh for about three months. When you want to eat one, just take it out and let it thaw at room temperature. You can also warm it in the microwave for a quick snack. To reduce sweetness, cut back on honey or maple syrup. Use only 1/4 cup instead of 1/2 cup. You can also use unsweetened applesauce. This will add moisture without extra sugar. Consider adding more orange zest for flavor. This keeps the muffins tasty without the extra sweetness. Yes, you can replace Greek yogurt with plain yogurt or sour cream. Both options will keep the muffins moist. For a dairy-free choice, use almond yogurt or coconut yogurt. Each option will work well, but it may change the flavor a bit. Choose what fits your diet best. This post covered how to make Cranberry Orange Energy Muffins. You learned key ingredients and their benefits. Substitutions help fit your needs. The step-by-step guide made baking easy and fun. Tips ensure moist muffins and perfect tops. Variations let you try gluten-free or vegan options. The nutritional info showed health benefits too. Try these muffins today. They are a tasty choice for any time!

Cranberry Orange Energy Muffins Nutritious Snack Idea

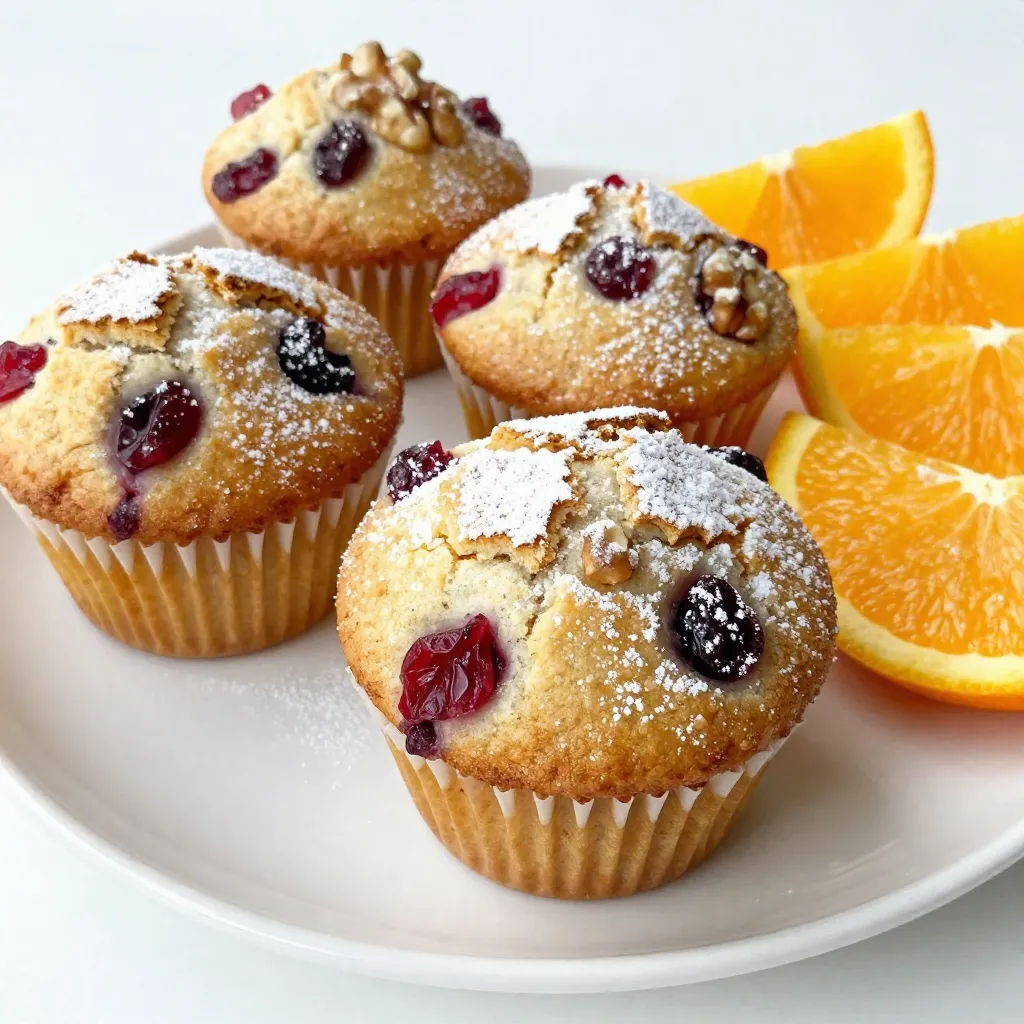
Looking for a boost that strikes the perfect balance of tasty and healthy? You’ll love my Cranberry Orange Energy Muffins!

To make savory Chicken Caesar wraps, gather these key items: - 2 cups cooked chicken breast, diced or shredded - 4 large tortillas (flour or whole wheat) - 1 cup romaine lettuce, chopped - 1/2 cup cherry tomatoes, halved - 1/4 cup Parmesan cheese, grated - 1/4 cup Caesar dressing (store-bought or homemade) - 1/4 teaspoon garlic powder - 1 pinch black pepper These ingredients work together to create a tasty meal that is easy to prepare. You will need a few tools to make your Chicken Caesar wraps: - Mixing bowl - Spoon or spatula - Knife and cutting board - Grill pan or skillet (optional) - Platter for serving Using the right tools makes the cooking process smooth and fun. To add more flavor and texture, consider these optional ingredients: - 1/4 cup croutons (for added crunch) - Sliced avocado or cucumber - Fresh herbs like parsley or basil These add-ons can elevate your wraps and make them even more delicious. Enjoy experimenting with different flavors! To make Chicken Caesar Wraps, gather your ingredients first. You will need cooked chicken, tortillas, lettuce, tomatoes, Parmesan cheese, and Caesar dressing. This meal comes together fast, so prepping is key. Chop the lettuce and tomatoes. Dice or shred the chicken if you haven’t done so. This step saves you time when you're ready to roll. 1. Mix Ingredients: In a large bowl, add your diced chicken, chopped romaine lettuce, halved cherry tomatoes, and grated Parmesan cheese. 2. Add Dressing: Pour Caesar dressing over the mix. Add garlic powder and black pepper to taste. Toss the mixture until everything is well coated. This step adds great flavor to your wrap. 3. Prepare Tortillas: Place a tortilla flat on a clean surface. Spoon about 1/4 of the chicken Caesar mixture onto the center of the tortilla. If you like crunch, sprinkle some croutons on top. 4. Wrap It Up: Fold in the sides of the tortilla, then roll it up from the bottom to the top. Ensure the filling is secure as you roll. 5. Repeat: Do the same for the remaining tortillas and filling until you finish. 6. Grill (Optional): If you want a crispy finish, grill the wraps on a pan for 2-3 minutes on each side. This step gives a nice golden touch. 7. Slice and Serve: Let the wraps rest for a minute. Then slice them in half diagonally. To present your wraps well, arrange them neatly on a platter. For a fun touch, serve with extra Caesar dressing on the side for dipping. Garnish with fresh parsley and some extra Parmesan shavings. This makes your dish look even more appetizing. Enjoy the ease and flavor of this quick meal! For the complete recipe, check out the [Full Recipe]. To boost the taste of your Chicken Caesar Wraps, use fresh ingredients. Fresh romaine lettuce and ripe cherry tomatoes add crispness. A sprinkle of freshly grated Parmesan cheese makes a big difference. You can also add herbs like basil or parsley for extra flavor. If you like spice, try adding a dash of hot sauce to the Caesar dressing. This small tweak can elevate the dish. One common mistake is overfilling the wraps. If you add too much filling, the wraps can tear. Stick to about a quarter of the filling per tortilla. Another mistake is not mixing the ingredients well. Make sure every piece of chicken and vegetable gets dressing. This ensures balanced flavor in every bite. Lastly, avoid skipping the resting time after grilling. Letting the wraps sit for a minute helps the flavors meld. You can make these wraps healthier with simple swaps. Use whole wheat tortillas instead of regular ones. This adds more fiber and nutrients. Replace Caesar dressing with a lighter yogurt-based version to cut calories. Adding extra veggies, like cucumbers or bell peppers, increases vitamins. You can also reduce the cheese or skip croutons to lower fat and carbs. These changes keep the wraps tasty while making them more nutritious. For the full recipe, check out the [Full Recipe]. {{image_2}} You can switch up the chicken in your wraps. Try turkey for a leaner choice. Shrimp adds a nice twist if you love seafood. You can also use grilled steak for a heartier option. Each protein brings a unique taste, making your wraps fun and different. For a vegetarian wrap, use grilled veggies like zucchini and bell peppers. You can add chickpeas for protein and a satisfying texture. If you want a vegan wrap, use tofu or tempeh. Replace Caesar dressing with a vegan version made from cashews or tahini. This way, everyone can enjoy a tasty wrap. You can easily change the flavor of your wraps. Add some spicy elements like jalapeños or hot sauce for heat. For a tangy kick, include pickled onions or olives. Fresh herbs like basil or cilantro can brighten the dish. Adjust these flavors to match your taste or mood. After you make Chicken Caesar wraps, store any leftovers in the fridge. Place them in an airtight container. This keeps the wraps fresh for up to three days. If you have extra filling, store it in a separate container. This helps the tortillas stay crisp. You can freeze the wraps, but it’s best to freeze the filling separately. Wrap each tortilla in plastic wrap and place them in a freezer bag. They last for about two months in the freezer. When you’re ready to eat, thaw the filling overnight in the fridge. Then, reheat in a skillet until warm. This keeps the wraps tasty and fresh. Each ingredient has a different shelf life. Cooked chicken lasts three to four days in the fridge. Romaine lettuce stays fresh for about a week if stored properly. Cherry tomatoes are good for five to seven days. Parmesan cheese can last a few weeks if unopened. Check dates on store-bought Caesar dressing for freshness. To make Chicken Caesar Wraps, start with cooked chicken. You can dice or shred it. Use about 2 cups of chicken. Next, take 4 large tortillas. You can choose flour or whole wheat. Chop 1 cup of romaine lettuce and halve 1/2 cup of cherry tomatoes. Grate 1/4 cup of Parmesan cheese. In a bowl, mix the chicken, lettuce, tomatoes, and cheese. Add 1/4 cup of Caesar dressing. Sprinkle in 1/4 teaspoon garlic powder and a pinch of black pepper. Toss it all well. Lay a tortilla flat. Spoon 1/4 of the mix onto the center. If you want, add croutons for crunch. Fold the sides of the tortilla in and roll it up from the bottom. Repeat with the rest. Grill if you like it crispy. Slice in half and enjoy! For more details, check the Full Recipe. Yes, you can use store-bought Caesar dressing. It saves time and still tastes great. Many brands offer tasty options. Just be sure to choose a dressing that you enjoy. If you want to make it healthier, look for low-fat or organic choices. Many sides go well with Chicken Caesar Wraps. Here are a few ideas: - Fresh fruit salad - Crispy potato wedges - Classic coleslaw - Veggie sticks with dip - Light soup, like tomato or vegetable These sides add balance to your meal. Chicken Caesar Wraps can be healthy. They have protein from chicken and nutrients from lettuce. Using whole wheat tortillas boosts fiber. However, watch the dressing and cheese amounts. You can make it lighter by using less dressing or a lighter cheese. Overall, they can fit well in a balanced diet. This blog post covered all you need for Chicken Caesar Wraps. We explored essential ingredients, helpful tools, and tasty add-ons. The step-by-step guide simplifies cooking, while tips show you how to avoid mistakes. We also discussed variations and healthy options for everyone. Finally, you learned how to store and reheat leftovers properly. Enjoy creating your perfect Chicken Caesar Wraps! With these ideas, your meals will shine.

Savory Chicken Caesar Wraps Easy to Make Meal

Looking for a quick meal that packs a punch? I’ve got you covered with savory Chicken Caesar Wraps! These wraps

Older posts
Newer posts
← Previous Page1 … Page79 Page80 Page81 … Page85 Next →

dsad

© 2026 greenmealmap • Built with GeneratePress

Our Policies

  • Copyright Policy
  • Cookie Policy
  • GDPR Policy
  • Privacy Policy
  • Disclaimer
  • Terms Of Use

More Information

  • Home
  • About
  • Contact
  • Appetizers
  • Dessert
  • Dinner
  • Drinks
©2026, greenmealmap About Back To Top