Skip to content
DisclaimerTerms Of UseGDPR PolicyCookie Policy

greenmealmap

  • Home
  • Drinks
  • Appetizers
  • Dinner
  • Dessert
  • About
  • Contact
  • Privacy Policy
DisclaimerTerms Of UseGDPR PolicyCookie Policy

NO-ING-IMG

To make your Cheesy Zucchini Boats, you will need the following ingredients: - 4 medium zucchini - 1 cup cherry tomatoes, halved - 1 cup corn kernels (fresh or frozen) - 1 cup shredded mozzarella cheese - 1/2 cup grated Parmesan cheese - 1/4 cup cream cheese, softened - 2 cloves garlic, minced - 1 teaspoon Italian seasoning - Salt and pepper to taste - Fresh basil leaves for garnish These ingredients come together to create a tasty and satisfying meal. Zucchini acts as the perfect base, while the cheeses add a rich, creamy flavor. The cherry tomatoes and corn bring a burst of freshness and sweetness. Plus, the Italian seasoning ties everything together with its warm, herby notes. You can easily find all these items at your local grocery store or farmer's market. When you gather your ingredients, consider the quality. Fresh zucchini and ripe tomatoes make a big difference in taste. This dish is not only easy to make but also allows you to enjoy healthy and delicious food. For the full recipe, visit the section dedicated to Cheesy Zucchini Boats. 1. Preheat your oven to 375°F (190°C). 2. Wash the zucchini under cool water. 3. Slice each zucchini in half lengthwise. 4. Use a spoon to scoop out the seeds and flesh. Reserve this flesh for later. 1. Place the zucchini halves cut side up on a baking sheet. 2. Sprinkle a little salt over the zucchini. 3. Bake the halves for 10 minutes. This softens them for the next steps. 1. In a medium bowl, mix the reserved zucchini flesh with cherry tomatoes, corn, mozzarella, Parmesan, and cream cheese. 2. Add minced garlic, Italian seasoning, salt, and pepper. 3. Stir the mixture well. This is your filling for the boats. 1. Fill each zucchini boat with the cheese and vegetable mixture. Press down gently to pack it. 2. Place the stuffed zucchini back in the oven. 3. Bake for 20–25 minutes. Look for bubbly and golden cheese on top. For the full recipe, check the instructions above. Enjoy your Cheesy Zucchini Boats! To get the perfect cheese melt, use a mix of mozzarella and Parmesan. Mozzarella melts well, while Parmesan adds a nice crust. Bake the zucchini boats until the cheese is bubbly and golden. This usually takes about 20 to 25 minutes. When deciding between fresh or frozen corn, fresh corn offers a crisp bite and sweet flavor. Frozen corn is handy and cooks quickly. If you use frozen corn, no need to thaw; just toss it into the mix. For serving, place the Cheesy Zucchini Boats on a large platter. Drizzle a bit of olive oil on top for shine. A sprinkle of extra Parmesan adds flavor and makes it look fancy. Use fresh basil leaves as a garnish to bring color and freshness to the dish. For plating, arrange the boats in a circular pattern. This creates an inviting look. You can even add a small bowl of marinara sauce in the center for dipping. To save time, prepare your ingredients in advance. Chop the tomatoes and corn the night before. This makes cooking easier and quicker. Using pre-chopped ingredients can also cut down your prep time. Many stores sell pre-cut veggies. This way, you spend less time in the kitchen and more time enjoying your meal. {{image_2}} You can switch up the cheeses in this dish easily. Try using cheddar or gouda for a different taste. If you want more protein, add cooked chicken or turkey to the filling. Simply shred the meat and mix it in with the other ingredients. This will make your Cheesy Zucchini Boats heartier and more satisfying. To make the dish gluten-free, ensure you check all labels on your ingredients. Most cheeses and vegetables are naturally gluten-free. For a vegetarian or vegan option, swap out the cheeses for plant-based ones. You can use cashew cheese or nutritional yeast to keep the cheesy flavor without dairy. To boost the flavor, add spices like chili powder or cayenne for some heat. Mixing in diced bell peppers or spinach will add more color and nutrients. Feel free to get creative with your veggies. The more you add, the more vibrant your boats will be. For more details, check out the Full Recipe to explore all the tasty options! To keep your Cheesy Zucchini Boats fresh, let them cool to room temperature first. Place leftovers in an airtight container. They can last in the fridge for about 3 to 4 days. When you're ready to eat them again, just reheat in the oven for the best taste. If you want to freeze your zucchini boats, it's best to do this before baking. Wrap each boat tightly in plastic wrap, then place them in a freezer-safe bag. They can stay good for up to 3 months. When you're ready to enjoy them, thaw in the fridge overnight. Reheat in the oven at 375°F until heated through and the cheese is bubbly. Leftover Cheesy Zucchini Boats can be a fun addition to your meals! You can chop them up and mix them into pasta for a tasty dish. They also work well in a salad, adding flavor and texture. You can even serve them as a side with grilled meats or fish. Enjoy getting creative with these delicious leftovers! You can tell when the zucchini boats are ready when the cheese is bubbly and golden brown. The zucchini should be tender but not mushy. If you poke it with a fork, it should yield slightly but still hold its shape. This usually takes about 20 to 25 minutes of baking after you stuff them. Keep a close eye during the last few minutes to avoid overcooking. Yes, you can prepare Cheesy Zucchini Boats ahead of time. First, wash and cut the zucchini as directed. Next, scoop out the seeds and mix the filling. You can store the unbaked boats in the fridge for up to 24 hours. Just cover them tightly with plastic wrap. When ready to bake, simply put them in the oven. You may need to add a few extra minutes to the baking time. If you don’t have cream cheese, you have options. You can use ricotta cheese or cottage cheese as a substitute. Both add creaminess and flavor. For a dairy-free option, try using silken tofu blended until smooth. This keeps the texture creamy while making it suitable for different diets. You can also mix in some sour cream or Greek yogurt if you have those on hand. In this blog post, we explored how to make cheesy zucchini boats. We covered the necessary ingredients, step-by-step instructions, and tips for success. Keep these techniques and variations in mind to customize the dish to your taste. Enjoying this meal is easy and fun. Whether you serve it as a main dish or a side, this recipe can fit many diets. You can make it your own with different flavors. Try it out and share your results!

Cheesy Zucchini Boats Tasty and Easy Dinner Idea

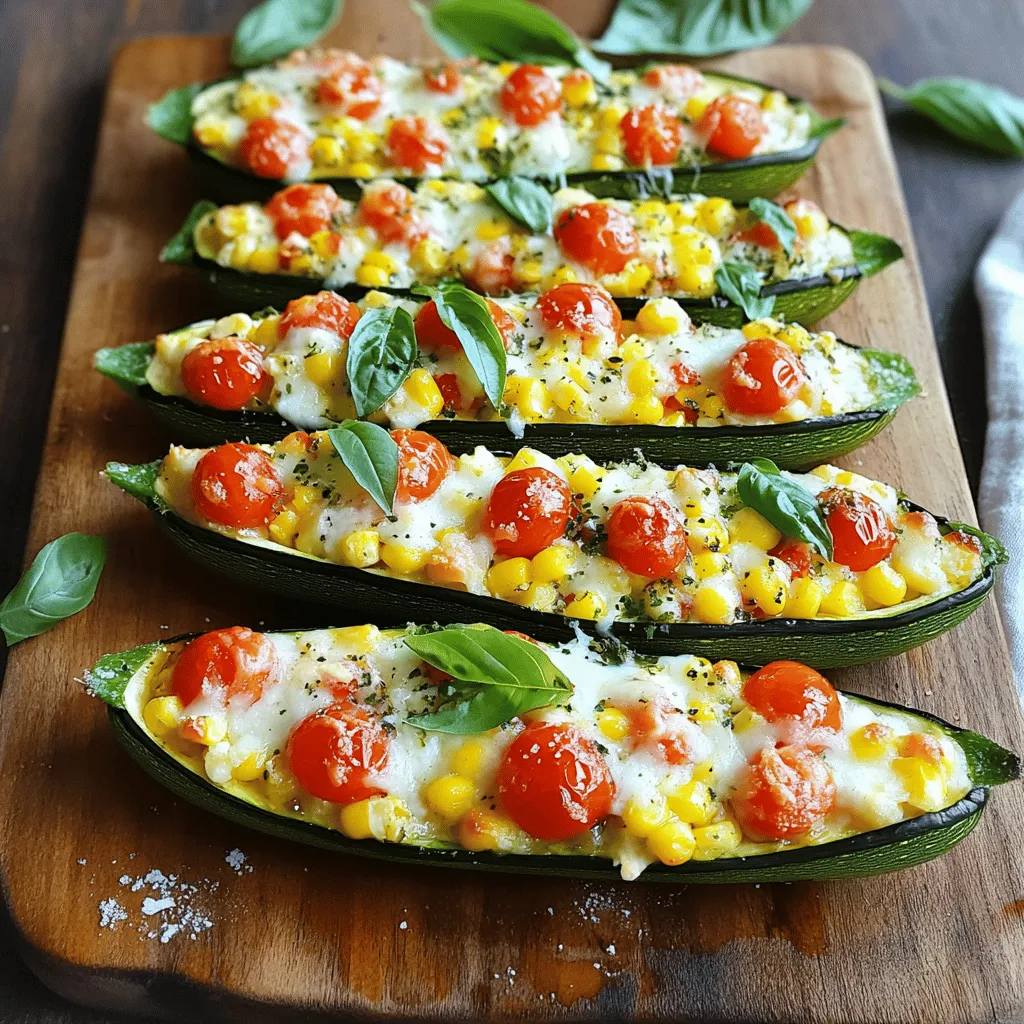
Looking for a quick, tasty dinner? You’re in the right place! Cheesy Zucchini Boats are simple to make and full

- Fresh watermelon - Feta cheese - Red onion - Fresh mint leaves - Olive oil - Balsamic glaze - Seasoning (salt and pepper) For a great Fresh Watermelon Salad, you need simple, fresh ingredients. Start with fresh watermelon. It should be sweet and juicy. Next, grab some feta cheese. This cheese adds a nice salty flavor. Thinly slice a red onion. It gives a nice crunch. You will also need fresh mint leaves. They add a burst of freshness. For the dressing, prepare olive oil and balsamic glaze. These create a rich, tangy taste. Don’t forget to season with salt and pepper. This will enhance all the flavors in the salad. You can find the full recipe in the earlier sections, but keep these ingredients in mind. They come together to make a delightful and refreshing dish. First, you need to cube the watermelon. Cut it into small, bite-sized pieces. Aim for about 1-inch cubes. This size helps the salad mix well. Use a sharp knife to make clean cuts. For the best flavor, choose a ripe watermelon. Look for one that is heavy for its size. The skin should have a smooth surface and a yellow spot. This spot shows where it rested on the ground. Now, let’s layer the salad components. Start with the cubed watermelon in a large bowl. Evenly sprinkle the crumbled feta cheese on top. Next, add the thinly sliced red onion. This adds a nice crunch. Finally, gently toss in the chopped mint leaves. They give a fresh taste to the salad. Mix these ingredients carefully. You want to keep the watermelon cubes intact for a pretty presentation. To make the dressing, grab a small bowl. Combine the olive oil and balsamic glaze. These two create a rich flavor. Whisk them together until they blend well. Taste the dressing and adjust seasoning with salt and pepper. You want just enough to enhance the salad. Drizzle this dressing over the salad mixture. Toss gently to coat all the ingredients. Let the salad sit for about 10 minutes. This time helps the flavors mix together. You can find the full recipe for this delightful dish above. Enjoy your fresh watermelon salad! Choosing ripe watermelon: To pick the best watermelon, look for one that feels heavy for its size. The skin should be smooth and dull, not shiny. Check for a yellow spot where it sat on the ground. This spot means it ripened well in the sun. Making ahead of time: You can prepare the salad a few hours before serving. Just mix the watermelon, feta, and onion. Keep the mint and dressing separate until you are ready to serve. This keeps the salad fresh and crunchy. Creative ways to present the salad: Serve the salad in a large, shallow bowl to show off the colors. You can also layer it in a clear jar for a fun look. Add extra mint leaves and a sprinkle of feta on top for a pretty touch. Pairing with main dishes: This salad goes well with grilled chicken or fish. It also complements spicy dishes, as the sweet watermelon cools the heat. Try it with a simple sandwich for a light meal. Keeping the salad fresh: Store any leftovers in an airtight container in the fridge. Make sure the mint and dressing are kept separate. This way, they stay fresh and don’t make the salad soggy. How long it lasts in the fridge: The salad lasts for about two days in the fridge. After that, the watermelon may become mushy. For the best taste, enjoy it within the first day. You can find the full recipe in the previous sections. {{image_2}} I love mixing flavors in my watermelon salad. One great combo is watermelon and feta. The salty feta pairs perfectly with the sweet, juicy watermelon. This balance makes each bite exciting. Another fun choice is a watermelon mint salad with lime dressing. The mint adds a fresh taste. The lime dressing gives it a zesty kick. These flavors work well together, making your salad refreshing. If you're vegan, you can swap out the feta cheese. Try using avocado or tofu for creaminess. These options keep the salad tasty while sticking to a plant-based diet. For those who need gluten-free meals, this salad is already safe! Just stick to fresh ingredients, and you’re good to go. Always check labels on any dressings or add-ins. You can change up the ingredients based on the season. In summer, keep it light with cucumber or basil. In fall, add roasted pumpkin seeds for crunch. These seasonal twists keep the salad exciting all year round. For holiday meals, you can enhance the salad with pomegranate seeds or pecans. These ingredients add color and flavor, making your dish festive and fun. For the full recipe, check out the Refreshing Watermelon Feta Delight. Enjoy creating your own versions of this salad! Watermelon is a great fruit for hydration. It is made up of 92% water. This makes it perfect for hot days. It also has vitamins A and C. These vitamins help keep your skin and eyes healthy. Plus, watermelon is low in calories. One cup has only about 46 calories. This makes it a tasty snack for those watching what they eat. In a serving of watermelon salad, you get a mix of nutrients. Here’s a quick look: - Calories: About 160 calories per serving - Protein: 6 grams from feta cheese - Carbs: 12 grams mostly from watermelon - Fat: 10 grams from olive oil The feta adds protein and calcium. The mint gives extra flavor and is full of antioxidants. The olive oil offers healthy fats, which are good for your heart. To make this salad a full meal, pair it with protein. Grilled chicken or chickpeas work great. You can also add grains like quinoa or farro for more fiber. Adding these items makes a balanced meal. You can include this salad in your weekly meal plan. It is fresh and light, perfect for lunch or dinner! Enjoy the Full Recipe to make your own delightful salad. To pick a great watermelon, look for a few key signs. First, check for a uniform shape. Round or oval shapes are ideal. Next, look for a creamy yellow spot on one side. This spot shows where the watermelon rested on the ground. It should be a light color, not white. Finally, give it a tap. A ripe watermelon will sound hollow and feel heavy for its size. Using these tips, you’ll find the sweetest watermelon for your salad. Yes, you can make your watermelon salad a day ahead. To do this, prepare the salad but leave out the dressing until you serve it. This keeps the watermelon fresh and crunchy. Store the salad in the fridge in an airtight container. When ready to serve, drizzle the dressing over the top. Toss the salad gently to mix. This method keeps your salad tasty and appealing. Watermelon salad pairs well with many dishes. Try serving it alongside grilled chicken or fish for a light meal. It also goes great with a spicy dish, as the sweetness of the watermelon cools the heat. For a vegetarian option, serve it with a quinoa salad or a veggie platter. You can even enjoy it as a side with tacos or burgers. Each of these options enhances the fresh flavors of your salad. For the full recipe, check out the above section. This blog post covered all you need for a delicious watermelon salad. We talked about fresh ingredients, step-by-step instructions, and tips for success. I shared ideas for variations and how to store the salad. Watermelon salad is tasty, healthy, and perfect for any meal. With a mix of flavors and textures, you can impress anyone. Enjoy making your own watermelon salad and explore the many ways to adapt it!

Fresh Watermelon Salad Delightful and Simple Recipe

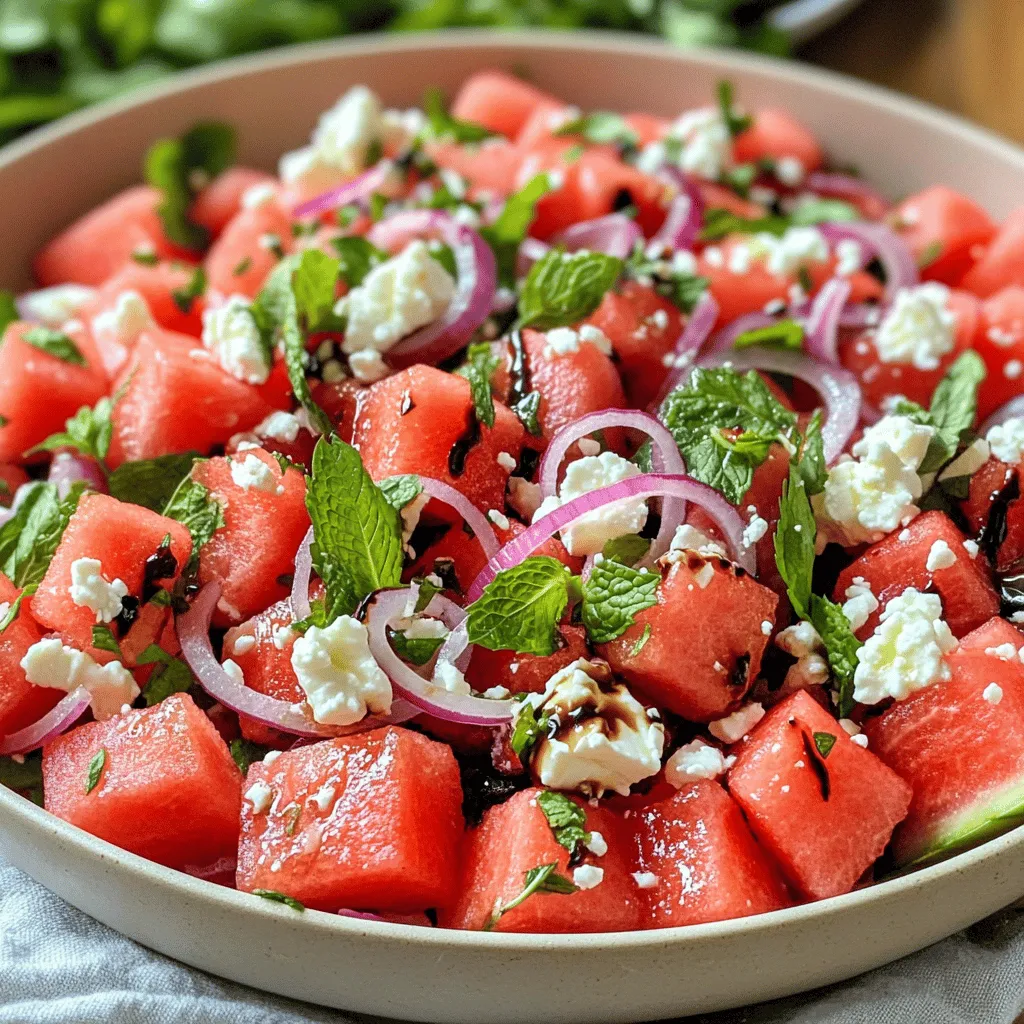
Are you ready to enjoy a fresh and tasty treat? This Fresh Watermelon Salad is both delightful and simple to

- 2 cups cooked chicken, shredded - 1 cup cheddar cheese, shredded - 1 cup mozzarella cheese, shredded - 1/2 cup mild salsa - 1/4 cup chopped green onions - 1 teaspoon cumin - 1 teaspoon paprika - 4 large flour tortillas - 2 tablespoons olive oil - Salt and pepper to taste You can change up your quesadilla with extras. Try adding: - Black beans for more protein - Bell peppers for crunch and flavor - Jalapeños for a spicy kick - Corn for sweetness - Avocado for creaminess Using good brands can make your quesadillas shine. I suggest: - Perdue for chicken, it’s tender and tasty - Tillamook for cheddar, it melts well - Galbani for mozzarella, it’s creamy and rich - Pace for salsa, it has great flavor Start by gathering your ingredients. You need cooked chicken, cheeses, salsa, and spices. In a large bowl, mix together 2 cups of shredded chicken, 1 cup of cheddar cheese, and 1 cup of mozzarella cheese. Add in 1/2 cup of mild salsa and 1/4 cup of chopped green onions. Sprinkle in 1 teaspoon of cumin and 1 teaspoon of paprika. Season with salt and pepper. Stir everything until it blends well. This mixture gives your quesadillas great flavor. Heat 1 tablespoon of olive oil in a large skillet on medium heat. Place one tortilla in the skillet. Spoon half of your chicken mixture onto one half of the tortilla. Spread it evenly for the best taste. Fold the tortilla over to cover the filling. Press down gently with a spatula. Cook for about 3-4 minutes until it turns golden brown. Flip it and cook for another 3-4 minutes. The cheese should melt nicely. Remove the quesadilla and repeat with the second tortilla and the rest of the chicken mixture. Slice your cooked quesadillas into wedges for easy serving. Arrange them on a plate and serve them hot. For a fun touch, add extra salsa or sour cream on the side. You can also sprinkle chopped green onions on top for color. This makes your dish look appealing. Enjoy your meal with family or friends! Don't forget to check out the Full Recipe for more tips. To get the best crispy quesadillas, use medium heat. Too high can burn them. Always use enough oil to coat your skillet. I like to use olive oil for flavor. Place the quesadilla in the pan and press down with a spatula. This helps everything cook evenly. Flip it carefully to keep the filling inside. Cook until both sides are golden brown. For gooey cheese, mix different types together. Cheddar and mozzarella melt well. Shred your cheese fresh for the best texture and taste. It melts better than pre-shredded cheese. Add cheese on both sides of the filling. This helps create a cheesy seal. Your quesadilla will hold together nicely. Use spices to boost flavor. I love adding cumin and paprika for warmth. You can also experiment with different herbs. Fresh cilantro gives a great taste. Don’t forget to season your chicken. Salt and pepper are key. Lastly, serve with salsa or sour cream. These toppings add zest and creaminess. For more details, check out the Full Recipe. {{image_2}} You can easily make a tasty vegetarian quesadilla. Start by using black beans or refried beans as a base. Add plenty of veggies like bell peppers, spinach, or mushrooms. For cheese lovers, use a mix of cheddar and mozzarella for a creamy texture. You can even add some corn for sweetness. This gives the quesadilla a great crunch and flavor without meat. Want a kick? Add jalapeños or diced chili peppers to your chicken mixture. You can also mix in a bit of hot sauce with the salsa. If you like bold flavors, try pepper jack cheese instead of regular cheese. It melts well and has a nice heat. For extra spice, sprinkle some chili powder in the mix. Your taste buds will love the extra warmth! Not in the mood for chicken? You can swap it out for turkey or shrimp. Both options work well with the same spices. For a plant-based choice, try tofu or tempeh. Marinate them in your favorite sauce for more flavor. Each option brings a unique taste to your quesadilla. Get creative and find your new favorite filling. For more chicken ideas, check out the Full Recipe. To keep your chicken quesadillas fresh, let them cool down first. Once cooled, wrap them in plastic wrap or aluminum foil. You can also place them in an airtight container. This helps keep them soft and tasty. Store them in the fridge for up to three days. If you plan to eat them later, it’s best to freeze them. For the best taste, reheat your quesadillas in a skillet. Heat a small amount of olive oil over medium heat. Place the quesadilla in the skillet and cook for about 2-3 minutes on each side. This helps make them crispy again. You can also use a microwave for quick reheating, but they may get soft. Heat them on a plate for about 30 seconds, then check if they are warm. To freeze quesadillas, wrap each one in plastic wrap. Then, place them in a freezer bag. Make sure to remove as much air as possible. They can stay frozen for up to two months. When you want to eat them, thaw them in the fridge overnight. After thawing, reheat them in a skillet for the best results. This way, you get a tasty meal ready in no time. Enjoy your easy chicken quesadillas anytime! For the full recipe, check out the details above. Yes, you can use other cheeses. Try pepper jack for a spicy kick. You can also use gouda or colby jack for a twist. Just make sure the cheese melts well. Mixing different cheeses adds more flavor. Quesadillas pair well with many sides. Refried beans are tasty and filling. You can also serve them with a fresh salad. Guacamole and salsa are great dips too. Rice can make a nice side as well. You can tell when it is golden brown. Look for melted cheese oozing out. Press down lightly with a spatula. If it feels firm, it is ready. Cooking time is about 3-4 minutes on each side. Enjoy your delicious meal! We’ve covered how to make quesadillas from start to finish. You learned about the key ingredients and how to customize them. I shared step-by-step instructions for cooking and presenting your dish. Tips helped you achieve crispy perfection, and I explored tasty variations. Lastly, I provided storage options to keep leftovers fresh. Now you’re ready to impress with your homemade quesadillas. Enjoy your cooking journey, and have fun experimenting with flavors!

Easy Chicken Quesadillas Quick and Tasty Meal

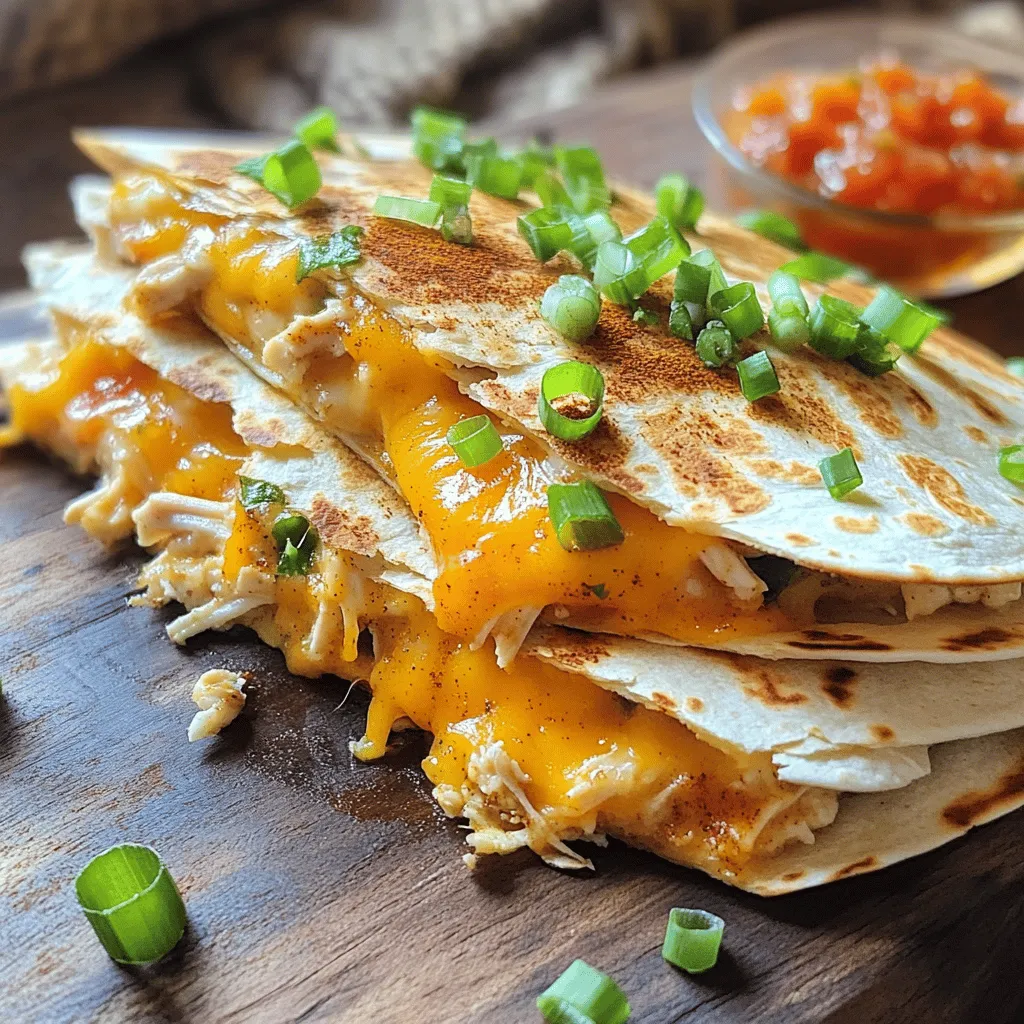
Craving a quick and tasty meal? You’re in the right place! These easy chicken quesadillas are simple to make and

I prefer fresh corn kernels for this chowder. Fresh corn gives the chowder a sweet and bright flavor. You can buy it on the cob or frozen. If you choose frozen, just thaw it first. Canned corn works too, but make sure to drain it well. The taste will be less sweet, but it's still easy and quick. The base of our chowder needs key vegetables. I always use: - 1 large onion, diced - 2 cloves garlic, minced - 2 medium potatoes, peeled and diced - 1 red bell pepper, diced - 1 carrot, diced These veggies add depth. The onion and garlic bring out rich flavors. Potatoes give a nice creaminess. The bell pepper adds sweetness, while carrots add a hint of earthiness. To make your chowder even better, consider some garnishes and add-ins. I suggest: - Fresh chives, chopped (for garnish) - A drizzle of cream for richness - Smoked paprika for a hint of spice These options will elevate your dish. You can also add cooked bacon or shredded chicken for protein. Each of these choices gives a new twist to the chowder. For the full recipe, check the instructions above. Enjoy this creamy delight! Start by heating olive oil in a large pot over medium heat. Once hot, add the diced onion and minced garlic. Cook these until they become soft, about 3 to 4 minutes. This step builds a strong flavor base for your chowder. Next, toss in the diced carrots and red bell pepper. Stir these for another 3 to 4 minutes until they soften a bit. Now, it's time to add the star of the dish: corn kernels and diced potatoes. Mix them well with the other veggies to ensure even cooking. Once everything is mixed, pour in 4 cups of vegetable broth. Bring this mixture to a boil. Boiling helps to extract flavors from the vegetables. After it boils, reduce the heat to low. Add thyme, smoked paprika, salt, and pepper. Let it simmer for about 15 to 20 minutes or until the potatoes are tender. This simmering time allows all the flavors to meld beautifully. Now comes the fun part! Use an immersion blender to puree part of the chowder. This step creates a smooth texture while keeping some chunks for bite. If you don’t have an immersion blender, you can carefully transfer the chowder to a regular blender in batches. After blending, stir in 1 cup of heavy cream or coconut milk for a vegan option. Heat it through for another 5 minutes to blend all the flavors. Adjust the seasoning if needed. Serve hot and enjoy! For the full recipe, check the ingredients listed above. To make your creamy corn chowder shine, use fresh herbs and spices. Add thyme for a warm taste. Smoked paprika gives a nice, smoky flavor. Don't forget to salt and pepper to taste. Taste as you cook. This way, you can adjust the flavors to your liking. Consider adding a squeeze of lime juice for some brightness. One mistake is not cooking the veggies enough. Make sure the onions and garlic are soft before adding other ingredients. Another common error is not blending enough. Blend part of the chowder for creaminess, but leave some whole corn for texture. Lastly, avoid skipping the cream. It adds richness and comfort to the dish. You can easily make this chowder vegan. Instead of heavy cream, use coconut milk. This gives the chowder a creamy texture and a hint of sweetness. Check your vegetable broth to ensure it is vegan-friendly. You can also add more veggies like zucchini or mushrooms for extra flavor. Feel free to explore different spices for a unique twist. For the full recipe, refer to the original. {{image_2}} You can easily spice up your corn chowder. To make it spicy, add fresh jalapeños or diced green chiles. Start with one pepper and taste as you go. You can also add cayenne pepper for a kick. Spice levels can vary, so adjust to your liking. This twist gives your chowder a fun twist and heat. Adding protein makes your chowder heartier. You can mix in cooked chicken for a filling meal. Simply shred rotisserie chicken and stir it in during the last few minutes of cooking. Crispy bacon is another great choice. Just fry it up, crumble it, and add it on top before serving. For a vegetarian option, black beans or chickpeas work well. They add texture and protein without meat. If you need a gluten-free chowder, it's simple! The base of the chowder is naturally gluten-free. Just check that your vegetable broth is labeled gluten-free. Instead of regular cream, you can use coconut milk. It gives a creamy texture and a hint of sweetness. This way, everyone can enjoy a bowl of comfort. For the full recipe, check out the Dreamy Creamy Corn Chowder recipe above. After you enjoy your creamy corn chowder, store leftovers in the fridge. Use an airtight container to keep it fresh. Corn chowder stays good for about 3 to 4 days. When you’re ready to eat, just take it out and check for any signs of spoilage. If it looks and smells fine, you’re good to go! You can freeze corn chowder for later use. It’s best to freeze it in portions. Use freezer-safe containers or bags. Leave some space at the top, as the chowder will expand. It can last for up to 3 months in the freezer. When you want to eat it, just let it thaw in the fridge overnight. To reheat your chowder, use a pot on medium heat. Stir it often to make sure it heats evenly. If it seems too thick, add a splash of broth or cream. You can also use a microwave. Heat it in short bursts, stirring in between. This way, it will taste just as good as when you first made it. For the full recipe, check out the original details above. To store creamy corn chowder, let it cool first. Then, pour it into a sealed container. It keeps well in the fridge for up to three days. If you want to save it longer, freeze it. Use freezer-safe containers or bags for best results. Just remember to leave some space in the container. The chowder expands when it freezes. Yes, you can make this chowder ahead of time. It tastes even better the next day! Just cook it, let it cool, and store it in the fridge. When you're ready to eat, heat it gently on the stove. Stir well and add a splash of cream if needed. This extra step brings back its rich taste. Creamy corn chowder pairs well with many sides. Here are a few ideas: - Crusty bread or dinner rolls - A fresh green salad - Grilled cheese sandwiches - Cornbread for a sweet touch - Pickles or chips for a crunch These sides can enhance your meal. Enjoy mixing and matching until you find your favorite combo! For the full recipe, check out the details above. This blog post covered how to make creamy corn chowder. We discussed choosing fresh or canned corn. You learned about essential vegetables and tasty garnishes. We went through step-by-step cooking tips for a rich base and the right creaminess. I shared ways to boost flavor and avoid common mistakes. You also saw different chowder variations, including spicy options and proteins. In the end, you can store leftovers easily. Whether in the fridge or freezer, reheating is simple. With these tips, you’re ready to enjoy a delicious bowl whenever you want!

Creamy Corn Chowder Delightful and Comforting Meal

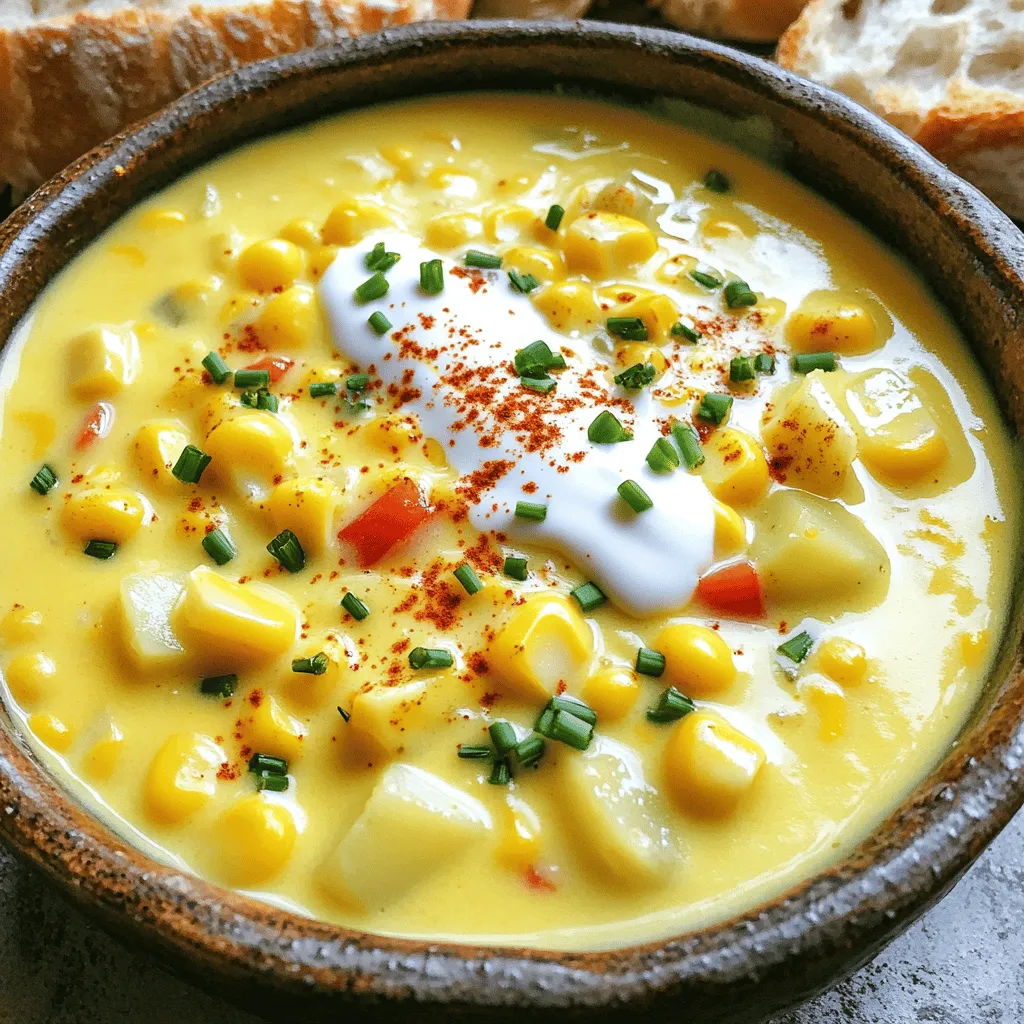
Warm up your kitchen with my Creamy Corn Chowder, a delightful and comforting meal. This chowder bursts with sweet corn

- 8 oz whole wheat spaghetti - 2 cups broccoli florets - 4 cloves garlic, minced - 1 teaspoon red pepper flakes (optional) - 3 tablespoons olive oil - Zest of 1 lemon - 3 tablespoons lemon juice - ½ cup grated Parmesan cheese (or nutritional yeast for a vegan option) - Salt and pepper to taste - Fresh parsley, chopped (for garnish) The key ingredients in Lemon Garlic Broccoli Pasta are simple yet vibrant. Whole wheat spaghetti gives a nutty taste and adds fiber. Broccoli florets provide crunch and a bright green color. Garlic adds a rich and savory flavor, while lemon juice and zest bring brightness. The Parmesan cheese adds creaminess and depth, but feel free to use nutritional yeast for a vegan option. If you want to switch things up, you can use other types of pasta. Try regular spaghetti, penne, or even spiralized zucchini for a lighter dish. For a gluten-free version, choose gluten-free pasta made from rice or chickpeas. Need a vegan option for cheese? You can use nutritional yeast. It gives a cheesy flavor without dairy. You can also try cashew cheese or any store-bought vegan cheese. This dish offers a balanced meal. One serving has about 350 calories, 12 grams of fat, and 15 grams of protein. Broccoli is a superfood packed with vitamins C and K. Lemon adds vitamin C, which helps boost your immune system. Together, they make this dish both tasty and healthy. For the full recipe, including instructions, check out the *Full Recipe*. To start, fill a large pot with water and add salt. Turn the heat to high and cover the pot. This helps the water boil faster. When the water bubbles, add the spaghetti. Cook the pasta until it is al dente, or firm to the bite. This usually takes about 8-10 minutes. Now, here’s the trick for the broccoli. About three minutes before the pasta is done, add the broccoli florets to the pot. This will blanch the broccoli just right. It should be bright green and tender but still crisp. While the pasta cooks, grab a large skillet and heat olive oil over medium heat. Once the oil is warm, add minced garlic. Stir it for 1-2 minutes. You want the garlic to smell good but not turn brown. Burnt garlic can ruin the flavor. If you like heat, sprinkle in red pepper flakes. Start with a little, then taste. You can always add more later. When the pasta and broccoli are ready, save about a cup of pasta water, then drain the rest. Add the drained pasta and broccoli to the skillet with the garlic oil. Toss them gently to mix. Next, pour in the lemon juice and zest. Mix well so that everything gets coated. If it looks dry, slowly add some reserved pasta water. This helps create a nice, smooth sauce. Finally, stir in the grated Parmesan cheese or nutritional yeast. Season with salt and pepper to taste. Give it one last toss to combine everything. Enjoy your Lemon Garlic Broccoli Pasta! For the complete recipe, check the *Full Recipe* section. To make your Lemon Garlic Broccoli Pasta sing, think about adding more herbs. Fresh basil or thyme can boost the taste. You can also add a pinch of oregano for depth. Each herb brings its own flair. Lemon zest is key here. It adds a bright, fresh flavor. Use a microplane to grate the zest finely. This helps release its oils. Sprinkle it in right before serving. The zest will brighten the dish and make it pop! Cooking pasta can be tricky. To avoid overcooking, set a timer. Follow the package instructions for al dente. It should be firm yet tender. Remember, the pasta will cook a bit more when you mix it with the sauce. Managing skillet temperature is also vital. Heat your olive oil to medium. If it gets too hot, the garlic will burn. You want it fragrant, not brown. Stir often to keep things even and smooth. For a heartier meal, consider adding protein. Shrimp or grilled chicken work well. They add flavor and make the dish filling. Simply cook them separately and toss them with the pasta. Pair your dish with a light salad. A simple mixed greens salad with lemon vinaigrette complements the pasta nicely. You could also serve it with crusty bread for a complete meal. For the *Full Recipe*, check the earlier section. Enjoy your cooking journey! {{image_2}} You can easily make this dish vegetarian or vegan. One great option is to swap in chickpeas. They add protein and make the meal more filling. Just drain and rinse a can of chickpeas. Toss them in with the pasta and broccoli. This change makes the dish heartier and keeps it plant-based. If you want a cheesy flavor without dairy, use nutritional yeast. It has a nutty taste and works well in this recipe. Replace the Parmesan cheese with half a cup of nutritional yeast. This keeps the dish creamy while being vegan-friendly. You won’t miss the cheese! Feel free to adjust the vegetables based on the season. In spring, add fresh peas or asparagus for a pop of color. In fall or winter, roasted squash or Brussels sprouts can add warmth. Just roast them in the oven before mixing them in with the pasta. This will give extra flavor and texture. You can also modify the dish for summer meals. Try adding fresh tomatoes or zucchini. These seasons give the meal a bright, fresh taste. You can even serve it cold as a pasta salad. Just let the dish cool before serving. Not all pasta is the same. You can switch to gluten-free pasta if needed. Many brands offer great gluten-free options that taste good. Look for ones made from brown rice or lentils. They will still give you a nice bite. You may also try whole grain pasta. It is more nutritious than regular pasta. Whole grain pasta adds fiber and keeps you full longer. Just keep the cooking time in mind, as it might differ from the regular type. Choose the pasta that fits your diet best! For the *Full Recipe*, check out the detailed instructions above. Store leftover Lemon Garlic Broccoli Pasta in an airtight container. This helps keep the pasta fresh. It stays good in the fridge for up to three days. After that, the flavors may fade. To reheat the pasta, use a skillet over low heat. Add a splash of water or olive oil. This will help keep the pasta moist. Stir gently to avoid burning. You can also microwave it. Just cover the bowl to keep steam in. This will help warm it without drying out. You can freeze Lemon Garlic Broccoli Pasta for later. Place it in a freezer-safe container. Make sure to leave some space for expansion. This dish can last up to three months in the freezer. When you’re ready to eat, thaw it in the fridge overnight. Reheat it in a skillet with a bit of water or oil for the best texture. To change the spice in your dish, try these tips: - Increase spice: Add more red pepper flakes. You can even use fresh chili if you like it hot. - Decrease spice: Use fewer red pepper flakes or skip them altogether. You can also add more cheese to balance the heat. Yes, you can make this dish ahead of time! Here’s how: - Cook the pasta and broccoli: Prepare both as usual. - Cool completely: Let everything cool before storing. This helps prevent sogginess. - Store: Place in an airtight container in the fridge. It stays fresh for up to three days. - Reheat: Warm it in a skillet with a splash of water to keep it moist. This pasta pairs well with many sides. Here are some ideas: - Complete meals: Add grilled chicken or shrimp for protein. - Appetizers: Serve with garlic bread or a light bruschetta. - Salads: A fresh green salad with lemon vinaigrette complements the meal well. You can find the Full Recipe in this article. It includes all the steps you need to make this tasty dish! In this blog post, we explored a simple and tasty Lemon Garlic Broccoli Pasta. We covered essential ingredients, substitutions, and nutritional info. You learned step-by-step cooking tips and tricks for a great meal. We also looked at variations and storage methods. With these insights, you can create this dish easily. Whether you eat vegan or not, this pasta is versatile. Enjoy making it your own!

Lemon Garlic Broccoli Pasta Easy and Flavorful Recipe

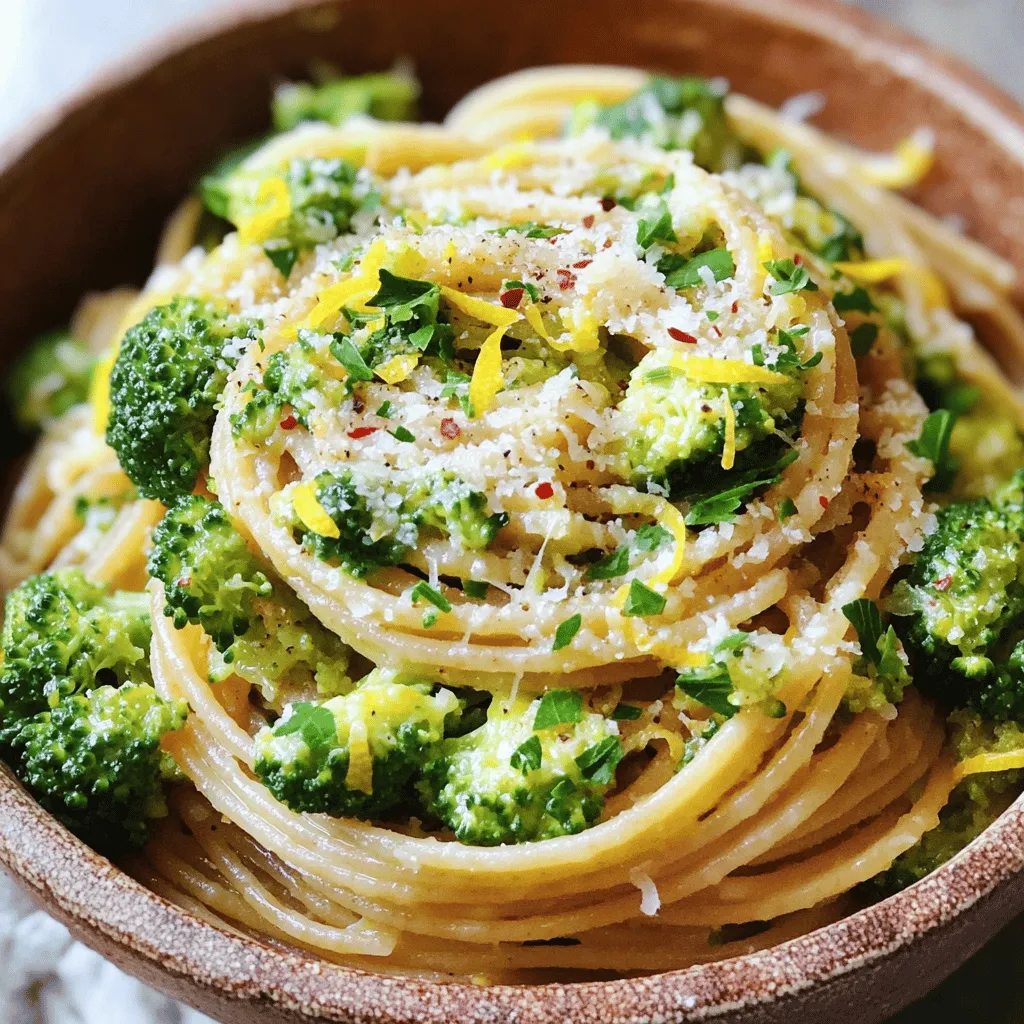
Are you in need of a quick and tasty meal? Look no further! Lemon Garlic Broccoli Pasta is not just

- 1 can (15 oz) chickpeas, drained and rinsed - 1/4 cup tahini - 2 tablespoons olive oil - 2 tablespoons lemon juice - 1 garlic clove, minced Classic hummus starts with simple ingredients. Chickpeas are the base. They give hummus its creamy texture and nutty flavor. Tahini, made from ground sesame seeds, adds richness. Olive oil enhances the taste and gives a smooth finish. Fresh lemon juice brightens the flavor, while garlic adds a nice kick. - 1/2 teaspoon ground cumin - Salt to taste - Water (as needed for desired consistency) - Paprika for garnish - Fresh parsley for garnish Cumin adds warmth and depth to the hummus. Adjust the salt to your liking. Water helps achieve the right texture. Paprika and fresh parsley are great for garnishing. They make the dish look pretty and add extra flavor. - Warm pita bread - Fresh vegetable sticks - Crispy pita chips Classic hummus pairs well with many foods. Warm pita bread is soft and perfect for dipping. Fresh vegetable sticks like carrots and cucumbers add crunch and freshness. Crispy pita chips add a nice texture. Enjoy these with your creamy dream hummus! For the full recipe, check out the section above. First, drain and rinse the chickpeas. This helps remove any extra salt and makes the hummus taste fresh. Use a colander to drain them well. Next, measure out the tahini. You need a quarter cup. Gather the olive oil, lemon juice, garlic, and cumin. Make sure everything is ready to go. Now, it’s time to blend! In a food processor, combine the chickpeas, tahini, olive oil, lemon juice, minced garlic, cumin, and a pinch of salt. It’s important to blend until smooth. Stop to scrape down the sides of the bowl if needed. This ensures every bit mixes well. If your hummus is too thick, add water. Start with one tablespoon at a time. Blend again after each addition. Keep going until you reach your desired creaminess. After that, taste your hummus. Adjust the seasoning if you want more salt or lemon juice. Make it perfect for you! For the full recipe, check out the details provided earlier. Enjoy your cooking! To make creamy hummus, you need to blend well. Start with a good food processor. Add all your ingredients in one go. Blend until smooth. Scrape down the sides to mix evenly. If it feels thick, add water slowly. This helps get the right texture. Temperature matters. Use room temperature ingredients. Cold tahini or chickpeas can make blending hard. Let them sit out for a bit. This small step helps you achieve that smooth, creamy finish. Garlic and lemon bring life to hummus. Taste as you blend. If you want more punch, add more garlic. Start with a small amount, then build up. The same goes for lemon juice. A little can go a long way. Olive oil quality matters too. Use extra virgin for the best flavor. It adds richness and depth. A good olive oil can change your hummus from good to great. Garnishing makes your hummus look special. After you blend, smooth the top with a spoon. Drizzle olive oil in the center. Sprinkle paprika for color. Add fresh parsley for a pop of green. When serving, use warm pita bread or fresh veggies. Arrange them around the bowl. This makes your dish inviting. It’s perfect for sharing at parties or family meals. For the full recipe, check out the instructions earlier. {{image_2}} To make roasted red pepper hummus, add roasted red peppers to your classic mix. You can use jarred peppers or roast fresh ones at home. Just blend one or two peppers with the other ingredients. This gives your hummus a sweet and smoky flavor. You can adjust the amount based on how bold you want the taste. For garlic lovers, adding more garlic can enhance the flavor. You can use two or three cloves instead of one. Roasting the garlic first can make it milder and sweeter. Blend your garlic of choice with the other ingredients for a rich and deep flavor. The more garlic, the stronger the taste! If you like heat, try adding chili powder or sriracha. Start with a small amount, then taste. You can add more if you want it spicier. This variation adds a nice kick to your hummus. It pairs well with cool veggies or creamy dips. To keep your hummus fresh, store it in the fridge. Use an airtight container. This helps seal in moisture and flavor. Make sure to cover the surface with a thin layer of olive oil. This extra layer keeps it from drying out. You can enjoy homemade hummus for about a week in the fridge. If you want to save hummus for later, freezing is a great option. First, place the hummus in a freezer-safe container. Leave some space at the top. Hummus can expand when frozen. Seal tightly to prevent freezer burn. When you’re ready to enjoy it, move the container to the fridge to thaw overnight. For best results, stir the hummus after thawing to restore its creamy texture. Hummus stays fresh in the fridge for about a week. Look for signs of spoilage. If it smells off or shows mold, it’s time to toss it. Hummus can also separate as it sits. Just give it a good stir before serving again. Enjoy your Classic Hummus Delightful and Simple Recipe knowing how to store it right! Classic hummus pairs well with many tasty items. Here are some popular choices: - Warm pita bread - Fresh vegetable sticks (like carrots, cucumbers, and bell peppers) - Crispy pita chips - Toasted bread - Crackers These options add crunch and freshness. They also make for great snacks or appetizers. Yes, you can prepare hummus in advance. Here are some tips: - Make the hummus a day ahead for best flavor. - Store it in an airtight container in the fridge. - Add a drizzle of olive oil on top to keep it fresh. - Stir it well before serving to get a smooth texture. This way, you save time and enjoy a quick, tasty dip later. Classic hummus is a healthy choice. It offers many benefits: - Chickpeas are high in protein and fiber. - Tahini provides healthy fats. - Olive oil adds heart-healthy monounsaturated fats. - Low in calories, making it a great snack option. One serving has about 100 calories. It's a perfect dip that satisfies your cravings without guilt. Classic hummus is simple and fun to make. We explored its main ingredients, like chickpeas and tahini, that create this tasty dip. I shared step-by-step instructions to blend it perfectly. You learned tips for a creamy texture and creative flavor ideas, from roasted red pepper to spicy versions. Store your hummus well, either in the fridge or freezer. Remember, it’s great for snacks or meals. Enjoy making and sharing this healthy dish. You know now how easy classic hummus can fit into your meals.

Classic Hummus Delightful and Simple Recipe

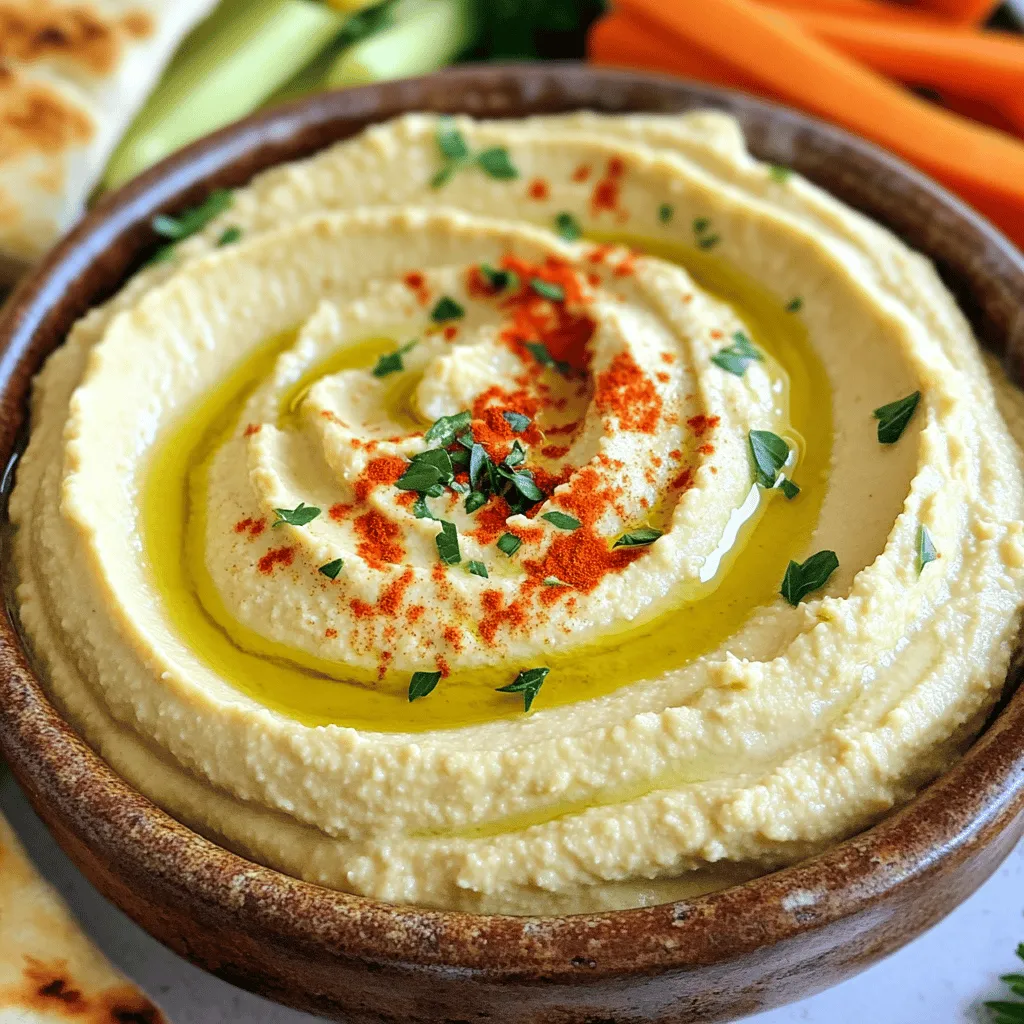
Are you ready to whip up a delicious batch of classic hummus? This delightful and simple recipe is perfect for

- 1 cup creamy peanut butter - 1 cup brown sugar, packed - 1 large egg - 1 teaspoon vanilla extract The heart of my peanut butter cookies lies in these simple, yet powerful ingredients. Creamy peanut butter brings rich flavor and moisture, making the cookies soft and chewy. Brown sugar adds a deep sweetness and helps create that lovely caramelized flavor. The large egg acts as a binder, holding everything together. Finally, vanilla extract enhances the overall taste, making each bite feel special. - 1/2 teaspoon baking soda - A pinch of salt Baking soda is crucial for helping the cookies rise. It gives them that nice, soft texture. A pinch of salt balances the sweetness and brings out the flavors. Don’t skip these two tiny ingredients; they make a big difference! - 1/4 cup dark chocolate chips - 1/4 cup chopped roasted peanuts Want to take your cookies to the next level? Add dark chocolate chips for a sweet twist. They melt beautifully and add a lovely richness. Chopped roasted peanuts provide a crunchy texture and extra peanut flavor. These add-ins are optional, but they can turn a good cookie into an amazing one! For the full recipe, check out Peanut Butter Paradise Cookies 🥜. - Preheat your oven to 350°F (175°C). - Line a baking sheet with parchment paper. This makes for easy clean-up. - In a mixing bowl, combine 1 cup of creamy peanut butter and 1 cup of packed brown sugar. - Mix well using a hand mixer or a wooden spoon until the mixture is smooth. - Now, add 1 large egg, 1 teaspoon of vanilla extract, 1/2 teaspoon of baking soda, and a pinch of salt to the bowl. - Mix everything until all the ingredients are well combined. - If you want to add some fun, fold in 1/4 cup of dark chocolate chips or 1/4 cup of chopped roasted peanuts. - Using a tablespoon or cookie scoop, drop dough balls onto the prepared baking sheet. - Leave about 2 inches of space between each cookie. - Flatten each cookie slightly with the back of a fork in a crisscross pattern. This gives the cookies their classic look. - Bake your cookies in the preheated oven for 10-12 minutes. The edges should turn golden brown. The centers will stay soft but will firm up as they cool. - Let the cookies cool on the baking sheet for about 5 minutes. Then, transfer them to a wire rack to cool completely. This simple and nutritious recipe for peanut butter cookies ensures great flavor and texture. For the full experience, check out the Full Recipe that I shared! To get the right dough consistency, mix your creamy peanut butter and brown sugar well. You want a smooth, thick texture. If the dough feels too sticky, add a little more baking soda. This small change can make a big difference. For soft centers, take the cookies out when they are just golden at the edges. They will continue to cook as they cool. Let them rest on the baking sheet for about five minutes before moving them. This helps keep them soft and chewy. You can add fun flavors to your cookies! Try mixing in some cinnamon or a dash of nutmeg for warmth. Both spices blend well with peanut butter. If you want to switch things up, use different nut butters. Almond or cashew butter can add a new twist to your cookies. Just remember, the flavor will change based on the nut butter you choose. Set your oven to 350°F (175°C) for the best results. This temperature gives your cookies a nice, even bake. When it comes to baking sheets, use parchment paper. This makes for easy cleanup and helps prevent sticking. If you don’t have parchment, grease the pan lightly. This keeps cookies from getting too brown on the bottom. For a full recipe, check out Peanut Butter Paradise Cookies. {{image_2}} You can easily make peanut butter cookies gluten-free. Start by using gluten-free flour instead of regular flour. Almond flour or coconut flour works great. They add unique flavors and keep the cookies soft. For sweetening, try using honey or maple syrup. These options can add a nice touch. Just remember to adjust the amounts. Too much liquid can change the dough's texture. Peanut butter and jelly cookies are a fun twist. Just add a spoonful of your favorite jelly in the center before baking. This gives a juicy surprise in each bite. You can also make chocolate-dipped peanut butter cookies. After baking, dip half of each cookie in melted dark chocolate. Let them cool on a wire rack. The chocolate adds richness that pairs well with peanut butter. Pair these cookies with a glass of cold milk or hot tea. The flavors blend perfectly. You can also serve them warm with a scoop of vanilla ice cream on top. For special occasions, arrange the cookies on a colorful plate. Sprinkle some chopped peanuts on top for decoration. You can even add a drizzle of melted chocolate. This makes the cookies look extra special and inviting. For the complete recipe, check out the Full Recipe section! Store peanut butter cookies at room temperature. They taste best this way. If you want to keep them fresh longer, use the fridge. Place cookies in an airtight container. This keeps them from drying out. Make sure the container has a tight seal. To freeze your cookies, first let them cool completely. Then, place them on a baking sheet. Arrange them in a single layer. Freeze for about an hour. After that, move the cookies to a freezer bag. Remove as much air as possible before sealing. Label the bag with the date. To thaw, take out one or two cookies. Leave them at room temperature for about 30 minutes. You can also warm them in the microwave for a few seconds. Peanut butter cookies stay fresh for about a week at room temperature. In the fridge, they can last up to two weeks. Look for signs that the cookies have gone bad. If they smell off or feel hard, it’s time to toss them. Always trust your senses to keep your treats safe and tasty. The main ingredients in peanut butter cookies are simple and easy to find. You need: - 1 cup creamy peanut butter - 1 cup brown sugar, packed - 1 large egg - 1 teaspoon vanilla extract - 1/2 teaspoon baking soda - A pinch of salt These ingredients create a rich, sweet, and nutty flavor that everyone loves. Yes, you can make peanut butter cookies without eggs! Some good egg substitutes are: - 1/4 cup unsweetened applesauce - 1/4 cup mashed banana - 1 tablespoon flaxseed meal mixed with 3 tablespoons water These options keep the cookies moist and tasty even without eggs. To stop your cookies from spreading too much, try these tips: - Chill the dough for at least 30 minutes before baking. - Use a thicker peanut butter instead of a runny one. - Make sure your baking sheet is cold before you place the dough on it. These tricks help keep your cookies thick and chewy. Absolutely! Using crunchy peanut butter instead of creamy adds texture. You will get little bits of peanuts in every bite. This change can make your cookies even more fun to eat. The taste will still be great, so feel free to experiment! For the full recipe, check out the Peanut Butter Paradise Cookies. Making peanut butter cookies is easy and fun. You need just a few key ingredients, like peanut butter and brown sugar. Mixing them well ensures a great texture. Adding chocolate chips or nuts can boost the flavor. Remember, bake at the right temperature for soft centers. Store cookies properly to keep them fresh. With these tips and variations, you can create delicious cookies for any occasion. Enjoy baking and sharing your tasty treats!

Ingredient Peanut Butter Cookies Simple and Nutritious

Are you ready to bake the best peanut butter cookies? These treats are simple, nutritious, and packed with flavor. With

Making a vegan chickpea salad sandwich is simple and fun. You only need a few key ingredients to create a tasty meal. Here’s what you will need: - 1 can (15 oz) chickpeas, drained and rinsed - 3 tablespoons vegan mayonnaise - 1 tablespoon Dijon mustard - 1 tablespoon lemon juice - 1 celery stalk, finely chopped - 1 small red onion, finely chopped - 1 carrot, grated - 1 tablespoon fresh dill (or 1 teaspoon dried dill) - Salt and pepper to taste - Whole grain or gluten-free bread - Lettuce leaves - Tomato slices (optional) These ingredients blend together to create a creamy, flavorful filling. The chickpeas provide protein and fiber, making this sandwich both healthy and satisfying. The vegan mayonnaise and Dijon mustard add a nice tang, while the lemon juice brightens the flavors. Fresh veggies like celery, onion, and carrot offer crunch and texture. You can also play around with the seasonings. For the bread, whole grain or gluten-free works well. It gives the sandwich a great base. If you want to make it even more exciting, you can add some fresh herbs or spices. If you're interested in the full recipe, check out the Chickpea Delight Sandwich 🥙 for detailed steps. To start, you need to mash the chickpeas. Open a can of chickpeas, drain, and rinse them. Place them in a bowl. Use a fork or a potato masher. Mash them lightly, leaving some whole. This gives your salad some good texture. Next, mix in the condiments. Add three tablespoons of vegan mayonnaise, one tablespoon of Dijon mustard, and one tablespoon of lemon juice. Stir well until everything is blended together. The mixture should be creamy and flavorful. Now, it’s time to add fresh veggies. Chop one celery stalk, and finely chop one small red onion. Grate one carrot. Toss these into your chickpea mix. Stir until all the veggies are evenly mixed in. Then, you’ll adjust the seasoning. Add salt and pepper to taste. This is where you can make the dish your own. Taste it and see if you want more salt or pepper. Now let’s assemble the sandwich. Take a slice of whole grain or gluten-free bread. Scoop a generous amount of the chickpea salad and spread it on the bread. Next, add some lettuce leaves. You can also include tomato slices if you like. Place another slice of bread on top to finish your sandwich. Finally, cut the sandwich in half and serve it right away. Enjoy every bite of this tasty vegan chickpea salad sandwich! For the full recipe, check out the details above. To make your Vegan Chickpea Salad Sandwich burst with flavor, consider adding spices and herbs. Here are some great options: - Garlic powder: It adds a nice kick. - Cumin: This gives a warm, earthy taste. - Paprika: A dash will add a sweet smokiness. Using fresh ingredients makes a big difference. Fresh dill or parsley brightens the dish. Always choose crisp veggies like lettuce and tomatoes for crunch. Choosing the right bread is key. Whole grain bread is hearty and adds fiber. If you prefer gluten-free, look for options that are soft and tasty. Toasting or grilling your bread enhances its flavor. A little crunch adds texture to your sandwich. Just toast until golden brown for the best result. When serving, presentation matters! Cut your sandwich in half and arrange it neatly on a plate. Pair your sandwich with sides like: - Crispy chips: They add crunch. - Simple green salad: It complements the flavors nicely. You can also wrap your sandwich in parchment paper for a rustic touch. This makes it easy to grab and go while looking great! {{image_2}} You can switch out chickpeas for other legumes. Try black beans or white beans for a new taste. You can also use lentils. They add a nice texture and flavor. For dressings, vegan mayonnaise is great, but you can try tahini too. It adds a creamy, nutty flavor. You could also use hummus as a spread. It gives a rich taste with less fuss. Feel free to add more veggies to your salad. Diced bell peppers add crunch and color. You can also mix in chopped cucumbers for a refreshing bite. If you want a sweeter taste, add diced apples or raisins. For toppings, consider avocado slices for creaminess. Microgreens can add a nice pop of flavor. You could also sprinkle some sunflower seeds on top for a nutty touch. Want to change up the flavor? Try adding curry powder for a spicy twist. This makes your sandwich warm and fragrant. If you like Mediterranean flavors, mix in olives and artichokes. You can customize your sandwich with spices too. A dash of smoked paprika gives a nice depth. Using flavored oils, like garlic oil, can enhance the taste further. For the full recipe, check out the Chickpea Delight Sandwich 🥙. To keep your chickpea salad fresh, store it in an airtight container. Make sure the lid is tight. This keeps air out and helps the salad stay tasty. If you want to freeze the chickpea salad, use a freezer bag. Press out as much air as you can. This helps prevent freezer burn. When you want to eat it, thaw it in the fridge overnight. Your chickpea salad can last up to three days in the fridge. After that, it may start to lose its flavor and crunch. Watch out for signs of spoilage. If your salad smells sour or has a strange color, it’s time to throw it away. Freshness is key for great taste! You can eat this sandwich cold, which is great for a quick meal. If you prefer it warm, heat it gently in a pan. Use low heat to avoid burning the bread. If you want a crispy texture, try toasting the sandwich in a skillet. This adds a nice crunch. Pair it with a side salad or pickles for a delightful meal. For the full recipe, check out the Chickpea Delight Sandwich. A Vegan Chickpea Salad Sandwich is a tasty, plant-based meal. It features mashed chickpeas mixed with vegan mayo, mustard, and fresh veggies. This sandwich is packed with protein and fiber, making it filling and healthy. It’s a great choice for lunch or a snack. You can enjoy it cold, which makes it perfect for warm days. Yes, you can make this sandwich gluten-free! Choose gluten-free bread for your sandwich. Always check labels to ensure the bread is safe. You can also use lettuce wraps instead of bread for a low-carb option. This keeps the flavors while making it gluten-free. To add heat, try mixing in some cayenne pepper or red pepper flakes. You can also use spicy mustard instead of Dijon. Hot sauce is another great option. Start with a small amount and adjust to your taste. This way, you can control the spice level. You can customize your sandwich with various ingredients. Try adding chopped bell peppers or cucumbers for crunch. Avocado adds creaminess and healthy fats. You can also swap chickpeas for other beans like black beans or white beans. Get creative with your mix! Absolutely! This recipe is perfect for meal prep. You can make the chickpea salad ahead of time and store it in the fridge for up to three days. Just assemble the sandwich when you are ready to eat. This saves time and makes lunch easy. For the full recipe, check out the Chickpea Delight Sandwich. This blog post shared an easy chickpea salad sandwich recipe. We covered ingredients, step-by-step instructions, and helpful tips. You learned about variations and how to store leftovers. In closing, this sandwich offers a tasty, healthy option for lunch. Feel free to experiment with flavors and enjoy the process. Simple is best, and you'll impress your friends with this quick meal. Try it, and you'll see how fun cooking can be!

Vegan Chickpea Salad Sandwich Flavorful and Healthy Meal

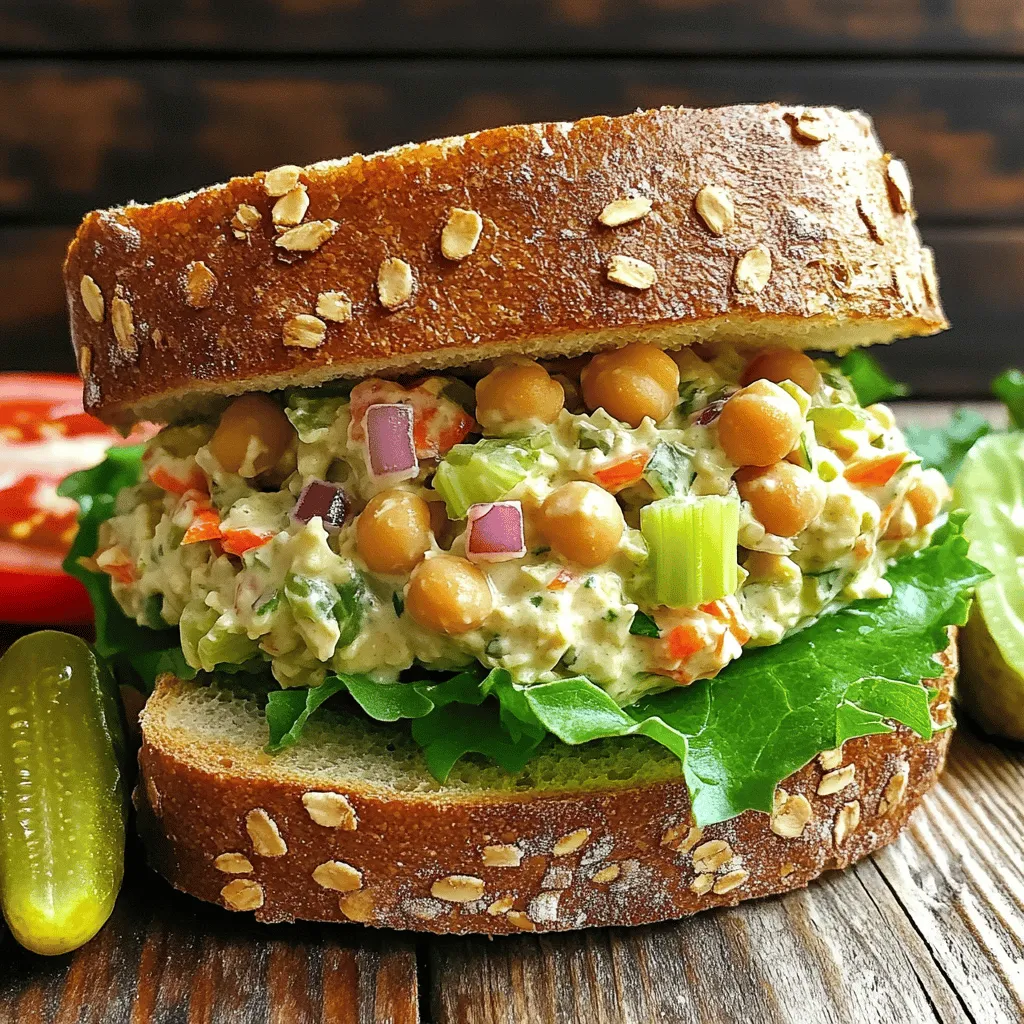
Looking for a quick, tasty, and healthy meal? Try my Vegan Chickpea Salad Sandwich! Packed with protein and flavor, this

- 12 large portobello mushrooms, stems removed - 2 cups fresh spinach, chopped - 1 cup cream cheese, softened - 1 cup ricotta cheese - 1 cup shredded mozzarella cheese - 1/2 cup grated Parmesan cheese The main ingredients for Cheesy Spinach Stuffed Mushrooms are simple yet flavorful. Portobello mushrooms serve as the perfect base. They are large, meaty, and hold the stuffing well. Fresh spinach adds a bright, earthy taste. For the cheeses, I use cream cheese, ricotta, mozzarella, and Parmesan. Each cheese brings a unique texture and flavor, making every bite creamy and rich. - 2 cloves garlic, minced - 1 teaspoon Italian seasoning - 1/4 teaspoon red pepper flakes (optional) - Olive oil, salt, and pepper Next, we have seasonings and oils. Garlic gives the dish a wonderful aroma and depth. Italian seasoning adds a blend of herbs, giving it a classic taste. If you like a little heat, the red pepper flakes are a great choice. Olive oil helps to cook the garlic and season the mushrooms. Don’t forget salt and pepper to taste; they enhance all the flavors. - Fresh parsley for decoration Finally, fresh parsley makes a great garnish. It adds a pop of green and freshness. Plus, it looks lovely on the plate. You can sprinkle it on just before serving. This simple touch makes your dish look even more inviting. {{ingredient_image_1}} Preheat your oven to 375°F (190°C). This step warms up the oven for even cooking. Next, clean the portobello mushrooms. Gently wipe them with a damp cloth. Remove the stems carefully. Set the mushroom caps aside for stuffing. Heat 1 tablespoon of olive oil in a skillet over medium heat. Add the minced garlic and sauté it for about 1 minute. You want it to smell great. Next, toss in the chopped spinach. Cook for 2-3 minutes until it wilts. Once done, take it off the heat and let it cool a bit. In a mixing bowl, combine cream cheese, ricotta cheese, mozzarella cheese, and Parmesan cheese. Mix until smooth. Add the wilted spinach, Italian seasoning, red pepper flakes, salt, and pepper. Stir until everything is well mixed. This filling is cheesy and packed with flavor. Brush the mushroom caps with the remaining olive oil. Season them with salt and pepper on both sides. Now, fill each cap with the spinach mixture. Mound it slightly on top to make it look nice. Place the stuffed mushrooms on a baking sheet lined with parchment paper. Bake the stuffed mushrooms in the preheated oven for 20-25 minutes. You want the mushrooms tender and the cheese bubbly. Keep an eye on them. For the best texture, you want the cheese to be slightly golden. Once they are done, let them cool for a few minutes. Enjoy the delicious aroma as they cool! To make your stuffed mushrooms shine, mound the filling high. This gives a nice look and taste. Avoid overflow by packing the mixture tightly but not too tight. The filling should stay in place, even when you bake it. If it spills, it can burn and make cleaning hard. Use a spoon or your hands to shape the filling on each mushroom. You can mix up the cheese for fun flavors. Try using goat cheese for a tangy kick or feta for a salty taste. If you want a lighter dish, swap in Greek yogurt for some of the cream cheese. Each cheese brings its own twist to the dish. Feel free to experiment. You’ll find your favorite combo with just a little trial. Having the right tools makes cooking easy. Use a large skillet to sauté the spinach and garlic. A mixing bowl helps combine the cheese smoothly. A spoon or spatula is great for stuffing the mushrooms. Line your baking sheet with parchment paper. This keeps the mushrooms from sticking and makes cleanup simple. All these tools make your cooking experience smooth and fun. Pro Tips Choose Fresh Spinach: Using fresh spinach instead of frozen will give your stuffing a brighter flavor and better texture. Don’t Overcook the Mushrooms: Bake the mushrooms just until tender to avoid them becoming soggy; you want them juicy but firm. Experiment with Cheese: Feel free to mix in other cheeses like feta or gouda for a unique twist on the flavor profile. Make Ahead: You can prepare the stuffing ahead of time and store it in the fridge; just fill the mushrooms and bake when ready to serve. {{image_2}} You can easily make Cheesy Spinach Stuffed Mushrooms gluten-free. Just check the cheese brands you use. Most cheeses are naturally gluten-free. For a dairy-free option, swap the cheeses for plant-based versions. Look for vegan cream cheese and mozzarella. This way, you can enjoy the dish while meeting your dietary needs. Want to change up the flavor? Try adding herbs like thyme or basil. These herbs bring a fresh taste. You can also switch the Italian seasoning for a mix of cumin and coriander. If you like heat, add more red pepper flakes. Experimenting with flavors can give your stuffed mushrooms a fun twist. You don’t have to stick with spinach. Other veggies work well too! Chopped bell peppers or artichokes add different textures. If you want protein, add cooked sausage or chicken. These changes can make the dish your own. The options are endless, so get creative with your fillings! To keep Cheesy Spinach Stuffed Mushrooms fresh, store them in the fridge. Place the mushrooms in an airtight container. Make sure to let them cool first. They will stay good for about 3 to 4 days. If you want to keep them longer, think about freezing them. When you reheat stuffed mushrooms, you want to keep them moist. The best way is to use the oven. Preheat it to 350°F (175°C). Place the mushrooms on a baking sheet and cover them with foil. Bake for about 10 to 15 minutes. This helps the cheese stay creamy and the mushrooms tender. If you want to freeze stuffed mushrooms, do it before baking. After you fill the mushrooms, place them on a baking sheet. Freeze until solid, then transfer them to a freezer bag. This way, they will last for up to 3 months. When you are ready to eat them, bake straight from the freezer. Just add a few more minutes to the cooking time. Yes, you can prepare Cheesy Spinach Stuffed Mushrooms in advance. Make the filling and stuff the mushrooms. Place them in a baking dish and cover with plastic wrap. Store them in the fridge for up to 24 hours. When you are ready to bake, just remove the wrap and bake as directed. This saves time and makes for a quick meal or appetizer. These stuffed mushrooms pair well with many side dishes. Consider serving a fresh green salad. A simple side of garlic bread complements the flavors nicely. You can also serve them with roasted vegetables for a healthy option. If you want to keep it light, a bowl of soup works great too. You'll know the mushrooms are done when they are tender. The cheese on top should be bubbly and slightly golden. A golden hue means the cheese is melting perfectly. You can also poke a mushroom with a fork; it should be soft but not mushy. Let them cool a bit before serving to enjoy the best texture. Cheesy spinach stuffed mushrooms are simple and fun to make. You learned about key ingredients like mushrooms, cheese, and spinach. The step-by-step guide helped you prep, stuff, and bake your dish perfectly. Tips showed ways to enhance flavor and adapt to your needs. You can store or freeze leftovers easily, making this a win for your kitchen. Cooking can be easy and delicious, so try these mushrooms soon. Your family and friends will love them!

Cheesy Spinach Stuffed Mushrooms Savory and Delightful

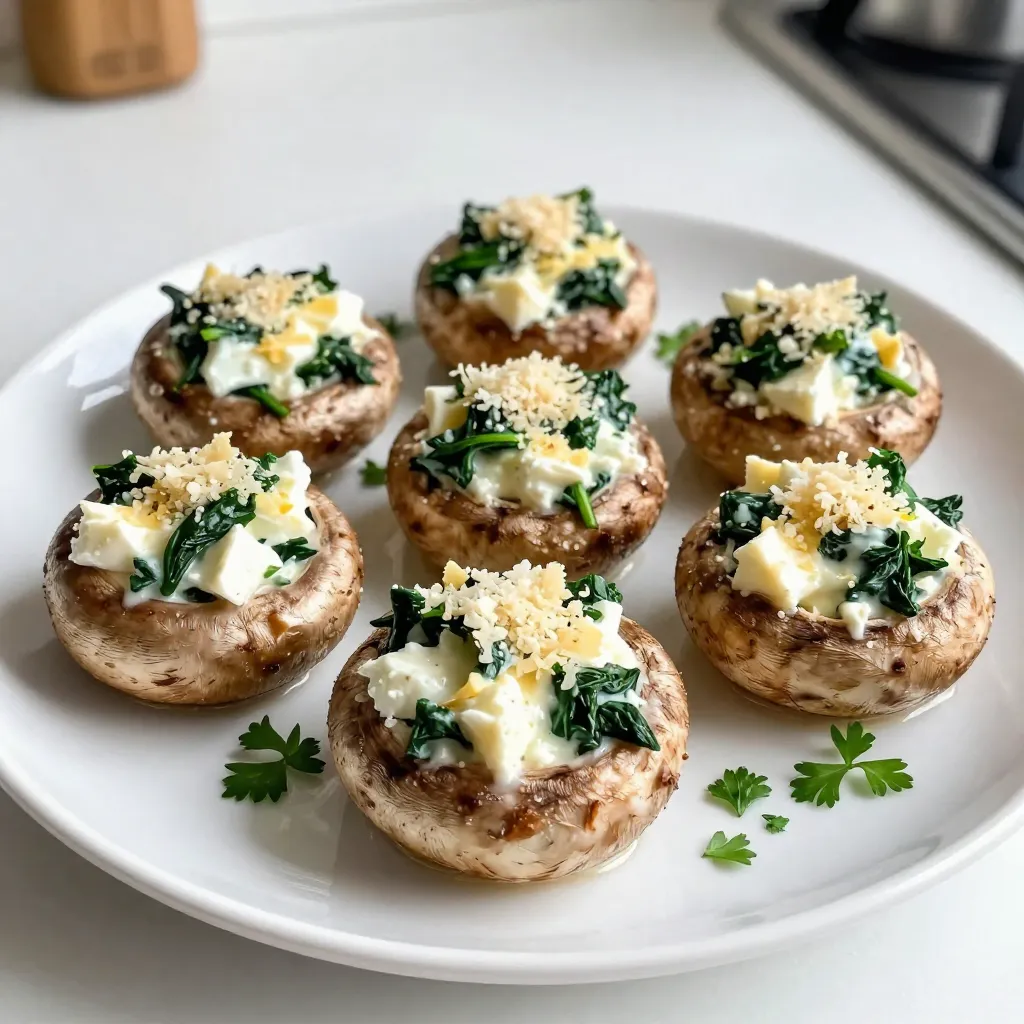
Are you ready to savor a dish that’s both cheesy and healthy? Cheesy Spinach Stuffed Mushrooms are a delightful treat

For this Chili Lime Baked Tilapia, you need: - 4 tilapia fillets - 2 tablespoons olive oil - 2 limes (juiced and zested) - 1 tablespoon chili powder - 1 teaspoon smoked paprika - 1 teaspoon garlic powder - 1 teaspoon cumin - Salt and pepper to taste These ingredients create a bright and zesty flavor. The tilapia fillets soak up the tangy lime and spicy chili. Each bite bursts with freshness. To elevate your dish, consider these garnishes: - Fresh cilantro - Lime wedges Cilantro adds a nice herbal touch. Lime wedges give you a zesty kick when you squeeze them on top. These garnishes make your dish look beautiful and taste even better. Each serving of this baked tilapia offers great nutrition. Here’s what you get: - Calories: 220 - Protein: 30g - Fat: 10g - Carbohydrates: 2g This dish is low in carbs and high in protein. It fits well into many diets. Enjoy a healthy meal without sacrificing flavor. For the complete cooking steps, check out the Full Recipe. To start, gather your ingredients. You need olive oil, lime juice, lime zest, chili powder, smoked paprika, garlic powder, cumin, salt, and pepper. In a small bowl, combine these ingredients. Stir them well until they mix into a smooth marinade. This blend packs a punch of flavor. The lime juice gives it a zesty kick, while the chili powder adds heat. Next, take your tilapia fillets and place them in a baking dish. Pour the marinade over the fish. Make sure each piece is well coated. This step is key for flavor. Let the tilapia marinate for at least 15 to 20 minutes. You can leave it at room temperature. The longer it sits, the more the flavors soak in. Now, it's time to bake. Preheat your oven to 400°F (200°C). Once it reaches this temperature, place the baking dish in the oven. Bake the tilapia for 12 to 15 minutes. You will know it’s ready when it flakes easily with a fork. After baking, let it rest for a couple of minutes. Garnish with fresh cilantro and serve with lime wedges. Enjoy this tasty dish! For the detailed cooking instructions, check the Full Recipe. I love baking tilapia for this recipe. Baking keeps the fish moist and tender. You can also grill it for a smoky flavor. If you prefer frying, use a light coating of flour. Frying gives a crispy texture. To get that perfect flaky texture, make sure to not overcook the fish. Bake it just until it flakes easily with a fork. The ideal cooking time for tilapia is around 12-15 minutes at 400°F. If you see the fish turn opaque, it’s ready. Want more heat? Add extra chili powder to the marinade. For a milder taste, cut back on the spice. You can also add fresh herbs like cilantro for a burst of flavor without the heat. Experiment to find your ideal balance! For the full recipe, check out the detailed steps above. {{image_2}} You can make this dish even better by adding vegetables. Try bell peppers, zucchini, or corn. Cut the veggies into small pieces. Toss them in the marinade. Place them around the tilapia in the baking dish. The veggies will soak up the flavor and add color. They also give you extra nutrients. If you want a change, use other fish. Cod, snapper, or salmon work well. They each have unique flavors. Cod is mild and flaky. Snapper has a slightly sweet taste. Salmon offers a rich, buttery flavor. Simply adjust cooking time based on the thickness of the fillets. You can switch up the marinade for new tastes. Try adding honey for sweetness. A dash of soy sauce gives a savory kick. You can also use fresh herbs like parsley or dill. If you want more heat, add more chili powder or even some cayenne. These small changes can create a whole new dish. For the full recipe, check out the detailed steps above. You can store any leftover Chili Lime Baked Tilapia in an airtight container. Make sure to cool it first. Keep it in the fridge for up to three days. The fish will stay fresh and tasty when stored this way. To reheat your tilapia, use the oven for the best results. Preheat your oven to 350°F (175°C). Place the fish on a baking sheet and cover it with foil. Heat for about 10 minutes or until warm. This method keeps the fish moist and prevents it from drying out. If you want to freeze your baked tilapia, wrap each piece tightly in plastic wrap. Then, put them in a freezer bag. Make sure to remove all the air. You can freeze it for up to two months. When you're ready to eat, thaw it in the fridge overnight before reheating. For more details, check the Full Recipe. Yes, you can use frozen tilapia fillets. Just thaw them first. Place the fillets in the fridge overnight or run them under cool water. Once thawed, pat them dry with paper towels. This step helps the marinade stick better. You can tell tilapia is cooked when it flakes easily with a fork. The fish should look opaque and firm. You can also use a food thermometer. The internal temperature should reach 145°F (63°C). Chili lime baked tilapia goes great with many sides. Here are some ideas: - Rice: White or brown rice soaks up the flavors well. - Quinoa: This adds a nice texture and is healthy. - Roasted Vegetables: Zucchini, bell peppers, or asparagus enhance the meal. - Salad: A fresh salad with citrus dressing can be refreshing. These sides balance the dish and add more color to your plate. For more details, check out the Full Recipe. You learned about the key ingredients and steps for making Chili Lime Baked Tilapia. I shared tips on cooking methods and ways to achieve flaky fish. You saw variations to make the dish more exciting. I also covered important storage tips and answered common questions. Use this guide to make a tasty meal. Enjoy experimenting with flavors and ingredients. Your kitchen adventures await—happy cooking!

Chili Lime Baked Tilapia Flavorful and Simple Recipe

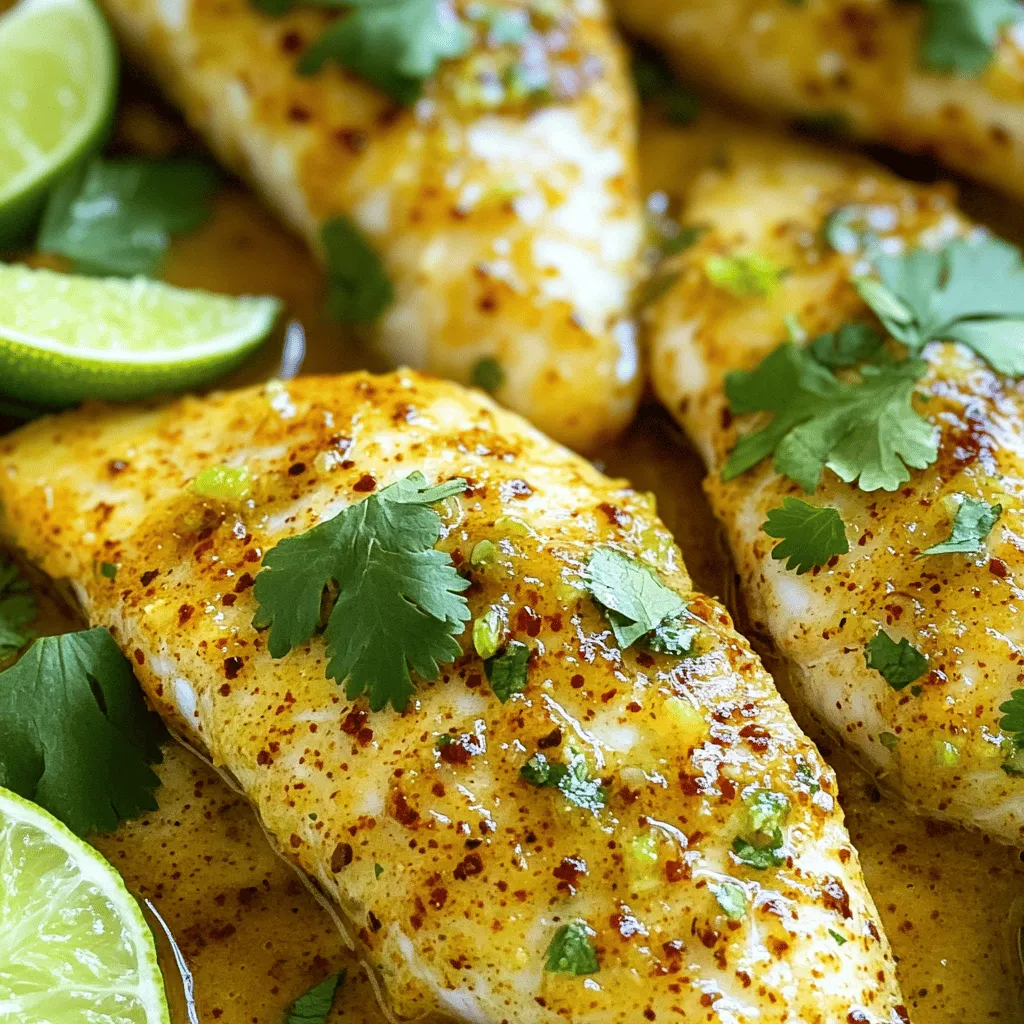
Looking for a quick and tasty meal? My Chili Lime Baked Tilapia recipe delivers flavor without fuss. This simple dish

Older posts
Newer posts
← Previous Page1 … Page75 Page76 Page77 … Page85 Next →

dsad

© 2026 greenmealmap • Built with GeneratePress

Our Policies

  • Copyright Policy
  • Cookie Policy
  • GDPR Policy
  • Privacy Policy
  • Disclaimer
  • Terms Of Use

More Information

  • Home
  • About
  • Contact
  • Appetizers
  • Dessert
  • Dinner
  • Drinks
©2026, greenmealmap About Back To Top