Skip to content
DisclaimerTerms Of UseGDPR PolicyCookie Policy

greenmealmap

  • Home
  • Drinks
  • Appetizers
  • Dinner
  • Dessert
  • About
  • Contact
  • Privacy Policy
DisclaimerTerms Of UseGDPR PolicyCookie Policy

NO-ING-IMG

To create a delicious Pesto Zoodle Bowl, gather the following essential ingredients: - 4 medium zucchini, spiralized into noodles (zoodles) - 1 cup fresh basil leaves - 1/4 cup pine nuts (or walnuts) - 1/4 cup grated Parmesan cheese (or nutritional yeast for vegan) - 2 cloves garlic, minced - 1/3 cup extra virgin olive oil - Salt and pepper to taste - 1 cup cherry tomatoes, halved - 1/2 cup cooked chickpeas (for protein) - 1/4 teaspoon red pepper flakes (optional for heat) These ingredients create a fresh and healthy meal. The zoodles replace traditional pasta, making this dish lighter and more nutritious. If you need alternatives, you can easily swap some ingredients: - Use walnuts or almonds instead of pine nuts for the pesto. - For a vegan version, substitute Parmesan cheese with nutritional yeast. - Add other veggies like bell peppers or carrots to give more texture and color. Making these changes allows you to customize the dish to your taste or dietary needs. Don't hesitate to experiment! For the full recipe, refer to the entire guide. To make the best pesto, start by gathering your ingredients. You need fresh basil leaves, pine nuts, Parmesan cheese, and garlic. Chop these ingredients into smaller pieces. Then, place them in a food processor. Pulse the mixture until it becomes finely chopped. This helps to blend the flavors well. Next, add olive oil slowly while the processor runs. This step makes the pesto smooth and creamy. If it feels too thick, add more olive oil. Season it with salt and pepper to taste. Aim for a rich flavor that pops in your mouth! Now, let’s focus on the zoodles. Use a spiralizer to turn fresh zucchini into noodles. This is where the fun begins! In a large pan, heat it over medium heat. Add the zoodles to the pan and sauté them lightly. Cook for just 2-3 minutes. You want them tender but still al dente. Be careful not to overcook them. Overcooked zoodles turn mushy and lose their charm. To prevent mushiness, avoid cooking them too long. A quick sauté is all they need. If you see extra water in the pan, drain it before mixing with pesto. Now it’s time to bring it all together! In a large bowl, toss the sautéed zoodles with the fresh pesto. Make sure every strand of zoodle gets coated in that delicious sauce. It should look bright and inviting. Next, add your toppings. Gently fold in halved cherry tomatoes and cooked chickpeas. These add color and protein to the dish. If you enjoy heat, sprinkle in some red pepper flakes for a spicy kick. Your Pesto Zoodle Bowl is now ready to serve! It’s colorful, healthy, and packed with flavor. For the full recipe, check the recipe section above. Enjoy every bite! To make your pesto zoodle bowl pop, try adding a few spices. A pinch of salt and pepper makes a big difference. You can also add herbs like oregano or thyme for extra flavor. Want some heat? Toss in a little red pepper flakes. These will wake up your taste buds! For a lovely look, use garnishes like fresh basil leaves or a sprinkle of Parmesan cheese. Cherry tomatoes add a splash of color too. A drizzle of olive oil on top makes the dish shine. You can save time by prepping zoodles and pesto ahead of time. Spiralize the zucchini and store the zoodles in an airtight container. Keep them in the fridge for up to three days. For the pesto, blend all the ingredients and store it in a jar. It lasts about a week in the fridge. You can also freeze it in ice cube trays. This way, you have quick pesto ready whenever you want it! Storing cooked chickpeas is easy too. Keep them in a container in the fridge, and they will stay fresh for up to five days. This means you can enjoy your pesto zoodle bowl whenever you like! Check the Full Recipe for more ways to make this dish your own. {{image_2}} You can add proteins to your pesto zoodle bowl for extra flavor and nutrition. Try these options: - Grilled chicken: Tender and juicy, it pairs well with the pesto. - Tofu: Firm or soft, it soaks up flavors nicely. - Shrimp: Quick-cooking and delicious, they add a fresh taste. For vegan choices, consider: - Edamame: These green soybeans add a nice crunch. - Lentils: Packed with protein, they give a hearty texture. Change the taste of your zoodle bowl by trying new ingredients. Here are a few ideas: - Mediterranean vibe: Add olives and crumbled feta for a salty kick. - Asian twist: Drizzle some soy sauce over the top for a savory flavor. These variations let you customize your dish and keep meals exciting. Check out the Full Recipe to explore more ways to enjoy your pesto zoodle bowl! To keep your zoodle bowl fresh, follow these simple steps: - Use airtight containers: This helps to lock in moisture and flavor. - Separate components: Store zoodles and pesto in different containers. This keeps the zoodles from getting soggy. - Refrigerate promptly: Put leftovers in the fridge within two hours of serving. - Use within three days: For the best taste and texture, eat leftovers within this time. If you want to store for longer, freezing is an option: - Freeze zoodles: Place them in freezer bags with as much air removed as possible. - Freeze pesto: Pour pesto into an ice cube tray. Once frozen, transfer cubes to a bag. This way, you can use just what you need. When it's time to enjoy your leftovers, reheating is key: - Reheat zoodles carefully: Use a pan over low heat. Stir gently for a few minutes. This keeps them from becoming mushy. - For pesto: Heat it in a small pan over low heat. Stir it often to keep it smooth. - Microwave method: If you use a microwave, heat zoodles in short bursts. Check every 30 seconds to avoid overcooking. Following these tips ensures your Pesto Zoodle Bowl remains delicious. Enjoy your meal! To make zoodles from fresh zucchini, you can use a spiralizer. This tool turns zucchini into long, noodle-like strands. Here are a few methods: - Handheld Spiralizer: This is a small tool. You twist the zucchini to create zoodles. - Countertop Spiralizer: This is bigger and easier. You place the zucchini in and turn a handle. - Vegetable Peeler: You can also use a peeler to make thin strips. Zoodles are best made from firm zucchini. Choose ones that feel heavy and have smooth skin. Yes, you can make pesto ahead of time. Store it in the fridge for up to one week. Here are some tips: - Use an Airtight Jar: This keeps air out and helps preserve flavor. - Add Olive Oil on Top: A thin layer of olive oil on pesto prevents browning. - Freeze for Longer Storage: Pour pesto into ice cube trays, freeze, and then store in bags. This way, you can use it as needed. Yes, zoodles are a healthy substitute for pasta. They have fewer carbs and calories. Here’s how they compare: - Caloric Content: One cup of cooked pasta has about 200 calories. One cup of zoodles has around 20 calories. - Nutritional Value: Zoodles are rich in vitamins A and C. They also have more fiber, which is good for digestion. - Gluten-Free: Zoodles are a great option for those who avoid gluten. By using zoodles, you can enjoy a lighter meal while still tasting great. To sum it up, making a pesto zoodle bowl is easy and fun. You need fresh zoodles, tasty pesto, and your favorite toppings. You can try different nuts, veggies, or proteins for a twist. Follow my step-by-step guide to get perfect zoodles and a rich sauce. Remember to store leftovers properly for quick meals later. Enjoy creating a dish that is both healthy and delicious! With these tips, you’ll impress everyone at your table with your cooking skills.

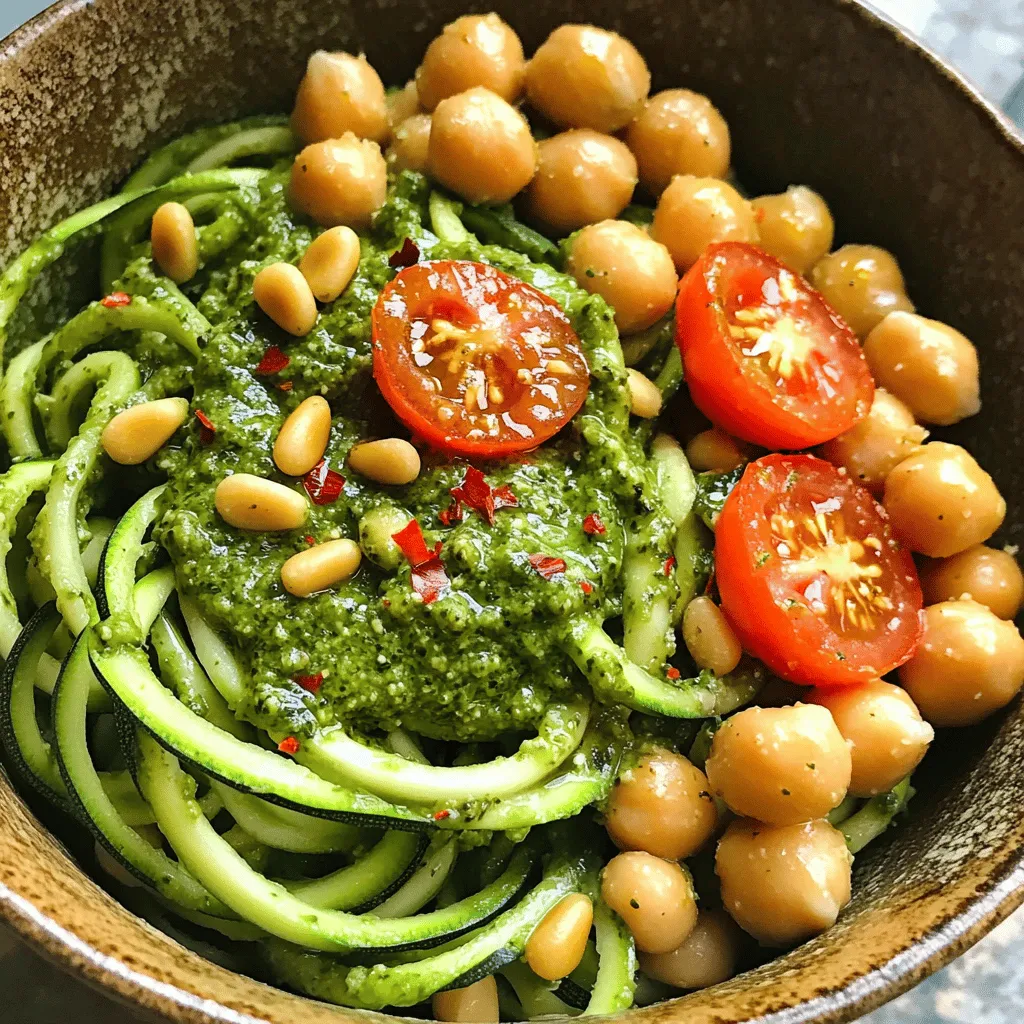
Pesto Zoodle Bowl Flavorful and Healthy Meal Option

Looking for a quick, tasty meal that won’t break the health bank? Let me introduce you to the Pesto Zoodle

For a tasty Chicken Taco Soup, gather these main ingredients: - 1 lb boneless, skinless chicken breasts - 1 can (15 oz) black beans, drained and rinsed - 1 can (15 oz) corn, drained - 1 can (14.5 oz) diced tomatoes with green chilies - 1 medium onion, diced - 2 cloves garlic, minced - 1 medium bell pepper, diced (any color) - 2 cups low-sodium chicken broth - 1 tablespoon taco seasoning - 1 teaspoon cumin - Salt and pepper to taste - 1 tablespoon olive oil You can add these optional toppings for extra flavor and texture: - Diced avocado - Shredded cheese - Sour cream - Tortilla strips - Chopped cilantro If you need alternatives, here are some ideas: - Swap chicken for shredded beef or turkey for a different taste. - Use canned chickpeas or lentils instead of black beans for a vegetarian option. - Opt for low-sodium broth if you watch your salt intake. - Choose organic canned goods if you prefer cleaner ingredients. Preparing your ingredients well makes cooking easier. Here are some tips: - For chopping vegetables, use a sharp knife. Cut the onion and bell pepper into small, even pieces. This helps them cook evenly. - Rinse black beans and corn under cold water. This removes excess salt and preservatives. - When washing fresh veggies, rinse them under running water. Rub gently to remove dirt or chemicals. These steps help ensure your Chicken Taco Soup is both healthy and tasty. For the full recipe, check out the complete guide! First, gather your ingredients. You'll need the chicken, beans, corn, tomatoes, onion, garlic, bell pepper, broth, and spices. 1. In a large pot, heat 1 tablespoon of olive oil over medium heat. 2. Add the diced onion and bell pepper to the pot. Sauté them for about 5 minutes until they soften. 3. Next, stir in 2 minced garlic cloves. Cook for another minute until you smell the garlic. 4. Now, add the chicken breasts to the pot. Pour in 2 cups of low-sodium chicken broth, 1 can of diced tomatoes, black beans, corn, 1 tablespoon taco seasoning, and 1 teaspoon cumin. Stir it all together. 5. Bring the mixture to a boil. Then, lower the heat and cover the pot. Let it simmer for 20 to 25 minutes, until the chicken is fully cooked. After the chicken is cooked, it's time to shred it. 1. Remove the chicken breasts from the pot and place them on a cutting board. 2. Use two forks to shred the chicken into bite-sized pieces. This method helps you get even shreds. 3. Once shredded, return the chicken to the pot. Stir it in well. Now we adjust the flavors. 1. Season the soup with salt and pepper to your taste. 2. Simmer the soup for another 5 minutes to heat everything through. 3. When ready to serve, ladle the soup into bowls. You can garnish it with toppings like diced avocado, shredded cheese, sour cream, tortilla strips, or chopped cilantro. You can find the full recipe above to make this tasty meal! Using pre-cooked chicken or rotisserie chicken can save you time. This small step cuts down your cooking time by half. Just shred the chicken and add it to the soup. For quick prep methods, try using a food processor to chop your vegetables. This tool makes dicing onions and peppers fast and easy. You can also buy pre-chopped veggies at the store. They save time and are very handy. Balancing spices and seasonings is key to a tasty soup. Start with a little taco seasoning. You can always add more if you want a stronger flavor. Taste as you go to make sure it’s just right. If you want to adjust heat levels, add jalapeños or hot sauce. For a milder flavor, reduce the spice or leave out the heat altogether. Keep tasting until you find your perfect balance. To add crunch, consider topping your soup with crispy tortilla strips. They give a great texture contrast. You can also use crushed tortilla chips for a similar effect. Choosing the right toppings can enhance texture too. Diced avocado adds creaminess, while shredded cheese brings a nice melt. Sour cream can add a cool touch. Each topping offers a new bite, making your soup even better. {{image_2}} You can switch up the protein in your Chicken Taco Soup. Ground beef or turkey works great too. For a lighter touch, try using shredded rotisserie chicken. If you want a meatless option, consider using black beans or chickpeas. When using beef or turkey, cook it first. Brown the meat in the pot before adding veggies. This step adds depth to the flavor. If you use vegetarian options, keep the cooking time the same. Love heat? You’re in luck! Adding jalapeños is an easy way to spice things up. Just chop them and toss them in with the other veggies. You can also add hot sauce to your bowl for extra kick. If you enjoy a lot of heat, try using spicy diced tomatoes. This will add flavor and warmth. Adjust the amount based on your taste buds. For a vegetarian or vegan twist, use plant-based proteins like tofu or lentils. These options will still give you a hearty soup. Use vegetable broth instead of chicken broth. It keeps the flavor rich and satisfying. You can also add more vegetables. Try bell peppers, zucchini, or spinach for extra nutrition. These will make the soup colorful and tasty. For the full recipe, check out [Full Recipe]. To keep your chicken taco soup fresh, store it in the fridge. Use airtight containers. Glass containers work best. They do not absorb odors. Make sure to cool the soup before sealing it. This helps prevent condensation inside the container. Label the container with the date. This way, you know when you made it. You can freeze chicken taco soup for later. Let the soup cool before freezing. Pour the soup into freezer-safe bags or containers. Remove as much air as possible. This helps prevent freezer burn. When ready to eat, thaw it overnight in the fridge. Reheat the soup on the stove or in the microwave. Stir it well to ensure even heating. Chicken taco soup lasts about 3-4 days in the fridge. If frozen, it can last up to 3 months. Check for signs of spoilage before eating. If you see mold or a bad smell, throw it away. Also, if the soup tastes off, do not eat it. Food safety is very important. If your soup is too thick, you can fix it easily. Just add more broth or water. Start with a half cup and stir well. Keep adding until it reaches your desired thickness. When you dilute the soup, the flavors might change. Taste it after adding liquid. You may need to add more taco seasoning or cumin. A pinch of salt can also help bring back the flavor. You can make Chicken Taco Soup in both a slow cooker and an Instant Pot. For a slow cooker, add all the ingredients at once. Set it on low for 6-8 hours or high for 3-4 hours. Make sure the chicken is cooked through before shredding. If using an Instant Pot, use the sauté feature first. Brown the onions and peppers, then add all other ingredients. Seal the lid and cook on high pressure for 10-12 minutes. Let it naturally release for 10 minutes before opening. Toppings can make your soup even better! Here are some popular options: - Diced avocado - Shredded cheese - Sour cream - Crispy tortilla strips - Chopped cilantro You can mix and match these toppings. For a spicy kick, add sliced jalapeños. For a little crunch, try crushed tortilla chips. Each bowl can be unique! For the full recipe, check the [Full Recipe]. This blog post covered how to make Chicken Taco Soup. We explored ingredients, cooking steps, tips, and storage methods. With these insights, you can customize your soup to fit your taste. Remember to try different proteins or toppings to change things up. Proper storage keeps your leftovers fresh, and tips for thick soup ensure you enjoy every bowl. Now, you can confidently create a flavorful dish that satisfies your cravings. Enjoy cooking and sharing your delicious Chicken Taco Soup!

Chicken Taco Soup Flavorful and Easy Recipe Guide

Looking for a warm and hearty meal that’s super easy to make? Chicken Taco Soup is your answer! In this

- 1 medium zucchini, sliced into half-moons - 1 red bell pepper, chopped into bite-sized pieces - 1 yellow bell pepper, chopped into bite-sized pieces - 1 small red onion, cut into wedges - 2 cups Brussels sprouts, halved - 3 tablespoons balsamic vinegar - 2 tablespoons olive oil - 1 tablespoon honey - 3 cloves garlic, minced - Salt and pepper to taste - Fresh rosemary or thyme for garnish When choosing your veggies, look for bright colors and firm textures. Fresh produce makes a big difference in flavor. - Calories per serving: Approximately 150 - Macronutrient breakdown: - Carbohydrates: 25g - Fats: 7g - Proteins: 3g This dish is not only tasty but also healthy. It is packed with vitamins, fiber, and antioxidants. Enjoy knowing you are eating something good for you. First, set your oven to 425°F (220°C). Preheating is key to great caramelization. While the oven heats, wash and chop your vegetables. I like to slice the zucchini into half-moons. Chop the red and yellow bell peppers into bite-sized pieces. Cut the red onion into wedges, and halve the Brussels sprouts. Keep the pieces roughly the same size. This helps them cook evenly. In a large bowl, combine all your veggies. Use a separate bowl to make the balsamic glaze. Mix together balsamic vinegar, olive oil, honey, minced garlic, salt, and pepper. Whisk until smooth. Pour this glaze over the veggies. Toss well to coat all the pieces evenly. An even coat ensures great flavor in every bite. Spread your coated veggies on a large baking sheet lined with parchment paper. Roast in the preheated oven for 25-30 minutes. Stir halfway through to promote even cooking. You want them tender and caramelized. If they get too brown, take them out early. Perfect caramelization adds sweetness and depth to the dish. Enjoy your Balsamic Roasted Veggies! For the full recipe, check the earlier section. - Keeping veggies from becoming soggy To keep your veggies crisp, use a high oven temperature. Set your oven to 425°F (220°C). This helps the veggies roast instead of steam. Space them out on the baking sheet. Avoid crowding, as this traps moisture. - How to achieve even cooking Cut all veggies into similar sizes. This ensures they cook at the same rate. Toss them well in the balsamic mixture so each piece gets coated. Stir halfway through roasting for even browning. - Ideal pairings with balsamic roasted veggies These veggies go great with grilled chicken or fish. They also make a tasty side for pasta dishes. You can serve them on a bed of quinoa for a healthy meal. - Ideas for garnish and presentation Fresh rosemary or thyme adds a nice touch. Sprinkle them on right before serving. A drizzle of balsamic glaze on top can enhance the look and flavor. - Overcooking or undercooking the vegetables Keep an eye on your veggies while roasting. They should be tender but not mushy. Roasting for 25-30 minutes is usually perfect. Check them at 25 minutes to see if they need more time. - Not seasoning adequately Don't skip on salt and pepper. They enhance the flavors of the veggies. Mix them well into the balsamic glaze for a balanced taste. Adjust to your liking before roasting. For the complete cooking process, check the Full Recipe. {{image_2}} If you want to switch things up, you can replace Brussels sprouts with broccoli or cauliflower. Both bring a nice crunch and flavor. You can also try using asparagus or carrots for a sweet twist. Mixed veggies like snap peas or green beans also work well. Feel free to get creative! To boost the taste, add spices like paprika or cumin. Fresh herbs, such as basil or parsley, add a nice touch, too. If you want to make this dish a full meal, consider adding a protein. Grilled chicken, shrimp, or chickpeas make fantastic additions. They blend well with the balsamic flavors. This recipe suits a vegan diet, as it only uses plant-based ingredients. For a gluten-free option, rest assured, this dish is naturally gluten-free. Just make sure any added sauces or seasonings are also gluten-free. You'll have a tasty and safe option for everyone! For the full recipe, check out the details above. After enjoying your balsamic roasted veggies, you can store any leftovers in the fridge. Place the veggies in an airtight container. This helps keep them fresh and tasty. They will stay good for about 3 to 5 days. When you’re ready to enjoy the leftovers, I recommend reheating in the oven. Set your oven to 350°F (175°C). Spread the veggies on a baking sheet. Heat them for about 10 to 15 minutes. This keeps them crispy and warm. You might also use a skillet. Heat a little olive oil in the pan. Add the veggies and stir for a few minutes. This method can help bring back their crunch. For a quick fix, you can use the microwave. Just be aware that they may lose some crispness. If you choose this method, heat in short bursts and stir often to keep them evenly warm. By following these tips, you can enjoy your balsamic roasted veggies again without losing their flavor! Roasting vegetables can take about 25 to 30 minutes at 425°F (220°C). The time may vary by veggie. Here are some specific times: - Zucchini: 20-25 minutes - Bell peppers: 25-30 minutes - Brussels sprouts: 25-30 minutes - Red onion: 25-30 minutes For best results, stir halfway to ensure even cooking and caramelization. Yes, you can use frozen vegetables, but they may not roast as well as fresh. Frozen veggies often have added water, which can lead to steaming instead of roasting. If you use frozen, try to thaw and pat them dry first. This helps them crisp up in the oven. Balsamic roasted veggies pair well with many dishes. Here are some ideas: - Grilled chicken or steak - Quinoa or rice bowls - Pasta with olive oil - A fresh green salad You can also serve them as a side with your favorite protein for a complete meal. Yes, you can make balsamic roasted veggies ahead of time. Roast them, then cool and store in the fridge. They can stay fresh for about 3 to 4 days. To reheat, just pop them back in the oven at 350°F (175°C) for about 10-15 minutes. This will keep them warm and slightly crispy. Balsamic roasted veggies offer a tasty mix of colors and flavors. We discussed key ingredients, cooking steps, and tips to get perfect results. Remember to keep the veggies crisp and avoid overcooking. You can mix and match ingredients to fit your taste. Leftovers can easily be stored and reheated. Enjoy this dish as a side or a main meal. By following these tips, you can create a healthy and delicious dish every time. Happy cooking!

Balsamic Roasted Veggies Perfectly Caramelized Delight

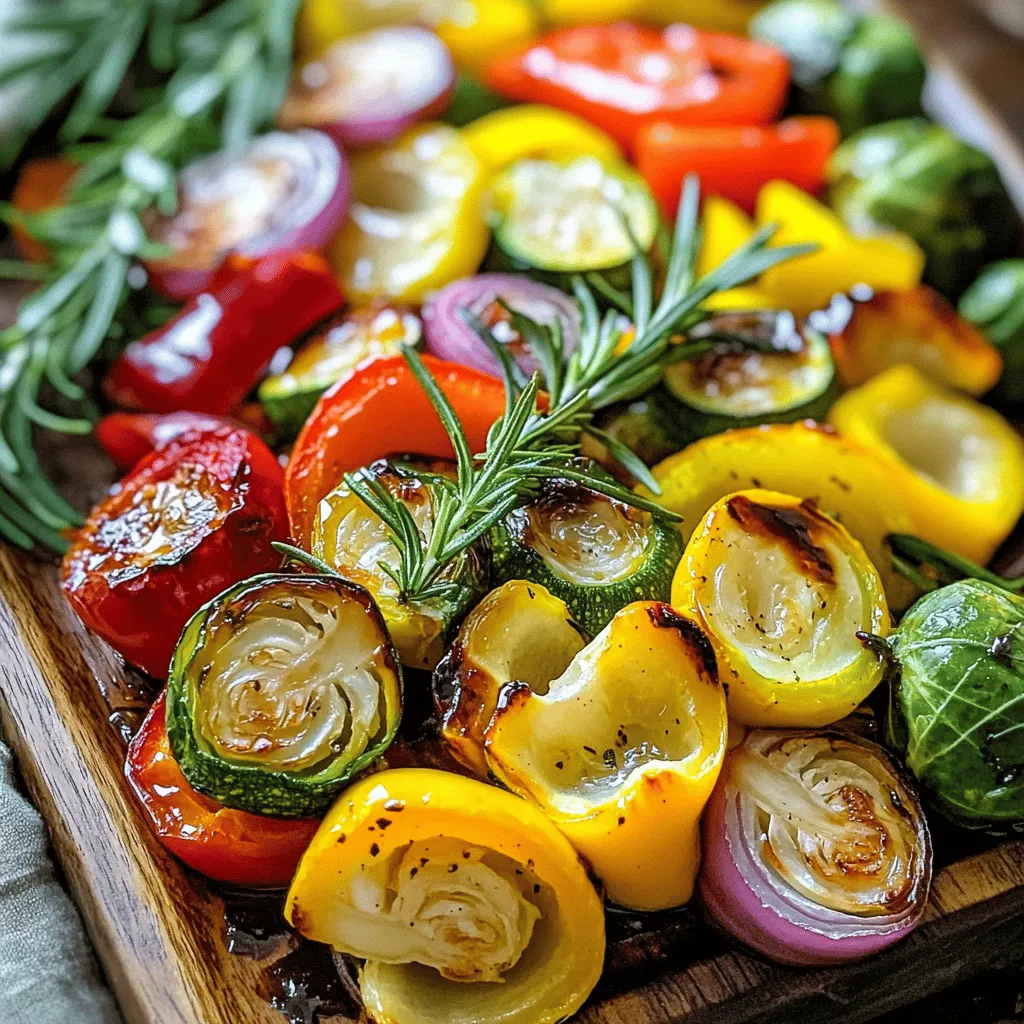
Looking for a tasty way to enjoy your veggies? Balsamic roasted veggies are your answer! This dish combines simple ingredients

To make delicious baked apple chips, you need a few simple items: - 4 medium-sized apples (I love using a mix of Fuji and Granny Smith) - 1 teaspoon ground cinnamon - 1 tablespoon coconut sugar (you can also use regular sugar) - Pinch of salt - Optional: 1 tablespoon lemon juice (this adds a nice tartness) These ingredients work together to create a sweet and crunchy snack. The apples are the star of the show, so choose varieties with good flavor. You can play with flavors by adding other ingredients. Here are some fun options: - A sprinkle of nutmeg for warmth - A pinch of cayenne for a spicy kick - Drizzle of honey or maple syrup for extra sweetness - Chopped nuts for added crunch These add-ins can make your apple chips unique and tasty. Feel free to experiment! Choosing the right apples is key for great chips. Here's what to look for: - Pick apples that are firm and fresh. - Avoid any with bruises or soft spots. - Try a mix of sweet and tart apples for balance. Using a variety of apples adds depth in flavor. Sweet apples like Fuji and tart ones like Granny Smith create a great combo. For the best taste, buy apples that are in season. Start with four medium-sized apples. I like to mix sweet and tart apples like Fuji and Granny Smith. Wash and dry the apples well. Use a sharp knife or a mandoline slicer. Slice the apples into thin rounds, about 1/8 inch thick. Remember to remove the core. Thin slices will bake better and become crispier. In a large bowl, toss the apple slices with lemon juice if you want a tangy kick. This step helps keep the apples bright and fresh. In a small bowl, mix together 1 teaspoon ground cinnamon, 1 tablespoon coconut sugar, and a pinch of salt. This mixture adds a warm sweetness. Sprinkle it evenly over the apple slices. Toss gently to coat all the slices. Preheat your oven to 225°F (110°C). Line two baking sheets with parchment paper. Lay the seasoned apple slices in a single layer on the sheets. Make sure they don't overlap; this helps them bake evenly. Bake for about 1.5 to 2 hours. Flip the slices halfway through to get both sides crispy. Keep an eye on them as baking times can vary. When done, let them cool on the sheets. Cooling makes them even crispier. Enjoy your homemade baked apple chips as a tasty snack! For the full recipe, check out the details above. To make apple chips crisp, thin slices are key. Use a sharp knife or a mandoline slicer. Aim for 1/8 inch thick slices. This thickness helps them bake evenly. Bake at a low temperature, around 225°F (110°C). Slow baking removes moisture without burning. Flip the apple slices halfway through for even crispiness. Let them cool completely on the baking sheets after baking. This cooling time will enhance their crunch. One common mistake is slicing apples too thick. If slices are thick, they will not dry properly. Another mistake is overcrowding the baking sheets. Always lay the slices in a single layer. Overlapping can lead to sogginess. Remember to check your oven’s temperature. An oven that is too hot can burn the chips. Lastly, don’t skip the cooling step. Chips need time to crisp up after baking. Baked apple chips are a great snack on their own. You can also serve them with yogurt for dipping. A sprinkle of cinnamon adds extra flavor. Try placing them in a decorative bowl for a fun touch. They are also perfect for topping salads or oatmeal. If you want a savory twist, pair them with cheese. Try serving them at parties or gatherings as a healthy snack. {{image_2}} You can have fun with baked apple chips by changing their flavors. For a sweet twist, add a drizzle of honey or maple syrup before baking. To make them spicy, sprinkle some cayenne pepper on top. If you want a savory version, try adding garlic powder or paprika. Each flavor gives a unique taste that keeps your snack exciting. If you want to swap out coconut sugar, use other sweeteners. Stevia or agave syrup works well. You can also use brown sugar for a richer flavor. Remember, each sweetener changes the taste slightly, so feel free to experiment. Find what you enjoy the most! Toppings can add extra fun to your apple chips. Try sprinkling crushed nuts or seeds on top for crunch. You could also drizzle yogurt or nut butter for a creamy dip. If you love chocolate, melted dark chocolate makes a great dip. These toppings can turn a simple snack into a gourmet treat. To keep your baked apple chips fresh, store them in an airtight container. You can use a glass jar or a zip-top bag. Make sure the chips are completely cool before sealing. This prevents moisture build-up, which can make them soggy. Baked apple chips can last up to two weeks when stored properly. Keep them away from heat and sunlight. If you notice any signs of moisture, it's best to toss them out. For the best taste, enjoy them within the first week. If your apple chips lose their crunch, you can re-crisp them. Preheat your oven to 200°F (93°C). Spread the chips in a single layer on a baking sheet and bake for about 10 minutes. This will help restore their crispiness. Just keep an eye on them to avoid burning. The best apple varieties for baking are Fuji and Granny Smith. Fuji apples are sweet, while Granny Smith adds tartness. This mix creates a balanced flavor. You can also try Honeycrisp or Pink Lady apples. They hold their shape well and taste great. Yes, you can use a dehydrator to make baked apple chips. Set your dehydrator to 135°F (57°C). Slice the apples thin and place them on the trays. Dry them for about 6 to 8 hours. Check for crispiness, as times may vary. Baked apple chips are a healthier choice than regular chips. They have less fat and fewer calories. Apple chips offer fiber and vitamins. Regular chips often have added salt and preservatives. Baked apple chips are a tasty, guilt-free snack. You can find pre-made baked apple chips in many grocery stores. Look in the snack aisle or health food section. They are also available online. Brands like Bare and Simply Nature offer tasty options. Always check the ingredient list for added sugars. You can customize baked apple chips easily. Try adding spices like nutmeg or ginger for a warm flavor. You can also sprinkle them with cocoa powder for a chocolatey twist. For a savory snack, add a pinch of chili powder or sea salt. Explore your creativity! For the full recipe, check out the earlier section. Baked apple chips are a fun and tasty snack. We covered ingredients, preparation, and how to get them crispy. Remember to choose the right apples for the best taste. Don't forget the optional spices for extra flavor. Also, storing them properly keeps them fresh longer. These chips can be sweet, spicy, or even savory. Feel free to mix and match toppings to find your favorite. I hope you enjoy making and sharing these delicious treats!

Baked Apple Chips Crispy Snack That Delights

If you’re looking for a tasty, healthy snack, baked apple chips are the perfect choice. They are easy to make

- 4 large sweet potatoes, peeled and cubed - 1/2 cup brown sugar - 1/4 cup maple syrup - 1/2 cup milk - 1/4 cup unsalted butter, melted - 2 large eggs - 1 teaspoon vanilla extract - 1 teaspoon ground cinnamon - 1/2 teaspoon ground nutmeg - 1/4 teaspoon salt Sweet potatoes are the star of this dish. They give it a creamy texture and a natural sweetness. You can use brown sugar for a rich flavor or maple syrup for a lighter sweetness. Both options work well. Next, we add dairy and eggs for creaminess and binding. The milk makes it smooth and the eggs help it set. - 1 cup mini marshmallows - 1/2 cup pecans, chopped Mini marshmallows make the top of the casserole sweet and fun. They puff up and turn golden brown in the oven. Chopped pecans add crunch and a nutty flavor. You can sprinkle them on top before baking for a nice contrast in texture. - Spices and flavor enhancers - Alternative sweeteners You can add spices like cinnamon and nutmeg for warmth. They bring out the sweet potato flavor. If you want to cut sugar, try using stevia or coconut sugar as sweeteners. These options keep the dish healthy without losing taste. For the Full Recipe, refer back to the beginning of this section. Enjoy making your sweet potato casserole! Start by prepping your sweet potatoes. Take four large sweet potatoes, peel them, and cut them into small cubes. This size helps them cook faster. Next, boil the sweet potato cubes in a large pot of salted water. Cook them until they are tender, which takes about 15 to 20 minutes. Once cooked, drain the water and mash the sweet potatoes in a large mixing bowl. The mash should be smooth and creamy. Now it's time to mix the ingredients. Add brown sugar, maple syrup, milk, melted butter, eggs, vanilla extract, ground cinnamon, ground nutmeg, and salt into the mashed sweet potatoes. Use a big spoon or a whisk to combine everything. Mix until the texture is even and smooth. This ensures every bite has that great flavor. Prepare your casserole dish by greasing it lightly with butter or oil. Pour the sweet potato mixture into the dish and spread it evenly. Now, top the mixture with mini marshmallows and chopped pecans. Make sure they cover the top well. Preheat your oven to 350°F (175°C) and bake the casserole. It needs about 30 to 35 minutes. You will know it’s done when the marshmallows turn golden brown and puffed up. To get the best texture, mash the sweet potatoes until smooth. You want no lumps. If you like it creamier, add a bit more milk. This makes it fluffy and rich. For flavor, use fresh spices like cinnamon and nutmeg. They add warmth and depth. A splash of vanilla extract brightens it up. Taste as you mix to find the balance you like. You can prepare this dish the day before. Just follow the recipe, but skip baking. Cover it tightly and store it in the fridge. When you are ready, bake it straight from the fridge. It may need a few extra minutes in the oven. If you have leftovers, store them in an airtight container. They stay fresh for about three days. For a lovely finish, sprinkle cinnamon on top before serving. Add a few whole pecans as a garnish. This looks nice and adds a crunch. Serve it warm right out of the dish. It’s perfect for family dinners or holiday gatherings. If you want to get fancy, use a decorative casserole dish. It makes your food look even more inviting. For the full recipe, check out the Sweet Potato Casserole Delight . {{image_2}} You can easily make this dish vegan. Use plant milk instead of regular milk. Swap eggs for flaxseed meal. Mix one tablespoon of flaxseed meal with three tablespoons of water. Let it sit until it thickens. For butter, use coconut oil or vegan butter. This keeps the flavor rich and creamy. To maintain flavor, add more spices. Try extra cinnamon or nutmeg. You can also mix in maple syrup. It will give your casserole a sweet kick. Don't forget to check your marshmallows. Some brands are not vegan, so choose wisely! If you need a gluten-free casserole, you're in luck! Most ingredients in this recipe are already gluten-free. Just make sure your toppings are safe. Use gluten-free marshmallows and check pecans for cross-contamination. For a different flavor profile, add a bit of orange zest. It brightens the dish. You can also mix in crushed gluten-free cookies for a crunchy topping. This adds texture and taste to your casserole. You can switch things up with savory flavors. Try adding garlic powder or cheese. This gives the dish a unique twist. If you want to keep it sweet, consider adding dried fruits. Raisins or cranberries work well. Don't be afraid to experiment with unexpected ingredients. Try adding a hint of chili powder for a spicy kick. A little bit can go a long way in making the dish stand out. Whatever you choose, enjoy the process of making this casserole your own! To store your sweet potato casserole, let it cool completely first. Use an airtight container to keep it fresh in the fridge. It can stay good for up to four days. If you want to save it for longer, freeze the casserole. Cut it into portions and wrap each piece tightly in plastic wrap. Then, place the wrapped pieces in a freezer bag. It can last up to three months in the freezer. To reheat your casserole while keeping the texture nice, use the oven. Preheat it to 350°F (175°C). Place your casserole in an oven-safe dish and cover it with foil. Heat for about 20 minutes, or until warm. If you're in a hurry, you can use the microwave. Place a portion on a microwave-safe plate and cover it with a damp paper towel. Heat it in short bursts, checking often to avoid overheating. Sweet potato casserole stays fresh in the fridge for about four days. In the freezer, it can last three months. Look for signs it has gone bad: a sour smell, mold, or a change in color. If you notice any of these, it's best to throw it away. Enjoy your casserole while it’s fresh for the best taste! Yes, you can make Sweet Potato Casserole ahead of time. This is a great way to save time. Prepare the casserole as directed, but stop before baking. Cover it well and store it in the fridge for up to two days. When ready to bake, take it out and let it sit at room temperature for 30 minutes. Then, bake it as usual. This method keeps the flavors fresh and delicious. Yes, you can use canned sweet potatoes. They can save time and effort. Canned sweet potatoes are already cooked, so you skip the boiling step. However, they may contain added sugar or preservatives which can change the taste. Rinse them well before use. The texture may also be softer, so adjust your baking time as needed. Making Sweet Potato Casserole gluten-free is easy. Start with gluten-free flour if you want a thicker mix. You can also skip any flour and stick with sweet potatoes and toppings. Use gluten-free marshmallows and nuts to ensure everything stays gluten-free. Always check labels to confirm that all ingredients are safe for your diet. This article covered the essential parts of making a great sweet potato casserole. We explored the main ingredients like sweet potatoes and sugar options, as well as tasty toppings and add-ins. You learned how to prepare, mix, and bake your casserole to perfection. We also shared tips, variations, and storage advice to help you succeed. Remember, the key is to enjoy the process and share delicious meals. Happy cooking!

Sweet Potato Casserole Simple and Delicious Recipe

Are you ready to make a sweet potato casserole that’s both simple and utterly delicious? This dish is a timeless

To make stuffed cabbage rolls, you will need the following ingredients: - 1 large head of green cabbage - 1 cup cooked rice (white or brown) - 1 lb ground turkey or chicken - 1 small onion, finely chopped - 2 cloves garlic, minced - 1 carrot, grated - 1 can (14 oz) diced tomatoes, undrained - 1 tablespoon Worcestershire sauce - 1 tablespoon fresh parsley, chopped - 1 teaspoon paprika - 1 teaspoon salt - 1/2 teaspoon black pepper - 1 tablespoon olive oil - 1 cup vegetable broth You can adapt this recipe for different diets. Here are some ideas: - Vegetarian Option: Use lentils or mushrooms instead of meat. - Gluten-Free: Ensure your Worcestershire sauce is gluten-free. - Low-Carb: Replace rice with cauliflower rice for a lighter option. Choosing fresh ingredients makes a big difference in flavor. Here are some tips: - Cabbage: Look for a firm head with crisp leaves. Avoid any that feel soft. - Meat: Pick lean ground turkey or chicken for a healthier mix. - Produce: Choose bright, firm vegetables. They should smell fresh and clean. - Tomatoes: Select cans with no added sugar or preservatives for the best taste. For the full recipe, refer to the section above. First, you need a large pot of water. Bring it to a boil. While waiting, remove the core from the cabbage. Carefully lower the whole head into the boiling water. Let it cook for about 5-7 minutes. The outer leaves will soften. Gently peel off about 12 large leaves. Set them aside to cool. This step is key; tender leaves roll better. Now, grab a skillet and heat some olive oil over medium heat. Add your finely chopped onion and minced garlic. Cook them until the onion turns soft and clear. Next, add the grated carrot and stir for another 2-3 minutes. You want the flavors to mix well. In a large bowl, combine the cooked rice, ground turkey or chicken, and the sautéed mix. Then, add Worcestershire sauce, half of the diced tomatoes, fresh parsley, paprika, salt, and pepper. Mix it all until it’s well blended. Take a cabbage leaf and lay it flat on a clean surface. At the stem end, place about 2-3 tablespoons of the filling. Fold the sides over the filling and start rolling it up tightly. Make sure it stays snug. Repeat this with all the leaves and filling. This process is fun and satisfying. Once they are all rolled, you are ready for the next step. You can find the full recipe details to guide you through the baking process and sauce preparation. Enjoy making your stuffed cabbage rolls! Many home cooks struggle with stuffed cabbage rolls. The biggest mistake is overcooking the cabbage. Boiling it for too long makes the leaves too soft. You want them flexible, not mushy. Another common error is not seasoning the filling. The mix must have flavor, so don't skip the salt and spices. Lastly, don’t cram too much filling into each leaf. This can lead to tears and spills. Each roll should be filled just right. To save time, prep your ingredients first. Chop your onion and garlic and grate your carrot while the cabbage boils. Another great tip is to use leftover rice. If you have rice in your fridge, it works perfectly here. You can also make the filling ahead of time. Store it in the fridge for up to two days. This way, you can assemble the rolls quickly when you are ready to cook. For baking, arrange the rolls seam-side down in the dish. This helps them stay closed while cooking. Make sure to cover the dish with foil. This keeps moisture in and prevents drying out. After 30 minutes, remove the foil to let the tops brown slightly. A little browning adds flavor and texture. Following these tips will lead to tender, flavorful stuffed cabbage rolls every time. For the full recipe, check the details above. {{image_2}} Vegetarian stuffed cabbage rolls are a great option for meat-free meals. You can use cooked quinoa or lentils as the base. These ingredients add protein and flavor. Add diced bell peppers, mushrooms, and fresh herbs to enhance taste. You can still include rice for texture and bulk. Tomato sauce or vegetable broth works well to keep them moist while baking. Different cultures have their own takes on stuffed cabbage. In Eastern Europe, you'll find rice and pork in the filling. In the Middle East, spices like cumin and cinnamon add warmth. In Southern Italy, they use ground beef and a rich tomato sauce. Each region adds unique flavors that reflect local ingredients and traditions. You can customize the filling to suit your taste. Consider adding shredded cheese for creaminess. Chopped nuts like walnuts can add crunch and depth. For a spicy kick, include diced jalapeños or crushed red pepper flakes. Herbs like dill, thyme, or basil can brighten the flavor. Be creative and mix your favorite ingredients to make every batch special. For a full recipe and detailed cooking steps, check out the Full Recipe. After enjoying your stuffed cabbage rolls, let them cool down. Place them in a glass or plastic container with a tight lid. This keeps the rolls fresh and tasty. Store them in the fridge for up to four days. Make sure to label the container with the date. You’ll know when to finish them off! You can freeze stuffed cabbage rolls for later. First, let them cool completely. Then, wrap each roll tightly in plastic wrap. Place them in a freezer-safe bag or container. They can last in the freezer for up to three months. When you’re ready to eat, just thaw them in the fridge overnight. To reheat, take the rolls out of the fridge or freezer. If frozen, let them thaw first. Place them in a baking dish and add a splash of vegetable broth or sauce. Cover the dish with foil to keep moisture in. Heat in the oven at 350°F for about 20-25 minutes. This keeps the rolls soft and flavorful. Enjoy your delicious meal again! Yes, you can use various types of meat for stuffed cabbage rolls. Ground beef, pork, or lamb work well. If you prefer a leaner option, turkey or chicken are great choices too. Each meat brings its own flavor. Just remember to adjust the seasoning based on your meat choice. For example, beef might need more salt. Always taste the filling before you stuff the cabbage! Absolutely! You can prepare stuffed cabbage rolls ahead of time. After you roll them, store them in the fridge for up to 24 hours. Just keep them covered tightly. If you want to make them even earlier, freeze the rolls. Place them in a freezer-safe container. They can last for up to three months. Just remember to thaw them in the fridge before baking. Stuffed cabbage rolls pair well with many sides. I love serving them with crusty bread or a fresh salad. You can also try mashed potatoes or rice. If you want a tangy twist, serve with a dollop of sour cream. For extra flavor, a sprinkle of fresh herbs on top adds a nice touch. These sides complement the savory taste of the rolls well. For the full recipe, check out the details above! Stuffed cabbage rolls are a delicious dish you can make easily. We covered ingredients, steps, tips, and variations to help you succeed. Remember to choose fresh ingredients and avoid common mistakes. You can also try different fillings to suit your taste. Storing leftovers properly keeps them tasty for later. With this guide, you can enjoy perfect stuffed cabbage rolls anytime. Happy cooking!

Stuffed Cabbage Rolls Easy and Flavorful Recipe

Looking for an easy and tasty dinner idea? Stuffed cabbage rolls deliver flavor and comfort with every bite. In this

To make Classic Chicken Marsala, gather these ingredients: - 2 boneless, skinless chicken breasts - 1 cup all-purpose flour - Salt and pepper to taste - 3 tablespoons olive oil - 1 tablespoon unsalted butter - 8 ounces cremini mushrooms, sliced - 2 cloves garlic, minced - 1 cup chicken broth - 1 tablespoon balsamic vinegar - 2 teaspoons fresh thyme, chopped - Fresh parsley, chopped (for garnish) Using high-quality ingredients makes a big difference. Always choose fresh chicken. It should feel firm and have no strong odor. For mushrooms, select firm, plump cremini. They add a rich flavor to the dish. Fresh herbs like thyme enhance taste. When picking garlic, look for bulbs that are tight and dry. Good olive oil adds depth to your sauce. You can swap ingredients if needed. If you want a gluten-free option, use gluten-free flour. For chicken, you can use turkey cutlets or even pork. If you don’t have cremini mushrooms, button mushrooms work well. For a different flavor, try using white wine instead of chicken broth. Balsamic vinegar can be replaced with red wine vinegar for a tangy kick. For the full recipe, check out the details provided above. Start with the chicken breasts. Use a meat mallet to pound them flat. This helps them cook evenly. Season both sides with salt and pepper. This step adds flavor. Next, spread the flour on a plate. Dredge each chicken breast in the flour. Shake off any extra flour. This will give your chicken a nice crust. Heat olive oil in a large skillet over medium-high heat. Once the oil is hot, add the chicken breasts. Cook each side for about 4-5 minutes. You want them golden brown and fully cooked. Use a meat thermometer to check for doneness. The chicken should reach 165°F. After cooking, remove the chicken from the skillet and set it aside. In the same skillet, add unsalted butter. Let it melt, then add sliced mushrooms. Cook the mushrooms for about 5 minutes until they are browned. This adds depth to the sauce. Next, add minced garlic and cook for 1-2 minutes. It will smell so good! Pour in chicken broth and balsamic vinegar. Scrape any browned bits from the bottom. This builds flavor in your sauce. Add fresh thyme and let it simmer for about 5 minutes. The sauce will thicken slightly. Finally, return the chicken to the skillet. Spoon the sauce and mushrooms on top. Heat everything for another 2-3 minutes. Your Chicken Marsala is ready to serve. For a nice touch, sprinkle chopped parsley on top. For the full recipe, refer to the previous section. To make Chicken Marsala perfect, follow a few key steps. First, pound the chicken breasts to an even thickness. This helps them cook evenly. Season them well with salt and pepper. Dredging the chicken in flour gives it a nice crust. Make sure to shake off the extra flour. Use a large skillet for cooking. Heat the olive oil over medium-high heat. This ensures a nice sear on the chicken. Cook the chicken for about 4-5 minutes per side. Look for a golden brown color. This shows they are cooked well. After cooking, set the chicken aside to keep it warm. When sautéing mushrooms, use the same skillet. This adds flavor to the dish. Cook the mushrooms until they are browned. This enhances their rich taste. Add garlic near the end to keep its fresh flavor. Pour in chicken broth and balsamic vinegar next. This creates a rich sauce. Let it simmer to reduce and thicken. Serve Chicken Marsala hot. Spoon the sauce and mushrooms over the chicken. This makes for a beautiful presentation. Garnish with fresh parsley for a pop of color. It adds freshness to the dish. For a casual meal, serve it on a plate with pasta. The sauce pairs well with noodles. For a more elegant setup, plate it with a side of roasted vegetables. This adds color and nutrition. Pair Chicken Marsala with simple sides. Consider mashed potatoes or creamy polenta. Both absorb the sauce nicely. A fresh green salad works well too. It adds a crisp contrast to the meal. You can also serve crusty bread on the side. This lets you soak up extra sauce. For a lighter option, steamed asparagus or green beans are great choices. They add a fresh touch to your plate. These tips will help you create a delicious Chicken Marsala at home. For more details, check out the Full Recipe. {{image_2}} You can make Chicken Marsala gluten-free easily. Just swap out all-purpose flour for a gluten-free flour blend. This works well for dredging the chicken. You can also check the chicken broth label to ensure it is gluten-free. This way, everyone can enjoy this tasty dish without worry. Cremini mushrooms give great flavor to Chicken Marsala. But if you prefer something else, try using shiitake or button mushrooms. Each type has its own unique taste. If you don’t like mushrooms, you can skip them entirely. You can also add vegetables like spinach or zucchini for added color and nutrition. Chicken is the star of this dish, but you can switch it up. Try using pork or veal for a different taste. For a vegetarian option, use firm tofu or eggplant. Each protein gives a new twist to the classic recipe. Just remember to adjust cooking times as needed to ensure everything cooks through. For more detailed steps on making this delightful dish, refer to the Full Recipe. To keep your Chicken Marsala fresh, let it cool first. Then, place it in an airtight container. Store it in the fridge for up to three days. This way, the flavors remain intact. If you notice any moisture, use a paper towel to absorb it. When reheating, the goal is to keep the chicken tender. You can use the microwave or a skillet. For the microwave, place your portion on a plate. Heat on medium power for about one to two minutes. Stir halfway through for even heating. If using a skillet, add a splash of chicken broth. Heat over low until warm. This also helps keep the sauce moist. Freezing Chicken Marsala is a great option for later meals. First, let it cool completely. Then, transfer it to a freezer-safe container. You can also use freezer bags, removing as much air as possible. It will stay good for up to three months. When you’re ready to eat, thaw it in the fridge overnight before reheating. Enjoy your easy Chicken Marsala again! Check out the Full Recipe for more details. Chicken Marsala comes from Italy. It hails from the region of Sicily. This dish uses Marsala wine, a sweet wine made in the Marsala region. People created it to highlight the rich flavors of the wine. Over time, it gained popularity in America. Chefs often use it to impress guests with its taste. Yes, you can make Chicken Marsala ahead of time. Prepare the dish and let it cool. Store it in an airtight container in the fridge for up to two days. Reheat it gently on the stove before serving. This method keeps the chicken juicy and the sauce flavorful. You have many great options for sides. Mashed potatoes pair well with Chicken Marsala's sauce. You can serve it with pasta or rice for a filling meal. Steamed vegetables add a fresh touch to your plate. A green salad can balance the richness of the dish. For more ideas, check the Full Recipe. This blog post covered all you need for Chicken Marsala. We explored the right ingredients, cooking methods, and tasty serving ideas. Remember, quality matters, so choose fresh ingredients. Don’t be afraid to try variations and substitutions. You can even store leftovers for later enjoyment. Embrace your creativity and personalize the dish. With these tips, you’ll impress everyone at your table. Enjoy your cooking adventure and the delicious meals that follow!

Classic Chicken Marsala Flavorful and Easy Recipe

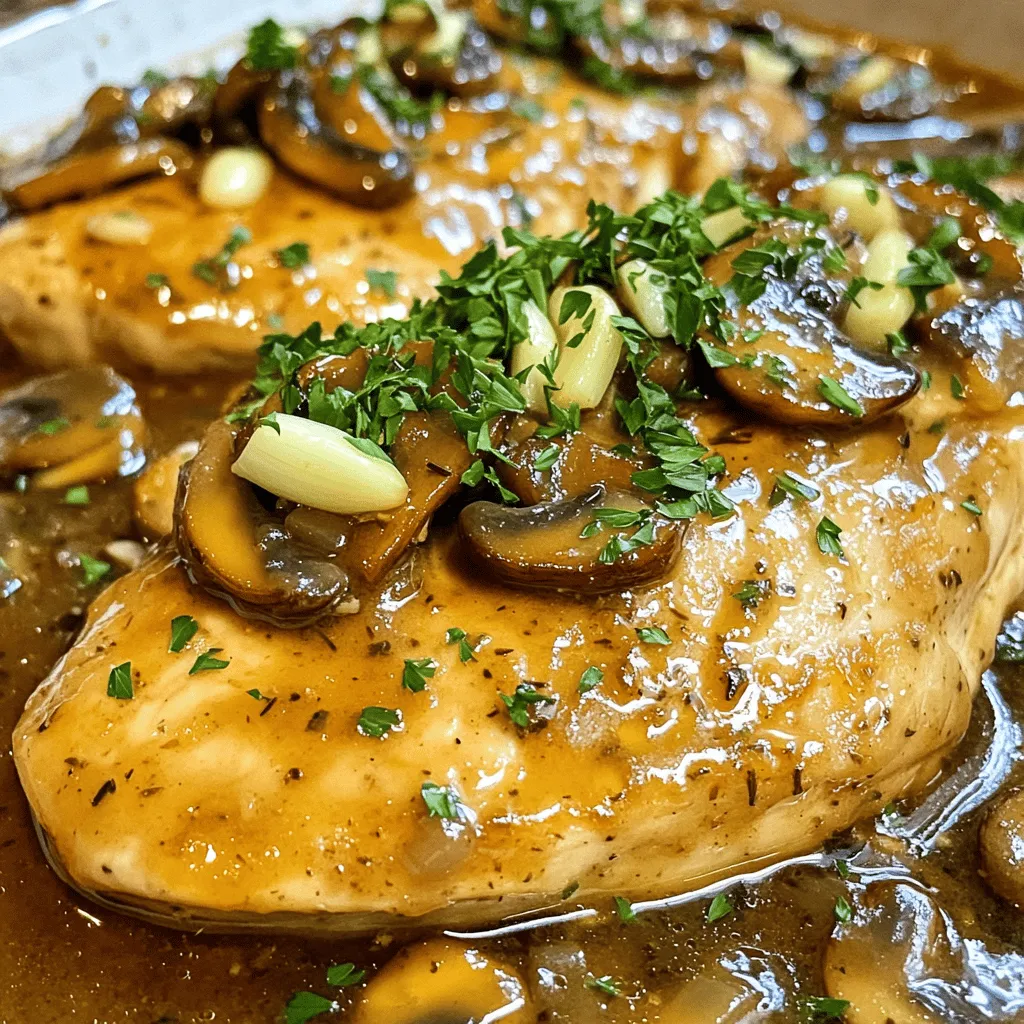
Are you ready to elevate your dinner game? Classic Chicken Marsala is a simple yet flavorful dish that impresses everyone

To make a delicious Chocolate Peanut Butter Mug Cake, you need some simple ingredients. Here’s what you'll need: - 4 tablespoons all-purpose flour - 2 tablespoons unsweetened cocoa powder - 2 tablespoons sugar (or coconut sugar) - 1/4 teaspoon baking powder - 1/8 teaspoon salt - 3 tablespoons milk (dairy or non-dairy) - 2 tablespoons peanut butter (creamy or crunchy) - 1 tablespoon vegetable oil (or melted coconut oil) - 1/4 teaspoon vanilla extract - Chocolate chips for topping (optional) Each ingredient plays a key role in making your mug cake rich and tasty. The flour gives structure, while cocoa powder adds that deep chocolate flavor. Sugar sweetens the deal, and baking powder helps it rise. Salt balances everything, while the milk keeps it moist. Peanut butter makes it creamy and adds a nutty taste. The oil adds richness, and vanilla enhances the overall flavor. Finally, chocolate chips are a fun, optional touch for extra sweetness. When you gather these ingredients, you lay the foundation for a quick and delightful dessert. You can find the full recipe at the end of this section. Happy baking! First, grab a microwave-safe mug. In the mug, combine the following dry ingredients: - 4 tablespoons all-purpose flour - 2 tablespoons unsweetened cocoa powder - 2 tablespoons sugar (or coconut sugar) - 1/4 teaspoon baking powder - 1/8 teaspoon salt Stir these dry ingredients well with a fork. Make sure there are no lumps. This mix forms the base of your cake. Next, it's time for the wet ingredients. Add these to your dry mix right in the same mug: - 3 tablespoons milk (dairy or non-dairy) - 2 tablespoons peanut butter (creamy or crunchy) - 1 tablespoon vegetable oil (or melted coconut oil) - 1/4 teaspoon vanilla extract Use that same fork to mix everything together. Keep stirring until you get a smooth batter. If you like, add in some chocolate chips for extra flavor. Now, place your mug in the microwave. Cook on high for about 1 minute and 30 seconds. At the 1-minute mark, check to see if it’s done. The cake should rise and look firm in the middle. If it is still gooey, microwave in 10-15 second bursts until it's fully cooked. Let the mug cake cool for a minute before enjoying. You can eat it right from the mug or slide it onto a plate. For a fun twist, try topping it with more peanut butter or a scoop of ice cream. For the full recipe, check out the details provided above. Enjoy your quick and tasty treat! To get a smooth batter, mix well but don’t overdo it. Use a fork to blend the wet and dry ingredients until you see no lumps. This helps the cake rise evenly. Checking doneness often is key. Microwave for one minute, then peek inside. If it’s still gooey, add 10-second bursts until it’s set. This way, you avoid a dry cake. Making your mug cake look great is easy. Drizzle extra peanut butter on top. A sprinkle of chocolate chips adds a nice touch. For a fun twist, add a scoop of ice cream or whipped cream. Fresh berries also make it pop with color. Use what you love! If you're short on time, pre-measure your ingredients. Set aside the flour, cocoa powder, and sugar in small bowls. This speeds up the mixing part. You can even prep the dry mix ahead of time and store it. Just add the wet ingredients when you’re ready to bake. This makes it quick and fun to enjoy your mug cake. {{image_2}} You can make your mug cake even tastier with simple add-ins. Here are some ideas: - Nuts: Chop up some walnuts or almonds for a crunchy bite. - Chocolate Chips: Add mini chocolate chips for extra sweetness. - Fruits: Toss in some banana slices or berries for a fruity twist. You can also swap out peanut butter for other nut butters. Try these: - Almond Butter: It has a light, nutty taste. - Cashew Butter: This one is creamy and smooth. - Sunflower Seed Butter: A great choice for nut allergies. Want a lighter version? You can make some easy swaps: - Lower Sugar Options: Use stevia or monk fruit to cut down on sugar. - Gluten-Free Substitutions: Replace all-purpose flour with almond flour or coconut flour. These changes keep the taste while making it better for you. You can enjoy this mug cake in many ways! For the full recipe, check the earlier section. After you enjoy your chocolate peanut butter mug cake, store any leftovers properly. You can keep it in the fridge. Place it in an airtight container. This will help it stay fresh for up to two days. If you don’t have a container, cover it with plastic wrap. This keeps moisture from getting in. Just remember, the cake might lose some of its fluffiness after a day. To enjoy your mug cake again, you need to reheat it carefully. Start by removing it from the fridge. Place it in the microwave for about 10 to 15 seconds. Check to see if it's warm enough. If it’s still cold, heat it in short bursts. This way, you won’t overcook it. You want to keep it soft and gooey. Try not to heat it for too long, as it can dry out. You can prepare the batter ahead of time if you want. Combine all the dry ingredients in a mug. Then, store it in a cool, dry place. When you’re ready to bake, simply add the wet ingredients. Mix and microwave it, and you’ll have a delicious treat. This method is great for busy days or quick snacks. Just remember to mix it fresh for the best taste. For the full recipe, check the section above! The total time for this mug cake is just 7 minutes. You spend about 5 minutes prepping the ingredients and 2 minutes cooking it in the microwave. This quick process fits perfectly into a busy day or late-night craving. If you have a peanut allergy, you can try sunbutter or almond butter. Both options give a similar creamy texture. You can also use tahini for a nut-free choice. Just make sure to pick a butter that suits your taste and needs. Yes, you can easily make this mug cake vegan. Use almond milk or oat milk instead of dairy milk. For the egg, you can replace it with 1 tablespoon of ground flaxseed mixed with 2.5 tablespoons of water. This mix works great as a binder. A microwave-safe ceramic or glass mug works best for even cooking. Avoid metal mugs as they can spark and cause a fire. Make sure your mug can hold at least 12 ounces to give your cake enough room to rise. This guide walks you through making a delicious chocolate peanut butter mug cake. You learned about measuring the right ingredients, mixing them well, and checking for doneness while microwaving. I shared tips for texture, variations to try, and storage options. Mug cakes are quick, fun, and perfect for satisfying a sweet tooth. Try it out, and enjoy your tasty treat!

Chocolate Peanut Butter Mug Cake Delight in Minutes

Get ready to indulge in a warm, gooey Chocolate Peanut Butter Mug Cake that’s ready in minutes! This easy recipe

- 1 lb (450g) boneless, skinless chicken thighs - 3 tablespoons olive oil - 2 tablespoons Greek yogurt - 1 tablespoon lemon juice - 2 cloves garlic, minced - 1 teaspoon dried oregano - 1 teaspoon paprika - Salt and pepper to taste - 4 pita breads - 1 cup shredded lettuce - 1 tomato, diced - 1/2 cucumber, thinly sliced - 1/4 red onion, thinly sliced - 1/2 cup tzatziki sauce When making chicken gyros, you want juicy chicken thighs. They are perfect because they stay moist. The marinade adds great flavor. I use olive oil, Greek yogurt, and lemon juice for a zesty kick. Garlic, oregano, and paprika make it even better. For toppings, fresh ingredients are key. Crisp lettuce, juicy tomatoes, and cool cucumbers add crunch. Red onion gives a nice bite, and tzatziki sauce ties it all together. - Chicken breast for leaner meat - Turkey thighs for a lighter option - Firm tofu for a plant-based choice If you want a lower-fat option, try chicken breast. It cooks faster but may dry out. Turkey thighs work well if you want a different flavor. For a plant-based meal, firm tofu absorbs marinades nicely. - 4 servings per recipe - 3-4 ounces of chicken per gyro - Pair with a side salad for balanced nutrition I recommend making four gyros with this recipe. Each gyro should have about 3-4 ounces of chicken. A side salad pairs well and boosts your veggie intake. This meal is not just tasty; it’s good for you, too! For the full recipe, check out the details I provided. To get the best flavor, coat the chicken well in the marinade. Start by mixing olive oil, Greek yogurt, lemon juice, minced garlic, oregano, paprika, salt, and pepper in a bowl. Stir until it's smooth. Next, add the chicken thighs. Make sure they are fully covered in the marinade. Cover the bowl and place it in the refrigerator. For great taste, let it marinate for at least 30 minutes. If you have time, marinate for up to 2 hours for even better flavor. You can cook the chicken on a grill or in a skillet. For grilling, preheat your grill to medium-high heat. Cook the chicken for about 5-7 minutes on each side. Use a meat thermometer to check if the chicken reaches 165°F (75°C). If using a skillet, heat a little oil and cook the chicken in the same way. Once done, take the chicken off the heat and let it rest for 5 minutes. This helps keep it juicy. After resting, slice the chicken into thin strips. Now it’s time to fill the pita. Start with a warm pita bread. Place the sliced chicken in the center. Then, add shredded lettuce, diced tomatoes, cucumber slices, and red onion on top. For a creamy touch, drizzle tzatziki sauce over everything. Fold the pita around the filling, making sure it stays inside. For a beautiful dish, stack the gyros neatly on a plate. You can garnish with extra herbs or a slice of lemon for a pop of color. For the full recipe, check out Easy Chicken Gyros. To really boost flavor in your Easy Chicken Gyros, try these spices and herbs: - Dried oregano: This adds a nice, earthy taste. - Paprika: Use smoked paprika for a deeper flavor. - Garlic powder: For extra garlic flavor without the fuss. When marinating, remember these dos and don’ts: - Do marinate for at least 30 minutes. - Don’t skip the salt; it brings out the flavors. - Do cover your chicken while it marinates. - Don’t marinate for too long; over 12 hours can make it mushy. To ensure your chicken is juicy and tender, follow these tips: - Use chicken thighs instead of breasts for more fat and flavor. - Cook on medium-high heat to get a nice sear. - Always let the chicken rest for a few minutes before slicing. This keeps it juicy. Avoid these common mistakes: - Don’t overcrowd the pan; this can lead to steaming instead of searing. - Check doneness with a meat thermometer; it should reach 165°F. - Avoid cooking on too high heat; this can burn the outside before the inside cooks. For great pairings with your chicken gyros, consider these side dishes: - Greek salad: Fresh and colorful, it adds crunch. - Sweet potato fries: Their sweetness matches well with savory gyros. - Rice pilaf: A light, fluffy side that complements the gyros. For drinks, I recommend: - Sparkling water: It refreshes without overpowering the meal. - Lemonade: A sweet and tangy choice that balances the flavors. - Greek wine: A light red or crisp white can elevate your meal. For the full recipe, check the Easy Chicken Gyros section. {{image_2}} You can swap chicken for other meats. Try lamb or beef for a richer taste. Turkey works well too if you want a leaner choice. If you prefer plant-based, use chickpeas or falafel. These options give you a tasty twist on the classic gyro. Tzatziki sauce is key, but you can make it your own. Add fresh herbs like mint or dill for extra flavor. You can also mix in more garlic or lemon juice to suit your taste. For toppings, consider feta cheese or olives. These add a nice salty bite that pairs well with the chicken. Pita bread is great, but there are other choices. Use flatbreads or wraps if you want a change. For gluten-free options, look for corn tortillas or gluten-free pita. These options keep your meal fun and accessible for everyone. Check out the Full Recipe for more details! Store leftover chicken gyros in the fridge. Use an airtight container. This keeps the flavors fresh. Place the chicken and toppings in separate containers. This prevents sogginess. Enjoy your leftovers within three days for the best taste. To reheat chicken gyros, use a skillet. Heat it over medium heat. Place the chicken in the skillet for about 5 minutes. Flip it halfway through to warm evenly. For the pita, wrap it in foil. Heat in the oven at 350°F (175°C) for 10 minutes. This keeps the pita soft and fresh. Yes, you can freeze gyros! Wrap the chicken tightly in plastic wrap. Then, place it in a freezer bag. Squeeze out the air before sealing. For best results, freeze for up to three months. When ready to eat, thaw overnight in the fridge. Reheat gently before serving. To make tzatziki sauce, you need just a few ingredients. Start with: - 1 cup Greek yogurt - 1/2 cucumber, grated - 2 cloves garlic, minced - 1 tablespoon lemon juice - Salt and pepper to taste 1. In a bowl, mix the yogurt, grated cucumber, garlic, and lemon juice. 2. Add salt and pepper to your liking. 3. Stir well until smooth. 4. Chill in the fridge for about 30 minutes. This helps the flavors blend. Now, you have a fresh and creamy tzatziki sauce for your gyros! Yes, you can use chicken breast. However, there are some key differences. Chicken thighs have more fat and flavor. They stay juicy when cooked. Chicken breast is leaner and may dry out if overcooked. If you choose breasts, watch the cooking time closely. Cook them for about 4-6 minutes on each side. You can serve chicken gyros with various sides. Here are some tasty options: - Greek salad with tomatoes and feta - Crispy fries or sweet potato fries - Roasted vegetables for a healthy touch - Pita chips with hummus for snacking - A refreshing drink like iced tea or lemonade These pair well with the gyros and make a complete meal. Enjoy your feast! In this article, we explored key ingredients for tasty chicken gyros, from thighs to toppings. I shared how to marinate and cook chicken perfectly, plus tips for assembling your dish. You learned about variations, sides, and even storage for leftovers. When you follow these simple steps, you'll enjoy delicious gyros every time. Experimenting with flavors and substitutes can make this dish your own. Enjoy your cooking journey and the tasty results!

Easy Chicken Gyros Flavorful and Quick Meal Idea

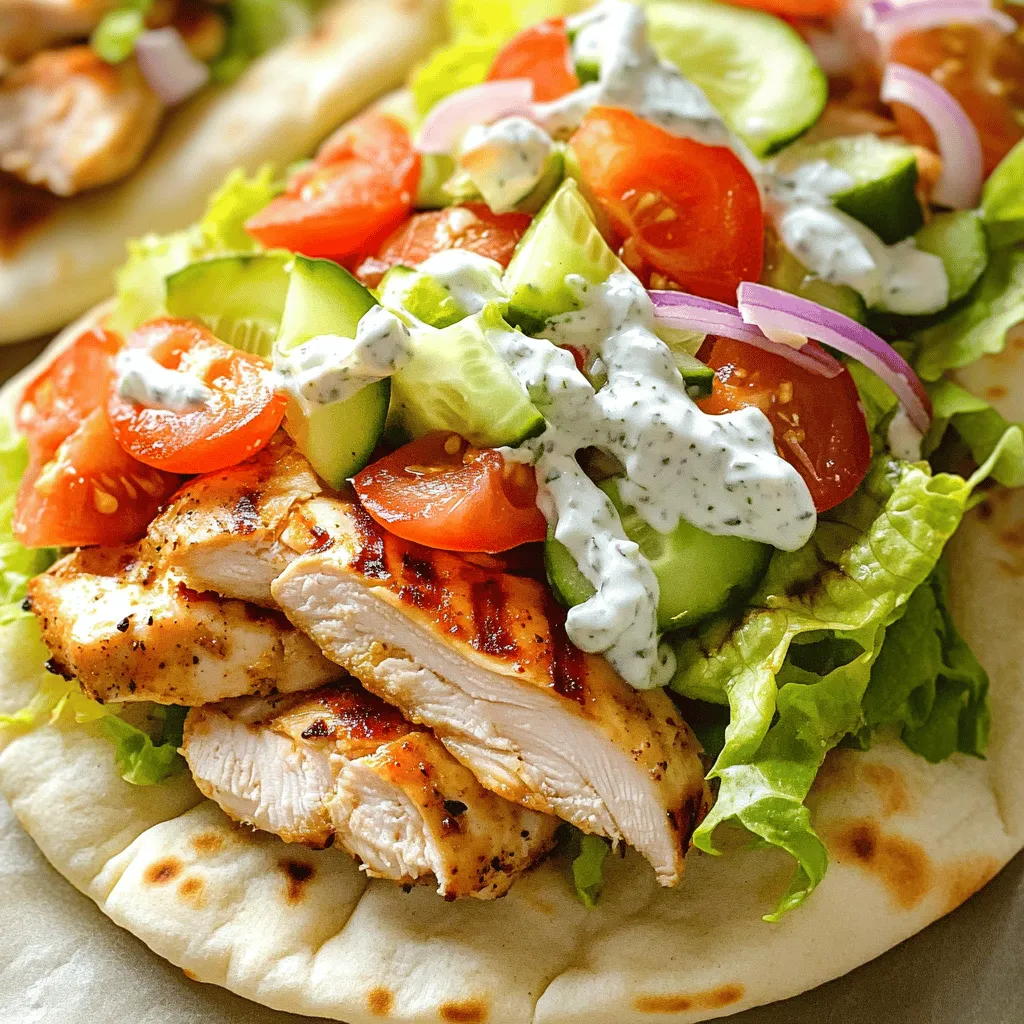
Looking for a quick and tasty meal? These Easy Chicken Gyros are your answer! With juicy marinated chicken, fresh toppings,

To make a tasty blueberry jam, you need these simple items: - 4 cups fresh blueberries, rinsed - 1 cup granulated sugar - 2 tablespoons lemon juice - 1 tablespoon lemon zest - 1/2 teaspoon ground cinnamon - 1/4 teaspoon salt - 1 package fruit pectin (1.75 oz, like Sure-Jell) These ingredients come together to create a bright and sweet jam. The blueberries give it that rich color and flavor. The sugar helps it thicken while adding sweetness. Lemon juice and zest give it a fresh taste. Cinnamon adds warmth, making it even better. You can add fun twists to your jam. Try these options: - 1/2 cup chopped strawberries or raspberries for a mixed berry jam. - 1 teaspoon vanilla extract for a sweet touch. - A pinch of nutmeg for a warm spice note. - Fresh herbs like basil or thyme for an herbal twist. These add-ins let you customize your jam. It’s great to experiment. You can find a flavor mix you love! Choosing the best blueberries makes a big difference. Here’s how to pick them: - Look for plump, firm berries with a deep blue color. - Avoid berries with wrinkles or soft spots. - Check for a dusty white coating, which is a natural protective layer. - Smell the berries; they should have a sweet aroma. Fresh blueberries will make your jam shine. Always rinse them well before use to remove any dirt or residue. Try these guidelines to ensure you make a delicious homemade blueberry jam. For the full recipe, check out the complete details on how to create this delightful spread! To make your blueberry jam, start with fresh blueberries. Rinse them well and place them in a large pot. Add sugar to the pot. Stir gently and let it sit for about 10 minutes. This helps the blueberries release their juices. After that, add lemon juice, lemon zest, ground cinnamon, and salt. Heat the mixture over medium heat. Stir constantly until it reaches a gentle boil. When it starts to boil, add the fruit pectin. Keep stirring and bring the mix to a rolling boil. Let it boil for one minute while stirring. Then, remove the pot from heat. Skim off any foam from the top with a spoon. For this recipe, you need: - 4 cups fresh blueberries, rinsed - 1 cup granulated sugar - 2 tablespoons lemon juice - 1 tablespoon lemon zest - 1/2 teaspoon ground cinnamon - 1/4 teaspoon salt - 1 package fruit pectin (1.75 oz, like Sure-Jell) Make sure your blueberries are fresh and firm. Choose berries that are dark blue and shiny. Avoid any that are soft or moldy. Pour the hot blueberry jam into sterilized jars. Leave about 1/4 inch of space at the top. Seal the jars with lids once filled. To ensure they are sealed, process the jars in a boiling water bath for 5-10 minutes. This step helps preserve the jam for long-term storage. After that, let the jars cool completely at room temperature. Store them in the fridge or pantry. Enjoy your homemade blueberry bliss jam! For the complete recipe, check the Full Recipe section. To make great blueberry jam, avoid adding too much sugar at once. This can make it too sweet and ruin the flavor. Mix sugar in small batches. Let the blueberries sit before cooking. This helps them release juices. If you skip this step, your jam may be too thick. The key to perfect jam is the right amount of pectin. Follow the package instructions closely. If your jam is runny, it means you might need more pectin. Don’t forget to boil it for one minute after adding the pectin. This step helps thicken the jam properly. You will need a few tools to make jam. Here’s a quick list: - A large pot for cooking - A stirring spoon - Measuring cups and spoons - Sterilized glass jars with lids - A canning pot or large pot with a lid for processing These tools will help you create your tasty blueberry jam. For the full recipe and more, check out the Full Recipe. {{image_2}} You can mix flavors to make your jam special. Try adding fresh herbs like mint or basil. A splash of vanilla can enhance the taste too. For a spicy kick, add a pinch of cayenne pepper. You can also mix in other fruits, like strawberries or raspberries, for a fun twist. Each mix can give your jam a unique flavor. If you want a healthier jam, you can use less sugar. Substitute half the sugar with honey or maple syrup. You can also use sugar substitutes like stevia or monk fruit. If you use these, check the package for the right amount. This way, you keep the sweetness without too much sugar. Frozen blueberries work great in this recipe. They are picked at peak freshness, so they taste good. Just thaw them and drain the extra liquid before starting. This can save time and still give you a tasty jam. Plus, it allows you to make blueberry jam any time of the year. For more tips, check the Full Recipe for details! Store your homemade blueberry jam in cool, dark areas. Keep jars in the pantry or a cupboard. After opening, move the jar to the fridge. Use clean spoons when you scoop out jam. This keeps it fresh and safe to eat. Always seal the lid tightly after use. Homemade blueberry jam can last up to one year in the pantry. If you keep it in the fridge, it stays good for about three weeks after opening. If you see signs of spoilage, it’s best to toss it. The jam can lose flavor over time but remains safe if stored well. Look for changes in color or texture. If the jam becomes moldy, that’s a clear sign to discard it. A strange smell or off taste means it has spoiled. Always check for bubbles in the jar. Bubbles can mean fermentation, which is not safe. Trust your senses; if it seems off, don’t use it. Yes, you can use other fruits! Fruits like strawberries, raspberries, or blackberries work great. Combine different fruits for fun flavors. For best results, use fruits with similar sugar and pectin levels. This helps the jam set well. Always adjust sugar based on the fruit's sweetness. To check if the jam is set, use the cold plate test. Place a small plate in the freezer for a few minutes. After boiling, spoon a little jam onto the cold plate. Let it sit for a moment, then push it with your finger. If it wrinkles and holds its shape, it’s ready. If not, boil it a bit more and retest. You can use homemade blueberry jam in many ways! Spread it on toast or pancakes for breakfast. Mix it into yogurt for a tasty snack. Use it in desserts like cakes, pies, or tarts. You can even swirl it into oatmeal for extra flavor. The possibilities are endless! For more ideas, check the Full Recipe. This guide covered everything you need to make great blueberry jam. You learned about fresh ingredients, cooking steps, and storage tips. I also shared how to avoid mistakes and tried different flavor combos. You can now store your jam and tell if it spoils. Whether using fresh or frozen blueberries, you're ready to create something delicious. Enjoy the process and share your jam with friends and family. Happy cooking!

Homemade Blueberry Jam Flavorful and Easy Recipe

Ready to transform fresh blueberries into a delicious homemade jam? This easy recipe is perfect for beginners and seasoned cooks

Older posts
Newer posts
← Previous Page1 … Page74 Page75 Page76 … Page85 Next →

dsad

© 2026 greenmealmap • Built with GeneratePress

Our Policies

  • Copyright Policy
  • Cookie Policy
  • GDPR Policy
  • Privacy Policy
  • Disclaimer
  • Terms Of Use

More Information

  • Home
  • About
  • Contact
  • Appetizers
  • Dessert
  • Dinner
  • Drinks
©2026, greenmealmap About Back To Top