Skip to content
DisclaimerTerms Of UseGDPR PolicyCookie Policy

greenmealmap

  • Home
  • Drinks
  • Appetizers
  • Dinner
  • Dessert
  • About
  • Contact
  • Privacy Policy
DisclaimerTerms Of UseGDPR PolicyCookie Policy

NO-ING-IMG

- Kale: Use curly or Lacinato kale. Curly kale has a nice crunch, while Lacinato kale is tender and sweet. Both are packed with nutrients and flavor. - Croutons: You can choose store-bought croutons for ease, or make your own. Homemade croutons offer a fresh taste and let you control the seasoning. Simply toast bread cubes with olive oil and herbs until golden. - Parmesan cheese: Grated Parmesan adds a rich flavor. If you need an alternative, try nutritional yeast for a vegan option or pecorino for a sharper taste. - Tahini: This sesame paste adds creaminess and healthy fats. If you don’t have tahini, try using almond butter or sunflower seed butter. Both provide a similar texture and flavor. - Garlic: Fresh garlic gives a strong taste. If you’re short on time, use garlic powder. Remember, a little goes a long way! - Sweeteners: Maple syrup balances the dressing's flavors. You can also use honey or agave syrup for a different touch. - Cherry tomatoes: These sweet bites add color and vitamins. They are rich in antioxidants and can boost the overall flavor of your salad. - Other salad toppings: Consider adding sliced avocado for creaminess or sunflower seeds for crunch. These extra touches enhance texture and taste, making your salad more satisfying. For the complete recipe, check the [Full Recipe]. To make the dressing, start with a large bowl. Combine tahini, lemon juice, minced garlic, Dijon mustard, maple syrup, salt, and pepper. Whisk these ingredients together until smooth. The key is to get a creamy texture. If your dressing is too thick, add a tablespoon of water. Keep mixing until you reach the right consistency. Next, you need to prep the kale. First, remove the tough stems. This step is crucial for a better taste. Tear the kale into bite-sized pieces. After that, massage the dressing into the kale. This takes about 2-3 minutes. Massaging helps soften the leaves and lets the flavors soak in. Now it’s time to assemble your salad. Start with the kale in a large bowl. Then, add the croutons. Toss them gently so they don’t break apart. Next, sprinkle the grated Parmesan cheese on top. Toss again to mix everything well. If you want to add a pop of color, toss in the halved cherry tomatoes. For the best look, serve the salad in a large bowl or on individual plates. Top with extra Parmesan and a sprinkle of pepper. This makes for a beautiful dish that is also tasty. Enjoy your vibrant Kale Caesar Salad as a side or a light meal. For the complete recipe, visit the [Full Recipe]. Choosing the right kale is key. I love using Lacinato kale for its rich flavor. It has a tender texture and dark green color. You can also use curly kale, which is more common. Both types are nutritious and delicious. To enhance flavor, massage the kale leaves with dressing. This softens the kale and helps it absorb the flavors. Use your hands to really work in the dressing. This step takes just a few minutes but makes a big difference. You can also add a little lemon zest for extra brightness. To keep your salad fresh, store the dressing and kale separately. Place the salad in an airtight container. This way, the kale won’t get soggy. You can store it in the fridge for up to two days. If you have croutons, keep them in a different container. They stay crunchy that way. When you’re ready to eat, combine everything again. Kale Caesar Salad pairs well with grilled meats. Try it with chicken or shrimp for a hearty meal. You can also serve it as a side dish with pasta or fish. This salad is great for casual dinners or festive gatherings. It looks vibrant and tastes amazing, making it perfect for any occasion. Try the Full Recipe for a quick and tasty meal! {{image_2}} You can make your Kale Caesar Salad more exciting by adding proteins. Grilled chicken adds a nice texture. Shrimp brings a fresh taste. If you want a plant-based option, chickpeas work well and boost protein too. For those looking to keep it vegan, think about cheese and crouton swaps. Nutritional yeast can give a cheesy flavor. You can also make croutons using whole-grain bread or a gluten-free option. In spring, you can add peas or asparagus for a bright touch. These veggies add color and crunch. They also bring a sweet note that pairs well with the dressing. When fall comes, think about roasted squash or apples. These ingredients add warmth and flavor. The natural sweetness of the squash or apples complements the salad nicely. While the tahini dressing is great, you can explore other options. Try a lemon vinaigrette for a zesty kick. A creamy avocado dressing can add richness. If you are short on time, there are many store-bought dressings you can use. Look for ones that are low in sugar and made with simple ingredients. This way, you keep the meal healthy without losing flavor. For the full recipe, check out the details above. Store your Kale Caesar Salad in an airtight container. Glass or plastic containers work well. This keeps the salad fresh and crisp. Aim to eat it within 2-3 days for the best taste. If you wait longer, the kale may get soggy and lose its crunch. Freezing Kale Caesar Salad is not the best idea. The kale can become mushy when thawed. If you must freeze, separate the dressing and croutons. Freeze the kale and any other veggies. When ready to eat, thaw in the fridge overnight. Add fresh dressing and croutons for a better taste. To refresh old salad, try adding new dressing. A splash of lemon juice can help too. Toss in fresh croutons for crunch. If the salad smells bad or looks slimy, it’s time to toss it out. Always trust your senses when deciding if food is still good. For the full recipe, check back to the beginning. Kale is a superfood packed with nutrients. It has vitamins A, C, and K. Kale also has calcium and iron. These nutrients support your bones and skin. Eating kale can boost your immune system too. It’s rich in fiber, which helps with digestion. This green leafy veggie also has antioxidants. Antioxidants protect your body from damage. Adding kale to salads gives you a tasty way to eat healthy. Yes, you can make this salad ahead. For best results, prepare the dressing first. Store it in the fridge for up to a week. Chop the kale and keep it separate. This way, it stays fresh. Combine the kale with the dressing just before serving. This keeps the salad crisp. You can also add croutons later for extra crunch. Meal prepping makes dinner easier! If you don’t have tahini, you can use peanut butter or sunflower seed butter. Both options add creaminess. Yogurt is a great choice too, especially for a lighter dressing. You can also blend avocado for a creamy texture while keeping it healthy. These substitutes suit different diets. They help everyone enjoy the rich flavor of the dressing. To keep kale fresh, wash it properly and dry it well. Use a salad spinner for best results. Store the kale in a container with a paper towel. The towel absorbs extra moisture. This keeps the leaves crisp. Massage the kale with dressing only when you’re ready to eat. This technique helps avoid wilting. Enjoy your Kale Caesar Salad fresh and vibrant! For the delicious full recipe, check out the complete instructions above! Kale Caesar Salad is simple to make and gives lots of flavor. We covered the main ingredients, like different types of kale, croutons, and tahini. I shared step-by-step tips for dressing, prepping, and assembling the salad. Lastly, creative twists and storage advice allow for great meals later. In the end, you can enjoy this salad often by tweaking it to your taste. Eat healthy and have fun with your new recipes!

Kale Caesar Salad Flavorful and Nutrient-Packed Meal

Looking for a new, healthy take on a classic dish? This Kale Caesar Salad is not only flavorful but also

- 2 cups grated zucchini (about 2 medium zucchinis) - 1 cup all-purpose flour - 1/2 cup whole wheat flour - 1/2 cup brown sugar - 1/4 cup granulated sugar - 1/2 cup unsweetened applesauce - 1/4 cup vegetable oil - 2 large eggs - 1 teaspoon vanilla extract - 1 teaspoon baking powder - 1/2 teaspoon baking soda - 1/2 teaspoon salt - 1 teaspoon ground cinnamon - 1/2 teaspoon nutmeg (optional) - 1/2 cup chopped walnuts or pecans (optional) - 1/2 cup raisins or chocolate chips (optional) When I make these muffins, I love how easy it is to use fresh zucchini. Grating the zucchini helps it blend well with the other ingredients. The mix of all-purpose and whole wheat flour gives a nice texture and flavor. Using applesauce instead of too much oil keeps the muffins moist and healthy. The sugars add sweetness, while the eggs and vanilla extract bind everything together. Baking powder and baking soda help the muffins rise. Cinnamon gives a warm flavor, and nutmeg adds a hint of spice. You can toss in walnuts, pecans, raisins, or chocolate chips for extra fun and flavor. For the full recipe, check out the details on how to put these tasty ingredients together. - Preheat your oven to 350°F (175°C). - Prepare the muffin tin with paper liners or grease it lightly. - In a large bowl, combine grated zucchini, applesauce, vegetable oil, eggs, and vanilla extract. - Mix well until everything is combined smoothly. - In another bowl, whisk together all-purpose flour, whole wheat flour, brown sugar, granulated sugar, baking powder, baking soda, salt, cinnamon, and nutmeg. - Make sure all dry ingredients are evenly blended. - Gradually add the dry mix to the wet zucchini mixture. - Fold gently until just combined. Avoid over-mixing for fluffy muffins. - If you want, fold in nuts, raisins, or chocolate chips at this stage. - Spoon the batter into the prepared muffin tin, filling each cup about two-thirds full. - Bake for 15 to 18 minutes. A toothpick should come out clean when inserted in the center. - Allow the muffins to cool in the pan for about 5 minutes. - Transfer them to a wire rack to cool completely. Enjoy these mini zucchini muffins as a healthy snack or delightful treat. For the full recipe, check out the details above. To make the best mini zucchini muffins, avoid over-mixing the batter. Mixing too much makes them dense. Gently stir until just combined. This keeps your muffins light and fluffy. Another key point is the moisture balance. Zucchini adds moisture, but too much can make them soggy. If your zucchini is very wet, squeeze out some water before mixing it in. When serving, display the muffins on a colorful platter. This adds a nice touch to your table. For garnish, consider a sprig of mint or a light dusting of powdered sugar. Both make the muffins look even more inviting and tasty. Zucchini is a great addition to your diet. It is low in calories but high in nutrients. Adding it to your muffins means you get fiber and vitamins. This makes your mini muffins healthier than regular ones. You don't just enjoy a tasty snack; you also boost your nutrition. {{image_2}} You can easily change the flavor of your mini zucchini muffins. For a creamier texture, substitute applesauce with yogurt. This makes the muffins moist and adds a tangy taste. You can also add warm spices like ginger or cardamom. These spices give a cozy feel to every bite. If you need gluten-free options, use almond or oat flour instead of regular flour. This keeps the muffins light and tasty. For those who follow a vegan diet, you can replace the eggs and dairy. Try using flaxseed meal or chia seeds mixed with water as egg substitutes. You can make these muffins special for each season. In the fall, add pumpkin puree for richness and flavor. During winter, toss in cranberries for a tart kick. Fresh herbs like basil or dill can create a unique flavor twist. These small changes can turn a simple muffin into a delightful treat. For the full recipe, click here. You can store mini zucchini muffins at room temperature or in the refrigerator. If you store them at room temperature, place them in an airtight container. They will stay fresh for about two days. If you want them to last longer, the fridge is a good choice. In the fridge, they can stay fresh for up to a week. Just make sure to seal them well to keep moisture out. Freezing muffins is a great way to save them for later. To freeze, let the muffins cool completely first. Then, wrap each muffin in plastic wrap or place them in a freezer bag. Remove as much air as possible before sealing. They can last up to three months in the freezer. When you want to enjoy them, take the muffins out and leave them in the fridge overnight. For a quick option, you can microwave them for 20-30 seconds. They taste just as good as fresh! In optimal storage conditions, mini zucchini muffins can last up to a week in the fridge or about three months in the freezer. Keep an eye on them. If you notice any mold or off smells, it’s best to toss them. Always check for freshness before enjoying your tasty treats! To keep your mini muffins moist, use fresh zucchini. Grate it and squeeze out excess water. Adding applesauce helps too. It adds moisture without extra fat. Avoid over-mixing the batter; just stir until combined. Yes, frozen zucchini works well! It’s easy and saves time. Thaw the zucchini and drain any excess water before adding it to the mix. Frozen zucchini still keeps its flavor and nutrients. For a healthier option, try using honey or maple syrup. These natural sweeteners add flavor and moisture. You can also use mashed bananas or date puree for sweetness and added nutrition. Yes, you can replace eggs with unsweetened applesauce or mashed banana. Each egg can be swapped for 1/4 cup of either. This keeps the muffins moist and helps them bind together. This recipe makes about 24 mini muffins. Each muffin is a perfect snack size. You can easily double the recipe for a larger crowd or to have extras for later. Zucchini muffins pair nicely with fresh fruit or yogurt. You can also serve them with nut butter for a filling snack. They work well with a cup of tea or coffee for a cozy treat. These mini zucchini muffins are easy to make and packed with flavor. We covered all the ingredients, tips, variations, and storage methods you need. Each step ensures muffins are fluffy and delicious. Plus, zucchini brings added health benefits. Remember, feel free to mix in your favorite flavors or adapt for dietary needs. Enjoy these muffins fresh or store them for later. They are a tasty snack anytime. Now, it's your turn to bake and enjoy these treats!

Mini Zucchini Muffins Tasty and Healthy Snack Idea

Looking for a snack that’s both tasty and healthy? These mini zucchini muffins are the answer! Packed with veggies, they’re

To make a tasty vegan coconut curry, gather these ingredients: - 1 can (400ml) coconut milk - 1 tablespoon coconut oil - 1 onion, diced - 3 cloves garlic, minced - 1-inch piece ginger, grated - 1 red bell pepper, sliced - 1 cup broccoli florets - 1 carrot, sliced - 1 cup snap peas - 2 tablespoons red curry paste - 1 tablespoon soy sauce (or tamari for gluten-free) - 1 tablespoon maple syrup - Juice of 1 lime - Fresh coriander, for garnish - Salt to taste Each ingredient in this curry adds flavor and health benefits: - Coconut milk: It’s creamy and rich in healthy fats. - Coconut oil: This oil boosts energy and can improve your skin. - Onion: It adds sweetness and supports heart health. - Garlic: This ingredient may help boost your immune system. - Ginger: It can ease nausea and reduce inflammation. - Red bell pepper: This adds vitamins A and C for better skin. - Broccoli: It’s full of fiber and supports digestion. - Carrot: This vegetable gives you beta-carotene for good vision. - Snap peas: They add sweetness and are high in vitamin K. - Red curry paste: This brings heat and depth to the dish. - Soy sauce: It adds umami flavor and enhances taste. - Maple syrup: This natural sweetener balances the spice. - Lime juice: It adds brightness and helps digestion. - Fresh coriander: This herb adds freshness and aroma. - Salt: It enhances the flavors of all the ingredients. You can easily swap ingredients to fit your taste or diet: - Coconut milk: Use almond milk or oat milk for a lighter option. - Coconut oil: Olive oil or avocado oil work well, too. - Red bell pepper: Try yellow or green peppers for a different taste. - Broccoli: Cauliflower or zucchini can also be used. - Snap peas: Use green beans or asparagus instead. - Red curry paste: If you want less spice, use mild curry paste. - Soy sauce: Coconut aminos can replace it for a soy-free option. - Maple syrup: Agave syrup or any sweetener can work here. Feel free to mix and match to create a curry just right for you! For more details, check out the Full Recipe. To make vegan coconut curry, start with a large pot. Heat one tablespoon of coconut oil over medium heat. Add one diced onion. Cook it for about 3-4 minutes until it turns soft and clear. Next, add three minced garlic cloves and one grated inch of ginger. Stir for one minute until you smell their great aroma. Now, it's time for the vegetables! Add one sliced red bell pepper, one cup of broccoli florets, one sliced carrot, and one cup of snap peas. Sauté these veggies for about 5-7 minutes. You want them soft but still crunchy. Then, add two tablespoons of red curry paste. Stir well to coat all the veggies. Cook for another 2 minutes. Pour in one can of coconut milk, one tablespoon of soy sauce, and one tablespoon of maple syrup. Mix everything to combine. Bring this mixture to a gentle simmer. - Heating oil and cooking onion: 3-4 minutes - Adding garlic and ginger: 1 minute - Cooking vegetables: 5-7 minutes - Adding curry paste: 2 minutes - Combining coconut milk and simmering: 10-15 minutes - Cut your veggies into similar sizes. This helps them cook evenly. - Stir often to prevent sticking and burning. - Taste as you cook! Adjust salt and lime juice to your liking. - Don't rush the simmering time. Let the flavors mix for a rich taste. For the full recipe, check out Vibrant Vegan Coconut Curry. Enjoy cooking! To boost the taste of your vegan coconut curry, use fresh herbs. Fresh coriander adds brightness. You can also add a splash of lime juice at the end. It brings a zesty kick. If you like heat, consider adding sliced fresh chili peppers. They will spice things up nicely. For perfect texture, cut your veggies evenly. This helps them cook at the same rate. Start with onions and garlic to build flavor. Sauté them until soft, then add your harder veggies first. This way, they get enough time to cook. When adding coconut milk, stir gently to keep it creamy. A common mistake is overcooking the vegetables. This makes them mushy. To avoid this, keep an eye on the cooking time. Also, don’t skip the lime juice. It’s key for balance. Lastly, taste your curry before serving. Adjust the salt and sweetness to your liking. These small changes make a big difference. For the full recipe, check out my vibrant vegan coconut curry guide. {{image_2}} Vegan coconut curry is naturally gluten-free. To keep it gluten-free, use tamari instead of soy sauce. Tamari tastes similar but lacks gluten. Always check labels on curry paste too. Some brands add gluten, so reading is key. Want to add protein? Tofu and tempeh are great choices. To use tofu, press it first and cut it into cubes. Sauté the tofu until golden before adding it to the curry. Tempeh adds a nutty taste. Slice it thin, then brown it in a pan before mixing it in. Both options make the dish heartier and more filling. Feel free to mix and match veggies in your curry. Zucchini, spinach, or mushrooms work well. Each choice adds its own taste and texture. For a twist, try sweet potatoes. They add sweetness and creaminess. Just remember to cut them smaller so they cook evenly. Have fun experimenting with your favorites! For the complete Vegan Coconut Curry recipe, check out the Full Recipe. Store any leftover vegan coconut curry in an airtight container. Let it cool down first. Place it in the fridge for up to four days. Remember to keep it sealed tight to maintain its flavor. If you want to enjoy it later, freezing is a great option. You can freeze vegan coconut curry for up to three months. Use a freezer-safe container or bag. Make sure to leave some space in the container for expansion. Label the container with the date. This way, you know when to use it by. To reheat, you can use the stove or microwave. If using the stove, heat on low. Stir often to prevent sticking. If you use a microwave, heat in short bursts, stirring in between. Add a splash of water or coconut milk if it seems too thick. This keeps the curry creamy and delicious. Enjoy your meal! Vegan coconut curry is a delicious dish made with coconut milk, spices, and fresh veggies. It has a creamy texture and rich flavor. The main base is coconut milk, which adds sweetness and depth. You can customize it with any veggies you like, making it a perfect meal for everyone. To add heat, you can use more red curry paste. Start with a small amount to taste. You can also add fresh chili peppers. Sliced jalapeños or Thai bird chilies work well. If you want more spice, try adding cayenne pepper or chili flakes. Adjust to your liking for the perfect kick. Yes, you can use other plant-based milks. Almond milk or soy milk are good options. However, they won’t give the same creamy texture as coconut milk. If you want a creamier texture, use cashew milk. Each milk will change the flavor, so choose one that you enjoy. For the full recipe, check out the details above. You learned the key ingredients for a tasty vegan coconut curry. Each ingredient adds health benefits and flavor. You now know the steps to cook it right and tips for great results. Variations let you customize the dish for your taste and needs. Storage tips help you keep leftovers fresh. In the end, this dish is easy and fun to make. Enjoy the flavors and share with others!

Vegan Coconut Curry Flavorful and Simple Recipe Guide

Are you ready to dive into the delicious world of vegan cooking? My *Vegan Coconut Curry* recipe is not just

- 8 ounces rice noodles - 2 tablespoons vegetable oil - 2 cloves garlic, minced - 1 cup firm tofu (or chicken) For Easy Pad Thai, start with the main ingredients. First, you need rice noodles. They give the dish its signature texture. You will also need some vegetable oil to cook everything. Garlic adds a strong flavor that makes the dish pop. Choose firm tofu or chicken as your protein. Both work well and taste great. - 3 tablespoons soy sauce - 2 tablespoons brown sugar - 1 tablespoon lime juice Next, let’s talk about flavor enhancers. Soy sauce adds a savory taste that is key in Pad Thai. The brown sugar brings a touch of sweetness that balances it out. Finally, lime juice gives it a fresh zing. These three ingredients make the dish come alive. - 1 cup bean sprouts - 3 green onions, chopped - ¼ cup crushed peanuts - Fresh cilantro leaves & slices of lime for garnish Now for the fresh additions. Bean sprouts add crunch and freshness. Green onions bring a mild onion flavor that brightens the dish. Crushed peanuts give a nice texture and nutty taste. To finish, use fresh cilantro leaves and lime slices for garnish. They make your dish look pretty and add more flavor. For the complete recipe, check out the Full Recipe. Start by soaking the rice noodles. Place them in a bowl. Pour hot water over them. Let them sit for about 10 minutes. They should become soft but still firm. After soaking, drain the noodles and set them aside. Next, heat the vegetable oil in a large skillet. Use medium-high heat for this step. Once the oil is hot, add the minced garlic. Sauté it for about 30 seconds until it smells great. This step adds a nice flavor to your dish. Now it's time to add your protein. Add the cubed tofu or chicken to the skillet. Fry it for about 3 to 4 minutes. Cook until it turns golden brown on all sides. This gives your Pad Thai a delicious taste. After cooking the protein, push it to one side of the skillet. Pour the beaten eggs on the other side. Scramble the eggs until they are fully cooked. Once done, mix the eggs with the tofu or chicken. This adds a nice texture to your dish. It's time for the star of the dish—the noodles! Add the soaked rice noodles to the skillet. Toss everything together gently. In another bowl, combine the soy sauce, brown sugar, and lime juice. Pour this sauce over the noodles. Stir well to coat all the noodles evenly. Finally, add the bean sprouts and half of the green onions to the skillet. Toss everything together again. Cook for an additional 2 to 3 minutes until heated through. Remove from the heat and serve right away. Top with crushed peanuts, the remaining green onions, fresh cilantro, and lime slices. Enjoy your Easy Pad Thai! For the full recipe, check out the detailed instructions. To get the best noodle texture, soak the rice noodles in hot water. Follow the package instructions until they are just tender, or al dente. This step is key to avoiding mushy noodles. After soaking, drain them well and set them aside. If you want a firmer bite, cook them for a shorter time. To amp up the taste, consider adding a pinch of red pepper flakes. You can also try a splash of fish sauce for depth. If you like it sweet, a bit more brown sugar works wonders. Don’t be afraid to adjust flavors to your liking. Experimenting is part of the fun! For a stunning presentation, serve your Pad Thai in a large, colorful bowl. Top it with a generous sprinkle of crushed peanuts and a few fresh cilantro leaves. Adding lime slices on the side not only looks great but adds a fresh zing. A beautiful plate makes the meal even more inviting! For the full recipe, check out the Easy Pad Thai section! {{image_2}} You can switch up the protein in your Easy Pad Thai. Shrimp is a great choice if you love seafood. Just sauté the shrimp until they turn pink. If you prefer a vegetarian option, use vegetables. Bell peppers, carrots, and snap peas work well. They add color and crunch. If you need a gluten-free dish, choose rice noodles made from 100% rice. Many brands offer these noodles. You can find gluten-free soy sauce too. Just check the label before buying. This way, everyone can enjoy Pad Thai without worry. Want it spicier? Adding chili is a simple fix. You can use fresh chili peppers or chili flakes. Start with a small amount, then taste. Adjust to your liking. A little heat makes the flavors pop and keeps things exciting! For the full recipe, check out the detailed cooking steps above. To store leftover Pad Thai, let it cool first. Place it in an airtight container. Keep it in the fridge for up to three days. This keeps it fresh and safe to eat. Make sure to label the container with the date. It helps you track how long it has been stored. For freezing portions, use freezer-safe bags or containers. Divide the Pad Thai into single servings. Remove as much air as possible before sealing. This helps prevent freezer burn. You can freeze it for up to two months. When you're ready to eat, just thaw it in the fridge overnight. To reheat your Pad Thai, use a skillet over medium heat. Add a splash of water or broth to keep it moist. Stir it often to heat evenly without drying out. You can also use the microwave. Place it in a bowl with a lid, adding a little water. Heat for one to two minutes, stirring halfway through. This keeps the texture nice and soft. For the best flavor, add fresh lime juice before serving. For the Full Recipe, check out the main article. Yes, you can! Shrimp, pork, or beef are great choices. If you prefer a plant-based option, try tempeh or seitan. Each protein brings its own flavor and texture. Feel free to mix and match based on your taste and what's on hand. Just adjust cooking times based on the protein you choose. To reduce sweetness, cut back on brown sugar. You can use only one tablespoon or skip it entirely. Another option is to add more lime juice. This will balance flavors and cut the sweetness. Adding extra soy sauce can also help with flavor without making it too sweet. If lime juice isn't available, use lemon juice instead. It offers a similar tangy taste. You can also try vinegar, like rice vinegar, for a different flavor. Adjust the amount to taste since vinegar can be stronger. Fresh herbs like cilantro can also brighten the dish. Pad Thai can be a balanced meal. It has protein from tofu or chicken and fiber from bean sprouts. You can make it healthier by adding more vegetables like bell peppers or carrots. Use less oil and sugar to lower calories. Overall, it can fit well into a healthy diet. Making Easy Pad Thai takes about 25 minutes. You need about 10 minutes for prep and 15 minutes for cooking. This quick process makes it perfect for busy nights. You can enjoy a delicious meal without spending hours in the kitchen. Try the Full Recipe for step-by-step guidance. This blog post provided a clear guide to making delicious Pad Thai at home. You learned about the main ingredients and how to enhance flavors with sauces and spices. I shared tips for perfecting the noodles and ideas for serving. Variations allow you to customize the dish to your taste. Lastly, I covered storage and reheating methods. With these steps, you can enjoy a tasty, homemade Pad Thai whenever you crave it. Now, it’s time to cook and enjoy this classic dish!

Easy Pad Thai Quick and Tasty Dinner Recipe

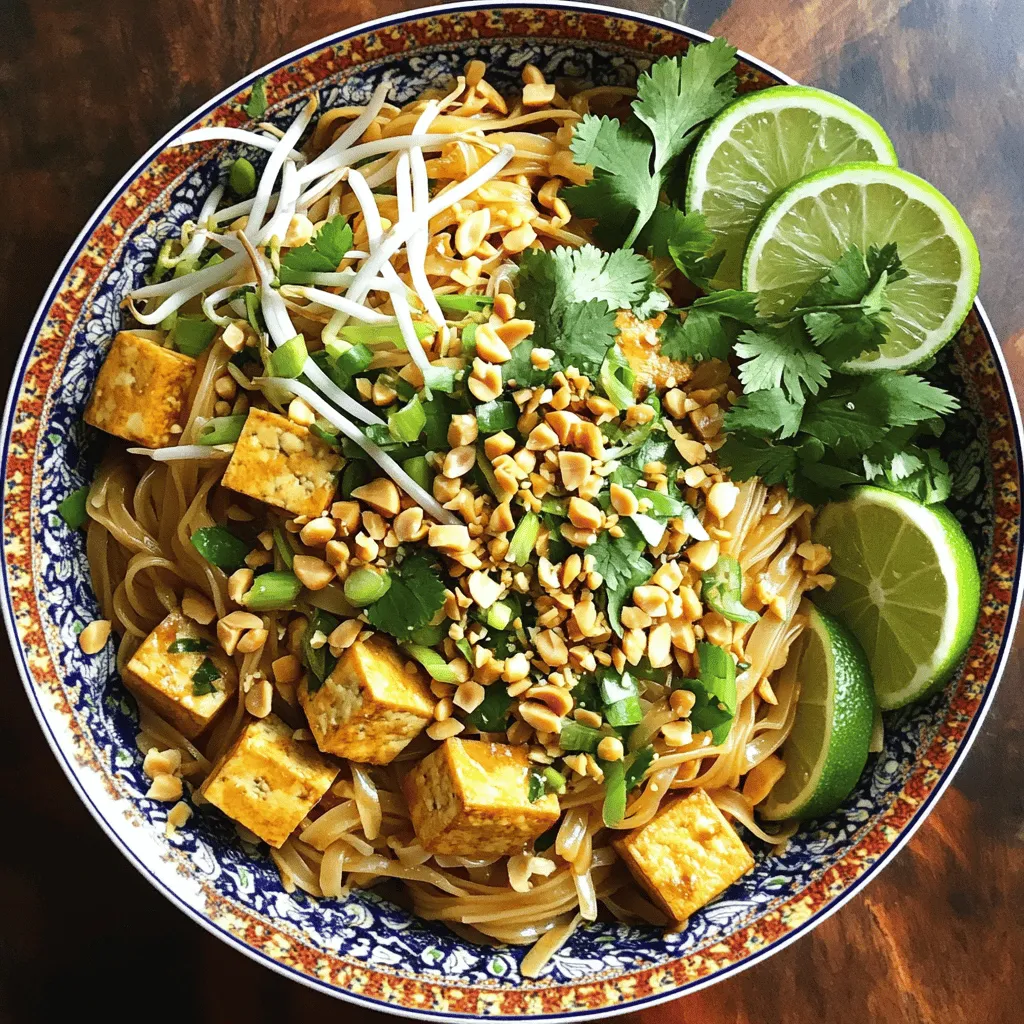
Looking for a quick and tasty dinner idea? This Easy Pad Thai recipe has you covered! With simple ingredients and

- 1 cup fresh raspberries, washed and dried - 1 cup all-purpose flour - 1/2 cup whole wheat flour - 1/2 cup granulated sugar - 1/4 cup brown sugar, packed - 2 teaspoons baking powder - 1/2 teaspoon baking soda - 1/2 teaspoon salt - 1/2 cup unsalted butter, melted and cooled - 2 large eggs - 1/2 cup milk (dairy or non-dairy) - Zest of 1 lemon - 2 tablespoons fresh lemon juice - 1 teaspoon vanilla extract - Optional: 1/4 cup powdered sugar for dusting These ingredients come together to create a muffin that bursts with flavor. The fresh raspberries give a sweet-tart taste, while the lemon adds a bright zing. The mix of all-purpose and whole wheat flour makes the muffins light yet hearty. - Preheat oven to 400°F (200°C) - Baking duration: 18-22 minutes Baking at this temperature helps the muffins rise beautifully. Keep an eye on them during the last few minutes. A toothpick inserted in the center should come out clean when they are done. - Servings: 12 muffins This recipe yields a dozen muffins, perfect for sharing or for a week of snacks. You can enjoy them fresh or store them for later. Each bite feels like a little piece of sunshine! For the complete details, check the [Full Recipe]. - Preheat your oven to 400°F (200°C). Line a muffin tin with paper liners. - In a large bowl, mix the all-purpose flour, whole wheat flour, granulated sugar, brown sugar, baking powder, baking soda, and salt. Whisk these dry ingredients well. - Melt the butter in a microwave or on the stove. Let it cool for a few minutes. - In another bowl, whisk together the eggs, milk, lemon zest, lemon juice, and vanilla extract. Combine these wet ingredients until smooth. - Pour the wet mixture into the bowl with dry ingredients. Stir gently until just mixed. - Carefully fold in the fresh raspberries, being gentle to keep them whole. - Spoon the batter into muffin cups, filling each about two-thirds full. - Bake in the preheated oven for 18 to 22 minutes. Check if done by inserting a toothpick. It should come out clean. - After baking, cool the muffins in the tin for five minutes, then transfer them to a wire rack to cool completely. - If you want, dust the cooled muffins with powdered sugar for a sweet touch. This process gives you delightful Raspberry Lemon Muffins. For the complete recipe, check the [Full Recipe]. - Always mix gently. Overmixing can make your muffins tough. - To check if muffins are done, insert a toothpick. It should come out clean. - Use all-purpose flour for light muffins. Whole wheat flour adds a nice texture. - Fresh lemons and raspberries make a big difference. They boost flavor and freshness. - Arrange muffins on a colorful platter for a pretty display. - Dust with powdered sugar for a sweet touch. Add lemon slices and raspberries around them for charm. For the full recipe, check out the instructions above. {{image_2}} You can switch up flavors in your Raspberry Lemon Muffins. Instead of raspberries, try blueberries. Blueberries give a sweet and juicy bite. They pair well with the lemon zest too. Another fun option is to add nuts or chocolate chips. Chopped walnuts add crunch. Chocolate chips bring a sweet twist, making them extra special. Do you need gluten-free muffins? You can swap all-purpose flour for almond or oat flour. These flours work well and keep the muffins light. If you're vegan, replace the eggs with flax eggs. Just mix ground flaxseed with water. For milk, use almond or oat milk. These swaps keep the muffins tasty and suitable for everyone. Adapting this recipe for seasonal fruits is easy. In summer, try peaches or cherries. In fall, add apples or pumpkin puree. These fruits give unique flavors to the muffins. For a festive touch, add cinnamon or nutmeg for the holidays. You can also decorate your muffins with festive sprinkles or colorful glaze. This makes them perfect for any gathering. For the full recipe, check out the [Full Recipe]. To keep your muffins fresh, store them in an airtight container. Set them at room temp for two days. If you want them to last longer, you can refrigerate them. Wrap each muffin in plastic wrap. Place them in a container to prevent drying. To freeze muffins, let them cool completely first. Then, wrap each muffin tightly in plastic wrap. Place the wrapped muffins in a freezer bag or container. They can stay fresh for up to three months in the freezer. When you want to eat one, take it out and let it thaw at room temperature. You can also warm it in the microwave for a quick treat. For the full recipe, check out the Raspberry Lemon Bliss Muffins. How do I prevent my muffins from sinking? To prevent sinking, do not overmix your batter. Mix just until combined. Also, make sure your baking powder is fresh. Old baking powder can cause muffins to collapse. What can I substitute for butter in the recipe? You can use coconut oil or applesauce as a butter substitute. Both add moisture and flavor. Use the same amount as the recipe calls for. Can I make the batter ahead of time? Yes, you can prepare the batter ahead. Cover it and store it in the fridge for up to 2 hours. Just stir gently before baking to combine. Can I double the recipe easily? Yes, you can double the recipe without any issues. Just keep the same mixing method and bake time. Use two muffin tins if you have them. How can I infuse more lemon flavor? Add extra lemon zest and a bit more lemon juice. You can also use lemon extract for an even stronger flavor. Just a teaspoon will do the trick. What’s the best way to reheat muffins? To reheat muffins, place them in the microwave for about 10-15 seconds. You can also warm them in an oven at 350°F for 5-7 minutes. This keeps them soft and tasty. Caloric content per muffin Each muffin has about 180 calories. This makes them a great snack or breakfast choice. Breakdown of macronutrients - Carbohydrates: 28g - Protein: 3g - Fat: 7g Potential allergens in the recipe This recipe contains wheat, eggs, and dairy. Be careful if you have allergies to these ingredients. You can use alternatives to make it safe. For the complete recipe, check out the Full Recipe section. This blog post covered a simple muffin recipe using fresh raspberries and vibrant lemon flavor. You learned about the key ingredients, precise baking times, and steps for preparation. I shared useful tips for perfecting your muffins, from mixing to storing. You can also explore flavor and dietary variations to make this recipe your own. Remember, the joy of baking comes from experimenting. Enjoy making these delightful muffins, and share them with family and friends for a sweet treat!

Raspberry Lemon Muffins Tasty and Simple Treat

Are you ready to bake a treat that bursts with flavor? These Raspberry Lemon Muffins are not just simple to

Let's get straight to the good stuff! Here’s what you need for One-Pot Creamy Mushroom Pasta. Gather these simple ingredients to create a meal everyone will love. - 12 oz (340g) fettuccine or spaghetti - 2 tablespoons olive oil - 1 medium onion, finely chopped - 3 cloves garlic, minced - 8 oz (225g) mushrooms, sliced (such as cremini or button) - 4 cups vegetable broth - 1 cup heavy cream (or coconut milk for a dairy-free option) - 1 teaspoon dried thyme - 1 teaspoon dried oregano - Salt and pepper to taste - ¼ cup grated Parmesan cheese (optional, for serving) - Fresh parsley, chopped (for garnish) With these ingredients, you’re well on your way to a creamy, comforting dish. The mushrooms bring a wonderful earthiness, while the cream adds richness. If you want a dairy-free version, just swap the heavy cream for coconut milk. This recipe offers flexibility, so you can adjust it to fit your tastes! For the full recipe, check out the complete guide. - Heat 2 tablespoons of olive oil in a large pot over medium heat. - Add 1 medium onion, finely chopped, and sauté for about 3-4 minutes until it is soft. - Stir in 3 cloves of minced garlic and 8 oz of sliced mushrooms. Cook for 5-6 minutes until the mushrooms brown. - Pour in 4 cups of vegetable broth. - Add 12 oz of fettuccine or spaghetti, making sure it is submerged in the broth. - Stir in 1 cup of heavy cream or coconut milk, 1 teaspoon of dried thyme, and 1 teaspoon of dried oregano. Season with salt and pepper to taste. - Bring the mix to a boil, then lower the heat to a simmer. Cover and cook for about 10-12 minutes, stirring occasionally. - If the sauce is too thick, add a bit more broth or water for your desired thickness. - Once cooked, remove from heat and stir in ¼ cup of grated Parmesan cheese if you like. - Serve the pasta, garnished with chopped fresh parsley for a bright touch. For the full recipe, refer to the section above. To make a great creamy sauce, start by sautéing the mushrooms well. This step brings out their rich flavor. Cook them until they are golden brown. This can take about 5 to 6 minutes. For the sauce's thickness, adjust the cream as needed. If you want it thicker, use less broth. If it's too thick, add more broth or water until it feels just right. Timing is key for cooking pasta. You want it to be al dente, which means firm but not hard. Check the pasta during cooking. Taste a piece a minute or two before the time ends. This way, you can catch it at the perfect texture. Stir the pasta often to prevent sticking. This keeps it soft and helps it soak up the sauce. To boost flavor, think about adding herbs and spices. Fresh basil or parsley makes a great addition. You can also try adding a pinch of red pepper flakes for heat. If you want more protein, consider adding chicken or shrimp. For a veggie twist, mix in spinach or bell peppers. This makes your dish more colorful and tasty. For the full recipe, check out the One-Pot Creamy Mushroom Pasta recipe. {{image_2}} You can easily adapt this dish to fit your dietary needs. For those who avoid dairy, using coconut milk is a great choice. It gives the sauce a creamy texture without any dairy. You can swap out heavy cream with one cup of coconut milk. This keeps the dish rich and satisfying. If you're gluten-free, you can use gluten-free pasta. Many brands offer options that work well in this recipe. Just cook it according to the package instructions. The rest of the steps will stay the same. Want to mix things up? You can add different vegetables for extra flavor and color. For example, spinach or bell peppers can enhance the dish. Just toss them in with the mushrooms. They will cook down and add nutrients. You can also introduce proteins to make the dish heartier. Chicken, shrimp, or tofu are great options. Cook the protein separately, then add it in before serving. This adds more depth to your meal. This creamy pasta pairs well with a fresh salad or crusty bread. A light side salad can balance the richness of the pasta. Try a simple mix of greens, tomatoes, and a lemon vinaigrette. If you want to plan meals, think about serving this dish for lunch or dinner. It works well as a main course. You can also save leftovers for a quick meal the next day. Check out the Full Recipe for more ideas on how to enjoy this dish! To keep your One-Pot Creamy Mushroom Pasta fresh, store it in an airtight container. Place it in the fridge. It will last for about 3 to 4 days. Make sure it cools down before sealing. This keeps the texture nice for later. When it’s time to eat again, you want to keep that creamy sauce! For reheating, use a stovetop or microwave. If you use the stovetop, add a splash of broth or cream. Heat it gently over low heat, stirring often. If using the microwave, heat in short bursts. Stir in between to warm it evenly. Yes, you can freeze this dish! Just store it in a freezer-safe container. It can last for up to 2 months. When you’re ready to eat, thaw it overnight in the fridge. Reheat it on the stovetop, adding a bit of broth to bring back the creaminess. This way, you get a tasty meal with ease! You can use many pasta shapes in this dish. My top picks are: - Fettuccine - Spaghetti - Penne - Linguine Fettuccine and spaghetti work best for creamy sauces. They hold the sauce well and add a nice bite. Penne is also great because its hollow shape traps sauce inside. Feel free to use what you have on hand. Just adjust the cooking time as needed. Yes, you can prep this dish ahead of time. Here are some tips: - Cook the pasta and sauce separately. - Store them in airtight containers. - Combine them just before serving. This way, you keep the pasta from getting mushy. You can also prepare the sauce a day before. Just reheat it on low heat. Add a splash of broth if it thickens too much. Making this dish vegan is easy. Here are some swaps: - Use coconut milk instead of heavy cream. - Replace Parmesan cheese with nutritional yeast. - Use vegetable broth to keep it plant-based. These changes keep the creamy texture and rich flavor. You won’t miss the dairy! Enjoy your vegan version just as much as the original. This blog post covered a rich, creamy mushroom pasta recipe. You learned about the fresh ingredients, step-by-step instructions, and useful tips. We also explored variations for different diets and tasty serving ideas. Making this dish is easy and fun. You can impress your family or friends with your cooking skills. Remember to explore flavors and customize it. Enjoy making and sharing this creamy delight! Your kitchen adventure awaits!

One-Pot Creamy Mushroom Pasta Simple and Delicious Recipe

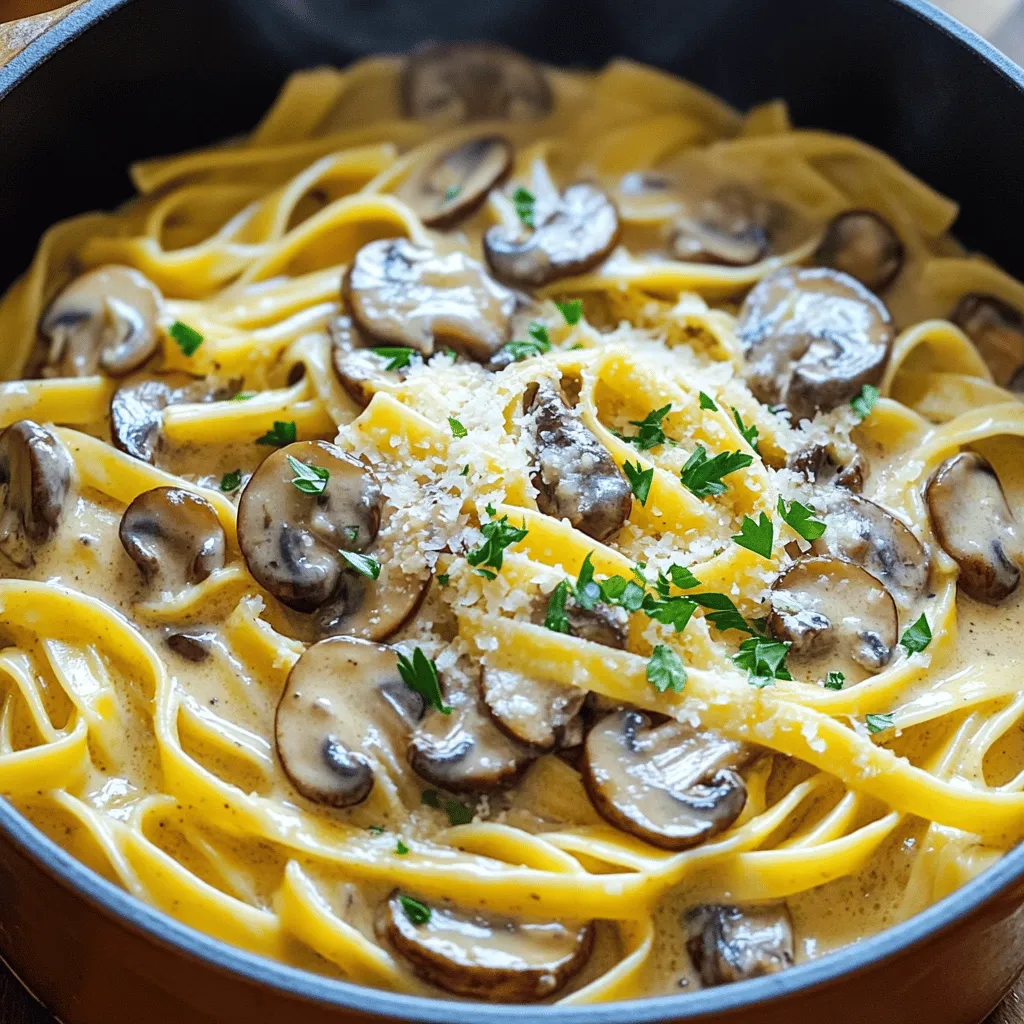
Are you ready to whip up a dish that’s both simple and full of flavor? My One-Pot Creamy Mushroom Pasta

- 2 large sweet potatoes - 2 tablespoons olive oil - 1 teaspoon sea salt - 1 teaspoon smoked paprika - ½ teaspoon garlic powder - ¼ teaspoon cayenne pepper (optional) - Fresh herbs (optional) Sweet potatoes are the star of this dish. They bring natural sweetness and a bright color. I love using two large sweet potatoes for the best results. Olive oil gives the chips a nice crisp. It also helps the seasonings stick. Sea salt adds flavor, while smoked paprika gives a warm, smoky taste. Garlic powder provides a nice bite. If you like heat, cayenne pepper adds a kick. Fresh herbs like rosemary or thyme can enhance the flavor further. Sweet potatoes are packed with vitamins and minerals. They are rich in vitamin A, which helps your eyes and skin. They also contain vitamin C, which boosts your immune system. Compared to regular potato chips, baked sweet potato chips are a healthier option. They have fewer calories and more fiber. Fiber helps you feel full and aids digestion. A serving of baked sweet potato chips has about 150 calories and 3 grams of fiber. This makes them a great snack choice. For a full recipe, check out the [Full Recipe]. Preheat your oven to 400°F (200°C). This step is key for crispy chips. Line a baking sheet with parchment paper. This helps prevent sticking and makes cleanup easy. Next, wash your sweet potatoes under cold water. Use a scrub brush to remove dirt. Then, peel them with a vegetable peeler. Peeling adds a cleaner taste and allows for a better texture. You can use a sharp knife or a mandoline slicer for this step. A mandoline gives you even slices quickly. If using a knife, aim for 1/8 inch thick slices. This thickness ensures they cook evenly. To achieve even slices, take your time and don’t rush. Uneven slices will cook at different rates. This can lead to some chips being burnt while others are soft. In a large bowl, mix the sweet potato slices with the olive oil. Add sea salt, smoked paprika, garlic powder, and cayenne pepper if you like spice. Toss until every piece is coated well. Next, arrange the slices in a single layer on the baking sheet. Avoid overlapping them. This helps them to crisp up nicely. Bake in the preheated oven for 20-25 minutes. Halfway through, flip the chips for even cooking. Keep an eye on them to prevent burning. Cooking times can vary, so check for a golden brown color. Once done, remove them from the oven. Let them cool for a few minutes. They will get even crunchier as they cool. For an extra touch, sprinkle fresh herbs over the chips before serving. For the full recipe, check out the complete instructions above. To get crispy sweet potato chips, slice them evenly. Thin slices cook better. Aim for about 1/8 inch thick. A mandoline slicer works well for this. Avoid thick slices. They will not bake evenly. To keep chips crispy, do not overcrowd the baking sheet. Spread them out in a single layer. Overlapping leads to steam and soggy chips. If you have many slices, bake in batches. You can add more flavor to your chips with various seasonings. Try different spices like chili powder or onion powder. Experiment with a pinch of cumin or a sprinkle of nutritional yeast. Fresh herbs, like rosemary or thyme, make great garnishes. Add them just before serving for a burst of flavor. They bring a lovely aroma and look nice too. One big mistake is overcrowding the baking sheet. Chips need space to cook properly. If they touch, they will steam rather than crisp. Another mistake is skipping the cooling process. After baking, let them cool for a few minutes. They will become even crunchier as they cool. Enjoy your crispy chips while they last! {{image_2}} You can add fun flavors to your baked sweet potato chips. For a spicy kick, try adding more cayenne pepper. This will make your chips hot and tasty. You can also mix in different herbs and spices for savory options. Think about using rosemary, thyme, or even a dash of cumin. Each adds a unique twist to your chips. If you prefer sweet flavors, you can easily change your chips. A sprinkle of cinnamon or brown sugar gives them a delightful twist. This sweet touch makes them perfect for dessert. You might also want to make a sweet dipping sauce. A simple mix of yogurt and honey can be a great match for your chips. You don't have to bake your sweet potato chips to enjoy them. An air fryer works well too. It can make your chips crispy in a shorter time. Just set it to 375°F (190°C) and cook for about 15 minutes. You can also use a dehydrator. This method keeps the flavor while making them super crunchy. Set your dehydrator to 135°F (57°C) and let them dry for several hours. Both methods create tasty, crispy snacks you will love. Check out the full recipe to get all the details on making baked sweet potato chips! To keep your baked sweet potato chips fresh, store them in airtight containers. This helps to keep air out and maintain crispiness. Make sure the chips are completely cool before sealing them. If you want extra crunch, consider adding a piece of parchment paper in the container. This helps absorb moisture. If you have leftover chips, you can reheat them in the oven or air fryer. Preheat the oven to 350°F (175°C). Spread the chips in a single layer on a baking sheet and heat for about 5-10 minutes. For the air fryer, set it to 350°F (175°C) as well. Heat for 3-5 minutes, checking often. Avoid using the microwave, as it makes the chips soggy. Baked sweet potato chips last about 1 week when stored properly. Keep an eye on them for signs of spoilage. If they smell off or feel soft, it’s best to toss them. For the best taste and crunch, eat them within a few days. For a full recipe, check the previous section. You can make sweet potato chips without oil by baking or dehydrating them. Slice the sweet potatoes thinly, about 1/8 inch thick. Lay them on a baking sheet lined with parchment paper. Bake them at 400°F (200°C) until they are crisp. For dehydrating, use a dehydrator set to 135°F (57°C) until they are dry and crunchy. This method keeps the chips light and healthy. Yes, you can use other potatoes. Regular potatoes work fine, but they may not have the same sweetness. Yams can also be a great substitute, giving a similar texture. Try using vegetables like zucchini or carrots for a fun twist. Just slice them thin and follow the same baking method. Several factors can lead to soggy chips. If the slices are too thick, they won't crisp well. Make sure to slice them thin. Overcrowding the baking sheet can also cause steam, making them soggy. Arrange them in a single layer with space between each slice. Lastly, check your oven’s temperature. It should be hot enough to bake the chips quickly. You can make sweet potato chips ahead of time. After baking, let them cool completely before storing. Place them in an airtight container to keep them fresh. For best results, eat them within a few days. If you want to meal prep, bake them in batches. This way, you have a healthy snack ready when you need it. Baked sweet potato chips pair well with many dipping sauces. Try a simple yogurt dip made with Greek yogurt, lemon juice, and herbs. You can also make a spicy salsa or a creamy avocado dip. For a sweet option, mix honey and peanut butter for a tasty treat. These sauces enhance the flavor and make your snack even more enjoyable. Baked sweet potato chips are easy and tasty. We covered the main ingredients, preparation, and baking steps. You learned how to achieve crispy chips and explored flavor variations. These chips are not only flavorful but also healthier than regular ones. Use the storage tips to keep them fresh. Whether you enjoy them spicy or sweet, you’re set for a delicious snack. Experiment with different flavors and make them your own! Enjoy your crispy treats with confidence and creativity.

Baked Sweet Potato Chips Crunchy and Flavorful Snack

Looking for a tasty snack that’s both crunchy and good for you? Baked sweet potato chips are your answer! With

To make Easy Chicken Parmesan, gather these items: - 4 boneless, skinless chicken breasts - 1 cup breadcrumbs (preferably Italian seasoned) - 1 cup marinara sauce - 1 ½ cups shredded mozzarella cheese - ½ cup grated Parmesan cheese - 2 large eggs - 1 teaspoon dried oregano - 1 teaspoon garlic powder - Salt and pepper to taste - Fresh basil leaves for garnish (optional) - Olive oil for frying If you need to swap some ingredients, here are my tips: - For breadcrumbs, use crushed crackers or panko for a crunchier texture. - If you do not have marinara sauce, try using tomato sauce with herbs. - For a dairy-free option, use vegan cheese instead of mozzarella and Parmesan. - You can use egg replacers if you want a vegan meal. To make the best Easy Chicken Parmesan, focus on quality: - Choose chicken breasts that are fresh and plump. - Look for breadcrumbs that are not stale and have good flavor. - Select mozzarella cheese that melts well, like whole milk mozzarella. - Fresh herbs give great taste, so use fresh basil if possible. - Use extra virgin olive oil for frying, as it adds flavor and richness. These tips will help you create a dish that stands out. You can find the Full Recipe here to guide you through the cooking process. To make easy chicken parmesan, start by preheating your oven to 375°F (190°C). Next, take two shallow dishes. In one dish, whisk two large eggs until smooth. In the second dish, mix breadcrumbs, dried oregano, garlic powder, salt, and pepper. Make sure everything is well blended. Take a chicken breast and dip it into the eggs. Allow any excess egg to drip off. Then coat the chicken in the breadcrumb mix. Press down lightly so the crumbs stick well. Repeat this for all chicken breasts. Heat olive oil in a large skillet over medium heat. When the oil is hot, add the breaded chicken. Cook each side for about 4-5 minutes, until golden brown. Once browned, place the chicken in a baking dish. Spoon marinara sauce over each piece. Sprinkle mozzarella and Parmesan cheese on top. Bake in the oven for 20-25 minutes. The chicken should be fully cooked, and the cheese should be bubbly. After baking, let the dish cool for a few minutes. You can garnish with fresh basil if you like. - When whisking the eggs, make sure they are well beaten. This helps the breadcrumbs stick better. - For the breadcrumb mix, using Italian seasoned crumbs adds great flavor. - Make sure the oil is hot enough before adding the chicken. This ensures a crispy texture. - When baking, check the chicken with a meat thermometer. It should reach 165°F (74°C). - Preheat oven: 375°F (190°C). - Browning chicken: 4-5 minutes per side. - Bake chicken: 20-25 minutes. - Final cooking temperature: 165°F (74°C). Follow these steps, and you will have a tasty chicken parmesan ready to enjoy! For the full recipe, check out the details above. To get the perfect cheese melt, use fresh mozzarella. Shred it yourself for the best texture. Spread the cheese evenly on the chicken. Bake it until it bubbles and turns golden. This creates a beautiful and tasty finish. Avoid these errors to ensure success: - Not seasoning the breadcrumbs: Seasoned breadcrumbs add flavor. Don't skip this step. - Overcrowding the pan: Cook the chicken in batches. This helps it brown nicely. - Skipping the resting time: Let the chicken rest after baking. This keeps it juicy. Serve your chicken with a side of pasta or a fresh salad. Garlic bread pairs well, too. For drinks, try a light white wine or sparkling water. Fresh basil leaves on top brighten the dish and add flavor. For more details, check out the full recipe. {{image_2}} You can enjoy Chicken Parmesan in different ways. Baked Chicken Parmesan is lighter. It uses less oil and is still tasty. You bake the chicken after coating it. This method gives it a nice crunch. Fried Chicken Parmesan is richer and crispier. You pan-fry the chicken first. This creates a golden crust. Both styles are delicious, so choose your favorite! If you have dietary needs, you can still make Chicken Parmesan. For a gluten-free version, swap regular breadcrumbs for gluten-free ones. You can use crushed rice cereal or almond flour. If you want a lower-carb option, try using zucchini slices instead of chicken. This twist is great for a fresh taste! Add your own flair to Chicken Parmesan! You can use different cheeses. Try provolone or gouda for a unique flavor. You can also add veggies like spinach or artichokes to the sauce. Mixing in fresh herbs can brighten the dish too. Experiment with spices like crushed red pepper for some heat. The key is to have fun and make it yours! To keep your chicken Parmesan fresh, place it in an airtight container. Make sure it cools down first. Layer parchment paper between pieces to avoid sticking. Store it in the fridge for up to three days. To reheat, use an oven for the best taste. Preheat the oven to 350°F (175°C). Place the chicken in a baking dish. Cover it with foil to keep it moist. Heat for about 15-20 minutes or until warmed through. You can also use a microwave, but the oven gives better results. If you want to save some for later, freezing works well. Let the chicken cool completely before freezing. Wrap each piece in plastic wrap, then place it in a freezer bag. Label the bag with the date. It can last up to three months in the freezer. To enjoy, thaw it in the fridge overnight before reheating. You can tell when Chicken Parmesan is done by checking the chicken's internal temperature. It should reach 165°F (75°C). You can use a meat thermometer for this. If you don’t have one, cut into the thickest part of the chicken. The meat should be white and juices should run clear, not pink. This ensures it is safe to eat and tender. Yes, you can prepare Easy Chicken Parmesan ahead of time. You can bread the chicken and keep it in the fridge for a few hours or overnight. Just bake it when you're ready. If you want, you can also cook it fully and store it in the fridge. Reheat it in the oven for the best taste and texture. Pair Chicken Parmesan with simple sides. Here are some good choices: - Spaghetti or any pasta - Garlic bread - Steamed vegetables like broccoli - A fresh salad with vinaigrette These sides balance the rich flavors of Chicken Parmesan and make a complete meal. You can find the full recipe for Easy Chicken Parmesan in the link provided. It has all the details you need to make this dish easily. If you’re new to cooking, check out beginner-friendly resources. Look for video tutorials and step-by-step guides online to help you along. Easy Chicken Parmesan is a simple dish with tasty layers of flavor. We explored the key ingredients, cooking steps, and helpful tips. Remember to choose fresh items for the best taste. Follow my step-by-step guide for perfect results. With variations and ways to store leftovers, you can enjoy this meal any time. Avoid common mistakes for a dish that shines. Keep these ideas in mind, and you’ll make a Chicken Parmesan your family loves. Enjoy your cooking journey!

Easy Chicken Parmesan Simple and Tasty Meal Guide

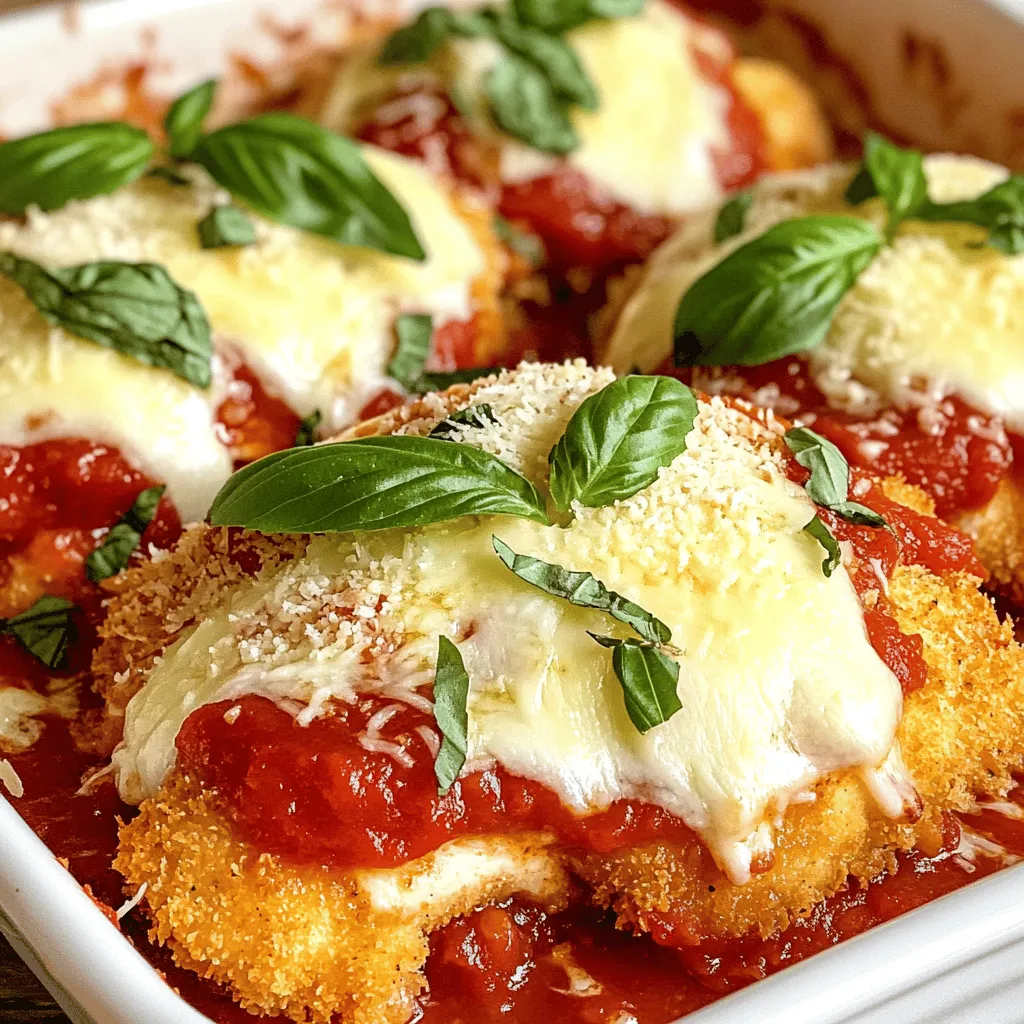
If you’re searching for a delicious meal that’s both simple and satisfying, you’ve found it! In this guide, I’ll share

To make the best homemade soft pretzel bites, gather these ingredients: - 1 ½ cups warm water (110°F-115°F) - 2 teaspoons sugar - 2 ¼ teaspoons active dry yeast (1 packet) - 4 cups all-purpose flour - 1 teaspoon salt - ½ teaspoon baking soda - 1 large egg, beaten (for egg wash) - Coarse sea salt (for topping) - Optional: melted butter, garlic powder, Parmesan cheese The warm water helps activate the yeast. Sugar feeds the yeast, giving it energy. The yeast helps the dough rise, making the pretzels fluffy. Flour gives structure, while salt adds flavor. Baking soda helps create that soft pretzel taste. The beaten egg wash gives a nice golden color. Finally, coarse sea salt adds that classic pretzel crunch. You can also enhance your bites with melted butter, garlic powder, or Parmesan cheese. Use these options to add your own twist and make your pretzel bites even more delicious. Enjoy gathering your ingredients; each one plays a key role in creating soft, tasty bites! {{ingredient_image_1}} Start by mixing warm water, sugar, and yeast in a small bowl. Use water that feels warm to your touch, around 110°F to 115°F. Let the mixture sit for 5 to 10 minutes. You want it to get frothy. This foam shows the yeast is active and ready to work. In a large bowl, mix the flour and salt. Create a well in the center. Pour in the yeast mixture. Stir with a wooden spoon until it comes together. Then, place the dough on a floured surface. Knead it for 5 to 7 minutes. The dough should feel smooth and elastic. After that, place it in a greased bowl. Cover it with a damp cloth and let it rise in a warm spot for about 1 hour. The dough will double in size. Preheat your oven to 425°F (220°C). Line a baking sheet with parchment paper. In a large pot, bring about 8 cups of water to a boil. Once boiling, stir in the baking soda carefully. It will bubble up a lot, so be careful! After that, punch down the risen dough. Turn it onto a floured surface. Cut it into 8 equal pieces. Roll each piece into a rope, about 1 inch thick. Cut these ropes into 1-inch pieces to create your pretzel bites. Now, drop the pretzel bites into the boiling water in batches. Boil each batch for 30 seconds. Use a slotted spoon to remove them and place them on the prepared baking sheet. Brush the tops with beaten egg and sprinkle with coarse sea salt. Finally, bake the pretzel bites for 12 to 15 minutes, until golden brown. Remove them from the oven and let them cool slightly. If you like, brush them with melted butter and sprinkle with garlic powder or Parmesan cheese. Enjoy your soft pretzel bites! When making soft pretzel bites, watch out for a few common mistakes. - Using cold water: Always use warm water (110°F-115°F). This helps the yeast activate. - Skipping the kneading: Knead the dough well. This creates a smooth and elastic texture. - Not boiling long enough: Boil each batch for 30 seconds. This step gives the pretzels their chewy crust. To get the perfect texture for your pretzel bites, you need to focus on a few key steps. - Knead properly: Knead the dough for about 5-7 minutes. It should feel smooth and elastic. - Let it rise: Allow the dough to rise until it doubles in size. This makes the bites fluffy. - Boil in baking soda water: The baking soda helps create a nice crust. Don’t skip this step! Adding flavors to your pretzel bites makes them even better. Here are some ideas: - Coarse sea salt: This classic topping adds a nice crunch and salty flavor. - Melted butter: Brush the pretzels with melted butter after baking. This adds richness. - Seasonings: Try garlic powder or Parmesan cheese for extra flavor. Experiment and have fun! Pro Tips Temperature Matters: Make sure your water is between 110°F-115°F for optimal yeast activation. Too hot or too cold can hinder the rising process. Kneading Technique: Knead the dough until it is smooth and elastic. This helps develop gluten, giving the pretzel bites their chewy texture. Boiling is Key: Boiling the pretzel bites in baking soda water is essential for that classic pretzel flavor and color. Don’t skip this step! Flavor Variations: Experiment with different toppings! Try adding spices, cheese, or herbs to the melted butter for unique flavor profiles. {{image_2}} To make cheese-stuffed pretzel bites, you can add a tasty surprise inside. Use cheese like cheddar or mozzarella. When you shape the dough, flatten it into small discs. Place a piece of cheese in the center and fold the dough around it. Pinch it tight to seal. Then, boil and bake as usual. You will love the gooey cheese when you bite in! For garlic parmesan pretzel bites, mix melted butter with garlic powder. After boiling and baking the bites, brush them with this mixture. Then, sprinkle grated Parmesan cheese on top. This adds a rich flavor and gives your pretzel bites a nice finish. They are perfect for snacking while watching a movie! If you prefer something sweet, try cinnamon sugar pretzel bites. Mix sugar and cinnamon together in a bowl. After baking the bites, brush them with melted butter. Then, roll them in the cinnamon sugar mix. This creates a sweet treat that is great for dessert. Pair them with cream cheese dip for a fun twist! To keep your leftover pretzel bites fresh, place them in an airtight container. You can also wrap them in plastic wrap. Store them at room temperature for up to two days. For longer storage, refrigerate them for up to one week. Just remember, the colder they get, the tougher they can become. When it’s time to enjoy your pretzel bites again, the best way to reheat them is in the oven. Preheat your oven to 350°F (175°C). Place the pretzel bites on a baking sheet and warm them for about 5-10 minutes. This method keeps them soft and helps restore their original texture. You can also use a microwave, but be careful. It may make them chewy instead of soft. Freezing is a great option if you want to save pretzel bites for later. Let them cool completely after baking. Then, place them in a single layer on a baking sheet. Freeze for about an hour until solid. After that, transfer them to a freezer bag. They can last up to three months in the freezer. When you’re ready to eat, simply reheat them as mentioned above. Yes, you can use bread flour. Bread flour adds more protein. This helps create a chewier texture. It may also make your pretzel bites a bit denser. If you prefer a lighter bite, stick with all-purpose flour. Look for a golden brown color. The pretzel bites should be firm to the touch. You can also tap them lightly; they should sound hollow. It usually takes about 12-15 minutes in the oven. Yes, you can make the dough ahead of time. Once you knead it, let it rise. After rising, you can cover it and store it in the fridge. Use it within 24 hours for best results. Just let it come to room temp before shaping. You learned how to make delicious pretzel bites from scratch. We covered the right ingredients, from yeast to flour, and I shared step-by-step instructions. You also discovered tips to avoid mistakes and add flavor. Variations like cheese-stuffed and cinnamon sugar pretzel bites can excite your taste buds. Finally, I showed you how to store and reheat your pretzels. Now, enjoy making these tasty snacks and share them with friends!

Homemade Soft Pretzel Bites Tasty and Easy Recipe

Craving a snack that’s soft, warm, and oh-so-delicious? I’ve got just the recipe for you! Homemade soft pretzel bites are

To make these tasty treats, you need just a few simple items: - 2 ripe bananas - 1 cup dark chocolate chips - 1 tablespoon coconut oil - Sea salt (for sprinkling) These key ingredients create a sweet and satisfying snack. The bananas provide natural sweetness, while the dark chocolate adds richness. Coconut oil helps the chocolate melt smoothly. You can make your chocolate-covered banana bites even better with fun toppings. Here are some ideas: - Crushed nuts - Shredded coconut - Sprinkles These toppings not only add flavor but also give a nice crunch or chew. You can mix and match to find your favorite combination. Using ripe bananas is key to this recipe. Ripe bananas are sweeter and softer. They blend perfectly with the chocolate. If your bananas are too green, they will be hard and less sweet. Aim for bananas with brown spots for the best taste. Enjoy this fun snack that is easy to make and even easier to love! {{ingredient_image_1}} First, peel the ripe bananas. Make sure they are firm but soft enough to slice. Cut each banana into thick slices, about 1 inch wide. This size is perfect for a bite. Next, place the banana slices on a baking sheet lined with parchment paper. Spread them out so they do not touch. Freeze the banana slices for about 30 minutes. This makes them firm and easier to dip in chocolate. While the bananas freeze, it’s time to melt the chocolate. In a heatproof bowl, add 1 cup of dark chocolate chips and 1 tablespoon of coconut oil. The coconut oil helps make the chocolate smooth and shiny. You can melt the mixture in two ways. Use a double boiler by placing the bowl over simmering water. Stir until smooth. If using a microwave, heat in 30-second bursts. Stir after each burst until it is fully melted. Once the bananas are firm, take them out of the freezer. Dip each banana slice into the melted chocolate. Make sure each piece is fully coated in chocolate. Let any excess chocolate drip off. Place the chocolate-covered slices back on the parchment-lined baking sheet. While the chocolate is still wet, sprinkle a pinch of sea salt on each bite. You can also add optional toppings like crushed nuts or sprinkles at this stage. Finally, return the baking sheet to the freezer for 15 to 20 minutes. This allows the chocolate to set nicely. Enjoy your bites as a fun snack! To coat bananas well, make sure they are firm. Freezing the banana slices helps. Cut them about 1 inch thick for easy dipping. Use a fork or toothpick to hold the banana while dipping. This keeps your hands clean and gives a good grip. For a smooth chocolate dip, melt the chocolate slowly. Use a double boiler or microwave. If using a microwave, heat in 30-second bursts. Stir after each burst to prevent burning. Adding coconut oil helps the chocolate stay shiny and smooth. Serve the chocolate-covered banana bites straight from the freezer. This keeps them firm and fresh. Use a nice bowl or platter for a fun touch. You can sprinkle extra toppings for a pop of color. Enjoy them as a tasty snack or dessert! Pro Tips Choose Ripe Bananas: Make sure your bananas are ripe for the best flavor and creaminess. They should have a few brown spots to ensure sweetness. Use Quality Chocolate: Opt for high-quality dark chocolate for melting, as it will give a richer taste and smoother texture to your bites. Experiment with Toppings: Get creative with your toppings! Try adding different nuts, seeds, or even spices like cinnamon for a unique twist. Storage Tips: Store any leftover banana bites in an airtight container in the freezer for up to two weeks to maintain their texture and flavor. {{image_2}} You can have fun with flavors. Try adding nut butter to your banana bites. Spread a thin layer of peanut butter on the banana slices before dipping them in chocolate. This adds a rich taste and creamy texture. You can also use different types of chocolate. Dark chocolate is rich and deep, while milk chocolate is sweet and smooth. White chocolate adds a creamy touch too. Each type brings a new flavor to the bites. These chocolate-covered banana bites are great for events. Arrange them on a colorful platter for a fun look. You can serve them as a dessert or a snack. They are perfect for birthday parties or casual get-togethers. Add small toothpicks for easy serving. Guests can grab a bite without mess. You can also have a toppings bar. Set out bowls of nuts, coconut, and sprinkles. Let everyone customize their bites! Seasonal toppings can make your banana bites even better. In the fall, try adding crushed candy canes for a peppermint twist. In the summer, fresh berries like raspberries or strawberries go well and add color. During holidays, sprinkle festive colors or edible glitter on top. You can also drizzle more chocolate over the bites for a fancy touch. These ideas will keep your treats exciting and tasty all year long! To keep your chocolate covered banana bites fresh, store them in the freezer. They taste best when cold. Place the bites in a single layer on a baking sheet. Once they are frozen, transfer them to a container. This method prevents them from sticking together. Freezing chocolate covered banana bites helps them last longer. They can stay tasty for up to three months in the freezer. Just remember to keep them in an airtight container. This keeps out air and moisture. For easy access, you can separate layers with parchment paper. The best containers for your banana bites are airtight ones. Use glass or plastic containers with tight lids. These keep your treats fresh and safe. You can also use freezer bags. Just make sure to squeeze out extra air before sealing. This way, your chocolate covered banana bites will stay delicious for a long time. Yes, you can use milk chocolate. It will make the bites sweeter. Milk chocolate melts well, just like dark chocolate. This gives you a creamier taste. If you like sweeter flavors, go for it! These banana bites can last about a week in the freezer. Store them in an airtight container. If they are in the fridge, eat them within three days. The bites taste best when they are fresh. You can try using dark chocolate that is at least 70% cocoa. This has less sugar. For toppings, use nuts or seeds instead of sprinkles. You can also try a yogurt dip as a healthy twist. Enjoy experimenting with these options! You learned how to make delicious chocolate-covered banana bites. We covered key ingredients, including ripe bananas and tasty toppings. I shared step-by-step instructions, tips for smooth dipping, and ways to customize flavors. We also discussed storage methods to keep them fresh. In conclusion, chocolate-covered banana bites are simple to make and fun to enjoy. Try different flavors and toppings to find your favorite. With these tips, you can impress your friends at any gathering. Enjoy your sweet treats!

Irresistible Chocolate Covered Banana Bites Recipe

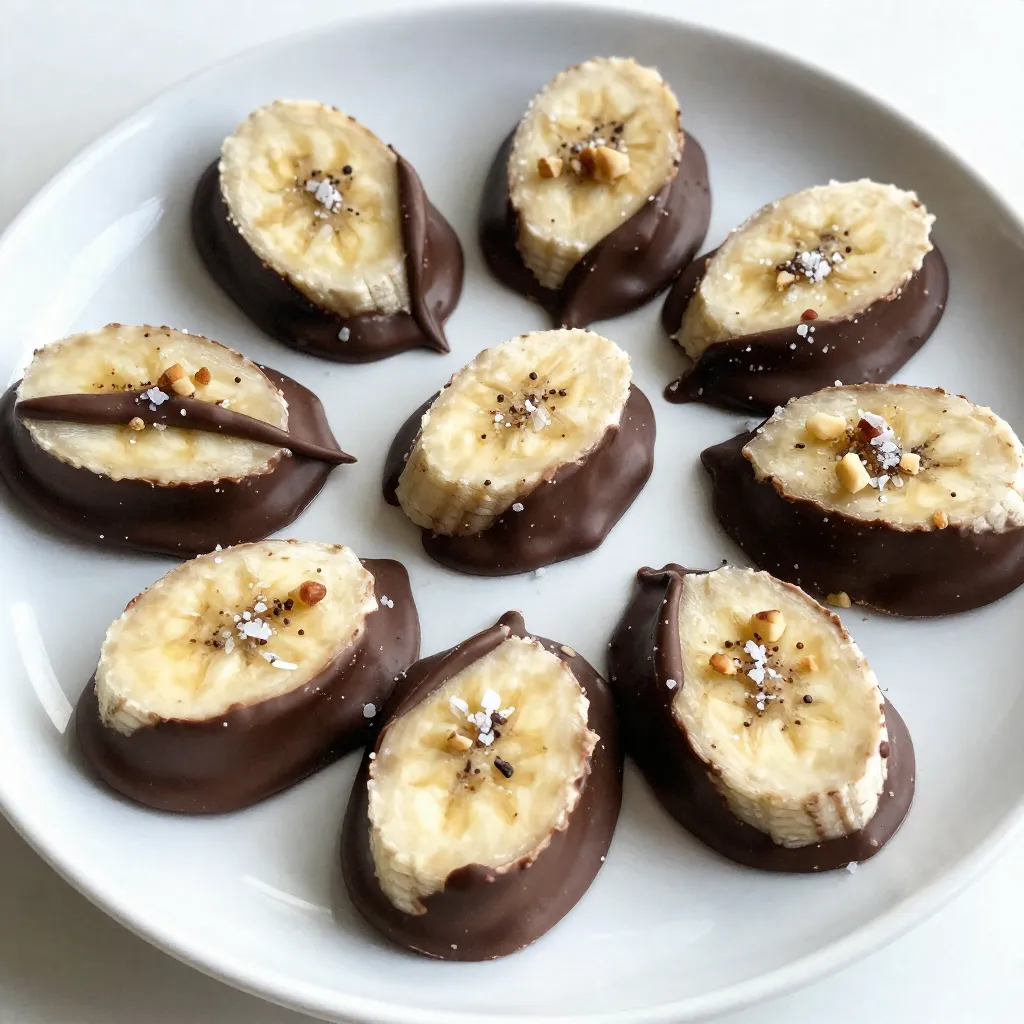
Are you ready to treat yourself to something sweet and simple? I’m excited to share my irresistible chocolate-covered banana bites

Older posts
Newer posts
← Previous Page1 … Page73 Page74 Page75 … Page85 Next →

dsad

© 2026 greenmealmap • Built with GeneratePress

Our Policies

  • Copyright Policy
  • Cookie Policy
  • GDPR Policy
  • Privacy Policy
  • Disclaimer
  • Terms Of Use

More Information

  • Home
  • About
  • Contact
  • Appetizers
  • Dessert
  • Dinner
  • Drinks
©2026, greenmealmap About Back To Top