Skip to content
DisclaimerTerms Of UseGDPR PolicyCookie Policy

greenmealmap

  • Home
  • Drinks
  • Appetizers
  • Dinner
  • Dessert
  • About
  • Contact
  • Privacy Policy
DisclaimerTerms Of UseGDPR PolicyCookie Policy

NO-ING-IMG

- 8 oz mixed mushrooms (cremini, shiitake, and oyster) - 2 tablespoons balsamic vinegar - 1 tablespoon olive oil - 4 slices of crusty bread (like ciabatta or sourdough) - 4 oz goat cheese or vegan alternative - Fresh parsley, chopped for garnish - Fresh thyme leaves or dried thyme When making Balsamic Roasted Mushroom Toast, the right ingredients are key. For this dish, I love using a mix of mushrooms. The cremini, shiitake, and oyster mushrooms work well together. They add depth and flavor that makes your toast special. Balsamic vinegar is another must-have. It gives a sweet and tangy taste that balances the earthiness of the mushrooms. Olive oil helps to roast the mushrooms to a perfect golden brown. This adds a rich flavor and a nice texture. Don't forget the bread! I prefer crusty types like ciabatta or sourdough. They hold up well against the toppings and add a delightful crunch. If you want to take your toast to the next level, consider adding goat cheese. It adds creaminess and a bit of tang. You can also use a vegan cheese if you prefer. Fresh herbs like parsley and thyme elevate the dish with their bright flavors. These ingredients combine to create a simple yet tasty snack. For the full recipe, check the section above. 1. Preheat your oven to 400°F (200°C). This helps mushrooms roast evenly. 2. In a mixing bowl, combine the sliced mushrooms, balsamic vinegar, olive oil, thyme, minced garlic, salt, and pepper. Toss well until all mushrooms are coated. 1. Spread the seasoned mushrooms onto a baking sheet in one layer. This helps them cook nicely. 2. Roast in the oven for 15-20 minutes. Stir halfway through for even cooking. The mushrooms should turn golden and caramelized. 3. While mushrooms roast, toast the slices of crusty bread until golden brown. A toaster or oven works great here. 1. Once the mushrooms cool slightly, spread a generous layer of softened goat cheese on each slice of toast. 2. Top each cheese layer with the balsamic roasted mushrooms. 3. Garnish with fresh parsley to boost color and flavor. This recipe is simple yet so delicious. If you want full details, check the Full Recipe. Enjoy your tasty snack! - Choosing the right mushrooms: Use a mix like cremini, shiitake, and oyster. These varieties add great texture and flavor. Fresh mushrooms are key for the best taste. - Ensuring even cooking during roasting: Spread the mushrooms in a single layer on the baking sheet. This helps them roast evenly. Stir them halfway through for a perfect caramelization. - Best bread types to use: Crusty bread like ciabatta or sourdough works best. These breads hold up well under the toppings. Toast them for extra crunch. - Pairing with complementary dishes: Serve with a fresh salad or a light soup. This adds balance to the meal and enhances the flavors of the toast. - Plating the dish for visual appeal: Arrange the toasts on a nice serving platter. A colorful platter makes the dish look inviting. - Adding balsamic reduction for garnish: Drizzle balsamic reduction over the mushrooms. This adds a glossy finish and extra flavor. It makes the dish pop visually and tastefully. For the full recipe, check the section above on ingredients and instructions. {{image_2}} For a vegan twist, you can swap goat cheese for a vegan cream cheese. This option keeps the spread creamy and delicious. If you're looking for gluten-free choices, use gluten-free bread. Many brands offer great alternatives that toast nicely. Want to spice things up? Try adding crushed red pepper flakes for heat. You can also mix in smoked paprika for a unique flavor. If you're a cheese lover, consider using feta or burrata instead of goat cheese. Each cheese brings its own taste and texture to the dish. Herbs can make a big difference. Fresh basil or chives work well with mushrooms. You can also try rosemary for a punch of flavor. Instead of plain olive oil, consider using garlic-infused oil. This adds extra taste and makes the dish even better. Explore these variations to make the Balsamic Roasted Mushroom Toast your own! For the full recipe, check out the detailed instructions and ingredients. To keep your balsamic roasted mushrooms fresh, place them in a sealed container. Store them in the fridge. They can last for about three days. This way, you can enjoy them later without losing flavor. For the bread, keep it in a paper bag to maintain crunch. A plastic bag will make it soggy. When you want to heat the mushrooms, the best method is to use a pan. Heat them on low until warm. This keeps them tender and tasty. For the bread, toast it again in a toaster or oven. This will restore its crunch. Avoid microwaving the bread, as it may become chewy. You can freeze the mushrooms before cooking. Just place them in a freezer bag and remove as much air as possible. They can last up to three months in the freezer. However, I do not recommend freezing the assembled toasts. The bread will lose its texture and turn mushy. Instead, make the toasts fresh for the best taste. For the full recipe, check the earlier section. You can use other vinegars like red wine or apple cider. Each adds a unique flavor. Red wine vinegar gives a fruity note. Apple cider vinegar offers a milder taste. If you want sweetness, try using a mix of vinegar and honey. This keeps the essence of the dish while changing the flavor a bit. Yes, you can prepare the mushrooms in advance. Roast them and store in the fridge for up to three days. Toast the bread fresh when you are ready to serve. This keeps the toast crunchy and delicious. You can also mix the cheese and herbs ahead. Just store them in a sealed container. Absolutely! You can prep each part for easy meals. Roast the mushrooms and keep them separate. Toast the bread when you are ready to eat. This way, everything stays fresh. You can even pack the cheese in small containers. This makes it easy to assemble your toast during a busy week. Balsamic Roasted Mushroom Toast is a delicious dish you can easily make. You learned about key ingredients, from mushrooms to crusty bread. Cooking and assembly steps helped you create a tasty treat. With tips on storage and variations, you can customize it to fit your taste. Overall, this dish is fun, simple, and perfect for sharing. Enjoy your cooking and impress your friends with this tasty meal!

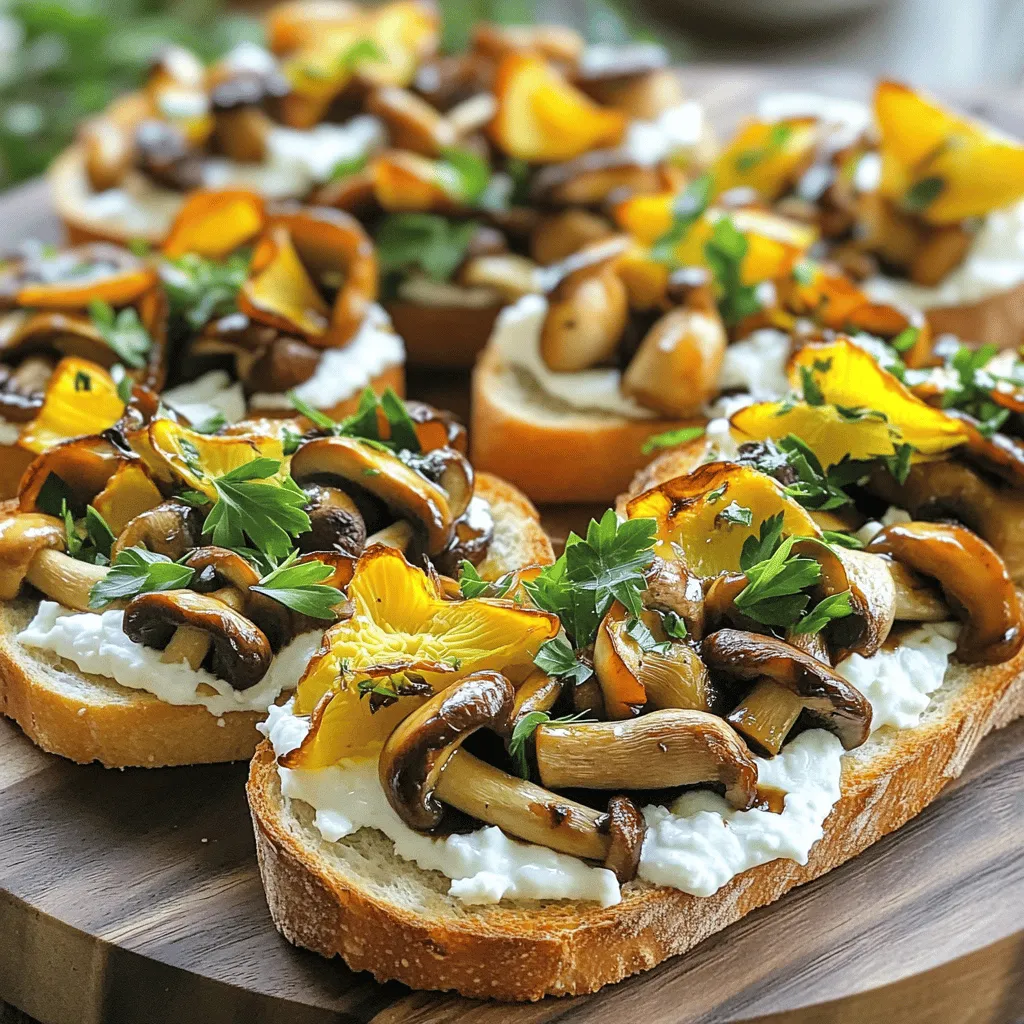
Balsamic Roasted Mushroom Toast Simple and Tasty Snack

If you’re looking for a simple and tasty snack, Balsamic Roasted Mushroom Toast is your answer! This dish combines savory

To make your Easy Chickpea Spinach Curry, gather these fresh and simple ingredients: - 1 can (15 oz) chickpeas, drained and rinsed - 2 cups fresh spinach, chopped - 1 medium onion, finely chopped - 3 cloves garlic, minced - 1 inch fresh ginger, grated - 1 can (14 oz) coconut milk - 1 tablespoon curry powder - 1 teaspoon ground cumin - 1 teaspoon turmeric - 1 tablespoon olive oil - Salt and pepper to taste - Fresh cilantro for garnish (optional) These ingredients form a vibrant and tasty dish. The chickpeas provide protein, while the spinach adds vitamins. Coconut milk brings creaminess, and spices give the curry its rich flavor. You can find the full recipe at the end of this section. This dish is quick and easy, perfect for any meal. 1. Heat 1 tablespoon of olive oil in a large skillet over medium heat. 2. Add 1 medium onion, finely chopped. Sauté for about 5 minutes until soft and clear. 3. Next, add 3 cloves of minced garlic and 1 inch of grated ginger. Cook for 2 minutes, stirring often. 4. Stir in 1 tablespoon of curry powder, 1 teaspoon of ground cumin, and 1 teaspoon of turmeric. Cook for 1 minute until you smell the spices. 1. Pour in 1 can of coconut milk and mix well. Scrape the bottom of the pan for extra flavor. 2. Add 1 can of drained chickpeas and 2 cups of chopped spinach. Stir so the spinach wilts down. 3. Let the curry simmer for about 10 minutes. Stir it now and then. If it’s too thick, add a bit of water. 4. Season with salt and pepper to taste. Let it simmer for 1 more minute to blend flavors. 5. Serve hot. Garnish with fresh cilantro if you like. For the full recipe, check out the details above! The ideal consistency for chickpea spinach curry should be creamy but not too thick. I like to simmer mine until it coats the back of a spoon. If it gets too thick, just add a splash of water or more coconut milk. This keeps it rich and smooth. To adjust spice levels, taste as you go. If you want more heat, add a pinch of cayenne or sliced chili peppers. For a milder curry, use less curry powder or cumin. You can also balance heat with a little extra coconut milk. For a hearty meal, pair your curry with fluffy basmati rice or warm naan bread. Rice soaks up the sauce well, making each bite tasty. Naan is perfect for scooping up the curry. Garnishing ideas can elevate your dish. Sprinkle fresh cilantro on top for a pop of color. A squeeze of lime juice adds zest and brightens the flavors. You can even add some sliced green onions for extra crunch. {{image_2}} You can change the recipe to fit your taste or what you have at home. For beans, try black beans or kidney beans instead of chickpeas. Both add great flavor and texture. If you want more greens, use kale or Swiss chard. They will also work well in this dish. For a dairy option, you can swap coconut milk for heavy cream or Greek yogurt. These choices can make the curry richer and creamier. To give your curry a kick, add chili peppers or red pepper flakes. This will bring heat to the dish. If you prefer a sweeter taste, include diced carrots or bell peppers. These veggies add natural sweetness and extra color. You can also add a squeeze of lime juice at the end for brightness. Experiment with these tweaks to make the dish your own. For more ideas, check out the Full Recipe. To keep your chickpea spinach curry fresh, store it in an airtight container. Place the container in your fridge if you plan to eat it within three days. For longer storage, freeze the curry. Use freezer-safe containers or bags. Make sure to leave some space for expansion. This way, your curry stays safe and tasty. When it's time to enjoy your curry again, use the stovetop for the best results. Pour the curry into a pan over medium heat. Stir it often to heat evenly. If it seems thick, add a splash of water or broth. You can also use a microwave. Place your curry in a bowl and cover it. Heat in bursts of 30 seconds, stirring in between. This keeps it moist and warm. Enjoy your meal! Yes, chickpea spinach curry is vegan. It uses plant-based ingredients like chickpeas, spinach, and coconut milk. This dish has no animal products, making it perfect for a vegan diet. Yes, you can use frozen spinach. Just make sure to thaw and drain it before adding it to the dish. This makes it easy and quick to prepare. The total cooking time is about 25 minutes. This includes prep and cooking time. You can have a tasty meal ready in no time. You can serve it with rice or warm naan. Both pair well with the curry. You can also add a side salad for freshness. Yes, this curry is naturally gluten-free. Just ensure that any bread or sides you serve with it are gluten-free. Enjoy a delicious meal without worry. For the full recipe, check out the details above! This blog post covers a tasty chickpea and spinach curry. We discussed the ingredients you’ll need and how to prepare them. You learned simple steps for cooking, plus tips to make it shine. I shared storage advice and answered common questions. In summary, this dish is easy to make and full of flavor. You can adjust it to fit your taste. Enjoy your curry with rice or naan for a satisfying meal.

Easy Chickpea Spinach Curry Simple and Delicious Meal

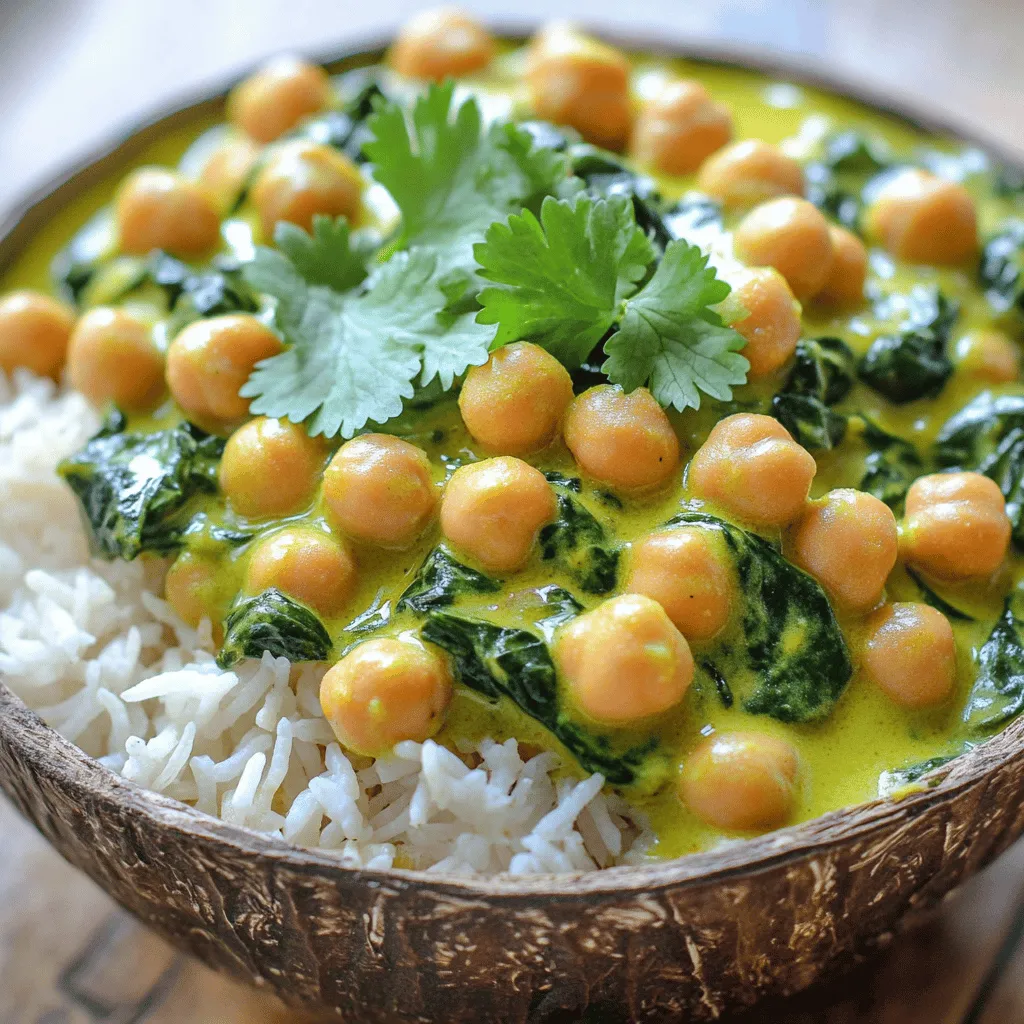
Ready for a quick, tasty meal? This Easy Chickpea Spinach Curry is just what you need! Packed with healthy ingredients

To make a Lemon Coconut Protein Shake, gather these fresh ingredients: - 1 cup unsweetened coconut milk - 1 ripe banana - 1 scoop vanilla whey protein powder - 2 tablespoons shredded unsweetened coconut - 2 tablespoons fresh lemon juice - 1 teaspoon lemon zest - 1 tablespoon honey (optional, adjust to taste) - A pinch of sea salt - Ice cubes (as desired for thickness) These ingredients create a refreshing and healthy drink. Each one plays a key role. The coconut milk gives a creamy base, while the banana adds sweetness and smoothness. The vanilla whey protein powder packs in protein for energy. Fresh lemon juice and zest bring a zesty kick that brightens the shake. Shredded coconut adds texture, making every sip interesting. If you like a bit of sweetness, feel free to add honey. Just a pinch of sea salt boosts all the flavors. Finally, ice cubes help create the perfect consistency, making your shake cool and enjoyable. For the full recipe, you can refer to the instructions above. Start by grabbing your blender. Add 1 cup of unsweetened coconut milk. Next, toss in 1 ripe banana. Finally, include 1 scoop of vanilla whey protein powder. Blend these three ingredients until smooth. This mix forms a creamy and tasty base for your shake. Now it’s time to add some fun flavors! Mix in 2 tablespoons of shredded unsweetened coconut. Then, squeeze in 2 tablespoons of fresh lemon juice. Add 1 teaspoon of lemon zest for a zesty kick. If you like it sweet, pour in 1 tablespoon of honey. Don’t forget a pinch of sea salt to enhance all those flavors! To make your shake just how you like it, add ice cubes. The more ice, the thicker your shake will be. Blend again until the mixture is smooth and creamy. Taste it! If it needs more sweetness, add a bit more honey. Once you love the flavor, pour the shake into a large glass or shaker. You can even sprinkle a bit of shredded coconut on top for fun! For the full recipe, refer to the earlier section. Enjoy your yummy Lemon Coconut Protein Shake! For the best Lemon Coconut Protein Shake, the right texture matters. Ice can make your shake thick and cold. If you want a creamier shake, try using less ice. A good balance is key to a shake you will love. Sometimes, you may want more or less sweetness. Honey is a great way to add sweetness. Start with one tablespoon, then taste it. If you want it sweeter, add more honey. You can also try using ripe bananas, as they are naturally sweet. This way, you can adjust without losing flavor. A good blender can change your shake game. High-speed blenders work best for making smooth shakes. They blend everything well, even if you add ice. If you don’t have a high-speed blender, a regular one will work, too. Just blend longer to get the same creamy texture. For the best results, consider a blender with at least 500 watts. For the full recipe, check out the Lemon Coconut Protein Shake section. {{image_2}} If you want a dairy-free shake, use almond or oat milk. Both options add a nice nutty taste. Almond milk is light and creamy, while oat milk is thicker and richer. Choose what you like best. This change keeps the shake tasty and healthy. You can make this shake even better by adding other fruits. Fruits like mango or pineapple bring a tropical twist. Just toss in some chunks before blending. This adds natural sweetness and flavor. You can mix and match fruits for your perfect blend! If you prefer plant-based options, switch to vegan protein powder. Pea protein or brown rice protein work well. They offer great nutrition without dairy. Each option creates a unique taste and texture. Experiment to find your favorite protein choice! For the full recipe, check out the Lemon Coconut Protein Shake. If you have extra shake, store it in the fridge. Use an airtight container. This helps keep the shake fresh. The cold will slow down spoilage. Consume it within 24 hours for best taste. Give it a quick shake before drinking. This will mix any settled ingredients. You can freeze the shake for later use. Pour it into ice cube trays or freezer-safe bags. Make sure to leave some space for expansion. When ready to enjoy, blend the frozen cubes with a bit of water or milk. This gives you a fresh shake in no time. For the best flavor and nutrition, drink the shake soon. It tastes best when made fresh. If refrigerated, use it within a day. If frozen, aim to use it within three months. After that, the taste may change. Enjoy your Lemon Coconut Protein Shake while it’s at its peak! A Lemon Coconut Protein Shake offers many health perks. First, it packs a good amount of protein. Protein helps build and repair muscles. This shake can boost your energy, making it great after workouts. The shake also includes coconut milk. Coconut milk is dairy-free and full of healthy fats. These fats can support heart health and provide lasting energy. Plus, the banana adds natural sweetness and potassium. Potassium is vital for muscle function. Lemon juice gives the shake a zesty kick. It is high in vitamin C, which supports your immune system. Overall, this shake is a tasty way to get protein and nutrients. Yes, you can prepare this shake in advance. Just blend the ingredients as the recipe shows. Pour it into a shaker bottle or jar. Seal it tightly and store it in the fridge. It stays fresh for up to 24 hours. If you want to keep it longer, consider freezing it. Pour the shake into ice cube trays or freezer-safe bags. When you are ready to drink, just blend the frozen cubes again. This way, you have a quick, healthy drink ready to go! For this shake, I recommend using vanilla whey protein powder. It blends well with the other flavors. If you prefer plant-based options, try pea or rice protein. Both can work well in this recipe. When choosing protein powder, look for one with no added sugars. This keeps your shake healthy and tasty. Check the labels to find the best option for you. This blog post covered how to make a Lemon Coconut Protein Shake. You learned the ingredients, steps to prepare it, and tips for the best results. The shake is nutritious and easy to customize. You can alter flavors or adjust sweetness as you like. Remember to store any leftovers properly for freshness. Enjoy the health benefits while experimenting with different variations. This shake is a simple way to fuel your body and satisfy your taste.

Lemon Coconut Protein Shake Refreshing and Healthy Drink

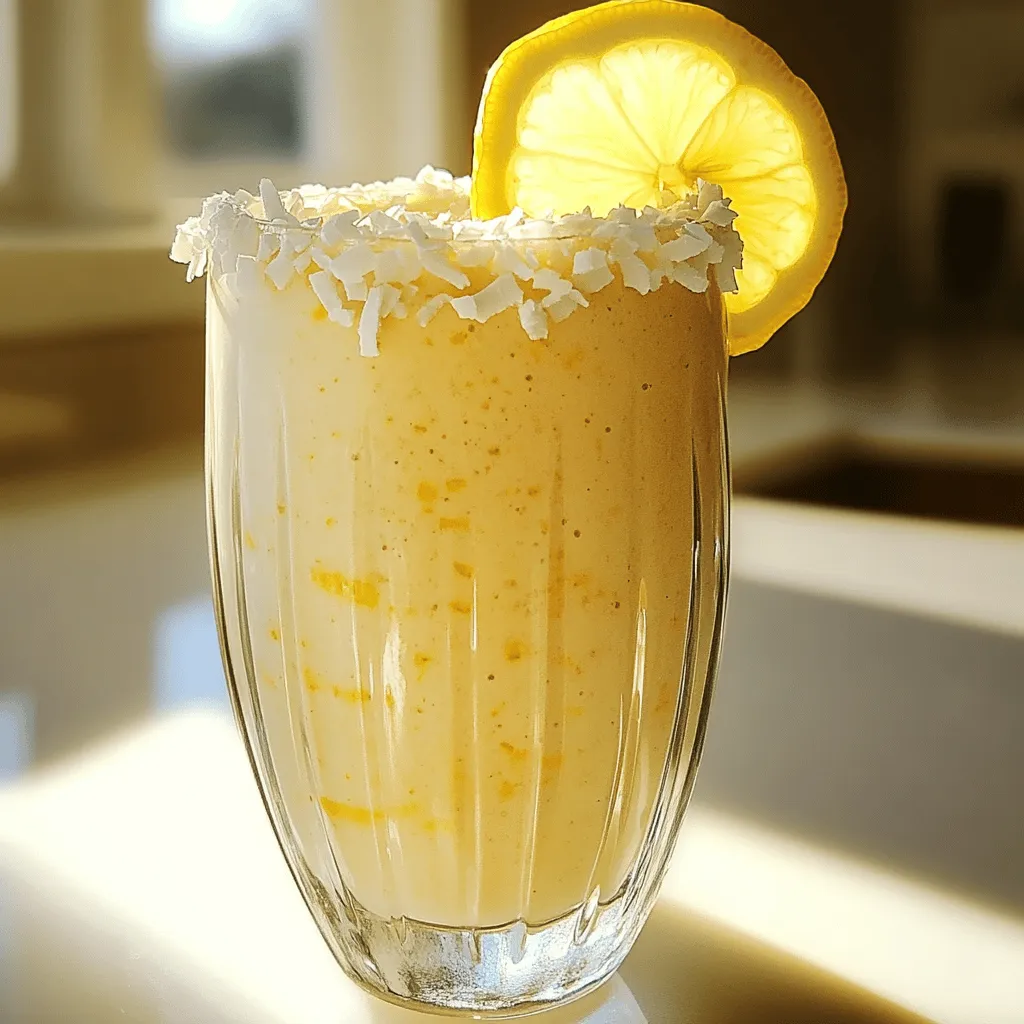
Are you looking for a refreshing and healthy drink? The Lemon Coconut Protein Shake is packed with flavor and nutrients.

Here’s what you need to make a tasty pumpkin pie smoothie. Gather these simple ingredients: - 1 cup pumpkin puree - 1 banana, frozen - 1 cup almond milk (or any preferred milk) - 1 tablespoon maple syrup (or honey) - 1 teaspoon pumpkin pie spice - 1 tablespoon chia seeds (optional) - 1/2 teaspoon vanilla extract - 1/4 cup rolled oats - Ice cubes (optional) Using pumpkin puree gives this smoothie a rich flavor. You can use canned or fresh puree. I like to freeze the banana. It adds a nice creaminess. Almond milk works great, but feel free to choose another milk you love. Maple syrup sweetens it well. If you want, honey is a good option too. The pumpkin pie spice brings in warm flavors. You can use a mix of cinnamon, nutmeg, and ginger if you prefer. Chia seeds add fiber and can help thicken the smoothie. Vanilla extract boosts the flavor. Rolled oats help make it filling and creamy. Adding ice cubes makes the smoothie cold and refreshing, especially on warm days. This recipe is great for a quick breakfast or snack. You can find the full recipe at the start of this article. Enjoy creating your own fall delight! 1. Gather all ingredients: Start by collecting everything you need for the pumpkin pie smoothie. You will need: - 1 cup pumpkin puree (canned or fresh) - 1 banana, frozen - 1 cup almond milk (or any preferred milk) - 1 tablespoon maple syrup (or honey) - 1 teaspoon pumpkin pie spice - 1 tablespoon chia seeds (optional) - 1/2 teaspoon vanilla extract - 1/4 cup rolled oats - Ice cubes (optional) 2. Blend ingredients until smooth: Put all your ingredients into a blender. Blend on high until everything is creamy and smooth. If you want a cooler drink, add ice cubes before blending. Blend again until you reach the texture you like. 3. Adjust sweetness to taste: After blending, taste your smoothie. If it needs more sweetness, add a little more maple syrup or a sprinkle of cinnamon. Blend again briefly to mix in any new ingredients. 1. Pour into glasses: Carefully pour the smoothie into your favorite glasses. This drink looks great in clear glasses, so you can see its bright orange color. 2. Garnish with pumpkin pie spice: To finish, sprinkle a dash of pumpkin pie spice on top. This adds a nice touch and extra flavor. For the full recipe, check the previous section. Enjoy your creamy pumpkin pie smoothie! To get a creamy pumpkin pie smoothie, use a frozen banana. It adds a thick and smooth texture. If you want a thicker or thinner drink, adjust the almond milk. Add less for a rich smoothie or more for a lighter one. You can make this smoothie taste even better by trying different spices. Cinnamon and nutmeg pair well with pumpkin. If you like it sweeter, add a little more maple syrup or honey. Taste as you mix to find your perfect flavor. {{image_2}} You can make your pumpkin pie smoothie even better with different milks. Here are two great choices: - Coconut milk: This milk gives a rich, creamy feel. It adds a slight sweetness that blends well with pumpkin. - Oat milk: If you prefer something lighter, oat milk works great. It has a mild flavor and thickens the smoothie nicely. Want to make your smoothie even healthier? Try these add-ins: - Spinach for extra greens: This leafy green adds vitamins without changing the taste much. It blends well and gives a nice color. - Protein powder for added protein: Adding protein powder helps make the smoothie more filling. It’s great if you need a quick meal or snack. Feel free to explore these options! These choices can help you create your perfect pumpkin pie smoothie. Check out the Full Recipe for more details. After enjoying your pumpkin pie smoothie, you might have some left. To keep it fresh, store it in an airtight container. Place it in the fridge and try to use it within 1-2 days. This keeps the flavors bright and the texture smooth. If you want to save your smoothie for later, freezing is a great option. Pour the smoothie into individual portions. This way, you can enjoy it at your own pace. When you're ready to drink, simply thaw it in the fridge overnight. Always give it a quick stir or shake before enjoying. Yes, but ensure it's cooked and pureed. Fresh pumpkin adds a nice, vibrant flavor. To prepare fresh pumpkin, cut it in half, clean out the seeds, and roast it until soft. After cooling, scoop the flesh and puree it until smooth. This step enhances the taste and texture of your smoothie. Use maple syrup and any plant-based milk. Almond milk works well, but any nut or soy milk is great too. This makes the smoothie creamy while keeping it plant-based. The maple syrup adds sweetness without honey, making it perfect for vegans. Yes, but it's best fresh for optimal taste and texture. If you prepare it early, store it in the fridge. Just remember, it may thicken as it sits. You can add more milk before serving to get your desired consistency. Enjoy it fresh for the best flavor! This smoothie is a simple, tasty blend of pumpkin, banana, and spices. You can make it your own with different milks and add-ins. Remember to use frozen bananas for a creamy texture. Adjust sweetness with maple syrup or honey as needed. Store any leftovers in the fridge for a quick treat later. Enjoy this nutritious drink, and feel free to play with flavors to find your perfect mix! A good smoothie can brighten your day and fuel your body.

Pumpkin Pie Smoothie Creamy Fall Flavor Delight

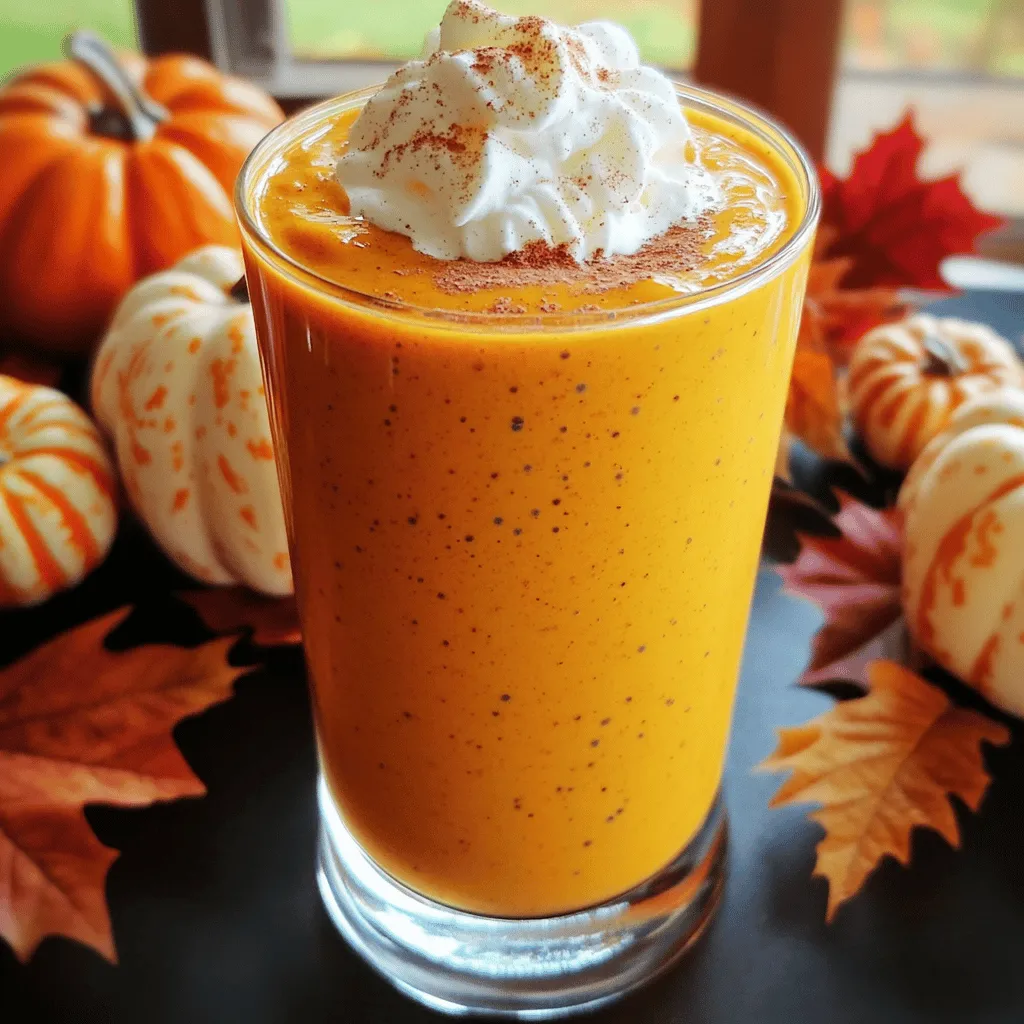
Fall is here, and it’s the perfect time for a Pumpkin Pie Smoothie! This creamy treat combines the flavors of

To make a delightful cup of orange ginger green tea, you need: - 2 cups water - 2 green tea bags - 1 orange, juiced and zested - 1 tablespoon fresh ginger, grated - 1 tablespoon honey (or to taste) - A pinch of cinnamon (optional) - Fresh mint leaves for garnish You can switch ingredients based on what you have. For the green tea bags, try white tea or herbal tea. For ginger, ground ginger works if you don’t have fresh. Use agave syrup or maple syrup instead of honey. If you want a different flavor, add lemon juice or grapefruit juice instead of orange. This tea is not just tasty; it’s good for you! - Green Tea: It has antioxidants that help fight free radicals. This may boost your immune system. - Orange: Oranges are high in vitamin C. This helps your body heal and stay healthy. - Ginger: Ginger can help with digestion and reduce nausea. It also has anti-inflammatory properties. - Honey: Honey can soothe your throat and add natural sweetness. - Cinnamon: This spice may help regulate blood sugar levels and add a warm flavor. These ingredients work together to create a drink that is both flavorful and beneficial. Try to enjoy a cup of this tea when you need a health boost! For the full recipe, check the details above. Start by measuring 2 cups of water. Pour it into a small saucepan. Heat this over medium heat until it boils. When the water is boiling, take the saucepan off the heat. Now, add 2 green tea bags to the hot water. This will help release the tea's flavor and benefits. Steeping is key to getting the best flavor. Let the tea bags sit in the hot water for 3 to 4 minutes. If you want a stronger tea, let it steep a bit longer. But don't steep too long; this can make your tea taste bitter. While the tea is steeping, prepare the orange. Juice the orange and zest the peel into a bowl. After steeping, remove the tea bags and stir in the grated ginger and orange juice. For added flavor, you can also mix in a pinch of cinnamon. Next, sweeten your drink with honey. Add it a little at a time, stirring until it dissolves. Finally, pour your tea into cups. Garnish with fresh mint leaves and a sprinkle of orange zest. Enjoy your zesty orange ginger green tea! For the complete recipe, check out the Full Recipe. To make the best orange ginger green tea, start with fresh green tea bags. They should smell bright and grassy. Use filtered water for the cleanest taste. When boiling, watch closely. If the water boils too long, it can taste bitter. Steep your tea for 3 to 4 minutes. This gives you a strong flavor without being too harsh. You can boost flavor with a few smart tricks. Try adding a pinch of cinnamon to warm the tea. This gives it a cozy touch. Fresh mint leaves add a nice, bright taste. You can also mix in other fruits like lemon or pineapple for a unique twist. Adjust the honey to your liking; less for tartness, more for sweetness. One common mistake is over-steeping the tea. This makes it bitter and less enjoyable. Avoid using old tea bags, as they lack flavor. Don’t skip the zesting step! The orange zest adds a fresh aroma and extra flavor. Lastly, remember to taste as you go. This helps you find the perfect balance for your tea. For the full recipe, check out the steps above! {{image_2}} You can play with flavors by adding other fruits. Try lemon or lime juice. They add a bright taste that pairs well with ginger. You can also use grapefruit for a unique twist. Just make sure to balance the sweetness with honey. Experiment with your favorite citrus combinations! If you want to change the sweetness, try maple syrup or agave nectar. These sweeteners give different flavors and can be healthier options. You can also add spices like cardamom or turmeric for depth. A sprinkle of nutmeg adds warmth and richness to your tea too. For a cool drink, make iced Orange Ginger Green Tea. Brew the tea as usual, then let it cool. Pour it over ice and add slices of orange or lemon. You can also mix in some fresh mint leaves. This version is perfect for hot days and keeps you refreshed. For the complete recipe, check the [Full Recipe]. To keep your brewed tea fresh, store it in the fridge. Use a clean glass or plastic container with a lid. Make sure to cool the tea to room temperature before sealing it. This helps keep the tea from getting too strong or bitter. Store leftover ingredients separately. Keep the orange juice and zest in an airtight container in the fridge. Fresh ginger can last longer if you wrap it in a damp paper towel and place it in a sealed bag. Honey should stay in a cool, dry spot, away from sunlight. Brewed tea lasts about 3 to 5 days in the fridge. After that, the flavor fades. For the best taste, drink it within 2 days. Fresh ginger can last about 2 to 3 weeks in the fridge. Always check for signs of spoilage, like mold or an off smell. For the full recipe, refer back to the beginning of our guide! Orange Ginger Green Tea is packed with health benefits. Green tea is rich in antioxidants. These help protect your cells from damage. Ginger is great for digestion. It can soothe your stomach and reduce nausea. The orange adds vitamin C, boosting your immune system. This tea can also help reduce inflammation. Drinking it may improve your mood and increase energy. Yes, you can make this tea without honey. If you prefer it unsweetened, skip the honey. You can also use other sweeteners like stevia or agave. Adjust the sweetness based on your taste. The flavor of the tea will still shine through. You can enjoy this tea daily. It is a healthy choice to include in your routine. However, if you are sensitive to caffeine, limit your intake. One to three cups a day is a good range. Listen to your body and adjust as needed. Yes, you can prepare this tea in advance. Brew a larger batch and store it in the fridge. Just keep it in a sealed container. You can enjoy it cold or reheat it later. Orange Ginger Green Tea is safe for most people. However, if you are pregnant or have certain health issues, consult your doctor first. Ginger can interact with some medications. Always check if it's right for you. The best time to drink this tea is in the morning or afternoon. It can give you a nice energy boost. It can also be a calming drink in the evening. Choose the time that fits your needs best. You can find the Full Recipe for Zesty Orange Ginger Green Tea above. It includes all the steps you need to make this delicious drink at home. This blog explained how to make Orange Ginger Green Tea. You learned the key ingredients, helpful steps, and useful tips. Each part plays a role in making a great cup. Remember to try different flavors and storage methods to keep tea fresh. Enjoy your tea journey. It's refreshing and healthy, making it perfect for daily enjoyment. Make this tea your own and share it with friends. Your taste buds will thank you.

Vital Orange Ginger Green Tea Recipe for Wellness

Looking for a tasty boost to your wellness routine? Try my Vital Orange Ginger Green Tea recipe! This simple drink

- Fresh strawberries: Use ripe strawberries for the best flavor. They add natural sweetness and vibrant color. - Matcha green tea powder: This powder offers a rich, earthy taste and is packed with antioxidants. - Milk options: Choose your favorite type of milk. Almond, oat, or traditional dairy all work well. - Honey or maple syrup: Adjust the sweetness to your liking. Honey adds a floral note, while maple syrup gives a warm flavor. - Salt and mint for garnish: A pinch of salt boosts the taste, and fresh mint adds a nice touch. - Small saucepan: You’ll use this to cook the strawberries. - Whisk or milk frother: This helps create a smooth matcha paste and frothy milk. - Serving glass: A clear glass lets you show off the beautiful layers of your drink. This Strawberry Matcha Latte is a delightful treat. The combination of flavors dances on your palate. The mix of sweet strawberries and earthy matcha creates a refreshing drink you can enjoy any time. For the full recipe, check out the detailed instructions on how to prepare this delicious drink. 1. Start by placing the sliced strawberries and honey (or maple syrup) in a small saucepan over medium heat. 2. Cook the mixture for about 5-7 minutes. Stir occasionally until the strawberries soften and release their juices. 3. Remove the saucepan from heat and let the mixture cool slightly. This step is key for the best texture. 1. In a small bowl, add the matcha green tea powder. 2. Pour in the hot water, but make sure it is not boiling. 3. Whisk the mixture until it forms a smooth paste. This ensures there are no lumps. A smooth paste makes the latte creamy. 1. In a separate container, froth or whisk the milk until it is light and airy. You can use a milk frother or a whisk. 2. If you want an iced version, chill the milk or add ice cubes to your glass. This gives a cool twist to your drink. Now that you have all the steps, you can easily create a delightful Strawberry Matcha Latte. Follow the [Full Recipe] for more details! To create a stunning layered effect, you need to master your pouring technique. Pour the frothed milk slowly over the strawberry mixture. This helps create a nice separation. Use a spoon to guide the milk if needed. For the matcha, drizzle it gently over the milk. This will keep the layers intact. For visual presentation, clear glasses work best. They show off the beautiful colors. You can also add fresh mint leaves on top for a pop of green. This makes your drink more appealing and fresh. Taste is important in every drink. You can adjust the sweetness of your Strawberry Matcha Latte to suit your preferences. Start with one tablespoon of honey or maple syrup. If you want it sweeter, just add more little by little. If you prefer alternative sweeteners, try agave syrup or stevia. These can also work well. Keep in mind that some sweeteners have stronger flavors. Adjust carefully to keep the balance. To add more depth to your drink, you can mix in spices or extracts. A dash of cinnamon or vanilla extract can add warmth. Just a tiny bit can change the flavor in a delightful way. If you want to try different tastes, consider using other berries. Raspberries or blueberries can be great substitutes. You can even use flavored matcha, like vanilla or chocolate. This gives fun twists to your Strawberry Matcha Latte. For the full recipe, check out the earlier section. Enjoy crafting your perfect drink! {{image_2}} For an iced version, you can adjust the ingredients slightly. Use the same strawberries and matcha. Instead of warm milk, use cold milk. You can also add ice cubes to your glass for a chilly treat. The method is simple: 1. Prepare your strawberry mixture as before. 2. Whisk your matcha with hot water to make a paste. 3. Froth or chill your milk. 4. Add ice cubes to a glass, then layer your strawberry mix, cold milk, and matcha. This method keeps your drink cool and refreshing. If you want a vegan strawberry matcha latte, choose dairy-free milk like almond, soy, or oat. These milk options work well with the strawberry and matcha flavors. For sweeteners, you can use maple syrup or agave nectar instead of honey. This keeps your drink vegan while still sweet and tasty. Mixing in other berries can create fun variations. Blueberries or raspberries blend well with strawberries. You can also try special matcha flavors, like vanilla or mint. These choices add a new twist to your latte. Experiment with different fruits and matcha types for a unique drink every time. For the full recipe, check the details above! To keep your strawberry syrup fresh, store it in an airtight container. Place it in the fridge. This helps it last about a week. If you want to store matcha, keep it in a cool, dark place. Use a tightly sealed jar to protect it from light and moisture. For the milk, if you used regular dairy, it lasts about 5 days in the fridge. Non-dairy options may last longer, up to a week. When you want to reheat your strawberry syrup, do it slowly. Heat it in a small pot over low heat. Stir gently to avoid burning. For matcha, do not boil it. Just mix it with warm water again. This keeps the flavor bright and fresh. If you have milk left over, warm it in the microwave. Use short bursts and stir in between to avoid overheating. The strawberry syrup lasts about a week when stored properly. Matcha can stay fresh for a few months if kept right. Check for clumps. If you see them, discard it. For milk, use it within a week if it's dairy. Non-dairy milk can last longer, but check the label for best dates. Signs of spoilage include sour smells, changes in color, or off tastes. If you notice any, throw it away. A Strawberry Matcha Latte is a creamy drink that mixes fresh strawberries and matcha green tea. It blends sweet and earthy flavors. This drink has gained popularity due to its vibrant colors and health benefits. People love it for its refreshing taste and energy boost. Matcha offers antioxidants and vitamins, making it a great choice for health-conscious drinkers. Yes, you can prepare parts of this drink in advance. Store the strawberry mixture in the fridge for up to three days. Keep your matcha and milk separate until ready to serve. This helps maintain freshness and flavor. When ready, just mix everything together and enjoy your drink. Yes, this recipe fits many diets. You can use almond or oat milk for a vegan option. For gluten-free eaters, make sure your sweetener is certified gluten-free. If you follow a keto diet, use a sugar-free sweetener. These adaptations help everyone enjoy this tasty drink. Matcha offers many health benefits. It has more antioxidants than regular green tea. These antioxidants help fight free radicals in the body. Matcha can also boost metabolism and help with focus. Compared to other teas, matcha provides a steadier energy boost without jitters. It's a great choice for a healthy pick-me-up! For the complete recipe, check out the Full Recipe section. In this post, we explored the vibrant world of Strawberry Matcha Lattes. We covered key ingredients like fresh strawberries and matcha powder. You learned how to prepare and layer this delightful drink for a stunning presentation. Tips on adjusting sweetness and exploring variations were shared, along with storage guidance for leftovers. Final thoughts: Enjoy making this drink your own. Experiment with flavors and techniques. A delicious, healthy treat awaits!

Strawberry Matcha Latte Refreshing and Delicious Treat

Are you ready to treat yourself to a refreshing drink that combines sweet strawberries with earthy matcha? In this blog

- 2 ripe bananas (frozen) - 1 cup milk (dairy or non-dairy) - 1/4 cup chocolate syrup - 1 tablespoon unsweetened cocoa powder - 1/2 teaspoon vanilla extract - 1/2 cup whipped cream (optional) - Chocolate shavings or sprinkles (for garnish) The key to a great chocolate covered banana shake is in the ingredients. Frozen bananas add a creamy texture, while milk offers richness. You can choose dairy or non-dairy milk based on your taste. The chocolate syrup and cocoa powder give the shake its rich chocolate flavor. If you want to make it extra special, consider using whipped cream on top. It adds a nice touch and a fun element to your shake. For the garnish, chocolate shavings or sprinkles make it look even more appealing. You might want to drizzle extra chocolate syrup on top for that added wow factor. These ingredients come together to create a smooth, delicious shake that feels like a treat. You can find the full recipe and details in the Chocolate Covered Banana Shake section. Start by peeling and cutting frozen bananas into chunks. This makes blending much easier. I prefer using ripe bananas. Look for bananas with a few brown spots. These spots mean they are sweet and perfect for this shake. If your bananas are not ripe, the shake may taste bland. In your blender, combine the banana chunks, milk, chocolate syrup, cocoa powder, and vanilla extract. Blend on high speed until smooth. You want a creamy texture. If it feels too thick, add a little more milk. Blend again until you reach your desired consistency. Always taste your shake. If you want it sweeter, add more chocolate syrup and blend briefly. Pour the chocolate banana shake into chilled glasses. Fill them about three-quarters full. If you love whipped cream, add a dollop on top of each shake. Drizzle extra chocolate syrup over the whipped cream. For a fun look, sprinkle chocolate shavings or sprinkles on top. Serve with colorful straws and a slice of fresh banana on the rim for a nice touch. To make your shake taste great, adjust the sweetness. Use more chocolate syrup if you want it sweeter. Just add a bit, blend, and taste. You can enhance the chocolate flavor by adding a tablespoon of cocoa powder. This extra cocoa makes it rich and delicious. Thaw your frozen bananas a little. This helps them blend easier and gives a smooth texture. Use the high-speed setting on your blender. Blend until everything is creamy and well-mixed. If your shake is too thick, just add more milk. Get creative when serving your shake. Use fun straws and colorful glasses. You can place a slice of fresh banana on the rim for a nice touch. Add whipped cream on top and drizzle chocolate syrup for a pretty look. Finish with chocolate shavings or sprinkles for extra flair. {{image_2}} If you want a dairy-free shake, there are great milk choices. You can use almond milk, oat milk, or coconut milk. Each brings a unique flavor. Almond milk adds a nutty touch, while oat milk gives a creamy feel. Coconut milk has a tropical vibe that pairs well with banana. You can boost your shake’s flavor and nutrition. Adding peanut butter or almond butter gives it a rich taste and creaminess. This also adds protein and healthy fats. If you want to increase protein, mix in some protein powder. This makes your shake even more filling and nutritious. Explore different flavors by changing the syrup. Caramel or strawberry syrup can add new layers to your shake. You can also sprinkle in some spices like cinnamon or nutmeg. These spices bring warmth and depth, making your shake even more exciting. After you enjoy your shake, store leftovers in the fridge. Use an airtight container to keep it fresh. Place the shake in the fridge right away. It tastes best within one day. If you want to save it longer, consider freezing. Pour the shake into ice cube trays. Once frozen, blend the cubes later for a quick treat. In the fridge, the shake lasts about one day. Check for separation or a change in smell. If it looks odd or smells sour, toss it out. Always trust your senses. Fresh ingredients help the shake taste great. Follow these tips, and you'll enjoy your treat longer! To make this shake, you need a few simple steps. First, peel and chop two frozen bananas. Next, blend them with one cup of milk, 1/4 cup of chocolate syrup, one tablespoon of cocoa powder, and 1/2 teaspoon of vanilla extract. Blend until smooth. If it’s too thick, add more milk. Pour it into glasses and top with whipped cream, chocolate syrup, and sprinkles. That’s it! For the full recipe, check above. Yes, you can use fresh bananas. However, the texture will differ. Fresh bananas make the shake thinner and less creamy. Frozen bananas add a chill and a smooth texture. If you use fresh, add ice for a cold shake. You can use many non-dairy alternatives. Almond milk, oat milk, and coconut milk work well. Each adds unique flavor. Almond milk has a nutty taste, while coconut milk gives a tropical twist. Oat milk is creamy and blends nicely. To make this shake healthier, try a few tricks. Use less chocolate syrup or opt for unsweetened cocoa powder. You can add spinach or protein powder for extra nutrition. Use almond milk for fewer calories. These small changes keep it tasty while boosting health. You now know how to make a delightful chocolate-covered banana shake. We covered the main ingredients, instructions, tips, and fun variations. Remember, use ripe, frozen bananas for the best taste and texture. Feel free to customize your shake with flavors you love. And don't forget about storage tips to enjoy your shake later. This treat is simple and can be tailored to your needs. Enjoy your shake creation!

Chocolate Covered Banana Shake Delightfully Smooth Treat

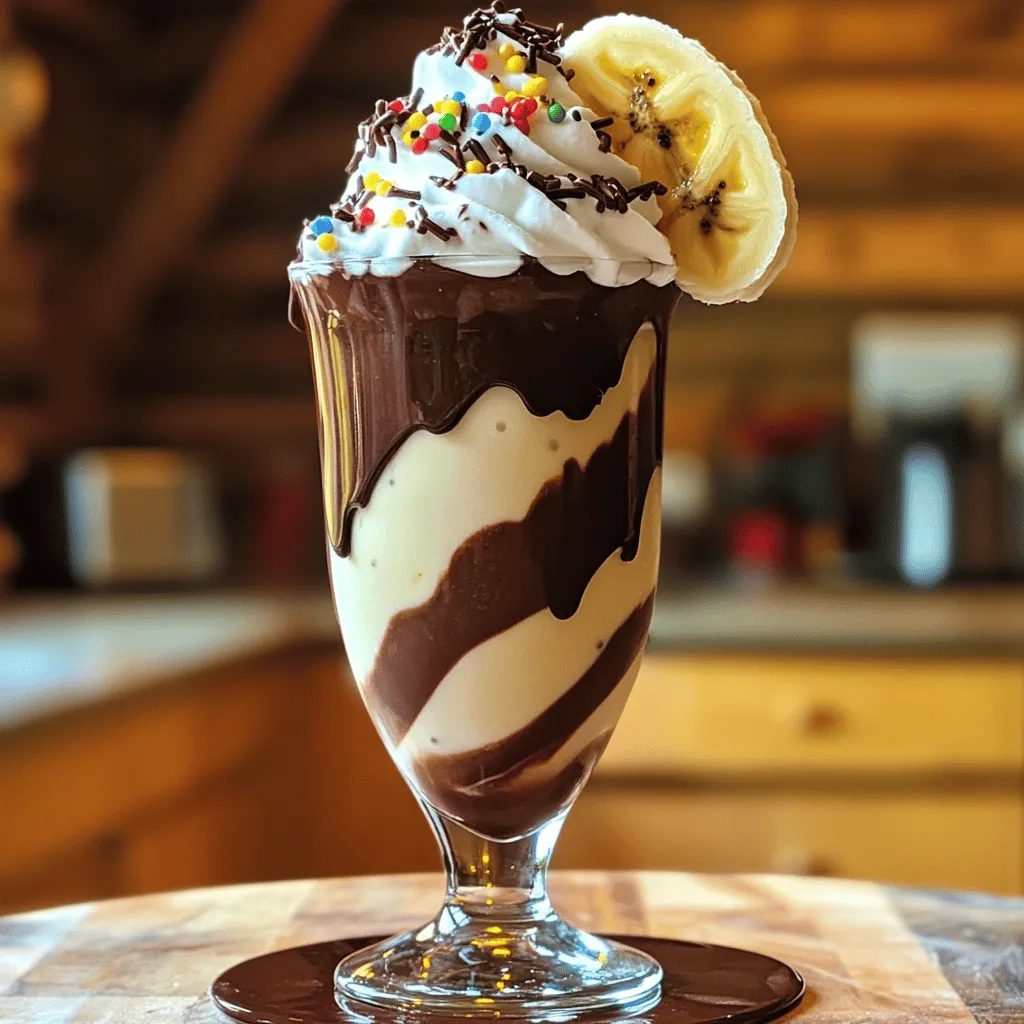
Who doesn’t love a creamy, chocolatey treat? The Chocolate Covered Banana Shake is your new go-to delight. With just a

To make a tasty Blueberry Matcha Frappe, you need some simple ingredients. Here’s what you’ll need: - 1 cup fresh or frozen blueberries - 1 tablespoon matcha green tea powder - 1 cup almond milk (or any milk of choice) - 1 tablespoon honey or maple syrup (adjust to taste) - 1/2 cup ice cubes - A pinch of salt - Whipped cream (optional, for topping) - Extra blueberries and matcha powder for garnish Using fresh or frozen blueberries offers great flavor and nutrition. Matcha green tea powder adds a unique taste and health benefits. Almond milk gives a nice creamy base, but you can use any milk you like. Sweeteners like honey or maple syrup add just the right touch of sweetness. Ice cubes keep your drink cool and refreshing. Finally, toppings like whipped cream and extra blueberries make your frappe look and taste even better! This combination of ingredients makes a delicious and healthy treat. When you blend them, you create a creamy and vibrant drink. For the full recipe, check the complete instructions above. 1. Rinse and prepare blueberries If you use fresh blueberries, rinse them well under cold water. Pat them dry with a towel. If you choose frozen blueberries, set them aside. They can go straight into the blender. 2. Combine ingredients in blender In your blender, add the blueberries, matcha green tea powder, almond milk, honey or maple syrup, ice cubes, and a pinch of salt. This mix brings together sweet fruit and earthy matcha. 3. Blend to desired consistency Blend everything on high speed. Watch the mixture turn smooth and creamy. If you want it sweeter, add more honey or syrup. Blend again until you reach your preferred taste. 4. Pour into glasses and add toppings Pour your frappe into tall glasses. Leave some space at the top if you plan to add whipped cream. For a fun touch, add a dollop of whipped cream, a sprinkle of matcha powder, and a few extra blueberries on top. This Blueberry Matcha Frappe is not just a treat; it is a blend of flavors that refreshes and nourishes. Enjoy every sip and feel good about it! For the complete recipe, check out the Full Recipe section. Choosing the right matcha powder is key. Look for bright green matcha. This color shows quality and freshness. You can find it at health food stores or online. Adjusting sweetness is easy. Start with one tablespoon of honey or maple syrup. Blend, then taste. If you want it sweeter, add more. This makes each drink just for you. To achieve optimal thickness, use less almond milk. You can also add more ice. Blend until smooth. If it’s too thick, add a bit more milk. The best times to enjoy a frappe are warm days. It’s great for breakfast, snacks, or a fun treat. Pair it with light snacks. Try it with granola bars or yogurt. You can also enjoy it with healthy meals, like salads or sandwiches. {{image_2}} You can change up your Blueberry Matcha Frappe with different fruits. Try adding bananas or strawberries for a new twist. Bananas add creaminess and a mellow flavor. Strawberries bring a sweet and tangy taste. Both fruits blend well with blueberries and matcha. If you want to skip dairy, use alternative milks. Almond milk is a great choice, but you can also use oat milk or coconut milk. Each type of milk gives the frappe a unique taste. Experiment to find your favorite! For a healthier frappe, swap out sweeteners. Instead of honey or syrup, use natural sweeteners like agave or stevia. These options can cut down on sugar while still keeping your drink tasty. You can also boost the nutrition by adding protein. Try mixing in a scoop of protein powder or a spoonful of nut butter. This will make your frappe more filling and can help with energy. Each of these changes keeps the drink delicious while making it better for you. If you want the complete recipe, check out the Full Recipe section! To keep your Blueberry Matcha Frappe fresh, store any leftovers in the fridge. Use an airtight container. This way, it stays cool and tasty for up to two days. If you want to store it longer, consider freezing. Pour the frappe into ice cube trays. Once frozen, transfer the cubes to a freezer bag. This method helps you enjoy a quick treat later. When you're ready to enjoy your frappe again, you’ll need to re-blend it. If it's frozen, let it sit at room temperature for about 10 minutes. Then, place the frappe cubes in a blender. Add a splash of almond milk or water. Blend until smooth. This method gives you a fresh taste without losing flavor. What is the nutritional value of Blueberry Matcha Frappe? The Blueberry Matcha Frappe is a healthy drink. It has vitamins, minerals, and antioxidants. Blueberries provide fiber and vitamin C. Matcha adds a boost of energy and antioxidants. Almond milk is low in calories and rich in calcium. Overall, this drink is a tasty and nutritious choice. Can I use different types of matcha? Yes, you can use different types of matcha. Each type has its own taste and quality. Ceremonial grade matcha is the best for drinking. Culinary grade matcha works well for cooking and baking. Choose based on your taste and budget. Where can I buy Blueberry Matcha Frappe? You can find Blueberry Matcha Frappe in cafes and juice bars. Some grocery stores offer ready-made versions too. If you want to make it at home, use the Full Recipe for easy steps. How do I make a vegan version? To make a vegan Blueberry Matcha Frappe, just use plant-based milk. Almond milk, oat milk, or coconut milk all work well. Sweeten with maple syrup instead of honey for a vegan-friendly option. What are the health benefits of blueberries and matcha? Blueberries are low in calories and high in antioxidants. They help fight free radicals and support heart health. Matcha boosts metabolism and supports mental clarity. Together, they create a powerful health duo. How can I make this recipe with a dairy alternative? You can easily swap out regular milk for any dairy alternative. Almond milk, soy milk, or oat milk all make great choices. This way, you can enjoy the same great taste without dairy. In this blog post, we explored how to make a Blueberry Matcha Frappe. We covered the ingredients needed, step-by-step instructions, and tips for the perfect drink. You learned about flavor variations, storage tips, and answers to common questions. This refreshing frappe blends health and taste. You can adjust it to fit your needs. Enjoy making this simple treat and share it with others.

Blueberry Matcha Frappe Refreshing and Healthy Treat

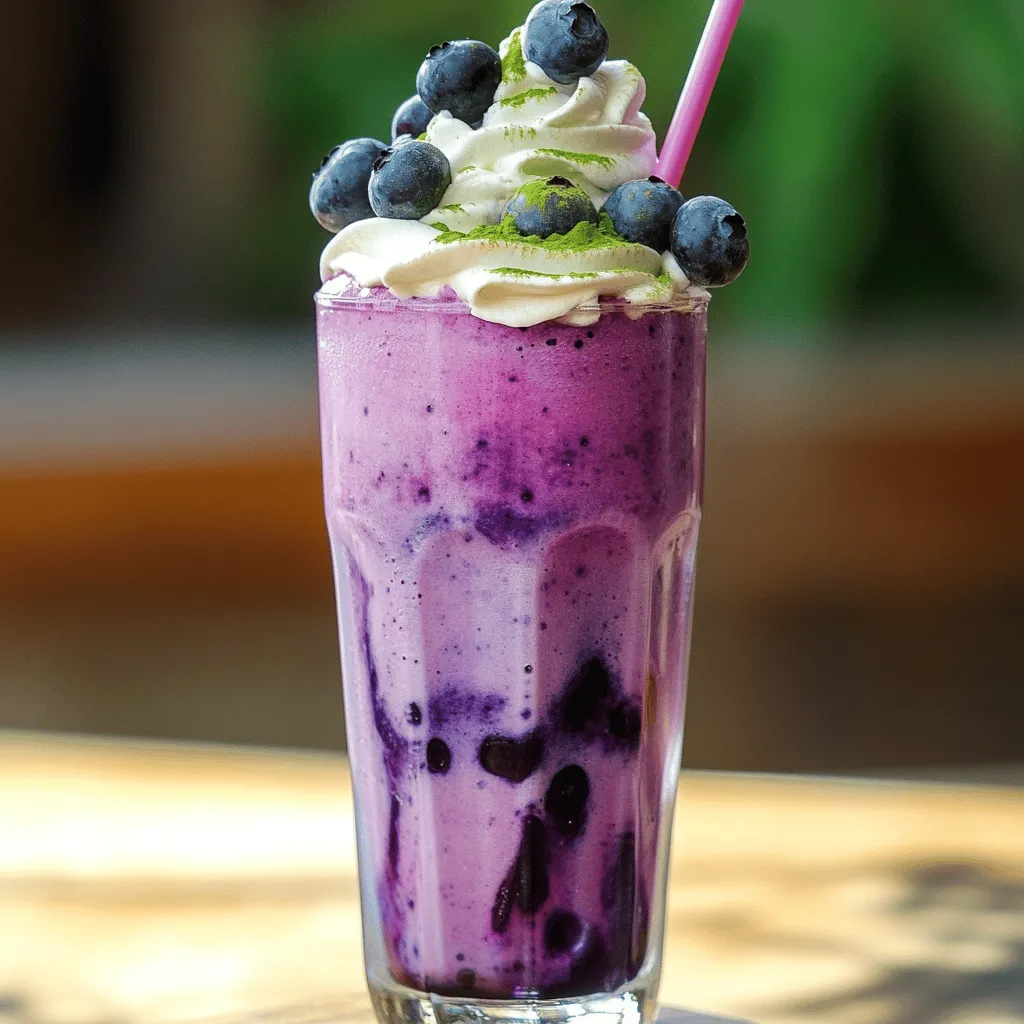
Looking for a cool, tasty treat that also packs a healthy punch? Let me introduce you to the Blueberry Matcha

- Strong brewed coffee - Milk options (dairy and non-dairy) - Syrups: caramel, praline, and vanilla - Additional toppings: whipped cream, crushed pralines, or pecans - Ice cubes To make an Iced Caramel Praline Latte, you need a few key items. First, brew a strong cup of coffee. I prefer using dark roast coffee for a bold flavor. Let it cool before you use it. You can brew it ahead of time for ease. Next, choose your milk. You can use whole milk, almond milk, or oat milk. Each option changes the taste, so try different kinds to see what you like best. Now, gather your syrups. You will need caramel sauce, praline syrup, and vanilla syrup. These add sweetness and flavor. Adjust the amount of syrup to match your taste. For toppings, whipped cream makes it extra special. You can also add crushed pralines or pecans for a nice crunch. Finally, don't forget the ice cubes! They keep your drink cold and refreshing. You can find the full recipe for this delicious drink [Full Recipe]. Brewing the coffee Start by brewing a strong cup of coffee. Use your favorite beans for the best flavor. Allow it to cool to room temperature. You can also brew it ahead and chill it in the fridge. Cooling and preparing the glass Grab a tall glass and fill it halfway with ice cubes. This keeps your drink cold and refreshing. Make sure the glass is clean and dry before adding ice. Layering ingredients for best flavor Pour the cooled coffee over the ice. Next, add the milk. You can use dairy or a non-dairy milk of your choice. Adjust the milk based on how creamy you like your drink. Then, drizzle in the caramel sauce, praline syrup, and vanilla syrup. Stir well to mix all the flavors. Serving suggestions Top your drink with whipped cream if you like. Drizzle more caramel sauce on top for a sweet finish. For extra crunch, sprinkle crushed pralines or pecans. Serve with a straw or a long spoon to enjoy every sip. To make the best Iced Caramel Praline Latte, focus on the coffee brewing method. Use a strong brew for bold flavor. I recommend using a drip coffee maker or a French press. The stronger the coffee, the better your drink will taste. Adjust the sweetness and creaminess to your liking. Start with two tablespoons of caramel sauce. If you like it sweeter, add more syrup. For creaminess, choose your milk. Whole milk gives a rich taste, while almond milk is lighter. You can add extras for flavor enhancement. Try a pinch of sea salt to balance the sweetness. A dash of cinnamon or nutmeg can add warmth and spice. You might also enjoy adding a splash of chocolate syrup for a mocha twist. These tips will help you create your perfect Iced Caramel Praline Latte. Follow the [Full Recipe] to guide you through the steps. Enjoy your delicious drink! {{image_2}} You can make your Iced Caramel Praline Latte just the way you like it. Here are some fun ideas to try: - Dairy-free alternatives: Use almond, oat, or soy milk instead of regular milk. These options give your drink a unique taste and are great for those who are lactose intolerant. - Flavor variations: Want something different? Add mocha or hazelnut syrup for an exciting twist. Mocha gives a rich chocolate flavor, while hazelnut adds a nutty touch. Both make your latte richer and more delicious. - Seasonal adaptations: Change it up for the seasons! In fall, add a dash of pumpkin spice syrup for a cozy vibe. For winter, try a peppermint syrup for a festive feel. You can keep your drink fresh and interesting all year long. With these options, you can create a new drink every time. Just check the full recipe for the basic steps to get started. Enjoy exploring flavors! You can make your Iced Caramel Praline Latte ahead of time. Here’s how: - Storing brewed coffee: Brew your coffee in advance. Let it cool and store it in the fridge. It stays fresh for about a week. Just remember, strong coffee will keep its flavor better. - Preparing syrups in advance: You can also make your syrups ahead of time. Mix equal parts sugar and water, then add your flavors. Store these in a jar in the fridge. They should last for up to a month. - Keeping the drink fresh for later enjoyment: If you want to save your latte, mix only what you need. Store the coffee and milk separately. When you're ready to sip, add ice and mix in the syrups. This way, it tastes fresh every time. These tips let you enjoy your Iced Caramel Praline Latte anytime you want. For the full recipe, check the recipe section. To make an Iced Caramel Praline Latte at home, follow these steps: 1. Brew a strong cup of coffee and let it cool. 2. Fill a tall glass halfway with ice cubes. 3. Pour the cooled coffee over the ice. 4. Add 1 cup of milk to the coffee. 5. Stir in 2 tablespoons of caramel sauce, 1 tablespoon of praline syrup, and 1 tablespoon of vanilla syrup. 6. Top with whipped cream, if you like, and drizzle more caramel sauce on top. 7. Finish with crushed pralines or pecans, if desired. This drink is simple yet tasty and perfect for warm days. You can find the Full Recipe above. The calories in an Iced Caramel Praline Latte vary based on the ingredients used. On average, this drink has around 300 to 500 calories, depending on the milk and syrups. Dairy milk adds more calories than non-dairy options. The whipped cream and extra toppings can also increase the count. You can buy an Iced Caramel Praline Latte at many coffee shops. Popular chains often offer this drink, especially in the summer. Local cafes may also serve it. Always check their menu or ask the barista for this delicious option. Yes, you can use decaf coffee for this recipe. Decaf coffee tastes great when mixed with milk and syrups. It allows you to enjoy the flavor without the caffeine boost. Just brew it strong to keep the taste rich. If you don't have praline syrup, you can use hazelnut syrup or toffee syrup. Both options add a nutty sweetness to your latte. You can also blend crushed nuts into your drink for a similar taste. This blog post covered how to make an Iced Caramel Praline Latte. You learned about the needed ingredients, from coffee to fun toppings. I gave you clear steps for preparation and offered tips to enhance flavor. Also, we explored ways to customize your drink for your tastes. Lastly, I shared storage tips to keep your drink fresh. Making this latte at home is easy and fun. You can adjust it to match your mood and cravings. Enjoy crafting your perfect Iced Caramel Praline Latte!

Iced Caramel Praline Latte Simple and Delicious Recipe

If you’re craving a sweet, cool treat to jazz up your day, look no further! My Iced Caramel Praline Latte

- 1 cup frozen cherries - 1/2 cup cream cheese, softened - 1/2 cup Greek yogurt - 1 cup milk (dairy or plant-based) - 2 tablespoons honey or maple syrup - 1 teaspoon vanilla extract - 1/4 teaspoon almond extract (optional) - 1/2 cup crushed graham crackers (for garnish) The cherry cheesecake smoothie combines sweet and creamy flavors. It starts with frozen cherries, which add a nice chill. I use cream cheese for a rich taste and Greek yogurt for protein. Milk helps blend everything smoothly. Sweetness comes from honey or maple syrup, and vanilla adds warmth. Almond extract gives a hint of nuttiness, but it’s optional. The crushed graham crackers on top mimic that cheesecake crust, making it fun to eat. - Calories per serving: About 300 - Protein content: 10 grams - Fat content: 9 grams - Carbohydrates: 50 grams, Sugars: 35 grams This smoothie is not just tasty; it's also packed with good stuff. You get protein from the yogurt and cream cheese, which helps you feel full. It has a good balance of carbs and sugars, mostly from the cherries and sweeteners. Check out the Full Recipe to make this delightful treat! 1. Combining ingredients in the blender Start by adding all your ingredients to the blender. You will need: - 1 cup frozen cherries - 1/2 cup cream cheese, softened - 1/2 cup Greek yogurt - 1 cup milk (dairy or plant-based) - 2 tablespoons honey or maple syrup - 1 teaspoon vanilla extract - 1/4 teaspoon almond extract (optional) Place these ingredients in the blender and secure the lid tightly. 2. Blending tips for smooth consistency Blend on high speed until the mixture is smooth and creamy. Make sure there are no chunks of cherries or cream cheese left. If your blender struggles, stop and scrape down the sides. You want a silky texture, so blend a bit longer if needed. 3. Adjusting sweetness to taste Once blended, taste your smoothie. If you want it sweeter, you can add more honey or maple syrup. Blend again briefly to mix in any extra sweetener. 1. Pouring into glasses Carefully pour the smoothie into glasses. Leave a little space at the top to add your toppings. 2. Garnishing with crushed graham crackers Take your crushed graham crackers and sprinkle them on top of each glass. This adds a nice crunch and cheesecake flavor. 3. Adding a cherry on top Finish each smoothie with a cherry on top. This makes it look pretty and adds a nice touch. Now you have a delicious Cherry Cheesecake Smoothie ready to enjoy! For the complete recipe, check out the Full Recipe above. Using fresh or frozen cherries can change your smoothie. Fresh cherries give a bright flavor but require pitting. Frozen cherries save time and make your drink cold. I often use frozen ones for a quicker prep. If you want to swap cream cheese, try ricotta or cashew cream. Greek yogurt adds protein, but regular yogurt works too. These alternatives can change the taste but still keep it creamy. To achieve a creamy texture, blend your ingredients well. Start on low speed, then increase. This helps all the pieces mix smoothly. If your smoothie is too thick, add more milk. Too thin? Blend in a bit more cream cheese or yogurt. If you face lumps, check your blender’s blade. Make sure it's sharp and clean. You can also let the cherries sit a bit to soften before blending. You can enhance the flavor with spices like cinnamon or nutmeg. A pinch can add warmth and depth. Want to make it unique? Try adding cocoa powder for a chocolate twist. Experimenting with sweeteners is fun too. If you like it sweeter, add more honey or maple syrup. You could use stevia or agave for a different taste. Adjust until it’s perfect for you. For the full recipe, check the [Full Recipe]. {{image_2}} You can make your cherry cheesecake smoothie healthier by swapping some ingredients. Use low-fat or non-dairy cream cheese to cut down on fat. This change still keeps that creamy taste. If you want to add more nutrition, try adding spinach or protein powder. Spinach blends well and adds vitamins without changing the taste much. Protein powder boosts the protein content, making it a great snack or meal option. Want to mix things up? Try a chocolate cherry cheesecake smoothie. Just add cocoa powder or chocolate syrup to the mix. This gives a rich, sweet twist. If you prefer something lighter, go for a vanilla cherry cheesecake smoothie. Use vanilla yogurt instead of plain yogurt and skip the almond extract. It’s a simple change that gives a fresh flavor. You can also adjust your smoothie based on the season. In summer, add other fruits like strawberries or peaches for a fruity kick. These fresh fruits pair nicely with cherries. In winter, add warm spices like cinnamon or nutmeg. This gives a cozy, festive feel to your drink. These variations keep your cherry cheesecake smoothie exciting all year round while sticking to the full recipe. To keep your smoothie fresh, refrigerate it in an airtight container. It stays good for about one day. If you want to make it last longer, you can freeze it. Pour the smoothie into ice cube trays for easy use later. This way, you can blend it again when you crave it. If you have leftover cream cheese, try making a quick dip. Mix it with herbs and spices for a tasty spread. For yogurt, use it in pancakes or muffins. Don't forget about leftover cherries! You can toss them into oatmeal or yogurt for extra flavor. Your cherry cheesecake smoothie lasts about 24 hours in the fridge. After that, it may lose its taste and texture. If you freeze it, it can last up to three months. Using frozen cherries helps keep the smoothie fresh longer. They lock in flavor and nutrients, making each sip delightful. A Cherry Cheesecake Smoothie is a creamy drink that tastes like dessert. It mixes frozen cherries, cream cheese, and Greek yogurt. The smoothie has a sweet and tangy flavor. You get a hint of cherry with a rich cheesecake taste. This drink is smooth and satisfying. You can enjoy it for breakfast or as a snack. It's like having your favorite cheesecake in a glass! Yes, you can use fresh cherries. However, this will change the texture. Fresh cherries make the smoothie thinner and less cold. Frozen cherries give a thicker and creamier texture. They also chill the drink, making it refreshing. If you use fresh cherries, add ice to keep it cool. Yes, this smoothie works well for meal prep. You can make it in advance and store it. To prepare, blend the ingredients and pour into jars. Seal them tightly and keep in the fridge. The smoothie stays fresh for up to two days. If you want to store it longer, freeze it. Just remember to thaw it before drinking. Yes! You can make this smoothie vegan easily. Use non-dairy cream cheese and yogurt. Almond milk or oat milk is great for the liquid. You can swap honey for maple syrup to keep it plant-based. These changes keep the rich flavor while making it vegan-friendly. The cherry cheesecake smoothie is a tasty blend of flavors and nutrients. You mix frozen cherries, cream cheese, and yogurt with a touch of sweetener. This guide showed you how to prepare it, blend it well, and serve it perfectly. Remember, you can customize the recipe with different flavors or healthier options. Have fun experimenting with ingredients! Whether you enjoy it fresh or store leftovers, this smoothie is a delightful treat any time of year.

Cherry Cheesecake Smoothie Simple and Delicious Recipe

Looking for a tasty way to enjoy the flavor of cherry cheesecake? This Cherry Cheesecake Smoothie recipe is simple and

Older posts
Newer posts
← Previous Page1 … Page70 Page71 Page72 … Page85 Next →

dsad

© 2026 greenmealmap • Built with GeneratePress

Our Policies

  • Copyright Policy
  • Cookie Policy
  • GDPR Policy
  • Privacy Policy
  • Disclaimer
  • Terms Of Use

More Information

  • Home
  • About
  • Contact
  • Appetizers
  • Dessert
  • Dinner
  • Drinks
©2026, greenmealmap About Back To Top