Skip to content
DisclaimerTerms Of UseGDPR PolicyCookie Policy

greenmealmap

  • Home
  • Drinks
  • Appetizers
  • Dinner
  • Dessert
  • About
  • Contact
  • Privacy Policy
DisclaimerTerms Of UseGDPR PolicyCookie Policy

NO-ING-IMG

- Fresh or frozen strawberries - Ripe banana - Greek yogurt (plain or vanilla) - Almond milk (or any milk of choice) The main ingredients create a tasty base for your smoothie bowl. You can use fresh strawberries or frozen ones. Both work well, but frozen gives a creamier texture. The ripe banana adds natural sweetness and creaminess. Greek yogurt gives a nice thickness and tang. Almond milk, or any milk you like, helps blend it all together. - Honey - Maple syrup You can make your bowl sweeter with honey or maple syrup. If you like it sweet, add a tablespoon of either. Taste the mix before adding more. You want it just right for your taste buds. - Sliced banana - Sliced strawberries - Granola - Shredded coconut - Nuts or seeds Toppings make your smoothie bowl look fun and tasty! You can add sliced banana and strawberries for color. Granola gives a nice crunch. Shredded coconut adds flavor and texture. Nuts or seeds pack a protein punch. Get creative and mix and match your toppings! Check out the Full Recipe for more ideas. To make your Strawberry Banana Smoothie Bowl, start by blending the ingredients. Gather all your items first. You will need fresh or frozen strawberries, a ripe banana, Greek yogurt, almond milk, honey or maple syrup, and chia seeds. 1. Place the strawberries, banana, yogurt, almond milk, and chia seeds into the blender. 2. If you like it sweeter, add honey or maple syrup. 3. Blend on high speed until it is smooth and creamy. Pause to scrape the sides if needed. Next, adjust sweetness to suit your taste. After blending, taste your smoothie. If it’s not sweet enough, add a bit more honey or maple syrup and blend again. Now, it's time to plate and serve your smoothie bowl. Pour the blended smoothie into a bowl. Make sure it looks nice and thick. Decorate the top with your favorite toppings. You can add slices of banana and strawberries for color. A handful of granola gives it a nice crunch. Sprinkle shredded coconut and a few nuts or seeds on top for extra flavor. Serve your smoothie bowl right away for the best taste. The fresh ingredients will shine when it’s fresh. Enjoy it with a spoon! This bowl is not just tasty; it also looks beautiful. Dive in and savor each bite. For the complete recipe, check the Full Recipe section. To get the right texture, adjust the liquid. If you want a thicker bowl, use less almond milk. For a thinner mix, add more milk. This lets you control how you like your smoothie bowl. Use a good blender. Start blending on low, then increase to high. Stop and scrape the sides. This makes sure everything blends well. Blend until your mixture is smooth and creamy. For a sweeter taste, add a splash of vanilla extract. This can really lift the flavor of your smoothie. You can also sprinkle in some cinnamon. It adds warmth and pairs well with bananas. If you prefer dairy-free, swap Greek yogurt with coconut yogurt. This keeps the bowl creamy without dairy. You can also add protein powder or greens. A scoop of protein fits well, and spinach blends in nicely without changing the taste. Explore these tips to make your strawberry banana smoothie bowl even better! For the complete recipe, check the Full Recipe section. {{image_2}} You can mix up your smoothie bowl with other fruits. A mixed berry smoothie bowl is a tasty option. Use ripe strawberries, blueberries, and raspberries for a burst of flavor. Just blend them with yogurt and milk. You can also try a tropical smoothie bowl with pineapple. This adds bright notes and a sweet twist. Blend pineapple chunks with bananas for a sunny treat. Want to boost your smoothie bowl? Add superfoods like spinach or kale. These greens add nutrients without changing the taste much. Just a handful makes a difference. You can also use nut butters for extra creaminess. Almond or peanut butter gives a rich texture and flavor. Just a spoonful will do. Change your smoothie bowl with the seasons. In summer, add ripe peaches for a juicy twist. Blend them in with your strawberries and bananas. For fall, try a pumpkin spice version. Use pumpkin puree and a pinch of cinnamon to warm things up. This makes your bowl cozy and perfect for cooler days. You can find the full recipe details to create your perfect Strawberry Banana Smoothie Bowl. You may have leftover smoothie bowl after enjoying it. To keep it fresh, store it in the fridge. Place it in an airtight container. This keeps air out and helps maintain flavor. Consume the leftovers within 24 hours for best taste. If you want to store it longer, freezing is a great option. Pour the leftover smoothie into ice cube trays. Once frozen, pop the cubes into a bag. This way, you can enjoy your smoothie bowl later. Just blend the cubes with some milk when you’re ready. For the fridge, use airtight containers. These help prevent spills and keep flavors intact. Make sure the lid closes tightly. For freezing, ice cube trays work best. They allow you to portion the smoothie easily. You can grab a few cubes at a time. This makes quick breakfasts or snacks easy! If you want the full recipe, check out the Strawberry Banana Bliss Bowl. To make your smoothie bowl thicker, use less liquid. Try these tips: - Add more frozen fruit. - Use less almond milk. - Mix in oats or nuts. - Blend in less yogurt. These steps help create a creamy texture that stays in the bowl. Yes, you can easily make this recipe vegan. Here are some swaps: - Use coconut yogurt instead of Greek yogurt. - Replace almond milk with any plant-based milk. - Skip honey and use maple syrup instead. These changes keep the flavors bright and fresh while being vegan-friendly. If you need a substitute for Greek yogurt, try these options: - Silken tofu can provide a creamy texture. - Coconut yogurt adds a nice flavor. - Cashew cream is rich and smooth. These alternatives work well and keep your bowl delicious. This article explored how to create a delicious smoothie bowl. We discussed main ingredients like strawberries, bananas, and Greek yogurt. I shared tips for sweeteners, toppings, and storage. It’s easy to customize for your taste. Try different fruits or superfoods to enhance flavor and nutrition. Remember to enjoy it fresh and adjust the texture to your liking. With these steps, you can make a tasty, healthy treat any time. Happy blending!

Strawberry Banana Smoothie Bowl Delightful Recipe

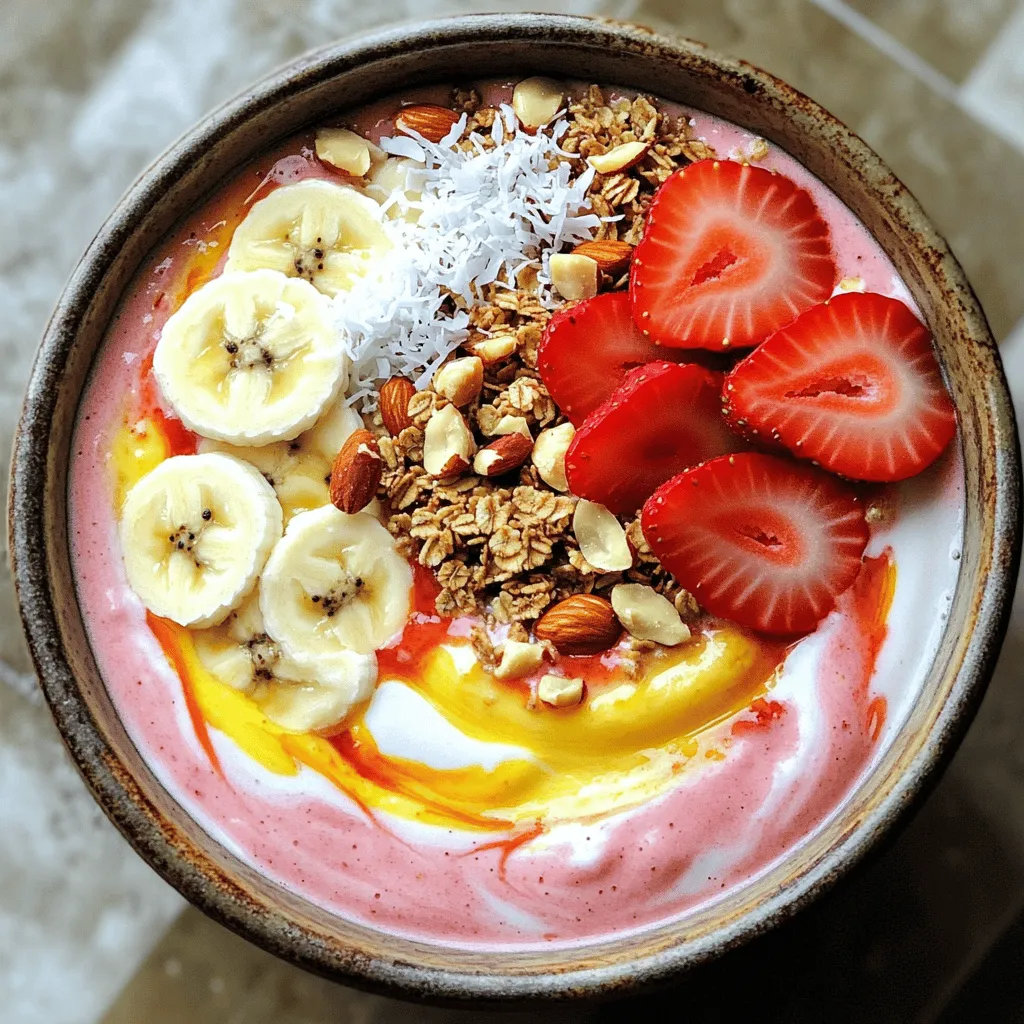
Craving a refreshing treat that’s both tasty and healthy? Dive into my Strawberry Banana Smoothie Bowl! This delightful recipe combines

- 2 chicken breasts, grilled and sliced - 4 cups mixed greens (spinach, arugula, romaine) - 1 avocado, diced - 1 cup cherry tomatoes, halved - 1/4 cup red onion, thinly sliced - 1/2 cup cucumber, diced The main ingredients offer a balance of protein, greens, and fresh vegetables. Chicken breasts serve as the star of this dish. They provide lean protein, making the salad filling and healthy. Mixed greens add a variety of textures and flavors, while the avocado brings creaminess. Cherry tomatoes burst with sweetness, and red onion adds a sharp bite. Cucumber gives a refreshing crunch. Together, these ingredients create a colorful and nutritious meal. - 3 tablespoons honey - 2 tablespoons Dijon mustard - 2 tablespoons apple cider vinegar - 1/4 cup olive oil - Salt and pepper to taste The dressing ties everything together. Honey adds sweetness, while Dijon mustard brings a tangy kick. Apple cider vinegar adds brightness, and olive oil smooths the mix. Salt and pepper round out the flavor. This dressing is simple yet packed with flavor. It complements the salad well, enhancing each bite. - 1/4 cup crumbled feta cheese (optional) - 1/4 cup sliced almonds or walnuts (for crunch) Optional add-ins can elevate your salad. Feta cheese adds a salty tang that contrasts nicely with the sweet dressing. Sliced almonds or walnuts provide crunch and a nutty flavor. You can mix and match based on your taste. These add-ins make the salad even more satisfying. You can find the Full Recipe with all the details to get started on your Honey Mustard Chicken Salad! To start, I season the chicken breasts with salt and pepper. This simple step adds great flavor. I prefer to grill the chicken over medium-high heat. Grill each breast for about 6-7 minutes on one side. Then, flip it over and grill for another 6-7 minutes. You want the chicken to be cooked through and no longer pink inside. After grilling, let the chicken rest for a few minutes. This helps keep it juicy when you slice it. Next, I make the honey mustard dressing. In a small bowl, I whisk together the honey, Dijon mustard, apple cider vinegar, and olive oil. The key is to whisk well until the dressing is smooth and creamy. This process is called emulsification. It makes the dressing thick and helps it stick to the salad. After whisking, I taste it. If it needs more flavor, I add a pinch of salt or pepper. Now, it’s time to assemble the salad. I start with a large bowl of mixed greens. Then, I add in diced avocado, halved cherry tomatoes, thinly sliced red onion, and diced cucumber. Next, I top it with the sliced grilled chicken. For a nice crunch, I sprinkle sliced almonds or walnuts over the top. When it’s all in the bowl, I drizzle the honey mustard dressing over everything. To mix, I toss the ingredients gently. This way, all the flavors blend without crushing the greens. You can find the Full Recipe for more detailed steps and measurements. To get juicy grilled chicken, cook for about 6-7 minutes per side. This time works well for chicken breasts that are about 1 inch thick. For thicker pieces, add a few more minutes. You can use a meat thermometer to check the inside temperature. It should reach 165°F for safety. To achieve those lovely grill marks, make sure the grill is hot before adding the chicken. Place the chicken on the grill and do not move it for a few minutes. Once you see good grill lines, flip it over. This method keeps the juices inside the chicken. If your honey mustard dressing is too thick, add a small amount of water or more olive oil. Whisk well until it reaches your desired consistency. If it’s too thin, add a bit more mustard or honey. For extra flavor, you can mix in herbs like dill or chives. A splash of lemon juice can also brighten the taste. Always taste the dressing before serving, and adjust as needed. To make your salad even better, pair it with toasted bread or a light soup. These sides will balance the meal nicely. When serving, use a large bowl to present the salad. This looks great at parties. You can also arrange the salad in layers for a colorful display. Top with feta cheese and nuts just before serving for a fresh look. For the full recipe, check the link provided. {{image_2}} You can switch up the protein in this salad. Rotisserie chicken makes a quick and tasty choice. Just shred the meat and toss it in. If you want a vegetarian option, try using tofu. Press and cube the tofu, then grill or sauté it until golden. This gives you a great base for your salad. While honey mustard dressing is classic, you can change it up. Try different types of mustard like spicy brown or whole grain. Each mustard adds a unique kick. If you're out of honey, you can use agave syrup instead. It has a similar sweetness and works well in this dressing. Using seasonal fruits or vegetables can elevate your salad. In summer, add fresh strawberries or peaches. In fall, try roasted squash or apples. These ingredients add flavor and color. Adjust the salad based on what’s fresh and in season. This keeps it exciting and full of flavor. To keep your Honey Mustard Chicken Salad fresh overnight, store it in the fridge. Use an airtight container to keep out air. This helps maintain the salad's crispness. I suggest layering the salad ingredients. Place the chicken on top of the greens to avoid sogginess. You can also store the dressing separately. This method keeps everything fresh and tasty. If you want to save the salad for later, consider freezing the chicken. Freeze it in a single layer to avoid sticking. For the dressing, do not freeze it. Freezing can change its texture. Instead, store the dressing in the fridge for up to a week. Keep all salad ingredients separate, like the greens and veggies. This way, your salad stays fresh and appealing. For reheating grilled chicken, use the oven or stovetop. Heat it gently to avoid drying it out. Microwave it in short bursts, checking often. For the dressing, if it's too thick after cooling, whisk in a little water to thin it out. Make sure to re-emulsify the dressing before serving. This keeps your salad tasty and fresh. Enjoy every bite! For the full recipe, check out the Honey Mustard Chicken Salad . You can use maple syrup or agave nectar as a sweetener. Both will add a nice flavor. Maple syrup gives a rich taste, while agave is milder. You might want to adjust the amount based on your taste. Start with less and add more if needed. Yes, you can prep the salad ahead of time! Keep the greens and dressing separate. This helps keep the salad fresh and crisp. You can grill the chicken earlier and store it in the fridge. Just remember to add the dressing right before serving. A typical serving has about 350-400 calories. This can vary based on the chicken and dressing amounts. If you want to lower calories, use less dressing or skip the cheese. You can still enjoy the meal without losing flavor. Yes, this salad is gluten-free! All the ingredients, like chicken and veggies, are safe to eat. Just check your dressing to ensure no gluten is added. Most mustard and honey are gluten-free, but always read labels. Many popular chains serve this salad well. Look for it at spots like Panera Bread or Corner Bakery. They often have fresh ingredients and tasty dressings. Local cafés might also have their unique take on this dish. This blog detailed how to create a delicious Honey Mustard Chicken Salad. We covered the ingredients, from the main items to the dressing. I shared tips for perfect grilling and the right way to mix the dressing. You learned how to store it well and even explored fun variations. Remember, customizing your salad can make it your own! Enjoy crafting this meal again and again.

Honey Mustard Chicken Salad Tasty and Simple Meal

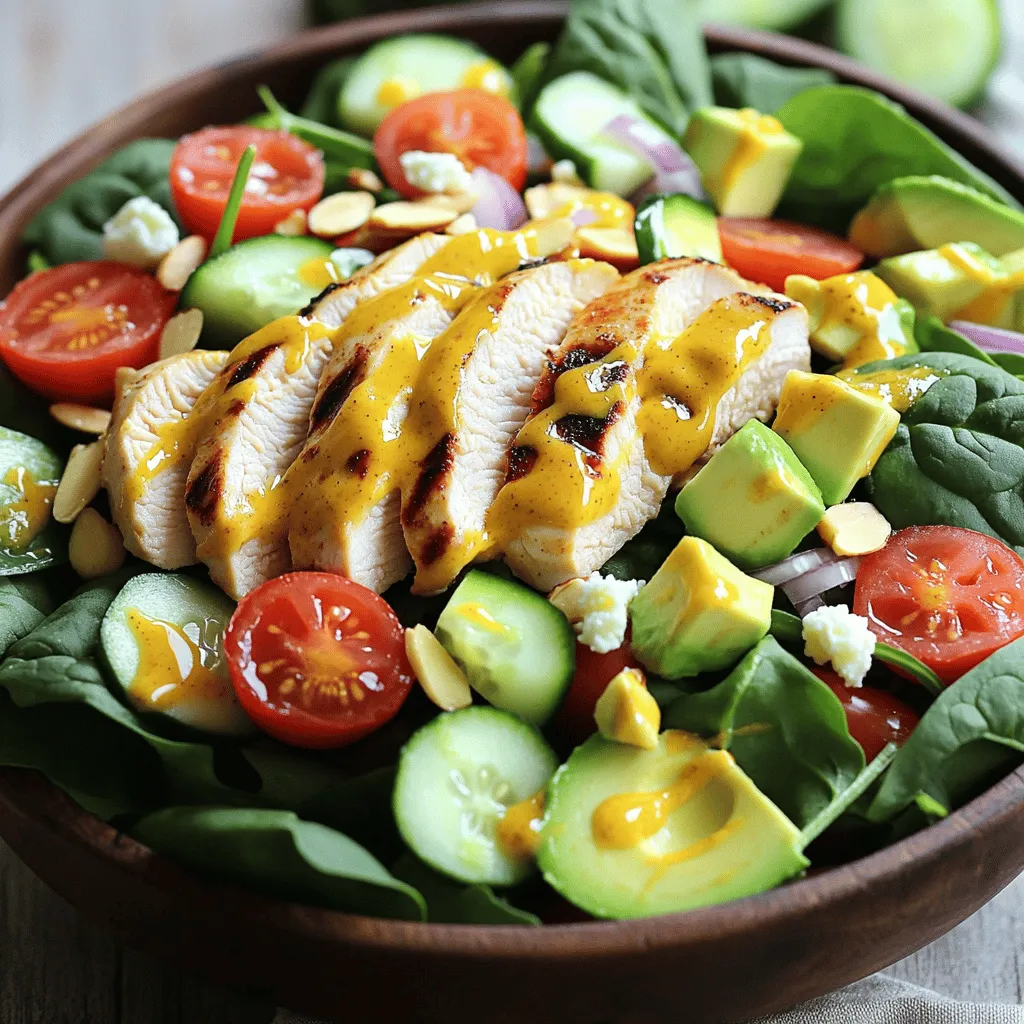
Looking for a meal that’s both tasty and easy to make? Look no further! This Honey Mustard Chicken Salad is

- 1 large head of cauliflower, cut into florets - 6 cloves of garlic, unpeeled - 2 tablespoons olive oil - Salt and pepper to taste - 1/2 cup unsweetened almond milk (or regular milk) - 1/4 cup sour cream or Greek yogurt - 2 tablespoons butter (or vegan alternative) - Fresh chives or parsley, chopped for garnish - Nutritional yeast for a cheesy flavor - Alternative milk options - Other herbs for garnishing To make Roasted Garlic Mashed Cauliflower, gather these ingredients first. Cauliflower is the star of this dish. It brings a light, fluffy texture. Garlic adds rich flavor and sweetness when roasted. Olive oil helps with roasting and gives a nice finish. Salt and pepper enhance the taste. The almond milk or regular milk creates creaminess. Sour cream or Greek yogurt adds tang and richness. Butter gives that extra lusciousness. Fresh herbs like chives or parsley brighten up the dish. You might want to explore some optional ingredients too. Nutritional yeast can mimic cheese flavor. You can also use different types of milk for variety. Fresh herbs can change the look and taste, so feel free to experiment. For the full recipe, check out Roasted Garlic Mashed Cauliflower. This dish will impress your family and friends! - Preheat the oven to 400°F (200°C). - Toss garlic and cauliflower in olive oil. Start by preheating your oven. The heat will help roast the veggies perfectly. Next, grab a large baking sheet. Toss the unpeeled garlic cloves in one tablespoon of olive oil. Then, add the cauliflower florets and drizzle with the remaining olive oil. Sprinkle some salt and pepper to taste. This simple step brings out the flavor. - Roast in the oven for 25-30 minutes. - Stir halfway through for even cooking. Place the baking sheet in the oven. Roast the garlic and cauliflower for about 25 to 30 minutes. You want the cauliflower to be tender and slightly caramelized. Stir halfway through cooking. This ensures that everything roasts evenly and doesn't burn. The smell will make your kitchen feel so warm and inviting! - Squeeze roasted garlic into a mixing bowl. - Blend roasted cauliflower with milk, sour cream, and butter. - Adjust seasoning and transfer to a serving dish. Once the veggies cool slightly, squeeze the roasted garlic from its skins into a mixing bowl. Discard the peels; they won’t add any flavor. Next, add the roasted cauliflower, almond milk, sour cream, and butter to the bowl. Use a potato masher or hand mixer to blend it all together. Keep mixing until you reach a smooth and creamy texture. Taste it and adjust the seasoning if needed. Now, transfer your mashed cauliflower to a serving dish. For a nice touch, you can garnish it with fresh chives or parsley. This dish looks fancy but is easy to make. For the full recipe, check the details above! - Use fresh ingredients for enhanced taste. Fresh garlic and cauliflower make a big difference. - Experiment with seasoning before serving. Taste as you go. Adjust salt and pepper as needed. - For a chunkier texture, mash less. This gives you a hearty feel. - Adjust almond milk to your preferred creaminess. Add more for a smoother mash. - Use colorful garnishes like chives or parsley. This adds brightness to your dish. - Serve in a decorative dish for visual appeal. A nice bowl makes your meal pop. These tips will make your Roasted Garlic Mashed Cauliflower shine. For the full recipe, check the section above. {{image_2}} You can easily make this dish vegan. First, substitute butter with a vegan alternative like coconut oil. This keeps the creamy texture while making it plant-based. Next, use coconut milk instead of almond milk. It adds a unique flavor and richness to the dish. For a keto-friendly version, skip the sour cream. You can also use a low-carb alternative if you prefer. Adding cheese like cream cheese or cheddar cheese gives you a creamier texture. This keeps the dish satisfying while remaining low in carbs. Want to jazz up your mashed cauliflower? Mix in roasted red peppers or fresh spinach for extra color and nutrients. You can also add spices like nutmeg or cumin to deepen the flavor. These small changes can make a big difference in taste. For the full recipe, check out the details above! You can store leftovers in an airtight container. Refrigerate them for up to 3 days. Allow the mashed cauliflower to cool before sealing. This step helps keep it fresh longer. To reheat, warm it in the microwave or stovetop. Add a splash of almond milk for creaminess. Stir it often to keep the texture smooth and lovely. For easy meals, freeze the mashed cauliflower in portions. This way, you can grab what you need. Remember to thaw it in the refrigerator before reheating. This method ensures the best taste and texture. Yes, but adjust cooking time accordingly. Frozen cauliflower may take longer to soften. Make sure to check it often to avoid overcooking. You can still enjoy a creamy texture even if using frozen. Yes, it's low in carbs and high in nutrients. Cauliflower gives you fiber, vitamins, and minerals. This dish is a great alternative to traditional mashed potatoes. It also provides healthy fats from olive oil and butter. Add red pepper flakes or diced jalapeños while mashing. You can also mix in hot sauce for an extra kick. Spice level is easy to adjust based on personal taste. It pairs well with grilled meats and roasted vegetables. Try serving it next to chicken, steak, or fish. Roasted garlic mashed cauliflower also complements sautéed greens or a fresh salad. For the full recipe, you can check out the earlier sections. Roasted Garlic Mashed Cauliflower is an easy and tasty dish. We reviewed the main ingredients, like cauliflower and garlic, and shared step-by-step instructions for cooking. I also included tips for flavor, texture, and appealing presentation. Plus, you can explore variations for vegan or keto diets. In my experience, this dish delights everyone and suits many meals. Enjoy the satisfaction of making a healthy, flavorful side that you can customize to fit your taste. Try it out and make this recipe your own!

Roasted Garlic Mashed Cauliflower Creamy Delight

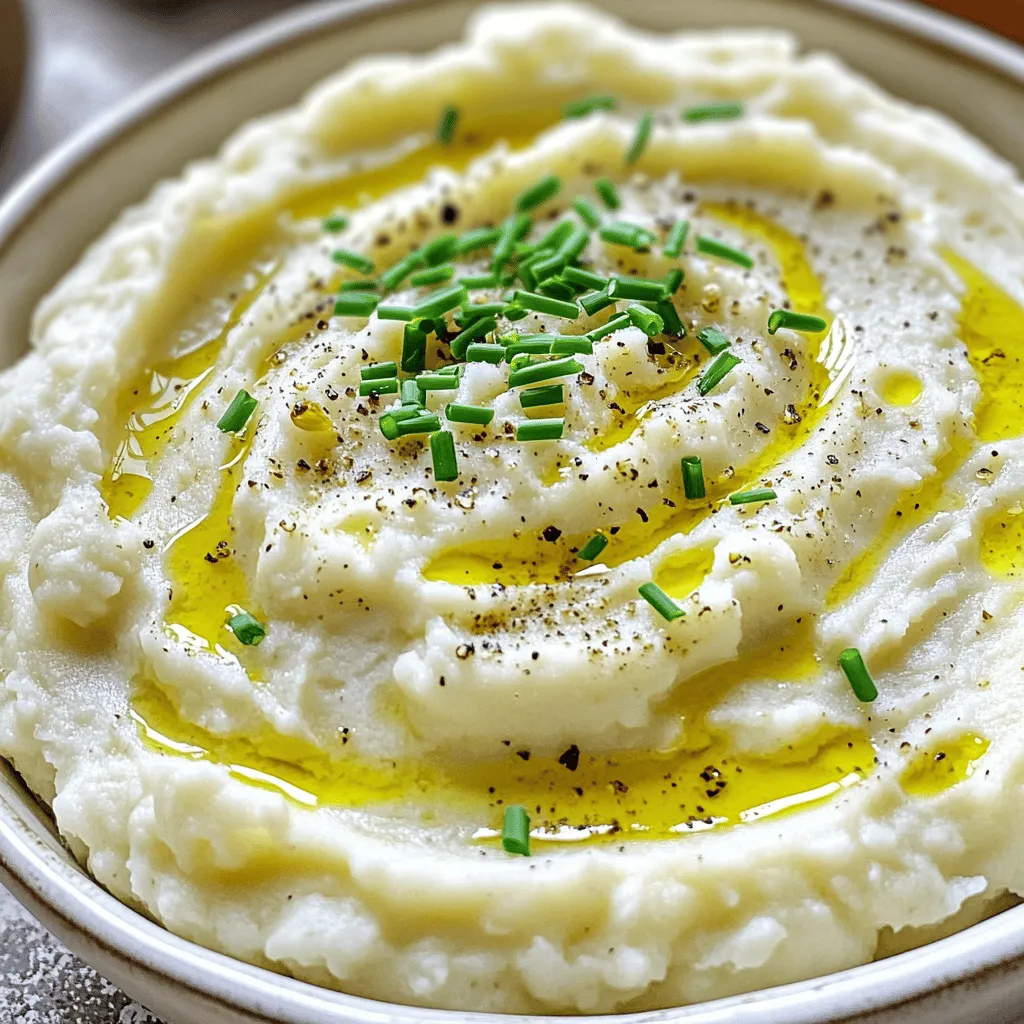
Are you ready to elevate your side dish game? Roasted Garlic Mashed Cauliflower is a creamy delight that offers all

To make Spicy Grilled Pineapple Skewers, you need just a few key items. Here’s what you’ll need: - 1 fresh pineapple, peeled and cut into cubes - 2 tablespoons olive oil - 2 tablespoons honey - 1 teaspoon chili powder - 1/2 teaspoon cayenne pepper - 1/2 teaspoon salt - 1 lime, juiced - Fresh cilantro, chopped (for garnish) - Bamboo skewers, soaked in water for 30 minutes Each ingredient plays a role in creating a sweet and spicy flavor. The pineapple adds natural sweetness, while the spices provide heat. Having the right tools makes cooking easier and more fun. Here are the items I recommend: - Mixing bowl - Whisk - Grill or grill pan - Knife and cutting board - Measuring spoons These tools help you mix well and grill perfectly. A grill pan is great if you don’t have an outdoor grill. Want to take your skewers to the next level? Here are some optional add-ons: - Fresh mint for a cool taste - Lime zest for extra zing - A dash of soy sauce for umami flavor These add-ons can enhance the taste. Feel free to mix and match based on your preferences! For the full recipe, check out the detailed instructions. To start, gather your ingredients. In a mixing bowl, combine: - 2 tablespoons olive oil - 2 tablespoons honey - 1 teaspoon chili powder - 1/2 teaspoon cayenne pepper - 1/2 teaspoon salt - Juice from 1 lime Whisk these items together well. This marinade gives the pineapple a spicy and sweet kick. It will coat each piece, so it's full of flavor. Next, cut your fresh pineapple into cubes. I like to use a ripe pineapple for the best taste. Add the pineapple cubes to the bowl with the marinade. Toss the cubes gently to coat them evenly. It's best to let them marinate for at least 30 minutes. If you have time, let them sit in the fridge for up to 2 hours. This step makes a huge difference! While the pineapple marinates, soak your bamboo skewers in water for 30 minutes. This helps prevent burning on the grill. Preheat your grill to medium-high heat. If you’re using a grill pan, get it hot on the stove. Thread the marinated pineapple cubes onto the skewers, leaving space between each piece. This ensures even cooking. Place the skewers on the grill and cook for about 3-4 minutes on each side. You want to see caramelized edges and nice grill marks. Once done, take them off the grill and let them cool for a minute. For extra flair, garnish with fresh cilantro before serving. For the full recipe, check out the details laid out earlier. To get those perfect grill marks, start with a hot grill. Preheat it well. Make sure the grill grates are clean. Oil the grates lightly to prevent sticking. Place the skewers on the grill and do not move them for a few minutes. This helps the pineapple get nice marks. After a few minutes, you can flip them to cook the other side. Want more heat? Add extra cayenne pepper to the marinade. If you prefer it milder, cut back on the chili powder. You can also mix in a little brown sugar. This will balance the heat and add sweetness. Taste the marinade before adding the pineapple. Adjust based on your spice preference. For a stunning presentation, use a wooden platter. Arrange the skewers in a fan shape for a pretty look. Add lime wedges on the side for a pop of color. Sprinkle fresh cilantro on top for a vibrant touch. This makes the dish look even more inviting. Serve them warm for the best taste. Check out the Full Recipe for more serving ideas! {{image_2}} You can add more fruits to your skewers. Mango, papaya, and kiwi work great. These fruits pair well with the sweetness of pineapple. Make sure to cut the fruits into similar sizes for even cooking. This mix brings fun flavors and colors to your dish. It also makes the skewers more exciting. For a vegan option, skip the honey. Use maple syrup or agave nectar instead. Both options keep it sweet and tasty. This recipe is already gluten-free. The ingredients do not contain gluten, so everyone can enjoy them. You can spice it up with new marinades. Try adding sriracha or hot sauce for extra heat. If you want a smoky flavor, add smoked paprika. For a fruity twist, mix in orange juice or coconut milk. These changes help create your unique version of spicy grilled pineapple skewers. Check out the Full Recipe for more ideas. After grilling your spicy pineapple skewers, let them cool down. Place the skewers in an airtight container. Cover them tightly to keep the flavors fresh. You can also wrap them in plastic wrap. If you plan to eat them later, refrigerate. This keeps them safe and tasty for your next meal. When you want to enjoy your skewers again, reheating is simple. Preheat your grill or a grill pan. Place the skewers on the grill for about 2 minutes on each side. This warms them up while keeping the flavor. You can also use a microwave if you’re in a hurry. Heat them for about 30 seconds. Check that they are warm throughout before serving. These spicy grilled pineapple skewers last up to 3 days in the fridge. If you freeze them, they can last up to 2 months. Just make sure to store them properly. For the best taste, eat them fresh. But if you have leftovers, enjoy them later! To stop pineapple from sticking, oil the grill grates. Use a paper towel dipped in oil. Rub it on the grates before heating. You can also brush olive oil on the pineapple cubes. This helps create a barrier. It keeps the pineapple from sticking while grilling. Yes, you can use canned pineapple for skewers. However, fresh pineapple tastes better. Canned pineapple is softer and may fall apart. If you use canned, drain it well. Pat it dry to remove extra moisture. This will help it grill better and hold its shape. Grilled pineapple skewers pair well with many sides. Here are some great options: - Coconut rice - Grilled shrimp or chicken - Black bean salad - Green salad with lime dressing - Quinoa with herbs These sides complement the sweet and spicy flavors of the skewers. This guide walked you through making spicy grilled pineapple skewers. We covered key ingredients, tools, and tips for perfect grilling. I shared ways to enhance flavor and serve beautifully. Remember to adjust spiciness to your taste. Try different fruits or marinades for unique twists. Finally, store leftovers properly to enjoy later. Happy grilling, and enjoy your delicious skewers!

Spicy Grilled Pineapple Skewers Fresh and Flavorful Treat

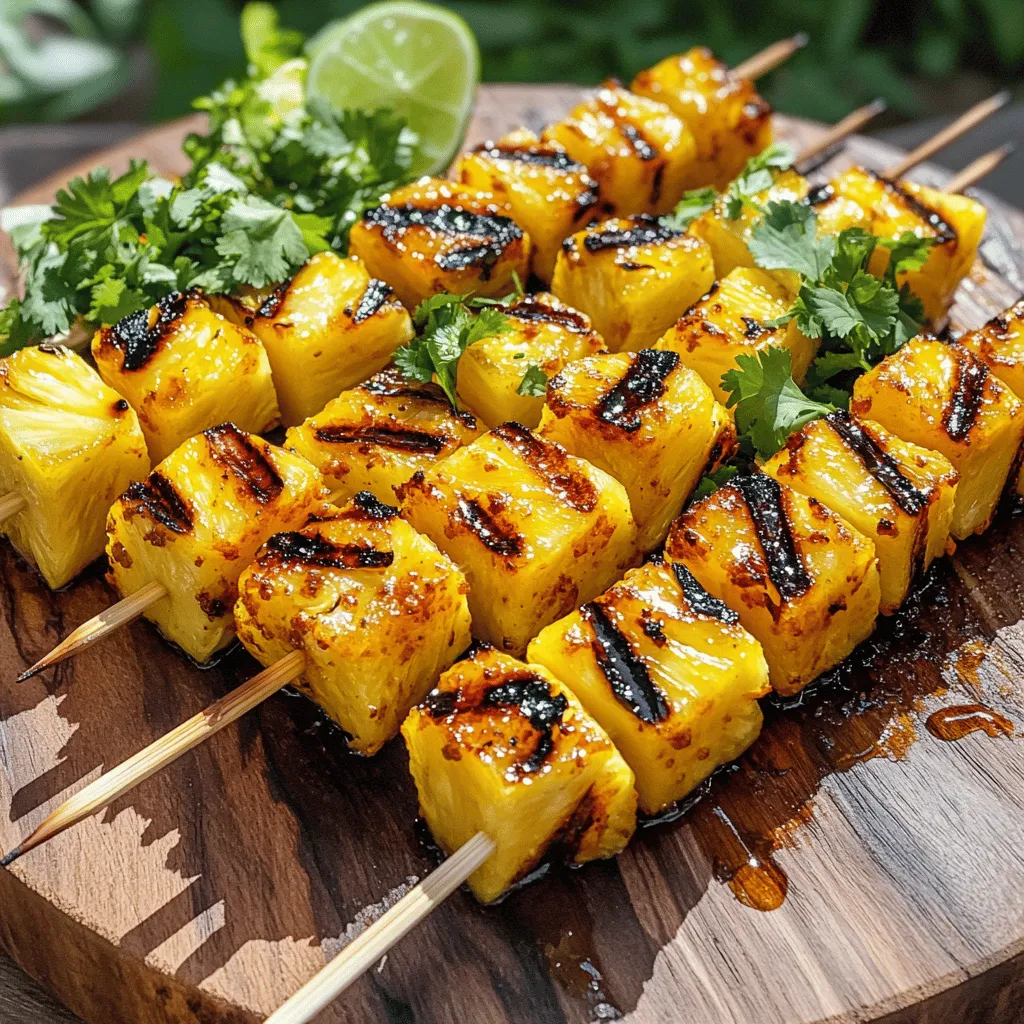
Are you ready for a fresh and flavorful treat? Spicy Grilled Pineapple Skewers are a must-try! These skewers combine sweet

- 4 hard-boiled eggs, chopped - 1 ripe avocado, mashed - 2 tablespoons Greek yogurt (or mayonnaise) - 1 tablespoon Dijon mustard - 1 tablespoon fresh lemon juice - 2 green onions, finely chopped - 1/4 teaspoon garlic powder - Salt and pepper to taste - Optional: diced cherry tomatoes for garnish The right ingredients make all the difference. Start with hard-boiled eggs. They bring protein and a nice texture. I love using ripe avocados. They add creaminess and healthy fats. Greek yogurt or mayonnaise gives a rich taste. For flavor, Dijon mustard adds a nice kick. Fresh lemon juice brightens everything up. Green onions add a fresh crunch. Don’t skip the garlic powder. It adds a warm depth. Season with salt and pepper to bring it all together. If you want, sprinkle diced cherry tomatoes on top. They add color and a fresh burst. This mix of flavors makes for a tasty, healthy snack. You can enjoy it in large lettuce leaves. These wraps are easy to hold and eat. Check out the Full Recipe for a detailed guide. These wraps are perfect for lunch or a snack. You’ll love how simple and delicious they are! - Step 1: Start by taking your four hard-boiled eggs and chop them into small pieces. Next, take one ripe avocado and mash it well. Combine the chopped eggs and the mashed avocado in a medium bowl. Mix them gently to keep some texture. This adds a nice bite to the salad. - Step 2: Now, add two tablespoons of Greek yogurt (or mayonnaise) to the bowl. This gives the salad a creamy texture. Then, stir in one tablespoon of Dijon mustard and one tablespoon of fresh lemon juice. These ingredients add flavor and freshness. Mix everything well until it's blended but still chunky. - Step 3: Next, fold in two finely chopped green onions. This will add a nice crunch and flavor. Sprinkle in 1/4 teaspoon of garlic powder for extra taste. - Step 4: Finally, season your salad with salt and pepper to taste. This step is key. Taste your salad and adjust the seasoning as needed. - Step 5: Now, prepare your lettuce leaves. You can use large romaine or butter lettuce leaves. Wash them well and pat them dry. This keeps the wraps crisp. - Step 6: Spoon the avocado egg salad mixture generously onto each lettuce leaf. Make sure to fill them without overstuffing. You want them easy to wrap. - Step 7: Wrap the lettuce around the filling like a taco. Serve immediately for the best taste. Enjoy your fresh, healthy snack! You can find the full recipe for Avocado Egg Salad Lettuce Wraps above. To get the best texture, gently mix your avocado and eggs. This keeps some pieces of egg intact. If you prefer a creamier salad, add more Greek yogurt or mayo. Always taste your mix and adjust the seasoning. A pinch more salt or pepper can make a big difference. For an appealing display, arrange your lettuce wraps on a colorful platter. Scatter some diced cherry tomatoes around them for a pop of color. You can also add lemon wedges to the side. This adds a zesty flair and brightens up the plate. Using the right tools can make cooking easier. A medium mixing bowl works well for combining ingredients. A sturdy spatula helps to mix without crushing the eggs. For meal prep, store leftovers in airtight containers. This keeps them fresh for later use. For the full recipe, check out my detailed instructions above. Happy cooking! {{image_2}} You can switch up the lettuce type for your wraps. Romaine and butter lettuce work well. Both add a nice crunch and hold the filling well. You might also try iceberg lettuce for a refreshing bite. For the creamy base, consider using avocado oil or even vegan mayo. These swaps keep the dish rich and tasty. They also cater to different diets or preferences. Want to add more flavor? Fresh herbs like dill or cilantro can elevate your salad. Just chop them finely and mix them in. They add a burst of freshness. You can also sprinkle in spices like paprika or cumin for warmth and depth. These spices make the salad exciting and unique. For those on gluten-free or low-carb diets, this dish is a winner. The lettuce wraps replace bread, making it perfect. You can enjoy this meal without worry. If you want a vegetarian-friendly option, simply skip the eggs and use chickpeas instead. Mash the chickpeas like you would with the eggs. This option is still creamy and delicious. By making these simple changes, you can customize your avocado egg salad lettuce wraps. Each bite can be just as tasty and healthy as the last. For the complete recipe, check out the Full Recipe section. To store leftover avocado egg salad, place it in an airtight container. This will keep the salad fresh. If you want to keep the lettuce crisp, store it separately. Wrap each lettuce leaf in a damp paper towel. Then, place them in a plastic bag. This helps them stay fresh and crunchy. Freezing avocado egg salad is not recommended. The texture of avocado changes when frozen. Instead, meal prep by making just what you need for the week. You can also mix the egg salad and keep the lettuce separate. This way, you can enjoy fresh wraps all week long. Avocado egg salad can last in the fridge for about 2 to 3 days. Always check for signs of spoilage. If you see brown spots or an off smell, it’s time to toss it out. Fresh ingredients mean better flavor, so aim to eat it within the first day or two. Enjoy your healthy snack while it’s still at its best! You can skip mayo by using Greek yogurt. It adds creaminess and protein. You can also try using avocado oil for a smooth texture. Another option is to mix in a bit of tahini. These swaps keep the salad healthy and tasty. Yes, you can make a vegan version. Replace eggs with mashed chickpeas or tofu. Use vegan mayo or more avocado to keep it creamy. Add some mustard and lemon juice for flavor. This way, you still enjoy a delicious salad without eggs. You can mix in many tasty ingredients. Try adding diced cucumbers for crunch. Chopped bell peppers add sweetness and color. Fresh herbs like cilantro or dill can boost flavor. For a spicy kick, consider jalapeños or sriracha. Each addition gives your salad a unique twist. To keep your avocado fresh, use lemon juice. The acid slows browning. Store the salad in an airtight container. Press plastic wrap directly onto the salad to reduce air exposure. If you prepare it in advance, these tips help keep it looking great. For the full recipe, check out the Avocado Egg Salad Lettuce Wraps recipe. In this article, I shared how to make tasty avocado egg salad lettuce wraps. We explored essential ingredients, flavorful enhancers, and step-by-step instructions to create this healthy dish. You also learned tips for perfecting texture, serving suggestions, and ingredient variations. Remember, this salad is versatile and easy to adapt to your taste. Enjoy these wraps soon for a fresh and satisfying meal!

Avocado Egg Salad Lettuce Wraps Easy and Healthy Snack

Looking for a quick yet healthy snack? You’ll love these Avocado Egg Salad Lettuce Wraps! This recipe combines tasty ingredients

The main ingredients for these muffins come together to create a tasty treat. Here’s what you need: - 1 cup grated zucchini (about 1 medium zucchini) - 1 cup whole wheat flour - 1/2 cup unsweetened cocoa powder - 1/2 cup almond milk (or any milk of choice) - 1/3 cup maple syrup (or honey) - 1/4 cup coconut oil, melted - 1/4 cup brown sugar (or coconut sugar) - 2 large eggs - 1 teaspoon vanilla extract - 1 teaspoon baking powder - 1/2 teaspoon baking soda - 1/4 teaspoon salt - 1/2 cup chocolate chips (dark or dairy-free) These ingredients work in harmony to provide flavor and nutrition. Each key ingredient brings health benefits. Zucchini adds moisture and fiber, helping digestion. Whole wheat flour offers more nutrients than white flour. It includes B vitamins and protein. Unsweetened cocoa powder is rich in antioxidants. It can boost heart health. Maple syrup gives a natural sweetness with minerals. Coconut oil is good for energy and healthy fats. Eggs add protein and help bind the muffins. You can swap ingredients easily. If you don't have zucchini, try using mashed bananas or applesauce. For flour, gluten-free blends work well too. Instead of almond milk, any milk works, like soy or oat. Honey can stand in for maple syrup if you prefer. You can also use applesauce in place of brown sugar for less sweetness. All these swaps keep your muffins healthy and delicious. For the full recipe, check the section above. Start by preheating your oven to 350°F (175°C). This ensures even baking. Next, prepare your muffin tin. You can line it with paper liners or grease it with cooking spray. In a large bowl, mix the grated zucchini, melted coconut oil, maple syrup, brown sugar, eggs, and vanilla extract. Stir well until the mix is smooth. In another bowl, whisk together the whole wheat flour, cocoa powder, baking powder, baking soda, and salt. This helps to combine the dry ingredients. Gradually add this dry mix to your wet ingredients, alternating with almond milk. Mix until just combined. Finally, gently fold in the chocolate chips. Pour the muffin batter into your prepared muffin tin. Fill each cup about 3/4 full to allow room for rising. Bake for 18-20 minutes in the preheated oven. To check if they are done, insert a toothpick into the center of a muffin. If it comes out clean, your muffins are ready. If not, bake for a few more minutes. Keep an eye on them, so they don’t dry out. After baking, let them cool in the pan for about 5 minutes. Then, transfer the muffins to a wire rack to cool completely. To check for doneness, use a toothpick. Insert it into the center of a muffin. If it comes out clean or with just a few crumbs, they are done. If the toothpick has wet batter on it, bake the muffins a little longer. This simple test helps avoid undercooked muffins. Enjoy your Healthy Chocolate Zucchini Muffins warm or let them cool to room temperature. For a fun twist, you can serve them with a sprinkle of powdered sugar or a dollop of Greek yogurt. For the full recipe, check out the detailed instructions above. To keep your muffins moist, use fresh zucchini. Grate it just before mixing. The water in the zucchini adds great moisture. You can also use the right amount of coconut oil. It helps to keep muffins soft. If you want extra flavor, add a bit more vanilla. It brings out the chocolate taste. Don’t skip the baking powder and baking soda. They help your muffins rise. Also, avoid over-mixing the batter. Mix it just enough to combine the wet and dry ingredients. Over-mixing can make your muffins tough. Lastly, don’t bake them too long. Check for doneness with a toothpick early. Use room temperature eggs for better mixing. They blend into the batter more easily. If you want to reduce sugar, cut back on the brown sugar. The zucchini keeps the muffins sweet. Try adding nuts for extra crunch. You can use walnuts or pecans. For a fancy touch, sprinkle some chocolate chips on top before baking. For the full recipe, check out the details above. {{image_2}} You can make these muffins even more fun! Try adding nuts like walnuts or pecans for crunch. You could also mix in dried fruits, such as raisins or cranberries, for extra sweetness. If you love spice, add cinnamon or nutmeg for warmth. A dash of espresso powder can boost the chocolate flavor, too. If you need gluten-free muffins, swap the whole wheat flour for almond or oat flour. Both work well and keep the muffins moist. For a dairy-free version, use coconut or almond milk. These changes keep the muffins tasty and healthy, while still being friendly to different diets. If you like your muffins less sweet, lower the brown sugar or maple syrup. You can try using mashed bananas or applesauce instead. These options still give you sweetness but add extra moisture. Taste the batter before baking so you can adjust the sweetness just right. For the Full Recipe, be sure to follow the steps for a delicious outcome! To keep your muffins fresh, store them at room temperature. Use an airtight container. If you have leftovers, they can last for about three days. If you want to keep them longer, try refrigerating them. Just ensure they are in a sealed bag. This can help them stay good for a week. Freezing is a great way to store muffins for a long time. First, let the muffins cool completely. Then, wrap each muffin in plastic wrap. Place the wrapped muffins in a freezer bag. This method helps prevent freezer burn. You can store them for up to three months. Just remember to label the bag with the date! When you’re ready to enjoy your frozen muffins, you can reheat them easily. For quick reheating, use the microwave. Heat each muffin for about 20-30 seconds. If you prefer a crispy top, use the oven. Preheat it to 350°F (175°C) and bake the muffins for about 10 minutes. This gives them a fresh-baked taste. Yes, you can use other flours. Almond flour and oat flour work well. Each flour gives a unique taste and texture. Whole wheat flour gives a hearty flavor. Almond flour adds moisture and a nutty taste. Oat flour makes the muffins light and fluffy. Experiment to find your favorite! To make sugar-free muffins, use ripe bananas or applesauce. These natural sweeteners add flavor without added sugar. You can also use stevia or monk fruit sweetener. Both help keep the sweetness without the calories. Adjust these to your taste for the best results. Serve these muffins warm for the best taste. You can add a sprinkle of powdered sugar on top. Pair them with Greek yogurt or a scoop of whipped cream. They also go well with fresh fruit or a drizzle of honey. Enjoy them as a snack or a tasty breakfast! These muffins stay fresh for about three days at room temperature. Store them in an airtight container to keep them moist. You can freeze them for up to three months. Just thaw them overnight in the fridge when you want to enjoy them. For the full recipe, check out the details above. You learned all about making healthy chocolate zucchini muffins. We covered key ingredients and their benefits. I shared step-by-step instructions and baking tips. Important tricks to avoid mistakes ensure great results. Variations allow for creative mix-ins and dietary changes. Proper storage helps keep your muffins fresh. These muffins are tasty and nutritious. Try them out, and enjoy every bite. Healthy baking is fun and rewarding!

Healthy Chocolate Zucchini Muffins Tasty and Simple Recipe

Craving something delicious that’s also healthy? You’ll love this simple recipe for Healthy Chocolate Zucchini Muffins. Packed with nutrients, these

To make crispy roasted chickpeas, gather these simple items: - 1 can (15 oz) chickpeas, drained and rinsed - 2 tablespoons olive oil - 1 teaspoon smoked paprika - 1 teaspoon garlic powder - 1/2 teaspoon ground cumin - 1/2 teaspoon sea salt - 1/4 teaspoon black pepper - 1/4 teaspoon cayenne pepper (optional for heat) - Fresh parsley, chopped (for garnish) You can change the flavor of your crispy chickpeas. Here are some ideas: - Use curry powder for a warm spice. - Add lemon zest for a fresh kick. - Try nutritional yeast for a cheesy taste. - Mix in some herbs like rosemary or thyme. These options let you create a snack that fits your taste. Chickpeas are not just tasty; they are also healthy. Here’s why they are great: - High in protein: Chickpeas give you a good dose of plant-based protein. - Rich in fiber: They help keep your gut healthy and can aid digestion. - Low in fat: This snack is a better choice than chips or other fried snacks. - Packed with vitamins: They contain iron, magnesium, and B vitamins. Adding chickpeas to your diet can boost your health and keep you full longer. For the full recipe, you can check out the Crispy Roasted Chickpea Snack 🥳. To start, you need to prepare the chickpeas. Grab a can of chickpeas, about 15 ounces. Drain and rinse them under cold water. This step washes away extra salt and reduces the canned taste. Next, spread the chickpeas on a clean kitchen towel. Pat them dry gently. It’s important to remove moisture. Dry chickpeas become crispier when roasted. Now, let’s get to the seasoning. In a large bowl, combine your dried chickpeas with 2 tablespoons of olive oil. Add 1 teaspoon of smoked paprika, 1 teaspoon of garlic powder, and 1/2 teaspoon of ground cumin. Sprinkle in 1/2 teaspoon of sea salt, 1/4 teaspoon of black pepper, and 1/4 teaspoon of cayenne pepper if you want some heat. Mix everything well. Make sure each chickpea gets coated in those tasty spices. This step adds flavor and excitement to your snack. For the roasting, preheat your oven to 400°F (200°C). Line a baking sheet with parchment paper. Spread the seasoned chickpeas in a single layer on the sheet. This helps them cook evenly. Roast in the oven for 20-25 minutes. Halfway through, shake the pan gently. This action helps ensure even cooking. You want them to turn golden brown and crispy. Once done, take them out and let them cool slightly. Taste and adjust the seasoning if needed. For a nice touch, garnish with chopped fresh parsley before you enjoy. You can follow the full recipe for details and enjoy these crispy roasted chickpeas anytime! To get the crispiest chickpeas, start by drying them well. After rinsing, use a kitchen towel to absorb moisture. This step is key. The drier the chickpeas, the crunchier they will be. Also, roast them at a high temperature. I recommend 400°F (200°C). This heat helps them turn golden brown and crisp. Shake the pan halfway through cooking. This action ensures that all sides get even heat. Crispy roasted chickpeas pair well with many dips. Try tzatziki or hummus for a creamy touch. You can also serve them with guacamole for a fresh taste. If you want a kick, consider a spicy salsa. For a twist, sprinkle some nutritional yeast on top. This gives a cheesy flavor without dairy. Mix and match flavors to find your favorite combination. One common mistake is not drying the chickpeas enough. If they stay wet, they won’t get crispy. Another mistake is overcrowding the baking sheet. Spread them out in one layer for best results. Avoid using too much oil; just enough to coat is perfect. Finally, don’t skip shaking the pan. This step is vital for even cooking. Following these tips will help you make perfect crispy roasted chickpeas every time. For the complete recipe, check the Full Recipe section. {{image_2}} You can change the flavor of crispy roasted chickpeas easily. Try using different spices. Instead of smoked paprika, you might like chili powder for a kick. If you want something zesty, use lemon zest or zest from a lime. Mix it up! Use Italian herbs like oregano or basil for a fresh taste. You can add more ingredients to your chickpeas for fun twists. Try tossing in some nuts or seeds. Sunflower seeds or pumpkin seeds add crunch and nutrition. You can also mix in some dried herbs like thyme or rosemary. These additions can make your snack even more exciting! Crispy roasted chickpeas can be both sweet and savory. For a sweet snack, coat the chickpeas with a little maple syrup and cinnamon. Roast them just like the savory ones. They become a crunchy treat that’s perfect for dessert. You can make both types and serve them together. It’s a great way to please everyone! To keep your crispy roasted chickpeas fresh, store them in an airtight container. Glass jars work great, as do plastic containers with tight lids. Avoid leaving them out in the open, as they can get stale quickly. If you have leftovers, let them cool completely before sealing them up. This helps maintain their crunch. If your roasted chickpeas lose some crispiness, you can easily reheat them. Spread them on a baking sheet and place them in a preheated oven at 350°F (175°C) for about 5 to 10 minutes. This method revives their crunch without overcooking them. You can also toss them into an air fryer for about 3 minutes on high heat. Crispy roasted chickpeas can last for about one week when stored properly. However, the sooner you eat them, the better! For the best taste and texture, enjoy them within the first few days. After that, they may lose their delightful crunch. For long-term storage, consider freezing them, though the texture may change slightly once thawed. For the full recipe, check out the Crispy Roasted Chickpea Snack. Yes, you can use dried chickpeas. First, soak them overnight in water. After soaking, cook them until they are tender. Then, dry them well before seasoning and roasting. This method takes more time, but the flavor is rich and satisfying. To make crispy roasted chickpeas in an air fryer, follow these steps: - Drain and rinse the chickpeas. - Pat them dry with a towel. - Toss the chickpeas with olive oil and spices in a bowl. - Place them in the air fryer basket in a single layer. - Cook at 400°F (200°C) for 12-15 minutes. - Shake the basket halfway for even cooking. This method gives you great crunch without using the oven. You can find pre-made crispy roasted chickpea snacks at many grocery stores. Look in the snack aisle or the health food section. Some online retailers also offer them. Check brands that focus on healthy snacks to find tasty options. In this blog post, we explored how to make crispy roasted chickpeas. We covered key ingredients, including optional ones for flavor. You learned step-by-step instructions to prepare, season, and roast chickpeas. I shared tips for maximum crispiness and flavor pairings. Additionally, we looked at storage best practices and answered common questions. Crispy roasted chickpeas are easy to make and delicious. Use your favorite spices to customize them. Enjoy your healthy snacks!

Crispy Roasted Chickpea Snack for Healthy Crunch

Looking for a tasty and healthy snack? Crispy roasted chickpeas might be your new favorite! These crunchy bites are not

- 4 large bell peppers (any color) - 2 cups cooked chicken, shredded - 1/2 cup basil pesto - 1 cup quinoa, cooked - 1/2 cup mozzarella cheese, shredded - 1/4 cup sun-dried tomatoes, chopped - 1/4 cup pine nuts, toasted - Salt and pepper, to taste - Fresh basil leaves for garnish When I create Pesto Chicken Stuffed Peppers, I always start with fresh bell peppers. They bring color and crunch. You can choose any color you like, from green to red. Next, I use cooked chicken. Shredded chicken works best here. I often use leftovers or rotisserie chicken to save time. Basil pesto is the star of this dish. Its rich flavor makes the chicken shine. I like to use a good-quality pesto, homemade or store-bought. This dish also needs cooked quinoa for texture and nutrients. For added creaminess, I mix in shredded mozzarella cheese. Sun-dried tomatoes add a burst of flavor, while toasted pine nuts offer a nice crunch. I season everything with salt and pepper to boost the flavors. Finally, I like to garnish with fresh basil leaves. They add a pop of color and fresh taste. This recipe is simple and uses easy-to-find ingredients. For the full recipe, you can refer to the sections above. Enjoy cooking! - Preheat your oven to 375°F (190°C). - Cut the tops off the bell peppers and remove the seeds. Start by washing the bell peppers. I love using bright, colorful peppers for this dish. They not only look good but also add different flavors. Once you cut off the tops, be sure to scoop out all the seeds and membranes. This step is crucial. It helps the filling mix with the pepper's flavor. - Combine chicken, pesto, quinoa, and cheeses. In a large bowl, mix the cooked chicken, pesto, quinoa, and cheeses. I prefer to use mozzarella for its creamy texture. The sun-dried tomatoes and toasted pine nuts add a nice crunch. Mix until everything is coated in the pesto. Taste your filling. Add salt and pepper as needed for better flavor. - Fill the peppers and place in the baking dish. - Cover with foil and bake for 25 minutes. Now it’s time to stuff those peppers! Use a spoon to pack the filling tightly into each one. Place the stuffed peppers upright in a baking dish. If they wobble, slice a little off the bottom for balance. Cover the dish with foil. Bake them in the oven for 25 minutes. This helps them cook evenly and stay moist. If you want a crispy top, take off the foil for the last 10-15 minutes. For the full recipe, check the earlier section. Enjoy the process of making these flavorful stuffed peppers! To make the best stuffed peppers, start with fresh bell peppers. Choose peppers that feel firm and heavy. Look for bright colors and smooth skin without blemishes. These signs mean they are ripe and tasty. To ensure even cooking, cut the tops of the peppers off and remove the seeds. When stuffing, pack the filling tight. This helps them cook uniformly. Place the peppers upright in a baking dish. If they wobble, trim the bottom slightly. If you have a convection oven, reduce baking time by about 5 minutes. For older ovens, add a few extra minutes. Every oven is different, so keep an eye on your peppers. To check for doneness, poke a fork into the peppers. They should be soft but not mushy. The cheese on top should be golden brown. This means they are ready to eat! Garnish your stuffed peppers with fresh basil leaves for a pop of color. You can also sprinkle extra cheese on top before baking for a cheesy finish. For serving, pair the peppers with a simple salad or some crusty bread. The balance of flavors will excite your taste buds. You can find the full recipe [here](#). {{image_2}} You can easily change the filling to suit your tastes. For a vegetarian twist, use mushrooms or beans. Both options add texture and flavor. If you want more cheese, try mixing in feta or cheddar. This makes each bite rich and creamy. Spices can boost the taste of your stuffed peppers. Garlic powder adds depth, while crushed red pepper brings heat. If you want to mix it up, try adding different sauces. A drizzle of balsamic glaze or a sprinkle of lemon juice can brighten the dish. You don’t need to bake these peppers only. An air fryer works great too. It cuts down cooking time and gives a nice crisp. Grilling is a fun option as well. It adds a smoky flavor that complements the pesto chicken perfectly. For the full recipe, check out the details above. Enjoy your cooking adventure! To keep your stuffed peppers fresh, store them in an airtight container. This helps prevent drying out. Place the peppers in the fridge within two hours of cooking. They can last for up to four days. When you want to enjoy them again, reheat carefully. Preheat your oven to 350°F (175°C). Place the peppers in a baking dish, cover with foil, and heat for about 15 minutes. This keeps them moist and warm. If you want to save some stuffed peppers for later, freezing is a great option. First, let them cool completely. Then, wrap each pepper in plastic wrap. Place the wrapped peppers in a freezer-safe bag or container. They can stay good for up to three months. When you’re ready to eat, take them out and thaw overnight in the fridge. To reheat, place them in a 350°F (175°C) oven for about 25 minutes. This will help bring back their flavor and texture. You can prep the ingredients a day in advance. Chop the bell peppers and store them in the fridge. Mix the chicken, pesto, quinoa, and cheese. Keep this filling in a separate container. When you're ready to cook, just stuff the peppers and bake. This tip saves time and makes cooking easier. Yes, you can use turkey or beef instead of chicken. Ground turkey works well, too. Just cook it before adding to the filling. Mix it with the pesto and other ingredients. This way, you can customize the recipe to your taste. These stuffed peppers pair well with a simple salad or garlic bread. You can also serve them with roasted veggies or rice. These sides complete the meal and offer a nice balance of flavors. Leftovers stay good for about 3 to 4 days in the fridge. Make sure to store them in an airtight container. To reheat, bake or microwave until hot. This keeps the flavors fresh and delicious. For the full recipe, check out the [Full Recipe]. Pesto Chicken Stuffed Peppers are easy to make and full of flavor. You start with fresh bell peppers and fill them with a tasty mix of chicken, quinoa, and pesto. Remember to pick the best peppers and bake them just right for a great result. You can customize your peppers with different fillings or cooking methods. Don't forget to store any leftovers properly. Enjoy this fun recipe any time! It's a simple yet satisfying meal everyone will love.

Pesto Chicken Stuffed Peppers Flavorful and Easy Recipe

Looking for a tasty and easy dinner idea? Try my Pesto Chicken Stuffed Peppers! These bright, colorful bell peppers are

- 1 ½ cups all-purpose flour - ½ cup granulated sugar - 2 teaspoons poppy seeds - 1 tablespoon baking powder - ½ teaspoon salt - 1 large egg - ½ cup plain Greek yogurt - ¼ cup vegetable oil - 1 teaspoon vanilla extract - Zest of 1 lemon - 2 tablespoons fresh lemon juice - ¼ cup powdered sugar (for glaze) - 1 tablespoon lemon juice (for glaze) The right ingredients make these muffins shine. They need all-purpose flour for the base. The sugar adds sweetness and helps with browning. Poppy seeds give a nice crunch and fun look. Baking powder helps the muffins rise. A bit of salt enhances flavor. For moisture, I add Greek yogurt. It makes the muffins soft and rich. The egg helps bind the mixture and adds protein. The oil keeps them moist. Vanilla extract adds warmth. Lemon zest and juice bring a bright, fresh taste. To finish, consider a glaze. It gives a sweet touch. Mix powdered sugar and lemon juice for a smooth finish. The glaze makes the muffins look special. When you gather these ingredients, you set the stage for a delightful experience. With these basics, you can create a treat everyone will enjoy. For the full recipe, check the section above. - Preheat oven to 350°F (175°C) - Prepare muffin tin with liners or non-stick spray Preparing your kitchen is key. First, you want to preheat your oven to 350°F (175°C). This step warms the oven for even baking. Next, grab a 12-cup muffin tin. Line each cup with paper liners or spray them with non-stick spray. This step helps the muffins release easily after baking. - Whisk together flour, sugar, poppy seeds, baking powder, and salt In a large bowl, combine the dry ingredients. Whisk together 1 ½ cups of all-purpose flour, ½ cup of granulated sugar, 2 teaspoons of poppy seeds, 1 tablespoon of baking powder, and ½ teaspoon of salt. Mixing these ingredients well ensures the muffins rise evenly. - Beat egg; add Greek yogurt, vegetable oil, vanilla, lemon zest, and lemon juice - Mix until ingredients are smooth and well combined Now, let’s mix the wet ingredients. In another bowl, beat 1 large egg. Then, add ½ cup of plain Greek yogurt, ¼ cup of vegetable oil, 1 teaspoon of vanilla extract, the zest of 1 lemon, and 2 tablespoons of fresh lemon juice. Stir this mixture until it is smooth and well combined. This mix brings moisture and flavor to the muffins. - Pour wet ingredients into dry; stir gently until just combined Next, pour the wet mixture into the dry ingredients. Use a spatula to stir gently. Mix until just combined; a few lumps are okay. Overmixing can make muffins tough, so be careful. - Divide batter evenly among the muffin cups and fill to 2/3 full Time to fill the muffin cups! Divide the batter evenly among the prepared cups. Fill each one about 2/3 full to allow space for rising. This helps create that perfect dome top. - Bake for 18-20 minutes until golden; cool in tin for 5 minutes then transfer to a wire rack Bake in your preheated oven for 18-20 minutes. You want them golden brown. To check for doneness, insert a toothpick in the center. If it comes out clean, they are ready! Let the muffins cool in the tin for about 5 minutes. After that, transfer them to a wire rack to cool completely. Enjoy the delightful aroma as they cool! To get the best texture for your muffins, don't overmix the batter. Mixing too much can make your muffins dense. Just stir until you see a bit of flour. Let the mixture rest for a few minutes before baking. This helps the flavors blend together well. To boost the lemon flavor, always use fresh lemon juice and zest. Fresh ingredients make a big difference in taste. If your lemons are very tart, you may want to adjust the sugar. A little more sugar can balance out the sourness. For a sweet touch, you can add a glaze. Mix powdered sugar with lemon juice and drizzle it over the muffins after they cool. It looks nice and tastes great! You can also sprinkle extra poppy seeds on top before baking. This adds a nice crunch and makes your muffins look pretty. {{image_2}} You can make your lemon poppy seed muffins even better! Try adding blueberries or cranberries for a fruity twist. The tartness of the berries pairs well with lemon. If you want a new flavor, swap vanilla extract for almond extract. This change gives your muffins a unique taste that surprises the palate. Want a lighter muffin? Use applesauce instead of Greek yogurt. This swap cuts calories while keeping moisture. You can also use whole wheat flour instead of all-purpose flour. Whole wheat adds fiber and nutrients, making your muffins a bit healthier without losing flavor. For those needing gluten-free options, you can easily adapt this recipe. Simply replace all-purpose flour with a gluten-free flour blend. This keeps the muffins fluffy and delicious while catering to dietary needs. Enjoying these muffins is easy for everyone! Store muffins in an airtight container at room temperature for up to 3 days. This keeps them fresh and tasty. If you have leftovers, make sure to seal them well. You can freeze muffins for up to 3 months. Wrap each muffin in plastic wrap before placing them in a freezer bag. When you want one, just thaw it at room temperature or in the fridge. To enjoy your muffins warm, simply reheat them. You can use the microwave for a few seconds. Alternatively, place them in the oven at 350°F (175°C) for about 5-10 minutes. This brings back their fresh-baked flavor. Check with a toothpick; it should come out clean if muffins are ready. If the toothpick has wet batter, bake the muffins a bit longer. I usually check them around 18 minutes. The tops should be nice and golden, too. Yes, the batter can be made a few hours in advance and stored in the fridge. This can save you time if you're busy. Just keep it in a covered bowl. Before you bake, give it a quick stir. Sour cream or buttermilk can be used as substitutes. Both options keep the muffins moist and tasty. If you want a lighter version, try using applesauce instead. For the full recipe and detailed instructions, refer to the section above. You now have the tools to make these tasty lemon poppy seed muffins. We covered the key ingredients, mixing methods, and baking tips. Remember, avoid overmixing for a light texture. Feel free to explore different flavors or healthier versions. Store your muffins properly to enjoy them longer. Baking can be fun and rewarding. Enjoy your delicious homemade treat!

Lemon Poppy Seed Muffins Fresh and Flavorful Delight

If you crave a bright and zesty treat, these Lemon Poppy Seed Muffins are for you! They burst with fresh

To make sweet chili roasted broccoli, gather these key items: - 1 large head of broccoli, cut into florets - 3 tablespoons olive oil - 3 tablespoons sweet chili sauce - 1 tablespoon soy sauce - 1 teaspoon grated fresh ginger - 2 cloves garlic, minced - Salt and pepper to taste These ingredients work together to create a flavorful dish. The broccoli becomes tender and slightly crispy, while the marinade adds sweetness and spice. You can enhance your dish with these optional garnishes: - 1 tablespoon sesame seeds - Chopped green onions for garnish Adding sesame seeds gives a nice crunch and extra flavor. Chopped green onions add color and freshness to your dish. These garnishes make your roasted broccoli look and taste even better. For the full recipe, check out the detailed instructions to create this tasty side dish. - Preheating the oven: Start by setting your oven to 425°F (220°C). This high heat helps the broccoli roast quickly and get crispy. - Preparing the marinade: In a large bowl, mix together these ingredients: - 3 tablespoons olive oil - 3 tablespoons sweet chili sauce - 1 tablespoon soy sauce - 1 teaspoon grated fresh ginger - 2 cloves garlic, minced - Salt and pepper to taste. Stir them until well combined. This sauce gives the broccoli its sweet and spicy flavor. - Tossing broccoli with marinade: Add the broccoli florets to the bowl with the marinade. Toss them well to coat every floret in the sauce. This step is key to infusing flavor into the broccoli. - Roasting instructions: Spread the marinated broccoli in a single layer on a baking sheet lined with parchment paper. Roast them for about 20-25 minutes. Halfway through, give the broccoli a stir to ensure even cooking. They are ready when they are tender and slightly crispy. If you want to add sesame seeds, sprinkle them on top and toast for an extra 2-3 minutes. For a detailed guide, check the Full Recipe. To make the best sweet chili roasted broccoli, pay close attention to cooking time and temperature. I find that roasting at 425°F (220°C) gives the best results. This heat makes the broccoli tender while keeping it crispy. The cooking time should be around 20-25 minutes. This timing is key for that perfect balance. I recommend stirring the broccoli halfway through. This ensures even roasting and helps achieve that ideal crispiness that we all love. To amp up the flavor, consider adding spices and herbs. A little crushed red pepper can give your dish a nice kick. You can also try garlic powder or onion powder for extra depth. Fresh herbs like cilantro or basil can add brightness to your dish. If you want to mix it up, use different sauces. Instead of sweet chili sauce, try teriyaki or hoisin sauce for a unique twist. Each sauce offers a new flavor profile, making your sweet chili roasted broccoli even more exciting. For the full recipe and more ideas, check out the [Full Recipe]. {{image_2}} You can mix things up by roasting different vegetables with broccoli. Cauliflower, carrots, and bell peppers all work well. They add colors and flavors. Keep the same marinade for a tasty twist. For seasonal options, try asparagus in spring or Brussels sprouts in the fall. Both enhance the dish's taste and look. You can also use zucchini in summer for a fun change. Roasting brings out their natural sweetness. Besides sweet chili sauce, you can try other sweet sauces. Honey or maple syrup adds a lovely touch. You can also mix soy sauce with hoisin for a unique flavor. Feeling spicy? Add chili paste or sriracha to the marinade. This gives your broccoli a kick! You can even mix sweet and spicy for a balanced taste. The options are endless! Store leftovers in the fridge. Place the sweet chili roasted broccoli in an airtight container. This keeps it fresh and tasty. You can store it for up to three days. If you want to keep it longer, you might freeze it. To reheat, use an oven or a skillet. The oven helps keep the broccoli crispy. Preheat the oven to 350°F (175°C). Spread the broccoli on a baking sheet. Heat for about 10 minutes. If using a skillet, warm it over medium heat. Stir it gently for even heating. Avoid using a microwave, as it can make the broccoli soggy. Enjoy the full recipe for a delicious dish! Can I use frozen broccoli? Yes, you can use frozen broccoli. It works well for this recipe. Just thaw it first and pat it dry. This helps remove excess water, so it roasts nicely. Frozen broccoli may cook faster, so check it a bit earlier. How do I adjust the recipe for larger servings? To serve more people, simply double the ingredients. Use two large heads of broccoli. Keep the same marinade ratio. Make sure to roast the broccoli in batches if your baking sheet is small. This way, it will roast evenly. Is sweet chili roasted broccoli healthy? Yes, sweet chili roasted broccoli is healthy. Broccoli is packed with vitamins and minerals. The sweet chili sauce adds flavor without too many extra calories. Olive oil provides healthy fats. This dish is a great way to enjoy vegetables. Dietary considerations and substitutions For a vegan option, ensure your sweet chili sauce is vegan. You can also use tamari instead of soy sauce for a gluten-free choice. If you want less sugar, use less sweet chili sauce. You can also try a homemade sauce for more control over the ingredients. Roasting broccoli with sweet chili sauce is simple and fun. We covered essential ingredients, like fresh broccoli and marinade. I shared steps for preparation and cooking. You learned tips for perfecting the dish and adding flavor. I also suggested alternatives like seasonal veggies and different sauces. Lastly, we discussed storage and reheating to keep it fresh. Enjoy your tasty roasted broccoli as a healthy side dish or snack!

Sweet Chili Roasted Broccoli Flavorful Side Dish Recipe

Looking for a tasty side dish that will impress everyone at your next meal? Sweet Chili Roasted Broccoli is your

Older posts
Newer posts
← Previous Page1 … Page69 Page70 Page71 … Page85 Next →

dsad

© 2026 greenmealmap • Built with GeneratePress

Our Policies

  • Copyright Policy
  • Cookie Policy
  • GDPR Policy
  • Privacy Policy
  • Disclaimer
  • Terms Of Use

More Information

  • Home
  • About
  • Contact
  • Appetizers
  • Dessert
  • Dinner
  • Drinks
©2026, greenmealmap About Back To Top