Skip to content
DisclaimerTerms Of UseGDPR PolicyCookie Policy

greenmealmap

  • Home
  • Drinks
  • Appetizers
  • Dinner
  • Dessert
  • About
  • Contact
  • Privacy Policy
DisclaimerTerms Of UseGDPR PolicyCookie Policy

NO-ING-IMG

- 1 cup quinoa, rinsed - 2 cups vegetable broth - 1 zucchini, diced - 1 bell pepper (any color), diced - 1 cup cherry tomatoes, halved - 1 cup broccoli florets - 1 red onion, diced - 2 tablespoons olive oil - 1 teaspoon garlic powder - 1 teaspoon smoked paprika - Salt and pepper to taste The main ingredients form the heart of your Roasted Veggie Quinoa Bowl. Quinoa acts as the perfect base. It’s high in protein and gives you energy. I love using vegetable broth for cooking quinoa. This adds depth to the flavor. Next come the veggies. You can pick any colorful mix. I enjoy zucchini, bell peppers, cherry tomatoes, and broccoli. These veggies not only taste great but also look vibrant. The red onion adds a nice touch with its sweetness. Drizzling olive oil helps to roast the veggies well. The garlic powder and smoked paprika bring in a warm, cozy flavor. Don’t forget the salt and pepper! They balance the taste and enhance the dish. - Avocado, sliced - Fresh parsley, chopped - Feta cheese, crumbled Toppings can make your quinoa bowl even better. Sliced avocado adds creaminess and healthy fats. Fresh parsley gives a pop of color and freshness. If you want a salty bite, sprinkle some crumbled feta cheese on top. These toppings make the dish look and taste gourmet. For the full recipe, I recommend checking out the detailed instructions to guide you through the process. Enjoy creating your Roasted Veggie Quinoa Bowl! To cook the quinoa, start by combining 1 cup of rinsed quinoa and 2 cups of vegetable broth in a medium saucepan. Bring this mix to a boil over high heat. Once it boils, reduce the heat to low. Cover the pot and let it simmer for about 15 minutes. Check the quinoa when the time is up. It should look fluffy and all the liquid should be gone. If it is not ready, let it simmer a few more minutes. After cooking, remove it from heat and set it aside. While the quinoa cooks, it’s time to prepare the vegetables. Gather your zucchini, bell pepper, cherry tomatoes, broccoli florets, and red onion. Dice them into small pieces. In a large mixing bowl, add all the diced veggies. Drizzle 2 tablespoons of olive oil over the vegetables. Next, season with 1 teaspoon of garlic powder, 1 teaspoon of smoked paprika, salt, and pepper. Toss everything until the veggies are nicely coated. This step adds great flavor. Now, it’s time to roast the seasoned veggies. Preheat your oven to 425°F (220°C). Spread the coated vegetables on a large baking sheet in a single layer. Make sure they have space to roast evenly. Roast them in the oven for 20 to 25 minutes. Stir the veggies halfway through to help them cook evenly. They are ready when tender and slightly caramelized. This caramelization brings out the natural sweetness in the vegetables. For the full recipe, check out the section above. You can easily swap out veggies in this bowl. Use what's fresh and in season. Try carrots, sweet potatoes, or even spinach. This helps keep flavors bright and fun. You can also adjust spices to suit your taste. Want more heat? Add chili powder or cayenne pepper. Prefer less spice? Try just salt and pepper. The goal is to make it your own. Make your bowl look great! Use colorful bowls to show off the food. Arrange the sliced avocado in a fan shape on top. This adds a nice touch. You can also drizzle balsamic reduction over the dish for extra flavor. If you want more protein, add grilled chicken or chickpeas. Another great idea is to pair it with a side salad. A simple green salad works well and adds crunch. Enjoy getting creative with your meal! {{image_2}} You can swap quinoa with other grains. Brown rice works well and adds a nutty taste. Couscous cooks quickly and gives a light texture. Farro adds a chewy bite. Each grain offers a unique flavor and texture to your bowl. If you want a vegan bowl, check all your ingredients. Use vegetable broth to keep it plant-based. For cheese lovers, try using nutritional yeast instead of feta. It gives a cheesy flavor without dairy. You can also skip cheese altogether for a lighter dish. Want to spice things up? Add herbs like basil or cilantro for freshness. Use spices like cumin or curry powder for warmth. Try drizzling a tahini sauce or a spicy sriracha on top. These simple changes can take your roasted veggie quinoa bowl to new heights. For the full recipe, check the main section. To keep your roasted veggie quinoa bowl fresh, use airtight containers. This helps to lock in flavors and moisture. Allow the dish to cool before sealing it. Store it in the fridge for up to three days. Always label your containers with dates. This way, you know when to enjoy them. You can freeze portions for meal prep. Divide the quinoa and veggies into single servings. Use freezer-safe containers or bags. Press out any air before sealing. The bowl can stay in the freezer for up to three months. To thaw, place it in the fridge overnight. Reheat in the microwave or on the stove. Add a splash of water to prevent drying out. Enjoy your meal anytime with this easy storage method! Quinoa usually takes about 15 minutes to cook. To make it perfect, follow these steps: - Rinse 1 cup of quinoa under cold water. - Combine the rinsed quinoa with 2 cups of vegetable broth in a medium pot. - Bring it to a boil, then reduce the heat and cover. - Simmer until all liquid is absorbed and the quinoa is fluffy. This method gives a nice, light texture. Yes, you can use frozen vegetables! They save time and are often just as nutritious. Here are some tips: - Thaw the veggies before roasting for even cooking. - Add a few extra minutes to roasting time if they are still partly frozen. - Frozen veggies may release more water, so keep an eye on them in the oven. These adjustments help maintain the dish's flavor and texture. If your quinoa turns out mushy, don't worry. Here’s how to fix it: - Start by draining any excess water. - Spread the quinoa on a baking sheet to cool. - This helps it firm up a bit. For next time, remember to measure the liquid correctly. Using too much broth can lead to mushy quinoa. This blog post shows you how to make a tasty quinoa dish. You learned about key ingredients, easy steps for cooking, and helpful tips. Customize with your favorite veggies and toppings. Consider storage methods for leftovers, and explore fun variations like different grains or international flavors. Cooking quinoa is simple, and it can fit many diets. Enjoy experimenting with this healthy and flexible recipe. You’ll soon have a meal that everyone will love. Get creative, and happy cooking!

Roasted Veggie Quinoa Bowl Flavorful and Nutritious Meal

Looking for a meal that’s both tasty and good for you? The Roasted Veggie Quinoa Bowl is packed with flavor

- Chickpeas and their benefits Chickpeas are a great source of protein and fiber. They help you feel full. They also support heart health and aid digestion. Using canned chickpeas makes this recipe quick and easy. - Honey and its flavor profile Honey adds a natural sweetness to the dish. It balances the tangy Dijon mustard. Honey also gives a rich, sticky texture, perfect for coating the chickpeas. - Dijon mustard explained Dijon mustard brings a bold, tangy flavor. It enhances the taste without overpowering. The smooth texture mixes well with honey for a tasty dressing. - Spices and seasoning options You can add garlic powder and smoked paprika for extra flavor. These spices give a warm, savory depth. Salt and pepper help bring all the flavors together. - Variations for heat lovers Want some heat? Add cayenne pepper for a spicy kick. You can adjust the amount based on your taste. This adds a fun twist to the recipe. - Suggested garnishes for presentation Serve the roasted chickpeas in a bowl. A sprinkle of fresh parsley gives a pop of color. You can also use them as a crunchy topping on salads. They look great and add texture. For the complete recipe, check out the Full Recipe section. First, gather your tools. You will need a mixing bowl, whisk, and a baking sheet. Rinse and drain the canned chickpeas. This step is key to getting rid of extra salt and liquid. Once they are dry, you can move on to making the honey mustard dressing. In your mixing bowl, add: - 2 tablespoons honey - 2 tablespoons Dijon mustard - 1 tablespoon olive oil - 1 teaspoon garlic powder - 1 teaspoon smoked paprika - 1/2 teaspoon cayenne pepper (optional) - Salt and pepper to taste Whisk these ingredients together until smooth. This tasty dressing adds the sweet and tangy flavor we love. Now, preheat your oven to 400°F (200°C). While the oven heats, line your baking sheet with parchment paper. This helps prevent sticking. After the oven is hot, it’s time to roast the chickpeas. Add the rinsed chickpeas to the bowl with your honey mustard dressing. Toss them gently to coat each chickpea well. Spread them in a single layer on your prepared baking sheet. Roast your chickpeas for 25 to 30 minutes. Stir them halfway through to ensure even roasting. Look for a crispy and golden brown appearance. This is how you achieve a perfect texture that’s crunchy and delicious. Once the chickpeas are done, let them cool slightly. Serve them in a small bowl. For a pop of color, you can add a sprinkle of fresh parsley. Honey Mustard Roasted Chickpeas also make a great crunchy topping for salads or soups. Enjoy your tasty and healthy snack! For the full recipe, check out the section above. To get crispy chickpeas, start with dry ones. After rinsing, pat them dry with a towel. Any moisture can make them soggy. Spread the chickpeas on a baking sheet in a single layer. This ensures they roast evenly. Stir them halfway through cooking for even crispiness. Common mistakes when roasting include not preheating the oven. Always heat it to 400°F (200°C) first. Also, avoid overcrowding the chickpeas on the baking sheet. If they’re too close, they can steam instead of roast. For the best taste, season your chickpeas well. The honey mustard mix adds a sweet and tangy flavor. Taste it before adding the chickpeas. If you want more spice, add extra cayenne pepper. You can also explore different toppings. Try adding crunchy nuts or seeds on top for more texture. Fresh herbs like parsley or cilantro can brighten the dish. For a zesty kick, squeeze some lemon juice before serving. You can find the complete instructions in the Full Recipe. {{image_2}} You can change the flavor of your honey mustard roasted chickpeas easily. Try different mustards to mix things up. Yellow mustard gives a classic taste, while spicy brown mustard adds a kick. You can even use whole grain mustard for a grainy texture. Sweeteners can also change the taste. Instead of honey, use maple syrup or agave nectar. Both alternatives bring a unique sweetness that pairs well with the chickpeas. If you want a vegan option, swap honey for maple syrup. This keeps the dish sweet and tasty. You can also use a sugar-free sweetener if you want to cut calories. For those watching sodium, choose low-sodium chickpeas. You can also reduce or skip the salt in the honey mustard mix. This makes it a heart-healthy snack for everyone. These variations help you customize your honey mustard roasted chickpeas. You can enjoy this tasty snack while meeting your dietary needs. For more details on how to make this dish, check the Full Recipe. After making your Honey Mustard Roasted Chickpeas, you might have some leftovers. To store them, place the cooled chickpeas in an airtight container. This keeps them fresh and tasty. You can store them in the fridge for up to four days. When you want to eat them again, just take them out and enjoy! If you want to save your chickpeas for later, freezing is a great option. First, let the roasted chickpeas cool completely. Then, spread them out on a baking sheet. Freeze them for about an hour. This way, they will not stick together. After that, place the frozen chickpeas in a freezer bag. Remove as much air as possible before sealing. They can last for up to three months in the freezer. To enjoy your frozen chickpeas, take them out and let them thaw in the fridge overnight. For the best taste and crunch, reheat them in the oven. Preheat your oven to 400°F (200°C). Spread the chickpeas on a baking sheet and heat them for about 10 minutes. They will become crispy again, just like when you first made them! For the full recipe, check the section above. Chickpeas are packed with protein and fiber. They help keep you full longer. They also support heart health by lowering cholesterol. Plus, they contain vitamins and minerals like iron and folate. Eating chickpeas can aid digestion and help control blood sugar levels. Yes, you can use dried chickpeas! Just soak them overnight and cook them until tender. This may take longer than using canned chickpeas. You’ll need to adjust the cooking time in the recipe. Dried chickpeas also have a fresher taste. You will know they are done when they are crispy and golden brown. This usually takes about 25-30 minutes in the oven. Stir them halfway through for even cooking. They should make a slight crunch when you bite into them. Absolutely! An air fryer works great for this recipe. Use the same temperature, around 400°F (200°C). Cook them for about 15-20 minutes, shaking the basket halfway through. You’ll get crispy chickpeas without using much oil. This blog post covered how to make Honey Mustard Roasted Chickpeas. We explored the main ingredients like chickpeas, honey, and Dijon mustard. Optional spices and garnishes added your personal touch. I shared step-by-step instructions, from prep to roasting. Tips helped ensure your chickpeas stay crispy. Lastly, variations and storage ideas make this dish flexible. Enjoy cooking and sharing this healthy snack with others!

Honey Mustard Roasted Chickpeas Healthy and Flavorful Snack

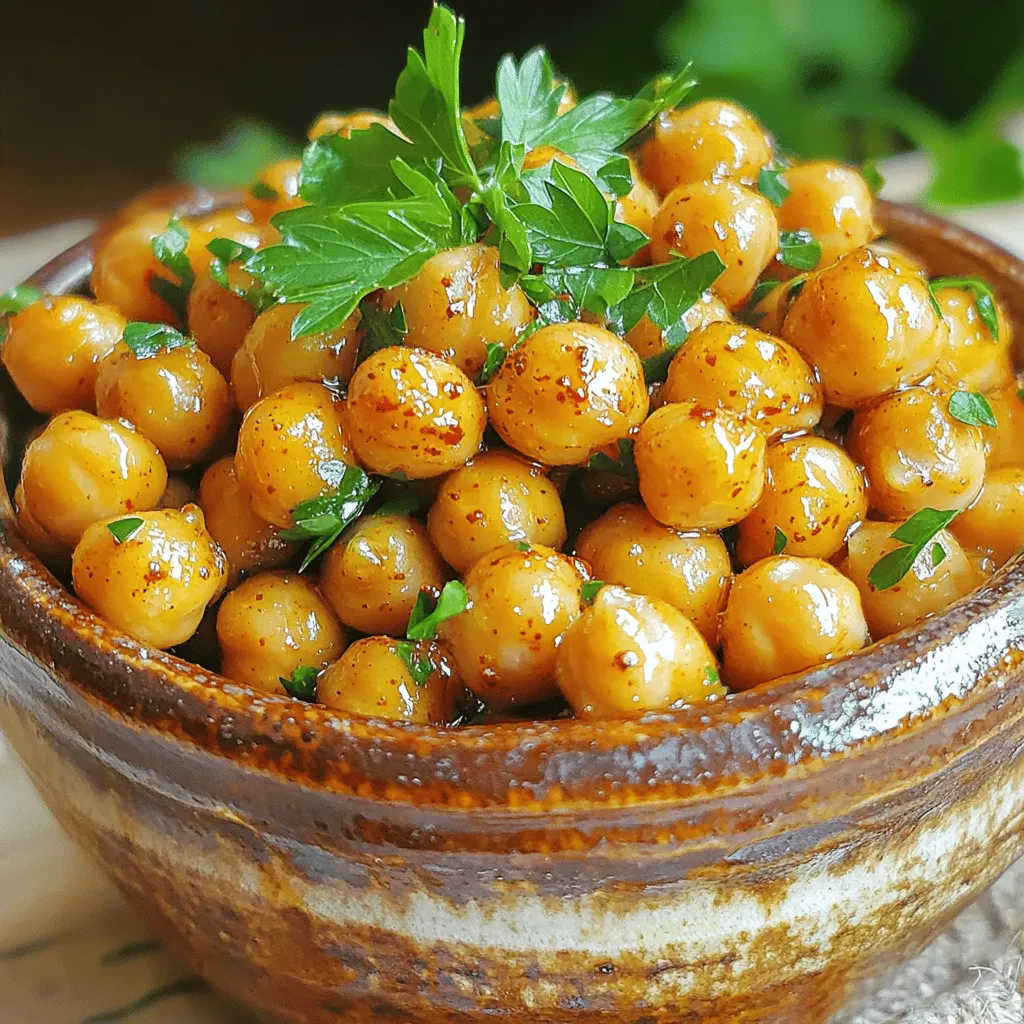
Looking for a snack that’s both healthy and packed with flavor? Honey Mustard Roasted Chickpeas are the answer! These tasty

- 2 cups cooked chicken breast, shredded - 1 cup plain Greek yogurt - 1/2 cup celery, finely diced - 1/2 cup red grapes, halved - 1/4 cup green onion, sliced - 1/4 cup walnuts, chopped - 1 tablespoon Dijon mustard - 1 tablespoon honey - 1 tablespoon lemon juice - Salt and pepper to taste - Lettuce leaves for serving I love using fresh ingredients for this Greek yogurt chicken salad. The cooked chicken adds protein, while the Greek yogurt keeps it creamy and healthy. Celery gives a nice crunch, and the grapes add a hint of sweetness. The walnuts add texture and healthy fats. Dijon mustard and honey give a tangy-sweet flavor that ties everything together. I also squeeze in some lemon juice for freshness. You can adjust the salt and pepper to fit your taste. Using lettuce leaves to serve this salad makes it light and fun. You can also use the full recipe for more details on how to prepare it! - Calories per serving: Approximately 300 - Protein: 30 grams - Fat: 12 grams - Carbohydrates: 20 grams Greek yogurt is rich in protein and low in fat. It helps build muscle and keeps you full longer. It also contains probiotics, which support gut health. This salad is not just tasty; it’s also a healthy choice! Mixing the chicken and vegetables Start by taking a large mixing bowl. Add 2 cups of shredded chicken, 1/2 cup of diced celery, 1/2 cup of halved red grapes, 1/4 cup of sliced green onion, and 1/4 cup of chopped walnuts. Mix them gently. This blend adds crunch and sweetness to your dish. Preparing the Greek yogurt dressing In a separate bowl, whisk together 1 cup of plain Greek yogurt, 1 tablespoon of Dijon mustard, 1 tablespoon of honey, 1 tablespoon of lemon juice, salt, and pepper. Whisk until it's smooth. This dressing brings creaminess without extra fat. Combining the ingredients Pour the yogurt dressing over the chicken mixture. Toss everything together gently. Ensure all ingredients are coated in the dressing. Cover the bowl and refrigerate for at least 30 minutes. This waiting time helps the flavors mix well. Plating on lettuce leaves When ready to serve, take individual lettuce leaves. Spoon the chicken salad onto the leaves. This makes a great, light meal perfect for lunch or dinner. Alternative serving ideas You can also serve this chicken salad in sandwiches or wraps. Use your favorite bread or tortilla. This dish is versatile and keeps well for meal prep. Enjoy it however you like! For the full recipe, check the details above. To make your Greek yogurt chicken salad truly shine, focus on moisture. Greek yogurt helps keep the salad creamy and fresh. If your salad feels too dry, add a bit more yogurt. This small tweak makes a big difference. Next, adjust the flavor. You can add spices like garlic powder or paprika for a kick. Fresh herbs, like dill or parsley, enhance the taste too. Experiment with these additions to find your perfect mix. Prepping ingredients in advance saves time. Chop your celery and grapes the night before. Store them in airtight containers. This simple step makes assembly fast and easy. Consider using store-bought rotisserie chicken. It’s a quick option that cuts down your prep time. Just shred the chicken and blend it with the other ingredients. You'll have a delicious salad ready in no time. For the full recipe, check out the Greek Yogurt Chicken Salad section. {{image_2}} You can easily make Greek yogurt chicken salad even healthier. Start by using low-fat yogurt instead of regular yogurt. This change cuts down on calories without losing creaminess. Next, add more veggies like bell peppers and cucumbers. These veggies add crunch and flavor. You can also toss in some spinach or kale for extra nutrients. Adding herbs can take your chicken salad to the next level. Fresh dill or parsley adds a bright taste. You can also mix in different fruits to change it up. Try diced apples for sweetness or dried cranberries for a tart kick. Both options give the salad a new twist. Experimenting with flavors keeps your meals fresh and exciting. For the full recipe, check the earlier section. To keep your Greek yogurt chicken salad fresh, store it in the fridge right away. Use an airtight container to prevent spills and keep out air. Glass containers work great, but plastic ones are fine too. Make sure the lid seals well. This keeps the salad tasty and safe. Your salad can last for about three to four days in the fridge. Keep an eye on it. If it starts to smell funny or looks off, toss it out. Also, if the yogurt separates or the chicken looks slimy, it’s time to say goodbye. Always check for signs of spoilage to stay safe. Can I use cooked frozen chicken? Yes, you can use cooked frozen chicken. Just thaw it first. Make sure to shred it before mixing it with other ingredients. This saves time and makes the salad quick to prepare. Is Greek yogurt healthier than mayonnaise? Yes, Greek yogurt is often healthier than mayonnaise. It has less fat and more protein. Greek yogurt also adds a creamy texture, which makes it perfect for this salad. It provides a tangy flavor that complements the chicken well. How can I make this recipe dairy-free? To make this recipe dairy-free, use a dairy-free yogurt. There are many options like almond or coconut yogurt. These alternatives work well and keep the salad creamy. Just watch for added sugars in those products. For the full recipe, check the section above! This blog post shared a simple Greek yogurt chicken salad recipe. You learned about the main ingredients, step-by-step instructions, and tips for perfecting it. We also covered variations, storage tips, and answered common questions. Overall, this chicken salad is tasty, healthy, and easy to make. You can adjust flavors or ingredients to fit your needs. Enjoy making this dish for lunch or dinner!

Greek Yogurt Chicken Salad Flavorful and Healthy Meal

Looking for a tasty and healthy meal? Let me introduce you to Greek Yogurt Chicken Salad! This fresh dish combines

To make a great tomato basil soup, you need some key items. Here’s what you will need: - 2 tablespoons olive oil - 1 onion, diced - 3 cloves garlic, minced - 3 cups ripe tomatoes, chopped (or 2 cans of diced tomatoes) - 2 cups vegetable broth - 1 teaspoon sugar - 1 teaspoon dried basil (or 1 tablespoon fresh basil, torn) - 1/2 teaspoon salt - 1/4 teaspoon black pepper - 1 cup heavy cream (or coconut cream for dairy-free) - Fresh basil leaves for garnish These ingredients create a smooth, rich soup that is bursting with flavor. The tomatoes offer a natural sweetness, while the basil adds a fresh touch. Olive oil helps cook the onion and garlic, giving your soup a great base. Garnishes can make your soup look even better. Here are a few ideas: - A drizzle of olive oil - Croutons for crunch - A sprinkle of parmesan cheese - Extra fresh basil leaves These extras can elevate your dish and add texture. They also let you customize your bowl, making each serving special. You might not have all the ingredients on hand. Here are some good swaps: - Use canned tomatoes if fresh ones are not available. - Swap heavy cream for coconut cream for a dairy-free option. - Vegetable broth can be replaced with chicken broth for a different taste. These substitutions keep the soup tasty, even if you change a few items. Don't be afraid to experiment; cooking is all about finding what you love! For the full recipe, check out the details above. Gather all your ingredients first. This makes cooking easier. You will need: - 2 tablespoons olive oil - 1 onion, diced - 3 cloves garlic, minced - 3 cups ripe tomatoes, chopped (or 2 cans of diced tomatoes) - 2 cups vegetable broth - 1 teaspoon sugar - 1 teaspoon dried basil (or 1 tablespoon fresh basil, torn) - 1/2 teaspoon salt - 1/4 teaspoon black pepper - 1 cup heavy cream (or coconut cream for dairy-free) - Fresh basil leaves for garnish Chop the onion and garlic. If using fresh tomatoes, dice them too. Heat olive oil in a large pot over medium heat. Add the diced onion and sauté it until it turns soft, about 5 minutes. Next, stir in the minced garlic and cook for 1-2 minutes. This step brings out that lovely garlic smell. Now, add your chopped tomatoes or canned tomatoes to the pot. Mix everything well. Pour in the vegetable broth, and add the sugar, dried basil, salt, and black pepper. Stir to combine. Bring the mixture to a gentle boil. Once it boils, lower the heat and let it simmer for 20-25 minutes. This time allows the flavors to mix well. For a smooth texture, use an immersion blender to puree the soup directly in the pot. If you have a regular blender, let the soup cool a bit before blending it in batches. Be careful while blending hot liquids. Once blended, return the pot to low heat. Stir in the heavy cream and heat for another 5 minutes. Do not let it boil again. Taste your soup and add more salt or pepper if needed. Serve it hot, and don’t forget to garnish with fresh basil leaves. This adds a nice touch. For the full recipe, check out the detailed instructions. To make your tomato basil soup even better, try these tips: - Use fresh tomatoes when in season for a sweeter taste. - Roast the tomatoes before adding them to the pot for a deeper flavor. - Add a splash of balsamic vinegar for a tangy kick. - Toss in a pinch of red pepper flakes for some heat. - Experiment with different herbs like oregano or thyme for new flavors. Here are some common mistakes that can hurt your soup: - Don’t skip the onion and garlic; they build a solid flavor base. - Avoid boiling the soup after adding cream; this can cause it to curdle. - Under-seasoning can leave your soup bland; taste as you go. - Don’t rush the cooking time; allow the soup to simmer for the best flavor. When it comes to serving your soup, keep it simple and fun: - Pair it with a crunchy grilled cheese sandwich for a classic combo. - Serve with crusty bread for dipping; it adds texture. - Top with a dollop of sour cream or yogurt for creaminess. - Garnish with fresh basil leaves for a pop of color and flavor. Feel free to check out the Full Recipe for detailed steps and tips! {{image_2}} To make a dairy-free version of this soup, swap heavy cream for coconut cream. Coconut cream gives a rich flavor without any dairy. You can also use almond milk or oat milk, but ensure to adjust the flavor with a pinch of salt. This way, you keep the soup creamy while keeping it dairy-free. For a heartier soup, consider adding protein. You can stir in cooked chicken, turkey, or shrimp. For a vegetarian option, add cooked lentils or chickpeas. This not only boosts nutrition but also makes the soup filling. It’s a simple twist that makes a big difference in your meal. If you like a kick, try making spicy tomato basil soup. Add red pepper flakes or chopped jalapeños when cooking the onions. This will give the soup a nice heat. You can also blend in some roasted red peppers for a smoky flavor. Adjust the spice to suit your taste. Try these variations to find your favorite. Each one offers a new take on the classic easy tomato basil soup. Enjoy experimenting! For the full recipe, check the earlier section. Once your Easy Tomato Basil Soup is cool, store it in an airtight container. It can stay fresh in the fridge for up to five days. Make sure to label your container with the date. This way, you can easily track how long it’s been stored. If you want to keep your soup longer, try freezing it. Use a freezer-safe container or resealable bag. Leave some space at the top, as the soup will expand when it freezes. Your soup can last up to three months in the freezer. To thaw, move it to the fridge overnight or use the defrost setting on your microwave. To reheat, pour the soup into a pot over low heat. Stir gently to avoid sticking. You can also use the microwave. Heat in 30-second intervals, stirring each time. If the soup is too thick, add a splash of vegetable broth or water to get your desired consistency. Enjoy your warm, creamy soup! For more tips, check the Full Recipe. Easy Tomato Basil Soup lasts about four to five days in the fridge. Store it in an airtight container to keep it fresh. Make sure to let it cool before putting it in the fridge. Yes, you can make this soup ahead of time. Cook it fully, then cool it down. After that, store it in the fridge for later. Reheat it on the stove when you’re ready. This soup tastes even better the next day! You can serve many things with Tomato Basil Soup. Here are a few ideas: - Grilled cheese sandwiches - Crusty bread or baguette - A fresh garden salad - Crackers or breadsticks These pair well and enhance the meal. Yes, you can make this soup vegan easily. Just swap the heavy cream with coconut cream or any plant-based cream. Also, check your vegetable broth to ensure it’s vegan. This way, everyone can enjoy it! For the full recipe, check the earlier sections. This article covered how to make Easy Tomato Basil Soup, from essential ingredients to serving tips. You learned about the cooking steps, ways to enhance flavors, and variations to try. With simple storage and reheating advice, this soup stays fresh longer. Remember, this dish is versatile. You can switch ingredients or serve it with different sides. Enjoy crafting a warm bowl of comfort that suits your taste! Your soup journey starts now—get cooking!

Easy Tomato Basil Soup Simple and Flavorful Recipe

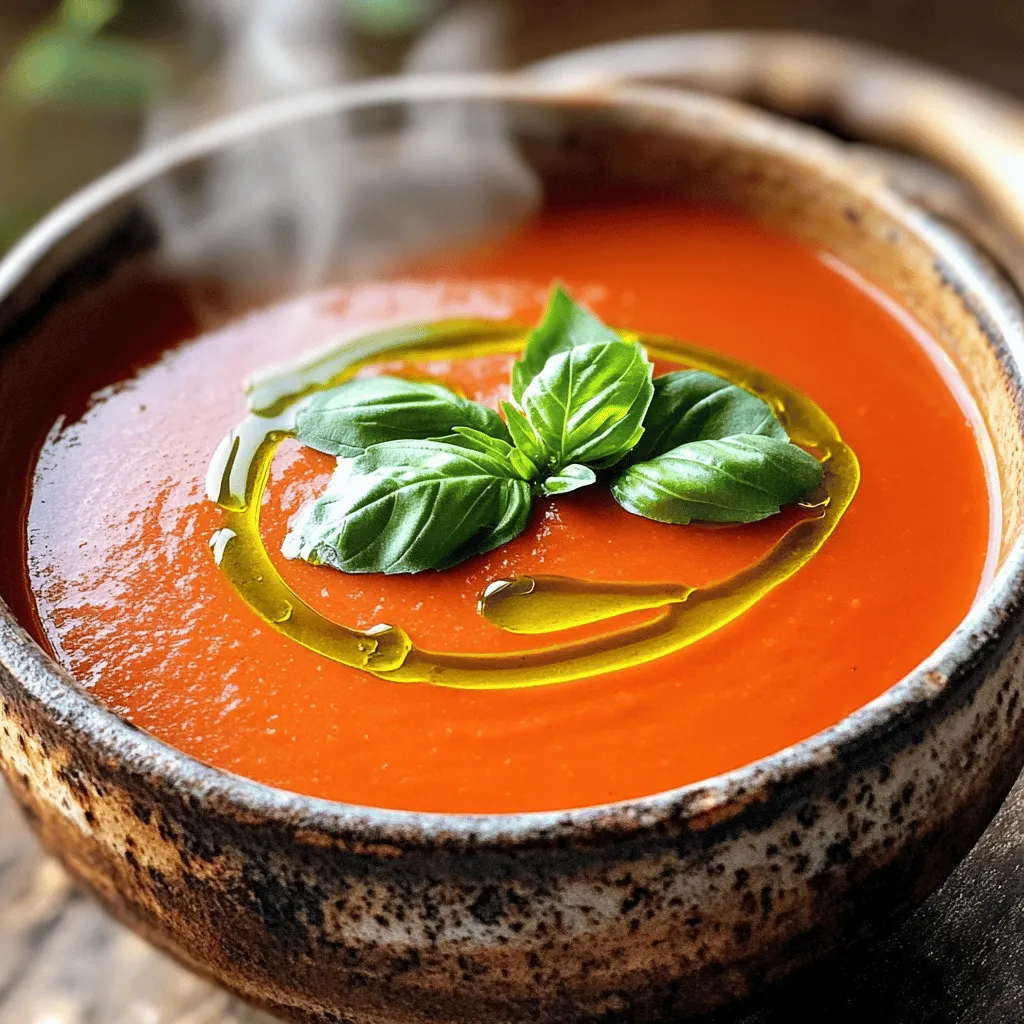
Craving a warm bowl of comfort? This Easy Tomato Basil Soup is your answer! It’s simple to make and bursting

To make a Sweet Potato Chickpea Buddha Bowl, gather these ingredients: - 2 medium sweet potatoes, peeled and cubed - 1 can (15 oz) chickpeas, drained and rinsed - 1 tablespoon olive oil - 1 teaspoon smoked paprika - 1 teaspoon ground cumin - Salt and pepper to taste - 2 cups cooked quinoa - 1 cup baby spinach - 1 avocado, sliced - 1/4 cup tahini - 2 tablespoons lemon juice - 1 tablespoon maple syrup - 1/4 cup water (add more for desired consistency) - Sesame seeds for garnish These ingredients come together to create a filling meal. Sweet potatoes provide natural sweetness and fiber. Chickpeas add protein and texture. Quinoa serves as a hearty base, while avocado brings creaminess. The tahini dressing ties everything together with its rich flavor. You can find the full recipe to guide you through each step. - Preheat the oven to 400°F (200°C). - Toss the sweet potatoes and chickpeas with olive oil, smoked paprika, cumin, salt, and pepper. First, you need to preheat your oven. This step is key for roasting. Set it to 400°F (200°C). While the oven warms up, get your sweet potatoes and chickpeas ready. Take your sweet potatoes and peel them. Then, cut them into cubes. Open the can of chickpeas, drain, and rinse them well. In a bowl, mix the sweet potatoes and chickpeas with olive oil. Add smoked paprika, ground cumin, salt, and pepper. This mix gives great flavor. - Spread on a baking sheet and roast for 25-30 minutes, turning halfway. Once mixed, spread the sweet potatoes and chickpeas on a baking sheet. Make sure they are in a single layer. This helps them cook evenly. Roast them in the oven for about 25-30 minutes. Halfway through, turn them to ensure they brown nicely. You want them tender and slightly crispy. - Prepare tahini dressing and assemble the bowl with quinoa and toppings. While the veggies roast, prepare the tahini dressing. In a small bowl, whisk together tahini, lemon juice, maple syrup, and water. Adjust the water to get your desired thickness. Now, let’s assemble your Buddha bowl. In each serving bowl, add cooked quinoa as the base. Top it with your roasted sweet potatoes, chickpeas, fresh spinach, and sliced avocado. Finally, drizzle the tahini dressing on top. Sprinkle with sesame seeds for extra flavor. Enjoy your Sweet Potato Chickpea Buddha Bowl! For the full recipe, check out the detailed instructions. To get the best flavor from your sweet potatoes and chickpeas, spread them out well. This means placing them in a single layer on the baking sheet. If they are too close together, they can steam instead of roast. This can make them soggy. The goal is to get crispy edges and soft centers. Roasting at 400°F (200°C) helps achieve this perfect texture. The tahini dressing is a key part of your Buddha bowl. If you want a thicker dressing, use less water. For a thinner texture, add more water. You can also tweak the flavor by adding more lemon juice or maple syrup. Taste as you go! This way, you can find the right balance that you enjoy most. Your Buddha bowl can be even more special with extra toppings. Try adding roasted nuts for crunch or fresh herbs for brightness. You can also include cherry tomatoes for a pop of color. A sprinkle of feta cheese adds creaminess, while a handful of sprouts boosts nutrition. Serve the bowl with whole-grain pita on the side for a complete meal. For the full recipe, check out the Sweet Potato Chickpea Buddha Bowl. {{image_2}} You can customize your Sweet Potato Chickpea Buddha Bowl by swapping ingredients. Instead of quinoa, try brown rice or farro. If you want a different protein, use black beans or lentils. For veggies, add roasted broccoli or bell peppers. Mixing up the grains and proteins gives you new flavors and textures. To add more flavor, consider spices and herbs. Try adding garlic powder or chili powder for heat. Fresh herbs like cilantro or parsley can brighten up your bowl. You can also mix in fruits like pomegranate seeds or mango slices. These will give your dish a fresh and sweet twist. You can easily adapt this recipe for various diets. To make it vegan, just use maple syrup in the dressing. For gluten-free, ensure your grains are certified gluten-free. If you want a lower-carb option, swap quinoa for cauliflower rice. These modifications keep the bowl tasty and satisfying for everyone. To keep your Sweet Potato Chickpea Buddha Bowl fresh, store it in an airtight container. Place the bowl in the refrigerator. The leftovers will stay good for about three to four days. Make sure to separate the dressing if you want to keep the texture nice. You can freeze the roasted sweet potatoes and chickpeas. Cool them first, then place them in freezer bags. Remove as much air as you can before sealing. These can last for up to three months in the freezer. When ready to eat, just thaw in the fridge overnight. For reheating, use the oven or a stovetop. Preheat the oven to 350°F (175°C) and spread the sweet potatoes and chickpeas on a baking sheet. Heat for about 10-15 minutes. If using a stovetop, place a pan over medium heat and add a little oil. Stir the mixture until warm. This keeps the texture and flavor just right. For the full recipe, check out the Sweet Potato Chickpea Buddha Bowl. If you need a tahini substitute, you have great options. You can use sunflower seed butter for a nut-free choice. Another option is peanut butter, which adds a different flavor. You can also use yogurt for a creamy texture. Just remember that each substitute will change the taste. Yes, you can make this bowl ahead of time! Prepare the sweet potatoes and chickpeas and store them in the fridge. Cooked quinoa also keeps well. When you are ready to eat, just reheat the veggies and quinoa. Add fresh toppings like spinach and avocado right before serving. This dish is very healthy! Sweet potatoes are full of vitamins and fiber. They help your eyes and boost your immune system. Chickpeas are a great source of plant protein. They help keep you full and support muscle health. Together, they make this bowl a nutritious meal. In this blog post, we explored a tasty Buddha bowl recipe. We covered essential ingredients, step-by-step instructions, and helpful tips. You learned about variations and storage options to keep your meals fresh. These bowls are not only delicious but also healthy and easy to customize. Make it your own with different toppings and flavors. Enjoying a Buddha bowl can bring joy to your meals. Get creative and nourish your body with this versatile dish!

Sweet Potato Chickpea Buddha Bowl Energizing Meal

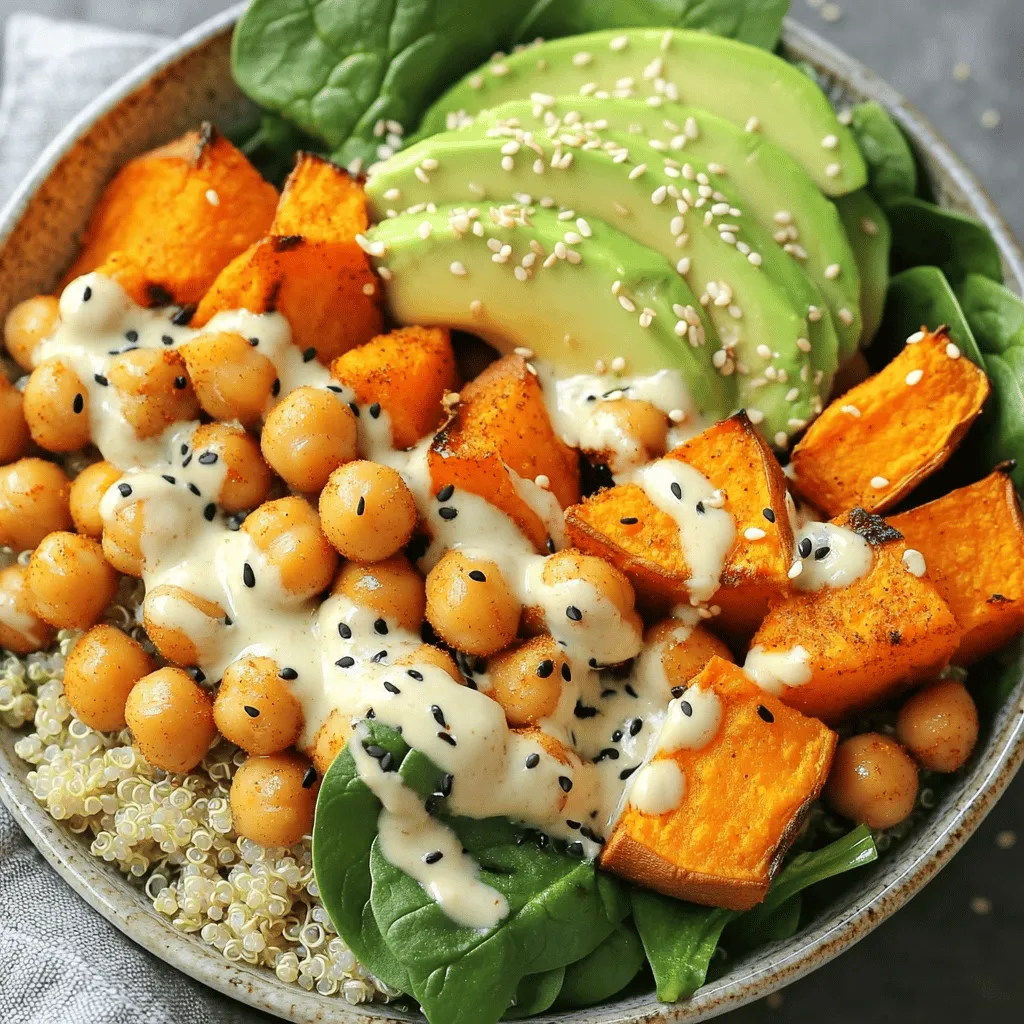
Looking for a meal that bursts with flavor and energy? Look no further! The Sweet Potato Chickpea Buddha Bowl combines

- 4 ears of fresh corn, husked - 1/2 cup mayonnaise - 1/2 cup crème fraîche or sour cream - 1 cup cotija cheese, crumbled - 1 tablespoon chili powder - 1 teaspoon garlic powder - 2 tablespoons lime juice - Salt to taste The star of this dish is the corn. Use fresh corn for the best taste. The sweetness of fresh corn really shines when grilled. The creamy sauce combines mayonnaise and crème fraîche. This adds richness and tanginess. Cotija cheese gives a salty kick. It melts slightly when you add it to hot corn. - Fresh cilantro, chopped (for garnish) - Lime wedges (for serving) Garnishes add a nice touch. Fresh cilantro brings brightness to the corn. Lime wedges add a zesty finish. You can squeeze lime juice over the corn. This will enhance the flavors. These simple additions make the dish pop. For the full recipe, check the detailed instructions. To start, you need to husk the corn. Remove all the green leaves and silk from each ear. This step is key for even cooking. Once husked, rinse the corn under cool water to clean it. Next, prepare your grilling tools. Make sure your grill is clean and ready to go. Gather your tongs and a brush for the sauce. In a medium bowl, combine the mayonnaise and crème fraîche. Mix them well to get a smooth base. Now, add the chili powder, garlic powder, and salt. Squeeze in the lime juice for a zesty kick. Stir everything until it's well mixed. This sauce will add creaminess and flavor to the corn. Now it’s time to grill! Preheat your grill to medium-high heat. This should take about 10 minutes. While the grill heats, brush the corn with your sauce. Make sure to cover all sides. Place the corn directly on the grill. Cook each ear for about 8 to 10 minutes. Turn them every few minutes for even grilling. Look for nice grill marks and tender kernels. After grilling, take the corn off the grill. Sprinkle crumbled cotija cheese over the hot corn so it melts slightly. Drizzle any leftover sauce on top. For extra heat, add more chili powder if you like. Garnish with fresh cilantro and serve with lime wedges. Enjoy this flavorful summer treat! For a full recipe, refer to the [Full Recipe]. To get those perfect grill marks, start with a hot grill. Heat your grill to medium-high. Place the corn on the grill and let it sit. Don't move it too much. After a few minutes, you will see nice golden stripes. Burnt corn can ruin your dish. To avoid this, turn the corn often. Check it every few minutes. If you see dark spots, move it to a cooler area of the grill. This way, you can cook it evenly without charring. You can adjust the spices to fit your taste. If you want it spicy, add more chili powder. For a milder flavor, cut back on the chili. You can also try adding smoked paprika for a smoky twist. Personalizing the mayo mixture makes it fun. You can mix in lime zest for more citrus flavor. Or add some hot sauce for extra heat. Make it your own! This way, every bite is just how you like it. For the full recipe, check the section above. Enjoy grilling! {{image_2}} Using different cheeses can change the taste of your grilled corn. Queso fresco is a great choice. It is mild and crumbly. It adds a nice texture without overpowering the corn’s flavor. Simply sprinkle it over the hot corn after grilling. You can also try feta cheese. Feta has a tangy taste that can enhance the dish. Crumble it on top just like cotija. This gives your corn a unique twist. If you want a vegan version, you can swap out the mayonnaise and crème fraîche. Use a plant-based mayonnaise instead. This will keep the creamy texture. For the sauce, try using cashew cream. It blends well with spices and gives a rich taste. Dairy-free cheese is another option. Look for brands that offer vegan cheese alternatives. These can mimic the texture of cotija. Sprinkle it on the corn after grilling for a tasty finish. Explore these variations to find your favorite way to enjoy grilled Mexican street corn. For the complete recipe, check out [Full Recipe]. To keep leftover grilled corn fresh, wrap each ear in plastic wrap. Store them in the fridge. They taste best if eaten within three days. When you are ready to eat, you can reheat the corn. Simply place it in the microwave for about one minute. If you prefer, you can reheat it on the grill for a few minutes. This way, you keep the nice grilled flavor. If you have extra grilled corn, freezing is a great choice. First, let the corn cool down completely. Then, wrap each ear tightly in foil or plastic wrap. Place them in a freezer bag and squeeze out the air. They can last up to three months. When you want to enjoy your frozen corn, take it out of the freezer. Let it thaw in the fridge overnight. You can also thaw it in the microwave on low power. After thawing, reheat it on the grill or in a pan. This helps restore some of the grilled taste. Enjoy your delicious grilled Mexican street corn again! You can find the Full Recipe above to enjoy this tasty treat. Mexican street corn, or elote, has a rich history. Street vendors sell it across Mexico. They grill the corn, then coat it with creamy sauces. This dish shines with flavors like lime and chili. The taste is bold, creamy, and tangy. Compared to regular corn, it’s a feast for the senses. The addition of cotija cheese gives it a unique twist. You won’t find this flavor in plain corn on the cob. You can grill corn without husking it, but it has pros and cons. Keeping the husk can help retain moisture. This can make the corn tender and juicy. However, it can also limit the smoky flavor from the grill. If you do husk it, be ready for more direct heat. The choice depends on your taste and grilling method. When serving grilled corn, keep it simple yet fun. You can place the corn on a platter. Add lime wedges for squeezing over the top. Fresh cilantro adds a pop of color and flavor. You can also sprinkle extra cheese on top for a tasty touch. Pair it with grilled meats for a complete meal. This dish is perfect for summer cookouts. For a full recipe, check the detailed instructions above. In this blog post, we explored the key ingredients for grilled corn. You learned how to prepare corn, mix the sauce, and grill it to perfection. We shared tips for grilling techniques and flavor enhancements, inviting you to experiment with variations. You now know how to store leftovers and answer common questions about Mexican street corn. Grilled corn is simple yet flavorful. Enjoy your creation and make it your own!

Grilled Mexican Street Corn Flavorful Summer Treat

Looking for a perfect summer treat? Grilled Mexican street corn is vibrant, flavorful, and sure to impress. This easy recipe

- 1 can (15 oz) chickpeas - 1/4 cup tahini - 2 tablespoons olive oil - 2 tablespoons lemon juice - 1 clove garlic, minced - 1/2 teaspoon ground cumin - Salt to taste - Fresh parsley and paprika for garnish - Assorted veggies and pita bread To make a classic hummus platter, you need simple yet fresh ingredients. Start with a can of chickpeas. These are the base for your hummus. Then, you’ll need tahini, which adds creaminess and depth. Olive oil brings richness, while lemon juice gives that needed zing. Don't skip the garlic! It adds a punch of flavor. Ground cumin gives a warm note that complements the other flavors. Use salt to bring all the tastes together. For a beautiful finish, use fresh parsley and paprika as garnishes. Finally, the platter shines with assorted veggies like carrot sticks and cucumber slices, plus warm pita bread cut into triangles. This variety makes it fun to eat and share. You can find the full recipe for a classic hummus platter linked above. - Drain and rinse the chickpeas: Start by taking your can of chickpeas. Use a colander to drain the liquid. Rinse them well under cold water. This step helps to remove any canning liquid and salt. Clean chickpeas make a smoother hummus. - Mince the garlic: Take one clove of garlic. Peel it and chop it finely. You want small pieces so that the garlic mixes well into the hummus. This adds a fresh, bold flavor. - Combine all ingredients in a food processor: In your food processor, add the drained chickpeas, tahini, olive oil, lemon juice, minced garlic, ground cumin, and a pinch of salt. You want all the flavors to blend together. - Achieve the desired consistency: Blend the mixture until it is smooth. If it feels too thick, add cold water one tablespoon at a time. Keep blending until you reach that creamy, dreamy texture. Taste it. If it needs more flavor, add a bit more salt or lemon juice. - Create a well in the hummus: Once your hummus is ready, transfer it to a serving bowl. Use the back of a spoon to make a shallow well in the center. This will hold your olive oil and make it look nice. - Drizzle with olive oil and garnish: Pour a little olive oil into the well. Then sprinkle paprika and chopped fresh parsley on top for color. This makes your hummus look fancy and inviting. - Arrange the veggies and pita bread: Place your assorted veggies and pita triangles around the hummus. This adds color and gives everyone something to dip with. Enjoy your Classic Hummus Platter! For the complete recipe, check the Full Recipe section. To make great hummus, pay attention to seasoning. I like to taste it after blending. You can add more salt or lemon juice if it needs a boost. The right balance makes a huge difference. For consistency, start with the basic recipe. If the hummus is thick, add cold water. Blend it until smooth. You want it creamy and easy to scoop. It should not be too runny either. When serving, arrange the veggies and pita bread nicely around the hummus. A colorful spread makes it more inviting. Carrot sticks, cucumber slices, and bell pepper strips work well. For extra flavor, add olives or cherry tomatoes. They add color and a burst of taste. Choose a bright, colorful plate for your platter. This will make your hummus look even more appealing. Layer the veggies and pita around the hummus. A well-arranged platter is fun and exciting. Remember, we eat with our eyes first! {{image_2}} You can give your hummus a tasty boost with roasted red peppers. Just chop them up and blend them in. They add a sweet and smoky flavor. Another option is to use spices like smoked paprika or za'atar. These spices add warmth and depth. A sprinkle of smoked paprika enhances the earthy chickpeas. Za'atar brings a fresh, herbal note that makes the hummus shine. Feel free to play around with these flavors! To keep things vegan and gluten-free, check your ingredient labels. Make sure your tahini and olive oil are certified vegan and gluten-free. If you want a gluten-free dipper, try carrots or celery sticks. They add a nice crunch and are great with hummus. You could also use rice crackers or cucumber slices for variety. There are many options to enjoy this classic dish! You can make your hummus platter unique by adding Mediterranean-style ingredients. Crumbled feta cheese gives a salty kick that pairs well with the creamy hummus. You can also explore regional spices. For example, adding sumac brings a tangy flavor that brightens the dish. Don't hesitate to experiment with ingredients from different cultures. Each twist will offer a fresh experience for your taste buds! For the complete recipe, check the [Full Recipe]. To store leftover hummus, place it in an airtight container. This keeps the hummus fresh and safe. In the fridge, it can last about 4 to 7 days. After a week, check for any changes in smell or texture before using. If you have more hummus than you can eat, freezing is a great option. To freeze hummus, spoon it into a freezer-safe container. Leave some space at the top, as it will expand. For the best taste, use it within three months. When you’re ready to enjoy it, thaw the hummus in the fridge overnight. For quicker thawing, place it in a bowl of cold water for about an hour. You can use leftover hummus in many ways. Spread it on sandwiches for added flavor. Use it as a dip for chips or veggies. You can even mix it into pasta for a creamy sauce. With these ideas, your hummus won’t go to waste! A Classic Hummus Platter is a simple yet tasty dish. It features creamy hummus at its center. You can surround it with colorful veggies and warm pita bread. Common veggies include carrot sticks, cucumber slices, and bell pepper strips. This platter is not only delicious but also great for sharing. It's a popular dish in many cultures, especially in the Middle East. Making hummus from scratch is easy and fun. Start with one can of chickpeas. You’ll also need tahini, olive oil, lemon juice, garlic, and spices. Here’s a quick overview of the steps: 1. Drain and rinse the chickpeas. 2. Blend them with tahini, olive oil, lemon juice, minced garlic, and cumin in a food processor. 3. Add salt to taste. 4. Blend until smooth, adding cold water for the right texture. For a detailed guide, check the Full Recipe. Hummus is a healthy choice for many reasons. It is high in protein and fiber. These nutrients help you feel full and satisfied. Chickpeas, the main ingredient, provide vitamins and minerals. However, some people worry about the fat in tahini and olive oil. While these fats are healthy, portion control is key. If you have nut allergies, check the tahini source. Overall, hummus is a nutritious option that can fit into a balanced diet. This blog post covered how to make delicious hummus step by step. We looked at key ingredients, prep techniques, and tips for a great flavor. You can customize your hummus with various additives and serve it creatively. Don’t forget storage tips to keep it fresh! Making hummus is simple and it packs nutrients too. Try it out for a healthy snack or meal idea. Enjoy exploring flavors and impress your friends with your hummus skills!

Classic Hummus Platter Simple and Flavorful Delight

Creating the perfect Classic Hummus Platter is easier than you think! With just a few simple ingredients like chickpeas and

To make crispy baked falafel, gather these items: - 1 can (15 oz) chickpeas, drained and rinsed - 1 small onion, roughly chopped - 2 garlic cloves, minced - 1/4 cup fresh parsley, chopped - 1/4 cup fresh cilantro, chopped - 1 teaspoon ground cumin - 1 teaspoon ground coriander - 1/2 teaspoon paprika - 1/2 teaspoon baking powder - Salt and pepper to taste - 3 tablespoons olive oil - 1/2 cup breadcrumbs (optional for extra crunch) - 1 lemon, juiced You can add these ingredients to enhance your falafel: - 1 teaspoon cayenne pepper for heat - 1/2 teaspoon turmeric for color - 1/4 cup tahini for creaminess - A dash of soy sauce or tamari for umami Crispy baked falafel is not only tasty but also nutritious. Here’s a quick look: - Calories: About 130 per serving - Protein: Approximately 6 grams - Carbohydrates: Roughly 18 grams - Fat: About 5 grams - Fiber: Around 4 grams This recipe serves four, making it a healthy choice for a meal or snack. Enjoy the fresh herbs and spices. They not only add flavor but also important nutrients. First, gather all your ingredients. You will need chickpeas, onion, garlic, herbs, spices, and lemon. Preheat your oven to 400°F (200°C). Line a baking sheet with parchment paper. This helps keep the falafel from sticking. In a food processor, add the drained chickpeas, chopped onion, minced garlic, parsley, and cilantro. Next, sprinkle in the cumin, coriander, paprika, salt, and pepper. Pour in the olive oil and lemon juice. Pulse the mixture until well mixed but still a bit coarse. If you want extra crunch, add breadcrumbs and pulse again. Use your hands to shape the mixture into small balls or patties, about 1.5 inches wide. This size helps them cook evenly. Place the formed falafel on the lined baking sheet. Be sure to leave space between each piece. For extra crispiness, lightly brush or spray the falafel with olive oil. Bake in the oven for 20-25 minutes. Flip them halfway through cooking. They should turn golden brown and crispy on both sides. Once done, take them out and let them cool slightly before serving. Enjoy your crispy baked falafel! For the full recipe, check the recipe section. To get your falafel nice and crispy, follow these steps. First, do not over-blend the chickpea mixture. You want some texture. Next, use a light touch when forming the balls. This helps air circulate while baking. Brush or spray the falafel with olive oil before baking. This adds flavor and helps with crispiness. Bake them on parchment paper to avoid sticking. Crispy baked falafel shines in many dishes. Serve it in a warm pita stuffed with fresh veggies. Add a dollop of tahini or yogurt for creaminess. You can also create a falafel salad. Just toss mixed greens with diced tomatoes, cucumbers, and a squeeze of lemon. This dish works well as an appetizer too, served with dipping sauces. Want to boost the flavor? Experiment with herbs and spices. Try adding dill or mint for a fresh twist. You can also mix in some chopped chili for heat. For a smoky flavor, use smoked paprika instead of regular paprika. A squeeze of lemon juice right before serving brightens every bite. Overall, these tweaks make the falafel even more delicious. For the full recipe, check out the Crispy Baked Falafel section. {{image_2}} Both oven-baked and air fryer methods create crispy falafel. When you use the oven, you get a nice, even bake. Set your oven to 400°F (200°C). Spread the falafel on a baking sheet and bake for 20-25 minutes. Flip them halfway for even crispiness. The air fryer cooks faster. It also makes the falafel extra crunchy. Cook at 375°F (190°C) for about 15 minutes. Flip halfway through for the best results. You can get creative with your falafel ingredients. For a spicier kick, add cayenne pepper or red pepper flakes. If you want a different flavor, try adding tahini or even beet puree. You can replace the chickpeas with black beans or lentils for a new twist. Fresh herbs can change the taste too. Swap parsley for mint or dill for a unique flavor. Falafel shines with dips and sauces. A classic choice is tahini sauce. Just mix tahini with lemon juice, water, and salt. Hummus also pairs well and adds creaminess. For a zesty touch, try a yogurt sauce with garlic and dill. You can serve falafel in pita with fresh veggies or simply on a plate. Add a squeeze of lemon juice for extra brightness. Check out the Full Recipe for more ideas. After enjoying your crispy baked falafel, you might have some leftovers. To store them, let the falafel cool completely. Then, place them in an airtight container. They will stay fresh in the fridge for up to three days. If you want to keep them longer, consider freezing them. To reheat your falafel, use an oven or toaster oven. Preheat it to 350°F (175°C). Place the falafel on a baking sheet lined with parchment paper. Heat for about 10 minutes. This method helps restore their crispiness. Avoid using a microwave, as it can make them soggy. Freezing falafel is easy and great for meal prep. To freeze, first, let them cool. Then, arrange them on a baking sheet in a single layer. Freeze them for about one hour. Once frozen, transfer the falafel to a freezer-safe bag. They will last for up to three months. When you’re ready to eat, bake them straight from the freezer, adding a few extra minutes to the cooking time. Enjoy your crispy baked falafel anytime! For the full recipe, check out the recipe section above. To get crispy falafel, follow these tips: - Dry chickpeas well. Use dried chickpeas instead of canned. Soak them overnight. - Don’t over-blend. Keep the mixture slightly coarse for better texture. - Add breadcrumbs. This helps bind the mixture and adds crunch. - Oil them up. Lightly brush the falafel with olive oil before baking. - Space them out. Place falafel on the baking sheet with space between them. These steps help create a crispy outside while keeping the inside soft and tasty. Yes, you can make falafel ahead of time! Here’s how: - Prepare the mixture. You can mix the ingredients and store them in the fridge. - Shape and chill. Form the falafel balls and chill them for up to a day. - Freeze for later. You can freeze shaped falafel for up to three months. When you’re ready to cook, just bake or fry them straight from the fridge or freezer. Crispy baked falafel tastes great with many sides. Here are some ideas: - Pita bread. Stuff it with falafel, fresh veggies, and tahini sauce. - Salads. A fresh salad with greens, tomatoes, and cucumbers pairs well. - Dips. Serve with hummus or tzatziki for a tasty experience. - Rice or quinoa. These grains make a hearty base for your meal. Feel free to mix and match these options to suit your taste! Yes, this recipe can be gluten-free! Here’s what to know: - Chickpeas are gluten-free. They are the main ingredient in falafel. - Use gluten-free breadcrumbs. If you want extra crunch, choose gluten-free options. - Check for cross-contact. If you have allergies, ensure all ingredients are safe. This makes crispy baked falafel a great choice for many diets! For the full recipe, refer to the section above. This blog post covered how to make tasty falafel. We discussed key ingredients, baking methods, and tips for a crispy texture. You learned about delicious variations and how to store leftovers. In conclusion, falafel is a versatile dish that fits many diets. With these steps, you can enjoy it fresh or saved for later. Now, you’re ready to create your own crispy falafel!

Crispy Baked Falafel Healthy and Flavorful Meal

Craving a tasty, healthy meal? You can’t go wrong with crispy baked falafel! This dish packs flavor and crunch while

To make this tasty One-Pot Lemon Orzo Soup, you need: - 1 tablespoon olive oil - 1 medium onion, diced - 2 garlic cloves, minced - 3 medium carrots, sliced - 2 celery stalks, diced - 8 cups vegetable broth - 1 cup orzo pasta - 1 cup fresh spinach, chopped - 1 lemon, zested and juiced - 1 teaspoon dried thyme - Salt and pepper to taste - Fresh parsley, chopped (for garnish) Each ingredient in this soup brings something special: - Olive oil adds healthy fats that support heart health. - Onion and garlic boost flavor and offer immune support. - Carrots provide beta-carotene, good for your eyes. - Celery adds crunch and is low in calories. - Vegetable broth gives depth and richness to the soup. - Orzo pasta makes it filling and fun to eat. - Spinach is packed with vitamins A, C, and K. - Lemon adds bright flavor and vitamin C. - Thyme has antioxidant properties that enhance health. - Parsley not only garnishes but adds more nutrients. If you have allergies or special diets, you can make changes: - Olive oil can be replaced with avocado oil for a different taste. - If you dislike onions, try using leeks or shallots. - Use gluten-free orzo made from rice or corn if you're gluten-free. - For a protein boost, add cooked chicken or chickpeas. - If you want a creamier soup, try adding a splash of coconut milk. You can check out the Full Recipe for more details on how to prepare this delicious soup! To make your One-Pot Lemon Orzo Soup, start by gathering all the ingredients. This helps you stay organized as you cook. You need: - 1 tablespoon olive oil - 1 medium onion, diced - 2 garlic cloves, minced - 3 medium carrots, sliced - 2 celery stalks, diced - 8 cups vegetable broth - 1 cup orzo pasta - 1 cup fresh spinach, chopped - 1 lemon, zested and juiced - 1 teaspoon dried thyme - Salt and pepper to taste - Fresh parsley, chopped (for garnish) Next, dice the onion and mince the garlic. Slice the carrots and dice the celery. This makes sure everything cooks evenly. Now it’s time to cook! Heat the olive oil in a large pot over medium heat. Add the diced onion and sauté until it turns clear, about 5 minutes. This brings out the onion's sweet flavor. Stir in the minced garlic, sliced carrots, and diced celery. Cook for another 3-4 minutes until the veggies start to soften. This step builds rich flavor. Pour in the vegetable broth and bring it to a boil. Once boiling, add the orzo pasta and dried thyme. Reduce the heat and let it simmer for about 10-12 minutes. Stir occasionally to prevent sticking. The orzo should be cooked al dente, which means it has a slight bite. Next, stir in the chopped spinach, lemon zest, and lemon juice. Cook for an additional 2-3 minutes until the spinach wilts. This adds freshness to your soup. Finally, season with salt and pepper to taste. Serve hot, garnished with fresh parsley. Enjoy the bright, zesty flavors! To get the best texture in your soup, follow these tips: - Keep an eye on the orzo. It can get mushy if overcooked. - Add the spinach at the end. This helps it stay bright and fresh. - Adjust the broth according to your preference. More broth means a lighter soup, while less gives a thicker texture. These steps will help you create a hearty and flavorful meal. For the complete recipe, check out the [Full Recipe]. To make the best One-Pot Lemon Orzo Soup, start with a few key techniques. First, always heat your olive oil before adding ingredients. This helps release flavors. Next, sauté the onion until soft. This step builds a strong base for your soup. Stir in garlic to bloom its flavor, then add your vegetables. When cooking orzo, watch the timing closely. It cooks fast, so stir often to prevent sticking. Lastly, add lemon zest and juice right at the end. This keeps the bright flavor fresh. Many people rush through the steps. Don't skip sautéing the vegetables. This step makes a big difference in taste. Also, watch the salt. Adding too much can overpower the other flavors. Start with a little, then taste and adjust. Another mistake is overcooking the orzo. It should be al dente, which means firm to the bite. If you cook it too long, it turns mushy. Lastly, don’t forget to season at the end. This small step can enhance your soup's flavor. You can easily elevate your One-Pot Lemon Orzo Soup with simple enhancements. Try adding fresh herbs like dill or basil for a unique twist. You can also mix in a dash of red pepper flakes for a bit of heat. If you want a creamier soup, stir in a splash of cream or coconut milk. For a heartier meal, add shredded chicken or chickpeas. These additions not only boost flavor but also add nutrition. For the full recipe, check out the detailed instructions above! {{image_2}} You can easily boost your One-Pot Lemon Orzo Soup by adding protein. Chicken is a great choice. Simply cook diced chicken breast in the pot before adding other ingredients. You can also use cooked beans like white or chickpeas for a vegetarian option. They add protein and fiber, making the soup heartier. Feel free to tailor the soup with different veggies. Zucchini works well; just slice it thin and add it in with the carrots. Peas can add a sweet pop of flavor. You can also toss in kale or bell peppers for extra color and nutrients. These swaps will keep the soup fresh and interesting. If you need gluten-free soup, swap orzo for gluten-free pasta. There are many options available now. For a dairy-free version, simply skip any cheese garnishes. The soup is still creamy and flavorful without dairy. It’s a great way to enjoy a delicious meal while sticking to your diet. For the full recipe, check out the detailed instructions above. You can store leftover One-Pot Lemon Orzo Soup in the fridge. Use an airtight container. It stays fresh for up to three days. Make sure the soup cools down before sealing the container. This helps keep it tasty and safe. If you want to save the soup for later, freezing works great. Pour the cooled soup into freezer bags. Remove as much air as you can before sealing. Label the bags with the date. You can freeze it for up to three months. When you’re ready to eat, thaw it in the fridge overnight. To reheat, pour the soup into a pot. Heat it on low medium heat. Stir often to avoid sticking. You might need to add a little water or broth. This helps bring back the soup's creamy texture. Enjoy it warm, just like when you first made it. For full details, check out the Full Recipe. Yes, you can use other pasta types. Small shapes like ditalini or acini di pepe work well. Just remember that cooking times may change. Check the package for timing. The soup will still have great flavor. To create a creamier soup, add a splash of heavy cream or coconut milk. You can also blend part of the soup. This gives it a smooth texture. Use an immersion blender for ease. Just blend until you like the texture. Reheat leftover soup on the stove for the best taste. Use a medium heat setting. Stir often to prevent burning. If it's too thick, add a bit of broth. You can also use the microwave. Heat in short bursts, stirring in between. For the full recipe, check out the detailed steps and ingredients. In this post, I covered all the essential parts to make a great dish. We looked at the key ingredients, how to prepare them, and what tips to use for the best results. I shared options for those with allergies and preferences too. Remember, you can always add different proteins or veggies to change things up. Store your leftovers properly for the best taste later. Simple adjustments can make your meals better and more enjoyable. Now, get cooking and enjoy your creation!

One-Pot Lemon Orzo Soup Hearty and Flavorful Meal

Craving a warm, comforting meal? My One-Pot Lemon Orzo Soup is made just for you! This hearty dish bursts with

To make these No-Bake S'mores Bars, you need: - 1 ½ cups graham cracker crumbs - ½ cup unsweetened cocoa powder - ½ cup powdered sugar - ½ cup unsalted butter, melted - 2 cups mini marshmallows - 1 cup semisweet chocolate chips - ½ cup creamy peanut butter - 1 teaspoon vanilla extract - Pinch of salt These simple ingredients make a tasty treat everyone loves. If you want to mix it up, try these ideas: - Replace graham crackers with gluten-free cookies. - Use almond or cashew butter instead of peanut butter. - Try dark chocolate chips for a richer flavor. - Swap mini marshmallows for larger ones, cut into small pieces. These changes can offer new tastes while keeping the fun. Fresh ingredients make a big difference in your treats. Using fresh mini marshmallows gives a soft, fluffy texture. Fresh chocolate chips melt smoothly for a nice layer. Fresh butter adds richness to the crust. Always check the expiration dates. This small step keeps your bars tasting great! Making No-Bake S'mores Bars is fun and easy. You will need to gather your ingredients first. The prep time is just 20 minutes. Then, let the bars chill in the fridge for 2 hours. This treat serves 16, perfect for sharing. 1. In a large mixing bowl, mix the graham cracker crumbs, cocoa powder, and powdered sugar. Use a whisk to combine them well. 2. Pour in the melted butter. Stir until the dry mix gets moist. It should start to clump together. 3. Firmly press the mixture into the bottom of an 8x8 inch baking dish. Use your hands or a spatula to pack it tightly. 4. In a microwave-safe bowl, combine the chocolate chips and peanut butter. Microwave for 30 seconds at a time. Stir between each interval until smooth. 5. Add the vanilla extract and a pinch of salt to the melted chocolate mixture. Stir well to combine. 6. Pour the chocolate-peanut butter mix over the graham cracker base. Spread it evenly with a spatula. 7. Sprinkle the mini marshmallows on top of the chocolate layer. Press them gently into the chocolate to make them stick. 8. Refrigerate the bars for at least 2 hours. This helps them set well. 9. Once set, lift the bars out of the baking dish. Cut them into squares and serve. - Use a food processor for the graham cracker crumbs. It saves time and makes a fine mix. - Keep a bowl of warm water nearby to wash your hands. This helps when you press the mixture into the pan. - For an easy clean-up, line the baking dish with parchment paper before adding the mix. This will help you lift out the bars later. For the full recipe, check the section above. Enjoy making these tasty No-Bake S'mores Bars! To get that ideal texture, press the crust tightly. Use your hands or a spatula. This helps it hold together. For the chocolate layer, melt the chocolate and peanut butter slowly. Stir often to keep it smooth. Don’t rush this step. A creamy, even layer makes the bars great. One common mistake is not measuring the ingredients. Use a measuring cup for accuracy. Another mistake is not chilling the bars long enough. They need at least two hours to set. Don’t skip this step or the bars will be too soft. Finally, avoid using too much heat when melting chocolate. It can burn quickly. For this recipe, you need a few basic tools. A large mixing bowl is essential for mixing. Use a spatula for spreading and pressing. A microwave-safe bowl helps melt the chocolate evenly. Have a greased 8x8 inch baking dish ready. Parchment paper can also help lift the bars out easily. These tools make the process smooth and fun! For the full recipe, see above. {{image_2}} You can change up the flavor of your no-bake s'mores bars with different nut butters. Try almond or cashew butter instead of peanut butter. Each nut butter adds its own taste and texture. You can also swap in Nutella for a rich twist. This chocolate hazelnut spread gives a dreamy flavor that pairs well with marshmallows. Don’t be afraid to mix flavors; creativity is key! If you need gluten-free options, use gluten-free graham crackers. Many brands offer great substitutes that taste just as good. You can also use coconut flour or almond flour for a unique twist. For a vegan option, swap out the butter for coconut oil and use dairy-free chocolate chips. This way, everyone can enjoy these tasty treats without worry. You can make your bars fit any season with special ingredients. For fall, add pumpkin spice to the chocolate mixture or sprinkle in some chopped pecans. In winter, mix in crushed candy canes for a minty flavor. For summer, try adding fresh berries or a layer of fruit preserves. These small changes make your no-bake s'mores bars fun and festive! For the full recipe, check the instructions above and get started! To keep your No-Bake S'mores Bars fresh, place them in an airtight container. This helps prevent them from drying out. You can also wrap them tightly in plastic wrap. Make sure they are fully set before storing. You can freeze these bars for longer storage. First, cut them into squares. Then, place them in a single layer in a freezer-safe container. You can add parchment paper between layers to prevent sticking. These bars can stay fresh for up to three months in the freezer. When stored in the fridge, No-Bake S'mores Bars last about a week. For the best taste and texture, enjoy them within the first few days. If you notice any changes in smell or texture, it’s best to toss them. You can find the full recipe for these delicious bars in the earlier section. To make No-Bake S'mores Bars, follow these steps: 1. Mix graham cracker crumbs, cocoa powder, and powdered sugar in a bowl. 2. Add melted butter and stir until clumps form. 3. Press this mix into the bottom of a greased 8x8 inch baking dish. 4. In a microwave-safe bowl, melt chocolate chips and peanut butter together. 5. Stir in vanilla extract and a pinch of salt. 6. Spread the chocolate mix over the graham base. 7. Top with mini marshmallows, pressing them gently into the chocolate. 8. Refrigerate for at least 2 hours to set. 9. Lift the bars out and cut them into squares. For the full recipe, refer to the previous section. Yes, you can use different types of chocolate. Milk chocolate, dark chocolate, or even white chocolate work well. Each type gives a unique flavor. Experiment with your favorites to find the best taste for you. Just remember to adjust the sweetness if needed. If you don’t have graham crackers, try digestive biscuits or vanilla wafers. Crushed pretzels can also work for a salty twist. Use whatever you have on hand. Just make sure it crumbles easily, so you can mix it well with other ingredients. No-Bake S'mores Bars need at least 2 hours to set. This time helps the layers firm up and hold together. For best results, leave them in the fridge longer if you can. This makes them easier to cut and enjoy. Yes, you can make these bars a day in advance. They store well in the fridge. Just cover them tightly to keep them fresh. This makes them great for parties or gatherings, saving you time on the day of the event. This article covered how to make easy No-Bake S'mores Bars. We looked at the key ingredients and some tasty alternatives. Fresh ingredients make a big difference. I shared step-by-step instructions for making them and tips for smoother prep. You now know how to avoid common mistakes and tools to use. We explored fun flavor variations and how to store your bars. Now, go ahead and enjoy making these delicious treats! You'll impress your friends and family.

No-Bake S’mores Bars Easy Treat for Everyone

Who doesn’t love a sweet treat that’s easy to make? No-bake s’mores bars are fun, delicious, and perfect for everyone!

Older posts
Newer posts
← Previous Page1 … Page68 Page69 Page70 … Page85 Next →

dsad

© 2026 greenmealmap • Built with GeneratePress

Our Policies

  • Copyright Policy
  • Cookie Policy
  • GDPR Policy
  • Privacy Policy
  • Disclaimer
  • Terms Of Use

More Information

  • Home
  • About
  • Contact
  • Appetizers
  • Dessert
  • Dinner
  • Drinks
©2026, greenmealmap About Back To Top