Skip to content
DisclaimerTerms Of UseGDPR PolicyCookie Policy

greenmealmap

  • Home
  • Drinks
  • Appetizers
  • Dinner
  • Dessert
  • About
  • Contact
  • Privacy Policy
DisclaimerTerms Of UseGDPR PolicyCookie Policy

NO-ING-IMG

To make One-Pot Spaghetti Primavera, gather these key ingredients: - 8 oz spaghetti - 2 tablespoons olive oil - 1 small onion, diced - 2 garlic cloves, minced - 1 cup bell peppers (red, yellow, green), sliced - 1 cup zucchini, diced - 1 cup cherry tomatoes, halved - 1 cup broccoli florets - 2 cups vegetable broth - 1 teaspoon Italian seasoning - 1/4 teaspoon red pepper flakes (optional) - Salt and pepper to taste - Fresh basil, chopped (for garnish) - Grated Parmesan cheese (optional for serving) These ingredients create a colorful and tasty dish. Each one brings flavor and nutrition to the table. You can make your One-Pot Spaghetti Primavera even better with these add-ins: - Spinach or kale for extra greens - Carrots for sweetness - Peas for a pop of color - Mushrooms for a meaty texture - Other herbs like oregano or thyme for more depth Feel free to mix and match. This recipe is flexible. Use what you have or love! To cook this dish, you will need: - A large pot to hold everything - A wooden spoon or spatula for stirring - A chopping board and knife for prep - Measuring cups and spoons for accuracy Having the right tools makes cooking easier. Set up your space before you start. This will help you move smoothly through the recipe. For the full recipe, check out the detailed instructions that follow. First, gather your ingredients. You need: - 8 oz spaghetti - 2 tablespoons olive oil - 1 small onion, diced - 2 garlic cloves, minced - 1 cup bell peppers (red, yellow, green), sliced - 1 cup zucchini, diced - 1 cup cherry tomatoes, halved - 1 cup broccoli florets - 2 cups vegetable broth - 1 teaspoon Italian seasoning - 1/4 teaspoon red pepper flakes (optional) - Salt and pepper to taste - Fresh basil, chopped (for garnish) - Grated Parmesan cheese (for serving, optional) Next, wash and chop all your vegetables. This makes cooking smoother. In a large pot, heat the olive oil over medium heat. Add the diced onion. Sauté until it turns soft, about 3-4 minutes. Stir in the minced garlic and cook for one more minute. It will smell great! Now, add the sliced bell peppers, zucchini, cherry tomatoes, and broccoli. Sauté the veggies for about 5-6 minutes. Stir them so they cook evenly. Pour in the vegetable broth. Add the Italian seasoning, red pepper flakes (if you like heat), salt, and pepper. Bring this mix to a gentle boil. Once it boils, add the spaghetti. Stir it well so the pasta is covered in broth. Lower the heat to medium-low. Cover the pot and cook for 10-12 minutes. Stir occasionally until the spaghetti is tender and the broth is mostly absorbed. When done, take the pot off the heat. Let it sit covered for 2-3 minutes. This helps soak up any leftover liquid. Fluff the spaghetti with a fork and check the seasoning. Serve your pasta hot. Garnish with fresh basil and a sprinkle of grated Parmesan cheese if you want. For a nice touch, drizzle a little extra olive oil on top. You can also add a lemon wedge on the side for a fresh twist. These steps make your one-pot spaghetti primavera not just easy but also full of flavor. For the complete recipe, check out the Full Recipe section. To make your One-Pot Spaghetti Primavera pop, focus on fresh herbs. Fresh basil adds great taste. You can also use fresh parsley or thyme. A splash of lemon juice brightens the dish. If you like heat, mix in extra red pepper flakes. This kicks up the flavor without much effort. Cook your spaghetti until it’s al dente. This means it should still have a bit of bite. Stir the pasta often while cooking. This helps it cook evenly and prevents sticking. If you find it too dry, add a splash of broth or water. This keeps it creamy and delicious. Serve the pasta in bright bowls. A sprinkle of fresh basil adds color. Drizzle a bit of olive oil on top for shine. Place a lemon wedge on the side for a zesty touch. This simple step makes your dish look fancy and inviting. For the best look, add grated Parmesan cheese right before serving. {{image_2}} You can easily make vegetarian versions of One-Pot Spaghetti Primavera. Just skip the meat and focus on fresh veggies. Use your favorite seasonal vegetables, like asparagus, peas, or carrots. This dish shines with colorful produce. Each bite bursts with flavor. You can also add a splash of lemon juice for brightness. For a vegan option, omit any cheese you might use. Instead of Parmesan, try nutritional yeast for a cheesy flavor. Ensure your vegetable broth is vegan. This dish remains rich and tasty without dairy. Don't forget to load up on extra veggies for a hearty meal. If you want to add protein, try chickpeas or lentils. They mix well and add great texture. You can also use grilled chicken or shrimp for a meatier dish. Cook these proteins separately and stir them in at the end. This boosts flavor and makes the meal more filling. For the full recipe, check out the detailed instructions above. To store leftovers, let the pasta cool first. Place it in an airtight container. You can keep it in the fridge for up to three days. Make sure it is sealed well to keep it fresh. When you’re ready to eat, heat the pasta gently. Use a pan on low heat. Add a splash of vegetable broth or water to help it warm up. Stir occasionally to keep it from sticking. You can also use the microwave. Just cover it to keep the moisture in. If you want to freeze the pasta, let it cool completely. Divide it into portions and put each in a freezer bag. Squeeze out the air before sealing. It can last for up to three months in the freezer. To enjoy later, thaw it in the fridge overnight before reheating. For the full recipe, check the One-Pot Spaghetti Primavera section. One-Pot Spaghetti Primavera is a simple pasta dish. It features fresh veggies and spaghetti cooked together in one pot. You get great flavors without the mess. The dish cooks quickly and is perfect for busy weeknights. The colorful veggies make it look fun and inviting. I love how easy it is to make. You just need a pot and a few ingredients. The best part? It’s healthy and tasty! Yes, you can use gluten-free pasta. Many brands offer good options. Look for pasta made from rice or quinoa. These types work well in this dish. Just follow the cooking time on the package. Gluten-free pasta can cook faster or slower than regular. So, keep an eye on it. The rest of the recipe stays the same. You’ll still enjoy a delicious meal. Adding more veggies is easy! Here are some ideas: - Carrots: Slice them thin for quick cooking. - Spinach: Toss it in at the end for extra greens. - Cauliflower: Cut it into small florets to blend well. - Peas: Add them in the last few minutes for a pop of color. You can mix and match your favorites. Just remember to cut them small so they cook evenly. More veggies mean more flavor and nutrition! This post covered making One-Pot Spaghetti Primavera. We looked at required and optional ingredients, plus the gear you need. I shared step-by-step cooking instructions along with serving tips. I offered hints to boost flavor and helped with variations for different diets. You also learned how to store leftovers and answers to common questions. Now, you can create this dish with ease. Enjoy cooking and exploring all the ways to make it your own!

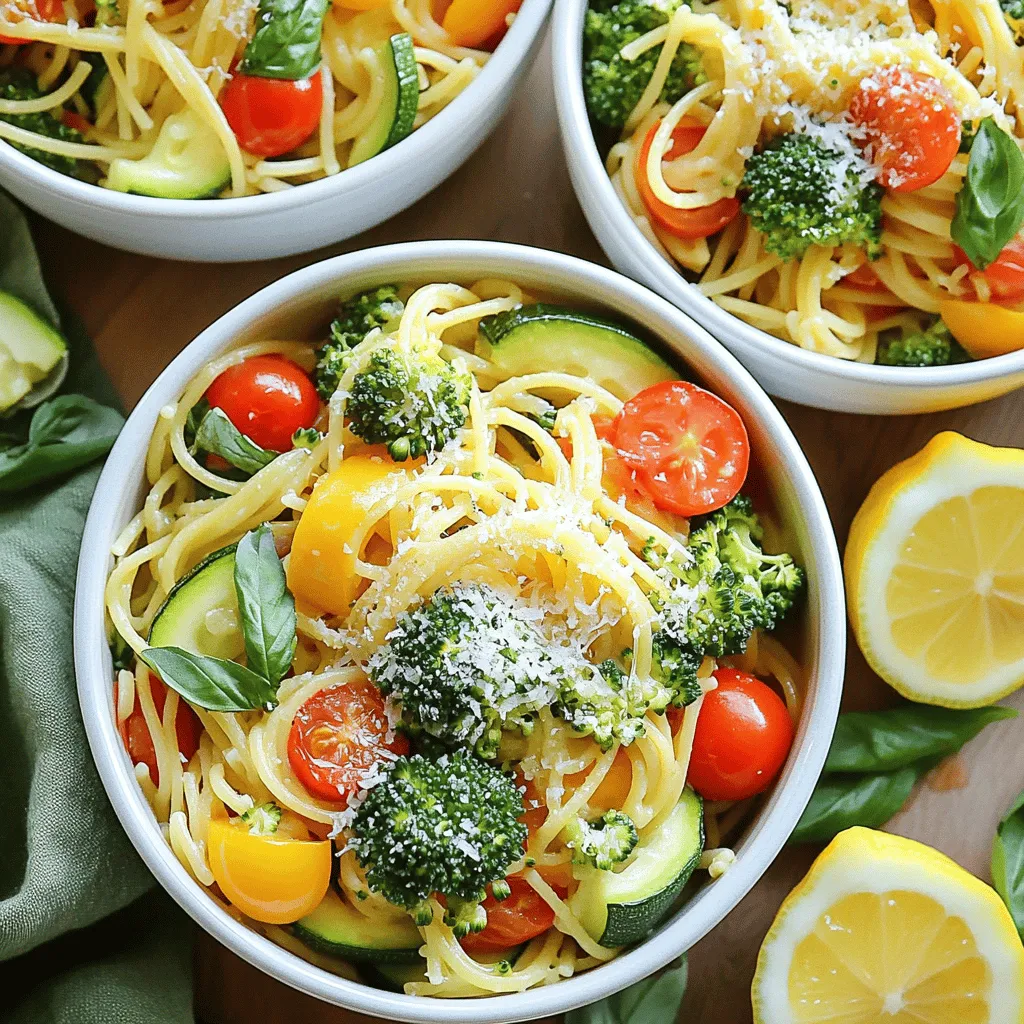
One-Pot Spaghetti Primavera Flavorful Easy Recipe

Do you crave a quick, tasty meal that packs a punch? Look no further! This One-Pot Spaghetti Primavera is both

- 1 cup fresh or frozen blueberries - 1 banana, sliced - 1 cup coconut milk - 1/2 cup Greek yogurt - 1 tablespoon honey or maple syrup - 1 tablespoon chia seeds - Ice cubes (if using fresh blueberries) - Additional sweeteners - Flavored extracts (like vanilla) - Spinach or kale for a green smoothie option When I make my blueberry coconut smoothie, I love using ripe, fresh blueberries. They add a rich, sweet flavor and a bright color. If you don’t have fresh berries, frozen ones work just as well. Both options pack the same great taste and nutrition. The banana adds creaminess. It also gives natural sweetness. I always slice it to help it blend smoothly. Coconut milk is my go-to for a tropical twist. It makes the smoothie rich and tasty. I prefer using full-fat coconut milk for a creamier texture. Greek yogurt boosts the protein in the smoothie. It also makes it thick and filling. If you want a vegan option, use dairy-free yogurt. Honey or maple syrup is optional but adds a nice touch of sweetness. I usually start with one tablespoon and adjust to my taste. Chia seeds are a great addition for extra nutrition. They provide fiber and omega-3 fatty acids. If you’re using fresh blueberries, toss in a few ice cubes to keep your smoothie cold and refreshing. Feel free to experiment with optional ingredients! A splash of vanilla extract can enhance the flavor. Adding spinach or kale gives you a green smoothie that’s still delicious. You can customize this smoothie to suit your taste! Check out the Full Recipe to see how to put it all together. To start, gather all your ingredients. If you're using fresh blueberries, rinse them well under cold water. If you pick frozen ones, there’s no need to thaw them. You can add ice cubes to keep your smoothie cold and refreshing. Slice your banana and get your coconut milk and Greek yogurt ready. This simple prep makes blending easier. In the blender, layer your ingredients carefully. Start with the blueberries, then add the banana. Pour in the coconut milk and Greek yogurt next. If you like a touch of sweetness, drizzle in honey or maple syrup. Finally, toss in chia seeds for extra nutrition. Blend everything on high speed for about 30 to 60 seconds until it’s smooth. If your blender gets stuck, pause and scrape down the sides. This ensures a creamy texture. You can taste your smoothie and add more sweetener if you like it sweeter. Blend again quickly. Now, it’s time to serve! Pour the smoothie into tall glasses. To make it look pretty, garnish with a few whole blueberries or a sprinkle of chia seeds. You can also add a slice of banana on the rim for flair. A sprig of mint adds a fresh touch. Enjoy your Blueberry Coconut Smoothie! For the full recipe, check out the details above. To get the right thickness for your blueberry coconut smoothie, use yogurt or milk. If you want it thicker, add more yogurt. For a lighter drink, add more coconut milk. When using fresh blueberries, add ice cubes. This gives your smoothie a nice chill. If you use frozen blueberries, skip the ice. They keep the smoothie cold and thick all on their own. To make your smoothie taste just right, balance sweetness and flavors. Start with one tablespoon of honey or maple syrup. Blend it in and taste. If it needs more sweetness, add a bit more. You can also add protein with Greek yogurt or nut butter. Superfoods like chia seeds boost nutrition. They add fiber and omega-3s, making your smoothie even better. For the best smoothie, use a high-speed blender. These blenders break down fruits and create a smooth texture. Look for a blender with a strong motor. It should blend ice and frozen fruit easily. To keep your blender in good shape, clean it right after use. Rinse it out to avoid stuck food. A little soap and water can help too. Proper care makes your blender last longer, so you can enjoy many smoothies! {{image_2}} You can switch up the berries in your smoothie. Raspberries and strawberries work well. They add a nice tartness and sweetness. You can also use tropical fruits like mango or pineapple. These fruits bring a bright flavor and make the smoothie taste like a vacation. Want a vegan version? Just swap regular yogurt for coconut yogurt. This keeps the creamy texture while keeping it plant-based. If you wish to cut calories, reduce sweeteners. You may not need much if your fruit is ripe and sweet. Adding nut butter can make your smoothie creamier. Almond butter or peanut butter are great choices. They add healthy fats and a nice flavor. Try mixing in cashew butter for a rich taste. Pairing nuts with blueberries enhances the taste, making it even more delicious. For the full recipe, check out Blueberry Coconut Bliss Smoothie. To keep your Blueberry Coconut Smoothie fresh, store it in the fridge. Use a glass or BPA-free plastic container with a lid. This helps keep it cold and tasty. If you want to save it longer, freeze the smoothie. Use ice cube trays for single servings. After they freeze, pop them out and place them in a freezer bag. This way, you can enjoy it later. To make mornings easy, prep your smoothie ingredients ahead of time. Portion out the blueberries, banana, and yogurt in small bags. Keep coconut milk in a carton. In the morning, just grab a bag, add the milk, and blend. You can also prep several bags for the week. This saves time and helps you eat healthy. Many smoothie ingredients are freezer-friendly. Blueberries and bananas freeze well and stay fresh. If you have leftover coconut milk, freeze it in ice cube trays. You can add these cubes to future smoothies. If you have extra yogurt, use it in pancakes or baking. This way, nothing goes to waste, and you can enjoy your ingredients in new ways. To make this smoothie vegan, swap Greek yogurt for dairy-free yogurt. Use coconut yogurt for a creamy texture. For sweetening, maple syrup works well. This keeps your smoothie plant-based and delicious. Yes, you can use frozen bananas! They add a nice creaminess to the smoothie. Frozen fruit makes your drink cold and thick. This is perfect for hot days or when you want a refreshing treat. Blueberries are full of vitamins and antioxidants. They help fight free radicals in your body. Coconut adds healthy fats and fiber. Together, they support heart health and boost your immune system. Enjoying this smoothie is a tasty way to get these benefits! Add protein powder or nut butter to increase fullness. You can also use oats or a scoop of chia seeds. These ingredients add fiber and keep you satisfied longer. This smoothie guide covers everything you need. We explored main ingredients, optional flavors, and how to blend perfectly. I shared tips on texture, flavor, and storage to make your smoothie game strong. Feel free to mix in new fruits or dietary swaps. The possibilities are endless. Remember, a good smoothie supports your health and taste buds. Enjoy crafting your unique blend and savor each sip!

Blueberry Coconut Smoothie Tasty and Nutritious Recipe

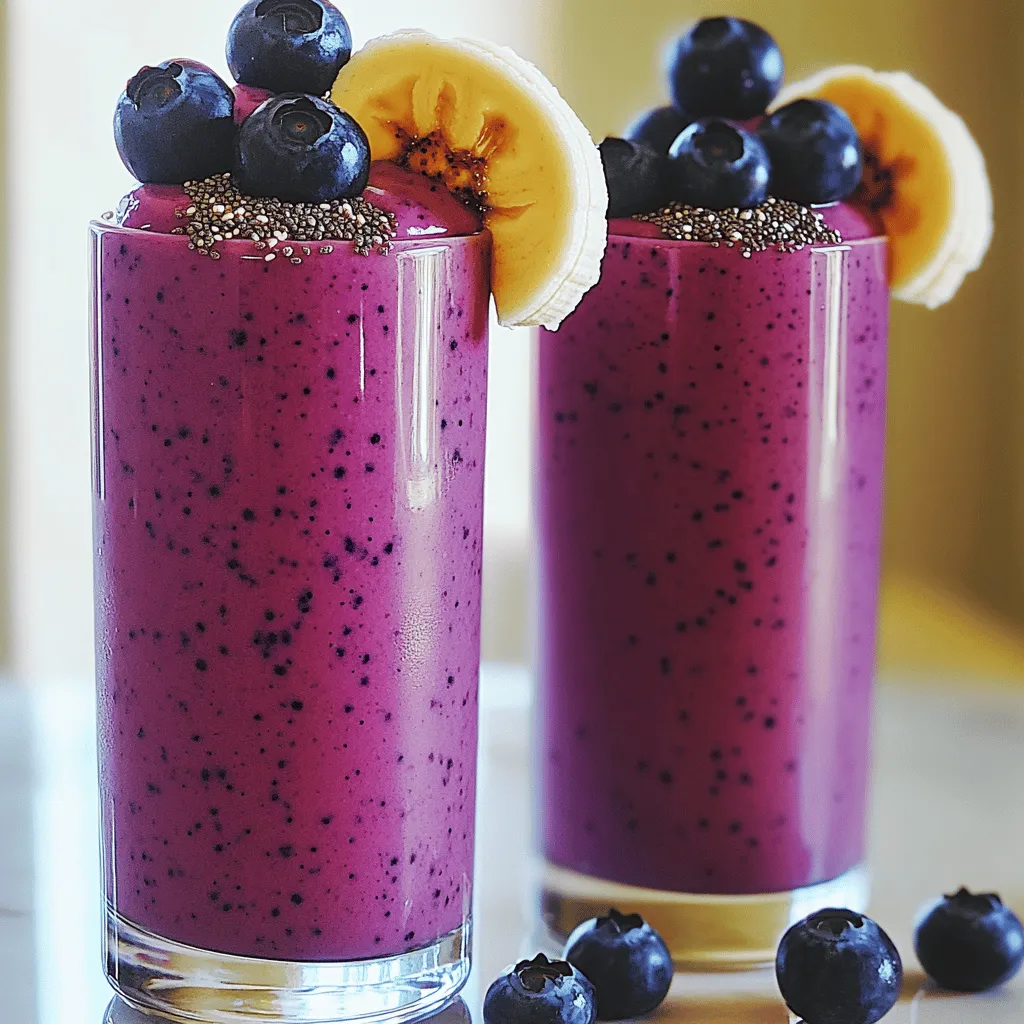
Are you ready to boost your day with a delicious and nutritious treat? This Blueberry Coconut Smoothie is not only

- Salmon fillets - Pistachios - Dijon mustard - Honey - Olive oil - Garlic powder - Lemon zest - Salt and pepper - Fresh parsley I love using fresh salmon fillets for this dish. The fish is rich in flavor and high in protein. It cooks quickly and pairs well with many flavors. The pistachios add a crunchy coating that makes each bite special. For the crust, I use finely chopped pistachios. They bring a nutty taste and a lovely green color. Dijon mustard adds a tangy kick. Honey balances this with a hint of sweetness. Olive oil keeps the salmon moist while adding extra flavor. Garlic powder gives a nice depth to the dish. Lemon zest brightens the taste and makes it fresh. Finally, salt and pepper enhance all the flavors. I like to garnish with fresh parsley for a pop of color. - Overview of calories and macronutrients - Health benefits of salmon - Nutritional benefits of pistachios This dish is not only tasty but healthy too. A serving of salmon has about 350 calories. It packs in protein and healthy fats. Salmon is rich in omega-3 fatty acids, which are good for your heart and brain. Pistachios also bring health benefits. They are a great source of fiber and protein. They help you feel full and satisfied. Plus, they contain vitamins and minerals like vitamin B6 and potassium. Combining these ingredients makes for a dish that tastes great and supports a healthy lifestyle. You can find the full recipe to make this delicious meal at home. First, preheat your oven to 400°F (200°C). This high heat helps the salmon cook quickly and evenly. While the oven warms up, prepare your baking sheet by lining it with parchment paper. This keeps the salmon from sticking and makes cleanup easy. Now it's time to mix the mustard sauce. In a small bowl, whisk together the Dijon mustard, honey, olive oil, garlic powder, lemon zest, salt, and pepper. This sauce adds a lovely flavor to the salmon. Make sure everything is well combined. Next, take your salmon fillets and place them skin-side down on the baking sheet. Evenly spread the mustard mixture over the top of each fillet. You want a good coat for great taste. Now, let's apply the pistachio crust. Take your finely chopped pistachios and press them onto the mustard-covered side of each fillet. Make sure each piece is well-coated for a delicious crunch. Finally, it's time to bake the salmon. Place the baking sheet in the preheated oven. Bake for 12-15 minutes. The salmon will be done when it flakes easily with a fork. Keep an eye on it to avoid overcooking. Once it's ready, remove the salmon from the oven. Let it rest for a few minutes before serving. Enjoy your flavorful and healthy pistachio crusted salmon! For the full recipe, check the details above. To get a nice, even coating of pistachios, press them firmly onto the salmon. This helps them stick better during baking. If you want to mix things up, try using walnuts or almonds. Both give a great crunch and flavor. To keep your salmon moist, do not overcook it. Bake it until it reaches an internal temperature of 145°F (63°C). This is the sweet spot where the fish is both safe to eat and deliciously tender. For sides, consider serving lemony asparagus or garlic mashed potatoes. They pair well with the salmon's rich taste. If you enjoy wine, a crisp Sauvignon Blanc works nicely. It balances the flavors and brings out the dish's freshness. For the complete recipe, check out the [Full Recipe]. {{image_2}} You can change the flavors of pistachio crusted salmon easily. Adding herbs or spices makes it fun. Try fresh dill or thyme for a nice twist. You can also add paprika for some heat. Experimenting with glazes can add depth. A sweet balsamic glaze pairs well with the salty pistachios. Brush it on after baking for added flavor. If you're looking for gluten-free options, you’re in luck. This recipe is naturally gluten-free as it uses no bread. For low-calorie substitutions, you can swap honey for maple syrup. It gives a sweet touch without adding too many calories. You can also reduce the oil for a lighter dish. Just remember, flavor is key! Plating is important for any dish. For pistachio crusted salmon, use a clean white plate. It makes the colors pop. You can slice the salmon and arrange it on the plate. Add a sprinkle of fresh parsley for color. Garnishing with lemon wedges adds a fresh touch. It also gives a burst of flavor when squeezed. To keep your pistachio crusted salmon fresh, store it in the fridge. Place the salmon in an airtight container. This helps prevent it from drying out. You should eat it within three days. If you have cooked salmon, reheat it gently. Use the oven at 350°F (175°C) for about 10 minutes. This keeps it moist. You can also use a microwave. Heat it in short bursts to avoid cooking it too much. If you want to save leftovers, freezing is a good option. Wrap the salmon tightly in plastic wrap. Then, place it in a freezer-safe bag. This keeps it fresh for up to three months. When you’re ready to eat it, defrost it in the fridge overnight. You can also use the microwave. Set it to defrost and check it often. Avoid letting it sit out at room temperature. In the fridge, pistachio crusted salmon lasts about three days. Always check for signs of spoilage. If the salmon smells off or feels slimy, it’s time to toss it. Fresh salmon should smell like the sea, not fishy. If you freeze it properly, it can last up to three months without losing flavor. Can I use other nuts? Yes, you can use other nuts. Almonds, walnuts, or pecans work well. Just chop them finely like the pistachios. Each nut brings its own flavor. How do I know when the salmon is fully cooked? The salmon is done when it flakes easily with a fork. You can also check the internal temperature. It should reach 145°F (63°C). Can I make this recipe ahead of time? You can prepare the salmon and nut mix ahead of time. Just store them separately in the fridge. When ready, coat the salmon and bake it fresh. What can I use instead of Dijon mustard? If you don’t have Dijon mustard, try using honey mustard or whole grain mustard. Both options add unique flavors to your dish. What sides go well with pistachio-crusted salmon? Pistachio-crusted salmon pairs well with roasted vegetables or a fresh salad. Quinoa or rice also make great sides. They balance the flavors nicely. Is this dish suitable for meal prep? Yes, this dish is great for meal prep. You can store it in airtight containers. It stays tasty in the fridge for up to three days. For the full recipe, check out the detailed instructions above! This blog post detailed how to make a delicious pistachio-crusted salmon. We covered key ingredients, their health benefits, and easy preparation steps. You learned tips for a perfect crust, ways to serve it, and even storage methods. I hope these insights inspire you to cook this healthy dish. Whether you follow my tips or get creative, enjoy the process and the meal! Healthy eating can be fun and flavorful.

Pistachio Crusted Salmon Flavorful and Healthy Dish

Want to impress your family or guests with a dish that’s both tasty and healthy? Look no further than pistachio

- 500g baby bella mushrooms - 4 tablespoons unsalted butter - 1 whole bulb of garlic - Fresh herbs: parsley and thyme - Crushed red pepper flakes - Salt and pepper - Zest of 1 lemon - You can use other mushroom types like cremini or shiitake. - Vegan butter works great for a dairy-free option. - Try herbs like rosemary or oregano for different flavors. When I make roasted garlic butter mushrooms, I love using baby bella mushrooms. They have a rich flavor that pairs well with garlic. The butter adds creaminess, and the garlic infuses the dish with warmth. Fresh herbs like parsley and thyme bring a bright touch. For seasoning, I sprinkle some red pepper flakes for a hint of heat. Adding salt and pepper enhances the taste. A splash of lemon zest brightens the mix. If you want to switch things up, consider different mushrooms. Cremini or shiitake will work well. For a vegan twist, swap in vegan butter. You can also use rosemary or oregano to change the dish's flavor. This dish is simple but packed with flavor. You can find the full recipe linked above to dive deeper into the details! First, we need to preheat the oven. Set it to 400°F (200°C). This temperature helps the mushrooms roast well. Next, let’s melt the butter. Use a medium saucepan and place it on low heat. Add the garlic cloves to the melted butter. Let them simmer for about 10 minutes. This step softens the garlic and infuses the butter with flavor. Remove it from the heat when done. Now, grab a large mixing bowl. Add in the cleaned baby bella mushrooms. Pour the melted garlic butter over the mushrooms, including the garlic cloves. Then, sprinkle in the fresh parsley, thyme, and crushed red pepper flakes if you want some heat. Don’t forget the lemon zest, salt, and pepper. Toss everything together. Make sure the mushrooms are evenly coated. This ensures each bite is full of flavor. Take a baking sheet and line it with parchment paper. Spread the mushrooms and any garlic cloves in a single layer. This helps them cook evenly. Now it’s time to roast. Place the baking sheet in your preheated oven. Roast for 25 to 30 minutes. Halfway through, give the mushrooms a stir. This ensures they brown nicely. Once they turn golden brown and are tender, they are ready. Enjoy your roasted garlic butter mushrooms as a tasty side or snack. For the full recipe, check out the details above. To make your roasted garlic butter mushrooms even tastier, think about adding some spices. Here are a few great options: - Fresh rosemary: Adds a fragrant touch. - Smoked paprika: Gives a subtle smokiness. - Cumin: Offers a warm, earthy flavor. You can also boost the dish by adding proteins or veggies. Try: - Grilled chicken: For a hearty meal. - Shrimp: It cooks quickly and pairs well. - Spinach: Adds color and nutrition. Getting the perfect roast on your mushrooms is key. Here are some tips: - Roast them at 400°F (200°C) for great results. - Spread them out on the baking sheet. This helps them brown nicely. - Stir halfway through roasting for even cooking. When it comes to herbs, fresh is best. Use fresh herbs for bright flavors. Dried herbs can work, but they may not be as vibrant. Roasted garlic butter mushrooms pair well with many dishes. Here are some ideas: - Pasta: Toss them with your favorite noodles. - Steak: Serve them beside a juicy cut for a gourmet touch. - Risotto: They add depth to creamy risotto. For a beautiful presentation, use a shallow bowl. Drizzle any leftover garlic butter over the mushrooms. Garnish with extra parsley and a sprinkle of lemon zest. This makes the dish look fresh and inviting. {{image_2}} You can change the taste of your roasted garlic butter mushrooms by adding different herbs. For a garlic herb blend, try rosemary, basil, or sage. These herbs bring a fresh twist to the dish. You can also sprinkle some grated cheese, like Parmesan, on top before serving. The cheese melts into the mushrooms, adding creaminess and flavor. If you follow a keto diet, you can skip the lemon zest or use less butter. This keeps the dish low in carbs while still packing flavor. For those who need gluten-free options, rest easy! This recipe is naturally gluten-free. Just ensure that any added ingredients, like cheese, are also gluten-free. You don't always need an oven to cook these mushrooms. You can use a stovetop method. Just melt the butter in a pan, add the garlic, and then toss in the mushrooms. Cook until they are golden and tender. Alternatively, grilling adds a nice smoky flavor. Just toss the mushrooms and garlic butter in a grill-safe pan or foil. Grill for about 10-15 minutes to get that charred taste. For the full recipe, check out Garlic Bliss Roasted Mushrooms. After enjoying your roasted garlic butter mushrooms, you may have leftovers. To keep them fresh, let them cool to room temperature. Place the mushrooms in an airtight container. I recommend using glass or plastic containers with tight lids. These will keep moisture in but prevent odors from escaping. Store them in the fridge for up to three days. If you want to save your mushrooms for later, you can freeze them. First, let the mushrooms cool completely. Next, spread them on a baking sheet in a single layer. Freeze them for about two hours. This helps keep them from sticking together. After that, transfer the mushrooms to a freezer-safe bag or container. They can last for up to three months in the freezer. When ready to eat, thaw them in the fridge overnight. Reheat them gently on the stove or in the microwave until warm. To enjoy the best flavor, eat your roasted mushrooms within three days. Check for freshness by looking for any changes in color or texture. If they feel slimy or have a sour smell, it’s time to toss them. Always trust your senses; they help you know when food is no longer safe to eat. Keeping an eye on these signs ensures your mushrooms stay tasty and safe. For more details, check the Full Recipe. To make roasted garlic butter mushrooms, follow these steps. First, preheat your oven to 400°F (200°C). Next, melt butter in a pan and add garlic cloves. Let them simmer for ten minutes. This step infuses the butter with garlic flavor. In a bowl, mix cleaned baby bella mushrooms with the melted garlic butter, fresh herbs, salt, and pepper. Toss well to coat. Spread the mushrooms on a baking sheet and roast for 25 to 30 minutes. Stir halfway for even cooking. This method gives you tender, flavorful mushrooms. Yes, you can use different mushrooms. Here are some great options: - Cremini mushrooms - White button mushrooms - Shiitake mushrooms - Portobello mushrooms, cut into pieces These varieties work well with the garlic butter. Each type offers its own unique taste and texture. Roasted garlic butter mushrooms pair well with many dishes. Here are some ideas: - Serve with grilled chicken or steak for a hearty meal. - Add to pasta dishes for a rich flavor. - Use as a topping on toasted bread for a tasty appetizer. - Pair with a fresh salad for a light side. These options enhance the mushrooms and create a balanced meal. In this blog post, I covered roasting garlic butter mushrooms from start to finish. You learned about the key ingredients, like baby bella mushrooms and fresh herbs, along with helpful tips for perfect roasting. I also shared variations and storage methods for your leftovers. Remember, these mushrooms can elevate many dishes and impress your guests. Try out different herbs or spices to tailor the flavor to your taste. Enjoy your cooking adventure!

Roasted Garlic Butter Mushrooms Savory and Simple Dish

Looking for a quick and tasty side dish? I’ve got just the recipe for you: Roasted Garlic Butter Mushrooms! This

- 1 small head of purple cauliflower, cut into florets - 1 small head of orange cauliflower, cut into florets - 1 small head of green cauliflower (or broccoli), cut into florets - 1 cup cherry tomatoes, halved - 1 cup corn kernels (fresh or frozen) - 1/2 red onion, finely chopped - 1/4 cup chopped fresh parsley - 1/4 cup crumbled feta cheese (optional) - 3 tablespoons olive oil - 2 tablespoons apple cider vinegar - 1 tablespoon honey (or maple syrup) - Salt and pepper to taste - Large pot for blanching - Ice bath bowl - Mixing bowls - Whisk When I make Rainbow Cauliflower Salad, I love to gather fresh ingredients. Each color in this salad brings its own flavor and joy. Purple cauliflower is crunchy and slightly sweet. Orange cauliflower adds a creamy taste. Green cauliflower, or broccoli, offers a fresh bite. I also add cherry tomatoes for a juicy pop, and sweet corn for a hint of sunshine. I like to use red onion for its sharpness. Fresh parsley adds a burst of herbal flavor. If you want, sprinkle some feta cheese on top. It gives a nice creamy touch. For the dressing, I mix olive oil and apple cider vinegar. Honey or maple syrup brings sweetness, while salt and pepper balance the flavors. The dressing ties everything together. You will need some tools too. A large pot helps to blanch the cauliflower. An ice bath bowl cools the cauliflower quickly. Mixing bowls and a whisk make combining the salad easy. This recipe is simple yet delightful. You can find the full recipe [here]. - Blanch cauliflower florets in boiling water for 2-3 minutes. - Transfer to an ice bath to stop cooking. - Drain and pat dry. I love starting with fresh, colorful cauliflower. The blanching step is key. It keeps the bright colors and crunch. When you place them in the ice bath, it halts the cooking. This way, the texture stays just right. - In a large mixing bowl, combine blanched rainbow cauliflower, cherry tomatoes, corn, red onion, and parsley. This is where the magic happens. Mixing these ingredients creates a vibrant dish. Each bite gives a new flavor. The sweet corn pairs well with the tangy tomatoes. The red onion adds a nice bite. - Whisk together olive oil, apple cider vinegar, honey, salt, and pepper. - Pour dressing over salad. Making the dressing is easy and fun. The olive oil and vinegar blend well. The honey adds a touch of sweetness. I always taste it and adjust as needed. - Toss ingredients until well coated. - Optional: sprinkle crumbled feta cheese on top. - Serve immediately or chill for 30 minutes. Once everything is mixed, it’s time to serve. Tossing well ensures every piece is coated. If you like, add feta for a salty kick. This salad tastes fresh right away, but chilling helps the flavors meld. Enjoy this beautiful dish with friends or family! Check out the Full Recipe for more details. When choosing cauliflower, look for heads that are firm and heavy. Fresh cauliflower should have bright colors and no brown spots. Seasonal veggies can add flavor and nutrition. Try to buy local produce when possible. This often means fresher ingredients and better taste. For organic options, check your local farmers’ market or grocery store. Many stores label their produce clearly. Choose organic for more flavor and fewer pesticides. Blanching is key for bright colors and crisp texture. Bring a pot of water to a rolling boil. Add your cauliflower florets, cooking them for just 2-3 minutes. This keeps them vibrant and crunchy. Quickly move them to an ice bath. This stops the cooking process and locks in color. Drain and pat the cauliflower dry with a towel. To avoid overcooking, keep a close eye on the time. You want tender veggies, not mushy ones. To plate the salad, use a large, shallow bowl. Spread the rainbow cauliflower in a colorful pattern. Add the cherry tomatoes and corn in groups for contrast. Sprinkle the parsley on top for a fresh touch. For an extra pop, add edible flowers if you have them. They not only look beautiful but add a hint of flavor. A drizzle of dressing can enhance the look and taste. Serve the salad chilled or at room temperature for the best experience. {{image_2}} You can make Rainbow Cauliflower Salad even more filling by adding proteins. Chickpeas are a great choice. They are easy to mix in and add a nice texture. Shrimp is another option. Cooked shrimp gives the salad a tasty twist. You can also use grilled chicken or tofu for more protein. When you add proteins, you turn this salad into a complete meal. Pair it with whole grains like quinoa or brown rice for extra nutrition. This way, you get a colorful, tasty dish that satisfies your hunger. The dressing can change the flavor of your salad. Try tahini for a creamy, nutty taste. It goes well with the fresh veggies. Lemon vinaigrette is another option. It adds a bright, zesty kick to the dish. For those who prefer vegan or dairy-free options, these dressings work perfectly. A simple olive oil and lemon mix can brighten the salad without any animal products. You can also make a cashew cream dressing for a rich, creamy flavor. Sometimes, you may not find all the ingredients. That’s okay! You can swap cauliflower for broccoli if needed. If you can’t find cherry tomatoes, use regular tomatoes cut into small pieces. Corn can be fresh or frozen, depending on what you have. For a low-carb or keto version, skip the corn and add more leafy greens. Spinach or arugula can give it a fresh taste. These substitutions keep the salad vibrant and full of flavor, no matter what you have on hand. To keep your Rainbow Cauliflower Salad fresh, store it in the fridge right away. Use an airtight container to keep moisture out. This helps the salad stay crunchy and tasty. I suggest using glass containers. They do not stain and are easy to clean. If you add feta cheese, it is best to store it separately. This keeps the cheese from getting soggy. You can freeze some parts of the salad, but not the whole thing. Freeze the cauliflower and corn separately. This way, they hold their texture. To freeze, place them in freezer bags. Remove as much air as possible. When you want to eat them, thaw in the fridge overnight. You can enjoy them cold or warm them up in a pan. When stored properly, your salad will last about 3 to 5 days in the fridge. Keep an eye out for signs of spoilage. If you see any wilting or bad smells, it is time to toss it. Fresh ingredients are key to a tasty salad. Always trust your senses to know when it’s time to say goodbye. For the full recipe, check the main section. Rainbow Cauliflower Salad is packed with vitamins and minerals. Each color of cauliflower brings unique benefits. - Purple cauliflower has antioxidants that help fight disease. - Orange cauliflower is rich in beta-carotene, good for your eyes. - Green cauliflower (or broccoli) is high in fiber and vitamin C. Eating colorful vegetables is key for a balanced diet. They provide a range of nutrients that support overall health. This salad not only looks stunning, but it also helps your body thrive. Yes, you can make this salad ahead of time. I recommend mixing the salad a few hours before serving. This allows the flavors to blend nicely. To keep the salad fresh, store it in an airtight container in the fridge. If you add dressing early, it may make the salad soggy. Instead, store the dressing separately and mix it right before serving. Yes, this salad is naturally gluten-free. Most ingredients do not contain gluten. However, be cautious with dressings. Some store-bought dressings may include gluten. To ensure your salad stays gluten-free, use vinegar and honey that are labeled gluten-free. Always check labels when buying pre-made ingredients. You can find rainbow cauliflower at local farmers' markets or specialty grocery stores. It is often in season during spring and summer. If you can’t find it locally, consider online grocery shopping. Many stores offer delivery options for unique vegetables. This makes it easy to get the ingredients you need. Yes! Adding nuts or seeds gives the salad a nice crunch. Consider using: - Sunflower seeds for a nut-free option. - Almonds or walnuts for a rich flavor. Be mindful of allergies when serving. If you know someone has a nut allergy, stick to seeds. They add crunch without the risk. Rainbow Cauliflower Salad offers a fun, tasty way to enjoy colorful veggies. We learned about key ingredients, simple steps for prep, and how to make a delicious dressing. The salad is easy to customize with proteins and dressings to fit your taste. Remember, using fresh ingredients makes all the difference. Keep leftovers fresh with proper storage, and enjoy your vibrant dish for days. Now, go ahead and experiment with your version of this salad. Your taste buds will thank you!

Rainbow Cauliflower Salad Vibrant and Flavorful Dish

Are you ready to brighten up your meals? This Rainbow Cauliflower Salad combines vibrant colors and fresh flavors that will

To make Banana Foster Overnight Oats, gather these simple ingredients: - 1 cup rolled oats - 2 ripe bananas, sliced - 1 cup almond milk (or any milk of your choice) - 1 tablespoon maple syrup - 1 teaspoon vanilla extract - 1 teaspoon ground cinnamon - 1 tablespoon unsalted butter - 2 tablespoons brown sugar - 1/4 cup chopped walnuts (optional) - Pinch of salt These ingredients are easy to find. The bananas give a sweet, creamy flavor. The oats soak in the milk, making them soft and tasty. Maple syrup adds a nice touch of sweetness. You can use any milk you like, such as almond, oat, or cow's milk. For the caramel sauce, butter and brown sugar work together to create a delicious topping. If you like nuts, add walnuts for a crunchy bite. You can mix and match these ingredients based on your taste. Each item plays a role in making this dish creamy and delicious. For the full recipe, check the details above. - In a bowl, combine 1 cup of rolled oats, 1 cup of almond milk, and 1 tablespoon of maple syrup. - Add 1 teaspoon of vanilla extract, 1 teaspoon of ground cinnamon, and a pinch of salt. - Stir well until all ingredients mix together. - Slice 1 banana and add half of the slices to the oat mixture. - Stir gently to ensure the banana pieces spread evenly throughout the oats. - In a small pan, melt 1 tablespoon of unsalted butter over medium heat. - Mix in 2 tablespoons of brown sugar until it dissolves. - Add the remaining banana slices and sauté for 1-2 minutes until they soften and caramelize. - Pour the oat mixture into two serving containers, like mason jars. - Top with the warm caramelized banana mixture and any sauce from the pan. - Seal the containers and refrigerate overnight or for at least 4-6 hours. This recipe is simple and allows you to enjoy a tasty breakfast with ease. For the full recipe, check the main ingredients above. To create Banana Foster Overnight Oats, you need the right ratio of oats to liquid. I recommend using 1 cup of rolled oats with 1 cup of almond milk. This balance keeps the oats creamy without being too runny. Soak the oats overnight for a soft and smooth texture. If you want them firmer, reduce the soak time to 4-6 hours. This way, you can adjust the consistency to your taste. You can easily change the sweetness of your oats. Try using honey or agave syrup instead of maple syrup for a different flavor. Explore toppings to make each bowl unique. Chopped nuts, berries, or coconut flakes can add fun textures and tastes. You can mix in some chocolate chips for a treat. The possibilities are endless, so get creative! For a creamier experience, pair your oats with yogurt. A dollop of Greek yogurt can elevate the dish. You can serve your Banana Foster Overnight Oats warm or chilled. If you prefer a warm breakfast, just heat it in the microwave for about 30 seconds. Enjoy it however you like! For the full recipe, check out the [Full Recipe]. {{image_2}} You can make this dish without nuts. Just swap the almond milk for oat or coconut milk. This keeps it creamy while being safe for nut allergies. Also, leave out the walnuts. This makes it an allergy-friendly version that everyone can enjoy. Want a vegan option? Use plant-based butter instead of regular butter. Also, switch the maple syrup for agave if you prefer. For yogurt, try almond or coconut yogurt. This will keep the dish rich and plant-based. You can get creative with this recipe. Add chocolate chips for a sweet twist. Other fruits like berries or peaches can work well too. Want to spice it up? Try adding a dash of nutmeg or ginger. These spices bring a unique flavor that makes your oats special. To keep your Banana Foster Overnight Oats fresh, store them in airtight containers. This helps maintain flavor and texture. Your oats are best enjoyed within 3-5 days. After this time, they might lose some creaminess and taste. Always check for any off smells before eating. You can freeze prepared oats if you want to save some for later. To freeze, place the oats in freezer-safe containers. Leave some space at the top for expansion. When you're ready to eat, thaw them in the fridge overnight. Reheat in the microwave for about 30 seconds before serving. This will help restore the creamy texture. Enjoy your delicious oats even when you’re busy! Yes, you can make Banana Foster Overnight Oats the night before. Just mix everything in a jar. The oats will soak up the flavors as they chill in the fridge. You should eat your overnight oats within 3-5 days for the best taste. After that, they may not be as fresh or tasty. Yes, quick oats will work. However, the texture will be softer and less chewy. If you want more bite, stick with rolled oats. Yes, if you use certified gluten-free oats, this recipe is gluten-free. Always check labels if you have a gluten sensitivity. Yes, you can warm them up. Just pop them in the microwave for about 30 seconds. This makes for a cozy breakfast! For the full recipe, you can check the earlier section. Enjoy making these delicious oats! Banana Foster Overnight Oats are easy and fun to make. You combine simple ingredients like oats, bananas, and almond milk. You can customize the recipe to fit your taste. Adding caramelized bananas makes it special. These oats are great for breakfast or a snack. They last for days and can easily be made ahead of time. Try it warm or chilled! Enjoy making this tasty dish in your kitchen. You can impress friends and family with your new skills.

Banana Foster Overnight Oats Creamy and Simple Recipe

Are you ready to make breakfast fun and tasty? Banana Foster Overnight Oats combine sweet bananas and warm spices, giving

To make Grilled Veggie Quinoa Bowls, you need fresh, vibrant ingredients. Here’s what you will need: - 1 cup quinoa - 2 cups vegetable broth - 1 zucchini, sliced - 1 bell pepper (any color), sliced - 1 cup cherry tomatoes, halved - 1 red onion, cut into wedges - 2 tablespoons olive oil - 1 teaspoon smoked paprika - 1 teaspoon garlic powder - Salt and pepper to taste - 1 avocado, sliced - ¼ cup fresh cilantro, chopped - Juice of 1 lime These ingredients create a colorful and tasty bowl. The quinoa acts as a great base. It adds protein and fiber. The grilled veggies bring a smoky flavor that is hard to resist. You can jazz up your bowls with some extra toppings. Here are some ideas: - Crumbled feta cheese - Sliced jalapeños for heat - Toasted nuts or seeds for crunch - A dollop of Greek yogurt or sour cream Feel free to mix and match these toppings. They can add different flavors and textures to your dish. This meal is not just tasty; it is also good for you. Here’s a quick look at the nutrition: - Quinoa has protein and fiber. - Veggies are full of vitamins and minerals. - Avocado gives you healthy fats. Each serving offers a balance of nutrients. You will feel satisfied and nourished after enjoying this bowl. For the full recipe, check out the instructions provided earlier. To start, rinse the quinoa under cold water. This step removes any bitterness. In a medium saucepan, combine 1 cup of quinoa with 2 cups of vegetable broth. Bring the mix to a boil over medium heat. Once boiling, reduce the heat to low. Cover the saucepan and let it simmer for about 15 minutes. Check to see if the quinoa is fluffy and the liquid is absorbed. When done, remove it from heat and let it sit covered for 5 minutes. This resting time helps the quinoa become even fluffier. While the quinoa cooks, it’s time to prep the veggies. Slice 1 zucchini and 1 bell pepper. Halve 1 cup of cherry tomatoes and cut 1 red onion into wedges. Place all the veggies in a large bowl. Drizzle with 2 tablespoons of olive oil. Add 1 teaspoon of smoked paprika and 1 teaspoon of garlic powder. Season with salt and pepper to your taste. Toss everything well so the veggies are coated in the oil and spices. This step adds flavor and makes grilling even more delightful. Now, let’s get grilling! Preheat your grill or grill pan over medium-high heat. Once hot, add the vegetable mix to the grill. Grill the veggies for about 5-7 minutes. Turn them occasionally to ensure even cooking. You want them to be tender with nice grill marks. This adds great flavor and texture. Once grilled, they will add a smoky taste to your quinoa bowl. After grilling, follow the Full Recipe to combine everything and enjoy! To cook quinoa perfectly, rinse it well. This removes the bitter coating called saponin. Use a ratio of 1 cup quinoa to 2 cups vegetable broth. Bring it to a boil, then lower the heat. Cover and let it simmer for 15 minutes. After cooking, let it sit for 5 minutes before fluffing with a fork. This method ensures you get fluffy, tender quinoa every time. Grilling adds a wonderful flavor to veggies. I love using zucchini and bell peppers for their sweetness. Cherry tomatoes burst with flavor when grilled. Red onion caramelizes nicely, adding depth to your dishes. Feel free to experiment with other options too! Asparagus, mushrooms, and eggplant also work great. Just pick your favorites and enjoy the smoky taste. Seasoning makes your grilled veggie quinoa bowls shine. I recommend olive oil as a base. It helps in cooking and adds richness. Smoked paprika gives a lovely, smoky flavor. Garlic powder adds a savory kick. Salt and pepper are must-haves to balance the taste. Squeeze fresh lime juice over the dish for bright acidity. You can also add herbs like cilantro for freshness. This combination creates a meal full of flavor. For the full recipe, check out the Flavorful Grilled Veggie Quinoa Bowls section. {{image_2}} You can easily make this dish vegan and gluten-free. The base of quinoa is already gluten-free. Just make sure to use vegetable broth instead of chicken broth. All the veggies in this recipe are vegan. You can add chickpeas or black beans for extra protein. This keeps the meal hearty and satisfying. Quinoa is great, but you can try other grains too. Brown rice adds a nutty flavor. Farro gives a chewy texture. Use barley for a different taste. Each grain brings its own flair to the bowl, so feel free to mix and match! For a Mediterranean vibe, add olives and feta cheese. A drizzle of tahini sauce will enhance the flavors. To switch to an Asian twist, use soy sauce instead of lime. Add sesame oil and top with green onions and peanuts. Both versions add a fresh take on this dish. Try these variations to keep your meals exciting! Check out the Full Recipe for more ideas. After enjoying your Grilled Veggie Quinoa Bowls, store any leftovers in an airtight container. Make sure to let the dish cool down first. This helps keep flavors fresh. You can keep it in the fridge for up to three days. If you want it to last longer, consider freezing it. When you're ready to enjoy your leftovers, reheating is simple. You can use a microwave or a stovetop. If using a microwave, place the bowl covered with a damp paper towel. Heat it in short bursts of 30 seconds. Stir in between to heat evenly. If using the stovetop, add a splash of water or broth in a pan. Stir over medium heat until warmed through. This keeps the quinoa and veggies moist. To freeze, portion your Grilled Veggie Quinoa Bowls into individual containers. Leave some space at the top for expansion. Label each container with the date. You can freeze them for up to three months. When you're ready to eat, thaw overnight in the fridge. For a quicker option, you can use the microwave on the defrost setting. After thawing, reheat as mentioned above for the best taste. Enjoy your meal at any time! Yes, you can prepare Grilled Veggie Quinoa Bowls in advance. This meal stores well. Cook the quinoa and grill the veggies ahead of time. Keep them in separate containers in the fridge. You can assemble the bowl when you're ready to eat. This makes for a quick lunch or dinner option. You have many choices for vegetables. Feel free to mix and match! Some great options include: - Eggplant - Asparagus - Carrots - Mushrooms - Broccoli - Spinach These veggies add different flavors and textures. Just cut them into even pieces for grilling. To boost protein in Grilled Veggie Quinoa Bowls, try these tips: - Add black beans or chickpeas. - Stir in cooked lentils or edamame. - Top with grilled chicken or tofu. - Use quinoa, which is already a complete protein. These additions will make your meal hearty and filling. For the full recipe, check the earlier section. Grilled veggie quinoa bowls combine tasty ingredients with simple steps. We explored main ingredients, optional toppings, and nutrition. I shared easy cooking techniques for quinoa and vegetables. You learned tips to enhance flavor and tried different grain options. To enjoy these bowls later, I covered storage and reheating methods. In my view, these bowls offer a healthy and fun meal. You can customize them to fit your taste. So, grab fresh veggies and start grilling!

Grilled Veggie Quinoa Bowls Fresh and Flavorful Meal

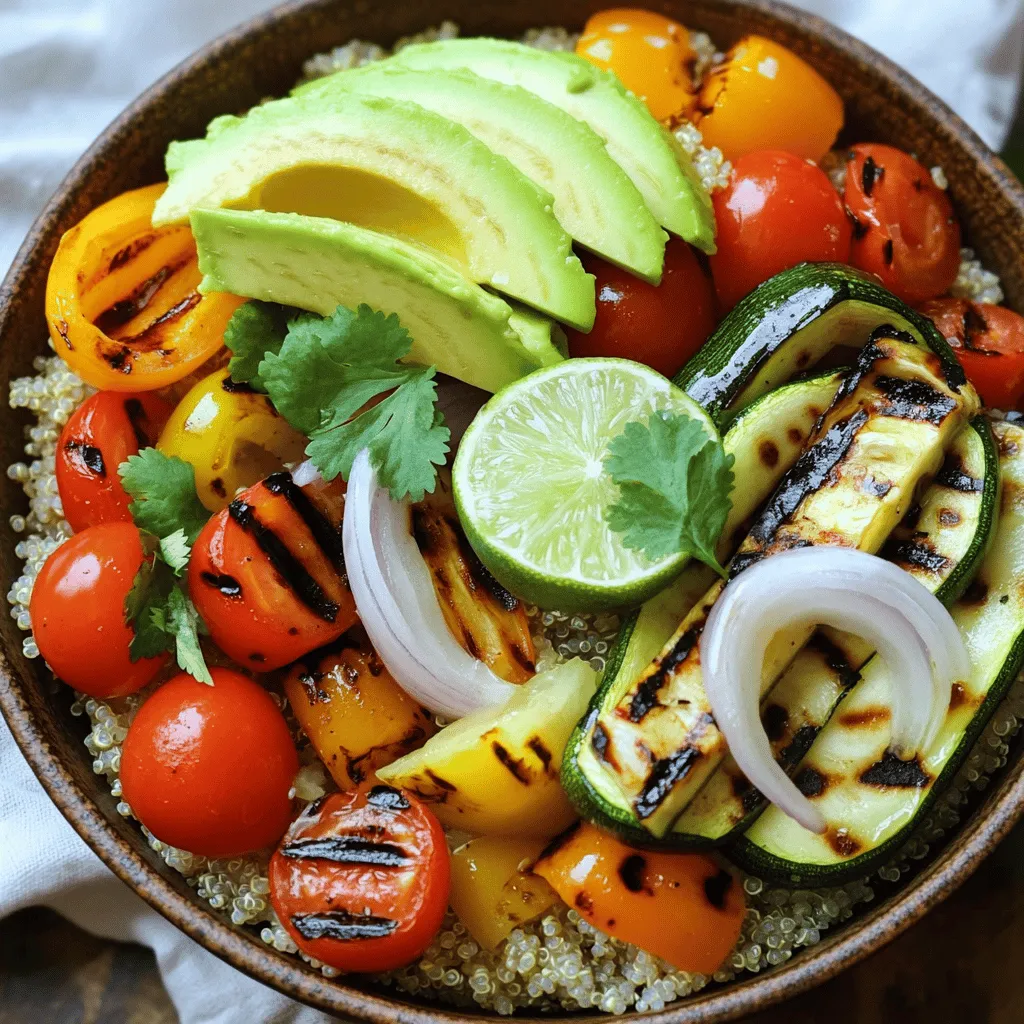
Looking for a fresh and flavorful meal? Grilled Veggie Quinoa Bowls are your answer! This dish packs healthy grains and

To make fresh mango peach salsa, gather these simple ingredients: - 1 ripe mango, diced - 2 ripe peaches, diced - 1/2 red bell pepper, finely chopped - 1/4 red onion, finely chopped - 1 jalapeño, seeded and minced - Juice of 1 lime - 2 tablespoons fresh cilantro, chopped - Salt to taste - 1 teaspoon honey (optional, for added sweetness) These ingredients come together to create a vibrant and tasty salsa. Using fresh ingredients makes a big difference in flavor. Fresh mangoes and peaches add sweetness and brightness to the salsa. They also provide a pleasant texture. Canned fruits can be mushy and less flavorful. If you want the best taste, always opt for fresh. You can customize your salsa easily. Here are some optional ingredients to consider: - Diced avocado for creaminess - Chopped green onions for a mild onion flavor - Corn for sweetness and crunch - Black beans for added protein and fiber Mix and match these ingredients to make the salsa your own. Making fresh mango peach salsa is simple and fun. You just need to gather your ingredients. This recipe takes about 15 minutes to prep. The salsa tastes even better after resting. The flavors mix and become vibrant. 1. Start by dicing the ripe mango and peaches. Use a sharp knife for clean cuts. 2. Next, finely chop the red bell pepper and red onion. This adds color and crunch. 3. Seed and mince the jalapeño. Add it to the mix for a spicy kick. Adjust the amount to suit your taste. 4. Squeeze the juice of one lime over the chopped fruits. The lime brightens the flavors. 5. Toss in the fresh cilantro, which adds a fresh taste. 6. If you like sweet salsa, add a teaspoon of honey. This step is optional but adds a nice touch. 7. Season with salt to taste. Mix all the ingredients gently until combined. 8. Let the salsa rest for 15 minutes. This helps the flavors come together nicely. To get the best texture, make sure your fruits are ripe. Ripe mangoes and peaches will be sweet and juicy. If you want a chunkier salsa, chop the fruits larger. For a smoother mix, chop them smaller. Taste the salsa before serving. You can always add more lime juice or salt. Experiment with the spice level as well. Adjust the jalapeño to make it milder or hotter. For the full recipe, check the earlier sections. Enjoy your fresh mango peach salsa with chips or grilled meats! To make your salsa shine, focus on how you cut the fruit. Here are my tips: - Use a sharp knife. A sharp knife makes clean cuts. - Cut on a stable surface. Use a cutting board to keep your fruit steady. - Dice evenly. Aim for small, even pieces. This helps the flavors mix well. - Remove the pit first. For peaches, slice around the pit. Twist to separate. Using these tips helps create a salsa that looks great and tastes fresh! Spice can bring life to your salsa. Here’s how to control it: - Start small with jalapeño. If you want mild salsa, use less jalapeño. - Taste as you go. After mixing, taste the salsa. Add more spice if needed. - Use different peppers. Try a bell pepper for no heat or a hotter pepper for more kick. Adjusting spice makes the salsa fit your taste perfectly. You can make this salsa ahead for parties or meals. Here’s how: - Prepare a few hours in advance. This allows flavors to blend well. - Store in the fridge. Keep it in an airtight container. - Stir before serving. Give it a gentle mix to freshen it up. Making salsa ahead saves time and boosts the flavor! For detailed steps, check the Full Recipe. {{image_2}} You can make this salsa even more fun by adding other fruits. Pineapple chunks bring a sweet kick. Try diced kiwi for a tart twist. Papaya also adds a smooth texture and a tropical vibe. Mix and match these fruits to find your favorite blend. Each fruit adds a new flavor layer to your salsa. Adjust the heat to your taste by changing the peppers. If you like it mild, skip the jalapeño. Instead, use sweet bell pepper for color and crunch. For more heat, add chopped serrano peppers. You can also try a dash of hot sauce for a fiery kick. Always taste as you go to find your perfect spice balance. This recipe is already vegan and gluten-free, which is great. You can enjoy it without worry. If you want it sweeter, use maple syrup instead of honey. This keeps it vegan-friendly. Always check labels on store-bought ingredients to ensure they meet your dietary needs. These small changes make it easy for everyone to enjoy this fresh mango peach salsa. For the full recipe, check the earlier section. To keep your fresh mango peach salsa tasty, store it in the fridge. Use an airtight container. This helps the salsa stay fresh and flavorful. Avoid using metal containers, as they can react with the lime juice. Glass or plastic works best. Fresh mango peach salsa lasts about 3 to 5 days in the fridge. The flavors blend well over time. However, the fruit may get mushy after a few days. To keep the texture nice, avoid stirring too much when you serve it. If you notice any brown spots, just scoop them out before serving. You can freeze fresh mango peach salsa for up to 2 months. Use freezer-safe bags or containers. Leave some space at the top to allow for expansion. When you want to use it, thaw it in the fridge overnight. The texture may change a bit, but the flavor will still shine. For the full recipe, check the earlier section. Fresh mango peach salsa pairs well with many dishes. You can enjoy it with tortilla chips for a crunchy snack. It also complements grilled chicken or fish. The sweet and spicy flavors enhance tacos and burritos, too. You can even use it as a topping for burgers. This salsa adds a fresh twist to any meal. Yes, you can use frozen fruit if fresh is not available. Just make sure to thaw and drain the fruit before using it. Frozen fruit may have a softer texture once thawed. This might change the crunch of your salsa. However, the flavors will still be delightful and vibrant. Homemade salsa lasts about 3 to 5 days in the fridge. Store it in an airtight container to keep it fresh. If you notice any separation, just give it a good stir. The flavors may even get better after a day or two. However, always check for off smells before eating. Enjoy your fresh mango peach salsa within that time for the best taste. You learned how to make fresh mango peach salsa with simple steps and tips. I shared how fresh ingredients shine and how to customize your salsa. You now know how to adjust the spice and store your salsa for later use. Remember, this salsa pairs well with many meals. Experiment with tropical fruits or different peppers for fun twists. Making this salsa is easy and rewarding. Enjoy your fresh creation, and share it with others!

Fresh Mango Peach Salsa Bold and Flavorful Delight

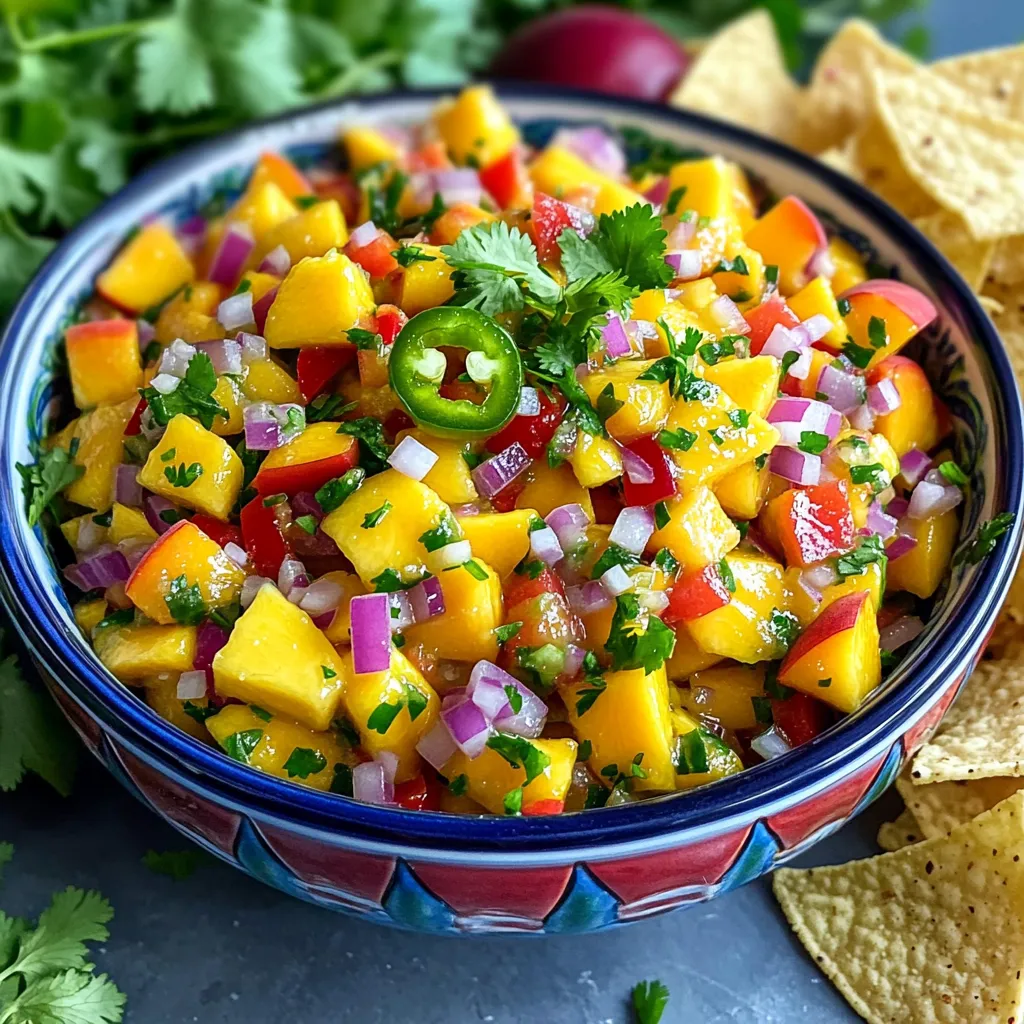
Are you ready to dive into a tropical flavor explosion? This Fresh Mango Peach Salsa is not just a dish;

To make these tasty No-Bake Chocolate Coconut Bars, gather the following items: - 1 cup unsweetened shredded coconut - 1 cup rolled oats - 1 cup almond flour - 1/2 cup maple syrup - 1/4 cup coconut oil, melted - 1/2 cup dark chocolate chips (dairy-free if desired) - 1 teaspoon vanilla extract - A pinch of sea salt You can easily swap some ingredients for personal taste or dietary needs. If you don’t have almond flour, try using cashew flour or oat flour. For a nut-free option, you can use sunflower seed flour. Instead of maple syrup, honey or agave syrup can work as a sweetener. If you want a different flavor, use coconut milk instead of coconut oil. Lastly, any type of chocolate can replace dark chocolate chips, like milk chocolate or white chocolate. Each bar provides a delicious and nutritious treat. Here’s a quick look at what’s inside: - Calories: Approximately 180 per bar - Protein: 3g - Carbohydrates: 18g - Fat: 10g - Fiber: 3g - Sugar: 6g These bars are great for a snack or dessert. They contain healthy fats from coconut and almond flour, along with fiber from oats. Enjoy these bars as part of a balanced diet! If you want to see the full recipe, check out the recipe section. Start by gathering all your ingredients. You will need unsweetened shredded coconut, rolled oats, almond flour, maple syrup, coconut oil, dark chocolate chips, vanilla extract, and sea salt. In a large bowl, mix the shredded coconut, rolled oats, and almond flour. Make sure to mix well so they blend evenly. This step is key to a great texture. Next, we melt the dark chocolate chips. Use a microwave-safe bowl for this step. Heat the chocolate in 20-second bursts. Stir after each interval until it is smooth. Be careful not to overheat the chocolate. It should be creamy and easy to spread. Now, let's combine everything. In another bowl, whisk together maple syrup, melted coconut oil, vanilla extract, and a pinch of sea salt. Then pour this mixture over the dry ingredients. Stir until everything is coated and sticky. Line an 8x8 inch baking dish with parchment paper. Press the mixture firmly into the dish to form an even layer. Once this is done, pour the melted chocolate over the pressed mixture. Use a spatula to spread it out evenly. Place the dish in the fridge for at least two hours so the bars can set. When ready, lift the bars out using the parchment paper and cut them into squares or rectangles. Enjoy this easy no-fuss treat! For the full recipe, check the earlier section. To get the right texture, mix the dry ingredients well. This helps them stick together. When you add the wet mix, stir until everything is fully coated. This sticky mix is key for holding the bars together. Press firmly into the baking dish. A tight pack gives a great bite. Serve these bars cold for a refreshing treat. You can cut them into squares or rectangles. Place them on a nice platter for a pretty display. Try adding extra shredded coconut on top. A drizzle of melted chocolate also looks great and tastes divine. One big mistake is not letting the bars chill long enough. They need at least 2 hours to set. Skipping the parchment paper can make removal hard. Always line your dish for easy lifting. Lastly, don’t over-melt the chocolate. Stir it slowly to keep it smooth. {{image_2}} You can easily change the taste of these bars. Try adding nuts like almonds or walnuts for a crunchy texture. You can also mix in dried fruit, like cranberries or apricots, for a sweet touch. Different extracts can enhance the flavor too. For a tropical vibe, add coconut extract. For a minty twist, use peppermint extract. Each tweak makes the bars unique and fun. If you need a gluten-free version, use certified gluten-free oats. This makes the bars safe for those with gluten allergies. For a vegan option, make sure to use dairy-free chocolate chips. You can also swap maple syrup for agave nectar for a plant-based sweetener. These simple changes ensure everyone can enjoy this tasty treat. If you want a different chocolate experience, consider using white chocolate or carob chips. Both options add a new flavor while keeping the bars sweet. For a richer taste, try dark chocolate with a high cocoa content. If you prefer less sweetness, use unsweetened cocoa powder mixed into the base. Each chocolate swap can transform the recipe into something new. For the full recipe, check out the detailed instructions provided above. To keep your no-bake chocolate coconut bars fresh, store them in an airtight container. Place a layer of parchment paper between layers if stacking. This method helps avoid sticking and keeps the bars intact. Store them in the fridge for the best taste and texture. You can freeze these bars for later enjoyment. Cut them into squares or rectangles before freezing. Wrap each piece in plastic wrap and place them in a freezer-safe bag. They will stay fresh for up to three months. When you want to eat one, just take it out and let it thaw in the fridge. When stored in the fridge, these bars last about one week. If you freeze them, they can last for three months. Always check for any signs of spoilage before eating. Keeping them in a cool area helps maintain their flavor and texture. Enjoy your treats at their best! No-Bake Chocolate Coconut Bars can last for about one week in the fridge. Store them in an airtight container to keep them fresh. If you want to enjoy them later, you can freeze them. They will last up to three months in the freezer. Just make sure to wrap them well. Yes, you can use other sweeteners. Honey is a great option if you are not vegan. Agave syrup works well too. You might need to adjust the amounts based on the sweetness level you prefer. Just keep in mind that the flavor might change slightly. I recommend using dark chocolate chips for a rich flavor. You can choose dairy-free chocolate chips if you want a vegan option. You can also use semi-sweet chocolate if you like a sweeter taste. The key is to pick a chocolate you enjoy. This will make your bars even more delicious. For the best results, use high-quality chocolate. For the full recipe, check out the section above! In this post, we explored how to make tasty no-bake chocolate coconut bars. We listed key ingredients and smart substitutions. The step-by-step guide showed you how to prepare, melt, and assemble the bars. I shared tips for texture and serving ideas to avoid common errors. You also learned about fun flavor twists and how to store your bars. Now, enjoy the process and make this recipe your own!

No-Bake Chocolate Coconut Bars Easy No-Fuss Treat

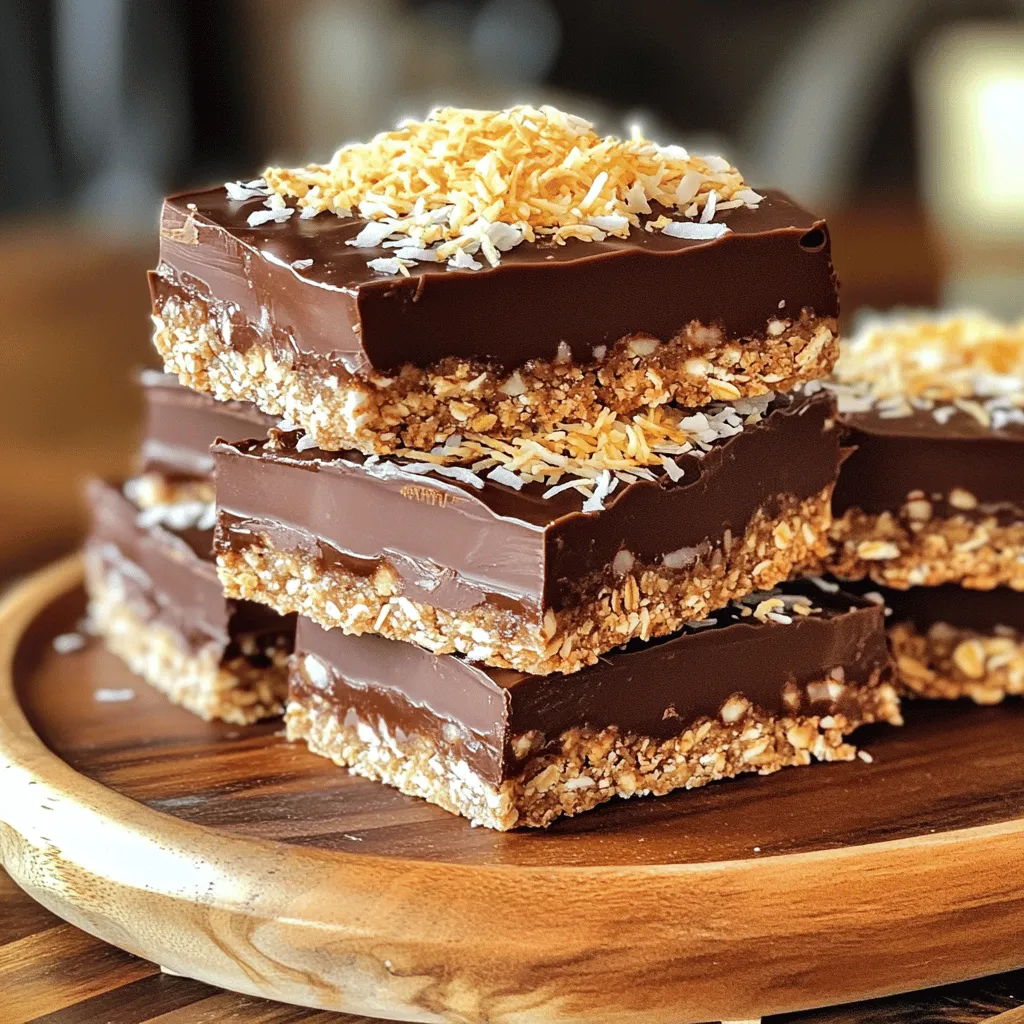
Are you ready to whip up a delight that requires no baking? These No-Bake Chocolate Coconut Bars are simple, tasty,

To make a tasty Peanut Butter Banana Smoothie, gather these simple ingredients: - 2 ripe bananas, sliced - 3 tablespoons creamy peanut butter - 1 cup almond milk (or your preferred milk) - 1 tablespoon honey (or maple syrup for a vegan option) - 1/2 cup rolled oats - 1/2 teaspoon vanilla extract - 1/4 teaspoon cinnamon - Ice cubes (optional) Using ripe bananas gives your smoothie a natural sweetness. The creamy peanut butter adds a rich flavor and protein. Almond milk keeps it light, but you can use any milk you like. Honey or maple syrup sweetens the mix, while oats provide fiber. Vanilla extract and cinnamon enhance the flavor, making it even more delicious. You can add ice cubes if you want a chilled smoothie. This recipe is quick and easy, taking just five minutes to prep. You can find the full recipe above to help you get started! - Step 1: Combine ingredients in a blender. Start by adding the sliced bananas, creamy peanut butter, almond milk, honey, rolled oats, vanilla extract, and cinnamon to your blender. This mix creates a tasty base. - Step 2: Adjust for temperature with ice (optional). If you want a chilled smoothie, toss in a handful of ice cubes. This step makes it refreshing. - Step 3: Blend until smooth. Blend on high speed until the mixture is creamy. Make sure there are no oat chunks left. You want it nice and smooth. - Step 4: Taste and adjust sweetness. After blending, taste your smoothie. If you want it sweeter, add a little more honey or maple syrup. Blend again briefly to mix. - Step 5: Serve and garnish (optional). Pour your smoothie into a glass. For a fun touch, add banana slices or a drizzle of peanut butter on top. Enjoy your Peanut Butter Banana Bliss Smoothie! For the full recipe, check out the earlier section. - Use ripe bananas for the best flavor. Ripe bananas add natural sweetness and creaminess. - Blend longer for a creamier texture. This helps break down the oats and makes it smooth. - Adjust milk for desired thickness. Add more milk for a thinner drink or less for a thicker one. - Substitute almond milk with dairy or other plant-based milk. This allows you to find your favorite taste. - Use flavored peanut butter for added taste. Flavors like honey or chocolate can enhance your smoothie. - Add protein powder or greens for extra nutrition. This is a great way to boost your smoothie’s health benefits. For the full recipe, check the Peanut Butter Banana Bliss Smoothie section. {{image_2}} You can mix up your Peanut Butter Banana Smoothie in fun ways. Here are some ideas that I love. - Chocolate Peanut Butter Banana Smoothie: Add 2 tablespoons of cocoa powder. This will give you a rich, chocolatey taste. Blend it with the other ingredients for a sweet treat. - Peanut Butter Banana Protein Smoothie: For a protein boost, add a scoop of your favorite protein powder. This is great after a workout. It keeps you full and supports muscle recovery. - Tropical Peanut Butter Banana Smoothie: Add a handful of tropical fruits. Try mango or pineapple for a sunny twist. This will brighten up the flavor and make your smoothie feel like a vacation. Experimenting with these variations keeps your smoothie fresh and exciting. You can find the full recipe for the classic Peanut Butter Banana Smoothie at the beginning of this article. Enjoy creating your perfect blend! To keep your Peanut Butter Banana Smoothie fresh, follow these tips: - Best practices for storing leftovers: Store any leftover smoothie in an airtight container. Glass or plastic containers work well. Keep it in the fridge for up to 24 hours. Shake or stir before drinking, as ingredients may separate. - Freezing smoothies for later use: If you have extra smoothie, pour it into ice cube trays. Once frozen, pop the cubes into a zip-top bag. This way, you can blend them later for a quick treat or snack. Just remember to use them within three months for the best taste. - Reblending after refrigeration: If your smoothie thickens in the fridge, don't worry. Just add a splash of almond milk or water and blend again. This will restore its creamy texture. Enjoy your smoothie again without losing any flavor! Can I make this smoothie in advance? Yes, you can prep this smoothie ahead of time. Blend the ingredients and store it in the fridge for up to 24 hours. Just give it a shake or stir before drinking. What can I substitute for peanut butter? If you need a swap, try almond butter or sunflower seed butter. Both work well and taste great. They also add a unique flavor to the smoothie. Is this smoothie suitable for kids? Absolutely! This smoothie is a fun and tasty treat for kids. It’s packed with nutrients, and they usually love the sweet taste of bananas and peanut butter. How many calories are in a Peanut Butter Banana Smoothie? A serving typically has around 300-400 calories. This can vary based on your milk choice and added sweeteners. Check the ingredients to get an exact number. Can I add vegetables to this smoothie? Yes, you can! Spinach or kale blends nicely without changing the taste a lot. It’s a smart way to sneak in extra nutrients. You learned about making a tasty Peanut Butter Banana Smoothie. We covered the key ingredients like ripe bananas and creamy peanut butter. I shared simple steps for blending and tips for the best texture. You can customize your smoothie with various flavors and add-ins. Storing your smoothie is easy, too, for later enjoyment. Enjoy trying different recipes and making it your own. Smoothies can be quick, nutritious, and delicious!

Peanut Butter Banana Smoothie Simple and Tasty Drink

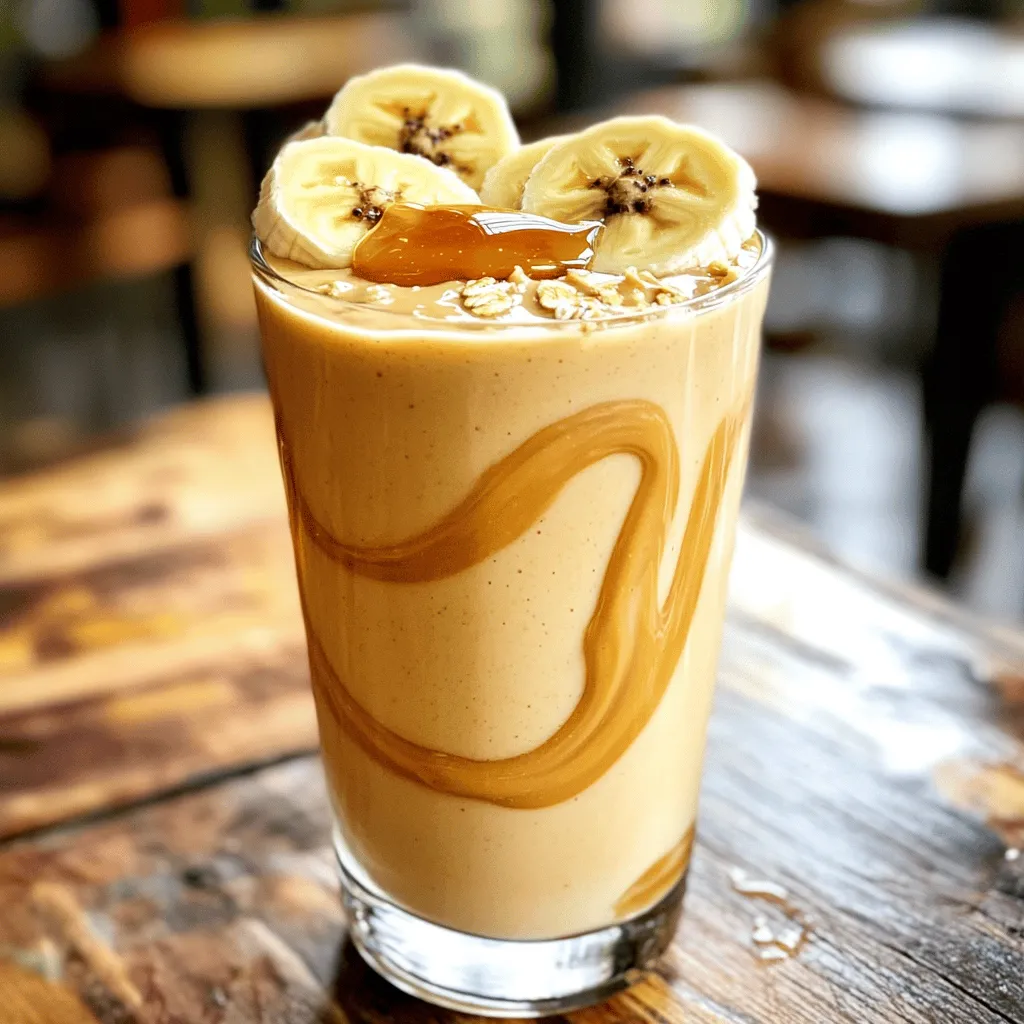
If you’re looking for a quick and tasty treat, you’re in for a treat! The Peanut Butter Banana Smoothie is

Older posts
Newer posts
← Previous Page1 … Page65 Page66 Page67 … Page85 Next →

dsad

© 2026 greenmealmap • Built with GeneratePress

Our Policies

  • Copyright Policy
  • Cookie Policy
  • GDPR Policy
  • Privacy Policy
  • Disclaimer
  • Terms Of Use

More Information

  • Home
  • About
  • Contact
  • Appetizers
  • Dessert
  • Dinner
  • Drinks
©2026, greenmealmap About Back To Top