![Chia seeds are the star of this dish. They are tiny, but they pack a punch. They absorb liquid and create a thick, creamy texture. You need 1/2 cup of chia seeds for this recipe. These seeds are full of fiber, protein, and healthy fats. They keep you full and satisfied. Almond milk makes this pudding light and tasty. Use 2 cups of unsweetened almond milk for the best flavor. It adds creaminess without extra calories. If you want, you can use other plant milks, but almond milk works best. It pairs well with the sweet blueberries and crunchy almonds. To sweeten the pudding, you can use 1/4 cup of maple syrup or honey. This adds a nice touch of sweetness. A teaspoon of vanilla extract adds warmth to the flavor. Finally, add a pinch of salt to balance the sweetness. Together, these ingredients make the pudding rich and satisfying. For the full recipe, check the Blueberry Almond Chia Pudding section above. Start by gathering your ingredients. You will need chia seeds, almond milk, maple syrup, vanilla extract, salt, and fresh blueberries. In a large mixing bowl, combine: - 1/2 cup chia seeds - 2 cups almond milk (unsweetened) - 1/4 cup maple syrup (or honey) - 1 teaspoon vanilla extract - A pinch of salt Whisk these ingredients together until the chia seeds spread out evenly. The chia seeds will soak up the almond milk and create a thick texture. This step is vital for the pudding's creamy feel. Once mixed, cover the bowl with plastic wrap or a lid. Place it in the refrigerator for at least 4 hours, or overnight is best. This waiting time allows the chia seeds to absorb the liquid and swell. You will notice a gel-like consistency form. This step is crucial for the pudding to set properly. After the pudding has thickened, take it out of the fridge. Give it a good stir; if it seems too thick, add a bit more almond milk to reach your desired texture. To serve, spoon the pudding into bowls or jars. Layer it with fresh blueberries and sprinkle sliced almonds on top for crunch. For added sweetness, drizzle some extra maple syrup over the top. You can find the full recipe for more details. Enjoy your tasty treat! To get that ideal texture, start with the right chia seed amount. Use 1/2 cup of chia seeds to 2 cups of almond milk. This ratio gives a nice gel-like pudding. Stir the mixture well to avoid clumps. If you want it thicker, let it sit longer in the fridge. For a thinner pudding, add a splash more almond milk before serving. You can boost the flavor in many ways. Consider adding a splash of vanilla extract. It brings warmth and depth. Try mixing in spices like cinnamon or nutmeg for extra zest. You can also add different fruits, such as bananas or strawberries, to switch it up. Drizzle some maple syrup on top for a sweet finish. Make your pudding visually appealing. Use clear jars or bowls to show off the layers. Add fresh blueberries on top for color and a sprinkle of sliced almonds for crunch. You can even create a parfait by layering the pudding with yogurt or granola. This makes it not only tasty but also Instagram-worthy! For the full recipe, check out the Blueberry Almond Chia Pudding section above. {{image_2}} You can change the flavor of your blueberry almond chia pudding easily. Try using other fruits. Strawberries, mangoes, or peaches work well. They add a fresh taste. You can also mix in spices like cinnamon or nutmeg. These spices give a warm flavor. If you want a tropical twist, add some coconut flakes. They bring a nice texture and taste. This recipe is super flexible. It is vegan, gluten-free, and dairy-free by default. If you need it nut-free, replace almond milk with oat or soy milk. For sweeteners, you can use agave syrup instead of maple syrup or honey. This option keeps it vegan-friendly. You can also skip sweeteners for a low-sugar treat. The natural flavor of fruits will shine through. Get creative with how you serve this pudding! You can layer it to make a parfait. Start with a layer of pudding, then add fruits, and repeat. This looks beautiful in clear jars. If you're in a hurry, blend it into a smoothie. Just add more almond milk and blend until smooth. This makes a quick breakfast or snack. For a fun touch, serve it in fun cups or bowls. Enjoy experimenting with these ideas! Store your blueberry almond chia pudding in an airtight container. Glass jars work well. Make sure the lid is tight. This keeps the pudding fresh and prevents spills. If you make a big batch, divide it into smaller portions. This way, you grab what you need easily. Your chia pudding can last in the fridge for about 5 days. Keep an eye on it. If you notice any change in smell or texture, it’s best to toss it out. The blueberries may lose their freshness, so consume them earlier than the pudding. If you have leftover pudding, get creative! You can blend it into smoothies for a tasty drink. Try adding it to yogurt or oatmeal for a quick breakfast. You can even bake it into muffins for a fun treat. Just remember to enjoy it within those 5 days for the best flavor. For the full recipe, check the details above. Yes, you can make Blueberry Almond Chia Pudding ahead of time. In fact, I suggest it! Chia pudding needs time to thicken. You should let it chill in the fridge for at least 4 hours. For the best taste and texture, prepare it the night before. This way, you wake up to a ready-to-eat treat. Just remember to store it in an airtight container! If you don't have almond milk, there are many options. You can use coconut milk, soy milk, or oat milk. Each option adds its own flavor. For a nut-free choice, try rice milk. Just keep in mind that the taste may change slightly. Use your favorite milk for the best result in your pudding. To reduce the sweetness, cut back on the maple syrup or honey. You can also use unsweetened almond milk. Another trick is to add more chia seeds. This will balance the sweetness with a thicker texture. If you want, try adding a pinch of cinnamon for flavor without extra sugar. Adjust it to your taste! For the full recipe, see the [Full Recipe]. You now know how to make delicious blueberry almond chia pudding. We covered essential ingredients like chia seeds and almond milk, along with sweeteners. I outlined a simple method, from preparing the base to serving tips. Remember, you can tweak flavors, adjust for diets, and get creative with presentations. Store wisely, and this treat will stay fresh. Use this guide to enjoy your pudding today or try new variations tomorrow. Your kitchen adventure starts here!](https://greenmealmap.com/wp-content/uploads/2025/07/a3fdc781-1409-4544-98dc-0ef3e26d30c4.webp)
Blueberry Almond Chia Pudding Easy and Healthy Treat
Are you looking for a quick, healthy treat that’s easy to make? Blueberry Almond Chia Pudding is your answer! Packed
Are you looking for a quick, healthy treat that’s easy to make? Blueberry Almond Chia Pudding is your answer! Packed

Looking for a healthy and tasty meal? Try my Vegan Stuffed Sweet Potatoes! These sweet potatoes are filled with rich
![- 4 hard-boiled eggs - 1 ripe avocado - 2 tablespoons Greek yogurt (or mayonnaise) - 1 teaspoon Dijon mustard - 1 tablespoon fresh lemon juice - 2 tablespoons fresh chives - Salt and black pepper - Optional garnishes For a tasty avocado egg salad, you need simple, fresh ingredients. Each one adds flavor and nutrition. The hard-boiled eggs are rich in protein. They help keep you full. The ripe avocado brings creaminess and healthy fats. Greek yogurt or mayonnaise adds a nice touch. Dijon mustard gives it a little zing. Fresh lemon juice brightens up the dish. It also helps keep the avocado from browning. Chives add a mild onion flavor. Salt and black pepper enhance the taste. This avocado egg salad is not just easy to make; it's also versatile. You can add optional garnishes like smoked paprika or lettuce. These add extra flavor and make the dish look pretty. For the full recipe, check out the Creamy Avocado Egg Bliss. To start, you need four hard-boiled eggs. Chop them into small pieces and place them in a medium bowl. Next, take one ripe avocado and mash it with a fork in a separate bowl. Aim for a smooth texture, but not too mushy. Now, combine the mashed avocado with two tablespoons of Greek yogurt or mayonnaise, one teaspoon of Dijon mustard, and one tablespoon of fresh lemon juice. Don’t forget to add a pinch of salt and black pepper. Mix everything until it's creamy and well blended. When you add the chopped eggs to the avocado mix, do it gradually. Gently fold them in with a spatula. Be careful not to mash the eggs too much. You want to keep some chunks for texture. This step makes your salad feel hearty and satisfying. Now it’s time to taste your creation. Adjust the seasoning as needed, adding more salt, pepper, or lemon juice. For serving, you can place the avocado egg salad on fresh lettuce leaves or serve it on whole-grain bread. This adds a nice crunch and makes your meal more fun. Don't forget to check the [Full Recipe] for all the details! To make the best avocado egg salad, start with the avocado. Look for one that is ripe but firm. A ripe avocado feels slightly soft when you press gently. If it’s too hard, let it sit on the counter for a day or two. If it’s too soft, it might be overripe. When it comes to cooking the eggs, hard-boiling is best. Start with cold water, then bring it to a boil. Once boiling, cover the pot and turn off the heat. Let the eggs sit for about 10-12 minutes. This gives you a nice, firm yolk without green rings. After cooking, cool them in cold water to stop the cooking process. To add flavor, don’t be shy with spices. A dash of smoked paprika gives a smoky note. You can also try a pinch of cayenne for heat or garlic powder for a savory kick. Fresh herbs can boost the taste, too. Chives are great, but you can also use parsley or dill. Just chop them finely and mix them in. Freshness really brightens the dish. How you serve your salad matters. For a simple touch, use a colorful bowl or plate. This makes the dish pop. You can also try serving it on whole-grain bread for a sandwich feel or in lettuce leaves for a lighter option. Garnishing makes it look nice. A sprinkle of smoked paprika on top adds color. Extra chives or even a slice of lemon can make it look fancy. Remember, we eat with our eyes first! {{image_2}} You can make avocado egg salad your own. For a protein boost, try adding cooked chicken or canned tuna. These proteins mix well with the creamy texture. You can also toss in veggies for extra crunch. Bell peppers and celery add color and flavor. They make the dish more vibrant and healthy. If you need gluten-free options, worry not! This salad is naturally gluten-free. You can serve it on gluten-free bread or lettuce wraps. For vegan alternatives, swap eggs with chickpeas. Mash them up for a similar texture. Use vegan mayo instead of Greek yogurt for creaminess. If you like some heat, add jalapeños to your salad. They give a spicy kick that many enjoy. For a Mediterranean flair, mix in olives and feta cheese. The salty olives and creamy feta pair perfectly with the avocado. These changes keep the salad exciting every time you make it. For the full recipe, check out Creamy Avocado Egg Bliss. Store your avocado egg salad in an airtight container. This keeps it fresh. Use a glass or plastic container with a tight lid. Place the salad in the fridge right after serving. It stays fresh for about two to three days. After that, the avocado may brown and affect taste. Can you freeze avocado egg salad? I do not recommend it. Freezing changes the texture of the avocado. If you freeze it, it may become mushy when thawed. If you must freeze, use a freezer-safe container. Thaw it in the fridge overnight before using. Stir it well to mix the ingredients again. Preparing smaller batches is a smart choice. It helps you avoid waste and keeps the salad fresh. Aim for about one cup per person. This is a good serving size. If you have more guests, you can easily make more. You can also scale the recipe up or down based on your needs. For the full recipe, check the earlier section. How can I tell if an avocado is ripe? A ripe avocado feels slightly soft when you gently squeeze it. The skin should have a dark green or almost black color. If it feels too hard, it is not ready. If it feels mushy, it is overripe. Can I use different types of mustard? Yes, you can use different mustards like yellow or whole grain. Each type brings a unique flavor. Experiment to find the one you like best! Nutritional value of avocado and eggs Avocados are rich in healthy fats, fiber, and vitamins. They support heart health and keep you full. Eggs provide protein, vitamins, and minerals. Together, they make a nutrient-packed meal. Is it low-carb? Yes, avocado egg salad is low in carbs. The main ingredients are low in carbohydrates. This makes it a great choice for low-carb diets. What to do if it's too creamy? If your salad is too creamy, add more chopped eggs to balance it. You could also mix in extra veggies like celery for crunch. Tips for avoiding browning of the avocado To keep the avocado green, add lemon juice right after mashing. You can also store it in an airtight container. Cover it tightly to limit air exposure. This blog post covered how to make a tasty avocado egg salad. We discussed the key ingredients, easy steps, and helpful tips. I suggested ways to modify the salad based on your taste and dietary needs. Remember, the best salads come from experimenting! Incorporating fresh flavors and textures can make your dish shine. Enjoy creating a salad that fits your style. Happy cooking!](https://greenmealmap.com/wp-content/uploads/2025/07/26c621f0-442a-432c-8288-0f5b902bbc70.webp)
Looking for a light, healthy meal that packs a punch? Try my Avocado Egg Salad! It combines creamy avocado with

Looking for a quick, tasty meal? You’ve come to the right place! Spinach Mushroom Quesadillas are not only easy to
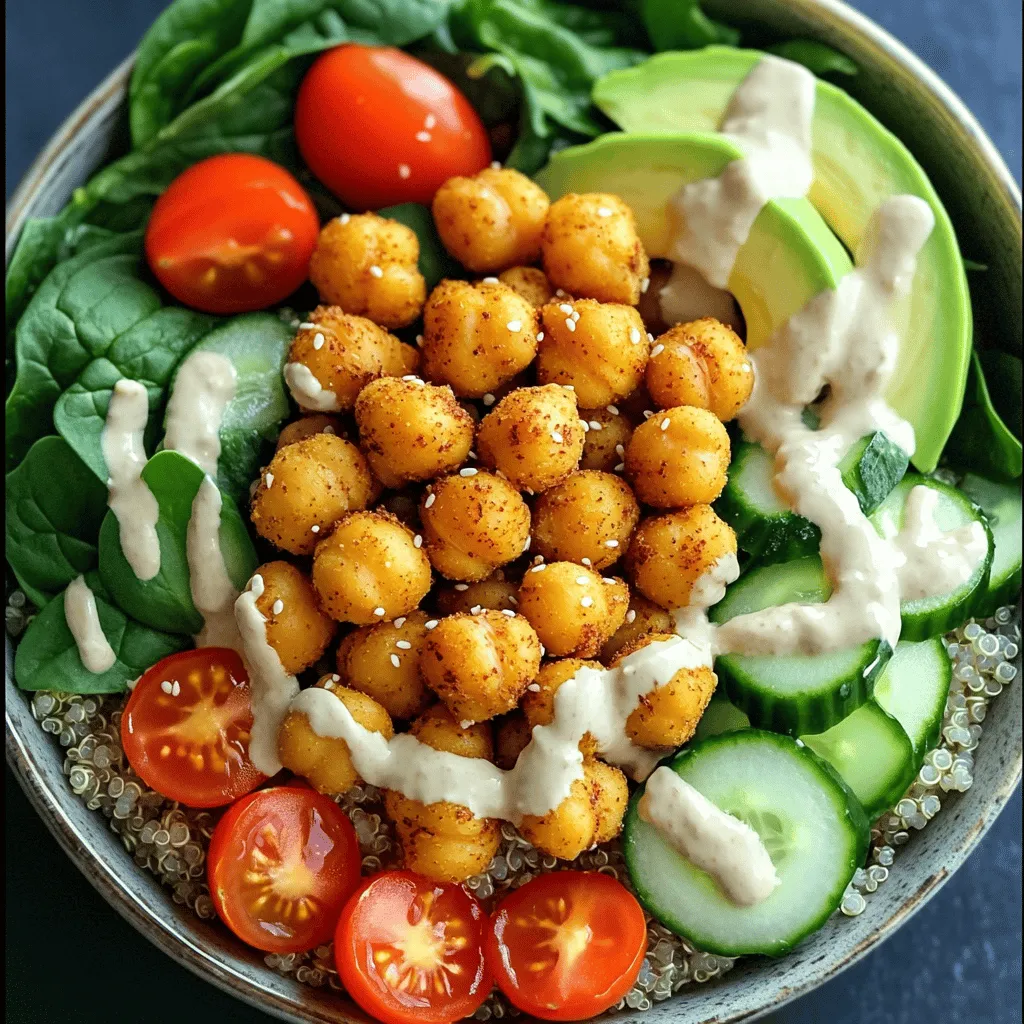
Are you ready to enjoy a tasty and healthy meal? This Crispy Chickpea Buddha Bowl packs flavor and nutrition in
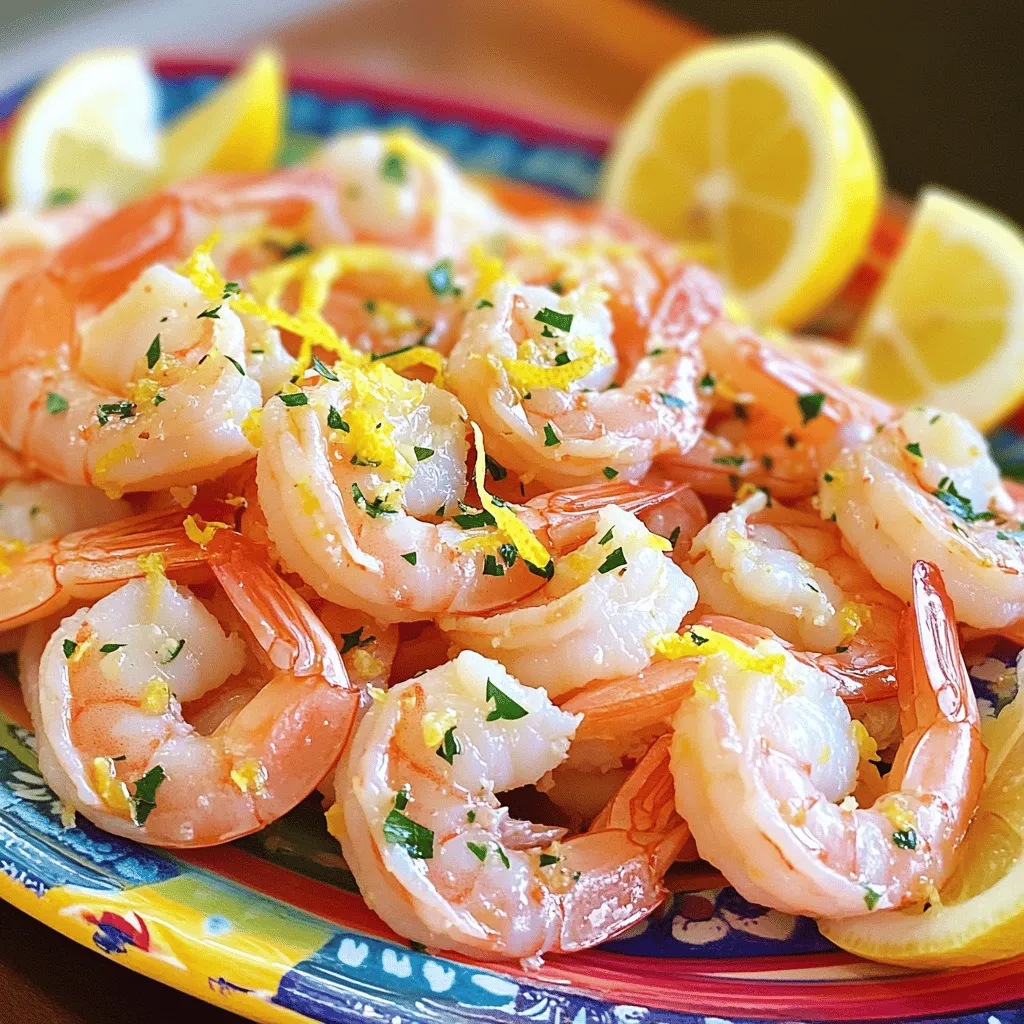
If you’re craving a dish that’s both zesty and easy to make, look no further! Lemon Garlic Roasted Shrimp is
![- Chicken: You need 500g of boneless chicken breasts. Cut them into bite-sized pieces. This helps the chicken cook evenly. - Spices: You'll use 2 tablespoons of tikka masala spice mix. This mix gives the dish its rich flavor. Additionally, add 1 teaspoon of garam masala for extra warmth. - Dairy and Vegetables: Use 1 cup of plain yogurt. This tenderizes the chicken and adds creaminess. You’ll also need 1 medium onion, 4 cloves of garlic, and 1 inch of grated ginger. These aromatics build a great base. Finally, use 1 can (400g) of crushed tomatoes and 1 cup of coconut milk. They create the delicious sauce. - Fresh Herbs: Fresh cilantro adds a burst of color and freshness. Chop it and sprinkle on top before serving. - Additional Flavor Enhancers: Consider adding a squeeze of lime juice for brightness. You might also try a dash of chili flakes for heat. These extras can make your dish more exciting. For a detailed list of all ingredients, check the Full Recipe. Preparing the Chicken Mixture First, grab a mixing bowl. Add bite-sized chicken pieces, one cup of plain yogurt, and two tablespoons of tikka masala spice mix. Make sure to mix it well. The chicken should be fully coated with the yogurt and spices. This mix will make your chicken tender and flavorful. Recommended Marinating Time I recommend you let the chicken marinate for at least 30 minutes. For the best taste, marinate it overnight. This extra time lets the flavors sink in deeply. Sautéing Onions and Aromatics Start by heating two tablespoons of vegetable oil in a large skillet over medium heat. Once the oil is hot, add one finely chopped medium onion. Sauté the onion until it turns translucent, about 5 to 7 minutes. Next, add four cloves of minced garlic and one inch of grated ginger. Cook these for one more minute. The kitchen will smell amazing! Browning the Chicken Now it's time for the marinated chicken. Add it to the skillet and cook until it's browned on all sides. This should take about 5 to 8 minutes. Don't rush this step; browning adds great flavor. Simmering the Sauce After browning the chicken, pour in one can of crushed tomatoes. Stir to combine everything well. Let this simmer for 10 minutes. This allows the flavors to blend. Then, reduce the heat and stir in one cup of coconut milk and one teaspoon of garam masala. Simmer for another 10 to 15 minutes. The chicken should be cooked through, and the sauce will thicken slightly. Adjust seasoning with salt and pepper to taste. Now you have a delicious chicken tikka masala ready to serve! For the full recipe, check the recipe section. Marinating for Optimal Flavor Marinating the chicken brings out the best taste. I always use plain yogurt and tikka masala spice mix. This mix gives the chicken deep flavor. Aim for at least 30 minutes to marinate. For even better taste, marinate overnight. The longer the chicken sits, the richer the flavor. Alternating Cooking Techniques I like to mix cooking methods for the best results. Start by sautéing onions, garlic, and ginger. This builds a strong base. Then, brown the marinated chicken. It adds a nice texture and flavor. Finally, simmer everything together. This helps all the flavors blend well. Best Pairings with Chicken Tikka Masala Chicken Tikka Masala shines with basmati rice or naan. The rice soaks up the sauce well. Naan is great for dipping. You can also serve it with a side of cucumber salad for freshness. Fresh cilantro on top adds a pop of color and flavor. Presentation Tips Make your dish look nice. Serve it in a warm bowl. Sprinkle chopped cilantro on top. Add a lemon wedge for a colorful touch. This makes the meal inviting and fun to eat. For a complete meal, pair it with a salad or some roasted vegetables. For a complete cooking guide, check out the [Full Recipe]. {{image_2}} If you want a meat-free meal, try using tofu or paneer. Tofu is a great choice. It soaks up flavors well. Cut the tofu into cubes and press it to remove extra water. Then, marinate it just like you would the chicken. Paneer is another tasty option. This Indian cheese adds a creamy texture to the dish. Simply cube the paneer and follow the same steps in the recipe. Both options taste great with the rich sauce. Do you like your food hot? You can adjust the spice level in your chicken tikka masala. If you want it milder, add less tikka masala spice mix. Start with one tablespoon and taste as you go. For more heat, add a pinch of cayenne pepper or red chili flakes. This lets you find the perfect level for your family. Remember, cooking is all about making it your own! After you enjoy your Easy Chicken Tikka Masala, store the leftovers properly. This dish keeps well in the fridge. - Place the chicken tikka masala in an airtight container. - Make sure it cools down before sealing. - Store it in the fridge for up to 3 days. If you want to keep it longer, freezing is a great option. - Use freezer-safe containers or bags. - Leave some space for expansion. - It can last up to 3 months in the freezer. Reheating chicken tikka masala is simple. You want to keep the flavor and texture intact. - The best method is to use the stovetop. - Pour the masala into a pan over low heat. - Stir often until it’s heated through. You can also use a microwave. - Place it in a microwave-safe dish. - Cover it loosely to avoid splatter. - Heat in short bursts, stirring in between. These methods will help your dish taste fresh and delicious! How to make Chicken Tikka Masala spicier? To make your Chicken Tikka Masala spicier, add more tikka masala spice mix. You can also add chopped fresh chilies or red pepper flakes. Start with a small amount, taste, and adjust as needed. This way, you control the heat level. Can I use chicken thighs instead of breasts? Yes, chicken thighs work well in this recipe. They stay juicy and tender. Just cut them into bite-sized pieces like the breasts. You may need to adjust the cooking time slightly, as thighs take longer to cook. What can I substitute for coconut milk? If you don't have coconut milk, use heavy cream or plain yogurt. You can also try almond milk or cashew cream for a dairy-free option. Just be aware that the flavor will change slightly. - Tips for adjusting recipe quantities: If you want to make more or less, easily scale the ingredients. For example, double the chicken and yogurt if you want to serve eight. Keep the spice levels similar, as they add the main flavor. - How to achieve the best results with a slow cooker: For slow cooking, marinate the chicken as usual. Then, add all the ingredients to your slow cooker. Cook on low for 6-8 hours or high for 3-4 hours. This method makes the chicken very tender and flavors blend well. We explored Chicken Tikka Masala, from key ingredients to cooking steps. I shared tips to enhance flavor and presented delicious variations. Proper storage and reheating ensure your meal stays tasty. With this knowledge, you can tailor the dish to your taste and preferences. Enjoy making your next Chicken Tikka Masala! Getting creative in the kitchen can lead to great meals and fun experiences.](https://greenmealmap.com/wp-content/uploads/2025/07/1fbd9027-198a-4a1e-bf2a-10871e3bbe25.webp)
Looking for a flavorful dinner idea that the whole family will love? This Easy Chicken Tikka Masala recipe pairs tender
![Here’s what you need to make roasted sweet potatoes with tahini drizzle. Gather these ingredients for a tasty dish: - 4 medium sweet potatoes, peeled and diced into 1-inch cubes - 3 tablespoons olive oil - 1 teaspoon smoked paprika - 1 teaspoon garlic powder - Salt and pepper to taste - 1/4 cup tahini - 2 tablespoons lemon juice - 2 tablespoons maple syrup - 1-2 tablespoons water (to thin the tahini) - Fresh parsley, chopped (for garnish) - Sesame seeds (for garnish) These ingredients create a balance of sweet and savory flavors. The sweet potatoes give a soft texture. The tahini drizzle adds creaminess and depth. Trust me, you won’t regret trying this dish. It’s perfect for any meal. You can even enjoy it as a snack. If you want to explore more, check out the Full Recipe for detailed steps. First, I preheat the oven to 425°F (220°C). This temperature helps the sweet potatoes roast well. Next, I line a large baking sheet with parchment paper. This step makes cleanup easier. In a large bowl, I add the diced sweet potatoes, olive oil, smoked paprika, garlic powder, salt, and pepper. I toss everything together until the sweet potatoes get a nice coat of oil and spices. This mix adds flavor and helps them roast evenly. Then, I spread the sweet potatoes on the baking sheet in a single layer. This spacing allows them to roast evenly. I place the baking sheet in the oven and set a timer for 25-30 minutes. Halfway through, I take them out and toss them gently. This ensures all sides get that perfect golden-brown color. While the sweet potatoes roast, I prepare the tahini drizzle. In a small mixing bowl, I whisk together tahini, lemon juice, maple syrup, and water. I keep mixing until it’s smooth and creamy. If it seems too thick, I add a bit more water. This drizzle will bring a creamy contrast to the sweet potatoes. For the complete recipe, check out the [Full Recipe]. To get your sweet potatoes just right, start with even pieces. Cut them into 1-inch cubes. This helps them cook at the same rate. Spread them out on a baking sheet. Avoid overcrowding; give them space to breathe. For crispiness, toss them with olive oil and spices. The oil helps them get that golden, crunchy layer. Toss halfway through cooking to ensure all sides brown nicely. You can spice up your tahini drizzle easily. Try adding cumin for warmth or cayenne for heat. Fresh herbs like dill or cilantro can add a bright taste, too. For a touch of sweetness, swap maple syrup with honey or agave. Each choice brings a new flavor profile, so get creative! When serving, make it look special. Use a large white plate to show off the colors. Drizzle the tahini in a swirl on top. Garnish with fresh parsley and sesame seeds for texture and color. Serve these sweet potatoes alongside grilled chicken or quinoa salad. They make a lovely addition to any meal. For the full recipe, check out the details above! {{image_2}} You can change the taste of roasted sweet potatoes by adding spices. Try cayenne for heat, or cinnamon for sweetness. Mixing in other vegetables can also create exciting flavors. Carrots, Brussels sprouts, or beets work well. They add color and texture to the dish. This recipe is already vegan and gluten-free. Use maple syrup for a low-sugar alternative. You can also swap tahini with sun butter for a nut-free option. It’s great to have choices that fit your diet. Roasted sweet potatoes pair well with many meals. Serve them as a side dish with grilled chicken or fish. You can add them to salads for extra nutrition. Mixing them with grains, like quinoa or farro, makes a filling meal. The creamy tahini drizzle enhances all these combos. For a fun twist, try them in tacos with black beans. Enjoy the different ways to savor this dish! To store leftover sweet potatoes, use an airtight container. This keeps them fresh. I recommend glass or BPA-free plastic containers. Place the cooled potatoes in the container. They will last in the fridge for about 3 to 5 days. The best way to reheat roasted sweet potatoes is in the oven. Set the oven to 350°F (175°C) and spread the potatoes on a baking sheet. Heat for about 10 to 15 minutes. You can also use a microwave, but it may change the texture. To keep them crispy, avoid covering them with a lid. Yes, you can freeze roasted sweet potatoes! To freeze them, let them cool completely first. Then, spread the potatoes on a baking sheet in a single layer. Freeze for 1 to 2 hours. Once frozen, transfer them to a freezer bag. When you want to enjoy them again, thaw overnight in the fridge. Reheat as mentioned above. For the full recipe, check out the details above. You can use almond butter or sunflower seed butter. These alternatives work well. They both have a creamy texture. Almond butter adds a nutty taste, while sunflower seed butter is mild. You might also try Greek yogurt for a tangy twist. Each substitute changes the flavor a bit, but they all taste good. Look for a golden-brown color on the outside. The sweet potatoes should feel soft when pierced with a fork. If they are tender and slightly caramelized, they are ready. You want them to have a nice, crispy edge while being soft inside. Yes, you can prep the sweet potatoes a day in advance. Just store them in the fridge. Roast them when you're ready to serve. For the tahini drizzle, mix it up and keep it in the fridge as well. Just give it a stir before using. This way, your meal will be quick and easy! This article covered how to make perfectly roasted sweet potatoes with a tasty tahini drizzle. You learned about the ingredients, easy steps, and helpful tips. I shared variations and served suggestions for meals. Remember to store leftovers well and follow reheating tips to keep that great flavor. Enjoy experimenting with different spices and ingredients. With these skills, you can create a dish that shines on any table. Enjoy your cooking journey!](https://greenmealmap.com/wp-content/uploads/2025/07/a3a2e6bd-d267-4343-b81d-8679706cf1f1.webp)
Get ready to enjoy a burst of flavor with my Roasted Sweet Potatoes with Tahini Drizzle Delight. This simple dish
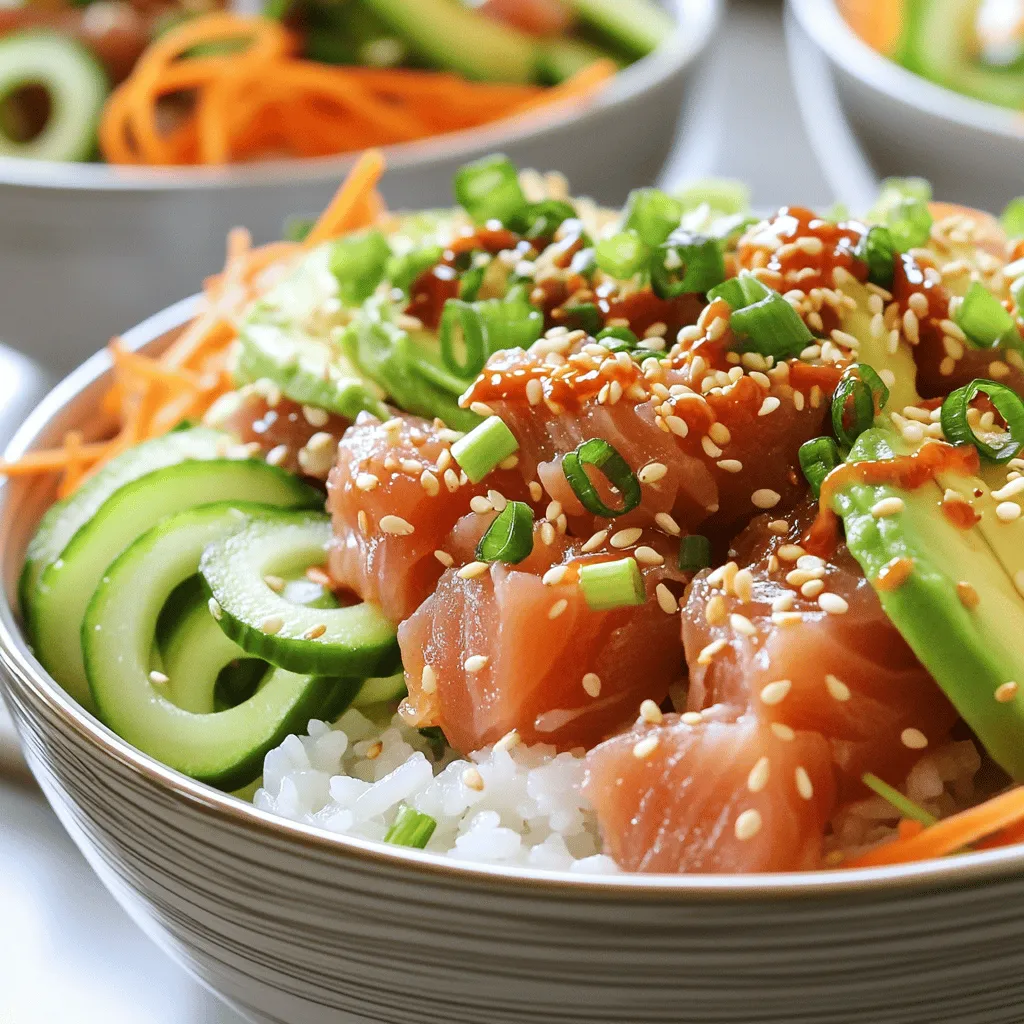
Are you ready to dive into a burst of flavor with Spicy Tuna Sushi Bowls? This delicious recipe combines fresh
![To make Garlic Parmesan Pull Apart Bread, you need some key ingredients. Here’s what you need: - 1 loaf of fresh sourdough bread (or any round artisan bread) - 1/2 cup unsalted butter, melted - 4 cloves garlic, minced - 1 cup shredded Parmesan cheese - 1 tablespoon fresh parsley, chopped - 1 teaspoon dried oregano - 1 teaspoon salt - 1/2 teaspoon black pepper These ingredients create a delicious mix of flavors. The sourdough bread adds a nice tang, while the garlic and Parmesan fill it with richness. If you want to make your bread even tastier, consider these optional garnishes: - Extra Parmesan cheese - More chopped parsley These toppings can make your bread look fancy and add extra flavor. A sprinkle of cheese on top can make it even more cheesy! You can switch some ingredients based on what you have. Here are some easy swaps: - Butter: Use olive oil instead of butter for a lighter option. - Parmesan Cheese: Try mozzarella or cheddar if you want a different cheese flavor. - Fresh Parsley: You can use basil or thyme for a fresh touch. These substitutions can change the taste and texture. Feel free to experiment to find your favorite version! You can find the full recipe to guide you through the steps. Start by preheating your oven to 350°F (175°C). This step is key for even baking. While it heats, gather your ingredients. You will need your loaf of bread, melted butter, and spices. In a small bowl, mix the melted butter, minced garlic, oregano, salt, and pepper. Whisk them well. Set this mixture aside for later. It packs a lot of flavor. Next, take your loaf of bread and place it on a baking sheet lined with parchment paper. Using a serrated knife, make cuts in the loaf about one inch apart. Aim for a grid pattern. Be careful not to cut all the way through the bottom. This keeps the loaf together. Once you make the cuts, gently pull apart the sections. This creates little pockets for the filling. These pockets are crucial for holding all that tasty garlic butter and cheese. Now it’s time to fill the bread. Grab your butter mixture and use a pastry brush to drizzle it into each pocket. Make sure each cut is well coated. Next, sprinkle the shredded Parmesan cheese evenly into the pockets. Try to ensure every section is filled. If you have leftover garlic butter, drizzle it over the top of the loaf. Wrap the bread loosely in aluminum foil, sealing the edges. This helps keep the bread soft while it bakes. Place it in the oven and bake for 15 to 20 minutes. After that time, remove the foil and bake for 10 more minutes. You want the cheese to be melted and bubbly, and the bread to be golden brown. Once it’s done, take it out of the oven. For a nice touch, sprinkle some extra parsley and Parmesan cheese on top. Serve it warm and enjoy the fun of pulling apart your cheesy, garlicky bread! For the full details, check out the Full Recipe. To get the best texture in Garlic Parmesan Pull Apart Bread, start with fresh bread. Sourdough or round artisan bread works well. Make sure to cut the bread without slicing all the way through. This keeps the loaf intact. When you pull apart the pieces, they should feel soft and fluffy inside. The outer crust should be crisp and golden. Adding flavor boosts the joy of eating this bread. Use fresh garlic; it adds a stronger taste. Mix the garlic with melted butter and herbs for a rich flavor. I suggest using parsley and oregano. These herbs blend well with the garlic. You can add extra cheese on top before baking for an even cheesier experience. Don't be shy; sprinkle a little more Parmesan for extra flavor! One common mistake is not cutting deep enough into the bread. If the cuts are too shallow, the garlic butter won’t soak in well. Another mistake is using cold butter. It won’t mix with the garlic as nicely. Be sure to melt it beforehand. Lastly, don't skip wrapping the bread in foil while baking. This helps keep the bread moist and ensures it cooks evenly. For the full recipe, refer to the earlier section on ingredients and instructions. {{image_2}} You can change the cheese in this recipe for a new taste. Mozzarella adds a gooey texture. Cheddar gives a sharp flavor. You can also try gouda for a smoky twist. Mixing cheeses is fun too! Try a blend of mozzarella and parmesan for a cheesy delight. Add herbs and spices to elevate your bread. Basil pairs well with garlic. Thyme adds a fresh note. Red pepper flakes give a spicy kick. You can even use Italian seasoning for a classic taste. Experimenting with flavors can make this dish your own. Making this bread vegan is simple. Use vegan butter instead of regular butter. Look for plant-based cheese as a tasty swap. For a gluten-free option, choose gluten-free bread. Many brands offer tasty gluten-free loaves. This way, everyone can enjoy your garlic parmesan pull apart bread! To keep your Garlic Parmesan Pull Apart Bread fresh, you have a few good options. First, let the bread cool down to room temperature. Wrap it tightly in plastic wrap or aluminum foil. This helps keep it soft. You can also store it in an airtight container. This way, it stays fresh for about two days at room temperature. When you want to enjoy your leftovers, reheating is key. Preheat your oven to 350°F (175°C). Unwrap the bread and place it on a baking sheet. Bake for about 10-15 minutes. This warms it through and makes the cheese nice and melty again. If you prefer a quicker method, you can microwave individual pieces. Just heat them for about 15-20 seconds. If you want to save some for later, freezing works well. Wrap the entire loaf tightly in plastic wrap, then in aluminum foil. This prevents freezer burn. You can also slice the bread first and wrap the pieces individually. When you’re ready to eat, thaw it overnight in the fridge. Reheat it as mentioned above. This way, you can enjoy Garlic Parmesan Pull Apart Bread anytime! For the complete recipe, check [Full Recipe]. To make Garlic Parmesan Pull Apart Bread from scratch, follow these steps: 1. Preheat your oven to 350°F (175°C). 2. Mix melted butter, minced garlic, oregano, salt, and pepper in a bowl. 3. Use a serrated knife to cut a grid in the loaf without cutting through the bottom. 4. Pull apart the bread slightly to create pockets. 5. Brush the garlic butter mixture into the pockets. 6. Fill each pocket with shredded Parmesan cheese. 7. Drizzle any leftover garlic butter on top. 8. Wrap the bread in foil and bake for 15-20 minutes. 9. Unwrap and bake for another 10 minutes until golden brown. 10. Serve warm and enjoy! This recipe is easy and fun. You can find the Full Recipe above. Yes, you can use other types of bread for Garlic Parmesan Pull Apart Bread. Here are some options: - Ciabatta: Its airy texture works well with the filling. - French bread: This offers a crispy crust and soft inside. - Whole wheat: This adds a nutty flavor and is a healthier option. - Focaccia: This gives a unique taste and is very soft. Feel free to experiment based on what you have at home. Garlic Parmesan Pull Apart Bread lasts about 2-3 days when stored properly. - Store it in an airtight container or wrap it tightly in plastic wrap. - Keep it at room temperature for the best taste. - If you want it to last longer, you can freeze it. Just wrap it well in foil or a freezer bag, and it will last for up to three months. When ready to eat, thaw and reheat in the oven for the best texture. In this post, we explored how to make Garlic Parmesan Pull Apart Bread. We covered essential ingredients, baking steps, and tips for perfecting texture and flavor. You can try variations and learn storage methods to keep it fresh. Remember, this bread is fun to make and share. Whether for a party or a quiet night in, it will impress. Enjoy experimenting with ingredients and techniques. Your kitchen adventures await!](https://greenmealmap.com/wp-content/uploads/2025/07/3dc1c334-f2ba-4976-92e9-facfc34cef74.webp)
Are you ready to wow your friends with a tasty treat? Garlic Parmesan Pull Apart Bread is easy to make
