Skip to content
DisclaimerTerms Of UseGDPR PolicyCookie Policy

greenmealmap

  • Home
  • Drinks
  • Appetizers
  • Dinner
  • Dessert
  • About
  • Contact
  • Privacy Policy
DisclaimerTerms Of UseGDPR PolicyCookie Policy

NO-ING-IMG

For tasty grilled veggie skewers, you need: - 1 zucchini, sliced into thick rounds - 1 bell pepper (any color), cut into chunks - 1 red onion, cut into wedges - 10 cherry tomatoes - 8 mushrooms, cleaned and halved These veggies add great color and flavor. Feel free to mix and match based on what you like. The marinade brings all the flavors together. You will need: - 2 tablespoons olive oil - 1 tablespoon balsamic vinegar - 2 teaspoons garlic powder - 1 teaspoon dried oregano - Salt and pepper to taste This mix enhances every bite. Adjust the seasonings if you want more or less flavor. Garnishes make your skewers look great. You can add: - Fresh herbs like parsley or basil - A side of tzatziki or hummus for dipping These extras make the dish shine. They’re not just pretty; they add more flavor, too! For the full recipe, check out the section above. Marinating adds flavor to your veggies. Start by mixing olive oil, balsamic vinegar, garlic powder, dried oregano, salt, and pepper in a bowl. Whisk until it looks good. Next, toss in your zucchini, bell pepper, red onion, cherry tomatoes, and mushrooms. Make sure each piece is covered in the tasty mix. Let them sit for at least 15 minutes. This will help the veggies soak up all those yummy flavors. Now, it’s time to grill! First, heat your grill to medium-high. While it heats, thread the marinated veggies onto soaked wooden skewers. Mix colors and shapes for a fun look. Place the skewers on the hot grill. Grill for about 10 to 12 minutes. Turn them often to get nice grill marks. When the veggies are tender, take them off the grill. Let them cool for a minute before serving. Serving your skewers is easy and fun. Arrange them on a large platter. For a fresh touch, add herbs like parsley or basil on top. You can also serve them with tzatziki or hummus. These dips add extra flavor and make it more exciting. Enjoy your grilled veggie skewers! For the full recipe, check out the details above. Pick fresh, colorful vegetables for your skewers. I love using zucchini, bell peppers, red onions, cherry tomatoes, and mushrooms. You can also try eggplant or squash for variety. Choose veggies that cook at similar times. This way, everything will grill evenly. To get those nice grill marks, preheat your grill to medium-high heat. Place the skewers on the grill and don’t move them for the first few minutes. This helps create those beautiful char lines. Turn the skewers only when you see good grill marks. Aim for about 10-12 minutes of grilling time. Marinades add tons of flavor! My go-to mix includes olive oil, balsamic vinegar, garlic powder, and oregano. But don’t stop there! You can switch it up. Try lemon juice and thyme for brightness or soy sauce and ginger for an Asian twist. Let your creativity shine! Check out the Full Recipe for more ideas. {{image_2}} You can change the veggies based on the season. In spring, try asparagus and peas. Summer brings fresh corn and eggplant. In fall, sweet potatoes and Brussels sprouts are great choices. Winter lets you use root vegetables like carrots and parsnips. Mixing colors and shapes makes the skewers fun and tasty. These veggie skewers are naturally vegan and gluten-free. You can add tofu or tempeh for more protein. Both soak up flavors well. Just marinate them with the same mix as the veggies. If you want a heartier meal, add quinoa or couscous on the side. To boost the taste, try different herbs and spices. Fresh basil or cilantro adds brightness. For a spicy kick, sprinkle some red pepper flakes. You can also use smoked paprika for a smoky flavor. Experimenting with flavors keeps the recipe exciting. For the full recipe, check out Grilled Veggie Skewers Delight. Once you finish your delicious grilled veggie skewers, store any leftovers in an airtight container. This keeps them fresh. Place the skewers in the fridge. They will last for up to three days. If you have lots of veggies left, you can also take them off the skewers. This makes storage easier. To reheat your skewers, use the oven or a skillet. Preheat your oven to 350°F. Place the skewers on a baking sheet. Heat for about 10 minutes, or until warm. If using a skillet, just add a bit of oil and warm them for about five minutes. This keeps them tasty and prevents them from drying out. Freezing these skewers is a great way to save them for later. First, let the skewers cool completely. Then, wrap them tightly in plastic wrap. Place them in a freezer-safe bag. They can last for up to three months in the freezer. When you're ready to eat, thaw them in the fridge overnight. You can then reheat them as mentioned above. Enjoy your grilled veggie skewers whenever you like! You should marinate the veggies for at least 15 minutes. This time helps the vegetables soak up all the great flavors. If you have more time, you can marinate them for up to 2 hours. Just remember to keep them in the fridge if you marinate longer. Yes, you can use different skewers! Bamboo skewers are common, but you can also use metal skewers. Just make sure to soak bamboo skewers in water for 30 minutes. This helps prevent them from burning on the grill. Metal skewers can go straight on the grill without soaking. Some tasty dipping sauces include tzatziki, hummus, or a balsamic glaze. Tzatziki is cool and creamy, making it a great match for grilled veggies. Hummus adds a rich, nutty flavor. A balsamic glaze gives a sweet and tangy kick that pairs well with the smoky veggies. Feel free to experiment with your favorites! Grilled vegetable skewers are easy and fun to make. You learned about choosing fresh veggies, creating a tasty marinade, and grilling to perfection. We also explored storage tips and variations. Remember to mix and match seasonal vegetables for new flavors. Enjoy experimenting with different marinades and garnishes. Keep your grilling simple and delicious. With practice, you’ll impress everyone with your skills. Happy grilling!

Grilled Veggie Skewers Flavorful and Simple Recipe

Fire up your grill for a vibrant and tasty dish: Grilled Veggie Skewers! This simple recipe brings fresh veggies to

To make Creamy Spinach Mushroom Orzo, gather these simple ingredients: - 1 cup orzo pasta - 2 cups fresh spinach, chopped - 1 cup mushrooms, sliced (cremini or button) - 1 small onion, finely chopped - 2 cloves garlic, minced - 1 cup vegetable broth - 1 cup heavy cream or coconut cream - ½ cup grated Parmesan cheese (optional) - 2 tablespoons olive oil - Salt and pepper to taste - 1 teaspoon dried thyme or Italian seasoning - 1 tablespoon lemon juice You can easily swap some ingredients to fit your needs: - For a dairy-free option, use coconut cream instead of heavy cream. - If you want to change the pasta, try using quinoa or brown rice pasta. - Fresh herbs add great flavor, but you can use dried herbs if needed. Each serving of Creamy Spinach Mushroom Orzo has about 400 calories. Here’s a quick breakdown of the main nutrients: - Carbohydrates: 50g - Protein: 10g - Fat: 20g (with heavy cream) - Fiber: 3g This meal is satisfying and packed with flavor, making it a great choice for any day. For the complete cooking process, check out the Full Recipe. To start, you need to bring salted water to a boil in a large pot. This step is key for cooking the orzo. Once the water is boiling, add 1 cup of orzo pasta. Cook it according to the package instructions. This usually takes about 8-10 minutes until it is al dente. When it’s ready, drain the orzo and set it aside. Next, it's time to build flavor. In the same pot, heat 2 tablespoons of olive oil over medium heat. Add 1 small chopped onion. Sauté it until it turns translucent, which takes about 3-4 minutes. Then, add 2 minced garlic cloves and 1 cup of sliced mushrooms. I suggest using cremini or button mushrooms. Cook them for about 5-6 minutes. Stir often until the mushrooms are browned and tender. Now, let’s bring it all together. Stir in 2 cups of chopped fresh spinach and cook until it wilts, which takes around 2 minutes. After that, pour in 1 cup of vegetable broth and 1 cup of heavy cream. Stir to mix everything well and bring the mixture to a simmer. Once it's simmering, add the cooked orzo back to the pot. If you like, you can also add ½ cup of grated Parmesan cheese at this stage. Finally, add 1 teaspoon of dried thyme or Italian seasoning, 1 tablespoon of lemon juice, and season with salt and pepper to taste. Cook everything together for an additional 2-3 minutes. Stir frequently until it becomes creamy and heated through. For the full recipe, check the details above. Enjoy this tasty comfort meal! To get that creamy texture just right, you can adjust the cream levels. Start with one cup of cream. If you want it richer, add a bit more. For a lighter version, use less cream or substitute with coconut cream. It still tastes great! Enhancing flavor with seasonings makes a huge difference. Use salt, pepper, and a teaspoon of dried thyme or Italian seasoning. A little lemon juice brightens the dish, too. These small steps make your orzo burst with flavor. Timing is key when cooking. Add the spinach right before serving. It wilts quickly, so just a couple of minutes is perfect. If you add it too early, it can become mushy. Serve the creamy orzo hot for the best taste. I like to dish it out in bowls and garnish with more grated Parmesan and black pepper. A lemon wedge on the side makes it look fancy and adds flavor. For this recipe, use a large pot. It lets you cook everything in one place. A good non-stick pot works wonders. It helps prevent sticking and makes for easy cleanup. Helpful kitchen gadgets include a garlic press and a sharp knife. They make chopping fast and easy. A wooden spoon is great for stirring all the tasty ingredients together. With the right tools, you’ll make this dish like a pro. {{image_2}} You can make this dish even heartier by adding protein. If you like meat, consider cooked chicken or shrimp. These options blend well with the creamy sauce. For a vegetarian twist, try chickpeas or white beans. Both add protein and texture. Tofu is also great; just sauté it until golden for extra flavor. Seasonal vegetables can change this recipe. In the spring, add asparagus or peas for freshness. In the fall, roasted butternut squash works well. You can also swap spinach for kale or Swiss chard. These greens bring different flavors and nutrients. Feel free to experiment with what you have on hand! Adding herbs and spices can boost the taste. Fresh basil or parsley adds brightness. A pinch of red pepper flakes gives it a kick. You might also try a splash of white wine for depth. Garlic powder or a squeeze of lemon can elevate the dish even more. Pair it with crusty bread for a complete meal. For the full recipe, check out the details above. Store leftovers in a sealed container. Glass containers work well. They keep food fresh. You can also use plastic containers. Make sure to cool the orzo before sealing. Creamy spinach mushroom orzo lasts three to four days in the fridge. If you want to keep it longer, freeze it. The best way to reheat this dish is on the stove. Use a non-stick pan for best results. Add a splash of broth or cream to prevent it from drying out. Stir often while heating. This keeps the orzo creamy and warm. You can also use the microwave. Heat in short bursts, stirring in between. Avoid cooking it too long, or it may get soggy. To freeze creamy orzo, let it cool completely. Then, transfer it to a freezer-safe container. Be sure to leave some space at the top for expansion. It can last for up to three months in the freezer. When you want to eat it, thaw it overnight in the fridge. Reheat on the stove or microwave, adding a bit of liquid if needed. This will help restore that creamy texture. Enjoy your delicious meal anytime! For the full recipe, check out the main article. It takes about 25 minutes in total. You need about 10 minutes to prep and 15 minutes to cook. First, boil the water, and then cook the orzo. Sauté the onions, garlic, and mushrooms while the orzo cooks. This timing keeps everything fresh and creamy. Yes, you can prepare it in advance. Cook the orzo and the sauce separately. When you’re ready to eat, mix them together. This way, the orzo stays firm and does not get mushy. Store the orzo and sauce in the fridge for up to three days. This dish pairs well with many sides. Try a simple green salad for a fresh touch. Garlic bread or crusty bread complements it nicely too. You can also serve grilled chicken or roasted vegetables for added protein. Consider a light vinaigrette to brighten the meal. In this blog post, we explored the easy steps to make Creamy Spinach Mushroom Orzo. We covered the ingredients, cooking methods, and tips for the best flavor. You can customize this dish with different proteins and veggies. Storing and reheating leftovers is simple, making it perfect for meal prep. This recipe is flexible and tasty, ensuring it fits your needs. Enjoy experimenting and making this dish your own!

Creamy Spinach Mushroom Orzo Tasty Comfort Meal

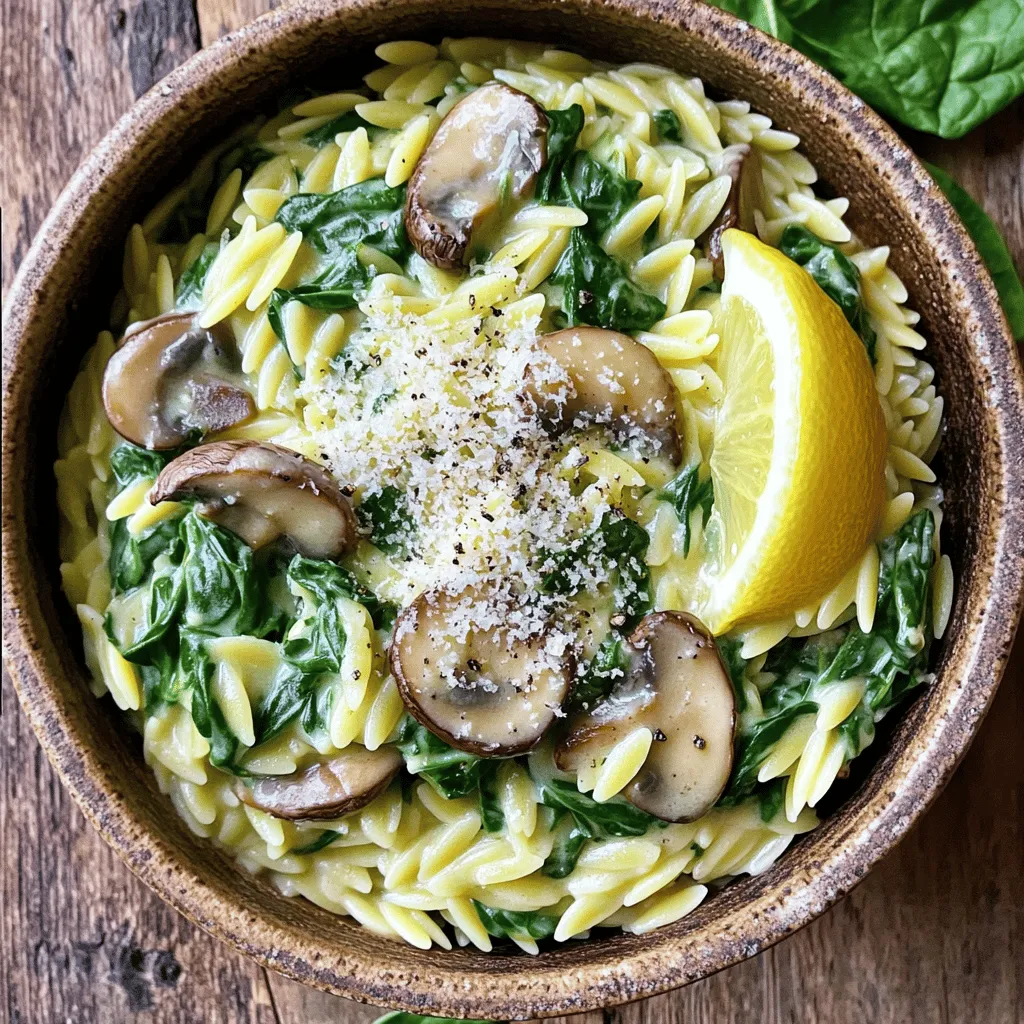
Looking for a cozy meal that warms both the heart and belly? My Creamy Spinach Mushroom Orzo is your answer!

- 1 cup cooked quinoa - 1 can (15 oz) chickpeas, drained and rinsed - 1 red bell pepper, diced - 1 cup shredded carrots - 1 avocado, sliced - 2 cups mixed greens (spinach, arugula) - 1/4 cup chopped green onions - 1/4 cup roasted peanuts, roughly chopped - 1/4 cup peanut butter - 2 tablespoons soy sauce (or tamari for gluten-free) - 1 tablespoon lime juice - 1 tablespoon maple syrup - 1 teaspoon sriracha (adjust to taste) - 1-2 tablespoons water (to thin) In this recipe, I focus on fresh, whole foods. I love quinoa for its protein and fiber. Chickpeas add a nice texture and more protein. The red bell pepper and shredded carrots bring crunch and sweetness. Avocado gives creaminess, while mixed greens add a fresh touch. For the spicy peanut sauce, I choose peanut butter for a rich flavor. Soy sauce adds saltiness, and lime juice brings brightness. Maple syrup balances the heat from sriracha, making it perfect. Adjust sriracha to your spice level! You can find the full recipe in the next section. Enjoy crafting this colorful and healthy bowl! Whisk together peanut butter, soy sauce, lime juice, maple syrup, sriracha, and water until smooth. Start with 1 tablespoon of water. You can add more if needed to thin it out. This sauce is the star of the bowl. It adds a rich and spicy flavor that brings everything together. In a large bowl, mix cooked quinoa, chickpeas, diced red bell pepper, and shredded carrots. Make sure the quinoa is cooked and cooled. This mix creates a hearty base for your Buddha bowl. The chickpeas add protein, while the bell pepper and carrots bring color and crunch. Layer mixed greens in serving bowls, then place the quinoa mixture on top. This adds a nice texture contrast. Garnish with sliced avocado, chopped green onions, and roasted peanuts. These toppings elevate the dish and make it look beautiful. Finally, drizzle the remaining spicy peanut sauce over the top or serve it on the side for dipping. For the full recipe, check out the details earlier in this article. To get your spicy peanut sauce just right, start with the basics. Mix peanut butter, soy sauce, lime juice, maple syrup, and sriracha. If the sauce feels too thick, add a little water. This helps you control the texture. You can make it creamy or runny based on your taste. Want more heat? Try adding more sriracha. Adjust to find your perfect flavor balance. When serving your Buddha bowl, think about how it looks. Use a large, shallow bowl to show off the colors. Layer your ingredients so each one stands out. You can add garnishes like sesame seeds for crunch and lime wedges for a zesty touch. These little extras make your dish pop and taste even better. For more ideas, check the Full Recipe for inspiration. {{image_2}} You can easily switch chickpeas for black beans or tofu. Black beans add a rich taste and are high in fiber. Tofu brings a soft texture and absorbs flavors well. These swaps let you enjoy different flavors while keeping it healthy. Feel free to mix in your favorite greens or veggies. Kale, for example, adds a hearty crunch. You can also try cucumber for a fresh, cool bite. The beauty of this bowl is its flexibility to fit your taste. Want to change up the sauce? Try tahini for a nutty creaminess. A yogurt-based dressing can add a tangy twist. Each option brings its own unique flavor, making your meal exciting and new each time. For the full recipe, check out the details above! To keep your Spicy Peanut Chickpea Buddha Bowl fresh, store it in an airtight container. Make sure to separate the sauce from the salad mix. This helps keep the veggies crisp. The bowl will stay good for about three days in the fridge. When you want to enjoy your leftovers, gently reheat the quinoa and chickpeas. Use a microwave or a stovetop. If using a microwave, heat in short bursts. Stir in between to avoid hot spots. Add a splash of water if it seems dry. This keeps the texture nice and fluffy. You can freeze the chickpea and quinoa mix for later. Just place it in a freezer-safe bag. Remove as much air as possible before sealing. The sauce can also freeze well in ice cube trays. This way, you can use it later as needed. When ready to eat, thaw and reheat the components. Enjoy your meal prep with this easy method. For the complete recipe, check out the [Full Recipe]. Making a Spicy Peanut Chickpea Buddha Bowl is quick! It takes about 15 minutes to prep and 10 minutes to cook. The total time is just 25 minutes. You can whip this up even on a busy day! Yes, you can make this dish ahead! Prepare the quinoa and chickpeas in advance. Store them in the fridge for up to three days. Keep the spicy peanut sauce separate to avoid sogginess. You can mix everything together right before serving. You can add many tasty things! Consider these options: - Spices: A pinch of cumin or paprika adds warmth. - Herbs: Fresh cilantro or basil enhances freshness. - Toppings: Try sesame seeds or crushed red pepper for extra crunch and heat. These will make your bowl even more delicious! This Buddha bowl combines healthy ingredients like quinoa, chickpeas, and veggies. The spicy peanut sauce adds great flavor. You can mix and match with different proteins and dressings to make it your own. Remember to store leftovers correctly to keep them fresh. Enjoy experimenting with ingredients! This dish is not only tasty but also fun to personalize. Happy cooking!

Spicy Peanut Chickpea Buddha Bowl Nutritious Delight

Are you ready to spice up your lunch or dinner? The Spicy Peanut Chickpea Buddha Bowl is your answer. This

For this tasty dish, you need a few main ingredients: - 2 cups cooked white rice - 1 lb boneless, skinless chicken breasts, diced - 1 can (10.5 oz) cream of mushroom soup - 1 cup shredded cheddar cheese - 1 cup frozen mixed vegetables (peas, carrots, corn) - 1/2 cup chicken broth - 1 teaspoon garlic powder - 1 teaspoon onion powder - Salt and pepper to taste - 1 tablespoon olive oil - Fresh parsley, chopped (for garnish) These ingredients create a rich and creamy base. The chicken adds protein, while the rice keeps it filling. The cheese gives a nice, gooey texture that everyone loves. You can make this dish even better with some optional add-ins. Try these: - 1/2 cup diced bell peppers for crunch - 1/4 cup sour cream for extra creaminess - 1 teaspoon smoked paprika for a hint of spice - 1/2 cup cooked bacon for a smoky flavor These add-ins can change the taste and make it your own. Feel free to mix and match! To create this easy casserole, gather these tools: - Large skillet for cooking chicken - Large mixing bowl for combining ingredients - 9x13-inch casserole dish for baking - Aluminum foil to cover the dish Having the right tools makes cooking easier. These items help you prepare and bake your casserole perfectly. For the full recipe, check out Cheesy Chicken Rice Delight. To start, gather all your ingredients. You will need: - 2 cups cooked white rice - 1 lb boneless, skinless chicken breasts, diced - 1 can (10.5 oz) cream of mushroom soup - 1 cup shredded cheddar cheese - 1 cup frozen mixed vegetables (peas, carrots, corn) - 1/2 cup chicken broth - 1 teaspoon garlic powder - 1 teaspoon onion powder - Salt and pepper to taste - 1 tablespoon olive oil - Fresh parsley, chopped (for garnish) Next, preheat your oven to 350°F (175°C). This step helps cook the casserole evenly. Heat the olive oil in a large skillet over medium heat. Add the diced chicken and cook it for about 5-7 minutes. Make sure the chicken is no longer pink. Sprinkle in garlic powder, onion powder, salt, and pepper for flavor. In a separate large bowl, mix the cooked rice, cream of mushroom soup, shredded cheddar cheese, and frozen mixed vegetables. Pour in the chicken broth. Stir until everything blends well. Add the cooked chicken from the skillet into this rice mixture. Gently stir again to ensure all ingredients are mixed evenly. Now, grease a 9x13-inch casserole dish. Transfer the mixture into the dish, spreading it out evenly. Cover the dish with aluminum foil to keep moisture in. Bake for 25 minutes. After that, remove the foil and let it bake for another 10-15 minutes. The top should turn golden and bubbly. Once it's done, let it cool for a few minutes. Garnish with fresh parsley before serving. Enjoy your easy chicken and rice casserole! This recipe is a simple and tasty meal for any night. You can find the full recipe above. To get the best texture in your casserole, use cooked rice. Fresh rice can become mushy. Mix in your cooked chicken gently. This way, you keep the chicken pieces intact. When you bake, cover the dish with foil first. This step keeps moisture inside. Remove the foil later to crisp the top. You want it golden and bubbly. Seasoning makes a big difference. Garlic powder and onion powder are great basics. You can add more herbs like thyme or rosemary for depth. A pinch of paprika can bring warmth. If you like heat, sprinkle in some cayenne. Always taste your mix before baking. Adjust seasoning to your liking for a richer flavor. You can make this casserole ahead of time. Prepare it and store it in the fridge for a day. If you want to freeze it, let it cool first. Cover it tightly with foil or plastic wrap. It can last in the freezer for three months. When ready, thaw it overnight in the fridge. Bake it as per the full recipe instructions. Enjoy your hassle-free meal! {{image_2}} You can make this dish lighter. Use brown rice instead of white rice. Brown rice is whole grain and has more fiber. Try low-fat cheese in place of regular cheese. You can also use low-sodium broth. This keeps the flavor but cuts down on salt. For a vegetarian twist, leave out the chicken. Use firm tofu or tempeh instead. Both options soak up flavors well. You can replace cream of mushroom soup with a homemade cashew cream. Blend soaked cashews with water and season to taste. For vegans, ensure your cheese is dairy-free. Experiment with spices to change the taste. Add paprika for a smoky flavor. Try Italian herbs like basil and oregano for a fresh kick. If you like heat, sprinkle in some cayenne pepper or red pepper flakes. You can also mix in different veggies. Bell peppers, mushrooms, or spinach work great for added color and nutrition. Check out the Full Recipe for more ideas! After you enjoy your Easy Chicken and Rice Casserole, store leftovers right away. Use an airtight container. Let it cool to room temperature before sealing. This helps keep it fresh longer. You can store it in the fridge for up to three days. If you want to keep it longer, consider freezing it. When reheating, take care to heat evenly. You can use an oven or a microwave. If using the oven, set it to 350°F (175°C). Cover the casserole with foil to prevent it from drying out. Bake for about 20 minutes or until hot. If using a microwave, heat in 1-minute intervals. Stir between intervals for even heating. The shelf life of your chicken and rice casserole depends on how you store it. In the fridge, it lasts about three days. In the freezer, it can stay good for up to three months. When ready to eat, make sure to check for any off smells or changes in texture. For best taste, enjoy it sooner rather than later. Yes, you can use brown rice. Brown rice adds a nutty taste and extra fiber. However, it takes longer to cook. I suggest cooking it first before mixing it with the other ingredients. This will help ensure that the casserole turns out well. If you want a different flavor, you can use cream of chicken soup or a homemade white sauce. You can also use sour cream or yogurt for a tangy twist. Each option gives a unique taste while still keeping the dish creamy. To make this casserole gluten-free, choose a gluten-free cream of mushroom soup. You can find many brands that offer this. Also, make sure your chicken broth is gluten-free. This way, you can enjoy the dish without worry. Cook the chicken in the skillet until it is no longer pink. This usually takes about 5-7 minutes. Use a meat thermometer to check the inside temperature. It should reach 165°F (75°C) for safe eating. You can serve a fresh salad or steamed veggies on the side. Roasted broccoli or green beans also make great pairings. These options balance the creamy casserole and add more nutrients to your meal. For more ideas, check out the Full Recipe. In this article, we covered how to make a tasty chicken and rice casserole. We explored essential ingredients, preparation steps, and cooking tips. You learned about variations for diet needs and how to store leftovers properly. This dish is simple, flexible, and great for families. Try new flavors and enjoy making it your own! Your kitchen will soon fill with wonderful smells. Happy cooking!

Easy Chicken and Rice Casserole Simple and Tasty Meal

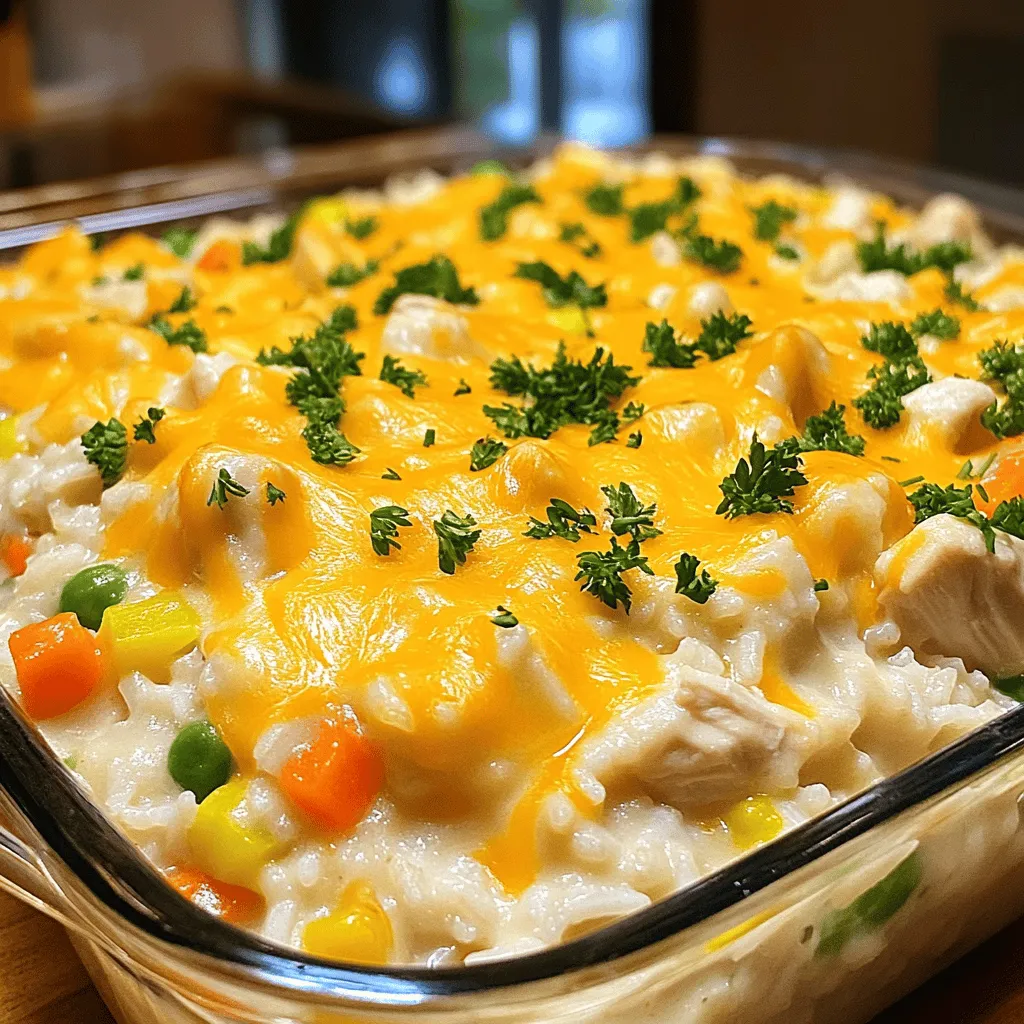
Are you ready for a meal that’s simple, tasty, and sure to please? This Easy Chicken and Rice Casserole is

- Chicken thighs (bone-in, skin-on) - Jerk seasoning options (homemade or store-bought) - Aromatics and vegetables (onion, garlic, ginger, bell pepper) - Oils and seasonings (olive oil, lime juice, salt, and pepper) - Rice and liquids (jasmine rice, coconut milk, chicken broth or water) - Fresh herbs (cilantro or parsley) - Additional toppings (sliced lime) When I make jerk chicken and rice, I love the mix of flavors. The chicken thighs bring a juicy taste, while the jerk seasoning adds a kick. You can use homemade jerk seasoning for a personal touch, or grab some from the store if you’re short on time. Aromatics like onion, garlic, and ginger make the dish pop. They fill your kitchen with wonderful smells while cooking. Diced bell pepper adds sweetness and color, making every bite special. For cooking, I choose olive oil for its rich flavor. Lime juice brightens the dish and balances the spices. Salt and pepper are key to enhancing all the flavors. Jasmine rice is my go-to because it’s fragrant and fluffy. Coconut milk adds creaminess, while chicken broth or water helps the rice cook perfectly. Finally, fresh herbs like cilantro or parsley add a fresh touch. A sliced lime makes a great garnish and adds a zesty kick. For the full recipe, check out the details above. To start, you need to marinate the chicken. Take four chicken thighs and coat them with olive oil and jerk seasoning. Use about two tablespoons of jerk seasoning. Make sure the chicken is well covered. For the best flavor, marinate the chicken for at least one hour. If you can, let it sit overnight. This will deepen the taste. Next, we move to the aromatics. In a large skillet, add a splash of olive oil over medium heat. Once hot, toss in one small chopped onion, two minced garlic cloves, and one teaspoon of grated ginger. Sauté these until fragrant, which takes about three to five minutes. These aromatics are key for building flavor in the dish. Now it's time to cook the chicken. Push the sautéed aromatics to one side of the skillet. Place the marinated chicken thighs in the skillet, skin side down. Sear them for about five minutes on each side until golden brown. Once the chicken is browned, remove it from the skillet. In the same skillet, pour in one can of coconut milk and one cup of chicken broth. Stir this mixture with the aromatics. Add one cup of jasmine rice and one diced bell pepper. Bring it to a simmer before adding the chicken back in on top of the rice. Cover the skillet and reduce the heat to low. Let it simmer for about 20 to 25 minutes. This allows the flavors to meld together. Keep an eye on it and check the chicken for doneness. The chicken should reach an internal temperature of 165°F. The rice should absorb all the liquid. After simmering, take the skillet off the heat. Let it rest for about five minutes. This helps the rice settle. Use a fork to fluff the rice gently. Add a teaspoon of lime juice and season with salt and pepper. For serving, plate the jerk chicken alongside the coconut rice. Garnish with fresh cilantro or parsley for a splash of color. For a nice touch, you can drizzle extra coconut milk around the plate. Enjoy this flavorful comfort food delight with family or friends. To make the jerk chicken burst with flavor, marinating is key. Use olive oil and jerk seasoning to coat the chicken well. Let it sit in the fridge for at least one hour. For the best taste, marinate it overnight. If you want less heat, use mild jerk seasoning or add honey. This will balance the spice. For crispy skin, start by searing the chicken skin-side down. Use medium heat to get it golden brown. Don't rush this step; it takes about five minutes per side. To keep the rice from getting mushy, rinse it first. This removes excess starch. Use a ratio of one cup rice to one and a half cups liquid for perfect results. Pair jerk chicken and rice with fresh sides. A simple green salad or coleslaw adds crunch. For a tropical twist, serve with fried plantains. To drink, try a cold ginger beer or a fruity punch. These beverages complement the spices and add a refreshing touch. For the full recipe, follow the instructions above. {{image_2}} You can swap chicken for other proteins. Tofu, shrimp, or vegetables work well. Tofu absorbs flavors nicely. Shrimp cooks quickly and adds a sweet touch. For veggies, use hearty options like zucchini or bell peppers. The rice type can change too. Jasmine rice is classic, but try brown rice for a nutty taste. Quinoa offers a healthy twist, while basmati brings a fragrant aroma. Spice levels can be changed to fit your taste. If you like it mild, reduce jerk seasoning. For more heat, add extra seasoning or chopped peppers. A dash of hot sauce can also kick it up a notch. Adding tropical fruits can enhance flavor. Pineapple or mango adds sweetness and freshness. You can also use fresh herbs like cilantro or scallions for a burst of taste. You can grill or bake this dish too. Grilling gives a smoky flavor. Just marinate the chicken and cook it on a hot grill. Bake it by placing chicken in a dish with rice and liquids. Cover and bake at 375°F until cooked through. For convenience, use an Instant Pot or slow cooker. In an Instant Pot, cook the marinated chicken with rice and liquids for about 10-15 minutes. In a slow cooker, let it simmer for 4-6 hours. Both methods yield tender chicken and flavorful rice. For the Full Recipe, follow the detailed steps to make this dish. To keep jerk chicken and rice fresh, store them in airtight containers. Make sure to cool the food down first. This helps keep the flavors intact. For best results, use glass or plastic containers. Label them with the date to track freshness. Place them in the fridge within two hours of cooking. They will stay good for up to four days. When reheating, I recommend using the stove or microwave. For the stove, add a splash of chicken broth to a pan. Heat over medium-low, stirring gently to keep it moist. In the microwave, cover the dish with a damp paper towel. This helps trap steam and prevents drying out. Heat in short bursts, stirring in between. Check the temperature to ensure it's hot throughout. Freezing jerk chicken and rice is a great way to save leftovers. First, cool the dish completely. Then, portion it into freezer-safe bags or containers. Squeeze out excess air before sealing. This helps prevent freezer burn. You can freeze the dish for up to three months. To thaw, place it in the fridge overnight. Reheat it following the methods above for the best taste. Jerk chicken comes from Jamaica. It is famous for its spicy and smoky flavor. The dish uses a mix of spices called jerk seasoning. Traditionally, cooks marinate chicken with this blend. Then they grill or smoke the chicken over pimento wood. This method gives jerk chicken its unique taste. It is a dish full of vibrant flavors and history. Yes, you can make jerk chicken and rice ahead of time. Marinate the chicken the night before for best results. Store the marinated chicken in the fridge. You can also cook the dish and keep it in the fridge. Just make sure to let it cool first. When you want to eat, reheat it gently on the stove or in the oven. You can serve many sides with jerk chicken and rice. Here are some great options: - Grilled vegetables - Coleslaw - Fried plantains - Cornbread - Salad with lime dressing These sides balance the spice and add freshness. Jerk chicken lasts about 3 to 4 days in the fridge. Make sure to store it in an airtight container. Always check for any off smells or colors before eating. If you want to keep it longer, consider freezing it. Yes, you can use brown rice if you prefer. Brown rice adds more fiber and a nutty flavor. Just remember that brown rice takes longer to cook. You might need to adjust the cooking time and liquid used. Follow the package instructions for best results. Jerk chicken can be spicy, but you can adjust it. The heat level depends on the jerk seasoning you use. If you like less heat, use less seasoning or a milder blend. You can also add dairy, like yogurt, to cool it down. Taste as you go to find your perfect spice level. In this blog post, we broke down how to make delicious jerk chicken with rice. We covered essential ingredients, cooking methods, and helpful tips. You learned how to marinate chicken, sauté aromatics, and combine flavors effectively. Remember to customize the dish to suit your taste. Whether you grill it or use an Instant Pot, there's room for creativity. Follow these steps for a tasty meal you'll love. Enjoying this dish is easier than you think, and each bite is worth the effort.

Jerk Chicken and Rice Flavorful Comfort Food Delight

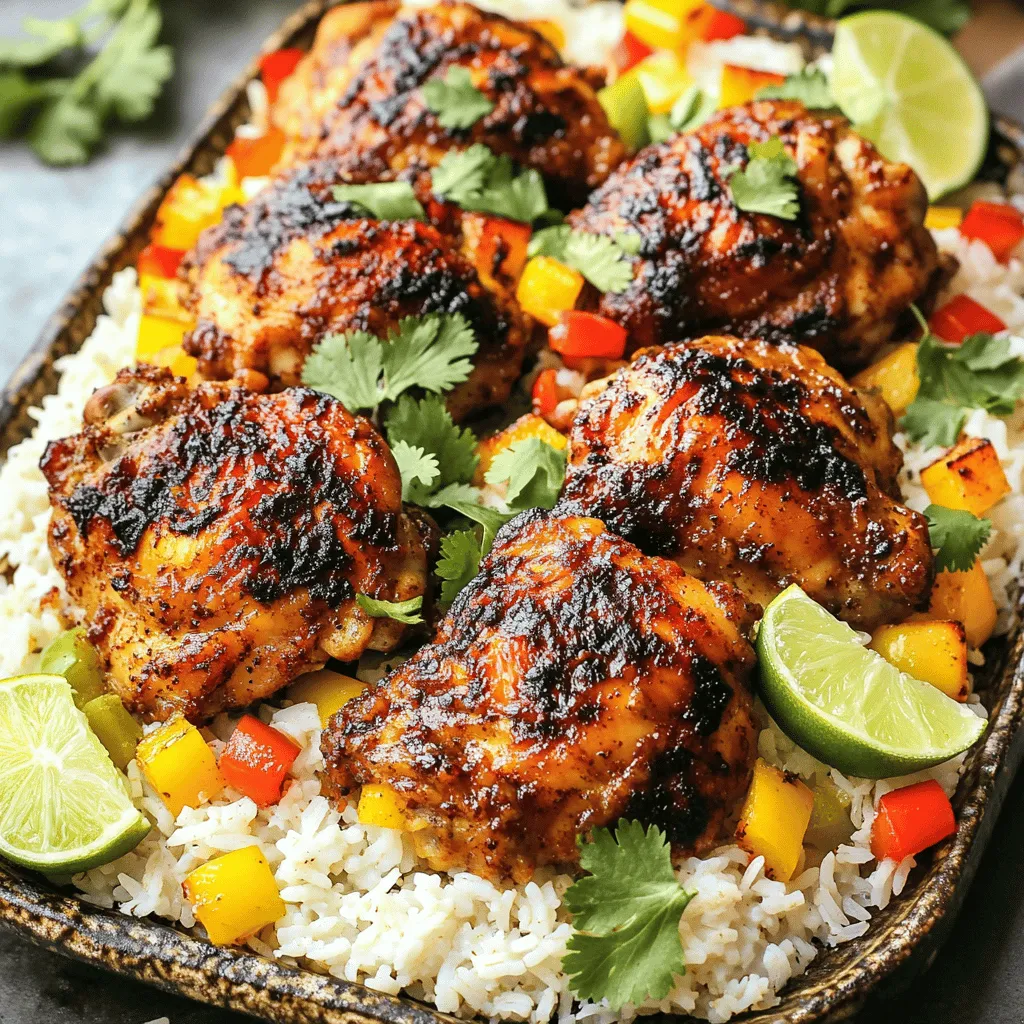
Welcome to the world of Jerk Chicken and Rice, a dish that’s pure comfort food! This recipe brings bold flavors

- 2 ripe avocados, diced - 1 cup fresh corn kernels (from about 2 ears of corn) - 1 small red onion, finely chopped - 1 tomato, diced - 1 jalapeño, minced (optional for heat) - 1/4 cup fresh cilantro, chopped - 2 tablespoons lime juice - Salt and pepper to taste When making avocado corn salsa, fresh ingredients are key. Ripe avocados give a creamy texture, while fresh corn adds crunch. You can choose sweet corn from the market or your garden. The red onion provides a nice bite, and a juicy tomato brings moisture and flavor. If you like some heat, add a minced jalapeño. This step is optional but fun! Fresh cilantro brightens the dish. Lime juice not only keeps the avocados green but also adds a zing. Finally, salt and pepper bring all the flavors together. - Mixing bowl - Knife and cutting board - Spatula Having the right tools makes cooking easier. A mixing bowl is great for combining all the ingredients. A sharp knife helps you chop the veggies quickly and safely. A spatula is perfect for gently mixing the salsa without mashing the avocados. For the complete process, you can refer to the Full Recipe. Enjoy every bite of this fresh and colorful salsa! How to boil corn on the cob To start, fill a large pot with water and add salt. Bring the water to a boil. Once boiling, add the corn on the cob. Boil for 3 to 5 minutes. The corn should be tender. After boiling, remove the corn from the water and let it cool. When cool, cut the kernels off the cob. Place the kernels in a large mixing bowl. Dicing avocados, tomatoes, and onions Next, take two ripe avocados. Cut them in half and remove the pit. Scoop out the flesh and dice it into small pieces. Then, take one tomato and dice it. Chop one small red onion finely. Add all these diced ingredients to the bowl with the corn. Incorporating ingredients into the mixing bowl Finally, add one minced jalapeño (optional for heat) and 1/4 cup of chopped fresh cilantro to the mixing bowl. This mix of ingredients creates a colorful and fresh base for your salsa. Adding lime juice for freshness Now, it's time to add flavor. Drizzle 2 tablespoons of fresh lime juice over the mixture. This adds a zesty taste and keeps the avocados from turning brown. Tossing the salsa gently without mashing Using a spatula, gently toss the ingredients together. Be careful not to mash the avocados. You want to keep their shape for a nice texture. Seasoning with salt and pepper Next, season your salsa with salt and pepper to taste. Start with a pinch of each and adjust as needed. The right seasoning brings all the flavors together. Letting the flavors meld Lastly, let the salsa sit for about 15 minutes. This resting time allows the flavors to blend and develop. Then your Avocado Corn Salsa is ready to enjoy! For the complete recipe, check the [Full Recipe]. To make great avocado corn salsa, start with ripe avocados. A ripe avocado feels slightly soft when you press it gently. The skin should be dark green or nearly black. If it is too hard, it is not ready. If it is too mushy, it is overripe. Store avocados at room temperature until they ripen. Once ripe, keep them in the fridge to slow down the process. Lime juice is key to brightening your salsa. Start with two tablespoons, but feel free to adjust based on your taste. If you love citrus, add more lime juice for a tangy kick. You can also add spices to boost flavors. A pinch of cumin or chili powder can add depth and warmth. Experiment with these spices to find your favorite mix. Fresh corn brings sweetness to the salsa. You can boil it, grill it, or microwave it. Boiling takes about 3-5 minutes. Just make sure it stays crunchy. Grilling adds a smoky flavor, while microwaving is quick and easy. No matter how you cook it, aim for that perfect crunch. Enjoy the fresh taste of summer in every bite. {{image_2}} You can change the heat in your avocado corn salsa. If jalapeño isn’t for you, try bell peppers. They add crunch without the spice. For a bit of heat, use serrano peppers. They pack more punch! Adding fruits can take this salsa to new heights. Mango brings a sweet note. Pineapple adds zest and brightness. Both make the salsa fresh and fun. Mix in small pieces for a delightful twist. This salsa shines with tortilla chips. The crisp chips complement the creamy avocados. It’s a perfect snack for parties or game day. You can also use this salsa as a topping. It pairs well with grilled meats. Try it on chicken, fish, or tacos. The fresh flavors elevate any meal. Avocado corn salsa is naturally vegan and gluten-free. This makes it great for many diets. You can serve it confidently at gatherings. If you want a protein boost, add beans. Black beans or chickpeas work well. They make the dish hearty and filling. It's a great way to enjoy a balanced meal. To keep your Avocado Corn Salsa fresh, store it in an airtight container in the fridge. This keeps flavors bright and prevents spills. To stop avocados from browning, add lime juice right before storage. The acid in lime juice slows down browning. You can also place plastic wrap directly on the surface of the salsa. This reduces air contact. Avocado Corn Salsa lasts about 2-3 days in the fridge. After that, it may lose its taste and texture. Look for signs of spoilage like a sour smell or changes in color. If it turns dark brown or mushy, it's time to toss it. You can freeze Avocado Corn Salsa, but the texture may change. If you want to freeze it, use a freezer-safe container. Leave some space at the top for expansion. To thaw, place the container in the fridge overnight. This keeps the salsa cool and helps maintain its flavor. Once thawed, stir well before serving. Avocado Corn Salsa is a fresh and vibrant mix of avocados and sweet corn. This salsa often includes diced tomatoes, onions, and cilantro. It’s great as a dip with tortilla chips or a topping for tacos and grilled meats. The balance of creamy avocados and crunchy corn makes it a crowd-pleaser. To add spice, you can include minced jalapeños or other hot peppers. Start with a small amount and taste as you go. You can also sprinkle in cayenne pepper or a dash of hot sauce for more heat. Adjust these ingredients to fit your taste. Yes, you can prepare this salsa ahead of time. To keep the avocados fresh, add lime juice right before serving. If you make it early, store it in an airtight container in the fridge. This helps keep the flavors fresh, but it’s best eaten within a day. You can customize Avocado Corn Salsa in many ways. Try adding diced mango or pineapple for a sweet twist. Black beans or chickpeas can give you extra protein. Fresh herbs like mint or basil can also add unique flavors. Mix and match to find your favorite combination! For the full recipe, check out the [Full Recipe]. In this post, we explored how to make Avocado Corn Salsa. We covered the fresh ingredients needed, useful kitchen tools, and step-by-step preparation. You learned tips for selecting ripe avocados and enhancing flavors, along with variations and serving ideas. In closing, this salsa is not just simple. It’s fun to make and delicious to eat. Try it with your favorite dishes or as a snack. Enjoy experimenting with your own unique twists!

Avocado Corn Salsa Fresh and Flavorful Delight

Get ready to dive into a bowl of pure freshness with my Avocado Corn Salsa. This vibrant mix of ripe

To make the Grilled Peach Chicken Salad, you will need: - 2 boneless chicken breasts - 2 ripe peaches, halved and pitted - 4 cups mixed greens (arugula, spinach, and romaine) - 1/4 cup crumbled feta cheese - 1/4 cup walnuts, toasted - 2 tablespoons olive oil - 2 tablespoons balsamic vinegar - 1 tablespoon honey - Salt and pepper to taste - Fresh mint leaves for garnish (optional) This salad is not just tasty; it's also good for you. Here are some key nutrients: - Chicken: High in protein, helps build muscle. - Peaches: Full of vitamins A and C, good for skin health. - Mixed Greens: Low in calories, high in fiber for digestion. - Feta Cheese: Adds calcium and protein, while being lower in fat than other cheeses. - Walnuts: Packed with omega-3 fatty acids, good for heart health. When picking peaches, look for these signs: - Color: Choose peaches that are golden and have a slight blush. - Feel: They should be slightly soft but not mushy. - Smell: A sweet fragrance means they are ripe. For chicken, consider the following: - Freshness: Look for chicken that is pink, moist, and has no odor. - Body: Choose breasts that feel firm and heavy. - Source: Organic or free-range options often have better flavor and texture. When you use fresh, high-quality ingredients, your salad will shine. For the complete steps to make this delightful dish, check the Full Recipe. To make grilled peach chicken salad, you need to gather all your ingredients. This salad is fresh and satisfying. You will enjoy the mix of sweet and savory flavors. First, wash your mixed greens. Halve and pit the peaches, then set them aside. Season the chicken breasts with salt, pepper, and olive oil. This adds great taste. Let the chicken marinate while you prepare the grill. Grilling chicken is simple if you follow a few steps. First, preheat the grill to medium-high heat. Clean the grates to avoid sticking. Place the chicken on the grill and cook it for 6-7 minutes on each side. Use a meat thermometer to check the internal temperature. It should reach 165°F (75°C). After grilling, let the chicken rest. This keeps it juicy and tender. Slice it into strips for your salad. Grilling peaches brings out their natural sweetness. Start by placing the peach halves cut-side down on the grill. Grill them for about 3-5 minutes. You want nice grill marks and a little softness. Remove them from the heat and let them cool. Then, slice them into wedges. Grilled peaches add a delicious twist to your salad. Their sweet flavor pairs perfectly with the savory chicken. You can find the Full Recipe to get all the details you need. Enjoy your cooking! To make your grilled peach chicken salad shine, use fresh ingredients. Choose ripe peaches for that sweet touch. You can add a squeeze of lemon juice for a zesty kick. Fresh herbs, like basil or mint, boost the flavor too. Try adding a sprinkle of smoked paprika for a unique twist. If you like it spicy, a pinch of red pepper flakes will do wonders. One big mistake is overcooking the chicken. Keep an eye on the grill. Remove the chicken when it reaches 165°F. Overcooked chicken can become dry and tough. Avoid using unripe peaches; they won’t grill well. Another mistake is not letting the chicken rest. Let it rest for a few minutes before slicing. This helps the juices stay in the meat. Also, toss the salad gently to keep the greens crisp. If you have leftover salad, store it in an airtight container. Keep the dressing separate to avoid soggy greens. The salad stays fresh for up to two days in the fridge. When ready to eat, add the dressing just before serving. If you want to enjoy it later, consider using grilled chicken cold in a wrap. This makes a quick meal with great flavor. For the full recipe, be sure to check out the details above. {{image_2}} You can switch out peaches for other fruits. Grilled nectarines add a sweet touch. Plums can also bring a nice tartness. Try using watermelon for a refreshing crunch. Berries, like strawberries or blueberries, can add color and flavor too. Chicken is great, but other proteins work well too. Shrimp gives a nice seafood twist. Grilled tofu is perfect for a plant-based choice. You can also use steak for a heartier salad. Each protein adds its own unique flavor to the dish. While balsamic dressing is tasty, other options can shine too. A lemon vinaigrette can brighten the salad. Try a yogurt-based dressing for creaminess. A honey mustard mix adds a sweet and tangy kick. Each dressing can change the whole vibe of your salad. Grilled peach chicken salad pairs well with light foods. Consider serving it with crusty bread or soft rolls. A chilled glass of white wine complements the sweetness of the peaches. You can also try sparkling water with a splash of lime for a refreshing drink. Fresh fruit on the side adds to the bright flavors. For special occasions, make your salad shine. Use a large, colorful bowl to hold the salad. Layer the ingredients for a stunning look. Place sliced peaches on top, and sprinkle feta cheese and walnuts for contrast. Garnish with fresh mint leaves for a touch of elegance. If you have extra time, serve the salad on individual plates for a fancy feel. To keep leftovers fresh, store them in an airtight container. Keep the dressing separate to avoid soggy greens. When ready to eat, toss the salad again for a fresh taste. You can also wrap the salad in a tortilla for a tasty lunch. If you want, add more grilled peaches or nuts to boost the flavor. For full instructions, check the Full Recipe. Yes, you can make this salad ahead. Cook the chicken and peaches, then chill them. Keep the salad greens separate to stay fresh. Mix it all when ready to eat for best taste. If you want a different cheese, try goat cheese or blue cheese. Both add great flavor. You can also use a dairy-free cheese if you prefer. Just pick one that you enjoy! To keep the chicken juicy, brine it in salt water for a few hours. This helps it stay moist. Also, do not overcook it. Use a meat thermometer to check that it reaches 165°F (75°C). You can find the Full Recipe for the Grilled Peach Chicken Salad in this article. Just scroll up to see all the steps and ingredients you need! This blog post explored how to create a delicious grilled peach chicken salad. We talked about choosing the right ingredients, from peaches to chicken. You learned the best grilling methods and how to enhance flavors. We also shared tips on avoiding common mistakes and ideas for serving. In conclusion, with these steps and tips, you can make a tasty salad that impresses. Enjoying fresh ingredients leads to good flavor. Have fun experimenting with your own twists!

Grilled Peach Chicken Salad Fresh and Flavorful Recipe

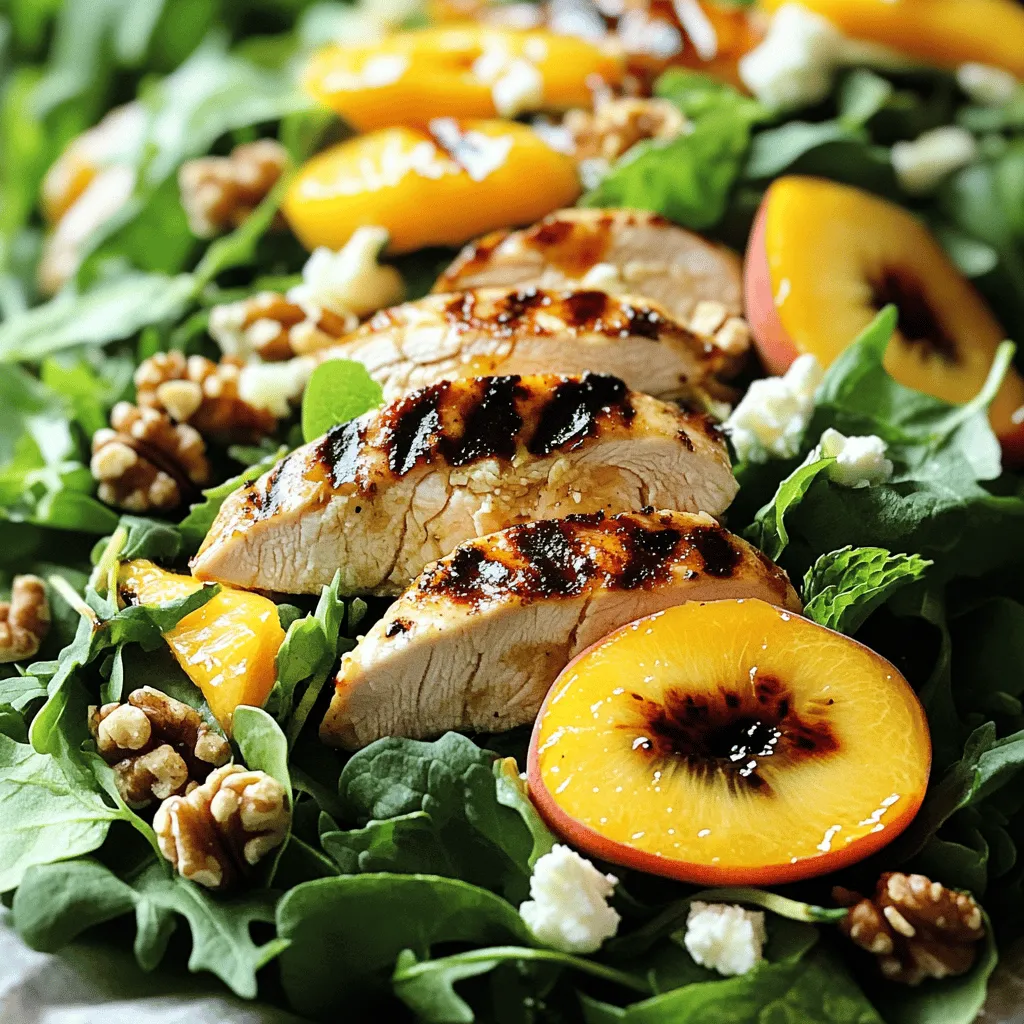
Looking for a fresh and tasty dish that’s perfect for summer? Let’s dive into this Grilled Peach Chicken Salad! I’ll

- 1 cup quinoa, rinsed - 2 cups vegetable broth - 1 cup chickpeas, cooked (or canned) - 1 cup sweet potato, diced - 1 cup kale, chopped - 1 avocado, sliced - 1/2 cup cherry tomatoes, halved - 1/4 cup red onion, thinly sliced - 2 tablespoons tahini - 1 tablespoon lemon juice - 1 tablespoon olive oil - 1 teaspoon garlic powder - Salt and pepper to taste - Fresh cilantro or parsley for garnish You need a mix of fresh and wholesome ingredients for a Vegan Power Bowl. Start with quinoa, which is a great base. Quinoa is not only tasty but also packed with protein. Next, vegetable broth adds flavor while cooking the quinoa. For protein, chickpeas are perfect. They provide a creamy texture and fill you up. Sweet potatoes add natural sweetness and nutrients. Kale gives crunch and a lot of vitamins. Avocado adds healthy fats and a smooth texture. Cherry tomatoes and red onion give color and zest. For the dressing, tahini, lemon juice, and olive oil blend together well, creating a rich taste. - Calories per serving: About 450 - Macronutrient breakdown: - Protein: 15g - Carbohydrates: 60g - Fats: 18g This bowl is nutrient-rich. It has key vitamins like A, C, and K. Plus, it supplies minerals like iron and magnesium. Eating this bowl provides energy and keeps you satisfied. Each bite is not just tasty but also good for your body. You can find the full recipe here for more details. To cook quinoa, start by combining one cup of rinsed quinoa with two cups of vegetable broth in a medium saucepan. This broth adds flavor. Bring the mixture to a boil over medium heat. Once boiling, reduce the heat to low, cover the pan, and let it simmer for about 15 minutes. After that, check if all the liquid has absorbed. If so, remove the pan from heat and fluff the quinoa with a fork. For the sweet potatoes, preheat your oven to 400°F (200°C). Begin by dicing one cup of sweet potatoes into small cubes. Toss them with olive oil, garlic powder, salt, and pepper in a bowl. Spread the seasoned cubes on a baking sheet in a single layer. Roast them for 25 to 30 minutes. Flip them halfway through cooking to ensure they cook evenly and become golden. Grab your skillet and heat a little olive oil over medium heat. Add one cup of chopped kale to the skillet. Sauté the kale for about 5 minutes until it wilts. Make sure to stir it often. Season with salt and pepper to taste. This quick cooking method keeps the kale bright and fresh. To make the tahini dressing, gather your ingredients. You need two tablespoons of tahini, one tablespoon of lemon juice, a pinch of salt, and a pinch of pepper. In a small bowl, whisk these together. Add a few tablespoons of water to achieve your desired consistency. If it's too thick, add more water. Now it's time to build your Vegan Power Bowl. Start with a base of quinoa in a large bowl. Layer on the roasted sweet potatoes, sautéed kale, and one cup of cooked chickpeas. Next, add sliced avocado, halved cherry tomatoes, and thinly sliced red onion on top. This creates a colorful and balanced meal. Drizzle the tahini dressing generously over the top of your assembled bowl. For the finishing touch, garnish with fresh cilantro or parsley. Serve your bowl immediately for the best flavor and texture. Enjoy your nutrient-packed Vegan Power Bowl! For the complete recipe, check out the Full Recipe section. To cook quinoa with the best texture, rinse it first. Rinsing removes the bitter coating. Use two cups of vegetable broth for one cup of quinoa. This will give it great flavor. Bring the broth to a boil, then reduce heat to low. Cover and simmer for 15 minutes. When done, fluff it with a fork for a light, fluffy texture. For even roasting, cut sweet potatoes into uniform pieces. Toss them with olive oil, garlic powder, salt, and pepper. Spread them on a baking sheet in a single layer. Roast at 400°F (200°C) for 25-30 minutes. Flip them halfway through for even cooking. This ensures they get crispy on the outside and tender inside. Meal prep can save you time. Cook a large batch of quinoa and store it in the fridge. It keeps well for up to five days. Roast sweet potatoes and store them in a separate container. You can also chop kale and other veggies in advance. This way, you can mix and match for quick meals. Store components separately to keep them fresh. This helps prevent sogginess. Keep your tahini dressing in a small jar. It can last in the fridge for up to a week. Assemble your Vegan Power Bowl when you're ready to eat. You can switch up your protein sources. Tempeh or tofu are great choices. They absorb flavors well and add texture. You can also try beans like black beans or lentils for variety. For vegetables, use what’s in season. In spring, add asparagus or peas. In summer, try bell peppers or zucchini. In fall, roasted Brussels sprouts or carrots work well. Winter calls for hearty greens like collards or Swiss chard. This keeps your bowl fresh and exciting! For the complete recipe, check the Full Recipe section. {{image_2}} You can change the Vegan Power Bowl with fun flavors from around the world. Mediterranean-inspired ingredients: - Use couscous instead of quinoa for a softer base. - Add olives, sun-dried tomatoes, and artichoke hearts for a briny kick. - Replace kale with spinach or arugula for a fresh twist. Asian-inspired variations: - Swap quinoa for brown rice or soba noodles. - Add edamame, bell peppers, and shredded carrots for crunch. - Use a sesame dressing made with tahini, soy sauce, and ginger. Each season brings unique vegetables. Embrace these changes for fresh flavors. Best ingredients for spring, summer, fall, and winter: - Spring: Peas and asparagus brighten your bowl. - Summer: Add corn and zucchini for a sweet touch. - Fall: Include roasted pumpkin and brussels sprouts for warmth. - Winter: Use hearty root veggies like parsnips and turnips. Creative uses for leftovers: - Mix leftover quinoa into soups for added texture. - Blend extra veggies into a smoothie for a nutrient boost. Dressings can change the whole taste of your bowl. Experiment with different options. Different dressing ideas for flavor variety: - Make a peanut sauce with peanut butter, lime, and soy sauce. - Try a citrus vinaigrette with orange juice and olive oil. - Blend avocado with lime juice for a creamy option. Using homemade versus store-bought options: - Homemade dressings often taste fresher and can be healthier. - Store-bought dressings save time but check for added sugars. For the full recipe, check out the details above. Enjoy mixing flavors! To keep your Vegan Power Bowl fresh, use airtight containers. Glass or BPA-free plastic works well. Always cool the bowl to room temperature before sealing it. This helps prevent moisture buildup, which can lead to sogginess. Store your leftovers in the fridge. They should stay good for up to four days. Yes, you can freeze your Vegan Power Bowl! Freezing keeps it fresh for up to three months. Here’s how to do it: 1. First, let the bowl cool completely. 2. Next, separate the ingredients. Freeze quinoa, sweet potatoes, and kale in different bags. 3. Label each bag with the date. 4. Use a vacuum sealer or remove as much air as possible from the bags. To reheat your Vegan Power Bowl, you can use a microwave or an oven. For the microwave: - Place the bowl in a microwave-safe dish. - Heat for 1-2 minutes, stirring halfway through. For the oven: - Preheat to 350°F (175°C). - Place the bowl in an oven-safe dish, cover with foil, and heat for about 15-20 minutes. To avoid sogginess, do not add extra liquid when reheating. If needed, you can add a little fresh dressing after reheating to restore flavor. You can use rice or couscous instead of quinoa. Both grains add great texture. Rice gives a nice chew, while couscous cooks faster. Make sure to adjust the cooking time. For brown rice, you need more time than for white rice. Couscous cooks in just 5 minutes. Yes, you can use frozen vegetables. They are quick and easy. Frozen veggies are often frozen at peak freshness. This keeps nutrients in. Just make sure to thaw them before cooking. If using frozen, reduce cooking time slightly. This helps to avoid mushy veggies. Yes, this recipe can be gluten-free. Quinoa is naturally gluten-free. If you choose rice or other gluten-free grains, you will stay gluten-free. Always check labels for any hidden gluten in packaged ingredients. To add more protein, include edamame, nuts, or seeds. Edamame is a great choice and easy to add. You can also sprinkle almonds or pumpkin seeds on top. These add crunch and nutrients to your bowl. To lower calories, use less oil in the dressing. You can also reduce the portion size of grains or toppings. Instead of one avocado, use half. Bulk up with more veggies like spinach or zucchini. These add volume without many calories. This Vegan Power Bowl offers nutritious and tasty ingredients. From quinoa to sweet potatoes, each element adds value. You learned how to cook and assemble it perfectly. Remember, you can customize it for your taste or season. Enjoy this meal fresh or as leftovers. Follow the tips for storing and reheating. With this guide, you can create a bowl that fits your needs. Power up your meals with this simple, healthy recipe.

Vegan Power Bowl Energizing and Nutritious Meal

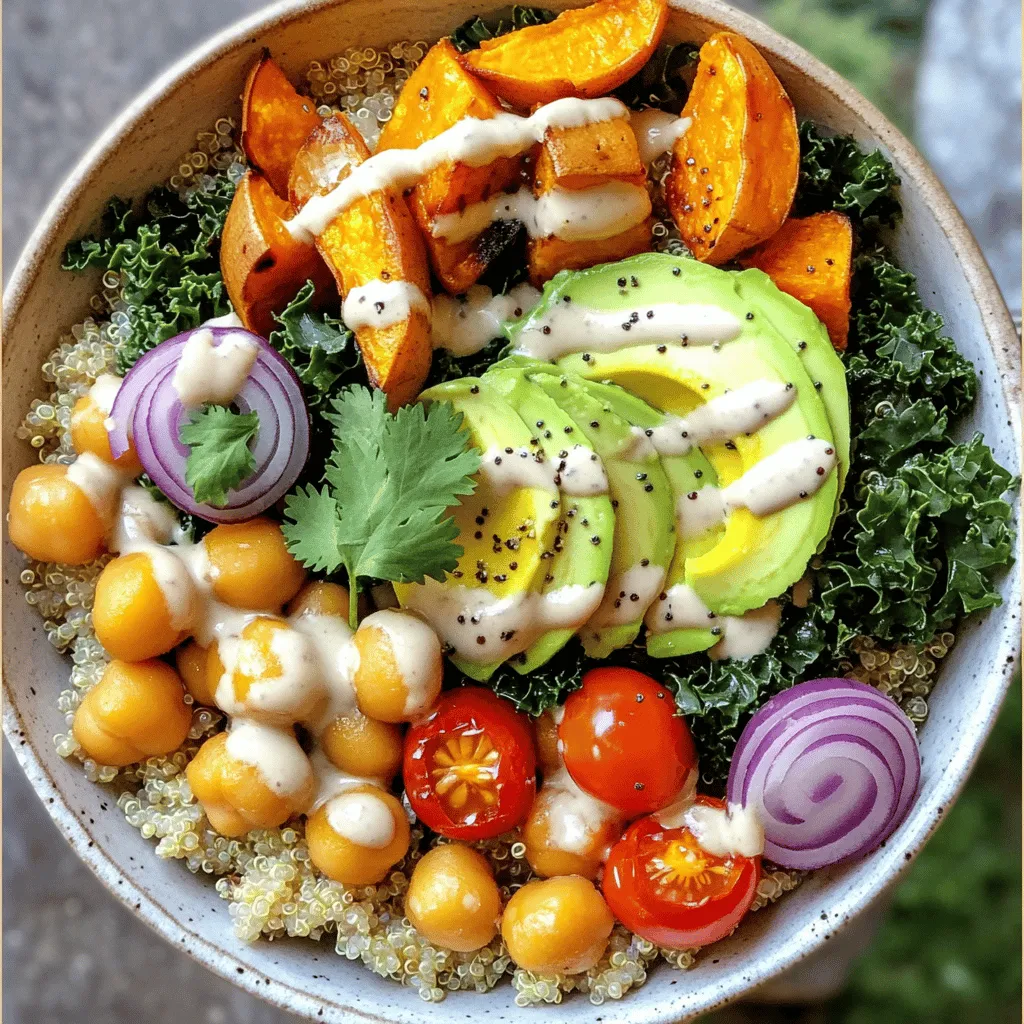
Looking for a delicious, energizing meal? The Vegan Power Bowl is your answer! Packed with protein-rich quinoa, fiber-filled chickpeas, and

For a tasty batch of crispy baked falafel, you need simple, fresh ingredients. Here’s what you will need: - 1 can (15 oz) chickpeas, drained and rinsed - 1 small onion, roughly chopped - 3 cloves garlic, minced - 1 cup fresh parsley, chopped - 1 teaspoon ground cumin - 1 teaspoon ground coriander - 1 teaspoon baking powder - ½ teaspoon salt - ¼ teaspoon black pepper - 3 tablespoons olive oil (plus more for drizzling) - 2 tablespoons flour (all-purpose or gluten-free) - Juice of 1 lemon Freshness matters. Using fresh herbs and high-quality spices makes a big difference. I always recommend checking the dates on your spices. Old spices lose flavor. Fresh ingredients give your falafel a vibrant taste. For the best falafel, look for chickpeas that are firm and whole. Canned chickpeas work well, but dried ones are even better if you soak them overnight. Fresh garlic adds a punch, and using fresh parsley gives a nice green color. Remember, quality counts! Using fresh and good ingredients will make your falafel stand out. For the complete recipe, you can find it in the Full Recipe section. Preparation Process 1. Preheat the oven and prepare baking sheet. Set your oven to 400°F (200°C). Line a baking sheet with parchment paper. This makes cleanup easy and helps the falafel crisp up. 2. Combining ingredients using a food processor. In a food processor, add the chickpeas, onion, garlic, parsley, cumin, coriander, baking powder, salt, and black pepper. Blend until the mix is smooth but still has some texture. 3. Shaping the falafel mixture. Transfer the mixture to a bowl. Use your hands to form small patties or balls, about 1.5 inches wide. This size helps them cook evenly. Baking Instructions 1. Drizzling oil and positioning falafel on the baking sheet. Place the shaped falafel on the prepared sheet. Lightly drizzle or spray the tops with olive oil. This gives them a nice golden color. 2. Optimal baking time and turning method. Bake the falafel for 20-25 minutes. Make sure to turn them halfway through. This ensures both sides get crispy and brown. Serving Suggestions 1. Cooling time before serving. Once they are done, take the falafel from the oven. Let them cool for a few minutes. This helps them firm up a bit more. 2. Presentation tips and garnishing options. Serve your crispy baked falafel on a nice platter. Garnish with chopped parsley and lemon wedges. Pair with tahini sauce or tzatziki for dipping. You can also add a fresh salad or pita bread for a full meal. For the complete recipe, check out the Full Recipe! To make crispy baked falafel, start by patting the chickpeas dry. Removing excess moisture helps them crisp up nicely. I often drain and rinse them well. After that, use just the right amount of oil. If you want extra crunch, drizzle a bit more oil on top before baking. A common mistake is over-processing the mixture. This can turn the falafel too mushy. You want a fine blend, but still some texture. On the other hand, under-processing can leave big chunks. These pieces will not hold together when baking. Another issue is soggy falafel. Make sure to shape them well and place them on the baking sheet without crowding. You can boost the flavor of your falafel by adding herbs and spices. Try fresh mint, dill, or even a bit of chili powder for heat. When serving, consider sauces like tahini or tzatziki. These sauces complement the falafel's taste perfectly and add a fresh twist. For a full experience, serve them with a side of salad or pita bread. For the full recipe, check the section above. {{image_2}} To make gluten-free falafel, swap regular flour for alternatives like chickpea flour or almond flour. These options keep the falafel tasty and allow everyone to enjoy them. Just use the same amount of the gluten-free flour as the recipe calls for. The texture may change a bit, but they will still be delicious. You can add different herbs or spices to boost the flavor. Try mint or dill for a fresh taste. You can also mix in vegetables like spinach or sweet potatoes. This not only makes your falafel unique but also adds nutrition. Just chop them finely before mixing them into the chickpea blend. Pairing your crispy baked falafel with a good sauce is key. A homemade tahini sauce is easy to make and adds creaminess. For a tangy option, yogurt or tzatziki sauce works great. Both sauces enhance the taste and make your snack even more enjoyable. For the full recipe, check out the detailed instructions above. To keep your crispy baked falafel fresh, place leftovers in an airtight container. Store them in the fridge for up to four days. Make sure to let them cool down before sealing the container. This prevents moisture buildup, which can make your falafel soggy. If you want to save falafel for later, freezing works great. First, let the falafel cool completely. Then, arrange them in a single layer on a baking sheet. Freeze them for about an hour until solid. After that, transfer the falafel to a freezer bag. Squeeze out as much air as possible before sealing. To reheat, bake them directly from frozen. Set your oven to 400°F (200°C) and bake for about 15-20 minutes. When stored properly, baked falafel lasts about four days in the fridge. In the freezer, they stay good for up to three months. Always check for any signs of spoilage before eating. Enjoy your crispy baked falafel whenever you like! For the full recipe, check the [Full Recipe]. You can tell falafel is ready by its color and texture. Look for a golden brown hue on the outside. It should feel firm but soft inside. You can also poke it gently with a fork. If it holds its shape, it’s done. Bake for 20-25 minutes, turning halfway for even cooking. This ensures a crispy outside and a tender inside. Yes, you can prep falafel in advance. Make the mixture a day before and store it in the fridge. Shape them into balls or patties but do not bake yet. When ready to cook, just place them on a baking sheet and bake. This method keeps the flavors fresh and makes cooking easy. If your falafel is crumbly, it may be too dry. This happens if you over-process the chickpeas. Make sure to mix until just combined. You can also add a bit more flour to help bind the mixture. If you added too much water or oil, the falafel might fall apart as well. Adjust the mixture until it holds together nicely. In this blog post, we explored how to make falafel. We covered key ingredients like chickpeas, spices, and fresh herbs. I shared steps for preparing, baking, and serving your falafel. You learned tips for crispiness and avoiding mistakes. We even discussed variations, storage, and answered common questions. Falafel is adaptable and fun to make. It can fit any diet. Use these guidelines to create your perfect falafel today. Enjoy your tasty and healthy treat!

Crispy Baked Falafel Healthy and Flavorful Snack

If you’re craving a healthy treat that’s bursting with flavor, look no further than crispy baked falafel! This snack is

- 4 salmon fillets (about 6 oz each) - 2 tablespoons olive oil - 2 tablespoons fresh lemon juice - 2 teaspoons lemon zest - 3 tablespoons fresh dill, chopped (or 1 tablespoon dried dill) - 2 cloves garlic, minced - Salt and black pepper to taste - Lemon slices for garnish - Fresh dill sprigs for garnish For this lemon dill roasted salmon, each ingredient plays a key role. The salmon fillets are the star of the dish, providing a rich, buttery flavor. I love using fresh salmon for the best taste. Olive oil adds healthy fat and helps to crisp the fish. Fresh lemon juice and zest brighten the dish. They give a fresh, zesty kick that complements the rich salmon. Dill brings a unique, grassy flavor that pairs perfectly with lemon and fish. Garlic adds depth and warmth, making each bite more satisfying. Salt and black pepper enhance all the flavors. They help balance the rich salmon and bright lemon. Garnishing with lemon slices and fresh dill sprigs makes the dish look stunning. It adds a pop of color and fresh aroma. This simple yet flavorful meal impresses everyone at the table. You can find the Full Recipe to guide you through the cooking process. Start by mixing your marinade. In a small bowl, whisk together: - 2 tablespoons olive oil - 2 tablespoons fresh lemon juice - 2 teaspoons lemon zest - 3 tablespoons fresh dill, chopped (or 1 tablespoon dried dill) - 2 cloves garlic, minced - Salt and black pepper to taste This mix brings bright flavors to your salmon. The lemon and dill work well together. Garlic gives it a nice kick. Make sure to whisk until it combines well. Next, you need to prep the salmon. Line a baking sheet with parchment paper. This helps with cleanup later. Place 4 salmon fillets on the sheet, skin side down. Arrange them so they have space. You want them to roast evenly. Now it’s time to cook. Brush the lemon dill mixture over the salmon fillets. Make sure each piece is well coated. Let the salmon marinate for about 10-15 minutes. This step helps the flavors soak in. Preheat your oven to 400°F (200°C) while the salmon marinates. When ready, roast the salmon for 12-15 minutes. Check if it flakes easily with a fork. This means it’s done. The salmon should also have a golden crust. After cooking, remove it from the oven. Let it rest for 2 minutes before serving. Garnish with lemon slices and fresh dill sprigs for a lovely touch. For the full recipe, you can refer to the earlier sections. To know when salmon is done, look for the color change. Fresh salmon turns from bright pink to a lighter shade. Check with a fork; it should flake easily. If it does, your salmon is perfect. Cooking time varies. Usually, it takes 12 to 15 minutes at 400°F. Use a meat thermometer for more accuracy. Aim for an internal temperature of 145°F for safety. Want to boost the flavor? Try adding fresh herbs like parsley or chives. You can also experiment with spices like paprika or cumin. A little red pepper flake adds a nice kick. If you like sweetness, try honey or maple syrup in the marinade. These tweaks can make your dish unique and exciting. Plating your salmon well makes it more appealing. Use a clean, white plate to let the colors pop. Place the salmon fillet in the center. Add lemon slices and fresh dill sprigs on top. You can also serve it with a side of colorful veggies for a vibrant look. Drizzle a bit of olive oil around the plate for extra flair. This makes your Lemon Dill Roasted Salmon a feast for the eyes! {{image_2}} You can change up the flavor of your lemon dill roasted salmon. Try using fresh parsley or thyme instead of dill. A bit of rosemary adds a nice twist, too. For a spicy kick, sprinkle some red pepper flakes on top. If you want a smoky flavor, add smoked paprika. Each herb or spice gives the dish a new taste. Mixing flavors keeps your meals exciting. You can cook salmon in different ways. Baking is a simple and common method. It keeps the fish moist and tender. Just follow the Full Recipe for oven steps. Grilling is another fun way to prepare salmon. It adds a nice char and smoky flavor. Brush the fish with oil and place it on a preheated grill. Cook until it flakes easily. Both methods yield delicious results, so pick your favorite. Pair your salmon with healthy sides. Roasted vegetables like asparagus or broccoli work great. A fresh green salad adds crunch and color. You can also serve it with quinoa or brown rice for a hearty touch. Mashed sweet potatoes offer a sweet contrast. These sides balance the flavors and make your meal complete. Mixing and matching keeps it fresh every time. To keep your Lemon Dill Roasted Salmon fresh, store it right. First, let the salmon cool down to room temperature. Then, wrap it tightly in plastic wrap or foil. You can also place it in an airtight container. This helps keep moisture in and air out. For the best taste, refrigerate your salmon. It stays fresh for about 3 days. If you want to store it longer, freezing is a good option. Wrap it well, and it can last up to 3 months in the freezer. When it comes to reheating salmon, you want to do it gently. Preheat your oven to 275°F (135°C). Place the salmon in a baking dish and cover it with foil. Heat for about 15-20 minutes. This method keeps the fish moist and tasty. You can also use a microwave, but be careful. Heat it in short bursts of 30 seconds to avoid overcooking. Always check that the salmon is warm throughout before serving. Leftover salmon can last up to 3 days in the fridge. If you freeze it, the shelf life extends to about 3 months. After that, the quality may drop. Always check for any off smell or change in color before eating. If you notice anything strange, it's best to toss it out. Enjoy your Lemon Dill Roasted Salmon with confidence, knowing you can store it safely! You can serve many tasty sides with lemon dill roasted salmon. Here are some ideas: - Steamed asparagus or green beans - Creamy mashed potatoes or cauliflower - Quinoa or brown rice for a healthy grain - A fresh garden salad with lemon vinaigrette - Roasted vegetables like carrots or zucchini These dishes add flavor and balance to your meal. Yes, frozen salmon works well for this recipe. First, thaw it properly. The best way is to place it in the fridge overnight. If you're in a hurry, you can run it under cold water for about an hour. After thawing, pat it dry with a paper towel. This helps the marinade stick better. Then, follow the steps in the Full Recipe for cooking. You can easily modify this recipe for dietary needs. Here are some tips: - For gluten-free, check labels on your ingredients. - To make it dairy-free, ensure no dairy in your sides. - For low-sodium, reduce the salt or use salt-free seasonings. These changes keep the dish flavorful and safe for everyone. You can find the Full Recipe for lemon dill roasted salmon in the earlier sections of this article. It includes detailed instructions and all the ingredients needed to make this simple and delicious meal. This blog covered how to prepare Lemon Dill Roasted Salmon. We listed the ingredients, shared step-by-step instructions, and offered tips for the best results. Variations and storage info help you enjoy this dish for longer. You can customize flavors and side dishes to make it your own. Whether you’re a beginner or a pro, this recipe is easy and tasty. Enjoy your fish, and remember to share it with friends and family. Happy cooking!

Lemon Dill Roasted Salmon Flavorful and Simple Meal

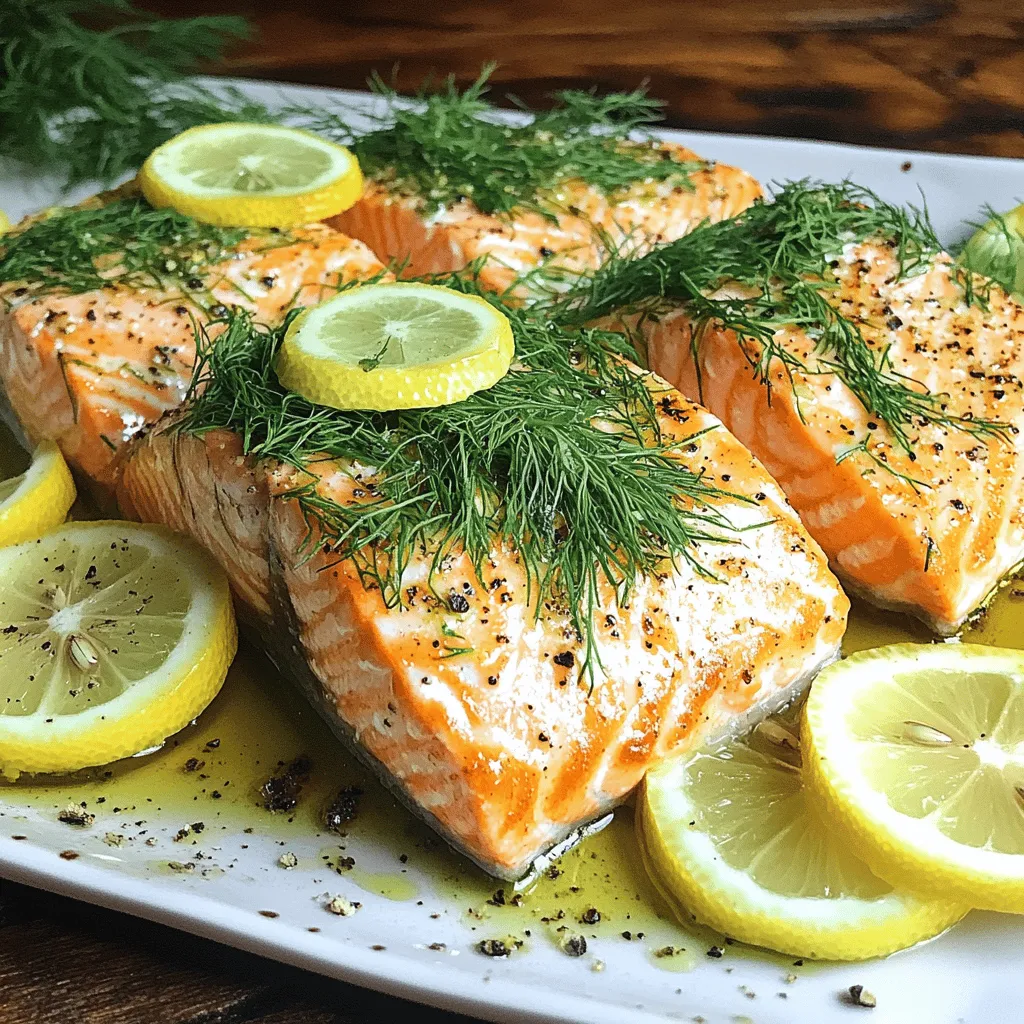
Looking for a simple and tasty meal? You’ve come to the right place! This Lemon Dill Roasted Salmon recipe combines

Older posts
Newer posts
← Previous Page1 … Page62 Page63 Page64 … Page85 Next →

dsad

© 2026 greenmealmap • Built with GeneratePress

Our Policies

  • Copyright Policy
  • Cookie Policy
  • GDPR Policy
  • Privacy Policy
  • Disclaimer
  • Terms Of Use

More Information

  • Home
  • About
  • Contact
  • Appetizers
  • Dessert
  • Dinner
  • Drinks
©2026, greenmealmap About Back To Top