Skip to content
DisclaimerTerms Of UseGDPR PolicyCookie Policy

greenmealmap

  • Home
  • Drinks
  • Appetizers
  • Dinner
  • Dessert
  • About
  • Contact
  • Privacy Policy
DisclaimerTerms Of UseGDPR PolicyCookie Policy

NO-ING-IMG

- 1 lb fresh asparagus, trimmed - 3 tablespoons olive oil - 4 cloves garlic, minced - Zest of 1 lemon - 2 tablespoons fresh lemon juice - 1 teaspoon sea salt - ½ teaspoon black pepper - 1 teaspoon red pepper flakes (optional, for added heat) - 2 tablespoons grated Parmesan cheese (optional, for serving) - Lemon wedges for serving Asparagus is more than just a tasty veggie. It is packed with vitamins A, C, E, and K. It also has fiber, which helps digestion. Asparagus is low in calories but high in nutrients. These nutrients can boost your health and help keep your body strong. Plus, it contains antioxidants that fight damage from free radicals. You can find fresh asparagus at grocery stores or farmers' markets. Look for vibrant green stalks with tight tips. If you want, try organic asparagus for a fresh taste. You can swap olive oil for avocado oil if you like. If you do not have garlic, shallots can work too. For a twist, try adding different herbs or spices, like thyme or chili powder. Start by gathering your ingredients. You will need: - 1 lb fresh asparagus, trimmed - 3 tablespoons olive oil - 4 cloves garlic, minced - Zest of 1 lemon - 2 tablespoons fresh lemon juice - 1 teaspoon sea salt - ½ teaspoon black pepper - 1 teaspoon red pepper flakes (optional) - 2 tablespoons grated Parmesan cheese (optional) - Lemon wedges for serving Next, preheat your oven to 425°F (220°C). This high heat helps the asparagus roast perfectly. While the oven heats, wash and trim the asparagus. Snap off the woody ends; they will break naturally at the right point. In a mixing bowl, combine olive oil, minced garlic, lemon zest, lemon juice, sea salt, and black pepper. If you like some heat, add red pepper flakes. Whisk this mixture until well blended. This dressing brings bright flavors to your dish. Place the trimmed asparagus on a baking sheet. Drizzle the lemon garlic mixture over the asparagus. Use your hands to toss them gently, ensuring they are coated evenly. Spread the asparagus in a single layer. This allows them to roast evenly and get crispy. Roast the asparagus in the preheated oven for 12-15 minutes. Keep an eye on them; they should become tender with slightly crispy tips. If you like, sprinkle grated Parmesan cheese over the hot asparagus right after you take them out of the oven. This adds a nice salty flavor. To ensure even roasting, here are some tips: - Make sure the asparagus is in a single layer on the baking sheet. Crowding them can cause steaming instead of roasting. - Use a large enough baking sheet. If you have too much asparagus, use two sheets. - Rotate the baking sheet halfway through cooking. This helps brown the asparagus more evenly. Following these steps gives you perfect Lemon Garlic Roasted Asparagus every time. For the full recipe, check out the complete instructions above. For lemon garlic roasted asparagus, simple is best. I love using olive oil, fresh garlic, and lemon. You can add sea salt and black pepper for flavor. If you want some heat, a sprinkle of red pepper flakes works well. For a twist, try fresh herbs like thyme or rosemary. These add depth and aroma, making each bite a treat. When picking asparagus, look for bright green stalks. They should feel firm and crisp. Avoid any that are limp or wilted. The tips should be closed and compact. Thinner stalks are tender and sweet, while thicker ones have a stronger taste. It’s all about your preference. Fresh asparagus is key to great flavor in your dish. One common mistake is overcooking the asparagus. It should be tender but still crisp. Roasting for 12-15 minutes usually works well. Another mistake is not spacing the asparagus on the baking sheet. They need room to roast evenly. Lastly, don’t skip the lemon juice! It brightens the dish and makes the flavors come alive. For the full recipe, check out the Zesty Lemon Garlic Roasted Asparagus. {{image_2}} You can change the flavor of Lemon Garlic Roasted Asparagus easily. Adding fresh herbs like thyme or rosemary gives it a new twist. Just chop a tablespoon of your chosen herb and mix it in with the lemon-garlic sauce before you toss the asparagus. The herbs will add depth and aroma. You can also try adding a splash of balsamic vinegar or a sprinkle of smoked paprika for a unique taste. These small changes can make a big difference in flavor. While roasting is great, you can also grill asparagus for a smoky flavor. Preheat your grill to medium heat. Toss the asparagus with the lemon-garlic mix just as you would for roasting. Place the asparagus on the grill and cook for about 6-8 minutes. Turn them often to ensure even cooking. Grilling gives the asparagus a nice char and enhances the taste. You can also sauté the asparagus in a pan for a quick dish. Just use the same lemon-garlic mixture. For a vegan version, skip the Parmesan cheese. The dish still tastes amazing without it. If you want some creaminess, try using nutritional yeast. It adds a cheesy flavor without any dairy. You can also add some toasted nuts like almonds or pine nuts for crunch. They not only add texture but also a nutty flavor. These options ensure everyone can enjoy the delicious Lemon Garlic Roasted Asparagus. Check out the Full Recipe for more tips on how to make this dish shine! After your tasty lemon garlic roasted asparagus, you might have some left. To keep it fresh, place it in an airtight container. Store it in the fridge for up to three days. This helps maintain its flavor and crunch. If you want to eat it later, you can also wrap it tightly in plastic wrap. You can freeze asparagus, but it needs a little prep first. Blanch the asparagus in boiling water for about two minutes. Then, quickly cool it in ice water. Once cooled, pat it dry and place it in a freezer bag. Remove as much air as you can. Frozen asparagus can last for up to six months. When ready to use, you can add it straight to your dishes. To enjoy your leftover lemon garlic roasted asparagus, reheat it in the oven. Preheat the oven to 350°F (175°C). Place the asparagus on a baking sheet and cover it with foil. Heat for about 10 minutes or until warm. You can also microwave it, but be careful not to overcook it. Just heat for 30 seconds at a time until warm. Enjoy the flavors from the Full Recipe again! Roasting asparagus takes about 12 to 15 minutes. It cooks at 425°F (220°C). You want it tender but still crisp. Check for doneness by looking at the tips. They should be slightly crispy. If you like it softer, leave it in a bit longer. Yes, you can use frozen asparagus. However, thaw it first. Pat it dry with a towel to remove excess moisture. This helps it roast better and prevents sogginess. Keep in mind that frozen asparagus cooks faster. Start checking it around 8 minutes. Lemon garlic roasted asparagus pairs well with many dishes. Try it with grilled chicken or fish for a fresh meal. It also goes great with pasta or rice. For a vegetarian option, serve it with quinoa or a hearty salad. This dish adds color and flavor to any plate. Check out the full recipe for more ideas! In this article, we explored the many ways to enjoy asparagus. We covered the best ingredients, their health benefits, and how to prepare asparagus with ease. You learned cooking tips, seasoning ideas, and common mistakes to avoid. We also highlighted variations for flavor and dietary needs. Proper storage and reheating ensure nothing goes to waste. Remember, cooking should be fun and tasty, so feel free to experiment. Enjoy your delicious asparagus dishes!

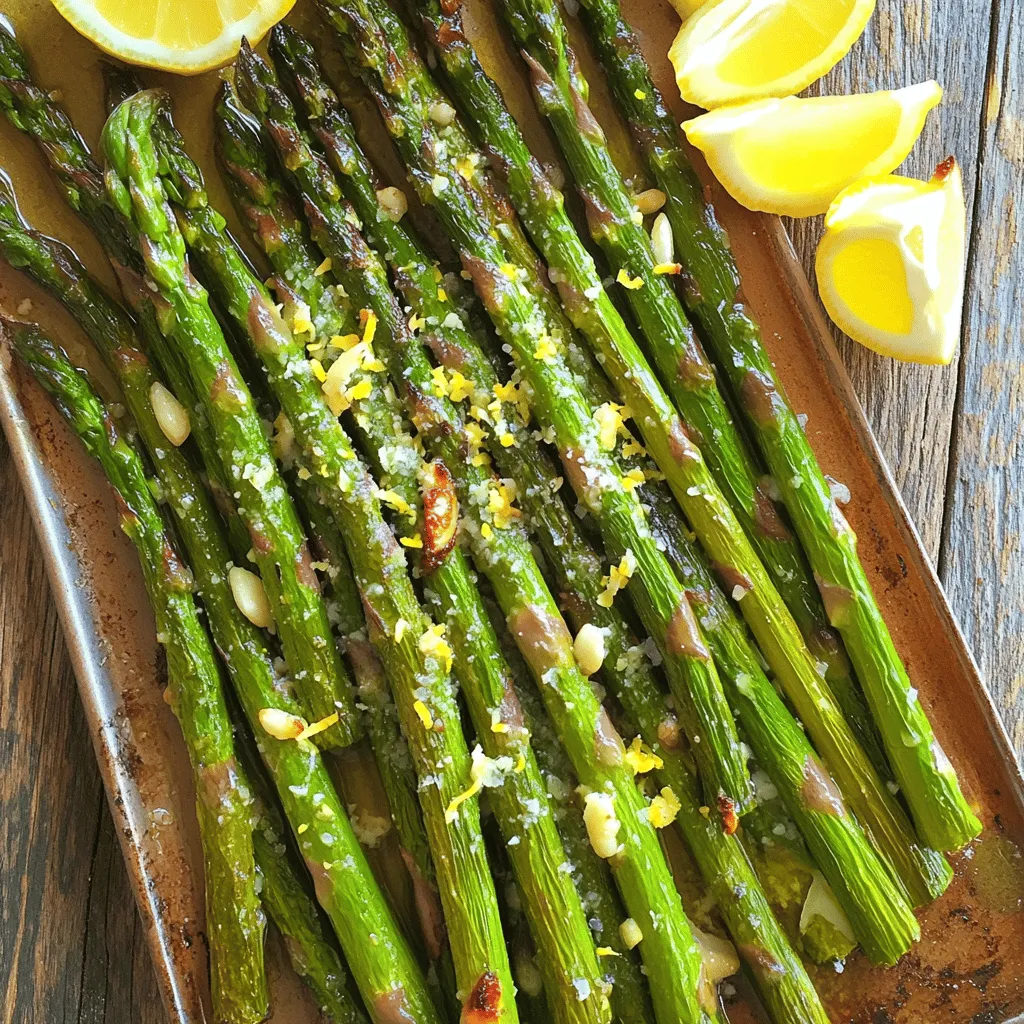
Lemon Garlic Roasted Asparagus Flavors That Dazzle

Imagine bright green asparagus, perfectly roasted with zesty lemon and fragrant garlic. In this post, I’ll show you how to

- 1 pound large shrimp, peeled and deveined - 2 tablespoons olive oil - Spices: chili powder, cumin, smoked paprika, garlic powder - Salt and pepper to taste - 8 small corn tortillas - 1 cup red cabbage, thinly sliced - 1 cup green cabbage, thinly sliced - 1 carrot, julienned - 1/4 cup fresh cilantro, chopped - Juice of 1 lime - 1 tablespoon honey - 1 avocado, sliced - Lime wedges for serving The main ingredients give the dish its bold flavor. The shrimp are the star, bringing sweetness and a nice texture. I love using a mix of spices like chili powder and cumin. They add warmth and depth to the dish. Next, we have the tacos and slaw components. The corn tortillas are soft and perfect for holding the shrimp and slaw. The red and green cabbage add crunch. The carrot gives a bit of sweetness, while cilantro brings freshness. A squeeze of lime juice brightens everything up. Honey adds a touch of sweetness to the slaw. You can find the complete instructions in the Full Recipe section. This dish is quick and easy, making it perfect for busy nights. Each ingredient plays a role in making these tacos both tasty and satisfying. First, I take a mixing bowl and add the shrimp. I drizzle in the olive oil and sprinkle the chili powder, cumin, smoked paprika, garlic powder, salt, and pepper. I make sure to toss the shrimp well so they get coated evenly with the spices. Next, I heat a large skillet over medium-high heat. Once the skillet is hot, I add the shrimp in a single layer. I cook them for about 2-3 minutes on each side until they turn pink and opaque. This quick cooking makes the shrimp tender and full of flavor. While the shrimp cooks, I prepare the slaw. I grab another bowl and mix the red cabbage, green cabbage, carrot, cilantro, lime juice, and honey. I toss everything together until well combined. This slaw adds a crunchy texture and a fresh taste. After mixing, I taste the slaw and adjust the seasoning with a bit more salt if needed. The balance of flavors is key for a delicious taco. Now it’s time to assemble the tacos. I warm the corn tortillas in another skillet or microwave until they are soft and pliable. Once warmed, I place a generous amount of slaw on each tortilla. Then, I top the slaw with a few pieces of shrimp and a slice of creamy avocado. This combination of textures and flavors makes each bite amazing. I serve the tacos with lime wedges on the side for a zesty finish. For the complete recipe, check the Full Recipe section. Use fresh shrimp for best flavor. Fresh shrimp tastes sweet and tender. Always choose shrimp that smells clean and ocean-like. Do not overcrowd the skillet. This lets each shrimp cook evenly. If the skillet is too full, the shrimp will steam instead of sear. Cook in batches if needed. Each side takes just 2-3 minutes. Add jalapeños for heat. They give the slaw a nice kick. You can slice them thin or dice them small. Incorporate additional veggies like bell peppers. They add color and crunch to the slaw. Try using different colors of bell peppers for a fun look. Warm tortillas to make them pliable. You can do this in a skillet or microwave. Just heat them for a few seconds. Always keep them covered with a cloth to stay warm. How to store leftover tortillas? Place them in a sealed bag or container. They keep well in the fridge for a few days. You can also freeze them for longer storage. {{image_2}} You can change the protein in this dish. Instead of shrimp, try fish or chicken. Both options work well with the spices. For a vegetarian choice, use jackfruit or tofu. Jackfruit adds a nice texture, while tofu absorbs flavors well. Slaw can be fun to change. For a twist, make an Asian-inspired slaw. Use sesame dressing to bring new flavors. You can also create a creamy slaw. Just mix mayonnaise or yogurt with your slaw ingredients for a rich taste. Spice level can change the whole dish. Use different peppers to adjust the heat. If you like it milder, go for bell peppers. To brighten flavors, experiment with citrus. Lemon or orange juice can add a fresh zing to both shrimp and slaw. You can find the full recipe for Spicy Shrimp Tacos with Slaw above to get started! To keep your shrimp tacos fresh, store the shrimp and slaw separately. This way, the slaw stays crunchy while the shrimp maintains its texture. Use airtight containers for both. When you want to eat them, reheat the shrimp in a skillet over medium heat. This warms them without making them rubbery. You can enjoy the slaw cold or at room temperature. Can you freeze shrimp tacos? Yes, but it's best to freeze the shrimp only. Cooked shrimp can freeze well for up to three months. For the slaw, avoid freezing it because the cabbage will become mushy. If you want to freeze slaw ingredients, chop the veggies and store them in a freezer bag. Just remember to use them within a month. How long do prepared tacos last in the fridge? You can keep them for about two days. After that, the flavor and texture decline. Signs of spoilage include a sour smell and slimy shrimp. If you notice these signs, it’s best to throw them away. For a flavorful meal that lasts, always store your tacos properly. For the complete details, check the Full Recipe. You can serve spicy shrimp tacos with many tasty sides and drinks. Here are some ideas: - Sides: - Mexican rice - Black beans - Grilled corn on the cob - Chips and salsa - Drinks: - Fresh limeade - Light beer - Sparkling water with lime These pairings enhance the taco experience and add variety to your meal. Yes, you can prepare some parts ahead of time. Here are my tips: - Shrimp: Cook shrimp and store in the fridge for up to two days. - Slaw: Make the slaw a day in advance. Keep it in a sealed container. - Tortillas: Warm them before serving for best taste. This way, you save time and enjoy a quick meal later. Reheating shrimp tacos is easy if you follow these steps: - Microwave: Place tacos on a plate, cover with a damp paper towel, and heat for 30 seconds. - Skillet: Heat a skillet over medium heat. Warm tacos for about 1-2 minutes on each side. Both methods keep the shrimp and slaw tasty. Yes, this recipe can be gluten-free. Here’s what you need to know: - Tortillas: Use corn tortillas, which are usually gluten-free. - Alternatives: If you need more options, look for gluten-free tortillas at the store. You can enjoy these tacos without worry if you follow these tips. This Spicy Shrimp Tacos with Slaw recipe is quick and fun to make. Here’s what you need to create this tasty dish and how to do it. - 1 pound large shrimp, peeled and deveined - 2 tablespoons olive oil - 1 tablespoon chili powder - 1 teaspoon cumin - 1 teaspoon smoked paprika - 1 teaspoon garlic powder - Salt and pepper to taste - 8 small corn tortillas - 1 cup red cabbage, thinly sliced - 1 cup green cabbage, thinly sliced - 1 carrot, julienned - 1/4 cup fresh cilantro, chopped - Juice of 1 lime - 1 tablespoon honey - 1 avocado, sliced - Lime wedges for serving 1. In a mixing bowl, combine the shrimp with olive oil and spices. Toss well to coat the shrimp evenly. 2. Heat a large skillet over medium-high heat. Add the seasoned shrimp in a single layer. Cook for 2-3 minutes on each side until they turn pink and opaque. Remove them from heat and set aside. 3. For the slaw, mix the red cabbage, green cabbage, carrot, cilantro, lime juice, and honey in a separate bowl. Toss well and adjust seasoning with salt if needed. 4. Warm the corn tortillas in another skillet or microwave until they are pliable. 5. To assemble the tacos, place a portion of the slaw on each tortilla. Add a few shrimp and a slice of avocado. 6. Serve with lime wedges for squeezing over the tacos before eating. This recipe brings together bold flavors and fresh ingredients. It's easy and perfect for any night! These spicy shrimp tacos are fun and easy to make. You learned how to prepare shrimp, slaw, and warm tortillas. I shared tips for perfecting flavors and suggested tasty variations. You can easily store leftovers or freeze ingredients for later. Remember, you can swap shrimp for other proteins or add more veggies to the slaw. This recipe lets you be creative while enjoying great food. Enjoy making your tacos and experimenting with flavors!

Spicy Shrimp Tacos with Slaw Quick and Flavorful Meal

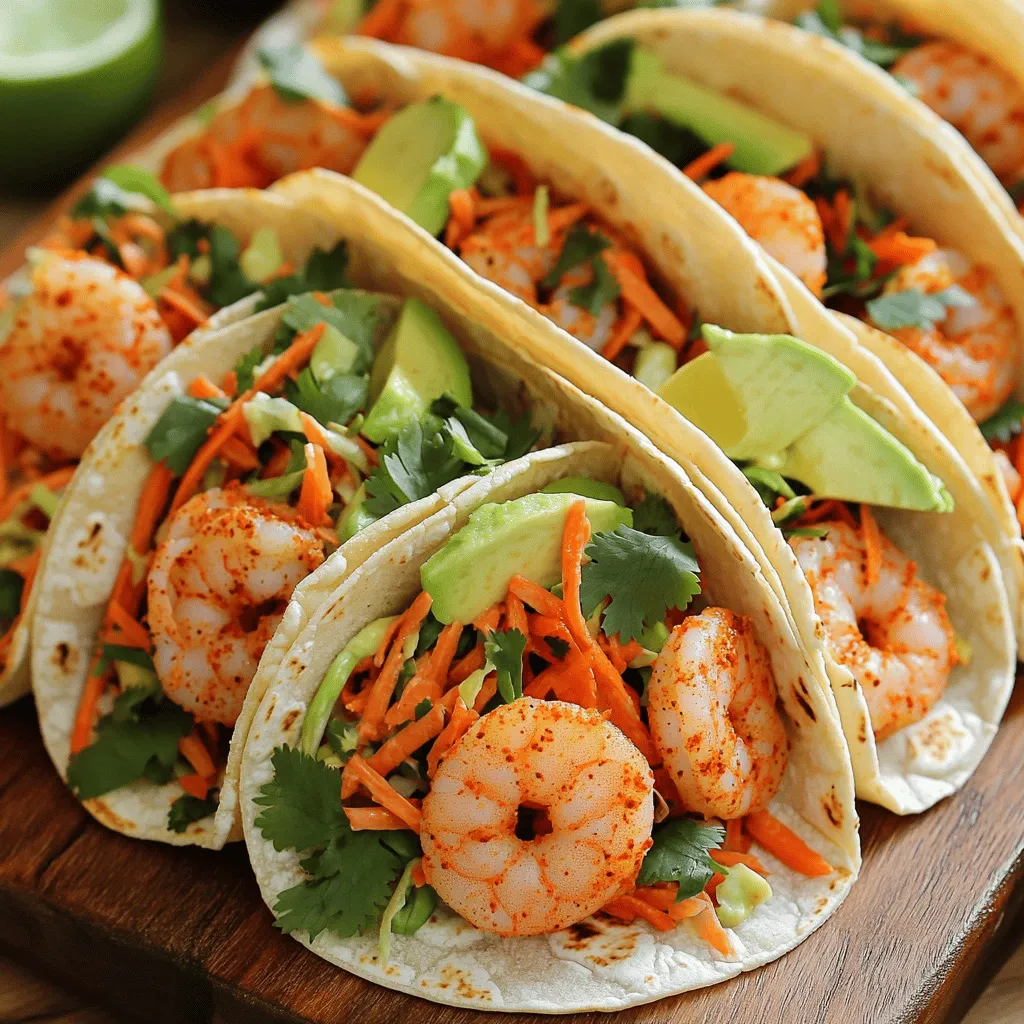
Get ready to spice up your dinner with these tasty Spicy Shrimp Tacos with Slaw! This quick meal features fresh

- Firm Tofu: 14 oz (400g), pressed and cubed - Cornstarch: 2 tablespoons - Vegetable Oil: 2 tablespoons - Vegetables: 1 red bell pepper, sliced; 1 cup broccoli florets; 1 carrot, julienned - Aromatics: 2 cloves garlic, minced; 1 tablespoon ginger, minced - Sauces: 3 tablespoons soy sauce; 1 tablespoon hoisin sauce; 1 teaspoon sesame oil - Garnish: Sesame seeds; 3 green onions, chopped (white and green parts separated) To make my crispy tofu stir fry, I choose fresh and vibrant ingredients. The firm tofu gives a solid base, while cornstarch helps create a delightful crunch. I use vegetable oil to fry the tofu, adding flavor and richness. The vegetables add color and nutrients. Red bell pepper brings sweetness, broccoli adds crunch, and carrot offers a bright touch. Aromatics like garlic and ginger give depth to the dish. They create a warm and fragrant base. For sauces, I mix soy sauce, hoisin sauce, and sesame oil. This combination brings umami and a hint of sweetness. Finally, I top the dish with sesame seeds and green onions for extra flavor and presentation. This crispy tofu stir fry is simple yet satisfying. You can find the full recipe at the end of the article. First, I press the tofu for at least 30 minutes. This step removes excess moisture. Less moisture means a crispier texture. After pressing, I cube the tofu into bite-sized pieces. Next, I take a bowl and toss the cubed tofu with 2 tablespoons of cornstarch. This coating helps make the tofu extra crispy when cooked. I heat 1 tablespoon of vegetable oil in a large skillet over medium-high heat. Once the oil is hot, I add the coated tofu cubes. I stir-fry them for about 8-10 minutes. I want them to turn golden and crispy on all sides. Once they are ready, I remove the tofu from the pan and set it aside. In the same pan, I add the remaining tablespoon of oil. Then, I stir in minced garlic, ginger, and the white parts of the green onions. I sauté this mix for about 30 seconds until it smells great. Next, I add the sliced red bell pepper, broccoli florets, and julienned carrot to the pan. I stir-fry everything for about 3-4 minutes. I want the vegetables to be tender-crisp. After the veggies are ready, I return the crispy tofu to the pan. I pour in the soy sauce, hoisin sauce, and sesame oil. I toss everything together for about 2 minutes. This step ensures everything is evenly coated and heated through. Finally, I sprinkle sesame seeds and the green parts of the green onions on top before serving. For the full recipe, check the details! To get crispy tofu, start by pressing it well. Pressing removes water, which makes it soggy. Wrap the tofu in a clean cloth and place something heavy on top. Let it sit for at least 30 minutes. After pressing, cut the tofu into small cubes. Next, coat the cubes with cornstarch. This step is key for crispiness. Cornstarch forms a crunchy layer when fried. Toss the tofu in a bowl with 2 tablespoons of cornstarch until covered. For tender-crisp veggies, timing is everything. Add your vegetables to the pan after the tofu is cooked. Stir-fry them for just a few minutes. You want them bright and slightly crunchy. To manage cook time, have all your ingredients ready. Prep them before you start cooking. This way, you can add everything to the pan without delay. For a stunning dish, serve the stir fry on a large platter. Garnish it with extra sesame seeds and chopped green onions. This makes your meal look colorful and inviting. Pair the stir fry with steamed jasmine rice or quinoa. It adds a nice texture and rounds out the meal. Enjoy your beautiful and tasty creation! For the full recipe, check out the earlier section. {{image_2}} When making crispy tofu stir fry, the type of tofu matters. Firm tofu works best for this dish. It holds its shape well and crisps up nicely. Soft tofu, while tasty, may not hold up in stir fry. It can break apart and become mushy. So, stick with firm tofu for that perfect crunch. You can switch up the veggies based on your mood or season. Bell peppers, bok choy, and snap peas all add crunch and color. Want a twist? Try zucchini or mushrooms for extra flavor. Seasonal vegetables like asparagus in spring or squash in fall can also shine in this dish. You can customize the sauce for your taste. If you want it vegan, use tamari instead of soy sauce. This keeps the dish gluten-free, too! For a spicy kick, add sriracha or chili paste. You can also mix in some peanut sauce for a rich flavor. Experiment with these options and find your favorite blend! For the full recipe, check out the crispy tofu stir fry details above. To store your crispy tofu stir fry, let it cool first. Place it in an airtight container. Store it in the fridge for up to three days. Make sure you keep the tofu and veggies together to maintain flavor. This way, you can enjoy your meal later without losing taste. To reheat your stir fry, use a skillet over medium heat. Add a splash of oil to help restore crispiness. Heat it for about five minutes, stirring often. This method keeps your tofu crunchy and your veggies fresh. Avoid using the microwave, as it can make the tofu soggy. You can freeze crispy tofu stir fry, but it might lose some texture. If you want to freeze it, let it cool completely. Store it in a freezer-safe bag or container. Use it within three months for the best taste. When you’re ready to eat, thaw it overnight in the fridge before reheating. For stir fry, I recommend using firm or extra-firm tofu. Firm tofu holds its shape well during cooking. Extra-firm tofu offers even more structure. Both types soak up flavors well, making them great choices. - Firm tofu: Good for stir fry and absorbs flavors. - Extra-firm tofu: Even firmer and holds its shape better. When using these types, you get crispy edges and a nice bite. Avoid soft tofu for stir fry, as it breaks apart easily and can turn mushy. You can still make crispy tofu without cornstarch by using a few alternatives. Try using all-purpose flour, rice flour, or potato starch. These options give a nice crunch. - All-purpose flour: Common choice, easy to find. - Rice flour: Lighter texture and great for crispiness. - Potato starch: Excellent for a crunchy coating. Simply coat your pressed tofu with one of these options before frying. Each provides its own unique texture and flavor. Yes, you can easily make this dish gluten-free. Use gluten-free soy sauce instead of regular soy sauce. Look for tamari, which is a great alternative. - Gluten-free soy sauce: Check for brands labeled gluten-free. - Other substitutions: Use coconut aminos for a sweeter taste. These swaps keep the dish flavorful while meeting gluten-free needs. Enjoy your crispy tofu stir fry with confidence! This blog post covered how to make a tasty crispy tofu stir fry. We discussed key ingredients like firm tofu, fresh vegetables, and flavorful sauces. I shared step-by-step cooking instructions and valuable tips for achieving crispiness. You can also explore variations like different tofu types and sauce alternatives. In the kitchen, enjoy being creative with this dish. Use fresh ingredients and personalize it to your taste. Whether you prefer firm tofu or vibrant veggies, this stir fry can be your go-to meal. Happy cooking!

Crispy Tofu Stir Fry Packed with Fresh Flavors

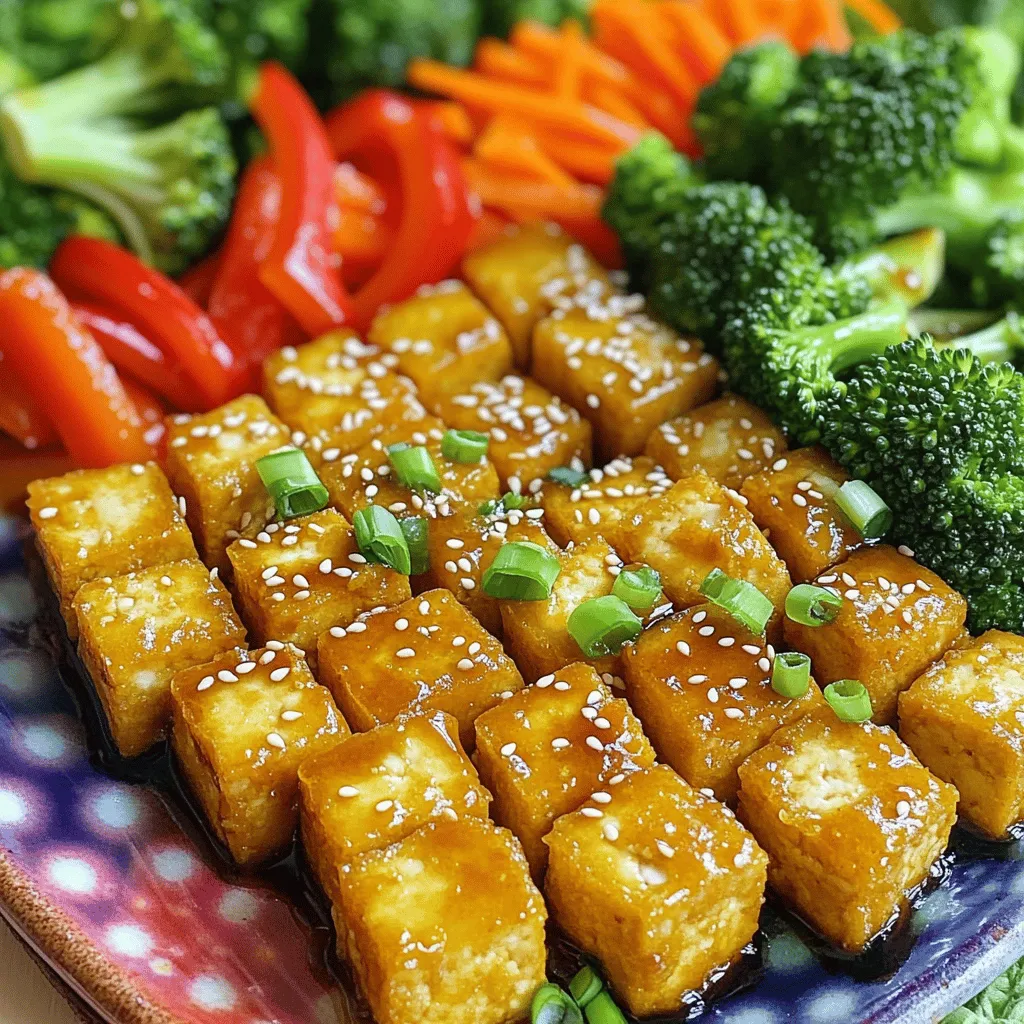
Are you ready to elevate your dinner game? This Crispy Tofu Stir Fry is not only quick to make but

- 4 boneless, skinless chicken breasts - 1/2 cup balsamic vinegar - 1/4 cup honey - 2 tablespoons Dijon mustard - 2 cloves garlic, minced - 1 teaspoon fresh rosemary, chopped - 1 teaspoon fresh thyme leaves - Salt and pepper, to taste - 2 tablespoons olive oil - 1/2 cup cherry tomatoes, halved - Fresh basil for garnish When I make balsamic glazed chicken, I start with the main ingredients. The chicken breasts are the star of the dish. They need to be fresh and of good quality. The balsamic vinegar brings tang, while honey adds sweetness. Dijon mustard gives it a nice bite. Next, I add seasonings and herbs. Minced garlic is a must for flavor. Fresh rosemary and thyme make it aromatic. Salt and pepper will enhance all the tastes. For cooking essentials, I use olive oil. It helps to brown the chicken well. Cherry tomatoes add color and a burst of flavor. Finally, I garnish with fresh basil. It not only looks nice but adds a fresh taste too. This combination makes the dish savory and simple. You can find the full recipe and more details to guide you in your cooking adventure. Start by making the glaze. In a small bowl, whisk together these ingredients: - 1/2 cup balsamic vinegar - 1/4 cup honey - 2 tablespoons Dijon mustard - 2 cloves garlic, minced - 1 teaspoon fresh rosemary, chopped - 1 teaspoon fresh thyme leaves - Salt and pepper to taste Mix it until smooth. Set the glaze aside for now. Next, heat 2 tablespoons of olive oil in a large skillet over medium-high heat. While the oil heats, season 4 boneless, skinless chicken breasts with salt and pepper on both sides. Once the oil is hot, add the chicken to the skillet. Cook for about 5-7 minutes on each side. You want the chicken to turn golden brown and reach an internal temperature of 165°F (75°C). After cooking, remove the chicken from the skillet and set it on a plate. In the same skillet, pour in the balsamic glaze you made earlier. Bring it to a simmer. Let it cook for about 3-4 minutes until it thickens a bit. Then, add 1/2 cup of halved cherry tomatoes to the skillet. Stir them in for another 2 minutes, letting them soften. Return the cooked chicken to the skillet, coating it well with the glaze. Let it simmer for an additional minute. Serve this warm, garnished with fresh basil for a lovely finish. For the full recipe and detailed timing, check the [Full Recipe]. To make your chicken juicy, aim for an internal temperature of 165°F (75°C). Cooking times may vary based on chicken size. Generally, cook 5-7 minutes per side in medium-high heat. This helps achieve a golden-brown crust, sealing in moisture. Always use a meat thermometer for accuracy. To thicken your balsamic glaze, simmer it gently. Cook it for about 3-4 minutes after adding it to the skillet. Watch for bubbles; they show it's thickening. If you want a thicker glaze, let it simmer longer. You can also add a bit of cornstarch mixed with water if needed. If you need alternatives for honey, try maple syrup or agave nectar. Both add sweetness and work well. For Dijon mustard, consider yellow mustard or whole grain mustard. These options keep the flavor but fit different diets. Always taste as you go to find the perfect balance. For the full recipe, check the detailed instructions above. {{image_2}} You can use chicken thighs instead of breasts. Thighs have more fat, which gives them a richer flavor. They take longer to cook, about 10-12 minutes per side. The extra fat helps keep them juicy. Just ensure their internal temperature hits 165°F (75°C). Grilling adds a nice smoky flavor. To make grilled balsamic chicken, marinate the chicken in the balsamic mixture for at least 30 minutes. Preheat your grill to medium-high heat. Grill the chicken for about 6-7 minutes on each side. Brush the chicken with the glaze while it cooks for extra flavor. Adding veggies makes your meal colorful and healthy. You can toss in bell peppers, zucchini, or asparagus. Cook them in the same skillet after the chicken. You can also serve the chicken with a side salad or rice. This way, you create a complete meal that's tasty and satisfying. For a full recipe, check out the detailed instructions above. To store your balsamic glazed chicken properly, first let it cool down. Placing hot food in the fridge can raise the temperature inside. Once cool, use an airtight container. This will keep your chicken fresh for up to three days. Always label your container with the date. This helps you track how long it has been stored. When you're ready to enjoy your leftovers, reheating is key. Place the chicken in a microwave-safe dish. Add a splash of water or extra balsamic sauce to keep it moist. Cover it with a microwave-safe lid or wrap. Heat in the microwave for about two to three minutes. Check that it’s heated through to 165°F (75°C). This method keeps the flavor and texture nice. Freezing is a great option if you want to save your balsamic glazed chicken for later. Start by letting the chicken cool completely. Wrap each piece tightly in plastic wrap. Then place them in a freezer bag, squeezing out as much air as possible. This helps prevent freezer burn. Label the bag with the date and type of dish. You can freeze it for up to three months. When ready to eat, thaw it overnight in the fridge. Then, reheat it using the instructions above to enjoy. For the full recipe, check out the main section! To marinate chicken in balsamic vinegar, mix equal parts of vinegar and oil. You can add honey, garlic, and herbs for extra flavor. Marinate the chicken for at least 30 minutes, but longer is better. For the best taste, aim for 2 to 4 hours. This time allows the chicken to soak up all the tangy goodness. You can even marinate it overnight if you plan ahead. Yes, you can use other meats like pork or beef. Pork tenderloin works well with the balsamic glaze. Just remember to cook it until it reaches a safe internal temperature. You can also use tofu for a plant-based option. Press the tofu first to remove excess moisture. This helps the marinade stick better and adds great flavor. Adjust cooking times based on the meat or tofu type. Balsamic vinegar has several health benefits. It is low in calories and rich in antioxidants. It can aid digestion and help control blood sugar levels. However, it can be high in sugar, so use it in moderation. Always check labels if you buy pre-made balsamic vinegar. Look for ones with fewer additives. Overall, when used wisely, balsamic vinegar can add flavor and health benefits to your meals. You learned how to make delicious balsamic glazed chicken with simple ingredients and steps. I shared tips for cooking, storing leftovers, and even making variations. This dish is easy and fun to prepare. You can impress friends or family with your cooking skills. Enjoy experimenting with flavors and making it your own! I hope these ideas inspire your next meal.

Balsamic Glazed Chicken Savory and Simple Recipe

If you’re searching for a dinner that is both tasty and easy to make, you’re in the right place! This

- 1 cup quinoa, rinsed - 2 cups vegetable broth - 1 can (15 oz) black beans, drained and rinsed - 1 cup cherry tomatoes, halved - 1 bell pepper (red or yellow), diced - 1 small red onion, finely chopped - 1 avocado, diced - 1/4 cup fresh cilantro, chopped - Juice of 2 limes - 3 tablespoons olive oil - 1 teaspoon cumin - 1/2 teaspoon chili powder - Salt and pepper to taste - Crumbled feta cheese - Sliced jalapeños - Additional lime wedges - Quinoa: High in protein and fiber - Black beans: Rich in antioxidants - Avocado: Healthy fats and vitamins When I make this zesty quinoa black bean salad, I focus on fresh, colorful ingredients. Each one adds taste and texture. Quinoa is my base, and it packs a protein punch. Rinsing it helps get rid of any bitter taste. I cook it in vegetable broth. This adds extra flavor without much effort. Next, I grab a can of black beans. Canned beans are a time saver and taste great. I rinse them well to remove excess sodium. Then, I cut cherry tomatoes in half. Their sweetness adds a nice balance to the dish. I also chop a bell pepper for crunch and color. Red onion brings a sharp taste. I finely chop it, so it blends well. Avocado adds creaminess, making each bite satisfying. I like to fold it in gently at the end. This way, it stays intact and looks pretty. Finally, I add fresh cilantro for a burst of flavor. Lime juice and olive oil make a simple dressing. Cumin and chili powder give it a little kick. I season with salt and pepper to taste. This zesty quinoa black bean salad is not just a dish; it's a celebration of health and flavor. For the full recipe, check the instructions above. To start, you need to prepare the quinoa. First, combine 1 cup of rinsed quinoa with 2 cups of vegetable broth in a saucepan. This combination gives the quinoa great flavor. Next, bring the mixture to a boil. Once it boils, reduce the heat to low. Cover the pan and let it simmer for about 15 minutes. The quinoa will soak up the broth and become fluffy. When it’s done, remove it from the heat and let it cool. While the quinoa cools, it’s time to mix the vegetables. In a large bowl, combine 1 can of drained and rinsed black beans, 1 cup of halved cherry tomatoes, 1 diced bell pepper, and 1 finely chopped red onion. These colorful veggies add crunch and taste. Toss them gently to mix everything well. This step ensures that every bite of your salad is full of flavor and nutrition. After the quinoa has cooled, it’s time to assemble your salad. Add the cooled quinoa into the bowl with the vegetable mixture. Now, you’ll make the dressing. In a small bowl, whisk together the juice of 2 limes, 3 tablespoons of olive oil, 1 teaspoon of cumin, and 1/2 teaspoon of chili powder. Season it with salt and pepper to taste. Pour this dressing over the salad and gently toss everything together. This step coats all the ingredients with the fresh, zesty flavor. Finally, just before serving, fold in 1 diced avocado and 1/4 cup of chopped cilantro. This adds creaminess and a fresh touch. Serve your Zesty Quinoa Black Bean Salad chilled or at room temperature for the best taste. For the full recipe, check out the instructions above. To get fluffy quinoa, rinse it well before cooking. This removes the bitter coating called saponin. Use a fine mesh strainer for best results. After cooking, let the quinoa rest for about five minutes. This step helps it become airy and light. You can adjust the lime juice and olive oil to match your taste. If you want a zesty kick, add more lime. For a richer flavor, use a touch more olive oil. Fresh herbs make a big difference too. Chopped cilantro adds a nice aroma and freshness to the salad. Pair this salad with grilled chicken or fish for a complete meal. It also works well as a light dish on its own. Serve it as a side at a picnic or barbecue. The bright colors and fresh flavors make it a hit at any gathering. For the full recipe, check out the details above and get cooking! {{image_2}} You can make your Zesty Quinoa Black Bean Salad even heartier by adding protein. Grilled shrimp or chicken works well. They add a nice flavor boost. You can also mix in nuts or seeds for crunch. Almonds or pumpkin seeds give a great texture and taste. Using seasonal ingredients makes the salad fresh and vibrant. In spring, try adding asparagus or radishes. In summer, sweet corn is a fantastic choice. It adds a pop of sweetness and color. As seasons change, feel free to swap out veggies to keep it exciting. Switching up the dressing can change the whole salad. You might try using lemon juice instead of lime. It gives a different zing. You can also experiment with spices. Adding smoked paprika or garlic powder can create new flavor profiles. Store your Zesty Quinoa Black Bean Salad in an airtight container. This keeps it fresh and tasty. It is best to eat within 3-4 days. After that, the flavors may fade, and the texture might change. You can freeze portions of the salad in sealed bags. This makes meal prep easy. To serve, thaw the salad in the refrigerator overnight. It’s a quick way to enjoy a healthy meal later. When it’s time to eat, gently toss the salad and reheat it on the stove. This helps keep the texture nice. Avoid using the microwave. Microwaving can make the salad soggy and less appealing. Enjoy your salad fresh and flavorful with every bite! For the full recipe, check out the earlier sections. Typically, quinoa cooks in about 15 minutes. First, rinse it well to remove any bitterness. Then, combine the quinoa with vegetable broth in a saucepan. Bring it to a boil. Lower the heat, cover it, and let it simmer. In no time, you will have fluffy quinoa ready for your salad. Yes, it's great prepared a day in advance; flavors meld well. Letting it sit allows the ingredients to absorb the dressing. This makes each bite even more delicious. Just be sure to add the avocado right before serving. Yes, all ingredients are naturally gluten-free. Quinoa, black beans, and veggies all fit into a gluten-free diet. This salad is perfect for anyone avoiding gluten. Absolutely, using canned beans saves time and is convenient. Drain and rinse the beans before adding them to your salad. This helps to reduce sodium and enhances their flavor. Greek yogurt or a handful of sunflower seeds can be alternatives. Greek yogurt adds creaminess, while sunflower seeds give a nice crunch. Both options keep the salad tasty and satisfying. For the full recipe, check out the Zesty Quinoa Black Bean Salad. This blog post covered a fresh quinoa salad that is both tasty and healthy. You learned about the key ingredients, simple steps to make it, and helpful tips for great results. Adding proteins and seasonal items can customize your salad to your taste. Enjoy this salad as a light meal or side dish. Keep leftovers stored right, and you can savor this dish for days. With easy adjustments, you can create a version you love. Now, go make your own delicious quinoa salad!

Zesty Quinoa Black Bean Salad Flavorful and Healthy Dish

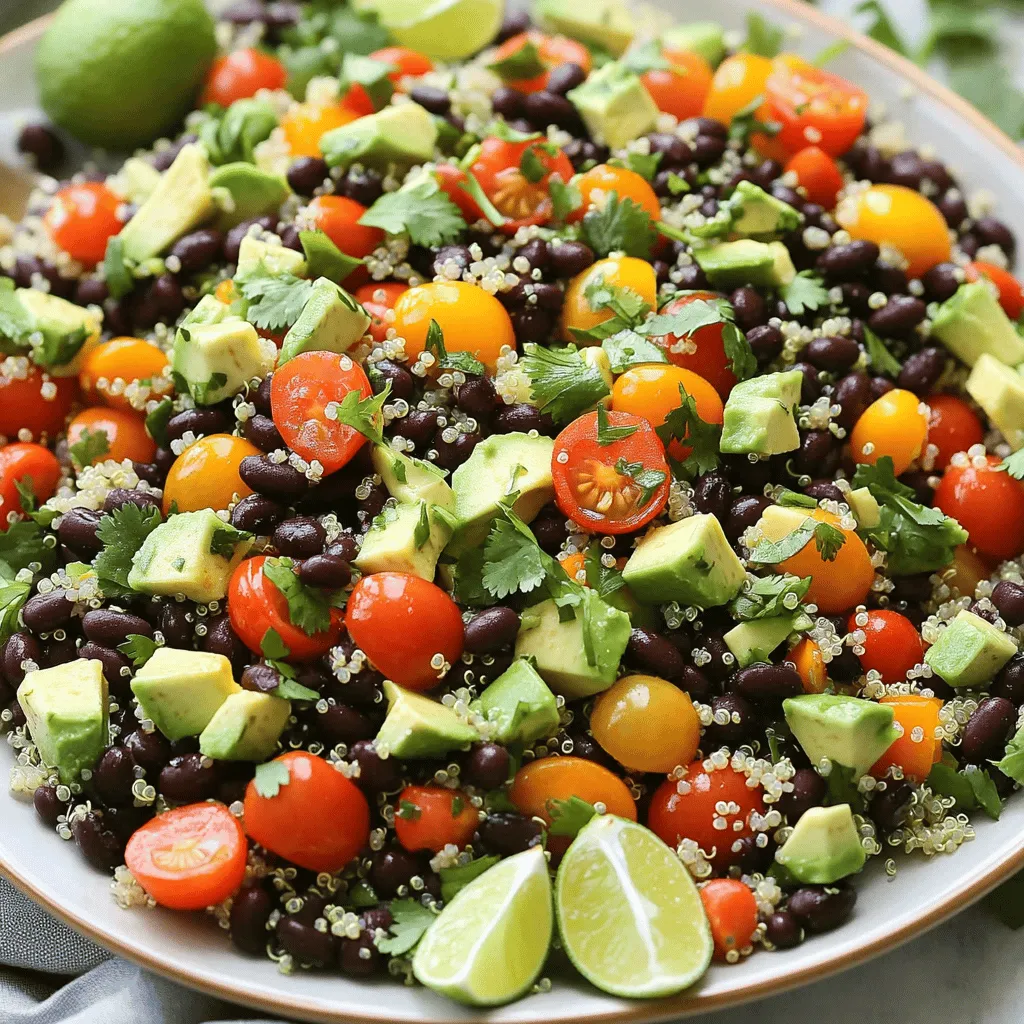
Looking for a fresh, healthy dish that bursts with flavor? This Zesty Quinoa Black Bean Salad is just what you

To make roasted cauliflower tacos, you need simple and fresh ingredients. Here’s what you will need to gather: - 1 medium cauliflower, cut into florets - 2 tablespoons olive oil - Seasonings needed: smoked paprika, cumin, garlic powder, chili powder, salt, and pepper - Tortillas (corn or flour) - Fresh toppings: avocado, red cabbage, cilantro, lime - Optional extras: crumbled feta cheese or vegan cheese for topping These ingredients combine to create a delightful and colorful meal. The cauliflower brings a hearty texture, while the spices add depth and warmth. The vibrant toppings finish off the dish with a burst of freshness. You can find the full recipe to guide you through the cooking process. First, you need to preheat your oven to 425°F (220°C). This step is key. A hot oven helps to crisp the cauliflower. Next, take your medium cauliflower and cut it into florets. Place these florets in a large bowl. Add 2 tablespoons of olive oil. Then, sprinkle in 1 teaspoon of smoked paprika, 1 teaspoon of cumin, 1/2 teaspoon of garlic powder, and 1/2 teaspoon of chili powder. Season with salt and pepper to taste. Toss everything together until each piece is coated well. Spread the seasoned florets out on a baking sheet. Make sure they are in a single layer. This allows them to roast evenly. Put the baking sheet in the preheated oven. Roast for about 25-30 minutes. Flip the cauliflower halfway through. You want them golden brown and tender. While the cauliflower roasts, heat your tortillas. You can use either corn or flour. Place them in a dry skillet over medium heat. Warm them for about 30 seconds on each side. This makes them soft and easy to fold. Once the cauliflower is done, take it out of the oven and let it cool for a few minutes. Now, it’s time to build your tacos! Place a generous amount of roasted cauliflower on each tortilla. Top with sliced avocado, shredded red cabbage, and chopped cilantro. Squeeze fresh lime juice over the tacos for a zesty kick. If you like, add crumbled feta cheese or vegan cheese for extra flavor. Serve these vibrant roasted cauliflower tacos right away and enjoy every bite! For a full recipe, check the earlier section. Seasoning cauliflower is key for great flavor. Start with olive oil to help the spices stick. Use a mix of smoked paprika, cumin, garlic powder, and chili powder. This combo gives warmth and depth. Don’t forget salt and pepper to enhance the taste. Toss the florets well to coat them evenly. This ensures every bite is packed with flavor. Adjust spices to your liking, adding more chili for heat. Roasting cauliflower is simple but needs attention. Set your oven to 425°F (220°C) for perfect roasting. Spread the florets in a single layer on the baking sheet. This helps them cook evenly and become crispy. Flip the cauliflower halfway through to brown all sides. Roast for about 25-30 minutes, until they turn golden and tender. Keep an eye on them to avoid burning. To keep your tacos fresh, warm the tortillas right before serving. Heat them in a dry skillet for about 30 seconds on each side. This makes them soft and pliable. When you assemble, add roasted cauliflower and toppings just before eating. This keeps the taco crunchy and prevents sogginess. Enjoy your vibrant roasted cauliflower tacos with a squeeze of lime for added zest. For more details on making these tacos, check the Full Recipe. {{image_2}} These tacos are great for vegan eaters. The roasted cauliflower shines as the main star. You can enjoy all the flavors without any animal products. Just follow the Full Recipe and skip the optional cheese. The creamy avocado and fresh lime add richness and zest. You won’t miss the cheese at all! If you need gluten-free options, corn tortillas work best. They hold the roasted cauliflower well. You can find them in most stores. Always check the label to ensure they are gluten-free. This way, everyone can enjoy these tacos without worry. Toppings can take your tacos to the next level. Try adding crunchy toppings like sliced radishes or pickled onions. They bring extra flavor and texture. You can also drizzle sauces like tahini or a spicy salsa. Experiment with different flavors to find your favorite combo. Fresh herbs, like basil or parsley, can also brighten the dish. Have fun with your toppings to make each taco unique! To keep your roasted cauliflower tacos fresh, wrap them tightly in foil or plastic wrap. This helps prevent them from drying out. You can also place them in an airtight container. Store them in the fridge for up to three days. When you are ready to eat them, you can reheat them easily. To reheat leftover tacos, you have a few simple options. You can use a skillet over medium heat. Place the tacos in the skillet and warm for about 2-3 minutes on each side. This keeps the tortillas soft and the filling warm. You can also use a microwave. Heat them in 30-second intervals until warm. Just be careful, as microwaving may make the tortillas a bit chewy. If you want to save time later, you can freeze the roasted cauliflower. Let it cool completely, then place it in a freezer-safe bag. Remove as much air as possible before sealing. You can freeze it for up to three months. When you are ready to use it, thaw it in the fridge overnight. After thawing, you can reheat it as mentioned before. Enjoy your roasted cauliflower tacos whenever you wish! For the entire recipe, check out the Full Recipe section. Yes, you can make roasted cauliflower tacos ahead of time. Roast the cauliflower and store it in the fridge. It stays good for 3-4 days. When ready to eat, warm the cauliflower in a pan. Heat the tortillas as well, then assemble your tacos. This way, you enjoy fresh flavors without much hassle. For side dishes, you have many tasty options. Here are a few ideas: - Black bean salad - Mexican street corn - Quinoa salad - Cilantro lime rice - Chips with salsa or guacamole These sides add flavor and color to your meal. Yes, adding protein is easy! Here are a few tasty options: - Grilled chicken - Black beans - Chickpeas - Tofu - Shrimp Just cook your protein separately and add it to your tacos. You’ll have a more filling meal and a great flavor mix. To spice up your tacos, try these tips: - Add more chili powder to the cauliflower mix. - Use spicy salsa or hot sauce as a topping. - Add sliced jalapeños for a fresh kick. - Mix in diced chipotle peppers for smoky heat. These tweaks will make your tacos extra bold and exciting. If you want to switch up the base, try these alternatives: - Broccoli florets - Brussels sprouts, halved - Eggplant, diced - Sweet potatoes, cubed These veggies roast well and bring unique flavors. You can enjoy a different taste while keeping it simple and healthy. For the full recipe, check out the detailed steps and ingredients above. Roasted cauliflower tacos are tasty and easy to make. You learned about key ingredients, steps for prep, and ways to make these tacos your own. I shared tips for seasoning, keeping them fresh, and even variations for different diets. Remember to store leftovers properly so you can enjoy them later. With these simple ideas, you can make delicious tacos that fit your needs. Dive in and explore the fun of taco-making!

Roasted Cauliflower Tacos Flavorful and Simple Meal

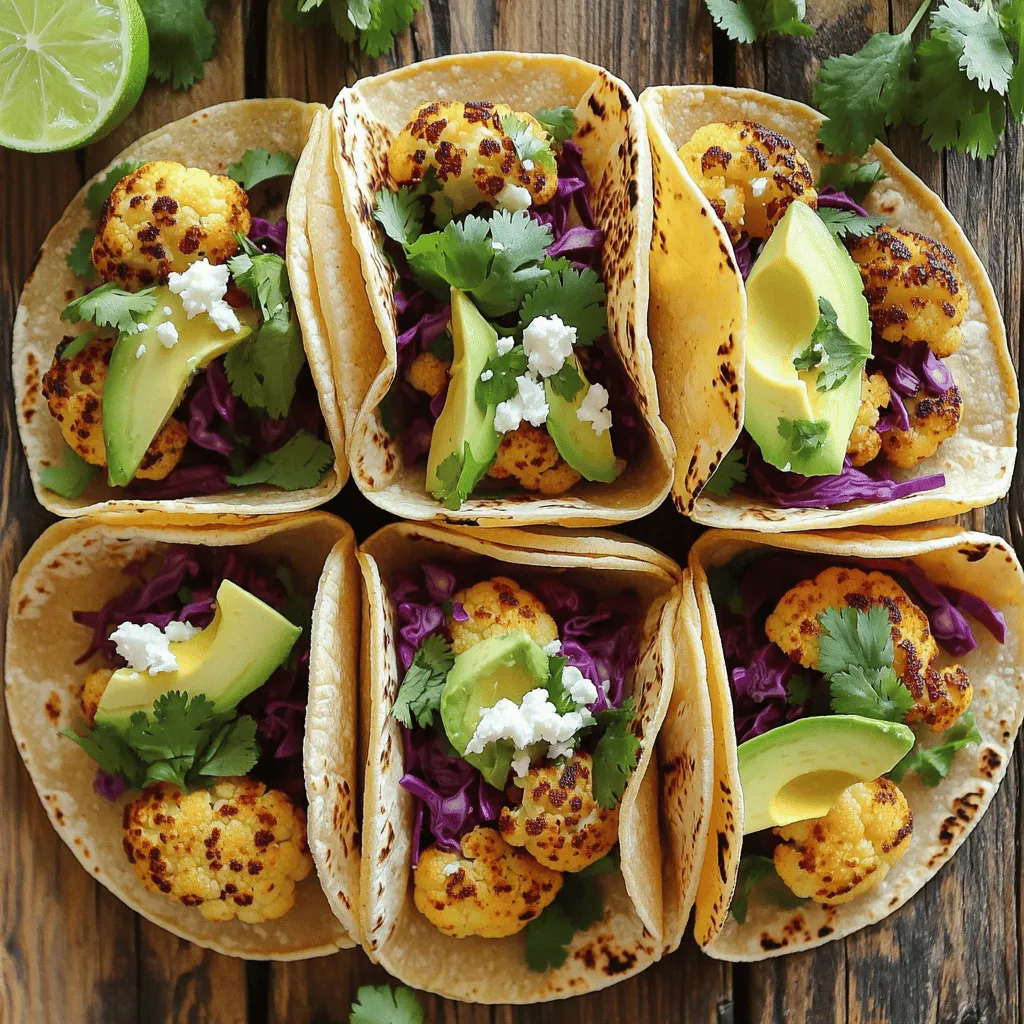
Craving a meal that’s both tasty and simple? Roasted cauliflower tacos bring bold flavors and crunch to your table! With

- 1 lb shrimp, peeled and deveined - 2 tablespoons Sriracha sauce - 2 tablespoons honey - 1 tablespoon soy sauce (or tamari for gluten-free) - 1 teaspoon garlic powder - 1 teaspoon ginger powder - Sesame seeds - Fresh cilantro - Lime wedges The key to great Sriracha honey shrimp bowls starts with fresh shrimp. I love using peeled and deveined shrimp. They cook quickly and soak up flavor well. The Sriracha sauce offers heat, while honey adds sweetness. This combination creates a perfect balance. Next, I add soy sauce for depth and umami. Garlic powder and ginger powder boost the flavor. They mix well with the shrimp and sauce. This blend of ingredients makes the base of our dish. For garnishing, I recommend sesame seeds and fresh cilantro. They add texture and a burst of color. Lime wedges are a must. A squeeze of lime brightens the dish and enhances the flavors. This simple list of ingredients helps you create a flavorful and satisfying meal. You can find the full recipe in this article to guide you through the cooking process. To start, gather your ingredients. In a medium bowl, mix together the Sriracha, honey, soy sauce, garlic powder, and ginger powder. This mix creates a sweet and spicy sauce that makes the shrimp shine. Once mixed, add the shrimp. Make sure the shrimp are well-coated in the marinade. Let them sit for at least 15 minutes. This step helps them soak up all the tasty flavors. While the shrimp marinates, it’s time to prepare the veggies. In a large skillet, heat the vegetable oil over medium-high heat. Once the oil is hot, add the sliced red bell pepper and the snap peas. Stir-fry them for about 3 to 4 minutes. You want them to be just tender but still crisp. After that, remove the veggies from the skillet and set them aside. Now comes the fun part! In the same skillet, add the marinated shrimp. Cook them for about 3 to 4 minutes. They should turn pink and opaque. Stir occasionally to ensure even cooking. Once they are cooked, return the vegetables to the skillet. Stir everything together until heated through. This mix of shrimp and vegetables will create a colorful and delicious base for your meal. Use a large skillet for even cooking. This helps shrimp cook nicely without crowding. A crowded pan can lead to uneven heat and steaming instead of searing. Get that great brown color on your shrimp! Don’t overcook shrimp; cook just until pink. Shrimp cook fast, usually in 3-4 minutes. You want them to be firm yet tender. If they turn rubbery, you’ve cooked them too long. Watch them closely for the best results. Experiment with additional seasonings for zest. You can add lime juice for brightness or a pinch of red pepper flakes for extra heat. Fresh herbs like cilantro or basil can also boost flavor. Each twist makes your meal more exciting! {{image_2}} If you want a gluten-free meal, use tamari instead of soy sauce. Tamari has a similar taste and is safe for those with gluten issues. It will still give the dish a great flavor while keeping it gluten-free. Feel free to play with the veggies. You can swap in broccoli or zucchini. These veggies add different textures and flavors. They also give you more color in your bowl, making it even more appealing. You can mix and match to find your favorite combo. Shrimp is tasty, but you can switch it up. Try using chicken, tofu, or scallops instead. Each option brings a new flavor and texture. Chicken is great for a heartier meal. Tofu is perfect for a vegetarian choice. Scallops add a touch of luxury to your bowl. Store your Sriracha honey shrimp bowls in an airtight container. Place them in the refrigerator. This keeps them fresh for about three days. Make sure to cool them before sealing. To enjoy your leftovers, reheat them on the stove. Use low heat to avoid overcooking. Stir occasionally to heat evenly. This method keeps your shrimp tender and tasty. If you want to store your meal longer, freeze it. Keep the shrimp separate from the rice or quinoa. This helps maintain texture and flavor. When you're ready to eat, thaw everything completely before reheating. This way, you’ll still enjoy a flavorful meal. - Follow the full recipe provided in the article. It’s easy and quick. - Yes, just make sure to thaw them completely before cooking. Thawing helps them cook evenly. - Consider sides like salad, steamed vegetables, or spring rolls. These add freshness and variety. This article covered how to make delicious Sriracha honey shrimp bowls. You learned about the key ingredients, cooking steps, and storage tips. I shared tips to enhance flavor and suggested variations, like using different proteins or vegetables. Remember to keep an eye on your shrimp while cooking to ensure they stay tender. With these simple steps, you can enjoy tasty meals that impress anyone. Happy cooking!

Sriracha Honey Shrimp Bowls Simple Flavorful Meal

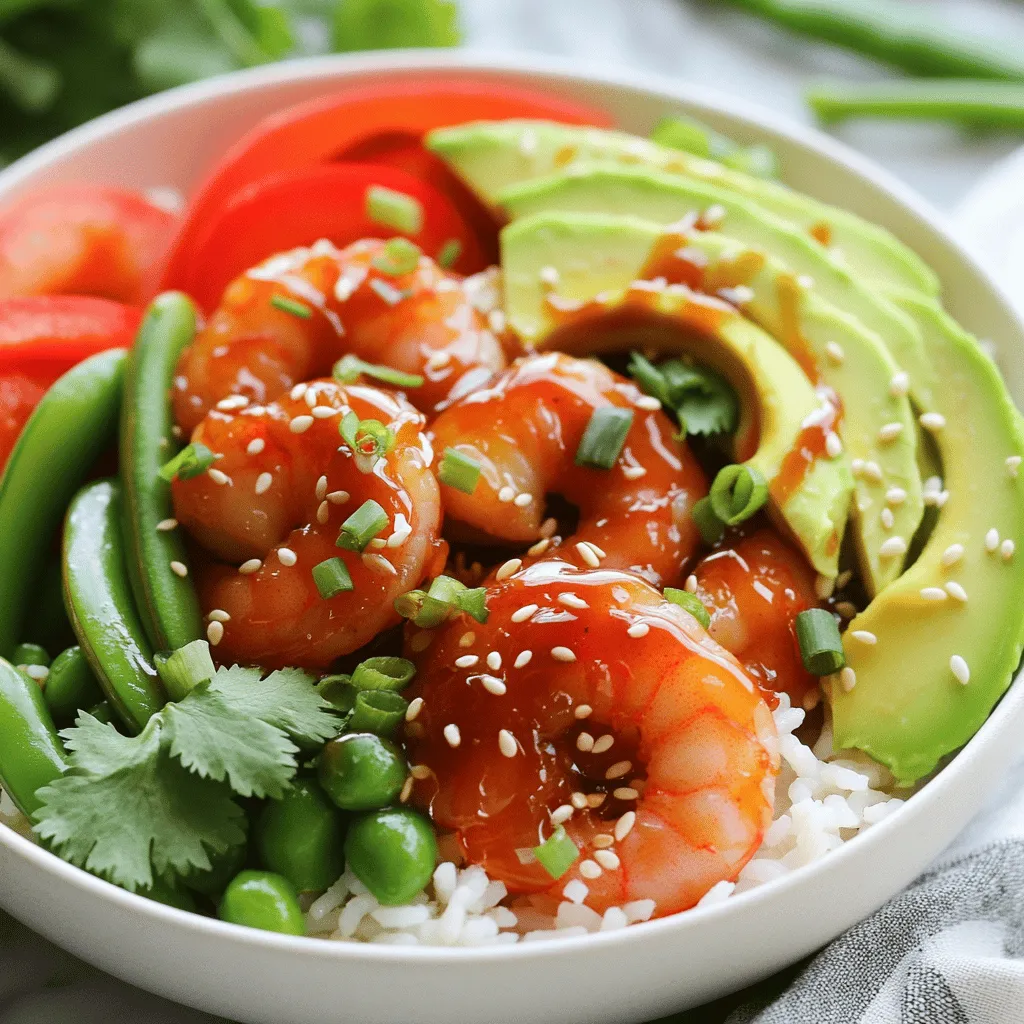
Craving a simple, tasty meal? You’re in for a treat! My Sriracha Honey Shrimp Bowls deliver bold flavors with just

To make delicious pumpkin chocolate chip muffins, you need these key ingredients: - 1 cup canned pumpkin puree - 1/2 cup brown sugar - 1/4 cup granulated sugar - 1/3 cup vegetable oil - 2 large eggs - 1 teaspoon vanilla extract - 1 1/2 cups all-purpose flour - 1 teaspoon baking soda - 1/2 teaspoon baking powder - 1/2 teaspoon salt - 1 teaspoon ground cinnamon - 1/2 teaspoon ground nutmeg - 1/4 teaspoon ground ginger - 1 cup semi-sweet chocolate chips These ingredients work together to create a moist and flavorful muffin. The pumpkin adds sweetness and moisture. The spices enhance the flavor and bring warmth. You can customize your muffins with some optional add-ins. Consider adding: - 1/2 cup chopped walnuts or pecans - Dried cranberries for a tart bite - A sprinkle of sea salt on top for contrast If you want to make this recipe healthier, you can swap out some ingredients. Use whole wheat flour instead of all-purpose flour. You can also use applesauce in place of some oil to lower fat. Each muffin is packed with flavor and nutrition. Here’s the breakdown per muffin: - Calories: 180 - Protein: 3g - Fat: 7g - Carbohydrates: 29g - Fiber: 1g - Sugar: 10g These muffins make a great breakfast or snack option. They are rich in flavor while still being balanced. For the full recipe, check the detailed instructions above. Start by gathering your ingredients. You will need: - 1 cup canned pumpkin puree - 1/2 cup brown sugar - 1/4 cup granulated sugar - 1/3 cup vegetable oil - 2 large eggs - 1 teaspoon vanilla extract - 1 1/2 cups all-purpose flour - 1 teaspoon baking soda - 1/2 teaspoon baking powder - 1/2 teaspoon salt - 1 teaspoon ground cinnamon - 1/2 teaspoon ground nutmeg - 1/4 teaspoon ground ginger - 1 cup semi-sweet chocolate chips - Optional: 1/2 cup chopped walnuts or pecans Preheat your oven to 350°F (175°C). Line a muffin tin with paper liners or grease them. In a large bowl, mix the pumpkin puree, brown sugar, granulated sugar, vegetable oil, eggs, and vanilla. Whisk until smooth. In another bowl, sift the flour, baking soda, baking powder, salt, cinnamon, nutmeg, and ginger. Slowly add this mix to the wet ingredients, stirring gently. Be careful not to overmix. Fold in the chocolate chips and nuts, if you choose to use them. Divide the batter among 12 muffin cups, filling each about 2/3 full. Place the muffin tin in the preheated oven. Bake for 18-22 minutes. To check if they are done, insert a toothpick into the center of a muffin. If it comes out clean, they are ready. Once baked, remove the muffins from the oven. Let them cool in the pan for 5 minutes. After that, transfer them to a wire rack to cool completely. To check if your muffins are done, use a toothpick. It should come out clean from the center of a muffin. If the toothpick has wet batter on it, bake the muffins a few more minutes. Keep an eye on them, as oven times can vary. Enjoy the delicious smell while they bake! For the complete recipe, check out the Full Recipe section. To make your muffins moist, use canned pumpkin puree. It has more water than fresh pumpkin. Mix the wet and dry ingredients gently. This keeps the muffins soft. Overmixing can make them tough. Adding a bit of vegetable oil also helps keep moisture in. One big mistake is using old baking powder. Always check the date on the package. Too much flour can dry out the muffins. Use a spoon to scoop flour into your measuring cup, then level it off. Don’t skip the spices. They add great flavor and warmth. Lastly, remember to cool the muffins in the pan for just five minutes before moving them to a wire rack. Store your muffins in an airtight container. This keeps them fresh for up to three days. You can freeze muffins for up to three months. Wrap each one in plastic wrap, then place them in a freezer bag. To enjoy them later, thaw them at room temperature. You can warm them in the microwave for a few seconds, too. For a special touch, serve with cream cheese or a sprinkle of powdered sugar. {{image_2}} You can add spices to change the taste of your muffins. Consider adding cloves or allspice for warmth. A pinch of cardamom can also enhance the flavor. If you like a bit of heat, try adding a dash of cayenne pepper. These spices work well with pumpkin and make each bite special. If you want a healthier muffin, you can make a gluten-free version. Use a gluten-free flour blend instead of all-purpose flour. You can also replace sugar with honey or maple syrup. This makes your muffins sweet but still healthy. Adding applesauce can cut down on oil and keep them moist. You can make your muffins festive by adding cranberries or orange zest. The tartness of cranberries pairs well with pumpkin. You can also add some chopped nuts for crunch. Try adding a bit of fresh ginger for a zesty kick. These twists make your muffins perfect for fall or winter gatherings. You can find the full recipe and more ideas to explore! To keep your pumpkin chocolate chip muffins fresh, place them in an airtight container. You can also wrap them in plastic wrap. Store them at room temperature for up to three days. If you want them to last longer, consider refrigerating them. Just remember, refrigeration can change their texture a bit. You can freeze these muffins for up to three months. Allow them to cool completely before freezing. Place them in a freezer-safe bag or container. When you want to enjoy them again, remove the muffins from the freezer. Let them thaw in the fridge overnight or at room temperature for a couple of hours. To reheat, warm them in the oven at 350°F (175°C) for about 10 minutes. When stored properly, these muffins can last about three days at room temperature and up to a week in the fridge. If frozen, they can stay fresh for three months. Always check for signs of spoilage, like mold or an off smell, before eating. Enjoy your muffins at their best! For the full recipe, check the link above. Yes, you can use fresh pumpkin. Start by roasting a small pumpkin. Cut it in half and scoop out the seeds. Bake the halves cut side down at 350°F (175°C) for about 45 minutes, or until soft. Once cool, scoop out the flesh and blend it until smooth. Use this as a 1:1 swap for canned pumpkin in the recipe. To make these muffins vegan, replace the eggs with flax eggs. Mix 1 tablespoon of ground flaxseed with 2.5 tablespoons of water. Let it sit for 5 minutes. This acts as a binder. You can also use plant-based oil, like coconut oil or canola oil, instead of vegetable oil. Make sure to use dairy-free chocolate chips too. If you want to swap out chocolate chips, try using dried fruit like raisins or cranberries. You can also use nuts, like chopped walnuts or pecans, for extra crunch. For a fun twist, consider white chocolate chips or butterscotch chips. For the complete recipe, including all the ingredients and steps, check out the Full Recipe for Pumpkin Chocolate Chip Muffins. We covered all you need for perfect pumpkin chocolate chip muffins. You learned about essential ingredients and optional add-ins. The step-by-step guide made baking easy and fun. Tips helped avoid common mistakes. Variations let you explore new flavors, and storage advice keeps muffins fresh. Now, you’re ready to bake tasty treats that everyone will love. Enjoy your muffins and share them with friends! Happy baking!

Pumpkin Chocolate Chip Muffins Tasty and Simple Recipe

Warm, spiced, and topped with chocolate, pumpkin chocolate chip muffins are a fall favorite. This tasty and simple recipe will

- Chicken and Marinade Ingredients - 1 lb (450g) boneless chicken thighs, cut into bite-sized pieces - 1 cup plain yogurt - 2 tablespoons lemon juice - 2 teaspoons garam masala - 1 teaspoon ground cumin - 1 teaspoon paprika - 1 teaspoon turmeric - 1 teaspoon coriander powder - 1 tablespoon ginger-garlic paste - Sauces and Seasonings - 2 tablespoons vegetable oil - 1 onion, finely chopped - 1 can (14 oz) crushed tomatoes - 1 cup coconut milk - Salt and pepper to taste - Optional Garnishes - Fresh cilantro, for garnish Gathering your ingredients makes cooking easy and fun. You will need chicken thighs for the base. The yogurt and spices create a tasty marinade. Lemon juice adds a nice zing. The onion and crushed tomatoes give the sauce its rich flavor. Coconut milk adds creaminess. Finally, cilantro adds color and freshness. This recipe is simple. You can find the Full Recipe for detailed steps. Enjoy cooking! Mixing the Ingredients Start by taking a mixing bowl. Add 1 cup of plain yogurt, 2 tablespoons of lemon juice, and the spices: 2 teaspoons of garam masala, 1 teaspoon of ground cumin, 1 teaspoon of paprika, 1 teaspoon of turmeric, and 1 teaspoon of coriander powder. Don’t forget the 1 tablespoon of ginger-garlic paste. Mix everything well until you have a smooth marinade. Marinating the Chicken Next, take 1 lb of boneless chicken thighs cut into bite-sized pieces. Put the chicken into the marinade and stir it around until all pieces are coated. Cover the bowl and let it sit in the fridge. You can marinate it for at least 30 minutes or up to overnight for a deeper flavor. Sautéing the Onions Heat 2 tablespoons of vegetable oil in a large skillet over medium heat. Add 1 finely chopped onion to the skillet. Sauté the onion until it turns golden brown, which takes about 5 to 7 minutes. This step adds a nice base flavor to your dish. Browning the Chicken Remove the chicken from the marinade. Add the chicken pieces to the skillet with the onions. Cook the chicken, stirring occasionally. You want it to brown on all sides, which should take about 8 to 10 minutes. Simmering the Sauce Now, pour in 1 can of crushed tomatoes and stir well. Let the sauce simmer for 10 minutes. This helps blend all the flavors. After that, add 1 cup of coconut milk and stir again. Simmer for another 10 to 15 minutes until the sauce thickens and the chicken is fully cooked. Adjusting Seasoning Once the chicken is cooked, taste the sauce. Add salt and pepper as needed to balance the flavors. This step is key for a tasty dish. Garnishing Before Serving Finally, chop some fresh cilantro and sprinkle it on top of your dish before serving. This adds a pop of color and freshness, making your chicken tikka masala even more inviting. For the full recipe details, check out the Easy Chicken Tikka Masala. Key Cooking Techniques Start by getting your chicken marinated. Mix yogurt, lemon juice, and spices in a bowl. This step makes your chicken tender and full of flavor. Use a non-stick skillet to sauté onions until golden. This adds depth to your sauce. Cook chicken until it browns on all sides. This helps lock in juices. Finally, let the sauce simmer. This melds all the flavors together nicely. Common Mistakes to Avoid Don’t skip marinating your chicken. It’s key for great taste. Avoid cooking the chicken too quickly. It should brown slowly for the best result. Don’t forget to taste your sauce. Adjust salt and pepper to suit your taste. Lastly, don’t rush the simmering. Letting it cook longer creates a richer flavor. Additional Spices and Add-ins You can add extra spices for more flavor. Try a pinch of cinnamon or cardamom. These spices give a warm, aromatic touch. Adding a tablespoon of brown sugar can balance acidity from the tomatoes. Fresh ginger or chili peppers can also kick up the heat. Cooking Time Adjustments If you want a thicker sauce, simmer a bit longer. Check the sauce as it cooks. If it’s too thin, let it bubble away. For a creamier dish, add more coconut milk. This will enrich the flavor and texture. Always adjust cooking times as needed to suit your taste. For the full recipe, check out the complete instructions. {{image_2}} For a tasty vegetarian version of chicken tikka masala, you can use tofu or paneer as substitutes. Tofu offers a great texture and absorbs flavors well. Paneer gives a creamy touch that pairs nicely with the spices. You can also try chickpeas or lentils for a heartier dish. They add protein and a unique flavor. For the sauces, use coconut milk or cashew cream to keep it rich and creamy. You can easily adjust the heat in your chicken tikka masala. To make it spicy, add more chili powder or fresh green chilies. A pinch of cayenne pepper can also kick it up a notch. If you prefer a milder taste, reduce the amount of spices. You can also add more coconut milk for creaminess. Consider using sweet bell peppers or carrots for a different flavor profile. These variations let you enjoy this dish in many ways. Customize it to your taste and share it with others! For the full recipe, check out the section above. Refrigeration Instructions After cooking, let the chicken tikka masala cool. Place it in an airtight container. Store it in the fridge for up to four days. This keeps your dish fresh and safe to eat. Freezing Tips If you want to keep it longer, you can freeze it. Use a freezer-safe container or a heavy-duty freezer bag. It can last up to three months in the freezer. Just make sure to label the container with the date. Best Methods for Reheating To reheat, you can use the stove or microwave. If using the stove, place the tikka masala in a pan. Add a splash of water or coconut milk to keep it moist. Heat it over medium until warm. If using a microwave, cover it loosely and heat in short intervals, stirring in between. Preserving Flavor after Storage When reheating, taste it again. You might want to add a pinch of salt or a dash of spices. This step helps bring back the flavors that may fade during storage. Enjoy your delicious chicken tikka masala, just like when it was fresh! Can I use bone-in chicken? Yes, you can use bone-in chicken. It adds great flavor. Just be sure to cook it longer. The chicken should reach 165°F to be safe. How do I make it dairy-free? To make it dairy-free, swap yogurt and cream with coconut yogurt or almond milk. Both options work well. They keep the dish creamy and tasty. What can I use instead of coconut milk? You can use almond milk or cashew cream instead of coconut milk. These options will change the flavor a bit, but they still taste great. How to make a quicker version of this recipe? For a quicker version, use store-bought tikka masala sauce. Just add cooked chicken and heat it up. This saves time and still gives you that rich flavor. Best Side Dishes to Pair With Serve your chicken tikka masala with rice or naan bread. They soak up the sauce well. You can also add a fresh salad for a crisp bite. Ideal Accompaniments Fresh cilantro and lime wedges are great accompaniments. They add freshness and brightness to each bite. You can also serve with yogurt for a cooling effect. In this post, we explored key ingredients, step-by-step instructions, and helpful tips for Chicken Tikka Masala. You learned about marinating chicken, the cooking process, and how to adjust flavors. We also discussed variants for vegetarians and those who prefer different spice levels. Storing and reheating tips ensure you enjoy every bite later. Remember, cooking is fun and simple. With these tools, you can create a tasty dish your friends and family will love. Dive into your kitchen and make this meal your own!

Easy Chicken Tikka Masala Simple and Flavorful Recipe

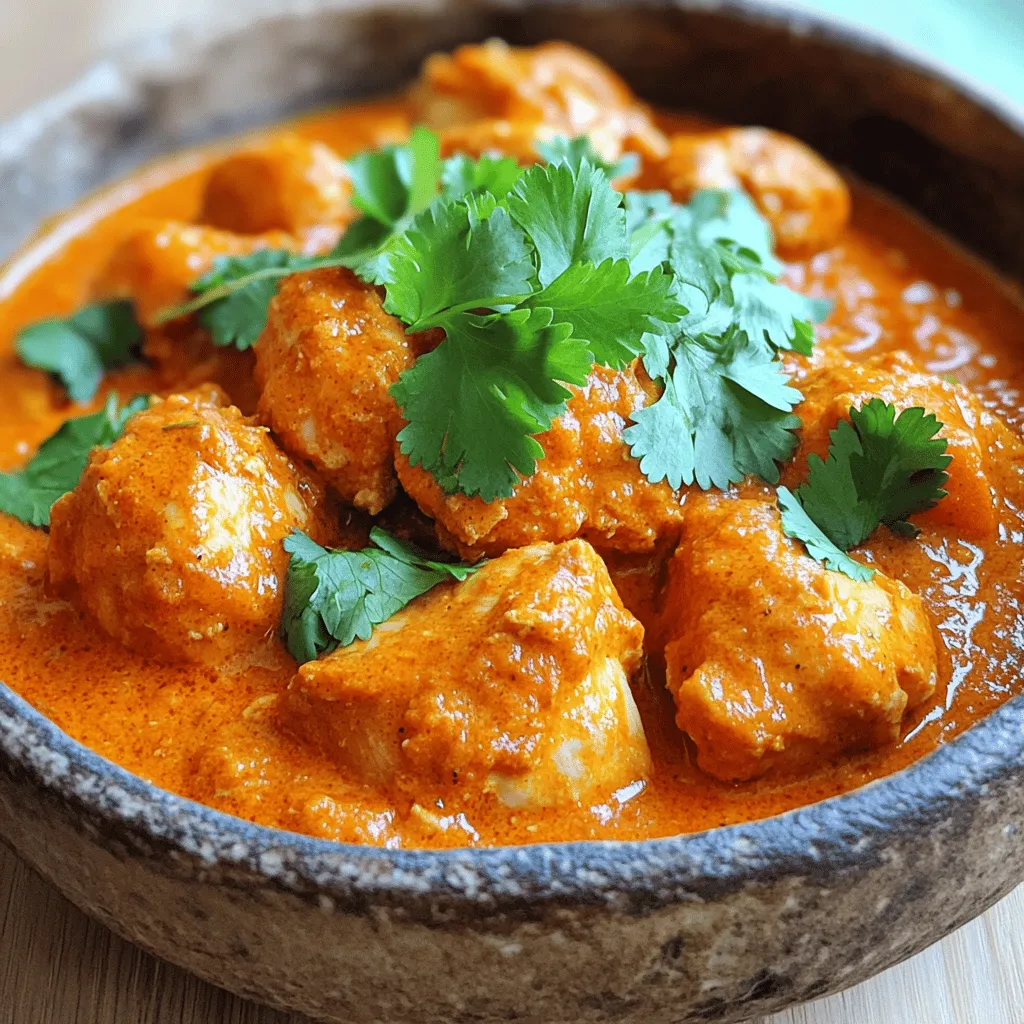
Are you craving a warm, flavorful dish that’s easy to make? Look no further! My Easy Chicken Tikka Masala recipe

- 2 large cucumbers - 3 medium tomatoes - 2 ripe avocados - 1 small red onion - 1 jalapeño (optional) For this salad, fresh produce is key. The cucumbers add crunch, while tomatoes bring juiciness. Ripe avocados give creaminess. A small red onion adds a mild bite. If you like heat, a jalapeño adds a nice kick. - ¼ cup fresh cilantro - Additional vegetables or proteins You can customize this salad. Fresh cilantro brightens up the flavors. You can add other veggies like bell peppers or even proteins like grilled chicken or chickpeas for more nutrition. - Juice of 2 limes - 2 tablespoons olive oil - Salt and black pepper The dressing is simple yet tasty. Lime juice brings fresh zest. Olive oil adds richness. Just a pinch of salt and black pepper will enhance all the flavors. Mix these ingredients well for a bright finish to your salad. For the complete recipe, check the Full Recipe. - Dice 2 large cucumbers and 2 ripe avocados into bite-sized pieces. - Chop 3 medium tomatoes and 1 small red onion. Start by dicing the cucumbers. Use a sharp knife for clean cuts. Make sure to remove any seeds if you prefer less water in your salad. Next, take the ripe avocados. Cut them carefully to keep their shape. Remember, the avocado adds creaminess to the salad. Chop the tomatoes and red onion into small pieces. This helps mix flavors well. - Combine fresh vegetables in a bowl. - Add cilantro and optional jalapeño. In a large mixing bowl, combine the diced cucumbers, chopped tomatoes, and avocados. Mix in the chopped red onion. If you want some heat, add the minced jalapeño. Don’t forget the fresh cilantro! It adds a bright flavor that makes this salad special. - Whisk together lime juice, olive oil, salt, and pepper. - Drizzle dressing over salad mixture. For the dressing, whisk together the juice of 2 limes, 2 tablespoons of olive oil, salt, and black pepper in a small bowl. This dressing will tie all the flavors together. Drizzle it over the fresh salad mixture. - Gently toss ingredients. - Allow to rest before serving. Now it’s time to toss everything together. Be gentle! You don’t want to mash the avocado. After mixing, let the salad sit for about 10 minutes. This helps the flavors blend well. Enjoy your refreshing salad! For the full recipe, check the details above. To make a great Cucumber Tomato Avocado Salad, you need fresh ingredients. Here’s how to choose the best ones: - Avocados: Look for avocados that yield slightly when you press them. They should feel firm but not hard. If they feel mushy, they may be overripe. - Tomatoes: Choose tomatoes that are bright in color and smell fresh. A slight softness indicates ripeness. Avoid any with bruises or wrinkled skin. - Cucumbers: Select cucumbers that are firm and dark green. Smaller cucumbers tend to be crunchier. If you like less bitterness, try English cucumbers; they have fewer seeds and a thinner skin. Avocados can brown quickly, so keeping them fresh is key. Here are some tips: - Preventing Browning: To slow browning, squeeze lime juice over the cut avocado. The acid helps keep it green. - Storage: If you have leftover avocado, store it in an airtight container. Adding a slice of onion can also help keep it fresh. Pairing and serving can make your salad shine. Here are some ideas: - Ideal Pairings: This salad goes well with grilled meats, like chicken or fish. You can also serve it with tortilla chips for a crunchy side. - Recommended Serving Sizes: A serving of this salad is about one cup. This recipe makes enough for four people, perfect for a small gathering or a light lunch. For the complete details on how to prepare this salad, check out the Full Recipe. {{image_2}} You can make this salad more filling by adding protein. Grilled chicken or shrimp works great. Just cook them and slice them up. If you prefer vegetarian options, try adding tofu or chickpeas. Both add good taste and nutrition. To give your salad a unique twist, try different herbs or spices. Fresh basil or mint adds freshness. You can also add cheese for creaminess. Feta or goat cheese are both excellent choices. They melt into the salad and boost the flavor. The dressing can change the salad's vibe. A lemon vinaigrette gives it a bright taste. Balsamic dressing adds a sweet touch. If you like creamy options, try ranch or yogurt-based dressings. They make the salad richer and more indulgent. For the full recipe, check the details above! Store your Cucumber Tomato Avocado Salad in an airtight container. Glass or plastic containers work great. The salad stays fresh in the fridge for up to three days. However, the avocado might brown after a day. To keep it fresh, add lime juice to the cut avocado before mixing. This helps slow down browning. You cannot freeze this salad as a whole. Freezing changes the texture of the cucumbers and tomatoes. However, you can freeze individual components. Chop cucumbers and tomatoes. Place them in freezer bags. When you want to use them, thaw in the fridge overnight. The avocados can also be mashed and frozen for later use. This salad is best served cold. There are no non-salad components to reheat. If you add grilled chicken or shrimp, heat them separately. You can use a pan or microwave to warm the protein. Then, let it cool slightly before adding it back to the salad. Cucumber Tomato Avocado Salad tastes best fresh. If you store it, keep it in a tight container. It lasts about one day in the fridge. The avocado may brown after a while, so eat it soon. To keep it fresh, store the dressing separately. Mix it in just before serving for the best taste. Yes, feel free to get creative! You can add bell peppers for crunch or corn for sweetness. Carrots or radishes can add a nice bite. You can also swap out the jalapeño if you want less heat. Mix and match to find your favorite flavors in this salad. This salad pairs well with grilled chicken or fish. It also goes great with sandwiches or wraps. You can serve it alongside a light soup for a full meal. The bright flavors make it perfect for picnics or barbecues. Enjoy it with your favorite main dish to brighten your plate. You can find the complete Full Recipe for Cucumber Tomato Avocado Salad above. It includes all the steps to make this refreshing dish. This Cucumber Tomato Avocado Salad is fresh and easy to make. You learned how to prepare the ingredients, mix them, and create a tasty dressing. I shared tips on choosing the best produce and keeping avocados fresh. You discovered variations with proteins, flavors, and alternative dressings. Remember to store leftovers properly to enjoy them later. A tasty salad can fit into many meals. Make it your own with fresh choices and enjoy every bite!

Refreshing Cucumber Tomato Avocado Salad Recipe

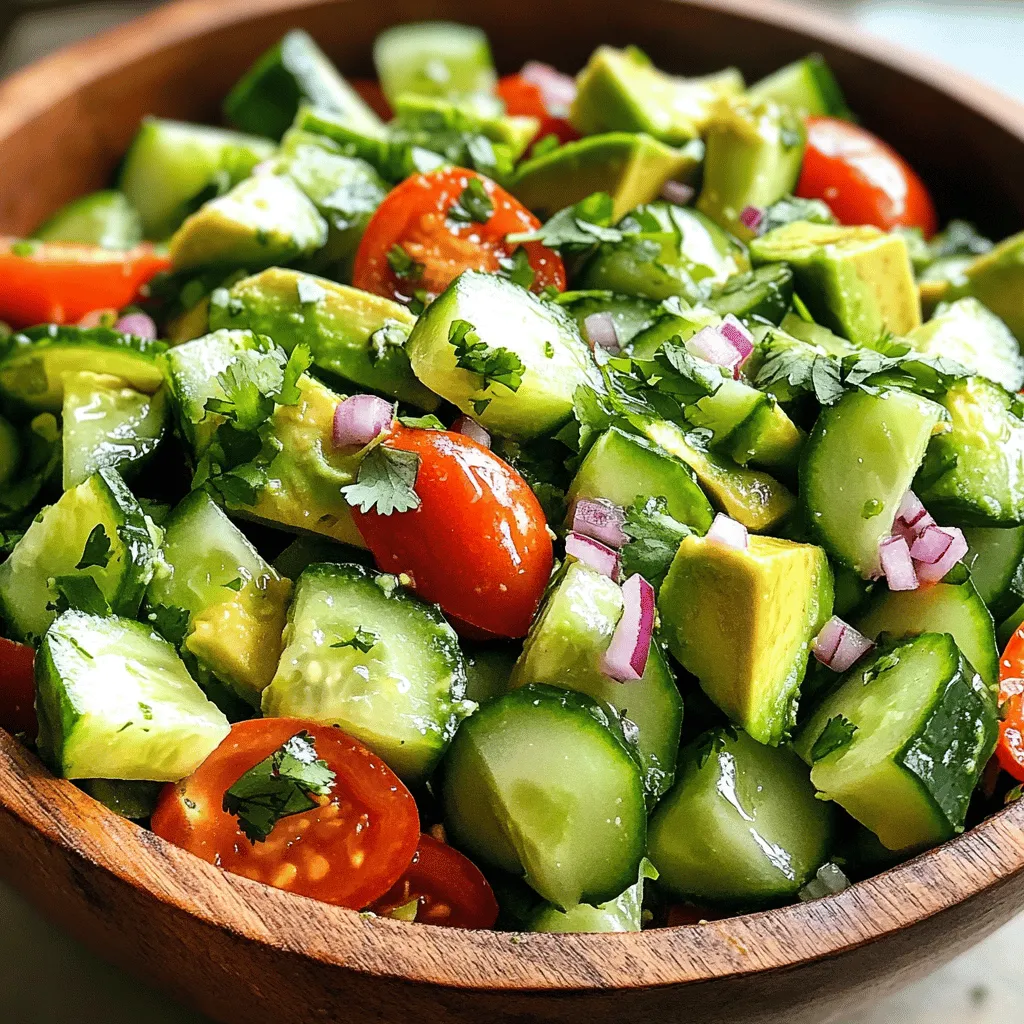
Looking for a quick and tasty dish? Let me introduce you to my Refreshing Cucumber Tomato Avocado Salad! This vibrant

Older posts
Newer posts
← Previous Page1 … Page61 Page62 Page63 … Page85 Next →

dsad

© 2026 greenmealmap • Built with GeneratePress

Our Policies

  • Copyright Policy
  • Cookie Policy
  • GDPR Policy
  • Privacy Policy
  • Disclaimer
  • Terms Of Use

More Information

  • Home
  • About
  • Contact
  • Appetizers
  • Dessert
  • Dinner
  • Drinks
©2026, greenmealmap About Back To Top