Skip to content
DisclaimerTerms Of UseGDPR PolicyCookie Policy

greenmealmap

  • Home
  • Drinks
  • Appetizers
  • Dinner
  • Dessert
  • About
  • Contact
  • Privacy Policy
DisclaimerTerms Of UseGDPR PolicyCookie Policy

NO-ING-IMG

- Ripe peaches (2, diced) - Chopped pecans (1 cup) - All-purpose flour (2 cups) - Granulated sugar (1 cup) - Baking powder (2 teaspoons) - Baking soda (1/2 teaspoon) - Salt (1/2 teaspoon) - Ground cinnamon (1/2 teaspoon) - Unsalted butter (1/2 cup, melted) - Large eggs (2) - Buttermilk (1 cup) - Vanilla extract (1 teaspoon) In these muffins, ripe peaches and pecans create a sweet and nutty flavor. I love using fresh peaches because they add juiciness. Make sure the peaches are soft to the touch. This shows they are ripe and full of flavor. Chopped pecans add a crunchy texture that contrasts well with the soft muffins. For dry ingredients, mix all-purpose flour, sugar, baking powder, baking soda, salt, and ground cinnamon. These items help the muffins rise and taste great. Ground cinnamon adds warmth and depth to the flavor. The wet ingredients bind everything together. Melted unsalted butter gives a rich taste. Large eggs help the muffins rise and add moisture. Buttermilk makes the muffins fluffy and adds a slight tang. Lastly, a teaspoon of vanilla extract enhances the overall sweetness. You can always find the full recipe below to guide you through these steps. - Preheat oven to 350°F (175°C). - Prepare muffin tin with liners or grease the cups with butter. - In a bowl, combine: - 2 cups all-purpose flour - 1 cup granulated sugar - 2 teaspoons baking powder - 1/2 teaspoon baking soda - 1/2 teaspoon salt - 1/2 teaspoon ground cinnamon - In another bowl, beat 2 large eggs. - Add 1/2 cup melted butter, 1 cup buttermilk, and 1 teaspoon vanilla. - Whisk until smooth and well combined. - Pour the wet mixture into the dry ingredients. - Stir gently until just combined. - Fold in 2 diced peaches and 1 cup chopped pecans. - Divide batter among muffin cups, filling each about 2/3 full. - Bake for 20-25 minutes until a toothpick comes out clean. - Cool muffins in the pan for 5 minutes. - Transfer to a wire rack to cool completely. For the complete instructions, check the Full Recipe. - Choosing ripe peaches for maximum flavor: Select peaches that have a sweet scent and yield slightly when squeezed. These peaches will bring a juicy flavor to your muffins, enhancing the overall taste. Avoid peaches that feel hard or have blemishes. - Toasting pecans for enhanced taste: Toast pecans in a dry skillet over medium heat for about 5 minutes. This process brings out their natural oils and makes them crunchy, which adds depth to your muffins. Watch them closely to prevent burning. - Avoiding overmixing for fluffy muffins: Mix the batter gently until just combined. Overmixing can lead to dense muffins instead of light and airy ones. A few lumps are perfectly fine! - Checking muffin readiness with toothpick test: Insert a toothpick into the center of a muffin. If it comes out clean or with a few crumbs, the muffins are ready. This simple test ensures you avoid under or over-baking your treats. - Ways to serve peach muffins attractively: Serve warm muffins on a colorful plate for a vibrant presentation. You can stack them or arrange them in a circle for a beautiful display. - Garnishing ideas with powdered sugar and peach slices: Dust the tops of your cooled muffins with powdered sugar. Add a slice of fresh peach on each muffin for an eye-catching touch. This simple garnish adds a pop of color and makes your muffins look extra special. For a complete guide on making these delicious muffins, check out the Full Recipe. {{image_2}} You can change the taste of your muffins easily. Adding spices like nutmeg or ginger can wake up the flavors. Both spices blend well with peaches and pecans. If you want a crunch, try using other nuts. Walnuts and almonds are great choices. They bring a different texture and taste to the muffins. For a healthier twist, swap all-purpose flour with whole wheat flour. This change adds fiber and nutrients. You can also cut down the sugar. Use natural sweeteners like honey or maple syrup instead. They add sweetness and keep the muffins moist. If you need a gluten-free option, you can use alternative flours. Almond flour or oat flour works well in this recipe. For a vegan version, replace the eggs with flaxseed meal or applesauce. Use plant-based milk instead of buttermilk. These changes keep the muffins delicious while meeting dietary needs. For the full recipe, check the earlier section. Store your peach and pecan muffins at room temperature. Place them in an airtight container. This keeps them fresh for about two days. If you want to enjoy them longer, consider freezing them. To freeze muffins, let them cool completely first. Wrap each muffin in plastic wrap. Place wrapped muffins in a freezer bag. They can stay frozen for up to three months. When you want to eat them, take out the muffins and let them thaw at room temperature. To reheat muffins, use the oven or microwave. For the oven, preheat it to 350°F (175°C). Place muffins on a baking sheet for about 10 minutes. In the microwave, heat muffins for 15 to 20 seconds. This keeps them soft and warm. After reheating, serve them with butter or a drizzle of honey for extra flavor. You can also enjoy them with coffee or tea for a delightful treat. For the full recipe, check earlier in the article. To check if your muffins are done, look for a few signs. First, the tops should be golden brown. Second, a toothpick inserted in the center should come out clean. If it has wet batter, bake a few more minutes. I recommend starting to check at 20 minutes for perfect muffins. Yes, you can use frozen peaches in this recipe. However, they may change the texture a bit. Frozen fruit can make the muffins more moist. This might also add a slight delay in baking time. Thaw and drain them before use for the best results. If you don’t have buttermilk, you can make your own. Mix one cup of milk with one tablespoon of vinegar or lemon juice. Let it sit for about five minutes. You can also use plain yogurt or sour cream, diluted with a bit of water to mimic buttermilk. To make these muffins gluten-free, use gluten-free flour blends. Look for a blend that includes xanthan gum for better structure. Almond flour or oat flour are great options too. Just remember, the texture may differ slightly, but the flavor will be just as delicious. For the full recipe, check the details above. These peach muffins are a delightful treat, easy to make with simple steps. We covered the key ingredients, mixing instructions, and baking tips. You can customize flavors and adapt recipes for health needs. Remember to store and reheat them properly for the best taste later. Enjoy your baking experience, and share these delicious muffins with family and friends. Their sweet aroma and flavor will brighten anyone's day. Happy baking, and savor each bite of your creation!

Peach and Pecan Muffins Delightful Flavor Burst

Get ready for a sweet treat! These Peach and Pecan Muffins pack a delightful flavor burst in every bite. Perfect

The Mediterranean cucumber salad uses fresh and vibrant ingredients. Here’s what you need: - 3 medium cucumbers, diced - 1 cup cherry tomatoes, halved - 1/2 red onion, finely chopped - 1 bell pepper (red or yellow), diced - 1/2 cup kalamata olives, pitted and halved - 1/3 cup feta cheese, crumbled - 1/4 cup fresh parsley, chopped - 3 tablespoons olive oil - 2 tablespoons lemon juice - 1 teaspoon dried oregano - Salt and pepper to taste These key ingredients bring bright colors and fresh flavors to your dish. You can mix in some optional ingredients for added taste. Consider these: - Avocado for creaminess - Cucumber ribbons for a fun twist - Chickpeas for protein - Fresh mint for a refreshing kick These add-ins can make your salad unique. You can easily adjust based on what you like or have on hand. This salad is not just tasty; it is also healthy. Here’s a quick look at its nutrition: - Calories: About 150 per serving - Fat: 10 grams, mainly from olive oil - Protein: 4 grams from feta and olives - Fiber: 3 grams for digestive health This salad is low in calories but high in flavor. It can fit well in many diets! For the full recipe, check the instructions above. To make Mediterranean cucumber salad, start by gathering your ingredients. You will need: - 3 medium cucumbers, diced - 1 cup cherry tomatoes, halved - 1/2 red onion, finely chopped - 1 bell pepper (red or yellow), diced - 1/2 cup kalamata olives, pitted and halved - 1/3 cup feta cheese, crumbled - 1/4 cup fresh parsley, chopped Begin by placing the diced cucumbers, cherry tomatoes, red onion, and bell pepper into a large mixing bowl. Be careful to chop your veggies evenly. This helps them mix well and look nice. Next, add the kalamata olives and crumbled feta cheese. When you toss the salad, be gentle. You want to keep the veggies intact. Use two large serving spoons or your hands. Start from the bottom and lift the ingredients to the top. This way, everything gets coated with the dressing. If you toss too hard, the veggies can break apart. Making the dressing is simple. In a small bowl or jar, combine: - 3 tablespoons olive oil - 2 tablespoons lemon juice - 1 teaspoon dried oregano - Salt and pepper to taste Whisk these ingredients together until well mixed. This will give your salad a bright, fresh flavor. Once the dressing is ready, pour it over the salad. Toss everything together gently again. Finally, sprinkle the chopped fresh parsley on top for added flavor and freshness. You can find the full recipe linked in this section to guide you through each step. Enjoy your vibrant and tasty Mediterranean cucumber salad! To make the best Mediterranean cucumber salad, you need fresh ingredients. Choose firm cucumbers with smooth skin. Look for bright cherry tomatoes without bruises. Select a red onion that feels heavy for its size. For peppers, pick ones that are shiny and firm. Fresh herbs, like parsley, should be vibrant and fragrant. When you use fresh ingredients, your salad will taste better. If you have leftovers, store them in an airtight container. This keeps the salad fresh and tasty. You can place it in the fridge for up to three days. The cucumbers may become a bit soft, but the flavors will still be great. If you can, add the dressing just before serving. This helps keep the salad crisp and bright. You can change this salad to fit your likes. Want more crunch? Add chopped bell peppers or radishes. Prefer a tangy bite? Squeeze in more lemon juice. You can also swap out feta for goat cheese or leave it out for a dairy-free option. Experiment with spices too; try adding cumin or chili flakes for heat. There are many ways to make this salad your own! Ready to make it? Check out the Full Recipe for all the details! {{image_2}} To make the Mediterranean cucumber salad more filling, add grains. Quinoa is a great choice. It cooks quickly and adds protein. You can also use bulgur or couscous. These grains mix well with the fresh veggies. They soak up the dressing nicely too. For each cup of grain, use about 1 ½ cups of water. This will keep the salad light yet hearty. This salad is easy to adapt for different diets. It is naturally vegetarian since it has no meat. For a vegan option, just skip the feta cheese. You can replace it with vegan feta or avocado for creaminess. Both options add flavor while keeping it plant-based. It’s a simple swap that keeps everyone happy. Using seasonal ingredients can boost flavor and freshness. In summer, add ripe peaches or juicy watermelon. They give a sweet touch that contrasts with the salty olives. In fall, try adding roasted butternut squash or apples. These ingredients add warmth and a bit of sweetness. Always look for what is fresh and local. This keeps your salad exciting and full of flavor. Try these variations to make your Mediterranean cucumber salad unique and delicious. For the complete recipe, check out the Full Recipe section. This salad shines when paired with grilled meats. Try it with chicken or lamb. The fresh taste balances the rich flavors. It also goes well with fish dishes. Salmon or tilapia will add a nice touch. Serve the salad alongside pita bread and hummus for a complete meal. You can even add it to a wrap for a quick lunch. Serve this salad in fun ways. Use large lettuce leaves as cups for a fresh bite. You can also layer it in a glass for a colorful display. This makes it look fancy for guests. Sprinkle extra feta on top for a tasty bonus. Add a lemon wedge for a pop of color and flavor. This salad is great for summer picnics. It’s refreshing and easy to make. Bring it to a barbecue or potluck to impress friends. It fits well at family gatherings too. You can also serve it for a light lunch or dinner. It works for casual meals or festive occasions. Enjoy it anytime you want something cool and vibrant! The main flavors in a Mediterranean cucumber salad are fresh and bright. You get the crispness of cucumbers and the sweetness of cherry tomatoes. The red onion adds a nice bite, while the bell pepper brings more crunch. Kalamata olives add a salty, briny taste. Feta cheese gives a creamy texture and a tangy flavor. The dressing, made with olive oil, lemon juice, and oregano, ties everything together. It adds a zesty kick that makes the salad refreshing and enjoyable. Yes, you can make the salad ahead of time! This salad is great for meal prep. Just mix all the fresh ingredients and store them in the fridge. However, wait to add the dressing until you are ready to serve. This keeps the veggies crisp and fresh. You can prepare the dressing in advance and keep it separate. This way, you can enjoy the salad at its best. Store leftovers in an airtight container in the fridge. The salad can stay fresh for about two days. If you have leftover dressing, keep it in a separate jar. When you are ready to eat, toss the salad with the dressing again. This helps revive the flavors. If the cucumbers become too soft, don’t worry. It will still taste good! For the full recipe, you can refer back to the earlier section. This blog post explored building a delicious Mediterranean cucumber salad. You learned about key ingredients, tasty add-ins, and nutritional benefits. I shared easy steps for preparation, tips for tossing, and making the perfect dressing. We covered how to keep it fresh and customize it to your liking. There are also great variations and serving ideas. Mediterranean cucumber salad fits any meal, making it a versatile choice. Enjoy every bite!

Mediterranean Cucumber Salad Fresh and Flavorful Dish

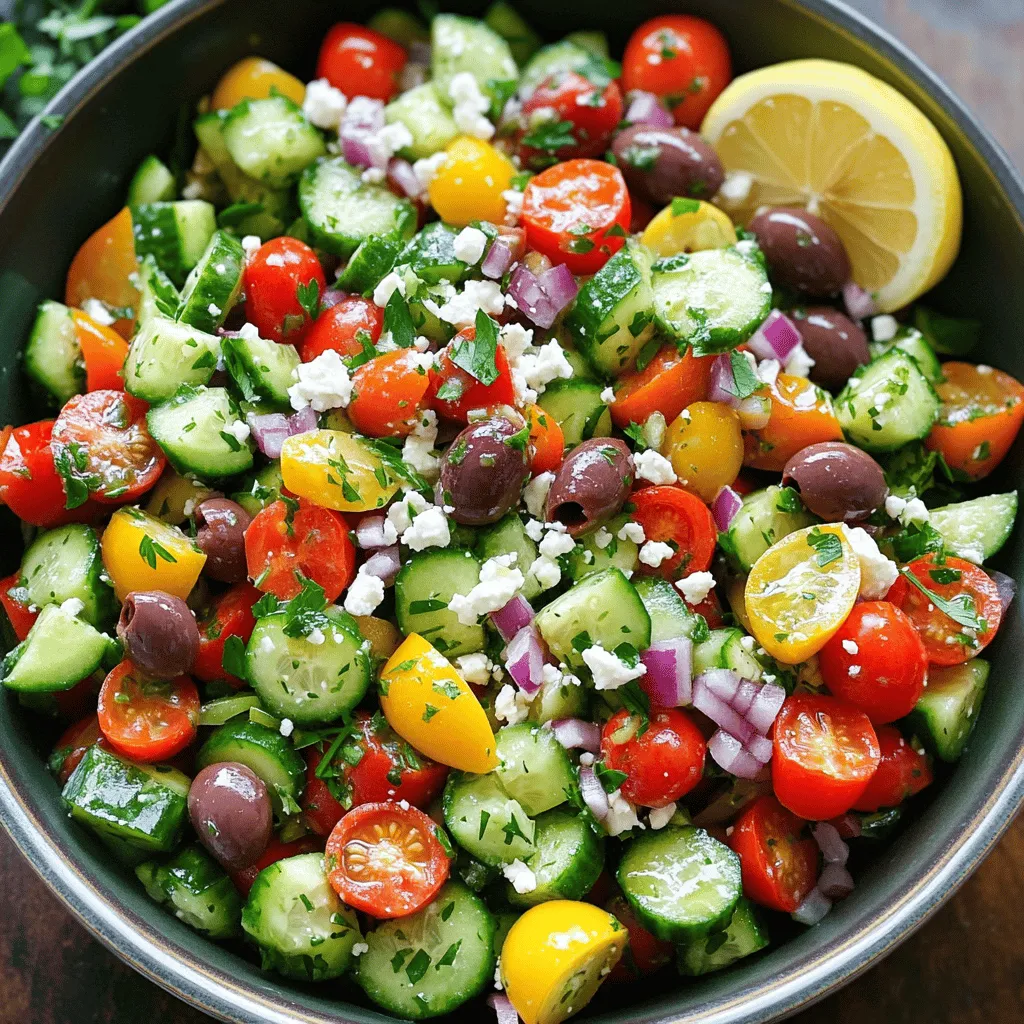
Looking for a fresh, tasty salad? This Mediterranean Cucumber Salad is a perfect choice! Loaded with bright flavors, it’s quick

To make delicious Zucchini Carrot Muffins, gather these items: - 1 cup grated zucchini (about 1 medium zucchini) - 1 cup grated carrots (about 2 medium carrots) - 1/2 cup granulated sugar - 1/2 cup brown sugar, packed - 1/2 cup vegetable oil - 2 large eggs - 1 teaspoon vanilla extract - 1 1/2 cups all-purpose flour - 1 teaspoon baking powder - 1/2 teaspoon baking soda - 1 teaspoon ground cinnamon - 1/2 teaspoon ground nutmeg - 1/2 teaspoon salt - 1/2 cup chopped walnuts or pecans (optional) - 1/4 cup raisins or dried cranberries (optional) You can make these muffins even more special with some add-ins. Try: - 1/2 cup chocolate chips for a sweet twist - 1/2 cup shredded coconut for a tropical flavor - 1/2 cup diced apples for added moisture These options let you play with flavors and textures. Feel free to mix and match! Each muffin has a good balance of nutrients. Here's what to expect per muffin: - Calories: 180 - Total Fat: 8g - Saturated Fat: 1g - Carbohydrates: 26g - Fiber: 2g - Sugars: 10g - Protein: 3g These muffins provide a healthy snack option. They are tasty and packed with veggies. Enjoy the goodness in every bite! For the full recipe, check the detailed instructions above. Start by preheating your oven to 350°F (175°C). Line your muffin tin with paper liners. If you don’t have liners, grease the tin well. In a large bowl, whisk together the granulated sugar, brown sugar, vegetable oil, eggs, and vanilla extract. Mix until it is smooth and well combined. Next, stir in the grated zucchini and carrots. Combine them well into the wet mixture. In a separate bowl, mix the all-purpose flour, baking powder, baking soda, ground cinnamon, ground nutmeg, and salt. Once it is mixed, slowly add this dry mix to the wet mix. Stir gently until just combined. Avoid overmixing, as this can make your muffins tough. If you want to add nuts or dried fruit, fold them in now. Now, fill each muffin cup about two-thirds full with the batter. Place the muffin tin in your preheated oven. Bake for about 18 to 20 minutes. To check if they are done, insert a toothpick into the center of a muffin. If it comes out clean, they are ready! After baking, let the muffins cool in the tin for 5 minutes. Then, transfer them to a wire rack to cool completely. For serving, I recommend dusting them lightly with powdered sugar. Arrange them on a rustic wooden board. You can also serve them with fresh carrot sticks and zucchini slices for a colorful touch. Enjoy these muffins with a cup of tea or coffee! Mixing is key but too much can ruin your muffins. To avoid overmixing, stir gently. Combine the wet and dry ingredients just until you see no dry flour. This helps keep your muffins light and fluffy. Remember, a few lumps are okay; they won’t hurt the final product. Grating zucchini and carrots gives muffins moisture. Use a box grater or a food processor. Grate them on the larger holes for best results. After grating, squeeze out excess water from the zucchini. This keeps your muffins from becoming soggy. Keep your fingers safe by using the grater’s handle. You can customize the sweetness and spice in your muffins. If you prefer less sugar, reduce it by a quarter cup. For more sweetness, add a few extra tablespoons. To enhance flavor, try adding more cinnamon or nutmeg. Tasting the batter before baking helps you find the right balance. For a fun twist, add chocolate chips or citrus zest to the mix. You can find the Full Recipe for all these tasty tips! {{image_2}} You can make these muffins gluten-free. Just swap the all-purpose flour for a gluten-free blend. Look for a mix that contains xanthan gum. This will help your muffins rise and have a good texture. I love brands that work well in baked goods. They give a nice crumb without changing the taste. Want a vegan option? It's easy! Replace the eggs with flaxseed meal. Mix one tablespoon of flaxseed meal with three tablespoons of water. Let it sit for a few minutes until it thickens. Use this mix instead of eggs. You can also replace the vegetable oil with applesauce for a lighter touch. This keeps the muffins moist and tasty. Add flavor to your muffins! Chocolate chips make a great treat. Just fold in 1/2 cup of mini chocolate chips when mixing the batter. If you like citrus, add a tablespoon of lemon or orange zest. This gives the muffins a fresh, bright taste. You can mix and match these ideas to create your perfect muffin. For the full recipe, check out the Zesty Zucchini Carrot Muffins. To keep your zucchini carrot muffins fresh, store them in an airtight container. Place a paper towel at the bottom of the container. This helps absorb any excess moisture. You can keep them on the counter for up to three days. If you want them to last longer, consider refrigeration. Freezing is a great way to save muffins for later. Let them cool completely before freezing. Wrap each muffin in plastic wrap or foil. Then place them in a freezer bag. Remove as much air as possible before sealing. They can last up to three months in the freezer. When you're ready to eat, just thaw them overnight in the fridge. To enjoy your muffins warm, you can reheat them in a few ways. The oven is best for even warmth. Preheat it to 350°F (175°C). Place the muffins on a baking sheet for about 10 minutes. You can also use the microwave. Heat them for 15 to 20 seconds, but check to avoid overheating. Enjoy them fresh and tasty with your favorite drink! Yes, you can swap some items. Use applesauce for oil to make it lighter. You can also use honey instead of sugar. If you lack zucchini, try using yellow squash. For gluten-free muffins, use almond or coconut flour. You can change nuts or add seeds too. These muffins stay fresh for about three days at room temperature. If you put them in the fridge, they last a week. For longer storage, freeze them. They can stay good for up to three months in the freezer. Just wrap them well in plastic and put them in a bag. I like to serve these muffins with fresh fruit or yogurt. They pair well with tea or coffee too. Try adding a dollop of cream cheese or butter for extra flavor. You can serve them as a snack or breakfast. For a fun twist, add a side of honey or maple syrup for dipping. Check out the Full Recipe for more serving ideas! We explored how to make tasty Zucchini Carrot Muffins. We covered ingredients, step-by-step instructions, and helpful tips. You can even adapt the recipe to fit your diet. Store them wisely for fresh taste later. Remember, baking is fun, and small changes can bring big flavors. Enjoy experimenting with this recipe!

Zucchini Carrot Muffins Tasty and Healthy Snack

Looking for a healthy snack that’s also a treat? Try my Zucchini Carrot Muffins! They’re easy to make and packed

For your Simple Peach Galette, gather these ingredients: - 2 large ripe peaches, pitted and sliced - 1 tablespoon lemon juice - 1 tablespoon granulated sugar - ½ teaspoon vanilla extract - 1 pre-made pie crust (store-bought or homemade) - 1 tablespoon butter, cut into small pieces - 1 egg (for egg wash) - 1 tablespoon coarse sugar (for sprinkling) - A pinch of cinnamon (optional) If you want to switch things up, here are some easy swaps: - Use nectarines instead of peaches for a different flavor. - Swap lemon juice with lime juice for a tangy twist. - Try brown sugar instead of granulated sugar for a richer taste. - For a dairy-free option, use non-dairy butter. You will need a few simple tools to make this galette: - A mixing bowl for the peach filling - A rolling pin to roll out your pie crust - A baking sheet lined with parchment paper - A small bowl for the egg wash - A whisk or fork to mix the egg - A sharp knife for slicing the peaches Now you have everything you need to create this delightful galette! For the full recipe, follow the steps outlined in the next section. Start by preheating your oven to 400°F (200°C). This step is key for a crisp crust. A hot oven helps the galette bake evenly. Next, prepare the peach filling. In a bowl, mix sliced peaches with lemon juice, granulated sugar, and vanilla extract. If you like, add a pinch of cinnamon for warmth. Toss the mixture gently to coat the peaches. Let it sit for about 10 minutes. This helps the flavors blend well. Now, roll out your pie crust on a floured surface into a 12-inch circle. Place the crust on a parchment-lined baking sheet. Spoon the peach mixture into the center, leaving a 2-inch border. Fold the edges over the filling, creating a rustic pleat. This adds a lovely touch. Scatter small pieces of butter over the peaches for richness. In a small bowl, whisk the egg and brush it over the folded crust edges. This gives a golden color when baked. Sprinkle coarse sugar on top for added sweetness. Bake the galette for 25-30 minutes until the crust is golden brown and the peaches bubble. Once baked, let it cool for 10 minutes before slicing. Serve warm for the best taste. For extra delight, pair it with a scoop of vanilla ice cream! Enjoy this Simple Peach Galette with friends and family. For the complete recipe, check the Full Recipe section. When picking peaches, look for ripe ones. They should feel slightly soft but not mushy. Their skin should be smooth and fragrant. I prefer yellow peaches for their sweet taste. White peaches are great if you want something a bit milder. Always avoid peaches with bruises or dark spots. Fresh, local peaches taste best. If they aren’t in season, use frozen peaches as a backup. A good crust makes your galette shine. Use a pre-made pie crust for ease. If you want to make your own, keep the butter cold. This helps create flaky layers. Roll it out evenly to about 12 inches. Don’t worry about it being perfect; rustic is the style! When you fold the edges over the fruit, create pleats. This adds charm and helps keep the filling inside. Serving your peach galette warm is best. It tastes great on its own, but you can add a scoop of vanilla ice cream. The hot fruit and cold ice cream make a delightful mix. You can also drizzle honey or caramel on top for extra sweetness. Pair it with a cup of tea or coffee for a cozy treat. For the full recipe, just follow the steps above! {{image_2}} You can make this galette even better by adding more fruits. Berries like blueberries and raspberries mix well with peaches. You can also try apples for a great crunch. Just use the same method for slicing and mixing. Adjust the sugar if needed, as some fruits are sweeter than others. Feel free to experiment with fruit combinations. Each mix brings a new flavor to enjoy. Changing the spices can give your peach galette a fresh twist. You can add nutmeg for warmth or ginger for a spicy kick. Try mixing in cardamom for a unique taste. These spices can enhance the sweetness of the peaches. Just a pinch is enough to notice the change. Don't be afraid to play around until you find your favorite blend. To make this galette gluten-free, swap the pie crust with a gluten-free option. You can find ready-made crusts or use a blend of gluten-free flours. Almond flour works well for a nutty taste. Just follow the same steps in the Full Recipe. Your gluten-free galette will still be delicious and satisfying. Enjoy it just like the original! To store your leftover galette, let it cool first. Then, cover it with plastic wrap or foil. Place it in the fridge. This keeps it fresh for about three days. If you want to keep it longer, freezing is a great option. When you want to enjoy your galette again, preheat your oven to 350°F (175°C). Place the galette on a baking sheet. Heat it for about 10 to 15 minutes. This warms it up and keeps the crust crisp. You can also use a microwave, but the crust won’t stay crunchy. To freeze the galette, wrap it tightly in plastic wrap. Then, place it in a freezer bag. This helps prevent freezer burn. You can freeze it for up to three months. When you’re ready to eat it, let it thaw in the fridge overnight. Then, reheat it in the oven for the best taste. You’ll love that fresh taste again! For the full recipe, check out the Simple Peach Galette. You can tell your peach galette is done when the crust turns golden brown. The peach juices should bubble up around the edges. The galette usually takes about 25-30 minutes at 400°F (200°C). Keep an eye on it in the last few minutes of baking. Yes, you can use frozen peaches. Just make sure to thaw them first. Drain any extra liquid to avoid a soggy crust. Frozen peaches can be just as tasty, especially when fresh peaches are out of season. Peach galette pairs well with many items. You can serve it warm with vanilla ice cream. Whipped cream also adds a nice touch. A sprinkle of fresh mint can make it look pretty and add flavor. No, a peach galette is not the same as a pie. Galettes have a free-form design and do not require a pie pan. The crust is folded over the filling, giving it a rustic look. Pies usually have a top crust and are more structured. Yes, you can make the galette ahead of time. You can prepare the filling and crust separately. Assemble and bake it when you’re ready to serve. For the best taste, enjoy it fresh out of the oven. You can find the Full Recipe for more details. We covered how to make a simple peach galette. You learned about key ingredients and tools. I shared tips for perfecting your crust and choosing the best peaches. We explored fun variations like adding other fruits or making it gluten-free. Remember to store leftovers properly for later enjoyment. Making a peach galette is easy and tasty. You can adapt it with what you have. Enjoy baking and sharing your delicious creation!

Simple Peach Galette Delightful and Easy Recipe

Are you ready to whip up a delicious dessert that looks fancy but is super simple? The Simple Peach Galette

- 1 ripe peach, diced - 1 tablespoon sugar - 1 tablespoon cornstarch - 1/4 cup all-purpose flour Peach cobbler mug cake needs fresh, ripe peaches. They give the best flavor and sweetness. The sugar helps to enhance the peach's natural sweetness. Cornstarch thickens the mixture, making it nice and gooey. All-purpose flour gives the cake its structure. - 1/2 teaspoon cinnamon - Whipped cream or vanilla ice cream Cinnamon adds a warm spice flavor. You can also top your cake with whipped cream or vanilla ice cream for extra richness. These toppings make your dessert even more delightful. - Plant-based alternatives for milk - Alternative sweeteners If you want a dairy-free option, use almond milk or oat milk. You can also choose different sweeteners, like honey or agave syrup, to make it your own. For the complete details on the recipe, check the Full Recipe section! Start by dicing your ripe peach into small pieces. In a microwave-safe mug, combine the diced peach with 1 tablespoon of sugar and 1 tablespoon of cornstarch. Stir everything well to coat the peach evenly. This step ensures the peach gets sweet and thick when cooked. In a separate bowl, measure out 1/4 cup of all-purpose flour, 1/4 teaspoon of baking powder, and a pinch of salt. If you want a warm spice, add a little cinnamon. Mix these dry ingredients together until they are well blended. This mix forms the cake base. Now, add the dry mix to a new bowl. Pour in 1/4 cup of milk, 1 tablespoon of vegetable oil, and 1/2 teaspoon of vanilla extract. Stir until just combined. Don’t overmix; a few lumps are okay. Pour this batter over the peach mixture in the mug. Gently stir it a couple of times to create a ripple effect. This adds a nice touch. Place the mug in the microwave and cook on high for 1 to 1.5 minutes. Check at 1 minute to see if it’s set but still moist. Let it cool for a minute, then top with whipped cream or a scoop of vanilla ice cream. Enjoy! For the complete details, refer to the Full Recipe. To get the best texture in your mug cake, do not overmix. When you mix your wet and dry ingredients, just stir until they come together. If you mix too much, your cake can turn out tough. You want it to be soft and fluffy. The right amount of mixing makes a big difference in your mug cake. Microwave cooking can be tricky. Always check your mug cake at the one-minute mark. It may need more time, but you want to avoid overcooking. The cake should feel set but still moist. If it seems dry, it has cooked too long. Remember, the mug will hold heat, so it will keep cooking even after you stop the microwave. Presentation can make your mug cake more appealing. You can serve it right in the mug for a cozy look. If you want a fancier touch, transfer it to a plate. Add a mint leaf and some diced peaches on top. For a sweet finish, a scoop of whipped cream or vanilla ice cream works great. Enjoy your creation warm from the microwave! {{image_2}} You can swap peaches with many fruits. Berries like blueberries or raspberries work well. Apples also make a great choice. Just dice them finely. Use the same amount as the peach. Each fruit adds its own flavor and sweetness. This gives you fun options to try! For a gluten-free mug cake, use gluten-free flour. Almond flour or oat flour can work, too. If you prefer vegan, replace milk with a plant-based option. Almond milk or oat milk are great choices. You can also use a flax egg instead of the egg for a vegan version. To make your mug cake extra special, think about adding nuts. Chopped walnuts or pecans add crunch. You could also sprinkle in some spices. A pinch of nutmeg or more cinnamon can boost the flavor. These small changes make a big difference. They help personalize your mug cake just how you like it. To keep your peach cobbler mug cake fresh, place it in an airtight container. If you have any leftovers, refrigerate them right away. This cake stays well for about three days in the fridge. Make sure to seal the container tight to avoid drying out. When you want to enjoy your mug cake again, use the microwave. Place the mug cake in the microwave for about 15 to 20 seconds. Check to see if it warms evenly. If it feels cold, heat it for another 10 seconds. Be careful to not overheat, or it may become tough. For the best taste, eat your peach cobbler mug cake within three days. After this time, the flavors start to fade. If you freeze it, it can last up to a month. When ready to eat, thaw it in the fridge overnight before reheating. Enjoy the sweet taste of fresh peaches anytime! Yes, you can! If you do not have a microwave, you can bake the mug cake in an oven. Preheat your oven to 350°F (175°C). Pour the prepared mixture into an oven-safe mug or ramekin and bake for about 20-25 minutes. Keep an eye on it, and use a toothpick to check if it is done. Frozen peaches can change the texture slightly. They may make the cake a bit more moist. This happens because frozen peaches release more juice as they heat up. However, they still work well in the recipe. Just be sure to thaw and drain any excess liquid before using them. You have many tasty options for toppings! Here are some popular choices: - Whipped cream - Vanilla ice cream - Crushed nuts for crunch - A drizzle of caramel sauce - Fresh mint leaves for a pop of color You can find the full recipe in this article. It has all the details you need to make your peach cobbler mug cake just right! This blog post covered the key ingredients for a delicious peach cobbler mug cake. We explored the main items needed, optional ingredients, and how to tweak the recipe for different diets. You learned step-by-step instructions and helpful tips for perfecting your cake. Remember, variations like using other fruits or flavors can make it your own. Don't forget to check the article for the full recipe. Enjoy your baking adventure!

Peach Cobbler Mug Cake Delightful and Easy Recipe

Are you ready to treat yourself to a warm, peachy delight? My Peach Cobbler Mug Cake is the answer! This

- 1 pre-made pie crust (store-bought or homemade) - 2 medium zucchinis, thinly sliced - 1 cup mushrooms, diced (cremini or button mushrooms work well) - 3 large eggs - 1 cup heavy cream or full-fat coconut milk - 1 cup shredded cheddar cheese (or a mix of your choice) - 1 teaspoon garlic powder - 1 teaspoon dried thyme - Salt and pepper to taste - Fresh herbs or alternative cheeses - Additional vegetables or spices When choosing zucchinis, look for ones that are firm and bright. They should feel heavy for their size. Avoid any that show signs of soft spots or wrinkles. For mushrooms, select ones that are dry and firm. Fresh mushrooms should have a nice, earthy smell. To keep your ingredients fresh, store zucchinis in the fridge. Place them in a plastic bag with holes for air. They can last up to a week this way. Keep mushrooms in their original packaging or a paper bag. Avoid sealing them in plastic, as that traps moisture. Use them within a few days for the best flavor. For the Full Recipe, check the link. Happy cooking! To start, you'll want to sauté the onions and mushrooms. Heat a splash of olive oil in a skillet over medium heat. Once the oil is hot, add the finely chopped onion. Cook it for about 3-4 minutes until it turns translucent. Next, add the diced mushrooms. Cook them for another 5 minutes. They will release moisture and start to brown nicely. Now, it’s time to cook the zucchini and season it. Add the thinly sliced zucchini to the skillet with the onions and mushrooms. Season with garlic powder, dried thyme, salt, and pepper. Stir everything together and let it cook for another 5-7 minutes. You want the zucchini to be tender but not mushy. Once done, take the pan off the heat and let the mixture cool slightly. In a large mixing bowl, crack open the eggs. Whisk them together with the heavy cream until they blend well. This is your rich base for the quiche. Next, mix in the shredded cheese and the sautéed vegetable mixture. Stir until everything is evenly combined. Now, pour the mixture into the pre-made pie crust. Make sure to spread it evenly so every bite is delicious. Preheat your oven to 375°F (190°C) before you bake. Place the quiche in the oven and bake for 30-35 minutes. You’ll know it’s ready when the center is set and the top is lightly golden. After baking, remove the quiche from the oven and let it cool for about 10 minutes. This helps it to set up nicely. Before serving, garnish with freshly chopped parsley for a pop of color and flavor. Enjoy your Zucchini Mushroom Quiche! For the full recipe, check the details below. To get a creamy filling, mix eggs and cream well. You want a nice blend. I often use heavy cream for richness. Coconut milk is a great option too. It makes the quiche dairy-free and adds flavor. To prevent a soggy crust, bake it for a bit first. This is called blind baking. Just pop it in the oven for 10 minutes at 375°F. This helps the crust stay crisp. You can use pie weights or dry beans to hold it down while baking. Garnishing with fresh herbs makes your quiche look pretty. Chopped parsley works great. You can also use chives or dill for a pop of color. For serving, cut the quiche into wedges. Place it on a nice platter. You can also serve it with a simple salad for a fresh touch. One mistake is overcooking the vegetables. This can make them mushy. Cook them just until tender. They will finish cooking in the quiche. Another common mistake is not allowing the quiche to set. After baking, let it cool for 10 minutes. This helps it hold its shape when slicing. Enjoy your perfect Zucchini Mushroom Quiche! For the Full Recipe, check the details above. {{image_2}} You can swap cheeses in this quiche. Try feta or goat cheese for a tangy taste. You can also use mozzarella for a milder flavor. For veggies, bell peppers or spinach add fun colors and tastes. You can even make it vegetarian by skipping meat. If you want some meat, try cooked bacon or diced ham. Both add a nice texture and flavor. Spices can bring new life to your quiche. Add paprika for warmth or cumin for a twist. Fresh herbs like basil or chives work well, too. They add brightness and freshness. If you want to add meat, consider crispy bacon or ham. Both enhance the quiche and make it heartier. Need a gluten-free option? Use a gluten-free crust made from almond flour or oats. This keeps the quiche tasty and safe for those with gluten issues. For dairy-free needs, replace heavy cream with coconut milk or almond milk. Both options keep the quiche creamy without the dairy. After you bake the quiche, let it cool. Wrap it tightly in plastic wrap or foil. Place it in the fridge. This keeps it fresh. Your quiche will last for about 3 to 4 days. If you want to keep it longer, freezing is a great option. You can freeze the quiche before or after baking. If you freeze it before baking, wrap it well. When you are ready, bake it straight from the freezer, adding extra time. If you freeze it after baking, let it cool first. Wrap it tightly. It can last up to 3 months in the freezer. To reheat, take it out of the freezer. Thaw it overnight in the fridge. Then, heat it in the oven at 350°F (175°C) until warm. This keeps the crust nice and crisp. This quiche is great for meal prep. You can slice it into wedges for easy meals. Pair it with a salad for lunch or dinner. To package for freezing, wrap each slice in plastic wrap. Place them in a freezer bag. Label the bag with the date. This makes it easy to grab a slice when you need it. You can enjoy homemade meals all week long! For the full recipe, you can refer back to the main section. You can tell your quiche is done when it is golden on top. The center should be firm, not jiggly. Insert a knife in the center. If it comes out clean, it’s ready. Yes, you can prepare the quiche ahead of time. You can assemble it and store it in the fridge. Just cover it tightly. Bake it the next day when you need it. This quiche pairs well with a fresh salad. You can also serve it with roasted vegetables. A light fruit salad can be a nice touch too. You can find the Full Recipe for Zucchini Mushroom Quiche [here](#). This article covered all you need to make a delicious zucchini mushroom quiche. We explored the must-have ingredients, tips for perfect texture, and common mistakes to avoid. You learned how to prepare, assemble, and bake your quiche. The variations and storage tips will help you customize your dish and keep it fresh. With these steps, your quiche can impress anyone. Enjoy your cooking journey!

Zucchini Mushroom Quiche Healthy and Simple Recipe

Are you ready to impress your taste buds with a delicious, yet easy dish? My Zucchini Mushroom Quiche is the

To make Honey Sriracha Roasted Okra, you need: - 1 pound fresh okra, trimmed - 2 tablespoons olive oil - 2 tablespoons honey - 1 tablespoon Sriracha sauce - 1 teaspoon garlic powder - 1 teaspoon onion powder - 1 teaspoon smoked paprika - Salt and pepper to taste - Fresh cilantro or parsley for garnish You will need a few simple tools for this dish: - Baking sheet - Parchment paper - Large mixing bowl - Whisk or spoon for mixing - Knife for trimming okra When choosing okra, look for these signs of freshness: - Bright green color: Avoid dull or brown spots. - Firm texture: Fresh okra should feel crisp, not soft. - Small pods: Smaller pods are usually more tender and tasty. Checking these details ensures you get the best okra for your Honey Sriracha Roasted Okra. For the full recipe, refer to the one provided above. First, gather all your ingredients. You need fresh okra, olive oil, honey, Sriracha sauce, garlic powder, onion powder, and smoked paprika. Don't forget salt and pepper! Preheat your oven to 425°F (220°C). Line a baking sheet with parchment paper. This helps with easy cleanup later. Next, wash the okra under cold water. Trim the ends carefully. Make sure to dry the okra completely with a towel. Dry okra will roast better and get crunchier. In a large mixing bowl, add olive oil, honey, and Sriracha. Then, sprinkle in garlic powder, onion powder, smoked paprika, salt, and pepper. Whisk them together until smooth. Now, add the okra to the bowl. Toss gently to coat each piece with the marinade. This step is key for flavor. Spread the okra on the baking sheet in a single layer. Make sure they have space. Crowded okra will steam instead of roast. Roast the okra in your preheated oven for 20-25 minutes. Stir halfway through to ensure even cooking. The okra should turn crispy and golden brown. Keep an eye on them near the end. When the okra is done, remove it from the oven. Let it cool for a bit before garnishing. Chop fresh cilantro or parsley and sprinkle it on top. This adds a nice pop of color and flavor. Serve the Honey Sriracha Roasted Okra warm. It works great as a side dish or a tasty appetizer. For more details, check the Full Recipe. Enjoy your delicious creation! For the best results, start with fresh okra. Trim the ends and wash them well. Make sure to dry them completely. Excess moisture can make them soggy. Use a baking sheet lined with parchment paper. This helps with easy cleanup and even cooking. Preheat your oven to 425°F (220°C). A hot oven gives you that nice, crispy texture. Spread the okra in a single layer. Crowding the pan can cause steaming instead of roasting. You can easily change the spice level in this dish. If you love heat, add more Sriracha. For a milder taste, cut the Sriracha in half. You can also add sweet chili sauce for flavor without too much heat. Another option is to mix in crushed red pepper flakes. Just a pinch can bring a nice kick. Don’t forget to taste your marinade before tossing the okra. This gives you a chance to adjust the spice. Honey Sriracha roasted okra pairs well with many meals. It works great alongside grilled chicken or fish. You can serve it as a side with rice or quinoa. For a fun twist, add it to tacos or wraps. The sweet and spicy flavor complements fresh greens too. Try it with a salad topped with avocado. This dish also makes a great appetizer for gatherings. Serve it with a yogurt dip or a spicy ranch for extra fun. For the full recipe, check the instructions above. {{image_2}} You can switch up the sauce to change the flavor. Here are some ideas: - Teriyaki sauce: This gives a sweet and savory taste. - BBQ sauce: It adds a smoky flavor with sweetness. - Chili garlic sauce: This packs in heat and garlic flavor. - Lemon herb sauce: A fresh twist with herbs and citrus. Each sauce brings out a new taste in the okra. So, feel free to experiment! Roasting okra with other veggies adds color and taste. Try these combinations: - Bell peppers: They add sweetness and crunch. - Zucchini: It roasts well and has a mild taste. - Carrots: Their sweetness balances the heat. - Red onion: This gives a sweet and sharp flavor. Mix and match any of these veggies. They will roast well alongside the okra. To turn this side dish into a main dish, add protein-rich foods. Here are some options: - Chickpeas: Toss in canned or cooked chickpeas for extra protein. - Quinoa: Serve the roasted okra over quinoa for a hearty meal. - Tofu: Add marinated, cubed tofu for a filling option. These additions make the dish more filling. You can enjoy it as a main course. Check out the Full Recipe for the best results! After enjoying your honey sriracha roasted okra, store any leftovers in an airtight container. Keep it in the fridge if you plan to eat it within a few days. Make sure the okra has cooled down before sealing the container. This helps to keep it fresh and tasty. When you want to enjoy your leftover roasted okra, preheat your oven to 350°F (175°C). Spread the okra on a baking sheet. Heat it for about 10-15 minutes, or until it warms up and gets crispy again. You can also use a microwave, but it may lose some crunch. If you choose the microwave, heat for 1-2 minutes at a time until warm. If you want to save your roasted okra for a longer time, freezing is a great option. Place the cooled okra on a baking sheet in a single layer. Freeze it for 1-2 hours until firm. Then, transfer the okra to a freezer-safe bag or container. This way, you can enjoy your honey sriracha roasted okra later. Just remember to label the bag with the date for easy tracking. The best way to prepare okra is to wash and trim it. Start by cutting off the tops and tails. This helps remove any bitterness. Next, pat the okra dry with a towel. Drying prevents it from getting slimy during cooking. Slice it into rounds or leave it whole, based on your recipe. For Honey Sriracha Roasted Okra, I recommend keeping them whole. This keeps them juicy and tender inside. Yes, you can use frozen okra for this recipe. Frozen okra is often pre-washed and trimmed, which saves time. However, frozen okra may have more moisture. To avoid sogginess, bake it straight from the freezer. Do not thaw it first. This will help achieve that crispy texture you want in roasted okra. You will know the okra is done roasting when it turns golden brown. It should also be crispy on the outside. Keep an eye on it during the last few minutes of cooking. Stir it halfway through to ensure even browning. Use a fork to check the texture. It should feel firm but tender inside. For the best taste, follow the [Full Recipe] closely. Roasting okra can elevate its flavor and make it a tasty dish. We discussed key ingredients, tools, and tips for selecting fresh okra. I provided step-by-step roasting instructions and garnishing ideas. We explored several tricks for perfect results and ways to tailor the spice level to your taste. I covered variations, storage tips, and answers to common questions about okra. Now you’re ready to create your own delicious roasted okra, whether as a side or a main dish. Enjoy making this fun, healthy treat!

Honey Sriracha Roasted Okra Flavorful Side Dish

Are you ready to spice up your side dishes? Honey Sriracha Roasted Okra is a tasty treat you won’t forget.

- 2 medium zucchini, sliced - 1 cup cherry tomatoes, halved - 1 medium onion, diced - 4 large eggs - 1 cup milk (or dairy-free alternative) - 1 cup shredded cheese (such as mozzarella or cheddar) - 1 teaspoon dried oregano - 1 teaspoon garlic powder - Salt and pepper to taste - 1 tablespoon olive oil - Fresh basil leaves for garnish You can easily make this dish your own. If you need a dairy-free version, try almond milk or coconut milk instead of regular milk. For cheese, consider vegan cheese options. You can also mix in other veggies like bell peppers, spinach, or mushrooms for added flavor. If you need a gluten-free option, this recipe is already gluten-free, so you can enjoy it without worry! When you experiment with these substitutions, you still keep the dish delicious and satisfying. Enjoy the process! Check out the Full Recipe for more guidance on making this casserole. - Preheat your oven to 350°F (175°C). Grease a 9x13 inch baking dish with olive oil. - In a skillet over medium heat, add olive oil and diced onion. Sauté until the onion becomes soft, about 4-5 minutes. - Add sliced zucchini to the skillet and cook for 3-4 minutes. Season with salt, pepper, oregano, and garlic powder. Remove from heat. - In a large bowl, whisk together the eggs and milk until smooth. - Stir in half of the shredded cheese. This adds creaminess and flavor. - Spread the sautéed zucchini and onion evenly in the bottom of the prepared baking dish. - Scatter halved cherry tomatoes on top of the veggies. - Pour the egg mixture over the vegetables, ensuring it covers everything. - Sprinkle the rest of the shredded cheese on top. - Bake in the preheated oven for 25-30 minutes. Check for doneness. The top should be golden brown. This process leads to a dish that is easy to make. I find this casserole perfect for breakfast or brunch. You can find the full recipe at the beginning of this article. Enjoy! - Checking doneness: The casserole is done when the center is set. Gently shake the dish. If it jiggles, bake a little longer. The top should also be golden brown. - Preventing sogginess: To avoid a soggy casserole, make sure to drain excess moisture from the zucchini. You can do this by salting the slices and letting them sit for a few minutes. This helps draw out the water. - Accompaniments for breakfast: Pair this dish with fresh fruit or whole-grain toast. A side of yogurt adds creaminess. You can also serve it with a light salad for a fresh touch. - Garnishing ideas: Try adding fresh basil leaves on top before serving. Chopped chives or a sprinkle of red pepper flakes also add a nice pop of color and flavor. - Recommended spices and herbs: Besides oregano, consider adding thyme or rosemary for more depth. A pinch of crushed red pepper can bring some heat if you like a bit of spice. - Cheese variations: While mozzarella and cheddar are great, try feta or goat cheese for a tangy twist. If you want a strong flavor, aged Parmesan works well too. {{image_2}} You can easily boost protein in your casserole. Try adding cooked sausage or crispy bacon. Both add great flavor and texture. If you prefer a vegetarian option, consider adding cooked lentils or chickpeas. These options are packed with protein and keep the dish hearty. For a low-carb twist, think about using cauliflower or spinach. Cauliflower rice works well as a base. It keeps the dish light and fluffy. Spinach brings in great nutrients and a nice flavor. For those on a keto diet, just adjust the recipe to include more vegetables and less milk. Cheese can transform this dish. Mozzarella and cheddar are classic choices, but you can explore more. Try feta or goat cheese for a tangy bite. For those who love heat, add diced jalapeños or red pepper flakes. These will kick up the flavor and make the casserole even more exciting. After making your Zucchini and Tomato Breakfast Casserole, let it cool down. Once it cools, store leftovers in the fridge. Place the casserole in an airtight container to keep it fresh. You can also cover it tightly with plastic wrap or aluminum foil. This keeps moisture in and prevents it from drying out. It will stay good for about 3 to 4 days. If you want to keep the casserole longer, freezing is a great option. First, let the casserole cool completely. Cut it into portions for easy serving later. Wrap each piece tightly in plastic wrap, then place them in a freezer-safe container. You can also use freezer bags, just remove as much air as possible. This method helps preserve flavor and texture. To thaw, move the casserole to the fridge overnight. If you need it fast, you can use the microwave. Reheat in the oven at 350°F (175°C) until it's hot throughout. Keep an eye on it to avoid overcooking. For more details, check the Full Recipe provided above. Yes, you can prepare the casserole ahead of time. Here are some simple tips: - Make-ahead preparation tips: You can assemble the casserole the night before. Just cover it and store it in the fridge. This saves time in the morning. - Reheating instructions: When ready to bake, remove it from the fridge. Preheat your oven and bake as directed. If it’s cold, it may take a few extra minutes to cook. Pairing is easy with this dish! Here are some ideas: - Ideas for side dishes: Fresh fruit salad or a light green salad works well. You can also add toast or muffins for some crunch. - Beverages: Serve it with fresh orange juice or a cup of coffee. A herbal tea can also be a great choice for a cozy breakfast. Absolutely! This recipe is perfect for meal prep. Here's how: - Portioning and storage recommendations: Cut the casserole into portions after it cools. Store each piece in an airtight container. It will stay fresh and tasty for up to four days in the fridge. For more details, check the Full Recipe of Zucchini & Tomato Sunrise Casserole. This blog post covered a tasty Zucchini and Tomato Breakfast Casserole. We talked about key ingredients, substitutions, and steps to prepare and bake. You learned helpful tips for baking and storage, plus common questions answered. In the end, this dish is versatile and easy to make. Enjoy trying different flavors or adding proteins. Make it your own and impress your family!

Zucchini and Tomato Breakfast Casserole Delight

Start your day with a burst of flavor! My Zucchini and Tomato Breakfast Casserole packs fresh veggies and delicious cheese

To start, you need one pound of fresh asparagus. Look for firm, green stalks. They should feel crisp and have a vibrant color. Trim the woody ends to ensure a tender bite. Fresh asparagus gives the best taste and texture. You will need a few key seasonings for flavor. Gather these ingredients: - 2 tablespoons olive oil - 3 cloves garlic, minced - 1 teaspoon garlic powder - 1/2 teaspoon salt - 1/4 teaspoon black pepper - Optional: 1/4 teaspoon red pepper flakes for heat Olive oil helps the seasonings stick and adds richness. Minced garlic and garlic powder boost the flavor. Salt and black pepper enhance the dish. If you like spice, add red pepper flakes. Parmesan cheese is essential for this recipe. Use 1/2 cup of grated Parmesan cheese. It offers a salty, nutty taste. Grating the cheese fresh makes it melt better and adds more flavor. You can also try different cheeses, but Parmesan gives the best crunch and taste. For the full recipe, refer to the instruction section. First, wash your asparagus under cool water. Trim the tough ends off each spear. This part can be hard, but it makes the asparagus nice to eat. You want them to be about 5 to 6 inches long. Once trimmed, place them in a large bowl. This bowl will help you mix in the oil and spices later. Now, pour in 2 tablespoons of olive oil. Toss the asparagus well so every piece gets coated. Next, add 3 minced garlic cloves, 1 teaspoon of garlic powder, 1/2 teaspoon of salt, and 1/4 teaspoon of black pepper. If you like heat, you can add 1/4 teaspoon of red pepper flakes. Mix everything together until the asparagus is well coated. The smell will be amazing! Preheat your oven to 425°F (220°C). Line a baking sheet with parchment paper. This helps with easy cleanup. Spread the asparagus in one layer on the sheet. Now for the best part: sprinkle 1/2 cup of grated Parmesan cheese over the top. Bake for 15 to 20 minutes. You want them to be tender and the cheese golden and crispy. Let them cool for a few minutes before serving. Enjoy your tasty snack! For the full recipe, check out the details above. To get your asparagus fries nice and crispy, start with fresh asparagus. Trim the ends to remove any tough parts. Use a good amount of olive oil to coat each piece. This oil helps create that crunchy layer. Spread the asparagus in a single layer on your baking sheet. Crowding them can lead to steaming, not baking. Bake at 425°F for 15-20 minutes. Keep an eye on them. When the cheese is golden, it’s time to pull them out. To boost the flavor, add garlic powder to the mix. You can also sprinkle some red pepper flakes for a little heat. If you love herbs, try adding dried oregano or thyme. These add a lovely twist to the flavor. Squeeze some fresh lemon juice over the fries before serving. This gives them a bright taste that pairs well with the cheese. These asparagus fries make a great snack or side. Serve them in a rustic basket lined with parchment paper. This adds a nice touch to your presentation. Offer lemon wedges on the side for a zesty kick. They also pair wonderfully with dips like ranch or aioli. For a full recipe, check the detailed instructions provided. Enjoy your crunchy and tasty snack! {{image_2}} You can change the cheese for different flavors. Try using feta for a tangy kick. Goat cheese adds a creamy texture. For a sharper taste, use aged cheddar. Each cheese brings a unique twist to your asparagus fries. Mix up the seasonings to match your taste. Instead of garlic powder, use onion powder for a sweet flavor. Italian herbs like oregano and basil add freshness. For heat, try smoked paprika or cayenne pepper. These changes can make your dish exciting. Feel free to add more veggies or proteins. Carrots or zucchini make great partners with asparagus. You can also toss in cooked chicken or shrimp for a heartier meal. Each addition brings new tastes and textures to the table. These variations can help you create your perfect Garlic Parmesan Asparagus Fries. Explore your options to find your favorite mix! For the full recipe, check out the main section. To keep your Garlic Parmesan Asparagus Fries fresh, store them in an airtight container. Place a paper towel in the container to absorb moisture. This helps maintain their crunch for longer. They will last in the fridge for up to three days. For the best results, reheat your asparagus fries in the oven. Preheat your oven to 400°F (200°C). Spread the fries on a baking sheet. Heat them for about 5-10 minutes. This method helps restore their crispy texture. You can also use an air fryer for a quick reheat. Set it to 350°F (175°C) for about 3-5 minutes. You can freeze asparagus fries if you want to save some for later. First, let them cool completely. Then, place them in a single layer on a baking sheet and freeze for about an hour. Once frozen, transfer them to a freezer-safe bag. They can last up to two months in the freezer. When ready to enjoy, bake from frozen for about 20-25 minutes at 425°F (220°C). This will keep them crispy and tasty. For the full recipe, refer back to the main instructions. Yes, you can use frozen asparagus. However, fresh asparagus gives better texture and taste. Frozen asparagus can be soggy. If you use frozen, thaw it first and pat it dry. This helps remove excess moisture. To make Garlic Parmesan Asparagus Fries gluten-free, you only need to ensure your ingredients are safe. The ingredients listed are naturally gluten-free. Just check that your Parmesan cheese has no additives that contain gluten. These fries pair well with many dishes. Serve them with grilled chicken or fish for a balanced meal. You can also enjoy them with a dip, like ranch or aioli. They make a great snack for parties too! For the complete method and measurements, refer to the Full Recipe. This blog post covered how to make Garlic Parmesan Asparagus Fries. We explored fresh asparagus, the right seasonings, and cheese options. I shared easy steps for preparing, coating, and baking your fries. I also included tips for a crispy texture and tasty variations. Finally, we addressed storage and reheating methods, ensuring you enjoy your leftovers. With a few simple ideas, you can make this dish your own. Enjoy experimenting with flavors, and happy cooking!

Garlic Parmesan Asparagus Fries Crunchy and Tasty Snack

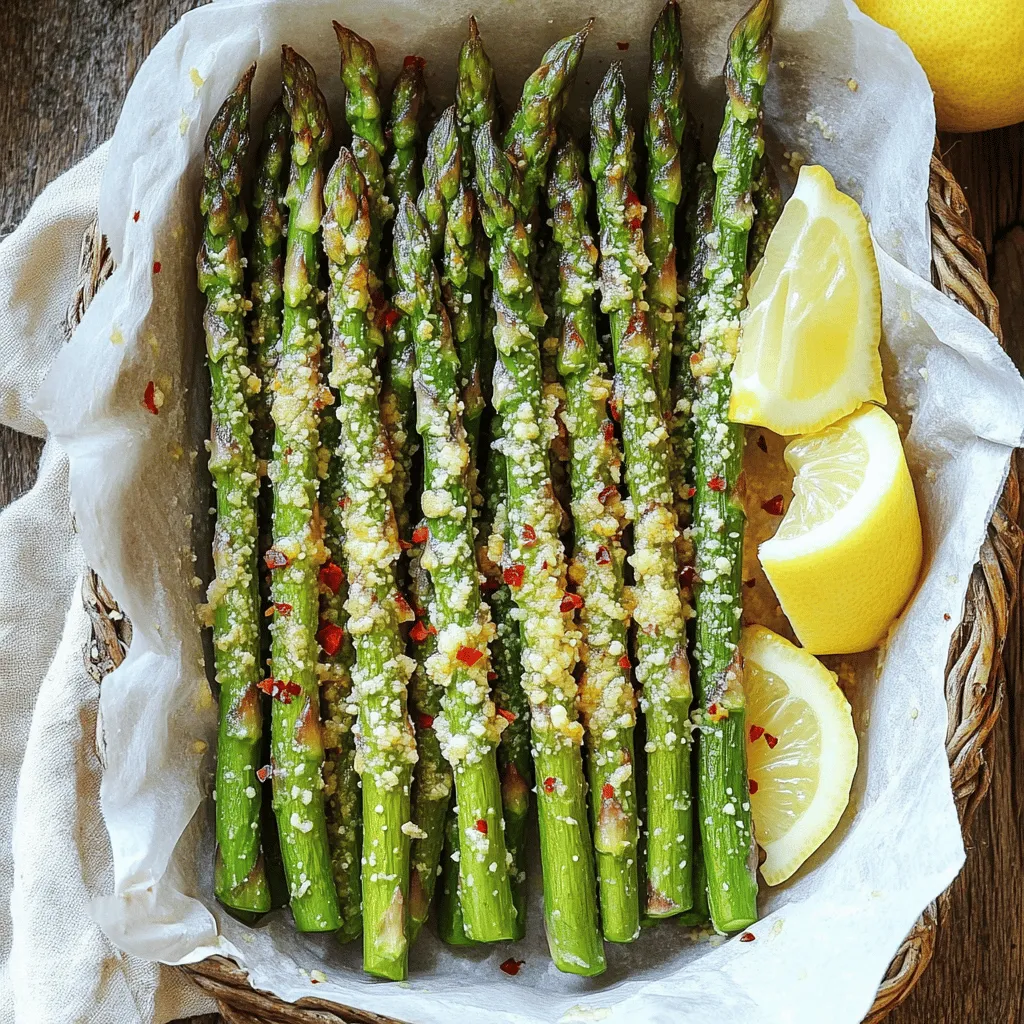
Looking for a snack that’s both crunchy and tasty? You’ll love these Garlic Parmesan Asparagus Fries! This simple recipe puts

- 2 cups sushi rice - 2 ½ cups water - ¼ cup rice vinegar - 2 tablespoons sugar - 1 teaspoon salt - 4 nori sheets - 1 medium cucumber, julienned - 1 medium carrot, julienned - 1 avocado, sliced - ½ red bell pepper, julienned - Sesame seeds for garnish - Soy sauce for dipping (optional) Fresh ingredients make your sushi shine. Choose ripe avocados. Look for smooth skin that gives slightly when pressed. The perfect avocado is bright green inside. For vegetables, use crisp and colorful options. Cucumber, carrot, bell pepper, and avocado work well. You can also add radishes or sprouts for crunch. Make sure to wash all your veggies before cutting. This keeps them clean and fresh. I always pick the best vegetables for my sushi rolls. It makes a big difference in taste and texture. You can find the full recipe at the end. Enjoy making your sushi! To start, you need to rinse the sushi rice. Rinse it under cold water until the water is clear. This step helps remove excess starch. After rinsing, let the rice drain well. Next, combine the rinsed rice with 2 ½ cups of water in a medium saucepan. Bring it to a boil over medium heat. Once boiling, reduce to low heat, cover, and simmer for 20 minutes. After the water absorbs, remove it from heat. Let it sit for 10 minutes with the lid on to steam. Now, mix the rice vinegar, sugar, and salt in a small bowl until dissolved. Then, gently fold this mixture into the cooked rice. Use a wooden spatula and be careful not to smash the rice. Once mixed, let the rice cool to room temperature. Next, prepare your bamboo sushi mat by placing it on a clean surface. Lay one sheet of nori on top, shiny side down. With wet hands, spread a thin layer of sushi rice over the nori. Leave about an inch at the top edge without rice. This space helps seal the roll later. Now, arrange a line of your julienned cucumber, carrot, avocado, and bell pepper. Place this line about 2 inches from the bottom edge of the rice. With the bamboo mat, lift the edge closest to you and start rolling the sushi away from you. Keep the filling in place as you roll. Roll tightly, but not too tightly, to prevent squishing the filling. Once you have rolled the sushi, use a sharp knife to slice the roll into 6-8 pieces. Wet the knife between cuts to prevent sticking. This makes cutting easier and keeps the rolls looking nice. To serve your sushi rolls, sprinkle sesame seeds over the top. Arrange them on a plate for presentation. You can serve with soy sauce on the side for dipping. Enjoy making your Easy Veggie Sushi Rolls with these simple steps! For the full recipe, check the section above. To make great sushi rolls, avoid common mistakes. One big issue is rolling too loosely. If you do this, your roll may fall apart. Make sure to apply even pressure when rolling. If the roll is too tight, it can squeeze out the filling. You want a snug fit, not an overpacked roll. Here’s a tip: use wet hands when handling sushi rice. This helps prevent sticking. Spread rice evenly over the nori, leaving space at the top. This space is key for sealing the roll. You need a few tools to make sushi at home. A bamboo mat is essential for rolling. Look for one that is sturdy and easy to clean. A sharp knife is also important for slicing your rolls. A dull knife can crush your sushi. Other helpful tools include a rice cooker for perfect sushi rice and a bowl of water for wetting your hands. These tools make the process easier and more fun. For the full recipe, check out the Easy Veggie Sushi Rolls section. {{image_2}} You can make your veggie sushi rolls even more fun with different fillings. For a vegetarian twist, try adding tofu. Firm tofu works great when you slice it thin. You can also use sprouts for a fresh crunch. They add a nice texture and boost the flavor. If you want a vegan option, skip any fish or dairy products. You can load up on veggies like bell peppers, zucchini, or radishes. These add color and taste. For those who need gluten-free sushi, you can use gluten-free soy sauce. Make sure to check the labels on your nori sheets. Most are gluten-free, but it’s always good to confirm. Enhancing your sushi flavors is easy. You can add sauces and spices to kick it up a notch. For a simple touch, try a drizzle of sriracha or a sprinkle of sesame oil. These add a nice zing that pairs well with veggies. You can also experiment with rice. While sushi rice is a classic choice, you can swap it out. Try brown rice for a nuttier flavor. Quinoa is another healthy option. It gives a unique twist to your rolls while being packed with protein. For the full recipe, you can check the Easy Veggie Sushi Rolls section. Enjoy your sushi making! To store leftover sushi rolls, place them in an airtight container. This keeps them fresh and prevents them from drying out. You can also wrap each roll in plastic wrap. If you want to keep them for a longer time, refrigerate them. It is best to eat leftover sushi within 24 hours for the best taste and quality. After that, the rice can become hard, and the veggies may lose their crunch. If you want to freeze sushi rolls, wrap each roll tightly in plastic wrap. After that, place them in a freezer-safe bag. This helps to avoid freezer burn. You can freeze sushi for up to a month. When you are ready to eat them, take the rolls out and thaw them in the fridge overnight. Avoid using a microwave to thaw sushi, as it can make the rice mushy. Enjoy your sushi cold or let it sit at room temperature for a few minutes before serving. How to make sushi without a bamboo mat? You can use a clean kitchen towel instead. Lay the towel flat and place the nori on it. Spread the rice and fillings as usual. Roll the towel tightly to form the sushi. This method works well if you don’t have a bamboo mat. Can I use brown rice for sushi rolls? Yes, you can use brown rice. It has a nutty flavor and is healthier. However, it requires longer cooking time. Be sure to rinse it well and adjust water ratios. This will help achieve a good texture. How long do sushi rolls last in the fridge? Sushi rolls can last for about 24 hours in the fridge. Wrap them tightly in plastic wrap to keep them fresh. They may lose some texture and flavor after a day. I recommend eating them as soon as possible. What can I substitute for nori? You can use lettuce leaves or rice paper as a substitute. These options still hold the fillings well. Lettuce adds a nice crunch, while rice paper offers a different texture. Feel free to experiment with your favorite wraps! You have learned how to make easy veggie sushi at home. We covered the essential ingredients, preparation steps, and pro tips. With this guide, you can create fresh, tasty sushi rolls just for you. Remember to choose ripe ingredients for the best flavor. Practice your rolling skills, and have fun experimenting with different flavors. Making sushi can be simple and rewarding. Enjoy sharing your delicious creations with family and friends!

Easy Veggie Sushi Rolls Simple and Fun to Make

Are you ready to roll up some fun in your kitchen? Making Easy Veggie Sushi Rolls is a simple and

Older posts
Newer posts
← Previous Page1 … Page59 Page60 Page61 … Page85 Next →

dsad

© 2026 greenmealmap • Built with GeneratePress

Our Policies

  • Copyright Policy
  • Cookie Policy
  • GDPR Policy
  • Privacy Policy
  • Disclaimer
  • Terms Of Use

More Information

  • Home
  • About
  • Contact
  • Appetizers
  • Dessert
  • Dinner
  • Drinks
©2026, greenmealmap About Back To Top