Skip to content
DisclaimerTerms Of UseGDPR PolicyCookie Policy

greenmealmap

  • Home
  • Drinks
  • Appetizers
  • Dinner
  • Dessert
  • About
  • Contact
  • Privacy Policy
DisclaimerTerms Of UseGDPR PolicyCookie Policy

NO-ING-IMG

To make Sheet Pan Honey Mustard Chicken, you need simple ingredients. This recipe serves four and takes about 45 minutes in total. You will enjoy the mix of tender chicken, tasty potatoes, and bright broccoli. - 4 bone-in chicken thighs - 2 tablespoons Dijon mustard - 2 tablespoons honey - 1 tablespoon olive oil These main ingredients bring flavor and texture. Bone-in chicken thighs stay juicy while cooking. The Dijon mustard and honey create a sweet and tangy glaze. - 1 teaspoon garlic powder - 1 teaspoon smoked paprika - Salt and pepper to taste - 1 pound baby potatoes, halved - 2 cups broccoli florets - Fresh parsley for garnish The garlic powder adds depth. Smoked paprika gives a nice warmth. Baby potatoes become crispy, and broccoli adds color along with nutrients. Don't forget fresh parsley for a pop of flavor! For the full recipe, you can explore the details and enjoy this dish. To make Sheet Pan Honey Mustard Chicken, start by gathering all your ingredients. This recipe is simple and quick. You will need chicken thighs, Dijon mustard, honey, olive oil, garlic powder, smoked paprika, baby potatoes, broccoli, and some salt and pepper. 1. First, preheat your oven to 400°F (200°C). 2. In a small bowl, whisk together the Dijon mustard, honey, olive oil, garlic powder, smoked paprika, salt, and pepper. Mix well until it is smooth. 3. Place the chicken thighs in a large bowl. Pour half of the honey mustard mixture over the chicken. Make sure each piece is coated well. Set aside the remaining sauce. 4. On a large sheet pan, lay out the halved baby potatoes in a single layer. Drizzle them with olive oil, salt, and pepper. Toss them to coat evenly. 5. Nestle the coated chicken thighs on one side of the sheet pan, skin side up. This helps it crisp up nicely. 6. Bake the chicken and potatoes for 20 minutes in the preheated oven. 7. After 20 minutes, take the pan out of the oven. Add the broccoli florets to the empty side. Drizzle the leftover honey mustard mixture over the broccoli. 8. Put the sheet pan back in the oven. Bake for an extra 15 to 20 minutes. Check that the chicken reaches an internal temperature of 165°F (75°C) and the veggies are tender. 9. Once cooked, remove the pan from the oven. Let it rest for a few minutes. Before serving, garnish with fresh parsley for color and flavor. The total baking time for this dish is around 35 to 40 minutes. Make sure to bake at 400°F (200°C) to get the best results. This ensures the chicken is juicy and the veggies are perfectly tender. Enjoy this savory meal! To get juicy chicken, use bone-in thighs. They stay moist and flavorful. Brining the chicken in saltwater for 30 minutes can add extra juiciness. Always check the chicken's internal temperature. It should reach 165°F (75°C). This ensures it cooks through but stays tender. Let it rest for a few minutes after cooking. This helps the juices redistribute and keeps the chicken moist. When cooking veggies, cut them evenly. This helps them cook at the same rate. For this dish, I love using baby potatoes and broccoli. Halve the potatoes for quicker cooking. Toss them in olive oil, salt, and pepper before baking. This enhances their flavor. Add the broccoli halfway through baking to avoid overcooking. This keeps it bright green and crisp. The honey mustard sauce is a star in this recipe. You can make it your own! Try adding a splash of soy sauce for depth. For a spicy kick, mix in some sriracha or hot sauce. If you like herbs, add fresh rosemary or thyme. This adds a nice aroma and flavor. Drizzle extra sauce on the veggies for more taste. Enjoy experimenting with flavors! For the complete recipe, check out the Full Recipe. {{image_2}} You can switch out chicken for other meats. Try bone-in pork chops for a tasty twist. They cook well and soak up the honey mustard flavor. You can also use salmon. It adds a nice richness to the dish. For a vegetarian option, consider chickpeas. They add protein and work well with the sauce. Feel free to swap out the broccoli and potatoes. Carrots bring sweetness and color. Brussels sprouts add a nice crunch. Green beans roast well and stay crisp. You can even use bell peppers for a pop of color. Just make sure to cut all veggies to similar sizes for even cooking. You can change the flavor with a few simple tweaks. Add a splash of lemon juice for brightness. For heat, mix in some cayenne pepper or red pepper flakes. Herbs like thyme or rosemary elevate the taste. If you want a bit of sweetness, throw in some apple slices. These add a nice contrast to the mustard. Explore these options to make this dish your own. Check out the Full Recipe for more ideas! Store leftover Sheet Pan Honey Mustard Chicken in an airtight container. Keep it in the fridge for up to four days. Make sure to let it cool down before sealing it. This helps keep the chicken juicy and tasty. You can freeze your chicken meal too! Place the cooled chicken and veggies in freezer-safe bags. Squeeze out the air to prevent freezer burn. It can stay good for up to three months. When you’re ready to eat, let it thaw overnight in the fridge. To reheat, preheat your oven to 350°F (175°C). Place the chicken and veggies on a baking sheet. Cover with foil to keep it moist. Heat for about 15-20 minutes, or until it's warm. You can also use a microwave, but oven reheating helps keep the crispiness. Enjoy your meal again, just like the first time! Making Sheet Pan Honey Mustard Chicken takes about 45 minutes. This includes 10 minutes for prep and 35 minutes for cooking. It’s a quick meal that fits into a busy schedule. You can get dinner on the table fast without losing flavor. Yes, you can use different cuts of chicken. If you prefer chicken breasts, they will work too. Just make sure to adjust the cooking time. Breasts may cook faster than thighs. Always check that the chicken reaches an internal temperature of 165°F for safety. This dish pairs well with many sides. Here are a few ideas: - Rice or quinoa for a hearty base - A fresh green salad for crunch - Roasted carrots for sweetness - A warm bread roll to soak up the sauce These sides complement the honey mustard flavor and make your meal more filling. This blog post covered a simple recipe for Sheet Pan Honey Mustard Chicken. We explored the main ingredients, step-by-step instructions, and helpful tips. You learned about cooking times, sauce variations, and how to store leftovers. In closing, this dish is easy to prepare and offers many variations. Don't hesitate to get creative with flavors and ingredients. Enjoy your cooking and have fun with it!

Savory Sheet Pan Honey Mustard Chicken Delight

Are you ready to transform your dinner routine? This Savory Sheet Pan Honey Mustard Chicken Delight is an easy, delicious

To make these no bake peanut butter chocolate bars, you need just a few simple ingredients. Each one plays a key role in creating a tasty treat. Here’s what you’ll need: - 1 cup natural peanut butter - 1/2 cup honey or maple syrup - 2 cups rolled oats - 1/2 cup chocolate chips (dark or semi-sweet) - 1/4 cup chia seeds (optional for added nutrition) - 1/2 teaspoon vanilla extract - Pinch of salt Natural peanut butter gives a rich taste and creamy texture. Honey or maple syrup adds sweetness and helps bind the mix. Rolled oats provide a hearty base and a chewy bite. Chocolate chips make every bar a little more decadent. Chia seeds boost nutrition but are totally optional. Vanilla adds warmth, while salt enhances all the flavors. Using these ingredients, you can whip up a batch quickly. I love how easy it is to find them in any kitchen. For the full recipe, check out the cooking steps I’ve laid out! 1. Combining peanut butter and sweetener: Start by taking a large mixing bowl. Add 1 cup of natural peanut butter. Then, add either 1/2 cup of honey or maple syrup. Mix these two until the mixture is smooth and creamy. This step is key. A good mix ensures the flavors blend well. 2. Mixing in other ingredients: Next, add 1/2 teaspoon of vanilla extract and a pinch of salt. Stir these in well. Then, gradually fold in 2 cups of rolled oats. If you want, you can add 1/4 cup of chia seeds for more nutrition. Finally, toss in 1/2 cup of chocolate chips. Mix until all the ingredients are combined. You want everything to be evenly spread out. 3. Preparing the baking dish: Take an 8-inch square baking dish. Line it with parchment paper, leaving some extra paper hanging over the sides. This will help you lift the bars out later. Pour your mixture into this dish. Spread it out evenly. Use a spatula to pack it down firmly. This helps the bars hold their shape. 1. Refrigeration time: Place the baking dish in the fridge. Let it chill for about 1-2 hours. This time helps the bars firm up. The longer you chill, the easier it will be to slice. 2. Slicing the bars: Once chilled, carefully lift the mixture out of the dish using the parchment paper. Place it on a cutting board. Use a sharp knife to cut it into bars. You can choose the size you like best. 3. Presentation tips: For a fun look, serve these bars wrapped in parchment paper. This gives a homemade touch. You can also stack them on a plate. Drizzle some melted chocolate on top for a fancy finish. Enjoy your delicious no bake peanut butter chocolate bars! To get the right texture, start with the peanut butter. Use natural peanut butter without added sugars or oils. It should be creamy but not too runny. If it’s too thick, the bars may be hard to mix. Next, let’s talk about chilling time. After you mix your ingredients, chill the mixture for at least 1-2 hours. This step is key. Chilling helps the bars firm up. If you skip this, the bars may fall apart when you cut them. You can make your bars even better by adding spices or extracts. A touch of cinnamon or a hint of nutmeg can add warmth. A few drops of almond extract can also bring a nice twist. Consider trying different types of chocolate too. Dark chocolate brings rich flavor, while semi-sweet chocolate offers a balanced taste. You might even mix in white chocolate for a fun effect. Get creative and find the flavor that makes your taste buds happy! For the full recipe, check out the recipe section. {{image_2}} If you have nut allergies, you can still enjoy this treat. Just swap out the peanut butter for sunflower seed butter. This change keeps the bars creamy and tasty. Sunflower seed butter has a similar texture to peanut butter. It will still mix well with honey or maple syrup. Plus, it adds a unique flavor. Want a vegan treat? Simply use maple syrup instead of honey. For chocolate, pick dairy-free chocolate chips. These swaps make the bars plant-based and still delicious. You won’t lose any flavor or texture. The maple syrup gives a nice, sweet taste. If you need gluten-free bars, it’s easy! Just choose certified gluten-free oats. Many brands offer oats that are safe for gluten-free diets. This way, you can enjoy this sweet snack without worry. The bars will still hold together well and taste amazing. For the full recipe, check out the [Full Recipe]. To keep your no bake peanut butter chocolate bars fresh, store them in an airtight container. This helps prevent them from drying out or absorbing other smells from your fridge. You can place parchment paper between layers if stacking them. You can refrigerate these bars for short-term storage. They stay good for about a week this way. If you want to keep them longer, freeze them. Just wrap each bar tightly in plastic wrap before placing them in a freezer-safe bag. This keeps them fresh for up to three months. These delicious bars will last about a week in the fridge if stored properly. In the freezer, they last up to three months. Keep an eye out for signs of spoilage. If you see mold, or if they smell off, it's best to toss them out. Also, if the texture changes and they feel overly dry or hard, it's time to say goodbye. For the full recipe, check out the details shared earlier! To make these bars, start by mixing peanut butter and honey in a bowl. The mix should be smooth and creamy. Next, stir in the vanilla extract and a pinch of salt. Then, fold in the rolled oats, chocolate chips, and chia seeds. This step is key for flavor and texture. Line an 8-inch baking dish with parchment paper for easy removal. Pour the mixture into the dish and pack it down firmly. Chill it in the fridge for 1-2 hours until set. After chilling, cut the bars into pieces. Enjoy your tasty treat! Yes, you can use different sweeteners. Maple syrup is a great option if you want a vegan choice. You can also try agave nectar for a milder taste. If you prefer a sugar substitute, stevia or monk fruit sweetener works well too. Just make sure to adjust the amount based on sweetness level. Each sweetener can change the taste a bit, but they all work with the recipe. You can tell when the bars are ready by checking their firmness. They should be firm to the touch but still slightly soft. If they hold their shape when you cut them, they're good to go. The bars need to chill for at least 1-2 hours. If they feel too soft, give them more time in the fridge. Once set, they will be easy to slice and enjoy! These no-bake peanut butter chocolate bars offer a quick and tasty treat. We covered simple ingredients like natural peanut butter and oats, plus easy steps for making and chilling. You can customize with nut-free, vegan, or gluten-free options. Storing them right keeps them fresh longer. Enjoy experimenting with flavors. With these tips, you’ll create something delicious. Happy cooking!

No Bake Peanut Butter Chocolate Bars Irresistible Treat

Craving a sweet treat that’s both easy to make and delicious? You’ll love these No Bake Peanut Butter Chocolate Bars!

- 1 ½ cups chocolate sandwich cookies, crushed (plus extra for topping) - ½ cup unsalted butter, melted - 16 oz cream cheese, softened - ¾ cup granulated sugar - ½ cup sour cream - 2 large eggs - 2 teaspoons vanilla extract - 1 cup mini chocolate chips You can add a few fun toppings to make your cheesecake bars shine. Here are some ideas: - Whipped cream dollops for a creamy touch - Extra crushed cookies for added crunch - More mini chocolate chips for a chocolate boost - A drizzle of chocolate sauce for a sweet finish If you need to swap out ingredients, here are some easy ideas: - Use gluten-free sandwich cookies for a gluten-free option. - Swap cream cheese with a dairy-free cream cheese for a dairy-free treat. - Replace sour cream with plain Greek yogurt for a lighter option. - Use vanilla extract's alternative, like almond extract, for a different flavor. Feel free to mix and match these substitutions to suit your taste and needs! {{ingredient_image_1}} To make the crust, start by preheating your oven to 325°F (160°C). Line an 8x8 inch baking pan with parchment paper. Leave some paper hanging over the sides. This helps you lift the bars out later. In a medium bowl, mix 1 ½ cups of crushed chocolate sandwich cookies with ½ cup of melted unsalted butter. Stir until it looks like wet sand. Press this mixture firmly into the bottom of your baking pan. Make sure it’s even. Bake the crust for about 10 minutes. Afterward, let it cool slightly. In a large bowl, beat 16 oz of softened cream cheese with an electric mixer. Mix until it’s smooth and creamy. Gradually add ¾ cup of granulated sugar and keep mixing until well combined. Next, add ½ cup of sour cream, 2 large eggs, and 2 teaspoons of vanilla extract. Beat until everything is smooth. Then, gently fold in 1 cup of mini chocolate chips. This adds a fun texture and flavor to the filling. Pour the cheesecake mixture over your cooled crust. Use a spatula to smooth the top. For a nice touch, sprinkle some extra crushed cookies on top. Bake the bars for 30 to 35 minutes. The edges should be set, but the center should still jiggle a bit. Once done, take them out and let them cool at room temperature. Chill the bars in the fridge for at least 4 hours, or overnight is best. When ready, lift them out using the parchment paper. Cut into squares and enjoy! To get the creamiest cheesecake bars, use room-temperature cream cheese. This helps it blend smoothly. Beat the cream cheese well, but don’t overmix. Adding sour cream gives a rich flavor and creaminess. Fold in the mini chocolate chips gently. This keeps the batter light and fluffy. One common mistake is overbaking. You want the edges set but the center should jiggle. Letting the bars cool at room temperature before chilling is key too. Don’t skip this step! Also, make sure your baking pan is lined with parchment paper. This helps with easy removal later on. For a great presentation, serve the cheesecake bars on a decorative plate. A dollop of whipped cream on top adds flair and creaminess. Sprinkle mini chocolate chips for extra crunch. You can also add a few crushed cookies on top for that wow factor. Pro Tips Use Room Temperature Ingredients: Ensure your cream cheese is at room temperature for a smooth batter. This prevents lumps and helps the ingredients blend better. Don’t Overbake: Keep an eye on the cheesecake bars as they bake. They should be set around the edges but still have a slight jiggle in the center for a creamy texture. Chill Before Serving: Allow the cheesecake bars to chill for at least 4 hours, preferably overnight. This enhances the flavors and makes slicing easier. Add a Flavor Twist: Experiment by mixing in different flavors like peppermint extract or orange zest for a unique twist on the classic cookies and cream. {{image_2}} You can mix things up by adding fruit. Berries like strawberries or raspberries work well. Just chop them small and fold them into the cheesecake mix. You can also use fruit purees for a smooth texture. Try mixing a bit of lemon or orange zest for a fresh taste. This brightens the bars and gives them a fun twist. If you want a different crust, there are many choices. You can use graham crackers for a classic flavor. For a nutty touch, try crushed almonds or pecans. You can also make a crust using gluten-free cookies for a tasty, safe option. Just make sure to adjust the butter amount based on the cookie type. For a gluten-free version, use gluten-free sandwich cookies. They work just as well in the crust. For a dairy-free option, swap the cream cheese with a dairy-free cream cheese. You can use coconut cream instead of sour cream for a rich texture. These changes still keep the bars tasty and creamy. Enjoy the fun of baking while making them fit your needs! To keep your cookies and cream cheesecake bars fresh, store them in the fridge. Place them in an airtight container. This helps keep them moist and prevents them from absorbing odors. You can also cover the bars tightly with plastic wrap. Yes, you can freeze these bars for later. First, cut them into squares. Then, wrap each square in plastic wrap. Place the wrapped bars in a freezer-safe bag or container. This way, they stay fresh for up to three months. In the fridge, the cheesecake bars last about five days. If you freeze them, they stay good for three months. Make sure to label your container with the date, so you know when to enjoy them! Yes, you can! Try using vanilla wafers or graham crackers. Both work well. You can also blend in some crushed Oreos for more flavor. Just adjust the butter if needed. The crust will still be tasty and hold together. Look for the edges to be set and the center to jiggle a bit. It should not be completely firm. If you insert a toothpick, it should come out mostly clean. This means your bars are done but still creamy. Absolutely! In fact, they taste better after resting. Make them a day before your event. Just chill them in the fridge for at least four hours or overnight. This gives the flavors time to mix and the texture to set. Use a sharp knife for clean cuts. Dip the knife in hot water and wipe it dry before each cut. This helps prevent sticking. For neat squares, cut the bars while they are still cold. This makes them easier to handle and serve. You learned how to make cheesecake bars from scratch. We covered the ingredients you'll need, including measurements and substitutions. The step-by-step instructions guide you through the crust and filling. Tips help you avoid mistakes and serve with flair. We explored fun variations and shared storage tips to keep them fresh. Now, you can impress friends and family with your delicious dessert. Enjoy every bite!

Cookies and Cream Cheesecake Bars Irresistible Delight

Are you ready to treat yourself to a sweet masterpiece? Cookies and Cream Cheesecake Bars are the perfect blend of

- 2 lbs boneless and skinless chicken thighs - 1/2 cup honey - 1/4 cup low sodium soy sauce - 5 minced garlic cloves - 1 tablespoon grated fresh ginger - 1 tablespoon sesame oil - 1 teaspoon black pepper - 1 teaspoon salt - 2 green onions, sliced - Sesame seeds for garnish - 1 tablespoon cornstarch - 2 tablespoons water Gather all these ingredients before you start. Having everything ready makes cooking smooth and easy. The chicken thighs are the star of the dish. Their rich flavor pairs well with the sweet honey and strong garlic. The soy sauce adds depth, while ginger gives a nice zing. Don’t forget the sesame oil; it adds a lovely nutty taste. For seasoning, use black pepper and salt to enhance all the flavors. Green onions and sesame seeds are great for finishing touches. They add color and a bit of crunch. Lastly, cornstarch and water help thicken the sauce. This gives it a nice texture that clings to the chicken. With these ingredients, you are set to make a delicious meal. {{ingredient_image_1}} First, I pat the chicken thighs dry with a paper towel. This step helps the skin get crispy. Next, I season both sides with salt and black pepper. This simple seasoning adds great flavor and makes the chicken tasty. In a bowl, I whisk together the honey, soy sauce, minced garlic, fresh ginger, and sesame oil. This sauce is sweet, savory, and full of flavor. It will coat the chicken and make it shine. I turn on the Instant Pot and set it to the Sauté function. Once it’s hot, I add the chicken thighs. I sear them for about 3-4 minutes on each side until they are browned. If I have a lot of chicken, I do this in batches. After browning, I remove the chicken and set it aside. Next, I pour a bit of the honey garlic sauce into the pot. Using a wooden spoon, I scrape up any browned bits stuck to the bottom. This step is key to avoid the burn notice. After that, I add the rest of the honey garlic sauce and the chicken back into the pot. I close the lid and make sure the pressure valve is set to Sealing. I cook on Manual or Pressure Cook for 10 minutes. Once the cooking time is done, I let the Instant Pot naturally release pressure for 5 minutes. Then, I switch to quick release to remove any remaining pressure. To thicken the sauce, I mix cornstarch with water to create a slurry. I turn the Instant Pot back to Sauté and stir in the slurry. I cook it for a couple of minutes until it thickens. Finally, I remove the chicken and slice it if I want. I drizzle the thickened sauce over the chicken and garnish with sliced green onions and sesame seeds. To make sure your chicken is tasty, season it well. Use salt and black pepper on both sides. This adds flavor right from the start. When you sauté the chicken, make sure to brown each side. This step brings out the best taste. When deglazing, pour a bit of the honey garlic sauce into the pot. Scrape the bottom with a wooden spoon. This helps remove any stuck bits and prevents a burn notice. If you see a burn warning, it means the pot is too hot or not enough liquid is present. Cooking times change depending on chicken cuts. For chicken breasts, you may need to cook for 12 minutes instead of 10. Adjust the time to ensure the meat is tender and juicy. If using frozen chicken, add 2-3 extra minutes to the cooking time. To thicken the sauce, use a cornstarch slurry. Mix cornstarch and water in a small bowl. After cooking, stir in this mixture. Heat on Sauté until the sauce thickens, which takes just a couple of minutes. You can add vegetables to the dish for extra nutrition. Bell peppers, snap peas, or broccoli work well. Add them after sautéing the chicken for a quick cook. This gives you a colorful meal with great taste. Pair this dish with rice or noodles. Both soak up the sauce nicely. You can also serve it with a fresh salad for a light touch. These sides make your meal complete and satisfying. Pro Tips Use Fresh Ingredients: Always use fresh garlic and ginger for the best flavor in your honey garlic sauce. Don't Skip Searing: Searing the chicken before pressure cooking adds depth and richness to the final dish. Natural Pressure Release: Allowing the Instant Pot to naturally release pressure helps retain moisture and tenderness in the chicken. Adjust Sweetness: Feel free to adjust the amount of honey based on your personal preference for sweetness in the sauce. {{image_2}} You can switch the chicken thighs for chicken breasts. Chicken breasts cook faster and stay juicy when cooked well. If you want to try something different, use tofu or shrimp. Tofu will soak up the sauce nicely, while shrimp cook quickly and add a nice flavor. To add some heat, toss in chili flakes. This will wake up the dish and give it a kick. You can also play with the honey. Different types of honey bring unique flavors. Try clover, wildflower, or even orange blossom honey for a fun twist. For a gluten-free version, use gluten-free soy sauce. This simple swap keeps the taste while ensuring everyone can enjoy it. If you want to cut sugar, use a low-calorie sweetener. This way, you can still enjoy the sweet taste without the extra calories. To keep your Honey Garlic Instant Pot Chicken fresh, store it in an airtight container. Let it cool first to avoid steaming and sogginess. Place it in the fridge right after it cools. Leftovers will stay good for 3 to 4 days. When reheating, the best method is using the microwave. Heat in short bursts of 30 seconds. This helps to warm the chicken evenly. You can also use a skillet on low heat. Add a splash of water to keep it moist. Avoid cooking too long to prevent dry chicken. Yes, you can freeze Honey Garlic Chicken! To freeze, place it in a freezer-safe bag or container. Remove as much air as possible to prevent freezer burn. It will keep well for about 3 months. Thaw it overnight in the fridge before reheating. To stop burning, proper deglazing is key. After you sauté the chicken, pour a little sauce into the pot. Use a wooden spoon to scrape up any brown bits. This step helps prevent the burn notice. Always ensure enough liquid is in the pot. A good rule is to use at least 1 cup of liquid for pressure cooking. The liquid helps create steam, which is essential for cooking. Yes, you can use frozen chicken thighs. Just remember to adjust the cooking time. If the chicken is frozen, increase the pressure cooking time to about 15 minutes. You may also need to add a few extra minutes for the pot to come to pressure. Always check that the chicken is fully cooked before serving. Use a meat thermometer; it should read 165°F in the thickest part. This dish pairs well with many sides. Here are a few ideas: - Steamed rice - Quinoa - Stir-fried vegetables - Roasted broccoli - Mashed potatoes - A simple green salad These options bring balance to the sweet and savory flavors of the chicken. To change the sweetness, you can modify the honey amount. If you like it less sweet, use 1/3 cup instead of 1/2 cup. For a sweeter taste, add more honey, up to 2/3 cup. You can also mix in a little apple cider vinegar. This adds a nice contrast to the sweet flavor. Always taste as you go to find the right balance for your palate. You learned how to make a delicious Honey Garlic Chicken in an Instant Pot. We explored key ingredients, step-by-step instructions, and clever tips to perfect your dish. You can even personalize it by trying different proteins or adjusting flavors. This recipe is not just easy; it’s also tasty and flexible. Whether you crave a sweet meal or want to impress friends, this dish delivers. Enjoy your cooking journey!

Honey Garlic Instant Pot Chicken Tasty Easy Dinner

Are you ready for a quick and tasty dinner that packs a flavorful punch? My Honey Garlic Instant Pot Chicken

To make spicy honey garlic cauliflower bites, you need these key ingredients: - 1 large head of cauliflower, cut into bite-sized florets - 1 cup all-purpose flour - 1 teaspoon garlic powder - 1 teaspoon smoked paprika - ½ teaspoon cayenne pepper (adjust for spice level) - 1 cup water (or vegetable broth for extra flavor) - 1 tablespoon olive oil - Salt and pepper to taste - ½ cup honey - 3 tablespoons soy sauce (or tamari for gluten-free) - 2 tablespoons apple cider vinegar - 2 cloves garlic, minced - 1 teaspoon fresh ginger, grated - 1 tablespoon sesame seeds (for garnish) - Chopped green onions (for garnish) The cauliflower is the star here. It absorbs great flavors and becomes tender. The batter has flour, spices, and water or broth. This mix gives a nice crunch after baking. You can swap some ingredients if you need to. For flour, try almond flour or chickpea flour for gluten-free options. If you want a different sweetener, use maple syrup instead of honey. For a soy sauce alternative, coconut aminos work well. Also, if you don’t have fresh ginger, ground ginger can work in a pinch. Garnishing your bites can add flair. Use sesame seeds for a nutty touch. Chopped green onions bring a fresh crunch. If you like, add crushed red pepper for an extra kick. These small touches can elevate the dish and make it look more appealing. For the full recipe, check out the details above. Start by preheating your oven to 425°F (220°C). This helps the bites become crispy. Next, cut a large head of cauliflower into bite-sized florets. Make sure they are all about the same size. This helps them cook evenly. Rinse the florets under cold water to wash away any dirt. Pat them dry with a clean towel. Dry florets will hold the batter better. In a large mixing bowl, combine 1 cup of all-purpose flour, 1 teaspoon of garlic powder, 1 teaspoon of smoked paprika, and ½ teaspoon of cayenne pepper. You can change the cayenne amount for more or less heat. Add salt and pepper to taste. Slowly pour in 1 cup of water or vegetable broth, stirring with a whisk until the batter is smooth. You want it to be thick enough to coat the cauliflower but not too thick. Dip each cauliflower floret into the batter, letting the extra drip off. Place the coated florets on a baking sheet lined with parchment paper. Make sure they are in a single layer. Bake them for about 25-30 minutes, turning halfway through. You want them golden and crispy. While they bake, make the spicy honey garlic sauce. In a small saucepan, mix ½ cup of honey, 3 tablespoons of soy sauce, 2 tablespoons of apple cider vinegar, 2 cloves of minced garlic, and 1 teaspoon of grated ginger. Heat it over medium heat and stir until it simmers for about 5 minutes. This thickens the sauce. Once the cauliflower is done, toss the bites in the sauce. Return them to the baking sheet and bake for another 5-7 minutes. This caramelizes the sauce and adds great flavor. To get crispy cauliflower, follow a few simple steps. First, make sure your oven is hot. Preheat it to 425°F (220°C). This heat helps the batter crisp up. Use a good amount of flour in your batter. The flour gives a nice crunch. When you coat the cauliflower, let the excess batter drip off. This helps avoid a soggy bite. Bake them in a single layer on parchment paper. This way, they won’t steam. Turn them halfway through baking for even crispiness. These spicy honey garlic cauliflower bites are great for many occasions. Serve them as a tasty appetizer at a party. They are fun finger foods. You can also enjoy them as a main dish with rice or noodles. For a fresh touch, add a side of cucumber salad. Just slice cucumbers and toss them in vinegar. It balances the spice well. Don’t forget to sprinkle some sesame seeds and green onions on top! They add color and texture. Want to boost the flavor? Try adding lime juice to the sauce. It gives a zesty kick. You can also mix in some chili flakes for extra heat. If you love herbs, fresh cilantro works great too. Just chop it and sprinkle on the bites before serving. For more depth, you can use dark soy sauce instead of regular. This makes the bites richer. Each of these tweaks can make your dish even more special. Check the Full Recipe for more ideas! {{image_2}} You can turn the heat up with a spicier version of these bites. To do this, add extra cayenne pepper to the batter. You can also mix in some chili flakes or hot sauce to the honey garlic sauce. This change makes the dish fiery but still tasty. If you love spice, try using a hotter pepper in the sauce, like sriracha. Adjust to your heat preference to find the perfect balance. To make this dish vegan, swap the honey for maple syrup or agave nectar. Both work well and keep the sweet flavor. You can also use a gluten-free flour mix if needed. Choose vegetable broth instead of water to add extra flavor to the batter. These simple swaps keep the dish delicious and allow everyone to enjoy it. You can experiment with different sauces for a new twist. Try a sweet teriyaki sauce instead of the honey garlic. A spicy buffalo sauce adds a tangy kick. For a creamy touch, mix in some ranch dressing after baking. Each sauce creates a unique flavor profile that makes this dish exciting. Don't hesitate to mix and match sauces to see what you love best. For the full recipe, check out the recipe above. To keep your spicy honey garlic cauliflower bites fresh, place them in an airtight container. Make sure the bites are cool before sealing the container. Store them in the fridge for up to three days. This way, you can enjoy them later without losing their flavor. To reheat, preheat your oven to 350°F (175°C). Spread the cauliflower bites on a baking sheet. Bake for about 10-15 minutes, or until they are warm and crispy again. You can also use an air fryer for a quicker option. Just heat them for around 5 minutes at 350°F (175°C). If you want to save some for later, freezing works great. Place the cauliflower bites in a single layer on a baking sheet. Freeze them for about one hour, then transfer them to a freezer-safe bag. They can last up to three months in the freezer. When ready to eat, bake them straight from the freezer for about 20-25 minutes at 425°F (220°C). Enjoy your tasty treat anytime! For more details, check the Full Recipe. Yes, you can use frozen cauliflower florets. Just make sure to thaw them first. Pat them dry with a towel to remove excess moisture. This helps the batter stick better. Frozen florets may cook faster, so keep an eye on them in the oven. These bites pair well with many dishes. I love serving them with rice or quinoa. They also work great as a side for grilled chicken or fish. You can even enjoy them on their own as a snack. Add a dipping sauce like ranch or yogurt for extra flavor. To change the spice level, simply adjust the cayenne pepper. Use less for a milder bite. If you like it spicy, add more cayenne or even some chili flakes. You can also add hot sauce to the honey garlic sauce for an extra kick. Spicy Honey Garlic Cauliflower Bites provide a tasty, healthy snack option. You learned the main ingredients, how to prepare, and tips for perfect bites. We also explored various flavors and storage tips. Enjoy these bites fresh or stored for later. Change up the flavors for fun. Remember, cooking is about trying new things. So, get creative and make this dish your own!

Spicy Honey Garlic Cauliflower Bites Tasty and Simple

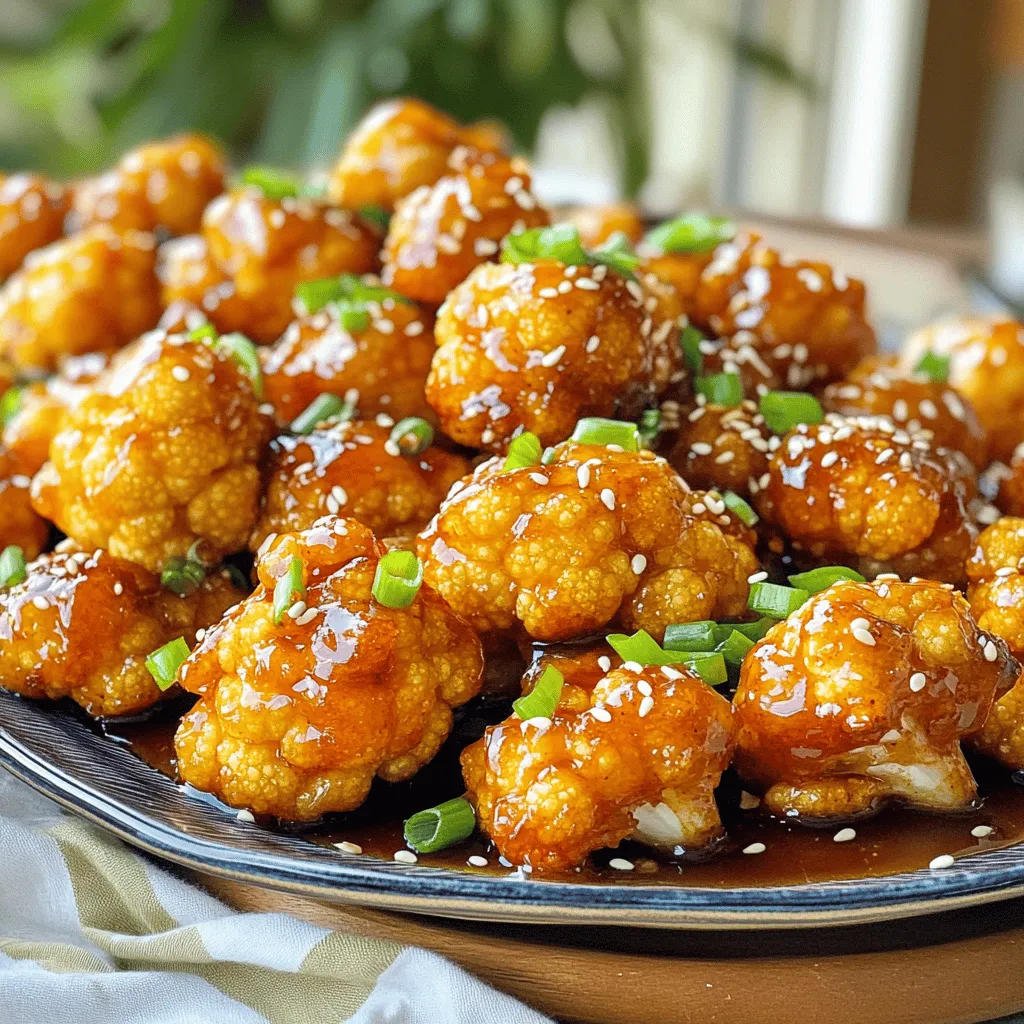
Looking for a quick, tasty snack that’s both spicy and sweet? You’re in the right place! My Spicy Honey Garlic

- Gnocchi options: You can use fresh or store-bought gnocchi. Fresh gnocchi is soft and fluffy. Store-bought is quick and easy, perfect for busy days. Both options taste great in this dish. - Chicken preparation: For this recipe, I use two boneless, skinless chicken breasts. Dice them into bite-sized pieces. This helps them cook evenly and absorb Cajun flavor well. - Cajun seasoning details: Cajun seasoning is key to this dish. It adds warmth and spice. You can buy it or make your own. Just mix paprika, cayenne, garlic powder, and oregano for a homemade version. - Types of bell peppers: Use mixed colors for a vibrant look. Red, yellow, and green bell peppers work well. Each adds a unique flavor and crunch to the dish. - Choosing cherry tomatoes: Look for ripe cherry tomatoes. They should be firm and bright in color. Halve them for easy mixing and a burst of flavor when you bite into them. - Heavy cream versus alternatives: Heavy cream gives a rich and creamy sauce. If you want a lighter option, try half-and-half or coconut cream. Both can still add creaminess to your dish. For the complete guide, check the Full Recipe. To cook the gnocchi, start with a large pot of water. Add a good amount of salt. This helps flavor the gnocchi as it cooks. Bring the water to a rolling boil. Once boiling, drop in the gnocchi. They will sink to the bottom at first. In a few minutes, they will float to the top. This means they are done. Use a slotted spoon to remove them from the pot. Drain and set them aside for later. Now, let’s move on to the chicken. First, season the diced chicken breasts with Cajun seasoning, salt, and pepper. This adds great flavor. Heat olive oil in a large skillet over medium-high heat. Add the seasoned chicken to the pan. Cook it for about 6-7 minutes. You want it browned and cooked through. Once done, take the chicken out and set it aside. In the same skillet, add the chopped onion. Cook it for 2-3 minutes until it softens. Then, add the minced garlic and cook for one more minute. Stir it often to avoid burning. Next, toss in the diced bell peppers. Sauté them for about 5 minutes until they are tender. Now, pour in the chicken broth and bring it to a simmer. Reduce the heat and stir in the heavy cream. Let it thicken for about 3-5 minutes. Now, add the cooked chicken back into the skillet. Mix in the halved cherry tomatoes. Stir gently to combine everything. Then, add the cooked gnocchi and grated Parmesan cheese. Mix well so everything is coated in the creamy sauce. Adjust the seasoning with salt and pepper if needed. Cook it for an extra 2 minutes until heated through. Serve hot and top with fresh parsley for a nice touch. For the full recipe, check out the earlier section. - To avoid soggy gnocchi, cook them until they float. This shows they are ready. Drain them well and do not let them sit in water. - For even chicken cooking, cut the chicken into small, equal pieces. This helps them cook at the same rate. Cook them until they are golden brown and no longer pink inside. - You can adjust the Cajun seasoning to match your taste. If you like it spicier, add more. If you prefer a milder dish, use less. - For the cheese, use freshly grated Parmesan. It melts better and adds a richer flavor than pre-grated cheese. - Serve the creamy Cajun chicken gnocchi in shallow bowls. This showcases the colorful ingredients. - Garnish the dish with fresh parsley. It adds a nice pop of color and a fresh taste. You can also add some extra Parmesan on top for a cheesy touch. {{image_2}} You can change the protein in this dish. Shrimp works great instead of chicken. It adds a nice flavor and cooks quickly. If you want a vegetarian option, use tofu. Just make sure to press it first to remove extra water. For vegetables, feel free to swap bell peppers with zucchini or spinach. Both add a fresh taste. You can also use frozen veggies for more convenience. Want more heat? Add some cayenne pepper or red pepper flakes. Start with a small amount and taste as you go. This way, you control the spice level. If you love herbs, try adding thyme or dill for a twist. They add a fresh note that brightens up the dish. If you need gluten-free options, look for gluten-free gnocchi. Many brands offer this. You can also use potato gnocchi, which is naturally gluten-free. For a dairy-free choice, use coconut cream instead of heavy cream. It gives a rich taste without dairy. You can skip the Parmesan or use a dairy-free cheese for more flavor. Remember, these variations keep the dish fun and exciting. Enjoy trying new combinations! For the full recipe, check out the recipe section above. For leftover Creamy Cajun Chicken Gnocchi, store it in an airtight container. Make sure it cools down first. Refrigerate it within two hours of cooking. This keeps it safe to eat. When ready to eat, you can reheat the dish. I suggest using the stovetop for even heating. Stir it often to avoid sticking. If you prefer the microwave, heat it in short bursts. Stir between each burst for best results. Freezing is a great way to save this meal. To freeze, let it cool completely. Then, place it in a freezer-safe container. Be sure to leave some space for expansion as it freezes. It can last up to three months in the freezer. When you want to eat it, thaw it in the fridge overnight. For reheating, use the stovetop again. Add a splash of chicken broth to help it rehydrate. Leftovers last about three to four days in the fridge. If you notice any off smells or mold, it’s best to throw it away. Signs of spoilage include a change in color or texture. Always trust your senses when checking food. Keeping leftovers safe means you can enjoy this tasty meal again! For the full recipe, check the complete details above. Can I use different types of pasta? Yes, you can use other types of pasta. Bowtie, penne, or even fettuccine work well. Just cook them according to the package instructions. Adjust the sauce amounts if needed. How do I make this recipe vegetarian? To make this dish vegetarian, skip the chicken and use mushrooms or tofu instead. You can also add more veggies like zucchini or spinach for extra flavor. What to do if the sauce is too thick or thin? If the sauce is too thick, add a splash of chicken broth or water. Stir well and heat gently. If it’s too thin, let it simmer longer to thicken. How to rescue overcooked chicken? To fix overcooked chicken, shred it into smaller pieces. Mix it with the sauce to keep it moist. You can also add a bit of cream to help. Can I make this ahead of time? Yes, you can prepare this dish ahead of time. Cook the gnocchi and sauce, then mix them just before serving. This keeps everything fresh. What can I add to make it more filling? To make it more filling, add veggies like broccoli or spinach. You can also toss in beans or chickpeas for protein. This blog post covered how to make a delicious gnocchi dish with chicken and Cajun flavors. You learned about the main and additional ingredients, step-by-step cooking instructions, and helpful tips. We also explored variations for different diets and how to store leftovers. Remember, cooking is fun and allows for creativity. Customize the recipe as you like for the best taste and health. Enjoy your cooking journey and share your tasty results!

Creamy Cajun Chicken Gnocchi Tasty and Easy Recipe

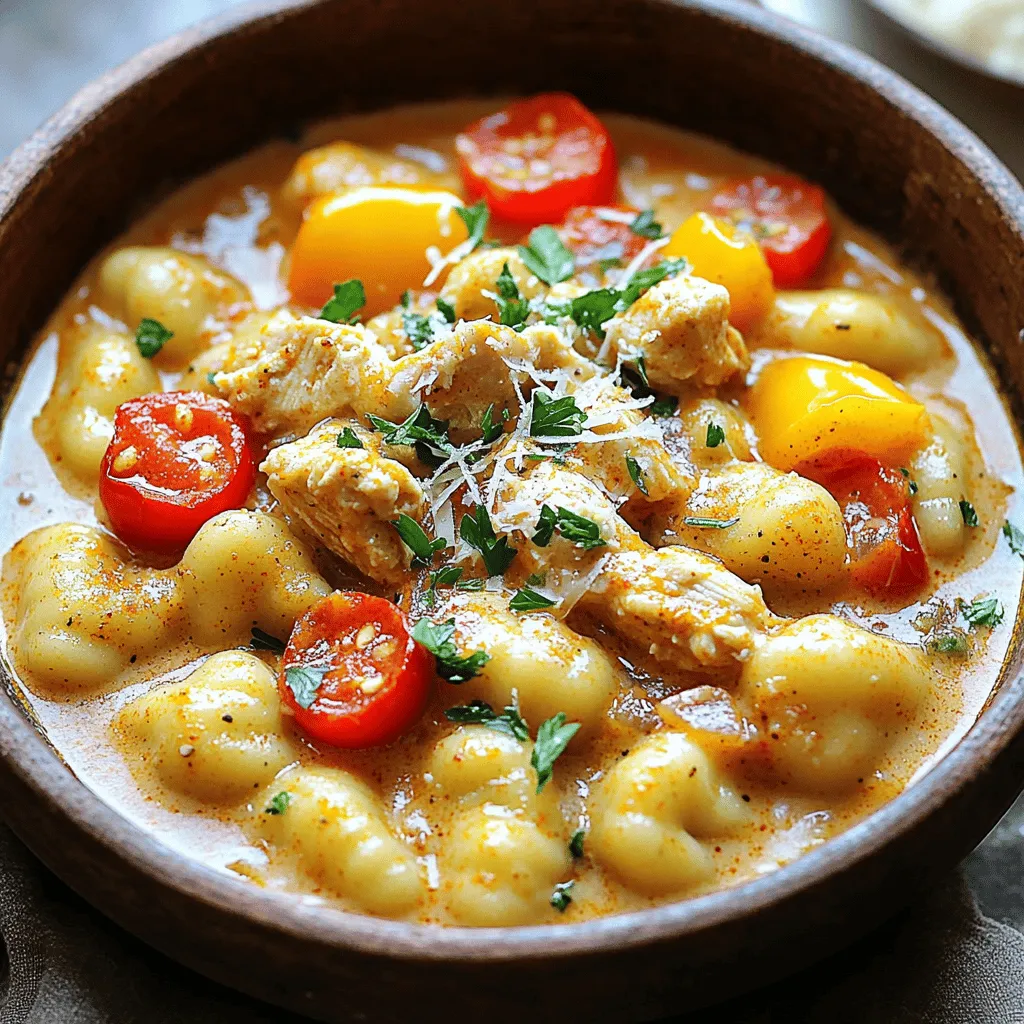
Are you ready to spice up dinner? This Creamy Cajun Chicken Gnocchi recipe combines tender gnocchi, seasoned chicken, and a

- Salmon fillets - Honey - Soy sauce - Garlic - Fresh ginger - Olive oil - Salt and pepper - Sesame seeds (for garnish) - Green onions (for garnish) Choosing the right salmon When picking salmon, look for fresh fillets. They should be bright and moist. Wild-caught salmon has great flavor. Farmed salmon is often cheaper but can be less tasty. Importance of low-sodium soy sauce Low-sodium soy sauce is better for your health. It adds flavor without too much salt. You can always add more salt later if needed. Fresh vs. pre-minced garlic Fresh garlic has a stronger taste than pre-minced garlic. I recommend using fresh garlic for this recipe. It gives the glaze a richer flavor. If you use pre-minced garlic, cut back a bit. You do not want the garlic to overpower the dish. You can check the [Full Recipe] for more details on making this dish. How to prepare the glaze To make the glaze, take a small bowl. Whisk together 1/4 cup honey, 3 tablespoons low-sodium soy sauce, 3 minced garlic cloves, and 1 tablespoon grated fresh ginger. This mix is sweet and savory. Set aside a tablespoon of this glaze for later. Seasoning the salmon fillets Next, season the 4 salmon fillets. Sprinkle salt and pepper on both sides. This step adds flavor. Make sure each fillet is well coated for the best taste. Heating the skillet Now, grab a large skillet. Heat 1 tablespoon of olive oil over medium heat. Wait until the oil is hot but not smoking. This ensures a nice sear on the salmon. Cooking salmon skin-side down Place the salmon fillets skin-side down in the hot skillet. Cook for 5-6 minutes. You want the skin to get crispy. This will add great texture and flavor. Flipping and glazing the salmon Carefully flip the salmon with a spatula. Brush the glaze mixture over the top of each fillet. Cook for another 4-5 minutes. Spoon more glaze over the fish as it cooks. The salmon should flake easily with a fork when done. Resting time for the salmon After cooking, remove the salmon from the skillet. Let it rest for a minute. This helps keep it juicy. Garnishing tips Before serving, drizzle the reserved glaze over the salmon. For a lovely touch, garnish with sesame seeds and chopped green onions. This adds color and crunch. Serve the salmon on a bed of rice or quinoa for a complete meal. Enjoy your honey garlic glazed salmon! For the complete recipe, check out the Full Recipe. To get the perfect glaze, mix honey and soy sauce well. Whisk until smooth. This helps blend the flavors. The sauce should be thick but pourable. If it is too thin, cook it a little longer on the stove. Avoid overcooking the salmon. It should take about 10 minutes in total. The fish is done when it flakes easily. If it looks dry, you may have cooked it too long. Use a timer to help keep track. You can add fresh herbs for a pop of flavor. Chopped parsley or cilantro work great. They add a fresh taste that brightens the dish. If you want a different flavor, try using teriyaki sauce instead of soy sauce. You can also mix in a bit of sriracha for some heat. Each sauce gives a unique twist to the meal. For a beautiful plate, serve salmon on steamed rice or quinoa. This adds color and texture. You can also add stir-fried veggies on the side. Drizzle any extra honey garlic glaze over the meal. This makes the dish look special. You can garnish with sesame seeds and green onions for a nice touch. {{image_2}} You can swap the salmon for chicken or tofu. Both options work well with the honey garlic glaze. For chicken, use boneless breasts or thighs. Cook them the same way as the salmon. Tofu is a great choice for a vegetarian meal. Press the tofu to remove excess water, then cut it into thick slices. Cook it until golden brown on each side, then glaze it. If you need a gluten-free option, use tamari instead of soy sauce. Tamari gives you a similar flavor without gluten. For those watching sugar intake, try a low-sugar honey. You can also mix honey with a sugar substitute. This way, you keep the sweet taste without the extra calories. Want to spice things up? Add crushed red pepper flakes or cayenne pepper to the glaze. This will give your dish a nice kick. If you prefer a fresh taste, try adding citrus. Squeeze some lemon or lime juice into the glaze. The citrus will brighten the flavors and balance the sweetness. To keep your leftover honey garlic glazed salmon fresh, store it in an airtight container. This helps lock in flavor and moisture. Make sure it cools down first before sealing the container. Your salmon will stay fresh in the fridge for up to three days. If you notice any off smells or changes in color, it’s best to toss it. If you want to save your honey garlic glazed salmon for later, freezing is a great option. First, wrap each fillet in plastic wrap and then place it in a freezer bag. This prevents freezer burn. You can freeze the salmon for up to three months. When you're ready to eat, thaw it overnight in the fridge. To reheat, place the salmon in a skillet over low heat. Add a splash of water to keep it moist. Heat it until warm, about 5-7 minutes. Making honey garlic glazed salmon ahead of time is perfect for busy weeknights. You can cook a few fillets and store them in the fridge. Pair them with rice or veggies for quick meals. This dish also works well with other meal prep recipes. Try adding it to salads, wraps, or grain bowls. It makes meal planning a breeze and keeps your dinners exciting! You should cook honey garlic glazed salmon for about 10 to 12 minutes. Start skin-side down for 5 to 6 minutes. Then flip it and glaze the top. Cook for another 4 to 5 minutes until it’s tender. Yes, you can use other fish, like trout or tilapia. Just adjust the cooking time based on the thickness. Salmon has a nice, rich flavor, but other fish can work well too. This dish pairs nicely with several sides. Try serving it with steamed jasmine rice or quinoa. You can also add stir-fried vegetables for a colorful plate. A fresh salad is another great option. To check if salmon is cooked, look for a few signs. It should flake easily with a fork and have a light pink color in the center. If it is opaque and firm, it’s done. Yes, you can make the glaze ahead of time. Just store it in the fridge for up to three days. When ready to use, give it a stir and it’s good to go. For the full recipe, check out the details above. This blog post covered a simple honey garlic glazed salmon recipe. You learned about the key ingredients and how to prepare and cook them step-by-step. I shared tips for the perfect glaze, variations for different diets, and how to store leftovers. Cooking can be fun and easy. With these tools and ideas, you can impress your family or friends. Enjoy!

Honey Garlic Glazed Salmon Simple and Tasty Meal

Are you ready to impress your family with a simple and tasty meal? Honey Garlic Glazed Salmon is the answer!

- 1 box of brownie mix (and required ingredients: eggs, oil, water) - 1 cup graham cracker crumbs - 1 cup mini marshmallows - 1 cup chocolate chips (semi-sweet or milk chocolate) - 1/4 cup unsweetened cocoa powder - 2 tablespoons sugar - 1/4 teaspoon salt - Cooking spray or butter for greasing The main ingredients create that rich, fudgy goodness. I use a box of brownie mix for simplicity. You just need to mix in eggs, oil, and water. Graham cracker crumbs give that classic s'mores flavor. Mini marshmallows add a fun, gooey touch. I love using chocolate chips, either semi-sweet or milk chocolate, for a sweet burst. For optional ingredients, I sometimes add unsweetened cocoa powder. It deepens the chocolate taste. Sugar adds extra sweetness, while salt balances the flavors. Greasing the muffin pan is a must to avoid sticking. This list covers everything for your S'mores Stuffed Brownie Cups. For the complete guide, check the Full Recipe! 1. Preheat your oven to 350°F (175°C). This ensures even baking. 2. Grease a muffin pan using cooking spray or butter. This helps the brownie cups come out easily. 3. In a mixing bowl, prepare the brownie batter according to the box instructions. Mix until smooth and creamy. 1. In a separate bowl, mix graham cracker crumbs, cocoa powder, sugar, and salt. This is your s'mores base. 2. Spoon about one tablespoon of brownie batter into each muffin cup. Make sure to cover the bottom evenly. 3. Add a layer of the graham cracker mixture over the brownie batter. Fill each cup about halfway. 4. Sprinkle a few chocolate chips and mini marshmallows on top of the graham mixture in each cup. 5. Pour more brownie batter over the filling until each cup is about three-quarters full. 1. Bake your brownie cups in the preheated oven for 18-20 minutes. Check with a toothpick; it should come out mostly clean. 2. Once done, cool the brownie cups in the pan for 10 minutes. Then, gently remove them. 3. For a gooey finish, top each cup with extra marshmallows and chocolate chips. Return to the oven for 2-3 minutes to toast the marshmallows. With these steps, you'll create a treat that's easy and fun! For the full recipe, check the earlier section. To get the perfect brownie texture, follow these steps. First, mix your brownie batter until smooth. Do not overmix, as this may make the brownies tough. Use a medium bowl for easy mixing. To check for doneness, insert a toothpick into the center of a brownie cup. If it comes out with a few moist crumbs, the cups are ready. If it is wet, bake for another minute or two. These brownie cups taste best warm. Serve them right out of the oven for gooey marshmallows. For a nice touch, drizzle melted chocolate over the top. Sprinkle extra graham cracker crumbs for added texture. For an extra treat, consider adding a scoop of ice cream on the side. This makes each bite even more delightful. If you want to try a new brownie mix, look for a low-sugar or gluten-free version. These can work just as well. You can also make brownies from scratch if you prefer. For chocolate chips, consider using white chocolate or dark chocolate. You can mix different types for a fun flavor. If you want a twist on marshmallows, try using flavored marshmallows, like caramel or strawberry. They can give your brownie cups a unique taste. For the full recipe, check the detailed instructions above. Enjoy making these delicious treats! {{image_2}} You can change up your s'mores stuffed brownie cups by adding nuts or caramel. Chopped nuts, like pecans or walnuts, give a nice crunch. Caramel drizzled atop adds a sweet touch. You can also try different types of chocolate. Dark chocolate brings a rich taste. White chocolate offers a sweet twist. Mixing semi-sweet and milk chocolate can create a delightful depth of flavor. For a fun twist, you can turn these brownie cups into a s'mores sundae. Just top them with a scoop of vanilla ice cream and a drizzle of chocolate sauce. Add extra mini marshmallows for a lovely finish. Another idea is to bake the s'mores in a pie crust. This gives a whole new way to enjoy the classic s'mores taste. The crust adds a crispy layer that contrasts nicely with the gooey filling. These variations make every bite exciting! For the full recipe, check out the link above. To keep your S'mores stuffed brownie cups fresh, follow these simple steps. First, let the brownie cups cool completely. This prevents moisture buildup. Once cooled, place them in an airtight container. This helps keep them moist and soft. You can also use plastic wrap if you prefer. Just make sure to seal it tightly. Store the container in a cool, dry place. They can last up to three days at room temperature. For longer freshness, consider refrigerating them. If you want to save some brownie cups for later, freezing is a great option. Here’s how to do it. After they cool, wrap each brownie cup in plastic wrap. Then, place them in a freezer-safe bag or container. This protects them from freezer burn. You can freeze them for up to three months. When you’re ready to eat, take them out and thaw them in the fridge overnight. For the best taste, warm them in the microwave for a few seconds before serving. Enjoy your delicious treat anytime! For the full recipe, check out the earlier section. How do I know when the brownie cups are done? You can check if the brownie cups are done by inserting a toothpick into the center. If it comes out mostly clean with a few moist crumbs, they are ready. The edges should look set, and the tops should be slightly firm. Keep an eye on them, as overbaking can lead to dryness. Can I make these S'mores Stuffed Brownie Cups ahead of time? Yes, you can make these cups a day ahead. Bake them, let them cool, and store them in an airtight container. When you are ready to eat, warm them in the oven at a low temperature. This will bring back their gooey texture. Can I use gluten-free brownie mix? Absolutely! You can use gluten-free brownie mix to make these cups. Many brands offer gluten-free mixes that work just as well. Make sure to check the package for any special instructions. What can I substitute for graham cracker crumbs? If you don’t have graham cracker crumbs, you can use crushed cookies like digestive biscuits or vanilla wafers. These will give a similar sweet and crunchy base for your brownie cups. Can I use a different type of pan? Yes, you can use a different pan, like a round cake pan or a baking dish. However, baking times may change. If you use a larger pan, check for doneness earlier, as they may bake faster. What is the best way to reheat leftover brownie cups? To reheat leftover brownie cups, place them in the oven at 300°F (150°C) for about 5-10 minutes. This will warm them up without making them dry. You can also microwave them for about 10-15 seconds for a quick option. These S'mores Stuffed Brownie Cups combine fun, flavor, and easy steps. You start with a simple brownie mix and layer in graham crackers, chocolate, and marshmallows. Don't forget the baking tips for the perfect texture! You can even freeze them for later. Mix up flavors or switch ingredients for your own twist. Enjoy these treats warm or cold, and serve them in fun ways. Now, get baking and savor every bite of your sweet creation!

S’mores Stuffed Brownie Cups Delicious and Simple Treat

If you love s’mores and brownies, you’re in for a treat. S’mores Stuffed Brownie Cups are the perfect combo of

- 2 large sweet potatoes - 2 tablespoons olive oil - 1 teaspoon garlic powder - 1 teaspoon paprika - 1/2 teaspoon cayenne pepper (optional) - Salt and pepper to taste - Fresh parsley for garnish (optional) When I make sweet potato fries, I love using fresh ingredients. Sweet potatoes give a sweet and nutty flavor. You'll need just two large sweet potatoes. Olive oil helps them crisp up nicely. I use two tablespoons, but feel free to adjust to your liking. For seasoning, I keep it simple yet flavorful. Garlic powder adds depth, while paprika gives a nice color. If you like heat, add cayenne pepper, but it's optional. Salt and pepper finish them off. You can always adjust these to fit your taste. Lastly, I like to add fresh parsley as a garnish. It makes the plate look bright and fresh. You can find the full recipe above to guide you through the steps! Start by washing the sweet potatoes under cold water. This removes dirt and grit. Then, peel the sweet potatoes with a vegetable peeler. After peeling, cut them into even-sized fries, about 1/4 inch thick. This step helps them cook evenly. Next, place the fries in a large bowl. Drizzle 2 tablespoons of olive oil over the fries. Toss them well to make sure they are all coated. Now, add the seasonings: 1 teaspoon garlic powder, 1 teaspoon paprika, and 1/2 teaspoon cayenne pepper if you like heat. Sprinkle salt and pepper to taste. Toss again until the fries are well-seasoned. Preheat your air fryer to 400°F (200°C) for about 3-5 minutes. Once it's hot, place the seasoned sweet potato fries in the basket in a single layer. You may need to cook in batches if they don't all fit. Cook the fries for 15-20 minutes, shaking the basket halfway through. This helps them cook evenly. The fries are done when they are golden brown and crispy. Enjoy them hot for the best taste! Check out the Full Recipe for more details. To get the best crispiness, cut the sweet potatoes evenly. I like to make them about 1/4 inch thick. This size helps them cook well and stay crunchy. If the fries are not even, some will cook faster than others. While cooking, shake the basket halfway through. This action helps the fries cook evenly. It also lets hot air reach all sides, which makes them crispy. For more flavor, try adding other seasonings. You can use a pinch of cayenne for heat or mix in some smoked paprika for a smoky taste. Do not be afraid to experiment! Fresh herbs like rosemary or thyme can add a nice twist. Try adding a bit of lemon zest for a fresh kick. The options are endless! If your fries turn out soft, it may be due to uneven cutting. Check your fry sizes and try again. Thicker fries need more cooking time, while thinner ones cook faster. Always keep an eye on the fries as they cook. If they seem soft, add a few extra minutes. You want them golden brown and crispy. For a perfect result, adjust the time based on the thickness of your fries. {{image_2}} You can change the taste of your sweet potato fries easily. For a spicy twist, add extra cayenne pepper or chili powder. This gives the fries a nice kick. You can also try a sweet flavor by mixing in cinnamon and a bit of brown sugar. This option is perfect for a unique treat. If you don’t have an air fryer, you can still enjoy sweet potato fries. Oven-baked fries are a great choice. Simply spread them out on a baking sheet and bake at 425°F (220°C) for 25-30 minutes. Flip them halfway for even cooking. Another option is traditional deep-frying. This method yields very crispy fries but uses more oil. If you choose this, heat oil to 350°F (175°C) and fry in small batches. Fries taste great on their own, but dips make them even better. Ketchup is a classic choice, but garlic aioli adds a gourmet touch. You can also pair fries with burgers for a fun meal. They go well with fresh salads too, adding a nice crunch. For a full experience, serve your fries with a side of your favorite main dish. To keep your leftover sweet potato fries fresh, store them in an airtight container. This helps prevent moisture loss. Make sure to cool the fries to room temperature before sealing. For the best taste, eat them within 2 days. If you want to save fries for later, freezing is a great option. Spread the cooled fries in a single layer on a baking sheet. Freeze them for about 1-2 hours until they're solid. Then, transfer them to a freezer bag or container. They can last in the freezer for up to 3 months. To reheat sweet potato fries, the air fryer is the best choice. It keeps the fries crispy. Preheat the air fryer to 375°F (190°C). Cook the fries for 5-7 minutes, shaking halfway through. You can also use the oven. Preheat it to 400°F (200°C). Spread the fries on a baking sheet and heat for about 10-15 minutes. If you’re short on time, the microwave works too, but fries may lose their crispiness. Heat in 30-second bursts until warm. In the fridge, sweet potato fries last for about 2-3 days. If they smell off or have a slimy texture, it’s time to toss them. Look for changes in color or mold as signs of spoilage. Always trust your senses when checking food freshness. To get crispy air fryer sweet potato fries, follow these tips: - Cut sweet potatoes evenly. This helps them cook at the same rate. - Soak the cut fries in water for 30 minutes. This removes excess starch. - Dry the fries well before seasoning. Moisture can make them soggy. - Use less oil. Just enough to coat them lightly will do. - Shake the basket halfway through cooking. This allows hot air to reach all sides. These steps help you achieve a golden, crunchy texture with every batch. Yes, you can use frozen sweet potato fries in the air fryer. Here are some tips: - Preheat the air fryer first. This helps to cook the fries evenly. - Cook without thawing. Frozen fries will keep their shape better. - Increase the cooking time by 5 to 10 minutes. This accounts for the chill. - Check for doneness. The fries should be golden and crispy. This method makes it easy to enjoy fries without the prep time. Sweet potatoes are packed with health benefits. Here’s a quick overview: - High in fiber, they aid digestion and keep you full. - Rich in vitamins A and C, they boost your immune system. - They contain potassium, which helps regulate blood pressure. - Sweet potatoes are low in calories and high in nutrients. Including sweet potatoes in your diet adds flavor and nutrition to your meals. For a delicious recipe, check out the Full Recipe. Air fryer sweet potato fries are simple, tasty, and healthy. We covered how to prepare, season, and cook them for crispiness. You learned tips for flavor and storage. You can also try fun variations and savor these fries with your favorite dips. Remember, experimenting with seasonings can lead to new favorites. Enjoying these fries fits well with many meals. Cook them often, and let your creativity shine in the kitchen.

Air Fryer Sweet Potato Fries Crispy and Delicious Treat

Are you craving a crispy and delicious snack? Air fryer sweet potato fries might be just what you need! They’re

The base of my pumpkin streusel muffins starts with simple, flavorful ingredients. Here’s what you need: - 1 ½ cups all-purpose flour - 1 teaspoon baking powder - ½ teaspoon baking soda - ½ teaspoon salt - 1 teaspoon ground cinnamon - ½ teaspoon ground nutmeg - ½ teaspoon ground ginger - ½ cup granulated sugar - ½ cup brown sugar, packed - ½ cup vegetable oil - 1 cup canned pumpkin puree - 2 large eggs - 1 teaspoon vanilla extract - ½ cup chopped walnuts or pecans (optional) These ingredients work together to create a moist, spiced muffin that captures the essence of fall. If you want to enhance your muffins, consider adding these optional ingredients: - ½ cup chopped nuts like walnuts or pecans for crunch - ½ cup chocolate chips for a sweet twist - ½ cup dried cranberries for a hint of tartness These additions can make your muffins unique and cater to your taste. Sometimes, you need to adjust ingredients for dietary needs. Here are a few swaps: - For gluten-free muffins, replace all-purpose flour with a gluten-free blend. - Use applesauce instead of oil for a lower-fat option. - Swap regular sugar with coconut sugar for a lower glycemic index. These substitutions can help you enjoy pumpkin streusel muffins while sticking to your dietary goals. For the full recipe, check out the detailed instructions above. First, gathering your tools helps keep things smooth. You need a muffin tin, mixing bowls, and a whisk. Preheat your oven to 350°F (175°C). Line your muffin tin with paper liners or grease it well. This step helps the muffins come out easily. Measuring your ingredients is vital. Use a dry measuring cup for flour and sugar. Use a liquid measuring cup for pumpkin puree and oil. Ensure everything is ready to go before mixing. Now, let's mix the dry ingredients. In a medium bowl, whisk together 1 ½ cups of all-purpose flour, baking powder, baking soda, salt, cinnamon, nutmeg, and ginger. This mix gives the muffins their warm flavor. In a large bowl, combine the granulated sugar and brown sugar with ½ cup of vegetable oil. Mix until smooth. Then, add 1 cup of canned pumpkin puree, 2 large eggs, and 1 teaspoon of vanilla extract. Whisk until everything blends well. Gradually add your dry mix to the wet mix. Stir gently until just combined. Overmixing can make the muffins tough. If you want to add nuts, fold in ½ cup of chopped walnuts or pecans carefully. The streusel topping makes these muffins special. In a bowl, combine ½ cup of all-purpose flour, ½ cup of oats, ¼ cup of brown sugar, and ¼ teaspoon of ground cinnamon. This mix adds a nice crunch. Cut 4 tablespoons of cold butter into the mixture. Use a pastry cutter or fork to mix until it looks like coarse crumbs. This step is quick and easy. Now, fill each muffin cup about ⅔ full with the muffin batter. Generously sprinkle the streusel topping over each filled cup. This adds a sweet, crunchy layer. Follow the rest of the [Full Recipe] for baking and enjoying your muffins! To get the best muffin texture, mix your ingredients gently. Overmixing can make the muffins tough. Combine the wet and dry ingredients until just mixed. Small lumps are okay! For a light texture, use room-temperature eggs and pumpkin. They help the batter blend well. Avoid packing your flour. Instead, spoon it into the measuring cup and level it off. This ensures you use the right amount. Also, don’t skip the streusel topping. It adds flavor and crunch that makes these muffins shine. Lastly, check your oven temperature. An oven that is too hot can burn the tops. Store your muffins in an airtight container. They stay fresh for about three days. For longer storage, freeze them. Wrap each muffin in plastic wrap, then place them in a freezer bag. They last up to three months. When you want one, just thaw it at room temperature. Enjoy them warm for the best taste! For the full recipe, check out the sections above. {{image_2}} You can easily make gluten-free pumpkin streusel muffins. Use a gluten-free flour blend instead of all-purpose flour. Look for blends that include xanthan gum. This gum helps mimic the texture of wheat flour. Keep the other ingredients the same. The spices and pumpkin will still shine through. You will enjoy a tasty muffin without the gluten. To make a vegan version, swap out the eggs and dairy. Use flaxseed meal mixed with water instead of eggs. Mix one tablespoon of flaxseed meal with three tablespoons of water. Let it sit for five minutes to thicken. Use a plant-based oil instead of vegetable oil. Almond or coconut oil works well. Replace the butter in the streusel with coconut oil or vegan butter. These changes keep the muffins moist and flavorful. Want to jazz up your muffins? Add chocolate chips or dried fruit. Dark chocolate chips bring a rich flavor. They pair well with the pumpkin spice. For dried fruit, try raisins or cranberries. They add a nice chew and extra sweetness. Mix in about half a cup of your choice before baking. These simple variations let you enjoy pumpkin streusel muffins in many ways. You can find the full recipe to guide you through these delightful changes. Each pumpkin streusel muffin contains about 200 calories. This is a great treat for fall. Here’s how the calories break down: - Fat: 10 grams - Carbohydrates: 30 grams - Protein: 3 grams This balance gives you a satisfying snack without going overboard. Pumpkin is packed with vitamins. It has vitamin A, which is good for your eyes. It also includes fiber, which helps your digestion. The spices like cinnamon and nutmeg add flavor and may help with inflammation. Walnuts or pecans add healthy fats and protein as well. These muffins can be both tasty and good for you. You can cut sugar by using less granulated sugar or brown sugar. Try using applesauce as a substitute for some of the oil. This keeps the muffins moist while lowering calories. Another option is to use a sugar substitute made for baking. This way, you can enjoy the muffins without the extra sugar. To boost moisture in your muffins, use more pumpkin puree. This adds richness and flavor. You can also add a bit of plain yogurt or sour cream. These ingredients keep the muffins soft and tender. Avoid overmixing the batter, as this can dry out the muffins. Yes, you can freeze pumpkin streusel muffins. Allow them to cool completely first. Wrap each muffin in plastic wrap or foil. Place them in a freezer bag to keep them fresh. When ready to eat, thaw them at room temperature or warm them in the oven. Pumpkin streusel muffins pair well with many drinks. A warm cup of coffee or tea is great. You can also serve them with a dollop of whipped cream or cream cheese spread. For a fun twist, try them with apple cider or hot chocolate. These options enhance the cozy flavors of fall. For the complete recipe, check out the Full Recipe section! We explored the key ingredients and gave you steps to make pumpkin streusel muffins. You learned how to mix wet and dry ingredients, and create a tasty streusel topping. I shared tips for achieving the right texture and avoiding common mistakes. You discovered fun variations, like gluten-free and vegan options. Finally, I discussed nutritional information and answered frequently asked questions. Now, you can bake some of the best muffins. Enjoy your delicious creations!

Pumpkin Streusel Muffins Irresistible Fall Treat

Fall is here, and that means it’s time for cozy treats! These Pumpkin Streusel Muffins are perfect for warm mornings

Older posts
Newer posts
← Previous Page1 … Page54 Page55 Page56 … Page85 Next →

dsad

© 2026 greenmealmap • Built with GeneratePress

Our Policies

  • Copyright Policy
  • Cookie Policy
  • GDPR Policy
  • Privacy Policy
  • Disclaimer
  • Terms Of Use

More Information

  • Home
  • About
  • Contact
  • Appetizers
  • Dessert
  • Dinner
  • Drinks
©2026, greenmealmap About Back To Top