Skip to content
DisclaimerTerms Of UseGDPR PolicyCookie Policy

greenmealmap

  • Home
  • Drinks
  • Appetizers
  • Dinner
  • Dessert
  • About
  • Contact
  • Privacy Policy
DisclaimerTerms Of UseGDPR PolicyCookie Policy

NO-ING-IMG

To make Minute Creamy Garlic Parmesan Pasta, gather these simple ingredients: - 8 oz fettuccine or spaghetti - 2 tablespoons butter - 4 cloves garlic, minced - 1 cup heavy cream - 1 cup grated Parmesan cheese - 1 teaspoon Italian seasoning - Salt and pepper to taste - Fresh parsley for garnish These ingredients come together to create a rich and creamy dish. Choosing between fettuccine or spaghetti is a personal choice. Both types work well in this recipe. The butter and minced garlic bring great flavor. Minced garlic adds a strong aroma and taste to the sauce. Heavy cream and Parmesan cheese make the sauce smooth and rich. They blend together for a creamy delight. Italian seasoning adds a hint of herbs. Adjust salt and pepper to suit your taste. Garnish with fresh parsley for color and a fresh kick. This dish is quick, easy, and satisfying. With just a few ingredients, you can enjoy a gourmet meal at home. Boiling the Water and Cooking Method Start by filling a large pot with water. Add a good amount of salt. Bring the water to a rolling boil. Once boiling, add 8 oz of fettuccine or spaghetti. Cook it based on the package instructions. You want it al dente, which means it should still have a slight bite to it. Reserving Pasta Water Before you drain the pasta, take out ½ cup of the pasta water. This water is starchy and will help the sauce stick later. Drain the rest of the water and set the pasta aside. Melting Butter and Timing In the same pot you used for the pasta, add 2 tablespoons of butter. Heat it over medium heat until it melts. Then, add 4 minced garlic cloves. Sauté the garlic for about 1 minute. You want it fragrant, but be careful not to burn it. Burnt garlic can ruin the sauce. Combining Heavy Cream and Garlic Pour in 1 cup of heavy cream. Stir it well to mix with the garlic. Bring the mixture to a slight simmer. Let it simmer for about 2-3 minutes. Do not let it boil, as this can change the cream's texture. Whisking in Parmesan Cheese Gradually add in 1 cup of grated Parmesan cheese. Whisk it in until the sauce is smooth. If the sauce seems too thick, add some of that reserved pasta water to reach your desired consistency. Mixing Techniques and Seasoning Tips Add the cooked pasta to your creamy sauce. Stir gently to coat every strand of pasta. Season with 1 teaspoon of Italian seasoning, salt, and pepper to taste. Toss everything together until it’s well mixed. Plating Ideas and Garnishing When serving, plate the pasta nicely. You can sprinkle some fresh chopped parsley on top for color and freshness. This simple garnish adds a nice touch to your dish. Enjoy your creamy garlic Parmesan pasta! To make a smooth sauce, avoid common mistakes. Do not cook the garlic too long. Just sauté it until it smells good. If you burn it, the sauce will taste bitter. When adding the cream, stir well and keep it on low heat. Too much heat can cause the cream to curdle. If your sauce is too thick, add a little pasta water. This will help make it creamy and flow better. You can boost the flavor with extra seasonings. Try adding a pinch of red pepper flakes for some heat. Fresh herbs like basil or thyme also add a nice touch. If you want a bit of zest, squeeze in some lemon juice. This brightens the dish and balances the richness. Experiment with these options to find your perfect mix. For a fast meal, use a few time-saving techniques. Cook the pasta while you prepare the sauce. This way, everything is ready at once. You can also use pre-minced garlic to save time. Keep your ingredients measured and ready. This will help you focus on cooking, not searching for items. {{image_2}} You can easily add protein to your creamy garlic Parmesan pasta. Chicken and shrimp are great choices. - Chicken: Cook diced chicken in the pot before adding garlic. Sauté it until it turns golden brown. Then, remove it and add garlic as usual. Mix the chicken back in with the pasta. - Shrimp: Cook shrimp in the same pot after the garlic. Just a few minutes will do until they turn pink. Then, add the cream and cheese as you normally would. Adding vegetables gives your pasta extra flavor and nutrition. Spinach, broccoli, and mushrooms work well. - Spinach: Toss in fresh spinach at the end. It wilts quickly and adds a nice color. - Broccoli: Steam or sauté broccoli till tender. Add it to the pasta when mixing in the sauce. - Mushrooms: Sauté sliced mushrooms with the garlic. They add a rich, earthy flavor to the dish. You can adjust the creaminess and seasoning to fit your taste. - Creaminess: If you want a richer sauce, add more cream or cheese. Use less if you prefer a lighter meal. - Seasoning: Feel free to add more Italian seasoning, salt, or pepper. You can also try adding red pepper flakes for some heat. These variations let you make the recipe your own. To keep your creamy garlic Parmesan pasta fresh, store it in an airtight container. Make sure it cools to room temperature before sealing. Place it in the fridge within two hours of cooking. It will stay good for about three days. If you want to enjoy it later, label the container with the date. This way, you won’t forget when you made it. When you’re ready to eat the leftovers, use low heat to reheat the pasta. You can use a pan or microwave. If using a pan, add a splash of milk or cream. This helps keep the sauce creamy and smooth. Stir gently to avoid burning. If using a microwave, cover the bowl with a damp paper towel. This keeps moisture in and helps the pasta warm evenly. You can freeze creamy garlic Parmesan pasta, but it may change in texture. To freeze, let the pasta cool first. Then, place it in a freezer-safe bag or container. Be sure to remove as much air as you can. The pasta can freeze for up to three months. When you want to eat it, thaw it overnight in the fridge. Reheat it gently, adding cream or milk to restore its creaminess. Yes, you can make this recipe dairy-free. To substitute for heavy cream, use coconut cream or cashew cream. For the cheese, try nutritional yeast or a dairy-free cheese blend. Both options give a nice flavor and creaminess without the dairy. To avoid clumpy cheese, make sure to add it slowly. Whisk it in gradually, and keep the heat on low. If the sauce is too thick, add a little reserved pasta water. This helps the cheese blend well and keeps your sauce smooth. You can serve this pasta with a simple green salad or garlic bread. Roasted vegetables like broccoli or asparagus also pair well. For a protein boost, add grilled chicken or shrimp on top. These sides add variety and color to your meal. We explored how to create a delicious creamy garlic parmesan pasta. You learned about the key ingredients, step-by-step cooking methods, and tips for making the sauce just right. I shared ways to customize your dish with proteins or vegetables. We also covered storage options and answered common questions. Remember, practice makes perfect. Enjoy your cooking journey, and don’t shy away from experimenting. You’ll create a dish that impresses everyone at the table.

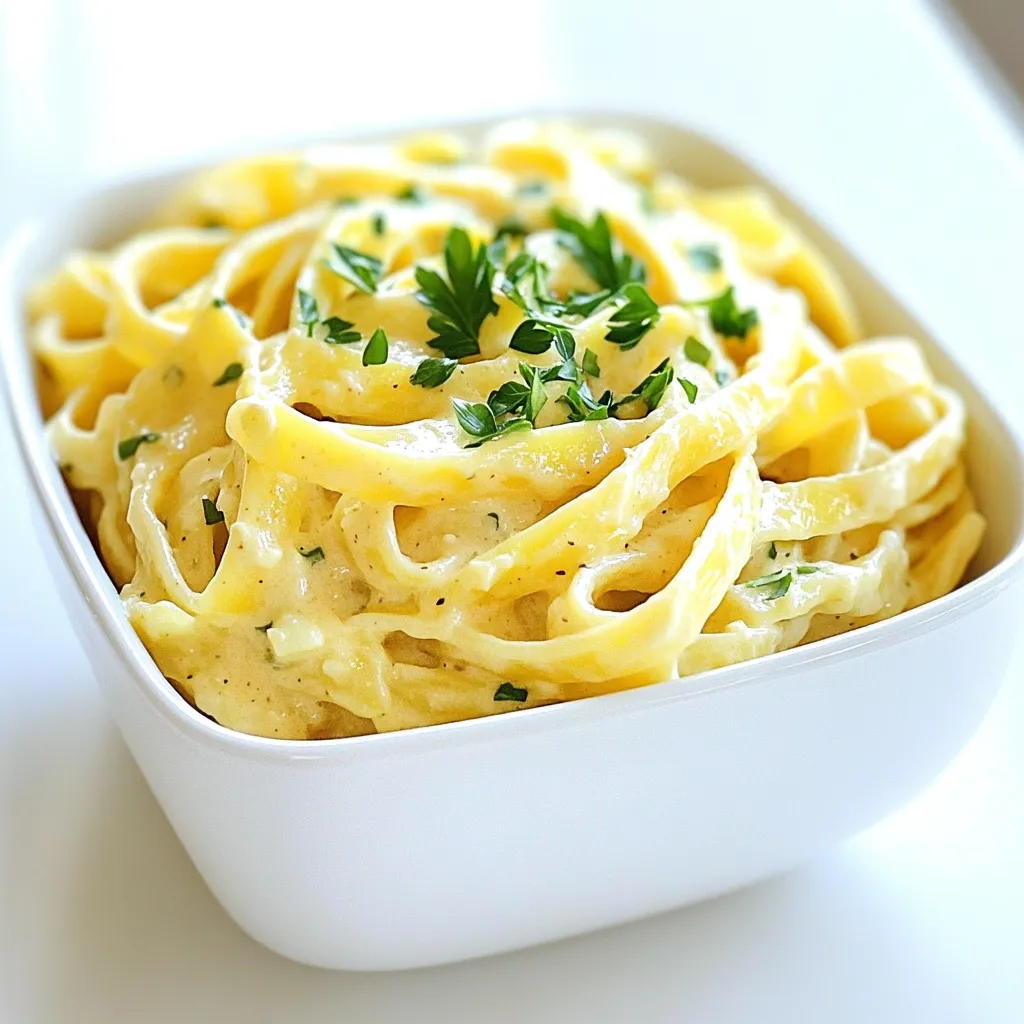
Minute Creamy Garlic Parmesan Pasta Quick and Easy Meal

Sometimes, you need a quick meal that packs flavor without much fuss. That’s where my Minute Creamy Garlic Parmesan Pasta

To make a Chai Spiced Apple Cider Latte, you will need: - 2 cups apple cider - 1 cup milk (dairy or plant-based) - 1 tablespoon chai tea blend (or 1 chai tea bag) - 1 teaspoon ground cinnamon - ½ teaspoon ground ginger - ¼ teaspoon ground cloves - ¼ teaspoon nutmeg - 1-2 tablespoons honey or maple syrup (adjust to taste) - Whipped cream (for topping, optional) - Apple slices and cinnamon stick (for garnish, optional) You can swap ingredients if you need to! Use any milk you like. Almond milk or oat milk works well. Instead of honey, try agave syrup or stevia for sweetness. You can also switch chai tea blend for spiced herbal tea if you prefer. If you don’t have cloves, using allspice can add a nice touch too. For the best flavor, I recommend using organic apple cider. It tastes fresh and pure. For chai tea, brands like Rishi or Stash offer great blends. If you use milk alternatives, try brands like Oatly or Silk for creamy textures. Whipped cream can be from Reddi-wip or a homemade version if you want to be fancy. This drink not only warms you up but also fills your home with a lovely scent. Enjoy crafting this cozy beverage! 1. Start by pouring 2 cups of apple cider into a small pot. 2. Add 1 tablespoon of chai tea blend or 1 chai tea bag to the pot. 3. Heat the pot over medium heat. Let it simmer for about 5 minutes. 4. Remove the pot from heat. Strain out the tea leaves or take out the tea bag. 5. In another small saucepan, heat 1 cup of milk over medium heat. 6. Make sure the milk is warm but do not let it boil. 7. Whisk the milk vigorously to create some froth, or use a milk frother. 8. Stir in 1-2 tablespoons of honey or maple syrup, ground cinnamon, ginger, cloves, nutmeg, and a pinch of salt into the warm milk. 9. Mix everything well until combined. 10. Pour the spiced apple cider into a mug. 11. Slowly add the chai spiced milk on top of the cider. 12. If you like, top your drink with whipped cream. 13. For garnish, add apple slices and a cinnamon stick. - When you heat the apple cider, keep an eye on it. You want it warm, not boiling. - For the milk, whisking helps to add air and makes it frothy. - If using honey, warm it slightly to help it dissolve better in the milk. - Layering the cider and milk creates a pretty drink. Pour slowly to keep the layers. - A small pot for heating the apple cider. - A small saucepan for the milk. - A whisk or milk frother for frothing the milk. - A strainer to remove tea leaves. - A large mug to serve your drink. - Optional: Clear glass mugs to show off the layers. To get the best flavor from your chai spiced apple cider latte, start with fresh apple cider. Look for cider that is unfiltered for a richer taste. When heating the cider, let it simmer gently. This allows the chai spices to infuse fully. Use a good quality chai tea blend or a strong tea bag. The more robust the tea, the more flavor it will bring. Serve your latte in clear glass mugs. This lets the vibrant colors shine through. For an added touch, sprinkle some cinnamon on top of the whipped cream. You can also add apple slices and a cinnamon stick for a nice look. This makes the drink more inviting and cozy. Enjoy it on a chilly day or when you want a warm treat. Feel free to get creative with your latte. You can add a pinch of nutmeg or allspice for extra warmth. If you prefer it sweeter, use more honey or maple syrup. For a creamier texture, try using oat milk or coconut milk. You can even add a splash of vanilla extract to enhance the flavor. Each change can make your drink unique and perfect for you. {{image_2}} You can use many kinds of milk for this drink. Dairy milk gives a creamy taste. Almond milk adds a nutty flavor. Oat milk is smooth and rich, making it a great choice. Coconut milk can bring a tropical twist. Try soy milk if you want a plant-based option that froths well. Each milk changes the drink’s flavor, so feel free to experiment! This drink shines in fall but can work in any season. In summer, try cold apple cider and chilled milk. You can even add ice to make it more refreshing. For winter, add a dash of peppermint extract for a festive touch. In spring, swap apple cider for fresh fruit juices like pear or cherry. If you want to change the sweetness, there are many options. Use agave syrup for a light sweetness. Coconut sugar adds a caramel note. Brown sugar will deepen the flavor. For a low-calorie choice, try stevia or monk fruit sweetener. You can adjust the amount based on your taste for the perfect balance. Store any leftover chai spiced apple cider latte in an airtight container. Keep it in the fridge. It will stay fresh for about three days. If you used dairy milk, consume it sooner. To reheat, pour the latte into a saucepan. Heat it over low to medium heat. Stir gently until warm, but do not boil. You can also use a microwave. Heat in short bursts, stirring in between. For long-term storage, consider freezing the latte. Use ice cube trays to freeze portions. Once frozen, transfer the cubes to a freezer bag. This way, you can enjoy a quick treat later. When ready, thaw in the fridge overnight before reheating. A Chai Spiced Apple Cider Latte is a warm drink. It combines apple cider with chai spices and milk. The drink has sweet and spicy flavors. You enjoy the rich taste of apple cider mixed with chai. It is perfect for cozy days or chilly nights. Yes, you can easily make this drink vegan. Use plant-based milk, like almond or oat milk. You can also use maple syrup instead of honey. This way, you keep the rich flavors while making it vegan-friendly. You can find chai tea blends in many places. Look at grocery stores in the tea section. You can also check specialty tea shops. Online retailers like Amazon offer a wide range. Choose one that fits your taste. Yes, you can enjoy this drink cold. Start by making the apple cider as usual. Allow it to cool in the fridge. Then, mix in cold milk and spices. Serve it over ice for a refreshing twist. You learned about the key ingredients for a Chai Spiced Apple Cider Latte. I discussed common swaps and brands for the best results. We explored step-by-step prep, tips, and tools to help you succeed. Flavor tips and serving ideas can enhance this drink. I also covered storage tricks and answered common questions. Now, you can create this cozy drink any time you desire. Enjoy your warm, fragrant latte!

Chai Spiced Apple Cider Latte Cozy and Inviting Drink

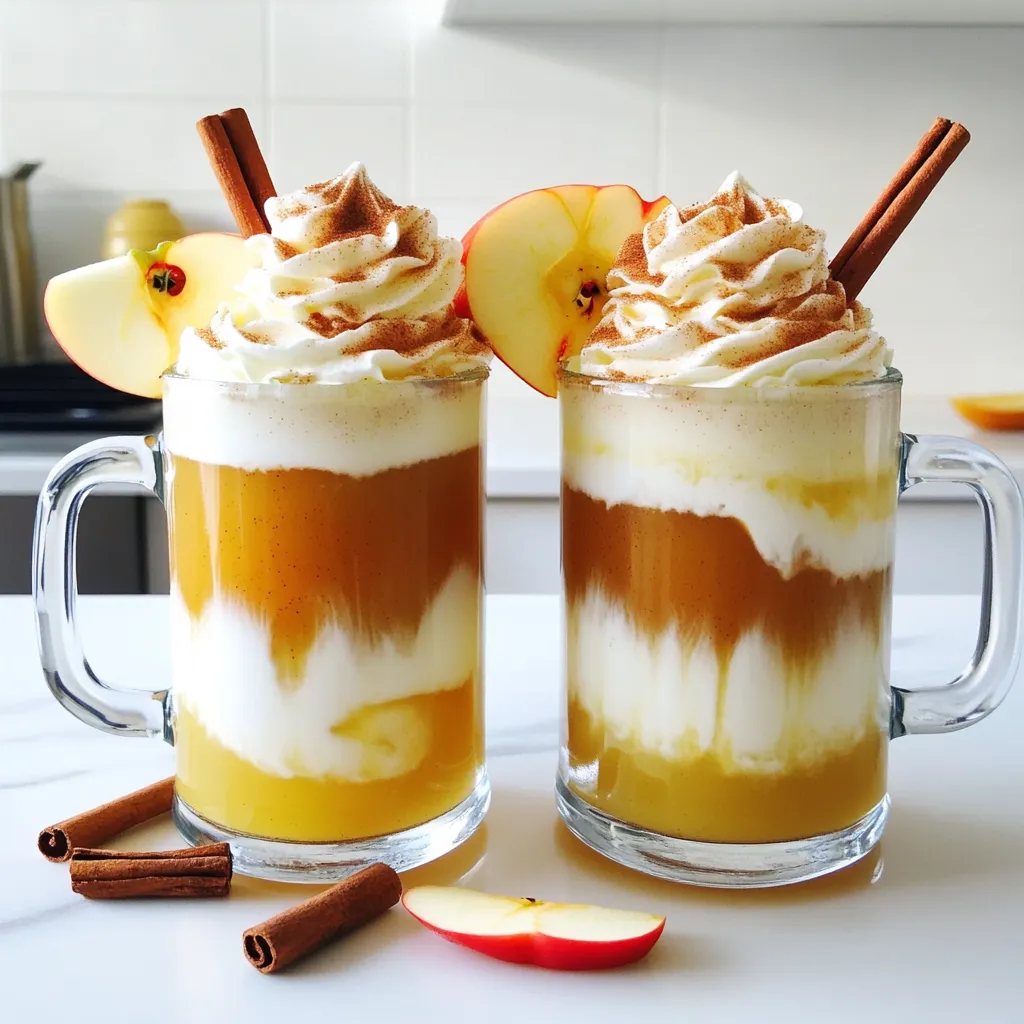
As the chill of autumn sets in, warm up with a Chai Spiced Apple Cider Latte. This drink blends cozy

- 2 large sweet potatoes, washed and cut into wedges - 3 tablespoons olive oil - 4 cloves garlic, minced - 1 teaspoon smoked paprika - 1 teaspoon onion powder - 1 teaspoon salt - ½ teaspoon black pepper - Fresh parsley, chopped (for garnish) - Optional: 1 tablespoon of freshly grated Parmesan cheese Using fresh ingredients makes a big difference. Sweet potatoes give a sweet, earthy taste. I use olive oil for healthy fat and great flavor. Garlic adds a nice kick, while smoked paprika gives a warm, rich touch. Onion powder and salt enhance the overall taste. Black pepper adds a little heat. For garnishing, I love using fresh parsley. It adds color and a fresh taste. If you want a cheesy twist, add grated Parmesan cheese. This mix of flavors makes the sweet potato wedges so tasty. Start by preheating your air fryer to 400°F (200°C) for about 5 minutes. Preheating is key for even cooking. It helps the sweet potato wedges cook perfectly from all sides. If you skip this step, the wedges may become soft and not crispy. First, wash your sweet potatoes well to remove any dirt. Next, cut them into wedges. Aim for uniform sizes to ensure even cooking. In a large mixing bowl, mix the sweet potato wedges with: - 3 tablespoons olive oil - 4 cloves garlic, minced - 1 teaspoon smoked paprika - 1 teaspoon onion powder - 1 teaspoon salt - ½ teaspoon black pepper Toss everything together. Make sure each wedge is well coated in the mix. This adds flavor and helps achieve that crispy texture. Now, it’s time to cook your wedges. Place them in the air fryer basket in a single layer. Avoid overcrowding the basket. If needed, cook in batches. Overcrowding can lead to uneven cooking. Air fry the wedges for 15-20 minutes. Shake the basket halfway through. This ensures even browning and crispiness. The wedges should come out golden brown and crisp. Enjoy the great flavor and texture! To get those sweet potato wedges crispy, set your air fryer to 400°F (200°C). This high heat cooks them fast and gives a nice crunch. Make sure to preheat for 5 minutes. It helps the wedges cook evenly. Shaking the basket is key! Halfway through cooking, pull out the basket and shake it. This helps the air circulate and cooks all sides. If you skip this, some wedges might not get crispy. You can boost the flavor with extra spices. Try adding cayenne pepper for heat or rosemary for a fresh taste. These will make your wedges even more exciting. For a cheesy kick, sprinkle Parmesan cheese on the hot wedges. It melts just enough to stick. Don’t forget to add fresh parsley on top for color and taste. It makes the dish look beautiful! If your wedges come out undercooked, they might need more time. Put them back in for another 3–5 minutes. Check them often to avoid overcooking. If your wedges are overcooked, they may be too crunchy. Next time, reduce the cooking time by a few minutes. After cooking, you can season to taste. If they need more salt or spice, sprinkle it on right after cooking. This way, the flavors mix well! {{image_2}} You can change up the flavor of your air fryer garlic sweet potato wedges. Try different spices to create a new taste. For a sweet twist, add cinnamon and a pinch of nutmeg. This makes them taste like fall! If you want something savory, use herbs like rosemary or thyme. You can also mix in chili powder for a little heat. If you want to switch from sweet potatoes, there are plenty of options. Carrots, parsnips, and even butternut squash work well. Just cut them into wedges and season them the same way. Each veggie brings its own flavor and texture. Many people have special diets these days. The good news is that air fryer garlic sweet potato wedges fit right in. They are naturally vegan and gluten-free. You just need to make sure any dips or sauces you use match your diet. If you are low-carb, you can swap sweet potatoes for zucchini or eggplant. They work great in the air fryer too! Just season and cook them the same way for a tasty low-carb treat. These sweet potato wedges are perfect for dipping. You can pair them with ketchup, ranch, or even a garlic aioli. If you want to be fancy, try a yogurt dip with herbs. They also go well with many main dishes. Serve them next to grilled chicken, fish, or a hearty salad. They add a nice crunch and flavor to any meal. To keep your sweet potato wedges fresh, refrigerate them. Place the cooled wedges in an airtight container. This helps keep moisture out and flavor in. Use a container that seals well to avoid drying out. Store them for up to three days in the fridge. The best way to reheat these wedges is in the air fryer. Set your air fryer to 350°F (175°C) and cook for about 5-8 minutes. This keeps them crispy. You can also use the oven. Preheat it to 350°F (175°C), and reheat for about 10-15 minutes. If you are in a hurry, the microwave works too. Heat them for 30 seconds at a time until warm, but they may lose crispiness. You can freeze sweet potato wedges either before or after cooking. If freezing raw, toss them in olive oil and seasonings first. Lay them flat on a baking sheet and freeze until solid. Then, transfer to a freezer bag. For cooked wedges, let them cool completely before freezing. Place them in a freezer-safe container. To thaw, you can leave them in the fridge overnight or use the microwave. If you want to keep the crispiness, reheat them directly from frozen in the air fryer. This works great and keeps them tasty. Air fryer sweet potatoes usually cook in 15 to 20 minutes. You want them to be golden brown and crispy. Check them halfway through and shake the basket. This helps them cook evenly. If they need more time, give them a few extra minutes. Yes, you can use other types of potatoes! Regular potatoes, like russets or Yukon golds, work well. They will have a different taste and texture, but they can be just as tasty. Cut them into similar wedge shapes for even cooking. No, you don’t have to peel sweet potatoes. The skin adds extra fiber and nutrients. Plus, it helps the wedges stay together while cooking. Just wash them well before cutting. If you prefer them peeled, that’s fine too! Air-frying sweet potatoes is simple and tasty. We covered key ingredients, like sweet potatoes and seasonings. I shared steps for preheating your fryer and preparing the wedges. You learned tips for crispiness and flavor, plus fun variations for diets. Storing leftovers and reheating them correctly keeps the taste fresh. Enjoy exploring all the ways to make this dish your own. With the right techniques, your sweet potato wedges can be a hit every time!

Air Fryer Garlic Sweet Potato Wedges Crispy Delight

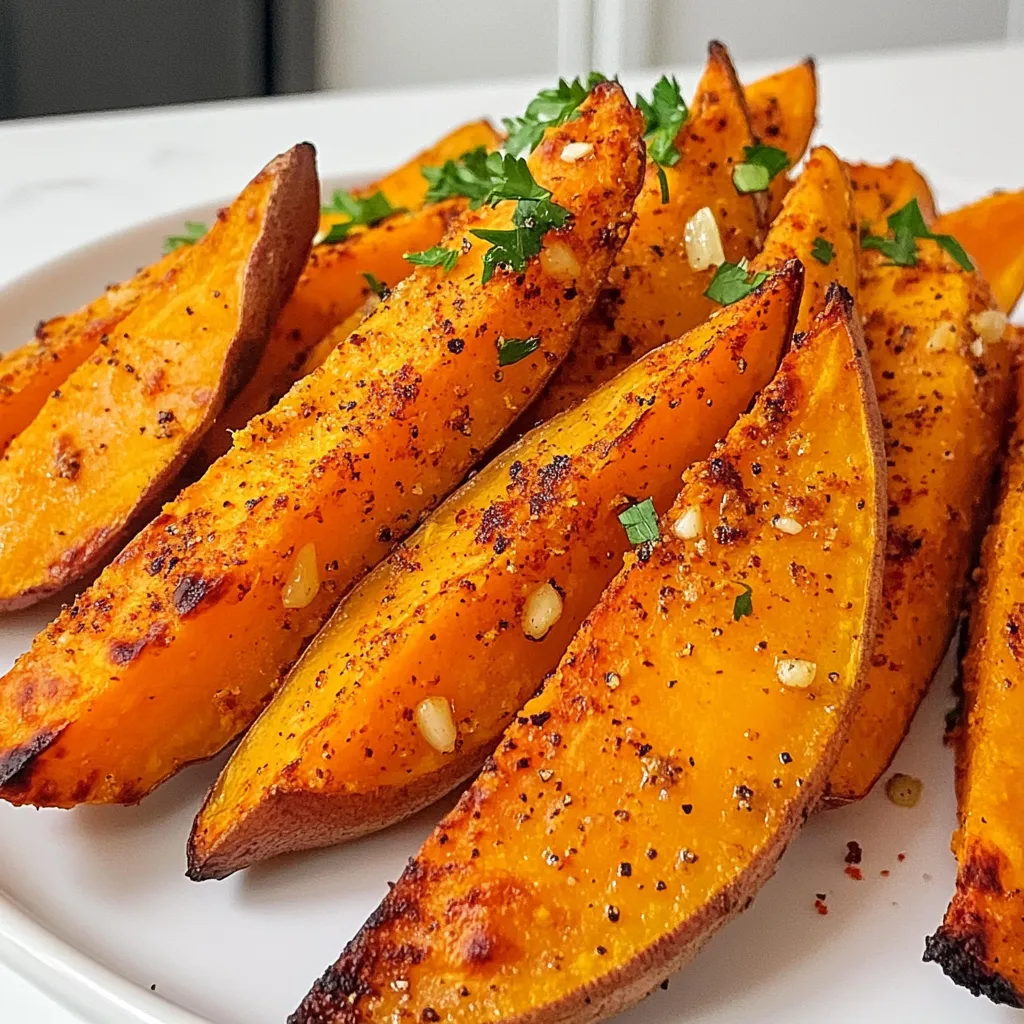
Are you craving a crispy snack that’s both tasty and healthy? You can whip up Air Fryer Garlic Sweet Potato

- 2 ripe avocados, cut into wedges - 1 cup breadcrumbs (Panko for extra crunch) - 1/2 cup all-purpose flour - 2 large eggs, beaten - 1 teaspoon paprika - 1/2 teaspoon garlic powder - 1/2 teaspoon cayenne pepper (optional) - Salt and pepper to taste - Cooking spray For a flavor boost, use spices like cumin or chili powder. You can also add fresh herbs like cilantro or parsley for a fresh taste. If you want a kick, try adding more cayenne pepper. This adds a nice heat to your fries. These crispy avocado fries go great with dips. Try them with a zesty cilantro lime dip or spicy mayo. You can also serve them with a fresh salsa. To make your plate pop, garnish with herbs and a lime wedge on the side. This adds color and flavor. Start with two ripe avocados. Cut them in half and remove the pit. Use a spoon to scoop the flesh out. Cut each half into wedges. Aim for even sizes for cooking. This helps them cook at the same rate. Set the avocado wedges aside on a plate. You need three shallow bowls for this part. In the first bowl, add half a cup of all-purpose flour. In the second bowl, beat two large eggs. In the third bowl, mix one cup of breadcrumbs with one teaspoon of paprika, half a teaspoon of garlic powder, and salt and pepper to taste. For extra heat, add cayenne pepper. Now, take each avocado wedge. First, roll it in the flour. Make sure it's fully coated. Next, dip it in the beaten egg. Finally, coat it with the breadcrumb mix. Press gently to help the crumbs stick well. This step is key for a crunchy outside. Preheat your air fryer to 375°F (190°C). This takes just a few minutes. Once it's hot, place the coated avocado wedges in the air fryer basket. Arrange them in a single layer without overcrowding. You may need to cook in batches to keep them crispy. Lightly spray the tops with cooking spray. This adds to the crunch. Cook for 10 to 12 minutes. Flip the wedges halfway through for even browning. Look for a golden brown color when cooking is done. After cooking, let them rest for a minute before serving. Enjoy your crispy avocado fries with your favorite dip! To get that perfect crunch, cooking spray is key. A light coat helps the breadcrumbs crisp up. I always spray the tops of the fries before cooking. Adjusting the temperature to 375°F (190°C) works best. You can cook them for 10-12 minutes. Flip them halfway for even browning. This method gives you a golden finish. One common mistake is overcrowding the air fryer basket. If the fries touch, they won’t crisp well. You may need to cook in batches for best results. Another mistake is inconsistent coating. Make sure you fully coat each wedge. Dip it in flour, then eggs, and finally breadcrumbs. Press lightly to make sure it sticks. For dipping, I love zesty sauces. A cilantro lime dip pairs perfectly with these fries. You can also try spicy mayo for a kick. As for sides, a fresh salad or roasted veggies work well. These choices balance the rich flavor of avocado. Garnish with fresh herbs and a wedge of lime for a colorful touch. {{image_2}} For a gluten-free twist, you can swap the breadcrumbs and flour. Use crushed rice cereal or ground almonds instead of breadcrumbs. For the flour, try almond flour or coconut flour. These options keep the fries crispy without gluten. Instead of eggs, you can use aquafaba, the liquid from canned chickpeas. It works well as a binding agent. Just whip it up until frothy before dipping the avocado wedges. Want to spice things up? Add shredded cheese like cheddar or mozzarella to your breadcrumb mix. It melts beautifully and adds a delicious flavor. You can also mix in herbs like oregano or basil for fresh taste. For a kick, try adding extra cayenne pepper or chili powder to the breadcrumbs. You can even make a taco seasoning blend for a unique twist. This makes your fries pop with flavor! Crispy avocado fries can shine in many ways. Serve them as a topping on salads for added crunch. They also work great as an appetizer at parties. For a fun presentation, stack the fries on a plate and drizzle with sauce. You can use a cilantro lime dip or spicy mayo. Add fresh herbs and lime wedges for a colorful touch. To keep your leftover crispy avocado fries fresh, place them in an airtight container. Make sure they cool down to room temperature first. Store them in the fridge. They will stay good for up to three days. To reheat your avocado fries, use the air fryer. This keeps them crispy. Set it to 350°F (175°C) and heat for about 5 minutes. You can also use an oven. Preheat to 375°F (190°C) and bake for 8-10 minutes. Avoid using a microwave. It can make them soggy. To freeze your avocado fries, first, let them cool completely. Then, arrange them in a single layer on a baking sheet. Place the sheet in the freezer for about an hour. Once frozen, transfer them to a freezer bag. Push out as much air as you can. They can stay frozen for up to 3 months. When ready to cook, do not thaw. Just air fry them directly from the freezer. Cook for a few extra minutes to ensure they get crispy. Enjoy your tasty snack any time! You can bake or pan-fry avocado fries. For baking, preheat your oven to 425°F (220°C). Place the coated avocado wedges on a lined baking sheet. Bake for 15-20 minutes, flipping halfway through. For pan-frying, heat oil in a skillet. Fry the wedges for about 2-3 minutes per side until golden brown. Both methods yield tasty results. Yes, but avoid very mushy avocados. Choose avocados that yield slightly to pressure. They should be firm but not hard. Soft avocados can become too mushy when cooked. Use ripe avocados for a creamy texture, but ensure they hold their shape during frying. You can use flaxseed meal mixed with water. Combine 1 tablespoon of flaxseed meal with 2.5 tablespoons of water. Let it sit for 5 minutes until it thickens. Another option is to use unsweetened applesauce or aquafaba. Both will help the breadcrumbs stick without eggs. To prevent browning, store fries in an airtight container. Use parchment paper to separate layers. Squeeze some lemon juice over the fries before sealing. This will slow down the oxidation process. Keep them in the fridge and consume within two days for the best taste. This blog post explored how to create crispy avocado fries, from ingredients to cooking tips. You learned about the best seasonings and serving suggestions to enhance flavor. I shared helpful tricks to avoid common mistakes and offered variations for gluten-free options. Remember, a bit of care in cooking ensures the best results. Enjoy experimenting with this fun recipe and share your delicious outcomes!

Crispy Avocado Fries Air Fryer Perfect Crunchy Snack

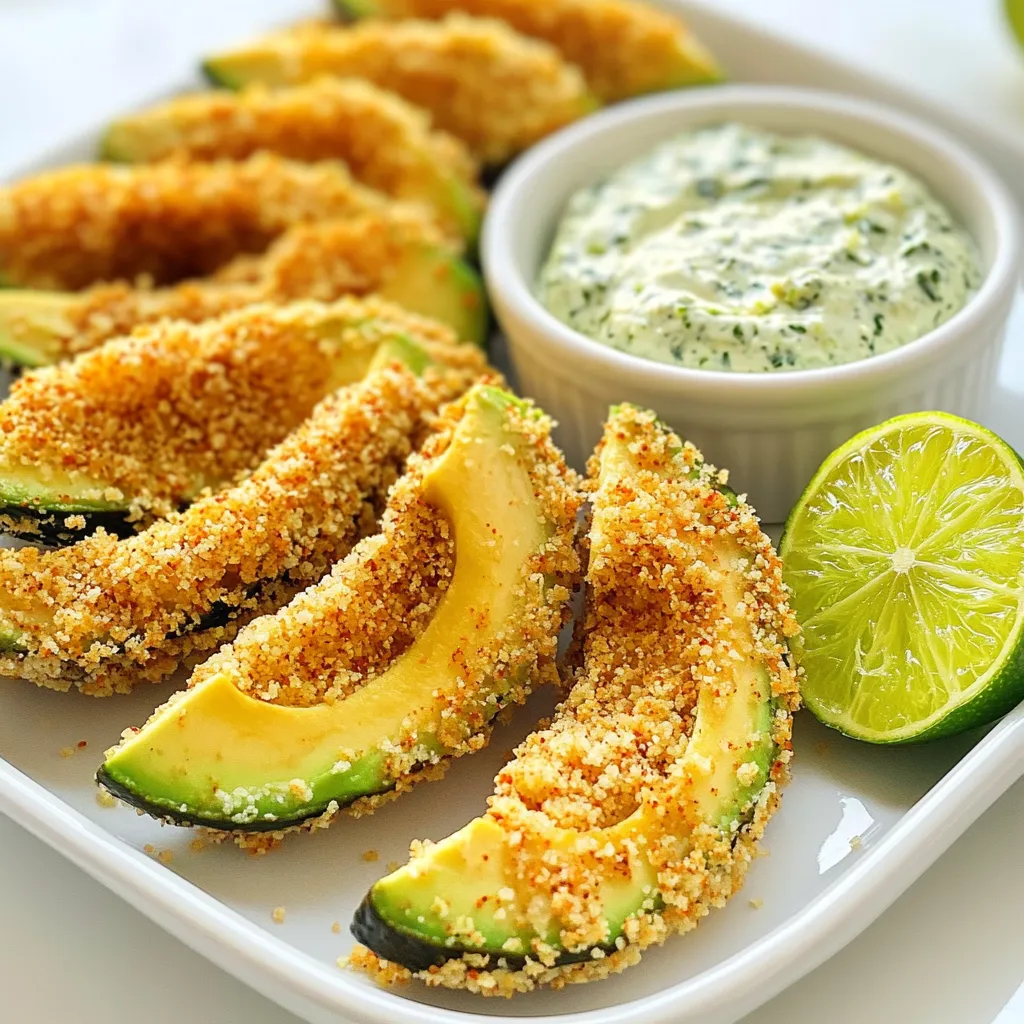
If you’re craving a snack that’s both healthy and delicious, you’ve got to try crispy avocado fries! Using an air

- 1 pound boneless, skinless chicken breast - 2 cans (15 oz each) white beans (cannellini or Great Northern), rinsed and drained - 1 medium onion, diced - 3 cloves garlic, minced - 1 can (4 oz) diced green chilies - 1 cup corn (fresh, frozen, or canned) - 2 cups chicken broth These main ingredients form the base of your chili. The chicken adds protein and flavor, while the white beans bring creaminess. The onion and garlic enhance the taste, and corn adds sweetness. - 1 teaspoon ground cumin - 1 teaspoon chili powder - 1/2 teaspoon smoked paprika - Salt and pepper to taste Spices are key to great flavor. Cumin gives warmth, chili powder adds heat, and smoked paprika brings depth. Adjust salt and pepper to make it just right for your taste. - 1 cup sour cream (for creaminess) - Juice of 1 lime - Fresh cilantro, chopped (for garnish) These add-ins give you options to elevate your chili. Sour cream makes it creamy, while lime juice adds a bright kick. Fresh cilantro is the perfect garnish that adds a burst of freshness. - Layering the Ingredients Start by placing the chicken breast at the bottom of the slow cooker. This helps it cook evenly. Next, add the white beans on top. Then, layer the diced onion, minced garlic, diced green chilies, and corn. Finally, pour in the chicken broth. The order matters for a great texture. - Combining Spices Sprinkle the ground cumin, chili powder, smoked paprika, salt, and pepper over the layers. These spices bring the chili to life. Gently stir the mixture. Be careful not to disturb the chicken too much. You want all the flavors to blend well. - Low vs High Setting You have two options for cooking: low and high. If you set it to low, let it cook for 6 to 8 hours. This gives the chicken time to become tender. If you choose high, cook for 3 to 4 hours. Both methods work well, but low is my favorite for deeper flavor. - Monitoring Cooking Progress Check the chili about halfway through the cooking time. This helps you ensure everything is cooking properly. If you’re using the high setting, it’s good to keep an eye on it. You want the chicken to be fully cooked and soft. - Shredding the Chicken About 30 minutes before serving, it’s time to shred the chicken. Use two forks to pull it apart right in the slow cooker. This makes it easier to mix with the other ingredients. Shredded chicken absorbs more flavors. - Adding Creaminess Stir in the sour cream and lime juice for creaminess and zest. This step makes the chili rich and smooth. Taste the chili and adjust the seasoning if needed. Add more salt, pepper, or lime juice to fit your taste. Once you finish, the chili is ready to serve! Adjusting Seasoning Start with the right spices. Use ground cumin, chili powder, and smoked paprika. Taste the chili before serving. Adjust salt and pepper as needed. If you want more zest, add lime juice. This brightens the dish and enhances flavor. Don’t rush this step. A little tweak can make a big difference. Using Fresh Ingredients Fresh ingredients matter. Use fresh lime juice instead of bottled. It adds a bright taste. Choose ripe cilantro for garnish. Fresh corn gives a nice crunch too. Fresh onion and garlic bring out great flavor. The quality of your ingredients affects the final dish. Always select the best you can find. Thickness Adjustments If your chili is too thick, add more chicken broth. You can also add water if needed. If it’s too thin, let it cook longer with the lid off. This helps the liquid reduce and thicken. Keep an eye on it. You want a perfect creamy texture. Timing for Ingredients Layer your ingredients right. Start with chicken at the bottom. This helps it cook evenly. Add beans, onion, garlic, and corn on top. Mix the spices in the broth before pouring it over. This ensures even flavor throughout. Shred the chicken about 30 minutes before serving. This allows the flavors to blend well. Cleaning Tips After cooking, let the slow cooker cool. Wash the insert with warm soapy water. If food sticks, soak it for a bit. Avoid using abrasive cleaners. They can scratch the surface. A well-maintained slow cooker lasts longer and cooks better. Best Practices for Longevity Store your slow cooker in a dry place. Keep the lid off when not in use. This helps prevent odors. Always check the cord and plug before using. Make sure there are no frayed wires. A safe slow cooker makes cooking fun and easy. {{image_2}} Gluten-Free Options This white bean chicken chili is naturally gluten-free. It uses ingredients like beans and chicken, which do not contain gluten. Check your spices for hidden gluten, but most are safe. Always read labels to be sure. Dairy-Free Alternatives To make this chili dairy-free, skip the sour cream. Instead, use coconut cream or cashew cream for a creamy touch. You can also add more lime juice for a zesty flavor. This keeps the dish rich without dairy. Different Bean Types While cannellini or Great Northern beans work best, you can try other beans too. Navy beans or even pinto beans can add a unique taste. Just rinse and drain them like the others. This keeps the flavor balanced and the dish hearty. Alternative Proteins If you're not a fan of chicken, use turkey or beans as a protein. Shredded rotisserie chicken is also a great time saver. You can even use tofu for a vegetarian twist. Just adjust the cooking time based on what you choose. Adding Spicy Jalapeños For some kick, toss in diced jalapeños. You can add them at the start for deep flavor or just before serving for a fresh bite. Adjust the amount based on your spice level. This gives the chili a nice warmth. Incorporating Different Herbs Fresh herbs can change the whole taste. Try adding oregano, thyme, or even a bit of basil. Stir them in while cooking for a fragrant boost. Fresh cilantro can also be mixed in or used as a garnish. It adds brightness and depth. - Refrigeration Tips: Once you finish your chili, let it cool. Use an airtight container to store it. Place it in the fridge. It will stay fresh for about 3 to 4 days. - Freezing Instructions: If you want to freeze it, pour the chili into freezer-safe bags. Remove as much air as you can. Seal and label them. It can last in the freezer for up to 3 months. - Best Methods for Reheating: To reheat, use the microwave or stovetop. If using a microwave, heat in short bursts. Stir in between to avoid hot spots. On the stovetop, warm it gently over low heat. - Avoiding Texture Changes: Avoid boiling to keep the texture smooth. Stir well to mix the ingredients evenly. - How Long It Lasts in the Fridge: In the fridge, the chili stays good for 3 to 4 days. Check for any off smells or appearance. - Signs of Spoilage: If you see mold or notice a sour smell, throw it away. It’s best to be safe than sorry. Yes, you can use frozen chicken. Just remember to thaw it first. To thaw, place the chicken in the fridge overnight. If you're short on time, you can use the defrost setting on your microwave. Make sure the chicken is fully thawed before cooking. This helps it cook evenly and safely. To spice things up, consider adding sliced jalapeños or hot sauce. You can also use spicy diced green chilies instead of mild ones. Another option is to sprinkle in some red pepper flakes. Add these during the cooking process for the best heat. Absolutely! To cook on the stovetop, follow these steps: 1. In a large pot, heat a little oil over medium heat. 2. Add the diced onion and minced garlic. Cook until soft. 3. Add the chicken, beans, chilies, and corn. Pour in the chicken broth. 4. Stir in the spices and bring to a boil. 5. Reduce heat and simmer for 30-40 minutes. 6. Shred the chicken and stir in the sour cream and lime juice before serving. This blog shared how to make a delicious slow cooker chicken dish. We explored the key ingredients like chicken, beans, and seasonal veggies. We covered spices, cooking steps, and tips for great flavor and texture. You can even customize with diet options and add-ins. Finally, proper storage keeps your leftovers fresh. Enjoy trying this recipe, and don't be afraid to make it your own! Your slow cooker can create tasty meals with ease, so have fun cooking!

White Bean Chicken Chili Slow Cooker Recipe Delight

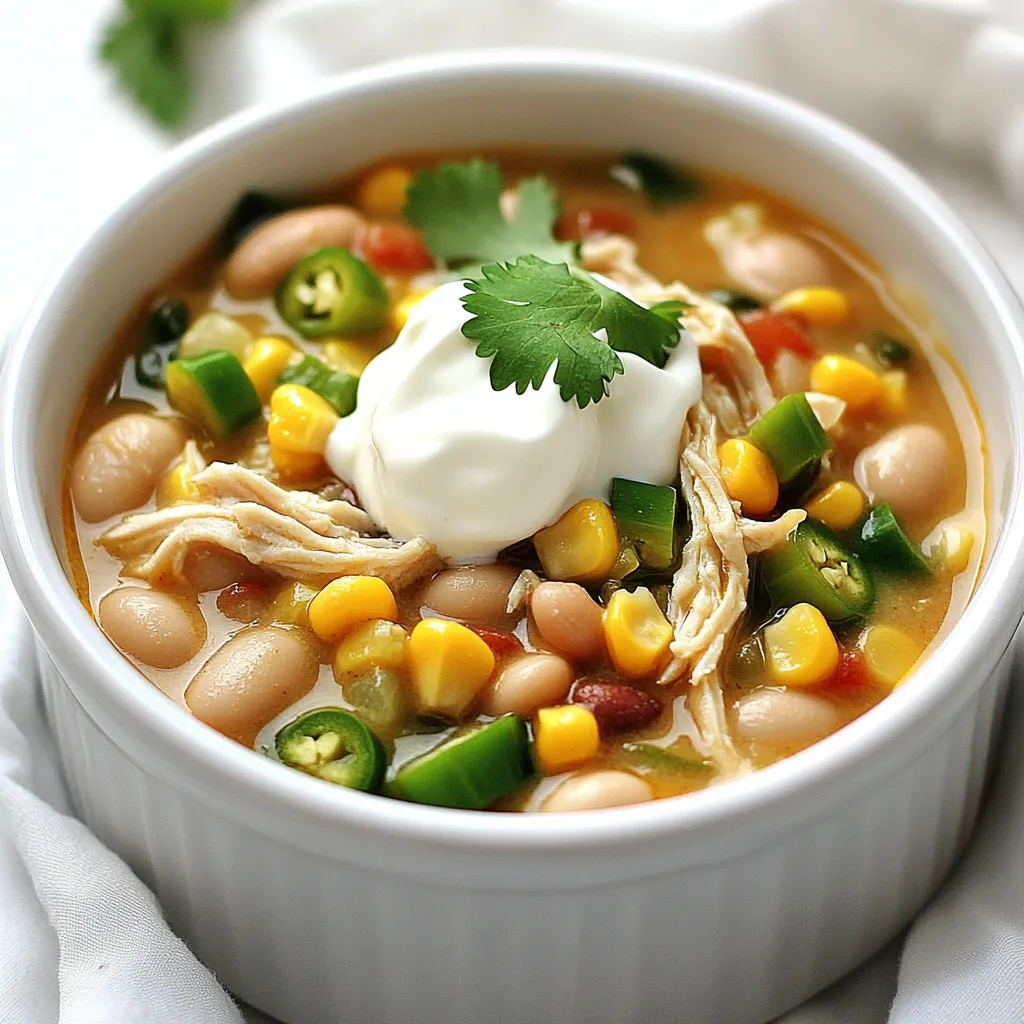
Craving a warm, hearty meal that’s easy to make? Try my White Bean Chicken Chili Slow Cooker Recipe Delight! This

To make spicy garlic shrimp tacos, gather these fresh ingredients: - 1 lb raw shrimp, peeled and deveined - 3 tablespoons olive oil - 4 cloves garlic, minced - 1 teaspoon smoked paprika - 1 teaspoon cayenne pepper (adjust to taste) - 1 teaspoon cumin - Salt and pepper to taste - 1 tablespoon lime juice - 8 small corn or flour tortillas - 1 avocado, sliced - 1 cup red cabbage, shredded - Fresh cilantro, for garnish - Lime wedges, for serving Each ingredient plays a key role in building flavor. The raw shrimp is the star, providing a juicy base. Olive oil adds richness and helps with cooking. Fresh garlic gives a strong, aromatic punch. The spices—smoked paprika, cayenne, and cumin—create a warm, spicy kick. Tortillas hold everything together. They can be corn or flour, depending on your taste. Fresh toppings like avocado and red cabbage add texture and color. Lastly, lime wedges bring a zesty finish to these savory tacos. This mix of ingredients comes together in just 15 minutes for a quick and tasty meal. - Heat 3 tablespoons of olive oil in a large skillet over medium-high heat. - Add 4 cloves of minced garlic to the skillet. Sauté for about 30 seconds until it smells great. Do not let it burn. - Add 1 pound of peeled and deveined shrimp to the skillet. - Sprinkle in 1 teaspoon of smoked paprika, 1 teaspoon of cayenne pepper, and 1 teaspoon of cumin. Season with salt and pepper to taste. Stir well so the shrimp gets coated with the spices. - Cook the shrimp for about 3 to 4 minutes. They are done when they are pink and opaque. Stir occasionally while cooking. - In a separate skillet, warm 8 small corn or flour tortillas over medium heat. Heat for about 30 seconds on each side until they are soft. - To build your tacos, place a few shrimp on each tortilla. Top them with sliced avocado, shredded red cabbage, and fresh cilantro. - Serve with lime wedges on the side for a zesty kick. To make your spicy garlic shrimp tacos shine, start with fresh ingredients. Fresh shrimp, garlic, and herbs boost flavor. For spice levels, taste before adding more cayenne. You can always add heat, but you can’t take it out. If you want it milder, cut back on cayenne. Instead, add more smoked paprika for depth. When cooking shrimp, aim for even cooking. Shrimp cooks fast and can easily overcook. Stir them gently and watch for color change. Once they’re pink and opaque, they're done. Remove them from heat right away. Overcooked shrimp can become rubbery and tough. For stacking toppings, layer wisely. Start with shrimp, then add avocado and cabbage. This keeps flavors balanced. Don’t overload the tortillas. Too much filling makes them fall apart. Use small tortillas to help with handling. Serve with lime wedges for a tangy kick. {{image_2}} You can change up this recipe by using different proteins. If you want chicken, just cut it into bite-sized pieces and cook it the same way as the shrimp. Tofu is another great option. Use firm tofu, press it to remove extra water, and cube it before cooking. Other seafood, like scallops or fish, can also work well. Just adjust the cooking time based on the protein you choose. Toppings can really make your tacos shine. I love adding pico de gallo for freshness. It gives a nice crunch. Sliced jalapeños add heat if you like spice. You might also want to try dairy alternatives like vegan cheese or sour cream. These add creaminess without the dairy. Don't forget to get creative! The type of tortilla you use can change the whole taco experience. Corn tortillas are classic and bring a nice flavor. Flour tortillas are soft and easy to fold. If you need a gluten-free option, look for corn tortillas. There are also gluten-free flour tortillas available. Choose what you love best! To keep shrimp fresh, store them in the fridge. Place the shrimp in a shallow container. Use a tight lid to seal it well. This helps keep odors out. - Best practices for shrimp storage: Use the shrimp within two days for the best taste. If you won’t eat them in time, freeze them. Shrimp can last up to three months in the freezer. Make sure to label the container with the date. - Recommended storage containers: Glass or plastic containers with tight-fitting lids work best. You can also use a heavy-duty freezer bag. Just squeeze out the air before sealing. To enjoy your shrimp again, reheat them carefully. You don’t want them to dry out. - How to reheat shrimp without drying: Use a pan on low heat. Add a splash of water or broth to keep them moist. Stir gently until they are warm. - Best methods for reheating tortillas: Heat tortillas in a dry skillet for about 30 seconds on each side. You can also wrap them in a damp paper towel and microwave them for 15-20 seconds. This keeps them soft and easy to fold. Making tacos ahead can save you time. Prepare shrimp and toppings in advance. - Making tacos in advance: You can assemble the tacos, but eat them the same day. The tortillas can get soggy if they sit too long. - Cooking shrimp ahead of time: Cook the shrimp and then cool them down. Store them in the fridge until you are ready to use them. This way, your meal is quick and easy to finish. To boost the heat in your shrimp tacos, try these tips: - Add more cayenne pepper. Start with a pinch and taste as you go. - Include fresh jalapeños or serrano peppers. Slice them thinly for added spice. - Use spicy salsa or hot sauce as a topping. This gives a nice kick! - Experiment with chili powder or crushed red pepper. These add flavor and heat. Each of these additions can change the flavor and heat level. Just remember to balance the heat with other flavors. You want all the tastes to shine. Yes, you can use frozen shrimp. Here’s how: - Thaw shrimp in the fridge overnight or under cold water for quick thawing. - Pat dry with a paper towel before cooking. This helps the shrimp sear nicely. - Cook the shrimp as you would fresh shrimp. Adjust cooking time if needed. Using frozen shrimp saves time and can be just as tasty. Just ensure they are cleaned and deveined for best results. These sides complement spicy garlic shrimp tacos: - Mexican street corn or elote adds a sweet and creamy flavor. - A fresh cucumber salad can cool down the heat. - Chips with guacamole or salsa are always a hit. - Refried beans add protein and richness. These sides enhance your meal and create a great dining experience. Enjoy experimenting with different combinations! You've learned how to make delicious shrimp tacos from scratch. We covered key ingredients, step-by-step instructions, and tips to perfect your dish. Remember, you can customize these tacos with different proteins and toppings to suit your taste. Experiment with flavors, and don’t be afraid to try new things. With these techniques, you can create a meal that’s sure to impress. Enjoy your cooking!

Spicy Garlic Shrimp Tacos 15 Minutes Quick Recipe

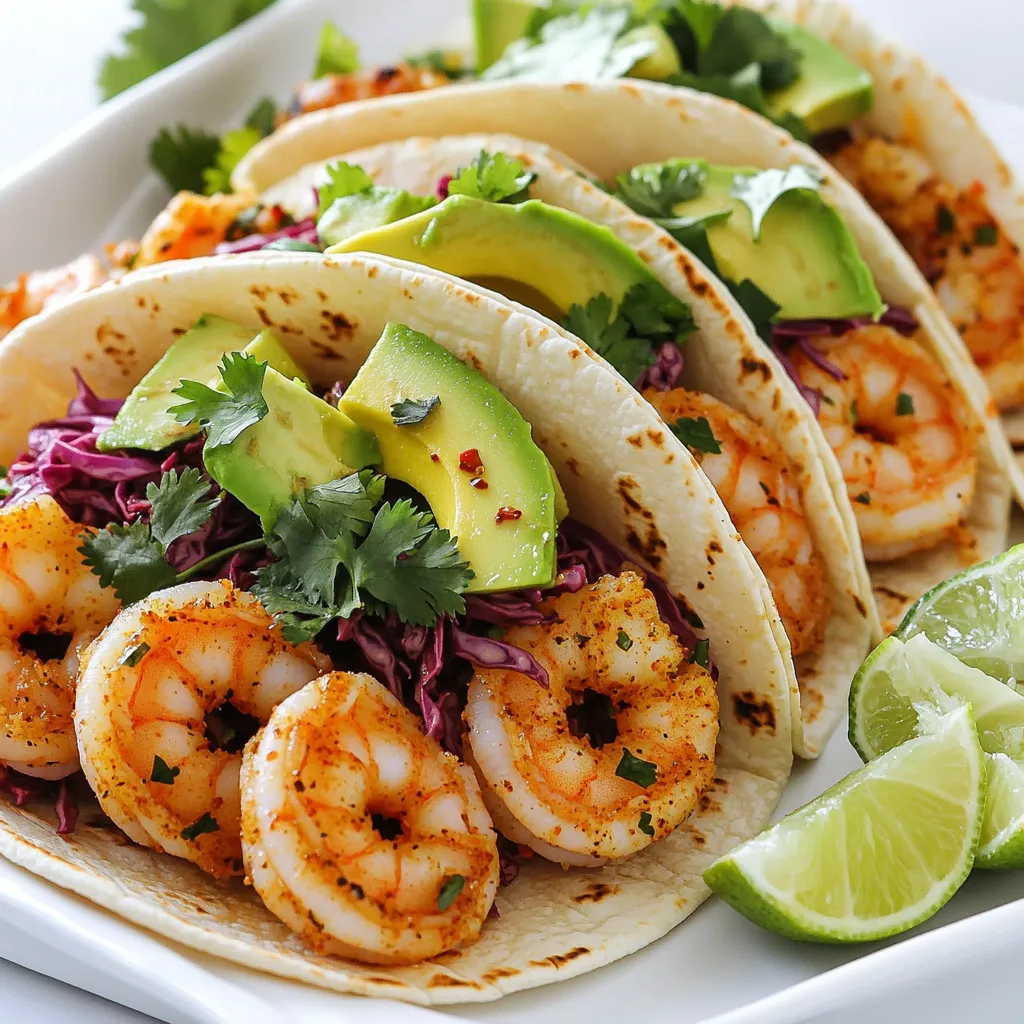
If you’re craving a quick and tasty meal, look no further! My Spicy Garlic Shrimp Tacos are ready in just

To make mocha chip muffins, gather these simple ingredients: - 2 cups all-purpose flour - 1 cup granulated sugar - 1/2 cup unsweetened cocoa powder - 1 tablespoon baking powder - 1/2 teaspoon baking soda - 1/4 teaspoon salt - 1 cup brewed coffee, cooled - 1/2 cup whole milk - 1/3 cup vegetable oil - 2 large eggs - 1 teaspoon vanilla extract - 1 cup chocolate chips (dark or semi-sweet) - 1/2 cup chopped walnuts (optional) For that soft, bakery-style texture, use these tips: - Choose high-quality all-purpose flour for better structure. - Use unsweetened cocoa powder for rich chocolate flavor. - Fresh baking powder ensures a nice rise. - Whole milk adds creaminess to the muffins. - Dark chocolate chips deepen the chocolate taste. You can mix in these fun options to change things up: - Add 1/2 cup of chopped walnuts for crunch. - Swap in milk chocolate chips for a sweeter flavor. - Use flavored coffee for a unique twist. - Try adding a pinch of cinnamon for warmth. - Experiment with different nuts like pecans or almonds. Each of these choices can lead to a delicious muffin, perfect for any occasion! Start by preheating your oven to 375°F (190°C). This temperature helps the muffins rise well. Next, line a muffin tin with paper liners. This makes it easy to take the muffins out later. In a large mixing bowl, add 2 cups of all-purpose flour, 1 cup of granulated sugar, and 1/2 cup of unsweetened cocoa powder. Next, add 1 tablespoon of baking powder, 1/2 teaspoon of baking soda, and 1/4 teaspoon of salt. Use a whisk to mix everything together until it’s all combined. This step is key for even flavor. In another bowl, mix together 1 cup of brewed coffee (cooled), 1/2 cup of whole milk, and 1/3 cup of vegetable oil. Then, crack in 2 large eggs and add 1 teaspoon of vanilla extract. Stir until the mixture is smooth. This blend adds moisture and flavor to your muffins. Now, pour the wet mixture into the bowl of dry ingredients. Use a spatula to gently stir them together. Mix until just combined, but don’t over-mix. Over-mixing can make the muffins tough, and we want them soft. Using a scoop or a spoon, fill each muffin liner about 3/4 full with the batter. This helps the muffins rise nicely without spilling over. If you want, gently fold in 1 cup of chocolate chips and 1/2 cup of chopped walnuts at this stage. Place the muffin tin in the oven and bake for 18-20 minutes. Check for doneness by inserting a toothpick into the center of a muffin. If it comes out clean, they are ready. Let the muffins cool in the pan for 5 minutes before moving them to a wire rack. Enjoy your tasty mocha chip muffins! To make your muffins just like the bakery, focus on the batter. Use fresh ingredients. Use the right oven temp. Preheat your oven to 375°F (190°C). This temp helps the muffins rise high. Fill muffin liners 3/4 full for the best height. Lastly, bake until a toothpick comes out clean. Over-mixing ruins the texture. Mix until the dry and wet ingredients just blend. A few lumps are fine. Gently fold in chocolate chips to keep the muffins light. This helps them stay fluffy and soft. Remember, a little care makes a big difference! Let your muffins cool in the pan for five minutes first. Then, move them to a wire rack. This helps them cool evenly. Store them in an airtight container at room temp. They stay fresh for up to three days. For longer storage, freeze them. Just thaw before enjoying! {{image_2}} You can switch up the flavors in your mocha chip muffins. Try using different types of flour like whole wheat or almond flour. These change the taste and texture. You can also add different spices, like cinnamon or nutmeg, for warmth. For a fruity twist, add mashed bananas or blueberries. These alternatives make the muffins unique and tasty. If you want a vegan version, replace the eggs with flaxseed meal. Mix 1 tablespoon of flaxseed with 2.5 tablespoons of water. Let it sit for a few minutes before adding it to your mix. For the milk, use almond milk or coconut milk instead of whole milk. You can also swap vegetable oil for melted coconut oil. These changes keep the muffins moist and delicious without dairy. To make your muffins even better, think about add-ins. You could add nuts like pecans or almonds for crunch. Dried fruit, such as cranberries or apricots, adds a nice chew. For toppings, consider sprinkling some coarse sugar on top before baking. This gives a sweet crust. You can also drizzle chocolate or caramel sauce after baking for extra flair. With these add-ins and toppings, your muffins will impress everyone! To keep your mocha chip muffins fresh, first let them cool completely. Place them in an airtight container. You can store them at room temperature for up to three days. If you want them to last longer, consider refrigerating them. Just remember, refrigeration can change their texture a bit. Freezing is a great way to save your muffins for later. Wrap each muffin tightly in plastic wrap. Then, place them in a freezer-safe bag or container. You can freeze them for up to three months. When you’re ready to eat, just take out what you need. To enjoy your muffins warm, preheat your oven to 350°F (175°C). Place the muffins on a baking sheet and heat for about 10 minutes. If you're in a hurry, you can also use the microwave. Heat each muffin for about 10-15 seconds. Enjoy them warm for the best flavor! To boost the chocolate flavor, you can add extra cocoa powder. Use up to 1/4 cup more. You can also increase the amount of chocolate chips to 1 1/2 cups. This will give your muffins a rich, chocolatey bite. If you love dark chocolate, use dark chocolate chips for an even bolder taste. Absolutely! You can use milk chocolate, dark chocolate, or semi-sweet chips. Each type adds a different flavor. If you want a fun twist, try white chocolate chips or even peanut butter chips. Mixing different types can create a unique flavor profile. If you don’t want coffee, use hot water or brewed tea instead. You can also use milk or a milk alternative. Just remember, coffee enhances the chocolate flavor. If you skip it, your muffins may taste a bit less rich. To check if your muffins are done, insert a toothpick into the center. If it comes out clean or with a few crumbs, they are ready. Avoid overbaking, as this can make them dry. Keep an eye on your muffins during the last few minutes of baking. You learned how to make delicious mocha chip muffins with detailed steps and tips. We explored the key ingredients, baking methods, and variations to enhance flavor. Proper storage helps keep your muffins fresh. Remember, practice leads to perfection. By trying different options, you can create your favorite version. I hope you enjoy baking these treats as much as I do! Share your muffin adventures with friends and family for even more fun.

Mocha Chip Muffins Bakery Style Tasty and Easy Recipe

Are you ready to bake delicious Mocha Chip Muffins just like the ones at your favorite bakery? This easy recipe

To make tasty cranberry orange scones, you need the following main ingredients: - 2 cups all-purpose flour - 1/2 cup granulated sugar - 1 tablespoon baking powder - 1/4 teaspoon salt - 1/2 cup unsalted butter, cold and cubed - 1/2 cup dried cranberries - Zest of 1 orange - 1/2 cup heavy cream - 1 large egg - 1 teaspoon vanilla extract These ingredients work together to create a light and fluffy scone, bursting with flavor. The glaze adds a sweet and tangy finish to your scones. For the glaze, you'll need: - 1 cup powdered sugar - 2 tablespoons fresh orange juice - 1 teaspoon orange zest This glaze is simple to whip up and enhances the orange flavor. You can customize your scones with a few easy swaps or boosts: - Flour: Use whole wheat flour for a healthier option. - Sweetener: Substitute brown sugar for a richer taste. - Add-ins: Try adding chopped nuts or white chocolate chips. These changes can help fit your taste or dietary needs while keeping the scone's charm. Enjoy experimenting! Start by preheating your oven to 400°F (200°C). This heat helps the scones rise nicely. Next, take a baking sheet and line it with parchment paper. This step keeps the scones from sticking and makes cleanup easy. In a large bowl, add 2 cups of all-purpose flour. Then, add 1/2 cup of granulated sugar, 1 tablespoon of baking powder, and 1/4 teaspoon of salt. Whisk these dry ingredients together until well combined. This mix gives the scones their structure and flavor. Now, take 1/2 cup of cold, cubed unsalted butter and add it to the flour mixture. Use a pastry cutter or your fingertips to work the butter into the flour. You want the mix to look like coarse crumbs. After that, stir in 1/2 cup of dried cranberries and the zest of 1 orange. This will add a burst of flavor to each bite. In another bowl, whisk together 1/2 cup of heavy cream, 1 large egg, and 1 teaspoon of vanilla extract. Pour this wet mix into the dry ingredients. Mix gently until just combined. Be careful not to overmix. Overmixing can make the scones tough. Turn the dough onto a lightly floured surface. Shape it into a disc about 1 inch thick. Use a sharp knife to cut the disc into 8 wedges. Transfer these wedges to your prepared baking sheet, leaving space between each one. Bake the scones in your preheated oven for 15-18 minutes. They are ready when they turn lightly golden on the edges. Keep an eye on them to avoid burning. While the scones bake, make the glaze. In a small bowl, whisk together 1 cup of powdered sugar, 2 tablespoons of fresh orange juice, and 1 teaspoon of orange zest until smooth. This glaze adds a sweet and zesty finish to your scones. Once the scones cool for about 10 minutes, drizzle the glaze over the top. Enjoy your tasty treat! To get that perfect scone texture, keep your butter cold. Cold butter helps create flaky layers. When mixing it into the flour, use a pastry cutter or your fingers. Stop when the mixture looks like coarse crumbs. Overmixing can lead to tough scones, so mix just until combined. Also, don’t forget to add in the dried cranberries and orange zest evenly. When you mix the dough, do it gently. Use a spatula or your hands to combine the wet and dry ingredients. If you see dry flour, it’s okay. Just mix until you can’t see it anymore. Remember, it’s better to have some lumps than to overwork the dough. This keeps your scones light and airy. For a smooth glaze, whisk the powdered sugar with fresh orange juice and zest. Make sure there are no lumps. Once your scones cool for about ten minutes, drizzle the glaze over them. To get an even coating, start from the center and move outward. You can also use a spoon or a squeeze bottle for more control. Enjoy the bright flavor it adds! {{image_2}} You can change up the scones by adding different mix-ins. Try using nuts like walnuts or pecans for a crunchy texture. Chocolate chips are also a great choice. They add a sweet touch that pairs well with tart cranberries. You can even mix in white chocolate chips for a creamy contrast. Feel free to get creative with dried fruits, too, like cherries or blueberries. The glaze can also be varied to match your taste. Instead of orange, use lemon juice for a bright twist. Lime juice adds a zesty kick, perfect for summer. You can mix in some almond extract for a unique flavor. Just remember to adjust the sweetness of the glaze to keep it balanced. If you need gluten-free scones, replace all-purpose flour with a gluten-free blend. Check that the blend has a binding agent like xanthan gum. For a dairy-free option, swap out butter for coconut oil or a plant-based butter. Use almond milk in place of heavy cream for a smooth dough. These adjustments keep the scones tasty while meeting your dietary needs. After baking, let the scones cool completely. Place them in an airtight container. This helps keep them fresh. You can store them at room temperature for up to two days. If you want to keep them longer, use the fridge. They will stay good for about a week in the fridge. To enjoy your scones warm, preheat your oven to 350°F (175°C). Place the scones on a baking sheet. Heat them for about 5-10 minutes. This will restore their soft texture. You can also microwave them for 15-20 seconds. Just be careful not to overheat, or they might get tough. Freezing is a great way to save scones. After cooling, wrap each scone tightly in plastic wrap. Put them in a freezer bag to avoid freezer burn. You can freeze scones for up to three months. When ready to eat, thaw them in the fridge overnight. Then, reheat them as mentioned above. This keeps them tasty and fresh. Yes, you can use fresh cranberries. They will make your scones more tart. To balance this, add a bit more sugar to the dough. Fresh cranberries also add moisture, so check the baking time. The scones are done when they turn lightly golden on the edges. You can also check for a firm touch. If they spring back when pressed gently, they are ready to come out. Cranberry orange scones pair well with butter, clotted cream, or jam. You can also serve them with a cup of tea or coffee. The citrus flavor works well with a hot drink. Scones last about 2 days at room temperature. Store them in an airtight container. They may dry out if left uncovered, so keep them well sealed. Yes, you can make the dough ahead of time. Wrap it in plastic wrap and chill it in the fridge. Use it within 24 hours for the best texture and flavor. We covered how to make delicious scones with an orange glaze. You learned the key ingredients and step-by-step instructions for perfect scones. I shared tips for texture and glazing. You explored tasty variations and proper storage methods. Remember, baking is about fun and creativity. Don't hesitate to try new mixes or flavors. Enjoy your baking journey and share your tasty scones with friends and family!

Cranberry Orange Scones with Glaze Easy Baking Guide

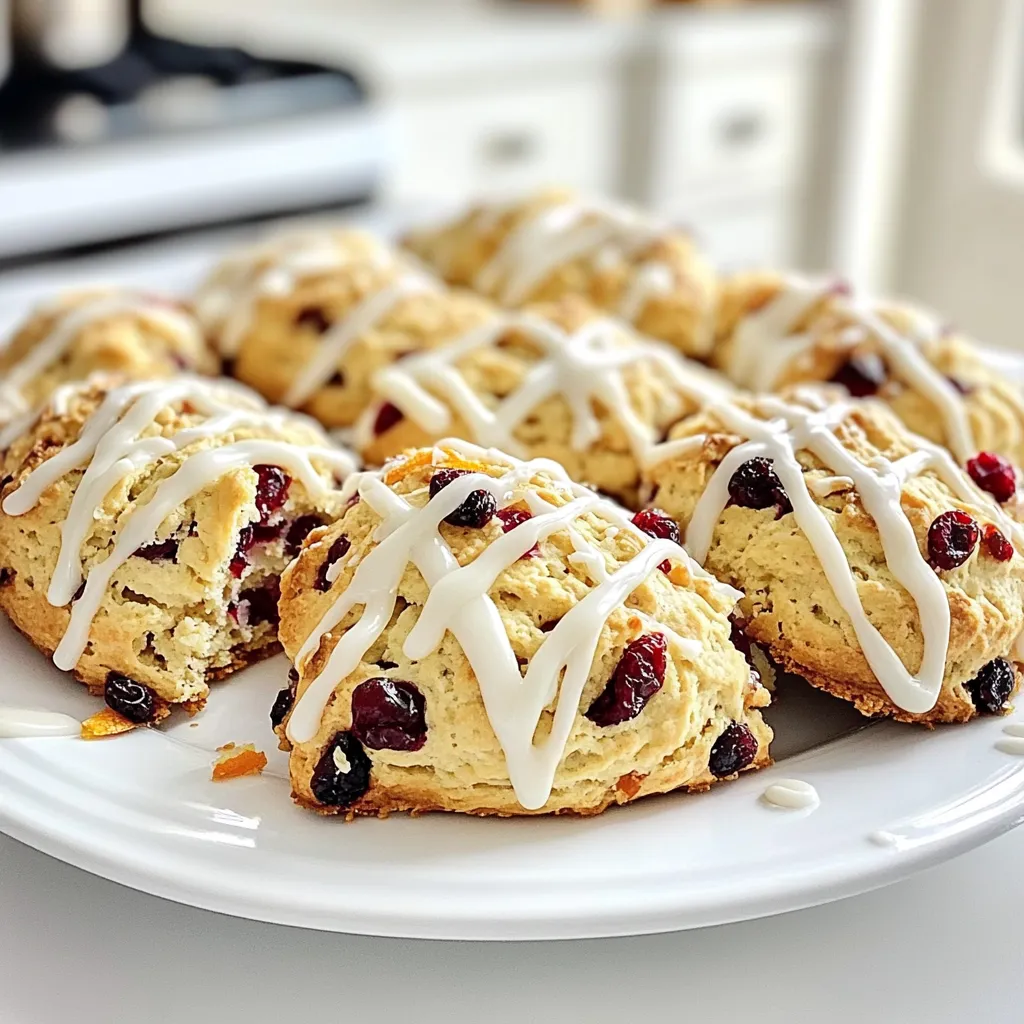
Welcome to your easy guide for baking Cranberry Orange Scones with Glaze! If you’re craving a delightful treat that combines

To make this creamy garlic Parmesan pasta, you will need: - 8 ounces fettuccine or your choice of pasta - 3 cups vegetable broth - 1 cup heavy cream - 1 cup grated Parmesan cheese - 4 cloves garlic, minced - 1 tablespoon olive oil - 1 teaspoon Italian seasoning - Salt and pepper to taste Each ingredient plays a key role in the dish. The pasta gives shape and texture. The vegetable broth adds depth and flavor. Heavy cream brings the richness we love. Garlic gives it that tasty kick. Parmesan cheese melts beautifully and thickens the sauce. Italian seasoning ties all the flavors together. You can add a few extras to boost the taste: - 1/2 teaspoon red pepper flakes (for a little heat) Red pepper flakes add a nice spice. Adjust the amount to your taste. If you want it milder, leave them out. To make your dish even more appealing: - Fresh parsley, chopped (for garnish) Chopped parsley adds a pop of color and freshness. You can sprinkle it on top right before serving. This small touch makes your pasta look gourmet. First, gather all your ingredients. Here is what you need: - 8 ounces fettuccine or your choice of pasta - 3 cups vegetable broth - 1 cup heavy cream - 1 cup grated Parmesan cheese - 4 cloves garlic, minced - 1 tablespoon olive oil - 1 teaspoon Italian seasoning - 1/2 teaspoon red pepper flakes (optional) - Salt and pepper to taste - Fresh parsley, chopped (for garnish) Chop the garlic finely so it mixes well. Measure out your broth and cream. This makes cooking faster. Grab a large skillet. Heat the olive oil over medium heat. When it’s warm, add the minced garlic. Sauté it for 1-2 minutes. You want it to smell great but not burn. Next, pour in the vegetable broth. Bring it to a simmer. Once it's bubbling, add your pasta. Make sure to stir it in well. Add the Italian seasoning and red pepper flakes if you like some heat. Cover the skillet and let the pasta cook for 10-12 minutes. Stir it often. You want the pasta to be al dente and soak up the broth. When the pasta is ready, lower the heat. Pour in the heavy cream. Add the grated Parmesan cheese next. Stir everything together until the cheese melts. This makes a rich and creamy sauce. Now, taste the sauce. Add salt and pepper to your liking. If it feels too thick, add a bit more broth or cream. Let it sit for a couple of minutes off the heat. This helps it thicken even more. Serve your pasta hot. Garnish it with fresh parsley. This adds a nice pop of color and flavor. Enjoy your meal! To get al dente pasta, start with a good pot of water. Use a large pot and add plenty of salt. Salt helps flavor the pasta. Bring the water to a boil before adding your pasta. Cook the pasta for about 10-12 minutes. Stir it a few times to keep it from sticking. Check the pasta a minute before it's done. It should be firm but not hard. This gives you that perfect bite. If your sauce is too thick, don't worry. You can fix it easily. Just add a splash of vegetable broth or heavy cream. Mix it in and let it warm. If the sauce is too thin, you can let it cook a bit longer. This helps it thicken up. Stir it gently to keep it smooth. Taste as you go and adjust with salt and pepper. Want to kick up the flavor? You can add more ingredients. Spinach or mushrooms work well for extra taste. Just sauté them with the garlic at the start. For a bit of heat, add more red pepper flakes. You can also use fresh herbs like basil or thyme. These add a bright touch. Consider a squeeze of lemon juice for a tangy zest. This will make your pasta even more delicious! {{image_2}} You can easily make this dish vegetarian. Start by using vegetable broth as the base. You can mix in fresh veggies like spinach, bell peppers, or mushrooms. These add great flavor and color. For extra protein, toss in some chickpeas or white beans. They pair well with the creamy sauce and make it heartier. If you want to add protein, chicken and shrimp work great. For chicken, use cooked, diced pieces. Add them after you pour in the cream and cheese. For shrimp, cook them in the pan until they turn pink. This adds a lovely seafood twist to the dish. Both options make the meal more filling and satisfying. To make this dish gluten-free, choose gluten-free pasta. There are many tasty options now, like rice or corn pasta. These cook up nicely and still taste great in the sauce. Make sure your vegetable broth is also gluten-free. This way, everyone can enjoy a delicious, creamy meal without worry. To store your creamy garlic Parmesan pasta, let it cool first. Place the pasta in an airtight container. Make sure the lid seals tightly to keep moisture out. This helps the pasta stay fresh. Store it in the fridge for up to three days. If you want to keep it longer, freezing is a great option. When you’re ready to eat, reheating is simple. You can use a microwave or a stove. For the microwave, place the pasta in a bowl. Add a splash of water or cream to keep it moist. Heat for one to two minutes, stirring halfway. On the stove, warm it in a skillet over low heat. Stir gently until hot. Make sure not to overcook it, or the pasta may become mushy. If you want to freeze the pasta, it’s easy! First, cool it completely. Then, divide it into portions. Use freezer-safe bags or containers to store it. Remove as much air as possible to prevent freezer burn. You can freeze the pasta for up to three months. When you're ready to enjoy it, thaw it in the fridge overnight. Reheat using the methods above for the best taste. To make your pasta less creamy, reduce the amount of heavy cream. You can cut it to ½ cup instead of 1 cup. Another option is to add more vegetable broth. This will keep the dish tasty while making it lighter. Yes, you can use different cheese. Try mozzarella for a milder taste or cheddar for a sharper flavor. You can even mix cheeses for a more complex taste. Just remember to adjust the amount based on how strong you want the cheese flavor to be. If you want a substitute for heavy cream, use half-and-half or whole milk. For a dairy-free option, try coconut cream or cashew cream. These alternatives will change the flavor a bit, but they still work well in the recipe. This creamy garlic parmesan pasta lasts about 3 to 5 days in the fridge. Store it in an airtight container for best results. When you reheat it, add a splash of broth or cream to keep it creamy. This creamy garlic Parmesan pasta is simple and tasty. You learned about the key ingredients, step-by-step cooking, and ways to customize the dish. We shared tips for perfect pasta and storage methods for leftovers. You can even try different flavors or make it gluten-free. With this recipe, cooking becomes easy and fun. I hope you enjoy making this dish as much as I do. The joy of cooking lies in the choices you make!

Creamy Garlic Parmesan Pasta One Pan Delight

Welcome to Creamy Garlic Parmesan Pasta One Pan Delight! This dish is a game-changer for busy weeknights. With just one

For this delicious pumpkin drizzle bread, you need a few key items: - 1 cup canned pumpkin puree - 1/2 cup vegetable oil - 1 cup brown sugar - 1/2 cup granulated sugar These ingredients create the soft, moist base of the bread. Canned pumpkin puree is easy to use and gives great flavor. The vegetable oil keeps the bread tender. Brown sugar adds richness, while granulated sugar balances the sweetness. You can enhance the flavor and texture with these add-ins: - 1/2 cup chopped walnuts - 1/2 cup caramel sauce for drizzling Chopped walnuts add a nice crunch. They also give a nutty flavor that pairs well with pumpkin. The caramel sauce on top makes the bread extra special. It adds a sweet and gooey finish. If you want to change things up, here are some tips: - For vegan substitutions, replace eggs with flax eggs. Mix 1 tablespoon of flaxseed meal with 3 tablespoons of water and let it sit for five minutes. - For gluten-free options, use a gluten-free flour blend. Make sure it has a good binding agent, such as xanthan gum. These adjustments help you enjoy this tasty bread in different ways. Whether you need it vegan or gluten-free, you can still savor the flavors! 1. Preheat your oven to 350°F (175°C). This ensures even baking. 2. Grease and flour a 9x5 inch loaf pan. You can also line it with parchment paper. This makes it easy to remove the bread later. 1. In a large bowl, combine the canned pumpkin puree, vegetable oil, brown sugar, and granulated sugar. Whisk until smooth. 2. Add the three large eggs one at a time. Mix well after each egg. 3. In another bowl, whisk together the all-purpose flour, baking soda, baking powder, ground cinnamon, nutmeg, and salt. 4. Gradually add the dry mix to the wet mixture. Stir until just combined. Do not overmix. If you like, gently fold in the chopped walnuts. 1. Pour the batter into the prepared loaf pan. Smooth the top with a spatula. 2. Bake in the preheated oven for 60 to 70 minutes. Check doneness by inserting a toothpick in the center. It should come out clean. 3. Once baked, remove the pan from the oven. Let it cool for about 10 minutes. Then transfer the bread to a wire rack to cool completely. 4. Drizzle warm caramel sauce over the top of the bread. This adds a sweet finish! To get the best texture in your pumpkin drizzle bread, do not overmix. Mix just until you see no dry flour. This keeps the bread fluffy and light. How can you know when the bread is done? Insert a toothpick into the center. If it comes out clean, your bread is ready. If not, bake for a few more minutes. When it comes to caramel, warm sauce works best for drizzling. Cold caramel can be thick and hard to pour. Heat it gently, so it flows nicely over your bread. For an even drizzle, use a small spoon or squeeze bottle. Start from the center and work your way to the edges. This creates a nice, beautiful pattern. To serve your pumpkin bread, slice it and place it on a rustic wooden board. Drizzle extra caramel sauce on each slice. You can also add a dollop of whipped cream for a fun touch. Pair your pumpkin drizzle bread with a hot drink, like coffee or tea. The warmth brings out those lovely flavors. You can also enjoy it with a scoop of vanilla ice cream for a special treat. {{image_2}} You can make your pumpkin drizzle bread even tastier with some simple changes. Try adding spices like ginger or cloves. These spices boost the warmth and flavor. If you love chocolate, consider a chocolate chip version. Just fold in some chocolate chips when mixing the batter. This adds a rich, sweet twist. Want to make this bread healthier? You can create keto-friendly options. Replace regular flour with almond flour and use a sugar substitute. This keeps the flavors while reducing carbs. For those with nut allergies, use sunflower seeds or pumpkin seeds instead of walnuts. This keeps the crunch without the nuts. You can change this recipe for different seasons. In spring, use lemon zest for a fresh taste. For summer, add berries for a fruity twist. During the holidays, spice it up with eggnog flavor or cranberries. Each season can bring new joy to your pumpkin drizzle bread. To keep your pumpkin drizzle bread fresh, let it cool completely. Wrap it in plastic wrap or place it in an airtight container. Store it at room temperature for up to three days. If you want to keep it a bit longer, you can refrigerate it for up to a week. Just remember, refrigeration can change the texture a bit. For long-term storage, freezing is your best bet. Slice the bread first, then wrap each slice in plastic wrap. Place the wrapped slices in a freezer-safe bag. It can last for up to three months in the freezer. When you’re ready to enjoy, take out a slice and let it thaw at room temperature. You can also reheat it in the oven or microwave for a warm treat. To keep the caramel sauce fresh, store it in an airtight container in the fridge. It will stay good for about two weeks. If the sauce thickens, just warm it gently on the stove or in the microwave. Stir it well to restore its smooth texture. Drizzling warm caramel over your bread enhances the flavors and makes each bite special. Can I use fresh pumpkin instead of canned? Yes, you can use fresh pumpkin. Just cook and mash it until smooth. Use the same amount as canned, about one cup. Fresh pumpkin may have more water, so drain excess liquid if needed. How can I make this recipe dairy-free? To make it dairy-free, swap vegetable oil for coconut oil or any plant-based oil. Use a dairy-free caramel sauce for drizzling. This keeps the flavors rich without dairy. Why did my bread sink? Your bread may sink due to overmixing the batter. This makes it dense. Also, check if your baking soda is fresh. If it’s old, the bread won’t rise well. What to do if the caramel hardens? If your caramel hardens, gently heat it in a microwave or over low heat. Stir often until it becomes smooth again. Adding a splash of water can help too. What goes well with pumpkin bread? Pumpkin bread pairs well with cream cheese frosting or whipped cream. You can also serve it with a sprinkle of chopped nuts on top for added crunch. Best drinks to serve with pumpkin drizzle bread Coffee or chai tea are perfect with pumpkin bread. A glass of spiced apple cider also enhances the fall flavors. Enjoy your treat with a warm drink! In this post, we explored how to make delicious pumpkin bread. We covered key ingredients like pumpkin puree and sugars and shared tips for texture and caramel drizzling. You learned about variations, storage methods, and answered common questions. Now, you can confidently bake this treat, whether for a cozy gathering or a simple snack. Experiment with flavors and share with friends. Enjoy your baking journey!

Pumpkin Drizzle Bread with Caramel Delightful Recipe

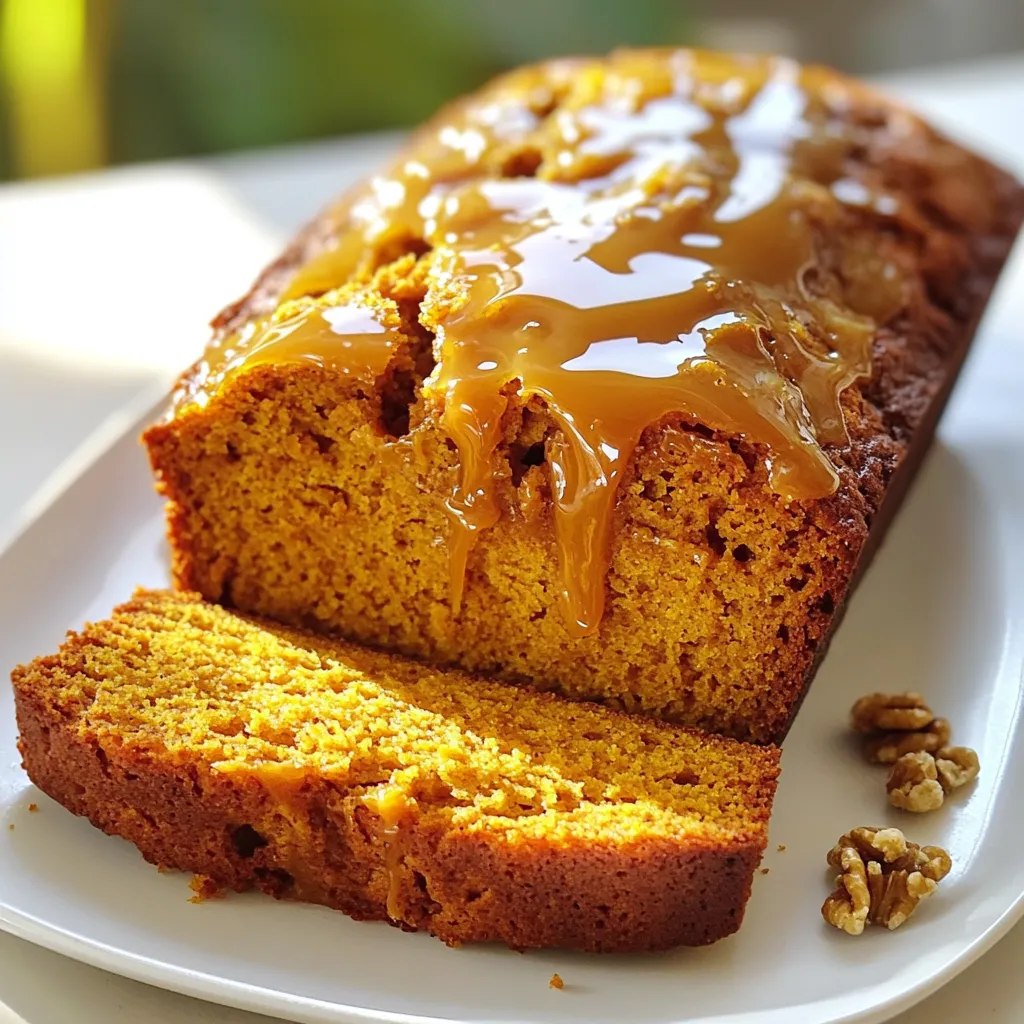
Welcome to a sweet adventure! In this post, I’ll share my delightful recipe for Pumpkin Drizzle Bread with Caramel. This

Older posts
Newer posts
← Previous Page1 … Page4 Page5 Page6 … Page85 Next →

dsad

© 2026 greenmealmap • Built with GeneratePress

Our Policies

  • Copyright Policy
  • Cookie Policy
  • GDPR Policy
  • Privacy Policy
  • Disclaimer
  • Terms Of Use

More Information

  • Home
  • About
  • Contact
  • Appetizers
  • Dessert
  • Dinner
  • Drinks
©2026, greenmealmap About Back To Top