Skip to content
DisclaimerTerms Of UseGDPR PolicyCookie Policy

greenmealmap

  • Home
  • Drinks
  • Appetizers
  • Dinner
  • Dessert
  • About
  • Contact
  • Privacy Policy
DisclaimerTerms Of UseGDPR PolicyCookie Policy

NO-ING-IMG

- 4 boneless, skinless chicken breasts - Fresh mango salsa ingredients: - 2 ripe mangoes, diced - 1 red bell pepper, finely chopped - 1 small red onion, finely chopped - 1 jalapeño, deseeded and minced - 1/4 cup fresh cilantro, chopped - 2 tablespoons lime juice - Spices and Seasoning - 1 tablespoon olive oil - 1 teaspoon cumin - Salt and pepper to taste For this dish, you need fresh and ripe ingredients. Start with the chicken breasts. They should be boneless and skinless for easy cooking. You want them tender and juicy. Next, let’s talk about the salsa. The key ingredient is ripe mangoes. They add sweetness and flavor. You’ll also need a red bell pepper. This adds crunch and color. The red onion gives a nice bite, while the jalapeño brings some heat. Don’t forget the fresh cilantro; it brightens the dish. Lime juice adds acidity. It balances the sweetness of the mango. For spices, olive oil helps everything stick to the chicken. Cumin adds a warm, earthy flavor. Salt and pepper enhance all the tastes. Gather all these ingredients before you start. This makes cooking easier and more fun! To marinate the chicken, I mix cumin, salt, pepper, and olive oil in a small bowl. I rub this blend all over the chicken breasts. Make sure each piece is fully coated. This step brings out the flavors. For best results, let the chicken marinate for at least 30 minutes. If you have time, marinate for a few hours. This helps the spices soak in deeper. While the chicken marinates, I prepare the mango salsa. I start by dicing two ripe mangoes. Next, I finely chop one red bell pepper and a small red onion. I deseed and mince one jalapeño for a little heat. Then, I add 1/4 cup of chopped cilantro and 2 tablespoons of lime juice. After mixing all the ingredients in a medium bowl, I let the salsa sit. Letting it rest allows the flavors to meld together beautifully. Now, it's time to grill the chicken. I preheat the grill to medium-high heat. Lightly oil the grill grates to prevent sticking. I place the marinated chicken on the grill and cook for about 6-7 minutes on each side. I check the internal temperature with a meat thermometer. The chicken should reach 165°F (75°C). Once cooked, I remove the chicken and let it rest for 5 minutes. This helps keep it juicy. To serve, I plate the chicken on a bed of mixed greens. I top it generously with the fresh mango salsa for a colorful look. Adding lime wedges not only enhances the taste but also adds a splash of color. This presentation makes the dish appealing and fun to eat! To get juicy chicken, start with a good marinade. Mix olive oil, cumin, salt, and pepper. Rub this all over the chicken. Let it marinate for at least 30 minutes. This helps the flavors soak in. For grilling, preheat your grill to medium-high heat. This ensures the chicken cooks evenly. Lightly oil the grill grates to help prevent sticking. Grill the chicken breasts for about 6-7 minutes on each side. Use a meat thermometer to check for doneness. The chicken should reach 165°F (75°C) at the thickest part. You can change your salsa based on your taste. Try adding diced pineapple or chopped tomatoes for a new twist. You can also use herbs like mint or basil for fresh flavor. If you prefer spicy salsa, add more jalapeño or a dash of hot sauce. For a milder version, leave out the jalapeño or use a sweet pepper instead. Mix and match to find your perfect flavor. Mango Salsa Grilled Chicken is a healthy meal. Each serving has about 300 calories, 30 grams of protein, and healthy fats from the olive oil. It is low in carbs, making it great for many diets. To complement this dish, consider serving it with a side of brown rice or quinoa. A light salad with mixed greens also pairs well. These sides add extra nutrition and balance the meal. {{image_2}} You can easily use fish or shrimp with mango salsa. Grilled salmon or shrimp works great. They soak up the salsa's flavors well. Simply follow the same marinating steps. Grill until cooked through. Fish usually cooks faster than chicken, so watch the time closely. Pair your chicken with tasty side dishes. Consider serving with rice or quinoa. A fresh salad can add crunch and color. Grilled vegetables also make a perfect match. For serving styles, you can plate the chicken on a bed of greens. Top it with a generous scoop of salsa. A sprinkle of lime juice brightens the dish. For a meatless version, try using portobello mushrooms or tofu. They grill well and absorb flavors. To make a vegan-friendly salsa, stick to the original recipe but swap honey with agave syrup. You can also add black beans for extra protein and texture. To keep your grilled chicken fresh, store it in the fridge. Place the chicken in an airtight container. It will last for about 3 to 4 days. Make sure to cool the chicken to room temperature before sealing it. If you want to keep the chicken longer, freezing is a good option. Wrap each piece tightly in plastic wrap, then place it in a freezer bag. This way, it can last for up to 3 months. When you’re ready to eat it, thaw it in the fridge overnight. To keep your mango salsa fresh, use a clean, dry container. A glass jar with a lid works best. Keep it in the fridge. It can stay fresh for about 2 to 3 days. If you want to store it longer, consider freezing it. Use ice cube trays to freeze small portions. Once frozen, transfer the cubes to a freezer bag. This makes it easy to use later. For the chicken, the best way to reheat is in the oven. Preheat it to 350°F (175°C). Place the chicken on a baking sheet. Heat for about 15-20 minutes, or until warm. To refresh your mango salsa, simply take it out of the fridge. Stir gently to mix the flavors again. If it seems dry, add a splash of lime juice for a fresh taste. To add heat, you can include more jalapeño. Use a whole jalapeño for a kick. You might also try a serrano pepper for added spice. If you want a smoky flavor, add a pinch of smoked paprika. Always taste as you go. You can mix in some hot sauce for a different flavor too. Adjust to your taste! Yes, you can grill chicken indoors. Use a grill pan on your stovetop. This method works well for searing. You can also bake the chicken in the oven. Set it to 400°F (200°C) and cook for 20-25 minutes. Just ensure the chicken reaches 165°F (75°C) for safety. Indoor grilling is a great option for rainy days. This dish pairs well with many sides. Try serving it with rice or quinoa for a filling meal. A fresh salad with greens adds crunch. You can also serve grilled veggies like zucchini or bell peppers. Corn on the cob complements the flavors well. Tortilla chips with extra salsa make a fun appetizer too! Mango salsa grilled chicken blends fresh flavors and juicy chicken. We discussed key ingredients like ripe mangoes, red peppers, and spices that make each bite pop. You learned to marinate, grill, and serve this dish with ease. Remember, grilling techniques and customizing salsa can make this meal fun and delicious. Try pairing it with healthy sides to boost nutrition. With a bit of practice, you'll impress family and friends with this vibrant dish. Enjoy experimenting and making it your own!

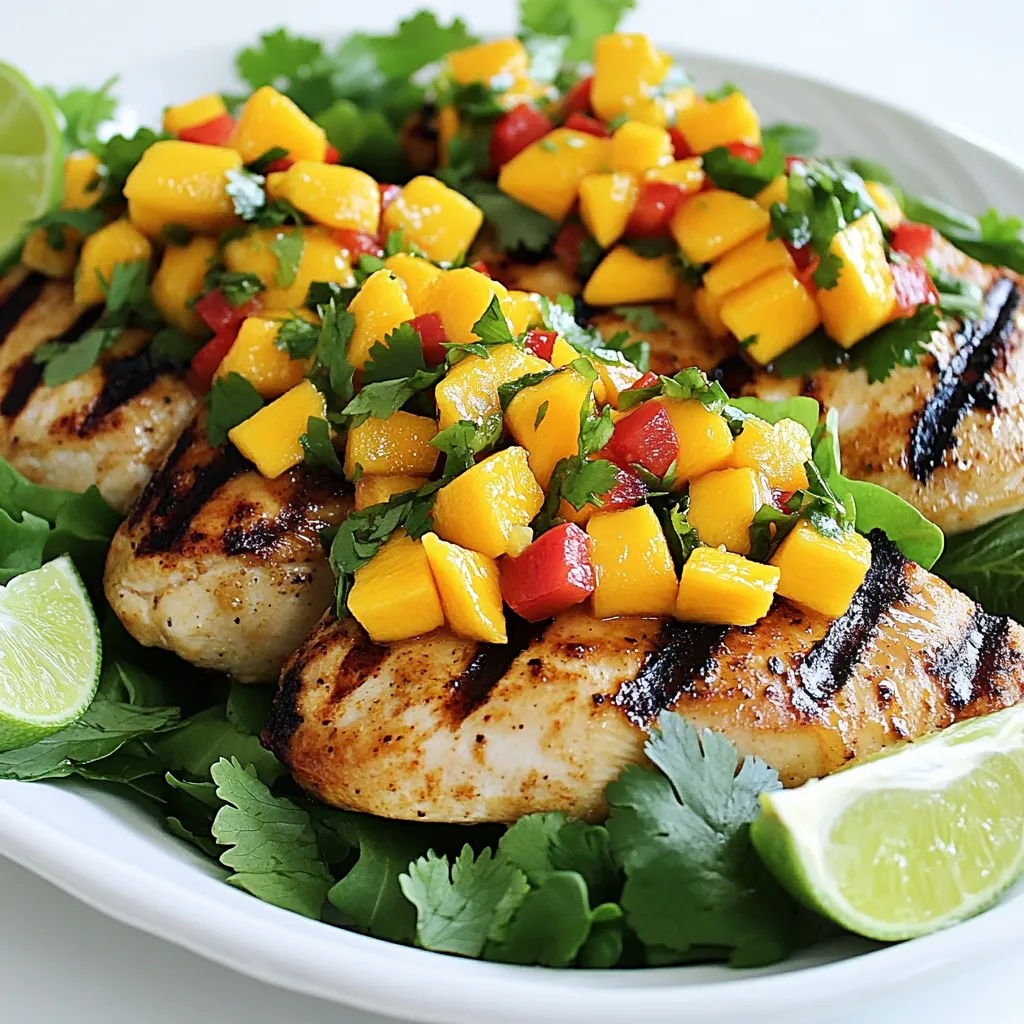
Mango Salsa Grilled Chicken Flavorful and Easy Recipe

Are you looking for a dinner that bursts with flavor and is easy to make? Look no further than Mango

- 4 boneless, skinless chicken breasts - 2 cups fresh spinach, chopped - 1 cup feta cheese, crumbled - 1/2 cup cream cheese, softened - 3 garlic cloves, minced - 1 tablespoon olive oil - 1 teaspoon dried oregano - Salt and pepper to taste - 1/4 cup sun-dried tomatoes (optional, for added flavor) - Toothpicks or kitchen twine - Skillet - Mixing bowl - Baking sheet lined with parchment paper Gathering the right ingredients is key to making this dish shine. Start with fresh chicken breasts. They should feel firm and look pink. Fresh spinach adds that bright green color and a healthy crunch. Feta cheese brings a salty, tangy flavor. Cream cheese gives the stuffing a creamy texture, making each bite rich and satisfying. I always add garlic because it brings warmth to any dish. It fills the kitchen with a lovely aroma. Olive oil helps in sautéing and adds a nice depth of flavor. For extra zest, consider adding sun-dried tomatoes. They add a sweet and tangy taste that pairs well with the other ingredients. You'll need some basic tools. Toothpicks or kitchen twine help keep the stuffing inside the chicken. A skillet is essential for cooking the spinach and garlic. A mixing bowl combines all the flavors. Finally, a baking sheet lined with parchment paper makes cleanup easy. Having everything ready before you start makes the cooking process smooth and fun. - Preheat oven to 375°F (190°C). - Sauté garlic in olive oil for flavor. - Add and wilt spinach, then cool slightly. Start by preheating your oven. This step is key for even cooking. Next, heat olive oil in a skillet. Add minced garlic and let it cook. You want it to smell great! After that, toss in chopped spinach. Cook it for about 2-3 minutes until it wilts. This step releases the spinach's flavor. Let it cool for a bit before mixing. - Combine sautéed spinach with feta cheese, cream cheese, oregano, salt, and pepper. - Mix in sun-dried tomatoes if desired. In a large mixing bowl, combine your cooled spinach and garlic. Add crumbled feta and softened cream cheese. The cream cheese adds creaminess. Then, sprinkle in oregano, salt, and pepper. If you like, toss in some sun-dried tomatoes for extra zing. Mix everything until it forms a thick stuffing. - Create pockets in the chicken breasts. - Fill each pocket with the spinach and feta mixture. - Secure openings with toothpicks or twine. Grab your chicken breasts and use a sharp knife. Cut horizontally into each breast to make a pocket. Be careful not to cut all the way through. Now, stuff each pocket with the spinach and feta mix. Fill it generously! Once done, secure the openings with toothpicks or kitchen twine. This keeps the filling safe inside. - Season the exterior of chicken with salt and pepper. - Place on a baking sheet and bake for 25-30 minutes until cooked through. Now it’s time to bake! Season the outside of each chicken breast with salt and pepper. This adds flavor to the outside. Place the stuffed chicken on a lined baking sheet. Bake them in your preheated oven for 25-30 minutes. Check that they are cooked through and the juices run clear. - Rest chicken for 5 minutes before serving. - Remove toothpicks or twine. When the chicken is done, let it rest for about 5 minutes. This helps keep it juicy. After resting, carefully remove the toothpicks or twine. Now, your spinach feta stuffed chicken is ready to serve! Enjoy the vibrant flavors and tender texture. To boost the taste of your spinach feta stuffed chicken, fresh garlic is key. It adds a bright, rich flavor. You can also experiment with different herbs or spices in the filling. Try adding basil or thyme for a unique twist. Sun-dried tomatoes can bring in an extra layer of flavor too. They add sweetness and depth. If you want to switch things up, consider grilling or pan-searing the stuffed chicken. These methods create a nice crust and enhance the taste. For a hands-off option, use a slow cooker. This method makes the chicken tender and juicy. Just adjust the cooking time to ensure it’s fully done. How you serve your dish matters. Place the stuffed chicken on a bed of mixed greens. It adds color and freshness. You can also pair it with roasted vegetables for a hearty meal. Drizzle a balsamic reduction over the chicken for an elegant touch. Lastly, sprinkle fresh herbs on top for a pop of green. This simple step makes your dish look professional and inviting. {{image_2}} You can switch out feta cheese for other options. Goat cheese adds a tangy twist. Mozzarella gives a creamy texture. If you prefer dairy-free, try vegan cheese. Many brands taste great and melt well. These choices keep the dish exciting and accessible for everyone. To enhance the stuffing, consider adding chopped artichokes. They bring a nice flavor. Roasted red peppers also work well. They add sweetness and color. If you want a heartier meal, mix in quinoa or rice. This makes the dish more filling while still being delicious. For those who like heat, add red pepper flakes. They bring a nice kick to each bite. You can also play with herbs. Thyme and basil both add lovely aromas and tastes. Don’t be afraid to experiment and find your favorite combination. To keep your spinach feta stuffed chicken fresh, store leftovers in an airtight container. This helps the chicken stay moist and flavorful. For best quality, enjoy the leftovers within three days. You can freeze the stuffed chicken for later use. To do this, wrap each piece tightly in plastic wrap, then place them in a freezer bag. This keeps out air and prevents freezer burn. For best results, use the frozen chicken within three months. When you’re ready to eat, thaw it in the fridge overnight. To reheat the chicken and keep it juicy, the oven is the best choice. Preheat your oven to 350°F (175°C). Place the chicken in a baking dish and cover it with foil. Bake for about 15-20 minutes until heated through. If you use a microwave, place the chicken on a microwave-safe plate. Heat it for 1-2 minutes, but be careful. Microwaves can dry out the chicken. Always check that it is warm all the way through before serving. Yes, you can use frozen spinach. First, thaw it completely. Then, squeeze out the extra water. This keeps your filling from being too wet. After that, chop the spinach and mix it with the other ingredients as you would with fresh spinach. You can tell the chicken is cooked when it is no longer pink inside. The juices should run clear. The best way to check is to use a meat thermometer. The internal temperature should reach 165°F (75°C). Yes, you can prepare the stuffed chicken ahead of time. Stuff the chicken breasts and store them in the fridge. This is great for meal prep. Just make sure to cook them within a day or two for the best taste. This dish pairs well with many sides. You can serve it with roasted vegetables, like carrots or zucchini. A fresh salad with mixed greens is also a good choice. For a heartier option, try rice or quinoa. These sides balance the flavors and make a complete meal. This blog post detailed how to create a delicious spinach feta stuffed chicken. You learned about the main ingredients, tools, and the step-by-step method for cooking. I shared tips for flavor enhancement, storage, and variations to personalize your dish. In closing, you can easily impress family and friends with this recipe. Enjoy experimenting with different flavors and methods. Make this dish your own, and savor every bite!

Spinach Feta Stuffed Chicken Juicy and Flavorful Dish

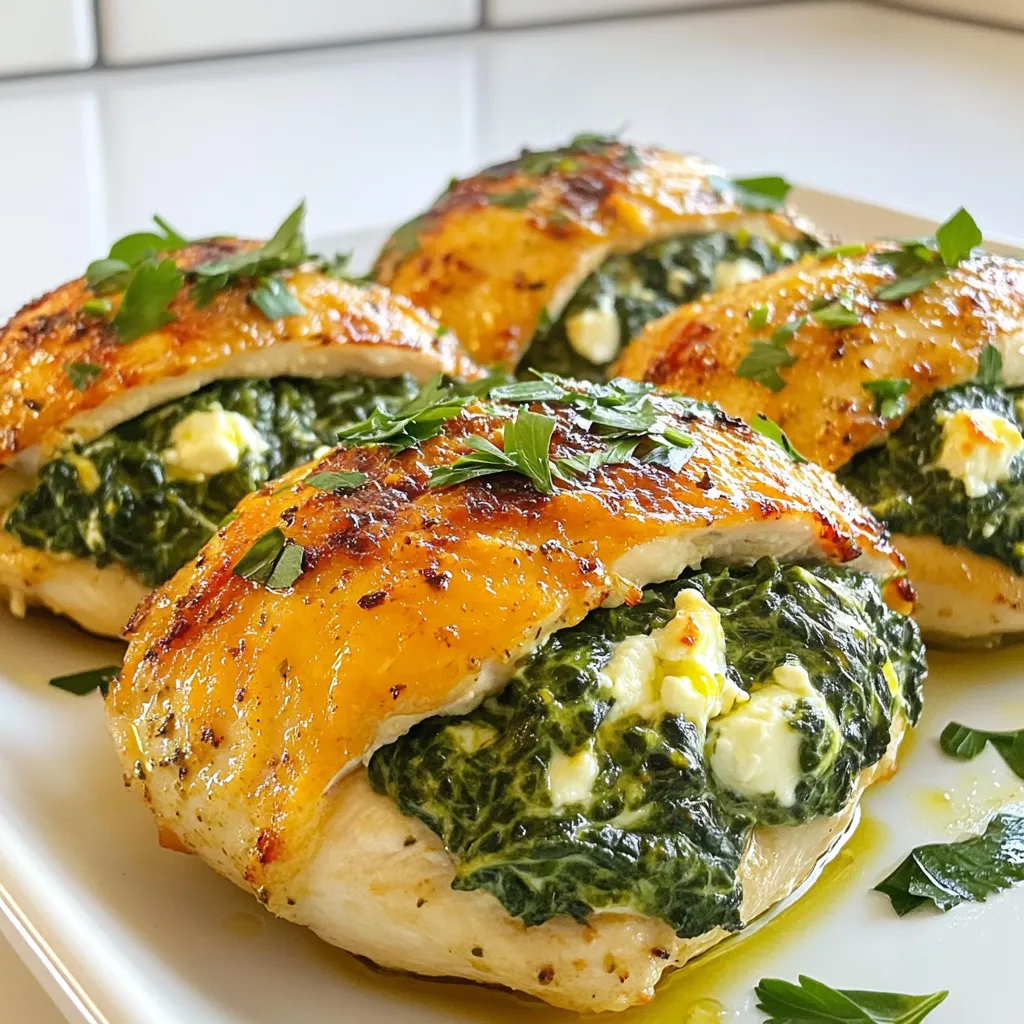
Are you ready to turn a simple dinner into a gourmet experience? My Spinach Feta Stuffed Chicken combines fresh spinach,

- 8 oz rice noodles - 1 cup shredded carrots - 1 bell pepper (red or yellow), thinly sliced - 1 cucumber, julienned - 1 cup edamame (shelled) - 1/4 cup green onions, chopped - 1/4 cup fresh cilantro, chopped - 1/4 cup roasted sesame seeds The main ingredients create a colorful and fresh base for your salad. Rice noodles provide the perfect texture. Shredded carrots add crunch and sweetness. Sliced bell pepper brings a pop of color and flavor. Julienned cucumber offers refreshing coolness. Edamame adds protein and a nice bite. Green onions and cilantro give it a fresh finish. Lastly, roasted sesame seeds add a delicious nutty taste. - 3 tablespoons soy sauce - 2 tablespoons sesame oil - 1 tablespoon ginger, freshly grated - 1 tablespoon honey or maple syrup - 1 tablespoon rice vinegar - 1 teaspoon chili oil (optional, for heat) The dressing is what makes this salad shine. Soy sauce gives a salty flavor, while sesame oil adds richness. Freshly grated ginger brings warmth and spice. Honey or maple syrup adds sweetness that balances the saltiness. Rice vinegar gives a tangy kick. If you like heat, add chili oil for a spicy touch. - First, cook the rice noodles according to the package instructions. - Once they are ready, drain the noodles. - Rinse them under cold water to stop the cooking process. - In a large bowl, combine shredded carrots, bell pepper, cucumber, edamame, green onions, and cilantro. - Mix well to ensure all the vegetables are evenly distributed. - In a small bowl, whisk together soy sauce, sesame oil, ginger, honey or maple syrup, rice vinegar, and chili oil if you want some heat. - Whisk until everything is well combined and smooth. - Add the cooled noodles to the bowl with the vegetables. - Pour the dressing over the noodle and vegetable mixture. - Toss everything gently to coat the noodles and veggies with the dressing. - Sprinkle roasted sesame seeds on top of the salad. - Let the salad sit for about 10 minutes. This helps the flavors blend together before serving. To avoid overcooking rice noodles, follow the package directions closely. Set a timer to ensure they cook just right. Once cooked, drain them immediately. Rinse the noodles under cold water. This stops the cooking process and keeps them firm. Make sure to toss them gently while rinsing. This helps separate the noodles and cool them quickly. Adjust the flavors of your dressing to suit your taste. If you like it sweeter, add more honey or maple syrup. For extra heat, increase the chili oil. If you don’t have an ingredient, substitute wisely. For example, use olive oil instead of sesame oil. You can also swap rice vinegar for apple cider vinegar. These changes will still give you a tasty dressing. For a beautiful presentation, serve the salad in a large bowl. You can also use individual plates for a fancy touch. Garnish with extra sesame seeds and fresh cilantro on top. This adds color and flavor. Consider pairing the salad with grilled chicken or tofu for extra protein. It also goes well with spring rolls or dumplings for a full meal. {{image_2}} You can add protein to your sesame ginger noodle salad for a heartier meal. Grilled chicken works great. Just slice it thin and toss it in. Tofu is a fantastic option too. Make sure to press it first to remove extra moisture. Shrimp is another tasty choice. Cook it quickly in a pan until pink. Each of these proteins will make your salad more filling and satisfying. Feel free to swap out vegetables based on what you like or have on hand. If you prefer broccoli, chop it up small for crunch. Snap peas add a sweet touch and nice color. Bell peppers can be any color you like; each offers a unique flavor. Seasonal veggies like zucchini or asparagus can also shine in this dish. This flexibility helps you create a salad that suits your taste. If you need a gluten-free version, you can easily adjust your noodles. Look for rice noodles that are labeled gluten-free; they are perfect for this salad. Some brands offer great texture and taste without gluten. Always check labels to ensure they meet your needs. Enjoy a delicious salad that everyone can love, no matter their dietary needs. To keep your Sesame Ginger Noodle Salad fresh, store it in an airtight container. Place it in the fridge right after serving. Make sure it cools down first. This helps to keep the flavors intact. Always use a clean utensil to scoop out servings. This prevents bacteria from entering. When stored properly, your salad stays good for about 3 to 5 days. After that, the veggies lose their crunch. The noodles may also get soggy. If you notice any strange smells or colors, it's best to toss it. You can freeze the noodles, but it's tricky. The texture changes when thawed. If you want to freeze, store the salad without the dressing. Keep the dressed salad in the fridge. When ready to eat, thaw it in the fridge overnight. Then, add fresh dressing before serving for the best taste. Yes, you can make this salad ahead of time. I recommend preparing the salad a few hours before serving. Keep the dressing separate until you are ready to serve. This way, the noodles and veggies stay fresh and crunchy. Store the salad in an airtight container in the fridge. It will stay good for up to two days. You can use many types of noodles for this salad. Rice noodles are great for a light and fresh taste. Soba noodles can add a nutty flavor, while whole wheat spaghetti gives a hearty twist. Just cook them according to the package. Each noodle type changes the dish's texture and flavor, making it fun to experiment. Absolutely! This salad is perfect for meal prep. It is quick to make and easy to pack. You can store it in individual containers for lunches. The fresh veggies and flavor-rich sauce make it a tasty choice to grab on busy days. Plus, it helps you eat healthy throughout the week. This blog post shared a simple and tasty noodle salad recipe. You learned about the main ingredients, cooking steps, and tips for best results. We also discussed variations and storage options. Remember, this salad is versatile and easy to customize. Feel free to experiment with your favorite veggies and proteins. It can be a great meal prep option that saves you time. Enjoy making this delicious dish for yourself or to share with friends!

Sesame Ginger Noodle Salad Fresh and Flavorful Dish

Are you looking for a dish that bursts with flavor and is easy to make? The Sesame Ginger Noodle Salad

- 1 French baguette, sliced into 1/2-inch pieces - 4 medium ripe tomatoes, diced - 1 bulb of garlic - 1/4 cup fresh basil leaves, chopped - 1/4 cup extra virgin olive oil - 1 tablespoon balsamic vinegar - Salt and pepper to taste - Optional: Grated Parmesan or feta cheese for topping To make roasted garlic tomato bruschetta, gather your main ingredients first. A French baguette is perfect for this dish. Slice it into 1/2-inch pieces. Ripe tomatoes bring a fresh taste. Dice about four medium ones. Garlic adds a rich flavor. Use one bulb for roasting. Fresh basil gives a lovely aroma. Chop about 1/4 cup of leaves. Extra virgin olive oil adds a smooth texture and taste. Measure out 1/4 cup for the recipe. Next, seasonings enhance the flavors. Balsamic vinegar adds a touch of sweetness. Use 1 tablespoon for balance. Salt and pepper make everything pop. Add these to your liking. Finally, if you want more flavor, sprinkle some grated Parmesan or feta cheese on top. This adds a creamy finish to the bruschetta. These ingredients come together for a simple and tasty treat. Enjoy the vibrant flavors of each bite! {{ingredient_image_1}} First, we need to preheat the oven. Set it to 400°F (200°C). This heat helps the garlic turn sweet and soft. Next, take your bulb of garlic. Slice off the top to expose the cloves. Drizzle a small amount of olive oil over the top. This adds flavor while roasting. Wrap the garlic in aluminum foil. Place it in the oven and roast for about 30-35 minutes. You want the cloves to be soft and caramelized. This step is key for a tasty bruschetta. While the garlic roasts, let's make the tomato mixture. Grab four ripe tomatoes and dice them into small pieces. You want them to mix well. In a mixing bowl, combine the diced tomatoes with chopped basil leaves. Add 1 tablespoon of balsamic vinegar and 2 tablespoons of olive oil. Sprinkle salt and pepper to taste. Mix everything well and let it sit. This allows the flavors to blend beautifully. Now that the garlic is done, it’s time to mash it. Squeeze the soft garlic cloves out of their skins into a bowl. Use a fork to mash the garlic until smooth. Next, take your French baguette slices. Spread a good amount of the mashed roasted garlic on each slice. This will give each piece a rich, savory base. Place the baguette slices on a baking sheet. Drizzle a bit more olive oil on top. Toast them in the oven for about 5-7 minutes. You want them to be golden and crisp. Once they are toasted, remove them from the oven. Spoon the tomato mixture generously on each slice. If you like, sprinkle some grated Parmesan or feta cheese on top for extra flavor. Your roasted garlic tomato bruschetta is ready to enjoy! Each bite is a delicious mix of flavors. To make the best roasted garlic, set your oven to 400°F (200°C). This temperature works well for softening the garlic. Roast the garlic bulb for about 30-35 minutes. You want the cloves to be soft and caramelized. If you don’t have an oven, you can use a stovetop. Place the garlic bulb in a small pan with a lid. Steam it for about 20 minutes on low heat. This method is quick and easy. You can boost the flavor of your tomato mix by adding diced onion or chopped bell peppers. Both ingredients add a nice crunch. Use ripe tomatoes for the best taste. Varieties like Roma or beefsteak work great. They are juicy and full of flavor. For plating, use a large serving platter. Arrange the bruschetta slices in a fan shape. This makes it look inviting. Pair your bruschetta with a light wine, like Pinot Grigio. It complements the tomatoes well. A simple green salad also makes a nice side dish. Pro Tips Use Fresh Ingredients: Always choose ripe, in-season tomatoes and fresh basil for the best flavor in your bruschetta. Customize Your Toppings: Feel free to add other toppings such as olives or roasted red peppers for a twist on the classic bruschetta. Control the Toastiness: Keep an eye on the baguette slices while toasting to prevent them from becoming too hard or burnt. Make Ahead: You can prepare the tomato mixture and roasted garlic in advance; just assemble the bruschetta right before serving for the best texture. {{image_2}} You can make roasted garlic tomato bruschetta for everyone. To create a vegan version, just skip the cheese. This dish tastes amazing without it. You can also add toppings like sliced olives or avocado. These options add great flavor and texture. Want to jazz up your bruschetta? Adding spices can give it a kick. Red pepper flakes are a fun choice. They add heat without hiding the other flavors. You can also try using different herbs. Oregano or parsley can change the taste nicely. Fresh herbs will brighten the dish and make it even better. Don't be afraid to get creative! To keep your bruschetta fresh, store it properly. First, place the leftover bruschetta in an airtight container. This helps prevent moisture loss. If you have leftover tomato mixture, keep it in a separate container. It will stay fresh longer this way. Bruschetta is best enjoyed right after making it. However, you can store it in the fridge for up to 2 days. When reheating bruschetta, avoid the microwave. Microwaving can make the bread soggy. Instead, preheat your oven to 350°F (175°C). Place the bruschetta on a baking sheet and heat for about 10 minutes. This method keeps the bread crispy. If you stored the tomato mixture, add it after reheating the bread. This way, it stays fresh and flavorful. Enjoy your bruschetta warm and tasty! Bruschetta is a classic Italian dish. It typically features toasted bread topped with fresh ingredients. The name "bruschetta" comes from the Roman dialect "bruscare," meaning to toast. This dish has roots in Central Italy, where it started as a way to enjoy fresh produce. The crunchy bread pairs well with tomatoes, garlic, and basil, making it a beloved appetizer. Yes, you can prepare bruschetta in advance. To do this, keep the components separate. You can make the tomato mixture and store it in the fridge. Just remember to add it to the toasted bread right before serving. This keeps the bread from getting soggy. You can roast the garlic ahead of time too. Store it in an airtight container for up to a week. The best bread for bruschetta is a French baguette. Its crusty exterior gives a nice crunch. You can also use ciabatta or Italian bread. These options are sturdy enough to hold toppings without getting soggy. Choose a bread that is fresh and has a good texture for toasting. You now know how to make delicious bruschetta. We covered fresh ingredients like ripe tomatoes, garlic, and basil. I shared step-by-step instructions for roasting garlic and mixing flavors. You learned tips for perfecting your dish and ways to store leftovers. Feel free to try variations that cater to your taste. Enjoy your tasty bruschetta as an appetizer or snack. Happy cooking!

Roasted Garlic Tomato Bruschetta Simple and Tasty

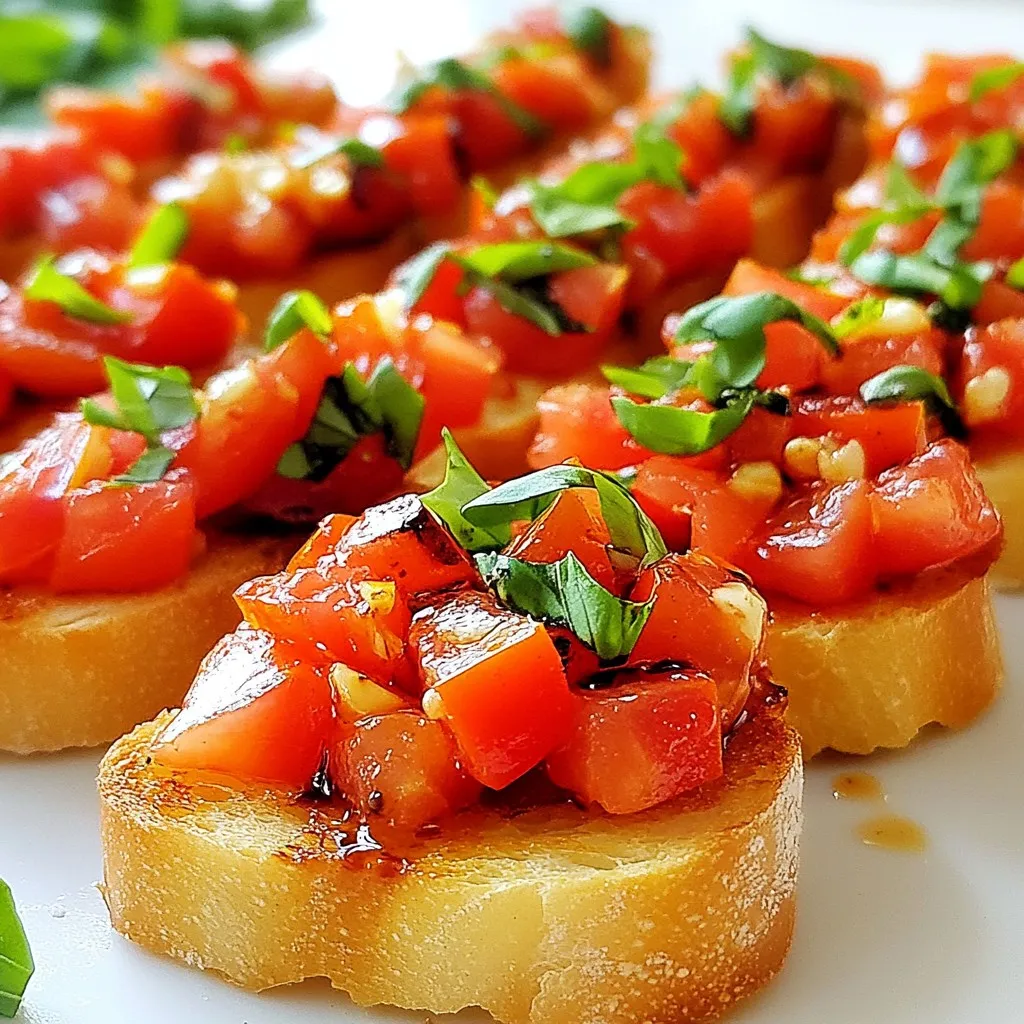
If you’re looking for a simple and tasty appetizer, roasted garlic tomato bruschetta is the perfect choice. This dish brings

- 2 pounds chicken wings - 1 tablespoon olive oil - 1 teaspoon garlic powder - 1 teaspoon onion powder - 1 teaspoon smoked paprika - Salt and pepper to taste - 1/2 cup grated Parmesan cheese - 1/4 cup fresh parsley, chopped - 3 cloves garlic, minced - Zest of 1 lemon - 2 tablespoons lemon juice You need fresh chicken wings for this dish. I prefer using large ones. The olive oil helps the seasonings stick. For seasonings, garlic powder and onion powder add great flavor. Smoked paprika gives a nice, smoky note. Salt and pepper help bring all the flavors together. I use fresh grated Parmesan cheese for the best taste. Fresh parsley adds color and freshness. Minced garlic adds a punch, while lemon zest and juice brighten the dish. Gather these ingredients before you start. This way, you make the cooking process smooth and fun. The right mix of these items ensures tasty wings every time. So, get ready to create a dish everyone will love! 1. Preheat the air fryer. Set your air fryer to 400°F (200°C) and let it heat for about 5 minutes. This step helps cook the wings evenly. 2. Coating the wings with olive oil and seasonings. Grab a large bowl. Place 2 pounds of chicken wings inside. Drizzle 1 tablespoon of olive oil over the wings. Toss them well to ensure each wing gets coated. Now, sprinkle in 1 teaspoon each of garlic powder, onion powder, and smoked paprika. Add salt and pepper to taste. Mix again until all wings are covered in the seasoning blend. 1. Cooking temperature and time. Carefully place the coated wings in the air fryer basket. Make sure not to overcrowd them. If needed, cook in batches. Set the timer for 25-30 minutes. 2. Importance of basket shaking. Halfway through cooking, shake the basket gently. This step helps the wings crisp up all around, giving them that perfect crunch. 1. Mixing the sauce ingredients. While the wings cook, prepare the garlic Parmesan sauce. In a small bowl, combine 1/2 cup of grated Parmesan cheese, 3 minced garlic cloves, the zest of 1 lemon, 2 tablespoons of lemon juice, and 1/4 cup of chopped fresh parsley. Mix everything well to create a tasty sauce. 2. Coating the wings post-cooking. Once the wings are done and crispy, remove them from the air fryer. Toss the hot wings in the garlic Parmesan mixture right away. Make sure each wing is coated thoroughly. Let them sit for a minute so the sauce sticks well before serving hot. To get crispy wings, set your air fryer to 400°F (200°C). Preheat it for 5 minutes. This step warms the air fryer, making the wings crisp up nicely. Avoid stuffing the basket too full. If you crowd the wings, they won’t cook evenly. Instead, place them in a single layer. You may need to cook in batches. This helps each wing get the heat it needs for that perfect crunch. For extra flavor, consider adding spices like cayenne pepper or Italian seasoning. These can give your wings a kick or a fresh note. Marinating the wings ahead of time can boost their taste. Mix olive oil, garlic powder, and any spices you choose. Let the wings sit in this mix for at least 30 minutes, or overnight for deeper flavor. This simple step can make a big difference in taste. Feel free to experiment. Cooking is about trying new things. Add your favorite herbs or spices to make these wings truly your own! {{image_2}} To make spicy garlic Parmesan wings, add hot sauce or red pepper flakes. Start by mixing your wing coating with a tablespoon of your favorite hot sauce. This gives a nice kick and balances the rich cheese flavor. You can also sprinkle red pepper flakes directly on the wings before air frying. Adjust the spice level to suit your taste. I love how the heat enhances the garlic's aroma and the Parmesan's creaminess. Herb-infused wings bring a fresh twist to the classic flavor. You can incorporate fresh herbs like thyme or rosemary. Chop up about a tablespoon of your chosen herb and mix it into the olive oil before coating your wings. The herbs add depth and a herby scent to the dish. You can even try a mix of herbs for a more complex flavor. Every bite feels like a gourmet experience, and it pairs perfectly with the garlic and cheese. For gluten-free wings, use gluten-free seasonings and sauces. Many brands offer gluten-free hot sauces and spices. Always check the label to ensure they meet your needs. You can still enjoy the same great flavor without any gluten. I recommend using gluten-free soy sauce as a base for your marinade. This keeps the wings tasty and friendly for those avoiding gluten. Enjoy guilt-free with your favorite dipping sauce! To keep your leftover wings fresh, store them in an airtight container. Place them in the fridge if you plan to eat them within a few days. Make sure they cool down before sealing. This helps prevent sogginess. Use them within 3 to 4 days for the best taste. When you want to eat leftover wings, you need to make them crispy again. The best way is to use the air fryer. Preheat it to 375°F (190°C). Place the wings in a single layer. Heat them for about 5-7 minutes. Check if they are hot and crispy. You can also use the oven. Set it to 350°F (175°C) and heat for about 10-15 minutes. Freezing wings is easy if you do it right. First, let them cool completely. Then, wrap them tightly in plastic wrap or foil. Place the wrapped wings in a freezer bag. Remove as much air as you can. They can stay frozen for up to 3 months. To defrost, place them in the fridge overnight. Reheat them using the tips above for best results. You cook chicken wings in an air fryer for 25 to 30 minutes at 400°F (200°C). Halfway through, shake the basket. This ensures even cooking and crispiness. Always check that the wings reach an internal temperature of 165°F (74°C) for safety. Use a meat thermometer for best results. The wings should be golden and crispy when done. Yes, you can use frozen wings. Just add extra cooking time. Cook them at the same temperature, but for 30 to 35 minutes. Avoid thawing them first. Check their doneness the same way. Make sure they reach 165°F (74°C). This method keeps them juicy and tender. Garlic parmesan wings pair well with many sides. Consider serving them with celery sticks and carrot sticks for crunch. A side of ranch or blue cheese dressing is perfect for dipping. You could also add potato wedges or a fresh salad for balance. These options enhance your meal and keep it fun! You learned how to make tasty air fryer garlic Parmesan wings with simple steps. We covered the ingredients, cooking method, and tips for the best results. Remember to shake the basket for even cooking. You can also try variations, like spicy wings or gluten-free options. Don’t forget how to store and reheat leftovers properly. With this guide, you’ll enjoy delicious wings every time, whether for a party or a snack. Happy cooking!

Savory Air Fryer Garlic Parmesan Wings Recipe Guide

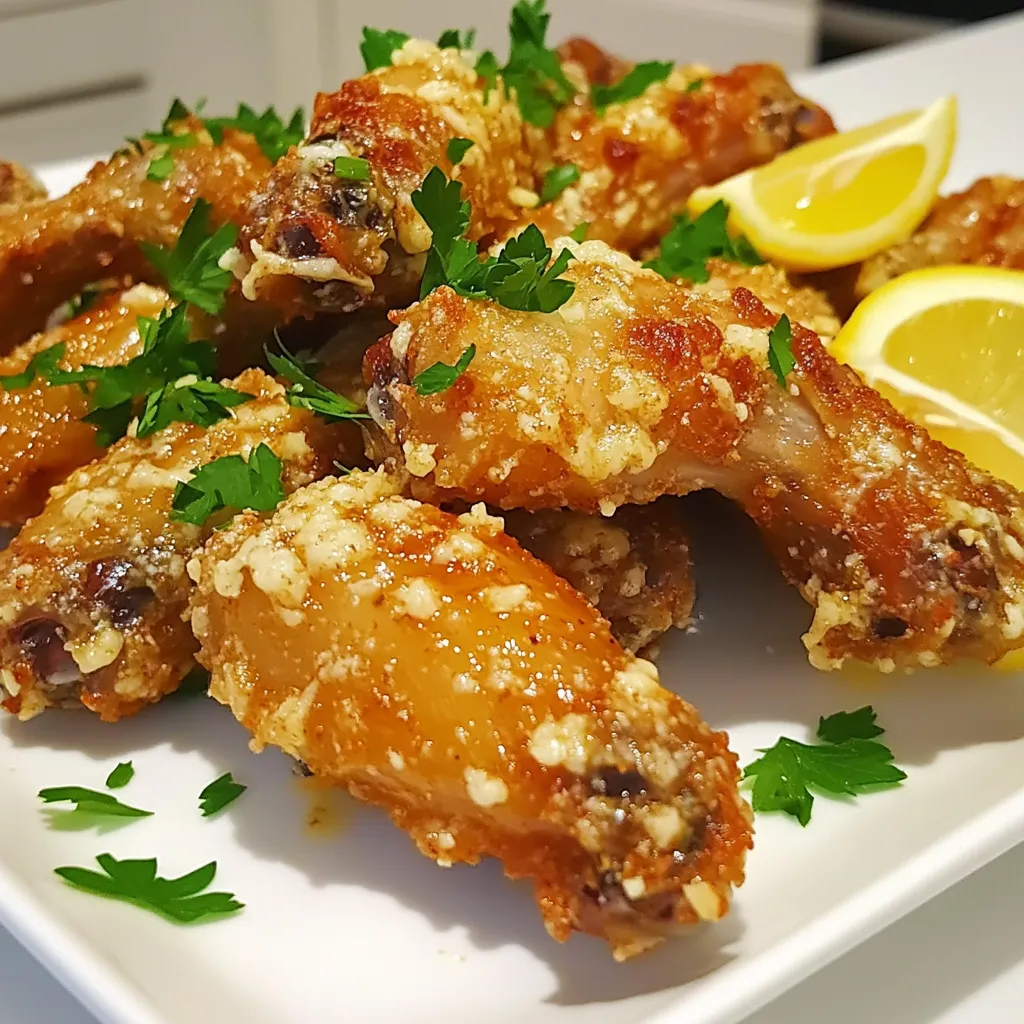
Craving a savory snack? Let’s make Air Fryer Garlic Parmesan Wings that are crispy and full of flavor! This simple

To make the perfect Pumpkin Cream Cheese Pound Cake, gather these simple ingredients: - 1 ½ cups all-purpose flour - 1 teaspoon baking powder - ½ teaspoon baking soda - ½ teaspoon salt - 1 teaspoon ground cinnamon - ¼ teaspoon ground nutmeg - ¼ teaspoon ground ginger - 1 cup granulated sugar - ½ cup unsalted butter, softened - 2 large eggs - 1 cup pumpkin puree - 1 teaspoon vanilla extract - 8 ounces cream cheese, softened - ½ cup powdered sugar - 1 teaspoon milk (optional, for consistency) Each of these items plays a key role in creating a rich and moist cake. The all-purpose flour gives the structure. The baking powder and baking soda help it rise. The salt balances the flavors, while the spice blend of cinnamon, nutmeg, and ginger adds warmth. The sugar and butter create a sweet and tender crumb. Eggs bind everything together, and pumpkin puree adds moisture and flavor. Vanilla extract enhances the taste, while the cream cheese mixture gives a creamy surprise inside. If your cream cheese is too thick, you can add a teaspoon of milk for a smoother texture. Each ingredient works together to make this cake an irresistible treat. First, preheat your oven to 350°F (175°C). This helps the cake bake evenly. Next, grab a 9x5 inch loaf pan. Grease and flour the pan well. This step prevents sticking and makes it easy to remove the cake later. In a medium bowl, whisk together the dry ingredients. Combine 1 ½ cups of all-purpose flour, 1 teaspoon of baking powder, ½ teaspoon of baking soda, and ½ teaspoon of salt. Add 1 teaspoon of ground cinnamon, ¼ teaspoon of ground nutmeg, and ¼ teaspoon of ground ginger. Whisk until everything is mixed well. Set this bowl aside for later. In a large mixing bowl, cream together ½ cup of softened unsalted butter and 1 cup of granulated sugar. Use a mixer for about 3-4 minutes until it looks light and fluffy. Then, beat in 2 large eggs one at a time. Mix well after each egg. Next, add 1 cup of pumpkin puree and 1 teaspoon of vanilla extract. Stir until it’s all combined. Now, it’s time to add the dry mix to the wet mix. Gradually add the dry ingredients. Mix gently until just combined. Be careful not to overmix. This keeps the cake soft and fluffy. In another bowl, take 8 ounces of softened cream cheese and mix it with ½ cup of powdered sugar. Stir until it is smooth. If the cream cheese is too thick, you can add 1 teaspoon of milk. This helps to reach the right consistency. Pour half of the batter into the prepared loaf pan. Spoon dollops of the cream cheese mixture over the batter. Then pour the rest of the batter on top. Use a knife or skewer to gently swirl the cream cheese into the batter. This gives a nice marbled effect. Place the loaf pan in the oven. Bake for 55-60 minutes. To check if it’s done, insert a toothpick into the center. If it comes out clean, the cake is ready. Let the cake cool in the pan for about 10 minutes. After that, transfer it to a wire rack to cool completely. - Importance of ingredient temperature: Always use room-temperature butter and cream cheese. This helps them blend smoothly. Cold ingredients can cause lumps in your batter. - Checking for doneness properly: Insert a toothpick in the center of the cake. If it comes out clean, the cake is ready. If wet batter sticks, bake a little longer. - Overmixing and its effects: Be gentle when mixing the batter. Overmixing can make the cake tough. Mix just until the flour disappears for a light texture. - How to avoid a dense cake: Use the right flour-to-liquid ratio. Ensure you measure flour correctly. Too much flour can lead to a heavy cake. - Serving suggestions and garnishes: Serve slices on a pretty plate. Dust with powdered sugar for a sweet touch. Sprinkle cinnamon and pumpkin seeds for extra flair. - Serving at optimal temperature: Enjoy the cake warm or at room temperature. Both ways bring out its rich flavors. Store leftovers in an airtight container to keep it fresh. {{image_2}} You can change the taste of your pumpkin cream cheese pound cake in fun ways. Adding nuts like walnuts or pecans gives it a nice crunch. You can also toss in chocolate chips for a sweet twist. Both options add texture and flavor. If you want to adjust the spices, try adding more cinnamon for warmth. You can also swap out some cinnamon for allspice or clove. These changes can help you find the flavor that you enjoy the most. Many people need special diets, and you can still enjoy this cake. To make it gluten-free, use a gluten-free flour blend instead of all-purpose flour. This keeps the cake moist and tasty. For a vegan version, replace the eggs with flaxseed meal or applesauce. Use a dairy-free cream cheese for the filling. These swaps let everyone enjoy this delicious cake, no matter their diet. This cake is tasty on its own, but you can make it even better. Drizzle caramel or cream cheese frosting on top for added sweetness. You can also serve it with whipped cream for a light touch. Pair the cake with warm drinks like coffee or chai tea. This combination makes for a cozy treat, perfect for fall gatherings or lazy afternoons. To keep your Pumpkin Cream Cheese Pound Cake fresh, wrap it tightly in plastic wrap. This helps keep moisture in. You can also place it in an airtight container. For long-term storage, slice the cake and place each slice in a freezer bag. Make sure to remove as much air as possible. This keeps the cake from getting freezer burn. At room temperature, the cake stays fresh for about three days. If you store it in the fridge, it can last up to a week. Just make sure it's wrapped well to avoid drying out. When you're ready to enjoy a slice, preheat your oven to 350°F (175°C). Place the slice on a baking sheet. Heat it for about 10-15 minutes. This warms the cake without drying it out. You can also use a microwave. Heat on low for about 15-20 seconds. Just be careful not to overheat, or it may dry out. You can use Greek yogurt or mascarpone cheese. Both options work well. Greek yogurt adds a tangy flavor. Mascarpone is rich and creamy. If you use yogurt, it may change the texture slightly. Adjust the sugar as needed to keep it sweet. Yes, you can use fresh pumpkin. Start by roasting a pumpkin until it’s soft. Scoop out the flesh and mash it. Make sure to drain any excess moisture. This will help keep your cake from getting too wet. To check if the cake is done, insert a toothpick into the center. If it comes out clean, your cake is ready. You can also gently press the top. If it springs back, it is done. If it leaves an indentation, bake for a few more minutes. You can prepare the batter in advance. Store it in the fridge for up to 24 hours. Just remember to let it sit at room temperature for a bit before baking. You can also bake the cake a day ahead. Wrap it well to keep it fresh. Serve the cake sliced on a pretty plate. You can dust it with powdered sugar for a nice touch. Try adding a sprinkle of cinnamon or a few pumpkin seeds. Pair it with coffee or tea for a cozy treat. Enjoy it warm or at room temperature! You’ve explored how to make a delicious pumpkin cream cheese pound cake from scratch. We covered ingredients, step-by-step instructions, and helpful tips to ensure success. With variations and storage info, you can customize and keep your cake fresh. Remember, baking is about practice and fun. Enjoy the process and make it your own. I can't wait to hear how your cake turns out!

Pumpkin Cream Cheese Pound Cake Irresistible Delight

Get ready to fall in love with your new favorite treat: Pumpkin Cream Cheese Pound Cake! This rich, moist cake

- 4 boneless, skinless chicken breasts - 3 cups low-sodium chicken broth - 1 cup carrots, sliced - 1 cup celery, sliced - 1 medium onion, diced - 1 teaspoon garlic powder - 1 teaspoon dried thyme - 1 teaspoon dried parsley - 1/2 teaspoon black pepper - 1 can (10.5 oz) cream of chicken soup - 2 cups biscuit dough (store-bought or homemade) These ingredients create the base for a warm and hearty dish. The chicken adds protein, while the broth keeps everything moist. The veggies bring in flavor and color. - Fresh parsley Garnishing with fresh parsley adds a pop of color. It also gives a fresh taste to each bowl. Making your own biscuit dough is easy. You can mix flour, baking powder, salt, butter, and milk. Here’s a quick recipe: - 2 cups all-purpose flour - 1 tablespoon baking powder - 1/2 teaspoon salt - 1/4 cup butter, cold - 3/4 cup milk Mix the dry ingredients first. Then, cut in the cold butter until it looks like crumbs. Finally, stir in the milk until just combined. Drop spoonfuls onto the chicken mixture in the slow cooker. This dough will create fluffy, tender dumplings that soak up all the flavors. Enjoy your cozy meal! Start by placing the four chicken breasts in the slow cooker. This helps to keep them moist. Next, pour in three cups of low-sodium chicken broth. This broth gives the dish great flavor. Then, add one cup of sliced carrots and one cup of sliced celery. These veggies add texture and nutrition. Dice one medium onion and add that too. The onion adds depth to the dish. Finally, sprinkle one teaspoon of garlic powder, one teaspoon of dried thyme, one teaspoon of dried parsley, and half a teaspoon of black pepper over the top. These spices make your meal taste amazing. Next, add one can of cream of chicken soup. Stir gently to mix all the ingredients. This soup will make the broth rich and creamy. Cover the slow cooker and set it on low for 6 to 8 hours. You can also cook it on high for 3 to 4 hours. The chicken will be tender and easy to shred when done. After cooking, carefully take the chicken out. Use two forks to shred the chicken into bite-sized pieces. Return the shredded chicken back into the slow cooker and stir everything well. This ensures every bite is full of flavor. Now it's time to make the dumplings. Use store-bought or homemade biscuit dough, about two cups. Drop spoonfuls of the dough onto the chicken mixture in the slow cooker. Space them out, so they have room to puff up. Cover the slow cooker again and cook on high for an additional 30 minutes. The dumplings will become fluffy and cooked through. This will complete your cozy meal. Serve it hot in deep bowls, and add fresh parsley for a touch of color. Enjoy with crusty bread for dipping! To achieve tender chicken, start with boneless, skinless chicken breasts. Place them at the bottom of the slow cooker. This allows them to soak in all the tasty juices. Use low-sodium chicken broth for flavor without too much salt. Cook on low heat for 6-8 hours or high for 3-4 hours. This slow cooking breaks down the meat fibers, making the chicken juicy and easy to shred. For fluffy dumplings, use store-bought biscuit dough or make your own. Drop spoonfuls of the dough on top of the chicken mixture. Do not stir them in! Let them rest on top for the best rise. Cook them on high for 30 minutes. This steams the dumplings and makes them light and airy. If you want a golden top, you can briefly broil them after cooking. Always start with a clean slow cooker. Layer ingredients in the order mentioned. The chicken goes first, followed by the broth and vegetables. This helps everything cook evenly. Avoid opening the lid during cooking. Each time you lift the lid, heat escapes, which can extend cooking time. Lastly, let the dish sit for a few minutes after cooking. This helps all the flavors blend nicely. {{image_2}} You can change up the veggies in your slow cooker chicken and dumplings. Try adding peas for sweetness. Green beans can add a nice crunch. You can also toss in corn or potatoes for extra heartiness. Each vegetable brings its own flavor and texture. Just make sure to cut them into similar-sized pieces. This will ensure they cook evenly and blend well with the chicken. If you want to switch proteins, turkey works great in this dish. You can also use pork or beef for a different taste. Just remember to adjust cooking times. Chicken cooks quickly, while larger cuts of meat may need more time. Always check that the meat is tender before serving. This keeps the meal just as comforting and tasty. For gluten-free dumplings, use a gluten-free biscuit mix. Many brands offer easy-to-use options. You can also make your own with gluten-free flour. Just follow a simple recipe that combines flour, baking powder, milk, and butter. These dumplings may have a different texture but will still be delicious. They will soak up all the tasty broth and flavors in your meal. To keep your chicken and dumplings fresh, let them cool first. Then, place them in an airtight container. Store the leftovers in the fridge for up to three days. Make sure to label the container with the date. This way, you can enjoy them later without worry. When you’re ready to enjoy your leftovers, reheat them gently. You can use a microwave or a stovetop. If using a microwave, heat in short bursts. Stir between heating to ensure even warmth. If using the stovetop, add a splash of chicken broth to keep it moist. Heat on low until warmed through. If you want to save your chicken and dumplings for later, freezing is a great option. Transfer the cooled dish to a freezer-safe container. You can also use freezer bags. Remove as much air as possible to prevent freezer burn. Label the bags with the date. You can freeze them for up to three months. When ready to eat, thaw in the fridge overnight before reheating. Yes, you can use frozen chicken breasts. Just add an extra hour to the cook time. This will ensure they cook all the way through. Make sure to check the internal temperature. It should reach 165°F for safe eating. Using frozen chicken can save you time on prep. You will still get a tasty meal! To thicken the broth, mix a little cornstarch with cold water. Use about one tablespoon of cornstarch and two tablespoons of water. Stir this mix into the slow cooker 30 minutes before serving. You can also mash some of the vegetables. This adds creaminess and thickness without extra steps. You can tell the chicken is done when it is tender and shreds easily. Use a meat thermometer for best results. It should read 165°F in the thickest part of the breast. If you don’t have a thermometer, just use two forks to shred it. If it falls apart easily, it’s done! This blog post covers essential steps to make chicken and dumplings. You learned about the key ingredients and options for garnishes. I shared tips for cooking tender chicken and creating fluffy dumplings. We explored variations, storage, and answers to common questions. Remember, cooking can be fun and simple. Feel free to customize recipes to fit your taste. Enjoy your meals and make cooking a joyful experience!

Slow Cooker Chicken & Dumplings Tasty Comfort Meal

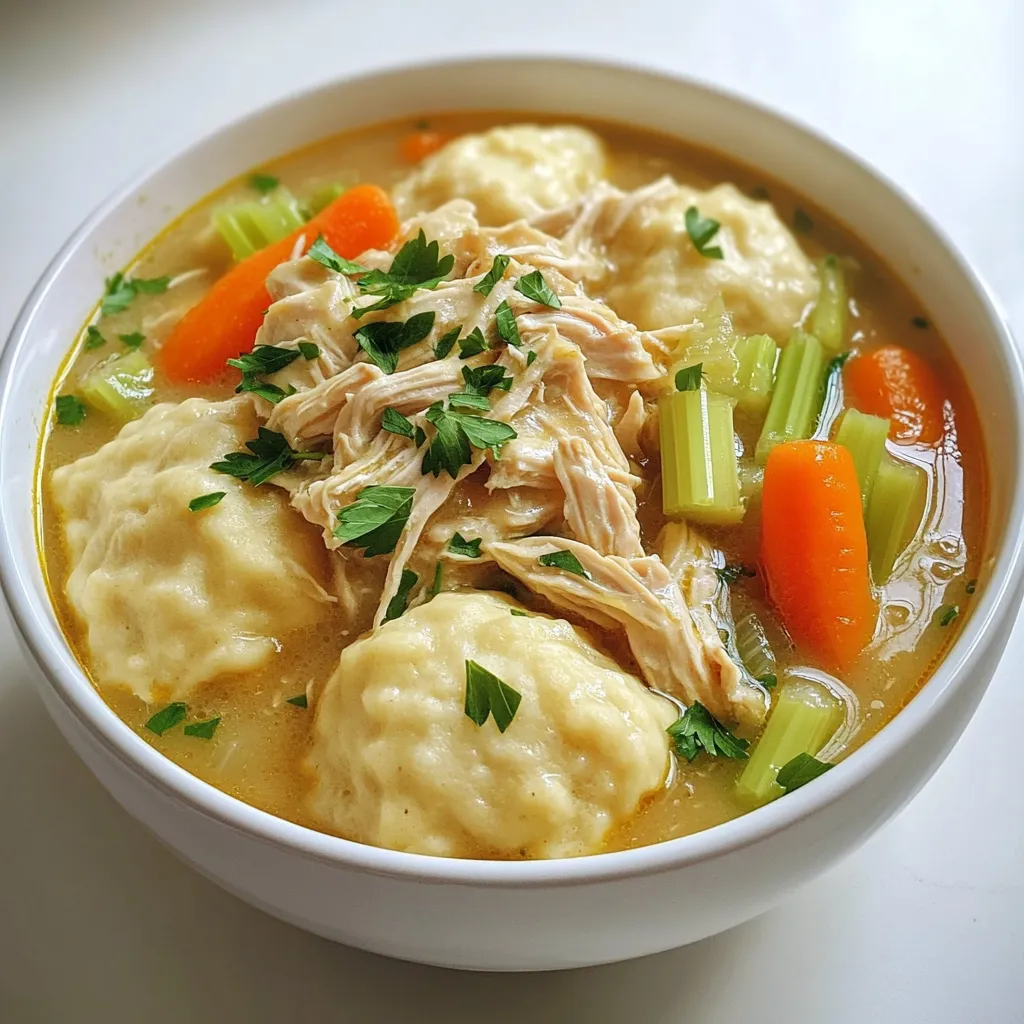
Looking for a warm, hearty meal that feels like a hug? Slow cooker chicken and dumplings can be your answer!

- 1 lb boneless, skinless chicken thighs - 1/2 cup spicy BBQ sauce - 2 large flatbreads or naan breads - 1 cup shredded mozzarella cheese - 1 jalapeño, sliced - Fresh cilantro for garnish - Corn kernels (fresh or canned) - Olive oil - Salt and pepper to taste - Additional BBQ sauce for serving The main ingredients make this dish shine. The chicken thighs give a juicy base. The spicy BBQ sauce adds a bold kick. Flatbreads or naan serve as a perfect canvas. Mozzarella cheese melts beautifully over the top. You can customize your flatbreads. Adding jalapeños gives extra heat. Fresh cilantro brightens the flavors. Corn kernels add a sweet crunch. Each optional ingredient enhances the dish's appeal. Use olive oil to coat your chicken. Season with salt and pepper for flavor. Extra BBQ sauce can be served on the side. This way, everyone can add more if they wish. Gather these ingredients to start your cooking adventure! - Preheat the oven to 425°F (220°C). - Line the sheet pan with parchment paper. Starting with a hot oven helps the chicken cook evenly. The parchment paper makes cleanup easy. You can use any baking sheet, but a half-sheet pan works best. - Toss chicken thighs with spicy BBQ sauce. - Roast chicken in the oven. In a medium bowl, mix the diced chicken with 1/4 cup of BBQ sauce. This adds great flavor. Season with a pinch of salt and pepper. Spread the coated chicken on one side of the sheet pan. Roast it for 15-18 minutes. Stir halfway through to ensure even cooking. The chicken should be cooked through and have a nice char. - Prepare the flatbreads with BBQ sauce and toppings. - Bake until cheese is melted and bubbly. While the chicken cooks, get your flatbreads ready. Take two flatbreads or naan and spread the rest of the BBQ sauce evenly on top. In another bowl, mix the shredded mozzarella, sliced red onion, and corn. Once the chicken is ready, spread the chicken mixture over the flatbreads. Top with the cheese mix and jalapeño slices if you want extra heat. Pop the sheet pan back in the oven for 8-10 minutes. Keep an eye on it. You want the cheese to be bubbly and golden brown. After baking, sprinkle fresh cilantro on top for a pop of color and flavor. Slice the flatbreads, and they are ready to serve. To get the best char on chicken, use high heat. Roast the chicken at 425°F until it browns. Stir it halfway through to cook evenly. This gives a great flavor and texture. Evenly distributing toppings is key. Start with BBQ sauce on the flatbreads. Then, spread the chicken and veggies evenly. This ensures every bite is full of flavor. For presentation, serve your flatbreads on a wooden board. Add extra cilantro on top for color. A side of BBQ sauce for dipping also looks nice and tastes great. Pair these flatbreads with a fresh salad or crispy fries. They balance the meal and add crunch. You can also serve them with coleslaw for a refreshing twist. To boost flavor, consider adding spices like smoked paprika or cayenne. These will add depth and heat. You can also drizzle some hot sauce before serving for an extra kick. If you want to change up the BBQ sauce, try using a teriyaki glaze or honey mustard. These alternatives can add a sweet and tangy twist to your flatbreads. {{image_2}} You can switch the chicken for other proteins. Turkey works great and gives a nice taste. Tofu is also a good choice for a vegetarian option. It absorbs flavors well, making it fun to eat. If you want to save time, use shredded rotisserie chicken. It’s already cooked, so you can skip some steps. Feel free to play around with the BBQ sauce. You can add more for a spicier kick or less for a milder taste. Adding different veggies can change the whole dish. Try bell peppers, spinach, or even mushrooms for a twist. Fresh herbs like basil or parsley can also brighten the flavors. You don’t have to stick to just one type of flatbread. Pita bread works well too. It has a nice pocket for all the toppings. If you need gluten-free options, many stores sell gluten-free flatbreads. Just check the label to ensure they fit your needs. To keep your flatbreads fresh, place them in the fridge. Use a sealed container or wrap them tightly in plastic wrap. This helps prevent them from drying out. If you have extra BBQ sauce, store it separately. The sauce can keep the flatbreads moist and tasty. You can reheat flatbreads in two ways: the oven or the microwave. For the oven, preheat it to 350°F (175°C). Place the flatbreads on a baking sheet and heat for about 10 minutes. This keeps the crust crispy. If you use the microwave, heat for about 30 seconds or until warm. However, this may make the crust soft. To keep the texture, I suggest using the oven. To freeze flatbreads, wrap them tightly in foil or plastic. You can freeze them either before or after baking. If you freeze them assembled, separate layers with parchment paper. When ready to eat, thaw them in the fridge overnight. Bake at 350°F (175°C) for 10-15 minutes until heated through. Enjoy your flatbreads any time! It takes about 15-18 minutes to cook the chicken. I recommend roasting it at 425°F (220°C) until it is fully cooked and has a nice char. Stir it halfway through for even cooking. Yes, you can prep this recipe ahead of time. You can dice the chicken and mix it with the BBQ sauce a few hours before cooking. You can also slice the onions and prepare the cheese mix early. Just store everything in the fridge until you are ready to bake. You can use mild BBQ sauce for less heat. If you want more spice, try a chipotle sauce or sriracha. You can also make your own sauce with ketchup, vinegar, and spices for a unique flavor. This recipe serves four people. If you need more portions, simply double the ingredients. You can also cut the flatbreads into smaller pieces for appetizers or snacks. This blog post highlights a tasty recipe for spicy BBQ chicken flatbreads. You learned about the key ingredients and options to customize your dish. I shared step-by-step cooking instructions, tips for the best results, and creative variations to try. Remember, you can easily store, reheat, or freeze your flatbreads for later enjoyment. With these insights, you can make a delicious meal your whole family will love. Enjoy cooking and have fun experimenting with flavors!

Sheet Pan Spicy BBQ Chicken Flatbreads Delight

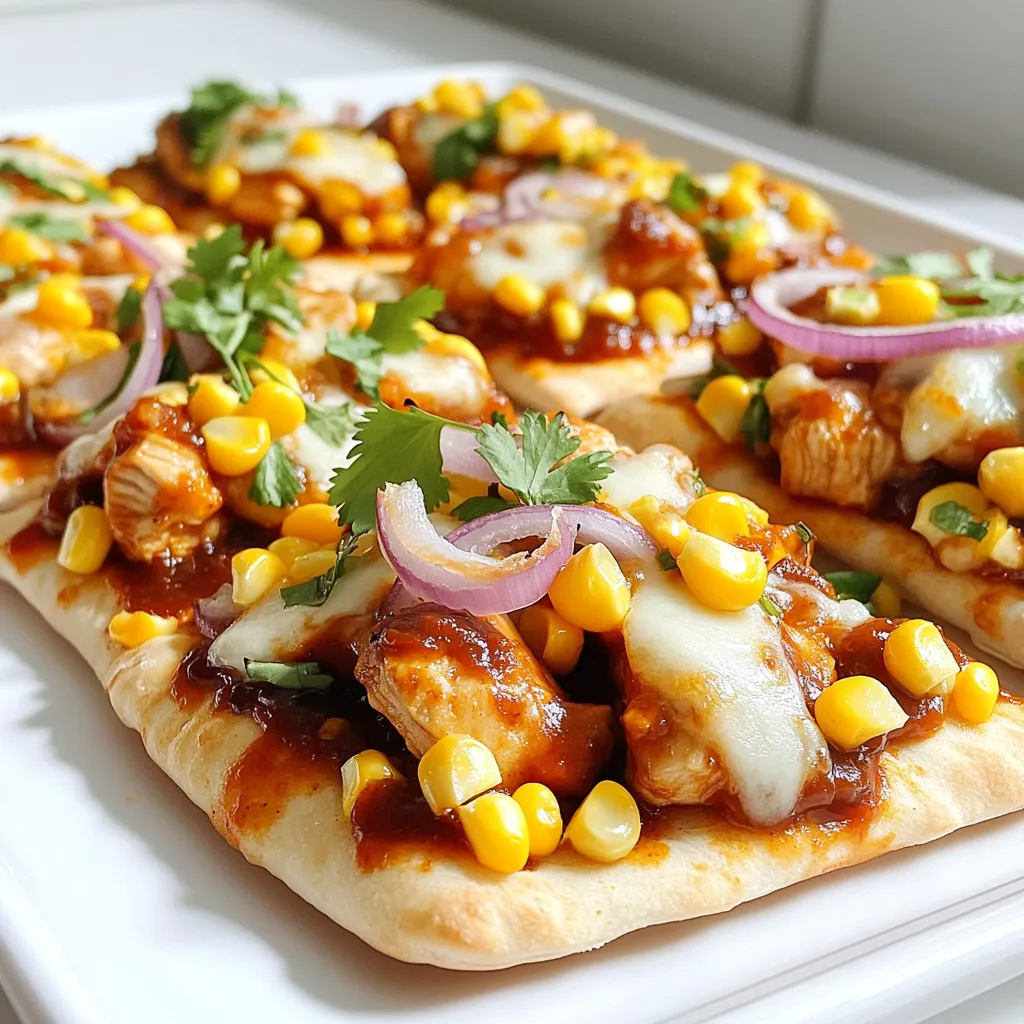
Looking for a quick and tasty meal? You’ll love my Sheet Pan Spicy BBQ Chicken Flatbreads! They are packed with

- 1 cup pumpkin puree - 8 oz cream cheese, softened - 1/2 cup powdered sugar - 1 teaspoon vanilla extract - 1 teaspoon pumpkin pie spice - 1 cup heavy whipping cream - 1 cup graham cracker crumbs - 4 tablespoons melted butter - Whipped cream for topping - Caramel sauce for drizzling (optional) - Pecan pieces for garnish (optional) Each ingredient plays a key role in the flavor and texture of the parfaits. - Pumpkin puree gives the dessert its rich, warm flavor. It also adds moisture. - Cream cheese makes the filling creamy and smooth. It balances the sweetness. - Powdered sugar sweetens the mixture without making it grainy. - Vanilla extract enhances the overall flavor and adds depth. - Pumpkin pie spice brings in the classic fall flavors. It’s a mix of spices like cinnamon and nutmeg. - Heavy whipping cream adds lightness and fluffiness to the filling. - Graham cracker crumbs form the crust base. They add crunch and sweetness. - Melted butter helps bind the crumbs and adds richness. - Whipped cream on top is a light, sweet finish. - Caramel sauce adds a sweet, sticky layer if desired. - Pecan pieces add crunch and a nutty flavor for garnish. You can easily swap some ingredients to fit dietary needs. - For a dairy-free option, use vegan cream cheese and coconut whipped cream. - If you want a lower-calorie version, use Greek yogurt instead of cream cheese. - You can replace graham crackers with gluten-free cookies for a gluten-free treat. - If you prefer a no-sugar option, use a sugar substitute in place of powdered sugar. - For a nut-free version, skip the pecans or use seeds like pumpkin seeds instead. These swaps keep the dessert tasty and fun for everyone! First, take a medium bowl. Add the softened cream cheese, powdered sugar, vanilla extract, and pumpkin pie spice. Use an electric mixer to beat this mixture. Mix until it is smooth and creamy. This step is key for a rich flavor. The blend of spices makes it taste like fall. Next, grab another bowl for the heavy cream. Use a mixer to whip it. You want stiff peaks to form. This means the cream holds its shape well. Once done, gently fold the whipped cream into the cream cheese mix. Be careful not to deflate the whipped cream. This step keeps the parfait light and airy. Now, it’s time to build your parfaits. Start with a layer of the graham cracker crumbs at the bottom of your cups. Then, add a layer of the pumpkin cheesecake filling on top. Repeat this process until the cups are full. Make sure the top layer is the pumpkin cheesecake. Cover the parfaits with plastic wrap. Refrigerate them for at least 2 hours. This helps the flavors come together and makes them taste even better. To make great whipped cream, use cold heavy cream. Chill your mixing bowl and beaters too. This helps the cream whip faster. Start at low speed, then increase to high. Whip until you see stiff peaks. Be careful not to over-whip. If you do, it may turn into butter. If you want to boost flavors, try adding a pinch of salt. It balances the sweetness. You can also mix in some maple syrup. This adds depth to the pumpkin flavor. Want a little spice? Add a dash of cinnamon or nutmeg. These spices complement pumpkin perfectly. For a lovely look, use clear cups or jars. This shows off the layers of your parfait. Top each one with a big dollop of whipped cream. Drizzle caramel sauce over the cream for a sweet touch. Sprinkle pecan pieces on top for crunch. You can also add a cinnamon stick for flair. {{image_2}} You can switch up the flavors in your parfaits. Try using chocolate or caramel instead of pumpkin. For a fruity twist, mix in mashed bananas or fresh berries. Each option gives a new taste while keeping the creamy texture. If you want a lighter dessert, use low-fat cream cheese. You can also replace heavy cream with Greek yogurt. For added sweetness without sugar, use honey or maple syrup in place of powdered sugar. These swaps keep the flavor strong while making it healthier. Mini parfaits are perfect for gatherings. Use small cups or jars for easy serving. Layer the ingredients just like in the big parfaits. Guests can grab their own treat without needing a plate. Plus, they make a fun and colorful display on any table. Store your parfaits in the fridge. Use airtight containers to keep them fresh. Cover each parfait with plastic wrap or a lid. This prevents any strong odors from seeping in. Keeping them chilled helps maintain the creamy texture. No bake pumpkin cheesecake parfaits last for about 3 to 4 days in the fridge. After this, the flavors may fade. If you notice any changes in texture or smell, it’s best to toss them. Always check before serving! You can freeze these parfaits, but texture might change. If you want to freeze them, skip the toppings. Freeze them in airtight containers. When ready to eat, let them thaw in the fridge overnight. Add whipped cream and toppings just before serving. This keeps everything fresh and tasty! Yes, you can use canned pumpkin for this recipe. Canned pumpkin is convenient and saves time. It has a smooth texture, which works well in the cheesecake mixture. Make sure to choose 100% pumpkin puree. Avoid pumpkin pie filling, as it has added sugar and spices. To make this recipe gluten-free, choose gluten-free graham crackers. Many brands offer gluten-free options. You can also use crushed nuts or cookies as an alternative for the crust. Just ensure the product is labeled gluten-free. This way, everyone can enjoy the parfaits without worry. You can replace heavy cream with coconut cream. Chill a can of coconut milk overnight, then scoop the thick cream from the top. This gives a rich texture and flavor. If you're looking for a lower-fat option, try using Greek yogurt. It adds creaminess without too many calories. This blog post covered the key ingredients for parfaits and their roles. I shared step-by-step instructions for making the cream cheese mixture and assembling the parfaits. You learned tips for perfect whipped cream and how to enhance flavors. I also shared variations, including healthier swaps and mini parfaits. Lastly, I provided best practices for storage and answered common questions. Enjoy creating delicious parfaits that suit your taste, dietary needs, and special occasions! Happy dessert-making!

No Bake Pumpkin Cheesecake Parfaits Delightful Treat

Craving a sweet and creamy dessert? My No Bake Pumpkin Cheesecake Parfaits are the answer! With rich layers of pumpkin

- 2 cans (16 oz each) refrigerated cinnamon rolls (with icing) - 2 medium apples, peeled, cored, and chopped (preferably Granny Smith) - 1/2 cup packed brown sugar - 1/3 cup unsalted butter, melted - 2 teaspoons ground cinnamon - 1/4 cup chopped pecans or walnuts (optional) - 1/4 cup caramel sauce (store-bought or homemade) For this delightful treat, gather your ingredients first. The cinnamon rolls are the star of this dish. Using two cans of refrigerated rolls makes it easy. I like using Granny Smith apples for their tartness. They balance the sweet caramel and brown sugar. Next, we need brown sugar. It adds a rich, deep flavor and helps create that lovely caramelization. Unsalted butter is key for moisture and richness. Ground cinnamon brings warmth and spice to our mix. If you want to add crunch, consider nuts. Pecans or walnuts work well. Lastly, caramel sauce is a must. It drizzles beautifully on top. You can use store-bought or make your own for extra fun. With these ingredients ready, you are set to create something special. Each item works together to build layers of flavor. Don't skip any of them! - Preheat your oven to 350°F (175°C) and grease a bundt pan. - Open the cinnamon roll cans and cut each roll into quarters. - In a bowl, mix chopped apples, brown sugar, and ground cinnamon. - Dip each cinnamon roll piece in melted butter, then coat in the apple mix. - Place the coated pieces in the bundt pan. - If you like, sprinkle chopped nuts over each layer. - Bake the monkey bread for 30-35 minutes until golden brown. - Warm the caramel sauce while it bakes. - Once baked, cool for 10 minutes and flip it onto a plate. - Drizzle warm caramel sauce over the monkey bread and enjoy! Choosing the right apples For this recipe, I recommend using Granny Smith apples. They add a nice tartness that balances well with the sweet caramel and cinnamon. Their firmness holds up well during baking. If you prefer sweeter apples, Fuji or Honeycrisp can work too. Just remember, you want some tang to cut through the sweetness. Best practices for baking Start by preheating your oven to 350°F (175°C). Greasing your bundt pan well is key. This helps the monkey bread release easily after baking. When you layer the cinnamon roll pieces, make sure to pack them loosely. This allows the heat to circulate for even baking. Keep an eye on your bread as it bakes. You want it golden brown, about 30 to 35 minutes. Pairing with ice cream Serving this monkey bread warm is a must! I love adding a scoop of vanilla ice cream on the side. The cold creaminess pairs perfectly with the warm, gooey bread. You can even drizzle some extra caramel sauce over the ice cream for a sweet touch. Presentation tips For a lovely presentation, serve your monkey bread on a nice platter. After inverting it from the pan, drizzle warm caramel sauce over the top. This creates a beautiful, sticky glaze. You can also sprinkle some chopped nuts or a dusting of powdered sugar for added flair. {{image_2}} You can change up the nuts in this recipe. Try using walnuts or almonds instead of pecans. Each nut adds its own flavor and crunch. You can also mix in some chocolate chips for a sweet twist. Want to boost the flavor? Add spices like nutmeg or ginger. A splash of vanilla extract can also enhance the taste. These simple swaps make your monkey bread even more unique. If you need a gluten-free option, look for gluten-free cinnamon rolls. Many brands offer great choices that taste just as good. Make sure to check labels for any gluten sources. For a vegan adaptation, use plant-based butter and almond milk. Choose vegan cinnamon rolls too. This way, everyone can enjoy this tasty treat. To keep your caramel apple cinnamon roll monkey bread fresh, store it in an airtight container. This will help keep the moisture in. If you don't have a container, wrap it tightly in plastic wrap. This will also work well. For longer storage, you can freeze the monkey bread. To do this, cut it into pieces. Wrap each piece in plastic wrap, then place them in a freezer-safe bag. This way, you can take out just what you want later. It will stay good for about two to three months in the freezer. When it's time to enjoy the leftovers, reheating is key. The best way to do this is in the oven. Preheat your oven to 350°F (175°C). Place the monkey bread in an oven-safe dish. Cover it with foil to keep it moist, and heat for about 10-15 minutes. If you’re in a hurry, you can use the microwave. Place a piece on a microwave-safe plate. Heat it for about 20-30 seconds. Check to see if it's warm enough. If not, heat for a few more seconds. Just be careful not to overheat it, or it might get tough. Enjoy your warm treat! How long does it take to make? It takes about 50 minutes to make this monkey bread. You will need 15 minutes for prep and 30-35 minutes for baking. This time can vary a bit based on your oven. Can I use homemade cinnamon rolls? Yes, you can use homemade cinnamon rolls. Just make sure they are similar in size to store-bought ones. This will help with even baking. How to store leftover monkey bread? Store leftover monkey bread in an airtight container. Keep it at room temperature for up to two days. If you want it to last longer, refrigerate it for up to a week. Can I make this ahead of time? You can prepare the monkey bread a day ahead. Just follow the steps up to the baking part. Cover it tightly and store it in the fridge. When ready, bake it straight from the fridge, adding a few extra minutes to the bake time. This blog post covered a tasty monkey bread recipe made with cinnamon rolls and apples. I shared ingredients, step-by-step instructions, and useful tips. You can customize this dish with nuts or spices to fit your taste. The storage and reheating tips help keep it fresh. Enjoy this delightful treat, perfect for sharing or a cozy night in. Try it out, and feel free to experiment with your own twists!

Caramel Apple Cinnamon Roll Monkey Bread Delight

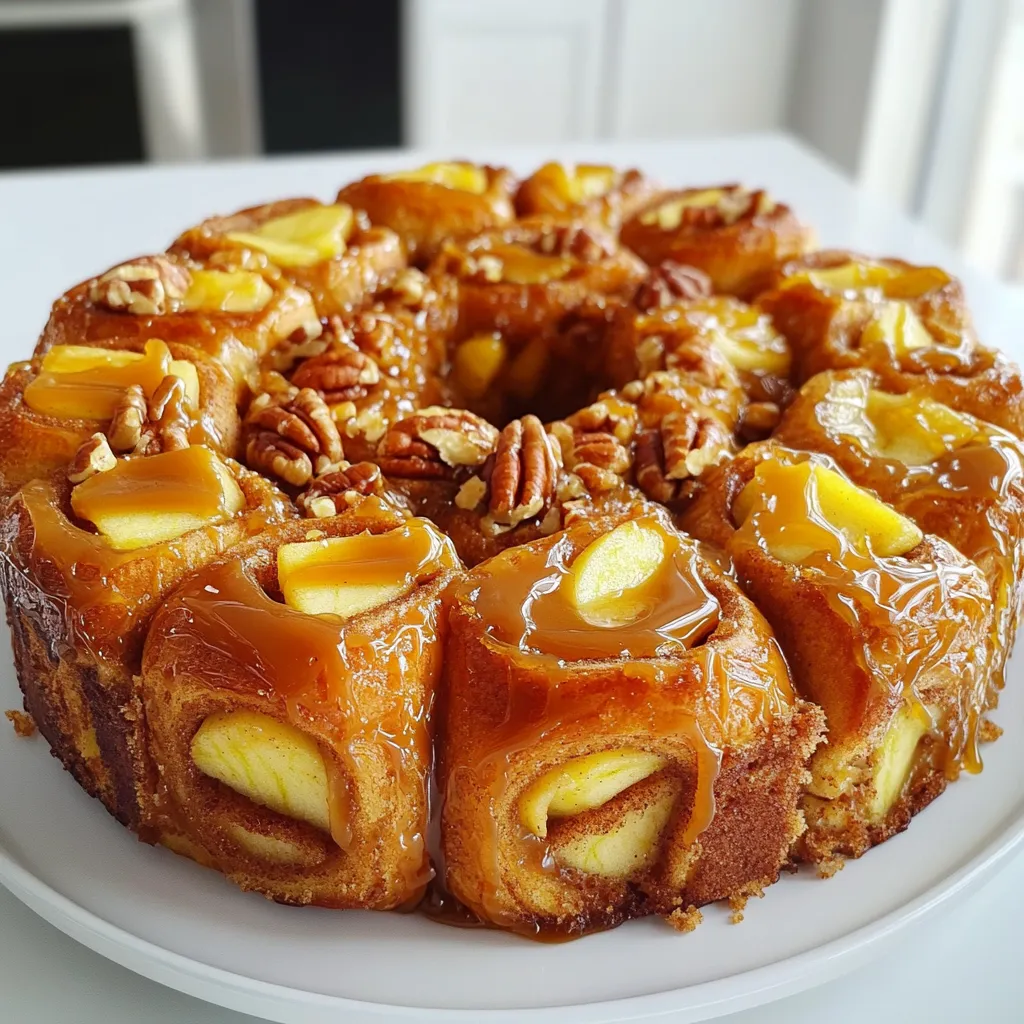
Get ready to indulge in a sweet treat that’s perfect for any gathering: Caramel Apple Cinnamon Roll Monkey Bread! This

Older posts
Newer posts
← Previous Page1 … Page3 Page4 Page5 … Page85 Next →

dsad

© 2026 greenmealmap • Built with GeneratePress

Our Policies

  • Copyright Policy
  • Cookie Policy
  • GDPR Policy
  • Privacy Policy
  • Disclaimer
  • Terms Of Use

More Information

  • Home
  • About
  • Contact
  • Appetizers
  • Dessert
  • Dinner
  • Drinks
©2026, greenmealmap About Back To Top