Skip to content
DisclaimerTerms Of UseGDPR PolicyCookie Policy

greenmealmap

  • Home
  • Drinks
  • Appetizers
  • Dinner
  • Dessert
  • About
  • Contact
  • Privacy Policy
DisclaimerTerms Of UseGDPR PolicyCookie Policy

NO-ING-IMG

In this section, I’ll share the key ingredients you need for making Raspberry Dark Chocolate Muffins. Each one plays a big role in the taste and texture of these treats. - 1 cup all-purpose flour - 1/2 cup unsweetened cocoa powder - 1 cup granulated sugar - 1 teaspoon baking powder - 1/2 teaspoon baking soda - 1/4 teaspoon salt - 1/2 cup unsalted butter, melted - 2 large eggs - 1 teaspoon vanilla extract - 1/2 cup buttermilk - 1 cup fresh raspberries - 1/2 cup dark chocolate chips - Optional: powdered sugar for dusting Each ingredient has its own purpose. The all-purpose flour gives structure. Unsweetened cocoa powder adds rich flavor. Granulated sugar sweetens the muffins and helps them rise. Baking powder and baking soda create that fluffy texture. Salt balances the flavors. Unsalted butter makes the muffins moist. Eggs add richness and help bind everything together. Vanilla extract brings a lovely aroma. Buttermilk gives a slight tang and keeps muffins tender. Fresh raspberries add juicy bursts, while dark chocolate chips provide a sweet contrast. You can also dust the muffins with powdered sugar for a pretty finish. Gather these ingredients for a delightful baking experience! {{ingredient_image_1}} First, you need to preheat your oven to 350°F (175°C). This step is key. It helps the muffins bake evenly. While the oven heats, prepare your muffin tin. You can use paper liners or grease it with cooking spray. In a large bowl, add 1 cup of all-purpose flour. Then, add 1/2 cup of unsweetened cocoa powder. Next, mix in 1 cup of granulated sugar. Don’t forget 1 teaspoon of baking powder, 1/2 teaspoon of baking soda, and 1/4 teaspoon of salt. Whisk everything together until it is well combined. In another bowl, melt 1/2 cup of unsalted butter. Let it cool a bit. Then, mix in 2 large eggs, 1 teaspoon of vanilla extract, and 1/2 cup of buttermilk. Stir until everything is smooth and mixed well. Next, pour the wet ingredients into the dry ingredients. Use a spatula to gently fold them together. Be careful not to overmix. Just mix until you can’t see any dry flour. This keeps the muffins soft. Now, it’s time to add flavor! Carefully fold in 1 cup of fresh raspberries and 1/2 cup of dark chocolate chips. Do this gently so you don’t break the raspberries. Spoon the batter evenly into your prepared muffin cups. Fill each about 3/4 full. Place the muffin tin in the oven. Bake for 18-20 minutes. To check if they’re done, insert a toothpick into the center. If it comes out clean, they are ready! After baking, let the muffins cool in the tin for about 5 minutes. Then, transfer them to a wire rack. Let them cool completely before serving. For a nice touch, you can dust them with powdered sugar before enjoying! To make sure your muffins stay moist, use buttermilk. The acidity in buttermilk helps keep the batter soft. Also, don’t bake them too long. Check your muffins at 18 minutes. If a toothpick comes out clean, they are done. Let them cool briefly in the pan before moving them. Overmixing can make your muffins tough. When you combine wet and dry ingredients, mix gently. Use a spatula to fold them together. Stop when you see a few flour streaks. This keeps the muffins light and fluffy. - Gluten-free alternatives: You can swap out all-purpose flour for a gluten-free blend. Look for one that has xanthan gum to help with texture. - Sugar substitutes: If you want less sugar, try coconut sugar or a sugar-free sweetener. Both options will work well in this recipe. Pro Tips Use Room Temperature Ingredients: Allow the butter, eggs, and buttermilk to sit at room temperature before mixing. This helps the ingredients combine more easily and results in a lighter muffin. Don’t Overmix the Batter: Gently fold the wet and dry ingredients together until just combined. Overmixing can lead to dense muffins. Fresh vs. Frozen Raspberries: Fresh raspberries yield the best flavor and texture. If using frozen, do not thaw them beforehand to prevent the batter from becoming too wet. Check for Doneness: Start checking the muffins at 18 minutes with a toothpick. They’re done when it comes out clean or with a few moist crumbs. {{image_2}} You can easily change the flavor of your muffins. Adding nuts like walnuts or pecans gives a nice crunch. If you want, toss in some sliced bananas or diced apples. These fruits bring a fresh taste and more moisture. Just keep the total fruit amount similar to the raspberries. This way, your muffins remain soft and delicious. If you avoid dairy, you can still enjoy these muffins. Use coconut oil instead of butter. Almond milk or oat milk works great in place of buttermilk. You can mix a tablespoon of vinegar with non-dairy milk to create a dairy-free buttermilk. Your muffins will taste just as good without the dairy. Spices can elevate your muffins to a new level. Try adding a pinch of cinnamon or nutmeg for warmth. A splash of almond extract adds a nice twist, too. Consider mixing in a bit of orange zest for a bright flavor. These small changes can make your muffins even more special. To keep your raspberry dark chocolate muffins fresh, store them in an airtight container. This method prevents moisture loss and keeps them soft. You can leave them at room temperature for up to three days. If you want them to last longer, consider refrigeration. Just make sure to wrap them well in plastic wrap first. Freezing muffins is a great way to enjoy them later. First, let the muffins cool completely. Then, wrap each muffin tightly in plastic wrap. Place the wrapped muffins in a freezer-safe bag or container. They will stay fresh for up to three months. When you want to eat one, just take it out and let it thaw at room temperature. To reheat your muffins, you have a few options. You can use a microwave for quick heating. Just place the muffin on a plate and heat it for about 15-20 seconds. For a nice crust, use an oven. Preheat it to 350°F (175°C) and heat the muffins for about 5-10 minutes. This way, they taste fresh and warm, just like when you first baked them! Yes, you can use frozen raspberries. Just make sure to thaw them first. Drain any extra juice to avoid soggy muffins. This way, you still get that tasty berry flavor! If you don't have buttermilk, you can make your own. Mix 1/2 cup of milk with 1/2 tablespoon of vinegar or lemon juice. Let it sit for about 5 minutes. This will mimic buttermilk's tangy taste. These muffins last about 3 days at room temperature. Store them in an airtight container. You can also keep them in the fridge for up to a week. Just remember to warm them up before eating! Yes, you can! Just reduce the baking time to about 12-15 minutes. Keep an eye on them. Mini muffins are great for snacks or parties! Choose dark chocolate with a cocoa content of 60-70%. This range gives the muffins a rich flavor. Brands like Ghirardelli or Guittard work well. Enjoy the deep taste they add! You now have a clear roadmap for making delicious muffins. We covered all the key ingredients and detailed steps to get you baking with ease. Remember to include tips for keeping your muffins moist and consider variations to suit your taste. Storing them well ensures you can enjoy them later. With this recipe, you can create tasty treats for yourself or share with others. Happy baking!

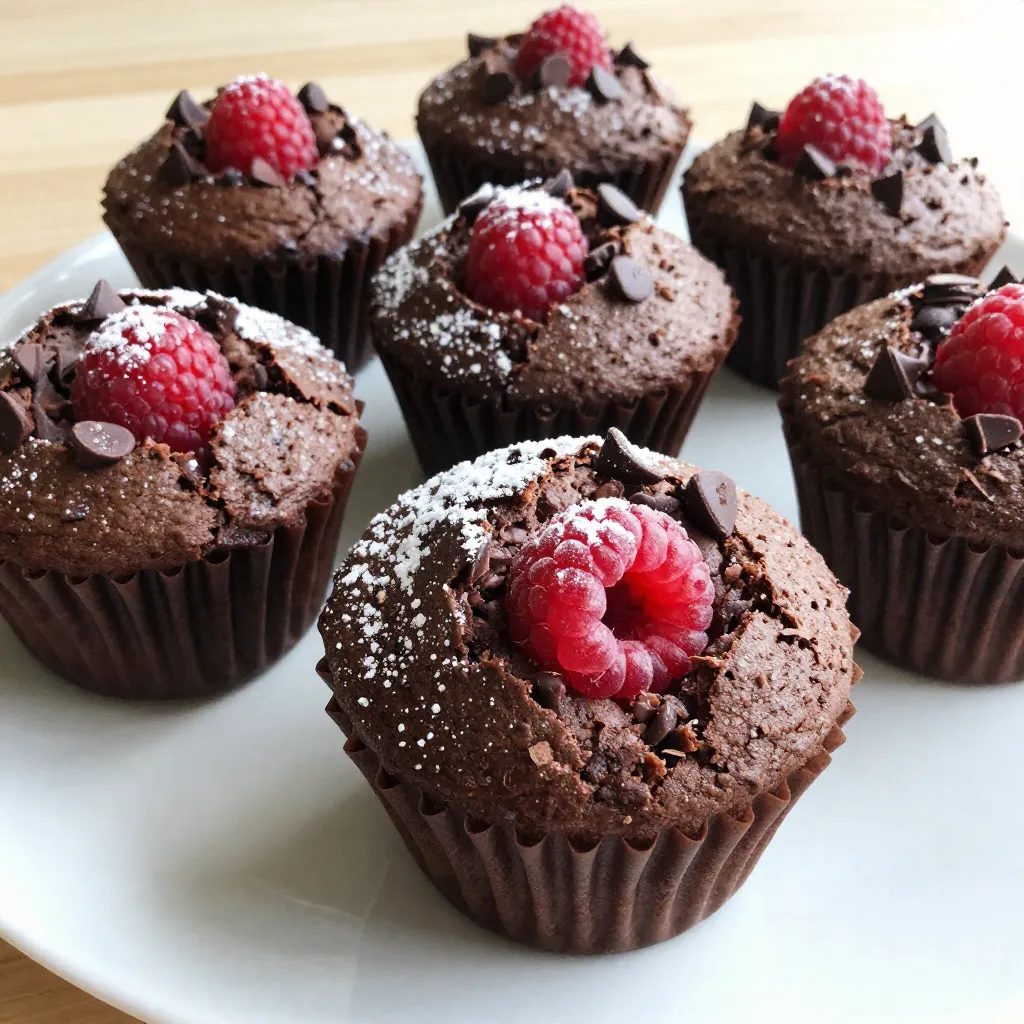
Raspberry Dark Chocolate Muffins Easy and Delicious Recipe

Craving a sweet treat that’s both easy to make and oh-so-delicious? Look no further! These Raspberry Dark Chocolate Muffins are

To make Cheesy Spinach Stuffed Chicken, gather these ingredients: - 4 boneless, skinless chicken breasts - 2 cups fresh spinach, chopped - 1 cup cream cheese, softened - 1 cup shredded mozzarella cheese - 1/2 cup grated Parmesan cheese - 2 cloves garlic, minced - 1 teaspoon onion powder - Salt and pepper to taste - 2 tablespoons olive oil You can add these for more taste: - 1/2 teaspoon red pepper flakes for heat - Fresh herbs like parsley or basil for garnish If you're out of an ingredient, try these swaps: - Use ricotta cheese instead of cream cheese for a lighter option. - Swap mozzarella with cheddar for a sharper flavor. - Frozen spinach can replace fresh, just thaw and drain it first. These options let you customize your dish while keeping it delicious! {{ingredient_image_1}} To make Cheesy Spinach Stuffed Chicken, start by gathering your ingredients. You will need chicken breasts, fresh spinach, cream cheese, mozzarella, Parmesan, garlic, onion powder, and olive oil. This dish is easy and fun to make. You’ll enjoy putting it together! 1. Preheat the oven to 375°F (190°C). This step is key for even cooking. 2. Mix the filling in a medium bowl. Combine chopped spinach, cream cheese, mozzarella, Parmesan, garlic, onion powder, and spices. Stir until everything is well mixed. 3. Butterfly the chicken breasts. Place each chicken breast on a cutting board. Slice it horizontally to create a pocket. Be careful not to cut all the way through. 4. Stuff the chicken. Take the cheesy spinach mixture and fill each chicken breast. Use toothpicks or kitchen twine to hold the filling inside. 5. Season the chicken. Sprinkle salt, pepper, and a little olive oil on the outside of each breast. This adds great flavor. 6. Sear the chicken. Heat olive oil in an oven-safe skillet over medium-high heat. Cook the stuffed chicken for about 3-4 minutes on each side until golden brown. 7. Bake the chicken. Move the skillet to the preheated oven. Bake for 20-25 minutes until the chicken reaches 165°F (75°C). 8. Rest and garnish. After baking, let the chicken rest for a few minutes. Then, remove the toothpicks or twine. Garnish with fresh herbs before serving. - Make sure the filling is not too loose. It should hold together well. - Do not overstuff the chicken. If it’s too full, the filling might spill out. - Use a sharp knife for butterflying the chicken to make the process easier. - If you have extra filling, bake it in a small dish alongside the chicken for a tasty side! To cook the Cheesy Spinach Stuffed Chicken perfectly, follow these steps: - Preheat your oven to 375°F (190°C). This sets the right heat for cooking. - Sear the chicken in an oven-safe skillet. This adds a nice brown color. - Use a meat thermometer to check the chicken. It should reach 165°F (75°C) inside. These techniques will make your chicken juicy and full of flavor. You can change the flavors to suit your taste. Here are some fun ideas: - Add different cheeses like feta or goat cheese for a tangy twist. - Mix in sun-dried tomatoes or olives for extra depth. - Try fresh herbs like dill or thyme to brighten the dish. Experimenting with flavors can make this dish your own! Cooking chicken safely is very important. Keep these tips in mind: - Always wash your hands before handling raw chicken. This helps prevent germs. - Use separate cutting boards for chicken and veggies. This avoids cross-contamination. - Cook chicken until it is no longer pink. This means it is ready to eat. By following these safety tips, you can enjoy your meal with peace of mind. Pro Tips Ensure Even Cooking: Make sure to pound the chicken breasts to an even thickness before stuffing to promote uniform cooking. Experiment with Cheese: Feel free to mix different cheeses like feta or cheddar for a unique flavor twist in the filling. Don’t Skip the Resting Time: Allow the chicken to rest after baking to help keep the juices locked in for a moist result. Use Fresh Spinach: Fresh spinach provides a vibrant flavor and texture; avoid frozen spinach as it can make the filling watery. {{image_2}} You can change the cream cheese flavor to make your dish special. Try spinach and herb cream cheese for a fresh twist. Garlic and herb cream cheese adds a nice kick. You can also use jalapeño cream cheese for some heat. Each flavor brings a new taste to your cheesy spinach stuffed chicken. Mozzarella is great, but you can mix other cheeses too. Try cheddar for a sharper taste. Gouda adds a creamy texture and smoky flavor. Feta cheese gives a tangy bite and pairs well with spinach. Use what you love to make the dish your own. Adding more veggies can boost the health factor. Try bell peppers or mushrooms for extra flavor. Zucchini or carrots can add crunch and color. You can also add artichokes for a unique taste. These veggie add-ins make your cheesy spinach stuffed chicken more nutritious and fun. Store your Cheesy Spinach Stuffed Chicken in an airtight container. Keep it in the fridge for up to three days. Make sure the chicken is cooled before sealing it. This keeps it fresh and tasty for later meals. To reheat, place the chicken in the oven. Set it to 350°F (175°C) and heat for about 15-20 minutes. This warms the chicken evenly. You can also use a microwave, but the oven keeps the chicken crispy. Heat it on medium power for about 2-3 minutes. For longer storage, you can freeze the stuffed chicken. Wrap each piece tightly in plastic wrap, then place it in a freezer bag. Label it with the date. It can last up to three months in the freezer. To cook from frozen, thaw it in the fridge overnight before reheating. You can serve many tasty sides with Cheesy Spinach Stuffed Chicken. I love pairing it with roasted vegetables. Carrots, broccoli, or green beans work great. Mashed potatoes or rice also make a nice addition. A fresh salad adds crunch and color. Try a simple Caesar salad or a garden mix. These sides balance the creamy chicken well. To check if the chicken is cooked, use a meat thermometer. Insert it into the thickest part of the chicken. The internal temperature should reach 165°F (75°C). If you don’t have a thermometer, cut into the chicken. The juices should run clear, not pink. Proper cooking keeps the chicken safe to eat and juicy. Yes, you can use frozen spinach! Just thaw it first. Squeeze out extra water to avoid a soggy filling. Frozen spinach is a great time-saver. It’s easy to store and lasts longer. This makes it simple to enjoy cheesy spinach stuffed chicken any day. This blog post covers all you need to make Cheesy Spinach Stuffed Chicken. You learned about key ingredients, tasty options, and helpful tips for cooking. I also shared how to store leftovers and answered common questions. As you try these tips, remember that customizing flavors can make each dish unique. Enjoy your cooking journey, and don’t hesitate to experiment! This dish can delight your family and impress your guests.

Cheesy Spinach Stuffed Chicken Tasty Dinner Delight

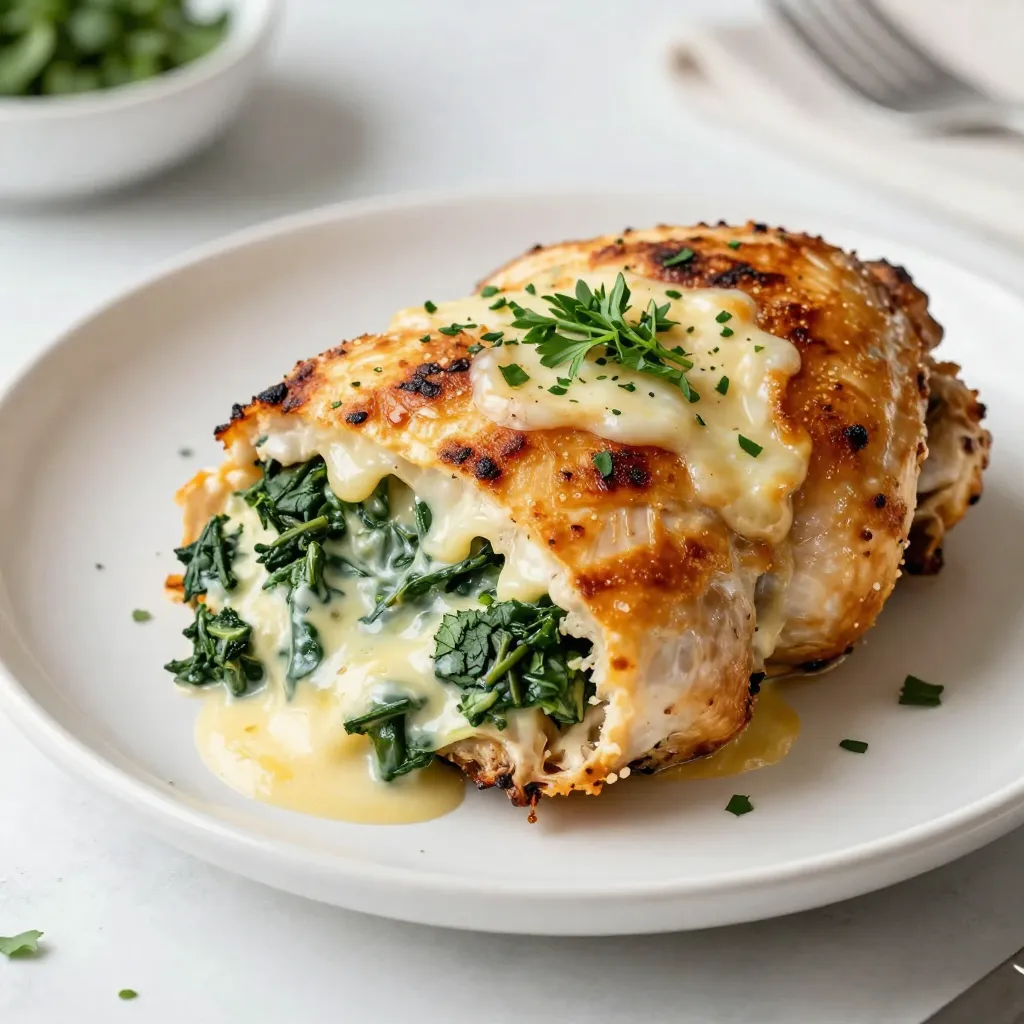
Are you ready to impress at dinner? Cheesy Spinach Stuffed Chicken is simple yet delicious! This dish combines tender chicken

- 1 cup creamy peanut butter - 1 cup semi-sweet chocolate chips - 1 can (14 oz) sweetened condensed milk - 1 teaspoon vanilla extract - 1/4 teaspoon salt These main ingredients create a rich and creamy fudge. The creamy peanut butter adds a smooth texture. The semi-sweet chocolate chips give the fudge a deep chocolate flavor. Sweetened condensed milk binds everything together, making it sweet and gooey. Vanilla extract enhances the taste, while salt balances the sweetness. - 1/2 cup chopped nuts - Caramel sauce for extra flavor You can add chopped nuts for crunch. They give the fudge a nice texture. Caramel sauce adds a layer of sweetness and richness. You can drizzle it on top for a fun twist. Both options let you customize your fudge to suit your taste. {{ingredient_image_1}} To start, line an 8-inch square baking pan with parchment paper. Make sure to leave some overhang on the sides. This overhang helps you lift the fudge out easily later. If you skip this step, removing the fudge may become tricky. Next, grab a medium saucepan and place it on low heat. Add the semi-sweet chocolate chips and sweetened condensed milk into the pan. Stir continuously until the mixture is smooth and melted. This step is crucial. If you don’t stir, the chocolate may burn and ruin your fudge. In a separate bowl, heat the creamy peanut butter in the microwave for about 20-30 seconds. This warming makes the peanut butter easier to mix. Once warm, combine it with the rest of the melted chocolate mixture. Stir well until fully blended. Now comes the fun part! Drop spoonfuls of the peanut butter-chocolate mixture on top of the chocolate layer in the pan. Using a skewer or a knife, gently swirl the two mixtures together. Be careful not to fully mix them. You want a beautiful marbled effect. If you like, sprinkle some chopped nuts on top for added crunch. After you have swirled the fudge, place it in the refrigerator. Let it chill for at least 2 hours or until it feels firm. Once set, lift the fudge out using the parchment overhang. Cut it into squares for serving. Enjoy your delicious creation! To get the perfect fudge texture, keep an eye on your cooking temperature. Use low heat while melting the chocolate and condensed milk. If you use high heat, the fudge can become grainy. Stir continuously to keep the mixture smooth. Common mistakes include not stirring enough and rushing the cooling time. Make sure you let the fudge set in the fridge for at least two hours. This helps it firm up properly. For the best swirl, use a skewer or a knife. I like to gently dip it into the fudge layers and move it in a figure-eight pattern. This creates a beautiful marbled effect. Avoid mixing too much; you want to see both peanut butter and chocolate. To enhance presentation, sprinkle chopped nuts on top before chilling. This adds color and crunch. You can add a drizzle of caramel or more chocolate on top for extra flavor. This gives your fudge a sweet touch. Switching to crunchy peanut butter is another fun option. It adds texture and a delightful bite. Each variation brings a new twist to this classic treat. Pro Tips Use High-Quality Chocolate: Opt for high-quality semi-sweet chocolate chips for a richer flavor and smoother texture in your fudge. Let it Cool Gradually: After melting the chocolate mixture, allow it to cool slightly before adding the peanut butter. This prevents the peanut butter from becoming too runny. Experiment with Mix-ins: Try adding different nuts, dried fruits, or even a sprinkle of sea salt on top for added flavor and texture variations. Storage Tips: Store the fudge in an airtight container in the refrigerator for up to two weeks, or freeze for longer storage. {{image_2}} To keep your chocolate peanut butter swirl fudge fresh, use airtight containers. This helps prevent air from getting in and drying out your fudge. You can store it in the refrigerator for up to two weeks. If you want to keep it longer, try the freezer. Fudge can last up to three months in the freezer. Just remember to wrap it well in plastic wrap before placing it in a container. Your fudge will stay fresh for about two weeks in the fridge. If you freeze it, it can remain good for three months. Look for signs that the fudge has gone bad. If it smells off or shows any white spots, it’s time to toss it. Always trust your senses. If it doesn’t seem right, don’t eat it. You can add different nuts for some great crunch. Try chopped walnuts, pecans, or almonds. Each nut gives a unique taste and texture. If you want to switch things up, use alternative nut butters. Cashew or almond butter can change the flavor but still keep it creamy. Make your fudge festive by adding seasonal colors or flavors. For example, add peppermint extract for a minty twist during the holidays. You can also mix in red and green sprinkles for a fun look. Think about using orange zest for Halloween or coconut for summer treats. To take your fudge to the next level, consider adding sea salt. It enhances the sweet and salty flavor. Another great option is to mix in espresso powder. This will give your fudge a deep, rich taste. Both of these add-ins can make your fudge feel gourmet and special. Yes, you can! To make this fudge dairy-free, simply swap the sweetened condensed milk for coconut cream. This will keep the fudge rich and creamy. You can also use dairy-free chocolate chips instead of semi-sweet chocolate chips. This way, you still enjoy that delicious taste without the dairy. If your fudge is too gooey, don't worry. You can fix it! First, try chilling it in the fridge for a few more hours. If that doesn’t work, gently reheat the fudge in a saucepan. Stir in a bit more chocolate chips until it melts again. Then, pour it into a lined pan and chill until it sets. This will help it firm up. You can serve this fudge with many treats. It pairs well with vanilla ice cream for a classic dessert. You could also try it with a cup of hot cocoa or coffee. If you want something fruity, serve it with fresh strawberries or raspberries. These flavors balance well with the rich fudge. Enjoy experimenting! In this article, we explored how to make delicious Chocolate Peanut Butter Swirl Fudge. We discussed key ingredients and provided step-by-step instructions for perfecting your fudge. I shared tips on achieving the best swirl and offered variations to suit your taste. Finally, we covered storage and answered common questions. With these insights, you can enjoy making and sharing this treat. Whether for a gathering or a quiet night at home, it’s the perfect sweet to try. Enjoy your fudge-making journey!

Chocolate Peanut Butter Swirl Fudge Irresistible Treat

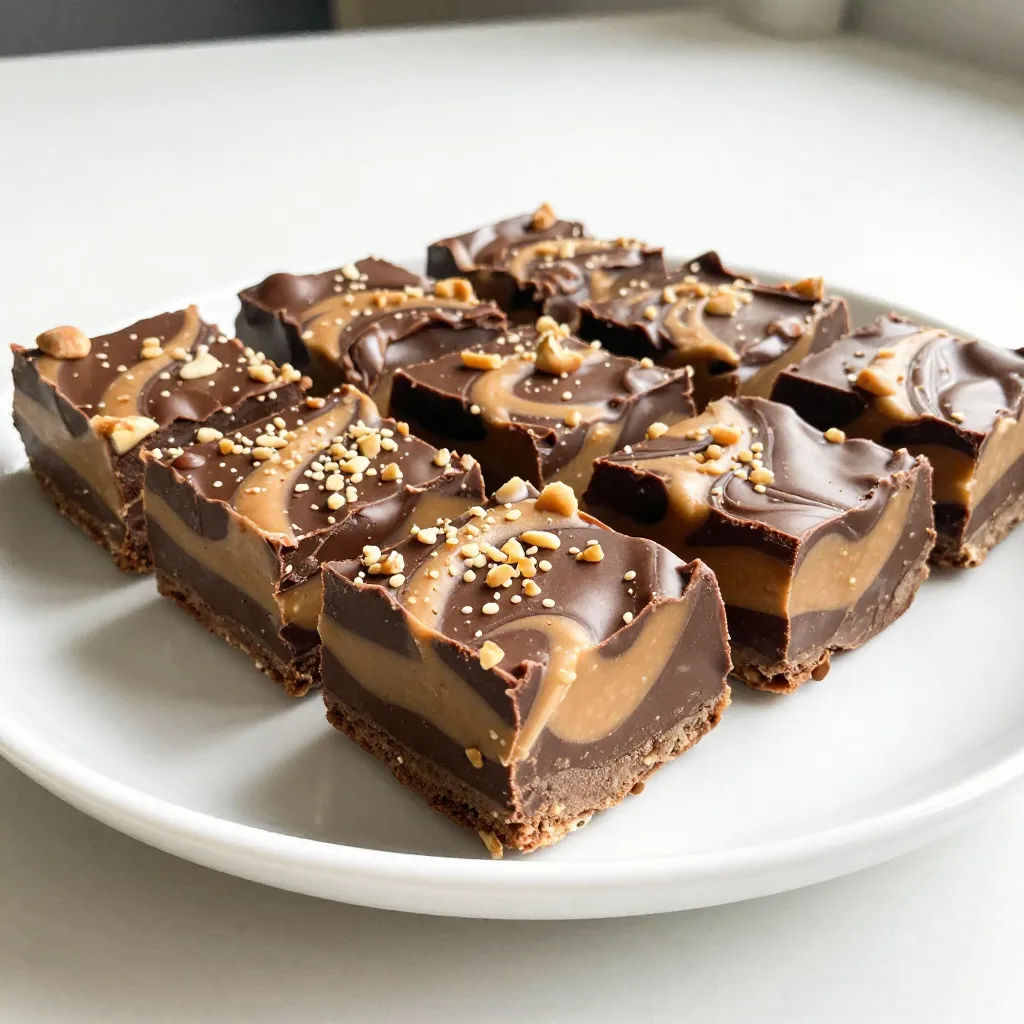
Are you ready for a sweet adventure? Chocolate Peanut Butter Swirl Fudge is the perfect treat for any occasion. With

Here are the ingredients you need for the creamy broccoli cheddar soup. Gather them before you start cooking. - 1 medium onion, chopped - 2 cloves garlic, minced - 4 cups fresh broccoli florets - 4 cups vegetable broth - 1 cup heavy cream - 2 cups sharp cheddar cheese, grated - 1 teaspoon Dijon mustard - 1 teaspoon paprika - Salt and pepper to taste - 2 tablespoons olive oil - Optional: Croutons for topping Each ingredient plays a key role. The onion and garlic bring great flavor. Fresh broccoli gives the soup a nice texture. The vegetable broth forms the base. Heavy cream makes it rich and smooth. Sharp cheddar adds a tasty finish. Dijon mustard and paprika give it a slight kick. Don't forget salt and pepper for extra taste. If you want, add croutons on top for a fun crunch. Make sure your ingredients are fresh. Fresh broccoli makes a big difference. Good cheese also helps the soup taste amazing. Now that you have everything, you are ready to cook! {{ingredient_image_1}} Step 1: Sauté the onion Start by heating two tablespoons of olive oil in a large pot over medium heat. Add one chopped medium onion. Stir and cook until the onion turns soft and clear, which takes about five minutes. This step builds a great flavor base for the soup. Step 2: Add garlic Next, add two minced garlic cloves to the pot. Stir it in and let it cook for one more minute. You want the garlic to smell nice, but don’t let it burn. Step 3: Cook broccoli and broth Now, it's time for the broccoli. Add four cups of fresh broccoli florets and four cups of vegetable broth. Bring the mix to a boil. Once it boils, cover the pot and let it simmer for ten to fifteen minutes. You want the broccoli to be tender when done. Step 4: Purée the soup After the broccoli is tender, take an immersion blender and blend the soup until it is smooth. If you don’t have one, pour the soup into a blender in small batches. Just be careful with the hot soup! Step 5: Incorporate cream and seasonings Return the blended soup to medium heat. Pour in one cup of heavy cream, and add one teaspoon of Dijon mustard and one teaspoon of paprika. Stir it well to mix all the flavors together. Step 6: Melt in the cheddar Now for the best part! Gradually add two cups of grated sharp cheddar cheese. Stir it in until the cheese melts and the soup is creamy. This makes the soup rich and tasty. Step 7: Season to taste Finally, taste the soup and add salt and pepper as you like. This step lets you adjust the flavor to your preference. Now your Creamy Broccoli Cheddar Soup is ready to serve! To make your soup smooth, use an immersion blender. This tool allows you to blend the soup right in the pot. It saves time and mess. If you don't have one, transfer small batches to a blender. Just be careful, as hot soup can splash. For the right consistency, start with less cream. Add it slowly until you reach your desired creaminess. If the soup feels too thick, add a bit more broth. If it’s too thin, let it simmer for a few extra minutes to thicken. You can spice up your soup with different seasonings. Try adding a pinch of nutmeg for warmth or some crushed red pepper for heat. Both enhance the rich flavors. When it comes to cheese, sharp cheddar shines bright. You could also mix in some Gruyère or Monterey Jack for variety. These cheeses melt well and add depth to the soup's flavor. Pro Tips Choose Fresh Broccoli: Fresh broccoli florets not only taste better but also retain more nutrients. Look for vibrant green color and firm texture when selecting your broccoli. Blend for Creaminess: Using an immersion blender allows you to blend the soup directly in the pot, making it easier and minimizing cleanup. If using a regular blender, let the soup cool slightly before blending in batches. Cheese Selection: Opt for a sharp cheddar cheese for a more robust flavor. You can also mix in a bit of Gruyère or Monterey Jack for added depth. Customize Toppings: Get creative with your toppings! Try adding crispy bacon bits, toasted nuts, or a drizzle of truffle oil for an extra gourmet touch. {{image_2}} You can make this soup lighter by using low-fat dairy. Substitute heavy cream with low-fat milk or a plant-based milk. This change keeps the soup creamy but cuts down on fat. Adding extra veggies is another great option. Spinach, carrots, or even zucchini can boost the nutrients. Simply chop them up and throw them in with the broccoli. They'll cook down and blend well with the soup. If you need a gluten-free version, ensure your vegetable broth is gluten-free. Most brands are, but it’s always good to check the label. For a vegan option, swap the heavy cream with coconut milk or cashew cream. Use a vegan cheese that melts well for that cheesy flavor. You can also skip the cheese altogether and enhance the taste with nutritional yeast. To keep your Creamy Broccoli Cheddar Soup fresh, store it in the fridge. Use an airtight container for best results. The soup can stay good for about three to four days. If you want to save it longer, consider freezing it. To freeze the soup, let it cool completely. Then, pour it into freezer-safe containers. Leave a little space at the top, as the soup may expand when it freezes. You can freeze the soup for up to three months. When you're ready to enjoy the soup again, there are a few good methods to heat it. You can use the stove or microwave. For the stove, pour the soup into a pot and heat it over low to medium heat. Stir often to prevent it from sticking. If you prefer the microwave, place the soup in a microwave-safe bowl. Heat it in short intervals, stirring in between. This way, it warms evenly. To keep the creaminess intact while reheating, add a splash of heavy cream or milk. This helps the soup stay smooth and rich. Avoid boiling the soup, as high heat can separate the cream. Can I make this soup in advance? Yes, you can make this soup ahead of time. Just store it in the fridge. It stays good for about three days. When you are ready to eat, heat it gently on the stove. If you freeze it, it can last up to three months. Just remember to let it cool completely before freezing. How do I fix a soup that’s too thick? If your soup is too thick, add more broth or water. Stir it in slowly until you reach your desired consistency. You can also add more cream for a richer taste. Just be careful not to dilute the flavor too much. What can I serve with Creamy Broccoli Cheddar Soup? This soup pairs well with crusty bread or a fresh salad. You can also enjoy it with a grilled cheese sandwich. For a fun twist, add some croutons on top for crunch. Caloric content and serving size One serving of this soup has about 400 calories. This gives you a nice and filling meal. Each batch serves four people. If you are sharing, you can easily make enough for everyone. Health benefits of broccoli and cheese Broccoli is a superfood packed with vitamins. It has vitamin C and fiber, which are great for your health. Cheese adds calcium and protein, making this soup a balanced option. Together, they create a tasty and nutritious dish that warms you up. This blog post shows how to make a delicious Creamy Broccoli Cheddar Soup. We covered the ingredients, step-by-step instructions, and helpful tips. You learned variations for healthier options and how to store and reheat leftovers. Creamy Broccoli Cheddar Soup is not only tasty but packed with nutrients. Now, you can enjoy this cozy dish any time. Experiment with flavors and make it your own. You’ll love sharing this recipe with family and friends. Your kitchen will soon smell wonderful!

Creamy Broccoli Cheddar Soup Delightful and Easy Recipe

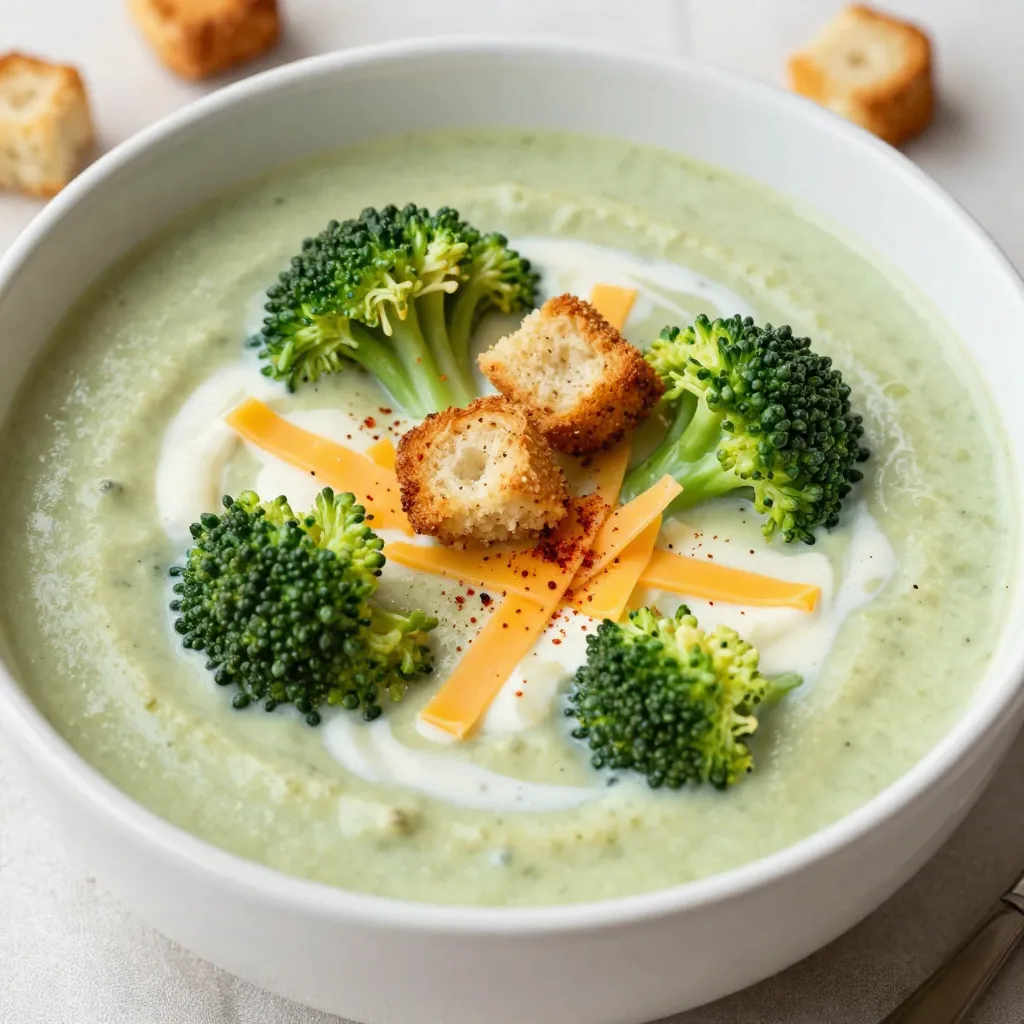
Looking for a warm and tasty dish? My Creamy Broccoli Cheddar Soup is perfect! With just a few simple ingredients,

- 2 medium sweet potatoes, peeled and diced - 1 tablespoon olive oil - 1 teaspoon smoked paprika - 1 teaspoon ground cumin - ½ teaspoon garlic powder - Salt and pepper to taste - 8 small corn tortillas - 1 cup black beans, rinsed and drained - 1 avocado, sliced - ¼ cup fresh cilantro, chopped - 1 lime, cut into wedges - Optional: ½ cup crumbled feta or queso fresco Using high-quality ingredients makes a big difference. Choose sweet potatoes that feel firm and heavy. Look for vibrant color in the skin. Fresh spices add depth to the flavor. Use cold-pressed olive oil for better taste. Fresh cilantro brightens the dish, so pick a bunch that smells strong. For the tortillas, find ones made with simple ingredients. You can add more to your tacos! Try crumbled feta or queso fresco for a creamy touch. A dollop of sour cream or a drizzle of hot sauce can bring heat. Consider adding pickled onions for tang. You might also enjoy fresh jalapeños for extra spice. Each addition can take your tacos to the next level! {{ingredient_image_1}} Start by peeling and dicing the sweet potatoes. You want medium-sized cubes for even cooking. Next, take a large bowl and add the sweet potatoes. Pour in one tablespoon of olive oil. Sprinkle one teaspoon of smoked paprika, one teaspoon of ground cumin, and half a teaspoon of garlic powder. Add salt and pepper to taste. Toss everything well to coat the sweet potatoes evenly. Preheat your oven to 400°F (200°C). Spread the seasoned sweet potatoes on a baking sheet in a single layer. Make sure they are not crowded. This helps them roast evenly. Place the baking sheet in the oven and roast for 25 to 30 minutes. Flip the sweet potatoes halfway through. They should come out tender and slightly caramelized. While your sweet potatoes roast, warm the corn tortillas. Heat a dry skillet over medium heat. Place a tortilla in the skillet and warm it for about 30 seconds on each side. You want them soft and pliable. Keep them warm by stacking them in a clean towel. Once the sweet potatoes are ready, it’s time to assemble. Take a warm tortilla and add a generous amount of roasted sweet potatoes. Top it with black beans, sliced avocado, and fresh cilantro. If you want an extra kick, crumble feta or queso fresco on top. Serve with lime wedges on the side for squeezing over the tacos. Enjoy your tasty creation! Roasting sweet potatoes is key for great flavor. First, cut the sweet potatoes into even pieces. This helps them cook at the same rate. Toss the sweet potatoes with olive oil and spices in a bowl. Make sure every piece is coated. Spread them out on a baking sheet. If they are crowded, they will steam instead of roast. Roast at 400°F for 25-30 minutes. Flip them halfway through for even browning. When they are tender and golden, they are ready! To boost the flavor, use smoked paprika and ground cumin. They add depth and warmth. Garlic powder also helps bring out the sweet potato's natural sweetness. You can adjust the spice levels to your taste. For a kick, add cayenne pepper or chili powder. Squeeze fresh lime juice over the tacos before serving. This adds brightness and balances the flavors. If you like creamy toppings, try crumbled feta or queso fresco. Presentation makes a meal more inviting. Serve the tacos on a colorful platter. Use vibrant toppings like fresh cilantro and lime wedges for a pop of color. Arrange the tacos neatly, and don't overcrowd them. A sprinkle of extra cilantro on top adds flair. You can also place a small bowl of black beans on the side. This way, guests can add more if they want. Enjoy the beauty of your dish before you dig in! Pro Tips Perfect Roasting: Make sure to cut the sweet potatoes into uniform pieces to ensure even cooking and caramelization. Flavor Boost: For an extra kick, add a pinch of cayenne pepper or chili powder to the sweet potato mixture before roasting. Tortilla Warm-Up: Warming the tortillas on a skillet enhances their flavor and makes them more pliable for folding. Garnish Smart: Adding a dollop of sour cream or a drizzle of hot sauce can elevate the flavor profile and add creaminess. {{image_2}} You can add proteins to your tacos for extra flavor and nutrition. For chicken, grill or sauté breast pieces with your favorite spices. Shred it and mix it in with the sweet potatoes. For a plant-based option, use tofu. Press it to remove water, then cube and sauté with olive oil and spices. Tofu absorbs flavors well and adds a nice texture. If you want to keep it vegan, skip the cheese. Use avocado instead, which gives creaminess. You can also add a cashew cream or vegan sour cream for richness. For a protein boost, chickpeas work great. Just roast them with spices, and they add a nice crunch. Toppings can make your tacos pop! Try adding pickled onions for a tangy bite. Fresh corn adds sweetness and crunch. You can also mix different salsas. A mango salsa brings a fruity twist, while a spicy salsa gives heat. Don’t forget about fresh herbs like parsley or mint for a fresh touch. To store leftovers, place sweet potatoes and toppings in separate containers. Keep the sweet potatoes in an airtight container in the fridge. They stay fresh for about three days. Make sure to cool them to room temperature before sealing. Store black beans, avocado slices, cilantro, and feta in small containers. You can also keep the corn tortillas in a zip-top bag. To reheat sweet potatoes, use your oven. Set it to 350°F (175°C). Place sweet potatoes on a baking sheet and heat for about 10-15 minutes. This keeps them crispy and warm. For tortillas, warm them on a skillet over medium heat for about 30 seconds on each side. This makes them soft and pliable again. You can freeze these tacos, but it takes some care. First, let the sweet potatoes cool completely. Then, place them in a freezer-safe bag. Remove as much air as possible to prevent freezer burn. You can freeze the black beans and tortillas too. When ready to eat, thaw everything in the fridge overnight. Reheat as described above for the best taste. Yes, you can make these tacos gluten-free. Just use corn tortillas, which are naturally gluten-free. Always check the label to ensure they are safe for your diet. You can enjoy these tacos without worry. These tacos have a mild spice level. The smoked paprika and cumin add warmth, not heat. If you like more spice, add jalapeños or hot sauce. You can easily adjust the flavors to suit your taste. These tacos pair well with many sides. Try a fresh salad with lime dressing or some Mexican rice. You can also serve them with roasted veggies or corn on the cob. They make a colorful and tasty meal. Yes, you can use other types of potatoes. Regular potatoes or Yukon golds work well. Just remember that they may taste different. Sweet potatoes add a nice sweetness and creaminess to the tacos. This blog post provided a detailed guide on making smoky sweet potato tacos. We explored ingredient choices, preparation steps, and ways to enhance flavors. You learned about roasting techniques and how to assemble your tacos perfectly. I shared tips for presentation and variations to suit different diets. Remember, you can store and reheat leftovers easily. Enjoy experimenting with these recipes and make them your own. Your culinary journey with these tacos starts now!

Smoky Sweet Potato Tacos Flavorful and Simple Treat

If you’re craving a meal that’s both tasty and easy, I’ve got just the dish for you: Smoky Sweet Potato

To make these delightful cranberry white chocolate scones, you will need: - 2 cups all-purpose flour - 1/3 cup granulated sugar - 1 tablespoon baking powder - 1/2 teaspoon salt - 1/2 cup cold unsalted butter, cubed - 2/3 cup heavy cream - 1 large egg - 1 cup fresh or dried cranberries (if dried, chop coarsely) - 1/2 cup white chocolate chips - 1 teaspoon vanilla extract - 1 egg wash (1 egg beaten with 1 tablespoon water) for brushing - Optional: coarse sugar for topping You can swap some ingredients for a healthier or different taste. Here are some ideas: - Use whole wheat flour instead of all-purpose flour for added fiber. - Swap granulated sugar for coconut sugar for a lower glycemic index. - Replace heavy cream with Greek yogurt for a lighter option. - Use butter alternative, like coconut oil, for a dairy-free version. - Try using dark chocolate chips instead of white chocolate for a richer flavor. To prepare these scones, gather these tools: - A large mixing bowl for combining dry ingredients - A pastry cutter or your fingers for mixing butter into flour - A separate bowl for whisking wet ingredients - A spatula for gentle mixing - A floured surface for kneading the dough - A baking sheet lined with parchment paper - A wire rack for cooling the scones - A sharp knife for cutting the dough into wedges {{ingredient_image_1}} First, set your oven to 400°F (200°C). This is the perfect temperature for the scones. Next, line a baking sheet with parchment paper. This keeps the scones from sticking. It also makes cleanup easy. In a large bowl, add 2 cups of all-purpose flour. Then, mix in 1/3 cup of granulated sugar. Next, add 1 tablespoon of baking powder and 1/2 teaspoon of salt. Use a whisk to blend these dry ingredients well. This step is crucial for even flavor. In a separate bowl, whisk together 2/3 cup of heavy cream, 1 large egg, and 1 teaspoon of vanilla extract. Make sure everything is mixed well. This mixture adds moisture and flavor to the scones. Now, pour the wet ingredients into the dry mixture. Use a spatula to mix until just combined. Be gentle to avoid tough scones. Next, fold in 1 cup of fresh or dried cranberries and 1/2 cup of white chocolate chips. Turn the dough onto a floured surface. Knead it gently 5 to 6 times. Shape it into a circle, about 1 inch thick. Cut the dough into 8 wedges. Place them on your prepared baking sheet. Brush the tops of the scones with an egg wash made from 1 beaten egg and 1 tablespoon of water. You can sprinkle coarse sugar on top for extra crunch. Bake the scones for 15 to 18 minutes, until they turn golden brown. Once baked, let them cool slightly on a wire rack. Enjoy the sweet aroma filling your kitchen! To get that perfect scone texture, you need to keep your ingredients cold. Use cold butter and cream. This helps create flaky layers. When mixing, don’t overwork the dough. Mix until it's just combined. This keeps the scones light and airy. Finally, shape the dough gently. Avoid pressing it too hard when forming the circle. One common mistake is overmixing the dough. This can make the scones tough. Another mistake is using warm ingredients. Warm butter or cream can ruin the texture. Also, cutting the scones too small can lead to uneven baking. Make sure to cut them into even wedges. Lastly, don’t skip the egg wash. It gives a beautiful golden color. You can boost flavor by adding zest. Lemon or orange zest pairs well with cranberries. You might also try different spices, like cinnamon or nutmeg. If you love nuts, chopped walnuts or pecans work nicely. For a richer taste, you can use dark chocolate instead of white. These small changes can make your scones unique and exciting. Pro Tips Use Cold Ingredients: Ensure your butter and cream are cold to help create flakier scones. This will enhance the texture and overall taste. Don’t Overmix: Mix the dough just until combined. Overmixing can lead to tough scones. Handle the dough gently to keep them light and tender. Customize Your Add-ins: Feel free to swap cranberries with other fruits like blueberries or cherries, and adjust the amount of white chocolate to your liking for a personalized flavor. Storing Leftovers: To keep scones fresh, store them in an airtight container at room temperature for up to 2 days or freeze for longer storage. {{image_2}} You can swap cranberries for many other fruits. Try blueberries for a sweet twist. Raspberries add a nice tart flavor. You can also use chopped apples, peaches, or cherries. Dried fruits work well too. Dried apricots or figs can add unique taste. Just remember to adjust the sugar if using sweeter fruits. While white chocolate is a great choice, you can use dark chocolate or milk chocolate. Each type changes the flavor profile. If you want a fun spin, try using toffee bits. They add a lovely crunch and rich taste. You can even mix different chocolates for a layered flavor. A simple glaze can elevate your scones. Mix powdered sugar with milk or cream. Drizzle it over warm scones for a sweet finish. You can also sprinkle more coarse sugar on top before baking. It creates a nice crunch. For a fruity touch, try a lemon glaze. Mix lemon juice with powdered sugar for a zesty kick. To keep your leftover scones fresh, store them in an airtight container. This helps prevent them from drying out. Place a paper towel in the container to absorb moisture. If you have extra scones, they can last up to two days at room temperature. If you want to save some scones for later, freezing is a great option. First, let the scones cool completely. Then, wrap each scone in plastic wrap. Put the wrapped scones in a freezer-safe bag or container. They can last for up to three months in the freezer. To reheat your scones, first thaw them in the fridge overnight if frozen. Preheat your oven to 350°F (175°C). Place the scones on a baking sheet and heat for about 10-15 minutes. This will make them warm and fresh again. You can also use a microwave for quicker reheating, but the oven keeps them crispier. Enjoy your scones with a cup of tea or coffee! Yes, you can prepare the dough ahead of time. Make the dough and shape it into wedges. Wrap the dough tightly in plastic wrap and store it in the fridge for up to 24 hours. When you're ready, bake them fresh. This step keeps the scones soft and delicious. Serve these scones warm for the best taste. You can place them on a nice platter. For a special touch, add clotted cream or your favorite jam. Fresh cranberries on top also make a lovely garnish. Enjoy them with a hot cup of tea or coffee. These scones are best eaten within two days. Keep them in an airtight container at room temperature. If you want to keep them longer, store them in the fridge for up to a week. Just remember, they may lose some of their softness over time. Yes, you can make some swaps for a healthier scone. Use whole wheat flour instead of all-purpose flour. You can also replace white sugar with coconut sugar or honey. For a lighter option, try using Greek yogurt instead of heavy cream. These changes can help cut calories while keeping taste. In this post, we explored how to make delicious scones, covering key ingredients, step-by-step instructions, and helpful tips. We also discussed fun variations and how to store your scones properly. Remember, the perfect scone texture comes from careful mixing and baking. Don't hesitate to try different flavors or serve them fresh. With these tips, you can enjoy great scones every time you bake! Happy baking!

Cranberry White Chocolate Scones Delightful and Fresh

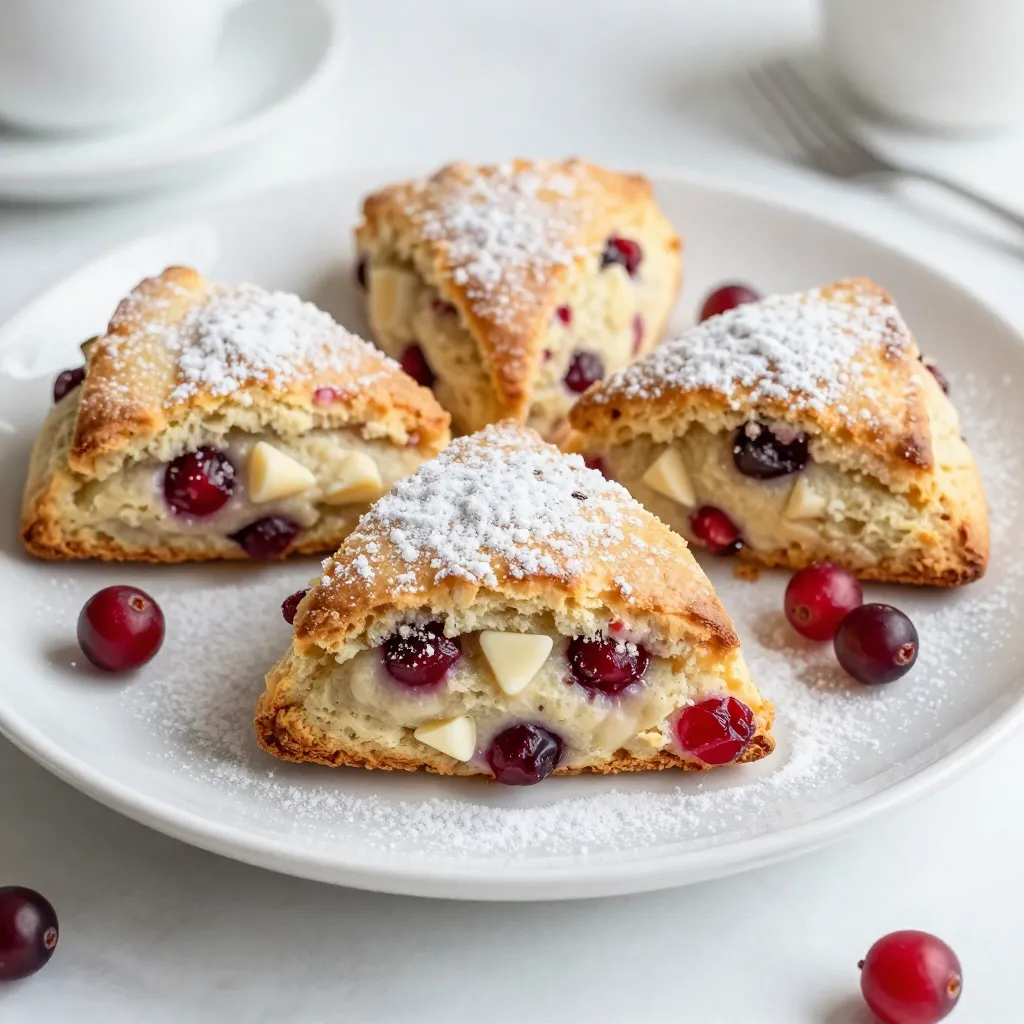
Welcome to a delightful journey of baking! Today, I’m sharing my favorite recipe for Cranberry White Chocolate Scones. These scones

- 2 cups whole milk - 1/2 cup heavy cream - 1/2 cup semi-sweet chocolate chips - 1/4 cup salted caramel sauce (plus extra for drizzling) - 1 teaspoon vanilla extract - A pinch of sea salt - Whipped cream (for topping) - Optional: Dark chocolate shavings (for garnish) To make this salted caramel hot chocolate, gather all these ingredients. Whole milk and heavy cream create a rich base. The semi-sweet chocolate chips melt into a smooth, chocolatey goodness. Salted caramel sauce adds the sweet and salty twist we love. A touch of vanilla extract boosts the flavor. Sea salt balances the sweetness. Whipped cream on top makes it extra special. You can also add dark chocolate shavings for a fancy finish. This drink is perfect for cold days. You can find these ingredients at your local store. Mix them together for a warm hug in a mug! {{ingredient_image_1}} Heating the Milk and Cream Start by taking a medium saucepan. Pour in 2 cups of whole milk and 1/2 cup of heavy cream. Heat them over medium heat. Watch closely as it warms. You want it hot but not boiling. Stir it gently to mix. Incorporating Chocolate and Caramel Once the milk and cream are warm, add 1/2 cup of semi-sweet chocolate chips. Next, pour in 1/4 cup of salted caramel sauce. Whisk this mixture until the chocolate melts and the sauce blends in. Keep whisking until it is smooth and creamy. Adding Vanilla and Sea Salt Now, it’s time for flavor. Add 1 teaspoon of vanilla extract to the mix. Then, sprinkle in a pinch of sea salt. This little bit makes a big difference. Stir well to blend all the flavors together. Final Mixing Steps Remove the saucepan from the heat. Ensure the mixture is well combined and creamy. You can taste it now, but be careful; it’s hot! Pouring into Mugs Grab two mugs or heatproof cups. Carefully pour the hot chocolate into them. Fill them about three-quarters full to leave space for toppings. Adding Toppings Top each mug with a generous dollop of whipped cream. Drizzle more salted caramel sauce on top for extra flavor. If you want to get fancy, sprinkle dark chocolate shavings over the whipped cream. This adds a nice touch and makes it look great. To make your salted caramel hot chocolate just right, avoid overheating. Heat the milk and cream slowly. Aim for warm, not bubbling. If it bubbles, it can change the taste and texture. Use a whisk for smooth mixing. A balloon whisk works great for this recipe. It helps blend the chocolate and caramel well. If you don’t have a whisk, a fork can work in a pinch. The key to great flavor is balance. You want both sweetness and saltiness. If it’s too sweet, add a bit more sea salt. This will bring out the caramel’s flavor. You can also try adding spices. A dash of cinnamon or nutmeg can give your drink a warm twist. Just a pinch can make a big difference! Make your drink look as good as it tastes. Get creative with whipped cream. You can swirl it, pile it high, or even use a piping bag for fun designs. Choose quality serveware. A nice mug can enhance the whole experience. Look for mugs that feel good in your hands and match the cozy vibe of the drink. Pro Tips Use High-Quality Chocolate: The better the chocolate, the richer your hot chocolate will taste. Opt for premium semi-sweet chocolate chips for a decadent flavor. Warm Your Mugs: Pre-warm your mugs by rinsing them with hot water before pouring in the hot chocolate. This keeps your drink warm longer! Customize Your Sweetness: Adjust the amount of salted caramel sauce based on your personal preference. Start with less and add more to taste. Experiment with Flavors: Try adding a dash of cinnamon or a splash of peppermint extract for a unique twist on the traditional salted caramel hot chocolate. {{image_2}} You can easily make your salted caramel hot chocolate dairy-free. Try using almond or oat milk instead of whole milk. These options give a nice flavor and keep it creamy. When using oat milk, look for a barista version for a thicker texture. Coconut cream is a great substitute for heavy cream. It adds a rich, tropical taste. Just whisk it in with the warm milk. This change makes the drink even more indulgent without dairy. If you want to make this drink vegan, use vegan chocolate alternatives. Look for dark chocolate that has no milk. You can find many brands that offer tasty options. These chocolates melt well and keep the drink rich. For caramel, use a plant-based caramel sauce. You can find these at many stores. They often use coconut or date syrup for sweetness. This keeps the salted caramel flavor while staying true to vegan needs. You can also add seasonal flavors to your hot chocolate. For winter, try a peppermint infusion. Just add a few drops of peppermint extract when mixing in the chocolate. This gives a fresh, minty taste that feels festive. In the fall, swap in pumpkin spice for a cozy twist. Mix in a teaspoon of pumpkin spice along with the chocolate. This adds warmth and spice, perfect for chilly days. Enjoy these variations to keep your drink exciting all year long! Store any leftover salted caramel hot chocolate in the fridge. Pour it into a glass or plastic container with a lid. Make sure it cools down first. It stays good for up to three days. The flavors will still be tasty, but the drink may thicken. Reheat your hot chocolate on the stove for the best taste. Use low heat and stir often. This helps keep it creamy. You can also use the microwave. Heat it in 30-second bursts and stir in between. This way, it warms evenly without burning. Can you freeze hot chocolate? Yes, you can! Pour it into ice cube trays or freezer-safe bags. It can last up to two months in the freezer. To thaw, place the cubes in the fridge overnight. If in a bag, run it under warm water. Reheat it on the stove or in the microwave, just like before. Enjoy your warm treat anytime you crave it! You can make your salted caramel hot chocolate less sweet by adjusting the sugar content. Start with less salted caramel sauce and chocolate chips. You can also try using unsweetened cocoa powder to balance the flavors. Another option is to use alternative sweeteners. Stevia or monk fruit can add sweetness without extra sugar. These options let you enjoy the same great taste with less sweetness. Yes, you can use milk alternatives for this recipe. Almond milk, oat milk, or soy milk works well. These milk types offer a nice flavor and a creamy texture. When using non-dairy milk, adjust for creaminess. You might want to add a bit more heavy cream or use a creamier milk alternative, like coconut milk. This will keep your drink rich and satisfying. You can find pre-made salted caramel hot chocolate at many stores. Look for brands like Starbucks or Land O’Lakes. These brands often offer easy-to-prepare options. Local cafes and chains may also have homemade versions. Check your favorite coffee shop or dessert place. They might whip up a delicious salted caramel hot chocolate just for you. In this blog post, we explored the rich and creamy world of salted caramel hot chocolate. We covered essential ingredients, step-by-step instructions, and tips for perfecting your drink. Remember, achieving the right balance of sweetness and saltiness is key. You can also customize your drink with dairy-free or seasonal variations. Whether you’re serving it for yourself or an event, this will impress. Enjoy experimenting with flavors and presentations to create your perfect cup of joy.

Salted Caramel Hot Chocolate Decadent Winter Drink

When winter’s chill sets in, there’s nothing quite like a warm cup of Salted Caramel Hot Chocolate. This creamy drink

You need 1 pound of fresh broccoli florets. Look for vibrant green color. The florets should be firm and compact. Avoid any yellowing or limp pieces. Fresh broccoli gives the best taste and texture. Use 4 cloves of garlic, minced finely. Garlic adds a rich, savory flavor. You'll also need 1 teaspoon of red pepper flakes for some heat. Adjust the amount to match your spice level. Finally, add salt and pepper to taste. These simple seasonings enhance the broccoli’s natural flavor. For this dish, use 2 tablespoons of olive oil. It helps the broccoli roast evenly and adds richness. You’ll also need 1 lemon. Zest and juice it to bring brightness to the dish. The lemon elevates the flavors and makes the broccoli shine. {{ingredient_image_1}} First, preheat your oven to 425°F (220°C). This high heat helps the broccoli get crispy. Next, gather all your ingredients. You’ll need 1 pound of fresh broccoli florets, 4 cloves of minced garlic, and 2 tablespoons of olive oil. Don’t forget the zest and juice of 1 lemon, 1 teaspoon of red pepper flakes, and salt and pepper to taste. If you like, grab 2 tablespoons of grated Parmesan cheese for a rich touch. Finally, get 1 tablespoon of chopped fresh parsley for garnish. Take a large bowl and add the broccoli florets, minced garlic, and red pepper flakes. These flavors blend well. In a separate small bowl, whisk together the olive oil, lemon juice, and lemon zest. This mixture adds brightness to the dish. Now pour this lemon-olive oil blend over the broccoli. Season with salt and pepper. Toss everything together. Make sure the broccoli is well coated in the mixture. Spread the broccoli mixture evenly on a baking sheet lined with parchment paper. This helps with cleanup and keeps the broccoli from sticking. Roast the broccoli in your preheated oven for 20-25 minutes. Toss it halfway through to get even cooking. You want the broccoli to be tender and slightly crispy at the edges. If you choose to add cheese, sprinkle the grated Parmesan on top during the last 5 minutes of roasting. Once done, take it out and transfer it to a serving dish. Garnish with chopped fresh parsley for color and flavor. Serve this dish hot for the best taste. To get the best roasted broccoli, start with dry florets. Moisture makes them steam, not roast. Spread the broccoli in a single layer on your baking sheet. This helps them cook evenly. Toss them halfway through cooking for a nice crisp. Roast at 425°F for 20 to 25 minutes. Look for tender stems and crispy edges. Adding Parmesan cheese is a great way to boost flavor. Sprinkle it on the broccoli during the last five minutes of roasting. This gives it a nice, cheesy touch. If you want a stronger cheese flavor, use more Parmesan. You can also try different cheeses like feta or goat cheese for variation. If you like spice, add more red pepper flakes. For a milder taste, use less. You can also swap the red pepper for other spices. Try garlic powder or paprika for a different kick. Always taste the broccoli before serving. Adjust the seasoning as needed to match your taste. Pro Tips Choose Fresh Broccoli: Always select vibrant green broccoli with tightly closed florets for the best flavor and texture. Adjust the Heat: Feel free to modify the amount of red pepper flakes to suit your heat preference, or substitute with a milder spice if desired. For Extra Crispiness: Make sure to spread the broccoli evenly on the baking sheet to ensure even roasting and maximum crispiness. Experiment with Cheese: Try different types of cheese like feta or goat cheese for a unique twist on the flavor profile. {{image_2}} You can mix other veggies with broccoli for variety. Carrots, bell peppers, or cauliflower work well. Just cut them to a similar size. This will help them cook evenly. Toss the added vegetables with the same lemon-garlic mix. Keep the roasting time the same or check for doneness. Colorful veggies make your dish even more appealing. If you want a vegan version, skip the cheese. You can add nutritional yeast instead. It gives a cheesy flavor without dairy. You can also use coconut oil for roasting. It adds a nice twist. This keeps the dish creamy and rich while remaining plant-based. To turn this side dish into a meal, add protein. Grilled chicken or tofu makes a great choice. Serve it over rice or quinoa for extra filling power. This adds healthy carbs and makes your meal more balanced. You can also serve it with a side of grains or a salad. This way, you create a lovely, wholesome plate. Enjoy your lemon garlic roasted broccoli in new ways! After enjoying your lemon garlic roasted broccoli, store leftovers in an airtight container. Make sure to cool the broccoli to room temperature first. Place it in the fridge, and it will stay fresh for up to three days. If you want to keep it longer, consider freezing. To reheat your leftovers, use the oven for the best taste. Preheat your oven to 350°F (175°C). Spread the broccoli on a baking sheet. Heat it for about 10-15 minutes, or until warm. This method keeps the broccoli crispy. You can also use the microwave, but it might make the broccoli soft. Freezing is a great option for longer storage. First, blanch the broccoli in boiling water for two minutes. Then, plunge it into ice water to stop cooking. Drain well and pack it into freezer bags. Remove as much air as possible. Label the bags and freeze. Use within six months for the best flavor. Roast broccoli at 425°F for 20-25 minutes. This gives the broccoli a nice crisp. Toss it halfway to ensure even cooking. You want it tender and slightly crispy at the edges. Keep an eye on it during the last few minutes. The time can vary based on your oven and broccoli size. Yes, you can use frozen broccoli. Just make sure to thaw it first. Pat it dry to remove excess moisture. This helps the broccoli roast better. Frozen broccoli may not get as crispy as fresh. However, it will still taste great with lemon and garlic. Lemon garlic roasted broccoli pairs well with many dishes. Try it with grilled chicken or fish. It also complements pasta and quinoa nicely. You can serve it with rice for a simple meal. Add it to a salad for extra flavor and crunch. Roasting broccoli brings out its best flavors. We covered key ingredients like fresh broccoli, garlic, and olive oil. I shared steps to prepare, mix, and roast. Tips for perfect texture and ways to enhance flavor add value. You can even try different veggies or vegan swaps. Store leftovers properly to enjoy them later. Remember, roasting veggies is easy and fun. With these ideas, you can create tasty meals for any season. Enjoy your cooking!

Lemon Garlic Roasted Broccoli Flavorful and Simple Dish

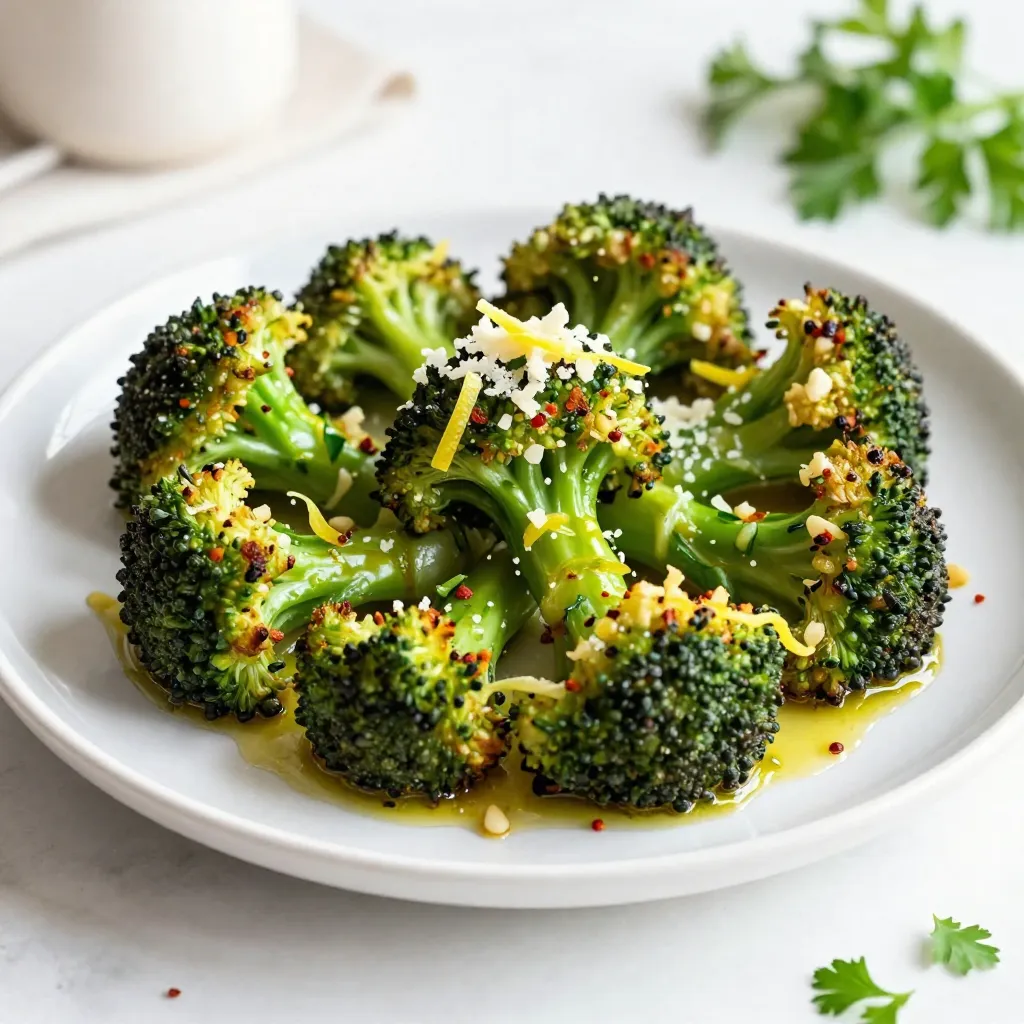
Brighten up your dinner table with my Lemon Garlic Roasted Broccoli! This tasty dish is not only flavorful but also

- 2 ripe mangoes, peeled and diced - 1 cup coconut milk (full fat recommended) - 1 banana, sliced - 1 tablespoon honey or maple syrup (optional) The main ingredients create the base of the smoothie bowl. Ripe mangoes offer sweetness and a bright color. Coconut milk gives a creamy texture and rich flavor. The banana adds natural sweetness and helps thicken the mix. You can add honey or maple syrup for extra sweetness, but it is not a must. - 1/4 cup granola - Fresh fruit (e.g., sliced kiwi, strawberries, blueberries) - Shredded coconut, toasted Toppings make the bowl fun and tasty. Granola adds crunch and a healthy bite. Fresh fruit gives color and more flavor. You can use any fruit you like, but berries and kiwis work well. Toasted coconut adds a nice touch and enhances the tropical vibe. - 1 tablespoon chia seeds - 1/2 teaspoon vanilla extract Chia seeds boost nutrition and add texture. They help thicken the smoothie and give it a nice mouthfeel. Vanilla extract enhances the overall flavor and makes the bowl smell great. These extras turn a simple smoothie into a gourmet breakfast. {{ingredient_image_1}} In a blender, combine the diced mangoes, creamy coconut milk, sliced banana, honey, chia seeds, and vanilla extract. Blend everything until you have a smooth and creamy mixture. This base is the heart of your smoothie bowl. If your mixture seems too thick, add more coconut milk. This will help you reach your desired texture. Taste your blend and adjust the sweetness if needed. You can add a bit more honey or syrup for extra flavor. Now it's time to put it all together! Pour the smoothie mixture into a bowl. Top it with granola for crunch, fresh fruit like kiwi or strawberries for color, and a sprinkle of toasted shredded coconut. Each topping adds flavor and makes your bowl look beautiful. Enjoy! Serve your smoothie bowl right away in chilled bowls. This keeps it cold and refreshing. I love to use colorful toppings. They make the bowl look great and invite you to dig in! Want to make it even sweeter? Drizzle a little extra honey on top. It adds a nice touch. For a cool twist, add fresh mint leaves. They add a bright flavor that feels fresh. The texture of your smoothie bowl matters! You can change the amount of coconut milk for how thick you want it. If you like it colder, use frozen fruit. It makes the smoothie thick and frosty. Pro Tips Use Frozen Mangoes: For an extra creamy texture, consider using frozen mango chunks instead of fresh ones. This will make your smoothie bowl thicker and colder, perfect for a refreshing treat. Sweetness Adjustment: Everyone's taste is different. Start with a small amount of honey or maple syrup and gradually add more if needed, tasting as you go to avoid making it too sweet. Garnish Creatively: Get creative with your toppings! Use a variety of fresh fruits, nuts, and seeds to add different textures and flavors. Consider adding a sprinkle of cinnamon for an unexpected twist. Chill Your Bowl: For an even more refreshing experience, chill your serving bowls in the freezer for a few minutes before serving. This will keep your smoothie bowl colder for longer. {{image_2}} You can mix things up by using different fruits. Instead of mango, try pineapple or banana. Both add a sweet flavor. If you want a green boost, add spinach or kale. This adds nutrients without changing the taste much. If you want to skip coconut milk, use almond, oat, or cashew milk. Each gives a different flavor and texture. For a creamier bowl, try yogurt. It makes the smoothie richer and more satisfying. If you need a nut-free option, omit chia seeds. You can switch to flaxseeds if you like. Be sure to choose granola that is free from nuts. This keeps your smoothie bowl safe for everyone. You can make the smoothie mixture ahead of time. Just blend your ingredients and store them in the fridge. It will stay fresh for 1-2 days. This saves time on busy mornings. If you have leftover smoothie, freeze it in ice cube trays. This way, you can enjoy it later. You can also store the assembled smoothie bowl in an airtight container. Just remember, toppings may lose their crunch and freshness over time. To enjoy frozen smoothie cubes, re-blend them with a splash of coconut milk. This gives you a quick and yummy treat. Avoid keeping pre-topped smoothie bowls for long. They taste best when fresh! Yes, frozen mangoes work great for a thicker smoothie bowl. They make your bowl cold and creamy. Using frozen fruit helps blend smoothly. This gives your smoothie bowl a refreshing texture. Plus, it saves time on cutting fresh fruit. Just toss them into your blender with the other ingredients. Use maple syrup instead of honey and ensure all toppings are plant-based. Many granolas are vegan-friendly, so check the label. You can also use almond or oat milk as a swap for coconut milk. This way, you keep all the flavors while making it vegan. Enjoy the same great taste without using animal products. Check the ingredients for calorie, fat, and sugar content to assess nutritional information per serving. A typical bowl is rich in vitamins from mangoes and bananas. Chia seeds add fiber and healthy fats. Coconut milk gives you a creamy base, but it also adds calories. To keep things balanced, adjust your toppings and sweeteners based on your dietary needs. This blog post shows how to make a tasty mango coconut smoothie bowl. You learned the right ingredients and steps to blend the base. I shared tips for serving and flavoring to make it special. Always feel free to try different fruits or dairy options. Remember, you can store leftovers for later. This smoothie bowl is fun, easy, and packed with flavor. Enjoy making it, and let your creativity flow!

Mango Coconut Smoothie Bowl Refreshing Breakfast Boost

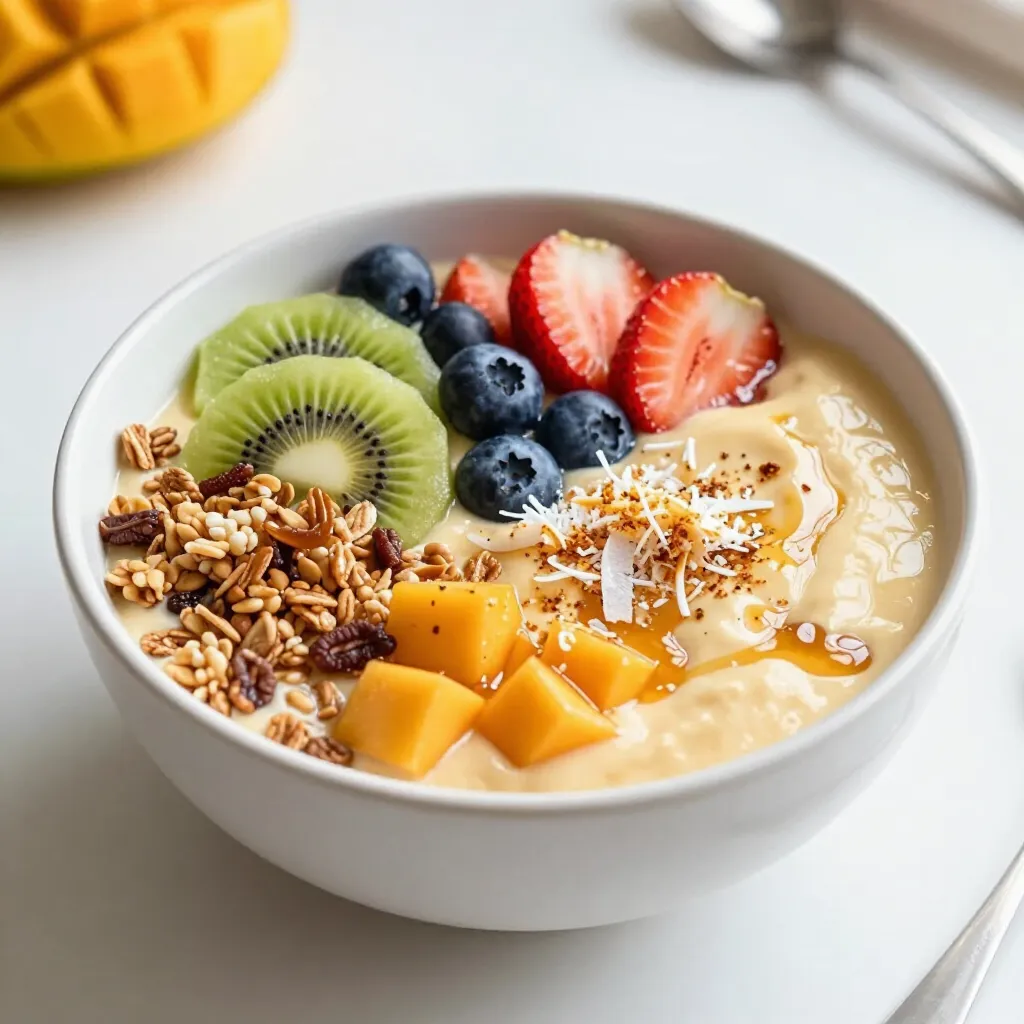
Start your day with a boost of tropical flavors! This Mango Coconut Smoothie Bowl is both refreshing and easy to

To make Strawberry Cheesecake Overnight Oats, gather these simple ingredients: - 1 cup rolled oats - 1 cup almond milk (or your preferred milk) - 1/2 cup Greek yogurt (plain or vanilla) - 1 tablespoon cream cheese, softened - 2 tablespoons honey or maple syrup - 1 teaspoon vanilla extract - 1/2 cup fresh strawberries, diced - 2 tablespoons crushed graham crackers (for topping) - Optional: 1 tablespoon chia seeds (for added texture and nutrition) You can swap some ingredients based on your needs: - Use any milk you like, such as cow's milk or oat milk. - Greek yogurt can be replaced with dairy-free yogurt for a vegan option. - For a lower-sugar option, try a sugar-free sweetener instead of honey. - You can use ricotta cheese instead of cream cheese for a lighter taste. - If you want more fiber, add flax seeds instead of chia seeds. Top your overnight oats for extra flavor and texture: - Add more fresh strawberries for a fruity touch. - Sprinkle crushed graham crackers for a cheesecake vibe. - Drizzle honey or maple syrup for added sweetness. - Try nuts like almonds or walnuts for a crunchy bite. - Add a dollop of whipped cream for a treat. {{ingredient_image_1}} Making strawberry cheesecake overnight oats is simple and fun. You will need some bowls, a spoon, and jars for serving. The prep time is just 10 minutes. After that, the oats chill overnight. 1. Mix the Oats and Milk: Take a medium bowl and add 1 cup of rolled oats. Pour in 1 cup of almond milk. Stir until the oats soak up the milk. 2. Blend the Yogurt Mixture: In another bowl, mix 1/2 cup of Greek yogurt and 1 tablespoon of softened cream cheese. Add 2 tablespoons of honey or maple syrup and 1 teaspoon of vanilla extract. If you want, toss in 1 tablespoon of chia seeds. Stir until smooth. 3. Combine Mixtures: Gently fold the yogurt mix into the oat mix. Make sure everything blends well. 4. Add Strawberries: Next, fold in 1/2 cup of diced fresh strawberries. Set aside a few strawberry pieces for later. 5. Jar It Up: Spoon the mix into jars or containers. Divide it evenly. 6. Chill Overnight: Seal the jars and put them in the fridge. Let them chill overnight or for at least 4 hours. 7. Serve: In the morning, stir the oats. Top with the reserved strawberries and sprinkle crushed graham crackers for that cheesecake touch. - Mix the oats and milk well to avoid clumps. - Use a spatula to fold in the yogurt mix gently. - Be careful not to mush the strawberries when you add them. - If you want more texture, chia seeds add a nice crunch. This recipe is simple and perfect for busy mornings. Enjoy your delicious strawberry cheesecake overnight oats! To make great overnight oats, use rolled oats. They soak up the milk well. Quick oats can get mushy, so avoid them. Always soak the oats in milk for at least four hours. This helps them become soft and creamy. Mix the oats and milk in a bowl. Stir until the oats are fully covered. This simple step makes a big difference in texture. You can change the flavors to suit your taste. Try adding different fruits, like bananas or blueberries. You can also swap the Greek yogurt for a dairy-free option. Use almond or coconut yogurt for a vegan choice. Mix in spices like cinnamon or nutmeg for warmth. If you love chocolate, add cocoa powder or mini chocolate chips. The options are endless! Make these oats for the week ahead. They last well in the fridge for up to five days. Use small jars for easy storage. This also makes it simple to grab a jar on busy mornings. To save time, prep several jars at once. Mix the oats, milk, and yogurt in bulk. Then, add the fruit and toppings just before eating. This keeps everything fresh and tasty! Pro Tips Use Overnight Soaking: Allowing the oats to soak overnight not only softens them but also enhances the flavor absorption from the other ingredients. Fresh Strawberries: For the best flavor and texture, use fresh strawberries rather than frozen, as they provide a delightful crunch and natural sweetness. Experiment with Sweeteners: Feel free to adjust the sweetness by using agave syrup or stevia instead of honey or maple syrup to suit your taste preferences. Chill Before Serving: Letting the oats chill longer will improve the texture and ensure a refreshing breakfast that’s ready to go. {{image_2}} You can switch up the fruit in your overnight oats. Berries work great. Use blueberries, raspberries, or blackberries. You can also try chopped bananas or diced peaches. Each fruit adds its own flavor and sweetness. Mix and match to find your favorite combo. Don’t forget to adjust the sweetness if you use tart fruits. If you're dairy-free or vegan, you can easily adapt this recipe. Use coconut yogurt instead of Greek yogurt. Almond milk is a great choice for the liquid. You can also try oat milk or soy milk. For cream cheese, use a plant-based version. Maple syrup is a perfect sweetener for vegan needs. This way, you still get creamy, tasty oats without dairy. Adding spices can take your oats to the next level. Try a pinch of cinnamon for warmth. You might also like a dash of nutmeg for a cozy flavor. Vanilla extract adds a nice touch; it enhances the sweetness. If you want a hint of citrus, add some lemon or orange zest. These small tweaks can make a big difference in taste. To store your strawberry cheesecake overnight oats, place them in airtight containers. This keeps them fresh and tasty. Make sure to seal the lids tightly. You can store them in the fridge for easy access. If you have leftovers, just grab them when you need a quick breakfast. Overnight oats last well in the fridge for up to three days. After that, the quality may drop. If you want to keep them longer, you can freeze them. Just make sure to use freezer-safe containers. They can last up to three months in the freezer. When ready to eat, thaw them in the fridge overnight. Use glass jars or BPA-free plastic containers. Glass jars are great because they show off the layers. Choose containers with tight-fitting lids to keep the oats fresh. If you’re on the go, smaller containers work well. They are easy to carry and perfect for busy mornings. Yes, you can use instant oats. Instant oats cook faster and absorb liquid quickly. They will make your overnight oats softer and creamier. If you choose instant oats, reduce the soaking time. You can let them sit for about 30 minutes instead of overnight. This way, they will still be tasty and have a good texture. You can keep overnight oats in the fridge for up to five days. This makes them great for meal prep. Store them in a sealed container to keep them fresh. If you notice any change in smell or color, it’s best to toss them out. The oats will stay tasty and healthy for a few days, so enjoy them throughout the week! Yes, you can easily make this recipe vegan. Use almond milk or any plant-based milk of your choice. For the yogurt, choose a dairy-free yogurt. Instead of cream cheese, use a vegan cream cheese. You can also swap honey for maple syrup or agave nectar. With these simple swaps, you can still enjoy delicious strawberry cheesecake overnight oats! You can create tasty overnight oats with simple ingredients and great flavors. We listed different options for ingredients, toppings, and variations. I shared step-by-step instructions to help you mix and prepare them easily. Remember to store your oats properly for the best taste and freshness. Feel free to customize your flavors to suit your taste. Enjoy this quick, healthy meal any time!

Strawberry Cheesecake Overnight Oats Easy Recipe

Looking for a quick and tasty breakfast? Try my Strawberry Cheesecake Overnight Oats! This easy recipe combines creamy yogurt and

Older posts
Newer posts
← Previous Page1 Page2 Page3 … Page85 Next →

dsad

© 2026 greenmealmap • Built with GeneratePress

Our Policies

  • Copyright Policy
  • Cookie Policy
  • GDPR Policy
  • Privacy Policy
  • Disclaimer
  • Terms Of Use

More Information

  • Home
  • About
  • Contact
  • Appetizers
  • Dessert
  • Dinner
  • Drinks
©2026, greenmealmap About Back To Top