Skip to content
DisclaimerTerms Of UseGDPR PolicyCookie Policy

greenmealmap

  • Home
  • Drinks
  • Appetizers
  • Dinner
  • Dessert
  • About
  • Contact
  • Privacy Policy
DisclaimerTerms Of UseGDPR PolicyCookie Policy

NO-ING-IMG

- 2 cups cooked shredded chicken - 1/2 cup buffalo sauce - 1 cup shredded cheddar cheese - 1/2 cup softened cream cheese - 1/2 teaspoon garlic powder - 1/2 teaspoon onion powder - Salt and pepper to taste - 8 small flour tortillas - Cooking spray The key to making Air Fryer Buffalo Chicken Taquitos lies in the ingredients. Start with cooked shredded chicken. You can use rotisserie chicken for a quick option. Next, grab buffalo sauce. This gives the taquitos their spicy kick. Cheddar cheese adds richness, while cream cheese keeps the filling creamy. For flavor, I use garlic powder and onion powder. Add salt and pepper to taste. Don’t forget the flour tortillas. They hold all that goodness inside. Lastly, I use cooking spray to get a crispy finish. Each serving has about 300 calories. The protein comes from chicken and cheese. You get around 20 grams of protein per serving. The fat mainly comes from cheese and cream cheese, which adds flavor and creaminess. You can switch the chicken for shredded turkey or even plant-based protein. For cheese, try pepper jack for a spicy twist or mozzarella for a milder taste. If you want less heat, go for a mild buffalo sauce or a barbecue sauce. To start, you need to mix the filling. Grab a large bowl. Add these ingredients: - 2 cups cooked shredded chicken - 1/2 cup buffalo sauce - 1 cup shredded cheddar cheese - 1/2 cup softened cream cheese - 1/2 teaspoon garlic powder - 1/2 teaspoon onion powder - Salt and pepper to taste Stir the mixture well until it is smooth and creamy. This will be your flavorful filling. Next, warm the tortillas. Place them in the microwave for about 15 seconds. This softens them and makes them easy to roll. Now, let’s roll the taquitos. Take one tortilla and scoop a tablespoon of the chicken mixture. Place it in the center. To roll it, fold in the sides and then roll it tightly. This keeps the filling secure. Keep doing this with each tortilla. Make sure they are snug but not too tight. For cooking, preheat your air fryer to 375°F (190°C). Place the rolled taquitos seam-side down in the basket. Avoid overcrowding. This helps them cook evenly. Lightly spray them with cooking spray. This gives them a nice, crispy texture. Cook the taquitos for 10-12 minutes. Flip them halfway through. This ensures both sides get golden brown and crispy. Once done, let them cool for a couple of minutes. Then, they are ready to enjoy! To get your taquitos crispy, always use cooking spray. A light coat helps them brown nicely. Without it, they might turn out soft and soggy. Make sure to cover all sides. Do not overcrowd the air fryer. Leave space between taquitos for hot air to flow. This helps them cook evenly and become crispy. If your fryer is small, cook in batches. Buffalo chicken taquitos taste great with dipping sauces. Ranch and blue cheese dressings are classic choices. They add a creamy touch that complements the spice. For garnishes, consider chopped green onions or celery sticks. These add color and crunch. A sprinkle of fresh herbs can also brighten the dish. To store leftovers, place taquitos in an airtight container. This keeps them fresh and prevents them from drying out. You can store them in the fridge for up to three days. When reheating, use the air fryer again. Set it to 350°F (175°C) for about 5-7 minutes. This restores their crispiness and warms them through. {{image_2}} If you crave heat, try adding more buffalo sauce to the filling. This will ramp up the flavor. You can also mix in some diced jalapeños for a fresh kick. Just chop them finely and blend them with the chicken. The spice level is all up to you! You can make these taquitos vegetarian by swapping chicken for plant-based proteins. Options like tofu or tempeh work great. For a cheesy delight, mix in more cheese and veggies. Spinach, bell peppers, or mushrooms add a nice touch. Get creative with cheese! Swap cheddar for pepper jack or mozzarella. Each type offers a different taste. You can also add herbs like cilantro or spices like cumin for extra depth. Don’t be afraid to try new flavors; it’s all about your taste! You should cook the taquitos in the air fryer for 10 to 12 minutes. Set the air fryer to 375°F (190°C). Flip the taquitos halfway through cooking. This helps them get golden brown and crispy all around. Yes, you can make these taquitos ahead of time. Prepare the filling and fill the tortillas. Roll them up and store them in the fridge. Cook them in the air fryer when you're ready to eat. They taste great fresh! Serve buffalo chicken taquitos with ranch or blue cheese dressing. These dips balance the spice of the buffalo sauce. You can also add chopped green onions or celery sticks. These extras give a nice crunch and freshness. Yes, you can freeze these taquitos. After rolling them, place them on a baking sheet. Freeze until solid, then transfer to a freezer bag. When ready to eat, cook from frozen. Just add a few extra minutes to the cooking time. - Prep time: 15 minutes - Cook time: 10-12 minutes - Total time: 30 minutes - Servings: 4 The Air Fryer Buffalo Chicken Taquitos are quick to make. You can prep the filling in 15 minutes. The cooking takes just 10 to 12 minutes. Altogether, you can have these tasty treats ready in 30 minutes. This recipe yields four servings, making it perfect for a small gathering or family snack. Each taquito is a delightful mix of flavors. You have tender chicken, spicy buffalo sauce, and creamy cheese all wrapped in a crispy tortilla. This dish is fun to eat and filled with bold flavors. Plus, using the air fryer cuts down on oil and mess while giving you that perfect crunch. When you follow the steps, you'll see how easy it is to make these taquitos. Just remember, the key is not to overload the air fryer basket. This way, every taquito gets that needed airflow to crisp up nicely. Enjoy cooking these delicious buffalo chicken taquitos and watch as everyone loves them! These buffalo chicken taquitos are easy and fun to make. We covered the key ingredients, including chicken, cheese, and sauce. You learned how to prepare, roll, and cook them to crispy perfection. I hope you experiment with substitutions and variations to find your perfect flavor. Enjoy these tasty snacks with dips and share them with friends. You can easily store leftovers and reheat them later. Get ready to enjoy a great meal that everyone will love!

Air Fryer Buffalo Chicken Taquitos Flavorful Delight

Get ready for a tasty treat with my Air Fryer Buffalo Chicken Taquitos! These crispy rolls are filled with shredded

- 8 oz rice noodles - 2 tablespoons sesame oil - 4 cloves garlic, minced - 2 inches fresh ginger, grated Rice noodles form the base of this dish. They cook quickly and soak up flavors well. Fresh ginger and garlic are key to the bold taste. They add a spicy and fragrant touch. Sesame oil gives a rich, nutty flavor that enhances the dish. - 1 bell pepper, thinly sliced (red or yellow) - 1 cup broccoli florets - 1 carrot, julienned - 2 green onions, sliced The bell pepper adds sweetness and color. Broccoli brings crunch and nutrients. Carrots offer a nice bite and vibrant color. Green onions add a mild onion flavor that brightens the dish. - 3 tablespoons soy sauce (or tamari for gluten-free) - 1 tablespoon honey or maple syrup - Optional toppings: sesame seeds, chopped cilantro, or crushed red pepper Soy sauce or tamari provides a salty umami flavor. Honey or maple syrup adds a touch of sweetness. Optional toppings like sesame seeds and cilantro bring more flavor and texture. Crushed red pepper can add heat for those who like spice. To cook rice noodles, follow the package instructions. Usually, you will need to boil water. Once the water is bubbling, add the noodles. Cook them for about 4-6 minutes. They should be tender but still firm. Drain the noodles and set them aside. Tips for perfect doneness: - Check the noodles a minute early. - Rinse them under cold water to stop cooking. - This helps keep them from getting mushy. Start by heating sesame oil in a large skillet or wok over medium heat. Wait until the oil is hot. This should take about 1 minute. Next, add minced garlic and grated ginger. Sauté for about 1 minute. You want them fragrant but not burnt. Keep stirring to avoid burning. Now, it’s time to add the vegetables. Stir in bell pepper, broccoli florets, and julienned carrot. Cook for 3-4 minutes. You want the veggies to be tender-crisp. Once the vegetables are ready, add the cooked rice noodles. Pour in soy sauce and honey or maple syrup. Toss everything well. Make sure the noodles and vegetables are coated with the sauce. Finally, mix in sliced green onions. Give it a good stir, then remove from heat. Serve the noodle mixture in bowls. You can add optional toppings like sesame seeds or chopped cilantro for extra flavor. - To avoid overcooking vegetables, keep an eye on them. Cook for only 3-4 minutes. They should stay bright and crunchy. - To ensure noodles don’t stick, rinse them in cold water once cooked. This helps separate them. - To adjust spice levels, add crushed red pepper to the skillet. Start small and taste as you go. - For more protein, consider adding diced chicken or tofu. These will blend well with the noodles and veggies. - For an ideal bowl presentation, layer the noodles first. Then, add the colorful veggies on top. - Pair with a light salad or spring rolls for a complete meal. These add freshness and crunch. {{image_2}} You can easily make garlic ginger noodle bowls gluten-free. Use gluten-free rice noodles instead of regular ones. These noodles have the same great taste. For sauces, swap soy sauce with tamari. Tamari has a similar flavor and works well in this dish. Want to make your bowl vegetarian or vegan? Try adding tofu. It soaks up flavors well and adds protein. You can also use chickpeas or tempeh. For more veggies, consider adding snap peas, spinach, or mushrooms. These options boost nutrition and flavor. Seasonal changes can inspire new ingredients. For summer, use fresh zucchini or bell peppers. They add color and crunch. In winter, think about hearty vegetables like kale or carrots. This keeps your bowls fresh and exciting. You can also swap ingredients based on what you find at the market. Enjoy experimenting! To keep your garlic ginger noodle bowls fresh, let them cool first. Place them in an airtight container. Store the leftovers in the fridge. They stay fresh for about 3 days. After that, they may lose flavor and texture. You can reheat your noodle bowls in several ways. The best method is using a skillet. Heat it on medium and add a splash of water. Stir the noodles gently until warm. This helps keep the noodles from getting mushy. You can also use a microwave. Heat in short bursts, stirring in between, until hot. If you want to save some noodle bowls for later, freezing is easy. First, let them cool completely. Then, pack them into freezer-safe containers. Make sure to leave some space at the top for expansion. When you’re ready to eat, thaw them in the fridge overnight. Reheat in a skillet or microwave as mentioned above. Yes, you can make garlic ginger noodle bowls in advance. To save time, prep your ingredients ahead. - Store the rice noodles in a separate container. - Keep garlic, ginger, and veggies in another. - Make the sauce and store it in a small jar. When you’re ready to eat, cook everything together. This way, your meal stays fresh and tasty. Absolutely! This recipe is great for meal prep. You can easily portion the noodles and veggies into containers. - Divide the noodle mix into single servings. - Use airtight containers to keep them fresh. - Add sauce just before eating to keep flavors bright. This method saves you time during busy days. You can add various proteins to your garlic ginger noodle bowls. Chicken, shrimp, or tofu are all great options. - For chicken, use cooked, shredded pieces for easy mixing. - Shrimp can be sautéed quickly with garlic and ginger. - Tofu should be cubed and pan-fried for added texture. These options keep your bowls exciting and full of flavor. This blog post covered how to make tasty garlic ginger noodle bowls. You learned about key ingredients, like rice noodles, vegetables, and the right sauces. We also explored cooking steps, tips, and ways to customize your dish. In conclusion, these bowls are easy, versatile, and great for any meal. Cooking should be fun, and this recipe makes it simple. Enjoy trying different flavors and make it your own!

Garlic Ginger Noodle Bowls 15 Minutes Quick Delight

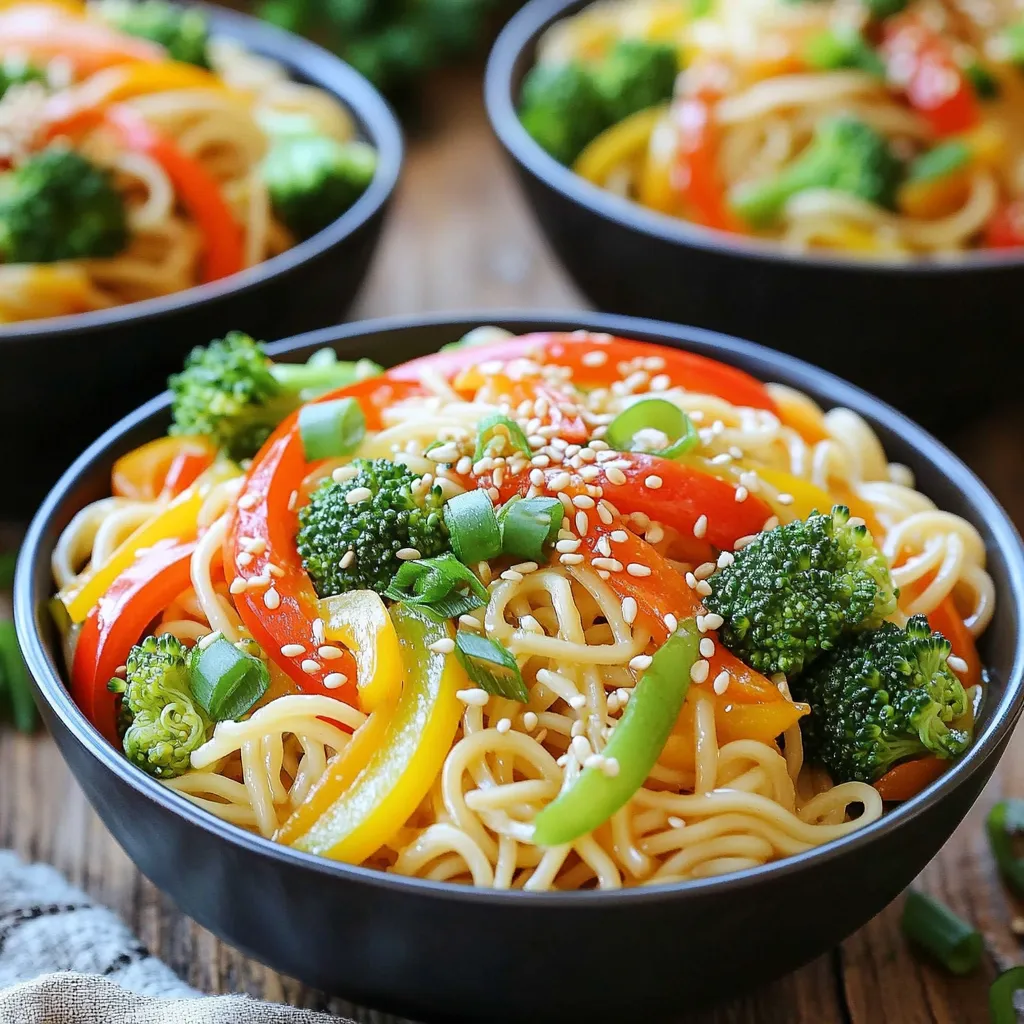
Craving a quick and tasty meal? Look no further than my Garlic Ginger Noodle Bowls! In just 15 minutes, you

To make caramel apple cheesecake parfaits, gather the following ingredients: - 2 large apples, peeled, cored, and diced - 1 tablespoon lemon juice - 1 teaspoon cinnamon - 1 cup granulated sugar - 1/4 cup unsalted butter - 1 cup cream cheese, softened - 1/2 cup powdered sugar - 1 teaspoon vanilla extract - 1 cup heavy whipping cream - 1 cup crushed graham crackers - 1/2 cup caramel sauce (plus extra for drizzling) - Optional: whipped cream for topping These ingredients come together to create a great dessert. The apples add sweetness, while cream cheese gives a rich texture. If you need to swap ingredients, here are some options: - Use any firm apple like Granny Smith or Honeycrisp instead of large apples. - Replace lemon juice with orange juice for a different flavor. - For a dairy-free option, try using vegan cream cheese. - You can use coconut cream instead of heavy whipping cream for a lighter version. - If you don’t have graham crackers, use crushed cookies or vanilla wafers instead. These substitutions can help you tailor the recipe to your taste or needs. Choosing fresh apples makes a big difference in flavor. Here are some tips: - Look for apples that are firm and free of bruises. - Check for a vibrant color. More color often means better flavor. - Smell the apple. A fresh apple should have a sweet and fruity aroma. - If possible, buy apples that are in season for the best taste. - Consider organic apples to avoid pesticides. Selecting the right apples leads to tastier and fresher parfaits. Enjoy the process of making your dessert! First, peel, core, and dice two large apples. I love using sweet apples, like Fuji or Honeycrisp. In a medium bowl, toss the diced apples with one tablespoon of lemon juice and one teaspoon of cinnamon. The lemon juice stops browning and adds bright flavor. Next, heat a skillet over medium heat. Add the apples and one cup of granulated sugar. Cook for about 5-7 minutes. Stir occasionally until the apples soften and turn golden. Remove the skillet from the heat. Stir in a quarter cup of unsalted butter until it melts. Let the caramelized apples cool for a few minutes. In another bowl, combine one cup of softened cream cheese, half a cup of powdered sugar, and one teaspoon of vanilla extract. Use a mixer to beat this mixture until it's smooth and creamy. In a separate bowl, whip one cup of heavy cream until stiff peaks form. This step adds lightness to your parfaits. Gently fold the whipped cream into the cream cheese mixture. Be careful not to deflate it. You want a fluffy texture that will make the parfaits delightful. To assemble, start with a layer of crushed graham crackers in the bottom of a clear glass or parfait dish. I recommend one cup of crushed graham crackers for the best texture. Then, add a layer of the cream cheese mixture. Next, spoon in some of your cooled caramelized apples and drizzle with caramel sauce. Repeat these layers until your glass is full. Finish with a final layer of the cream cheese mixture. For a fun touch, pipe some whipped cream on top and drizzle with extra caramel sauce. This adds both flavor and visual appeal. Enjoy your beautiful and tasty caramel apple cheesecake parfaits! To caramelize apples well, start with a hot skillet. Use medium heat for even cooking. Add sugar once the pan is hot, then toss in your apples. Stir them gently. This helps them cook evenly. Keep an eye on them. They should soften and turn golden in about 5-7 minutes. Don’t rush this step; good caramel makes all the difference in flavor. When whipping cream, start with cold heavy cream. It whips better and faster. Use a chilled bowl for best results. Beat the cream on medium speed. Watch for stiff peaks. This means it holds its shape well. Gently fold the whipped cream into your cream cheese mix. Be careful not to deflate it. This keeps the parfait light and airy. For a stunning parfait, use clear glasses. This shows off the layers of cream, apples, and graham crackers. Layer carefully for a neat look. Top with a dollop of whipped cream for flair. Drizzle extra caramel sauce on top for a sweet finish. A sprinkle of crushed graham crackers adds texture and looks great. Enjoy your beautiful dessert! {{image_2}} You can use many apples for your parfaits. I love Granny Smith apples for their tart flavor. They balance the sweetness of the caramel. Honeycrisp apples add a nice crunch and sweetness. Fuji apples are also great if you want a sweeter treat. Try mixing different apples for fun flavors. Each type brings its own unique taste to the dish. Experiment to find your favorite! While cream cheese is classic, you can switch it up. Try adding a bit of peanut butter for a nutty twist. You could also use flavored cream cheese, like strawberry or pumpkin. For a chocolate lover, add cocoa powder to the mix. This can create a rich, creamy layer. You can even swap it for Greek yogurt for a tangy touch. Each variation can give your parfaits a new life! Want a lighter version? You can use reduced-fat cream cheese. This keeps the creamy texture but cuts calories. Instead of sugar, use honey or maple syrup for sweetness. You can also use Greek yogurt instead of heavy cream. It adds protein and makes it lighter. Plus, you can use whole-grain graham crackers for extra fiber. These simple swaps can make your dessert healthier without losing flavor! Store your caramel apple cheesecake parfaits in the fridge. Use airtight containers to keep them fresh. If you layer the parfaits in glasses, cover each one with plastic wrap. This keeps them from drying out. Enjoy them within three days for the best taste. Each ingredient has its own shelf life. Apples last about one week in the fridge. Cream cheese stays good for about two weeks after opening. Heavy cream can last about a week once opened. Always check for any signs of spoilage before use. You can freeze the caramelized apples and cream cheese mixture. However, do not freeze the whipped cream. To freeze, put the apples and cream cheese mixture in separate, airtight containers. Use them within three months for the best flavor. When ready to eat, let them thaw in the fridge overnight and reassemble the parfaits. Yes, you can make this dessert ahead of time. You can prepare the caramelized apples and cream cheese mix a day in advance. Store each in the fridge. When you are ready to serve, simply layer the parfaits in glasses. This keeps everything fresh and tasty. Just remember to add whipped cream and caramel sauce right before serving for the best look. If you need a cream cheese substitute, try mascarpone cheese. It has a similar taste and texture. You can also use Greek yogurt for a lighter option. Make sure to choose full-fat yogurt for the best flavor. Both options will give you a creamy layer in your parfaits. Making homemade caramel sauce is easy! Start with 1 cup of granulated sugar. In a saucepan, heat the sugar over medium heat. Stir it with a wooden spoon until it melts and turns golden brown. Next, add 1/4 cup of unsalted butter and stir until melted. Finally, carefully add 1/2 cup of heavy cream and mix well. Let it cool before using. This sauce will make your parfaits even more delicious! This blog post covered everything you need to know to create delicious parfaits. We explored the best ingredients, how to prepare them, and tips for crafting the perfect layers. I shared ideas for variations and ways to store your parfaits so they stay fresh. For your best results, remember to select fresh apples and experiment with flavors. Enjoy this tasty treat, and don't hesitate to get creative with your own ideas! Happy parfait-making!

Caramel Apple Cheesecake Parfaits Easy Dessert Delight

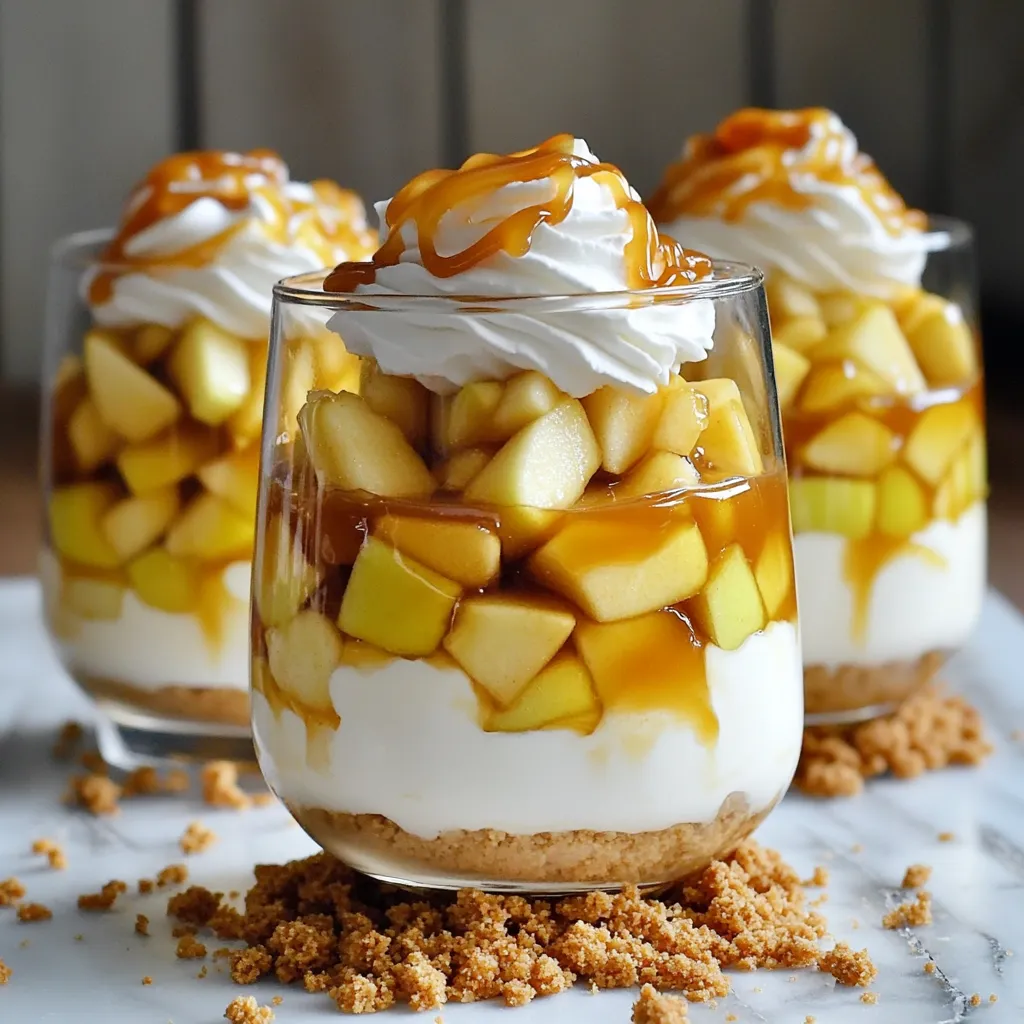
If you’re craving a sweet treat that combines creaminess and crunch, you’ve found it! These Caramel Apple Cheesecake Parfaits are

Here is the list of ingredients you will need for these delicious Chocolate Pumpkin Oat Bars: - 1 cup rolled oats - 1/2 cup pumpkin puree - 1/2 cup almond butter (or any nut butter) - 1/4 cup honey or maple syrup - 1/4 cup unsweetened cocoa powder - 1/2 teaspoon vanilla extract - 1/4 teaspoon cinnamon - 1/4 teaspoon salt - 1/4 cup chocolate chips (or dark chocolate chunks) - 1/4 cup chopped nuts (optional, such as walnuts or pecans) Using quality ingredients makes a big difference in taste. The rolled oats give great texture, while pumpkin puree adds moisture and flavor. Almond butter or any nut butter provides healthy fats. Honey or maple syrup offers natural sweetness. Unsweetened cocoa powder gives a rich, chocolatey taste without extra sugar. Vanilla extract and cinnamon enhance the flavor profile. Finally, salt balances the sweetness, and chocolate chips provide a delightful treat. Feel free to get creative! You can swap out nut butters or sweeteners. Adding chopped nuts can give a nice crunch. This recipe is flexible, making it fun to adjust to your taste! First, gather all your ingredients. In a large bowl, mix rolled oats, pumpkin puree, and almond butter. Next, add honey, cocoa powder, vanilla extract, cinnamon, and salt. Use a spatula to blend everything together. The mixture should be thick and sticky, like dough. If it feels too dry, add a bit more pumpkin puree. If it’s too wet, add extra oats. This base is the heart of your bars. Now, it’s time to add some fun! Fold in the chocolate chips gently. If you want a crunch, mix in chopped nuts like walnuts or pecans. Make sure to spread them evenly throughout the mixture. This step adds flavor and texture, making each bite exciting. Next, prepare to transfer your mixture. Line an 8x8 inch pan with parchment paper, leaving some paper hanging over the sides. This makes it easy to lift out later. Pour your mixture into the pan. Use your hands or the back of a spatula to press it down firmly. This step is key for even distribution. Make sure it’s compact so the bars hold together. Now comes the important part: chilling. Place the pan in the fridge for at least 2 hours. This helps the bars set and firm up. If you skip this step, your bars may crumble. Trust me, waiting is worth it for a great texture! Once the bars are firm, it’s time to cut them. Carefully lift the mixture out of the pan using the parchment paper. Place it on a cutting board. Use a sharp knife to cut it into squares or rectangles. Aim for about 12 bars for perfect serving sizes. Enjoy your tasty treats! To get the right texture in your bars, the nut butter plays a big role. If you want a creamier mix, use almond butter. For a firmer texture, try a thicker nut butter like peanut butter. When mixing, make sure everything blends well. The mix should feel thick and sticky, not runny. To achieve firmness, chilling is key. After pressing the mixture into the pan, let it set in the fridge for at least two hours. This helps the bars hold their shape when you cut them. If your bars are too soft, consider adding more oats or nut butter next time. Spices can take your bars to the next level. A pinch of nutmeg or ginger adds warmth. If you like a sweeter treat, adjust the honey or maple syrup. Start with the amount in the recipe, then taste. If you want it sweeter, add a bit more. You can also try adding extracts. A touch of almond or peppermint extract can surprise your taste buds. Just remember that a little goes a long way. These bars pair well with yogurt or fresh fruit. For a fun twist, serve them with a drizzle of honey or a sprinkle of nuts on top. For presentation, slice the bars into fun shapes. Use cookie cutters for stars or hearts. This makes them more appealing, especially for kids. You can also stack them for a lovely display. {{image_2}} You can easily change up the flavor of your Chocolate Pumpkin Oat Bars. One fun option is to create a pumpkin spice version. Just add a bit more cinnamon and a pinch of nutmeg. This small change boosts the fall flavors! Another great idea is to add fruit purées. You can try using mashed banana or applesauce. These add natural sweetness and moisture. If you want some crunch, consider adding chopped nuts. Walnuts or pecans work well here. They give texture and extra flavor. If you have dietary needs, you can still enjoy these bars. For a vegan option, swap honey for maple syrup. This makes your bars fully plant-based. If you need a nut-free recipe, use sunflower seed butter instead of almond butter. This keeps the bars creamy without nuts. You can also look for low-sugar options. Use a sugar substitute that measures like sugar. This way, you can lower the sugar content without losing taste. To keep your chocolate pumpkin oat bars fresh, store them in an airtight container. This helps avoid moisture and keeps them from drying out. Place a piece of parchment paper between layers if you stack them. These bars stay fresh in the fridge for up to one week. If you want to enjoy these bars longer, freezing is a great option. First, cut the bars into desired sizes. Wrap each piece tightly in plastic wrap. Then, place them in a freezer-safe bag or container. This method keeps them tasty and prevents freezer burn. To thaw, simply take out a bar and let it sit at room temperature for about 15 minutes. You can also microwave it for 10-15 seconds. Serve chilled or at room temperature for the best taste. Yes, you can use other options. Sweet potato puree works well and has a similar taste. You can also try applesauce for a lighter texture. Using these options may change the flavor slightly. Sweet potatoes add a richer taste, while applesauce brings more sweetness. These bars stay fresh for about one week in the fridge. Store them in an airtight container to keep them from drying out. If you freeze them, they can last up to three months. Just make sure to wrap them well to prevent freezer burn. Absolutely! Adding protein powder is easy. Use about 1/4 cup for a protein boost. You may need to adjust the liquid in the recipe to keep it moist. This can make the bars a bit denser but still tasty. Now you know how to make tasty, healthy bars with simple ingredients. We covered everything from mixing oat and pumpkin puree to adding chocolate. I shared tips on making them just right and how to store or freeze them for later. You can easily change flavors or keep them vegan. Enjoy experimenting with these bars in various ways. Each bite will be simple and satisfying. Happy snacking!

Chocolate Pumpkin Oat Bars No-Bake Easy Treat

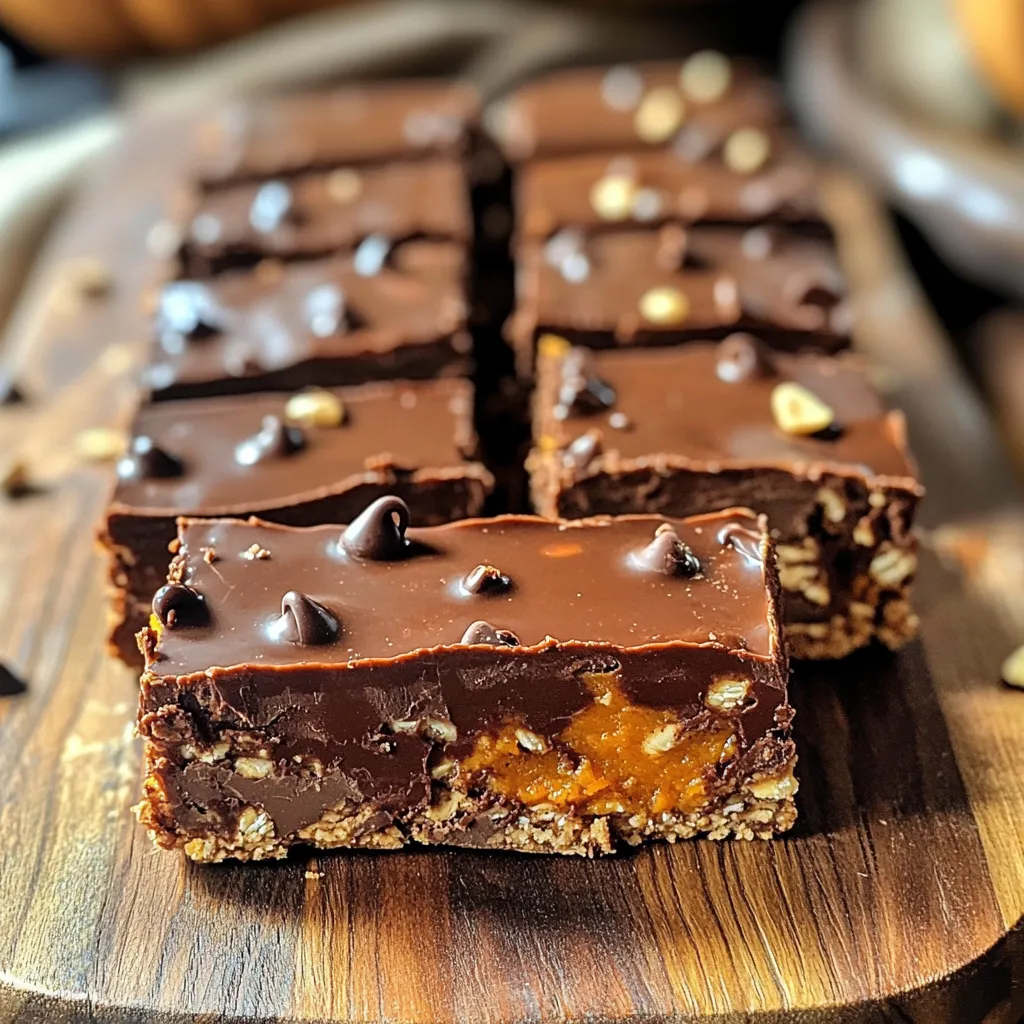
Craving a sweet treat that’s both easy and healthy? You’ve come to the right place! These Chocolate Pumpkin Oat Bars

To make Pumpkin Spice Chia Pudding Parfaits, you need simple, healthy ingredients. Here’s what you'll need: - 1 cup almond milk - 1/4 cup chia seeds - 1/2 cup pumpkin puree - 2 tablespoons maple syrup - 1 teaspoon pumpkin pie spice - 1/2 teaspoon vanilla extract - Pinch of salt - 1/2 cup granola - 1/4 cup chopped nuts - Whipped coconut cream (optional) These ingredients combine to create a creamy, spiced pudding. Each item plays a key role. The almond milk gives a nice base. Chia seeds add texture and healthy fats. Pumpkin puree brings that autumn flavor. Maple syrup adds sweetness, while pumpkin pie spice wraps everything in warmth. Vanilla extract gives a hint of sweetness and depth. A pinch of salt balances the flavors. Granola and nuts provide crunch and nutrition. Whipped coconut cream is optional but adds a lovely finish. You can mix and match based on what you have. This recipe is flexible and forgiving. You’ll find it easy to adapt to your taste. - In a medium bowl, add 1 cup of almond milk. - Next, mix in 1/4 cup of chia seeds. - Then, add 1/2 cup of pumpkin puree. - Pour in 2 tablespoons of maple syrup. - Add 1 teaspoon of pumpkin pie spice. - Include 1/2 teaspoon of vanilla extract. - Finish with a pinch of salt. - Whisk everything together until well mixed. After whisking, cover the bowl. Place it in the fridge for at least 4 hours. For best results, chill overnight. This waiting time lets the chia seeds soak up the liquid. They will swell and create a thick pudding. - Grab your serving glasses or bowls. Start with a layer of chia pudding. - Next, add 1/2 cup of your favorite granola. - Sprinkle 1/4 cup of chopped nuts, like walnuts or pecans, on top. Repeat these layers until your glasses are full. Finish with one last layer of chia pudding on top. For a special touch, add a dollop of whipped coconut cream. You can also sprinkle some cinnamon or extra pumpkin pie spice on top. Enjoy the seasonal flavors right away! To make chia pudding just right, focus on consistency. You want it thick, but not too lumpy. Mix your ingredients well. Whisk the almond milk, pumpkin puree, and chia seeds until smooth. Let it sit for a bit before chilling. This helps the seeds soak up the liquid. Sweetness is also key. Start with two tablespoons of maple syrup. Taste it after mixing. If you want it sweeter, add more syrup a little at a time. Remember, you can always add, but you can't take away. Layering your parfait can be fun and creative. Start with a good base of chia pudding. This gives a solid foundation. Then, carefully add granola. This adds crunch and texture. Top it with chopped nuts for extra flavor. For a nice touch, use clear glasses. This lets the beautiful layers shine through. You can also try a drizzle of honey or a sprinkle of cinnamon for garnish. Whipped coconut cream adds a creamy finish. Feel free to mix it up with your favorite toppings! {{image_2}} You can change the milk in this recipe. Almond milk works well, but you can try oat milk, coconut milk, or regular milk too. Each milk gives a different taste. You may find you like one better than the others. For spices, you can mix it up. Use cinnamon or nutmeg for a new twist. You can even add a bit of ginger for extra warmth. These spices can change the whole flavor of your parfait. Fruits are a fun way to top your chia pudding. Add fresh berries like strawberries, blueberries, or raspberries. Sliced bananas also work great. They add sweetness and color to your parfait. Nuts are another option. Walnuts and pecans are tasty, but you can also use almonds or hazelnuts. They add a nice crunch. You can even skip the nuts if you want a lighter treat. - How Long to Store Leftovers: You can keep your chia pudding in the fridge for up to five days. The flavors will blend and deepen as it sits. If you add nuts or granola, store those separately to keep them crunchy. - Best Containers for Storage: Use airtight glass containers for storage. They help keep the pudding fresh and let you see the lovely layers. - Chia Pudding Freezing Safety: You can freeze chia pudding if you want to keep it longer. It stays good for about one month in the freezer. Just remember, the texture may change slightly after thawing. - Thawing Instructions: To thaw, move the pudding from the freezer to the fridge for several hours or overnight. Stir well before serving to get the right consistency back. Yes, you can use regular milk. Any milk works well in this recipe. Use cow's milk, oat milk, or soy milk. Just keep in mind that each type of milk gives a different flavor. If you need a substitute for maple syrup, try honey or agave nectar. You can also use brown sugar, but dissolve it in the milk first. Adjust the amount based on your taste preference. Chia pudding lasts about 5 days in the fridge. Store it in an airtight container. This keeps it fresh and tasty for later. Yes, this recipe is vegan-friendly! Use almond milk and maple syrup. Both are plant-based and fit a vegan diet. Enjoy this treat without worry! This blog post covered how to make a tasty chia pudding parfait. You learned about the simple ingredients needed and the easy steps to prepare it. I shared tips to get the best texture and ways to layer your parfait for a fun look. You can also make this dish your own with different flavors and toppings. Remember to store leftovers properly to enjoy later. Now, you have all the tools to create a delicious treat that anyone will love. Enjoy making it your way!

Pumpkin Spice Chia Pudding Parfaits Healthy Treat

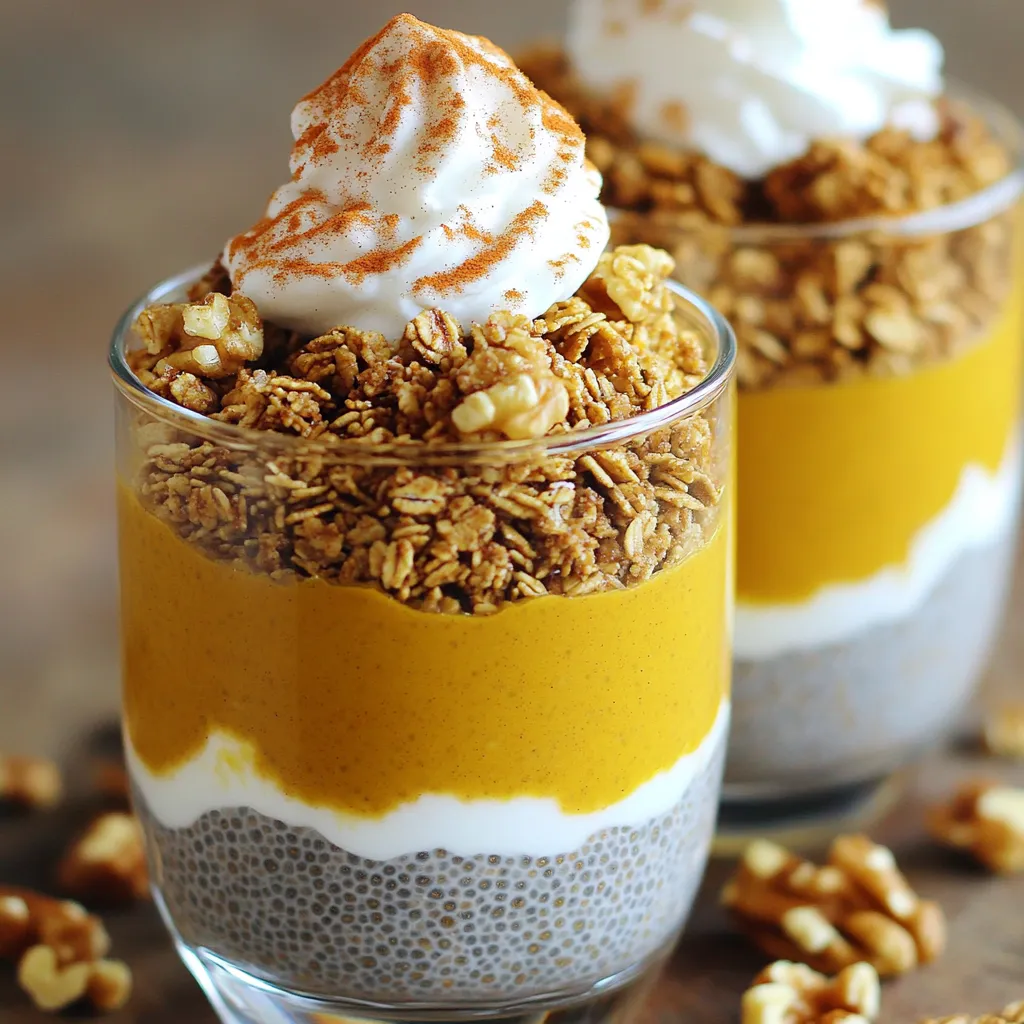
Are you ready to treat yourself to a delicious and healthy dessert? Pumpkin Spice Chia Pudding Parfaits are the ideal

- 2 cups fresh cherries, pitted and halved - 1 cup heavy cream - 1 cup whole milk - ¾ cup granulated sugar - 1 teaspoon vanilla extract - ½ cup semi-sweet chocolate chips - ¼ teaspoon salt - 1 tablespoon lemon juice When you make Cherry Chocolate Chip Ice Cream, fresh cherries shine. Their sweet and tart flavor makes this treat special. I like to use ripe, juicy cherries. They add a burst of flavor. The heavy cream and whole milk give this ice cream a rich, creamy texture. Granulated sugar sweetens the mix, while vanilla extract adds warmth. A little salt helps balance the sweetness. The semi-sweet chocolate chips bring a delightful crunch. Lastly, lemon juice brightens the cherry flavor and helps keep the mixture fresh. - Non-dairy options - Sugar substitutes - Dairy-free chocolate chips If you want to make this ice cream non-dairy, use coconut cream instead of heavy cream. Almond milk or oat milk works well too. For sugar, you can use maple syrup or agave nectar. These will change the taste a bit but still taste great. If you need dairy-free chocolate, look for dairy-free chocolate chips. They melt well and taste delicious. - Ice cream maker - Mixing bowls - Whisk - Airtight container To make this ice cream, you need a few tools. An ice cream maker is key for the right texture. Mixing bowls help combine the ingredients easily. A whisk is great for mixing the cream and sugar. Finally, use an airtight container to store your ice cream. It keeps your ice cream fresh and ready to enjoy. {{ingredient_image_1}} First, take 2 cups of fresh cherries. Pit them and cut them in half. Place the cherries in a medium bowl. Add 1 tablespoon of lemon juice and 2 tablespoons of sugar. Toss the cherries well to coat them. Set this bowl aside for about 30 minutes. This process is called maceration. The sugar will draw out the juice from the cherries. You want to see a nice cherry syrup form in the bowl. In a large mixing bowl, combine 1 cup of heavy cream and 1 cup of whole milk. Add ½ cup of granulated sugar, 1 teaspoon of vanilla extract, and ¼ teaspoon of salt. Use a whisk to mix these ingredients. Keep whisking until the sugar fully dissolves. This step is key for a smooth ice cream base. You want all the sugar to blend in nicely. Now, add the cherry mixture to the cream base. Be sure to include all the juices too. Stir gently to combine everything well. Next, pour this mixture into your ice cream maker. Churn according to the machine's instructions, usually around 20 to 25 minutes. Once the ice cream is creamy and soft, fold in ½ cup of semi-sweet chocolate chips. This adds a rich flavor. Transfer the ice cream to an airtight container. Smooth the top with a spatula. Freeze it for at least 4 hours or until solid. Enjoy your homemade cherry chocolate chip ice cream! To get a soft-serve consistency, follow these steps: - Churn the mixture for 20-25 minutes in your ice cream maker. - Check for the right texture; it should be creamy and light. When you fold in the chocolate chips, do it gently. This helps to keep the ice cream smooth. Use a spatula to lift and turn the mixture. This way, you mix the chips evenly without breaking them. Serving your ice cream in colorful cones makes it more fun. Try adding fresh cherry halves on top. A sprinkle of chocolate chips adds extra flair. You can also pair it with brownies or a slice of pie. This makes for a great dessert combo. One big mistake is over-churning your ice cream. If you churn it too long, it can become icy. Listen to your machine, and stop when it’s fluffy. Another mistake is not freezing it long enough. It needs at least four hours in the freezer. This helps it firm up nicely. If you skip this step, your ice cream might be too soft to scoop. Pro Tips Use ripe cherries: Choose cherries that are deep red and slightly soft to the touch for the best flavor and sweetness. Chill your mixture: For a smoother texture, chill the cream mixture in the refrigerator for about an hour before churning. Experiment with chocolate: Try using dark chocolate or white chocolate chips for a different flavor profile in your ice cream. Store properly: To prevent ice crystals, make sure to store the ice cream in an airtight container and press a piece of plastic wrap directly onto the surface before sealing. {{image_2}} You can make this ice cream even better by adding nuts or other fruits. Chopped almonds or walnuts give a nice crunch. You can also mix in diced peaches or strawberries for a fruity twist. If you want a different taste, try swapping semi-sweet chocolate for white chocolate. This change gives a sweeter flavor that pairs well with cherries. If you follow a vegan diet, you can easily make vegan cherry chocolate chip ice cream. Replace heavy cream and whole milk with coconut cream and almond milk. Use a plant-based sugar substitute to keep it vegan and tasty. For those watching sugar, low-sugar or keto options are available. You can use erythritol or stevia in place of granulated sugar. This will cut calories while keeping the flavor rich. Feel free to get creative with mix-ins! You can add different flavors like mint or almond extract to change the taste. Candies like crushed Oreos or sprinkles can add fun textures. Seasonal ingredients can also enhance the taste. In summer, add fresh berries, or in fall, try pumpkin spice for a seasonal treat. Let your imagination guide you to create your perfect scoop! To keep your Cherry Chocolate Chip Ice Cream fresh, choose the right container. An airtight container is best. This helps avoid ice crystals and keeps the flavor strong. Glass containers work well, but plastic ones are lighter. Make sure the lid seals tight. When storing, place a piece of plastic wrap over the ice cream before sealing the lid. This extra layer helps block air. Always scoop with a clean spoon to avoid adding germs. How long does homemade ice cream last? Homemade ice cream can last up to two weeks in the freezer. After that, it may lose texture and flavor. Watch for signs of spoilage. If you see ice crystals on top, that means it's losing quality. If the color changes or the smell is off, it’s time to toss it. Can you refreeze ice cream? Yes, you can refreeze it. However, it may change texture. If it melts a lot, refreezing can make it icy. To maintain quality after refreezing, keep it cold. Move the ice cream back to the freezer as soon as you scoop. Try to limit how often you open the container. Each time you open it, warm air gets in, which can harm your ice cream. You can easily make Cherry Chocolate Chip Ice Cream without an ice cream maker. Start by mixing your cream, milk, sugar, and vanilla in a large bowl. Then, add the cherry mixture after macerating. Pour everything into a shallow dish. Place it in the freezer. Every 30 minutes, stir the mixture with a fork. Repeat this process for about 3-4 hours. This method helps create a creamy texture without a machine. Yes, you can use frozen cherries. They work well in this ice cream. Just thaw them before using. Drain any excess liquid. The flavor will still be delicious, but fresh cherries add a nice texture. If you use frozen cherries, you might skip the maceration step since they are already soft. A serving of Cherry Chocolate Chip Ice Cream has about 250 calories. It contains 15 grams of fat, 25 grams of sugar, and 3 grams of protein. The nutritional values can change based on your ingredients. You can also adjust sugar and cream for healthier options. Check labels on any alternatives you choose. Yes, this recipe contains dairy and sugar. These are common allergens. If you have a dairy allergy, consider using non-dairy milk and cream. Chocolate chips may also contain allergens like soy or nuts. Always check labels for any specific allergens. You can find Cherry Chocolate Chip Ice Cream at most grocery stores. Look in the ice cream aisle. Some local shops may also carry it. If you prefer homemade, making it is fun and easy. You can customize it to your taste! You learned how to make Cherry Chocolate Chip Ice Cream from fresh ingredients. We covered prep, mixing, and churning. You can also explore vegan and low-sugar options. Remember to keep your ice cream stored well for the best taste. Avoid common mistakes for a smooth texture. Making this treat can be fun and rewarding. Enjoy your homemade ice cream with friends and family. Celebrate your skills by sharing and enjoying every scoop!

Cherry Chocolate Chip Ice Cream Simple and Delicious Treat

Looking for a tasty treat that beats the heat? Cherry Chocolate Chip Ice Cream is a perfect blend of sweet

To make the One-Pot Spinach Artichoke Orzo Bake, gather these ingredients: - 1 cup orzo pasta - 2 cups vegetable broth - 1 cup fresh spinach, chopped - 1 can (14 oz) artichoke hearts, drained and quartered - 1 cup cream cheese, softened - 1 cup shredded mozzarella cheese, divided - 1/2 cup grated Parmesan cheese - 2 cloves garlic, minced - 1 teaspoon onion powder - 1/2 teaspoon black pepper - Salt to taste - 1/4 cup breadcrumbs (optional for topping) - Fresh parsley for garnish (optional) You can swap out orzo for another pasta, like quinoa or rice. If you want a creamier dish, use more cream cheese. For a lighter version, replace cream cheese with Greek yogurt. Don't have fresh spinach? Frozen spinach works too. Just thaw and squeeze out extra water. For a cheesy twist, add your favorite cheese blend. Each serving of this dish contains: - Calories: 450 - Protein: 15g - Carbohydrates: 50g - Fat: 20g - Fiber: 3g - Sodium: 600mg This meal is filling and packed with flavor. Enjoy the creamy goodness while getting your greens! Gather all your ingredients first. Make sure your spinach is fresh and chopped. Drain and quarter the artichoke hearts. Soften the cream cheese by leaving it out for a bit. Mince the garlic cloves. You can also measure the spices and cheeses ahead of time. This makes cooking easier. Start by preheating your oven to 375°F (190°C). In a large, oven-safe pot, heat a little olive oil on medium heat. Once hot, add the minced garlic. Sauté it for about one minute until it smells nice. Next, add the orzo pasta to the pot. Toast the orzo for two minutes. Stir it often so it doesn’t burn. Now, pour in the vegetable broth. Add the chopped spinach, artichoke hearts, and softened cream cheese. Sprinkle in the onion powder, black pepper, and salt. Stir until the cream cheese melts and blends well. This makes your dish creamy and delicious. Mix in half of the mozzarella cheese and half of the Parmesan cheese. Stir until everything is cheesy and well combined. Remove the pot from heat. Sprinkle the rest of the mozzarella and Parmesan on top. If you want a crunchy topping, add breadcrumbs now. Cover the pot with a lid or foil. Place it in the preheated oven. Bake for about 25 to 30 minutes. You want the orzo to be cooked and the top to be bubbly and golden. Once done, take it out of the oven. Let it cool for a few minutes. If you like, garnish with fresh parsley before you serve. Enjoy your one-pot spinach artichoke orzo bake! To get the best texture in your orzo bake, use fresh ingredients. Fresh spinach adds a nice crunch. When cooking, toast the orzo for two minutes. This gives it a nutty flavor. Stir often to avoid sticking. Bake until the top is golden and bubbly. The cheese will melt perfectly, making it creamy. One common mistake is not measuring the broth. Too much broth can make it soggy. Use the right amount for a firm texture. Another mistake is overcooking the orzo. It should be al dente before baking. Don't skip toasting the orzo. This step adds great flavor. Lastly, mixing the cheese well is key. Make sure it's evenly spread for a creamy bite. Serve your One-Pot Spinach Artichoke Orzo Bake with a simple salad. A fresh green salad balances the richness. You can add a splash of lemon juice for zest. Pair it with garlic bread for a comforting meal. For drinks, a light white wine enhances the flavors. Sparkling water with lemon is a nice non-alcoholic option. Enjoy your delicious creation! {{image_2}} You can easily make this dish vegan. Replace the cream cheese with a vegan cream cheese. Use dairy-free mozzarella to keep it cheesy. For a gluten-free option, swap orzo with gluten-free pasta. Just check the cooking times, as they may vary. Feel free to mix up the cheeses! Try goat cheese or feta for a tangy taste. You can also add other veggies. Chopped bell peppers or mushrooms work great. Get creative with what you have on hand! You can easily adjust this recipe. To make more servings, double all the ingredients. Use a larger pot to cook everything at once. For fewer servings, cut the amounts in half. Just keep an eye on the cooking time to ensure it turns out perfect. After enjoying your One-Pot Spinach Artichoke Orzo Bake, let it cool down. Once cooled, place the leftovers in an airtight container. This will keep the dish fresh for up to three days in the fridge. Make sure to seal the container well to keep out air. When ready to eat the leftovers, reheat them in the oven or microwave. If using the oven, set it to 350°F (175°C). Place the orzo bake in an oven-safe dish, cover it with foil, and heat for about 15 minutes. If using a microwave, heat in short bursts, stirring in between, until warm. You can freeze the One-Pot Spinach Artichoke Orzo Bake for up to three months. First, let it cool completely. Then, transfer it to a freezer-safe container. For easy serving, consider portioning it into smaller containers. When you are ready to enjoy it, thaw overnight in the fridge before reheating. Yes, you can prepare this dish in advance. Just follow the recipe up to the baking step. Once mixed, cover it and store it in the fridge for up to 24 hours. When ready, bake it straight from the fridge. You may need to add a few extra minutes to the baking time to ensure it heats through. If you don't have orzo, use any small pasta shape. Some good options are ditalini, couscous, or even rice. Each substitute will change the texture, but the flavors will still shine through. Make sure to adjust the cooking time as needed, especially for rice. To add some heat, try these ideas: - Mix in red pepper flakes when cooking. - Add diced jalapeños or serrano peppers. - Top with a spicy cheese blend. Each option boosts the heat without losing the dish's creamy charm. We covered a lot in this article. We explored the key ingredients and their roles. I provided step-by-step cooking and baking instructions. You learned tips for the best texture and common mistakes to avoid. We also looked at how to adjust recipes for special diets. To wrap it up, this dish is flexible and fun. You can personalize it based on your tastes. With these guidelines, you’re ready to create something delicious, no matter your skill level. Enjoy your cooking adventure!

One-Pot Spinach Artichoke Orzo Bake Delight

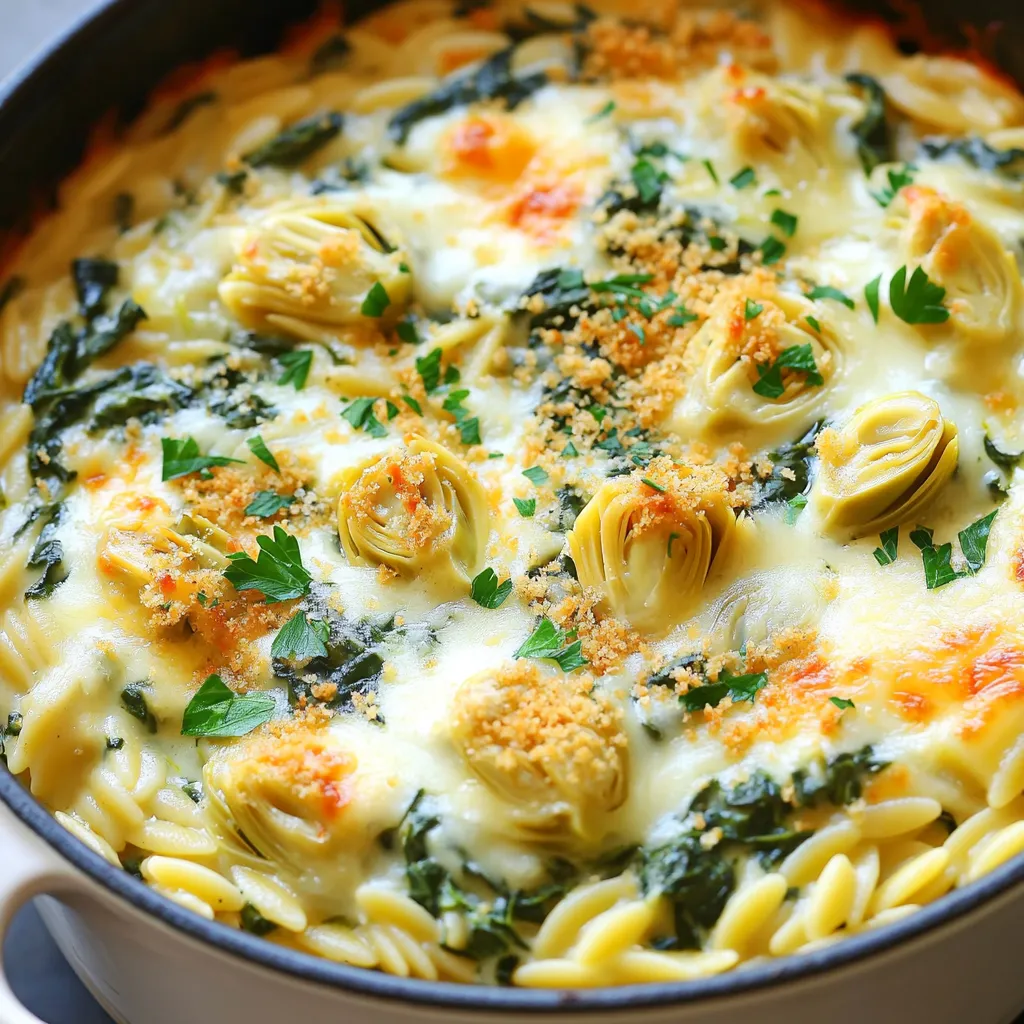
Welcome to my kitchen! Today, I’m excited to share a simple and delicious recipe for One-Pot Spinach Artichoke Orzo Bake.

- 1 lb chicken tenderloins - 1 cup buttermilk - 1 cup all-purpose flour - 1 cup panko breadcrumbs - 2 tablespoons everything bagel seasoning - 1 teaspoon garlic powder - 1 teaspoon onion powder - Salt and pepper to taste - Cooking spray Gathering the right ingredients is key for Air Fryer Everything Bagel Chicken Tenders. First, you need chicken tenderloins. They are juicy and cook quickly. Next, buttermilk helps tenderize the chicken. It also adds a nice flavor. All-purpose flour is your first step in the breading process. It helps the next layer stick. Panko breadcrumbs give a great crunch. They are lighter and crispier than regular breadcrumbs. Everything bagel seasoning brings a lot of flavors. It has bits of onion, garlic, and sesame. Garlic powder and onion powder add depth. Salt and pepper will enhance all flavors. Finally, cooking spray keeps everything from sticking in the air fryer. With these ingredients, you will create a tasty dish that everyone will love. Start by soaking the chicken tenderloins in buttermilk. This helps make the chicken tender and juicy. I recommend soaking for at least 30 minutes. If you have more time, an hour is even better. The buttermilk not only flavors the chicken but also helps the breading stick better. Next, set up your breading station. Use three shallow dishes. In the first dish, add the all-purpose flour. In the second dish, beat a few eggs. This step is optional but it adds extra crunch. In the third dish, mix panko breadcrumbs with everything bagel seasoning, garlic powder, onion powder, salt, and pepper. Make sure everything is well combined. Now, it’s time to prepare the air fryer. Preheat it to 400°F (200°C). This high heat ensures a crispy outside. While the air fryer heats, lightly spray the basket with cooking spray. This prevents the chicken from sticking. Once the air fryer is preheated, it's time to cook. Take each tenderloin from the buttermilk and let the excess drip off. First, dredge it in flour, shaking off the extra. Then dip it in the beaten egg, if you chose to use it. Finally, coat it in the panko mixture, pressing down to help it stick. Arrange the breaded chicken tenders in a single layer in the air fryer basket. Spray the tops lightly with cooking spray. Air fry for 8-10 minutes. Flip them halfway through for even cooking. The tenders should be golden brown and reach an internal temp of 165°F (75°C). After cooking, let the chicken tenders rest for a few minutes. This helps keep them juicy. Serve them on a platter. You can garnish with fresh parsley or sprinkle some extra everything bagel seasoning on top. Pair with your favorite dipping sauce, like honey mustard or ranch, for extra flavor. - Achieving maximum crispiness: For the crispiest chicken tenders, make sure to use panko breadcrumbs. They give a light and airy crunch. Also, spray a bit of cooking spray on the tenders before air frying. This helps them brown nicely. - Alternative soaking methods: If you want a quick soak, use yogurt instead of buttermilk. Yogurt also adds flavor and keeps the chicken juicy. You can let it sit for 15 to 30 minutes. - Refrigeration procedures: Store any leftover chicken tenders in an airtight container. They can last in the fridge for up to three days. Make sure they cool down before sealing. - Reheating methods: To reheat, use the air fryer again at 350°F (175°C) for about 5-7 minutes. This keeps them crispy. You can also use a microwave, but they won’t be as crunchy. {{image_2}} You can change the flavors of your chicken tenders easily. Here are some fun ideas: - Adding different seasonings: Try using spicy seasoning for a kick. You can add paprika for a smoky flavor. Lemon zest gives a fresh taste. Mix in some cumin for warmth. - Changing breading options: Instead of panko breadcrumbs, use crushed cornflakes for a crunchier bite. You can also try almond flour for a nutty flavor. For a gluten-free option, use ground oats instead of flour. Looking for a healthier twist? Here are some options to consider: - Using whole wheat flour: Swap all-purpose flour with whole wheat flour. This gives you extra fiber and nutrients. It still works great for breading! - Air fryer substitute options: If you want to cut calories, skip the cooking spray. Instead, brush the chicken lightly with oil using a pastry brush. This will still help your tenders crisp up nicely without the added calories. If your chicken is not crispy, try a few simple tricks. First, ensure you coat the chicken well with panko. Press the breadcrumbs firmly onto the chicken. This helps them stick better. Also, make sure to spray the tops with cooking spray before cooking. This adds extra crunch. If you prefer even more crispiness, try adding cornstarch to your flour. A mix of half flour and half cornstarch works wonders for texture. Air fryers can be tricky. One common issue is overcrowding the basket. If you pack too many tenders in, they won’t cook evenly. Always arrange them in a single layer with space in between. This allows hot air to circulate around each piece. If you find your chicken is undercooked, check the temperature. Use a meat thermometer to ensure it reaches 165°F (75°C). If it’s not done, simply put it back in the air fryer and cook for a few more minutes. It’s better to check early than to overcook. With these tips, you can enjoy perfectly crispy everything bagel chicken tenders every time. Soak the chicken in buttermilk for at least 30 minutes. This step helps the chicken stay juicy and tender. For best results, you can soak it for up to 2 hours. The longer it soaks, the more flavor it absorbs. Yes, you can use frozen chicken tenderloins. Just make sure to thaw them first for even cooking. You can thaw them overnight in the fridge or use the defrost setting on your microwave. Once thawed, soak them in buttermilk as you would fresh chicken. Several sauces work well with these chicken tenders. Here are some tasty options: - Honey mustard - Ranch dressing - BBQ sauce - Spicy mayo - Garlic aioli Feel free to try different sauces to find your favorite! This blog post covered everything you need to make crispy everything bagel chicken tenders. We explored key ingredients, step-by-step instructions, helpful tips, and variations to suit your taste. Remember to soak the chicken for the best flavor and texture. Don’t hesitate to experiment with seasonings or try healthier alternatives. If you run into issues, our troubleshooting section can help. With these simple steps, you can create a dish that impresses. Enjoy every bite!

Air Fryer Everything Bagel Chicken Tenders Crispy Treat

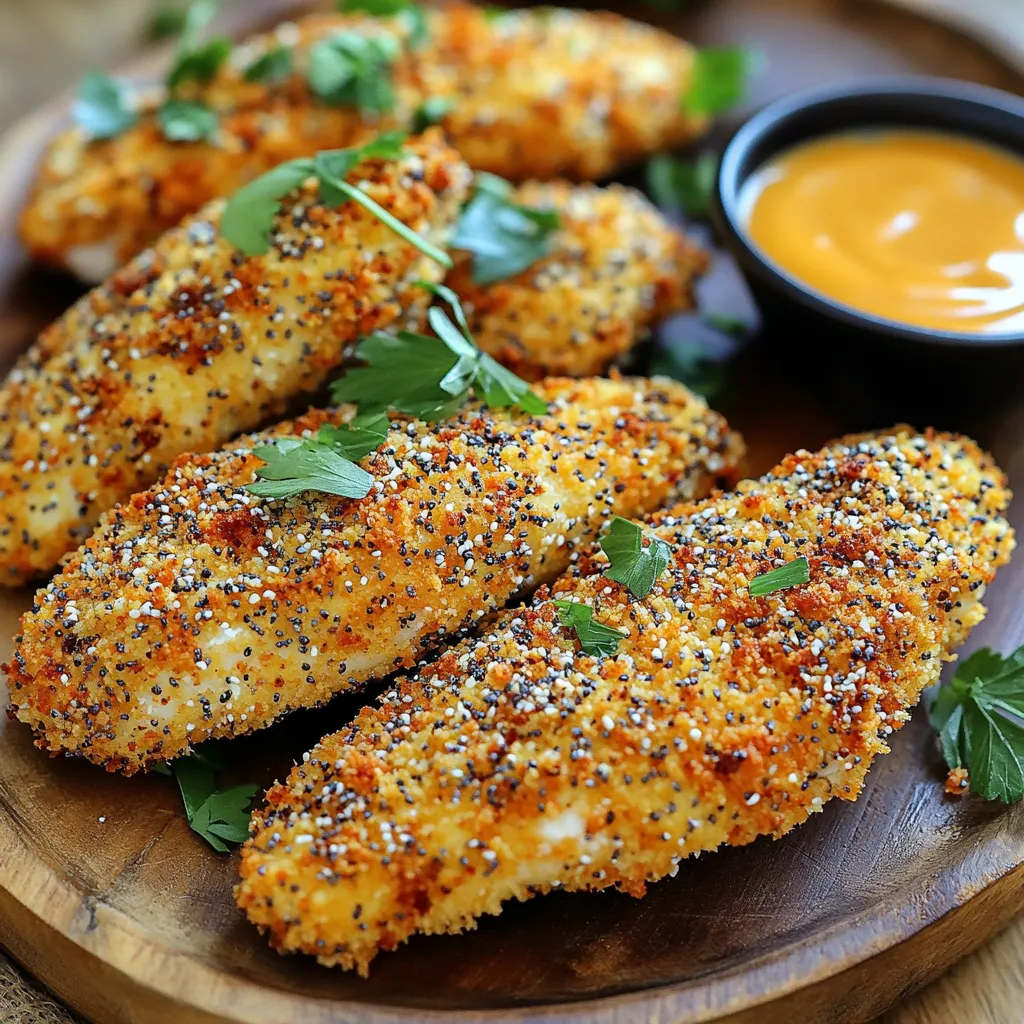
Looking for a fun and easy dinner idea? Try my Air Fryer Everything Bagel Chicken Tenders! These crispy treats combine

- 1 cup all-purpose flour - 1/2 cup granulated sugar - 1/2 teaspoon baking powder - 1/4 teaspoon baking soda - 1/4 teaspoon salt - 1/2 cup unsweetened cocoa powder - 1/2 cup brewed coffee, cooled - 1/4 cup vegetable oil - 1 large egg - 1 teaspoon vanilla extract - 1/2 cup chocolate chips (dark or semi-sweet) - 1/4 cup whipped coffee (made from instant coffee, sugar, and water) The ingredients for whipped coffee chocolate chip muffins are simple yet magical. The dry mix starts with all-purpose flour, which gives these muffins their structure. I add granulated sugar for sweetness and cocoa powder for that rich chocolate flavor. Baking powder and baking soda help the muffins rise, while salt balances the sweetness. Next, I move on to the wet ingredients. Brewed coffee, cooled, adds depth and flavor. I mix it with vegetable oil for moisture, an egg for richness, and vanilla extract for warmth. For a delightful twist, I fold in chocolate chips. You can use dark or semi-sweet, depending on your taste. The whipped coffee topping is optional but adds a fun, creamy finish. It’s made from instant coffee, sugar, and water, whipped to airy perfection. These ingredients work together to create a muffin that is not just delicious but also a treat to share. Each bite combines the warmth of coffee and the sweetness of chocolate, making them an irresistible delight. 1. Preheat the Oven: Start by setting your oven to 350°F (175°C). This ensures even baking. 2. Prepare the Muffin Tin: Line a muffin tin with paper or silicone liners. This makes for easy removal later. 1. Combine Dry Ingredients: In a large bowl, whisk together the following: - 1 cup all-purpose flour - 1/2 cup granulated sugar - 1/2 teaspoon baking powder - 1/4 teaspoon baking soda - 1/4 teaspoon salt - 1/2 cup unsweetened cocoa powder Mix well until everything is evenly blended. 2. Combine Wet Ingredients: In another bowl, stir together: - 1/2 cup brewed coffee, cooled - 1/4 cup vegetable oil - 1 large egg - 1 teaspoon vanilla extract Mix until the mixture is smooth. 3. Mix the Two Mixtures: Pour the wet mixture into the dry ingredients. Stir gently until just combined. It's okay if there are a few lumps. 1. Fold in Chocolate Chips: Add 1/2 cup of chocolate chips to the batter. Gently fold them in, saving a few for the top. 2. Fill Muffin Tin: Spoon the batter into the prepared muffin tin. Fill each cup about 2/3 full to allow for rising. 3. Add Whipped Coffee: Top each muffin with a dollop of whipped coffee. Use the back of a spoon to spread it gently. Sprinkle the reserved chocolate chips on top for extra flavor. 4. Baking Process: Place the muffin tin in the oven and bake for 18-20 minutes. Check doneness by inserting a toothpick in the center. It should come out clean. Now, you have a delightful treat ready to enjoy! To make great muffins, avoid overmixing. When you mix the wet and dry ingredients, stir gently. A few lumps in the batter is okay. This keeps the muffins light and fluffy. Using cooled coffee is key. Hot coffee can cook the egg and change the texture. Brew your coffee ahead and let it cool before using it in the mix. To boost flavor, try adding spices like cinnamon or nutmeg. These spices can add warmth and depth to your muffins. You can also play with chocolate chips. Dark or semi-sweet chips work well. If you want, try white chocolate or even peanut butter chips for a twist. Serve these muffins warm on a pretty plate. Dust them with powdered sugar for a sweet touch. You can also add a side of whipped cream. This adds a creamy element that pairs well with the muffins. For a fun garnish, place a chocolate chip on top of the whipped coffee. This makes each muffin look even more inviting. {{image_2}} You can easily make these muffins fit your diet. For gluten-free options, use a gluten-free flour blend. This will keep the texture light and fluffy. When using gluten-free flour, measure carefully for the best results. If you want vegan muffins, replace the egg with a flax egg. To make a flax egg, mix one tablespoon of ground flaxseed with three tablespoons of water. Let it sit for five minutes. Also, use a plant-based oil, like coconut or canola oil. You can swap the milk for almond or oat milk too. Get creative with flavors! Adding nuts, like walnuts or pecans, gives a nice crunch. Chopped fruits, like bananas or berries, can add sweetness and moisture. You can also try using different coffee flavors. For a stronger taste, use espresso in place of brewed coffee. This will give your muffins a richer coffee flavor that pairs well with chocolate. Want smaller bites? Make mini muffins instead of standard ones. This way, you can enjoy more without feeling too full. Just fill the mini muffin tin about halfway. Bake for around 12-15 minutes. Always check with a toothpick to see if they are done. If you prefer standard muffins, follow the original recipe. Adjust the baking time to 18-20 minutes. Each method offers a fun way to enjoy these tasty treats! To keep your muffins fresh, store them in an airtight container. This helps prevent them from drying out. You can also wrap them in plastic wrap before placing them in the container. For extra care, add a slice of bread in the container. This slice will help maintain moisture. Try to store your muffins at room temperature. Avoid placing them in the fridge, as it can make them stale faster. Freezing muffins is simple and effective. First, let the muffins cool completely. Then, wrap each muffin in plastic wrap. Place the wrapped muffins in a freezer bag, removing as much air as possible. This will help prevent freezer burn. When you're ready to enjoy a muffin, take it out and let it thaw at room temperature. You can also warm it in the microwave for about 15 seconds for a fresh taste. When stored correctly, these muffins can last up to 3 days at room temperature. If you choose to freeze them, they can last for about 3 months. Always check for signs of spoilage. If you see mold or if they smell off, it’s best to throw them away. Enjoy your Whipped Coffee Chocolate Chip Muffins while they are fresh for the best taste! What is whipped coffee and how is it made? Whipped coffee, also known as Dalgona coffee, is a frothy coffee drink. To make it, mix equal parts instant coffee, sugar, and hot water. Use a whisk or mixer to beat it until it becomes thick and creamy. It's a fun topping for many desserts, including these muffins. Can I substitute ingredients in this recipe? Yes, you can! For the flour, you can use a gluten-free blend. You can also swap the sugar for a natural sweetener, like honey or maple syrup. If you need dairy-free options, use almond milk instead of regular milk. How do I know when muffins are done? Muffins are done when a toothpick inserted into the center comes out clean. You may also see a golden-brown top. If the toothpick has batter on it, give them a few more minutes in the oven. Can I use instant coffee instead of brewed coffee? Yes, you can use instant coffee. Just mix it with hot water to dissolve it before adding to your wet ingredients. This will give your muffins a nice coffee flavor. What drinks pair well with these muffins? These muffins pair well with a hot cup of coffee or a creamy latte. A glass of cold milk also balances the rich chocolate flavors. For a fruity twist, try a berry smoothie. Can I serve these muffins for breakfast or dessert? You can serve these muffins for both! They are great as a sweet breakfast treat or a dessert. Add a scoop of ice cream on top for a fun dessert option. You've learned how to make tasty muffins with clear steps and helpful tips. We covered dry and wet ingredients, mixing them just right, and how to personalize your muffins. Remember, cool coffee is key, and don’t overmix for perfect results. Enjoy your creation for breakfast or a snack. Whether you freeze them or serve them fresh, these muffins are a delicious treat you’ll love sharing. Now get baking and enjoy your sweet success!

Whipped Coffee Chocolate Chip Muffins Irresistible Treat

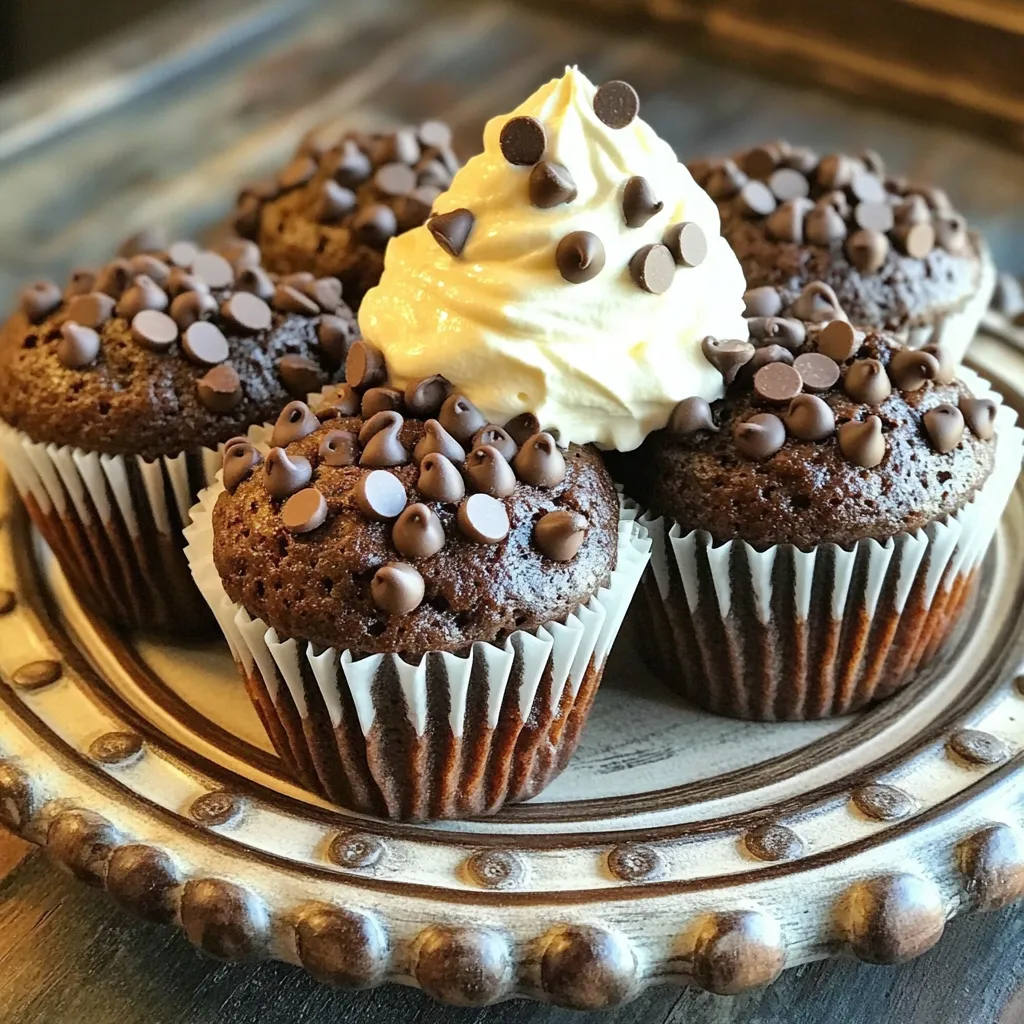
If you love coffee and chocolate, get ready for a treat! Whipped Coffee Chocolate Chip Muffins blend rich flavors into

- 2 packages of instant ramen noodles (discard the seasoning packets) - 1 cup bell peppers (red, yellow, or green), sliced - 1 cup broccoli florets - 1 cup carrots, julienned - 2 cloves garlic, minced - 1 inch fresh ginger, grated - 1 cup heavy cream - 2 tablespoons soy sauce - 1 tablespoon sesame oil - 1 tablespoon sriracha (adjust to taste) - Salt and pepper to taste - ½ cup green onions, chopped (plus extra for garnish) - Sesame seeds Gather these simple ingredients to create a creamy ramen stir-fry. The instant ramen noodles act as a great base. Fresh vegetables add crunch and color. Garlic and ginger give it a nice kick. The heavy cream makes it rich and smooth. Soy sauce and sesame oil bring umami flavors. Adjust the sriracha for spice. Finally, top it off with green onions and sesame seeds for extra flair. Enjoy the fun of making this dish! Boil a pot of salted water. Add two packages of instant ramen noodles. Cook them for about three minutes. They should be just tender. Drain the noodles and rinse them under cold water. This stops the cooking process. Set the noodles aside for later. Heat one tablespoon of vegetable oil in a large skillet or wok. Use medium-high heat for best results. Add two cloves of minced garlic and one inch of grated ginger. Sauté for about thirty seconds until you smell their great aroma. Next, add one cup of sliced bell peppers, one cup of broccoli florets, and one cup of julienned carrots. Stir-fry these vegetables for four to five minutes. They should be tender but still crisp. Push the vegetables to one side of the skillet. Place the cooked ramen noodles in the center. Drizzle two tablespoons of soy sauce, one tablespoon of sesame oil, and one tablespoon of sriracha over the noodles. Pour in one cup of heavy cream. Stir everything together until it mixes well and becomes creamy. Cook for an additional two to three minutes. This allows the dish to heat through and thicken. Season with salt and pepper to taste. Adjust the spice level with more sriracha, if you like. Finally, remove the skillet from heat and stir in half a cup of chopped green onions. To get that smooth, creamy feel, you can tweak the cream and sauce amounts. Start with the recipe’s heavy cream. If you want it richer, add more cream slowly. If it’s too thick, add a splash of broth or water. This will help you find the right balance. Want more heat? You can add extra sriracha to boost the spice. Taste as you go. If you like it mild, hold back. You can also adjust the soy sauce and sesame oil to match your taste. A little extra can make a big difference! For perfect noodles, cook them until they are just tender. Rinse them to stop cooking. For veggies, stir-fry until they are crisp but tender. This keeps them bright and fresh. You want crunch in each bite! {{image_2}} You can make this dish even better by adding protein. Here are some great options: - Chicken: Use cooked, shredded chicken. It adds a nice texture and flavor. - Shrimp: Toss in peeled and deveined shrimp. Cook them until pink and tender. - Tofu: For a plant-based choice, add cubed tofu. Sauté it until golden. Adding any of these will boost your meal's nutrition and make it heartier! If you want to keep it plant-based, you have some great swaps. Here are my favorites: - Cream: Use coconut cream or cashew cream instead of heavy cream. Both add a rich flavor. - Ramen: Try using rice noodles or whole grain noodles. They work well and are often gluten-free. These options keep the dish creamy while staying true to vegetarian or vegan diets. Let's talk about how to change the taste! You can easily mix in different sauces or spices: - Soy Sauce: Try tamari for a gluten-free option. It has a similar taste. - Spices: Add garlic powder or crushed red pepper for extra kick. - Sauces: Experiment with teriyaki sauce or hoisin sauce. They bring unique flavors. These variations help you create a new dish every time! To keep your creamy ramen fresh, use airtight containers. Glass or plastic containers work well. Make sure they seal tightly to prevent air from getting in. You can also divide leftovers into single-serving sizes for easy meals later. Reheat your ramen on the stove for the best results. Add a splash of milk or water to keep it creamy. Heat over medium-low until warm. Stir often to avoid sticking. You can also use a microwave. Cover it with a microwave-safe lid and heat in short bursts, stirring in between. Stored properly, your creamy ramen lasts about 3 to 4 days in the fridge. Always check for any off smells or changes in texture before eating. If it looks or smells bad, it’s best to toss it out. Yes, you can use regular ramen. However, regular ramen takes a bit longer to cook. Instant ramen cooks faster and gives a nice chewy texture. If you use regular ramen, adjust the cooking time. Make sure to drain and rinse it well. This helps keep the noodles from sticking together. The base recipe has a little heat from sriracha. You can adjust the spice level. If you like it mild, start with a small amount of sriracha. You can always add more later. For extra heat, add more sriracha right before serving. Feel free to experiment until it’s just right for you. Yes, you can prepare this dish ahead. Cook the noodles and stir-fry the veggies. Store them separately in airtight containers in the fridge. When ready to eat, reheat the noodles and veggies together. Add the cream and sauce to keep it creamy. This dish tastes great even the next day! In this blog post, we explored how to make a creamy ramen dish. We covered the main ingredients like instant noodles, fresh veggies, and a rich sauce. You learned step-by-step instructions for cooking and combining everything. We also shared tips for perfecting texture and flavor. Plus, variations allow for tasty changes and easy vegetarian options. Store leftovers correctly to keep them fresh. Now, you can enjoy a quick, delicious meal any night. With these tips, your ramen will shine at dinner!

TikTok Creamy Ramen Noodle Stir-Fry Delight

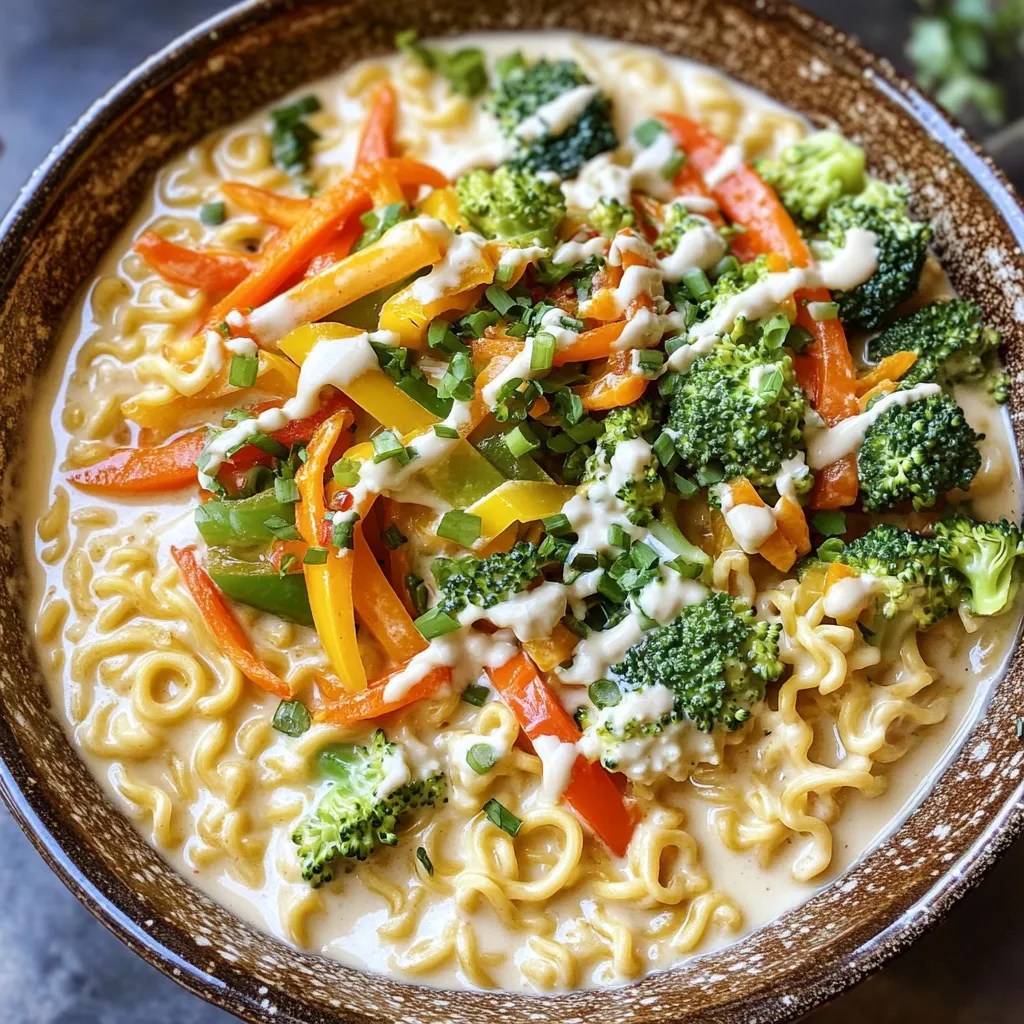
Craving a quick and tasty meal? You’ll love the TikTok Creamy Ramen Noodle Stir-Fry Delight! This dish is packed with

Older posts
Newer posts
← Previous Page1 … Page16 Page17 Page18 … Page85 Next →

dsad

© 2026 greenmealmap • Built with GeneratePress

Our Policies

  • Copyright Policy
  • Cookie Policy
  • GDPR Policy
  • Privacy Policy
  • Disclaimer
  • Terms Of Use

More Information

  • Home
  • About
  • Contact
  • Appetizers
  • Dessert
  • Dinner
  • Drinks
©2026, greenmealmap About Back To Top