Skip to content
DisclaimerTerms Of UseGDPR PolicyCookie Policy

greenmealmap

  • Home
  • Drinks
  • Appetizers
  • Dinner
  • Dessert
  • About
  • Contact
  • Privacy Policy
DisclaimerTerms Of UseGDPR PolicyCookie Policy

NO-ING-IMG

- 1 lb shrimp, peeled and deveined - 2 cups cooked jasmine rice (preferably day-old) - 4 cloves garlic, minced - 2 tablespoons chili paste (adjust to taste) - 1 tablespoon oyster sauce - 1 cup mixed vegetables (carrots, peas, corn) - 2 eggs, lightly beaten - 2 green onions, sliced - 2 tablespoons soy sauce - 3 tablespoons vegetable oil - Salt and pepper to taste When making Chili Garlic Shrimp Fried Rice, you'll need fresh shrimp. Use 1 lb of peeled and deveined shrimp for a great taste. Jasmine rice works best, so use 2 cups of cooked rice. It's ideal if the rice is day-old, as it stays fluffy. Garlic adds depth; use 4 cloves minced. For spice, include 2 tablespoons of chili paste, but adjust it based on your heat preference. You can add optional ingredients for more flavor. If you like, mix in 1 tablespoon of oyster sauce. Adding 1 cup of mixed veggies, like carrots, peas, or corn, can boost nutrition. Two lightly beaten eggs add richness, while 2 sliced green onions give freshness. For seasoning, 2 tablespoons of soy sauce brings umami. Use 3 tablespoons of vegetable oil for cooking, and season with salt and pepper to taste. This simple list of ingredients makes your meal tasty and satisfying. To make your shrimp full of flavor, mix them with chili paste and salt. Use 1 tablespoon of chili paste. Let the shrimp sit for about 10 minutes. This gives the flavors time to soak in. Using day-old rice is key. It stays fluffy and doesn’t clump together. If you use fresh rice, let it cool on a tray to separate the grains. This step helps keep the rice light and airy. First, heat 1 tablespoon of vegetable oil in a large skillet over medium-high heat. Add the marinated shrimp and cook for about 2-3 minutes. They should turn pink. Remove the shrimp and set them aside. Next, add more oil if needed, and pour in the beaten eggs. Scramble them until just set and then transfer them to a plate. After that, add the remaining oil to the skillet. Toss in the minced garlic and sauté it for about 30 seconds. Then, mix in the vegetables and cook for about 3-4 minutes until they are tender. Now, it's time to combine everything. Add the cooked rice to the skillet, breaking up any clumps. Pour in the soy sauce, oyster sauce if using, and the remaining chili paste. Stir well to mix everything. Reintroduce the shrimp and scrambled eggs back into the skillet. Season with salt and pepper. Stir-fry for about 2-3 minutes until heated through. Finally, add sliced green onions and give it one last mix. - Use day-old rice for best results. It helps keep the rice non-sticky. - If using fresh rice, spread it out on a tray to cool. This helps it fluff up. - Keep your heat at medium-high. This ensures quick cooking without burning. - Adjust the chili paste to suit your taste. More paste means more heat! - For milder flavors, try using sweet chili sauce instead of chili paste. - You can swap soy sauce for a gluten-free version. Tamari works well too. - Serve your fried rice in colorful bowls. This makes it more inviting. - Garnish with extra green onions for a fresh look. - A sprinkle of sesame seeds adds a nice crunch and visual appeal. {{image_2}} You can switch up the shrimp with different proteins. - Chicken: Use diced chicken breast instead of shrimp. Cook it until golden brown. This adds a nice twist. - Tofu: For a plant-based option, use firm tofu. Cut it into cubes and sauté until crispy. It absorbs flavors well. Not a fan of jasmine rice? Try these options. - Brown rice: This adds a nutty flavor. It takes longer to cook, so plan ahead. - Quinoa: Quinoa is a great gluten-free choice. It’s packed with protein and cooks quickly. You can make this dish fit your diet. - Using tempeh: Tempeh is a great protein source. Cube it and sauté until golden. It adds a hearty texture. - Veggie-only adaptations: Skip the shrimp and add more veggies. Use bell peppers, broccoli, or snap peas. This keeps the dish colorful and tasty. After enjoying your chili garlic shrimp fried rice, store leftovers in an airtight container. This keeps the flavors intact. Use a container that seals well to prevent air from getting in. In the fridge, your fried rice lasts about 3 to 4 days. Be sure to cool it down before placing it in the fridge. To reheat, use a skillet or a microwave. In a skillet, add a splash of water and heat over medium. Stir often to prevent sticking. In the microwave, cover the dish with a lid or a damp paper towel. This keeps moisture in and avoids sogginess. Heat in short bursts, stirring in between. You can freeze chili garlic shrimp fried rice for later. Use freezer-safe containers or bags to keep it fresh. Divide the rice into portions before freezing. This makes it easy to thaw just what you need. When you're ready to eat, thaw it in the fridge overnight or use the microwave. Can I use frozen shrimp? Yes, you can use frozen shrimp for this recipe. Just thaw them first. Place the shrimp in cold water for about 20 minutes. This helps them cook evenly. What is the best rice for fried rice? Jasmine rice works best for fried rice. It has a nice texture and flavor. Day-old rice is even better since it's drier and won't clump together. How do I make the dish spicier? To add more heat, increase the chili paste. You can also sprinkle some crushed red pepper flakes. Adjust to your taste for the right kick. Is there a gluten-free option for the soy sauce? Yes, you can use gluten-free soy sauce or tamari. Both options give the same umami flavor without gluten. Can I add other vegetables? Absolutely! Feel free to add bell peppers, broccoli, or snap peas. Mix and match to your liking for added color and nutrition. This blog covered all you need to know for cooking shrimp fried rice. We discussed key ingredients like shrimp, rice, and garlic. You learned step-by-step how to marinate shrimp and fry rice perfectly. We shared helpful tips for flavoring, presentation, and variations for the dish. In the end, shrimp fried rice is easy and fun to make. You can customize it to fit your taste. Enjoy experimenting with flavors and share your delicious creation!

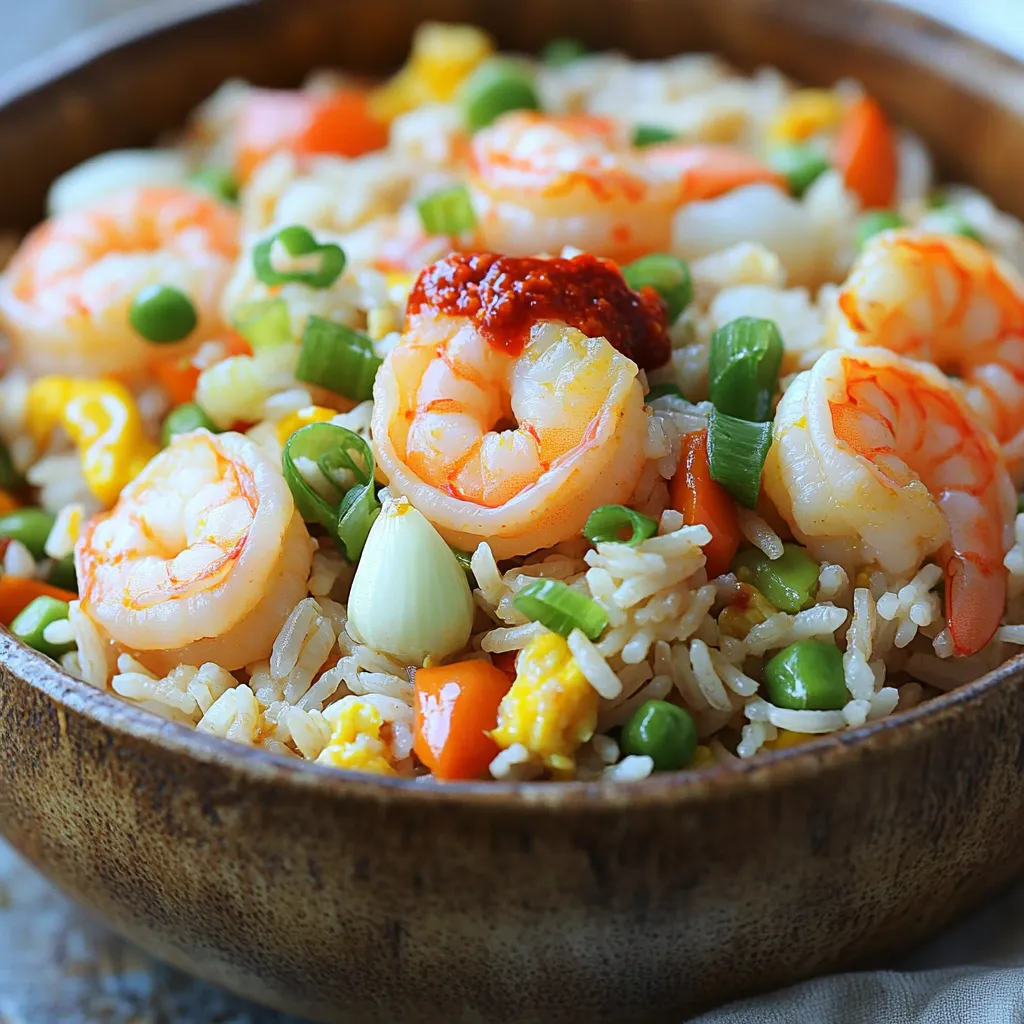
Chili Garlic Shrimp Fried Rice Simple and Tasty Meal

Craving a delicious and quick meal? Chili Garlic Shrimp Fried Rice is your answer! This dish is packed with flavor

- 2 cups Greek yogurt (plain or vanilla) - 1 cup fresh blackberries (plus extra for garnish) - 1/4 cup honey or maple syrup - 1 cup granola (your choice) - Fresh mint leaves for garnish (optional) - Zest of 1 lemon - Juice of 1/2 lemon In this recipe, the main players are Greek yogurt, fresh blackberries, and a sweetener like honey or maple syrup. Greek yogurt gives our parfait a creamy texture and rich taste. It’s packed with protein, making it a healthy base. Fresh blackberries add a burst of flavor and color. They also provide vitamins and antioxidants. For sweetness, honey or maple syrup makes each spoonful a delight. You can elevate your parfait with optional ingredients. Granola adds a nice crunch and fills you up. Fresh mint leaves can bring a refreshing twist. Adding lemon zest and juice brightens the flavor. It adds a zesty kick that pairs well with the blackberries. Each ingredient works together to make a tasty and healthy treat. {{ingredient_image_1}} To start, grab a medium bowl. Add 2 cups of Greek yogurt to the bowl. Next, pour in 1/4 cup of honey or maple syrup. This adds sweetness. Then, add the zest of 1 lemon. Don't skip this step, as it brings bright flavor. Finally, squeeze in the juice of 1/2 lemon. This adds tang. Mix all the ingredients well until the mixture is smooth and creamy. You want a consistency that is easy to spoon out. Now it’s time to layer your parfait. Take your serving glasses or bowls. Start by adding a generous spoonful of your lemon yogurt mixture at the bottom. This will be the first layer. Next, sprinkle a layer of granola on top of the yogurt. This gives a nice crunch. After that, add a layer of fresh blackberries. Use about 1 cup of fresh blackberries for this. Repeat the layers until you fill the glasses. Always end with a layer of the lemon yogurt on top. This looks great and keeps everything in place. To make your parfaits look special, it’s time for garnishing. Add extra blackberries on top of each parfait. This makes them pop with color. If you like, add a sprig of fresh mint for a lovely touch. Mint adds a fresh aroma. Serve the parfaits right away for the best taste. You can also refrigerate them for up to an hour. This helps the flavors blend nicely. To mix yogurt smoothly, start with a medium bowl. Use a whisk or fork to blend. Combine the Greek yogurt, honey or maple syrup, lemon zest, and lemon juice. Mix until you have a creamy texture. This step is key to a tasty parfait. If you find lumps, keep mixing. The smoother the yogurt, the better your parfait will taste. You can boost flavors with fun additions. Try adding a pinch of cinnamon or vanilla extract. For a fruity twist, mix in some mashed bananas or chopped strawberries. You could also use flavored yogurt instead of plain. Each addition brings a new taste to your parfait. Get creative and find what you love. Use clear glasses or jars to show off your layers. Tall glasses work well for a pretty view. Keep servings small for a fun treat. Add extra blackberries on top for color. A sprig of fresh mint adds a nice touch. These simple garnishes make your parfait look special. Enjoy the beauty and taste of your creation! Pro Tips Choose Your Yogurt Wisely: Opt for full-fat or Greek yogurt for a creamier texture and richer flavor in your parfait. Layering Technique: For the best presentation, use clear glasses to showcase the beautiful layers of yogurt, granola, and blackberries. Freshness is Key: Always use fresh blackberries for the best taste and texture; frozen berries can become mushy when thawed. Make Ahead Option: Prepare the yogurt mixture and granola ahead of time, but layer just before serving to keep the granola crunchy. {{image_2}} You can switch blackberries for many other fruits. Try strawberries, blueberries, or raspberries. Seasonal fruits like peaches or mangoes work great too. Each fruit brings its own taste and charm. Mix and match to find your favorite flavors. If you want, use dairy-free yogurt made from almond or coconut. These options taste great and are good for those who avoid dairy. You can also try flavored yogurts. Vanilla or lemon yogurts add a nice twist to the parfaits. You can use store-bought granola for a quick option. Look for brands that have less sugar. If you want, make your own granola at home. Mix oats, nuts, and honey, then bake until golden. Homemade granola lets you control the flavors and crunch. Store your parfaits in an airtight container. This keeps them fresh and safe. If you have leftovers, cover them well. They can stay in the fridge for up to two days. However, the granola may get soggy. To avoid this, keep granola separate. Add it right before serving. You can freeze parfaits, but it changes the texture. The yogurt may become icy when thawed. If you still want to freeze them, use an airtight container. Just remember to eat them within a month for best taste. For the best taste and texture, eat your parfaits fresh. Enjoy within a few hours of making them. If you must refrigerate, consume within two days. This way, you will savor the bright flavors of lemon and blackberries. Yes, you can make these parfaits ahead of time. I recommend preparing the yogurt layer and granola separately. Store the yogurt in the fridge and the granola in an airtight container. Layer them right before serving. This keeps the granola crunchy and the yogurt fresh. To make the yogurt mixture less tart, you can add more honey or maple syrup. Start with a bit more sweetener and taste it. Adjust until it suits your taste. You might also use vanilla yogurt instead of plain. This will add sweetness and flavor. Yes, you can use frozen blackberries. But keep in mind they may release more juice than fresh ones. Thaw them first and drain excess liquid. This will help keep your parfait from becoming too soggy. You can also use them directly if you like a softer texture. You should eat these parfaits within one day if stored in the fridge. The granola can get soft if left too long. If you want them to last longer, keep yogurt and granola separate. Combine them only when ready to eat. If you want a different taste, you can use regular yogurt. You could also try dairy-free yogurt made from almond or coconut. Just make sure it has a creamy texture to get the best results. Absolutely! You can add any fruit you love. Strawberries, blueberries, or peaches work great. Just chop them into small pieces to layer easily. This adds flavor and color to your parfait as well. You can swap granola for nuts or seeds if you want. This adds healthy fats and protein. You might also cut back on the sweetener if you prefer less sugar. This keeps it light but still tasty. Yes, these parfaits make a great party dessert! You can prepare them in clear cups for a nice look. Guests will love the layers of color and flavor. Plus, they are easy to grab and eat. This blog post shared how to create delicious Blackberry Lemon Yogurt Parfaits. You learned about key ingredients like Greek yogurt and sweeteners, plus options like granola and mint. The step-by-step guide showed you how to mix, layer, and present your parfaits. I included tips for texture and flavor, along with storage advice. You can vary this recipe to keep it fresh. Enjoy making your parfaits, and don’t forget to experiment with flavors. Dive into this tasty treat and share it with those you love!

Blackberry Lemon Yogurt Parfaits Simple and Tasty Treat

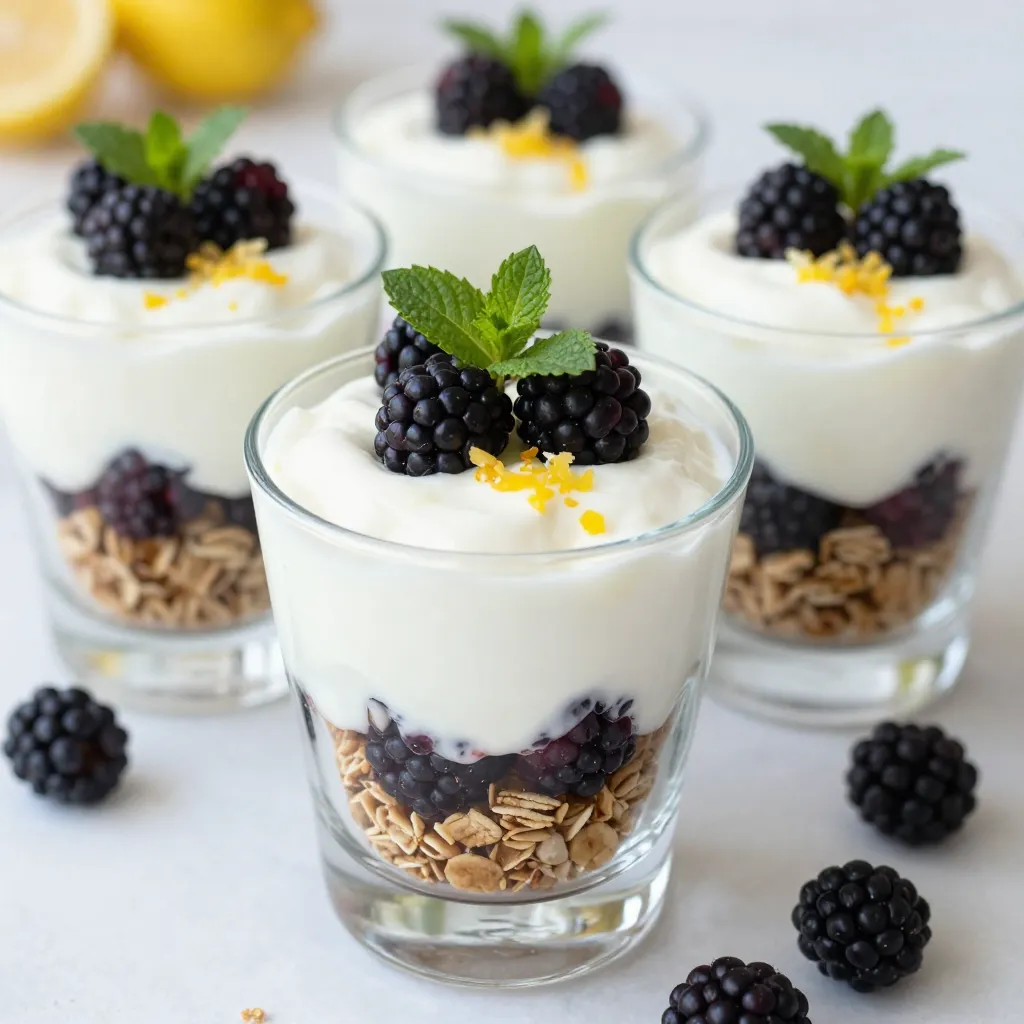
Looking for a delicious and simple treat? Let me introduce you to Blackberry Lemon Yogurt Parfaits! This tasty dessert is

- 1 lb chicken thighs, boneless and skinless - 1/2 cup all-purpose flour - 1 teaspoon paprika - 1/2 teaspoon garlic powder - 1/2 teaspoon onion powder - 1/2 teaspoon salt - 1/4 teaspoon black pepper - 1/4 cup honey - 2 tablespoons soy sauce - 2 tablespoons minced garlic - 1 tablespoon apple cider vinegar To make this dish perfect, you need tender chicken thighs. They cook well and stay juicy. The flour mixture gives the chicken a nice crunch. The spices add great flavor. The honey garlic sauce ties everything together with sweetness and depth. - 2 tablespoons sesame seeds - Chopped green onions Garnishes are key. Sesame seeds give a nutty crunch. The green onions add freshness and color. Together, they make your dish look and taste amazing. Don't skip these steps; they enhance your meal! First, gather your dry ingredients. In a large bowl, mix together: - 1/2 cup all-purpose flour - 1 teaspoon paprika - 1/2 teaspoon garlic powder - 1/2 teaspoon onion powder - 1/2 teaspoon salt - 1/4 teaspoon black pepper This blend is your dredging mixture. It gives the chicken a nice crunch and flavor. Make sure it’s mixed well so each piece of chicken gets coated evenly. Next, cut the chicken thighs into bite-sized pieces. This helps them cook faster and makes them easy to eat. Then, take the chicken pieces and coat them in your flour mix. Make sure to cover each piece fully but shake off any extra flour. This step is key for that crispy texture! Now, it's time to cook! Preheat your air fryer to 380°F (190°C) for about 5 minutes. This helps the chicken start cooking right away. Once preheated, place the chicken in a single layer in the basket. For extra crispiness, lightly spray them with cooking oil. Air fry the chicken for 10 minutes. Make sure to shake the basket halfway through. This ensures even cooking and helps achieve that golden-brown color. While the chicken cooks, prepare the honey garlic sauce. In a saucepan over medium heat, combine: - 1/4 cup honey - 2 tablespoons soy sauce - 2 tablespoons minced garlic - 1 tablespoon apple cider vinegar Let it simmer for about 5 minutes until it thickens slightly. Once the chicken is done, transfer it to a bowl and pour the sauce over it. Toss the chicken to coat it well. For the final touch, return the coated chicken to the air fryer basket for another 2-3 minutes. This caramelizes the sauce and enhances the flavor. After that, let the chicken rest for a minute. Sprinkle with sesame seeds and chopped green onions before serving. Enjoy your crispy honey garlic chicken! To get that perfect crunch, the flour mixture is key. I use all-purpose flour mixed with spices. This blend adds flavor and helps the chicken crisp up nicely. Make sure you coat each piece well. Shake off extra flour; too much can make it gummy. A light spray of cooking oil is crucial. It helps the chicken get golden and crunchy as it cooks. For the honey garlic sauce, I use simple ingredients. Combine honey, soy sauce, minced garlic, and apple cider vinegar. Cook this mix over medium heat. Stir it gently and let it simmer for five minutes. This helps the sauce thicken and build flavor. Adjust the sweetness by adding more honey or vinegar for a tangy taste. Tasting is important, so find what you like best! I love serving this dish with steamed rice or a fresh salad. The rice soaks up the extra sauce, making each bite delightful. For presentation, use a large platter. Drizzle additional honey garlic sauce on top. Garnish with sesame seeds and chopped green onions for color. This makes the dish look tasty and inviting! {{image_2}} You can swap chicken thighs for chicken breast. Chicken breast is leaner but still tasty. Tofu is a great choice for a plant-based meal. Just press it to remove water first. Cut it into bite-sized pieces like the chicken. Then, coat it in the dredging mixture. Follow the same air frying steps for the best results. Want to kick up the flavor? Add spices like cayenne or chili powder. These will give a nice heat. You can also switch up the sauce. Try teriyaki or sweet chili sauce instead of honey garlic. Each option brings a new twist to the dish. Experiment with what you like best. Looking for lower-calorie options? Use almond flour instead of all-purpose flour. It has fewer carbs and adds a nutty taste. You can also try gluten-free soy sauce for a gluten-free meal. For a lighter sauce, mix honey with a bit of water. This makes it less sticky while keeping the sweet flavor. To store leftovers, place the chicken in an airtight container. This keeps it fresh for up to three days. Make sure the chicken is cool before sealing the container. If you want to keep it crispy, store the sauce separately. This way, it won't make the chicken soggy. For freezing, let the chicken cool completely. Then, place it in a freezer-safe bag. Squeeze out the air before sealing. You can freeze the chicken for up to three months. If you freeze the sauce, store it in a separate container. Thaw the chicken and sauce in the fridge before using. To reheat and keep the chicken crispy, use your air fryer. Set it to 350°F (175°C) and heat for about 5-7 minutes. You can also use an oven. Place the chicken on a baking sheet and heat at 375°F (190°C) for 10 minutes. This helps maintain the crispiness of the chicken. Yes, you can use frozen chicken. However, you need to thaw it first. Place the frozen chicken in the fridge overnight. If you are short on time, use the microwave's defrost setting. After thawing, pat the chicken dry. This step helps the coating stick better. If you air fry chicken without coating, cook it for about 12-15 minutes. Check for an internal temperature of 165°F (74°C). Adjust the time if your chicken pieces are larger. Always shake the basket halfway for even cooking. This method keeps the chicken juicy and tender. You can use maple syrup or agave nectar as a sweetener. Both options add a unique flavor. If you prefer less sweetness, try using brown sugar. Mix it with a bit of water to create a syrup-like consistency. Each substitute changes the taste slightly, so experiment to find your favorite! This article covered how to make a tasty honey garlic chicken in an air fryer. We explored the key ingredients, including chicken thighs and a flavorful sauce. I shared step-by-step instructions for a crispy coating and perfect cooking time. Remember to consider alternative proteins and smart storage tips. You can enjoy this dish in so many ways. With practice, you'll master both the recipe and your air fryer skills. Try it out, and enjoy a yummy meal tonight!

Air Fryer Crispy Honey Garlic Chicken Delight

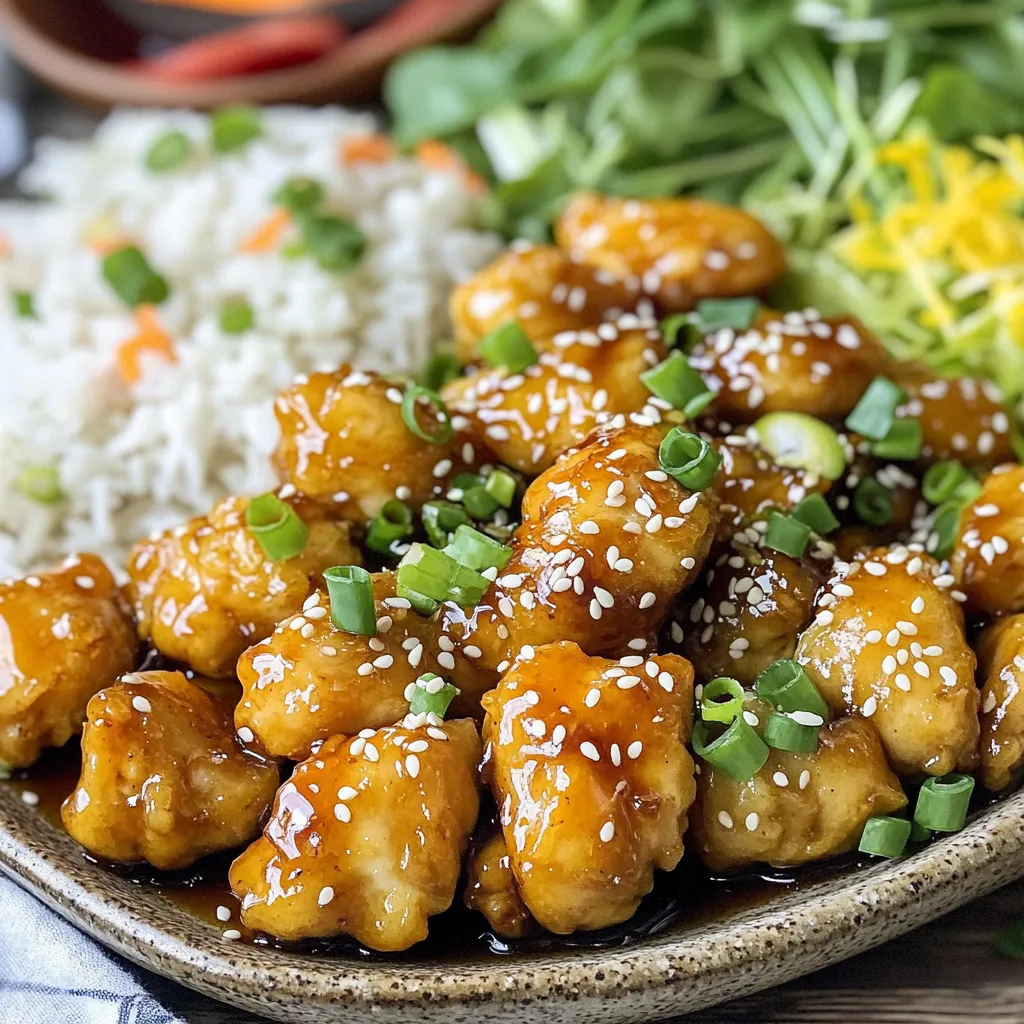
Are you ready to elevate your dinner game? This Air Fryer Crispy Honey Garlic Chicken is a delicious twist on

Chicken and Rice Components - 4 boneless, skinless chicken breasts - 1 cup uncooked brown rice - 1 cup frozen mixed vegetables (peas, carrots, corn) - 1 medium onion, diced Creamy Base Ingredients - 1 can (10.5 oz) cream of mushroom soup - 1 can (10.5 oz) cream of chicken soup - 2 cups low-sodium chicken broth Seasonings and Optional Toppings - 3 cloves garlic, minced - 1 teaspoon dried thyme - 1 teaspoon paprika - Salt and pepper to taste - 1 cup shredded cheddar cheese (optional, for topping) - Fresh parsley, chopped (for garnish) Each ingredient plays a key role. The chicken gives protein and flavor, while the rice adds texture. The cream soups create a rich, smooth base. Mixed veggies bring color and nutrition. The spices enhance the dish with warmth. Feel free to use cheese for a creamy topping, and parsley for a fresh touch. Preparing the Ingredients Start by getting your ingredients ready. You will need: - 4 boneless, skinless chicken breasts - 1 cup uncooked brown rice - 1 can (10.5 oz) cream of mushroom soup - 1 can (10.5 oz) cream of chicken soup - 2 cups low-sodium chicken broth - 1 cup frozen mixed vegetables (peas, carrots, corn) - 1 medium onion, diced - 3 cloves garlic, minced - 1 teaspoon dried thyme - 1 teaspoon paprika - Salt and pepper to taste - 1 cup shredded cheddar cheese (optional, for topping) - Fresh parsley, chopped (for garnish) Once you have everything, chop the onion and mince the garlic. Layering in the Slow Cooker Place the chicken breasts at the bottom of the slow cooker. This helps the chicken cook evenly. In a bowl, mix the cream of mushroom soup, cream of chicken soup, and chicken broth. Pour this mixture over the chicken. Add the uncooked brown rice, diced onion, garlic, and frozen veggies. Sprinkle in the thyme, paprika, salt, and pepper. Stir gently to mix everything. Cooking Time and Temperature Settings Cover the slow cooker and set it to low for 6-7 hours or high for 4-5 hours. The chicken should be cooked through, and the rice will be tender. Use a quick read thermometer if you are unsure. Chicken should reach 165°F for safety. Shredding the Chicken and Adding Cheese When cooking is done, take two forks and shred the chicken right in the slow cooker. This makes it easier to mix with the rice and veggies. Stir well to combine everything. If you like cheese, sprinkle it on top. Cover the slow cooker for about 10 minutes. This lets the cheese melt nicely. Garnishing for Serving Before serving, chop some fresh parsley. Sprinkle it over the creamy chicken and rice. This adds a nice touch and makes your dish look great. Enjoy your meal! Ensuring Perfectly Cooked Chicken and Rice To get tender chicken and fluffy rice, follow these steps: - Use boneless, skinless chicken breasts for even cooking. - Place the chicken at the bottom of the slow cooker. - Add the uncooked rice right above the chicken. - Stir the rice and other ingredients well, so they mix evenly. - Keep the lid on during cooking to seal in moisture. - Check the chicken with a meat thermometer; it should reach 165°F. Recommended Slow Cooker Settings I recommend using the low setting for this dish. It allows flavors to meld well. Cook on low for 6-7 hours or high for 4-5 hours. If you're in a rush, the high setting works fine. Just remember that the low setting yields richer flavors. Accompaniments and Side Dishes This creamy chicken and rice dish pairs well with simple sides, like: - Steamed broccoli or green beans for a fresh crunch. - A light garden salad for a refreshing contrast. - Garlic bread for extra flavor and a filling option. - Sliced avocado adds creaminess and healthy fats. Alternatives for Cream Soups and Vegetables If you want to switch things up or need alternatives, try these: - Use homemade cream of chicken or mushroom soup for a fresher taste. - Swap frozen mixed vegetables with fresh ones for better texture. - If you dislike certain veggies, use peas, bell peppers, or even spinach. - For a lighter option, use low-fat cream soups or broth. {{image_2}} You can change the dish's taste with herbs and spices. Try adding fresh herbs like basil or dill for a fresh kick. You might also enjoy using rosemary for a warm flavor. A dash of cayenne pepper can bring heat, while a touch of lemon zest adds brightness. Each of these changes makes your meal special and fun. If you need gluten-free options, there are easy swaps. Use gluten-free cream soups instead of regular ones. Choose gluten-free broth, too. You can also use brown rice or quinoa, which are naturally gluten-free. These swaps keep your dish tasty without gluten. Feel free to switch up the meat or rice type. You could use turkey instead of chicken for a leaner choice. For a vegetarian version, swap chicken for chickpeas or lentils. You can also try different rice types like jasmine or basmati for varied textures and flavors. Each swap gives a new twist and keeps the dish exciting. To store your slow cooker creamy chicken and rice, let it cool first. Place the leftovers in an airtight container. You can keep it in the fridge for up to three days. When you reheat, make sure to check that the food is hot all the way through. You can freeze this dish for later meals. First, let it cool completely. Then, transfer it to a freezer-safe container. Make sure to leave space at the top, as the rice may expand. It will stay good for up to three months in the freezer. To reheat your creamy chicken and rice, use the stove or microwave. If using the stove, place it in a pot over low heat. Stir it often to heat it evenly. If using the microwave, heat in short bursts, stirring in between. Add a splash of broth or water if it seems dry. This helps keep the dish creamy and tasty. How long can I store Slow Cooker Creamy Chicken and Rice? You can store this dish in the fridge for up to four days. Make sure to place it in an airtight container. If you want to keep it longer, you can freeze it. In the freezer, it lasts for about three months. Just remember to thaw it in the fridge before reheating. Can I make this recipe in advance? Yes, you can prepare this dish ahead of time. You can layer all the ingredients in the slow cooker and keep it in the fridge overnight. Just take it out in the morning and start cooking. This makes it easy for busy days. If you prefer, you can also cook it and store the leftovers for later. What should I do if the rice is not cooked through? If the rice is not fully cooked, don’t worry! You can add a bit more chicken broth and cook it for an extra 30 minutes. Make sure to check if the chicken is done too. Stirring helps the rice cook evenly. If the rice is still hard, it may need more liquid. This blog post covers all you need to make creamy chicken and rice in a slow cooker. We discussed the key ingredients, preparation steps, and cooking tips to ensure perfect results. You learned about variations and ingredient swaps for different tastes and diets. I also shared storage tips to help you save leftovers for later. Overall, this dish is simple, tasty, and adaptable. You can impress your family with this easy meal that suits any occasion. Enjoy making it and experimenting with your own twists!

Savory Slow Cooker Creamy Chicken and Rice Recipe

Are you ready for a comforting meal that practically cooks itself? My Savory Slow Cooker Creamy Chicken and Rice Recipe

- 1 ½ cups graham cracker crumbs - ½ cup unsalted butter, melted - 1 cup cream cheese, softened - ½ cup granulated sugar - 1 teaspoon vanilla extract - 1 cup pumpkin puree - 2 large eggs - 2 teaspoons pumpkin spice mix - ½ cup strong brewed coffee, cooled - 1 tablespoon cornstarch - Pinch of salt - Whipped cream and ground cinnamon for topping To make these Pumpkin Spice Latte Cheesecake Bars, you need a few key ingredients. First, I recommend using high-quality pumpkin puree. It gives the bars a rich flavor. You can use canned puree or make your own by roasting fresh pumpkins. Next, let's talk about coffee. A strong brewed coffee works best for this recipe. It adds depth to the cheesecake. You can use espresso or any coffee you prefer, but ensure it’s strong. The graham cracker crumbs form a crunchy base. You can crush whole crackers or buy pre-made crumbs. Just make sure they are finely ground for a smooth crust. When it comes to the cream cheese, use full-fat for a creamy texture. Softened cream cheese blends better and helps avoid lumps. For optional toppings, I suggest whipped cream and ground cinnamon. They add a lovely finish to each bar. A dollop of whipped cream makes it extra special, while cinnamon brings out the spices in the cheesecake. With these ingredients, you will create a delightful treat that captures the essence of fall. Enjoy the process, and remember, each ingredient plays a vital role in the final flavor! 1. Prepping the oven and baking pan Start by preheating your oven to 350°F (175°C). This ensures a good bake. Next, line a 9x9 inch baking pan with parchment paper for easy removal later. 2. Making the graham cracker crust In a medium bowl, mix 1 ½ cups of graham cracker crumbs with ½ cup of melted unsalted butter. Stir until the crumbs are fully coated and crumbly. Press this mixture firmly into the bottom of your prepared pan. This crust will hold the cheesecake bars together. 3. Preparing the cheesecake filling In a large mixing bowl, beat 1 cup of softened cream cheese until smooth. Gradually add ½ cup of granulated sugar, mixing until creamy. Then, stir in 1 teaspoon of vanilla extract and 1 cup of pumpkin puree. Next, add 2 large eggs, 2 teaspoons of pumpkin spice mix, ½ cup of cooled brewed coffee, 1 tablespoon of cornstarch, and a pinch of salt. Beat until everything is well combined and smooth. 4. Baking and cooling instructions Pour the cheesecake filling over the crust and spread it evenly. Bake in the preheated oven for 30-35 minutes. The edges should set, but the center will have a slight jiggle. Once done, turn off the oven and crack the door open. Let the cheesecake bars cool in the oven for about 30 minutes. This helps prevent cracks. 5. Final chilling before serving After cooling, refrigerate the bars for at least 3 hours. This allows them to set completely. Once chilled, cut into bars. Serve with whipped cream and a sprinkle of ground cinnamon for a delightful touch. Enjoy making these creamy, pumpkin spice latte cheesecake bars! How to avoid cracking in cheesecake To stop cracks, always cool your cheesecake slowly. After baking, turn off the oven and crack the door. Let the bars cool for 30 minutes inside. This helps keep them nice and smooth. Checking doneness of cheesecake bars To know if your cheesecake is done, look at the edges. They should be set, while the center has a slight jiggle. This means they are ready to cool down. Tips for ensuring smooth filling For a creamy filling, mix the cream cheese until it's very smooth. Add ingredients slowly and mix well. Be sure to add the eggs one at a time. This keeps air bubbles from forming, making your filling nice and smooth. Presentation ideas For a beautiful plate, top your bars with whipped cream. Add a sprinkle of ground cinnamon for flavor and style. You can serve them on a colorful plate to make them pop. Pairing with beverages These cheesecake bars go great with a cup of strong coffee. The coffee flavor matches the bars well. You can also enjoy them with hot cocoa for a cozy treat. {{image_2}} You can easily change the flavor of your cheesecake bars. Try adding chocolate chips or a drizzle of caramel on top. These extra flavors make each bite exciting. You can also mix in nuts like pecans or walnuts for added crunch. If you want to switch up the spices, use cinnamon or nutmeg instead of pumpkin spice. You can even create a chai spice blend for a unique twist. The options are endless, so feel free to get creative! If you need a gluten-free version, use gluten-free graham crackers for the crust. They work just as well and taste great. For a dairy-free option, swap the cream cheese with a dairy-free alternative. Brands like Tofutti or Kite Hill make good choices. These changes will help you enjoy this treat without worry. You can still have fun with flavors while meeting your dietary needs. To keep your pumpkin spice latte cheesecake bars fresh, store them in the fridge. Place them in an airtight container. They will last about five days in the fridge. If you want to save some for later, you can freeze them. Cut the bars into pieces and wrap each one in plastic wrap. Then, put them in a freezer-safe bag. These bars can stay good for up to three months in the freezer. Just remember to label and date the bags. This helps you know when to enjoy them again! When you want to eat your cheesecake bars again, you do not need to heat them. They taste great cold! If you prefer to warm them up, do so gently. You can microwave them for about 10-15 seconds. Be careful not to overheat them. This can make the texture change. Serve the bars with fresh whipped cream and a sprinkle of ground cinnamon for a cozy touch. Enjoy your treat! Yes, you can make these bars a day ahead. Chill them well after baking. This helps the flavors blend and improves the texture. Just slice and serve when ready! Pumpkin spice mixes great with many treats. Think about chocolate chip cookies or apple pie. Donuts with pumpkin spice are a hit too. Pairing these with coffee or hot cocoa makes them perfect! You can find pumpkin spice at most grocery stores. Look in the baking aisle. If you want to make your own, use cinnamon, nutmeg, ginger, and allspice. Mix them in equal parts for a fresh blend. Absolutely! Using flavored coffee adds a fun twist. Try hazelnut or vanilla coffee for extra taste. Just make sure it’s strong enough to keep the flavor bold. This blog post covered making delicious cheesecake bars from start to finish. We talked about the key ingredients, steps for preparation, and tips to prevent cracking. You learned about variations like adding chocolate and how to serve these treats with coffee or hot cocoa. In conclusion, I hope you feel ready to make your own pumpkin cheesecake bars with confidence. Enjoy the process and share your tasty results!

Pumpkin Spice Latte Cheesecake Bars Delightful Treat

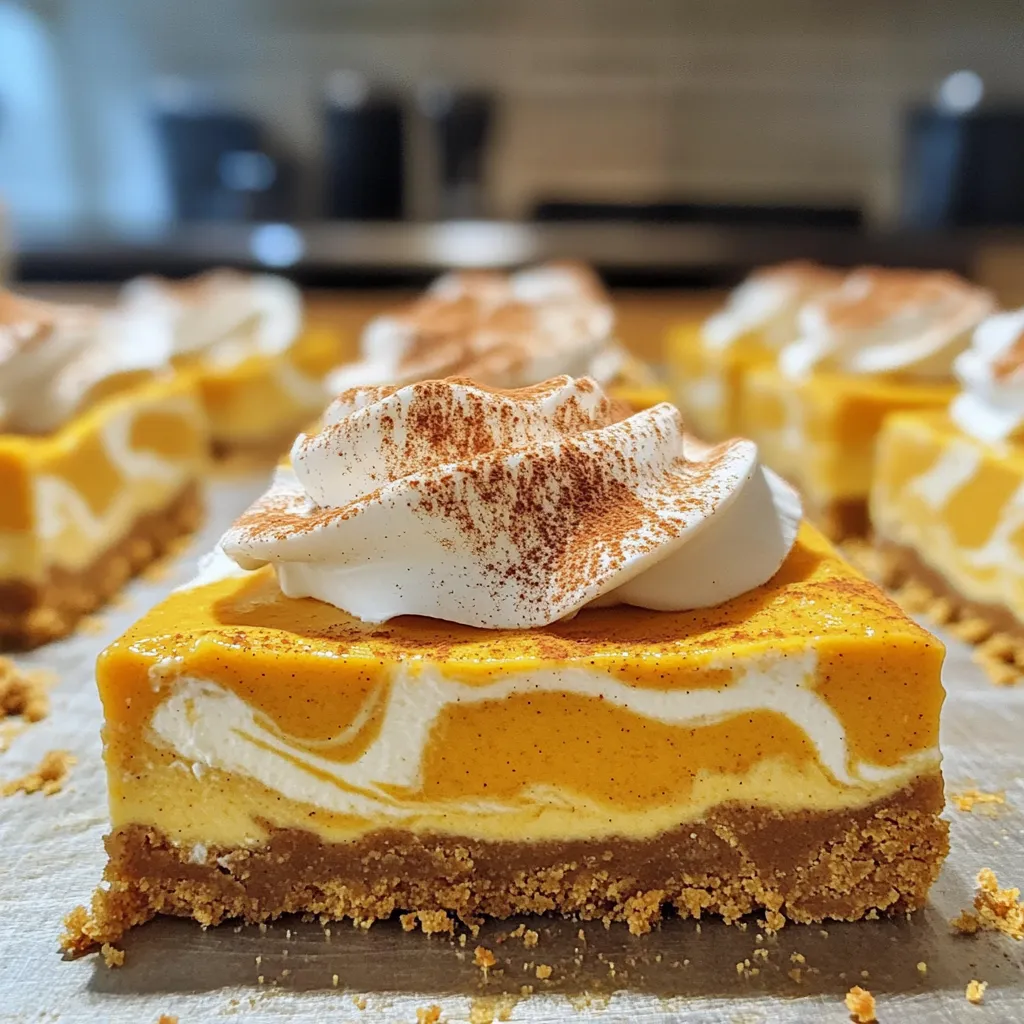
Are you ready to indulge in the ultimate fall treat? Pumpkin Spice Latte Cheesecake Bars combine creamy cheesecake with a

- 2 cups all-purpose flour - 1 tablespoon baking powder - ½ teaspoon baking soda - ½ teaspoon salt - 1 teaspoon ground cinnamon - ¼ teaspoon ground nutmeg - 1 cup unsalted butter, softened - 1 ½ cups granulated sugar - 3 large eggs - 1 teaspoon vanilla extract - 1 cup apple cider - ½ cup powdered sugar - 2 tablespoons apple cider The key to making a great apple cider pound cake is in the ingredients. Each one plays an important role in taste and texture. Dry Ingredients: The flour gives the cake its structure. Baking powder and baking soda help it rise. Salt brings out all the flavors. The spices, like cinnamon and nutmeg, add warmth and depth. Wet Ingredients: Butter makes the cake rich and moist. Sugar adds sweetness and helps create a nice crumb. The eggs bind everything together. Vanilla extract gives a lovely aroma, while apple cider adds a sweet, fruity note. Glaze Ingredients: The glaze is simple but so tasty. Powdered sugar makes it sweet and smooth, while apple cider adds flavor. It creates a beautiful finish on the cake, making it even more appealing. Using fresh apple cider will enhance the flavor, making this cake truly special. Make sure to set everything out before you start. This way, you can mix the ingredients easily and enjoy the process! 1. Preheat your oven to 350°F (175°C). Grease and flour a 9x5 inch loaf pan. This helps the cake release easily after baking. 2. In a medium bowl, whisk together the dry ingredients: flour, baking powder, baking soda, salt, cinnamon, and nutmeg. This mix adds flavor and helps the cake rise. Set it aside for now. 3. In a large bowl, cream together 1 cup of softened butter and 1 ½ cups of granulated sugar. Use an electric mixer until the mix is light and fluffy. This step adds air to your batter, making it nice and soft. 1. Add 3 large eggs to the butter and sugar mix, one at a time. Mix well after each egg. Then, stir in 1 teaspoon of vanilla extract. This adds a lovely flavor to your cake. 2. Gradually add the dry mix to the wet mix. Alternate this with 1 cup of apple cider. Start and end with the flour mix. Mix just until combined. Overmixing can make your cake tough. 3. Pour the batter into the prepared loaf pan. Use a spatula to smooth the top evenly. This ensures even baking. 1. Bake in your preheated oven for 55-65 minutes. To check for doneness, insert a toothpick in the center. If it comes out clean, your cake is ready. 2. Once baked, let the cake cool in the pan for about 10 minutes. This helps it firm up and makes it easier to transfer. 3. Carefully transfer the cake to a wire rack to cool completely. This allows air to circulate around the cake, preventing sogginess. To get the best texture, mixing is key. Start by creaming the butter and sugar well. This step adds air, making your cake light. Mix until the blend is fluffy and pale. Using room temperature ingredients is also important. Cold ingredients can make the batter heavy. Let your butter and eggs sit out for about 30 minutes before you start. This small step leads to a cake with the right fluffiness. Choosing the right apple cider can greatly enhance your flavor. Look for fresh, unfiltered apple cider. This type gives a rich, bold taste. You can also add spices to boost the flavor. Ground cinnamon is a must, but nutmeg adds warmth. Consider a pinch of allspice or cardamom for a unique twist. These spices create layers of flavor that will surprise your taste buds. For the glaze, the right consistency is key. It should be thick but pourable. Mix powdered sugar with apple cider until smooth. If it’s too runny, add more sugar. If it’s too thick, add a bit more cider. When drizzling the glaze, start from the center of the cake. Let it flow over the edges for a beautiful look. Use a spoon or a small pitcher for control. This makes your pound cake look as good as it tastes. {{image_2}} You can make this cake even more fun by adding nuts or dried fruits. Chopped walnuts or pecans add a nice crunch. Dried cranberries or raisins bring a sweet note. You could also try adding different spices. Cardamom adds a warm, unique flavor. Just remember to keep the spice balance in mind. If you want a healthier version of this cake, you can use whole wheat flour instead of all-purpose flour. This swap adds fiber and nutrients. You can also reduce the sugar content. Try using only one cup of sugar instead of one and a half. The cake will still taste good and be a bit lighter. For gluten-free options, use a gluten-free flour blend. This will help the cake rise well and keep it soft. If you want a vegan version, replace the eggs. You can use flaxseed meal or applesauce in their place. Just mix one tablespoon of flaxseed with three tablespoons of water for each egg. These swaps let everyone enjoy this tasty treat. To keep your apple cider pound cake fresh, wrap it tightly in plastic wrap. This helps prevent it from drying out. Place it in an airtight container or a zip-top bag. Store the cake in the fridge if you plan to eat it within a week. If you want to save it for longer, freezing is a great option. Wrap it tightly in plastic, then cover with foil. This way, it can last up to three months in the freezer. In the fridge, the pound cake can last about 5 to 7 days. At room temperature, it stays good for about 3 to 4 days. If you see any mold or a change in smell, it’s best to toss it out. A dry texture can also mean it’s time to say goodbye to the cake. To enjoy your cake warm, use an oven or microwave. If you use an oven, preheat it to 350°F (175°C). Place the cake in for about 10 minutes. This will help keep the cake moist. In the microwave, heat a slice for about 15-20 seconds. Make sure to cover it with a damp paper towel. This keeps the cake from getting too dry. Serve it warm for the best taste! Pound cake has a unique texture. It is dense and rich compared to other cakes. The classic recipe uses equal parts of flour, butter, sugar, and eggs. This balance gives it a heavy feel that many find comforting. Most cakes are lighter and fluffier. They often use baking soda or baking powder for lift. Pound cake relies on its own weight for structure. The addition of apple cider adds moisture and flavor, enhancing its appeal. Yes, you can use other liquids! Orange juice is a great choice for a fruity twist. It adds brightness and pairs well with spices. Milk can also work if you want a creamier texture. Each liquid will change the flavor slightly, so choose what you like best. You may even mix different liquids for fun combinations. Just remember, the essence of apple cider contributes to the cake's fall flavor, so use alternatives that complement it. To avoid a dense pound cake, follow a few key tips. First, use room temperature ingredients. Cold butter or eggs can lead to a heavy batter. Next, cream the butter and sugar well. This step adds air and makes the cake lighter. Also, be careful when mixing. Over-mixing can develop gluten, making the cake tough. Finally, measure your flour correctly. Too much flour can lead to density. Use the spoon-and-level method for best results. These steps help create a light and fluffy pound cake that melts in your mouth. You now have all the tools to make a delicious apple cider pound cake. We explored each ingredient, from the dry to the wet, ensuring you know how everything works together. I walked you through the steps to prepare, mix, and bake the cake perfectly. You’ve also learned tips for flavor, texture, and even variations to elevate your recipe. Remember, the right storage will keep your cake fresh. Enjoy baking, and share this delightful treat with friends and family. Your kitchen will smell amazing!

Irresistible Apple Cider Pound Cake with Glaze Recipe

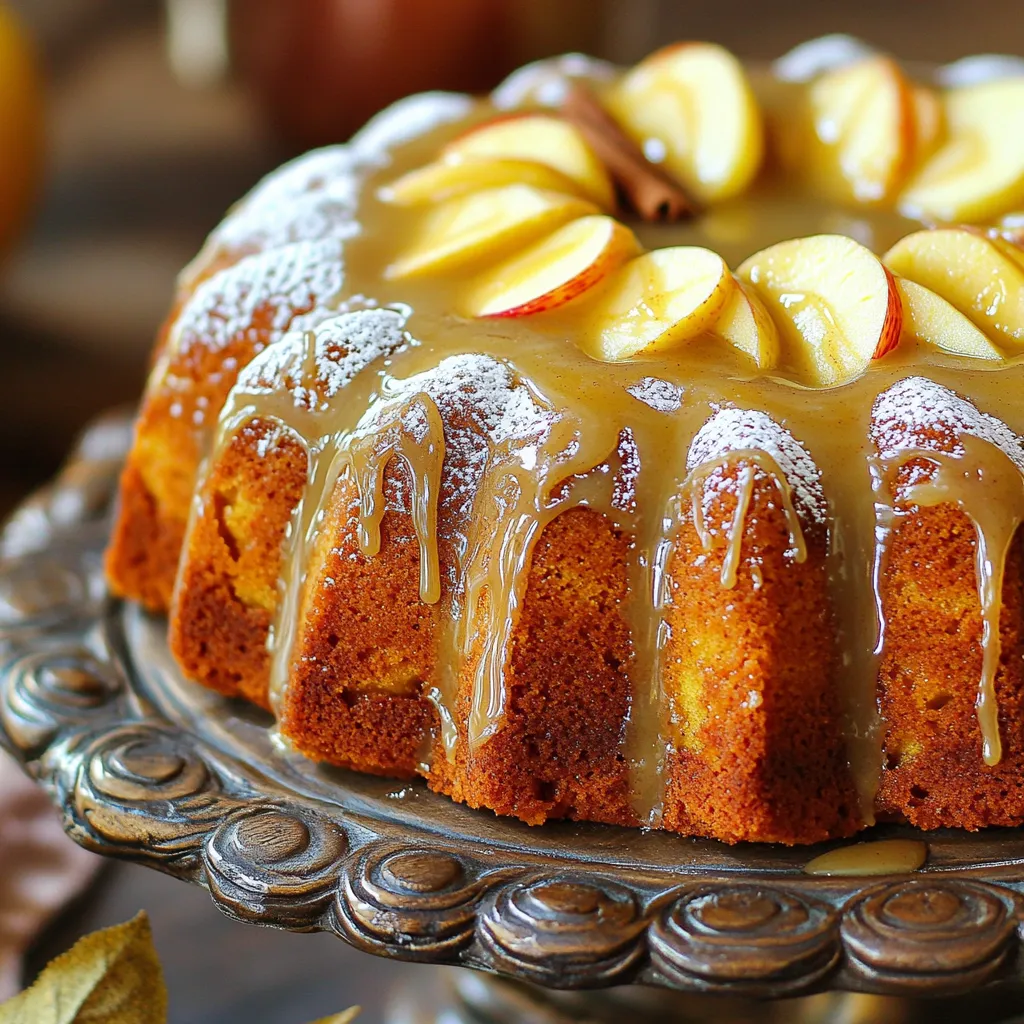
Get ready to fall in love with the rich, warm flavors of my Irresistible Apple Cider Pound Cake with Glaze!

- 1 ½ cups all-purpose flour - 1 teaspoon baking soda - ½ teaspoon baking powder - ½ teaspoon salt - 1 teaspoon ground cinnamon - ½ teaspoon ground nutmeg - ½ teaspoon ground ginger The dry ingredients form the base of your loaf. The all-purpose flour gives structure. Baking soda and baking powder help it rise. Salt adds depth. The warm spices make this loaf special. Cinnamon, nutmeg, and ginger create a cozy flavor profile. - 1 cup pumpkin puree - ½ cup maple syrup - ½ cup brown sugar, packed - ⅓ cup vegetable oil - 2 large eggs - 1 teaspoon vanilla extract The wet ingredients bring moisture and sweetness. Pumpkin puree is the star, giving a rich flavor. Maple syrup and brown sugar add natural sweetness. Vegetable oil keeps the loaf moist. Eggs help bind the mixture, while vanilla adds a lovely aroma. - ½ cup chopped pecans or walnuts Chopped nuts are a great option. They add a delightful crunch. Pecans bring a sweet, buttery flavor. Walnuts offer a slightly bitter taste, balancing the sweetness. You can choose one or both for a tasty twist. Preheating the oven: Start by preheating your oven to 350°F (175°C). This step is key for even baking. Preparing the loaf pan: Grease a 9x5-inch loaf pan. You can also line it with parchment paper for easier removal later. This helps keep your loaf intact when serving. Combining wet ingredients: In a large bowl, whisk together the pumpkin puree, maple syrup, brown sugar, vegetable oil, eggs, and vanilla extract. Mix until it is smooth and well combined. This step blends the flavors and keeps your loaf moist. Combining dry ingredients: In another bowl, sift together the all-purpose flour, baking soda, baking powder, salt, cinnamon, nutmeg, and ginger. Make sure there are no lumps. This mix adds spice and structure to your loaf. Merging wet and dry mixtures: Gradually add the dry ingredients to the wet mixture. Stir gently until just combined. It’s okay if some flour is still visible. Overmixing can make your loaf tough. Pouring batter and baking duration: Pour the batter into the prepared loaf pan. Smooth the top with a spatula. Bake in the oven for 55-60 minutes. To check, insert a toothpick into the center. It should come out clean when your loaf is done. To get a soft and moist loaf, avoid overmixing. When you combine wet and dry ingredients, stir gently. Stop mixing as soon as you see no dry flour. This helps keep your loaf tender. To check if your loaf is done, use a toothpick. Insert it into the center of the loaf. If it comes out clean, your loaf is ready. If it has batter on it, bake for a few more minutes. For the best flavor, choose fresh pumpkin when possible. Fresh pumpkin has a rich taste. However, canned pumpkin is convenient and works well too. Just ensure it’s pure pumpkin, not pie filling. When it comes to maple syrup, choose pure syrup over imitation. Pure maple syrup has a deeper flavor. It enhances the pumpkin taste and adds sweetness in a natural way. To serve your loaf, slice it warm and add a dollop of whipped cream. This makes each bite even better. A drizzle of extra maple syrup on top adds sweetness and shine. For a bakery-style look, sprinkle cinnamon on top or add chopped nuts. This not only looks great but adds texture too. These little touches make your loaf stand out! {{image_2}} You can make your maple pumpkin loaf even better. Adding chocolate chips gives a sweet twist. I love using semi-sweet or dark chocolate for a rich flavor. Just fold in about ½ cup of chips before you pour the batter. Another option is to substitute different nuts. Pecans and walnuts work great. You can also use almonds or hazelnuts for a unique crunch. Just chop them coarsely and mix them in with your batter. If you or someone you know is gluten-free, you can easily swap the flour. Use a gluten-free all-purpose blend. Look for one that has xanthan gum for the best texture. This keeps your loaf soft and moist. For those who want a vegan option, you can replace eggs and dairy. Use flax eggs instead of real eggs. To do this, mix 1 tablespoon of ground flaxseed with 2.5 tablespoons of water for each egg. For dairy, substitute plant-based milk and oil. Adding cranberries or apple chunks gives your loaf a fun fall vibe. Toss in about ½ cup of fresh or dried cranberries for a tart kick. If you prefer apple, chop 1 small apple and mix it in. You can also change up the spices. Try adding allspice or cardamom for a deeper flavor profile. Even a dash of cloves can make your loaf pop with seasonal warmth. After baking your maple pumpkin loaf, let it cool in the pan for about 10 minutes. This step helps it firm up, making it easier to remove. Next, transfer it to a wire rack. Allow it to cool completely at room temperature. This way, it won’t get soggy. For storage, wrap the loaf tightly in plastic wrap or aluminum foil. You can also place it in an airtight container. Store it in a cool, dry place. This will keep it fresh for about 3 to 4 days. If you want to enjoy it longer, freezing is a great option. To freeze your maple pumpkin loaf, first, let it cool completely. Once cooled, slice the loaf into individual pieces. Wrap each slice in plastic wrap. Then, place the wrapped slices in a freezer-safe bag. Make sure to remove excess air before sealing. This method prevents freezer burn. When you’re ready to enjoy it, take out a slice and let it thaw. You can thaw it overnight in the refrigerator. For a quick thaw, leave it at room temperature for about 1 hour. If you want a warm treat, use the microwave for 15 to 20 seconds. When stored properly, your maple pumpkin loaf can last about 3 to 4 days at room temperature. If kept in the fridge, it may last up to a week. However, bread can spoil if not stored correctly. Look for signs like a change in texture or color. If the loaf feels very dry or has a strange smell, it’s best to throw it away. Mold is another clear sign of spoilage. Always check your loaf before enjoying it. Keeping an eye on these signs will help you enjoy your delicious treat safely. Yes, you can use homemade pumpkin puree. To make it, choose a sugar pumpkin. Cut it in half, remove the seeds, and roast it in the oven at 350°F until soft. This usually takes about 45 minutes. Once cool, scoop out the flesh and blend it until smooth. Use the same amount as the canned version, one cup. To check if the loaf is ready, insert a toothpick into the center. If it comes out clean or with a few crumbs, your loaf is done. The top should look golden brown. You can also gently press the top; it should spring back. Yes, you can make mini loaves. Use mini loaf pans and divide the batter evenly. Bake for about 25-30 minutes. Check with a toothpick to know when they are done. Mini loaves are great for sharing. Pumpkin bread goes well with many dishes. Try serving it warm with whipped cream. A drizzle of maple syrup adds sweetness. You can also pair it with coffee or tea for a cozy treat. A sprinkle of cinnamon on top makes it extra special. This blog post covered everything you need for perfect pumpkin bread. We explored key ingredients, step-by-step instructions, and valuable tips to achieve the best results. You learned how to adjust flavors and satisfy dietary needs. Remember, storing and freezing your bread correctly keeps it fresh longer. With this guide, you can bake delicious pumpkin bread that wows everyone. Enjoy the process, get creative with variations, and make it your own. Happy baking!

Bakery-Style Maple Pumpkin Loaf Recipe Delight

Are you ready to bake a loaf that tastes like autumn in every slice? This Bakery-Style Maple Pumpkin Loaf Recipe

To make No-Bake Peanut Butter Granola Cups, you need: - 1 cup rolled oats - ½ cup natural peanut butter - ¼ cup honey or maple syrup - ½ cup chocolate chips (dark or semi-sweet) - ½ cup chopped nuts (almonds, walnuts, or pecans) - ¼ cup dried fruit (cranberries or raisins) - ½ teaspoon vanilla extract - Pinch of salt Each serving has about: - Calories: 150 - Protein: 4g - Carbs: 18g - Fat: 7g - Fiber: 2g - Sugars: 6g This snack offers a nice mix of protein and healthy fats. You can swap some ingredients for a twist: - Use almond butter instead of peanut butter. - Try agave nectar instead of honey. - Replace chocolate chips with dried coconut or sunflower seeds. - Use walnuts or pistachios for different flavors. These swaps keep your snack fun and tasty! First, gather your dry ingredients. You need 1 cup of rolled oats, ½ cup of chopped nuts, and ¼ cup of dried fruit. You can use cranberries or raisins. In a large mixing bowl, add the oats, nuts, and dried fruit. Mix them well. This step helps spread the flavors evenly. Next, we create the peanut butter mixture. Take ½ cup of natural peanut butter and ¼ cup of honey or maple syrup. Place them in a microwave-safe bowl. Heat this mix for about 30 seconds. It should be warm and easy to stir. Remove it from the microwave. Now, stir in ½ teaspoon of vanilla extract and a pinch of salt. Mix until it’s smooth and creamy. Now it’s time to combine everything. Pour the peanut butter mixture over the dry ingredients. Mix well until all the dry ingredients are coated. Gently fold in ½ cup of chocolate chips. Be careful not to melt them too much. Then, prepare a muffin tin. You can line it with paper liners or lightly grease it. Spoon the granola mixture into each cup. Press down firmly with your fingers or a spoon. This helps them hold their shape. Finally, place the muffin tin in the refrigerator. Let it sit for at least 30 minutes. This helps the cups set. Once they are firm, you can remove them from the tin. Enjoy them right away or store them in an airtight container in the fridge for up to a week. To get the best texture in your granola cups, use rolled oats. They hold up well and give a nice chew. Mixing in chopped nuts adds crunch. I love using almonds or walnuts for this recipe. Make sure to pack the mixture tightly in the muffin tin. This helps the cups hold their shape when set. You can save time by measuring everything before starting. This way, you won’t scramble to find ingredients. To heat the peanut butter and honey, use the microwave. Just 30 seconds is enough to warm them. Stir well to combine. If you want, use a food processor to mix the dry ingredients quickly. For a lovely presentation, arrange the granola cups on a platter. Drizzle extra honey on top for sweetness. Add a few whole nuts as a garnish. This makes them look inviting and tasty. You can also serve them with yogurt or fresh fruit on the side. This adds color and flavor to your snack! {{image_2}} You can switch peanut butter for other nut butters. Almond butter, cashew butter, or sunflower seed butter work great. Each brings a different taste and texture. Almond butter adds a nutty crunch. Cashew butter is creamier and sweeter. Sunflower seed butter is great for nut-free options. Honey and maple syrup are popular choices, but you can get creative. Try agave nectar, brown rice syrup, or coconut sugar. Each sweetener gives a unique flavor. Agave is mild and works well if you want less sweetness. Brown rice syrup makes the cups chewy. Feel free to add more fun ingredients! Chia seeds or flaxseeds boost nutrition. They add fiber and omega-3s. You can also mix in spices like cinnamon or nutmeg for extra flavor. A pinch of sea salt can enhance all the tastes too. These small changes can make your granola cups even better! To keep your no-bake peanut butter granola cups fresh, store them in an airtight container. This helps prevent moisture and keeps them crunchy. You can place parchment paper between layers to avoid sticking. Always store them in the refrigerator for the best taste and texture. If stored properly, these granola cups will last about a week in the fridge. After that, they may start to lose their texture and flavor. Keep an eye on them, and if you notice any changes, it's best to toss them out. You can freeze these granola cups for longer storage. Wrap each cup in plastic wrap or place them in a freezer-safe bag. They can last up to three months in the freezer. When you're ready to enjoy, thaw them in the fridge overnight. This way, they’ll be ready for a quick snack anytime! Yes, you can use quick oats. Quick oats will make the cups softer and less chewy. They absorb liquid faster than rolled oats. This means your granola cups may not hold their shape as well. If you prefer a firmer texture, stick with rolled oats. To make these granola cups vegan, swap honey for maple syrup. Use a peanut butter brand that has no added oils or sugars. Ensure your chocolate chips are dairy-free, too. With these changes, you will have a tasty vegan snack! You can use agave nectar or brown rice syrup in place of honey or maple syrup. Both options are sweet and will work well. You may also try coconut sugar mixed with a little water for a different flavor. This blog post covered all you need to make tasty granola cups. We discussed every ingredient, cooking steps, and storage tips. You can also explore fun variations and shortcuts for easier prep. Remember, you can swap nut butters or sweeteners to match your taste. By following these steps, you can create delicious snacks that fit your needs. Keep these tips in mind for the best results. Enjoy your cooking and the tasty treats that follow!

No-Bake Peanut Butter Granola Cups Simple Snack Idea

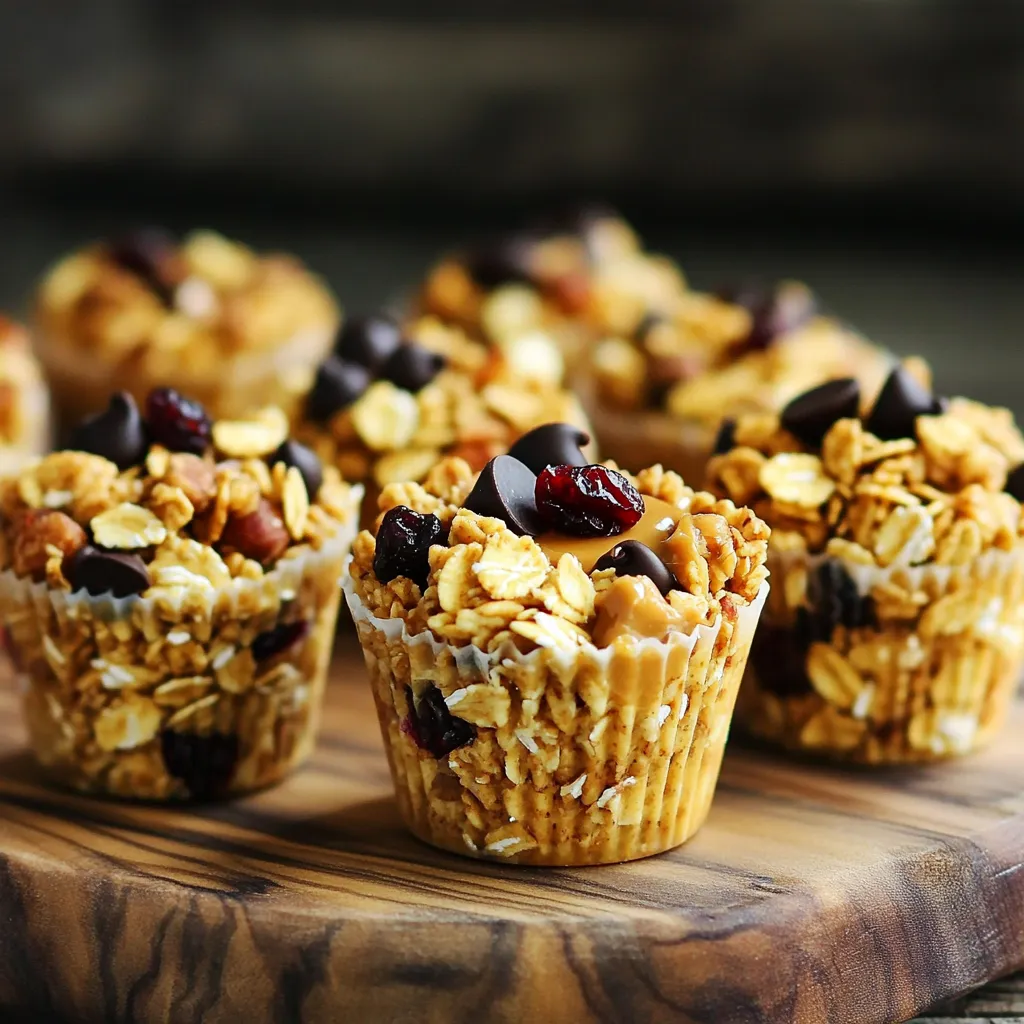
Looking for a tasty snack that’s easy to make? These No-Bake Peanut Butter Granola Cups are perfect for you! I’ll

- 2 boneless, skinless chicken breasts - 1 tablespoon Cajun seasoning - Salt and pepper to taste - 2 tablespoons olive oil - 3 cups chicken broth - 8 ounces fettuccine pasta - 1 cup heavy cream - 1 cup grated Parmesan cheese - 1 cup cherry tomatoes, halved - 2 cups fresh spinach - Fresh parsley for garnish In this dish, we start with two boneless, skinless chicken breasts. These provide a great base for flavor. You’ll season them with Cajun seasoning, salt, and pepper. This mix gives the chicken a spicy kick. Next, we need cooking essentials. You’ll use two tablespoons of olive oil to cook the chicken. It helps to create a nice sear. For the pasta, three cups of chicken broth brings in a rich flavor. This broth cooks the fettuccine, making it tasty. For the pasta and sauces, eight ounces of fettuccine pasta is key. It holds the sauce well. Adding one cup of heavy cream gives the dish its creamy texture. One cup of grated Parmesan cheese adds depth and richness. Lastly, we have fresh ingredients. One cup of halved cherry tomatoes adds a pop of color and sweetness. Two cups of fresh spinach bring in nutrition and a vibrant touch. Don’t forget fresh parsley for garnish; it makes the dish look beautiful! These ingredients come together to create a delightful one-pan meal. Each bite is a mix of creamy, spicy, and fresh flavors. First, season the chicken breasts with Cajun seasoning, salt, and pepper. Use enough seasoning to coat both sides well. Next, heat olive oil in a large skillet over medium-high heat. Once hot, add your seasoned chicken. Cook each side for 5 to 7 minutes until golden brown. Ensure that the chicken is cooked through. After cooking, remove the chicken from the skillet and let it rest on a plate. In the same skillet, pour in the chicken broth and bring it to a boil. Once boiling, lower the heat to medium and stir in the fettuccine pasta. Cook for about 10 minutes, stirring occasionally. You want the pasta to be al dente, which means it should be firm to the bite but cooked through. Lower the heat again and add the heavy cream to the skillet. Stir it well to combine with the broth. Gradually mix in the grated Parmesan cheese. Keep stirring until the sauce becomes creamy and smooth. The cheese will melt and thicken the sauce nicely. Next, add the halved cherry tomatoes and fresh spinach to the skillet. Cook for an additional 2 to 3 minutes until the spinach wilts down. While this is cooking, slice the chicken breasts into strips. Add the chicken back into the skillet, mixing it with the pasta and sauce. Allow everything to heat through for about one minute. Give the dish a taste and adjust the seasoning as needed. You can add more Cajun seasoning, salt, or pepper based on your preference. Serve the dish warm. Enjoy the rich flavors and creamy texture of your One-Pan Creamy Cajun Chicken Alfredo! To keep your chicken juicy, start with even seasoning. Use Cajun seasoning, salt, and pepper on both sides. This helps lock in flavor. Cook the chicken in hot olive oil for a nice sear. Aim for about 5-7 minutes on each side. The chicken should be golden and cooked all the way through. When done, set it aside to rest. This lets the juices settle back in. You want a creamy sauce that coats the pasta well. Start by adding heavy cream to the chicken broth mixture. Stir it in slowly. Gradually add the grated Parmesan cheese. Mix until smooth and creamy. If the sauce is too thick, use pasta cooking water to adjust. Just add a little at a time until you reach the right consistency. To make your dish even more special, try adding spices. A pinch of smoked paprika or garlic powder can elevate the flavor. For garnishing, sprinkle fresh parsley on top. It adds a pop of color and freshness. You can also add extra Parmesan cheese for a cheesy finish. Serve in a large bowl for a beautiful presentation. {{image_2}} You can switch up the protein in your dish. If you want to use shrimp, start with 1 pound of peeled shrimp. Cook the shrimp in olive oil until pink. This adds a nice seafood flair. You can also use sausage. Choose a spicy sausage for a kick. Slice it and cook it until browned. For a vegetarian option, use plant-based proteins. Tofu or tempeh works well. Cube the tofu and cook it until golden. It soaks up the flavors nicely. Feel free to play with flavor. You can swap the Cajun seasoning for other spices. Try Italian herbs, taco seasoning, or even curry powder. This changes the taste in fun ways. Adding garlic or onion gives more depth. Sauté chopped onion and minced garlic in olive oil before adding broth. This builds a strong base for your sauce. You can also add a pinch of cayenne for extra heat. Fettuccine is great, but you can use other pasta types. Penne or rigatoni hold the sauce well. If you prefer a lighter option, try zucchini noodles. For gluten-free needs, use gluten-free pasta. It cooks similarly, so you won’t lose out on taste. Just check the cooking time on the package. You can enjoy a creamy dish no matter your diet. To keep your One-Pan Creamy Cajun Chicken Alfredo fresh, store it in an airtight container. Make sure it cools completely before sealing. You can refrigerate it for up to three days. After that, the pasta might get mushy and lose flavor. When reheating, your goal is to bring back the creaminess and flavor. You can use a microwave or stove. For the microwave, heat in short bursts of 30 seconds. Stir between each burst to avoid hot spots. On the stove, use low heat and add a splash of chicken broth or cream. This keeps your dish moist and tasty. If you want to prepare in advance, cook the chicken and pasta separately. You can freeze the chicken and sauce together in a freezer-safe container. This way, when you’re ready to eat, just reheat and mix with fresh pasta. It’s a great way to save time and enjoy a quick meal later! Yes, you can switch pasta types. Fettuccine is great, but you can try: - Penne - Rigatoni - Spaghetti - Gluten-free pasta These options work well with the creamy sauce. Just keep an eye on cooking times. The Cajun seasoning gives it a nice kick. If you want less heat, adjust the spice: - Use less Cajun seasoning. - Add a pinch of sugar to balance flavors. - Serve with a side of sour cream to cool it down. This way, you can enjoy the flavors without too much spice. You can definitely make this dish dairy-free. Here are some ideas: - Use coconut cream instead of heavy cream. - Swap Parmesan cheese for nutritional yeast or a dairy-free cheese. - Use a dairy-free milk like almond or oat milk. These substitutes keep the dish creamy and delicious. Yes, you can prepare this dish ahead of time. Here’s how: - Cook the chicken and pasta, then let them cool. - Store them separately in the fridge for up to 2 days. - Reheat in a skillet, adding extra broth to keep it creamy. This makes meal prep easy and saves time during the week. Many sides go well with this dish. Here are some tasty ideas: - Garlic bread for a crunchy bite. - A fresh green salad with lemon vinaigrette. - Roasted vegetables like broccoli or asparagus. These sides complement the creamy flavors and add balance to your meal. This recipe combines chicken, pasta, and fresh ingredients. You can customize it easily. Use shrimp, sausage, or go vegetarian. Adjust seasonings to your taste and enjoy creamy goodness. Store leftovers well and reheat for future meals. With simple steps, you can serve a hearty dish that impresses. Cook it today and savor the flavors you create.

One-Pan Creamy Cajun Chicken Alfredo Delight

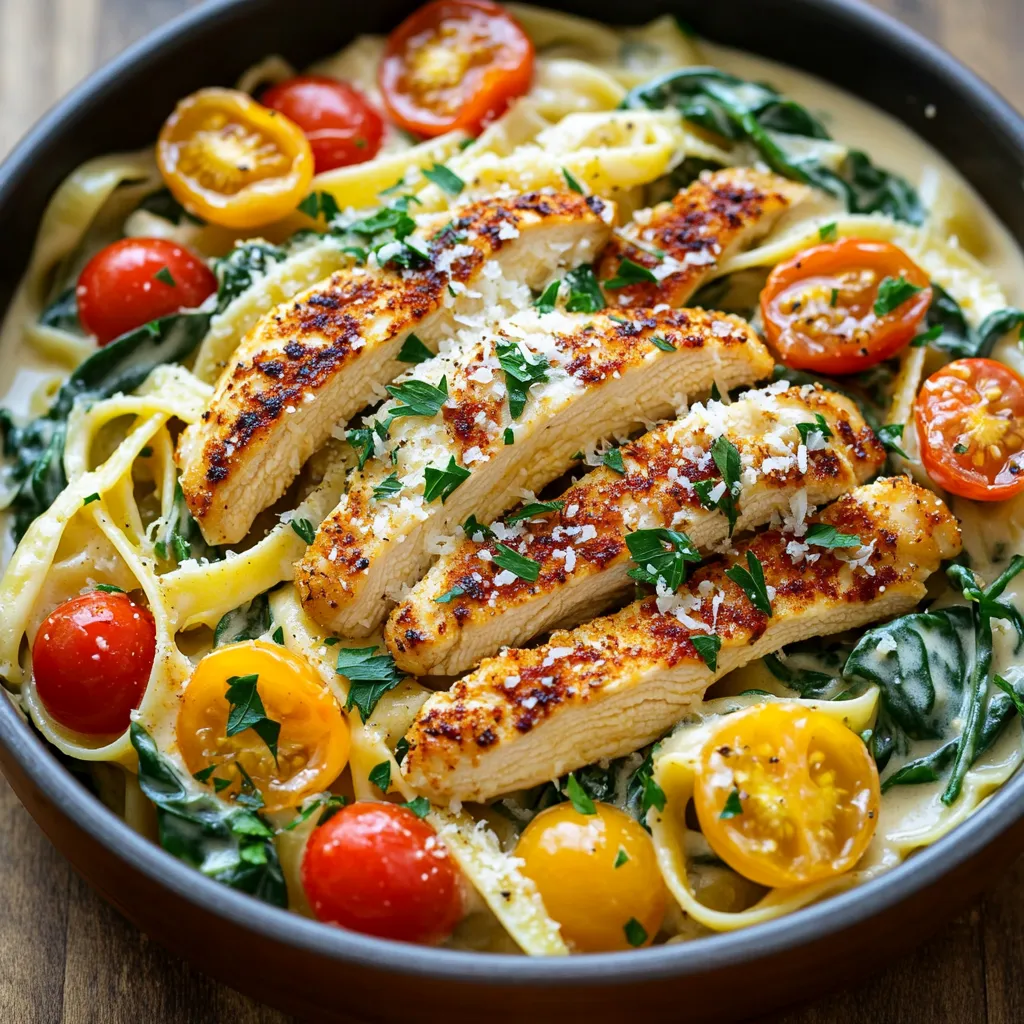
Get ready to savor a dish that’s both creamy and spicy: One-Pan Creamy Cajun Chicken Alfredo Delight! This easy recipe

- 4 medium russet potatoes, washed and cut into wedges - 3 tablespoons olive oil - 1 tablespoon ranch seasoning mix - 1/2 cup grated Parmesan cheese - 1 teaspoon garlic powder - 1 teaspoon onion powder - Fresh parsley, chopped (for garnish) - Salt and pepper to taste You can adjust the amount of ranch seasoning to suit your taste. If you like more zing, add a bit more! For a twist, try using smoked paprika or chili powder for a kick. When it comes to garnishes, fresh parsley adds a lovely color and freshness. You could also use green onions or even a sprinkle of extra Parmesan for a rich finish. This simple list of ingredients makes it easy to whip up a tasty side. Each item plays a key role in creating that crispy, savory delight you crave! Start with clean potatoes. Wash 4 medium russet potatoes under cold water. A good scrub helps remove dirt. Cut each potato into wedges. Aim for equal sizes for even cooking. Next, preheat the air fryer to 400°F (200°C). This step is key for crispy results. Preheating ensures the potatoes cook evenly. It also helps them get golden brown and crunchy. In a big bowl, mix 3 tablespoons of olive oil. Add 1 tablespoon of ranch seasoning mix. Toss in 1 teaspoon of garlic powder and 1 teaspoon of onion powder. Don't forget salt and pepper to taste. Stir until combined. Now, add the potato wedges to the bowl. Coat them well with the oil and spice mix. A good coating brings out all the flavors. Sprinkle 1/2 cup of grated Parmesan cheese over the wedges. Toss again to spread it evenly. Arrange the potato wedges in a single layer in the air fryer basket. Avoid overcrowding. This helps them cook evenly and stay crispy. If needed, work in batches for best results. Set the air fryer to cook for 15-18 minutes. Shake the basket halfway through. This ensures even cooking on all sides. When done, the wedges should be golden brown and crispy. Let the wedges cool slightly before serving. Garnish with fresh chopped parsley for a nice touch. Enjoy your flavorful and crunchy potato wedges! To keep your potato wedges crispy, avoid overcrowding the air fryer. Give each wedge space for hot air to circulate. If you have a small fryer, cook in batches. This way, they cook evenly and get that perfect crunch. Adjust the cook time if your fryer model differs from the standard. Some fryers may cook faster or slower. Start with 15 minutes and check for doneness. If they need more time, add a couple of minutes. Consider adding spices like smoked paprika or cayenne for a kick. These spices can elevate your dish and add depth. You can also experiment with dried herbs like rosemary or thyme. They pair well with the potatoes and ranch flavor. If you want a different cheese, try cheddar or feta. Both bring unique tastes. Cheddar adds sharpness, while feta gives a tangy twist. Dips make a great addition to your wedges. Ranch dressing or sour cream are classic choices. For a zesty option, try guacamole or salsa. These dips complement the flavors of the wedges nicely. For a full meal, serve the potato wedges alongside grilled chicken or a fresh salad. They pair well with many main dishes. You can even use them as a side for burgers or sandwiches! {{image_2}} You can change up the flavor with different seasoning blends. For a spicy kick, add chili powder. Start with one teaspoon and adjust to your taste. This heat pairs well with the creamy ranch flavor. You can also mix in smoked paprika for a smoky touch. For a fresh twist, try herb-infused options. Use dried herbs like oregano, thyme, or rosemary. A mix of these adds depth and aroma. You can change the vibe of your potato wedges with just a few shakes of herbs. While russet potatoes are great, you can explore other varieties. Sweet potatoes make a fantastic alternative. They offer a natural sweetness and vibrant color. Cut them the same way and use the same seasonings for a different taste. Red potatoes or Yukon Gold potatoes can also work well. Red potatoes have a waxy texture and a subtle flavor. Yukon Golds are creamy and buttery. Each type gives a unique twist to your air-fried wedges. You can easily make these wedges vegetarian or vegan. Use plant-based cheese substitutes instead of Parmesan. Nutritional yeast adds a cheesy flavor without dairy. There are many brands that offer vegan cheese that melts well, too. For seasoning, add more plant-based ideas. Try smoked salt for a bold kick or add nutritional yeast for extra flavor. Fresh herbs can also enhance the taste while keeping it plant-based. To keep your potato wedges fresh, refrigerate them in an airtight container. They last up to three days. If you want to keep them longer, freeze the wedges. Place them in a freezer-safe bag and remove as much air as possible. They can stay in the freezer for about a month. Just remember, the longer they sit, the less fresh they taste. For reheating, I recommend using the air fryer. It keeps the wedges crispy. Preheat the air fryer to 350°F (175°C). Heat the wedges for about 5 to 7 minutes. If you use a microwave, expect them to be soft. If you must use the microwave, place a paper towel under the wedges. This helps absorb moisture. You can prep these potato wedges in advance. Wash and cut the potatoes a day before. Store them in cold water in the fridge. This keeps them from browning. You can also mix the olive oil and spices ahead of time. Store them in a jar for easy use. When you're ready to cook, just combine everything and air fry. This makes meal prep quick and easy! To make your potato wedges crispier, soak them in cold water for 30 minutes. This removes excess starch. After soaking, pat them dry with a towel. Coat the wedges lightly with olive oil and seasoning. Avoid overcrowding the air fryer basket. Cook in batches if needed. This helps hot air circulate and crisp them up. Yes, you can use sweet potatoes! They add a sweet flavor and a vibrant color. Cut them into wedges just like russet potatoes. Adjust your cooking time, as sweet potatoes may cook faster. Keep an eye on them to avoid overcooking. They will taste great with the same seasoning mix. If your air fryer isn’t reaching the right temperature, first check the plug and settings. Make sure it's plugged in properly and set to 400°F. If it still doesn’t heat up, try preheating it longer. If the problem continues, consult the user manual. It may need repair or replacement. Cooked potato wedges last about 3 to 5 days in the fridge. Store them in an airtight container to keep them fresh. For best taste, reheat them within this timeframe. You can reheat them in the air fryer to regain their crispness. Enjoy them as a tasty snack or side dish! Now you know how to make tasty air fryer potato wedges. We covered ingredients, prep, cooking, and serving tips. You learned ways to make them crispier and even tried new flavors. Whether you stick to classic recipes or explore fun variations, you have the tools to enjoy air-fried goodness. Remember, practice makes perfect. Enjoy your delicious creations!

Air Fryer Parmesan Ranch Potato Wedges Savory Delight

Looking for a snack that’s both easy and tasty? You’ll love these Air Fryer Parmesan Ranch Potato Wedges. Crunchy on

Older posts
Newer posts
← Previous Page1 … Page14 Page15 Page16 … Page85 Next →

dsad

© 2026 greenmealmap • Built with GeneratePress

Our Policies

  • Copyright Policy
  • Cookie Policy
  • GDPR Policy
  • Privacy Policy
  • Disclaimer
  • Terms Of Use

More Information

  • Home
  • About
  • Contact
  • Appetizers
  • Dessert
  • Dinner
  • Drinks
©2026, greenmealmap About Back To Top