Skip to content
DisclaimerTerms Of UseGDPR PolicyCookie Policy

greenmealmap

  • Home
  • Drinks
  • Appetizers
  • Dinner
  • Dessert
  • About
  • Contact
  • Privacy Policy
DisclaimerTerms Of UseGDPR PolicyCookie Policy

NO-ING-IMG

To make flavorful butternut squash stuffed shells, you will need the following ingredients: - 12 large jumbo pasta shells - 2 cups butternut squash, peeled and cubed - 1 cup ricotta cheese - 1 cup shredded mozzarella cheese - 1/2 cup grated Parmesan cheese - 1 tablespoon olive oil - 1 clove garlic, minced - 1 teaspoon dried sage - 1/2 teaspoon nutmeg - Salt and pepper to taste - 2 cups marinara sauce - Fresh basil for garnish (optional) These ingredients come together to create a rich, creamy filling with a nice hint of sage and nutmeg. The butternut squash adds a lovely sweetness, while the cheeses provide a creamy texture. You can find these items at most grocery stores. If you want to make this dish even more special, use fresh herbs when possible. Fresh basil as a garnish adds a nice touch and brightens the dish. First, boil water in a large pot. Add salt to the water. This helps flavor the pasta. Once the water boils, add 12 large jumbo pasta shells. Cook them until they are al dente, which is firm to the bite. This usually takes about 8-10 minutes. After cooking, drain the shells and set them aside. Next, prepare the filling. In a medium pot, bring water to a boil. Add 2 cups of peeled and cubed butternut squash. Cook the squash for 10-12 minutes until fork-tender. Drain the squash and let it cool slightly. In a large mixing bowl, mash the cooked squash. Add 1 cup of ricotta cheese, half of the shredded mozzarella, and 1/2 cup of grated Parmesan cheese. Then, mix in 1 minced garlic clove, 1 teaspoon of dried sage, and 1/2 teaspoon of nutmeg. Season with salt and pepper. The filling should be well mixed but still slightly chunky. Now, it's time to assemble. Grease a baking dish with 1 tablespoon of olive oil. Take each cooked shell and fill it with a generous portion of the butternut squash filling. Place each filled shell in the baking dish. Pour 2 cups of marinara sauce evenly over the stuffed shells. Then, sprinkle the remaining mozzarella cheese on top. Cover the dish with aluminum foil and bake in a preheated oven at 375°F (190°C) for 25 minutes. After 25 minutes, remove the foil. Bake for an additional 10 minutes. This helps the cheese to become bubbly and golden. To ensure the cheese melts perfectly, use freshly shredded cheese. Pre-shredded cheese often has additives that prevent melting. Also, covering the dish with foil traps steam, helping the cheese melt evenly. Removing the foil gives the cheese a nice, golden crust. Enjoy your delicious butternut squash stuffed shells! When picking butternut squash, look for a squash that feels heavy for its size. The skin should be a light tan color with no soft spots. Check for firmness. A good squash will feel solid all over. You can also smell it. A sweet scent means it's ripe and ready to use. If you need to swap out cheese, you have options. Cottage cheese works well instead of ricotta. You can also use vegan cheese for a dairy-free version. For mozzarella, you can try a blend of almond or cashew cheese. Parmesan can be replaced with nutritional yeast for added flavor. You can make these stuffed shells ahead of time. Prepare the filling and stuff the shells, then place them in a baking dish. Cover and store in the fridge for up to two days. To freeze, wrap the dish tightly in plastic wrap and foil. They can stay in the freezer for three months. To reheat, cover the dish with foil and bake at 350°F (175°C) for about 20 minutes. This keeps them moist. You can also microwave them for a quick option. Just place the shells on a plate and heat for 2-3 minutes. Add a splash of marinara sauce to keep them juicy. {{image_2}} You can make these stuffed shells vegan with simple swaps. Use cashew cheese or tofu instead of ricotta. Choose a plant-based mozzarella to keep it creamy. Also, check the marinara sauce. Some may have cheese, so pick a vegan-friendly option. Want to boost the protein? Add cooked lentils or chickpeas to the filling. This makes the dish heartier. You can also mix in some cooked quinoa for a nice texture. Just make sure to season well so it all blends perfectly. Switch up the sauce for a new twist. Try a spicy marinara for some heat. It pairs well with the sweet squash. You can also serve it with creamy Alfredo sauce. Both options add a new flavor layer to the dish. Just pour it over the stuffed shells before serving. To store your butternut squash stuffed shells, place them in an airtight container. Let them cool down before sealing. This helps keep moisture in check. Store them in the fridge for up to three days. If you want to keep them longer, freezing is a great option. When you are ready to eat the leftovers, preheat your oven to 350°F (175°C). Place the stuffed shells in an oven-safe dish. Add a splash of marinara sauce to keep them moist. Cover the dish with foil to avoid drying out. Heat for about 20 minutes or until warm. You can also reheat them in the microwave for a quick meal. Just cover them and heat in short bursts until hot. If you want to freeze the stuffed shells, it's best to do it before baking. Fill the shells and place them in a single layer in a freezer-safe dish. Cover them with marinara sauce and wrap the dish tightly. They can last up to three months in the freezer. When you're ready to cook them, bake from frozen. Just add about 10-15 extra minutes to the baking time. - Tips for maintaining flavor and texture: - Use fresh, high-quality ingredients. - Ensure the filling is cool before freezing. - Cover tightly to prevent freezer burn. Yes, you can use other squashes. Acorn squash or pumpkin work well. They give a different taste but still taste great. Just remember to cook them until soft. This way, they mash easily into your filling. You can keep stuffed shells in the fridge for about three to five days. Make sure they are in a sealed container. This keeps them fresh and tasty. If you want to eat them later, check for any signs of spoilage before enjoying. Absolutely! You can prepare stuffed shells a day ahead. Just make the filling and stuff the shells. Place them in a baking dish with sauce on top. Cover and store them in the fridge. When you are ready, bake them as usual. - If you want to save time, you can also freeze them. Just remember to thaw them before baking. - For cooking modifications, if you find the filling too thick, add a splash of cream. If it's too runny, add a bit more cheese. - If the shells break while cooking, don’t worry. Just use them in a layered dish instead. This blog post covered making butternut squash stuffed shells from start to finish. We discussed ingredients, cooking tips, and different variations to try. You learned how to pick squash, substitute cheese, and freeze leftovers. Whether you follow the original or make your own version, stuffed shells are a tasty dish. Enjoy exploring this fun recipe that can easily impress family or friends. Keep experimenting in the kitchen and make every meal special!

Butternut Squash Stuffed Shells Flavorful and Easy Recipe

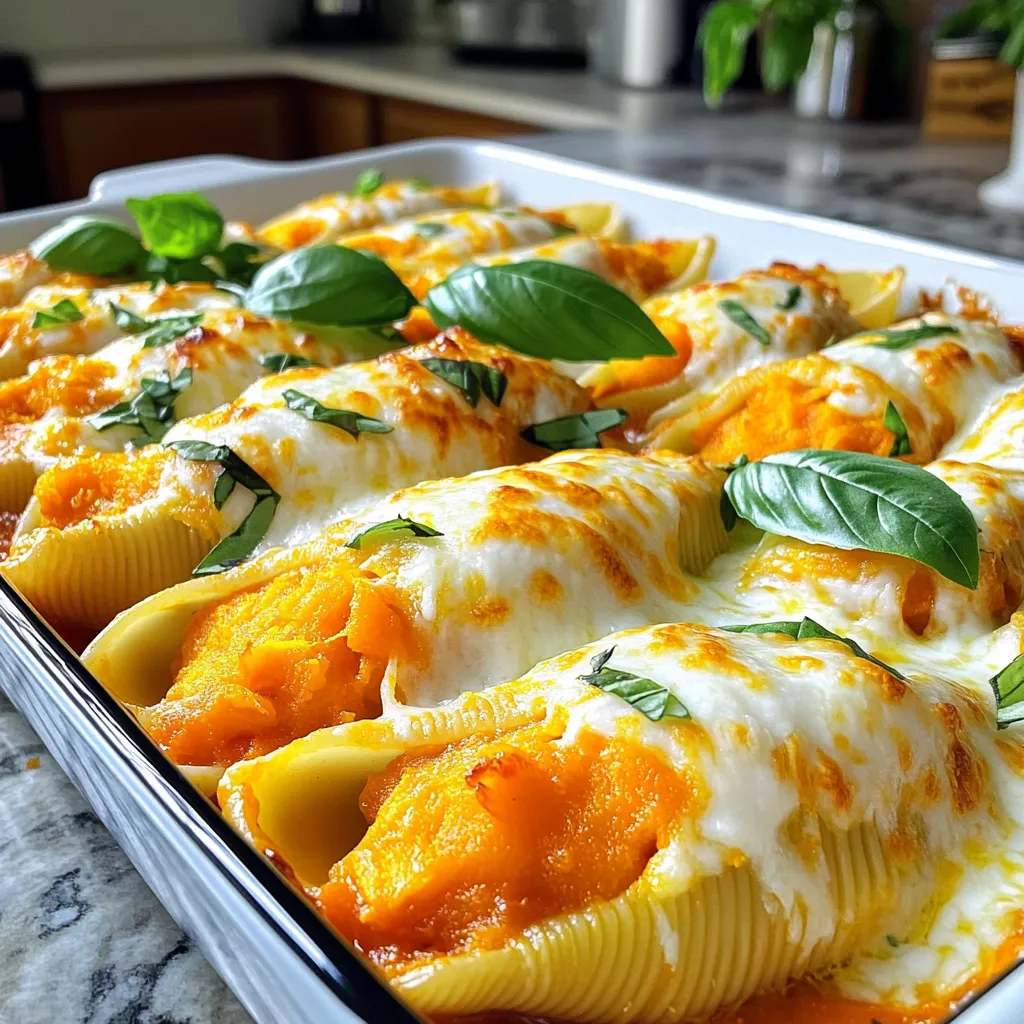
If you’re looking for a cozy and delicious dish, you’ve found it! Butternut Squash Stuffed Shells are packed with flavor

- 1 ½ cups rolled oats - 1 cup all-purpose flour - ¾ cup apple butter Rolled oats give these pies a chewy texture. They soak up flavors well. All-purpose flour binds everything, making the dough sturdy. Apple butter adds a sweet, fruity twist to each bite. - 1 cup cream cheese - 1 cup powdered sugar - 1 teaspoon vanilla extract Cream cheese makes the filling rich and creamy. Powdered sugar sweetens it and gives a smooth texture. Vanilla extract adds warmth and depth, making the filling extra tasty. - 1 teaspoon baking soda - ½ teaspoon cinnamon - ¼ teaspoon nutmeg - ½ teaspoon salt - ½ cup unsalted butter, softened - ½ cup brown sugar, packed - ¼ cup granulated sugar - 1 large egg - 1 teaspoon vanilla extract (for dough) Baking soda helps the cookies rise. Spices like cinnamon and nutmeg bring warmth and flavor. Salt balances the sweetness. Butter adds richness. The sugars create a lovely, caramelized taste. The egg binds the dough together, giving it structure. 1. Preheat your oven to 350°F (175°C). Make sure to line two baking sheets with parchment paper. This keeps the cookies from sticking. 2. In a medium bowl, mix the rolled oats, all-purpose flour, baking soda, cinnamon, nutmeg, and salt. Set this bowl aside while you work on the wet ingredients. 3. In a large mixing bowl, cream together the softened butter, brown sugar, and granulated sugar. Mix until the mixture is light and fluffy. This should take about 3 minutes. 4. Now, add in the egg and vanilla extract to the butter-sugar mix. Mix until everything is well combined. 5. Gradually add the dry mix to the wet mixture. Stir until just incorporated. Be careful not to overmix; this keeps the cookies soft. 6. Fold in the apple butter gently. It adds moisture and a lovely flavor to the dough. 7. Using a cookie scoop or a tablespoon, drop spoonfuls of dough onto the prepared baking sheets. Leave enough space between each for spreading during baking. 8. Bake the cookies in the preheated oven for 10-12 minutes. They are done when the edges turn lightly golden. 9. Allow the cookies to cool on the baking sheet for 5 minutes. Then, transfer them to a wire rack to cool completely. 10. For the cream filling, beat together the softened cream cheese and powdered sugar in a bowl. Mix until smooth. 11. Add in the vanilla extract and stir until it is fully blended. This filling is rich and adds a nice contrast to the cookies. 12. Once the cookies are cooled, pair them up by size. Spread a generous layer of cream filling on the flat side of one cookie. 13. Lastly, sandwich it with the other cookie. Press gently to secure. Repeat this step until all cookies are filled and sandwiched. Now, you have delightful and soft Apple Butter Oatmeal Cream Pies ready to enjoy! How to know when cookies are done? You can tell when cookies are done by looking at their edges. The edges should be lightly golden. The centers might look a bit soft but will firm up as they cool. Preventing cookies from spreading too much To stop cookies from spreading, chill the dough for 30 minutes before baking. You can also use parchment paper to help keep their shape. Make sure you leave space between each cookie on the baking sheet. Achieving the perfect texture For a smooth filling, beat the cream cheese until soft. Then, add the powdered sugar slowly. This step helps create a creamy, fluffy filling that is easy to spread. Flavor variations for the filling You can change the flavor of the filling by adding a bit of cinnamon or nutmeg. You could also mix in some lemon zest for a fresh taste. Garnishing ideas Dust the tops of the cream pies with powdered sugar for a lovely look. You can also place a few apple slices on top for a nice touch. Serving suggestions with apple slices Serve your pies with thin apple slices on the side. This adds color and a fresh crunch. You can even pair them with a small bowl of caramel sauce for dipping. {{image_2}} For those with dietary needs, there are great options. - Gluten-free alternatives: Swap all-purpose flour for gluten-free flour. Many brands offer blends that work well. Just make sure to check the label for starches or gums. - Vegan modifications: Replace butter with vegan butter. Use flaxseed meal mixed with water as an egg substitute. This keeps the texture light and soft. You can easily switch things up to make these pies your own. - Adding nuts or chocolate chips: Try adding chopped walnuts or pecans for a crunchy bite. Dark chocolate chips also add a rich flavor. Just fold them in when you mix in the apple butter. - Using different types of fruit butter: Not a fan of apple butter? Use pear or peach butter instead. Each adds a unique sweetness that still feels cozy. Seasonal flavors can make these pies even more special. - Making with pumpkin butter in fall: In autumn, use pumpkin butter for a festive twist. It pairs well with cinnamon and nutmeg. - Incorporating spices for holiday flavors: Add ginger or allspice to the dough for a warm holiday taste. These spices turn your cookies into a seasonal treat that everyone will love. To keep your Apple Butter Oatmeal Cream Pies fresh, store them in an airtight container. Place parchment paper between layers to avoid sticking. They taste best when eaten within five days. If you want to save them for later, freezing is a great option. You can freeze the dough before baking. Scoop the dough onto a baking sheet and freeze until firm, about an hour. Then, transfer the dough balls to a freezer bag. They will stay fresh for up to three months. If you prefer, you can freeze the assembled pies. Just wrap each pie in plastic wrap and place them in a freezer bag. To thaw the frozen dough, leave it in the fridge overnight. If you freeze the assembled pies, take them out and let them sit at room temperature for about 30 minutes. This will help keep their soft texture after freezing. Enjoy your delicious pies! Apple butter is a sweet spread made from cooked apples. It has a smooth, thick texture and a rich flavor. You can use apple butter in many ways. Spread it on toast, mix it into oatmeal, or use it in baking. It adds moisture and flavor to recipes, making it perfect for these oatmeal cream pies. Yes, you can substitute cream cheese. Use Greek yogurt for a lighter option. Mascarpone cheese works well too, as it has a similar taste. If you're looking for a dairy-free choice, consider coconut cream. Each option gives a different flavor, so choose what you like best. Look for golden edges on the cookies. They should feel soft yet set in the middle. If you press lightly, they should spring back. Baking usually takes about 10-12 minutes. Keep an eye on them, as ovens can vary. Remove them from the oven once they reach that perfect golden color. Absolutely! You can prepare the cookie dough a day in advance. Just wrap it tightly and chill it in the fridge. You can also bake the cookies ahead and store them in an airtight container. As for the cream filling, make it a day ahead too. Just keep it in the fridge until you're ready to assemble the pies. These cookie pies combine rolled oats, apple butter, and a creamy filling. You now know how to prepare the dough, bake the cookies, and make that delicious cream filling. Remember to try all the tips for baking and presentation. Feel free to explore variations, too. Whether you want gluten-free options or tasty seasonal twists, these pies can fit your needs. Store them well to enjoy later. With these ideas, you'll make delightful treats that impress everyone. Now, it's time to bake and savor!

Apple Butter Oatmeal Cream Pies Delightful and Soft

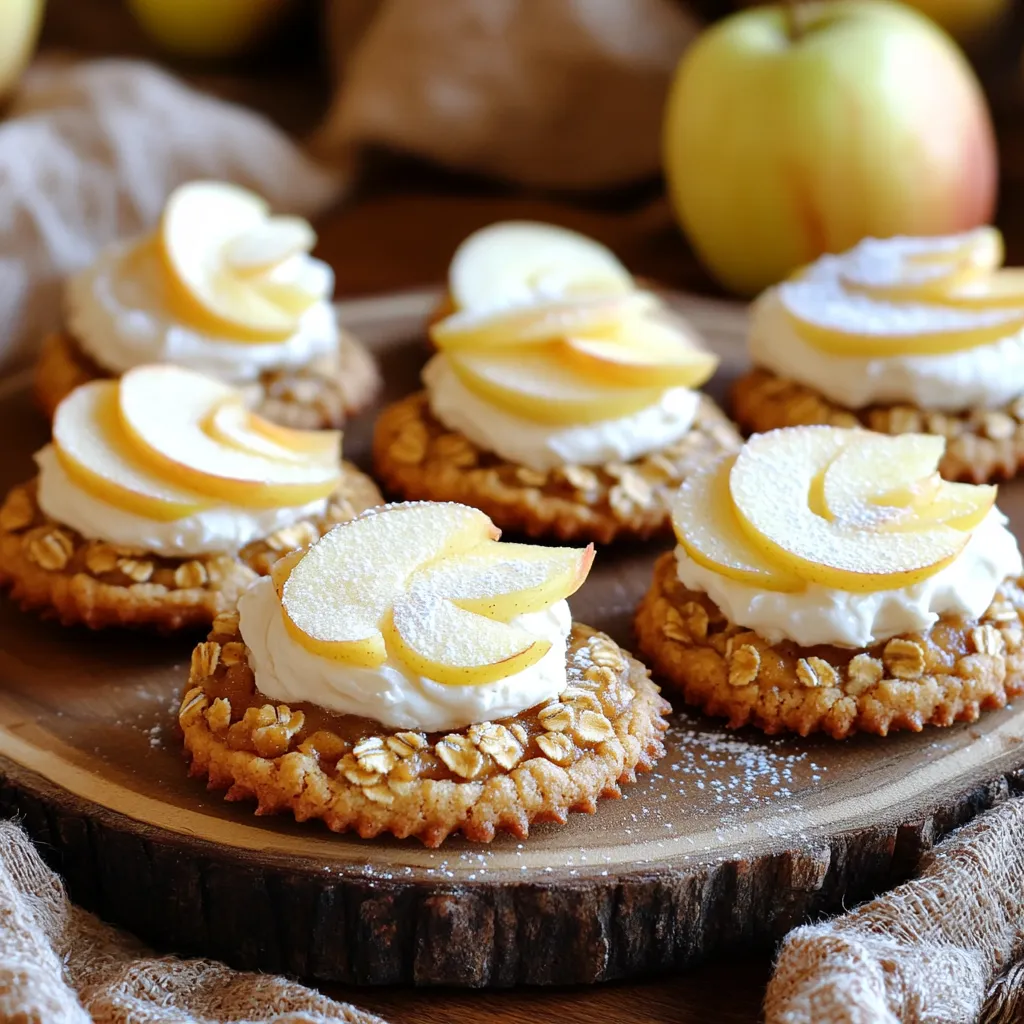
If you crave a sweet, soft treat that feels like a warm hug, you’ll love these Apple Butter Oatmeal Cream

- 2 pounds chicken wings - 1 tablespoon olive oil - 1 teaspoon garlic powder - 1 teaspoon onion powder - 1 teaspoon smoked paprika - 1 teaspoon salt - 1/2 teaspoon black pepper - 1/4 cup grated Parmesan cheese - 2 tablespoons fresh parsley, chopped - 1 teaspoon red pepper flakes for heat - Use avocado oil instead of olive oil for a different taste. - Swap garlic powder with fresh minced garlic for a stronger flavor. - If you lack smoked paprika, regular paprika works well too. - For a dairy-free version, skip the Parmesan or use a vegan cheese alternative. Each ingredient adds its own flair to these wings. You can mix and match as you see fit. Personalizing your wings will make them truly yours. Start by patting the chicken wings dry with paper towels. This step is key for crispiness. Remove any excess moisture. Place the wings in a large bowl. Make sure they have room to move and mix well. Drizzle olive oil over the wings. This helps the seasonings stick. Next, add garlic powder, onion powder, smoked paprika, salt, and black pepper. If you want heat, add red pepper flakes. Toss the wings well, so every inch gets coated with flavor. Preheat your air fryer to 400°F (200°C) for about 5 minutes. Once heated, place the wings in a single layer in the basket. Avoid overcrowding them. Cook for 25-30 minutes. Halfway through, shake the basket or flip the wings. This ensures even cooking. When they are crispy, transfer them to a bowl. While hot, sprinkle grated Parmesan cheese over the wings. Toss them to coat well. Finally, add chopped parsley for color. Serve right away for the best taste! To make your wings extra crispy, start by drying them well. Use paper towels to pat them dry. This step removes moisture that can make wings soggy. Adding olive oil is key; it helps the seasoning stick and aids in browning. Cook in a single layer in the air fryer. Overcrowding leads to uneven cooking and less crispiness. Cooking time can change based on wing size. For smaller wings, check for doneness around 25 minutes. Larger wings may need up to 30 minutes. Always use a meat thermometer to check the internal temperature. Wings should reach 165°F (75°C). Adjust the time as needed to ensure they are fully cooked. You can boost the flavor of your wings with a few simple tweaks. Try adding fresh herbs like rosemary or thyme for a fragrant twist. A splash of lemon juice adds brightness. If you like heat, mix in red pepper flakes or hot sauce. Don’t forget to sprinkle extra Parmesan cheese right after cooking for a rich finish. {{image_2}} To make spicy garlic Parmesan wings, add heat with red pepper flakes. Use one teaspoon for mild spice or more for a kick. Mix the flakes with the other seasonings. You will get a nice balance between garlic, Parmesan, and heat. For lemon pepper garlic wings, swap garlic powder for lemon pepper seasoning. Add a tablespoon of lemon juice to the olive oil. Toss the wings well before air frying. This gives a fresh, zesty flavor. The lemon brightens the dish while garlic still shines through. For a sweet twist, add honey to your wings. Mix two tablespoons of honey with olive oil. Toss this mix with the wings and season as usual. The honey caramelizes and adds a nice glaze. You will love the blend of sweet, salty, and savory flavors. After enjoying your wings, let them cool down. Place the wings in an airtight container. They can stay fresh in the fridge for up to three days. Make sure to cover them well to keep them from drying out. If you want to save your wings for later, freezing is a great option. First, let the wings cool completely. Then, place them in a freezer bag. Try to remove as much air as possible before sealing. You can keep frozen wings for up to three months. When ready to eat, thaw them in the fridge overnight. Reheating wings can be tricky. You want them crispy, not soggy. The best way to reheat is in the air fryer. Preheat it to 350°F (175°C). Place the wings in the basket for about 5-10 minutes. This will help restore their crunch. Alternatively, you can use an oven at 375°F (190°C) for 10-15 minutes. Enjoy your wings just like they were fresh! You cook chicken wings in an air fryer for 25 to 30 minutes. This time makes them crispy and golden. Start with 25 minutes and check for doneness. If they need more time, add a few extra minutes. Make sure to flip or shake the basket halfway through cooking. This ensures even cooking for all the wings. Yes, you can use frozen chicken wings for this recipe. Just add a few extra minutes to the cooking time. Cook them at 400°F (200°C) for 30 to 35 minutes. I recommend thawing them first for best results, but it’s not necessary. They will still turn out tasty and crispy if cooked from frozen. Just be sure to check them for doneness. Garlic parmesan wings go well with many dipping sauces. Here are a few great options: - Ranch dressing: Its creaminess complements the garlic flavor. - Blue cheese dressing: A classic choice that adds tang. - Buffalo sauce: If you like heat, this adds a nice kick. - Honey mustard: This sauce brings a sweet and tangy taste. Try different sauces to find your favorite pairing! You now have all the tools to make tasty chicken wings. We covered the main ingredients, notes for extra flavor, and swaps for what you might not have. I shared steps for prep, seasoning, and cooking in an air fryer. Plus, I offered tips to get them crispy and ways to store leftovers. Don't forget to try the flavor variations like spicy garlic or lemon pepper. Enjoy your wings and the fun of sharing them with friends and family!

Air Fryer Garlic Parmesan Wings Simple and Crispy

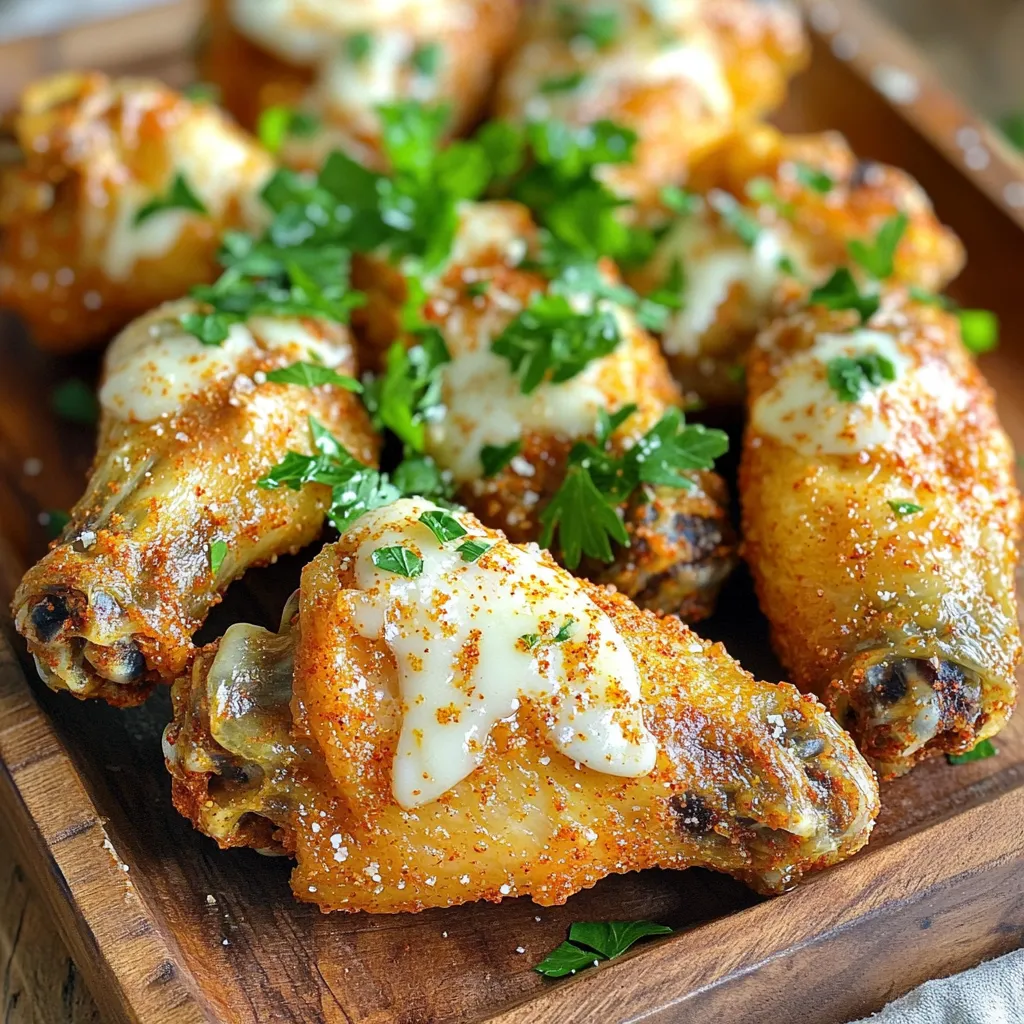
Craving crispy chicken wings packed with garlicky goodness? You’ve landed on the right recipe! In “Air Fryer Garlic Parmesan Wings:

To make One Pot Spinach Ricotta Pasta, gather these simple ingredients: - 10 oz pasta of your choice - 3 cups fresh spinach, roughly chopped - 1 cup ricotta cheese - 2 cups vegetable broth - 1 tablespoon olive oil - 3 cloves garlic, minced - 1 teaspoon Italian seasoning - Salt and pepper to taste - 1/2 cup grated Parmesan cheese for topping - Fresh basil leaves for garnishing Each ingredient plays a key role in the dish. The pasta serves as the base, soaking up the flavors. Fresh spinach adds a burst of color and nutrients. Ricotta gives creaminess and a rich taste. Using vegetable broth instead of water enhances the flavor. Olive oil is your friend for sautéing garlic, which adds depth to your dish. Italian seasoning brings a classic taste, while salt and pepper balance all flavors. Grated Parmesan provides a savory finish, and fresh basil adds a fragrant touch. With these ingredients, you can create a delicious one-pot meal in just about 25 minutes. Each bite will be a blend of creamy, savory, and fresh flavors that everyone will love. Start by taking a large pot. Heat 1 tablespoon of olive oil over medium heat. Once the oil is hot, add 3 minced garlic cloves. Sauté the garlic for about 1 minute. The goal is to make it fragrant but not brown. Next, add 10 ounces of pasta to the pot. Pour in 2 cups of vegetable broth. Stir everything well to mix. Now season it with 1 teaspoon of Italian seasoning, salt, and pepper to taste. Bring this mixture to a boil. Once boiling, lower the heat to simmer. Cover the pot and let it cook for about 10 to 12 minutes. Stir occasionally until the pasta is al dente and most of the broth is absorbed. After the pasta is cooked, it’s time to add flavor. Toss in 3 cups of roughly chopped spinach and 1 cup of ricotta cheese. Stir gently. You want the spinach to wilt and the ricotta to mix well with the pasta. Let this cook on low heat for another 2 to 3 minutes. This helps blend all the wonderful flavors together. Stirring is key to perfect pasta. As the pasta cooks, it can stick together. Stir gently every few minutes. This keeps it from clumping and helps it cook evenly. Keep an eye on the broth level, too. If it gets too low, add a splash more. You want the pasta to be al dente, firm but not hard. This gives a nice bite in every forkful. Want to boost the flavor? Try adding a pinch of red pepper flakes for heat. A squeeze of lemon juice can add brightness. Fresh herbs like thyme or oregano work well, too. You might also swap the Italian seasoning for fresh herbs if you have them. Experiment and find what you love. Every small change can make a big impact on taste. Presentation matters! Serve the pasta in deep bowls for a nice look. Sprinkle grated Parmesan cheese on top for a savory touch. Add fresh basil leaves for color and aroma. This makes each serving pop. You can also drizzle a bit of olive oil before serving to add richness. Serve with crusty bread for a complete meal. {{image_2}} You can mix in other leafy greens for a fun twist. Kale adds a hearty bite. Swiss chard brings a nice touch of sweetness. Arugula offers a peppery flavor. Just chop them roughly and add them in with the spinach. Not a fan of ricotta? You can use cottage cheese instead. It gives a similar creaminess with fewer calories. For a plant-based option, try vegan cream cheese. This option keeps the dish rich and satisfying. If you're gluten-free, choose pasta made from rice or quinoa. Brands like Barilla Gluten Free or Banza work well. Both have great taste and texture. Just follow the cooking instructions on the package for best results. After cooking, let the pasta cool slightly. Place it in a sealed container. This keeps the dish fresh for up to three days. Make sure to store it in the fridge. If you can, separate the cheese from the pasta. This helps keep the cheese creamy. To reheat, add a splash of water or broth. This adds moisture back into the pasta. Heat it in a pot on low. Stir it often to warm evenly. You can also use a microwave. Heat in short bursts, checking often to avoid overcooking. You can freeze this dish, but it may change texture. If you freeze it, use a freezer-safe container. Leave some space for expansion. It’s best to eat frozen portions within three months. Thaw in the fridge overnight before reheating. Yes, you can use frozen spinach. It works well in this dish. Just make sure to thaw it first. Drain any excess water. Then, add it with the ricotta. Frozen spinach is often just as nutritious. Penne and fusilli are great choices. They hold sauce well and cook evenly. You can also try spaghetti or rotini. Each shape gives a fun twist to the dish. The recipe is already vegetarian. To keep it that way, just skip any meat toppings. You can also add more veggies like bell peppers or mushrooms. This adds flavor and texture without losing the vegetarian aspect. This recipe combines simple ingredients, quick steps, and helpful tips. You learned how to blend pasta, spinach, and ricotta for a delicious dish. Remember to adjust flavors and consider variations to suit your taste. Proper storage and reheating can keep your meal fresh for later. Enjoy experimenting with alternatives and make it your own. You now have the tools to create a great meal for any occasion.

One Pot Spinach Ricotta Pasta Flavorful Delight

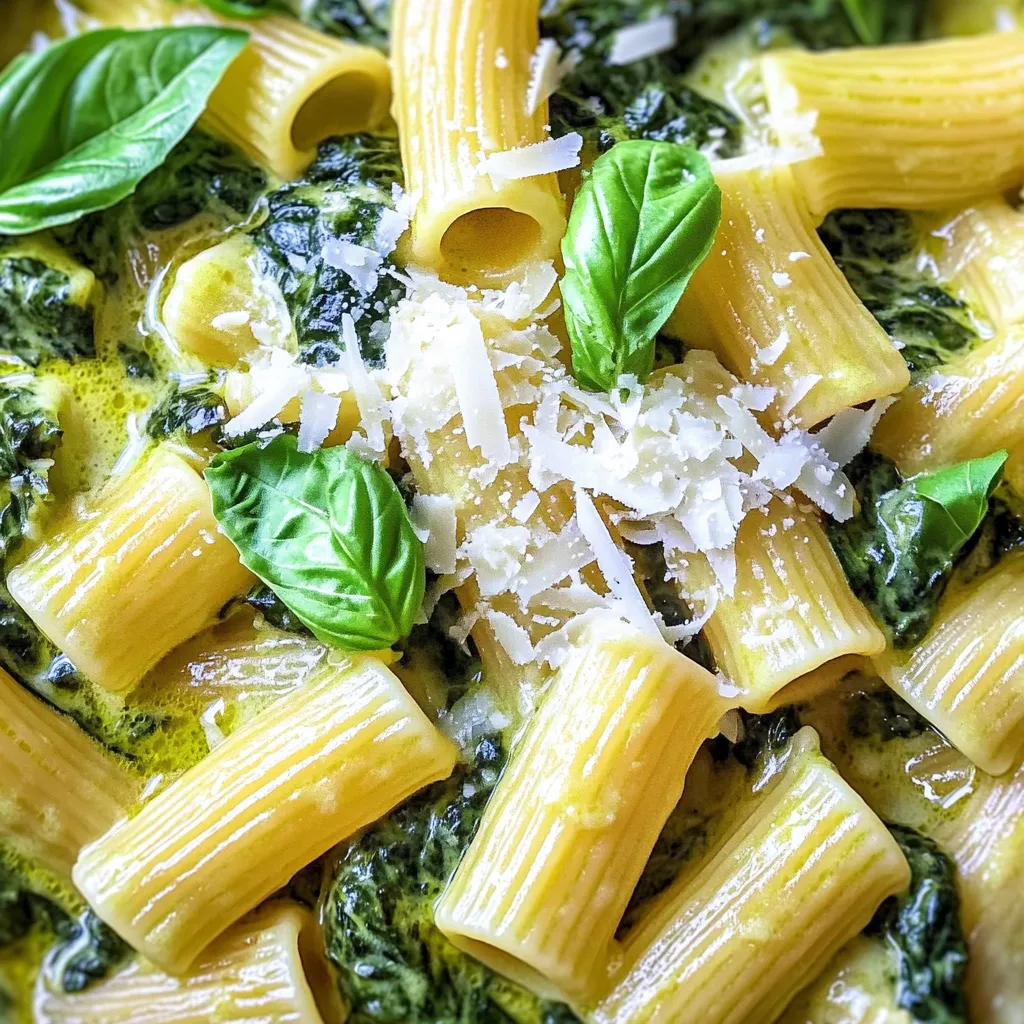
Are you ready to whip up a meal that’s quick, easy, and oh-so-delicious? My One Pot Spinach Ricotta Pasta brings

To make this rich and creamy Peanut Butter Brownie Batter Dip, gather these simple ingredients: - 1 cup creamy peanut butter - 1/2 cup unsweetened cocoa powder - 1 cup powdered sugar - 1 teaspoon vanilla extract - 1/4 cup milk (dairy or non-dairy) - 1/2 cup mini chocolate chips - A pinch of salt - Dipping options: sliced apples, pretzels, graham crackers Each ingredient plays a key role. The creamy peanut butter gives a smooth base. Cocoa powder adds rich chocolate flavor. Powdered sugar sweetens the dip, while vanilla extract enhances taste. Milk helps adjust the dip's texture. Lastly, mini chocolate chips add delightful bites of chocolate. You can dip sliced apples, crunchy pretzels, or sweet graham crackers into this delicious treat. Each option brings its own fun twist! - Mixing peanut butter and cocoa powder Start with a medium bowl. Add 1 cup of creamy peanut butter and 1/2 cup of unsweetened cocoa powder. Use a hand mixer or a whisk. Blend until the mixture looks smooth and well combined. - Gradually incorporating powdered sugar and vanilla extract Next, take 1 cup of powdered sugar. Sift it in slowly to avoid clumps. Add 1 teaspoon of vanilla extract. Mix well until everything is fully blended. - Adjusting dip consistency with milk Pour in 1/4 cup of milk, bit by bit. Keep mixing until you find the right dip thickness. You want it creamy but thick enough to hold its shape. - Folding in mini chocolate chips and salt Now, fold in 1/2 cup of mini chocolate chips. Add a pinch of salt for flavor. Make sure the chips are evenly spread throughout the dip. - Transferring and smoothing mixture in a serving bowl Transfer your dip into a serving bowl. Use a spatula to smooth the top. This makes it look nice and ready to serve. - Chilling the dip for flavor enhancement Chill your dip in the fridge for about 30 minutes. This helps the flavors mix together better, but it’s optional. Enjoy your rich and creamy treat! To make your Peanut Butter Brownie Batter Dip look great, serve it in a decorative bowl. A colorful bowl can catch the eye. Drizzle a bit of extra peanut butter on top. This adds a nice touch. Finish with a sprinkle of mini chocolate chips. It makes the dip look even more tempting. This dip pairs well with many tasty options. Sliced apples add a fresh crunch. Pretzels give a nice salty twist. Graham crackers are sweet and soft. Each of these choices brings out the rich flavors of the dip. Try them all to find your favorite! You can easily make this dip vegan. Just use a plant-based milk and a vegan powdered sugar. For gluten-free, check your sugar and use gluten-free dipping options. Want to add some flair? You can mix in flavored extracts, like almond or hazelnut. Another fun idea is to fold in crushed cookies or nuts for extra texture. These tweaks add your personal touch to the dip! {{image_2}} You can twist the taste of your Peanut Butter Brownie Batter Dip in fun ways. One easy method is to add flavored extracts. Try almond or hazelnut extract for a new layer of taste. Just add a teaspoon when mixing. It makes the dip more interesting without much effort. You can also include crushed cookies or nuts. Oreos or graham crackers add a crunchy bite. Chop them up and fold them in with the mini chocolate chips. This adds texture and a unique flavor to your dip. Seasons can inspire your dip too. For holidays, you can make a festive version. Adding peppermint extract gives it a holiday twist. Use just a half teaspoon to keep the balance right. It’s great for parties and gatherings during the festive season. You can even add colored sprinkles on top for a cheerful look. These small twists make your dip special for any event. To keep your Peanut Butter Brownie Batter Dip fresh, follow these steps: - Place any leftovers in an airtight container. - Make sure to smooth the top of the dip before sealing. - Store the dip in the fridge. This keeps it cool and tasty. This dip can last up to five days in the fridge. After that, the flavors can fade. Always check for any signs of spoilage before eating. If it smells off or looks strange, it's best to toss it. Enjoy this rich and creamy delight while it's fresh! Yes, you can make this dip ahead of time. Prepare it, then store it in the fridge. I recommend chilling it for at least 30 minutes before serving. The flavors blend better when it sits. It will taste even more delicious after a day! If you need an alternative, try almond butter or cashew butter. They both work well. You can also use sunflower seed butter for a nut-free option. Just make sure to choose a smooth variety for the best texture. Yes, this dip is perfect for kids! It has a rich, sweet taste that they love. Just watch the ingredients for any allergies. Serve it with healthy dippers like apples or pretzels. Kids enjoy the fun of dipping! You can freeze this dip, but it may change texture. To freeze, place it in an airtight container. Thaw it in the fridge when you're ready to enjoy it again. Stir well before serving to bring back its creamy goodness. This blog post covered how to make Peanut Butter Brownie Batter Dip. We went through the ingredients, step-by-step instructions, and tips for serving. You can customize your dip to fit your needs. Try adding flavors or using different dippers. Always store leftovers properly to keep them fresh. This dip is fun and easy, perfect for any gathering. Enjoy making it and sharing it with friends!

Peanut Butter Brownie Batter Dip Rich and Creamy Delight

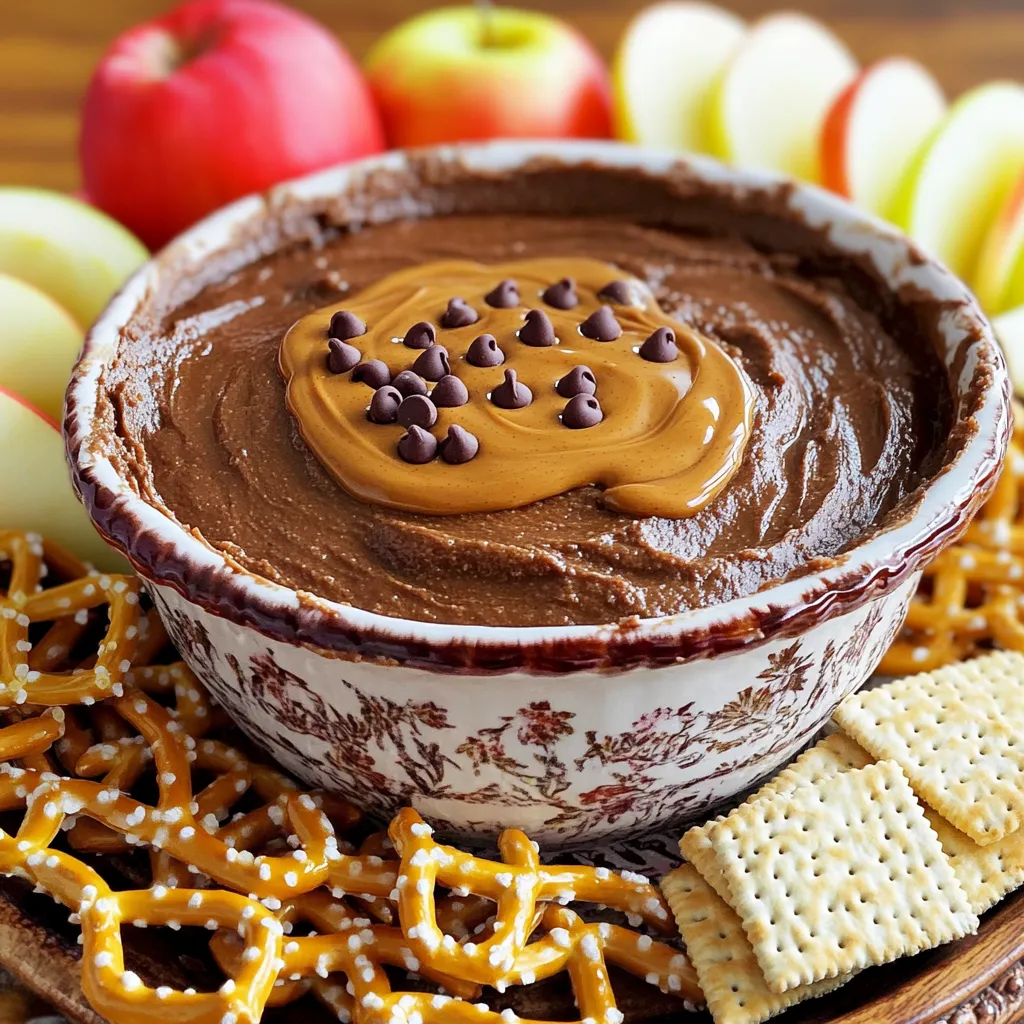
Are you ready for a sweet treat that will leave you wanting more? My Peanut Butter Brownie Batter Dip is

- 8 oz rice noodles - 1 tablespoon sesame oil - 1 bell pepper (red or yellow), thinly sliced - 1 carrot, julienned - 1 cup snap peas, trimmed - 2 green onions, chopped - 1 tablespoon ginger, minced - 2 cloves garlic, minced - ¼ cup peanut butter - 2 tablespoons soy sauce - 2 tablespoons honey or maple syrup - 1 tablespoon rice vinegar - 1 teaspoon sriracha (adjust to taste) - ¼ cup crushed peanuts (for garnish) - Fresh cilantro (for garnish) These ingredients create a blend of flavors that will excite your taste buds. The rice noodles serve as the base, soaking up all the yummy sauce. Sesame oil adds a nutty depth, while fresh veggies add crunch and color. - Crushed peanuts - Fresh cilantro - Extra sriracha Garnishes can elevate your dish. Crushed peanuts add crunch, and cilantro gives a fresh taste. A drizzle of sriracha adds heat for those who love spice. - Use whole wheat noodles instead of rice noodles for more fiber. - Swap sesame oil with olive oil if unavailable. - Almond butter can replace peanut butter for nut allergies. - Maple syrup can substitute honey for a vegan option. These substitutes keep your dish tasty and adaptable. You can enjoy sweet and spicy noodle bowls even if you lack some ingredients. To start, you need to cook the rice noodles. Boil water in a pot and add the noodles. Cook them according to the package directions. This usually takes about 4 to 6 minutes. Once they are soft, drain the noodles and rinse them under cold water. This helps stop the cooking process. Set them aside while you prepare the rest. Next, grab a large skillet or wok. Heat one tablespoon of sesame oil over medium heat. Once the oil is hot, add two cloves of minced garlic and one tablespoon of minced ginger. Sauté for about one minute. This releases a great aroma. Now, toss in your sliced bell pepper, julienned carrot, and snap peas. Stir-fry for about five minutes. You want the veggies to be soft but still crisp. Now, let’s make the sauce! In a small bowl, mix together ¼ cup of peanut butter, two tablespoons of soy sauce, two tablespoons of honey or maple syrup, one tablespoon of rice vinegar, and one teaspoon of sriracha. Whisk them until they are smooth. This sauce adds the sweet and spicy kick to your noodles. It’s time to bring everything together! Add the cooked rice noodles to the skillet with the sautéed veggies. Pour the peanut sauce over the noodles. Toss everything together for about two to three minutes. Make sure the noodles are well coated and heated through. Finally, stir in the chopped green onions before serving. Enjoy your colorful and tasty noodle bowls! To make your dish shine, balance sweetness and heat. Start with a base of peanut butter, soy sauce, and honey or maple syrup. Add sriracha for heat; adjust it to your taste. If it’s too sweet, add a splash of rice vinegar. If it’s too spicy, add more honey. Mix until you get a flavor you love. Keep vegetables bright and crisp. Use high heat when stir-frying. Start with garlic and ginger for flavor. Add harder veggies like carrots first, then softer ones like bell peppers and snap peas. Stir-fry for about five minutes. This keeps them tender but crisp. Don’t overcook them; you want a nice crunch. To keep your noodle bowls fresh, let them cool first. Store leftovers in an airtight container. They can stay in the fridge for up to three days. When reheating, add a splash of water. This keeps the noodles moist and tasty. Enjoy your sweet and spicy flavors again! {{image_2}} You can add protein to your noodle bowls for a heartier meal. Chicken works great. Simply cook diced chicken breast in the skillet until brown. For tofu lovers, use firm tofu. Cube it and sauté until golden. Shrimp is another tasty choice. Cook them until they turn pink. Each protein adds a different flavor. Feel free to change the veggies. If you don’t have snap peas, try broccoli or bok choy. Zucchini and mushrooms also work well. You can use frozen veggies, too. Just cook them a bit longer. Mixing veggies keeps the dish fresh and exciting. Want more heat? Add extra sriracha to the sauce. You can also sprinkle red pepper flakes for a kick. If you prefer mild flavors, cut back on the sriracha. A dash of honey can balance out the heat. Adjusting spice levels makes this dish friendly for everyone. To store your sweet and spicy noodle bowls, let them cool first. Place them in an airtight container. Make sure to cover them well to avoid drying out. These noodle bowls last up to 3 days in the fridge. Keep the garnishes, like peanuts and cilantro, separate until you're ready to eat. You can freeze these noodle bowls for longer storage. Use a freezer-safe container to keep them fresh. Avoid adding garnishes before freezing. They can get soggy. These noodle bowls can last up to 2 months in the freezer. When you're ready to eat, thaw them in the fridge overnight. To reheat, you can use a microwave or a skillet. If using a microwave, heat on medium for about 2-3 minutes. Stir halfway to ensure even heating. If using a skillet, add a splash of water and heat on low until warm. Add fresh garnishes before serving to keep it tasty! Yes, you can use other noodles. Rice noodles are great, but try egg noodles or whole wheat noodles. Each type gives a unique taste and texture. Just cook them according to the package directions. To add more heat, simply increase the sriracha. You can also add red pepper flakes. Another option is to include fresh chopped chilies in the sauce. Taste as you go to find your perfect heat level. To cook rice noodles, boil water and add the noodles. Let them soak for about 5 to 7 minutes. Stir to avoid sticking. Once soft, drain and rinse with cold water. This stops the cooking process and keeps them from clumping. Yes, you can easily make it vegan. Use maple syrup instead of honey. For the sauce, ensure your soy sauce is vegan-friendly. You can also swap peanut butter for almond butter if needed. Leftovers stay good for about 3 days. Store them in an airtight container in the fridge. Reheat gently in a pan or microwave. Add a splash of water for moisture if needed. You now have all the tools to make a tasty sweet and spicy noodle bowl. We covered key ingredients and how to cook rice noodles and sauté vegetables. You learned about perfecting flavors and different protein options. Storing leftovers properly keeps meals fresh for later. Remember, cooking is all about trying new flavors and having fun. Use this guide to create your own bowl masterpiece. Enjoy your cooking journey!

Sweet and Spicy Noodle Bowls Tasty Flavor Delight

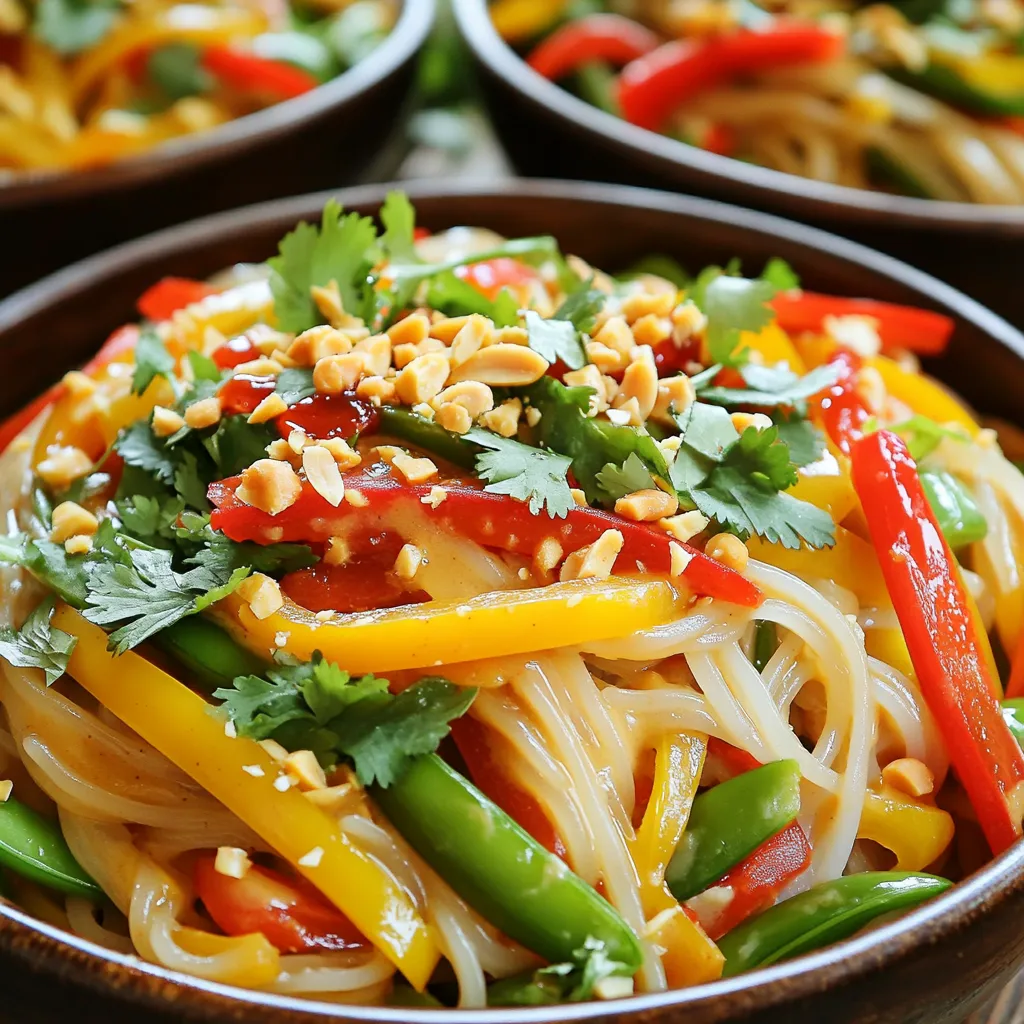
Looking to spice up your mealtime? Sweet and Spicy Noodle Bowls are the answer! I’ll show you how to blend

- Chicken: Use 2 pounds of boneless, skinless chicken thighs. They stay juicy in the stew. - Vegetables: You need 1 medium onion, 3 cloves of garlic, 1 cup of sliced carrots, and 2 cups of baby spinach. These add flavor and nutrition. - Spices and Seasonings: Use 1 teaspoon of dried basil, 1 teaspoon of dried oregano, and 1/2 teaspoon of red pepper flakes. Salt and pepper are also important for seasoning. - Canned items: Grab 1 can (14 oz) of diced tomatoes and 1 cup of canned chickpeas, drained and rinsed. These give the stew body and texture. - Broth: You will need 1 cup of low-sodium chicken broth. This adds depth to the stew. - Fresh basil: Fresh basil leaves make a great garnish. They add a burst of color and flavor to the dish. To start, we need to sauté the onions and garlic. First, heat olive oil in a skillet over medium heat. Add the diced onion and cook for about 3-4 minutes. The onion should turn soft and clear. Then, add the minced garlic. Cook it for another 1-2 minutes. You want it to smell nice but not burn. Next, we’re going to layer everything in the slow cooker. Place the boneless chicken thighs at the bottom. Make sure they lay flat. Take the sautéed onions and garlic and spread them over the chicken. This adds great flavor from the start. Now, pour in the canned diced tomatoes with their juice. Add the chicken broth next. Then, toss in the drained chickpeas and sliced carrots. Sprinkle in dried basil, oregano, red pepper flakes, salt, and pepper to taste. Stir gently, making sure the chicken is covered with the liquid. Now it’s time to set the slow cooker. Cover it and cook on low for 6-7 hours or on high for 3-4 hours. The chicken will become tender and easy to shred. About 30 minutes before serving, stir in the baby spinach. It will wilt nicely into the stew. This step adds color and nutrients to your dish. Remember to taste it and adjust the seasoning if needed. For an ideal presentation, serve the stew in rustic bowls. Crusty bread on the side is perfect for dipping. It adds a nice touch. You can also sprinkle extra fresh basil on top for color and flavor. Pairing options include a simple salad or roasted vegetables. Both balance the meal nicely. Enjoy your delicious Slow Cooker Tuscan Chicken Stew! For the best slow cooker results, follow these tips: - Layer smartly: Start with chicken at the bottom. This helps it cook evenly. - Sauté first: Sauté onions and garlic before adding them. It boosts flavor. - Don’t peek: Keep the lid closed during cooking. Each time you open it, you lose heat. Timing is key. For tender chicken, cook on low for 6-7 hours. If short on time, use high for 3-4 hours. Check the chicken; it should shred easily. To make your stew even tastier, try these spices: - Add herbs: Dried basil and oregano are great choices. They add warmth. - Spice it up: Red pepper flakes can bring heat. Adjust to your taste. Feel free to mix in fresh herbs, like parsley or thyme. They add a nice touch. Sometimes, things don't go as planned. Here are fixes for common issues: - Too thick?: If the stew is thick, add a splash of chicken broth. Stir well. - Too bland?: Taste and add more salt or spices as needed. This can brighten flavors. - Chicken not tender?: If it’s tough, let it cook longer. Slow cooking needs time. With these tips and tricks, you can create a rich and hearty Slow Cooker Tuscan Chicken Stew. Enjoy cooking! {{image_2}} Chicken alternatives You can use chicken breast instead of thighs. Breast meat is leaner and cooks faster. If you prefer, turkey thighs work well too. They add a rich flavor to the stew. Vegetable substitutions Feel free to swap in your favorite veggies. Zucchini, bell peppers, or green beans add color and taste. You can also use frozen spinach if fresh isn’t available. Just add it later in the cooking process. Instant Pot version For a quick meal, use the Instant Pot. Sauté the onions and garlic first, then add the rest of the ingredients. Cook on high pressure for 15 minutes. Let the steam release naturally for 10 minutes. Stir in spinach before serving. Stove-top variation If you prefer the stove, use a large pot. Brown the chicken on medium heat, then add the onions and garlic. Stir in the rest of the ingredients, cover, and simmer for about 30-40 minutes. Add spinach before serving. Gluten-free options This stew is naturally gluten-free. Just ensure your broth is gluten-free as well. All the veggies and spices are safe and delicious. Vegetarian adaptations For a vegetarian dish, replace the chicken with mushrooms or lentils. Use vegetable broth and add more beans or chickpeas for protein. This keeps the stew hearty and satisfying while being meat-free. To store leftover Slow Cooker Tuscan Chicken Stew, let it cool first. Place it in an airtight container. This keeps it fresh. Store it in the fridge for up to three days. When you reheat, use the stove or microwave. If using the stove, heat it in a pot over medium heat. Stir often until warm. In the microwave, place it in a microwave-safe bowl. Heat in short bursts, stirring in between. You can freeze this stew too! First, let it cool completely. Pour it into a freezer-safe container or bag. Leave some space at the top for expansion. Seal it well to avoid freezer burn. It will last up to three months in the freezer. To thaw, move it to the fridge overnight. If you need it quicker, you can use the microwave. Once thawed, reheat on the stove or in the microwave. In the fridge, the stew stays good for about three days. In the freezer, it lasts up to three months. Always check for any signs of spoilage. If it smells bad or looks off, throw it out. Enjoy your flavorful stew safely! Yes, you can use chicken breast in this stew. Chicken breast is leaner and cooks faster than thighs. It may dry out if overcooked. Thighs stay moist and tender due to their fat content. If you choose breast, watch the cooking time closely. This stew pairs well with several sides. Here are some tasty options: - Crusty bread for dipping - A fresh green salad - Steamed rice or quinoa - Garlic bread for extra flavor Each of these sides adds to the meal's charm and is easy to prepare. Yes, you can skip the chickpeas. They add protein and texture but are not essential. Here are some alternative protein sources: - White beans for a similar texture - Lentils for a hearty bite - Extra chicken for a meatier stew Feel free to mix and match based on what you like! In this post, we explored how to make Slow Cooker Tuscan Chicken Stew. We covered key ingredients, including chicken, veggies, and spices. I shared tips for storing leftovers and options for variations. You can swap chicken or try gluten-free choices. Cooking is about creating flavors that suit you. Use your own ingredients and enjoy this dish. With these steps and tips, your stew will be a hit. Happy cooking, and don’t forget to share your results!

Slow Cooker Tuscan Chicken Stew Flavorful and Easy Meal

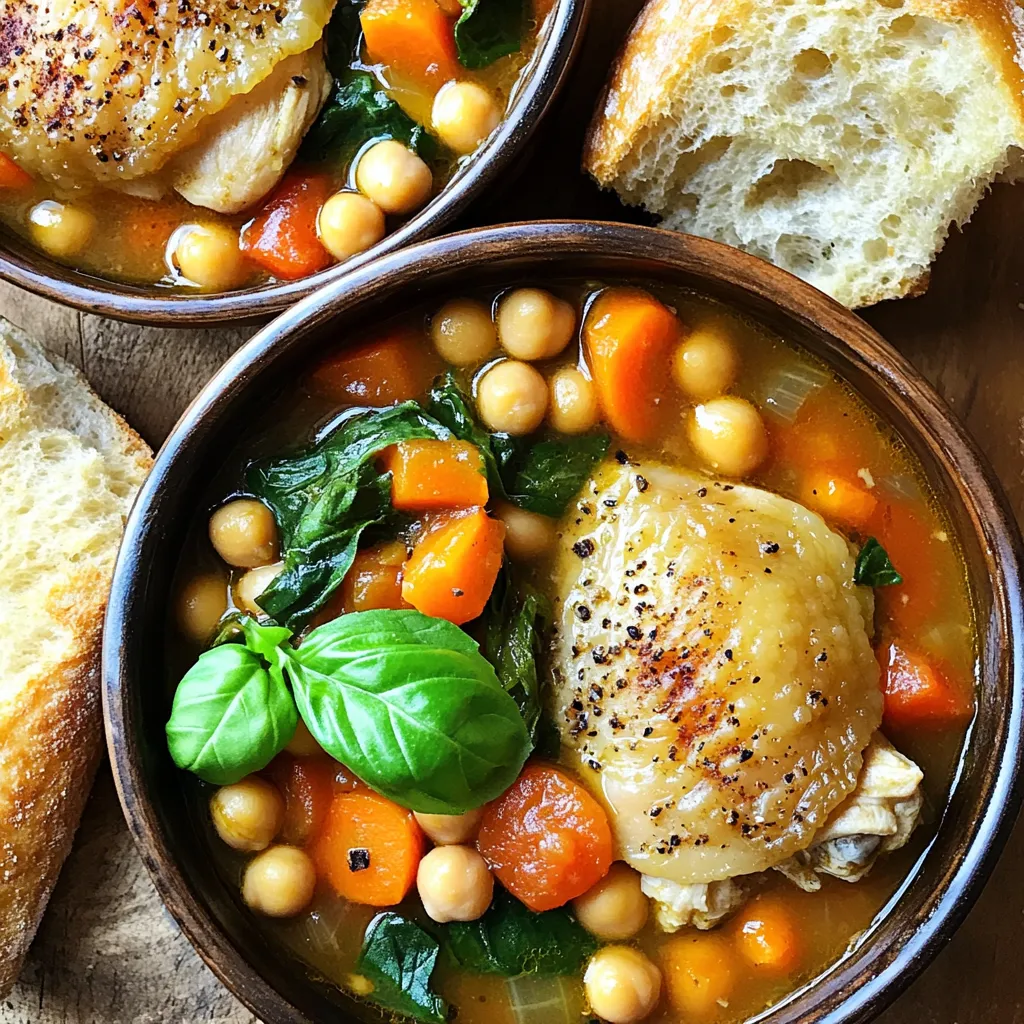
Looking for a simple, delicious meal that warms the soul? This Slow Cooker Tuscan Chicken Stew blends tender chicken, fresh

- 4 chicken thighs, bone-in and skin-on - 2 bell peppers (red and yellow), sliced - 1 large onion, sliced - 4 garlic cloves, minced - 1/4 cup honey - 2 tablespoons soy sauce (low-sodium) - 1 tablespoon apple cider vinegar - 2 tablespoons olive oil - 1 teaspoon smoked paprika - 1/2 teaspoon black pepper - 1/2 teaspoon salt The main ingredients for this dish are simple yet flavorful. The chicken thighs give a rich taste and juicy texture. The bell peppers and onion add sweetness and color. Garlic brings a nice aroma to the mix. - Olive oil - Low-sodium soy sauce - Honey - Apple cider vinegar - Smoked paprika - Black pepper - Salt These staples create a savory glaze. Honey mixes with soy sauce for sweetness. Apple cider vinegar adds a touch of tang. Smoked paprika gives a warm, smoky flavor, while black pepper and salt season everything nicely. - Fresh cilantro or parsley Garnishing with cilantro or parsley brightens the dish. It adds a fresh element that balances the sweetness and savory notes. You can sprinkle the herbs right before serving for a pop of color and taste. First, gather all your ingredients. You need chicken thighs, bell peppers, onion, garlic, honey, soy sauce, apple cider vinegar, olive oil, smoked paprika, black pepper, and salt. 1. Preheat your oven to 400°F (200°C). 2. In a small bowl, mix honey, soy sauce, apple cider vinegar, minced garlic, smoked paprika, black pepper, and salt. This mix becomes your marinade. 3. Place the chicken thighs in a large bowl. Pour half of the marinade over the chicken. Coat it well. Let it sit for 15 to 20 minutes. This step helps the chicken soak up flavor. Now, let’s get cooking! 1. On a large sheet pan, arrange the sliced bell peppers and onions. Drizzle them with olive oil. Sprinkle a pinch of salt and pepper on top. Toss to combine. 2. Place the marinated chicken thighs skin-side up on the veggies. Drizzle the rest of the marinade over the chicken. 3. Bake in the oven for 30 to 35 minutes. The chicken should reach 165°F (75°C). The skin should be golden brown. The veggies will be tender. Once cooked, remove the pan from the oven. Let it rest for 5 minutes before serving. This helps keep the chicken juicy. For a great look, serve the chicken and veggies directly from the sheet pan. You can also plate them individually. Drizzle some sauce from the pan over the top for extra flavor. If you like, garnish with fresh cilantro or parsley for a pop of color. To get the most flavor in your chicken, marinate it well. Use half of the marinade to coat the chicken thighs. Let them sit for 15-20 minutes. This short time helps the flavors soak in without making the chicken tough. If you have more time, you can marinate the chicken for a few hours in the fridge. This will create a deeper taste. For great veggies, cut the bell peppers and onions into even slices. This helps them cook at the same rate. Drizzle olive oil over them and season with salt and pepper. Toss well so they are coated. Place the veggies on the sheet pan first. The chicken will roast on top, keeping the veggies moist and full of flavor. Using the right tools makes cooking easier. A large sheet pan is key for this dish. It allows the chicken and veggies to cook evenly. A good mixing bowl is needed for the marinade. I also recommend a meat thermometer. This tool helps you check if the chicken is cooked to the right temperature of 165°F (75°C). {{image_2}} To make this dish gluten-free, swap soy sauce for tamari. Tamari is a great choice and tastes similar. Always check labels to ensure no gluten is hidden in other ingredients. Most honey is gluten-free. Make sure you choose the right one! If you're watching carbs, skip the honey. Use a sugar-free sweetener instead. You can use coconut aminos in place of soy sauce for a lower-carb option too. This keeps the flavors while cutting down on carbs. Feel free to get creative with vegetables. Zucchini, broccoli, or carrots work well. You can also use chicken breast or even shrimp for a different protein. Just adjust cooking times as needed. After you enjoy your meal, let the leftovers cool. Place the chicken and vegetables in an airtight container. This helps keep the flavors fresh. Store them in the fridge for up to three days. If you plan to eat them later, store them right away. To reheat, take the leftovers out of the fridge. Preheat your oven to 350°F (175°C). Place the chicken and peppers on a baking sheet. Cover them with foil to keep them moist. Heat for about 15-20 minutes or until hot. You can also use a microwave. Place the food on a microwave-safe plate and cover it. Heat for about 2-3 minutes, checking every minute. If you want to freeze the dish, cool it first. Place the chicken and peppers in a freezer-safe bag or container. Remove as much air as possible before sealing. Label it with the date. You can freeze it for up to three months. To eat, thaw it overnight in the fridge before reheating. Yes, you can swap chicken thighs for breasts. Chicken breasts cook faster than thighs. Be careful not to overcook them. Check the internal temperature; it should be 165°F (75°C). Using thighs gives a richer taste, but breasts will work too. To add heat, use red pepper flakes or diced jalapeños. You can mix these into the marinade. Another option is to add hot sauce to the honey and soy mix. Adjust the amount based on your spice level. Taste as you go to find your perfect heat. This dish pairs well with rice or quinoa. You can also serve it with a fresh salad for crunch. Garlic bread is a great side too. For a healthy option, steamed broccoli or green beans work nicely. Enjoy mixing and matching your sides! This blog post covered all you need for a great sheet pan honey garlic chicken. We looked at key ingredients, cooking steps, and helpful tips. You learned how to adapt the recipe and store leftovers effectively. Remember, cooking is a fun way to explore new flavors. Try out these ideas and enjoy your kitchen time! With practice, you'll make this dish your new favorite.

Savory Sheet Pan Honey Garlic Chicken Peppers Dish

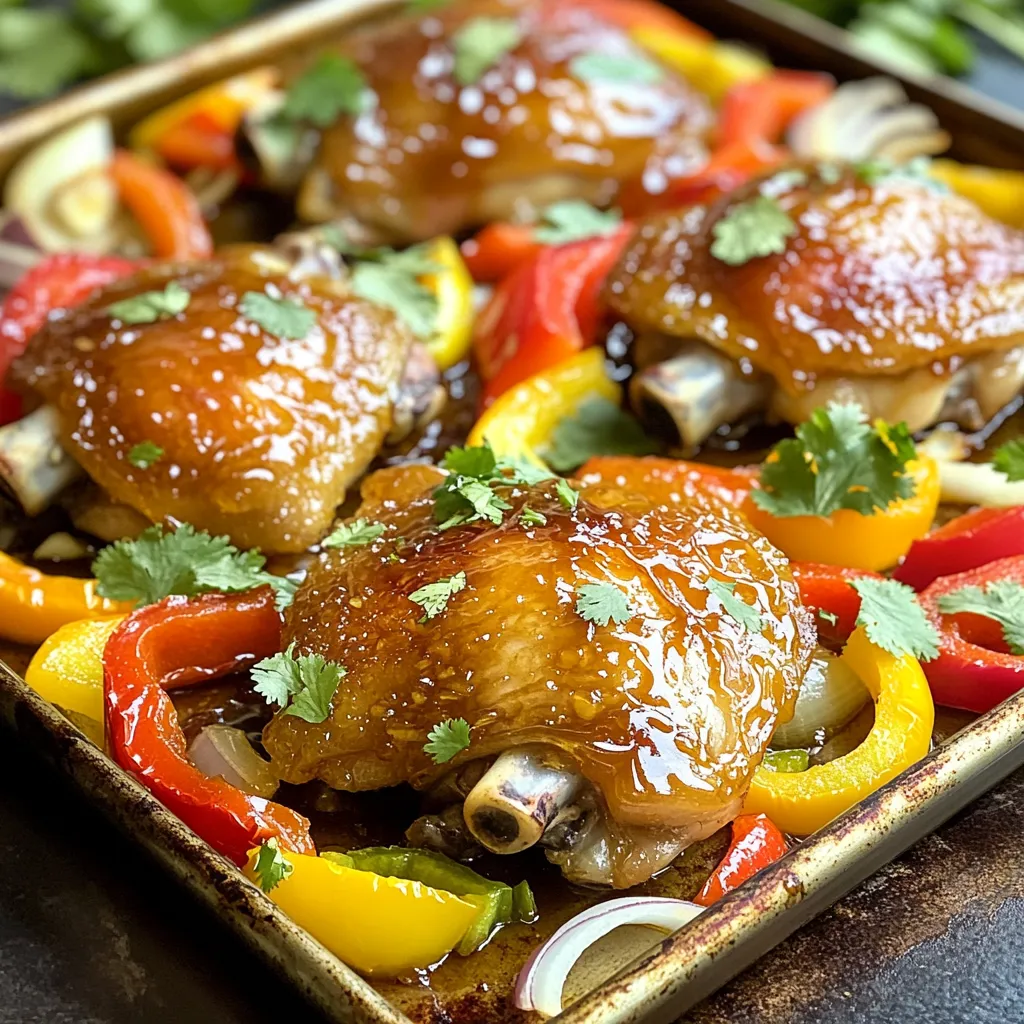
Welcome to your new favorite dinner! This Savory Sheet Pan Honey Garlic Chicken Peppers dish is quick, tasty, and perfect

- 2 medium zucchinis - 1/2 cup grated Parmesan cheese - 1 teaspoon garlic powder - 1 teaspoon onion powder - 1/2 teaspoon paprika - Salt and pepper to taste - 2 tablespoons olive oil - Fresh parsley, chopped (for garnish) When making Air Fryer Garlic Parmesan Zucchini Chips, slicing is key. Aim for thin, even slices. This helps them cook at the same rate. If some pieces are thick, they will not get crispy. A mandoline slicer works well for this task. Next, let’s talk oils. Olive oil adds a nice flavor. You could try other oils, too, like avocado or coconut. Each oil gives a different taste. Choose one that suits your style. Just remember, the oil helps the spices stick to the zucchini and adds crispiness during cooking. First, wash the zucchinis well under cold water. This removes dirt and ensures they are clean. Cut off both ends of the zucchinis. Use a sharp knife or a mandoline slicer to slice them thinly. Aim for slices about 1/8 inch thick. This thickness helps them cook evenly and become crispy. Next, take a large mixing bowl. Add the sliced zucchinis to the bowl. Pour in 2 tablespoons of olive oil. Toss the zucchini slices gently. Make sure every piece is coated in oil. This will help the seasonings stick and improve the texture. In a separate bowl, gather your dry ingredients. Combine 1/2 cup grated Parmesan cheese, 1 teaspoon garlic powder, 1 teaspoon onion powder, 1/2 teaspoon paprika, salt, and pepper. Mix these together well. This blend will give the zucchini chips a tasty and savory flavor. Now, sprinkle the cheese and spice mixture over the zucchini slices. Toss them gently again. Ensure all slices are covered in the mixture. This step is key for great flavor in every bite. Before you cook, preheat your air fryer. Set it to 375°F (190°C) and let it warm up for about 3 to 5 minutes. This helps the chips cook evenly and get crispy. Place the zucchini slices in a single layer in the air fryer basket. Do not overcrowd the basket. If needed, cook in batches to avoid steaming them. Air fry the zucchini chips for about 10 to 12 minutes. Check them halfway through and shake the basket. This ensures even cooking. When they turn golden and crispy, they are done. Remove the chips from the air fryer. Let them cool on a wire rack for a few minutes. This step helps them stay crunchy. Enjoy your tasty garlic Parmesan zucchini chips! To get your zucchini chips super crispy, cool them on a wire rack. This lets air flow around the chips, keeping them crunchy. If you want them crunchier or softer, adjust the cook time slightly. Check them at the 10-minute mark. If they need more time, add a minute or two. You can boost the flavor with some extra seasonings. Try adding a pinch of cayenne pepper for heat or some Italian herbs for an earthy taste. For cheese, you can swap Parmesan with Pecorino Romano or even nutritional yeast for a vegan option. Pair your zucchini chips with dips like marinara sauce or ranch dressing for a tasty combo. For a fun look, serve the chips on a big platter. Add a small bowl of your dip in the center. Garnish with fresh parsley to make it pop! {{image_2}} You can switch zucchinis for other vegetables. Try using yellow squash. It has a similar texture. Slice it the same way as zucchini. You can also use root vegetables like carrots or sweet potatoes. They offer a different taste and crunch. Just make sure to adjust the cooking time. Some may need a little longer to crisp. If you like heat, add chili powder to the spice mix. It gives a spicy kick that many enjoy. You can also try herbs like thyme or oregano. These add a fresh taste. Mix them in with the cheese and spices for a new twist. For those needing gluten-free options, this recipe is easy! The ingredients already use no gluten. Just ensure the cheese is gluten-free. If you want a vegan alternative, swap the Parmesan for nutritional yeast. It gives a cheesy flavor without dairy. You can also try vegan cheese shreds. To keep your leftover zucchini chips fresh, use airtight containers. This helps maintain their crispness. Store them in the fridge. They stay good for about 2-3 days. After that, they may lose their crunch and flavor. When it comes to reheating, you want those chips crispy again. The air fryer works best for this. Set it at 375°F (190°C) and heat for about 5 minutes. This method revives their crunch perfectly. You can use the microwave, but it won't give the same effect. Chips may turn soggy instead of crispy. If you use a microwave, heat them for 30 seconds at a time. Check often to avoid overcooking. For the best results, always go back to the air fryer. Enjoy your delicious, crispy zucchini chips! Air fryer zucchini chips last about 3 to 4 days in an airtight container. Look for signs of spoilage. If you see moisture or the chips feel soft, it’s time to toss them. For best results, enjoy them fresh! You can, but fresh zucchinis work best. Frozen zucchini has more water. This can make your chips soggy. If you use frozen, thaw them first and pat them dry. This helps remove excess moisture. If your chips aren’t crispy, check a few things. First, make sure you slice the zucchini thinly. Thicker slices take longer to cook. Second, avoid overcrowding the air fryer basket. Give each chip space. Lastly, try cooking them a bit longer. If they still aren’t crisp, sprinkle a little extra salt. This can help draw out moisture. Air fryer zucchini chips are easy and fun to make. We covered the key ingredients, like fresh zucchini and Parmesan cheese, along with simple steps for prep and cooking. I shared tips for achieving crispiness and flavor variations, plus storage and reheating advice. Try out different veggies or spices to make this snack your own. Enjoy your tasty, healthy chips, and impress your friends and family with your cooking skills!

Air Fryer Garlic Parmesan Zucchini Chips Delight

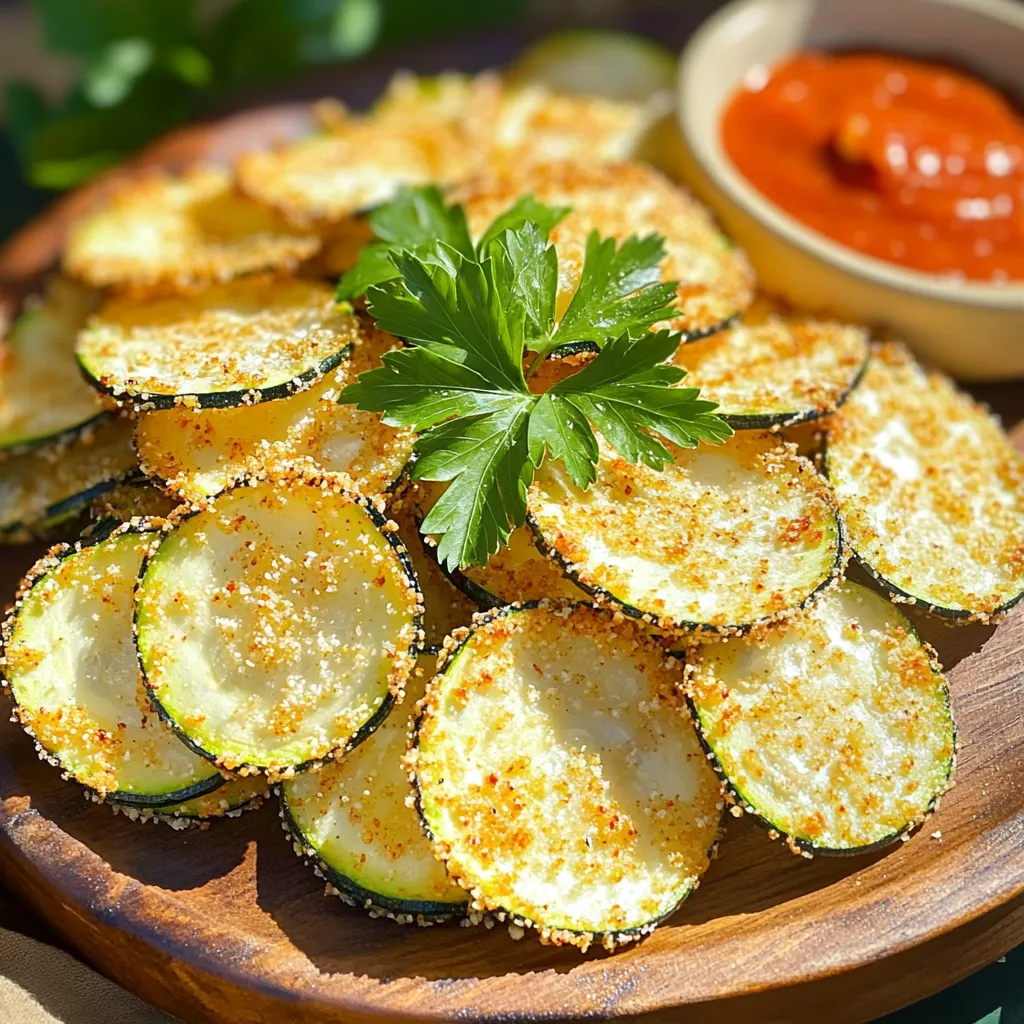
Craving a healthy snack that’s packed with flavor? Look no further! These Air Fryer Garlic Parmesan Zucchini Chips are the

To make the No Bake Chocolate Peanut Butter Oat Bars, you will need a few simple ingredients. Each one plays a key role in creating the perfect balance of flavor and texture. - 2 cups rolled oats - 1 cup natural peanut butter - 1/2 cup honey or maple syrup - 1/4 cup cocoa powder - 1/2 teaspoon vanilla extract - 1/4 teaspoon salt - 1/2 cup dark chocolate chips - Optional: 1/4 cup chopped nuts or seeds (like almonds or sunflower seeds) - Optional: Flaky sea salt for sprinkling The rolled oats form the base. They add fiber and texture. Natural peanut butter gives a rich, nutty taste. Honey or maple syrup acts as a sweetener and helps bind everything together. Cocoa powder adds a deep chocolate flavor, while vanilla extract enhances the overall taste. The salt balances the sweetness. Dark chocolate chips provide a melty, chocolatey bite. You can add nuts or seeds for extra crunch. Flaky sea salt on top makes it even more special. Using quality ingredients is key for the best taste. I love how each bite is a mix of creamy, chewy, and crunchy. Trust me; these bars will make your taste buds dance! - Mixing dry ingredients Start with a large bowl. Add 2 cups of rolled oats, 1/4 cup of cocoa powder, and 1/4 teaspoon of salt. Stir until everything mixes well. This step gives your bars a strong base. - Melting peanut butter and honey Grab a microwave-safe bowl. Put in 1 cup of natural peanut butter and 1/2 cup of honey. Heat in the microwave for about 30 seconds. Stir until the mix is smooth. This makes it easy to combine with the dry ingredients. - Combining mixtures Pour the melted peanut butter mix into the bowl with dry ingredients. Add 1/2 teaspoon of vanilla extract. Stir everything together until it forms a thick and sticky mixture. Make sure no dry bits remain. - Preparing the baking dish Take an 8x8 inch baking dish. Line it with parchment paper. Leave some paper hanging over the edges. This helps you lift the bars out later. - Pressing the mixture into the dish Transfer the mixture into the lined dish. Use a spatula or your hands to press it down firmly. Make sure it is even and packed tightly. This is key for good bar structure. - Refrigerating to set Optionally, sprinkle some flaky sea salt on top for extra flavor. Cover the dish and place it in the fridge. Let it set for at least 1 hour. This helps the bars hold their shape. After this, your No Bake Chocolate Peanut Butter Oat Bars are ready to enjoy! To get the best bars, pack the mixture tightly. This helps them hold shape. If you don't pack them, they might crumble. You can use alternative sweeteners like agave or brown rice syrup. They change the taste and texture a bit but can work well. For customization, try adding nuts or seeds. Almonds and sunflower seeds add crunch. You can also mix in dried fruits for extra flavor and chew. One mistake is overheating the peanut butter. Heat it just enough to melt, not too much. If it gets too hot, it can change the texture. Another error is not letting the bars set long enough. If they don't chill for at least an hour, they will be too soft. Always wait to cut them until they are firm. This makes slicing easier. {{image_2}} You can make this recipe fit different diets with easy swaps. For a vegan option, use maple syrup instead of honey. Choose dark chocolate chips that are dairy-free. If you need gluten-free bars, check your oats. Look for oats labeled as gluten-free. These oats are safe for those with gluten allergies. Adding spices can boost the taste. A sprinkle of cinnamon gives warmth and depth. You can also try nutmeg or a dash of sea salt for a twist. Using different types of chocolate can change the flavor. Dark chocolate adds richness, while milk chocolate makes it sweeter. For a fun twist, try white chocolate chips. This way, you can create your perfect bar! To keep your No Bake Chocolate Peanut Butter Oat Bars fresh, store them in the refrigerator. Place them in an airtight container. This helps prevent them from drying out. They stay good for about a week when refrigerated. If you want to save them for later, freezing is a great option. Wrap each bar in plastic wrap. Then, place them in a freezer-safe bag or container. When you want a bar, just thaw it in the fridge overnight. This keeps the bars tasty and fresh for up to three months. These bars last well if stored properly. In the fridge, expect them to stay fresh for about one week. Keep an eye out for signs of spoilage. If they smell off or look dry, it’s best to toss them. When frozen, they can last for about three months. After that, they may lose flavor or texture. Always check for changes. Enjoy these delicious bars while they are at their best! To make these bars nut-free, swap the peanut butter for sun butter or soy nut butter. Both options provide a similar creamy texture and flavor. You can also try using tahini, which adds a unique taste. Ensure you check for nut-free labels on all ingredients to avoid cross-contamination. Yes, you can substitute cocoa powder with carob powder. Carob gives a sweet, mild flavor and is naturally caffeine-free. You can also use a chocolate protein powder for a boost. Just remember, this will change the taste, so adjust to your liking. The best way to cut the bars evenly is to use a sharp knife. First, remove the bars from the dish using the parchment paper. Then, score the top lightly with the knife. This helps guide your cuts. Finally, cut straight down with firm pressure for neat pieces. Yes, you can use rolled oats instead of quick oats. The texture may be a bit chewier, but they still work well. Just keep in mind that rolled oats might need a little extra time to absorb moisture. You can use this recipe as a base for other treats. Try adding dried fruits like raisins or cranberries for a fruity twist. You can also mix in seeds such as chia or flax for added nutrition. These bars can also be crumbled over yogurt or ice cream for a tasty topping. You learned about the key ingredients for delicious bars. We covered preparation steps and tips for the best texture. You can personalize your bars with different flavors or dietary needs. Storing them properly helps keep them fresh longer. By avoiding common mistakes, you can create tasty treats each time. Try adding your own twists. Making these bars can be fun and rewarding. Enjoy the process and share them with friends!

No Bake Chocolate Peanut Butter Oat Bars Delight

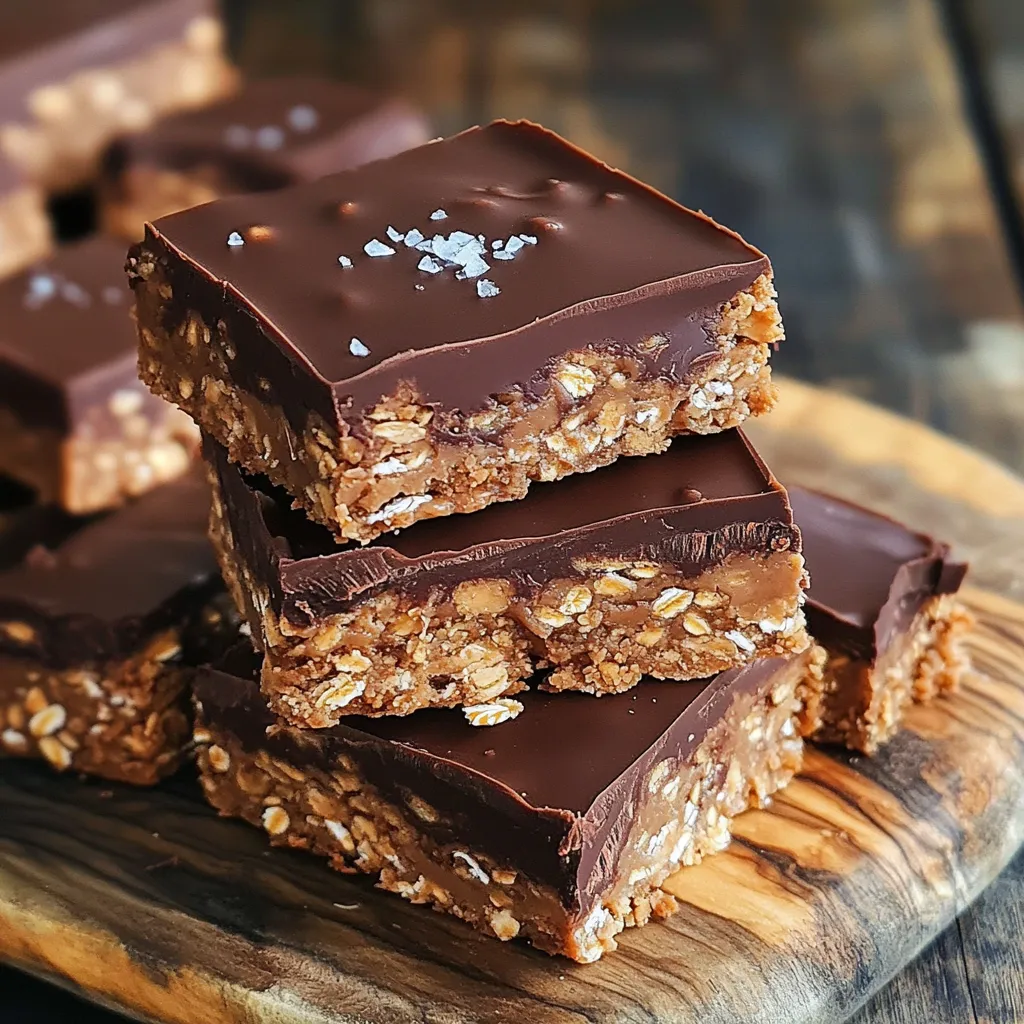
Are you ready to indulge in a tasty treat that’s easy to make? My No Bake Chocolate Peanut Butter Oat

Older posts
Newer posts
← Previous Page1 … Page13 Page14 Page15 … Page85 Next →

dsad

© 2026 greenmealmap • Built with GeneratePress

Our Policies

  • Copyright Policy
  • Cookie Policy
  • GDPR Policy
  • Privacy Policy
  • Disclaimer
  • Terms Of Use

More Information

  • Home
  • About
  • Contact
  • Appetizers
  • Dessert
  • Dinner
  • Drinks
©2026, greenmealmap About Back To Top