Skip to content
DisclaimerTerms Of UseGDPR PolicyCookie Policy

greenmealmap

  • Home
  • Drinks
  • Appetizers
  • Dinner
  • Dessert
  • About
  • Contact
  • Privacy Policy
DisclaimerTerms Of UseGDPR PolicyCookie Policy

NO-ING-IMG

- 1 cup pumpkin puree - 1/2 cup brown sugar - 1/4 cup granulated sugar - 1/3 cup vegetable oil - 2 large eggs - 1 teaspoon vanilla extract - 1 1/2 cups all-purpose flour - 1 teaspoon baking powder - 1/2 teaspoon baking soda - 1 teaspoon ground cinnamon - 1/2 teaspoon ground nutmeg - 1/4 teaspoon ground ginger - 1/4 teaspoon salt - 1/2 cup chopped pecans (plus extra for topping) Pumpkin puree is the heart of this recipe. It brings moisture and flavor to the muffins. You can find it canned or make your own by roasting fresh pumpkin. Both options work well. For sugar, I use brown and granulated. Brown sugar adds a rich, deep flavor. Granulated sugar helps with sweetness and a light texture. Together, they create a lovely taste balance. Flour is the base of our muffins. I use all-purpose flour for a light and soft crumb. Baking powder and baking soda help the muffins rise. The spices, like cinnamon, nutmeg, and ginger, add warmth and depth to the flavor. - 1/4 cup chocolate chips - Additional spices - Types of nuts You can customize your muffins with chocolate chips. They melt and add a sweet touch. If you love spice, consider adding more cinnamon or even a pinch of cloves for a unique twist. For nuts, chopped pecans shine in this recipe, but walnuts or almonds can also work. They all add crunch and flavor. Feel free to mix and match to suit your taste. 1. First, preheat your oven to 350°F (175°C). This helps the muffins bake evenly. 2. Line a muffin tin with paper liners or lightly grease it. This prevents sticking and makes for easy removal. 3. In a large mixing bowl, combine the pumpkin puree, brown sugar, granulated sugar, vegetable oil, eggs, and vanilla extract. Mix until smooth. This blend gives the muffins their rich flavor and moist texture. 1. In a separate bowl, whisk together the all-purpose flour, baking powder, baking soda, cinnamon, nutmeg, ginger, and salt. This mix adds structure and zest. 2. Gradually add the dry mix to the pumpkin mixture. Stir gently until just combined. Avoid overmixing. This keeps the muffins light and fluffy. 3. Fold in the chopped pecans and optional chocolate chips. This adds crunch and a bit of sweetness. 1. Divide the batter evenly among the muffin cups, filling each about 2/3 full. This allows room for rising. 2. Sprinkle a few extra chopped pecans on top. This gives a nice finish and texture. 3. Bake in the preheated oven for 18-22 minutes. Check doneness by inserting a toothpick into the center. It should come out clean. 4. Once baked, let the muffins cool in the tin for about 5 minutes. Then transfer them to a wire rack to cool completely. To make the best pumpkin pecan muffins, avoid overmixing the batter. When you mix the wet and dry ingredients, do it just until they come together. Overmixing makes muffins tough instead of soft. Baking temperature is also key. Preheat your oven to 350°F (175°C). This ensures even baking. You want the muffins to rise and set properly. A hot oven helps them puff up nicely. These muffins are great warm. You can serve them plain or dust them with powdered sugar for a sweet touch. A dollop of cream cheese spread makes them even better. Pair your muffins with coffee or tea. They also taste great with a side of fresh fruit. This combination adds a lovely balance to your snack. One common mistake is overfilling muffin cups. Fill each cup about 2/3 full. This allows room for the muffins to rise without spilling over. Not checking for doneness is another pitfall. Use a toothpick to test if they are done. Insert it into the center. If it comes out clean, your muffins are ready. If not, bake for a few more minutes. {{image_2}} You can easily change the nuts in your muffins. Try walnuts or almonds instead of pecans. Each nut brings its own taste. If you want sweetness, use maple syrup or honey, too. These can add a rich flavor. If you need gluten-free muffins, use almond flour or a gluten-free blend. These will work well in your recipe. For a dairy-free option, use plant-based milk and oil. This keeps your muffins moist and fluffy without dairy. Add cranberries for a tart twist. They pair well with pumpkin. You can also mix in chopped apples or pears for added sweetness. For the holidays, sprinkle cinnamon sugar on top. This gives a festive touch to your muffins. To keep your pumpkin pecan muffins fresh, store them in an airtight container. This helps lock in moisture. Place a paper towel inside to absorb extra moisture and keep them soft. For longer storage, you can freeze these muffins. Wrap each muffin tightly in plastic wrap. Then, place them in a freezer bag before freezing. This method can keep them tasty for up to three months. When it’s time to enjoy your muffins again, you can easily reheat them. The best method is using a microwave. Heat them for about 15 to 20 seconds. You can also use an oven. Preheat it to 350°F (175°C) and warm the muffins for about 5 to 10 minutes. This method helps keep the muffin’s texture nice and fluffy. At room temperature, your pumpkin pecan muffins can last for about three days. After that, they may start to dry out. If you see any mold or a change in smell, it’s time to toss them. Always check your muffins before eating. Keeping them in the fridge can extend their life to a week, but they may lose some moisture. To check if your muffins are done, use a toothpick. Insert it into the center of a muffin. If it comes out clean or with just a few crumbs, your muffins are ready. If the toothpick has wet batter on it, bake for a few more minutes. Keep in mind, every oven is a little different. Always check around the 18-minute mark. Yes, you can make these muffins ahead of time! They stay fresh for about three days at room temperature. To store, place them in an airtight container. If you want to keep them longer, freeze them. Wrap each muffin in plastic wrap and place in a freezer bag. They will last for up to three months. When ready to enjoy, thaw overnight in the fridge or at room temperature. If you don't have pumpkin puree, you can use applesauce or mashed banana. Both options add moisture and sweetness. You can also use sweet potato puree, which has a similar texture and flavor. Just remember, these substitutes may change the taste a bit. If you want the classic pumpkin flavor, stick to pumpkin puree when you can. In this article, we explored the key ingredients for delicious muffins. We covered main ingredients like pumpkin puree, sugars, and flour. I shared preparation steps and tips for perfect muffins. You learned about variations and storage methods to keep muffins fresh. Baking muffins can be fun and rewarding. With these insights, you can enjoy tasty treats anytime. Happy baking!

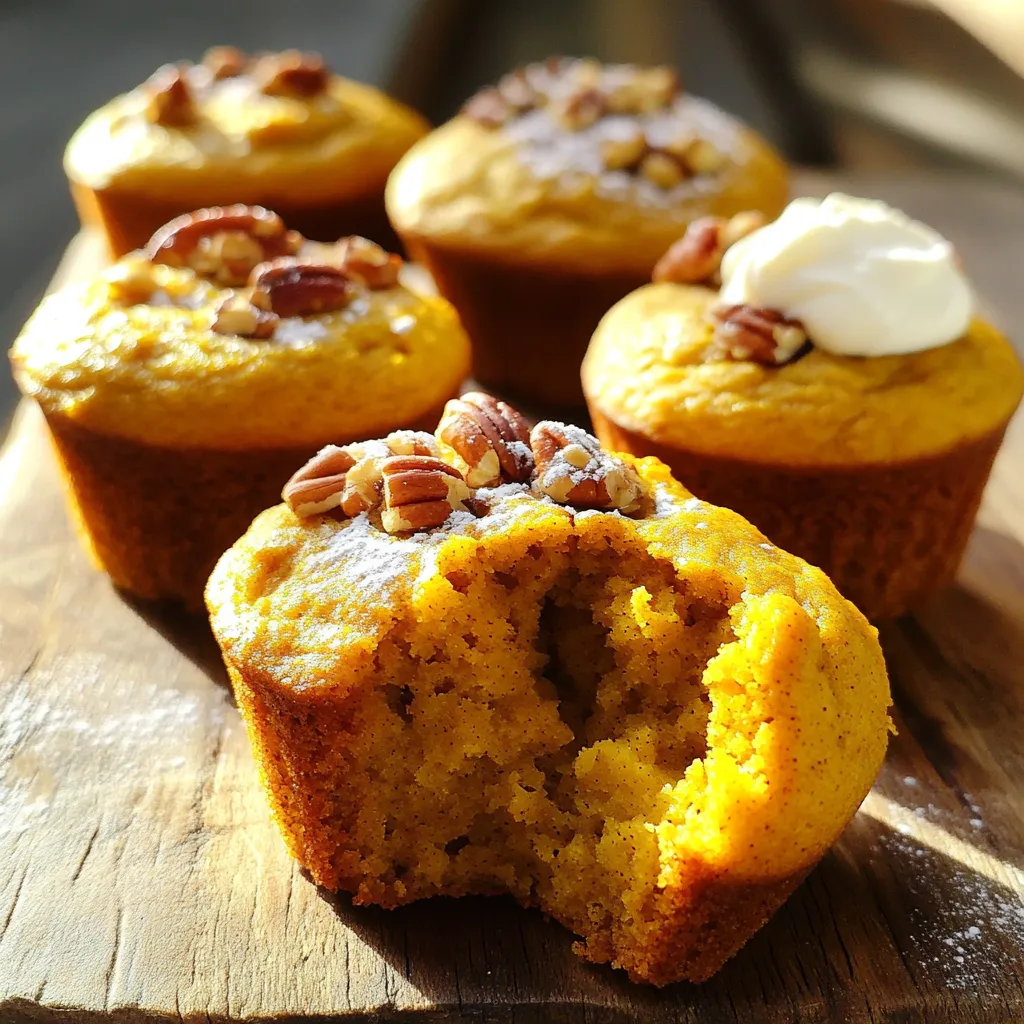
Pumpkin Pecan Muffins Flavorful Fall Treat Recipe

Fall is here, and it’s time to indulge in warm, cozy treats! These Pumpkin Pecan Muffins bring the flavors of

- 8 ounces penne pasta - 2 cups cooked chicken breast, shredded or diced - 1 cup cherry tomatoes, halved - 1 cup fresh mozzarella balls, halved - 1 cup fresh basil leaves, chopped To make a great Caprese Chicken Pasta Salad, you need fresh and simple ingredients. The penne pasta serves as the base. It holds all the flavors well. Use cooked chicken for protein. You can shred or dice it. Cherry tomatoes add a burst of color and sweetness. Fresh mozzarella balls give a creamy texture. Finally, fresh basil leaves add a bright herbal note. - 1/4 cup balsamic glaze - 1/4 cup extra virgin olive oil - 1 tablespoon Dijon mustard - Salt and pepper to taste The dressing is key for flavor. Balsamic glaze provides sweetness and tang. Extra virgin olive oil adds richness. Dijon mustard gives it a nice kick. Remember to season with salt and pepper for balance. - Additional herbs or spices - Parmesan cheese - Avocado slices Feel free to customize your salad. You can add more herbs like oregano or thyme. Parmesan cheese adds a savory depth. Avocado slices bring creaminess and healthy fats. These options can make your dish even more exciting. {{ingredient_image_1}} To cook penne pasta, start by boiling water in a large pot. Add a pinch of salt to enhance flavor. Once the water is boiling, add 8 ounces of penne pasta. Cook it according to the package instructions until it's al dente, usually about 10-12 minutes. After cooking, carefully drain the pasta in a colander. Rinse it under cold water to stop the cooking process. This also helps cool the pasta quickly. In a large mixing bowl, combine 2 cups of cooked chicken breast, 1 cup of halved cherry tomatoes, and 1 cup of halved fresh mozzarella balls. Use shredded or diced chicken for easy mixing. Once the pasta is cool, add it to the bowl. Toss everything together gently to combine. This step ensures every bite is packed with flavor and texture. In a small bowl, whisk together 1/4 cup of balsamic glaze, 1/4 cup of extra virgin olive oil, and 1 tablespoon of Dijon mustard. Add salt and pepper to taste. Whisk until smooth and well combined. Pour this dressing over the pasta mixture. Gently toss until everything is coated evenly. This dressing adds a rich, tangy flavor that ties the dish together. Chill the salad in the refrigerator for at least 30 minutes. This allows the flavors to meld beautifully. For serving, present it in a large bowl or individual portions. Drizzle extra balsamic glaze on top and garnish with fresh basil leaves. This not only adds flavor but also enhances the visual appeal of your dish. Cooking pasta just right is key. I suggest cooking penne pasta until it's al dente. This means it’s firm but not hard. Drain the pasta and let it cool down. This step keeps the pasta from soaking up too much dressing. Adjusting seasoning is also important. After mixing the salad, taste it. Add salt and pepper as needed. Everyone's taste buds are different. You might want more or less seasoning than I do. Garnishing your salad makes a big difference. I love adding fresh basil leaves on top. They add color and flavor. Drizzling balsamic glaze on your salad can really impress. It looks fancy and tastes amazing. For gatherings, serve this salad in a large bowl. You can also use individual bowls. This way, everyone can enjoy their own portion. One common mistake is overcooking the pasta. If it's too soft, it won't hold up in the salad. Make sure to check it often while cooking. Another mistake is skipping the chill time. Letting the salad chill for at least 30 minutes helps the flavors blend. It tastes better when it's cold! Pro Tips Cook Pasta Al Dente: Make sure to cook the penne pasta until it is al dente, as this will help prevent it from becoming mushy when combined with the other ingredients. Use Fresh Ingredients: For the best flavor, opt for fresh mozzarella, ripe cherry tomatoes, and vibrant basil leaves. Fresh ingredients elevate the dish significantly. Chill Before Serving: Allowing the salad to chill in the refrigerator for at least 30 minutes helps the flavors meld together, resulting in a more delicious dish. Customize Your Dressing: Feel free to adjust the balsamic glaze and olive oil ratio or add herbs like oregano or thyme for a unique twist on the dressing. {{image_2}} You can change up your Caprese Chicken Pasta Salad by adding vegetables. Bell peppers add crunch and color. Spinach brings a fresh taste. You can also switch in seasonal veggies. Think about zucchini in summer or roasted butternut squash in fall. These additions keep the dish vibrant and healthy. If you want a twist, try using rotisserie chicken or grilled shrimp. Both options are quick and add great flavor. For a vegetarian choice, chickpeas or tofu work well. These proteins boost nutrition and make the salad filling. You can enjoy a new taste while keeping it satisfying. Changing the dressing can make a big difference. Pesto gives a herby kick that pairs nicely with the salad. Homemade vinaigrettes also work well. You can use lemon juice, olive oil, and herbs for a light touch. This way, you can alter the flavor profile to suit your taste. To keep your Caprese Chicken Pasta Salad fresh, store it in the fridge right away. Use airtight containers to lock in flavors. This also helps keep the salad from drying out. Make sure the lid is tight to avoid spills. I recommend not freezing this salad. The fresh ingredients can become mushy when thawed. If you do freeze it, place it in a freezer-safe container. When ready to enjoy, let it thaw in the fridge overnight. Reheat gently in a pan on low heat. Add a splash of olive oil to help restore moisture. This keeps the pasta from getting too dry. In the fridge, your salad will last for about 3-4 days. Always check for freshness before eating. Signs that the salad is bad include a sour smell, discoloration, or slimy texture. If you notice any of these, it’s best to toss it out. Enjoy your salad while it’s fresh for the best taste! Yes, you can use regular pasta. Different shapes can change the dish's texture. For example, rotini or fusilli hold more sauce. This makes each bite flavorful. Different shapes also make the dish fun and interesting. Experiment with what you have at home! To make the salad gluten-free, you can use gluten-free pasta. Look for brands that use rice or chickpeas. These options work well and taste good. Be sure to check the label for gluten-free certification. This way, everyone can enjoy the salad. Yes, this salad is great for meal prep. Make it ahead and store it in the fridge. It tastes even better the next day. To keep it fresh, store the dressing separately. Mix it in right before you eat. This keeps the pasta from getting soggy. This Caprese Chicken Pasta Salad is fresh, tasty, and easy to make. We covered key ingredients like penne pasta, chicken, and mozzarella. I shared step-by-step instructions to prepare it well and tips to make it shine. You can also switch up ingredients for variety and store leftovers safely. This salad is perfect for gatherings or meal prep. Enjoy creating different flavors and sharing your version with friends!

Caprese Chicken Pasta Salad Fresh and Flavorful Dish

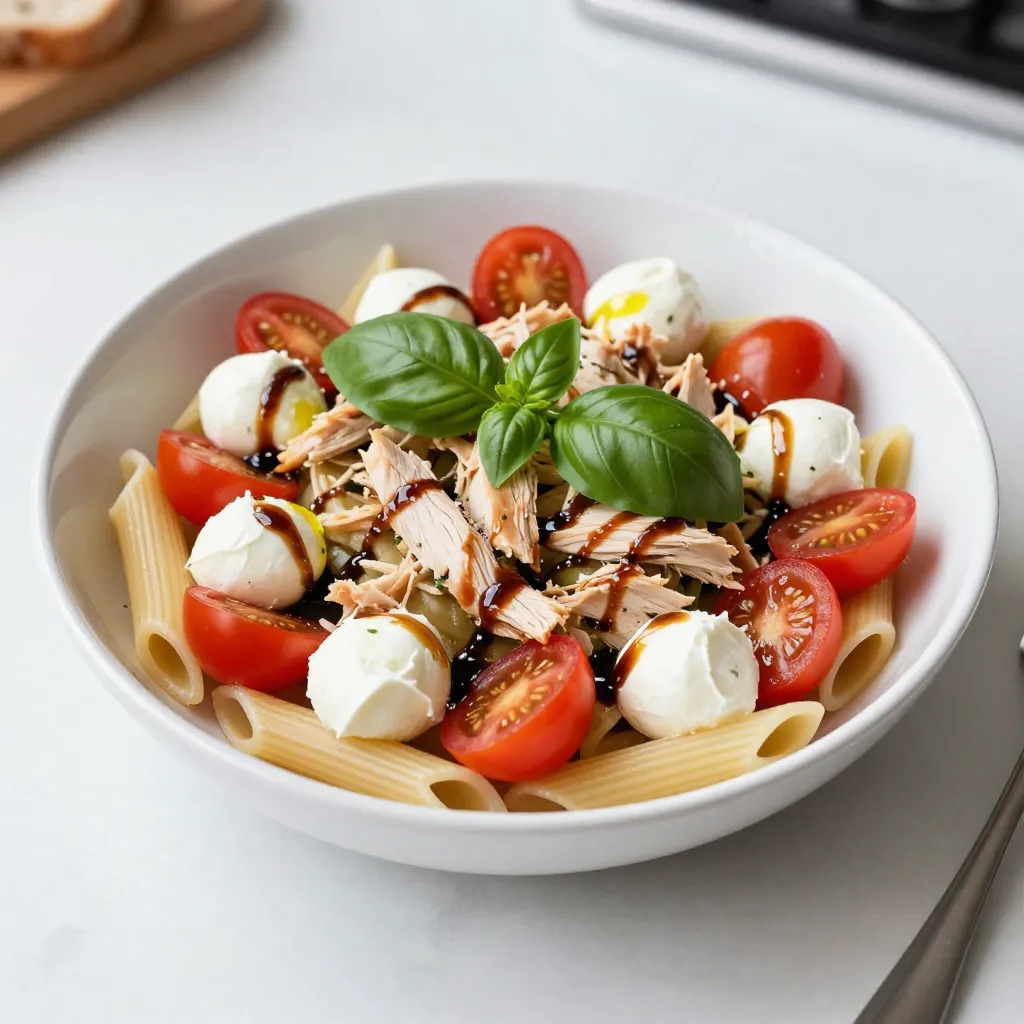
Looking for a fresh meal that’s packed with flavor? You will love this Caprese Chicken Pasta Salad! It combines tender

- 2 cups all-purpose flour - 1/2 cup granulated sugar - 1 tablespoon baking powder - 1/2 teaspoon salt - 1/2 cup cold unsalted butter, cubed - 1 cup fresh blueberries (or frozen) - Zest of 1 lemon The main ingredients create a perfect base for blueberry lemon scones. All-purpose flour gives structure. Sugar adds sweetness. Baking powder helps them rise, while salt balances flavor. Cold butter ensures a flaky texture. Blueberries burst with flavor, and lemon zest gives a fresh kick. - 1/2 cup buttermilk - 1 large egg - 1 teaspoon vanilla extract - 2 tablespoons lemon juice The wet ingredients blend well with the dry ones. Buttermilk keeps the scones moist. An egg helps bind everything together. Vanilla extract adds depth, while lemon juice enhances the lemon flavor. These elements make the scones rich and flavorful. - Coarse sugar for sprinkling The coarse sugar adds a crunchy top. It gives the scones a nice finish and extra sweetness. Sprinkling this on top before baking makes them look even better. This simple touch goes a long way in presentation and taste. {{ingredient_image_1}} First, set your oven to 400°F (200°C). This is important for even baking. While the oven heats, line a baking sheet with parchment paper. This helps prevent sticking and makes cleanup easy. In a large bowl, combine 2 cups of all-purpose flour, 1/2 cup of granulated sugar, 1 tablespoon of baking powder, and 1/2 teaspoon of salt. Whisk these dry ingredients together well. This step is key for mixing flavors and textures. Next, add 1/2 cup of cold, cubed unsalted butter to your flour mix. Using a pastry cutter or your fingers, work the butter into the flour until it looks like coarse crumbs. Then, gently fold in 1 cup of fresh blueberries and the zest of 1 lemon. Make sure they are spread evenly for great flavor in each bite. In a separate bowl, whisk together 1/2 cup of buttermilk, 1 large egg, 1 teaspoon of vanilla extract, and 2 tablespoons of lemon juice. Mix these well until everything is blended. This mixture will bring moisture to your dough. Now, pour the wet mixture into the bowl with the dry ingredients. Stir gently until just combined. Be careful not to over-mix. The dough should feel slightly sticky but not too wet. Turn the dough out onto a floured surface. Shape it into a 1-inch thick circle. Cut the dough into 8 wedges or use a round cutter for individual scones. Place the scones on your prepared baking sheet. Brush the tops with a bit of buttermilk. Sprinkle with coarse sugar for a sweet touch. Bake for 15-20 minutes. They should be golden brown. A toothpick should come out clean when inserted. Enjoy them warm! To get fluffy scones, keep a few things in mind. First, use cold ingredients. Cold butter helps to create a light texture. Next, avoid over-mixing the dough. Mix just until the wet and dry ingredients combine. Over-mixing can lead to tough scones. You want a sticky dough, not a firm one. Balancing the ingredients is key. Use a full cup of blueberries for sweetness and juiciness. The lemon zest adds fresh flavor. Make sure to fold it in gently with the blueberries. This way, you get bursts of flavor in each bite. Don't skip the lemon juice; it brings out the blueberry taste. Presentation is important for any dish. Dust the warm scones with powdered sugar before serving. This adds a nice touch. Serve them with lemon curd or clotted cream for added enjoyment. It makes for a delightful treat! Arrange the scones on a pretty plate to impress your guests. Pro Tips Use Cold Ingredients: Ensure your butter and buttermilk are cold to achieve a flaky texture in your scones. Don't Overmix: Mix the dough just until combined to keep the scones tender and light. Experiment with Add-ins: Feel free to substitute blueberries with other fruits like raspberries or add nuts for extra crunch. Brush with Buttermilk: Brushing the tops with buttermilk before baking gives the scones a beautiful golden color and a slight crisp. {{image_2}} To make gluten-free blueberry lemon scones, you can use different flours. Here are some great options: - Almond flour - Coconut flour - Gluten-free all-purpose flour These substitutes work well. Just remember to add a binding agent like xanthan gum or flaxseed meal. This helps the scones hold together and gives them a nice texture. For vegan blueberry lemon scones, you need to swap out dairy and eggs. Here are some plant-based replacements: - Use almond milk or oat milk instead of buttermilk. - Replace the egg with a flax egg. To make this, mix 1 tablespoon of ground flaxseed with 2.5 tablespoons of water. Let it sit for 5 minutes. These changes keep the scones moist and flavorful. You can add more zing to your scones with herbs or spices. Here are some ideas: - Add fresh thyme for a herbal touch. - Try ginger for a sweet and spicy kick. These ingredients can enhance the taste and make your scones even more special. Feel free to experiment and find your perfect flavor! To keep your blueberry lemon scones fresh, store them in an airtight container. Place a piece of parchment paper between layers to prevent sticking. They stay good for up to three days at room temperature. If you want them to last longer, put them in the fridge. They will stay fresh for about a week. Freezing is a great way to save scones for later. You can freeze them before or after baking. If you freeze unbaked scones, place them on a baking sheet first. Put the sheet in the freezer until they are solid. Then, transfer the scones to a freezer bag. They last up to three months this way. For baked scones, let them cool completely. Wrap them in plastic wrap and then in foil before freezing. They will also last about three months when frozen. To enjoy your scones warm, you can reheat them in several ways. For best results, preheat your oven to 350°F (175°C). Place the scones on a baking sheet and heat for about 10 minutes. If you want a quicker method, use a microwave. Heat them for about 15-20 seconds. However, this method may make them a bit soft, so keep that in mind. Enjoy your scones fresh and warm! Yes, you can use frozen blueberries. They work well in scones. Frozen berries may release more juice than fresh ones. This can change the color of the dough. If you use frozen blueberries, do not thaw them. Add them directly to the dough for the best results. Look for golden brown tops. A toothpick inserted into a scone should come out clean. The edges will also feel firm to the touch. If they are still wet inside, bake for a few more minutes. Keep an eye on them to avoid over-baking. I love serving these scones with lemon curd. Clotted cream also pairs well. A cup of tea is a delightful choice too. For a fun twist, try some fresh fruit on the side. Enjoying them warm makes the experience even better. In this blog post, we explored the delightful world of blueberry lemon scones. We covered the essential ingredients, step-by-step baking instructions, and tips for perfecting your scones. You can enjoy delicious variations, including gluten-free and vegan options. Remember, the key to great scones lies in not over-mixing and balancing flavors. Store them properly to keep them fresh for longer. Now, you have all the tools to create your own tasty treats! Enjoy baking and sharing these scones with friends and family.

Blueberry Lemon Scones Fresh and Flavorful Delight

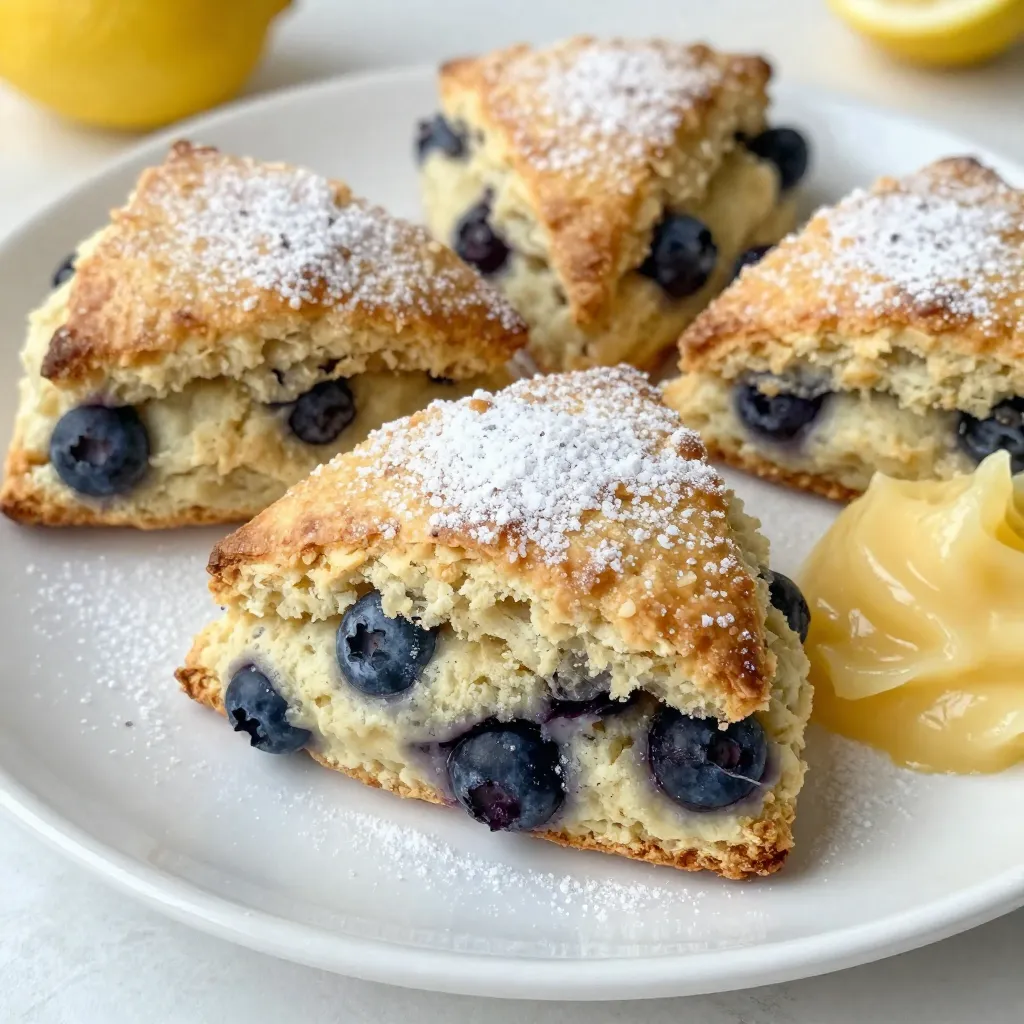
Craving a treat that bursts with fresh flavor? You’re in the right spot! These Blueberry Lemon Scones combine sweet blueberries

To make this warm apple cinnamon roll cake, gather these key ingredients: - 2 cups all-purpose flour - 1 cup granulated sugar - 1 tablespoon baking powder - 1/2 teaspoon salt - 1 teaspoon ground cinnamon - 3/4 cup milk - 1/3 cup unsalted butter, melted - 2 large eggs - 1 teaspoon vanilla extract - 2 medium-sized apples, peeled and diced - 1 tablespoon lemon juice - 1/4 cup brown sugar - 1 tablespoon ground cinnamon (for filling) - 1/2 cup powdered sugar (for glaze) - 2 tablespoons milk (for glaze) These ingredients work together to create a soft and flavorful cake. The apples add moisture, while the spices give a warm aroma. You can tweak the recipe to suit your taste. Here are some options: - Swap the apples for pears or peaches for a different fruit flavor. - Use almond milk instead of regular milk for a dairy-free option. - Substitute coconut oil for unsalted butter to make it dairy-free. - Add nuts like walnuts or pecans for added crunch. These substitutions keep the cake delicious while allowing for personal touches. Before you start baking, gather these tools: - A 9x13-inch baking dish - Mixing bowls (one large and one medium) - Whisk for mixing - Measuring cups and spoons - A spatula for spreading the batter - A toothpick to check doneness Having the right tools makes the process smooth and fun. With these items ready, you can create a treat everyone will love! Start by preheating your oven to 350°F (175°C). This step helps the cake rise well. Next, take a 9x13-inch baking dish and grease it with butter. Make sure to flour the dish too. This will help the cake come out easily. In a large bowl, add 2 cups of all-purpose flour. Then, mix in 1 cup of granulated sugar, 1 tablespoon of baking powder, 1/2 teaspoon of salt, and 1 teaspoon of ground cinnamon. Use a whisk to combine them well. This mix gives the cake its base flavor. In another bowl, combine 3/4 cup of milk, 1/3 cup of melted unsalted butter, 2 large eggs, and 1 teaspoon of vanilla extract. Whisk these until they are smooth. Slowly pour this wet mix into your dry mix. Stir gently until just combined. Avoid overmixing to keep your cake fluffy. Take 2 medium-sized apples, peel and dice them. Toss the apple pieces in a medium bowl with 1 tablespoon of lemon juice, 1/4 cup of brown sugar, and 1 tablespoon of ground cinnamon. This mixture adds a sweet and tangy layer to your cake. Set this aside while you prepare the batter. Pour half of your batter into the greased baking dish. Spread it evenly. Next, layer the apple mixture over the batter, making sure it’s evenly distributed. Pour the remaining batter over the apples. Gently spread it to cover the apples. Bake for 35-40 minutes. Use a toothpick to check if it’s done. If it comes out clean, your cake is ready. While the cake bakes, prepare the glaze. In a small bowl, mix 1/2 cup of powdered sugar with 2 tablespoons of milk. Whisk until smooth. Once the cake cools slightly, drizzle the glaze on top. Enjoy your warm apple cinnamon roll cake! To keep your Warm Apple Cinnamon Roll Cake moist, use fresh apples. Diced apples add moisture and flavor. Toss the apples with lemon juice. This step keeps them bright and tasty. Avoid overmixing the batter. Overmixing can cause the cake to be tough. Mix just until you see no dry flour. Preheat your oven correctly to 350°F (175°C). This ensures even baking. Use a 9x13-inch pan. Grease and flour it well to prevent sticking. Bake for 35-40 minutes. Check for doneness with a toothpick. It should come out clean from the center. Let the cake cool slightly before glazing. This helps the glaze stick better. Serve your cake warm for the best taste. Cut it into squares for easy serving. Dust the top with powdered sugar and a sprinkle of cinnamon. This adds a lovely look. Pair it with a scoop of vanilla ice cream. The warm cake and cold ice cream create a perfect mix. Enjoy each bite! {{image_2}} You can change the flavor of your warm apple cinnamon roll cake easily. Try adding nutmeg for a warm kick. You can also use different fruits. Pears or peaches work great. They add a unique taste and keep the cake moist. You could even mix apples with berries for a fun twist! If you need a gluten-free version, swap out the all-purpose flour. Use a gluten-free blend instead. Make sure it has xanthan gum for texture. For dairy-free options, replace milk with almond or oat milk. Use coconut oil instead of butter. These changes keep the cake tasty while meeting your needs. This cake shines when served warm. You can slice it into squares and dust it with powdered sugar. A scoop of vanilla ice cream on the side makes it extra special. Whipped cream is another great choice. Pair it with a cup of coffee or tea for a cozy treat. Enjoy the cake with friends or family for a perfect dessert moment! To keep your Warm Apple Cinnamon Roll Cake fresh, let it cool first. Once cool, cover it tightly with plastic wrap or foil. You can also place it in an airtight container. Store it in the fridge for up to five days. This will help keep the cake moist and tasty. If you want to save some cake for later, freezing is a great option. First, let the cake cool completely. Then, cut it into squares. Wrap each piece in plastic wrap. After that, place them in a freezer-safe bag or container. It will keep well for up to three months. When you're ready to enjoy it, just thaw it in the fridge overnight. To reheat your cake, you have a few easy options. You can use the microwave for a quick fix. Heat a piece for about 20-30 seconds. If you prefer to use the oven, preheat it to 350°F (175°C). Place the cake on a baking sheet and warm it for about 10-15 minutes. This will bring back its warm, gooey goodness. Enjoy it fresh like it just came out of the oven! You can check if the cake is done by inserting a toothpick into the center. If it comes out clean, the cake is ready. You can also lightly press the top with your finger. It should spring back. The edges will pull away from the pan a bit when it’s done. Yes, you can make this cake ahead of time. Bake it, let it cool, and then store it. Keep it in an airtight container at room temperature. You can also refrigerate it for up to three days. Just warm it up before serving for the best taste. You can play with the recipe by adding nuts like walnuts or pecans. Try different fruits like pears or berries for a new twist. You can also switch up the spices. Nutmeg or ginger can add a unique flavor. To make this cake healthier, use whole wheat flour instead of all-purpose flour. You can also reduce the sugar by using applesauce to sweeten it. For a dairy-free version, replace the milk with almond or oat milk. This blog post shared how to make a warm apple cinnamon roll cake. We covered essential and optional ingredients, useful equipment, and detailed steps for baking. I provided tips to ensure your cake is moist and well-presented. You can also try fun flavor variations and learn how to store leftovers. In the end, this cake is a cozy treat perfect for any occasion. Enjoy baking and sharing this delight with others!

Warm Apple Cinnamon Roll Cake Irresistible and Simple

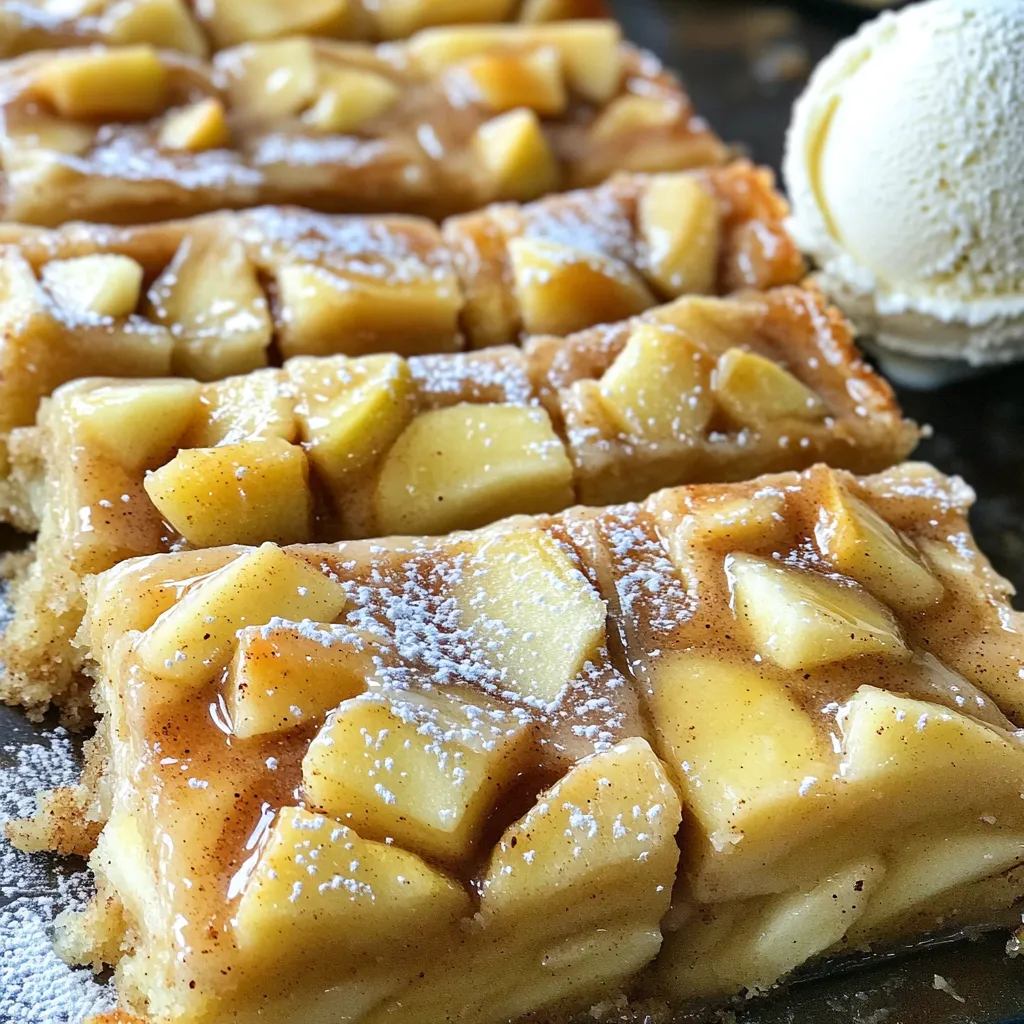
Warm Apple Cinnamon Roll Cake is a treat you won’t want to miss. It combines soft cake, sweet apples, and

- 1 ½ cups Arborio rice - 4 cups vegetable broth - 1 cup mushrooms (shiitake, cremini, or a mix), sliced - 1 small onion, finely chopped - 3 cloves garlic, minced - 3 tablespoons olive oil - 2 tablespoons truffle oil - ½ cup grated Parmesan cheese (optional) - Salt and pepper to taste - Fresh parsley, chopped (for garnish) When buying mushrooms, look for firm ones. Their caps should be smooth and free of dark spots. Fresh mushrooms smell earthy, not sour. Many types work well in risotto, but shiitake and cremini add great flavors. Store mushrooms in a paper bag in the fridge. This keeps them fresh longer. Avoid plastic bags, as they can trap moisture and make mushrooms slimy. Arborio rice is the best choice for risotto. It has a high starch content, making the dish creamy. Other good options include Carnaroli and Vialone Nano. These types absorb liquid well and give the risotto its rich texture. Avoid using regular long-grain rice, as it won’t yield the same creamy result. Always rinse the rice before cooking to remove excess starch. Start by heating the vegetable broth. Use a saucepan and place it over low heat. Keeping the broth warm helps the rice cook evenly. This step is key for smooth risotto. Make sure you don’t boil it; just keep it warm throughout the process. Next, grab a large skillet. Pour in three tablespoons of olive oil and heat it on medium. Add one small, finely chopped onion and sauté it for three to four minutes. You want the onion to turn soft and see-through. Then, add three minced garlic cloves and one cup of sliced mushrooms. I like using shiitake or cremini mushrooms. Cook this mix for about five to seven minutes until the mushrooms are soft and golden. Now, it’s time to add the star of the dish: the Arborio rice. You’ll need one and a half cups. Stir it in, coating the rice with the oil and veggies. Sauté this for two minutes. You want the rice to look slightly clear around the edges. Here comes the fun part! Start adding the warm broth one ladle at a time. Stir the rice while it cooks. Let it absorb most of the broth before adding more. This process takes about 18 to 20 minutes. You’ll know it’s done when the rice is creamy and slightly firm. Once your risotto reaches that perfect creamy state, take it off the heat. Stir in two tablespoons of truffle oil and half a cup of grated Parmesan cheese if you want. Season it with salt and pepper to taste. Let it rest for a minute for extra creaminess. Serve your mushroom risotto right away. Don’t forget to sprinkle some fresh parsley on top for a beautiful finish! To make your risotto creamy, you need to stir often. This helps release starch from the rice. Use Arborio rice, as it has a high starch content. Gradually add warm broth, one ladle at a time. Wait until the rice absorbs most of the liquid before adding more. This slow process gives the dish its rich texture. Avoid adding too much broth at once. It can make the rice gummy. Don’t skip the stirring. It is key to a great risotto. If you cook it too fast, the rice will be hard. Taste the rice often to check for doneness. A perfect risotto is al dente, which means tender but still firm. For more flavor, try adding herbs like thyme or rosemary. A splash of white wine can add depth. Mix in some grated Parmesan cheese for extra creaminess. You can also top it with fresh parsley for a fresh look and taste. Truffle oil adds an amazing aroma, making your dish feel gourmet. {{image_2}} You can make a vegan version of this risotto. Just skip the Parmesan cheese. Instead, use nutritional yeast for a cheesy taste. This keeps the dish creamy and flavorful. You can also add a splash of lemon juice for brightness. The truffle oil adds a nice touch too. To make gluten-free risotto, ensure your vegetable broth is gluten-free. Arborio rice is naturally gluten-free, so you are already set. Just check all your ingredients. Some might contain gluten, especially store-bought broths or toppings. You can customize your risotto with different add-ins. For proteins, try grilled chicken, shrimp, or tofu. They add heartiness to the dish. Fresh herbs like thyme or basil enhance the flavor. You can also sprinkle some toasted pine nuts for crunch. Consider adding spinach or peas for extra color and nutrients. Store your leftover risotto in an airtight container. Make sure it cools down first. You can keep it in the fridge for up to three days. If you want to enjoy it later, label the container with the date. This way, you will know when to eat it. To reheat risotto, place it in a skillet over low heat. Add a splash of broth or water to help it regain its creaminess. Stir often. This will keep it from sticking or burning. You can also heat it in the microwave. Use a microwave-safe bowl and cover it. Add a few drops of liquid before heating. Heat in short bursts, stirring in between. You can freeze mushroom risotto, but it may change texture. Allow the risotto to cool completely. Then, pack it in freezer bags or containers. Remove as much air as possible. Label the bags with the date. Frozen risotto can last up to three months. When ready to eat, thaw it in the fridge overnight. Reheat it using the tips above for best results. Yes, you can use many types of mushrooms. Shiitake, cremini, and button mushrooms all work well. Each type adds unique flavor. You can mix them for more depth. Try wild mushrooms for a fun twist. Just slice them and follow the recipe as usual. To reheat risotto, add a splash of broth or water. Use a pan on low heat. Stir gently as it warms. This keeps the risotto creamy. You can also use a microwave. Add a little broth, cover, and heat in short bursts. Stir in between to avoid drying it out. The risotto is done when the rice is al dente. It should be tender but still have a slight bite. The texture should be creamy and smooth. You can taste a small spoonful to check. If it feels right, mix in your truffle oil and cheese. This blog post covered mushroom risotto from start to finish. We explored the best ingredients, including quality mushrooms and rice choices. I shared step-by-step instructions for making risotto and tips to keep it creamy. You learned about vegan and gluten-free variations, plus how to store leftovers. In summary, making perfect mushroom risotto is easy and rewarding. By following these tips and instructions, you can enjoy this dish anytime. Experiment with flavors and always trust your taste. Happy cooking!

Mushroom Risotto Creamy Comfort Food Recipe

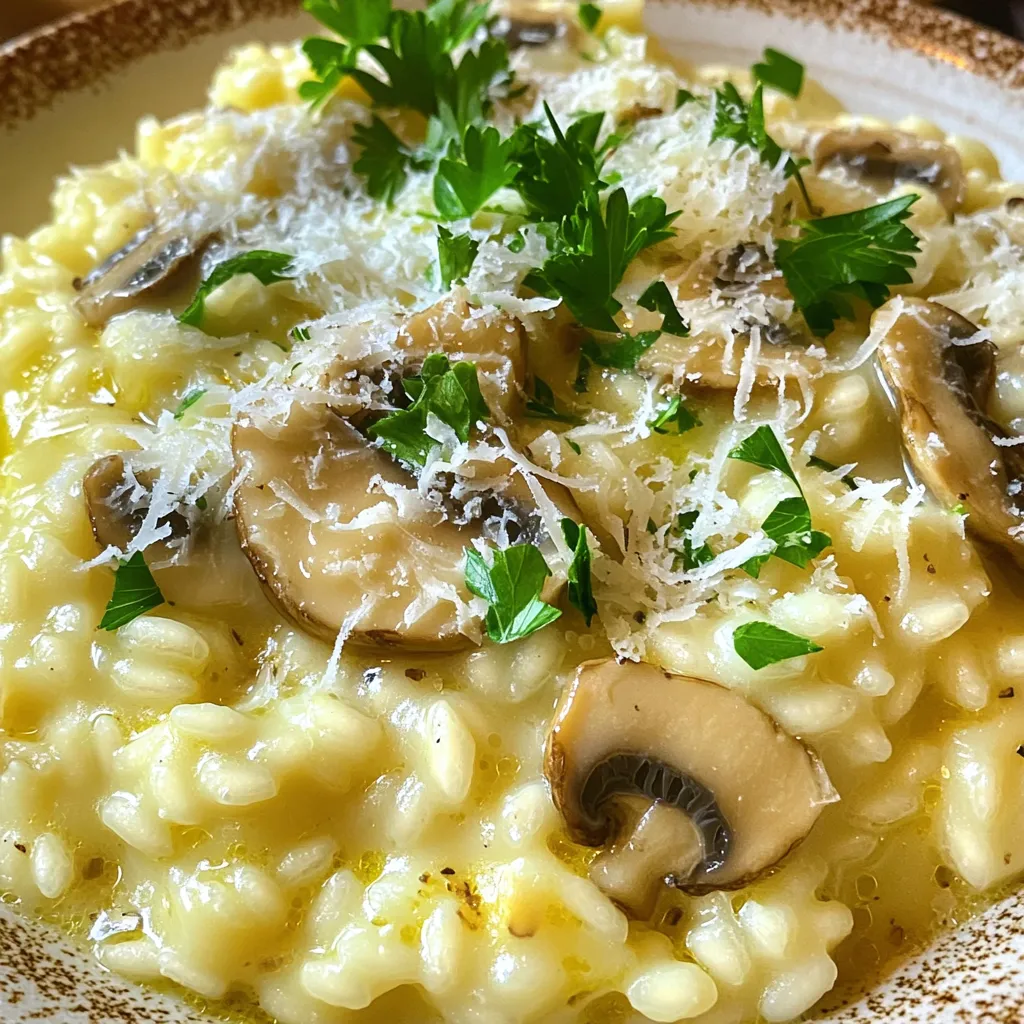
If you’re craving a cozy dish that warms both body and soul, this Mushroom Risotto recipe is for you. A

- 2 medium zucchinis, thinly sliced - 1/2 cup all-purpose flour - 1 teaspoon garlic powder - 1 teaspoon onion powder - 1 teaspoon paprika - 1/2 teaspoon salt - 1/4 teaspoon black pepper - 2 large eggs, beaten - 1 cup panko breadcrumbs - Olive oil spray To make crispy air fryer zucchini chips, gather these simple ingredients. First, you need fresh zucchinis. Choose firm ones for the best flavor. The seasoning mix includes garlic powder, onion powder, paprika, salt, and black pepper. This blend gives the chips great taste. Next, use all-purpose flour to coat the zucchini slices. The flour helps the seasoning stick. You will also need eggs for the binding process. Beaten eggs hold the panko breadcrumbs to the zucchini. Panko breadcrumbs are key to achieving that crunchy texture. Finally, don’t forget the olive oil spray. It gives the chips a nice golden color and enhances crispiness. With these ingredients ready, you're set to make a delicious snack! 1. Preheat air fryer: Start by preheating your air fryer to 400°F (200°C). This takes about 5 minutes. 2. Prepare flour mix: In a mixing bowl, add 1/2 cup of all-purpose flour. Then, mix in 1 teaspoon of garlic powder, 1 teaspoon of onion powder, 1 teaspoon of paprika, 1/2 teaspoon of salt, and 1/4 teaspoon of black pepper. Stir until well combined. 3. Beat the eggs: In another bowl, beat 2 large eggs until they are smooth and mixed well. 4. Set up panko coating: Place 1 cup of panko breadcrumbs in a third bowl. This will give your chips a nice crunch. 1. Dipping procedure: Take each zucchini slice and dip it first into the flour mix. Make sure it is fully coated. Next, dip the slice into the beaten eggs, letting the excess drip off. Finally, coat it with panko breadcrumbs. Set each coated slice aside on a plate. 2. Arranging zucchini slices: Lightly spray the air fryer basket with olive oil spray. Place the coated zucchini chips in a single layer. Avoid overlapping the slices. This helps them cook evenly. 1. Cooking time and temperature: Cook the zucchini chips in the preheated air fryer for 8 to 10 minutes. Start checking at 8 minutes to avoid overcooking. 2. Flipping instructions: Halfway through cooking, flip the zucchini chips. This ensures both sides get crispy and golden brown. To get crispy zucchini chips, the thickness of your coating matters. A thin, even layer works best. If your coating is too thick, it may not crisp up well. Aim for a light coating of flour, egg, and panko. This method helps create that crunchy texture we all love. Using olive oil spray is key, too. A light spray helps the chips crisp without adding too much oil. Too much oil can make them soggy. Spray the chips lightly before cooking to enhance the crispiness. Avoid overcrowding the air fryer basket. When you pack the chips too tightly, they don’t cook evenly. It’s better to cook them in batches. This way, each chip gets the hot air it needs for even cooking. Checking for doneness is also important. Start checking the chips at 8 minutes. You want them golden brown and crispy. If they need more time, keep a close eye on them. This ensures you don’t end up with overcooked chips. {{image_2}} You can change the flavor of your zucchini chips with fun spices. Here are some tasty options: - Italian Style: Use dried oregano, basil, and garlic powder. - Spicy Kick: Add cayenne pepper or chili powder for heat. - BBQ Flavor: Mix in smoked paprika and a bit of brown sugar. - Cheesy Twist: Sprinkle some grated Parmesan cheese right after cooking. Each option gives your chips a unique taste. Feel free to mix and match spices based on what you love. If you want to try different coatings, there are many ways to do this. Here are some ideas: - Gluten-Free Options: Substitute all-purpose flour with almond flour or a gluten-free blend. This keeps your chips crispy without gluten. - Different Breadcrumbs: Swap panko with crushed cornflakes or chips for a crunchy texture. You can also use whole wheat breadcrumbs for a nuttier flavor. These variations let you customize your zucchini chips to fit your needs and taste. Enjoy experimenting! To keep your zucchini chips fresh, store them in an airtight container. This helps prevent moisture from making them soggy. You can also layer paper towels in the container. This will absorb any excess moisture. Zucchini chips stay fresh for about 2-3 days in the fridge. To reheat your chips and keep them crispy, use the air fryer. Set it to 350°F (175°C). Heat the chips for about 3-5 minutes. This method revives their crunchiness. If you don't have an air fryer, use an oven. Place the chips on a baking sheet and heat at 350°F (175°C) for about 5-7 minutes. Avoid microwaving, as this will make them soft and chewy. To make zucchini chips, start by slicing two medium zucchinis thinly. Next, mix 1/2 cup of all-purpose flour with garlic powder, onion powder, paprika, salt, and black pepper in a bowl. In another bowl, beat two large eggs. In a third bowl, place 1 cup of panko breadcrumbs. Dip each zucchini slice in the flour, then the eggs, and finally coat with breadcrumbs. Preheat your air fryer to 400°F (200°C) for about five minutes. Spray the basket with olive oil. Arrange the zucchini chips in a single layer and cook for 8-10 minutes, flipping them halfway. Check at 8 minutes for crispness. Yes, you can use other vegetables! Carrots, sweet potatoes, and even eggplant work well. Just slice them thinly so they cook evenly. The coating and cooking time will stay the same. Feel free to switch up the spices too. Each vegetable adds its own flavor and texture. Experiment and find your favorite! Air fryer zucchini chips are healthier than traditional fries. They use less oil, which cuts down on fat and calories. Zucchini is lower in carbs than potatoes. Plus, you get more vitamins and minerals from zucchini. Enjoying these chips can be a tasty way to snack smart! You now have all the steps to make crispy air fryer zucchini chips. We covered the key ingredients, the cooking process, and tips to get the best texture. Remember to experiment with seasonings and coatings to suit your taste. Store extras properly to enjoy them later. With the right methods, these chips can be tastier than regular fries. Enjoy making and sharing this healthy snack!

Air Fryer Zucchini Chips Crispy and Delicious Snack

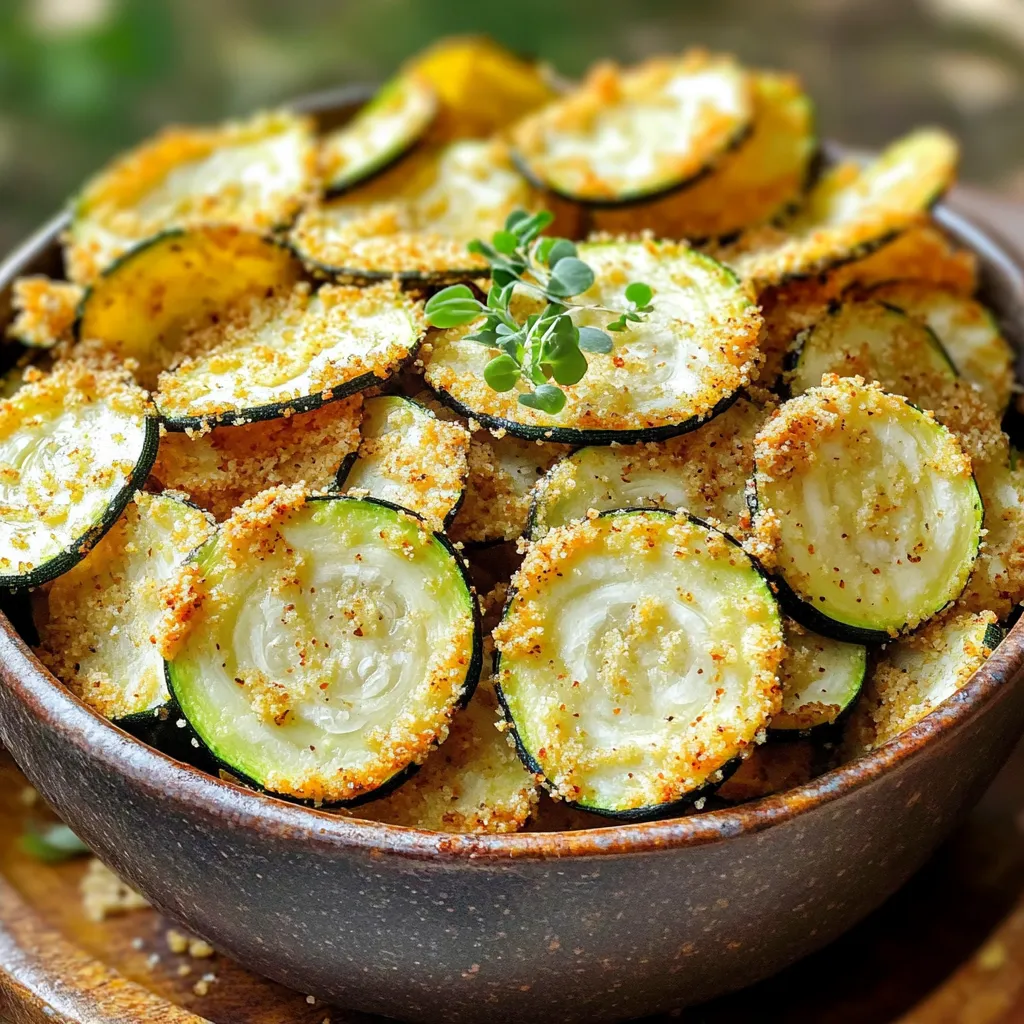
Looking for a snack that’s both crispy and guilt-free? You’ve found it! Air fryer zucchini chips are easy to make

To make this tasty skillet cookie, gather these key ingredients: - 1 cup canned pumpkin puree - 1 cup brown sugar, packed - ½ cup granulated sugar - 1 cup unsalted butter, melted - 2 large eggs - 2 teaspoons vanilla extract - 2 ½ cups all-purpose flour - 1 teaspoon baking soda - 1 teaspoon baking powder - 1 teaspoon cinnamon - ½ teaspoon nutmeg - ½ teaspoon salt - 1 cup semi-sweet chocolate chips Each ingredient plays a special role. For instance, the pumpkin puree adds moisture and flavor. The sugars help create that perfect sweetness. You can enhance your skillet cookie with these optional items: - ½ cup toasted pecans Toasted pecans add a nice crunch and extra flavor. I love the way they contrast with the soft cookie. If you need to make changes, here are some tips: - Instead of canned pumpkin, you can use fresh pumpkin puree. - Swap granulated sugar for coconut sugar for a different taste. - Use gluten-free flour if you need a gluten-free option. These substitutions can keep the spirit of the recipe while catering to your needs. Just remember, each swap may change the final taste or texture a bit. First, heat your oven to 350°F (175°C). This step is key for even baking. While the oven warms, grease a 10-inch cast-iron skillet. Use butter or cooking spray to coat the pan well. A well-prepped skillet will help your cookie slide out easily later. In a large mixing bowl, combine 1 cup of canned pumpkin puree, 1 cup of packed brown sugar, and ½ cup of granulated sugar. Mix these until smooth. Add in 1 cup of melted unsalted butter, 2 large eggs, and 2 teaspoons of vanilla extract. Stir well until everything blends together. This mixture will give your cookie a rich, moist texture. In another bowl, whisk together 2 ½ cups of all-purpose flour, 1 teaspoon of baking soda, 1 teaspoon of baking powder, 1 teaspoon of cinnamon, ½ teaspoon of nutmeg, and ½ teaspoon of salt. Make sure there are no lumps. This dry mix adds flavor and structure to your cookie. Gradually add the dry ingredients to the wet mix. Stir until just combined. Be careful not to overmix. Fold in 1 cup of semi-sweet chocolate chips and ½ cup of toasted pecans if you choose to use them. Pour the dough into your greased skillet, spreading it evenly. Bake in the preheated oven for 25-30 minutes. The edges should turn golden brown, and a toothpick should come out clean from the center. Once baked, take the skillet out of the oven. Let it cool for about 10 minutes before serving. This cooling time helps the cookie set. For a fun twist, serve it warm with a scoop of vanilla ice cream and a drizzle of caramel sauce. Enjoy your delicious pumpkin chocolate chip skillet cookie! To avoid overmixing, mix just until ingredients blend. You want to keep the dough light. Overmixing makes the cookie tough. I usually mix with a spatula instead of a mixer. This gives me better control. For a soft, chewy cookie, use room temperature butter. Melted butter helps add richness. Adding eggs at room temperature also helps the dough blend well. Make sure to use all-purpose flour, as it creates the right balance. Spices like cinnamon and nutmeg add warmth. I love to add a pinch of ginger for a kick. You can also try adding vanilla bean paste instead of vanilla extract. This makes the flavor richer and more complex. {{image_2}} You can easily make this skillet cookie gluten-free. Just swap the all-purpose flour for a gluten-free blend. Many brands work well, but choose one that measures cup for cup. This change keeps the cookie soft and tasty. Make sure your baking soda and baking powder are also gluten-free. To make a vegan pumpkin chocolate chip skillet cookie, replace the eggs with flaxseed meal. Mix 1 tablespoon of flaxseed meal with 2.5 tablespoons of water for each egg. Let it sit until it thickens. You can also switch the butter for coconut oil or a vegan butter. Use dairy-free chocolate chips for a fully vegan treat. Get creative with your flavors! Try dark chocolate chips instead of semi-sweet for a richer taste. You can also mix in white chocolate chips for a fun twist. Nuts add great flavor too. Use walnuts or almonds if you want a different crunch. For a kick, add a pinch of cayenne pepper or chili powder. This adds warmth to the sweet cookie! After enjoying your pumpkin chocolate chip skillet cookie, let it cool. Once cool, cover it with plastic wrap or store it in an airtight container. This way, the cookie stays fresh for up to three days. You can keep it at room temperature, but the fridge works too if you prefer. If you want to save some for later, freezing is a great option. First, let the skillet cookie cool completely. Then, cut it into squares. Wrap each square in plastic wrap. Place them in a freezer bag or container. You can freeze the cookie for up to two months. When you are ready to eat it, simply thaw in the fridge overnight. To enjoy your skillet cookie warm, preheat your oven to 350°F (175°C). Place the cookie square on a baking sheet. Heat for about 10 minutes until warm. If you prefer the microwave, heat for 15-20 seconds. Enjoy it warm, perhaps with a scoop of ice cream on top! Yes, you can make this recipe ahead of time. You can prepare the dough and store it in the fridge for up to 24 hours. Just remember to let it sit at room temperature for about 15 minutes before baking. This helps the dough spread better in the skillet. If you don't have pumpkin puree, you can use applesauce or mashed bananas. Both options will give a nice texture and moisture. However, they will change the flavor a bit. You can also try butternut squash puree for a similar taste. To check if the skillet cookie is done, look for golden edges. Insert a toothpick into the center. If it comes out clean or with a few crumbs, it's ready. If it has wet batter, give it a few more minutes. Remember, it will continue to cook a bit after you take it out. Absolutely! If you love chocolate, feel free to add more chocolate chips. You can increase it to 1.5 cups for an extra chocolatey delight. Just remember, more chips can affect the cookie's overall texture a bit. Enjoy your creation! This blog post covered everything you need for a perfect pumpkin chocolate chip skillet cookie. We looked at required and optional ingredients, plus swaps you can use. I shared step-by-step instructions for making the cookie. We also explored tips to get the best texture and flavor. Finally, I talked about different variations and how to store leftovers. Enjoy making this delicious treat, and feel free to get creative with flavors!

Pumpkin Chocolate Chip Skillet Cookie Delightful Treat

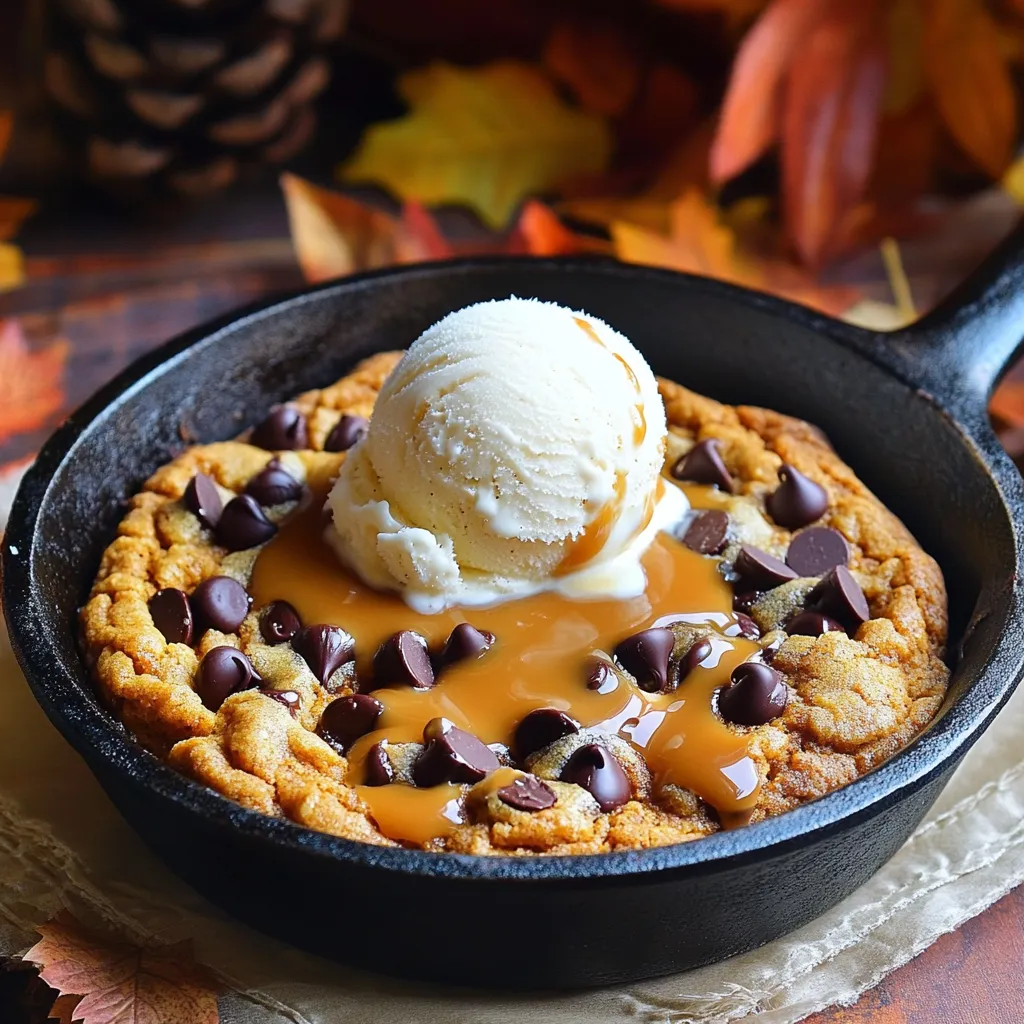
Are you ready to bake a cozy treat that combines fall flavors with gooey chocolate? This Pumpkin Chocolate Chip Skillet

- 1 ½ cups graham cracker crumbs - ½ cup unsalted butter, melted - ¼ cup brown sugar - 1 teaspoon cinnamon - 8 oz cream cheese, softened - ½ cup granulated sugar - 1 teaspoon vanilla extract - 1 large egg - 2 large apples, peeled and diced (such as Granny Smith or Honeycrisp) - ¼ cup granulated sugar - 1 teaspoon cinnamon - 1 teaspoon lemon juice - 1 cup all-purpose flour - ½ cup rolled oats - ½ cup brown sugar - ½ teaspoon cinnamon - ½ cup unsalted butter, cold and cubed - ½ cup caramel sauce (store-bought or homemade) Each ingredient plays a key role in making these bars a treat. The graham cracker crust offers a sweet, buttery base. The cream cheese adds a rich, creamy layer that balances the sweet apples. When you mix the apples with sugar and lemon juice, they become a burst of flavor. The streusel topping gives a crunchy finish, while the caramel drizzle adds an irresistible sweetness. You will love how every bite combines different textures and tastes. These bars are not just dessert; they are a celebration of fall flavors. First, set your oven to 350°F (175°C). Grab a 9x9-inch baking dish and grease it well. This will help your bars come out easily later. In a mixing bowl, combine 1 ½ cups of graham cracker crumbs, ½ cup of melted unsalted butter, ¼ cup of brown sugar, and 1 teaspoon of cinnamon. Mix until everything is well blended. Press this mixture evenly into the bottom of the baking dish. Bake it for 10 minutes, then take it out to cool a bit. For the cheesecake layer, beat 8 oz of softened cream cheese in a medium bowl. Add ½ cup of granulated sugar and 1 teaspoon of vanilla extract. Mix until it’s smooth and creamy. Then, add 1 large egg and mix again until just combined. Pour this mixture over your cooled crust. Spread it out evenly. In another bowl, toss 2 large peeled and diced apples with ¼ cup of granulated sugar, 1 teaspoon of cinnamon, and 1 teaspoon of lemon juice. This will give the apples a nice coating. Evenly scatter this apple mixture over the cheesecake layer. To make the streusel topping, mix 1 cup of all-purpose flour, ½ cup of rolled oats, ½ cup of brown sugar, and ½ teaspoon of cinnamon in a bowl. Add ½ cup of cold, cubed unsalted butter. Use your fingers or a fork to mix it until it becomes crumbly. Sprinkle this topping over the apples. Place the baking dish in the oven to bake for 30-35 minutes. Look for a golden brown streusel topping and bubbly apple filling. Once done, take it out and let it cool completely in the dish. After it cools, drizzle ½ cup of caramel sauce over the top before slicing into bars. To make a smooth cheesecake layer, I always start with softened cream cheese. This helps avoid lumps. Mix the cream cheese, sugar, and vanilla until creamy. Then, add the egg. Be sure to mix until just combined. Overmixing can add air and cause cracks. When choosing apples, I love using Granny Smith or Honeycrisp. Granny Smith apples give a nice tartness. Honeycrisp adds a sweet crunch. Both types hold up well when baked. Always peel and dice them for even cooking. If you have leftovers, store them in an airtight container. They can last up to five days in the fridge. Make sure they cool completely before covering. This keeps the topping from getting soggy. These bars shine with a drizzle of caramel sauce. I also like to sprinkle some cinnamon on top. Serve them warm or at room temperature. Pair with a scoop of vanilla ice cream for extra fun! {{image_2}} You can make a gluten-free crust easily. Use gluten-free graham cracker crumbs instead of regular ones. Look for brands that taste great and hold well. Combine the crumbs with melted butter and brown sugar just like in the original recipe. This way, everyone can enjoy these tasty bars. While apples are classic, feel free to try other fruits. Pears, peaches, or berries work well too. Each fruit brings a unique taste. Just make sure to adjust the sugar based on the fruit's sweetness. This lets you explore new flavors and keeps the recipe fresh. If you're a chocolate lover, try swapping caramel with chocolate sauce. Drizzle rich chocolate on top after baking. You can use store-bought sauce or make your own. This change gives the bars a whole new vibe. Chocolate and cheesecake are a match made in heaven! To keep your caramel apple cheesecake bars fresh, place them in an airtight container. Make sure to separate the layers with parchment paper to avoid sticking. Store the bars in the fridge for up to five days. The cool air helps maintain their texture and flavor. You can freeze these bars for later enjoyment. Cut them into squares and wrap each piece tightly in plastic wrap. Then, place them in a freezer-safe bag or container. They can stay in the freezer for up to three months. When ready to eat, just thaw them in the fridge overnight. If you want to warm up your bars, place them in a microwave for about 15-20 seconds. This step makes the cheesecake layer creamy again. For a crisp topping, bake them in the oven for a few minutes at 350°F. This method revives the delicious streusel topping and enhances the flavors. Enjoy the warm, gooey goodness! Yes, you can use a different crust recipe. Try using crushed cookies like Oreos or vanilla wafers. Just make sure to mix them with melted butter and a bit of sugar. This will keep the crust sweet and firm. These bars can last up to five days when stored properly. Keep them in an airtight container in the fridge. They will stay fresh and tasty for you to enjoy any time. Absolutely! You can make these bars a day or two ahead. Just bake them, let them cool, and store them in the fridge. Drizzle the caramel on top just before serving for the best look and taste. If you need a substitute for cream cheese, try using Greek yogurt or mascarpone. Both will give you a creamy texture. You may want to adjust the sugar since Greek yogurt is tangy, but it works great! This blog post walks you through creating delicious caramel apple cheesecake bars. We discussed the key ingredients, like the crust, cheesecake layer, apple filling, streusel, and caramel drizzle. I provided step-by-step instructions for making and baking these treats. You also learned tips for perfecting flavors and keeping leftovers fresh. In the end, these bars are fun to make and share. Try different variations for added fun. Enjoy your baking journey!

Caramel Apple Cheesecake Streusel Bars Delightful Treat

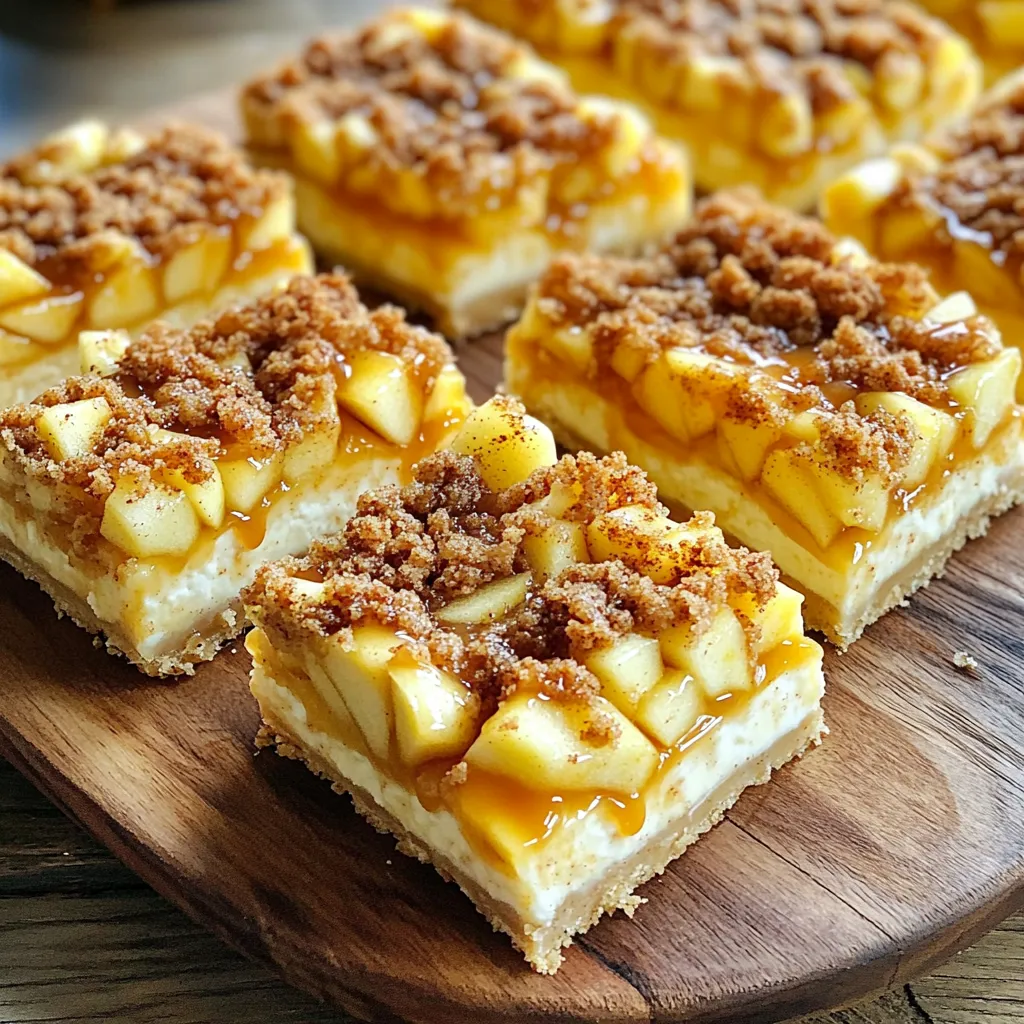
Craving a sweet treat that combines all your favorites? Look no further! My Caramel Apple Cheesecake Streusel Bars deliver a

To make a hearty slow cooker sausage bean stew, gather these ingredients: - 1 lb (450g) Italian sausage (mild or spicy) - 1 can (15 oz) cannellini beans, drained and rinsed - 1 can (15 oz) kidney beans, drained and rinsed - 1 cup diced carrots - 1 cup diced celery - 1 cup chopped onion - 2 garlic cloves, minced - 1 can (28 oz) crushed tomatoes - 4 cups vegetable broth - 2 teaspoons smoked paprika - 1 teaspoon dried oregano - 1 teaspoon dried thyme - Salt and pepper to taste - Fresh parsley, chopped (for garnish) You can add these ingredients to change the stew's flavor: - 1 cup corn for sweetness - 1 bell pepper for crunch - 1 teaspoon red pepper flakes for heat - 1 tablespoon Worcestershire sauce for depth If you have dietary needs, consider these swaps: - Use turkey or chicken sausage for a lighter option. - Substitute beans with lentils for a quicker cook time. - Use vegetable broth for a vegan stew. - Swap out the crushed tomatoes for tomato sauce if you prefer a smoother texture. These ingredient choices help you make a stew that suits your taste and dietary needs. Enjoy the rich flavors and warmth! Start by gathering your ingredients. This stew needs fresh veggies and hearty beans. You will need: - 1 lb Italian sausage - 1 can cannellini beans - 1 can kidney beans - 1 cup diced carrots - 1 cup diced celery - 1 cup chopped onion - 2 garlic cloves - 1 can crushed tomatoes - 4 cups vegetable broth - Spices: smoked paprika, dried oregano, dried thyme, salt, and pepper - Fresh parsley for garnish Take a skillet and set it over medium heat. Add the Italian sausage to the pan. Cook it until brown. Break it into smaller pieces as it cooks. This helps mix the flavor later. Once cooked, drain any extra fat. Transfer the sausage into your slow cooker. Now, it’s time to add the veggies. Add the diced carrots, celery, and onion. Then, add the minced garlic. Next, pour in the drained cannellini and kidney beans. Add the crushed tomatoes and the vegetable broth. Season your stew with smoked paprika, oregano, thyme, salt, and pepper. Stir well to mix everything. Cover the slow cooker. Set it to low heat for 6-8 hours or high heat for 3-4 hours. The stew is ready when the veggies are tender, and the flavors blend well. Taste your stew before serving and adjust the seasoning if needed. Enjoy this warm dish with a sprinkle of fresh parsley on top. To boost flavor, add a splash of hot sauce. It gives a nice kick. You can also toss in a bay leaf for depth. If you like herbs, try adding fresh thyme or rosemary. These herbs will brighten the dish. A squeeze of lemon juice just before serving adds freshness. For this stew, I love using Italian sausage. You can choose mild or spicy, based on your taste. Other great options include chorizo or smoked sausage. Each type brings a unique flavor to the stew. Just be sure to brown the sausage first. This step makes the flavor richer. Serve the stew with crusty bread or over rice. Both options soak up the tasty broth. A simple green salad pairs well too. For drinks, try a hearty red wine or a light beer. These drinks complement the flavors nicely. Don't forget to garnish with fresh parsley. It adds a nice pop of color and taste. {{image_2}} To make a vegetarian or vegan version of this stew, swap the sausage for plant-based options. You can use meatless sausage or even mushrooms for a hearty texture. Replace the vegetable broth with a rich vegetable stock to keep the flavor strong. This change keeps the stew filling and tasty without meat. While cannellini and kidney beans work great, feel free to mix in your favorite beans. Black beans or pinto beans add a unique taste and color. You can even throw in chickpeas for extra protein. Experimenting with beans can change the dish and keep it exciting. You can easily adjust the heat level of the stew. If you enjoy spice, choose spicy Italian sausage and add a pinch of red pepper flakes. For a milder stew, stick to the mild sausage and skip the heat. This choice makes the dish enjoyable for everyone, no matter their spice tolerance. To store your leftover sausage bean stew, let it cool first. Use airtight containers for storage. You can keep it in the fridge for up to three days. This helps keep flavors fresh. Label your containers with the date. This way, you’ll know when to use them. If you have a lot, consider splitting it into smaller portions. This makes reheating easy. When it's time to enjoy your stew again, reheating is simple. You can use the stove or microwave. If using the stove, heat it on medium-low. Stir often to avoid burning. For the microwave, place the stew in a safe bowl. Heat in one-minute intervals, stirring in between. Make sure it's hot all the way through. If it seems thick, add a splash of broth or water. Freezing is a great option for long-term storage. First, let the stew cool completely. Then, pour it into freezer-safe containers. Leave about an inch of space at the top. This allows for expansion when it freezes. You can also use freezer bags. Make sure to remove as much air as possible. Label them with the date. Frozen stew lasts about three months. To thaw, place it in the fridge overnight before reheating. Yes, you can use fresh beans. However, fresh beans take longer to cook. Soak them overnight. Then, add them to the slow cooker with more broth. This way, they will cook perfectly. You can store the stew for up to five days in the fridge. Make sure to use an airtight container. This helps keep the flavors fresh and delicious. A slow cooker with a capacity of 4 to 6 quarts is best for this stew. This size allows all the ingredients to fit and cook evenly. Programmable slow cookers are great too for setting cook times. Yes, you can cook this stew overnight. Set your slow cooker on low heat for 6-8 hours. This makes for a warm and hearty meal ready for breakfast or lunch. This blog post covers all you need to know about making a delicious sausage stew. We reviewed the key ingredients, including options and substitutions. I gave you step-by-step instructions for easy cooking. We discussed tips to enhance flavor and even variations for different diets. Storage tips help you keep leftovers fresh. In conclusion, with these insights, you can create a hearty meal that fits your taste. Enjoy experimenting with flavors and make this stew your own!

Slow Cooker Sausage Bean Stew Hearty Comfort Meal

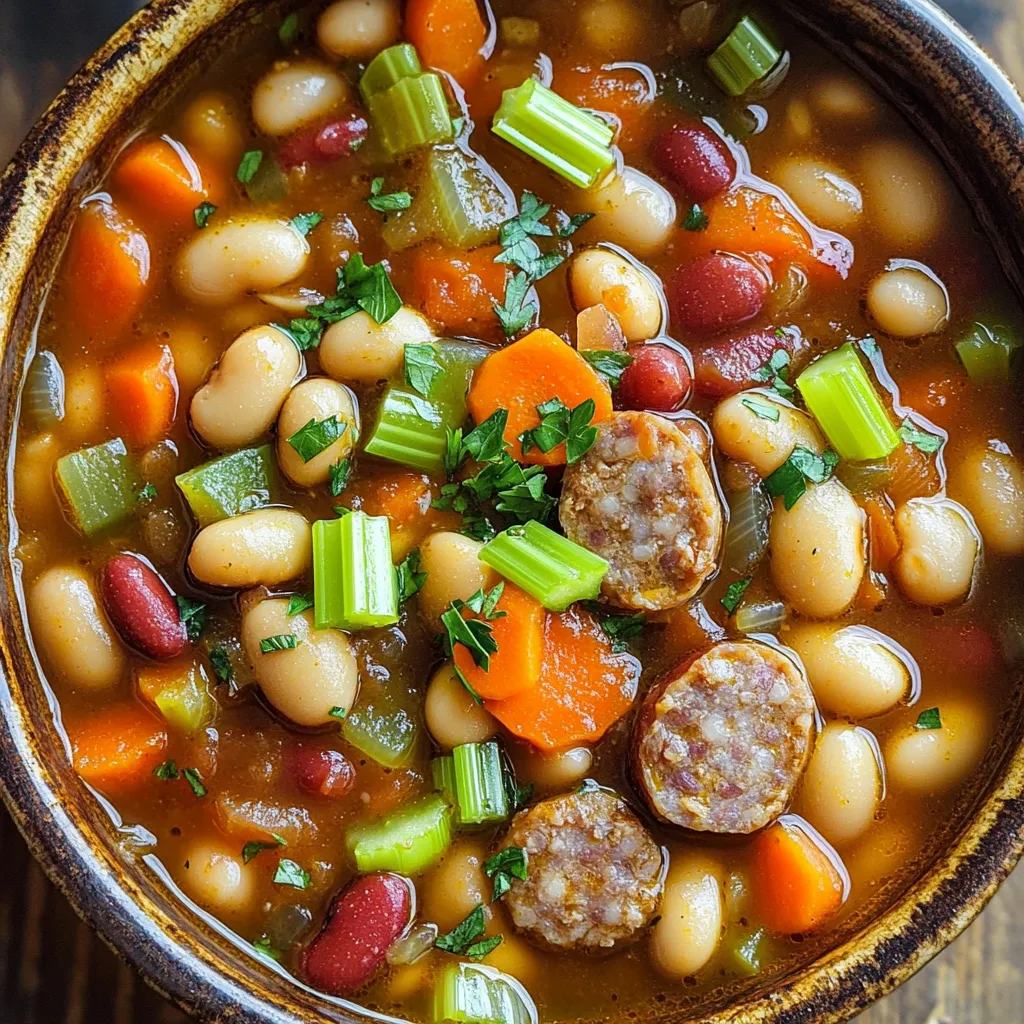
Looking for a warm, filling meal that practically cooks itself? Try my Slow Cooker Sausage Bean Stew! This hearty dish

For this tasty dish, you will need: - 4 salmon fillets - 2 cups broccoli florets - 1 red bell pepper, sliced - 1 cup snap peas - 3 tablespoons teriyaki sauce - 2 tablespoons olive oil - 2 cloves garlic, minced - 1 teaspoon fresh ginger, grated - Salt and pepper, to taste - 1 tablespoon sesame seeds, for garnish - 2 green onions, chopped, for garnish Using fresh ingredients always gives the best flavor. Fresh salmon has a nice texture. Fresh veggies, like broccoli and snap peas, keep their crunch. However, frozen options can work in a pinch. They are convenient and often just as healthy. If using frozen salmon, thaw it first. Frozen vegetables can be added directly to the pan without thawing. You can swap ingredients if needed. Use another fish, like trout or cod, instead of salmon. For a plant-based option, try tofu or tempeh. If you don’t have teriyaki sauce, mix soy sauce with honey or maple syrup. You can also change the veggies based on what you have. Carrots, zucchini, or bell peppers work well, too. First, set your oven to 400°F (200°C). This high heat helps cook everything evenly. Next, gather your ingredients: salmon fillets, broccoli, red bell pepper, and snap peas. Wash the veggies under cool water. Cut the red bell pepper into thin slices. Make sure to separate the broccoli into small florets. Having everything ready makes cooking easier. In a small bowl, mix together the teriyaki sauce, olive oil, minced garlic, and grated ginger. Use a whisk to blend them well. This sauce will add great flavor to both the salmon and veggies. If you want more sweetness, add a bit more teriyaki sauce. If you like it spicy, a dash of chili flakes can work too. Take a large sheet pan and spread out the broccoli, red bell pepper, and snap peas. Drizzle half of the teriyaki mixture over the veggies. Toss them gently to coat them well. Next, put the salmon fillets right in the center of the pan. Season each fillet with salt and pepper. Brush the remaining teriyaki sauce over the salmon. This helps keep it moist and flavorful. Now, place the sheet pan in your preheated oven. Bake for 15 to 20 minutes. Check the salmon after 15 minutes. It should flake easily with a fork. The veggies should also be tender but still crisp. When it’s done, carefully take the pan out. Sprinkle sesame seeds and chopped green onions on top for a nice finish. Enjoy your meal straight from the pan for a fun touch! For the best results, bake your salmon for 15 to 20 minutes. Check for doneness by using a fork. The salmon should flake easily. If it is still raw in the center, give it a few more minutes. Each oven is different, so keep an eye on it as it cooks. To keep your veggies crisp, do not overcrowd the pan. Spread them out evenly. Toss them in half of the teriyaki sauce before baking. This method lets the heat circulate and keeps them from steaming. Also, bake them for about 10 minutes before adding the salmon. This way, they cook perfectly without getting soggy. To change the flavor, play with the teriyaki sauce. Add more ginger for spice or honey for sweetness. You can also try adding lime juice for a zesty kick. If you like heat, sprinkle some red pepper flakes. Taste as you go to find your perfect balance. {{image_2}} You can swap salmon for other proteins. Chicken breasts work well in this dish. They cook nicely and soak up the teriyaki flavor. If you prefer a plant-based option, try firm tofu. Cut the tofu into cubes and marinate it in the same teriyaki sauce. It gives a tasty twist while keeping it healthy. Feel free to mix up the veggies! Asparagus, zucchini, or carrots can add color and crunch. You can also use baby corn or bell peppers of different colors. Just ensure they are cut to similar sizes for even cooking. This way, every bite is delicious and fun. If you need a gluten-free option, use tamari instead of regular soy sauce. Tamari is made without wheat but has a similar taste. You can also find gluten-free teriyaki sauces at many stores. Just check the label to make sure it meets your needs. This way, everyone can enjoy this dish! After cooking, let the dish cool down for about 30 minutes. Then, place the leftovers in an airtight container. This will keep your salmon and veggies fresh. Store them in the fridge for up to three days. If you notice any strong smells, it’s best to toss them out. To reheat your leftovers, use an oven or a microwave. If using an oven, set it to 350°F (175°C). Place the salmon and veggies on a baking tray. Heat for about 10-15 minutes. If using a microwave, place them in a microwave-safe dish. Heat in 30-second intervals until warm. This helps keep the salmon moist. You can freeze the salmon and veggies if you want to save them for later. Use freezer-safe containers or bags. Make sure to remove as much air as possible. Label with the date. They will stay good for up to three months. When ready to eat, thaw them overnight in the fridge. Then reheat as needed. Yes, you can! You could use soy sauce, hoisin, or even a sweet chili sauce. Each sauce adds its own flavor. If you want a spicy kick, try sriracha. Just keep in mind that the taste will change based on what sauce you pick. You can check if the salmon is done by using a fork. Gently poke the thickest part of the fillet. If it flakes easily, it’s ready. You can also use a meat thermometer. The salmon should reach 145°F (63°C) to be safe to eat. It’s best not to overcook it, as it can get dry. Broccoli, red bell peppers, and snap peas are great choices. They cook well and stay crisp. You can also add carrots, zucchini, or asparagus for more color and flavor. Just remember to cut them into similar sizes for even cooking. This blog post covered key ingredients for salmon and veggies, including fresh and frozen choices. I shared step-by-step baking instructions and useful tips to ensure your meal turns out great. You also learned about variations, storage, and common questions. Try different veggies or sauces for fun twists. Experimenting with flavors will keep meals fresh and exciting! Enjoy cooking and sharing this delicious dish.

Savory Sheet Pan Teriyaki Salmon & Veggies Recipe

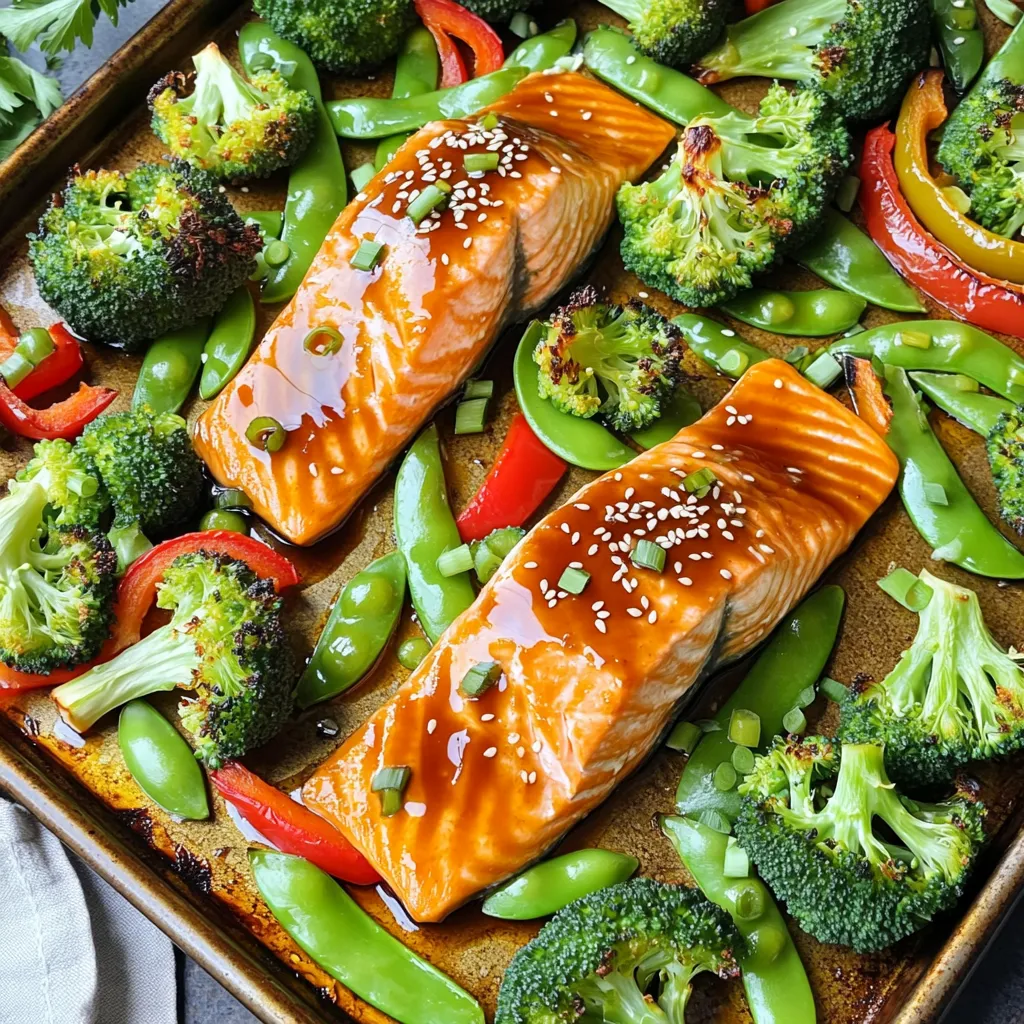
Get ready to bring bold flavors to your dinner table with my Savory Sheet Pan Teriyaki Salmon & Veggies Recipe!

Older posts
Newer posts
← Previous Page1 … Page12 Page13 Page14 … Page85 Next →

dsad

© 2026 greenmealmap • Built with GeneratePress

Our Policies

  • Copyright Policy
  • Cookie Policy
  • GDPR Policy
  • Privacy Policy
  • Disclaimer
  • Terms Of Use

More Information

  • Home
  • About
  • Contact
  • Appetizers
  • Dessert
  • Dinner
  • Drinks
©2026, greenmealmap About Back To Top