Skip to content
DisclaimerTerms Of UseGDPR PolicyCookie Policy

greenmealmap

  • Home
  • Drinks
  • Appetizers
  • Dinner
  • Dessert
  • About
  • Contact
  • Privacy Policy
DisclaimerTerms Of UseGDPR PolicyCookie Policy

NO-ING-IMG

To make your One-Pot Creamy Pesto Chicken Pasta, gather these items: - 2 cups pasta (fusilli or penne works great) - 1 pound boneless, skinless chicken breast, diced - 2 tablespoons olive oil - 3 cloves garlic, minced - 1 ½ cups chicken broth - 1 cup heavy cream - ¾ cup basil pesto (store-bought or homemade) - 1 cup cherry tomatoes, halved - ½ cup grated Parmesan cheese - Salt and pepper to taste - Fresh basil leaves for garnish You can swap out some ingredients if needed: - Use whole wheat pasta for a healthier option. - Swap chicken with cooked shrimp or tofu for a different protein. - Use vegetable broth instead of chicken broth for a vegetarian base. - Replace heavy cream with coconut milk for a dairy-free version. - Try different cheeses like mozzarella or pecorino if you want variety. Choosing fresh ingredients makes a big difference: - Look for firm, bright-colored chicken. It should smell fresh, not sour. - Choose pasta with a good texture, and pick a shape that holds sauce well. - Pick basil that is vibrant and fragrant. Avoid wilted leaves. - For tomatoes, select firm ones with a rich color. They should feel heavy for their size. - Always check the expiration dates on cream and pesto. Freshness matters! First, heat the olive oil in a large pot over medium heat. Add the diced chicken. Season with salt and pepper. Cook for about 5-7 minutes. You want the chicken to be golden brown and cooked through. Once done, remove the chicken and set it aside. In the same pot, add the minced garlic. Sauté it for about 1 minute. Be careful not to burn the garlic, as it can turn bitter. Now, pour in the chicken broth and bring it to a boil. Add the pasta, stirring occasionally. This helps prevent sticking. Lower the heat and cover the pot. Let it simmer for about 10-12 minutes, until the pasta is al dente. Once the pasta is cooked, it’s time to add the heavy cream and basil pesto. Stir everything together well. Let it simmer for an additional 2-3 minutes to thicken up. Return the cooked chicken to the pot. Add the halved cherry tomatoes too. Stir everything together and cook for another 2 minutes, just until heated through. Remove the pot from heat. Stir in the grated Parmesan cheese until it melts and makes the dish creamy. Taste it and adjust seasoning with more salt or pepper if needed. Dish out the creamy pesto chicken pasta onto plates or bowls. Garnish with fresh basil leaves. Add an extra sprinkle of Parmesan if you like. Enjoy your meal! To cook pasta just right, follow a few steps. Use a large pot filled with water. Add a pinch of salt to the water before boiling. This step adds flavor. Once the water boils, add the pasta. Stir it often to keep it from sticking. Cook until it is al dente, which means it should be firm yet tender. Taste it to check if it is done. This way, you avoid overcooking. To boost the flavor of your one-pot creamy pesto chicken pasta, consider adding a few extras. You can toss in some spinach or kale for a fresh touch. Sun-dried tomatoes add a nice tang. If you like heat, sprinkle in some red pepper flakes. These small changes can make your dish even more exciting. Feel free to experiment with herbs like thyme or oregano for more depth. For the best creaminess, timing is key. Once your pasta is al dente, stir in the heavy cream and pesto right away. This helps the sauce blend smoothly. Let it cook for a few minutes, but don’t rush. This allows the flavors to meld and creates that rich, creamy texture. Always check the heat; too high can curdle the cream. Keep it low and gentle for a perfect finish. {{image_2}} You can easily make this dish vegetarian. Just swap the chicken for chickpeas or tofu. Both options add protein and texture. Chickpeas give a nice bite, while tofu soaks up flavors well. Use firm tofu for the best results. Remember to sauté them until golden for added flavor. Adding vegetables boosts nutrition and adds color. You can toss in spinach, broccoli, or bell peppers. Just chop them into small pieces. Add them when you mix in the cream and pesto. They will cook quickly and stay vibrant. This way, you get a tasty, healthy meal in one pot. Feel free to switch up the pasta type. Fusilli and penne are great, but you can try spaghetti or farfalle too. Use whole wheat or gluten-free pasta for a healthier choice. Just remember to adjust the cooking time. Check the package instructions for perfect pasta. Each type adds a unique twist to your creamy pesto chicken pasta. To store your creamy pesto chicken pasta, let it cool first. Use an airtight container to hold the leftovers. This helps keep the dish fresh. You can store it in the fridge for about 3 to 4 days. Just make sure to check it before eating. If there are any off smells, it's best to toss it. Reheating this pasta is easy. You can use the microwave or the stovetop. If using the microwave, place the pasta in a bowl. Add a splash of water or cream to keep it moist. Heat in short bursts, stirring in between. On the stovetop, place the pasta in a pan. Add a bit of water and heat over low heat. Stir often until warm. Freezing this dish is a great option for meal prep. To freeze, let the pasta cool completely first. Then, transfer it to a freezer-safe container. You can also use freezer bags. Remove as much air as you can before sealing. This way, the pasta stays fresh for up to 3 months. When ready to eat, thaw it overnight in the fridge. Reheat as mentioned above. Enjoy your creamy pesto chicken pasta later! Yes, you can make this dish dairy-free. Use coconut cream instead of heavy cream. For cheese, try a dairy-free alternative. Check labels to ensure they fit your diet. To prevent pasta from sticking, stir it often while cooking. Add a splash of olive oil to the water before adding pasta. Make sure the water boils before adding the pasta. Absolutely! Homemade pesto adds a fresh taste. Blend fresh basil, garlic, nuts, and olive oil. Adjust the ingredients to fit your flavor preferences. It will make the dish even better. Yes, you can cook this in an Instant Pot. Sauté the chicken first, then add garlic. Pour in the broth and pasta. Cook on high pressure for 4-6 minutes. Release pressure and stir in cream and pesto. In this post, we covered key ingredients, cooking steps, and helpful tips. You learned how to sauté chicken, mix in creamy sauces, and choose fresh ingredients. I shared storage tips to keep leftovers tasty and ways to make variations to suit your taste. Remember, cooking is fun and you can adapt recipes as you wish. With these insights, you can create a delicious meal that your friends and family will love. Enjoy your cooking journey!

One-Pot Creamy Pesto Chicken Pasta Delight Recipe

Craving a delicious, creamy meal that’s quick and easy? Try my One-Pot Creamy Pesto Chicken Pasta Delight! This dish mixes

- 1 cup rolled oats - 1 ½ cups almond milk (or any milk of choice) - 1 medium apple, diced (preferably Granny Smith or Honeycrisp) - 2 tablespoons caramel sauce (plus extra for drizzling) - 1 tablespoon chia seeds - 1 teaspoon cinnamon - 1 tablespoon maple syrup (optional) - ½ teaspoon vanilla extract - Pinch of salt These main ingredients create a creamy and sweet base for your overnight oats. Rolled oats soak up the almond milk, making them soft and tasty. The diced apple adds a nice crunch and fresh flavor. Chia seeds provide a boost of fiber and help thicken the oats. - Chopped nuts (e.g., walnuts or pecans) - Extra caramel drizzle - Thin apple slices for garnish I love adding chopped nuts for a crunchy texture. They also give a nice nutty flavor. A drizzle of extra caramel sauce makes the dish feel special. Thin apple slices on top add beauty and freshness to your bowl. Each topping offers a fun way to customize your breakfast. - Combine 1 cup rolled oats, 1 ½ cups almond milk, 1 tablespoon chia seeds, 1 teaspoon cinnamon, 1 tablespoon maple syrup, ½ teaspoon vanilla extract, and a pinch of salt. - Stir well until all ingredients blend together. - Fold in 1 diced apple and 2 tablespoons caramel sauce. Mix gently to keep apple pieces intact. - Transfer the mixture into airtight jars, making sure each jar has apple bits. - Seal the jars tightly to keep the oats fresh. - Refrigerate overnight or for at least 5 hours. This allows the oats to soak up the liquid and soften. - The next morning, stir the oats before serving. - If the oats seem too thick, add a splash of almond milk. - Top with chopped nuts and a drizzle of caramel sauce. Enjoy your tasty breakfast! To get the perfect texture, measure your oats and liquids carefully. Use 1 cup of rolled oats to 1 ½ cups of almond milk. Mix them in a bowl. Stir until they blend well. Soak your oats overnight. This gives them time to soften. I recommend at least 5 hours for soaking. The longer the oats soak, the creamier they become. For added flavor, try a pinch of nutmeg or ginger. These spices mix well with apples and caramel. You can also adjust the sweetness by adding more or less maple syrup. Start with 1 tablespoon and taste as you go. This way, you can find the right sweetness for your taste. Serving in clear jars makes your oats look lovely. You can see the layers of apples and oats. For garnishes, add thin apple slices on top. Sprinkle some chopped nuts for crunch. A drizzle of caramel sauce makes it even more tempting. This not only enhances the look but also the taste! {{image_2}} You can switch up the fruit in your caramel apple overnight oats. Try bananas, berries, or pears. Each fruit brings its own taste and texture. Bananas add creaminess, while berries give a tart kick. In fall, use sliced peaches or figs for a nice twist. In winter, consider adding dried fruits like cranberries or dates. If you need gluten-free options, look for certified gluten-free oats. They work just as well in this recipe. For a vegan version, use plant-based milk and maple syrup instead of honey. You can also skip the caramel or use a vegan version to keep it plant-based. Want to take your oats to the next level? Add a spoonful of chocolate spread or peanut butter. These choices add rich flavors and creamy textures. For a warm taste, sprinkle in nutmeg or ginger. They pair perfectly with the sweetness of apple and caramel. To keep your caramel apple overnight oats fresh, use clean glass jars or airtight containers. Glass jars show off your lovely layers. Make sure to leave some space at the top. This allows the oats to expand as they soak. Seal the jars tightly to lock in the flavor and keep out air. You can keep your overnight oats in the fridge for up to five days. After that, the texture may change, and they might not taste as good. Freezing is not the best option for overnight oats. They may become mushy when thawed. If you want to store them longer, eat them within five days. If you have leftovers, eat them cold straight from the fridge. If you prefer warm oats, microwave them for about 30 seconds. Stir and check if it's warm enough. If they seem dry, add a splash of almond milk. To refresh older servings, add extra toppings like nuts or a drizzle of caramel sauce. This adds flavor and makes them feel new again. To make your oats thicker, you can adjust the oat-to-liquid ratio. Use more oats and less liquid. Aim for 1 cup of oats to 1 ¼ cups of milk for a creamier mix. You can also try using less almond milk or add a bit more chia seeds. Chia seeds soak up liquid, making the oats thicker. Yes, you can skip chia seeds if you want. They add a nice texture and nutrition, but you can use ground flaxseed instead. This will help keep some thickness. Without any seeds, your oats may be a bit runnier, but still tasty. Yes, you can eat overnight oats later. They last in the fridge for up to five days. Just make sure to keep them in airtight jars. If you notice any odd smell or change in color, it’s best to toss them. Always trust your senses! In this post, we explored how to make delicious overnight oats. We covered the main ingredients, step-by-step preparation, tips for the best texture, and fun variations. With options for toppings and storage advice, you can enjoy this meal for days. Remember, make it your own with different fruits or flavors. Overnight oats are easy, fun, and fit any diet. Dive in and customize your recipe for a tasty start to your day. The next time you wake up, a nutritious breakfast will be waiting!

Caramel Apple Overnight Oats Delightful Breakfast Dish

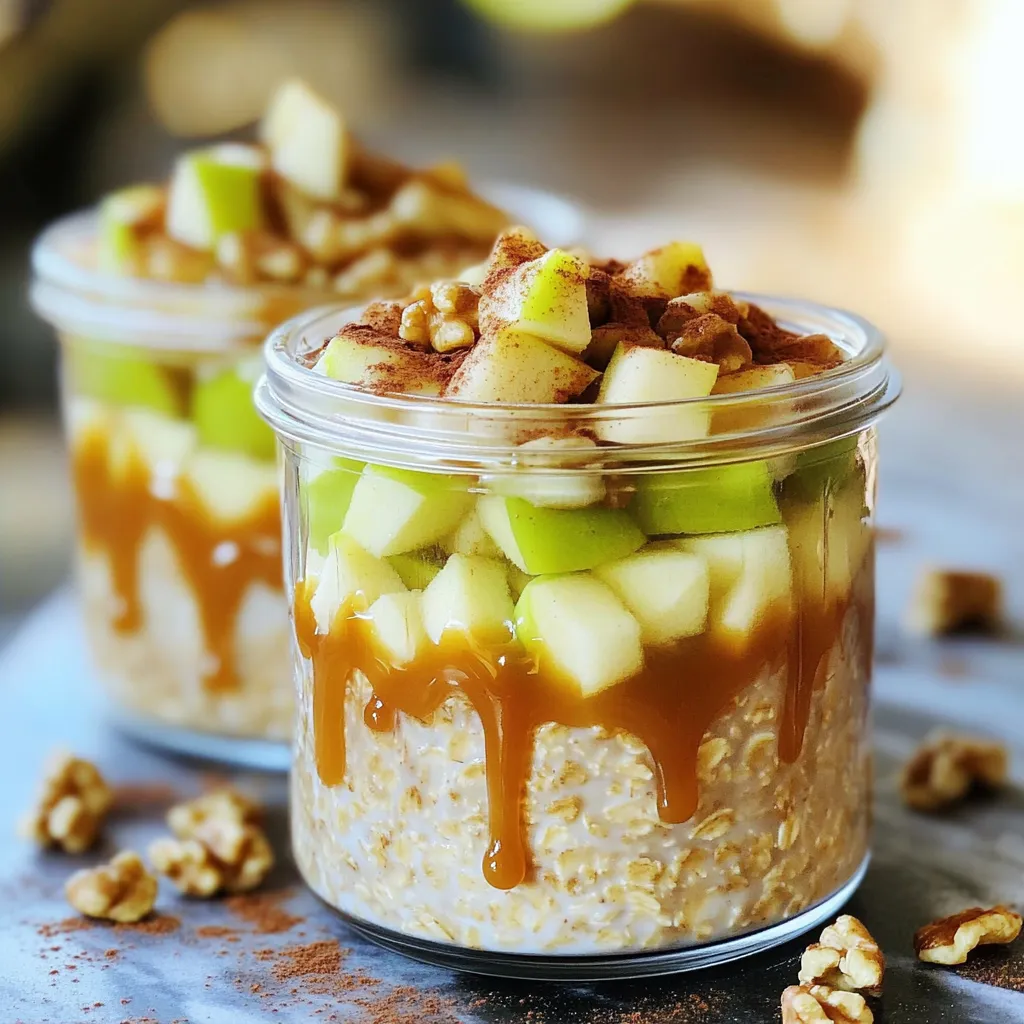
Start your day right with a bowl of Caramel Apple Overnight Oats! This simple and tasty recipe blends creamy oats

- 1 pound ground chicken - 1/2 cup breadcrumbs - 1/4 cup grated Parmesan cheese - 1/4 cup fresh parsley, chopped - 1 clove garlic, minced - 1 teaspoon Italian seasoning - 1/2 teaspoon salt - 1/4 teaspoon black pepper - 1 cup marinara sauce - 1 cup shredded mozzarella cheese - Fresh basil leaves for garnish You can use gluten-free breadcrumbs if needed. They work just as well. For a lighter dish, try low-fat ground chicken. This will keep your meatballs tasty without extra fat. You can use fresh herbs for a stronger flavor. However, dried herbs are fine too if that's what you have. Fresh herbs add bright flavors to the meatballs. Parsley gives a nice pop and freshness. Cheese plays a big role in keeping the meatballs moist. Parmesan adds a rich taste, while mozzarella makes them gooey and fun to eat. To begin, gather all your ingredients. In a large bowl, mix the ground chicken, breadcrumbs, grated Parmesan cheese, chopped parsley, minced garlic, Italian seasoning, salt, and black pepper. Use your hands to combine everything. You want a nice blend with no dry spots. Next, form the mixture into meatballs. Each meatball should be about 1 inch wide. This recipe makes around 16 meatballs. Now, pour half of the marinara sauce into the bottom of your slow cooker. This will keep the meatballs moist. Carefully place the meatballs on top of the sauce in a single layer. Pour the rest of the marinara sauce over the meatballs. Cover the slow cooker with its lid. Cook on low for about 4 hours. If you are short on time, set it to high for 2 hours. The meatballs should be cooked through and tender when done. During the last 15 minutes, sprinkle the shredded mozzarella cheese on top of the meatballs. This will melt and create a nice cheesy layer. Once the cooking time is up, remove the lid and garnish with fresh basil leaves. This adds a pop of color and freshness. Enjoy your homemade chicken Parmesan meatballs! To keep your meatballs moist, use ground chicken with some fat. Fat adds flavor and helps them stay juicy. Mix the meat gently; over-mixing can make them tough. For the best slow cooker settings, I prefer low heat. Cook on low for four hours. This slow method lets the flavors blend well. If you're short on time, cook on high for two hours. Spaghetti and garlic bread are perfect sides. Serve the meatballs over a bed of spaghetti. This adds a nice touch to the dish. For plating, drizzle extra marinara sauce over the meatballs. Sprinkle more parsley and grated Parmesan on top. This makes the dish look inviting and tasty. Try adding a pinch of red pepper flakes. This gives a nice kick to the meatballs. You can also mix in some fresh herbs like thyme or oregano. To customize the marinara sauce, add garlic or onion for extra flavor. A splash of red wine can deepen the sauce's taste. Experiment with these ideas to create your perfect dish! {{image_2}} You can switch up the meat in this dish. Try ground turkey or beef for different flavors. Each option adds a unique taste to your meatballs. If you want a veggie twist, consider using plant-based meat. Many brands offer great alternatives that taste amazing. The sauce is key to making these meatballs shine. You can use different marinara sauces to find your favorite. Some brands offer spicy or herby options. You can also add veggies to the sauce. Chopped bell peppers or mushrooms can boost the flavor and nutrients. Not everyone has a slow cooker. If you have an Instant Pot, use it! Just adjust the cooking time to suit the method. You can also bake the meatballs in the oven. Place them on a baking sheet with sauce and cheese for a quicker option. Either way, you'll enjoy a tasty meal! To store your cooked meatballs, let them cool first. Place them in an airtight container. This helps keep them fresh. You can store them in the fridge for up to three days. For long-term storage, freezing is a great option. Use a freezer-safe bag or container. Label it with the date. The meatballs can last up to three months in the freezer. You can reheat meatballs using a microwave or an oven. For the microwave, place them on a plate with a splash of marinara sauce. Heat for about one to two minutes. Stir halfway to ensure even heating. If using the oven, preheat it to 350°F. Place the meatballs in a baking dish, cover with foil, and heat for about 15 minutes. This keeps them moist and tasty. In the fridge, cooked meatballs last about three days. In the freezer, they can stay good for up to three months. Always check for signs of spoilage. If the meatballs smell off or have a strange color, it’s best to throw them away. Keeping an eye on these signs helps you enjoy your delicious meals safely. You can cook chicken meatballs on low for 4 hours or on high for 2 hours. The time varies based on your slow cooker. If your slow cooker runs hot, check for doneness sooner. Use a meat thermometer to ensure the meatballs reach 165°F. This way, you know they are safe to eat. Yes, you can make these meatballs ahead of time. Prepare the meatball mixture and form the meatballs. You can store them in the fridge for up to 24 hours before cooking. This saves you time on busy days. For longer storage, freeze the formed meatballs. Just remember to thaw them before cooking. To freeze these meatballs, follow these steps: - Lay the uncooked meatballs on a baking sheet. - Place the sheet in the freezer for about 1 hour. - Once they are firm, transfer the meatballs to a zip-top bag. - Remove as much air as you can before sealing. - Label the bag with the date and type. - Freeze for up to 3 months. This method helps keep them from sticking together. When ready to cook, thaw them in the fridge overnight. You now know the key ingredients to create tasty chicken meatballs in a slow cooker. Use fresh herbs and quality cheese to boost flavor and texture. The step-by-step guide helps you mix, cook, and serve perfectly. Don't forget the tips on storing and reheating to keep them delicious. Feel free to try variations and substitutions that fit your taste. Enjoy making these meal options for yourself or your loved ones, and savor the process of cooking delicious food.

Slow Cooker Chicken Parmesan Meatballs Flavorful Dish

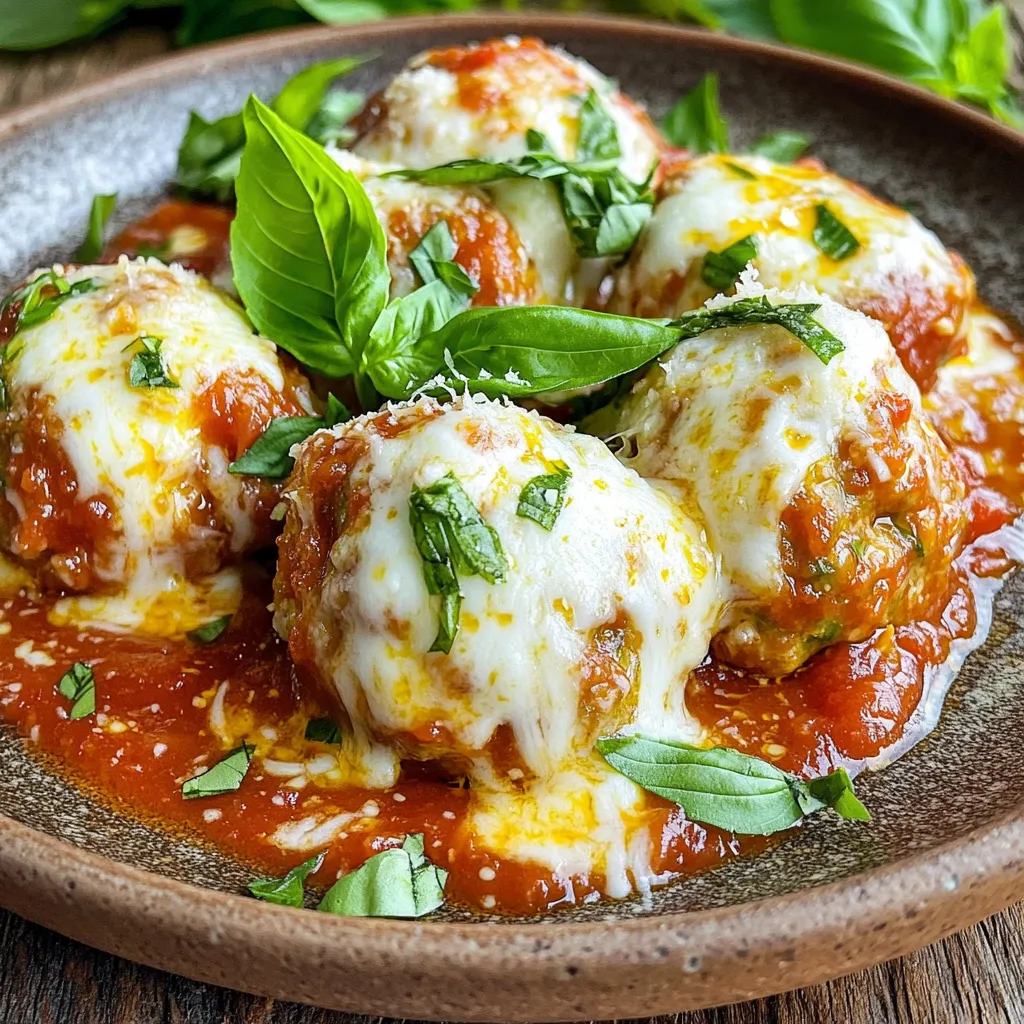
Looking for a comforting dish that’s both easy and tasty? You’ve found it! My Slow Cooker Chicken Parmesan Meatballs are

- 1 package (16 oz) gnocchi - 4 tablespoons unsalted butter - 4 cloves garlic, minced - 1/4 teaspoon red pepper flakes (optional) - 1/4 cup grated Parmesan cheese - Salt and black pepper to taste - Fresh parsley, chopped (for garnish) For this Minute Garlic Butter Gnocchi, you need a few key ingredients. The gnocchi gives the dish its base. Look for a 16-ounce package of gnocchi at your store. It cooks quickly and tastes great. Next, we need unsalted butter. Four tablespoons of butter add rich flavor. Garlic, minced, is a must for that classic taste. Use four cloves for a strong kick. If you like heat, add red pepper flakes. Just a pinch can spice things up. It’s optional, but I love the extra flavor it brings. For seasonings, grab some salt and black pepper. These help enhance the taste. Finally, don’t forget the Parmesan cheese. A quarter cup adds creaminess and depth. For the finishing touch, use fresh parsley. Chop it up and sprinkle it on top. It adds color and freshness to the dish. Enjoy these fresh and simple ingredients for a quick meal! First, get a large pot and fill it with salted water. Turn the heat on high until the water boils. Once it boils, add the gnocchi from the package. Cook them for about 2-3 minutes. You know they are ready when they float to the top. This means they are done! Drain the gnocchi and set them aside for now. Next, take a large skillet and place it on medium heat. Add 4 tablespoons of unsalted butter to the skillet. Wait for the butter to melt and foam. This usually takes just a minute. Once melted, add 4 cloves of minced garlic. Sauté the garlic for about 1 minute. It should smell great but not turn brown. If you like a bit of heat, add 1/4 teaspoon of red pepper flakes and stir for another 30 seconds. Now, it’s time to combine everything. Gently add the cooked gnocchi to the skillet. Toss them in the garlic butter until they are well coated. Season with salt and black pepper to taste. Cook for another 2-3 minutes. This lets the gnocchi brown a bit while you stir. When done, take the skillet off the heat. Sprinkle 1/4 cup of grated Parmesan cheese over the gnocchi and toss to mix. Finally, transfer the gnocchi to a serving dish and top with freshly chopped parsley for a lovely garnish. To get the best gnocchi, start with proper drainage. After boiling, gently pour the gnocchi into a colander. Let the water drain completely. This step helps keep the gnocchi from becoming mushy when you cook them in the sauce. The ideal cooking time for gnocchi is short. Usually, it takes about 2-3 minutes to cook. Watch for them to float. When they rise, they are ready to drain. This shows they are cooked. You can add fun flavors to your dish. Try adding sautéed spinach or sun-dried tomatoes for a twist. Both options bring nice colors and tastes. If you like heat, red pepper flakes can add a kick. For garlic, always use fresh cloves. Mince them finely for the best flavor. Sauté for just one minute. This way, the garlic gets fragrant but does not burn. Burnt garlic tastes bitter and ruins the dish. Pair your gnocchi with a light salad. A simple green salad with lemon dressing works well. The fresh taste of the salad balances the rich butter sauce. For a fun serving style, use a shallow bowl. Place the gnocchi in the center and sprinkle cheese on top. Add chopped parsley for color. This makes the dish look special and inviting. {{image_2}} You can easily make this dish vegetarian. Adding fresh vegetables can give it more color and taste. Try tossing in spinach, cherry tomatoes, or bell peppers. Sauté these veggies in the garlic butter for a few minutes before adding the gnocchi. This change makes the meal not just tasty, but also healthy. For plant-based substitutes, use vegan butter and nutritional yeast instead of cheese. Nutritional yeast adds a cheesy flavor without dairy. You can also try chickpea gnocchi if you want a gluten-free option. This way, everyone can enjoy this dish. Get creative with herbs and spices! Adding fresh basil, oregano, or thyme can change the taste. If you like heat, increase the red pepper flakes. For a zesty twist, squeeze some lemon juice over the dish before serving. You can also swap out Parmesan for other cheeses. Pecorino Romano or even feta can add a new flavor. These changes keep your meal exciting and fresh each time you make it. Adding protein makes the meal more filling. Chicken, shrimp, or sausage work great with gnocchi. Cook your choice of protein in the garlic butter before adding the gnocchi. This step adds depth to the dish. For a lighter option, consider using canned tuna or chickpeas. These choices provide protein without overwhelming the dish. They also make it easy to whip up a quick meal. Store any leftover gnocchi in an airtight container. Make sure it cools down first. Place it in the fridge for up to three days. When you are ready to eat, reheat it on the stove. Heat a skillet over medium heat and add a splash of water. This helps keep the gnocchi moist. Stir gently until it warms through. You can also use the microwave. Just place it in a bowl with a damp paper towel. Heat in short bursts to avoid overcooking. You can freeze cooked gnocchi for up to three months. First, let it cool completely. Spread the gnocchi on a baking sheet in a single layer. Freeze until firm, then transfer to a freezer bag. Remove as much air as possible to prevent freezer burn. When you’re ready to enjoy it, thaw the gnocchi in the fridge overnight. For reheating, use a skillet with a bit of water or broth. Cook over medium heat, stirring until hot again. This keeps the gnocchi tender and delicious. How long does gnocchi last in the fridge? Gnocchi lasts about three to five days in the fridge. Store it in an airtight container. Make sure it cools down before sealing. For best taste, eat it fresh. Can I use dried garlic instead of fresh? Yes, you can use dried garlic. Use about 1/4 teaspoon for each clove. Dried garlic has a different flavor, so adjust to your taste. Can I make this recipe gluten-free? Yes, you can! Look for gluten-free gnocchi at the store. Many brands offer good options. Check the ingredient label to be sure. What can I substitute for gnocchi? You can try using other pasta like penne or fusilli. Cauliflower rice is another option if you want something lighter. Can I use margarine instead of butter? Yes, margarine works as a substitute. The flavor may change slightly, but it will still taste good. What cheese can replace Parmesan? You can use Pecorino Romano or Grana Padano. Nutritional yeast is a great vegan option too. It adds a cheesy flavor without dairy. This blog post covered how to make garlic butter gnocchi. We looked at essential ingredients, like gnocchi, butter, and garlic. You learned how to cook the gnocchi and prepare the sauce. I also shared tips for flavor and serving ideas. To wrap it up, this dish is simple and tasty. Feel free to get creative with variations to suit your taste. Enjoy cooking and share this recipe with friends!

Minute Garlic Butter Gnocchi Quick and Tasty Meal

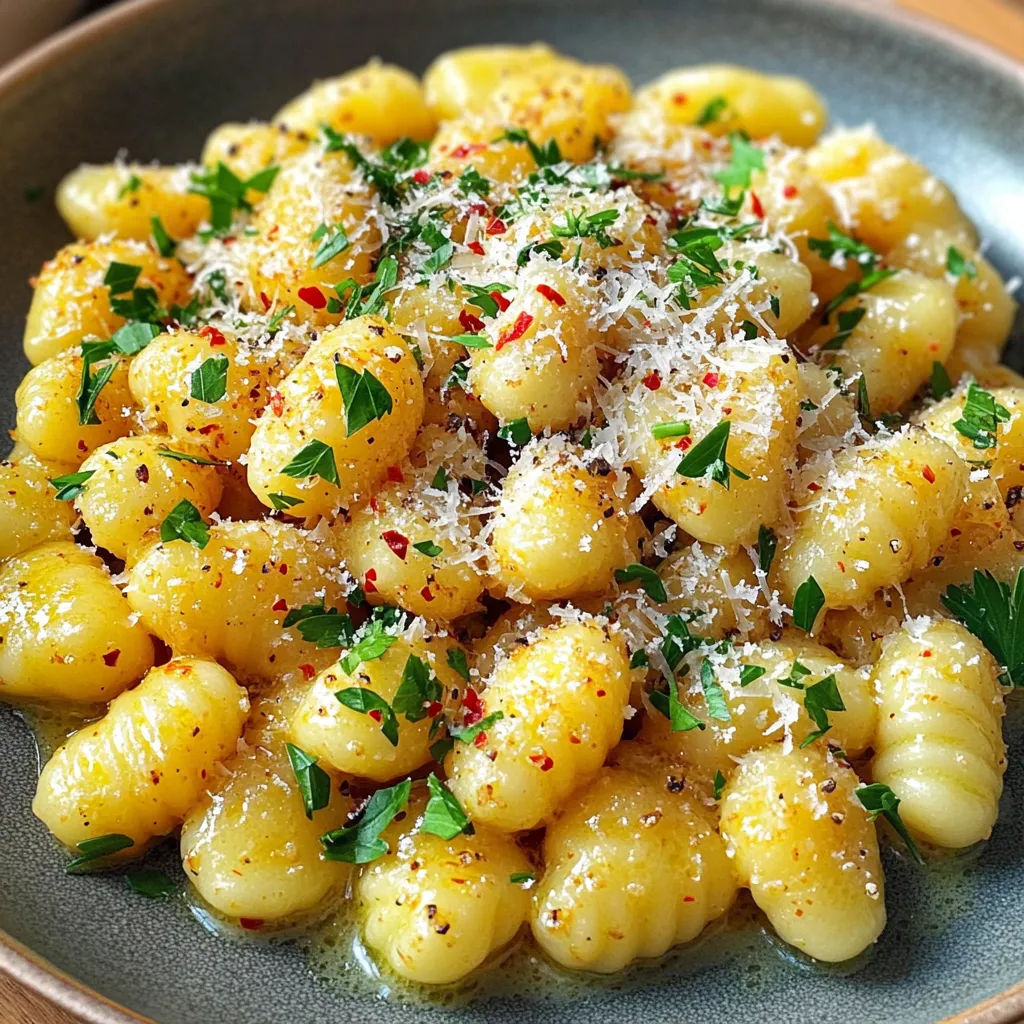
Are you looking for a quick and tasty meal that feels gourmet? Minute Garlic Butter Gnocchi might be just what

- 2 cups cream cheese, softened - 1 cup powdered sugar - 1 teaspoon vanilla extract - 1 cup heavy whipping cream - 2 large apples, peeled, cored, and diced - 1 teaspoon cinnamon - 1 tablespoon lemon juice - 1 cup caramel sauce (store-bought or homemade) - 1 cup graham cracker crumbs - 1/2 cup chopped walnuts (optional) - Whipped cream for topping Creating caramel apple cheesecake parfaits is fun and easy! This recipe uses simple ingredients to make a treat that tastes fancy. Here’s what you’ll need. Cream cheese is the base for our cheesecake layer. It gives a thick and creamy texture. Make sure to use softened cream cheese for easy mixing. Powdered sugar adds sweetness. It blends well and gives a smooth finish to the cream cheese. Vanilla extract brings a nice flavor. Just a teaspoon adds depth to the cheesecake. Heavy whipping cream is key for the light texture. Whipping it creates air, making the cheesecake fluffy. Apples are the star of the show. They give a fresh taste and crunch. You can use any apples you like, but tart ones work best. Cinnamon adds warmth and spice. It pairs perfectly with apples and caramel. Lemon juice keeps the apples from browning. It also brightens the flavor. Caramel sauce is a must for drizzling. You can use store-bought or make your own. Graham cracker crumbs form the base layer. They add a nice crunch and sweetness. Chopped walnuts are optional but add a lovely texture. Whipped cream on top makes everything look pretty and tastes great. It’s the perfect finishing touch for your parfaits. Gather these ingredients, and you’re ready to start making something delicious! To start, peel, core, and dice two large apples. Toss the diced apples in a medium bowl with one tablespoon of lemon juice and one teaspoon of cinnamon. This step keeps the apples fresh and adds flavor. Let them marinate for about ten minutes. This marinating time allows the flavors to blend and enhances the taste. In a large mixing bowl, beat together two cups of softened cream cheese and one cup of powdered sugar. Mix until it is smooth and creamy. Next, add one teaspoon of vanilla extract to the mixture. This adds a lovely depth of flavor that pairs well with the apples. In another bowl, whip one cup of heavy cream until it forms stiff peaks. This step is key for a light texture. Gently fold the whipped cream into the cream cheese mixture. Make sure to do this slowly to keep the mixture fluffy and airy. Grab some serving glasses or bowls for this part. Start by adding a layer of graham cracker crumbs on the bottom. Then, add a layer of the cheesecake mixture. Follow this with some marinated apples and a drizzle of caramel sauce. Repeat this process until the glasses are filled. Finish with a layer of cheesecake mixture on top for a beautiful finish. To complete your parfaits, drizzle extra caramel sauce over the top. Sprinkle the remaining graham cracker crumbs and optional chopped walnuts for added texture. Top each parfait with a dollop of whipped cream. For the best flavor, let the parfaits chill in the refrigerator for at least one hour before serving. This chilling time allows all the flavors to meld perfectly. To make a smooth cheesecake mixture, start with softened cream cheese. Beat it well with powdered sugar until creamy. This step is key to avoid lumps. After mixing, add in vanilla extract for that rich flavor. For a twist, try adding a bit of lemon zest or almond extract. These variations can surprise your taste buds. Use sweet and tart apples for the best taste. I recommend Granny Smith or Honeycrisp apples. They hold up well and add a nice crunch. To prepare, peel, core, and dice the apples. Toss them with lemon juice and cinnamon. This helps enhance their flavor and keeps them from browning. For serving, use clear glasses or jars. This lets everyone see the beautiful layers. Start with graham cracker crumbs at the bottom. Then, layer cheesecake, apples, and caramel sauce. Repeat until full. Top with whipped cream and a drizzle of caramel. A sprinkle of chopped walnuts adds a nice touch. Keep it chilled before serving to ensure it looks great and tastes fresh. {{image_2}} You can change the taste of your caramel apple cheesecake parfaits by adding spices. Nutmeg and ginger are great choices. These spices give a warm, cozy flavor. You can also switch up the fruit layers. Try pears or berries for a fresh twist. Each fruit brings a unique taste, making your parfaits even more exciting. If you need a gluten-free version, you can substitute graham crackers. Use gluten-free cookies or oats instead. These alternatives still add great texture. For toppings, consider using crushed nuts or seeds. They add crunch without gluten, keeping your dessert safe and tasty. To make vegan parfaits, swap cream cheese and heavy cream for plant-based options. Use cashew cream or coconut cream as substitutes. They give a rich texture and flavor. Adjust the recipe by using maple syrup or coconut sugar instead of powdered sugar. This way, you can enjoy a dairy-free treat that everyone will love. After making your caramel apple cheesecake parfaits, store them in the fridge. Place them in airtight containers to keep them fresh. These parfaits stay tasty for up to three days in the fridge. Make sure to cover each parfait well to avoid any fridge smells seeping in. Can you freeze parfaits? Yes, but it’s not the best option. Freezing can change the texture of the cream cheese and whipped cream. If you must freeze them, cover them tightly in plastic wrap and then in foil. To serve, move them to the fridge overnight to thaw. Do not refreeze once thawed, as it can make them watery. To refresh the parfaits after storage, simply give them a gentle stir. This helps mix any settled layers. For a fresh look, add more caramel sauce or whipped cream on top. Presentation matters! Serve in a clear glass to show off the beautiful layers. This makes the dessert look appealing and tasty. Yes, you can prepare these parfaits a day in advance. Just layer all the ingredients and chill them in the fridge. This gives the flavors a chance to mix. I suggest waiting to add the whipped cream until right before serving. This keeps it fresh and fluffy. If you don’t have caramel sauce, try using chocolate sauce or fruit sauce. You could even use honey for a different twist. Each option adds its own sweetness and flavor to the parfaits. To lower the sugar, use less powdered sugar in the cream cheese mix. You can also swap some of the cream with yogurt. For a lighter touch, try using reduced-fat cream cheese. These changes keep the taste great while cutting some calories. Absolutely! You can use crushed cookies or nuts instead of graham crackers. Almond flour or oat flour works well too. Each crust changes the taste, so feel free to experiment to find your favorite. This blog post covered how to create delicious cheesecake parfaits with apples and caramel. You learned about key ingredients and step-by-step instructions for making and layering. We discussed tips for perfecting the cheesecake, presented variations, and storage methods. These parfaits are easy, fun, and great for any occasion. Experiment with flavors and enjoy serving them to friends and family!

Caramel Apple Cheesecake Parfaits Simple and Sweet Treat

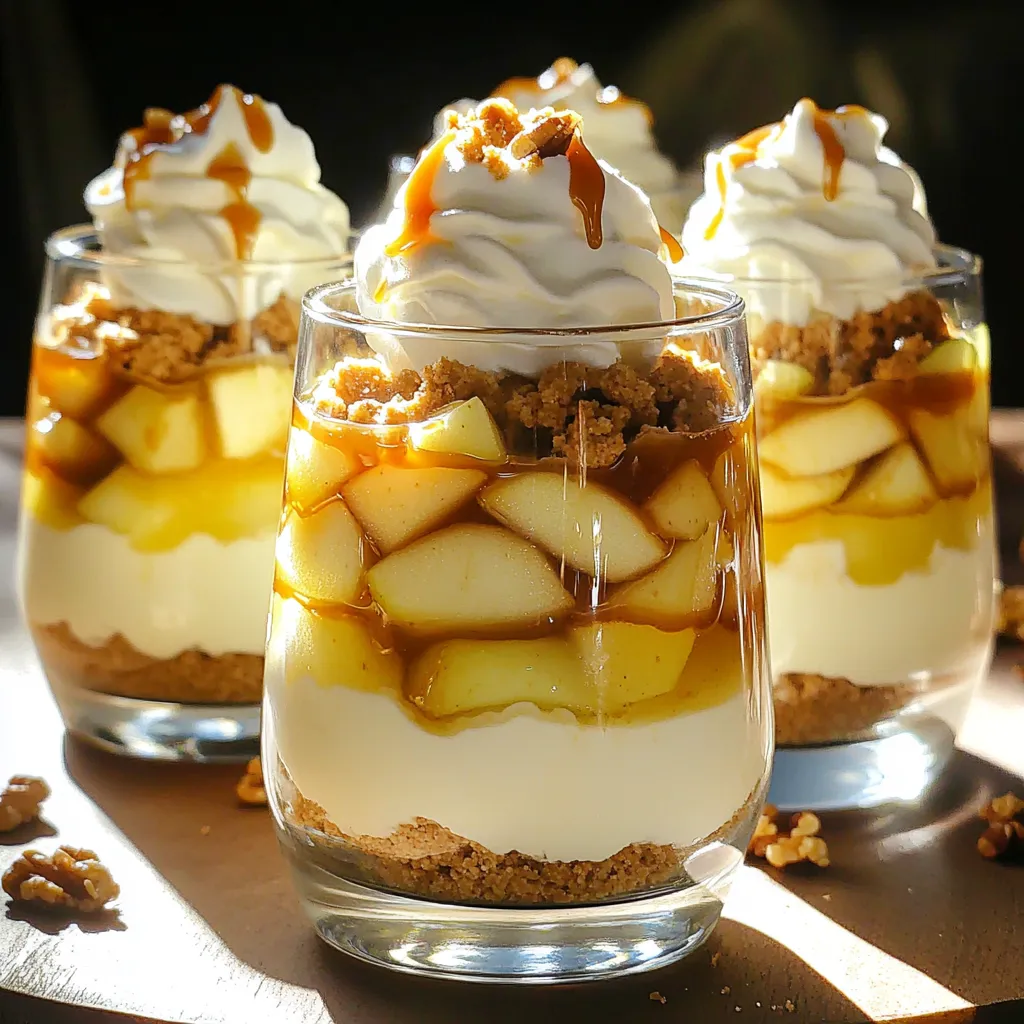
If you love sweet treats that are simple to make, you’re in the right place! These Caramel Apple Cheesecake Parfaits

- 2 cups all-purpose flour - 1 teaspoon baking powder - 1 teaspoon baking soda - 1 teaspoon cinnamon - ½ teaspoon nutmeg - ½ teaspoon salt - 1 cup granulated sugar - ½ cup brown sugar, packed - 1 cup canned pumpkin puree - ½ cup vegetable oil - 3 large eggs - 1 teaspoon vanilla extract - 1 cup chopped walnuts (optional) - 1 cup crumb topping I use all-purpose flour for this cake. It gives the right texture. You can also use whole wheat flour for a healthier twist. I recommend regular granulated sugar for sweetness. Brown sugar adds moisture and a hint of caramel flavor. Both work great together. If you want to avoid gluten, use a gluten-free flour blend. This will keep the cake tasty. For a vegan option, replace eggs with flax eggs or applesauce. You can also swap vegetable oil with melted coconut oil. This adds a nice flavor, too. If you want a nut-free cake, simply skip the walnuts. How to Preheat the Oven Set your oven to 350°F (175°C). This temperature ensures your cake bakes evenly and rises well. Greasing the Baking Pan Use a 9x13-inch pan for this recipe. Coat the bottom and sides with vegetable oil or butter. This step helps the cake release easily after baking. In a large bowl, combine the dry ingredients. Sift together 2 cups of flour, 1 teaspoon of baking powder, and 1 teaspoon of baking soda. Add 1 teaspoon of cinnamon, ½ teaspoon of nutmeg, and ½ teaspoon of salt. Mixing well helps distribute the leavening agents evenly. In another bowl, whisk together the wet ingredients. Mix 1 cup of granulated sugar with ½ cup of brown sugar. Then add 1 cup of canned pumpkin puree, ½ cup of vegetable oil, 3 large eggs, and 1 teaspoon of vanilla extract. Whisk until the mixture is smooth and creamy. If you like nuts, fold in 1 cup of chopped walnuts. Use a spatula to gently mix them in. This adds a nice crunch and flavor to your cake. To make the crumb topping, combine 1 cup of flour with ½ cup of brown sugar. Then, add ½ cup of melted butter. Mix until it forms a crumbly texture. This topping adds a sweet, crunchy layer to your cake. Pour the batter into your greased pan. Spread it evenly across the bottom. Sprinkle the crumb topping over the batter. Bake in the oven for 35-40 minutes. Check for doneness by inserting a toothpick in the center. It should come out clean when the cake is ready. Once baked, let the cake cool in the pan for at least 10 minutes. This cooling period helps it set. For serving, slice it into squares. Dust with powdered sugar and add a dollop of whipped cream or a scoop of vanilla ice cream if you want. A sprinkle of cinnamon gives it an extra touch. Enjoy your delightful fall treat! To keep your pumpkin crumb cake moist, use canned pumpkin puree. This adds rich flavor and moisture. You can also add extra oil or a bit of yogurt to the batter. Each of these tricks helps keep your cake soft and tender. To boost the flavor, try adding spices like ginger or allspice. A teaspoon of vanilla extract adds depth. You can also mix in chocolate chips or dried cranberries for a sweet twist. These small changes can make a big difference in taste! One common mistake is overmixing the batter. Mix just until combined to avoid a tough cake. Make sure to check your oven temperature as well. An oven that is too hot can dry out your cake. Finally, don’t skip the toothpick test. If it comes out clean, your cake is ready! {{image_2}} You can switch nuts in this recipe for a fun twist. Try pecans or almonds instead of walnuts. Each nut brings a different flavor and crunch. You can also skip the nuts if you prefer a nut-free treat. For toppings, consider adding shredded coconut or seeds like sunflower for extra texture. If you need a gluten-free version, it’s easy to adapt this recipe. Use a gluten-free all-purpose flour blend instead of regular flour. Make sure the blend has xanthan gum to help with texture. The taste will still be great, and everyone can enjoy it! To change things up with seasonal flavors, add mix-ins like chocolate chips or dried cranberries. Chocolate chips add sweetness, while cranberries give a nice tartness. You can also fold in chopped apples or pears for a fruity twist. Don’t be afraid to get creative and make this cake your own! To keep your pumpkin crumb cake fresh, let it cool first. Place it in an airtight container. You can store it at room temperature for about three days. If you want to keep it longer, move it to the fridge. In the fridge, it lasts up to one week. Make sure to wrap it well to avoid drying out. If you want to freeze the cake, slice it first. This makes it easy to grab a piece later. Wrap each slice in plastic wrap tightly. Then, place the wrapped slices in a freezer-safe bag. You can freeze them for up to three months. When you are ready to enjoy, take a slice out and let it thaw in the fridge overnight. To reheat your pumpkin crumb cake, use the oven. Preheat it to 350°F (175°C). Place the cake on a baking sheet. Heat for about 10-15 minutes. You can also use the microwave. Heat individual slices on medium power for about 20-30 seconds. Enjoy your warm cake with a sprinkle of sugar or a scoop of ice cream! Yes, you can use fresh pumpkin. Start with a small pumpkin. Cut it in half, remove the seeds, and roast it until soft. After it cools, scoop out the flesh and puree it. Make sure to measure the same amount as the canned pumpkin, which is one cup. To check if the cake is done, insert a toothpick into the center. If it comes out clean, the cake is ready. It should also be slightly firm to the touch. If it’s still wet, bake it for a few more minutes. You can serve pumpkin crumb cake warm or at room temperature. Dust it with powdered sugar for a sweet touch. A dollop of whipped cream adds creaminess. You can also enjoy it with a scoop of vanilla ice cream. A sprinkle of cinnamon on top makes it look great! This blog post covered all you need to know to make a delicious pumpkin crumb cake. We explored the key ingredients, detailed step-by-step instructions, and shared tips for perfecting the cake. I also provided variations and storage methods to suit your needs. Remember, baking is about fun and creativity. Don’t hesitate to try new ingredients and flavors. Enjoy your baking adventure!

Pumpkin Crumb Cake Delightful Fall Treat Recipe

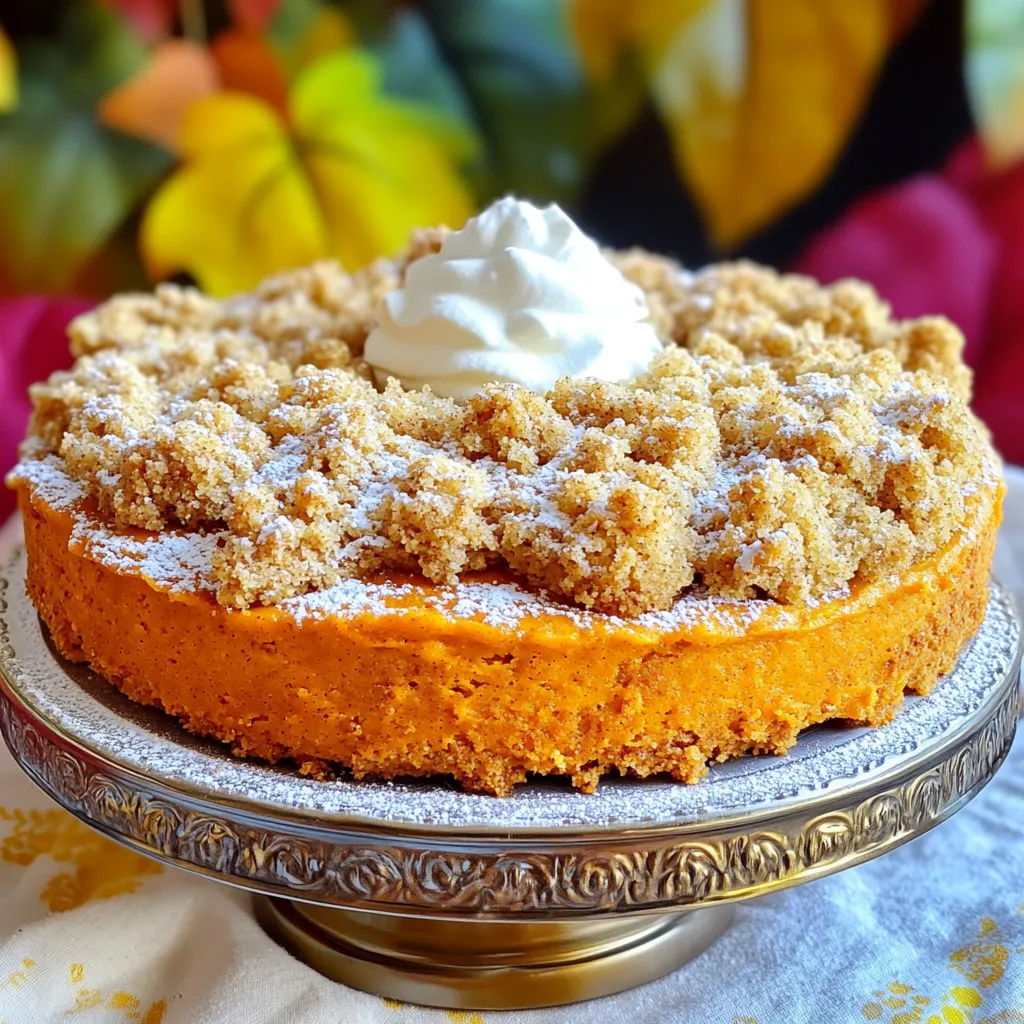
Fall is the perfect time to enjoy a warm slice of pumpkin crumb cake. This delightful treat brings together the

- 1 block firm tofu - 2 tablespoons cornstarch - 1 tablespoon olive oil - 2 tablespoons soy sauce - 1 tablespoon sriracha - 1 teaspoon garlic powder - 1 teaspoon smoked paprika - 1 teaspoon ginger powder - Salt and pepper to taste - Chopped green onions - Sesame seeds When preparing Air Fryer Spicy Tofu Bites, you want to choose the right ingredients. Start with firm tofu. It holds its shape well and gives a nice texture. Press the tofu to remove moisture. This step is key to getting crispy bites. Next, cornstarch acts like a magic dust. It provides that crunchy coating we all love. Olive oil adds a touch of richness without overwhelming the flavor. Soy sauce brings umami, making the bites savory and delicious. Now, let's spice things up! Sriracha adds heat. Adjust it to your liking for extra kick. Garlic powder gives a nice depth, while smoked paprika adds a smoky note. Ginger powder brightens the flavor and balances the heat. Don't forget salt and pepper for seasoning. For garnish, use chopped green onions and sesame seeds. They add color and a nice crunch. Together, these ingredients make your Air Fryer Spicy Tofu Bites a tasty treat that’s hard to resist! Start by pressing the tofu. This step helps remove extra moisture. Wrap the block in a clean kitchen towel. Place a weight on top for 15 to 20 minutes. Once pressed, cut the tofu into bite-sized cubes. Aim for uniform pieces to ensure even cooking. In a large bowl, combine the cubed tofu with cornstarch and seasonings. Add olive oil, soy sauce, sriracha, garlic powder, smoked paprika, ginger powder, salt, and pepper. Gently toss everything together. Make sure each tofu cube is evenly coated. This will help create that crispy texture. Preheat your air fryer to 375°F (190°C) for about 5 minutes. Place the tofu bites in a single layer in the basket. Avoid overcrowding. This helps them crisp up well. Cook the tofu bites for 15 to 20 minutes. Shake the basket halfway through. This ensures even cooking and browning. Once done, let them cool for a couple of minutes. Garnish with chopped green onions and sesame seeds before serving. Pressing tofu is key for crispiness. It removes extra moisture that makes it soggy. Wrap the tofu in a clean towel and place a weight on top. Leave it for 15 to 20 minutes. This will help the tofu absorb flavors and get crispy. Cornstarch is a great tool for texture. It creates a crunchy coating when you air fry the tofu. Toss the pressed tofu cubes with cornstarch before cooking. This step makes a big difference in the final dish. You can change the heat level with sriracha. Use less for a milder taste or add more for extra kick. If sriracha is too hot, try mixing in some ketchup or honey. These will add sweetness without too much heat. If you want even milder flavors, swap sriracha with barbecue sauce. It gives a nice taste but keeps it gentle on the tongue. Spicy tofu bites are great with dips. Try serving with soy sauce, sweet chili sauce, or a creamy garlic dip. These pair well with the crunchy tofu. You can also add tofu bites to salads or wraps. They add protein and flavor to any meal. Toss them in a bowl with veggies or grains for a hearty dish. {{image_2}} You can change the taste of your spicy tofu bites easily. Adding spices like cumin or chili powder gives them a new kick. You might also mix in some colorful veggies. Bell peppers or zucchini add crunch and flavor. Try different combinations to find what you love! You don't have to use an air fryer. You can oven-bake these tofu bites as well. Just set your oven to 400°F (200°C) and bake for 25-30 minutes. Keep an eye on them for crispiness. If you want, you can even pan-fry the tofu. Heat some oil in a skillet and cook the bites until they are golden brown. Make sure your soy sauce is gluten-free if you need that option. Look for brands that guarantee it. You can also explore other vegan sauces for extra flavor. Coconut aminos or tamari work well too. These swaps can help you enjoy this recipe without worry! To store your spicy tofu bites, first let them cool. Place them in an airtight container. Keep them in the fridge for up to three days. If you want to keep them longer, consider freezing them. To reheat your tofu bites, use the air fryer. Set it to 375°F (190°C) for about five minutes. This helps restore their crispiness. Avoid using the microwave, as it makes them soggy. To freeze, lay the tofu bites in a single layer on a baking sheet. Freeze them for about one hour. Once frozen, transfer them to a freezer-safe bag. To thaw, leave them in the fridge overnight. Reheat in the air fryer for best results. Air fryer spicy tofu bites take about 15 to 20 minutes to cook. The cooking time can change based on your air fryer model. For best results, preheat your air fryer to 375°F (190°C) before adding the tofu. Shaking the basket halfway through helps them cook evenly. Check for a golden color and crisp texture for the perfect bite! Yes, you can make this recipe without cornstarch. If you skip it, the tofu may not be as crispy. You can use rice flour or potato starch as a substitute. Both options work well but may alter the texture slightly. You might also try skipping the coating for a softer bite. You can serve spicy tofu bites with many tasty sides. Here are a few ideas: - Steamed rice or quinoa - Fresh salad with greens and veggies - Dipping sauces like soy sauce or sriracha mayo - Noodles in a light broth - Wraps with crunchy veggies These sides will enhance the flavors of your spicy tofu bites and create a great meal! You now have a great recipe for spicy tofu bites. We discussed the key ingredients like tofu, cornstarch, and seasonings. You learned how to prepare, mix, and air fry the tofu for a crispy finish. Remember to adjust spices to your liking and perhaps try different cooking methods. These tips make cooking fun and easy. Enjoy your spicy tofu bites as a snack or meal. With practice, you'll master this dish and impress friends and family.

Air Fryer Spicy Tofu Bites Crispy and Flavorful Snack

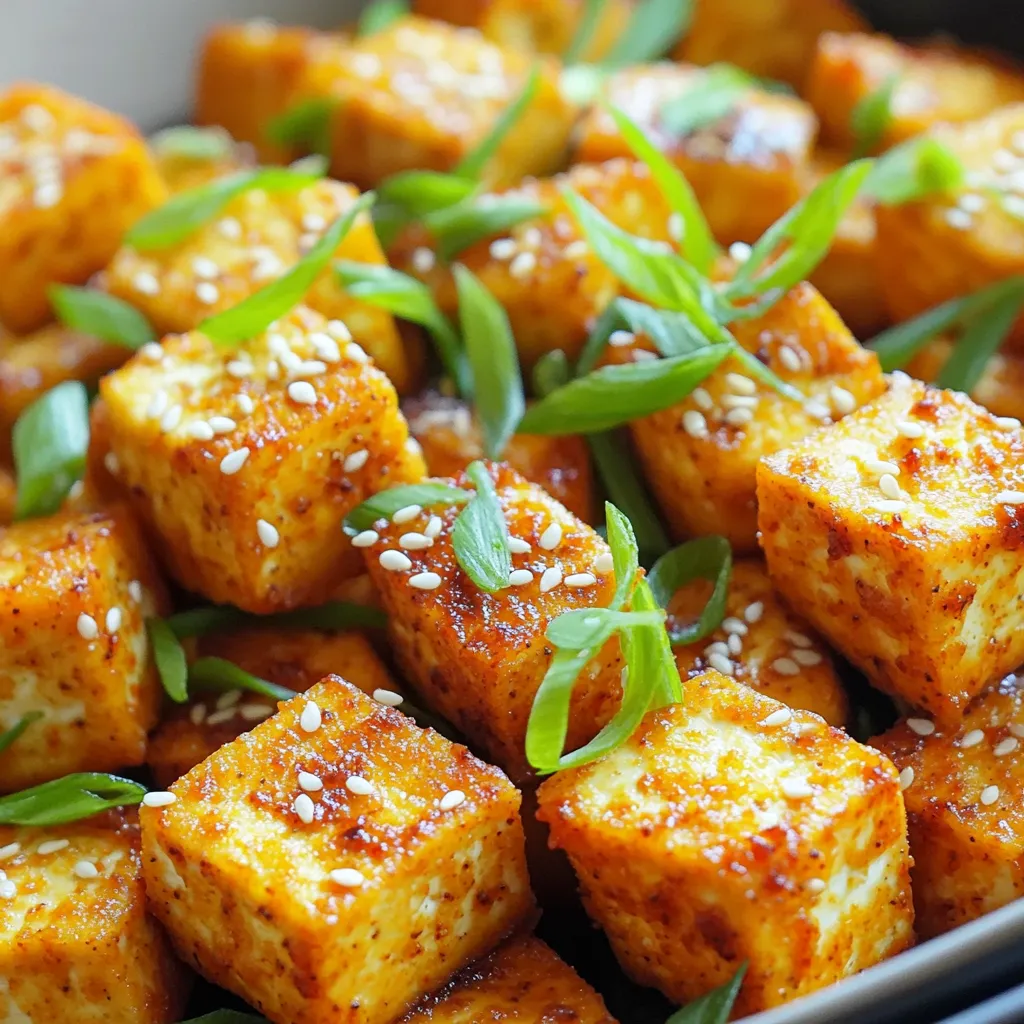
Are you ready to elevate your snacking game? Air Fryer Spicy Tofu Bites are the perfect mix of crispy and

- 1 pound large shrimp, peeled and deveined - 4 cups broccoli florets - 1/4 cup unsalted butter, melted - 3 tablespoons fresh lemon juice - 2 teaspoons garlic powder - 1 teaspoon paprika - 1 teaspoon salt - 1/2 teaspoon black pepper - 1 teaspoon red pepper flakes (optional for heat) - 1 tablespoon fresh parsley, chopped (for garnish) - Lemon wedges (for serving) Gathering these ingredients is the first step to making this dish. The large shrimp give a sweet and tender bite. Fresh broccoli florets add a nice crunch and bright color. The unsalted butter creates a rich base, enhancing all the flavors. The seasonings are key. Fresh lemon juice adds a zesty kick. Garlic powder gives depth, while paprika brings warmth. A touch of salt and black pepper balances the flavors. If you like spice, add red pepper flakes for some heat. For garnish, fresh parsley adds color and a hint of earthiness. Lemon wedges serve as a bright, tangy finish. Together, these ingredients create a dish that’s easy yet full of flavor. 1. Preheat the oven: Set your oven to 400°F (200°C). This high heat helps cook the shrimp and broccoli quickly. 2. Prepare the baking sheet: Line a large baking sheet with parchment paper. This will keep the shrimp and broccoli from sticking and make cleanup easy. 1. Whisk butter and seasonings: In a large bowl, combine 1/4 cup melted unsalted butter with 3 tablespoons fresh lemon juice. Add 2 teaspoons garlic powder, 1 teaspoon paprika, 1 teaspoon salt, 1/2 teaspoon black pepper, and optional red pepper flakes. Whisk until mixed well. 2. Coat the shrimp and broccoli: Add 1 pound of peeled and deveined shrimp to the bowl. Toss them well to coat with the lemon butter mixture. In another bowl, toss 4 cups of broccoli florets with some of the remaining butter mix until they are well coated. 1. Arrange on the baking sheet: Spread the coated shrimp and broccoli in a single layer on the prepared baking sheet. Make sure they have space to cook evenly. 2. Baking time and temperature: Place the baking sheet in the oven. Bake for about 12 to 15 minutes. The shrimp should turn pink and opaque, and the broccoli should be tender and bright green. 3. Garnishing before serving: Once done, take the baking sheet out of the oven. Sprinkle chopped fresh parsley on top for a nice finish. Serve with lemon wedges for extra zing. To cook shrimp just right, look for a pink color. When they turn opaque, they are done. Perfect shrimp should be firm yet tender. Avoid overcooking; it makes them rubbery. Cook them for about 12 to 15 minutes. Keep an eye on their color change. If they curl tightly, they may be overdone. To keep broccoli bright and green, do not overcook it. Aim for a tender texture while it stays vibrant. Start by choosing fresh broccoli. Look for firm florets and bright green color. Avoid any yellowing or wilted leaves. Fresh broccoli adds a nice crunch and flavor. To make the dish even tastier, you can add more seasonings. Consider using lemon zest for extra citrus flavor. A pinch of onion powder can add depth. Fresh herbs like thyme or dill can also enhance taste. Toss in these extras with the shrimp and broccoli before baking. They add a fun twist to the classic flavor profile. {{image_2}} You can add many other veggies to this dish. Carrots, bell peppers, and snap peas work well. They add color and crunch. Each vegetable brings its own taste and nutrients. When you add more veggies, think about their cooking times. For example, bell peppers cook faster than broccoli. Make sure everything is tender when done. If you want to change the shrimp, chicken or tofu are great options. Chicken breast should be cut into small pieces. Tofu should be firm and pressed to remove extra water. Adjust the cooking times based on what you choose. Chicken takes longer, about 20 minutes. Tofu cooks at the same time as shrimp, so keep an eye on it. You can spice things up with different seasonings. Add cayenne pepper for heat or lemon zest for a citrus kick. Other citrus fruits like lime or orange can change the flavor too. Just squeeze their juice in the mix. They add a fun twist to the dish while still keeping it fresh and bright. After you enjoy your Lemon Butter Shrimp & Broccoli, cool any leftovers. Place them in an airtight container. Store them in the fridge for up to three days. Make sure to separate the shrimp from the broccoli to keep both fresh. This method helps maintain their texture and taste. To reheat, use a microwave or an oven. If using a microwave, place the shrimp and broccoli on a microwave-safe plate. Heat for 30 seconds at a time. Check often to avoid overcooking. For the oven, preheat to 350°F (175°C). Place the leftovers on a baking sheet for about 10 minutes. This keeps the shrimp tender and the broccoli crisp. If you want to save some for later, freeze the leftovers. Place them in a freezer-safe container. Squeeze out any air before sealing. You can freeze them for up to three months. When ready to eat, thaw in the fridge overnight. For a quicker option, use the microwave's defrost setting. This helps you enjoy your meal without losing flavor or texture. It takes about 25 minutes to make Lemon Butter Shrimp & Broccoli. You need 10 minutes for prep and 12-15 minutes for cooking. This quick dish is perfect for busy nights. Yes, you can use frozen shrimp! Just thaw them first. Place shrimp in a bowl of cold water for about 15-20 minutes. Drain them well before mixing with the lemon butter. This works well and saves time. This dish pairs great with rice or quinoa for a filling meal. You can also serve it with a fresh green salad for a light touch. For drinks, try a crisp white wine or sparkling water with lemon. These choices balance the rich lemon butter flavor perfectly. This blog post covers a delicious recipe for Lemon Butter Shrimp and Broccoli. We explored the main ingredients like shrimp, broccoli, and butter. I shared tips for cooking shrimp and keeping broccoli bright. We also discussed variations to customize flavors and suggested storage and reheating methods. Overall, this dish is easy to make and packed with flavor. Enjoy experimenting and creating your perfect version of this meal!

Lemon Butter Shrimp & Broccoli Sheet Pan Delight

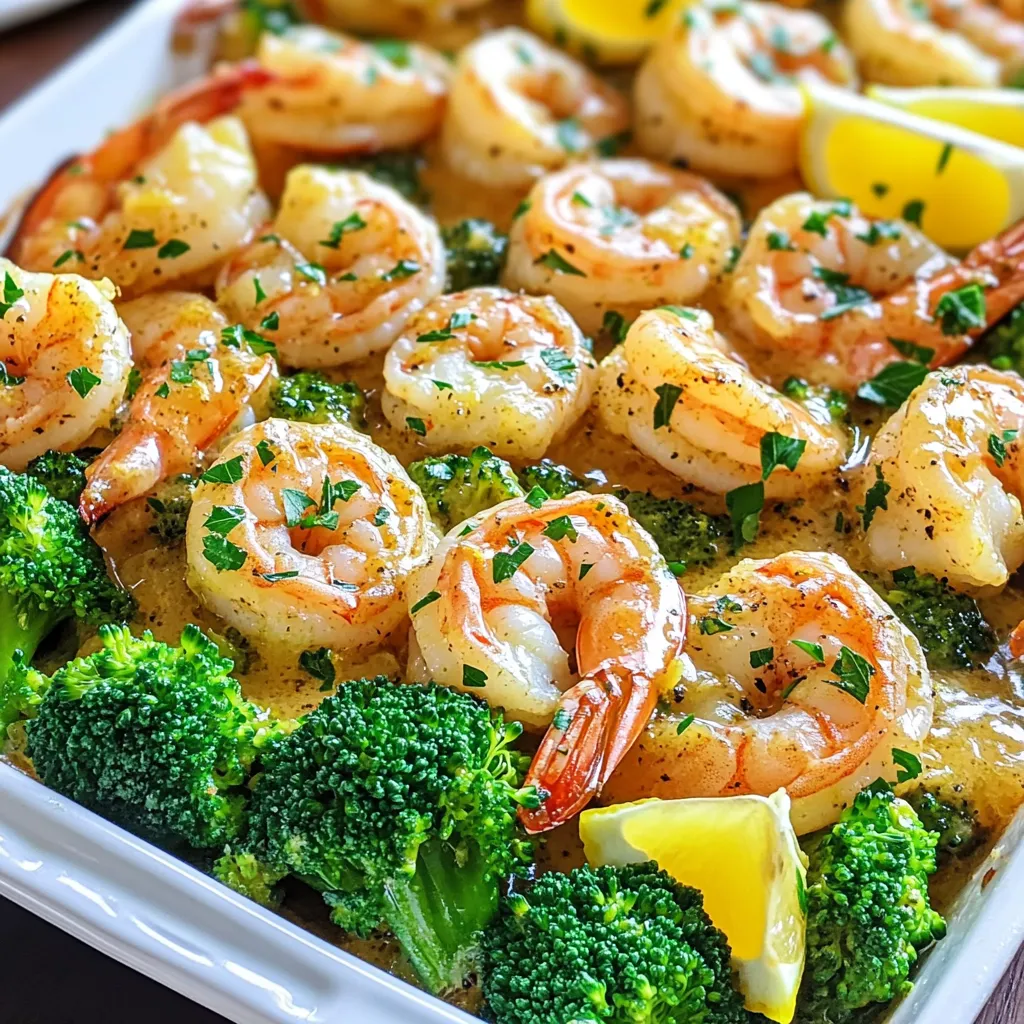
Get ready to indulge in a burst of flavor with my Lemon Butter Shrimp & Broccoli Sheet Pan Delight! This

- 1 ½ cups all-purpose flour - 1 teaspoon baking powder - ½ teaspoon baking soda - ½ teaspoon salt - 1 tablespoon pumpkin spice - ½ cup unsalted butter, softened - 1 cup granulated sugar - 2 large eggs - 1 cup canned pumpkin puree - ½ cup brewed coffee, cooled - 1 teaspoon vanilla extract - ½ cup cream cheese, softened - 2 cups powdered sugar - 1 tablespoon milk - Extra pumpkin spice for garnish Pumpkin Spice Latte Cupcakes are a joy to make. You start with dry ingredients. Use all-purpose flour, baking powder, baking soda, salt, and pumpkin spice. Pumpkin spice gives your cupcakes that warm fall flavor. Next, you blend the wet ingredients. Softened butter and sugar make your base rich. Then, add eggs, canned pumpkin puree, brewed coffee, and vanilla extract. The coffee adds a nice depth to the flavor. For the frosting, beat the softened cream cheese until smooth. Gradually mix in powdered sugar and milk. This creates a creamy, spreadable frosting. A sprinkle of extra pumpkin spice on top makes it pretty. These ingredients combine to create a treat that captures the essence of fall in every bite! - Preheat the oven to 350°F (175°C). - Line a cupcake pan with paper liners. - In a medium bowl, mix the dry ingredients. This includes flour, baking powder, baking soda, salt, and pumpkin spice. - In a large bowl, cream together the softened butter and granulated sugar. Beat until light and fluffy. - Add the eggs, one at a time. Mix well after each egg. - Stir in the pumpkin puree, cooled brewed coffee, and vanilla extract until mixed thoroughly. - Gradually fold the dry mix into the wet mixture. Stir until just combined. Be careful not to overmix. - Fill each cupcake liner about two-thirds full with the batter. - Bake for 18-20 minutes. Check for doneness with a toothpick. If it comes out clean, they are done. - Allow the cupcakes to cool in the pan for five minutes. Then, move them to a wire rack to cool completely. - Avoiding overmixing: When you mix the batter, stop as soon as you see no dry flour. Overmixing makes cupcakes dense. You want them light and fluffy. - Ideal oven temperature: Always preheat your oven to 350°F (175°C). This helps cupcakes bake evenly. Use an oven thermometer to check accuracy. - Achieving the right consistency: For the cream cheese frosting, mix until it’s smooth. If it’s too thick, add a bit of milk. If it’s too thin, add more powdered sugar. - Decorating with extra pumpkin spice: After you frost the cupcakes, sprinkle some pumpkin spice on top. It adds flavor and makes them look nice. - Prep time: Take about 20 minutes to prep. This includes mixing ingredients and filling the cupcake liners. - Bake time: Bake the cupcakes for 18-20 minutes. Check them with a toothpick. It should come out clean. - Cool time: Let the cupcakes cool in the pan for 5 minutes, then move them to a wire rack. They need to cool completely before frosting. {{image_2}} You can change the flavor of your Pumpkin Spice Latte Cupcakes. One fun option is adding chocolate chips. The chocolate adds a sweet touch that pairs well with pumpkin. You can use ½ cup of semi-sweet or dark chocolate chips for a rich flavor. Another option is to substitute nuts. Pecans work great in these cupcakes. You can chop them and mix in ½ cup for a nice crunch. Walnuts are also a good choice if you prefer a different nutty flavor. If you need gluten-free options, you can use gluten-free flour. Look for a blend designed for baking. It works well in this recipe. Just replace the all-purpose flour with the gluten-free mix. For vegan substitutions, you can use flax eggs. Combine 1 tablespoon of ground flaxseed with 2.5 tablespoons of water for each egg. You can also use plant-based butter instead of regular butter. These swaps make the cupcakes friendly for vegan diets. When it comes to frosting, you have choices. Cream cheese frosting is rich and tangy. It complements the cupcakes nicely. If you want something sweeter, you can try buttercream frosting. Just whip together butter, powdered sugar, and a splash of milk for a creamy treat. You can also add different flavors to your frosting. Try using maple syrup for a fall twist. Or mix in a little coffee for a stronger flavor. These small changes can make a big impact on your cupcakes! To keep your cupcakes fresh, store them in an airtight container. Place a piece of wax paper or a paper towel between the cupcakes. This keeps them from sticking together. Store at room temperature for up to three days. For longer freshness, refrigerate them. Just make sure to let them sit for a bit before serving. If you want to freeze your cupcakes, wrap each one in plastic wrap. This helps to keep air out. Then, place them in a freezer-safe bag. They can last up to three months in the freezer. To avoid freezer burn, try to remove as much air as possible from the bag. After freezing, let the cupcakes thaw in the fridge overnight. If you want them warm, preheat your oven to 350°F (175°C). Place the cupcakes on a baking sheet for about 10 minutes. This will help them regain their fresh texture. Enjoy them warm for a cozy fall treat! How can I make these cupcakes ahead of time? You can make these cupcakes a day before. Just bake and cool them. Store them in an airtight container at room temperature. Frost them on the day you plan to serve. Can I use fresh pumpkin instead of canned? Yes, you can use fresh pumpkin. Cook and puree the pumpkin until smooth. Make sure to drain extra moisture for the best texture. What is the best way to store leftover cupcakes? Store any leftover cupcakes in an airtight container. Keep them at room temperature for up to three days. If you want to keep them longer, refrigerate or freeze. How can I adjust the recipe for mini cupcakes? To make mini cupcakes, fill the liners halfway. Bake them for about 12 to 15 minutes. Check for doneness with a toothpick. Can I use decaf coffee in the recipe? Absolutely! Decaf coffee works well in this recipe. It keeps the flavor without the caffeine rush. What can I substitute for pumpkin spice? If you don’t have pumpkin spice, mix 2 teaspoons of cinnamon, 1 teaspoon of nutmeg, and 1 teaspoon of ginger. This blend gives a similar flavor. These cupcakes blend simple ingredients into a tasty treat. We covered the dry and wet components, mixing, baking, and frosting tips. Don’t forget flavor variations and storage options. Baking should be fun and rewarding. With some practice and care, you’ll make perfect cupcakes each time. Enjoy sharing these delights with family and friends!

Pumpkin Spice Latte Cupcakes Delightful Fall Treat

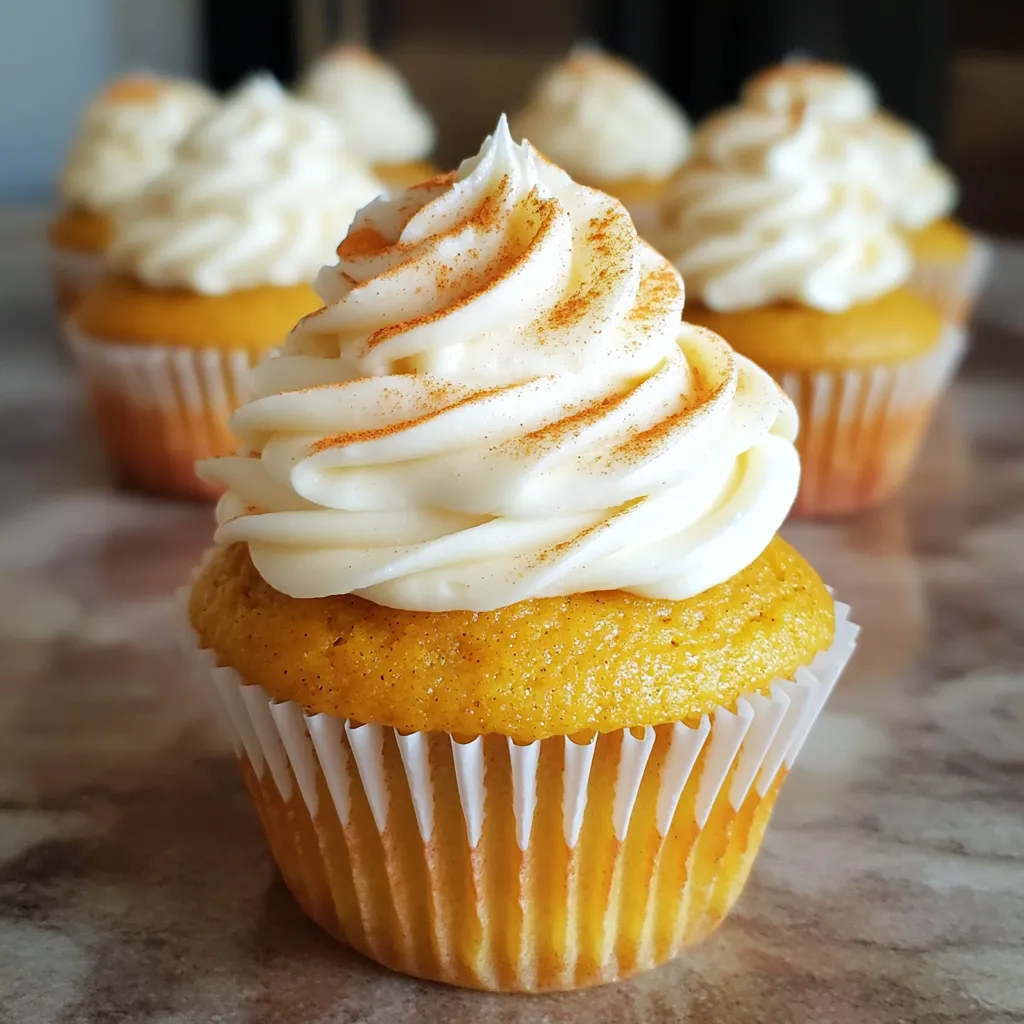
Fall is here, and what better way to celebrate than with Pumpkin Spice Latte Cupcakes? These moist, flavorful delights blend

- 1 pound Brussels sprouts, trimmed and halved - 4 tablespoons unsalted butter - 5 cloves garlic, minced - 1 tablespoon olive oil - 1 teaspoon salt - 1/2 teaspoon black pepper - 1 teaspoon smoked paprika - Zest of 1 lemon - 2 tablespoons fresh parsley, chopped Garlic Butter Roasted Brussels Sprouts need simple but fresh ingredients. You start with Brussels sprouts. Trim them and cut them in half. This helps them cook evenly. The unsalted butter adds a rich taste. I use four tablespoons. The garlic gives a strong flavor. Five cloves minced will do the trick. Next, you need oil and spices. A tablespoon of olive oil helps the butter coat the sprouts. Salt and pepper add flavor. The smoked paprika gives a hint of warmth. Zest from a lemon brings brightness. Lastly, fresh parsley adds color and taste at the end. These ingredients come together to make a tasty side dish. First, preheat your oven to 400°F (200°C). This high heat helps the Brussels sprouts get nice and crispy. While the oven heats up, wash your Brussels sprouts. Trim off the ends and cut them in half. This step helps them cook evenly. Next, melt 4 tablespoons of unsalted butter in a saucepan over low heat. Add 5 cloves of minced garlic to the butter. Cook it for 2-3 minutes. You want the garlic to smell great, but do not let it brown. That will make it bitter. In a big bowl, combine the halved Brussels sprouts with the melted garlic butter. Also add 1 tablespoon of olive oil, 1 teaspoon of salt, 1/2 teaspoon of black pepper, and 1 teaspoon of smoked paprika. Toss everything well. Make sure each sprout is coated with the garlic butter mix. Then, spread them out on a baking sheet lined with parchment paper. Put the baking sheet in your preheated oven. Roast the Brussels sprouts for 25-30 minutes. Stir them halfway through for even cooking. You want them to be tender and golden brown on the edges. Once they are done roasting, take them out of the oven. Sprinkle the zest of 1 lemon and 2 tablespoons of chopped fresh parsley on top. This adds a fresh pop of flavor that makes the dish shine. Serve these warm as a tasty side dish. To keep Brussels sprouts from getting mushy, use high heat. Roast them at 400°F for that nice crisp. Also, cut them evenly. This helps them cook at the same rate. Aim for halves that are about the same size. This way, you avoid some being soft while others are hard. You can boost the taste with extra spices. Try adding garlic powder or onion powder for depth. If you want a bit of heat, sprinkle some chili flakes in the mix. This adds a nice kick that pairs well with the garlic. To serve these Brussels sprouts beautifully, use a large white plate. The bright green color really pops against it. You can add a sprinkle of fresh parsley on top for a touch of color. For a fun twist, add lemon wedges on the side. They look great and offer a fresh squeeze when serving. {{image_2}} You can swap out butter for ghee or olive oil. Ghee adds a rich taste, while olive oil keeps it light. Both options work well. If you want more texture, try adding cheese or nuts. Parmesan cheese can add a salty bite. Nuts like walnuts or pecans bring a nice crunch. To elevate the flavor, consider balsamic vinegar or honey. A splash of balsamic gives a tangy twist. Honey adds sweetness that contrasts the sprouts' slight bitterness. You can also mix in other vegetables. Carrots or sweet potatoes roast well and add color to your dish. To make this dish vegan, simply replace butter with vegan butter or olive oil. Use a garlic-infused oil for extra depth. This way, you keep the great taste while sticking to a plant-based diet. Enjoy your meal without missing out on flavor! Store cooked Brussels sprouts in an airtight container. This keeps them fresh. They last for about 3-4 days in the fridge. Before storing, let them cool completely. This helps avoid steam buildup, which can make them soggy. If you want to enjoy them later, keep the lemon zest and parsley separate to maintain flavor. To reheat, use the oven for the best flavor. Preheat your oven to 350°F (175°C). Spread the sprouts on a baking sheet. Heat for about 10-15 minutes. This brings back their crispness. You can also use the microwave if you're in a hurry. Heat them in short bursts, about 30 seconds at a time. Stir in between until warmed through. You can freeze Brussels sprouts, but it's best to blanch them first. Boil them for 2-3 minutes, then place them in ice water. This stops the cooking process. Drain and pat dry before putting them in freezer bags. Press out as much air as you can. They can last up to 3 months in the freezer. When you are ready to use them, thaw overnight in the fridge. Roasting from frozen is also fine; just add a few extra minutes to the cooking time. To make Brussels sprouts crispy, start with dry sprouts. After washing, pat them with a towel. Cut them in half to increase surface area. Toss them with enough oil and seasonings to coat. Roast them at 400°F for 25-30 minutes. Stir halfway through for even cooking. Use fresh sprouts for the best texture. Yes, but frozen Brussels sprouts can be softer. They take longer to cook. Thaw them first for better results. If you roast them from frozen, increase the cooking time by about 10 minutes. This helps them become tender and golden. Garlic Butter Roasted Brussels sprouts pair well with many main dishes. Try them with grilled chicken or fish. They also go great with steak or pork chops. For a vegetarian meal, serve them with quinoa or a hearty grain salad. Roasting Brussels sprouts takes about 25-30 minutes. This results in a tender inside and crispy edges. Cooking time may vary based on the size of the sprouts. Always check for a golden brown color for the best texture. Brussels sprouts are very healthy! They are high in vitamins C and K. They also provide fiber, which aids digestion. Eating them may help lower cholesterol. Plus, they are low in calories, making them a great choice for meals. Garlic butter roasted Brussels sprouts are a great dish to make. We covered the main ingredients and how to prepare them perfectly. With the right tips, you can avoid mushy sprouts and give them more flavor. I shared variations that suit your taste and storage tips for leftovers. You can adapt this recipe easily, whether you're vegan or like different flavors. Enjoy making this tasty side dish that impresses everyone at your table!

Garlic Butter Roasted Brussels Sprouts Simple and Tasty

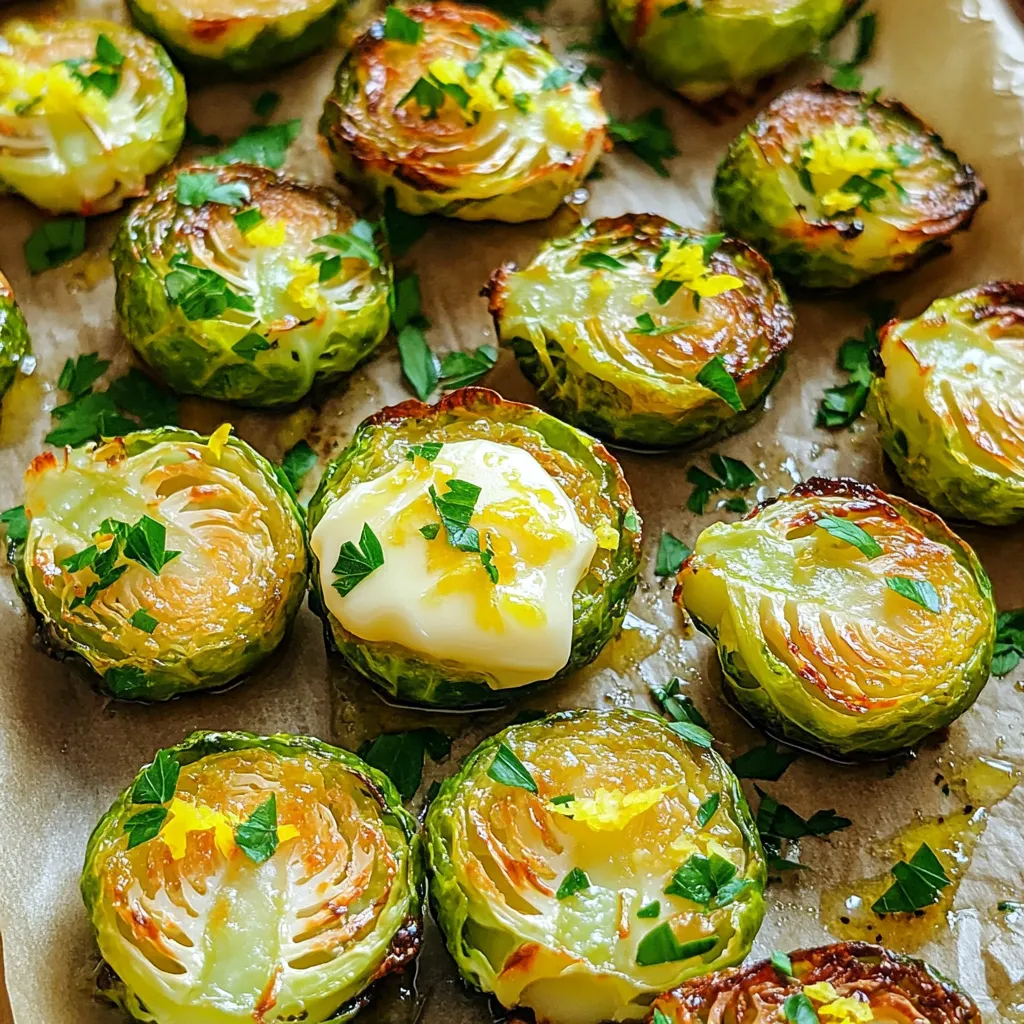
Looking for a delicious way to enjoy Brussels sprouts? My Garlic Butter Roasted Brussels Sprouts recipe is simple and oh-so-tasty!

Older posts
Newer posts
← Previous Page1 … Page11 Page12 Page13 … Page85 Next →

dsad

© 2026 greenmealmap • Built with GeneratePress

Our Policies

  • Copyright Policy
  • Cookie Policy
  • GDPR Policy
  • Privacy Policy
  • Disclaimer
  • Terms Of Use

More Information

  • Home
  • About
  • Contact
  • Appetizers
  • Dessert
  • Dinner
  • Drinks
©2026, greenmealmap About Back To Top