Skip to content
DisclaimerTerms Of UseGDPR PolicyCookie Policy

greenmealmap

  • Home
  • Drinks
  • Appetizers
  • Dinner
  • Dessert
  • About
  • Contact
  • Privacy Policy
DisclaimerTerms Of UseGDPR PolicyCookie Policy

NO-ING-IMG

- 1 medium head of cauliflower, chopped into florets - 2 tablespoons olive oil - 3 cloves garlic, minced - 1 cup vegetable broth - 1 cup unsweetened almond milk (or your preferred milk) - ½ cup nutritional yeast - 1 teaspoon onion powder - 1 teaspoon garlic powder - Salt and pepper to taste - 12 oz pasta of your choice (fettuccine works well) - Fresh parsley, chopped (for garnish) - Freshly cracked black pepper (for garnish) You can add some fun flavors to your dish! Consider these options: - A pinch of red pepper flakes for heat - A squeeze of lemon juice for brightness - Fresh basil or thyme for an herbal touch When selecting cauliflower, look for heads that are firm and heavy. The florets should be tightly packed and white. Avoid any with brown spots or soft areas. Fresh cauliflower will give your dish a great taste and texture. If you can, buy organic for the best flavor and health benefits. Start by boiling water in a large pot. Add salt to enhance the pasta's taste. Once the water is boiling, add 12 ounces of your favorite pasta. Fettuccine works great here! Cook the pasta according to the package directions until it is al dente. This means it should be firm but not hard. After cooking, drain the pasta and set it aside. While the pasta cooks, let's make the creamy sauce. First, steam one medium head of cauliflower. Chop it into florets and steam for 8-10 minutes until tender. You can use a pot or a microwave to steam them. Next, heat two tablespoons of olive oil in a skillet over medium heat. Add three cloves of minced garlic and sauté for 1-2 minutes until it smells good. Be careful not to burn the garlic! Now, it's time to blend the sauce. In a blender, combine the steamed cauliflower, sautéed garlic, one cup of vegetable broth, one cup of unsweetened almond milk, half a cup of nutritional yeast, one teaspoon of onion powder, one teaspoon of garlic powder, and salt and pepper to taste. Blend everything until it is smooth and creamy. If the sauce is too thick, add more vegetable broth or almond milk to get the right consistency. In the same skillet with the garlic oil, add your drained pasta. Pour the creamy cauliflower sauce over the pasta. Toss everything together well so the sauce coats the pasta evenly. Heat it for another 2-3 minutes, stirring gently. Taste it and add more salt and pepper if you want. Once heated through, serve the pasta right away. Garnish it with freshly chopped parsley and cracked black pepper for a nice touch! Enjoy your delicious, creamy cauliflower Alfredo pasta! To get the creamiest texture, steam the cauliflower well. You want it soft. This helps it blend smoothly. When blending, add the vegetable broth and almond milk slowly. If the sauce is too thick, add more liquid. Blend until you see no lumps. This is key for a velvety sauce. You need a few tools for this dish. A large pot is great for boiling pasta. You also need a steamer for the cauliflower. A skillet helps sauté garlic. Most importantly, a blender or food processor makes the sauce creamy. These tools work together for the best result. Watch out for overcooking the cauliflower. If it becomes mushy, the sauce can turn watery. Don’t skip the nutritional yeast; it adds flavor. Be careful not to burn the garlic while sautéing. Lastly, remember to season well. Taste as you go to get it just right. {{image_2}} You can easily make this dish vegan and dairy-free. Instead of using regular milk, choose unsweetened almond milk or any plant-based milk you like. Nutritional yeast gives a cheesy flavor without dairy. You can also swap the olive oil for vegan butter if you want a richer taste. To boost the protein in your dish, consider adding chickpeas or white beans. They blend well and add creaminess. You can also use grilled chicken or shrimp if you want meat. Just add them after mixing the pasta and sauce. You can play around with flavors to make this dish your own. Adding fresh herbs like basil or thyme can enhance the taste. For a kick, sprinkle in some red pepper flakes. You can also add lemon juice for a zesty twist. Experiment with these options to find your favorite! To store leftover Creamy Cauliflower Alfredo Pasta, let it cool first. Place it in an airtight container. It will stay fresh in the fridge for up to three days. Make sure to label the container with the date. When you are ready to eat, take the pasta out of the fridge. You can reheat it on the stove or in the microwave. If using the stove, add a splash of almond milk or broth for moisture. Heat slowly over medium heat, stirring often. In the microwave, heat in short bursts, stirring in between. This keeps the pasta creamy and delicious. You can freeze this pasta for later meals. Just make sure it’s completely cool before freezing. Use a freezer-safe container or bag. It will last for about two months in the freezer. When you are ready to eat, thaw it in the fridge overnight. Reheat as mentioned above. Enjoy the creamy goodness whenever you want! Yes, you can make this recipe gluten-free. Use gluten-free pasta instead of regular pasta. Many brands offer tasty gluten-free options, like brown rice or chickpea pasta. These will work great with the creamy sauce. Creamy Cauliflower Alfredo Pasta lasts about 3 to 5 days in the fridge. Store it in an airtight container to keep it fresh. When you're ready to eat, just reheat it on the stove or in the microwave. Yes, frozen cauliflower works well for this dish. Just steam it until tender, like you would with fresh cauliflower. This can save you time and effort, and it’s just as tasty. If you don’t have nutritional yeast, try using grated Parmesan cheese for a cheesy flavor. You can also blend in some sunflower seeds or hemp seeds for a nutty taste. These substitutes can still give your dish a great flavor. This blog post covered everything you need to make Creamy Cauliflower Alfredo Pasta. We talked about the ingredients, cooking steps, and tips for the best results. I shared ways to make it your own with different flavors and protein options. Storage tips help you enjoy leftovers, while the FAQs answer common questions. By trying this recipe, you can create a delicious dish that's both tasty and good for you. Enjoy your cooking!

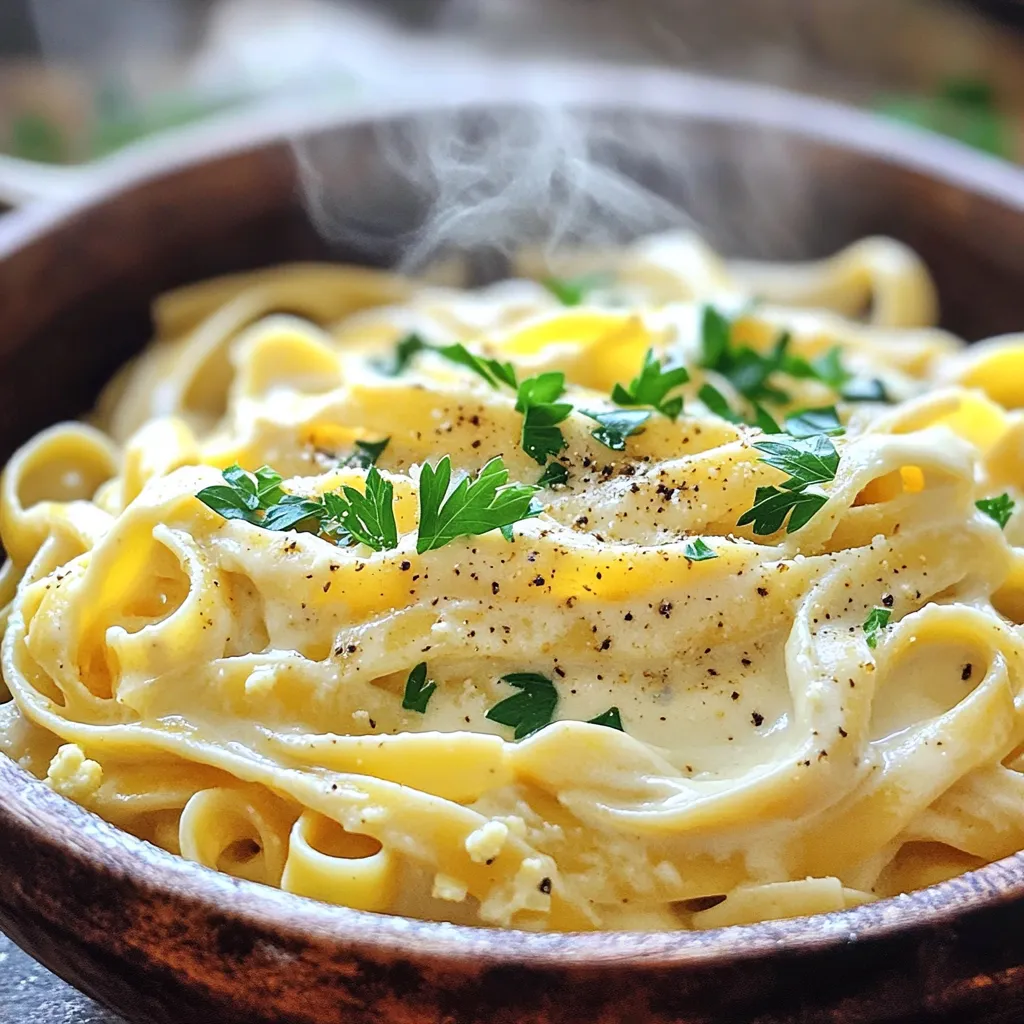
Creamy Cauliflower Alfredo Pasta Delightful Dish

If you’re looking for a tasty meal that’s both creamy and healthy, you’re in the right place! My Creamy Cauliflower

- 1 bag of tortilla chips - 1 cup black beans, drained and rinsed - 1 cup corn kernels (fresh or frozen) - 1 medium bell pepper (any color), diced - 1 small red onion, finely chopped - 1 jalapeño, sliced (seeds removed if less heat is desired) - 1 ½ cups shredded cheese (cheddar, Monterey Jack or a mix) - ½ teaspoon cumin - ¼ teaspoon smoked paprika - 1 avocado, diced - ½ cup sour cream or Greek yogurt - ¼ cup fresh cilantro, chopped - Jalapeño slices and lime wedges for garnish - Salt and pepper to taste To create the best Loaded Veggie Nacho Sheet Pan, you need fresh, vibrant ingredients. Start with a bag of tortilla chips. They form the base that holds all the flavors. Next, grab a cup of black beans. Make sure to drain and rinse them well. This keeps them clean and ready to mix. Corn adds sweetness and crunch. You can use fresh corn or frozen. Either works great! A medium bell pepper, diced into small pieces, gives color and texture. I like using red, but any color is fine. A small red onion, finely chopped, brings a mild bite. The jalapeño adds heat, so slice it up. Remove the seeds if you want it milder. Cheese is key for nachos. Use about 1 ½ cups of shredded cheese. Cheddar or Monterey Jack are great choices. For spices, add cumin and smoked paprika. These add depth to your dish. Don't forget salt and pepper to taste! For toppings, you’ll need a diced avocado for creaminess. Sour cream or Greek yogurt adds tang, too. Fresh cilantro gives a burst of flavor. Lastly, garnish with jalapeño slices and lime wedges. These ingredients make your nachos fun and tasty! 1. Preheat the oven: Start by setting your oven to 400°F (200°C). Preheating helps ensure even cooking. 2. Layering the tortilla chips: Grab a large sheet pan. Spread one bag of tortilla chips evenly across the bottom. Cover the pan well without any gaps. 1. Combining beans, corn, and spices: In a medium bowl, mix 1 cup of black beans, 1 cup of corn, 1 diced bell pepper, 1 chopped red onion, and sliced jalapeño. Add ½ teaspoon of cumin, ¼ teaspoon of smoked paprika, salt, and pepper. Stir it all together until combined. 2. Spoon veggie mixture over chips: Take your mixed veggies and spoon them over the chips. Spread the mixture evenly so every chip gets some goodness. 1. Baking time and temperature: Place the sheet pan in the preheated oven. Bake for about 10-12 minutes. You want the cheese to melt and bubble. 2. Adding fresh toppings after baking: Once baked, take the nachos out. Top them with diced avocado, ½ cup of sour cream or Greek yogurt, and ¼ cup of fresh cilantro. Feel free to add jalapeño slices and lime wedges for extra flavor. Serve hot and enjoy! To get perfectly melted cheese, use a mix of cheeses. I like cheddar and Monterey Jack. These melt well and taste great. Spread the cheese evenly over the veggies. This helps it melt smoothly. For even heating, make sure you preheat your oven to 400°F (200°C). Bake the nachos for about 10-12 minutes. Watch for the cheese to bubble. If you see it, your nachos are ready! You can swap out veggies for whatever you have. Try zucchini, mushrooms, or spinach. They add nice flavors and textures. For beans, kidney beans or pinto beans work well too. If you want a vegan option, use plant-based cheese. Many brands make tasty vegan cheese now. Just make sure it melts well. You can also skip the cheese and add more avocado or cashew cream for a creamy touch. {{image_2}} You can make loaded veggie nachos fun with seasonal veggies. In spring, use fresh asparagus and peas. For summer, add ripe tomatoes and zucchini. Fall brings great options like roasted pumpkin and squash. In winter, think about hearty greens like kale or Brussels sprouts. You can also add holiday flair. For Halloween, use orange cheese and black beans for a spooky look. For Christmas, try red and green peppers with a sprinkle of festive herbs. These ideas make your nachos tasty and visually fun. You can twist the flavors of your nachos. For a Mexican vibe, stick to black beans, corn, and jalapeños. Top it with avocado and fresh lime juice. For a Mediterranean touch, use chickpeas, feta cheese, and olives. Drizzle with a bit of olive oil and lemon juice for zest. Choose between spicy and mild. If you love heat, add more jalapeños or some spicy salsa. For a milder dish, skip the seeds and use sweet peppers. Adjusting the spice level makes your nachos perfect for everyone at the table. To keep your Loaded Veggie Nacho Sheet Pan fresh, store leftovers in the refrigerator. Use an airtight container to prevent moisture. This method helps maintain flavor and texture. Make sure to cool the nachos to room temperature before sealing them up. If you add toppings like sour cream or avocado, store them separately to avoid sogginess. For reheating, you can use an oven or microwave. If using an oven, preheat it to 350°F (175°C). Place the nachos on a baking sheet and heat for about 10 minutes. This method keeps the chips crispy. If using a microwave, heat in short bursts. Check every 30 seconds to avoid overheating and making the chips chewy. The shelf life of your Loaded Veggie Nacho Sheet Pan is about 3 to 4 days in the fridge. After this, the quality may decline. Always check for signs of spoilage before eating. Look for changes in smell, color, or texture. If the nachos smell off or the cheese has a strange hue, it’s best to toss them out. Enjoying your nachos fresh is always best! Yes, you can prep the ingredients. Keep the tortilla chips separate from the veggies. This helps the chips stay crunchy. You can mix the beans, corn, and veggies a few hours before baking. Just cover them and store in the fridge. When you're ready, spread the chips on a pan and add the veggie mix. Bake until the cheese melts. You have a few options. Greek yogurt works great as a substitute. It adds creaminess and protein. Avocado also makes a nice creamy topping. You can mash it up and spread it on top. For a dairy-free option, use a vegan sour cream. This gives you the same tangy taste. Yes, this recipe can be gluten-free. Just make sure to use gluten-free tortilla chips. Many brands offer this option. Check the label to be sure. The other ingredients like beans, corn, and cheese are naturally gluten-free. Enjoy this tasty dish without worry! In this post, I covered how to make loaded veggie nachos, including key ingredients and easy steps. You learned to layer tortilla chips with black beans, corn, and fresh veggies before baking. I shared tips for the best cheese melt and ingredient swaps, plus fun variations. Lastly, I explained how to store leftovers safely. Get creative with your nachos! Explore new flavors and toppings for a fun twist. Enjoy your tasty snack!

Loaded Veggie Nacho Sheet Pan Flavorful and Fun Meal

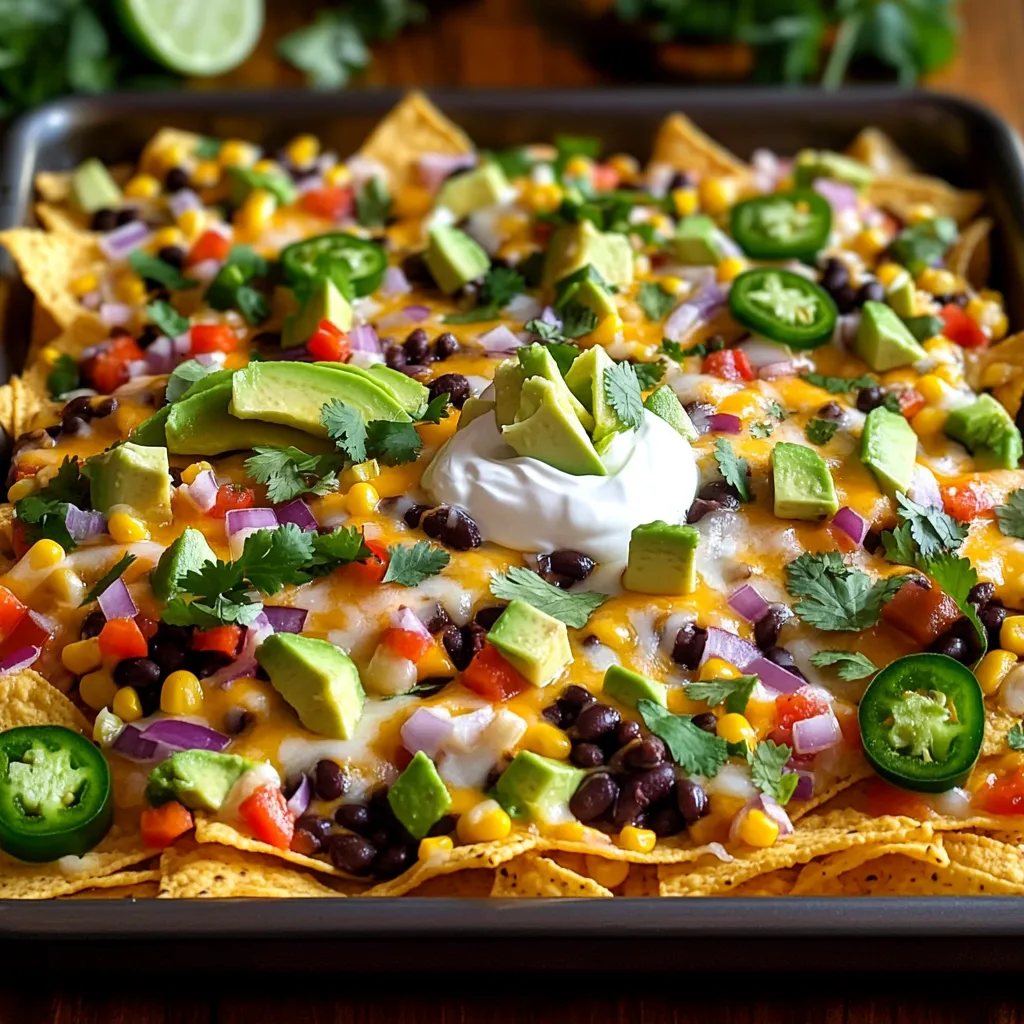
Are you ready to elevate your snack game? My Loaded Veggie Nacho Sheet Pan brings fun and flavor to your

To make pumpkin spice granola, you will need the following simple ingredients: - 2 cups rolled oats - 1 cup pumpkin puree - 1/2 cup honey or maple syrup - 1/2 cup chopped almonds - 1/2 cup chopped pecans - 1/4 cup sunflower seeds - 1/4 cup flaxseeds - 2 teaspoons pumpkin pie spice - 1 teaspoon vanilla extract - 1/2 teaspoon salt - 1/2 cup raisins or cranberries (optional) These ingredients come together to create a warm and cozy flavor. The oats provide a hearty base. Pumpkin puree adds moisture and a rich taste. Honey or maple syrup gives sweetness. Nuts and seeds add crunch and nutrition. Pumpkin pie spice brings the essence of fall, while vanilla enhances flavor. You can customize your granola by adding dried fruits or different nuts. This recipe is flexible. Enjoy making it your own! - Preheat your oven to 350°F (175°C). Line a baking sheet with parchment paper. - In a large mixing bowl, combine: - 2 cups rolled oats - 1/2 cup chopped almonds - 1/2 cup chopped pecans - 1/4 cup sunflower seeds - 1/4 cup flaxseeds - 2 teaspoons pumpkin pie spice - 1/2 teaspoon salt. Stir until everything is mixed well. - In another bowl, mix together: - 1 cup pumpkin puree - 1/2 cup honey or maple syrup - 1 teaspoon vanilla extract. Whisk until smooth. - Pour the pumpkin mix into the dry ingredients. Stir until all the oats and nuts are well coated. - Spread the granola mixture evenly on the prepared baking sheet. - Bake for 25-30 minutes. Stir halfway through for even baking. Look for a golden color and a nice smell. - After baking, remove the sheet from the oven. Let the granola cool completely on the baking sheet. This cooling step helps it become crunchy. - Once cooled, feel free to add in 1/2 cup raisins or cranberries if you like. Mix well. - Transfer the granola to an airtight container for storage. Enjoy your tasty treat! To get that perfect crunch, here are a few tips. First, make sure to spread the granola in a thin layer. This helps it bake evenly. Stir the granola halfway through baking to ensure it browns nicely. Keep an eye on it, as ovens can vary. You want it golden, not burnt! Cooling time is key. Once you take it out of the oven, do not rush to move it. Let it cool on the baking sheet. This helps it harden and become crunchy. If you break it apart too soon, it may stay soft. You can change the nuts if you like. Try walnuts or pecans instead of almonds. You can also swap honey for agave syrup or maple syrup. These changes can give your granola a new flavor. Want to boost nutrition? Add spices like cinnamon or nutmeg for extra warmth. You can also mix in superfoods like chia seeds or pumpkin seeds. These additions make your granola even healthier and more fun! {{image_2}} You can make your pumpkin spice granola even more fun by adding seasonal flavors. Dried fruits like apples or apricots bring a sweet touch. They also add chewy texture, which is nice against the crunch of the nuts. Just chop them into small pieces and mix them in before baking. You can also play with spices. Nutmeg or cinnamon adds warmth. Just a pinch can change the taste. Mix these spices in with the pumpkin pie spice. This way, you create a blend that feels cozy and festive. If you need to follow a special diet, there are easy ways to adapt this recipe. For gluten-free granola, use certified gluten-free rolled oats. This small change keeps the taste while making it safe for gluten-sensitive eaters. For a vegan option, switch honey with maple syrup. You can also use agave syrup if you want. These swaps keep the granola sweet and delicious without using animal products. Enjoy your breakfast knowing it fits your diet! To keep your pumpkin spice granola fresh, use airtight containers. Glass jars or plastic bins work well. Avoid containers that let air in. This helps keep the granola crunchy and tasty. Store the granola in a cool, dry place away from sunlight. When stored at room temperature, your granola lasts about two weeks. If you put it in the fridge, it can last up to a month. Look for signs of spoilage. If it smells off or tastes stale, it’s time to toss it. Always trust your senses to keep your breakfast treat safe and delicious. How to make pumpkin spice granola vegan? To make pumpkin spice granola vegan, swap honey for maple syrup. This keeps the sweetness without using animal products. You can also ensure all nuts and seeds are raw. Can I use rolled quinoa instead of oats? Yes, you can use rolled quinoa instead of oats. Quinoa adds a nice crunch and is gluten-free. Just remember to adjust the liquid slightly since quinoa absorbs more moisture than oats. What are the health benefits of pumpkin spice ingredients? Pumpkin spice ingredients offer many health benefits. Pumpkin is rich in vitamins A and C. It also has fiber which aids digestion. Nuts provide healthy fats and protein, while flaxseeds are high in omega-3s. Is it possible to bake this granola in a dehydrator? Yes, you can use a dehydrator to make this granola. Spread the mixture evenly on dehydrator trays. Set the temperature to 115°F (46°C) for 6-8 hours. This keeps it raw and retains nutrients. Can I freeze pumpkin spice granola? You can freeze pumpkin spice granola. Place it in an airtight container or freezer bag. It can last up to three months in the freezer. Thaw it in the fridge before enjoying. You now have a complete guide to making delicious pumpkin spice granola. We covered the key ingredients, easy steps to make it, and tips for the perfect crunch. You can customize your granola with different nuts and spices to fit your taste. Plus, we discussed how to store it for long-lasting freshness. Enjoy it as a snack or breakfast, knowing it’s both tasty and healthy. Dive into this fun cooking project and enjoy the rewards of your efforts!

Pumpkin Spice Granola Flavorful Fall Breakfast Treat

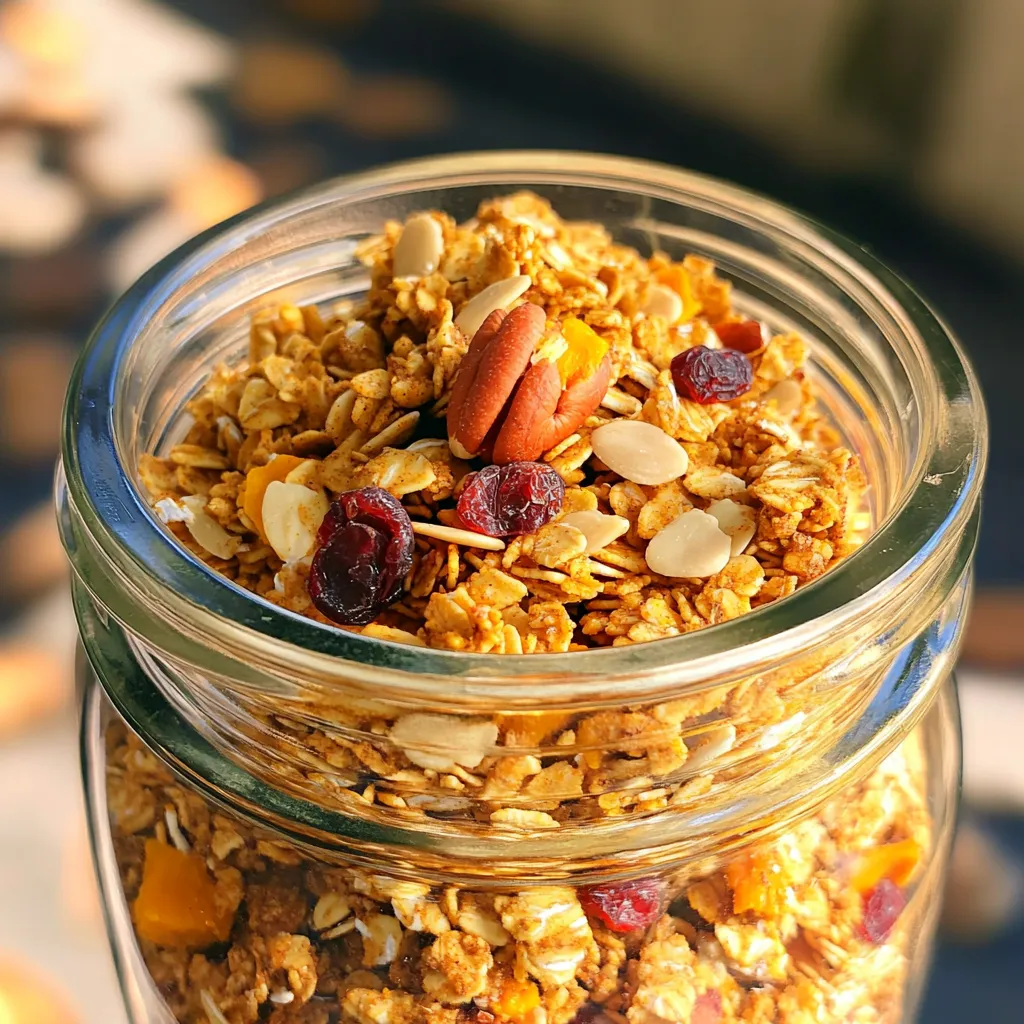
Are you ready to bring the cozy flavors of fall to your breakfast table? This Pumpkin Spice Granola is a

- 1 lb large shrimp, peeled and deveined - 4 tablespoons unsalted butter - 4 cloves garlic, minced The main ingredients are key to making this dish shine. Shrimp adds protein and flavor. Butter gives richness, while garlic offers that fragrant punch. Fresh garlic makes a big difference. - 1 teaspoon red pepper flakes (adjust to taste) - 1 tablespoon lemon juice - 1 tablespoon fresh parsley, chopped - Salt and pepper to taste Seasonings elevate the dish. Red pepper flakes add heat. Lemon juice brightens up the flavors. Fresh parsley adds color and freshness. Salt and pepper balance everything out. - Cooked rice or pasta for serving I love serving this dish over rice or pasta. They soak up the yummy garlic butter sauce. You can also enjoy it with crusty bread for dipping! - Melt the butter over medium heat until bubbly. - Add the minced garlic and sauté for about 1 minute until fragrant. To prepare the skillet, start by heating your pan on medium. Add the butter and watch it foam. This means it’s ready! Once it bubbles, toss in the minced garlic. Stir it gently but don’t let it burn. The smell will fill your kitchen with warmth. - Stir in red pepper flakes and add shrimp in a single layer. - Cook for 2-3 minutes on each side until pink and opaque. Next, sprinkle the red pepper flakes into the bubbling butter. This adds a nice kick! Carefully place the shrimp in the skillet in a single layer. Cook for 2-3 minutes on one side. Flip them over and cook for another 2-3 minutes. You want them to turn pink and opaque. That means they are perfectly cooked! - Squeeze lemon juice over shrimp and season with salt and pepper. - Remove from heat and garnish with parsley. Now, it’s time for the final touches. Squeeze fresh lemon juice over the shrimp. This adds a bright flavor. Season with salt and pepper to taste. Finally, remove the skillet from heat and sprinkle fresh parsley on top. This adds color and freshness to your dish. Enjoy your Easy Garlic Butter Shrimp Skillet! To get the perfect cook time for shrimp, aim for about 2-3 minutes on each side. When shrimp turn pink and opaque, they are ready. Keep an eye on them, as they cook quickly. If they curl tightly, they are likely overcooked. To avoid overcooked shrimp, remove them from heat as soon as they change color. This keeps them tender and juicy. If you are unsure, take one out and check. It should be firm but not tough. To boost the flavor, try adding more spices or herbs. Fresh herbs like basil or thyme can add extra depth. You can also experiment with a dash of smoked paprika or a hint of cumin. Garlic powder is a great option for an extra garlic kick. Just sprinkle a little in with the minced garlic for a richer taste. Adjust the amount based on your love for garlic. For an attractive serving suggestion, use a shallow bowl. Lay the shrimp over a bed of rice or pasta. Drizzle leftover garlic butter sauce on top for added flavor. Garnish with fresh parsley and extra lemon wedges. This adds color and freshness. A sprinkle of red pepper flakes can also make it pop visually. Pair your dish with a crisp green salad or crusty bread for a complete meal. {{image_2}} If you want to enjoy this dish while sticking to a low-carb or keto diet, there are easy swaps. You can replace the butter with olive oil or ghee. Both options add nice flavor. They also keep the dish rich and satisfying. This change can help you stay on your diet without missing out on taste. For those who love to mix things up, adding different spices can elevate your garlic butter shrimp. Try using paprika for a smoky flavor or turmeric for a warm, earthy note. You can also toss in some fresh vegetables like spinach or bell peppers. This not only adds color but also boosts the nutrition of your meal. While serving over rice or pasta is classic, consider new options. Zoodles, made from zucchini, are a great low-carb choice. They soak up the garlic butter nicely. Cauliflower rice is another fantastic alternative. For a heartier meal, pair the shrimp with crusty bread or a fresh salad. These options enhance the dish and make it even more enjoyable. To store leftovers in the fridge, place them in an airtight container. This helps keep the shrimp fresh. I suggest using glass or BPA-free plastic containers. Make sure to cool the shrimp before sealing the container. This helps prevent condensation, which can make the shrimp soggy. For freezing garlic butter shrimp, first let it cool completely. Place the shrimp in a freezer-safe bag or container. Remove as much air as possible to avoid freezer burn. When you're ready to eat, thaw the shrimp in the fridge overnight. To reheat, warm it gently in a skillet over low heat. This keeps the shrimp tender and avoids overcooking. Garlic butter shrimp stays fresh for about 3 days in the fridge. If frozen, it can last up to 3 months. Always check for any off odors or changes in color before eating. Cooking garlic butter shrimp takes about 15 minutes. First, you need 10 minutes to prep. Then, the actual cooking time is about 5 minutes. 1. Prep time: 10 minutes 2. Cooking time: 5 minutes 3. Total time: 15 minutes Yes, you can use frozen shrimp! Just remember to thaw them first. Here are some tips for frozen shrimp: - Thawing: Place shrimp in a bowl of cold water for 10-15 minutes. This helps them thaw quickly. - Cooking: Ensure they are fully thawed before cooking. This makes sure they cook evenly. - Quality: Look for shrimp that are firm and smell fresh. If you have a garlic allergy, try these substitutes: - Garlic powder: Use 1/8 teaspoon for a similar taste. - Shallots: Use 1 teaspoon of finely chopped shallots for a mild flavor. - Onion: Use 1 tablespoon of finely chopped onion for sweetness. These options keep the dish tasty without garlic. This blog post showed you how to make delicious garlic butter shrimp. You learned about the main ingredients, step-by-step cooking instructions, and tips to perfect your dish. Variations let you cater to different diets or spice up your flavors. Finally, we covered storage tips for leftovers. Cooking shrimp can be easy and rewarding with these simple steps and ideas. Enjoy your meal and share it with others!

Easy Garlic Butter Shrimp Skillet Delightful Dish

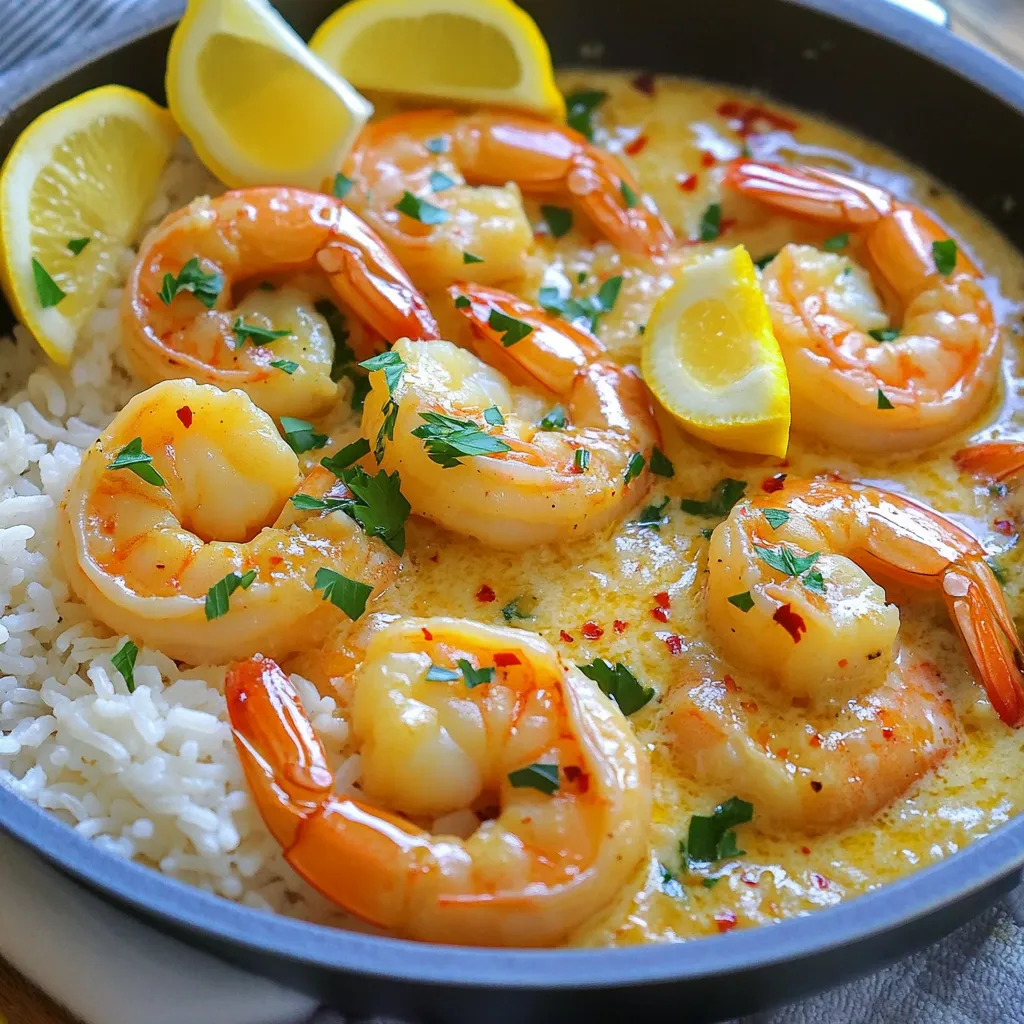
If you’re craving a quick and tasty meal, this Easy Garlic Butter Shrimp Skillet is for you. With just a

- 1 whole turkey (12-14 pounds), thawed - 1 cup unsalted butter, softened - 4 cloves garlic, minced - 1 tablespoon fresh rosemary, chopped - 1 tablespoon fresh thyme, chopped - 1 tablespoon fresh sage, chopped - 2 teaspoons lemon zest - Salt and pepper to taste - 2 cups low-sodium chicken broth - 1 onion, quartered - 1 lemon, quartered - 2 carrots, roughly chopped - 2 celery stalks, roughly chopped To make this herb butter roasted turkey, you need a few key items. The star is a whole turkey that weighs between 12 and 14 pounds. You want it thawed, so plan ahead. Next, you’ll need a cup of unsalted butter. It should be soft to mix well with herbs. The herbs are vital for flavor. Gather fresh rosemary, thyme, and sage. Each adds its own taste. Minced garlic and lemon zest brighten the mix. Salt and pepper are important for seasoning. You also need some aromatics for stuffing the turkey. Onion, lemon, carrots, and celery bring depth. They give off great flavors while roasting. Lastly, low-sodium chicken broth adds moisture. This mixture keeps the turkey juicy and enhances the flavor. With these ingredients, you're set for a delicious herb butter roasted turkey. {{ingredient_image_1}} First, you must preheat your oven to 325°F (165°C). Place the oven rack in the lower third. This position helps cook the turkey evenly. Next, let’s make the herb butter mixture. In a bowl, combine 1 cup of softened unsalted butter, 4 minced garlic cloves, 1 tablespoon of chopped rosemary, 1 tablespoon of chopped thyme, 1 tablespoon of chopped sage, 2 teaspoons of lemon zest, and salt and pepper to taste. Mix these until smooth and creamy. This butter will add lots of flavor to your turkey. Now, it’s time to prep the turkey. Remove the giblets and neck from its cavity. Pat the turkey dry with paper towels. This step helps the skin get crispy. Carefully loosen the skin over the breast and thighs using your fingers. Spread half of the herb butter mixture under the skin. Make sure to cover it evenly. Next, rub the rest of the herb butter all over the outside of the turkey. This will make it golden and tasty. For more flavor, you need to stuff the turkey cavity. Fill it with a quartered onion, a quartered lemon, and roughly chopped carrots and celery. These aromatics will give the turkey a nice taste as it cooks. Place the turkey on a roasting rack in a large roasting pan. Pour 2 cups of low-sodium chicken broth into the bottom of the pan. This broth keeps the turkey moist. Cover the turkey loosely with aluminum foil. Roast it in the oven for about 2 to 2.5 hours. Use a meat thermometer to check the thickest part of the thigh. It should read 165°F (74°C). During the last 30 minutes of cooking, remove the foil. This step helps the skin get crispy and brown. Baste your turkey with the pan juices every 15 minutes. This keeps it juicy and adds flavor. After cooking, let the turkey rest for at least 30 minutes before carving. This allows the juices to flow back into the meat. To get that perfect crispy skin, start by drying the turkey. Pat the turkey with paper towels before cooking. This helps the skin become golden and crunchy. After cooking for a while, remove the foil. Do this about 30 minutes before the turkey is done. This allows the heat to crisp up the skin. You can add more herbs and spices to your herb butter. Try adding parsley, dill, or even some spices like paprika or cayenne for a kick. Each herb brings a unique taste. You can also use aromatic vegetables for stuffing. Besides onion and lemon, consider using garlic or fresh herbs. They add great depth and flavor to your turkey. Pro Tips Resting the Turkey: Letting the turkey rest for at least 30 minutes after roasting is crucial for juicy meat. This allows the juices to redistribute throughout the bird. Flavorful Basting: Basting your turkey every 15 minutes in the last 30 minutes of cooking will help achieve a crispy skin and enhance the flavor. Checking Doneness: Use a meat thermometer to ensure your turkey is cooked perfectly. Insert it into the thickest part of the thigh; it should read 165°F (74°C). Herb Butter Storage: If you have leftover herb butter, you can freeze it in portions for future use on other meats or vegetables. {{image_2}} You can change the flavors in your herb butter. Try using different herbs to match your taste. Here are some options: - Basil and Oregano: This mix gives a fresh Italian twist. - Parsley and Dill: A bright combo that adds zest. - Tarragon and Chives: This mix offers a subtle yet bold flavor. If you want a vegan option, use plant-based butter. Look for brands that have a creamy texture. You can still mix in the same herbs and spices. This keeps the dish rich and flavorful without dairy. You can cook your turkey in different ways for unique flavors. - Smoking the turkey: This method adds a deep, smoky taste. Use wood chips like hickory or applewood. Smoke the turkey for a few hours at a low temperature. Keep an eye on the internal temperature to ensure it cooks through. - Slow cooking variations: A slow cooker is perfect for tender meat. Rub the herb butter on the turkey and place it in the slow cooker. Add broth and aromatics. Cook on low for 6-8 hours. This method keeps the turkey juicy and full of flavor. These variations let you customize your herb butter roasted turkey to match your style and preferences. Enjoy experimenting! After your herb butter roasted turkey feast, you want to store leftovers properly. Here are some best practices: - Cool the turkey first: Let it sit at room temperature for about two hours before storing. - Use airtight containers: Place the turkey in a container or wrap it tightly with plastic wrap. - Refrigerate within two hours: Keep the turkey in the fridge at 40°F (4°C) or lower. - Consume within four days: Enjoy your leftovers within this time for the best taste. If you want to save turkey for longer: - Freezing options: Cut the turkey into smaller pieces for easy freezing. - Wrap well: Use heavy-duty aluminum foil or freezer bags to protect from freezer burn. - Label and date: Write the date on the bag or container to keep track. - Use within six months: For the best quality, eat frozen turkey within this time. Reheating turkey can be tricky, but I have some great methods for you: - Oven method: Preheat your oven to 325°F (165°C). Place turkey in a baking dish. Add a splash of chicken broth to keep it moist. Cover with foil to avoid dryness. Reheat for about 20 minutes per pound. - Microwave method: Slice the turkey into smaller pieces. Place it in a microwave-safe dish. Add a little broth or water. Cover loosely with a lid or plastic wrap. Heat in short bursts, checking often. - Skillet method: For smaller pieces, heat a skillet over medium-low heat. Add a splash of broth and cover. This keeps the turkey juicy while warming. To keep moisture and flavor: - Don’t overheat: Heat just until warmed through, not hot. - Baste during reheating: Spoon the pan drippings or broth over the turkey to keep it juicy. These tips will help you enjoy your herb butter roasted turkey even after the big day! You should cook a 14-pound turkey for about 2 to 2.5 hours at 325°F. This time may vary based on your oven. The best way to know when it’s done is to check the temperature. Insert a meat thermometer into the thickest part of the thigh. It should read 165°F. Yes, you can prepare the herb butter up to two days ahead. Just mix the butter with garlic, herbs, zest, salt, and pepper. Store it in an airtight container in the fridge. Let it soften before using it. This makes spreading it under the skin much easier. Use a meat thermometer to check the turkey's temperature. Insert it into the thigh without touching the bone. Always aim for 165°F. Let the turkey rest for at least 30 minutes after cooking. This helps the juices stay inside the meat. You now have the tools to create a delicious herb butter roasted turkey. We covered the main ingredients, cooking steps, and tips for success. Remember to prepare your turkey well and choose the right herbs for flavor. There are many ways to customize this dish to suit your taste. Store leftovers properly, and you can enjoy the turkey long after the feast. Follow these guidelines, and you’ll impress everyone at the table. Happy cooking!

Herb Butter Roasted Turkey Juicy and Flavorful Delight

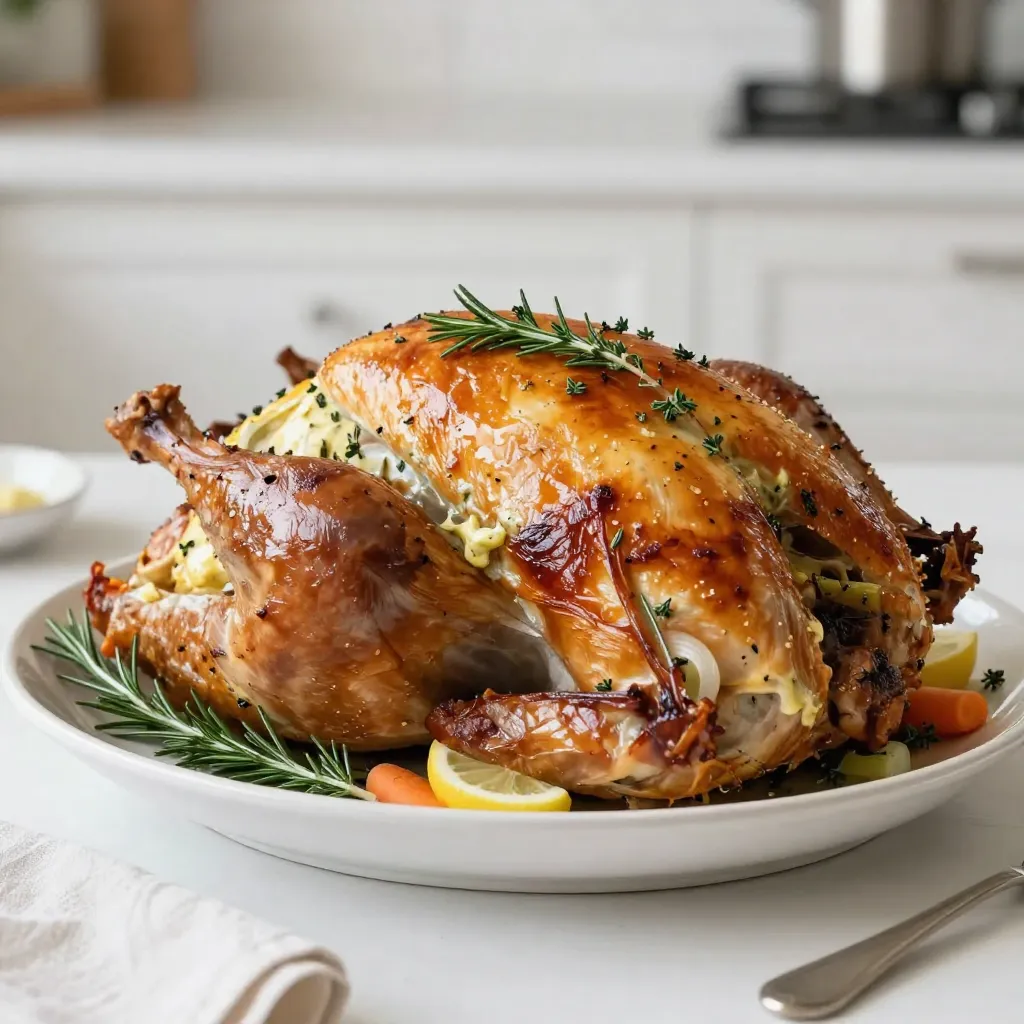
If you want a juicy, flavorful turkey this holiday season, you’re in the right place! My Herb Butter Roasted Turkey

To make this delightful Cinnamon Roll Pancake Bake, you will need the following: - 2 cups pancake mix - 1 ½ cups milk - 2 large eggs - 1 teaspoon vanilla extract - 1/2 cup brown sugar - 2 tablespoons ground cinnamon - 1 cup cream cheese, softened - 1/4 cup powdered sugar - 2 tablespoons maple syrup (for drizzling) These simple items create the base of the dish. They work together to form a sweet, fluffy pancake bake that tastes just like cinnamon rolls. For a little extra flair, consider these optional ingredients: - 1 cup chopped walnuts Adding walnuts gives a nice crunch and flavor. You can skip them if you prefer a smoother texture. If you don’t have something on hand, here are some easy swaps: - Use almond milk or oat milk instead of regular milk for a dairy-free option. - For a gluten-free version, choose a gluten-free pancake mix. - You can replace eggs with 1/4 cup unsweetened applesauce for a vegan option. These substitutions keep the recipe flexible while maintaining the deliciousness of the dish. Enjoy making your Cinnamon Roll Pancake Bake! Start by preheating your oven to 350°F (175°C). Grease a 9x13-inch baking dish with butter or cooking spray. This step helps the pancake bake come out easily after cooking. Make sure to cover the bottom and sides well. In a large bowl, combine 2 cups of pancake mix, 1 ½ cups of milk, 2 large eggs, and 1 teaspoon of vanilla extract. Stir until the mixture is smooth. No lumps, please! This batter will be the base for our cozy pancake bake. Pour half of the pancake batter into the prepared dish. Spread it evenly across the bottom. In a small bowl, mix ½ cup of brown sugar with 2 tablespoons of ground cinnamon. Sprinkle this cinnamon sugar mixture over the batter. If you like, add 1 cup of chopped walnuts for extra crunch. Then, pour the rest of the batter over the top and smooth it out. Bake in the oven for 25-30 minutes. It’s ready when the pancakes puff up and a toothpick comes out clean from the center. While the pancake bake cooks, whip together 1 cup of softened cream cheese and ¼ cup of powdered sugar in a bowl. Mix until the cream cheese is smooth and creamy. Once your pancake bake cools for 5 minutes, drizzle with 2 tablespoons of maple syrup and add dollops of the cream cheese topping. Cut it into squares and serve warm for a sweet treat. For a fluffy texture, mix your batter gently. Overmixing can lead to tough pancakes. Use a spatula to fold the wet and dry ingredients together until just combined. Letting the batter sit for a few minutes allows it to thicken. This extra time can help create a lighter bake. Baking time is key. Watch for the pancakes to puff up. Set your timer for 25 minutes. Check for doneness by inserting a toothpick. It should come out clean. If it’s still wet, add a few more minutes. Let it cool slightly before cutting. This helps the squares hold their shape. Serve warm for the best taste. Drizzle with maple syrup for added sweetness. A dollop of the cream cheese mixture makes it extra special. You can also sprinkle extra cinnamon or nuts on top. Fresh fruit like berries or bananas pairs nicely too. This dish is perfect for sharing with friends or family. {{image_2}} You can change up the flavor of your Cinnamon Roll Pancake Bake. Try adding chocolate chips for a sweet twist. Just mix in a cup of chocolate chips with the batter. It brings a rich flavor that everyone loves. You can also use pumpkin spice for a fall treat. Simply swap out the cinnamon for pumpkin spice. It gives a warm and cozy taste perfect for chilly mornings. Need a gluten-free option? Use a gluten-free pancake mix. Many brands offer great flavors that work well. If you want a dairy-free version, substitute milk with almond or oat milk. You can also replace cream cheese with a dairy-free cream cheese. These swaps will keep the taste delicious while meeting your dietary needs. Toppings can make your pancake bake even better. Try fresh fruit like strawberries or blueberries for a burst of flavor. You can also sprinkle chopped nuts on top for a nice crunch. For drizzles, maple syrup is classic, but you can mix it up. Try a caramel sauce or even a berry compote. These toppings add color and taste to your cozy morning delight. Store any leftover Cinnamon Roll Pancake Bake in an airtight container. This keeps it fresh. Place the container in the fridge. It will stay good for about three days. Make sure it cools down before sealing. To reheat, preheat your oven to 350°F (175°C). Place the pancake bake in an oven-safe dish. Cover it with foil to keep it moist. Heat for about 10-15 minutes or until warm. You can also use the microwave. Heat individual pieces for about 30-45 seconds. You can freeze Cinnamon Roll Pancake Bake for later. Cut it into squares and wrap them well in plastic wrap. Then place the wrapped pieces in a freezer bag. Make sure to remove as much air as possible. This will help prevent freezer burn. It can last up to two months in the freezer. When ready to eat, thaw it in the fridge overnight. Then reheat as mentioned above. Yes, you can make this dish ahead. Prepare the batter and layer it in the baking dish. Cover it and store it in the fridge overnight. In the morning, bake it straight from the fridge. This saves you time and adds convenience. You can serve many things with this bake. Fresh fruit like strawberries or bananas adds color and flavor. Whipped cream or yogurt gives a creamy touch. You might also enjoy a drizzle of extra maple syrup for sweetness. Absolutely! Feel free to use any pancake mix you like. You can even try whole wheat or gluten-free mixes. Just follow the same steps in the recipe for best results. Cinnamon Roll Pancake Bake lasts about three to four days in the fridge. Be sure to cover it well to keep it fresh. You can enjoy it cold or warm it up in the microwave. The Cinnamon Roll Pancake Bake offers a fun twist on breakfast. We explored essential and optional ingredients, plus tasty substitutions. You discovered easy steps for prep, mixing, and baking. I also shared tips for perfect texture and serving ideas. Don’t forget about creative variations and smart storage methods. With these insights, you can enjoy delicious, warm treats anytime. Experiment, have fun, and make this dish your own!

Cinnamon Roll Pancake Bake Cozy Morning Delight

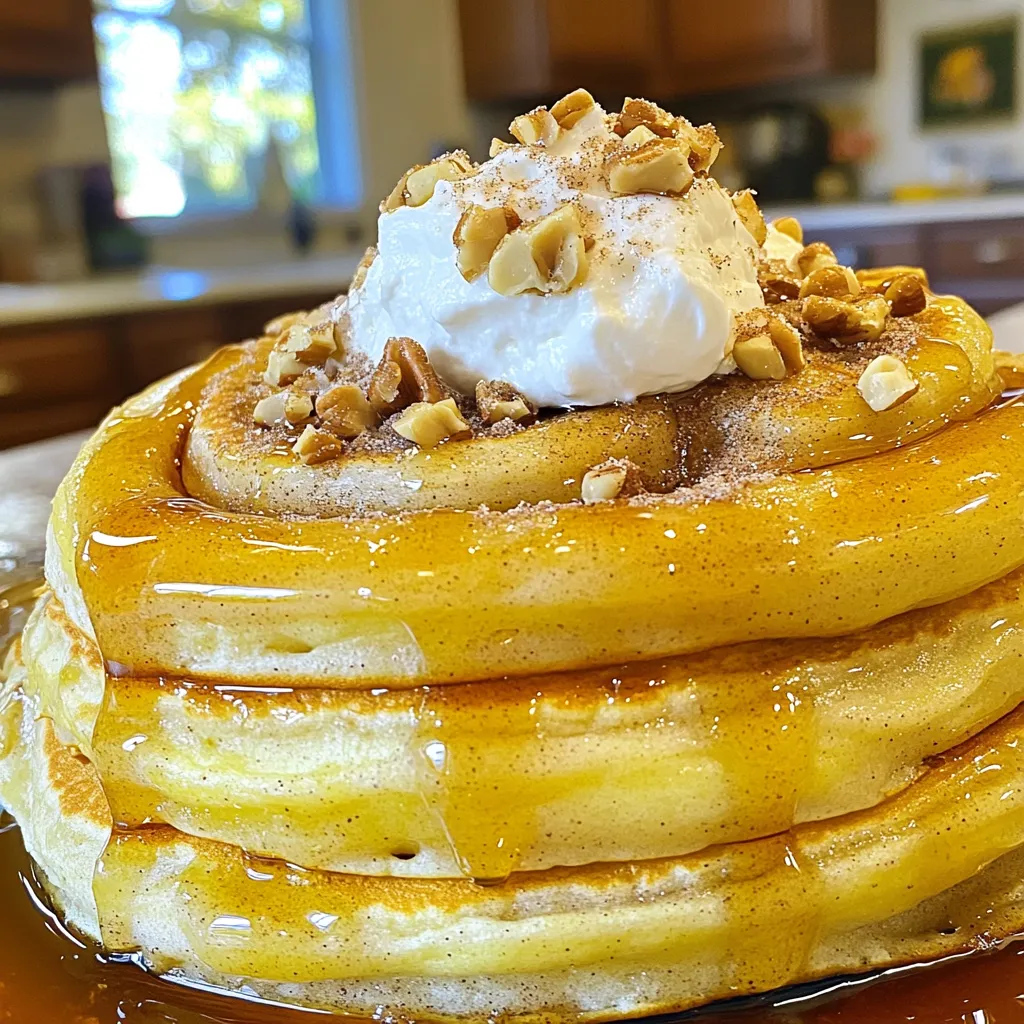
Are you ready to transform your breakfast routine? My Cinnamon Roll Pancake Bake is the perfect way to turn a

To make tasty honey garlic meatballs, you need a few key items: - 1 lb ground beef or turkey - 1/2 cup breadcrumbs - 1/4 cup grated Parmesan cheese - 1/4 cup fresh parsley, chopped - 1 large egg - 2 cloves garlic, minced - 1 teaspoon salt - 1/2 teaspoon black pepper These ingredients blend together to create meatballs that are both moist and flavorful. The ground meat is the base, while the breadcrumbs help bind the mixture. Parmesan cheese adds a nice depth of flavor, and parsley gives a pop of color and freshness. The sauce is what makes these meatballs shine. You will need: - 1 cup honey - 1/4 cup soy sauce (or tamari for gluten-free) - 1 tablespoon apple cider vinegar - 1 tablespoon cornstarch (optional, for thickening) The honey provides sweetness, while soy sauce adds a savory touch. Apple cider vinegar gives a tangy kick. If you want a thicker sauce, mix cornstarch with water before adding it to the sauce. Garnishes make your dish look pretty and add flavor. Consider using: - Sesame seeds - Green onions, sliced These toppings add a nice crunch and a fresh taste. You can sprinkle them on right before serving to make the dish pop. To start, grab a large mixing bowl. Add 1 pound of ground beef or turkey. Next, pour in 1/2 cup of breadcrumbs. Sprinkle in 1/4 cup of grated Parmesan cheese. Then, add 1/4 cup of chopped fresh parsley. Don’t forget the large egg and 2 cloves of minced garlic. Season with 1 teaspoon of salt and 1/2 teaspoon of black pepper. Mix everything together gently. You want it just combined; overmixing can make the meatballs tough. Now, take a small amount of the mixture and roll it into a ball. Aim for about 1 inch in diameter. Place your meatballs on a baking sheet as you form them. You should end up with about 20 to 24 meatballs. This step is fun and allows you to shape them just right. Once done, set them aside while you prepare the sauce. In a separate bowl, combine 1 cup of honey, 1/4 cup of soy sauce, and 1 tablespoon of apple cider vinegar. Whisk these together until smooth. If you prefer a thicker sauce, mix 1 tablespoon of cornstarch with 2 tablespoons of water, then add it to the honey mix. This will help the sauce stick better to the meatballs later. Place the meatballs in a single layer in the slow cooker. Carefully pour the honey garlic sauce over them. Make sure each meatball is well coated in the sauce. Set your slow cooker to low for 6 to 8 hours or high for 3 to 4 hours. When the meatballs are cooked through and tender, they’re ready to enjoy. Before serving, gently stir the meatballs to coat them again in the sauce. This adds more flavor and makes them shine. To get the best meatballs, don’t overmix your ingredients. Just mix until everything is combined. Use ground beef or turkey for good flavor. If you want a lighter meatball, try turkey. The breadcrumbs help keep the meatballs soft and moist. You can also add a touch of milk to the mix for extra moisture. The honey garlic sauce is key to this dish. To make it shine, use fresh garlic. Fresh garlic gives a stronger taste than powder. For the best flavor, let the meatballs soak in the sauce while cooking. If you like a bit of a kick, add red pepper flakes to the sauce. You can also use tamari instead of soy sauce for a gluten-free option. When using your slow cooker, layer your meatballs in a single row. This helps them cook evenly. Make sure to coat them well with the sauce. If you want thicker sauce, add cornstarch mixed with water. Cook on low for 6-8 hours for tender meatballs or on high for 3-4 hours. Always check that your meatballs are cooked through before serving. {{image_2}} You can use different meats for your meatballs. Ground turkey is a great choice if you want a leaner option. Chicken also works well and gives a nice taste. For a richer flavor, use ground beef. Each meat gives a unique flavor to the dish. Make sure to adjust cooking times slightly based on the meat you choose. To make this recipe gluten-free, swap regular breadcrumbs for gluten-free breadcrumbs. You can also use tamari instead of soy sauce. Tamari is a great option that has a similar taste without gluten. These easy changes keep the meal tasty while meeting gluten-free needs. You can change the flavors of the honey garlic meatballs to suit your taste. Add a teaspoon of red pepper flakes for heat. If you love citrus, mix in some orange juice or zest for brightness. For a more Asian twist, add ginger and sesame oil to the sauce. Experiment with different herbs too, like cilantro or basil, to find your perfect flavor blend. To keep your honey garlic meatballs fresh, store them in an airtight container. Make sure to let them cool before sealing. This helps avoid moisture build-up. Place them in the fridge if you plan to eat them within a few days. They should stay good for about 3 to 4 days. When you're ready to enjoy your leftovers, you can reheat them simply. You can use the microwave or the stove. For the microwave, heat the meatballs in a bowl. Make sure to cover them to keep moisture in. Heat for about 1 to 2 minutes. If using the stove, warm them in a pan over low heat. Add a splash of water or extra sauce to keep them moist. Stir gently until heated through. If you want to store your meatballs for a longer time, freezing is a great option. First, let the meatballs cool completely. Then, place them in a single layer on a baking sheet. Freeze them for about 1 to 2 hours until firm. Once frozen, transfer the meatballs to a freezer bag. This helps save space and keeps them fresh. You can freeze them for up to 3 months. When ready to use, thaw them in the fridge overnight before reheating. Yes, you can use frozen meatballs. Just add them to the slow cooker without thawing. The cooking time will stay the same. The sauce will still soak in well. This option saves time and effort. Frozen meatballs can be just as tasty! To check if the meatballs are done, use a meat thermometer. The internal temperature should reach 165°F. If you don’t have a thermometer, cut one open. It should be no longer pink inside. The meatballs should also feel firm to the touch. You have many options to serve with these meatballs. Here are some ideas: - Steamed rice - Cooked noodles - Mashed potatoes - A fresh salad - Stir-fried veggies These sides will soak up the tasty sauce. Enjoy your meal! You learned how to make tasty slow cooker honey garlic meatballs. We covered the key ingredients, from the meats to the sauces. The step-by-step guide helped you form and cook perfect meatballs. I also shared tips for the right texture and flavor boosts. You now know how to store leftovers and reheat them easily. Try out these ideas and enjoy! Cooking should be fun and tasty.

Slow Cooker Honey Garlic Meatballs Tasty and Easy Meal

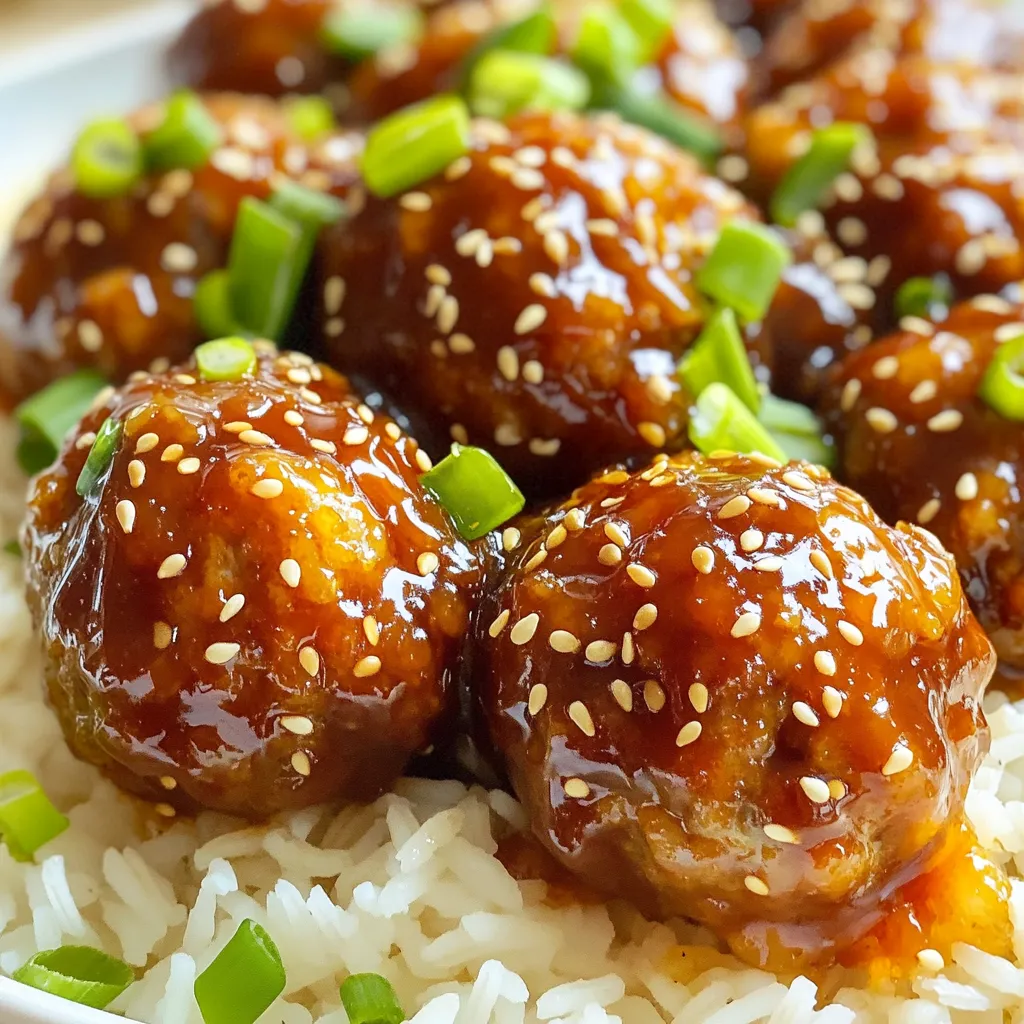
Looking for a simple, tasty meal? Try my Slow Cooker Honey Garlic Meatballs! With just a few easy steps, you’ll

- 200g soba noodles Soba noodles are made from buckwheat. They are thin and have a nutty taste. You can find them in most stores. - 2 tablespoons sesame oil - 1 tablespoon fresh ginger, grated - 2 tablespoons soy sauce (or tamari for gluten-free) - 1 tablespoon rice vinegar - 1 tablespoon honey or maple syrup - 1 garlic clove, minced This sauce is where the magic happens. The sesame oil adds richness. Fresh ginger gives a warm spice. Soy sauce or tamari adds saltiness. Rice vinegar brings a nice tang. Honey or maple syrup sweetens it up. Garlic adds depth to the flavor. - 1/4 cup scallions, finely chopped - 1/4 cup sesame seeds, toasted - 1 cup mixed vegetables (carrots, bell peppers, snap peas), thinly sliced - Fresh cilantro for garnish Garnishes make the dish pop! Scallions add a mild onion flavor. Toasted sesame seeds give a crunchy texture. Mixed vegetables add color and nutrients. Fresh cilantro tops it off with a burst of freshness. First, grab a large pot and fill it with water. Bring the water to a boil. Once boiling, add 200g of soba noodles. Cook them for about 4-5 minutes. Stir the noodles often to stop them from sticking. When they are soft, drain them in a colander. Rinse the noodles under cold water to stop the cooking. This will help keep them firm and fresh. While the noodles cook, you can make the sauce. In a small bowl, combine the following ingredients: - 2 tablespoons sesame oil - 1 tablespoon fresh ginger, grated - 2 tablespoons soy sauce (or tamari for gluten-free) - 1 tablespoon rice vinegar - 1 tablespoon honey or maple syrup - 1 garlic clove, minced Whisk these together until they mix well. The sauce should smell nice and fragrant. Now, it’s time to put it all together. In a large mixing bowl, add the drained soba noodles. Pour the sauce over the noodles and toss gently. Make sure the noodles are fully coated in the sauce. Next, add in 1 cup of thinly sliced mixed vegetables and 1/4 cup of finely chopped scallions. Fold the veggies into the noodles. To finish, serve the noodles in bowls. Top them with 1/4 cup of toasted sesame seeds and some fresh cilantro for a pop of color. Enjoy your quick and tasty meal! To cook soba noodles perfectly, follow these steps: - Bring a large pot of water to boil. - Add the soba noodles and cook for 4-5 minutes. - Stir occasionally to keep them from sticking. - Drain the noodles in a colander. - Rinse the noodles under cold water. This stops the cooking. Doing this keeps your noodles firm and chewy. To make your dish more exciting, add some tasty extras: - Thinly sliced carrots, bell peppers, and snap peas add crunch. - Try adding some cooked chicken or tofu for protein. - For a spicy kick, add a dash of chili oil or red pepper flakes. - Top with your favorite nuts or seeds for a fun texture. These add-ins make your meal more colorful and tasty. Serve your sesame ginger soba noodles like this: - Use individual bowls for a nice touch. - Add toasted sesame seeds and fresh cilantro on top. - Pair with a light salad or some spring rolls. - Enjoy with a cold drink, like iced tea or lemonade. These tips help you create a meal that looks good and tastes great. {{image_2}} You can easily make this dish gluten-free. Use gluten-free soba noodles made from buckwheat. Tamari works well as a soy sauce substitute. Check labels to ensure no wheat is in the ingredients. This way, everyone can enjoy the flavors! Want to boost the protein? Add cooked chicken, shrimp, or tofu. Chicken breast can be grilled and sliced. Shrimp cooks quickly, just like the noodles. For tofu, try pan-frying for a crispy texture. Each option adds flavor and makes the meal heartier. Change the veggies based on the season. In spring, add asparagus or snap peas. Summer calls for fresh zucchini or bell peppers. In fall, pumpkin or roasted sweet potatoes fit well. Winter can bring in kale or broccoli. This keeps the dish fresh and exciting! You can store leftover soba noodles in the fridge. Place them in an airtight container. They stay fresh for up to three days. Make sure to keep the sauce separate. This keeps the noodles from getting too soggy. When you want to eat them, just take them out and enjoy! Reheat the noodles gently to keep them tasty. You can use a microwave or a pan. If using a microwave, add a splash of water. This helps them steam and stay moist. If using a pan, heat on low and stir often. This makes sure they warm evenly without sticking. Freezing your soba noodles is a great option! First, let them cool completely. Then, place them in a freezer-safe bag. Make sure to squeeze out as much air as you can. They can last up to three months in the freezer. When ready to use, thaw them overnight in the fridge. This way, they stay tasty and fresh! Yes, you can easily make this recipe vegan. To do this, replace honey with maple syrup. Use tamari instead of soy sauce for gluten-free options. All other ingredients are plant-based. This keeps the dish tasty and suitable for a vegan diet. Cooked soba noodles can last 3 to 5 days in the fridge. Be sure to store them in an airtight container. They may lose some texture after a few days. To enjoy the best flavor, eat them within the first few days. You can serve many things with sesame ginger soba noodles. Try adding grilled tofu for protein. A fresh salad pairs well too. You can also enjoy them with a side of steamed edamame. These options add variety and nutrients to your meal. This post covered how to make delicious sesame ginger soba noodles. We explored key ingredients like noodles, sauce, and toppings. You learned how to cook the noodles and make the sauce. We discussed tips to perfect your dish and shared fun variations. Storage methods help keep leftovers fresh. In the end, you can customize this recipe to fit your taste. Enjoy your cooking and feel free to get creative!

Minute Sesame Ginger Soba Noodles Quick Meal Guide

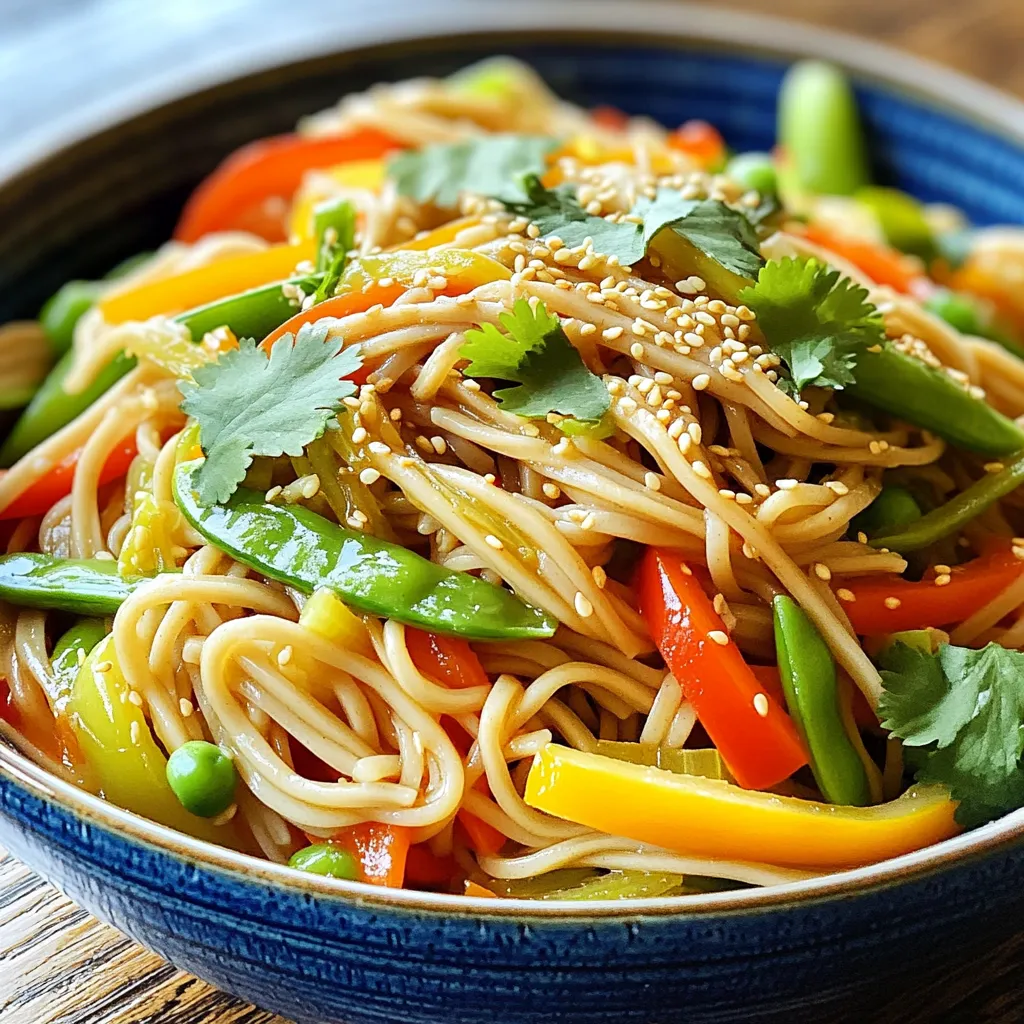
Are you in need of a quick and tasty meal? Look no further than Minute Sesame Ginger Soba Noodles! This

For your No-Bake Oreo Pumpkin Truffles, gather these main ingredients: - 1 package (15.25 oz) Oreo cookies - ½ cup pumpkin puree - 4 oz cream cheese, softened - 1 teaspoon pumpkin spice - 1 teaspoon vanilla extract - 1 cup white chocolate chips - ½ cup crushed graham crackers (for rolling) - Pinch of salt These ingredients come together to create a tasty treat. The Oreo cookies give a sweet base, while the pumpkin puree adds a fall twist. Cream cheese makes the truffles creamy, and pumpkin spice brings warmth. You can also customize your truffles with these optional ingredients: - Different flavored cookies (like peanut butter or mint) - Extra spices (like cinnamon or nutmeg) - Nuts (for crunch) If you need to make substitutions, here are some measurement conversions: - If you don’t have pumpkin puree, use applesauce instead in the same amount. - For a vegan option, replace cream cheese with a plant-based cream cheese. - Use dark chocolate chips instead of white chocolate for a richer flavor. These substitutions keep your treat delicious while meeting your needs! To make No-Bake Oreo Pumpkin Truffles, gather your tools. You will need a food processor, a mixing bowl, and a lined baking sheet. Make sure your work area is clean. When melting chocolate, use a microwave-safe bowl. Heat in 30-second bursts to avoid burning. Stir after each interval until smooth. Be careful, as melted chocolate can be hot. 1. Crush the Cookies: Start by pulsing the Oreo cookies in the food processor. Aim for a fine powder. This will be the base of your truffles. 2. Mix Ingredients: In your mixing bowl, combine the Oreo crumbs, pumpkin puree, softened cream cheese, pumpkin spice, vanilla extract, and a pinch of salt. Stir until it forms a thick dough. 3. Form Truffles: Use your hands to roll the mixture into small balls, about 1 inch in size. Place them on the lined baking sheet. 4. Chill the Truffles: Freeze the truffles for 20-30 minutes. This helps them firm up and makes coating easier. 5. Melt the Chocolate: While the truffles chill, melt the white chocolate chips. Use a microwave-safe bowl and heat in 30-second intervals, stirring in between until it is smooth. 6. Coat the Truffles: Dip each chilled truffle into the melted chocolate. Let any excess drip off before placing it back on the lined sheet. 7. Roll in Graham Crackers: Immediately roll the dipped truffles in crushed graham crackers to coat. This adds a nice crunch. 8. Final Chill: Refrigerate the truffles for another 15 minutes. This helps the chocolate set before you enjoy them. Images or videos can really help here. Showing each step can guide you through the process. For the best presentation, arrange the truffles on a nice platter. You could even add a sprinkle of extra graham cracker crumbs for flair. Enjoy your tasty fall treat! To make your No-Bake Oreo Pumpkin Truffles shine, use fresh ingredients. Always choose high-quality Oreo cookies. This adds a rich taste. The same goes for pumpkin puree. Fresh puree gives a brighter flavor than canned options. Feel free to mix in extra spices for a kick. A dash of cinnamon or nutmeg can elevate your truffles. You might also try adding crushed nuts for some crunch. For toppings, consider drizzling melted chocolate on top. This adds both flavor and a pretty look. Sometimes, your mixture might be crumbly. If this happens, add a bit more pumpkin puree. Just a little will help bind everything. If your mixture feels too sticky, add more crushed Oreo cookies. When coating with chocolate, it's key to let any excess drip off. This keeps the coating smooth. If the chocolate clumps, try melting it slower. Use 30-second intervals in the microwave. Stir well between each. This way, you get a nice, glossy finish on your truffles. {{image_2}} You can easily change the flavor of these truffles. Dark chocolate adds richness. Just melt it like the white chocolate and dip the truffles. Mint extract can give a cool twist. Use only a few drops to avoid overpowering the pumpkin. You can also switch up the cookies used. Try chocolate sandwich cookies for a deeper flavor. Golden Oreos work well too for a sweeter taste. Mix and match to find your favorite combo. Make these truffles festive for holidays! For Halloween, use orange and black sprinkles on top. You can even shape them like pumpkins for a fun touch. For Thanksgiving, add chopped nuts or cranberries for a seasonal flair. You can also package them in cute boxes as gifts. They make great treats for your friends and family during the holidays. To keep your No-Bake Oreo Pumpkin Truffles fresh, store them in the fridge. They last about one week there. If you want to keep them longer, try the freezer. They can stay good for about three months frozen. Use an airtight container to store the truffles. This helps keep them from drying out. You can also place parchment paper between layers to stop them from sticking together. These truffles are great for parties or gatherings. You can serve them on a festive plate or in small cupcake liners. They look cute and are easy to grab. Pair these treats with drinks like coffee or hot chocolate. The rich flavors of the truffles match well with warm beverages. You can even create a dessert table with different treats to enjoy alongside your truffles. How long do No-Bake Oreo Pumpkin Truffles last? No-Bake Oreo Pumpkin Truffles can last about one week in the fridge. Keep them in an airtight container. If you want them to last longer, freeze them. They stay good for up to three months in the freezer. Can I make these truffles ahead of time? Yes, you can make these truffles ahead of time. They taste great after a day in the fridge. You can prepare them a few days before your event. Just coat them in chocolate and store them until you’re ready to serve. Can I make this recipe gluten-free? Yes, you can! Use gluten-free Oreo cookies instead of regular ones. This simple swap keeps the treat delicious and safe for those with gluten allergies. Are there dairy-free options available for this recipe? You can make dairy-free truffles by using dairy-free cream cheese. Many brands offer tasty alternatives. Also, check for dairy-free chocolate chips for coating. What can I use instead of cream cheese? If you want to skip cream cheese, use Greek yogurt for a lighter option. Silken tofu is another great dairy-free choice. Both will give you a nice texture in the truffles. How can I modify for different dietary needs (vegan, nut-free)? For vegan truffles, use dairy-free cream cheese and chocolate. Ensure your Oreos are vegan-friendly too. For nut-free truffles, check all products for nut traces, especially chocolate brands. In this blog post, we explored how to make No-Bake Oreo Pumpkin Truffles. We covered the key ingredients, step-by-step instructions, and creative variations for flavor. Storage tips and common questions helped make the process easy. These truffles are a fun treat for any occasion. Feel free to experiment with flavors and share them with friends. Enjoy making your delicious creations!

No-Bake Oreo Pumpkin Truffles Tasty Fall Treat

Fall is here, and that means it’s time for delicious treats! If you love the cozy flavors of pumpkin and

- Everything bagels - Olive oil - Garlic powder - Onion powder - Sesame seeds - Poppy seeds - Coarse sea salt - Try different types of bagels, like plain or whole wheat. - Use avocado oil or melted butter if you need an olive oil substitute. - Get creative with extra seasonings like smoked paprika or Italian herbs. These ingredients make a tasty, crunchy snack. Everything bagels offer a great base. The oils and seasonings elevate the flavor. You can easily swap some ingredients for what you have at home. Preheating your air fryer is key. It helps cook the chips evenly. Set the air fryer to 350°F (175°C) for 3-5 minutes. This small step makes a big difference in crunch. Slice your everything bagels thinly. Aim for about 1/4 inch thick. This helps them crisp up nicely. Place the slices in a large bowl. Drizzle 2 tablespoons of olive oil over them. Toss gently to coat each slice. Make sure every piece gets some oil. Time to create the spice mix! In a small bowl, combine: - 1 teaspoon garlic powder - 1 teaspoon onion powder - 1 teaspoon sesame seeds - 1 teaspoon poppy seeds - 1 teaspoon coarse sea salt Mix these well. Sprinkle the blend over the oiled bagel slices. Toss again until every slice is coated. This adds flavor and crunch. Arrange the bagel slices in a single layer in the air fryer basket. Don’t overcrowd them. You may need to cook in batches. Air fry for 5-7 minutes. Shake the basket halfway through cooking. This helps them cook evenly. Look for a golden brown color for the best texture. Once cooked, remove the chips and let them cool on a wire rack. This keeps them crunchy. Serve the chips in a decorative bowl. Pair them with a creamy dip, like hummus or a spinach yogurt dip. Enjoy your crunchy snack! To get your bagel chips just right, adjust the cooking time based on your taste. If you like them extra crispy, add a few more minutes. Keep an eye on them as they cook. Check for doneness by looking for a golden brown color. You want them crunchy but not burned. After you enjoy your chips, store any leftovers in a good container. Use an airtight container to keep them fresh. Avoid letting air in, as this can make them soggy. For best results, keep them at room temperature. These bagel chips shine when paired with tasty dips. Try serving them with creamy hummus or a spinach yogurt dip. You can also get creative by using them in a charcuterie board. They add a nice crunch and flavor that everyone will love. {{image_2}} You can mix up the flavor of your bagel chips. For sweet bagel chips, try adding cinnamon sugar. Just mix 2 tablespoons of sugar with 1 teaspoon of cinnamon. Sprinkle it over the bagel slices after the olive oil. This gives you a sweet twist that is perfect for snacking. If you like heat, consider a spicy version. Just add a pinch of cayenne or paprika to your spice mix. This will make your chips pop with flavor. Adjust the amount based on your spice level. Enjoy the kick with every crunchy bite! Making your own bagels can be fun and rewarding! Fresh bagels taste better and offer a chance to customize. You can control the ingredients and flavors. This makes each bagel unique to you. When using homemade bagels, you might need to adjust cooking times. Fresh bagels can be thicker, so slice them thinner for the best crunch. You can also tweak the seasoning to match your taste. Keep the spices you love and add your own twist! If you don’t have an air fryer, you can bake these chips in the oven. Preheat your oven to 350°F (175°C). Arrange the bagel slices on a baking sheet in a single layer. Bake for about 10-12 minutes. Be sure to flip them halfway for even cooking. Air fryer chips usually cook faster and get crispier. The oven can take longer but still gives tasty results. Both methods create a delicious snack, so choose what works for you! To keep your Air Fryer Everything Bagel Chips fresh, store them at room temperature. If you put them in the fridge, they may lose their crispness. Use an airtight container to keep air out. This helps maintain their crunch. Make sure the container is clean and dry before using it. If you have a lot of chips, consider separating them in smaller containers. This way, you open only what you need. If you need to save some bagel chips for later, freezing is a good option. To freeze leftovers, let the chips cool completely first. Then, place them in a freezer-safe bag or container. Remove as much air as you can to prevent freezer burn. When you want to eat them, take out how many you need. To thaw, simply leave them at room temperature for 30 minutes. For extra crunch, pop them back in the air fryer for a few minutes. This will help them crisp up again. Air Fryer Everything Bagel Chips can last about a week when stored properly. Keep them in an airtight container at room temperature. If they lose their crunch, they may be stale. Signs of spoilage include a soft texture or off smell. Yes, you can use any bagel type you like. Try plain, sesame, or onion bagels for unique flavors. Each type will give a different taste and texture. Just make sure they are fresh for the best results. These chips pair well with many dips. Hummus is a classic choice. Spinach yogurt dip adds creaminess and flavor. You can also try guacamole or a simple herb dip. Here are two easy recipes: - Creamy Hummus: Blend 1 can of chickpeas, 2 tablespoons tahini, juice of 1 lemon, and 1 garlic clove with salt to taste. - Spinach Yogurt Dip: Mix 1 cup of Greek yogurt, 1 cup of cooked spinach, 1 teaspoon garlic powder, and salt to taste. Yes, you can make bagel chips in the oven. Preheat the oven to 350°F (175°C). Place the seasoned bagel slices on a baking sheet lined with parchment paper. Bake for about 10-15 minutes, flipping halfway, until crispy and golden. The air fryer gives a faster cook, but the oven works well too. You learned how to make tasty Everything Bagel Chips using an air fryer. We covered the ingredients, steps, and tips for the best results. You can even explore different flavors and serving ideas. With the right tricks, your chips will be crispy and delicious. Remember, the key is to slice thin and season well. Enjoy making these snacks that are perfect for sharing or dipping. Keep experimenting with flavors, and you'll never run out of ideas!

Air Fryer Everything Bagel Chips Crunchy Snack Delight

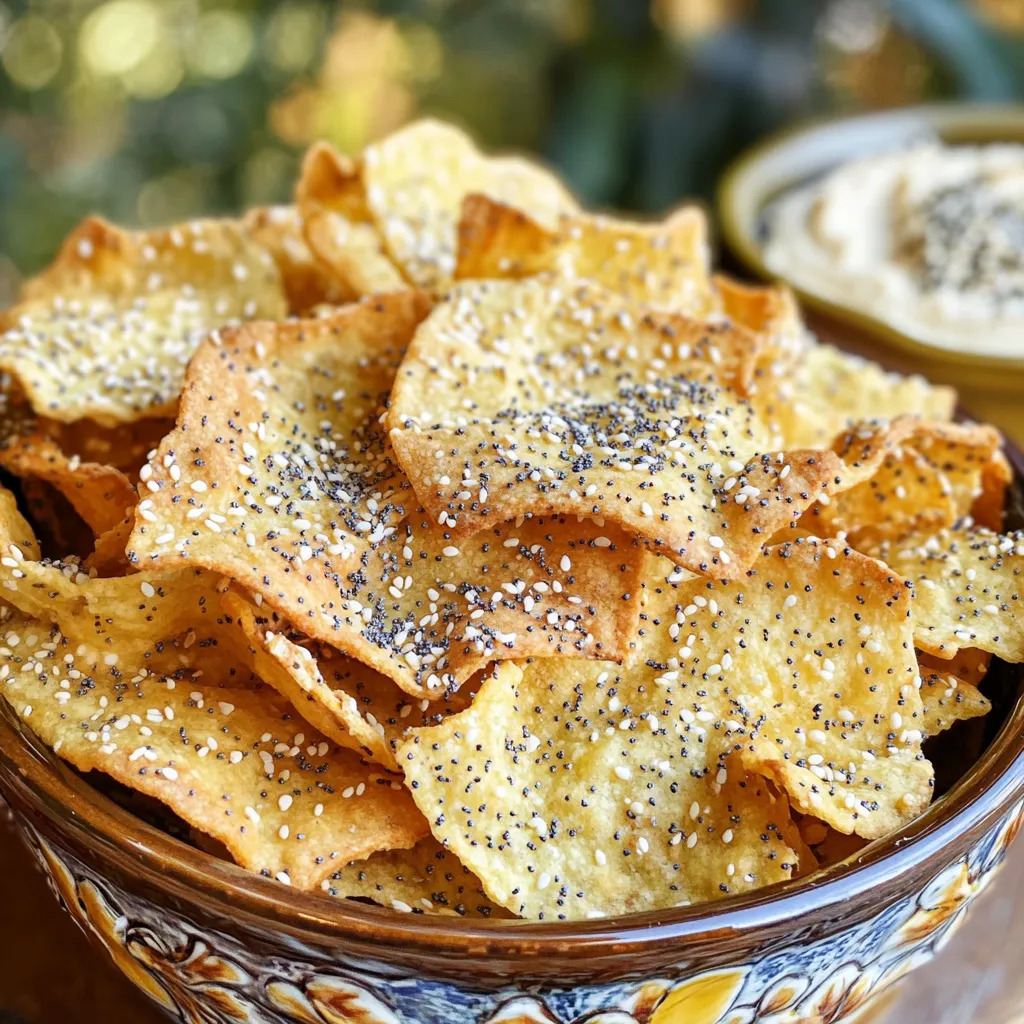
Are you ready to crunch into something delicious? My Air Fryer Everything Bagel Chips are a game-changer for snack time!

Older posts
Newer posts
← Previous Page1 … Page10 Page11 Page12 … Page85 Next →

dsad

© 2026 greenmealmap • Built with GeneratePress

Our Policies

  • Copyright Policy
  • Cookie Policy
  • GDPR Policy
  • Privacy Policy
  • Disclaimer
  • Terms Of Use

More Information

  • Home
  • About
  • Contact
  • Appetizers
  • Dessert
  • Dinner
  • Drinks
©2026, greenmealmap About Back To Top