Skip to content
DisclaimerTerms Of UseGDPR PolicyCookie Policy

greenmealmap

  • Home
  • Drinks
  • Appetizers
  • Dinner
  • Dessert
  • About
  • Contact
  • Privacy Policy
DisclaimerTerms Of UseGDPR PolicyCookie Policy

NO-ING-IMG

- 2 ripe avocados, halved and pitted - 1 cup breadcrumbs (panko recommended for extra crunch) - ½ cup grated Parmesan cheese - 1 teaspoon garlic powder - 1 teaspoon onion powder - ½ teaspoon paprika - Salt and pepper to taste - 1 egg, beaten - Cooking spray (olive oil or avocado oil) Gathering the right ingredients is key to making perfect Air Fryer Parmesan Crusted Avocado Fries. Start with ripe avocados. Ripe avocados give a creamy texture that pairs well with the crispy coating. Use panko breadcrumbs for crunch. They help create that perfect crispy bite. Grated Parmesan cheese adds a salty flavor that makes these fries irresistible. Next, we have the seasonings. Garlic powder and onion powder add depth. Paprika gives a nice color and a hint of heat. Don’t forget salt and pepper. They enhance all the flavors. You’ll also need a beaten egg. This helps the crumbs stick to the avocado. Finally, grab some cooking spray, either olive oil or avocado oil. It ensures the fries crisp up nicely in the air fryer. With these ingredients ready, you’ll create a dish that is both tasty and fun! Set your air fryer to 375°F (190°C). This step is key for crispy fries. Preheating helps them cook evenly and avoids sogginess. Take your ripe avocados and slice them in half. Remove the pit carefully. Cut each half into thick wedges, about three to four per half. This size is perfect for frying. In a shallow bowl, combine these items: - 1 cup breadcrumbs (panko is best) - ½ cup grated Parmesan cheese - 1 teaspoon garlic powder - 1 teaspoon onion powder - ½ teaspoon paprika - Salt and pepper to taste Mix well. In another bowl, beat one egg until smooth. Dip each avocado wedge into the egg, covering it fully. Next, roll the wedge in the breadcrumb mix, pressing gently to coat well. Place the coated wedges in a single layer in the air fryer basket. Lightly spray them with cooking spray. This helps achieve a golden color. Cook for about 8-10 minutes. Flip the fries halfway through for even cooking. They should look crispy and golden when done. Remove them carefully and let them cool for a few minutes before enjoying! To get that nice crunch on your fries, use cooking spray. A light coat helps the breading crisp up nicely. You should spray both the basket and the fries. This step prevents sticking and ensures an even cook. If they stick, you may lose that crispy outer layer. Pair these fries with tasty dipping sauces. Spicy mayo or cilantro lime dip work great. They add a fun kick and flavor. For a pretty plate, arrange the fries on a nice platter. You can sprinkle fresh parsley or cilantro on top. This makes them look extra special. Watch the cooking time closely. Overcooking makes the fries tough, while undercooking leaves them soggy. Flip the fries halfway through cooking. This helps them cook evenly. Also, make sure each wedge has a good coating. Press the crumbs firmly so they stick well. This step ensures every bite is packed with flavor. {{image_2}} You can boost the taste of your fries with spices. Try adding cayenne for heat or Italian seasoning for a herby kick. Both add unique flavors that make each bite exciting. Just mix these spices into your breadcrumb mixture. This small change can make a big difference. If you want a lighter version, swap regular breadcrumbs for whole wheat breadcrumbs. This keeps the crunch while adding fiber. You can also reduce the amount of cheese. Use just a quarter cup instead of half. This lowers calories but keeps the yummy flavor. These avocado fries go well with many dishes. Serve them with a fresh salad or grilled chicken for a full meal. They also pair nicely with dipping sauces like spicy mayo or cilantro lime dip. Add these sides to make your meal more fun and tasty. To keep your avocado fries fresh, place them in an airtight container. Store them in the fridge. They will last for about 2-3 days. If you want to keep them longer, freezing is an option. Just make sure they are fully cooled before placing them in a container. When you’re ready to eat your leftovers, reheat them in the air fryer. Set the air fryer to 350°F (175°C). Cook for about 5 minutes. This helps maintain their crispness. Avoid using the microwave, as it can make them soggy. Yes, you can freeze avocado fries! Place them in a single layer on a baking sheet. Freeze them for about 1 hour. Once frozen, transfer them to a freezer bag. They can last up to 3 months in the freezer. When ready to enjoy, cook them straight from the freezer in the air fryer, adding a few extra minutes to the cook time. For frying, you want ripe avocados. Ripe avocados are firm but slightly soft. They should give a little when you press them. Overripe avocados become mushy and won’t hold up. Choose avocados with smooth skin and no dark spots. This ensures your fries stay intact and tasty. Yes, you can make this recipe vegan! Instead of egg, use a flaxseed mixture. Mix one tablespoon of ground flaxseed with three tablespoons of water. Let it sit for five minutes to thicken. For cheese, try nutritional yeast or vegan cheese. Both give a nice flavor without using dairy. These fries pair well with many meals. Serve them as a snack or side dish. They go great with burgers, sandwiches, or salads. You can also offer dips like spicy mayo or a cilantro lime sauce. For a fun twist, use them in a taco! This blog post covered making delicious air fryer avocado fries. You learned about the key ingredients like ripe avocados, breadcrumbs, and seasonings. We walked through the steps, from prepping the avocados to achieving the perfect crispiness. I shared tips for serving and storage to keep your fries tasty. Remember, experimenting with spices or using healthier ingredients can enhance your dish. Whether you're enjoying a snack or serving at a gathering, these fries will impress. Enjoy your cooking adventure and savor every bite!

Air Fryer Parmesan Crusted Avocado Fries Delight

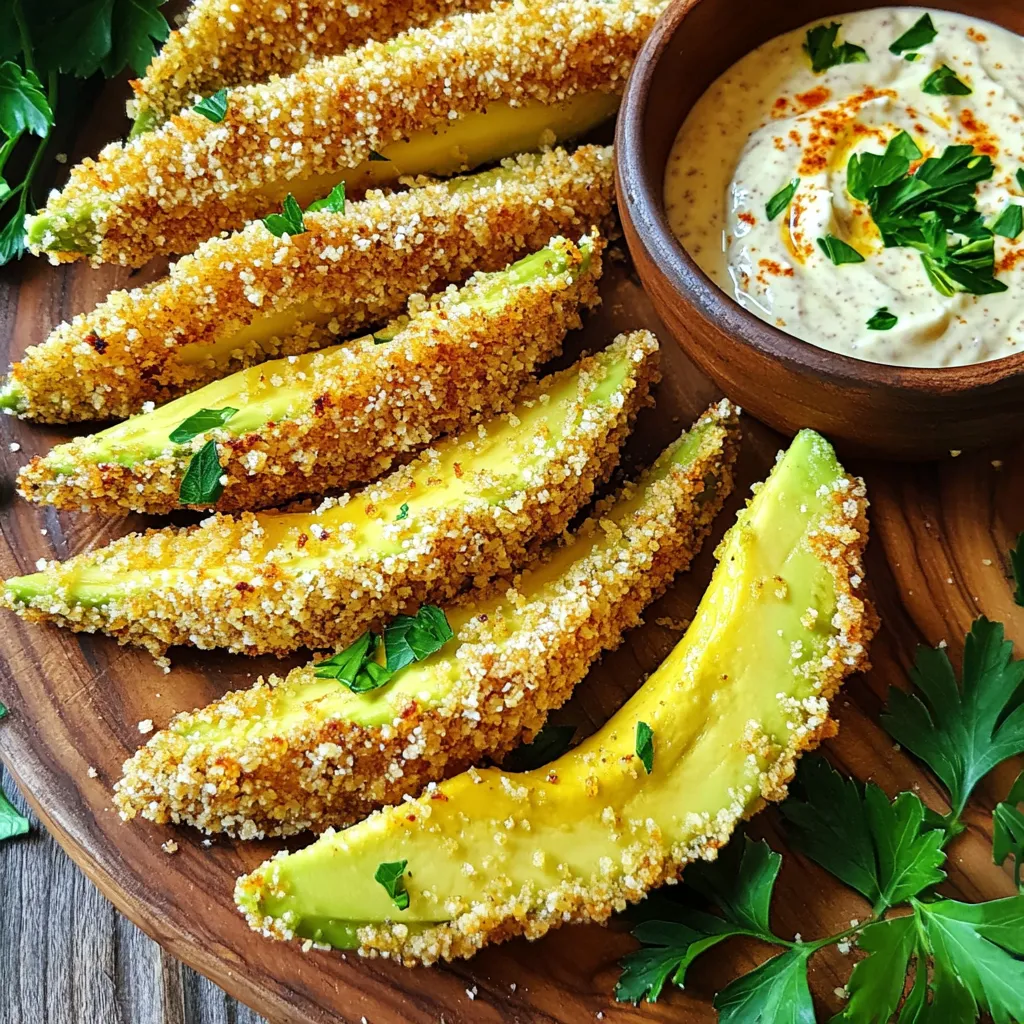
Are you ready to take your snacking game to the next level? With my Air Fryer Parmesan Crusted Avocado Fries,

- 2 packages instant ramen noodles - 1/4 cup creamy peanut butter - 2 tablespoons soy sauce - 1 tablespoon sriracha (adjust for spice level) - 1 tablespoon sesame oil - 1 tablespoon rice vinegar - 2 green onions, finely chopped - 1/2 cup shredded carrots - 1/4 cup chopped cilantro - 1/4 cup roasted peanuts, roughly chopped - 2 cups water Each ingredient plays a key role in this dish. The instant ramen noodles serve as the base. They cook quickly and soak up flavor. Creamy peanut butter brings richness and depth. Soy sauce adds saltiness and umami. Sriracha gives heat, but you can adjust it to your taste. Sesame oil contributes a nutty aroma. Rice vinegar adds a slight tang. Green onions and carrots add freshness and crunch. Cilantro brightens the dish, while roasted peanuts offer extra texture. - Medium saucepan - Mixing bowl - Measuring cups and spoons - Cutting board - Sharp knife A medium saucepan is ideal for cooking the noodles and mixing the sauce. It should hold at least 3-4 quarts. A mixing bowl is needed to combine the peanut sauce. Use a cutting board and knife for chopping veggies. These tools help keep the prep easy and fun! First, take a medium saucepan and fill it with 2 cups of water. Place it on the stove and turn the heat to high. Wait for the water to boil. Once boiling, add the 2 packages of instant ramen noodles. Cook them according to the package instructions, which usually takes about 2-3 minutes. To get the best noodle texture, stir them gently as they cook. This helps them separate and prevents clumping. While the noodles cook, grab a bowl. In this bowl, mix together the creamy peanut butter, soy sauce, sriracha, sesame oil, and rice vinegar. Use a whisk or a fork to combine everything well until it forms a smooth sauce. If you like more heat, you can add extra sriracha. Just remember to taste as you go! Once the noodles are cooked, it's time to drain them. Reserve about 1/4 cup of the cooking water before draining the rest. Return the drained noodles back to the saucepan. Pour the spicy peanut sauce over the noodles and mix thoroughly. If the sauce is too thick, add a little of the reserved cooking water to reach a smooth consistency. Next, stir in the shredded carrots and half of the chopped green onions. Make sure everything is coated well in the sauce. Now, plate your ramen in deep bowls. Top with the chopped cilantro, remaining green onions, and roasted peanuts for that perfect crunch! To prevent overcooking the noodles, watch the clock closely. Instant ramen cooks quickly, usually in 2-3 minutes. Stir the noodles gently while they cook. This helps them cook evenly. For a smoother peanut sauce, mix the peanut butter with soy sauce first. Then add sriracha, sesame oil, and rice vinegar. Whisk until the mixture is creamy. If it feels too thick, add a little water to loosen it up. For garnishing the dish, use chopped cilantro and green onions. This adds color and flavor. A sprinkle of crushed peanuts gives a nice crunch. Serve your ramen in deep bowls for a cozy look. Aim for a serving size of about one cup for each person. This keeps it filling but not overwhelming. You can add proteins like tofu or chicken for extra heartiness. Cook the protein separately, then mix it in with the noodles. If you prefer, swap out the peanut butter for almond or sunflower butter. These options work well for different diets. You can also include more veggies, like spinach or bell peppers, to boost nutrition. {{image_2}} You can choose different types of peanut butter for your ramen. Natural peanut butter has simple ingredients and a rich taste. It offers a strong peanut flavor. Processed peanut butter has added sugar and oils, making it sweeter and creamier. If you want to try something new, consider nut butters like almond or cashew. These can give your dish a unique twist. Adding vegetables can boost nutrition and flavor. You might include: - Shredded carrots - Spinach - Broccoli florets - Bell peppers - Snap peas Seasonal veggies can make your meal fresh. In spring, add asparagus or peas. In autumn, try pumpkin or sweet potatoes. These veggies can add color and crunch to your ramen. Adjusting spice is easy. If you like it hot, add more sriracha. You can also use chili oil for a different flavor. For milder heat, reduce the sriracha or mix in some honey. Different hot sauces, like sambal oelek or Thai chili paste, can change the taste too. Don’t be afraid to experiment with the spice to find your perfect level. To store leftovers, let the ramen cool down first. Place it in an airtight container. This helps keep the flavors fresh. Your ramen will stay good in the fridge for about three days. For best results, store the noodles and sauce separately. This keeps the noodles from getting mushy. When you reheat, use a microwave or stovetop. If using the microwave, put the ramen in a bowl. Add a splash of water to keep it moist. Heat for one to two minutes, stirring halfway. On the stovetop, warm it in a saucepan over low heat. Add a bit of water if it looks dry. Stir gently to keep the texture nice. You can freeze leftovers if you want to save them longer. Use a freezer-safe container and make sure it's airtight. The ramen will last about one month in the freezer. When you are ready to eat, thaw it in the fridge overnight. Then, reheat as mentioned above for the best taste. It takes just 5 minutes to prep. Cooking the ramen noodles adds another 2 to 3 minutes. So, the total time is about 10 minutes. This quick meal is perfect for busy days. Yes, you can! Look for gluten-free instant ramen noodles. Many brands offer rice or quinoa-based noodles. They work well and still taste great in this recipe. If you need a nut-free option, try sunflower seed butter. It gives a similar creaminess. You can also use tahini, which is made from sesame seeds. Both options keep the dish tasty and safe for allergies. This blog post covered key aspects of making delicious Minute Spicy Peanut Butter Ramen. We discussed the necessary ingredients and their roles, the utensils you'll need, and detailed step-by-step cooking instructions. You learned tips for perfect cooking and presentation, along with variations to customize your dish. Lastly, we explored storage methods and answered common questions. Enjoy making this tasty meal your own, and don't hesitate to experiment!

Minute Spicy Peanut Butter Ramen Flavorful Quick Meal

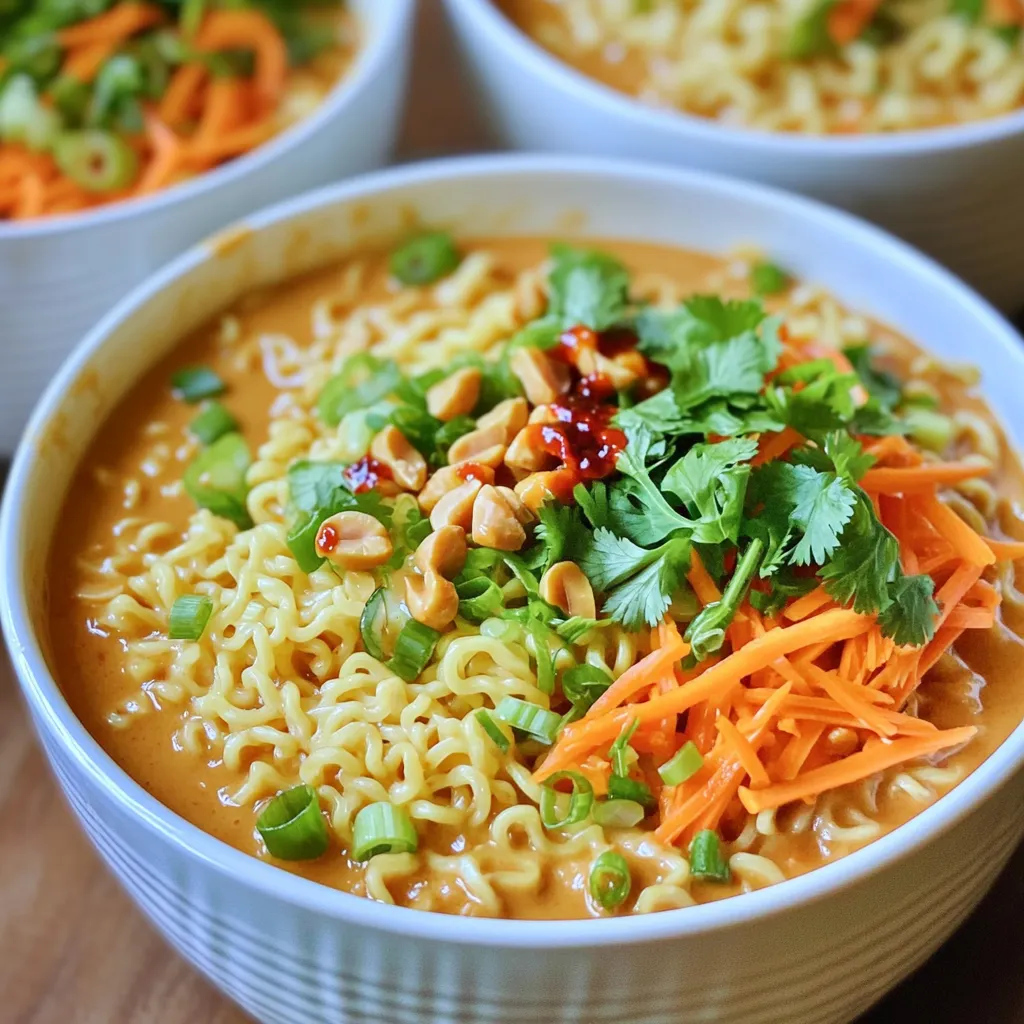
Looking for a quick, tasty meal? Look no further! Minute Spicy Peanut Butter Ramen combines rich flavors with fast prep.

- Orzo Pasta and Broth - 2 cups orzo pasta - 2 cups vegetable broth (or chicken broth) - Salmon and Spices - 1 lb salmon fillets - 1 tablespoon Cajun seasoning - Salt and pepper to taste - Creamy Components - 1 cup heavy cream - Vegetables and Garnishes - 1 cup cherry tomatoes, halved - 1 cup spinach, roughly chopped - 3 cloves garlic, minced - 1 medium onion, diced - 2 tablespoons olive oil - Fresh parsley, chopped (for garnish) - Lemon wedges (for serving) Gathering the right ingredients is key to a great dish. Orzo pasta is the base, soaking up all the flavors. I love using vegetable broth, but chicken broth works too. The rich salmon fillets give the dish depth, while Cajun seasoning adds a spicy kick. Cream brings everything together, making it creamy and luscious. Fresh veggies like cherry tomatoes and spinach brighten the dish. Garlic and onion add a savory touch. Olive oil helps sauté the aromatics, enhancing the overall flavor. Finally, don’t skip the parsley and lemon; they add freshness and zest to each bite. Seasoning and Marinating Start by seasoning the salmon fillets. Use Cajun seasoning, salt, and pepper. Make sure to coat both sides well. Let the salmon marinate for about 10 minutes. This helps the flavors soak in. Searing Techniques Heat a non-stick skillet over medium heat. Add olive oil and let it shimmer. Place the salmon fillets skin-side down in the pan. Sear for about 4-5 minutes. Then, flip the salmon and cook for another 3-4 minutes. The salmon is ready when it flakes easily with a fork. Remove it from the heat and set it aside. Sautéing Aromatics In the same pan, add diced onion and minced garlic. Sauté them until the onions turn translucent. This should take about 3-4 minutes. The garlic adds a nice aroma. Toasting the Orzo Next, stir in the orzo pasta. Cook it for another 2 minutes. This will give the orzo a bit of a toasty flavor. Simmering with Broth Pour in the vegetable broth. Bring the mix to a gentle boil. Then, reduce the heat and cover. Let it simmer for 8-10 minutes until the orzo is al dente. Stir occasionally to prevent sticking. Adding Cream and Veggies Once the orzo is cooked, stir in heavy cream, cherry tomatoes, and chopped spinach. Mix everything until the spinach wilts and colors the dish. Adjust the seasoning with salt and pepper. Flaking and Folding Salmon Now, flake the cooked salmon into large chunks. Gently fold the salmon into the orzo mixture. Be careful not to break the salmon too much. Your one-pan creamy Cajun salmon orzo is now ready to serve! Best Cooking Techniques for Salmon To cook salmon well, start with the right heat. Use medium heat for even cooking. Sear skin-side down first for a nice crisp. Flip it gently to keep the fish intact. Cook until it flakes easily with a fork. This usually takes about 8-10 minutes. Ensuring Flakiness Let the salmon rest for a few minutes after cooking. This helps it stay juicy and flaky. If you overcook it, the salmon will dry out. Keep an eye on the color; it should turn from bright pink to a lighter shade. Achieving Al Dente Texture Cook the orzo in broth for great flavor. Bring the broth to a boil before adding the orzo. Stir occasionally to prevent sticking. You want it to be firm yet tender, or al dente. This usually takes around 8-10 minutes. Common Mistakes to Avoid Don’t cook orzo too long or it will become mushy. Also, don’t forget to stir. This keeps it from clumping together. Always taste it before draining. If it’s not ready, give it a minute more. Adjusting the Spice Level Cajun seasoning can vary in heat. Taste it first. If it’s too spicy, add more cream to cool it down. You can also add a pinch of sugar to balance the heat. Alternative Ingredients for Variations If you want a twist, try different veggies. Bell peppers, zucchini, or asparagus work well. You can swap salmon for shrimp or chicken for a new flavor. Use coconut milk instead of cream for a lighter option. {{image_2}} You can change up the veggies in this dish to suit your taste. Here are some great options: - Zucchini: Slice it thin and add it in with the spinach. - Bell Peppers: Chop colorful bell peppers for a sweet crunch. - Broccoli: Use small florets for a healthy boost. Adding more colorful produce not only makes the dish pretty, but it also packs in more nutrients. Consider adding: - Carrots: Grate or thinly slice them for a sweet touch. - Peas: Toss in frozen peas near the end of cooking for a pop of color. If you want to switch the salmon, you have plenty of choices. Try these substitutes: - Chicken: Use diced chicken breasts. Cook them until golden before adding the orzo. - Shrimp: Add shrimp when the orzo is almost done. They cook fast! For vegetarian or vegan versions, consider: - Tofu: Use firm tofu, marinated and seared for a protein boost. - Chickpeas: Add canned chickpeas for a hearty twist. The creamy sauce can change based on what you like. Here are some ideas: - Greek Yogurt: Swap out cream for Greek yogurt for a tangy flavor. - Coconut Milk: Use coconut milk for a rich, dairy-free option. To adjust the spice profiles, you can: - Add More Cajun: If you love heat, sprinkle in extra Cajun seasoning. - Lemon Zest: Grate lemon zest into the sauce for a fresh kick. These variations let you customize your One-Pan Creamy Cajun Salmon Orzo to fit any meal. Enjoy experimenting! To keep your One-Pan Creamy Cajun Salmon Orzo fresh, store leftovers in the fridge. Use airtight containers for best results. Make sure to cool the dish first before sealing. This helps to avoid condensation inside the container. Leftovers can last for up to three days in the fridge. Label your containers with the date to track freshness. When it’s time to enjoy leftovers, reheating is key. The best way to reheat this dish is on the stove. Simply add a splash of broth or cream to keep it creamy. Heat it over medium heat, stirring gently. This helps to warm the dish evenly without drying it out. You can also use a microwave, but be sure to cover the dish and stir halfway through for even heat. Yes, you can freeze this dish! This makes it great for meal prep. Place it in a freezer-safe container, leaving some space for expansion. Label the container with the date. It can last for up to three months in the freezer. To thaw, place it in the fridge overnight. For quick thawing, you can use the microwave on the defrost setting. After thawing, reheat thoroughly on the stove or microwave. Yes, you can. While salmon is delicious, you can use other fish like trout or cod. Both have great flavors that mix well with the Cajun spices. If you want a milder taste, try tilapia or haddock. These options will still give you a tasty dish. Just keep cooking times the same, adjusting for thickness. This dish stays fresh for about three days in the fridge. Store it in an airtight container to keep it safe. Check for any off smells or changes in color before eating. If you see any signs of spoilage, it's best to throw it away. Always prioritize food safety when storing leftovers. Yes, you can prep this dish in advance! Cook the orzo and veggies, then store them in the fridge. You can cook the salmon just before serving for the best taste. If you want, you can also cook everything and store it together. Just remember to reheat gently to keep the salmon flaky. This dish combines orzo, salmon, and fresh veggies for a tasty meal. I shared tips on perfecting salmon and achieving the right texture in orzo. You can change vegetables, proteins, or sauces to fit your taste. Remember to follow storage tips to keep leftovers fresh. With these steps and tricks, you can make a great meal quickly and easily. Enjoy experimenting with flavors and ingredients!

One-Pan Creamy Cajun Salmon Orzo Flavorful Delight

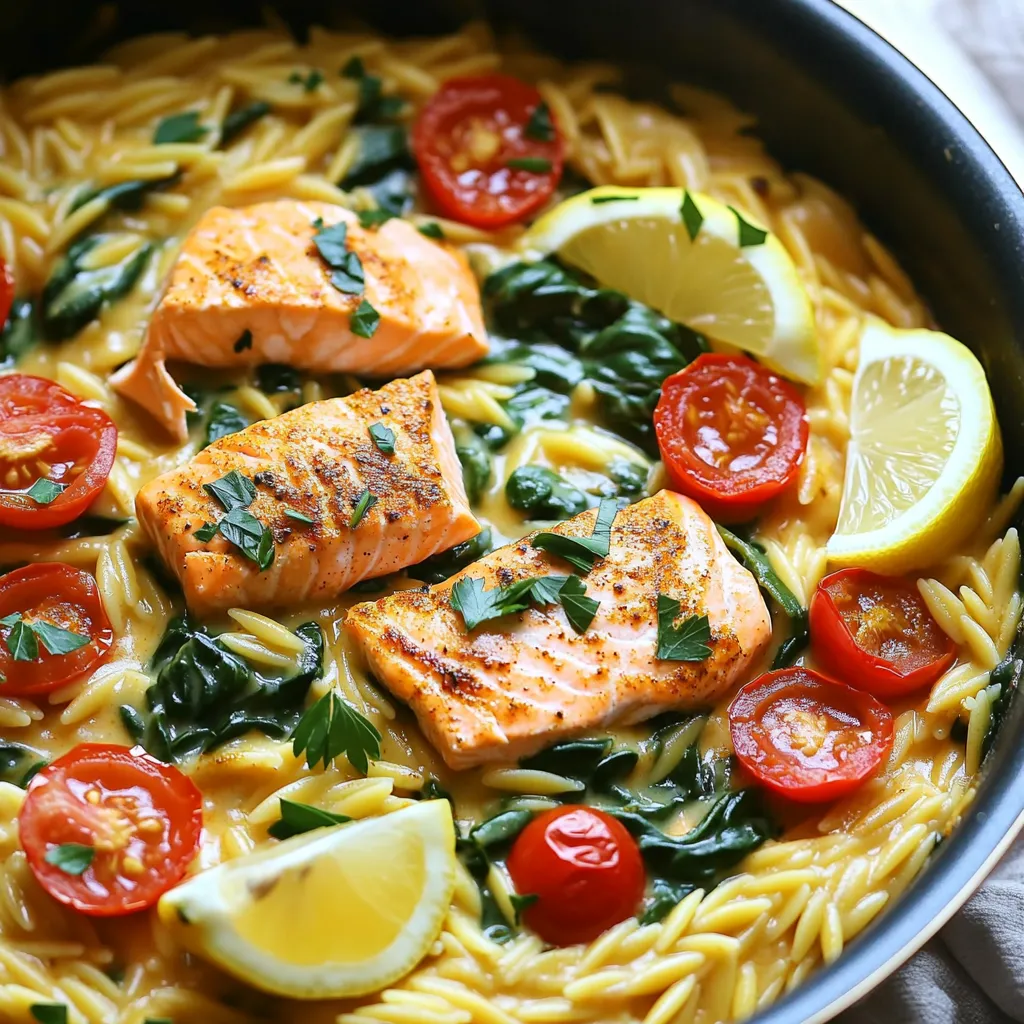
Welcome to a mouthwatering journey! Today, I’m excited to share my One-Pan Creamy Cajun Salmon Orzo, a flavorful delight that

Here’s what you need to make this tasty smoothie: - 2 ripe frozen bananas - 1 cup unsweetened almond milk (or milk of choice) - 1 scoop chocolate protein powder - 2 tablespoons natural almond or peanut butter - 1 tablespoon cocoa powder - 1 tablespoon chia seeds - 1 tablespoon honey or maple syrup (optional) - 1/4 cup dark chocolate chunks - Ice cubes (optional) Using frozen bananas makes this smoothie thick and creamy. They add natural sweetness too. Almond milk is a great choice, but any milk works. Chocolate protein powder boosts the protein level. Almond or peanut butter adds healthy fats. Cocoa powder gives deep chocolate flavor. Chia seeds add fiber and omega-3s. Honey or maple syrup is optional. It’s perfect if you like your smoothie sweeter. Dark chocolate chunks create a nice texture. Ice cubes can make it extra thick. You can mix and match these ingredients based on what you like. This smoothie is not just filling; it’s also a treat! To make the High-Protein Chocolate Chunk Banana Smoothie, follow these simple steps. - Combine all ingredients in a blender. Start with 2 ripe frozen bananas. Then, add 1 cup of unsweetened almond milk. Next, include 1 scoop of chocolate protein powder, 2 tablespoons of natural almond butter, 1 tablespoon of cocoa powder, and 1 tablespoon of chia seeds. If you want it sweeter, add 1 tablespoon of honey or maple syrup. - Blend until smooth and creamy. Turn on your blender at high speed. Blend all the ingredients until the mixture is smooth and creamy. If you like your smoothie thicker, add a few ice cubes and blend again for a few seconds. - Adjust sweetness if needed. After blending, taste your smoothie. If it’s not sweet enough for you, add a bit more honey or maple syrup. Blend for a few more seconds to mix. - Fold in dark chocolate chunks. Once your smoothie is well-blended, stop the blender. Gently fold in 1/4 cup of dark chocolate chunks for a delightful texture. - Serve and garnish. Pour your smoothie into a tall glass or bowl. For a pretty touch, sprinkle a little cocoa powder on top or add a few extra chocolate chunks. Enjoy your delicious creation! To achieve the perfect thickness in your smoothie, use frozen bananas. They add creaminess and chill. If your smoothie is too thin, add ice cubes. Blend again until smooth. When choosing ripe bananas, look for yellow skin with some brown spots. This means they are sweet and ready for blending. Overripe bananas work great too. They give a rich flavor. For extra nutrition, consider adding spinach or kale. A handful will boost vitamins without changing the flavor much. You can also add oats for fiber. If you want alternatives to almond butter, try peanut butter or sunflower seed butter. Both add protein and healthy fats. They can change the taste slightly, so pick what you like best. {{image_2}} You can change the flavors of your smoothie easily. If you love berries, try a berry chocolate smoothie. Just add 1/2 cup of mixed berries like strawberries or blueberries to your blender. The berries will give your smoothie a fresh twist. They also add vitamins and fiber. Blend them with the other ingredients, and enjoy this fruity delight. Another fun option is a tropical version. Replace the almond milk with coconut milk. Add 1/2 cup of fresh pineapple chunks. This version tastes like a vacation in a glass. The coconut milk makes it creamy and rich. It pairs well with the chocolate chunks for a sweet treat. You can adjust the protein content in your smoothie. If you want more protein, add an extra scoop of chocolate protein powder. You can also add Greek yogurt for an additional protein boost. This change will make your smoothie more filling. It’s great for a post-workout snack. For those who prefer dairy-free options, almond milk works well. You can also use oat milk or soy milk. These milks give the same creamy texture without dairy. This makes the smoothie perfect for anyone with lactose intolerance. Just choose the milk you enjoy most. To store leftovers of your High-Protein Chocolate Chunk Banana Smoothie, pour any extra into a jar. Make sure the jar is clean and airtight. Seal it tightly. Keep it in the fridge. This helps keep the smoothie fresh for later. If you want to freeze the smoothie for future use, pour it into ice cube trays. Once frozen, transfer the cubes to a zip-top bag. This way, you can grab a few cubes for a quick treat. When you're ready to enjoy, blend the frozen cubes with a splash of milk. In the refrigerator, you can keep your smoothie for up to 2 days. The taste and texture may change as it sits. If you freeze the smoothie, it can last for about 3 months. Just remember to label your bags with the date. This helps you keep track of freshness. You can use many options if you need dairy-free milk. Here are some great alternatives: - Soy milk - Oat milk - Coconut milk - Cashew milk - Regular cow's milk Each type brings its own flavor and texture. Soy milk adds creaminess. Oat milk gives a sweet taste. Coconut milk offers a tropical twist. Choose what fits your needs! Yes, you can use fresh bananas. However, fresh bananas will change the drink's texture and taste. Frozen bananas make the smoothie thick and creamy. They also keep it cool without extra ice. If you use fresh bananas, consider adding ice cubes. This step helps maintain that delightful chill. You can easily boost protein in your smoothie. Here are some ideas: - Add Greek yogurt - Toss in cottage cheese - Include silken tofu - Use extra protein powder These options mix well and give your smoothie a creamy texture. Plus, they amp up the protein, making it more filling. This blog post covered tasty and easy smoothie recipes. You learned how to blend simple ingredients into delicious drinks. We explored ways to change the flavors and boost nutrition. With some tips on storage, you now know how to keep your smoothies fresh. Enjoy experimenting with bananas, nut butter, and chocolate! Each smoothie can fit your taste and needs. Keep blending and create your perfect drink.

High-Protein Chocolate Chunk Banana Smoothie Bliss

Looking for a delicious and nutritious boost? Try my High-Protein Chocolate Chunk Banana Smoothie Bliss! This easy recipe packs chocolatey

- 1 tablespoon olive oil - 1 small onion, diced - 3 cloves garlic, minced - 1 teaspoon dried oregano - 1 teaspoon dried basil - 1 can (14 oz) crushed tomatoes - 4 cups vegetable broth - 12 oz cheese tortellini (fresh or frozen) - 1 cup heavy cream - 1 cup fresh spinach - Salt and pepper to taste - Grated Parmesan cheese for serving These ingredients create a rich, creamy sauce packed with flavor. The cheese tortellini gives it a delightful texture. You can use fresh or frozen tortellini based on what you have. Fresh spinach adds a nice pop of color and nutrients. - Red pepper flakes for heat - Fresh basil for garnish - Italian sausage for extra protein - A splash of balsamic vinegar for tang Adding red pepper flakes can give your dish a spicy kick. Fresh basil enhances the aroma and taste. Italian sausage offers a meaty option, making this dish heartier. A splash of balsamic vinegar adds depth to the sauce. - Olive oil can be replaced with butter for a richer taste. - Vegetable broth can be swapped for chicken broth if you prefer. - Heavy cream can be replaced with half-and-half for a lighter version. - Spinach can be substituted with kale for a different green. These substitutes allow you to customize the dish based on your pantry. They also help to accommodate dietary needs. Always taste as you go when making substitutions to get the right balance. First, set your Instant Pot to 'Sauté' mode. Add one tablespoon of olive oil. When the oil is hot, add one small diced onion. Cook the onion for 3 to 4 minutes until it turns translucent. Next, stir in three minced garlic cloves. Add one teaspoon of dried oregano and one teaspoon of dried basil. Sauté this mixture for about one minute. You want to smell those lovely herbs! Now it’s time to add more flavors. Pour in one can of crushed tomatoes and four cups of vegetable broth. Stir everything well to combine. Press 'Cancel' to turn off the sauté mode. Then, add twelve ounces of cheese tortellini. Gently stir to make sure the tortellini is submerged. Close the lid tightly. Set the Instant Pot to 'Manual' on high pressure for four minutes. Make sure the valve is in the sealing position. When the timer goes off, perform a quick release. Carefully turn the valve to venting. Keep your hands safe from the steam! Once all steam is gone, open the lid. Stir in one cup of heavy cream and one cup of fresh spinach. Mix until the spinach wilts and the sauce looks creamy. Finally, season with salt and pepper to taste. If you use frozen tortellini, the cooking time remains the same. The Instant Pot will take a bit longer to reach pressure, but the four minutes cook time works perfectly. Just make sure to stir gently before sealing the lid. This ensures the tortellini cooks evenly. Enjoy your creamy tomato tortellini! To create a rich, creamy sauce, you need to add heavy cream at the right time. Stir it in after cooking the tortellini. This keeps it smooth and avoids curdling. Use fresh spinach for vibrant color and taste. It wilts nicely into the dish. You can also mix in some grated Parmesan cheese for extra flavor. This makes the sauce even creamier! One common mistake is overcooking the tortellini. They only need 4 minutes under pressure. If you cook them too long, they can turn mushy. Another mistake is not using enough salt. Taste the dish before serving. Adjust salt and pepper to make the flavors pop. Lastly, don’t forget to release the pressure carefully. Use a kitchen towel to avoid steam burns. If you like it spicy, add a pinch of red pepper flakes. You can mix this in with the garlic and herbs. For a milder dish, skip the red pepper. If you want a touch of sweetness, add a teaspoon of sugar. This balances out the acidity from the tomatoes. Adjust the spice level based on your taste, and enjoy! {{image_2}} You can boost this dish with protein. Adding chicken or sausage makes it heartier. For chicken, use bite-sized pieces. Sauté them in the pot before adding other ingredients. Cook until they are no longer pink. For sausage, slice it and brown it in the pot first. This adds great flavor to the sauce. You can also use cooked shrimp for a seafood twist. Just add them in at the end, so they don’t overcook. This recipe is easy to adapt for vegetarians and vegans. To make it vegetarian, just skip the meat and use vegetable broth. For a vegan option, replace the heavy cream with coconut milk or cashew cream. You can also use vegan cheese tortellini. This keeps the dish creamy and delicious without dairy. Don’t forget to check the labels on the tortellini to ensure they are vegan. You can change up the flavors by using different herbs and spices. Try adding fresh basil or parsley for a burst of freshness. A pinch of red pepper flakes gives it a nice kick. You can also use thyme or rosemary for a different taste. Experiment with garlic powder or onion powder for depth. The fun is in trying new things, so don’t be afraid to mix it up! To store your creamy tomato tortellini, let it cool first. Then, place it in an airtight container. Make sure to seal it well. You can keep it in the fridge for up to 3 days. When ready to eat, check for any changes in smell or texture. If it looks or smells off, throw it out. If you want to freeze your tortellini, it's best to do this right away. Place it in a freezer-safe container or bag. Make sure to remove as much air as possible. Your tortellini can last in the freezer for about 2 months. When you're ready to eat, thaw it in the fridge overnight before reheating. To reheat your tortellini, use a pot on the stove for even heat. Add a splash of broth or water to keep it creamy. Heat it over medium-low heat, stirring often. You can also use the microwave, but be careful not to overcook it. Heat in short bursts, stirring in between. This way, you ensure a tasty meal again! Yes, you can use non-dairy options. For the heavy cream, try coconut cream or cashew cream. They add a rich taste. Use almond milk or oat milk for a lighter option. Just remember, these choices may change the flavor a bit. Store tortellini in an airtight container. If you have leftovers, keep them in the fridge. They last about three days. For longer storage, freeze them in a single layer. Once frozen, move them to a freezer bag. This keeps them fresh for up to three months. To make this in a slow cooker, start by sautéing the onion and garlic in a pan. Then, add them to the slow cooker with the other ingredients. Set it to cook on low for 6-8 hours or high for 3-4 hours. Stir in the heavy cream and spinach just before serving. This blog post covers easy steps to make a tasty tortellini dish in the Instant Pot. We went over the main ingredients and how to cook them. I shared tips for a creamy sauce and how to avoid common mistakes. You learned about protein options and how to store leftovers. Now, you can enjoy making your tortellini just the way you like it. Experiment with flavors and enjoy delicious meals!

Instant Pot Creamy Tomato Tortellini Delight Recipe

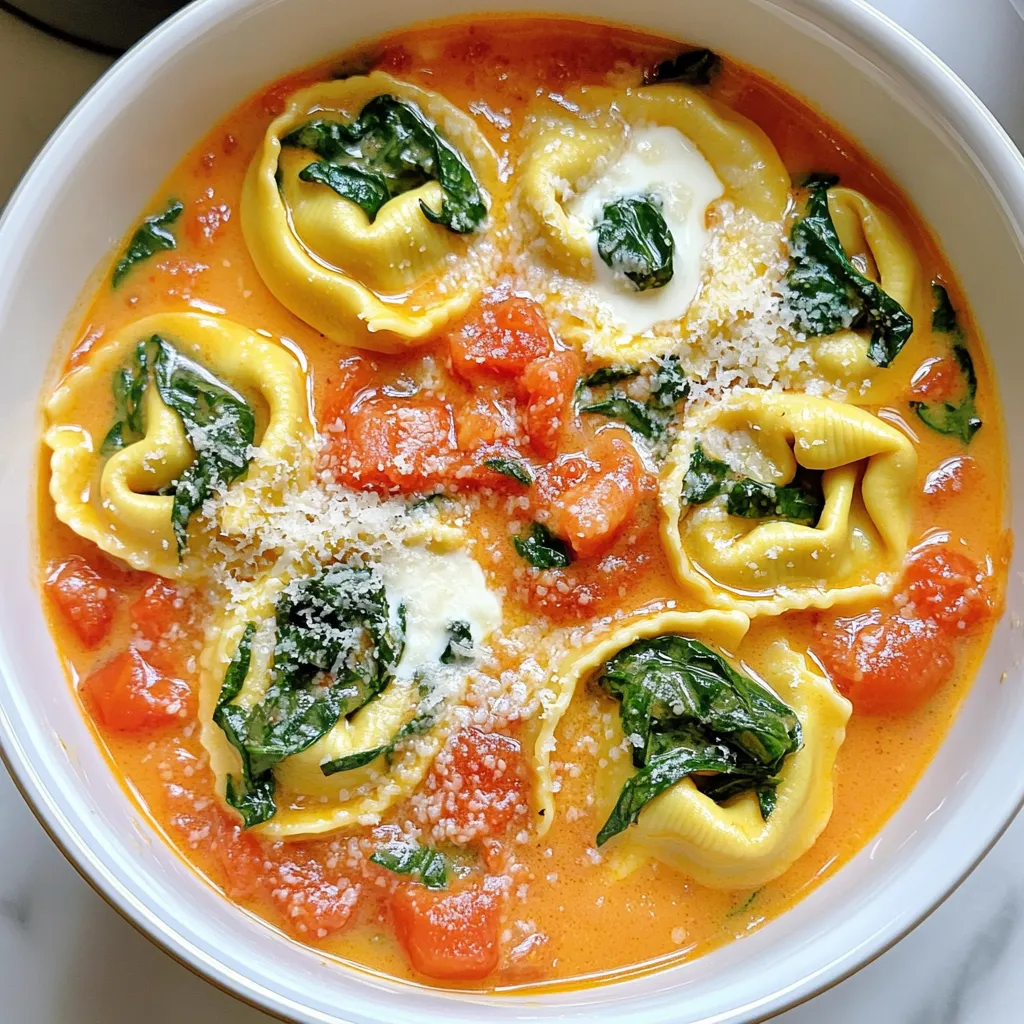
Get ready for a delicious and easy meal with my Instant Pot Creamy Tomato Tortellini Delight Recipe! This dish combines

To create a tasty base for your cheesecake, gather these simple ingredients: - 1 ½ cups graham cracker crumbs - ½ cup unsalted butter, melted - 1 tablespoon granulated sugar These ingredients form a crunchy and sweet crust. The graham cracker crumbs give texture, while the butter binds them. For the rich filling, you will need: - 2 cups cream cheese, softened - 1 cup pumpkin puree - ¾ cup granulated sugar - ½ cup brown sugar - 3 large eggs - 1 teaspoon vanilla extract - 1 teaspoon ground cinnamon - ½ teaspoon ground nutmeg - ¼ teaspoon ground ginger This combination makes the filling creamy and flavorful. The pumpkin puree adds a warm taste, while the spices bring a cozy fall vibe. Finish your cheesecake with these delightful toppings: - 1 cup heavy whipping cream - ½ cup caramel sauce (store-bought or homemade) - Sea salt, for garnish The whipped cream adds lightness, while the caramel sauce gives a sweet finish. A sprinkle of sea salt balances the flavors perfectly. First, preheat your oven to 325°F (160°C). This step is key for baking the crust right. In a mixing bowl, combine 1 ½ cups of graham cracker crumbs, ½ cup of melted unsalted butter, and 1 tablespoon of granulated sugar. Mix these together until the crumbs are fully coated. Next, press this mixture firmly into the bottom of a 9-inch springform pan. Make sure it’s even. Bake the crust for 10 minutes, then take it out of the oven. Let it cool while you get ready to make the filling. In a large mixing bowl, beat 2 cups of softened cream cheese until it’s smooth and creamy. This is where the magic starts. Add in 1 cup of pumpkin puree, ¾ cup of granulated sugar, and ½ cup of brown sugar. Toss in 3 large eggs, 1 teaspoon of vanilla extract, 1 teaspoon of ground cinnamon, ½ teaspoon of ground nutmeg, and ¼ teaspoon of ground ginger. Mix all these ingredients until the mixture is smooth and well combined. Pour this creamy filling over your cooled crust. Use a spatula to smooth the top. Now it’s time to bake! Place the cheesecake in the preheated oven and bake for 55 to 65 minutes. The center should be set but still have a slight jiggle. Once baked, turn off the oven and crack the door open a bit. Let the cheesecake sit inside for about 1 hour. This helps stop it from cracking. After that, refrigerate the cheesecake for at least 4 hours, or overnight for the best taste. It’s hard to wait, but it’s worth it! To keep your cheesecake smooth, start by cooling it slowly. After baking, turn off the oven but leave the cheesecake inside. Keep the door slightly open for about one hour. This method helps avoid sudden temperature changes, which can cause cracks. Another tip is to bake your cheesecake in a water bath. Wrap the springform pan in foil to prevent water from leaking in. Place it in a larger pan filled with hot water. This gentle heat helps the cheesecake cook evenly and reduces cracks. When whipping cream, start with chilled equipment. Use a cold bowl and beaters for the best results. Pour the heavy cream into the bowl and beat on medium speed. Stop when you see soft peaks forming. Be careful not to overmix, or you’ll end up with butter instead of whipped cream. For extra flavor, add a little vanilla extract or sugar while whipping. This adds a sweet touch to your caramel whipped cream. Serve your cheesecake cold for the best taste. Slice it into even pieces for a neat presentation. Top each slice with a generous dollop of caramel whipped cream. Drizzle more caramel sauce over the top and sprinkle with sea salt. For a fun twist, add some crushed graham crackers or nuts as a garnish. Pair your cheesecake with a scoop of vanilla ice cream or a cup of coffee for a delightful treat. {{image_2}} You can change the sweeteners to fit your diet. If you want less sugar, use stevia or monk fruit. These options add sweetness without the calories. For a more natural taste, try honey or maple syrup. Just remember to adjust the amounts since they are sweeter than sugar. Making this cheesecake gluten-free is easy. Use gluten-free graham cracker crumbs for the crust. You can also use almond flour or ground oats as an alternative. Both options work well to create a tasty crust. Ensure that all your other ingredients, like the caramel sauce, are also gluten-free. You can boost the flavor of your cheesecake. Try adding a splash of bourbon or rum to the filling for a warm twist. You can also mix in some chocolate chips for a sweet surprise. For a fruity touch, add a layer of cranberry sauce on top. These simple changes can make your cheesecake even more delightful! To store leftover salted caramel pumpkin cheesecake, first cover it tightly with plastic wrap. You can also use aluminum foil. Place it in the fridge. It will stay fresh for up to five days. Make sure to keep it in a cool part of the fridge. This helps maintain its rich and creamy texture. If you want to save some for later, freezing is a great option. First, let the cheesecake cool completely. Then, cut it into slices. Wrap each slice in plastic wrap, then place them in a freezer-safe bag. Label it with the date. You can freeze the cheesecake for up to three months. When you’re ready to eat, take it out and let it thaw in the fridge overnight. Reheating salted caramel pumpkin cheesecake is simple. If you prefer it warm, place a slice on a microwave-safe plate. Heat it in the microwave for about 15-20 seconds. Check it to see if it's warm enough. Be careful not to overheat it, as it can change the texture. If you like it cold, just take it straight from the fridge. It tastes great either way! To avoid cracks, watch the baking time closely. Bake at a low temperature. It’s also helpful to leave the oven door slightly open after baking. This allows the cheesecake to cool slowly. Cooling slowly helps to keep it smooth. Remember, a slightly jiggly center is okay. The cheesecake will set as it cools. Yes, you can use butternut squash puree or sweet potato puree as substitutes. Both have a similar texture and flavor. Make sure to use unsweetened puree for the best results. You can also use mashed bananas, but the flavor will change. Adjust your spices if needed, as pumpkin has a unique taste. If you don’t have caramel sauce, try using chocolate sauce or maple syrup. Both add sweetness and a different flavor. You can also make a quick caramel by melting sugar. Just heat sugar in a pan until it turns golden. For a healthier touch, try a fruit compote or honey drizzle instead. In this post, we explored how to make a delicious cheesecake. You learned about the crust, filling, and toppings. We discussed steps to prep, bake, and cool it properly. I shared tips to prevent cracks and gave great serving ideas. You also discovered fun variations and storage options. Remember, cheesecake is fun to make and delightfully tasty. With practice, you'll create the perfect dessert. Enjoy sharing your cheesecake with friends and family!

Salted Caramel Pumpkin Cheesecake Rich and Creamy Delight

Are you ready to indulge in the most delicious Salted Caramel Pumpkin Cheesecake? This rich and creamy delight will be

- 1 lb ground beef or sliced beef sirloin - 1 tablespoon sesame oil - 1 medium onion, sliced - 3 cloves garlic, minced - 1 tablespoon ginger, grated - 2 tablespoons gochujang (Korean chili paste) - 1 tablespoon soy sauce - 1 teaspoon brown sugar - 1 cup broccoli florets - 1 cup shredded carrots - 2 green onions, chopped - 2 cups cooked rice (white or brown) - Sesame seeds for garnish - Lime wedges for serving For this dish, you want to gather fresh ingredients. Start with the beef. Ground beef or sliced beef sirloin works great. The sesame oil adds a lovely nutty taste. Use a medium onion, sliced to add sweetness. Fresh garlic and ginger are key for flavor. Gochujang gives the heat and spice. Next, you’ll need soy sauce for saltiness and brown sugar for a touch of sweetness. Broccoli florets and shredded carrots add color and crunch. Green onions give a fresh finish. Serve over cooked rice for a hearty meal. Don't forget sesame seeds and lime wedges for garnish! These make your dish pop with flavor and style. 1. Heat the sesame oil: Start by adding one tablespoon of sesame oil to a large skillet. Turn the heat to medium-high. Let the oil get hot. 2. Stir-fry the onion: Slice one medium onion. Add it to the hot oil. Stir-fry for about 2-3 minutes. You want it to soften. 3. Add garlic and ginger: Next, take three cloves of minced garlic and one tablespoon of grated ginger. Add these to the onion. Cook for one more minute until you smell the aromas. 4. Cook the beef: Now, increase the heat to high. Add one pound of ground beef to the skillet. Break it up with a spatula. Cook until it turns brown and is fully cooked, about 5-7 minutes. 5. Mix in sauces: Stir in two tablespoons of gochujang, one tablespoon of soy sauce, and one teaspoon of brown sugar. Make sure the beef is fully coated in this spicy mixture. 1. Add the veggies: Toss in one cup of broccoli florets and one cup of shredded carrots. Stir everything together. 2. Cook the vegetables: Let them cook for 3-4 minutes. You want the veggies to stay tender-crisp. 3. Adjust seasoning: Taste the mix. If you want more heat, add extra gochujang or soy sauce. 1. Serve the rice: Take two cups of cooked rice and place a scoop in each bowl. 2. Top with beef mix: Spoon the spicy beef and vegetable mixture over the rice. 3. Garnish: Finish by sprinkling chopped green onions and sesame seeds on top. Serve with lime wedges for a zesty touch. This dish is not just tasty; it is also vibrant and colorful! Enjoy every bite of your spicy Korean beef bowl. - Best practices for frying ground beef: Start with a hot skillet. This helps the beef brown nicely. Break the beef apart as it cooks. This keeps it from clumping. Stir often to ensure even cooking. You want it brown, not gray. - How to achieve the right vegetable texture: Add vegetables at the right time. Broccoli and carrots should stay slightly crisp. Stir-fry them for about 3-4 minutes. This keeps their color bright and fresh. - Recommended side dishes and beverages: Serve your spicy Korean beef with rice. You can choose white or brown rice. For a drink, try iced tea or a light beer. These pair well with the heat. - Ideas for presentation and garnishing: Use colorful bowls to make the dish pop. Add extra lime wedges on the side. Sprinkle more sesame seeds for a finishing touch. Chopped green onions add bright color too. - Adjusting gochujang quantity: If you want less heat, use less gochujang. Start with one tablespoon and taste it. You can always add more if you like it spicy. - Alternative spice options for different heat levels: Try sriracha for a different flavor. You can also use chili flakes for a milder kick. Adjust to your taste for the perfect spice level. {{image_2}} You can swap ground beef with ground turkey or chicken. These meats are leaner and still pack flavor. If you want a vegetarian meal, try using tofu or jackfruit. Both options absorb flavors well and make the dish hearty. To boost flavor, add more veggies like bell peppers or snap peas. You can even include fermented radish for a tangy crunch. Experiment with different sauces like teriyaki or sriracha to give your bowl a unique twist. If you're looking for rice alternatives, consider quinoa or cauliflower rice. Quinoa adds protein, while cauliflower rice keeps it low-carb. You can also use noodles for a fun twist. They soak up the sauce and add a different texture to your meal. To store your spicy Korean beef bowls, let them cool first. Place the leftovers in airtight containers. This keeps the flavors fresh and safe. Glass or plastic containers work well. Make sure to label them with the date. You can freeze the beef mixture for later use. Just pack it tightly in a freezer-safe container. Leave some space for expansion. For best results, eat it within three months. When you're ready to enjoy it, thaw it overnight in the fridge. Reheat it on the stove over low heat for even warmth. In the refrigerator, your spicy Korean beef bowls will stay fresh for about three to four days. If you freeze them, they can last up to three months. Always check for any signs of spoilage before eating. What is gochujang and where can I buy it? Gochujang is a spicy Korean chili paste. It has a sweet and spicy flavor. You can find it in Asian grocery stores or online. Look for it in the condiment aisle. Can I make this dish ahead of time? Yes, you can make this dish ahead of time. Cook the beef mixture and store it in the fridge. You can also prepare the rice in advance. Just reheat everything before serving. Is this recipe gluten-free or dairy-free? This recipe can be gluten-free. Use gluten-free soy sauce instead of regular soy sauce. It is naturally dairy-free, so it works for dairy-free diets too. Can I make a spicy Korean beef bowl vegetarian? Yes, you can make it vegetarian. Substitute ground beef with crumbled tofu or tempeh. You can also use mushrooms for a meaty texture. What’s the best way to cook ground beef? The best way to cook ground beef is over medium-high heat. Break it up with a spatula as it cooks. This helps it brown evenly and prevents clumping. How do I know when my beef is fully cooked? Your beef is fully cooked when it turns brown with no pink spots. Use a meat thermometer to check for 160°F as a safe temperature. This blog post outlined a tasty Korean beef bowl recipe. You learned about the key ingredients and step-by-step cooking methods. Cooking tips helped you improve flavor and texture. Variations offered new ideas to suit different diets. Storage information ensures your leftovers stay fresh. As you try this dish, remember to adjust spice levels to your taste. Explore different proteins and vegetables to make it your own. Enjoy this fun cooking adventure! It's a simple recipe that can impress anyone.

Spicy Korean Beef Bowls Packed with Flavor and Heat

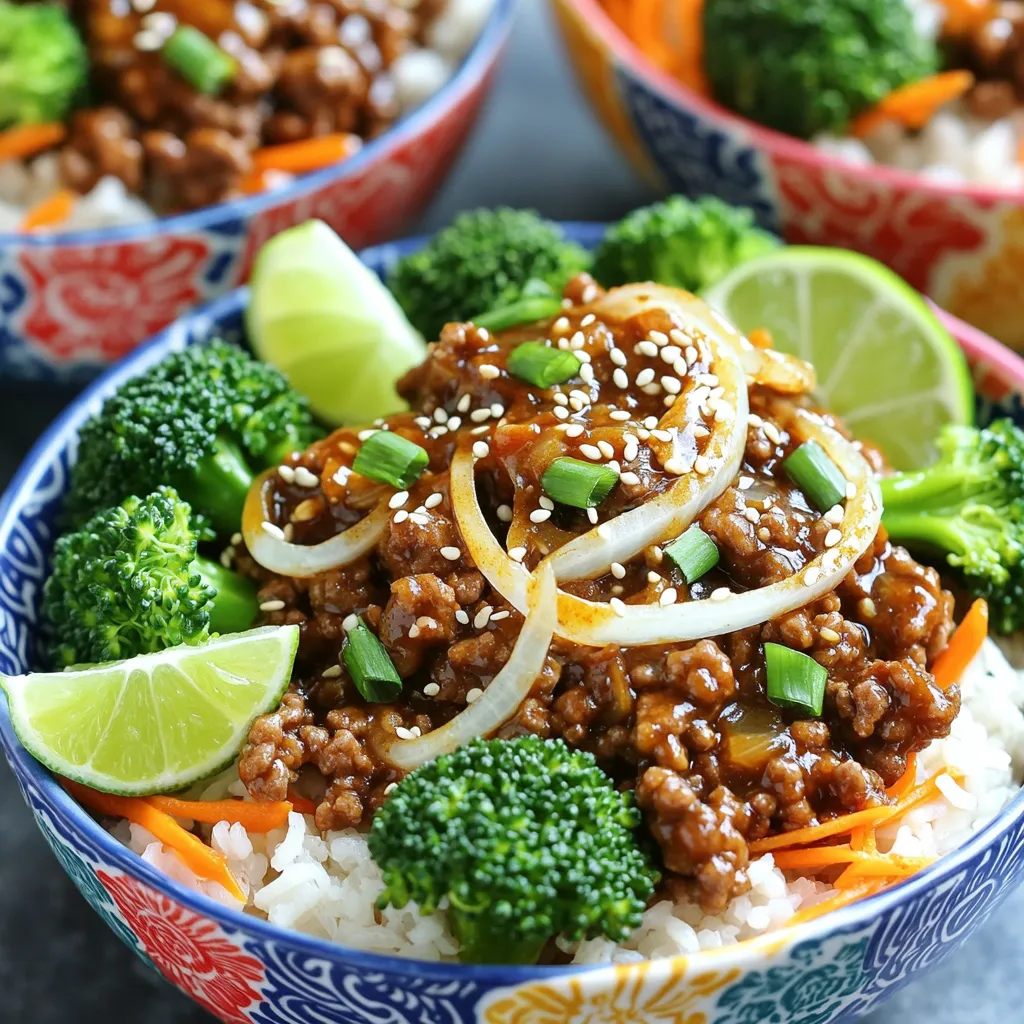
Are you ready to spice up your dinner routine? This Spicy Korean Beef Bowl recipe bursts with flavor and heat.

- 2 cups Greek yogurt - 1/4 cup honey or maple syrup - Zest of 1 lemon - 2 tablespoons lemon juice The main ingredients in this recipe create a creamy and tangy base. Greek yogurt gives you a thick texture and lots of protein. Honey or maple syrup adds a touch of sweetness. The lemon zest and juice brighten the flavor, making each bite refreshing. - 1 cup fresh raspberries - 1 cup granola (your choice) - Mint leaves for garnish Raspberries add a burst of tartness and color. The granola gives a nice crunch, making each layer fun to eat. Finally, mint leaves bring a fresh look and aroma to your parfaits. - Alternative sweeteners - Different fruits or nuts If you want to switch things up, you can use other sweeteners like agave or stevia. You can also try different fruits like strawberries or blueberries. Nuts like almonds or walnuts can add extra crunch and flavor. Start by getting a mixing bowl. In it, combine 2 cups of Greek yogurt with 1/4 cup of honey or maple syrup. Mix them well until smooth. Next, add the zest of one lemon and 2 tablespoons of lemon juice. Stir again until everything blends nicely. This mixture will be creamy and tangy, perfect for your parfaits. Grab your serving glasses or bowls. Begin by spooning some of the yogurt mixture into the bottom. Use about 1/4 cup per glass. Next, add a layer of fresh raspberries on top. Aim for about 1/4 cup of raspberries per layer. Then, sprinkle a layer of granola over the raspberries. Use about 2 tablespoons of granola. Repeat these layers—yogurt, raspberries, granola—until the glasses are full. Finish with a final layer of yogurt on top for a nice look. To make your parfaits pop, garnish them with a few extra raspberries. Add a sprig of fresh mint on top for a colorful touch. This not only looks pretty but adds a nice aroma too. Serve your parfaits right away for the best taste. If you want, chill them in the fridge for about 30 minutes to let the flavors mix. Enjoy your tasty and easy Lemon Raspberry Yogurt Parfaits! To get the right consistency for your yogurt, start with Greek yogurt. It is thick and creamy. Mix it with honey or maple syrup. This adds sweetness. Next, add lemon zest and lemon juice. This gives a fresh, tangy flavor. Stir until smooth. You want a creamy blend that holds its shape. When layering, use equal amounts of yogurt, raspberries, and granola. This balance makes each bite tasty. The colors in your parfait matter too. Use bright red raspberries against the white yogurt. This contrast looks beautiful. Finish with a layer of yogurt on top. It makes a nice cap for your parfait. For more flavor, add a splash of vanilla extract to the yogurt mix. This adds warmth and depth. You can also experiment with nuts. Try almonds or walnuts for a crunchy twist. They add texture and flavor. Just sprinkle them on top of the granola. {{image_2}} You can switch the raspberries for other berries. Strawberries, blueberries, and blackberries work great. You can also try seasonal fruits. Fresh peaches or apples can add a nice twist. A mix of fruits gives your parfait fun colors and flavors. If you want a dairy-free option, try coconut or almond yogurt. Both have great taste and texture. You can also experiment with different flavors of yogurt. Vanilla or berry-flavored yogurt can add a unique touch to your parfait. Natural sweeteners can be a healthy choice. Try maple syrup, agave nectar, or even mashed bananas as sweeteners. If you prefer low-calorie options, consider stevia or monk fruit sweeteners. These can keep your parfait sweet without the extra calories. To store your parfaits, cover them tightly with plastic wrap or a lid. This keeps them fresh and prevents any odors from the fridge. The parfaits taste best when eaten within a day or two. If you plan to enjoy them later, store the yogurt mixture, raspberries, and granola separately. This way, the granola stays crunchy. You can freeze the yogurt mixture for later use. Just place it in an airtight container. It lasts well in the freezer for about a month. When you want to eat it, move the container to the fridge to thaw overnight. Serve it cold with fresh raspberries and granola for a quick treat. In the fridge, assembled parfaits last about 2 to 3 days. Watch for signs of spoilage. If the yogurt smells off or the raspberries become mushy, it’s time to toss them. Always trust your senses when it comes to food safety. Enjoy your tasty parfaits while they are fresh! You can easily make this parfait vegan. For the yogurt, swap Greek yogurt for coconut or almond yogurt. Both options give a creamy texture. For sweetener, use maple syrup instead of honey. This keeps the flavor sweet while staying plant-based. Yes, you can use frozen raspberries. They are a great option if fresh ones aren’t available. Just remember to thaw them first. This helps keep the parfait from becoming too watery. They might not hold their shape as well, but they will taste great. There are many ways to use leftover yogurt mixture. You can spread it on toast for a tasty snack. You can also dip fruits in it for a fun treat. Another idea is to mix it into smoothies for extra creaminess. You can make a tasty parfait using simple ingredients like Greek yogurt, honey, and lemon. Mix the yogurt with sweetener and layer it with fresh raspberries and granola. Experiment with different fruits and nuts to find your favorite combo. Store your parfaits for a quick snack later or enjoy them right away. This treat is not just easy to make; it’s also healthy and fun to customize. Embrace your creativity and delight in these parfaits!

Lemon Raspberry Yogurt Parfaits Easy and Tasty Treat

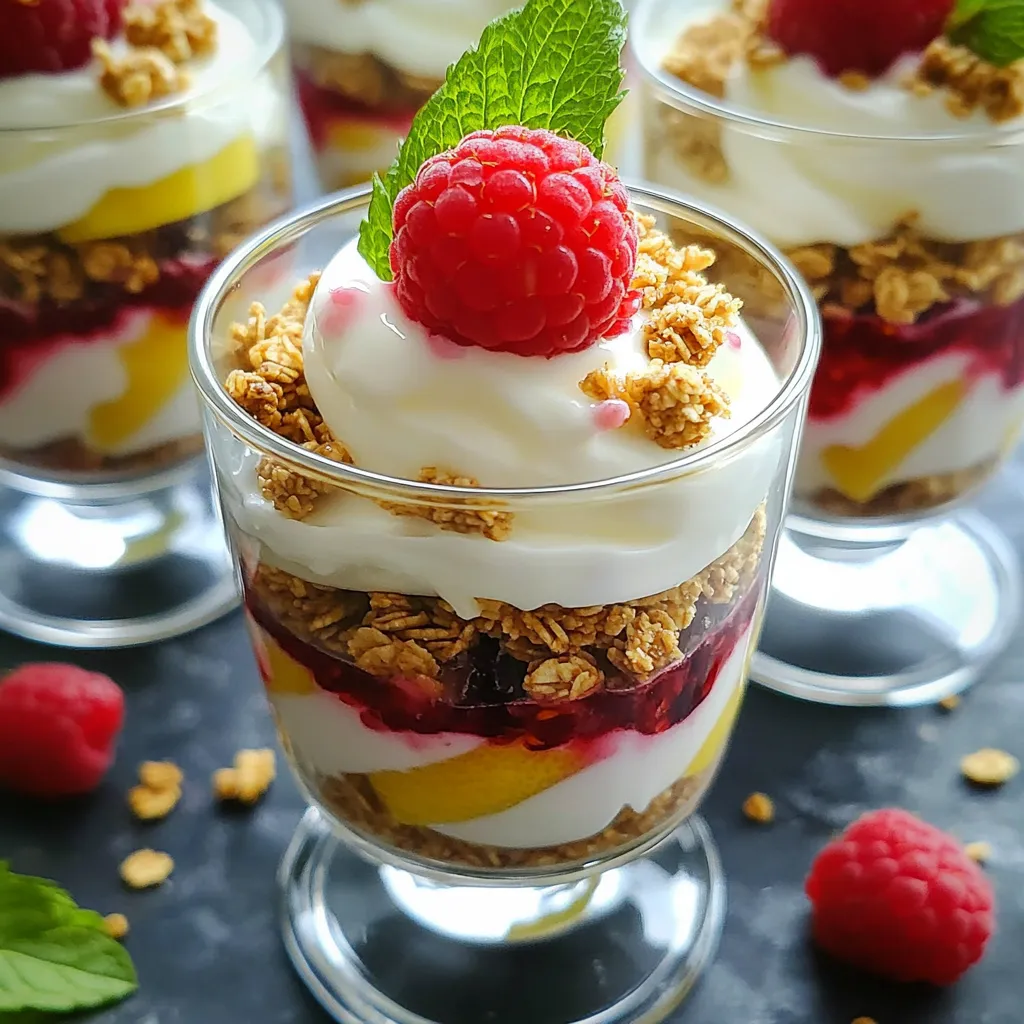
Are you looking for a simple and delicious dessert? Lemon Raspberry Yogurt Parfaits are your answer! This treat layers creamy

To make the best Honey Garlic Teriyaki Meatballs, you need some key ingredients. Here’s what I use: - 1 pound ground chicken or turkey - 1/2 cup breadcrumbs - 1/4 cup green onions, finely chopped - 2 cloves garlic, minced - 1 tablespoon fresh ginger, grated - 1/4 cup soy sauce (low-sodium) - 1/4 cup honey - 1 tablespoon rice vinegar - 1 tablespoon sesame oil - 1 teaspoon cornstarch mixed with 1 tablespoon water (for thickening) - Sesame seeds, for garnish - Fresh cilantro, for garnish These ingredients create a tasty and sweet flavor. The chicken or turkey gives a nice base. The ginger and garlic add a bold kick. You can mix things up with some optional ingredients. Here are a few I recommend: - Chopped bell peppers for crunch - Diced carrots for sweetness - Chili flakes for heat - Pineapple chunks for a fruity twist Feel free to experiment. Adding these ingredients can enhance your dish. You may not have all the ingredients on hand. Here are some easy swaps: - Use beef or pork instead of chicken or turkey. - Swap breadcrumbs with crushed crackers or oats for a gluten-free option. - Agave syrup can replace honey if you need a vegan choice. - Coconut aminos can substitute soy sauce for a soy-free version. When cooking, always taste and adjust. This helps ensure the flavors are just right for you. To start, gather your ingredients. You need ground chicken or turkey, breadcrumbs, green onions, garlic, and ginger. In a large bowl, mix these ingredients well. Make sure everything is combined evenly. This step is key for flavor. The mixture should feel moist but not sticky. Next, preheat your oven to 400°F (200°C). While the oven heats, line a baking sheet with parchment paper. This keeps the meatballs from sticking. Now, form the meat mixture into small balls, about one inch in size. Place them on the sheet, leaving space between each one. Bake for 15 to 20 minutes. You want them golden brown and fully cooked. Check for doneness with a meat thermometer. It should read 165°F (74°C). While the meatballs bake, it's time for the sauce. In a small saucepan, mix soy sauce, honey, rice vinegar, and sesame oil. Heat this over medium heat. Stir often until it simmers. Add the cornstarch mixed with water. This will thicken your sauce. Stir constantly for about 2 to 3 minutes. Once thickened, remove it from heat. After the meatballs are done, transfer them to a large bowl. Pour the honey garlic teriyaki sauce over them. Toss gently to coat every meatball. Now you can serve them warm, topped with sesame seeds and fresh cilantro. Enjoy! To get the best meatball texture, use ground chicken or turkey. This keeps them moist. Add breadcrumbs for a nice bite. They help hold the meatballs together. Mix in green onions, garlic, and ginger for flavor. Don't overmix; just combine until blended. This helps keep them tender. These meatballs shine on their own but pair well with rice. Serve them over steamed white or brown rice. You can also add veggies like broccoli or snap peas. For a crunchy touch, sprinkle sesame seeds and fresh cilantro. These add brightness and color to your dish. Watch out for overbaking! Meatballs can dry out quickly. Keep an eye on them at 15 minutes. If they look golden brown, they're ready. Also, be careful with the sauce. If it’s too thick, add a bit of water to loosen it. Taste the sauce before serving; adjust sweet and salty to your liking. {{image_2}} You can switch up the protein in your meatballs for fun. Ground chicken or turkey is the base of this recipe. If you want beef, use ground beef instead. Pork works great too. If you prefer a vegetarian dish, try using plant-based ground meat or even mashed chickpeas. Each protein brings a unique flavor and texture, so feel free to experiment. Want more flavor? You can make these meatballs spicy, sweet, or savory. Add red pepper flakes for heat. You can also mix in some sriracha or chili paste. For a sweeter twist, increase the honey a bit. Adding pineapple juice to the sauce gives a tropical touch. You can also use garlic powder for a stronger garlic flavor. The options are endless, so make it your own! While honey garlic teriyaki sauce is tasty, you can try different sauces too. A sweet chili sauce gives a nice kick. Alternatively, use a hoisin sauce for a richer flavor. You can also make a creamy sauce by mixing mayonnaise with soy sauce. This adds a unique twist to the meatballs. Feel free to play around with various glazes and find your favorite! You can store leftover honey garlic teriyaki meatballs in the fridge. First, let them cool down. Place them in an airtight container. These meatballs will stay fresh for up to three days. If you want to keep them longer, try freezing them. To freeze the meatballs, first, lay them out on a baking sheet. Make sure they are not touching each other. Freeze them for about an hour. Then, transfer them to a freezer-safe bag. They can last up to three months in the freezer. When you are ready to eat, let them thaw in the fridge overnight. You can reheat them in the oven at 350°F (175°C) for about 15 minutes. Make sure they are hot all the way through before serving. To keep your meatballs fresh, store them in a cool place. Avoid leaving them out at room temperature for too long. Always use clean utensils when taking meatballs from the container. This practice helps prevent germs. If you freeze them, label the bag with the date. This way, you know how long they have been in the freezer. Honey Garlic Teriyaki Meatballs last about 3 to 4 days in the fridge. Make sure to store them in an airtight container. This keeps them fresh and tasty. If you see any signs of spoilage, throw them away. Yes, you can make Honey Garlic Teriyaki Meatballs ahead of time. You can prepare the meatballs and sauce and store them separately. Keep them in the fridge for up to 2 days. When you're ready to eat, just bake and combine them. This makes meal prep easy and quick. You can serve Honey Garlic Teriyaki Meatballs with many sides. Here are some great options: - Steamed rice - Fried rice - Noodles - Asian-style salad - Roasted vegetables These sides complement the sweet and savory flavors of the meatballs. Enjoy your meal! In this post, we covered the key ingredients for honey garlic teriyaki meatballs. We explored step-by-step instructions for making them, including tips on perfecting texture. We also shared various protein options and flavor enhancements. Finally, we discussed how to store leftovers and answered some common questions. Making these meatballs is fun and rewarding. With a few simple tweaks, you can create a dish that suits your taste. Enjoy cooking and sharing these tasty meatballs with others!

Honey Garlic Teriyaki Meatballs Easy and Flavorful Dish

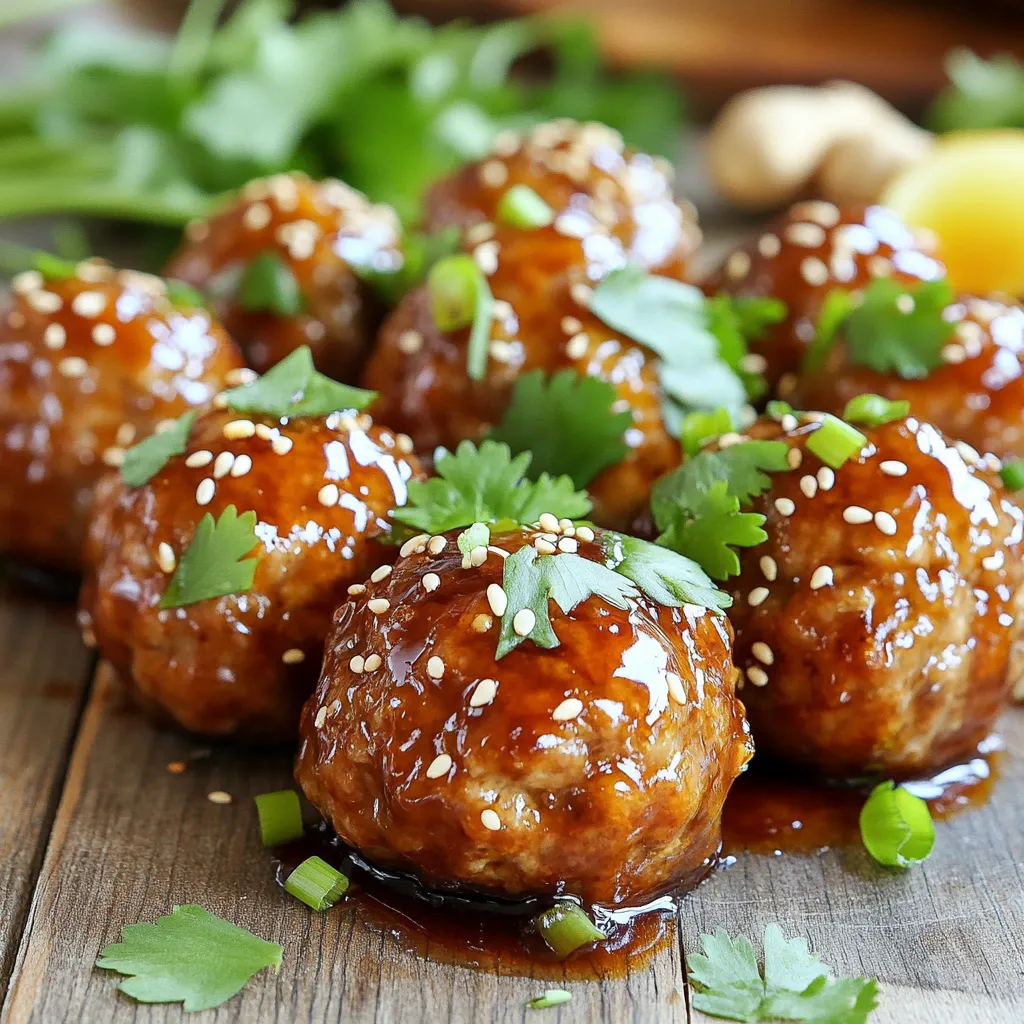
If you’re craving a dish that’s both easy and packed with flavor, look no further! Honey Garlic Teriyaki Meatballs are

To make Air Fryer Apple Fritter Bites, you will need: - 2 medium apples, peeled, cored, and diced - 1 cup all-purpose flour - 1/4 cup granulated sugar - 1 tablespoon baking powder - 1/2 teaspoon cinnamon - 1/4 teaspoon nutmeg - 1/2 teaspoon salt - 1 large egg - 1/2 cup milk - 1 teaspoon vanilla extract - 1/3 cup powdered sugar (for icing) - 1 tablespoon milk (for icing) I recommend using firm apples for this recipe. Good choices are: - Granny Smith - Honeycrisp - Fuji These apples add a nice balance of sweetness and tartness. Their crispness holds up well in the air fryer, giving your fritter bites a great texture. If you need to make swaps, here are some easy ideas: - Use whole wheat flour instead of all-purpose flour for a healthier option. - Swap granulated sugar with brown sugar for a deeper flavor. - If you don't have milk, use almond milk or oat milk as a substitute. - You can replace the egg with a flaxseed meal mix for a vegan version. Feel free to get creative with your ingredients. Cooking should be fun and flexible! First, you need to prepare the apples. Take two medium apples, peel them, core them, and dice them into small pieces. In a medium bowl, mix the diced apples with a sprinkle of cinnamon. Set this bowl aside for now. Next, grab a large mixing bowl. Combine 1 cup of all-purpose flour, 1/4 cup of granulated sugar, 1 tablespoon of baking powder, 1/2 teaspoon of cinnamon, 1/4 teaspoon of nutmeg, and 1/2 teaspoon of salt. Whisk these dry ingredients together until they blend well. In a separate bowl, whisk together 1 large egg, 1/2 cup of milk, and 1 teaspoon of vanilla extract. Slowly add this wet mixture to your dry ingredients. Stir just until everything combines. Don't overmix. Now, gently fold in the diced apples. Make sure the apples are evenly spread throughout the batter. This step adds great flavor to every bite. Before air frying, preheat your air fryer to 350°F (175°C). While it warms up, lightly spray the air fryer basket with cooking spray. This helps the fritter bites not stick. Using a tablespoon, drop spoonfuls of the batter into the basket. Make sure not to overcrowd it. You might need to cook in batches for the best results. Air fry the fritter bites for 8-10 minutes. Watch for them to turn golden brown and look cooked through. They should smell amazing while they cook! While the fritter bites air fry, it's time to make the icing. In a small bowl, whisk together 1/3 cup of powdered sugar and 1 tablespoon of milk. Keep mixing until it becomes smooth. If the icing is too thick, add a little more milk until you reach the right consistency. Once the fritter bites are done, remove them from the air fryer. Let them cool for a few minutes. Drizzle the icing over the tops before you serve them warm. Enjoy this tasty snack! To achieve a great texture, you need to avoid over-mixing. Stir the batter until the dry and wet ingredients just blend. This helps keep the fritter bites light. Also, make sure your apples are diced small. Smaller pieces cook faster and blend well in the batter. Most air fryers cook at a similar time. However, some may run hotter. For most models, air fry at 350°F for 8-10 minutes. Check your fritter bites at 8 minutes. If they’re not golden, cook for another minute or two. Always use a toothpick to test if they are done. To boost flavor, add more spices. A pinch of ginger or allspice adds warmth. For a sweeter twist, mix in some brown sugar. You can also experiment with flavored extracts, like almond or maple, instead of vanilla. Lastly, for a fun topping, sprinkle some chopped nuts or toasted coconut on the icing. {{image_2}} You can make these fritter bites even better by adding nuts or dried fruits. Try adding chopped walnuts or pecans. They add a nice crunch and flavor. Dried cranberries or raisins also work well. Just mix them in with the apples. Remember, this is all about your taste! If you need a gluten-free version, swap the all-purpose flour. Use a gluten-free flour blend instead. Check that it has a good binding agent. This will keep the fritters from crumbling. The taste will still be great, and everyone can enjoy them. You can play with flavors in these fritters. Try adding a swirl of caramel or chocolate chips to the batter. This will give a sweet surprise in every bite. You can also add a dash of maple syrup for a unique flavor. These small tweaks can change the whole snack! Store your leftover fritter bites in an airtight container. This keeps them fresh and tasty. Make sure they cool completely before you pack them away. You can keep them in the fridge for up to three days. If you want to keep them longer, freeze them for up to two months. Just remember to wrap each fritter well in plastic wrap before freezing. To reheat, take the fritter bites out of the fridge or freezer. If frozen, let them thaw in the fridge overnight. For refrigeration, simply place them in the air fryer at 350°F for about 3-5 minutes. This makes them warm and crisp again. You can also use a microwave for about 20-30 seconds, but they won’t be as crispy. Use glass or plastic containers with tight-fitting lids for storage. Glass containers are great because they do not stain and are easy to clean. If you choose plastic, make sure it is BPA-free. For freezing, use freezer-safe bags or containers to prevent freezer burn. Yes, you can use frozen apples. Just thaw and drain them first. This helps avoid extra moisture in your fritter bites. Frozen apples can work well, but fresh apples give a better taste and texture. If you choose frozen, chop them into small pieces. This way, they mix well into the batter. You can enjoy these fritter bites on their own or with a dip. I love serving them with vanilla ice cream or whipped cream. A warm caramel sauce also pairs perfectly. You can even sprinkle some cinnamon sugar on top for extra flavor. A cup of hot cider or coffee makes a nice drink option, too. To make these fritter bites healthier, try a few simple swaps. Use whole wheat flour instead of all-purpose flour. This adds fiber and nutrients. You can also cut down on sugar by using a sugar substitute. Another option is to bake them instead of air frying. This reduces the fat content. You might also skip the icing or use a yogurt-based topping for a lighter choice. Air Fryer Apple Fritter Bites are easy and fun to make. You learned about the best apples, how to substitute ingredients, and the simple steps to perfect your fritters. Tips for texture and cooking time will help you achieve great results. You can even try fun variations and store leftover bites easily. Remember, these fritters can be sweet or healthy. Experiment with flavors and enjoy the process! Happy cooking!

Air Fryer Apple Fritter Bites Easy and Tasty Snack

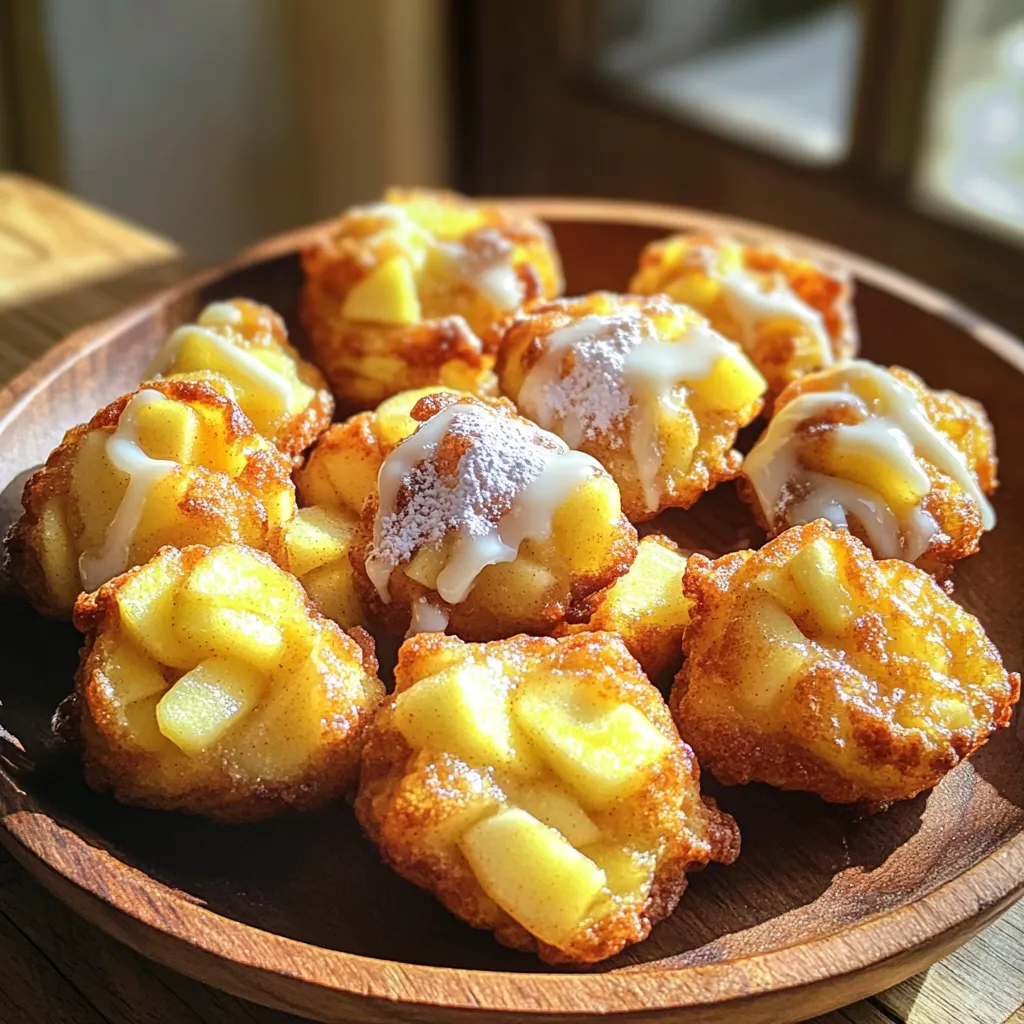
Craving a sweet treat that’s easy to make? Look no further! Air fryer apple fritter bites are the perfect snack.

Older posts
Newer posts
← Previous Page1 … Page9 Page10 Page11 … Page85 Next →

dsad

© 2026 greenmealmap • Built with GeneratePress

Our Policies

  • Copyright Policy
  • Cookie Policy
  • GDPR Policy
  • Privacy Policy
  • Disclaimer
  • Terms Of Use

More Information

  • Home
  • About
  • Contact
  • Appetizers
  • Dessert
  • Dinner
  • Drinks
©2026, greenmealmap About Back To Top