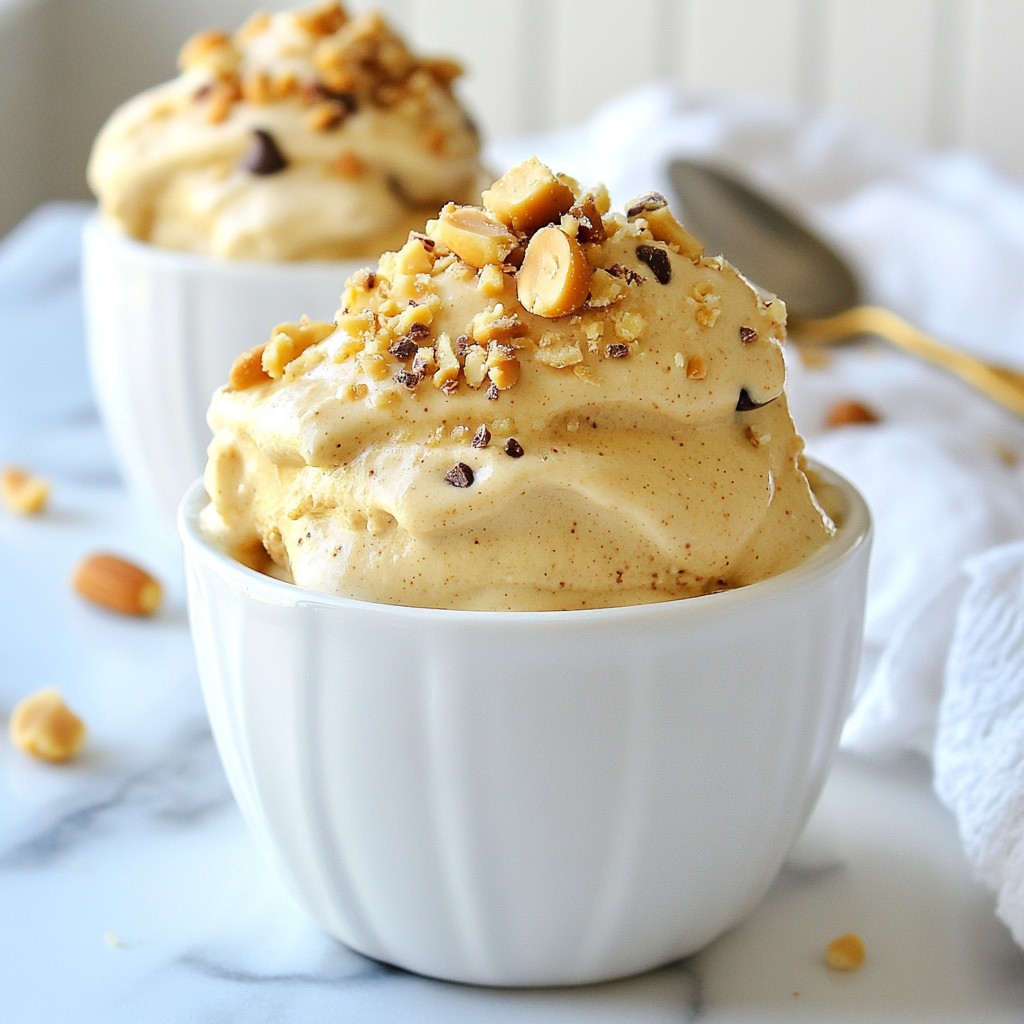
Craving a cool treat that’s both tasty and healthy? Let me introduce you to Peanut Butter Banana Nice Cream! This creamy delight blends ripe bananas with rich peanut butter for a fun dessert anyone can enjoy. With just a few ingredients and easy steps, you can whip up a frozen wonder that leaves traditional ice cream in the dust. Let's dive into this scrumptious recipe and how it can brighten your day!
Why I Love This Recipe
- Deliciously Creamy: This nice cream has a rich and creamy texture that mimics traditional ice cream but is made with wholesome ingredients.
- Quick and Easy: With just a few simple ingredients and minimal prep time, you can whip up this delightful treat in no time.
- Healthy Indulgence: Made primarily from bananas and peanut butter, this recipe offers a healthier alternative to sugary desserts without sacrificing flavor.
- Customizable: You can easily customize this nice cream with your favorite toppings or add-ins, making it a versatile dessert option.
Ingredients
Main Ingredients for Peanut Butter Banana Nice Cream
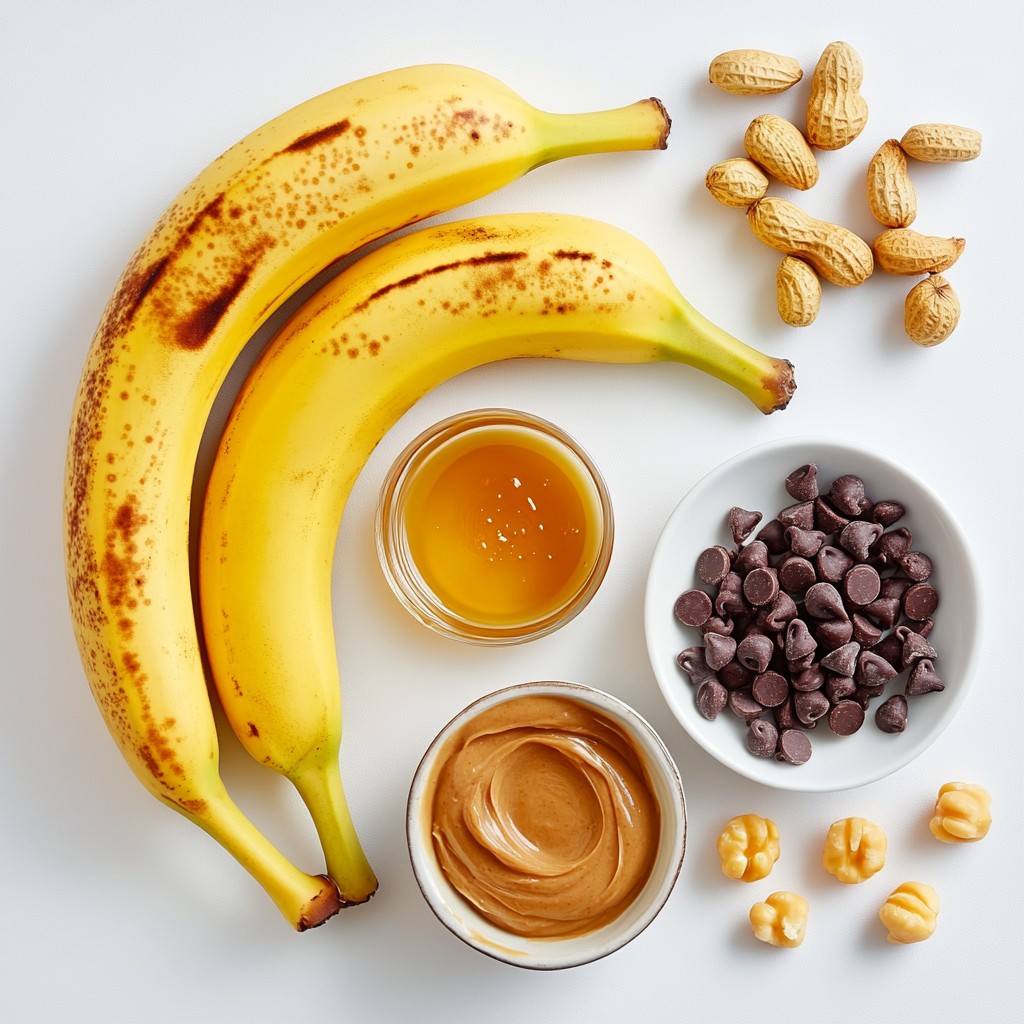
To make Peanut Butter Banana Nice Cream, you need just a few key items:
- 4 ripe bananas, sliced and frozen
- 1/2 cup creamy peanut butter
- 1 teaspoon vanilla extract
- A pinch of sea salt
These main ingredients create a rich, creamy base. The frozen bananas give it a smooth texture. Peanut butter adds a nutty flavor that pairs well with bananas.
Optional Ingredients for Extra Sweetness
If you like your nice cream sweeter, consider adding:
- 1 tablespoon honey or maple syrup
This sweetener is not a must, but it can enhance the flavor. Just add it during blending. Taste it first and adjust if you want more sweetness.
Garnishes for Serving
When serving, you can make it even better with these toppings:
- Chopped peanuts
- Dark chocolate chips (optional)
These garnishes add crunch and extra flavor. They also make your nice cream look great in a bowl. Enjoy customizing your creation!
Step-by-Step Instructions
Preparing the Frozen Bananas
To start, peel the ripe bananas. Slice them into 1-inch pieces. Spread the slices on a baking sheet. Make sure they don’t touch each other. This helps them freeze better. Place the baking sheet in the freezer for at least 2 hours. You want them to be completely frozen. Frozen bananas give the nice cream its smooth, creamy texture.
Blending the Nice Cream Mixture
Next, gather your blender or food processor. Add the frozen banana slices to the bowl. Then, scoop in 1/2 cup of creamy peanut butter. If you want extra sweetness, add 1 tablespoon of honey or maple syrup. Pour in 1 teaspoon of vanilla extract and a pinch of sea salt. Blend on low speed at first. Gradually increase to high speed. Use a spatula to scrape down the sides. Keep blending until the mixture is smooth and creamy. It should look like soft serve ice cream.
Serving and Freezing Tips
You can serve the nice cream right away for a soft texture. Use a scoop to place it in bowls. If you prefer it firmer, transfer it to an airtight container. Freeze it for another 1-2 hours. When you’re ready to enjoy, scoop it into bowls. Top with chopped peanuts and dark chocolate chips if desired. This adds a nice crunch and extra flavor.
Tips & Tricks
Achieving the Perfect Texture
To get that creamy texture, use ripe bananas. They should be nice and spotty. After slicing, freeze them in a single layer. This helps them freeze evenly. Blend the frozen bananas at low speed first. Gradually increase to high speed. This way, the mix becomes smooth like soft serve. If it’s too thick, add a splash of almond milk or coconut milk.
Adjusting Sweetness to Taste
Taste your nice cream as you blend. If you want it sweeter, add honey or maple syrup. Just a little can go a long way. Blend it again for a few seconds. This lets the sweetener mix in well. You can always add more if needed, but start small!
Equipment Recommendations
A high-speed blender works best for this recipe. It makes the bananas creamy fast. If you don’t have one, a food processor can also work. Just be patient and scrape the sides often. You will need a baking sheet for freezing bananas. A spatula is handy for mixing too. Finally, use airtight containers for storing any leftovers.
Pro Tips
- Choose Ripe Bananas: Make sure the bananas are fully ripe with plenty of brown spots for maximum sweetness and creaminess.
- Use a High-Speed Blender: A high-speed blender or food processor will help achieve a smooth, creamy texture without chunks.
- Freeze in Portions: If you don't want to use all the nice cream at once, freeze it in individual portions for easy serving later.
- Experiment with Flavors: Feel free to add other ingredients like cocoa powder, cinnamon, or even protein powder for a unique twist on the classic recipe.
Variations
Adding Other Nut Butters
You can swap peanut butter for other nut butters. Almond butter works great. Cashew butter adds a smooth taste. Each nut butter gives a new flavor twist. Try a mix of nut butters for fun. Just keep the same amount as the peanut butter in the recipe.
Incorporating Fruits for Flavor
Fruits can boost flavor and nutrition. Add berries like strawberries or blueberries. They add sweetness and color. You can also mix in mango or pineapple for a tropical taste. Just chop the fruit and blend it in with the bananas. Adjust the amount of bananas if needed to keep it creamy.
Chocolate Variations
For a chocolatey treat, add cocoa powder. One to two tablespoons is enough. You can also stir in dark chocolate chips for a nice crunch. If you love mocha flavors, try adding a shot of espresso. Blend it all together for a creamy chocolate peanut butter nice cream.
Storage Info
How to Store Leftover Nice Cream
To store leftover nice cream, place it in an airtight container. Make sure to press a piece of plastic wrap against the surface to reduce air. This helps prevent ice crystals from forming. Seal the container tightly and store it in the freezer.
Best Practices for Freezing
When freezing nice cream, ensure it’s in a flat layer. This helps it freeze evenly. If you want to scoop it later, allow it to soften for a few minutes on the counter. You can also use an ice cream scoop to serve it more easily.
Shelf Life and Using Thawed Nice Cream
Peanut butter banana nice cream lasts about one week in the freezer. After thawing, use it within two days for the best taste. If it gets too hard, let it sit out for a few minutes before scooping. If it separates, just stir it gently to mix again.
FAQs
Can I use ripe bananas that are not frozen?
Yes, you can use ripe bananas that are not frozen. However, the nice cream will not be as creamy. Freezing the bananas gives it a smooth texture. If you want to use fresh bananas, blend them with ice. This will help mimic the frozen texture.
What if I don’t have a blender?
If you lack a blender, use a food processor instead. It can also blend your nice cream well. If neither is available, try mashing the bananas by hand. Then, mix in the peanut butter and other ingredients. This will take more effort but still works.
How can I make this recipe vegan?
To make this recipe vegan, choose maple syrup instead of honey. The rest of the ingredients are already plant-based. Ensure your peanut butter is free from added sugar or dairy. This way, you can enjoy a tasty vegan treat.
Can I use other nut butters?
Yes, you can use other nut butters like almond or cashew butter. Each nut butter will give a different flavor. Make sure it's creamy to keep the nice cream smooth. You can experiment to find your favorite nut butter combo.
How can I add more flavor to the nice cream?
You can add extra flavors by mixing in cocoa powder or cinnamon. Try adding a splash of almond or coconut extract for a twist. You can also blend in other fruits like strawberries or mango for a fruity touch.
Can I make this nice cream ahead of time?
Yes, you can make this nice cream ahead of time. After blending, store it in an airtight container. It will stay good in the freezer for up to two weeks. Just remember to let it sit for a few minutes before serving.
How do I know when the bananas are ripe enough?
Ripe bananas have brown spots on the skin and feel soft. They should smell sweet and strong. This ripeness adds natural sweetness to your nice cream. Using overripe bananas gives the best flavor and texture.
Can I skip the sweeteners?
You can skip the sweeteners if you like less sweetness. The ripe bananas already add a natural sweetness. However, if you want a sweeter taste, add a small amount. Adjust it to your liking for the best flavor.
Peanut butter banana nice cream is easy to make and fun to eat. You learned how to get the right texture using frozen bananas. Adding options like extra sweeteners or other nut butters can boost flavor. You can also store leftovers for later. This tasty treat is simple and flexible for any taste. Enjoy making your nice cream in different ways! You will love the creamy, sweet results. Now, get started and treat yourself today!