Fall flavors come alive with this No Bake Pumpkin Cheesecake. This creamy dessert is simple to make and perfect for any gathering. I’ll guide you through each step, from the crunchy graham cracker crust to the rich pumpkin filling. Whether you're a seasoned chef or a kitchen newbie, you’ll find tips and tricks to make it just right. Ready to impress your family and friends? Let’s dive in!
Why I Love This Recipe
- Easy Preparation: This no-bake cheesecake requires minimal effort, making it perfect for busy days or last-minute gatherings.
- Seasonal Flavor: The combination of pumpkin and warm spices creates a delightful, cozy flavor that embodies the essence of fall.
- Rich and Creamy Texture: With the creamy filling and buttery crust, every slice is a luxurious treat that melts in your mouth.
- Versatile Serving Options: This cheesecake can be dressed up with whipped cream and cinnamon or enjoyed plain for a simple yet satisfying dessert.
Ingredients
List of Ingredients
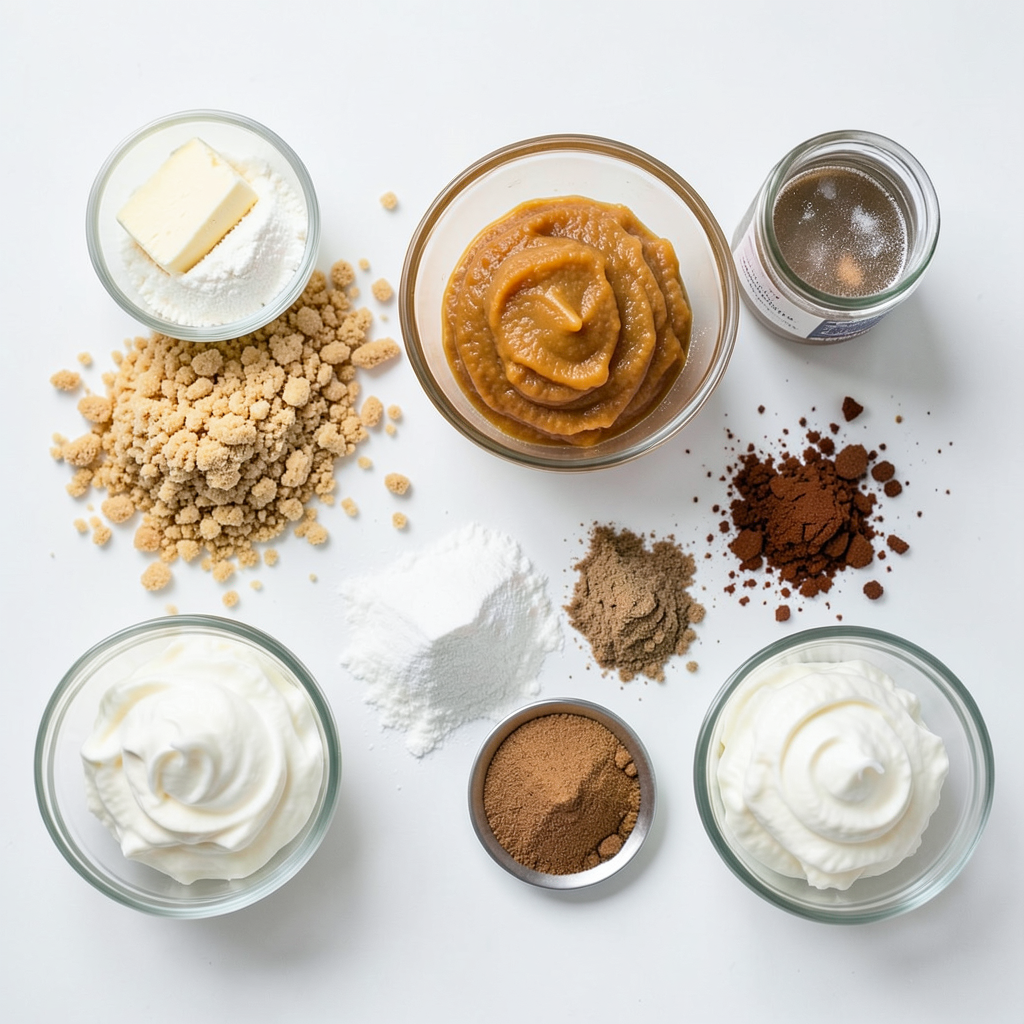
To make a no bake pumpkin cheesecake, you will need the following ingredients:
- 1 ½ cups graham cracker crumbs
- 1/2 cup unsalted butter, melted
- 1/4 cup brown sugar
- 2 (8 oz) packages cream cheese, softened
- 1 cup pumpkin puree
- 1 cup powdered sugar
- 1 teaspoon vanilla extract
- 1 teaspoon ground cinnamon
- 1/2 teaspoon ground nutmeg
- 1/4 teaspoon ground ginger
- 1 cup heavy whipped cream
These ingredients come together to create a rich and creamy cheesecake. The graham cracker crumbs give a nice crunch. The pumpkin puree gives the cheesecake its signature flavor and color.
Optional Toppings
You can add some fun toppings to your cheesecake to make it even better. Here are some ideas:
- Whipped cream
- A sprinkle of cinnamon
These toppings add a nice touch of sweetness and warmth. They also make the cheesecake look great for serving. You can get creative and add your favorite toppings too!
Step-by-Step Instructions
Preparing the Graham Cracker Crust
To make the crust, grab a medium bowl. Combine 1 ½ cups of graham cracker crumbs, 1/2 cup of melted unsalted butter, and 1/4 cup of brown sugar. Mix them well until the crumbs look like wet sand. This step is key for a good base. Press the mixture into the bottom of a 9-inch springform pan. Make sure it’s even and packed tight. Chill the crust in the fridge while you prepare the filling. This helps it hold its shape.
Making the Pumpkin Cheesecake Filling
In a large mixing bowl, beat 2 packages of softened cream cheese with an electric mixer. Mix until it’s smooth and creamy. Next, add in 1 cup of pumpkin puree, 1 cup of powdered sugar, 1 teaspoon of vanilla extract, 1 teaspoon of ground cinnamon, 1/2 teaspoon of ground nutmeg, and 1/4 teaspoon of ground ginger. Mix this together until it is fully combined and smooth. In a separate bowl, whip 1 cup of heavy cream until stiff peaks form. This step adds fluffiness. Gently fold the whipped cream into the pumpkin mixture. Be careful here. You want to keep the air in the whipped cream.
Assembling and Chilling the Cheesecake
Now, pour the pumpkin cheesecake filling onto your chilled graham cracker crust. Use a spatula to spread it evenly. Cover the cheesecake with plastic wrap and place it in the fridge. Let it chill for at least 4 hours, or overnight if you can wait. This helps the cheesecake set properly. When you’re ready to serve, remove the sides of the springform pan. For a nice touch, top it with whipped cream and a sprinkle of cinnamon. Enjoy your creamy delight!
Tips & Tricks
How to Achieve the Perfect Creamy Texture
To get that smooth, creamy texture, start with softened cream cheese. This step is key. Use an electric mixer to beat the cream cheese until it is silky and fluffy. Then, add your pumpkin puree and mix well. The pumpkin should blend smoothly into the cream cheese. Adding powdered sugar also helps keep things creamy. When you fold in the whipped cream, do it gently. This keeps the air in the cream, making your cheesecake light and fluffy.
Storage Tips for Leftover Cheesecake
Store any leftover cheesecake in the fridge. Cover it well with plastic wrap or use an airtight container. This keeps the cheesecake fresh and prevents it from drying out. The cheesecake tastes best within three days, but it can last up to a week. If you want to save it longer, consider freezing it. Just wrap each slice tightly in plastic wrap and then foil. This way, you can enjoy it later!
Advice for Successful Whipping Cream
For great whipped cream, start with cold heavy cream. Use a chilled bowl and beaters for better results. Whip the cream until stiff peaks form, but don’t overdo it. Over-whipping can turn your cream into butter, and that’s not what we want! Gently fold the whipped cream into your pumpkin mixture. This keeps your cheesecake light and airy. Remember, patience is key!
Pro Tips
- Chill Ingredients: Make sure your cream cheese and heavy cream are fully chilled for the best texture and stability when mixing and whipping.
- Graham Cracker Variations: Try using different flavored cookies like ginger snaps or chocolate cookies for a unique crust experience.
- Whipped Cream Folding: When folding the whipped cream into the pumpkin mixture, use a gentle hand to retain the light and airy texture.
- Overnight Chill: For the best results, allow the cheesecake to set overnight. This will enhance the flavor and improve the texture.
Variations
Flavor Variations
You can make this No Bake Pumpkin Cheesecake even better! Try adding chocolate for a rich twist. Melt some dark chocolate and mix it into the pumpkin filling. You can also sprinkle chocolate chips on top for extra fun. If you love spice, add more nutmeg or a pinch of allspice. These flavors pair well with pumpkin.
Alternative Crust Options
While graham crackers make a great crust, you have choices. Try using crushed Oreos for a chocolatey base. You can also use almond flour for a gluten-free option. Just mix it with melted butter and press it into the pan like before. Another idea is to use crushed vanilla wafers for a sweet taste.
Dairy-Free and Vegan Adaptations
Want a dairy-free or vegan version? Swap cream cheese for a vegan cream cheese brand. Use coconut cream instead of heavy cream for a rich texture. For the filling, use maple syrup instead of powdered sugar. This keeps the sweetness and adds a nice flavor. Always check labels to ensure your ingredients are vegan-friendly.
Storage Info
How to Store No Bake Pumpkin Cheesecake
Store your no bake pumpkin cheesecake in the fridge. Use an airtight container to keep it fresh. If you used a springform pan, cover it with plastic wrap. This helps prevent drying out and keeps it tasty.
Best Practices for Freezing
You can freeze the cheesecake for later. First, let it set in the fridge. Once it's firm, wrap it in plastic wrap. Then, place it in a freezer-safe container. This way, it stays protected from freezer burn. To eat, thaw it in the fridge overnight before serving.
Shelf Life in the Refrigerator
In the fridge, your no bake pumpkin cheesecake lasts about 3 to 5 days. Check for any signs of spoilage, like off smells or changes in texture. If it looks and smells good, it’s likely safe to enjoy!
FAQs
Can I make this cheesecake ahead of time?
Yes, you can make this cheesecake ahead of time. I often prepare it a day before serving. It saves time and helps the flavors meld together. Just store it in the fridge, covered with plastic wrap. It keeps well for up to three days.
What can I substitute for cream cheese?
If you need a cream cheese substitute, try mascarpone or ricotta cheese. Both options create a rich and creamy texture. You can also use a dairy-free cream cheese for a vegan option. Just make sure it's softened before mixing.
How long does the cheesecake need to set?
The cheesecake needs at least four hours to set. I prefer to let it chill overnight for the best results. This time allows it to firm up and makes slicing easier. Make sure to cover it well in the fridge while it sets.
This blog post shared everything you need for a great no-bake pumpkin cheesecake. We covered the ingredients, options for toppings, and step-by-step instructions. You'll create a delicious dessert with tips for creaminess and storage. Don’t forget to try variations to make it your own. With these tips, you can impress anyone with your baking skills. Enjoy making your cheesecake and sharing it with friends and family!