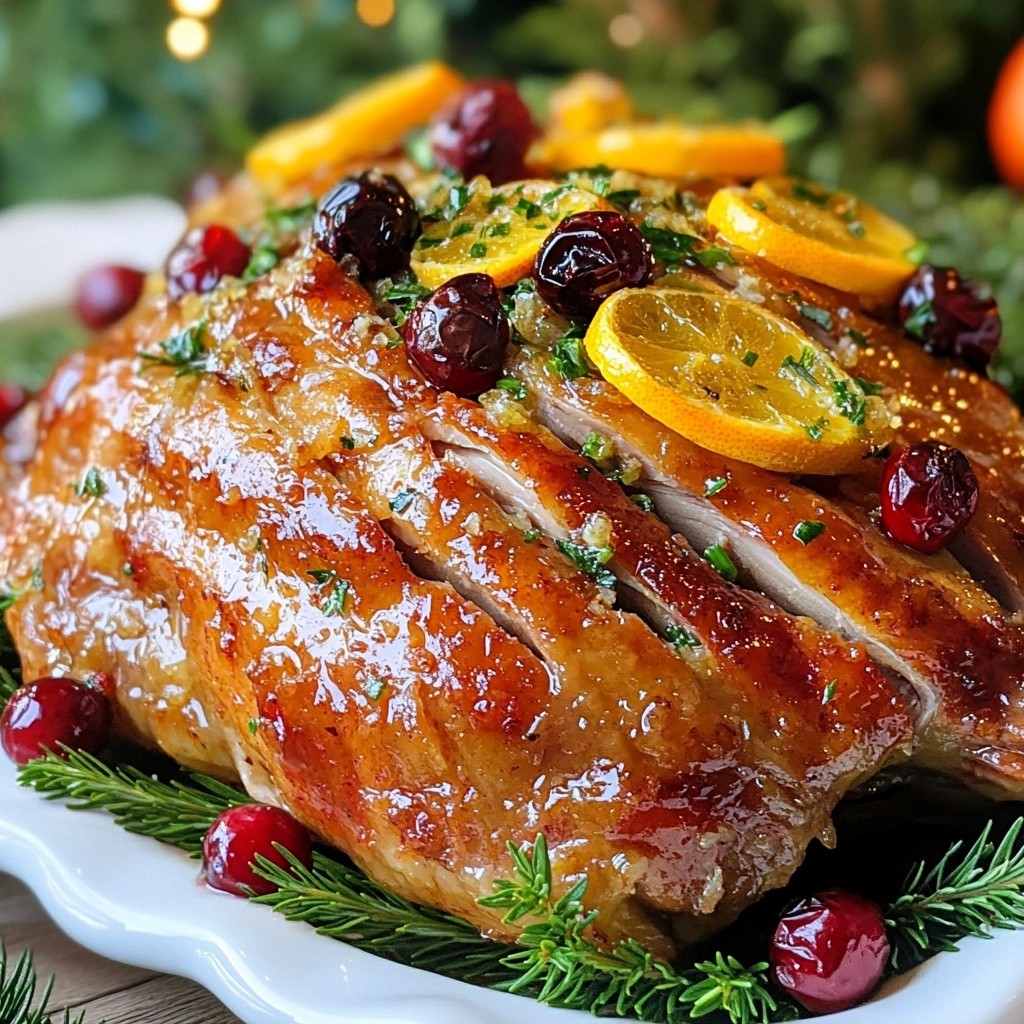
Ready to impress your friends and family this holiday season? This Juicy Christmas Citrus Herb Roast Duck is your secret weapon! It's packed with bold flavors from fresh herbs and zesty citrus. In this guide, I’ll walk you through the steps to create a mouthwatering dish that will steal the show at your table. Let’s dive into the tasty details and make your Christmas feast unforgettable!
Why I Love This Recipe
- Flavor Explosion: The combination of citrus and fresh herbs creates a beautiful flavor profile that elevates the duck to a whole new level.
- Festive Presentation: This dish not only tastes great but also looks stunning on the dinner table, making it perfect for holiday celebrations.
- Moist and Tender: The method of roasting the duck with broth ensures that the meat remains juicy and tender throughout the cooking process.
- Versatile Garnish: Adding cranberries not only enhances the visual appeal but also brings a sweet-tart contrast that complements the rich duck.
Ingredients
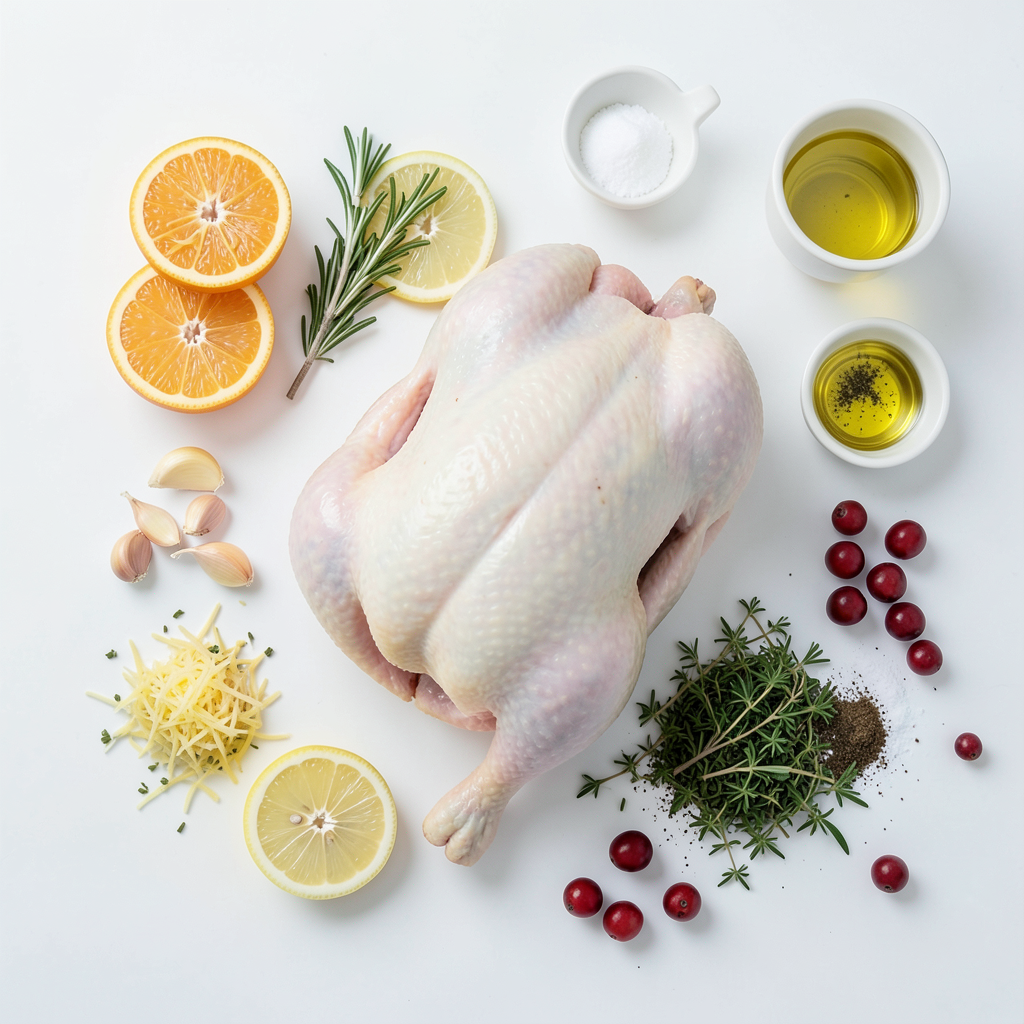
Complete List of Ingredients
To make this juicy roast duck, gather the following ingredients:
- 1 whole duck (about 4-5 lbs)
- 2 oranges, zested and juiced
- 1 lemon, zested and juiced
- 4 garlic cloves, minced
- 2 tablespoons fresh rosemary, chopped
- 2 tablespoons fresh thyme, chopped
- 2 tablespoons olive oil
- Salt and pepper to taste
- 2 cups chicken broth
- 1 cup fresh cranberries (optional for garnish)
Ingredient Substitutions
You can swap some ingredients if needed. For example, use a different citrus like limes or grapefruit. If you don’t have fresh herbs, dried herbs can work too. Just use half the amount since dried herbs are stronger. You can also use vegetable broth instead of chicken broth for a lighter option. If you can’t find a whole duck, try a duck breast.
Importance of Fresh Herbs
Fresh herbs make a huge difference in flavor for this dish. They add brightness and depth to the duck. Rosemary and thyme pair well with poultry, bringing out the duck's rich taste. Fresh herbs also enhance the aroma as the duck roasts, making your kitchen smell amazing. If you can, use fresh herbs over dried ones for the best results.
Step-by-Step Instructions
Preparation: Prepping the Duck
First, you need a whole duck, about 4 to 5 pounds. Rinse it under cold water. Use paper towels to pat it dry. Drying helps the skin get crispy later.
Creating the Citrus Herb Mixture
In a small bowl, mix together the zest and juice of two oranges and one lemon. Add four minced garlic cloves, two tablespoons of chopped rosemary, and two tablespoons of chopped thyme. Pour in two tablespoons of olive oil. Add salt and pepper to taste. This mix brings bright flavor to the duck.
Roasting the Duck: Timing and Temperature
Preheat your oven to 375°F (190°C). Place the duck on a rack in a roasting pan. Pour two cups of chicken broth into the pan. This keeps the duck moist. Roast for one hour, then flip it over. Roast for another 30 minutes.
Next, raise the oven temperature to 400°F (200°C) and roast for another 30 to 40 minutes. The skin should look crispy. The internal temperature should reach 165°F (75°C). If you want, add fresh cranberries in the last 15 minutes for extra color.
Once done, take the duck out of the oven. Let it rest for 10 to 15 minutes before carving. This lets the juices settle, making the meat juicy and tender. Enjoy your festive feast!
Tips & Tricks
Achieving Crisp Skin
To get that perfect crispy skin, start with a dry duck. Pat it dry with paper towels before cooking. This helps remove extra moisture. Moisture makes skin soggy, which is not what you want. Another tip is to score the skin lightly. Use a sharp knife to make small cuts. This helps fat render out and gives you a crisp bite. Finally, roast at a higher temperature at the end. This will finish the duck with a golden, crunchy skin.
Flavor Enhancements with Marinades
Marinades add great flavor to your duck. For this recipe, I use a mix of citrus and herbs. Combine orange zest, lemon zest, garlic, rosemary, and thyme in a bowl. This mix creates a bright and tasty blend. Rub it all over the duck, even under the skin. The more you can get into the meat, the better! Let it marinate for at least an hour. If you have more time, overnight is even better! This way, the flavors really soak in.
How to Carve the Duck Properly
When it's time to carve the duck, start with a sharp knife. Let the duck rest for 10-15 minutes first. This helps the juices stay inside the meat. Begin by cutting off the legs. Slice through the joint to separate them. Next, cut along the breastbone to get nice, clean slices. Aim for even pieces to make it look great on the plate. Use a carving fork to hold the duck steady. Arrange the pieces on a platter with garnishes. This makes for a beautiful presentation!
Pro Tips
- Resting is Key: Allow the duck to rest for 10-15 minutes after roasting. This helps the juices redistribute, resulting in more succulent meat.
- Flavor Under the Skin: For enhanced flavor, try to rub the herb mixture beneath the skin of the duck. This will infuse the meat directly during cooking.
- Check for Crispiness: If the skin isn't as crispy as you'd like, broil the duck for a few minutes at the end of cooking. Keep an eye on it to prevent burning!
- Use a Meat Thermometer: To ensure perfect doneness, use a meat thermometer. The internal temperature should reach 165°F (75°C) for safely cooked duck.
Variations
Alternative Citrus Combinations
You can swap the oranges and lemon for other citrus fruits. Try using grapefruit for a tangy twist. Blood oranges add a deep color and sweet taste. Limes bring a sharp zest, adding freshness. Experiment with these fruits to find your favorite blend. Each choice brightens the duck's flavor in its own way.
Using Different Herbs
While rosemary and thyme shine in this dish, many herbs work well. Sage offers a warm, earthy note. Oregano brings a Mediterranean flair, while parsley adds a fresh touch. Mix and match herbs to create your unique flavor profile. The key is to use fresh herbs for the best taste.
Serving Suggestions for Accompaniments
Pair your roast duck with delicious sides. Roasted root vegetables add sweetness and color. A light salad with citrus dressing brings brightness. Serve mashed potatoes or wild rice for heartiness. Don’t forget cranberry sauce; it adds a nice tartness. Each side enhances the duck, making your meal festive and complete.
Storage Info
How to Store Leftover Duck
After enjoying your roast duck, let it cool down. Wrap the duck in plastic wrap or foil. Place it in an airtight container. Store in the fridge for up to three days. This keeps the meat moist and tasty. If you have sauce, store it separately in a jar. This adds more flavor when you reheat it.
Reheating Tips
To reheat, preheat your oven to 350°F (175°C). Place the duck on a baking tray. Cover it with foil to keep it from drying out. Heat for about 20-30 minutes, or until warm. Check the internal temperature; it should be at least 165°F (75°C). For extra crispiness, remove the foil for the last 10 minutes. This gives you that nice, crispy skin again.
Freezing Options for Future Use
If you want to save some duck for later, freezing is a great choice. Cut the duck into portions for easy use. Wrap each piece tightly in plastic wrap, then in foil. Place the wrapped pieces in a freezer bag. Make sure to remove most of the air. Label the bag with the date. You can freeze the duck for up to three months. When you're ready to eat, thaw it in the fridge overnight before reheating.
FAQs
How long do I roast a duck per pound?
You should roast the duck for about 20 to 25 minutes per pound. For a 4 to 5-pound duck, this means cooking it for around 1.5 to 2 hours. Start at 375°F and then increase the heat later for crispy skin.
Can I use frozen duck for this recipe?
Yes, you can use frozen duck. Just make sure to fully thaw it before cooking. Place it in the fridge for 1 to 2 days to thaw safely. This step ensures even cooking and helps you achieve juicy meat.
What's the best way to check if the duck is done?
The best way to check if the duck is done is to use a meat thermometer. Insert it into the thickest part of the thigh. It should read 165°F. If you don’t have a thermometer, you can pierce the thigh and check if the juices run clear. If they do, your duck is ready!
This blog post covered the key steps to cooking duck perfectly. You learned about essential ingredients and how to swap them. We explored the prepping and roasting process for optimal flavor. Tips for crisp skin and proper carving were crucial. Variations let you customize your dish with different herbs and citrus. Lastly, we discussed how to store leftovers and answer common questions. Cooking duck is fun and rewarding. With these guidelines, you can impress your friends and family. Enjoy your culinary adventure!