
Easter is the perfect time to treat yourself and your loved ones to something special. Imagine biting into a warm, fluffy scone, bursting with fresh lemon flavor and rich cream cheese. In this guide, I’ll share my easy step-by-step recipe for Fluffy Easter Lemon Cream Cheese Scones. With just a few simple ingredients and tools, you’ll create delightful treats that make any gathering feel festive. Let’s get baking!
Why I Love This Recipe
- Deliciously Tangy: The bright lemon flavor combined with the creamy texture of cream cheese makes these scones irresistibly delicious.
- Perfect for Any Occasion: Whether it’s a festive Easter brunch or a simple afternoon tea, these scones are a delightful treat.
- Easy to Make: This recipe is straightforward, making it accessible for bakers of all skill levels.
- Customizable: You can easily add your favorite mix-ins, like blueberries or nuts, to make these scones your own!
Ingredients
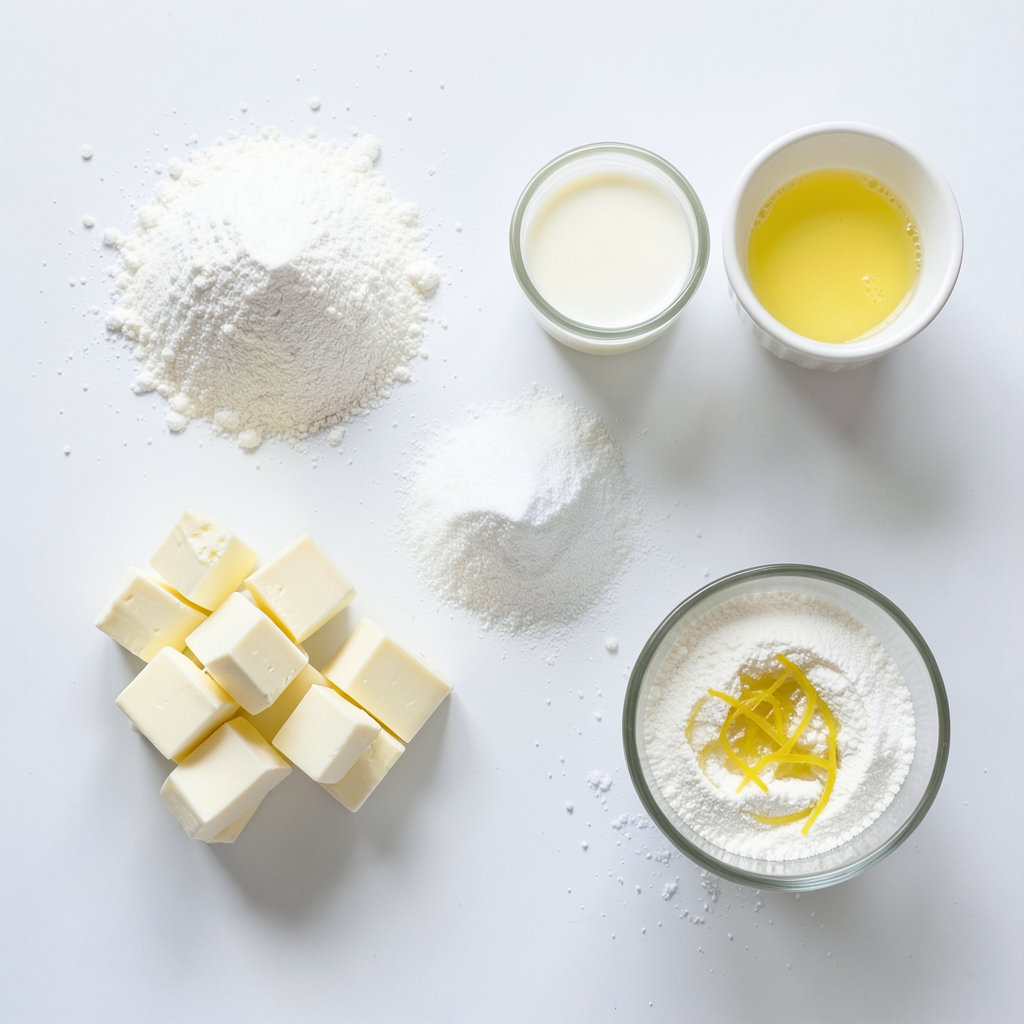
List of Ingredients
- 2 cups all-purpose flour
- 1/4 cup granulated sugar
- 1 tablespoon baking powder
- 1/2 teaspoon salt
- 1/2 cup cold cream cheese, cubed
- 1/2 cup unsalted butter, cold and cubed
- 1/2 cup heavy cream
- 1 tablespoon lemon zest
- 1 teaspoon lemon juice
- 1 egg, lightly beaten (for egg wash)
- Extra sugar for sprinkling
Gathering these ingredients is key to my fluffy Easter lemon cream cheese scones. Start with all-purpose flour for the base. The granulated sugar adds sweetness, while baking powder helps them rise. A pinch of salt balances the flavors.
Cold cream cheese is essential. It makes the scones tender and rich. Make sure your butter is also cold. This keeps the scones light. Heavy cream gives moisture and a lovely texture.
Lemon zest and lemon juice bring out bright, fresh flavors. The egg wash gives the scones a golden color. Finally, a sprinkle of extra sugar on top adds a sweet crunch.
Having the right tools can make your baking easier. You will need mixing bowls to combine your ingredients. A pastry cutter or your fingers will help mix the cold butter and cream cheese.
Measuring cups and spoons ensure you get the right amounts. Use a baking sheet lined with parchment paper to prevent sticking. A wire rack cools the scones after baking.
These simple ingredients and tools will help you create delightful scones.
Step-by-Step Instructions
Prepping the Oven and Baking Sheet
- Preheat the oven to 400°F (200°C).
- Line a baking sheet with parchment paper.
First, I set the oven to 400°F. This heat gets the scones nice and fluffy. Lining the baking sheet helps prevent sticking. It makes cleanup so much easier, too.
Mixing Dry Ingredients
- Whisk flour, sugar, baking powder, and salt.
In a big bowl, I whisk 2 cups of flour, 1/4 cup of sugar, 1 tablespoon of baking powder, and 1/2 teaspoon of salt. This step mixes all the dry ingredients well. It helps the scones rise and taste great.
Incorporating Cream Cheese and Butter
- Blend in cold cream cheese and butter until crumbs form.
Next, I add 1/2 cup of cold cream cheese and 1/2 cup of cold butter. I use my fingers or a pastry cutter to mix them in. I want the mix to feel like coarse crumbs. This gives the scones their rich, creamy flavor.
Combining Wet and Dry Ingredients
- Mix heavy cream, lemon zest, and lemon juice.
- Fold the wet mixture into dry ingredients.
In another bowl, I mix 1/2 cup of heavy cream, 1 tablespoon of lemon zest, and 1 teaspoon of lemon juice. I then pour this wet mix into my dry ingredients. I fold it gently until just combined. Careful here! Overmixing can make the scones tough.
Shaping the Dough
- Pat the dough into a circle.
- Cut into wedges or use a round biscuit cutter.
I turn the dough onto a lightly floured surface. I pat it into a circle about 1 inch thick. Then, I cut it into 8 wedges or use a round biscuit cutter for fun shapes. This makes the scones easy to serve.
Baking the Scones
- Brush with egg wash and sprinkle sugar.
- Bake for 15-20 minutes until golden brown.
I place the scones on the baking sheet. I brush the tops with a beaten egg for a shiny look. A sprinkle of sugar adds a sweet crunch. I bake them for 15 to 20 minutes until they turn golden brown. The sweet smell fills my kitchen, and I can hardly wait to taste them!
Tips & Tricks
Achieving Fluffiness
To make your scones light and fluffy, treat the dough gently. Overmixing can lead to tough scones. When you fold in the wet ingredients, do it with care. Stop mixing as soon as you see no dry flour. This keeps the texture soft. Remember, lumps are fine!
Best Serving Temperature
Serve your scones warm for the best taste and feel. The warmth brings out the lemon flavor. A warm scone with cream cheese is a delight. If they cool down, you can reheat them in the oven for a few minutes.
Garnishing Suggestions
To make your scones look pretty, dust them with powdered sugar. This adds a sweet touch. You can also serve them with lemon curd. The tartness of the lemon curd pairs well with the scones. Fresh mint leaves or a lemon slice can make a lovely plate.
Pro Tips
- Use Cold Ingredients: Ensure that your cream cheese and butter are cold. This helps the scones rise beautifully and remain fluffy.
- Don’t Overmix: When combining the wet and dry ingredients, mix just until combined. Overmixing can lead to tough scones.
- Perfect Cutting Technique: When cutting your scones, use a sharp knife or a biscuit cutter to ensure clean edges and even baking.
- Experiment with Flavors: Feel free to add dried fruits, such as cranberries or blueberries, for added flavor and texture to your scones.
Variations
Adding Fruits
You can easily add fruits to your scones for more taste. Try mixing in fresh blueberries or raspberries. These fruits add a burst of flavor and a pretty touch. Just fold in about one cup of your chosen fruit into the dough before shaping it. The fruit will make each bite juicy and sweet.
Different Zest Options
While lemon is great, you can switch it up with different zests. Orange or lime zest gives a unique twist to the scones. Just replace the lemon zest with one tablespoon of your chosen zest. Each option brings its own fresh taste and bright aroma to your baked treats.
Gluten-Free Adaptation
If you need a gluten-free option, it's simple! Just swap the all-purpose flour for a gluten-free flour mix. Make sure to choose a blend that works well for baking. This way, everyone can enjoy these fluffy scones without worry. Follow the same steps in the recipe and watch them puff up beautifully.
Storage Info
Storing Leftovers
To store your leftover scones, place them in an airtight container. This keeps them fresh. You can leave them at room temperature for a day or two. If you want to keep them longer, consider freezing.
Freezing the Scones
You can freeze the scones both before and after baking. If you freeze them before baking, shape the scones as usual. Place them on a baking sheet and freeze until solid. Then, transfer them to a freezer bag. This way, you can bake them fresh later. If you freeze after baking, let them cool completely first. Then, wrap each scone in plastic and place them in a bag. They can last up to three months in the freezer.
Reheating Suggestions
To reheat the scones, preheat your oven to 350°F (175°C). Place the scones on a baking sheet. Heat them for about 10 minutes until warm. You can also use a microwave for quick reheating. Just warm them for 15-20 seconds. Enjoy them fresh for the best taste!
FAQs
Can I use low-fat cream cheese?
Yes, you can use low-fat cream cheese. Your scones may be a bit less rich. They might still taste great, but the texture can be a little different. Full-fat cream cheese gives more creaminess and flavor.
How do I know when the scones are done?
You can tell when the scones are done by checking the color. They should be golden brown on top. You can also insert a toothpick in the center. If it comes out clean, they are ready.
What's the best way to add flavor variations?
You can add different flavors easily! Try mixing in fresh fruits like blueberries or raspberries. You could also swap lemon zest for orange or lime zest. This will give your scones a new twist while keeping them delightful.
Can I prepare the dough in advance?
Yes, you can prepare the dough ahead of time. Wrap it tightly in plastic wrap and chill it in the fridge. You can keep it there for up to 24 hours. Just remember to cut the scones before baking them.
What should I serve with lemon cream cheese scones?
These scones taste great with lemon curd or clotted cream. You can also dust them with powdered sugar for a sweet touch. A slice of lemon or mint leaves can add a nice look too!
In this post, I covered how to make delicious lemon cream cheese scones. We explored the key ingredients, essential tools, and step-by-step instructions for perfect scones. I shared tips for fluffiness and variations to try, along with storage advice. Remember, baking is about fun and creativity. With these simple steps, you can enjoy fresh scones anytime. Happy baking!