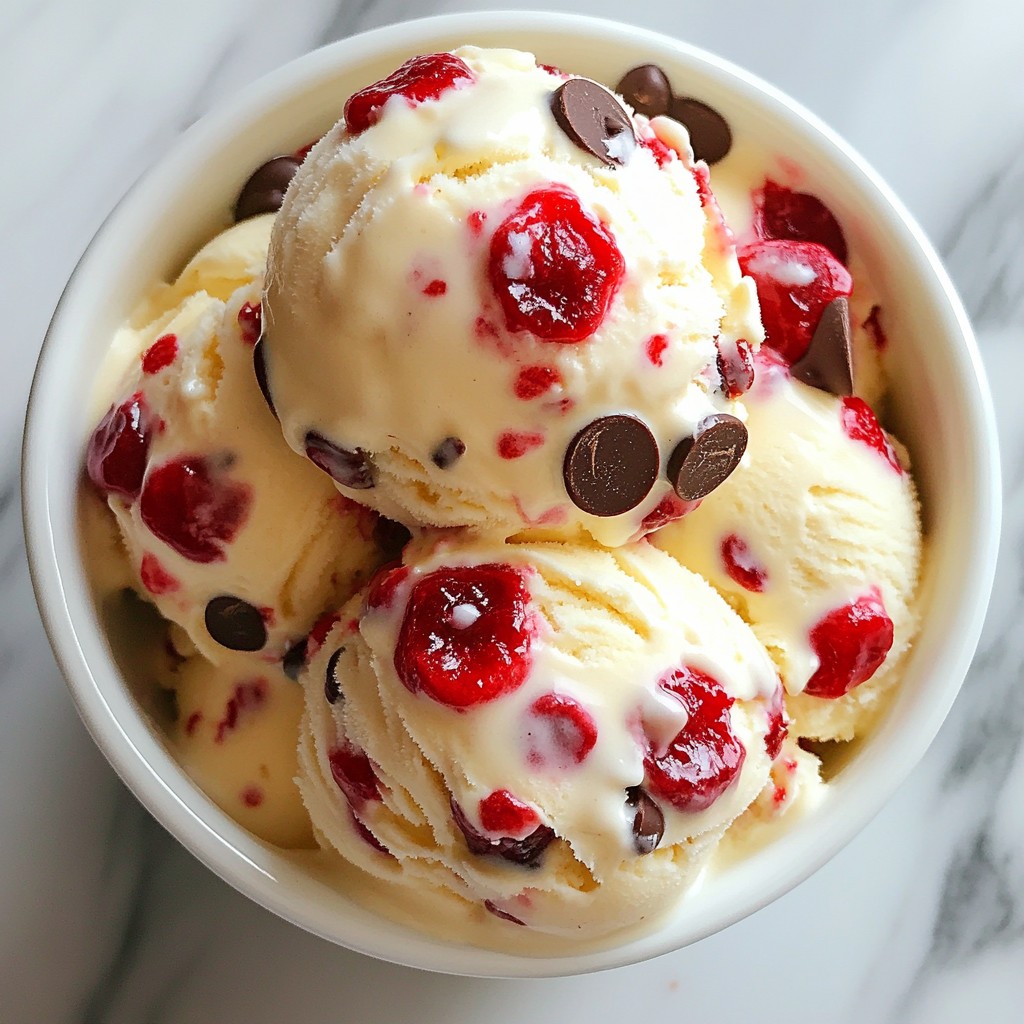
Craving a cool summer treat? Let's dive into the sweet world of Cherry Chocolate Chip Ice Cream! This recipe combines fresh cherries, rich chocolate, and creamy goodness to make a delightful dessert. I’ll guide you through every step, from gathering fresh ingredients to perfecting your texture. Whether you're an ice cream lover or just looking to impress, this treat will cool you down and bring smiles all around. Ready to get started?
Why I Love This Recipe
- Fresh and Fruity Flavor: This ice cream captures the essence of summer with its juicy cherries, making every scoop a delightful treat.
- Chocolatey Goodness: The addition of semisweet chocolate chips provides a rich contrast to the tartness of the cherries, creating a perfect balance.
- Simple Ingredients: Made with just a few wholesome ingredients, this recipe is easy to whip up and perfect for homemade ice cream lovers.
- Customizable Texture: You can decide how chunky or smooth you want your ice cream by adjusting how you fold in the cherry mixture.
Ingredients
Fresh Ingredients Needed
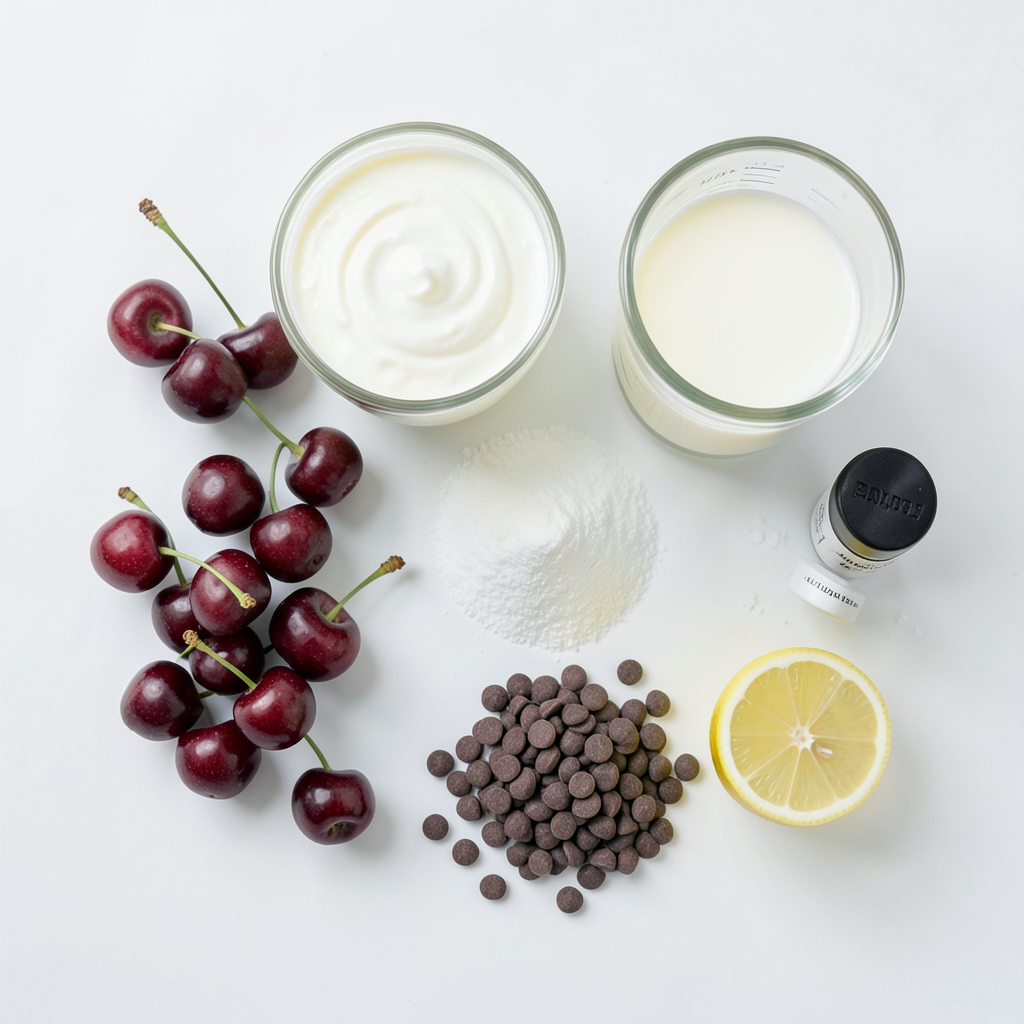
For this Cherry Chocolate Chip Ice Cream, you need fresh cherries. Use 2 cups of cherries, pitted and halved. This gives the ice cream great flavor and color. The cherries should be ripe for the best taste. You also need 1 tablespoon of lemon juice to brighten the cherry flavor.
Dairy Components
Dairy is key for creamy ice cream. Use 1 cup of heavy cream for richness. Add 1 cup of whole milk to balance the creaminess. These two make the base smooth and comforting. The heavy cream gives a nice, rich texture. The milk adds lightness.
Sweeteners and Flavor Enhancers
Sweetness comes from 3/4 cup of granulated sugar. This sugar helps balance the tartness of the cherries. You also need 1 teaspoon of vanilla extract for added depth. A pinch of salt enhances all the flavors, rounding out the taste. Finally, stir in 1/2 cup of semisweet chocolate chips. These chips add a delightful crunch and sweetness to each bite.
Step-by-Step Instructions
Preparation of Cherry Mixture
First, gather your fresh cherries. You need 2 cups, pitted and halved. This step is fun! The cherry juice will give your ice cream a nice color and taste. Place the cherries in a medium saucepan. Add 1 tablespoon of lemon juice for a zesty kick. Cook them over medium heat for about 5 minutes. Stir occasionally as they soften. You’ll see the juices start to flow. Once they look good, remove the pan from the heat. Let the mixture cool for a bit. You can leave some cherry chunks whole for texture later.
Creating the Ice Cream Base
Next, in a mixing bowl, combine 1 cup of heavy cream and 1 cup of whole milk. Add 3/4 cup of granulated sugar. Stir well until the sugar dissolves. This will be your creamy base. Don’t forget to add 1 teaspoon of vanilla extract and a pinch of salt. These flavors will balance the sweetness. After mixing, fold in your cooled cherry mixture. Make sure it’s well combined, so each bite has cherry goodness.
Churning and Freezing Process
Now, pour your mixture into an ice cream maker. Follow the manufacturer's instructions for churning. This usually takes 20 to 25 minutes. About 5 minutes before it's done, add 1/2 cup of semisweet chocolate chips. This step spreads the chocolate throughout the ice cream. Once churning is complete, transfer the ice cream to an airtight container. Freeze it for at least 4 hours. This will help it firm up. Now you’re ready to scoop and enjoy your delightful cherry chocolate chip ice cream!
Tips & Tricks
Achieving the Best Texture
To get the best texture, use fresh cherries. Fresh fruit gives a vibrant taste. Also, use heavy cream and whole milk. This mix makes the ice cream rich and smooth. Churn it long enough, around 20-25 minutes. This time helps it become fluffy. If it seems too soft, let it freeze longer.
Flavor Enhancements
Add lemon juice to boost the cherry flavor. It brightens the taste and balances sweetness. For a twist, try a splash of almond extract. This gives a nice depth. You can also mix in extra chocolate chips for a richer chocolate flavor. Just add them in the last five minutes of churning.
Common Mistakes to Avoid
Avoid using canned cherries. They can make the ice cream watery. Also, don’t skip the salt; it enhances flavors. If you over-churn the ice cream, it can become too hard. Monitor the ice cream closely while it churns. Lastly, let it cool before freezing. This helps the flavors develop better.
Pro Tips
- Choose Ripe Cherries: For the best flavor, select ripe, sweet cherries that are deep red in color. They will enhance the overall taste of your ice cream.
- Chill Your Mixture: Before churning, chill the cream mixture in the refrigerator for at least an hour. This helps the ice cream to freeze faster and improves the texture.
- Use a Quality Ice Cream Maker: A good ice cream maker will ensure even churning and a creamy texture. Follow the manufacturer's instructions for best results.
- For Extra Creaminess: Consider adding a tablespoon of corn syrup or a splash of vodka to the mixture. This can help keep the ice cream from becoming too hard when frozen.
Variations
Vegan Cherry Chocolate Chip Ice Cream
If you want a vegan version, swap the dairy. Use coconut cream or almond milk instead of heavy cream and whole milk. This keeps the creaminess you want. Use maple syrup or agave for sweetness. These work well and add a nice flavor. Check your chocolate chips to ensure they are dairy-free.
Alternative Flavor Combinations
You can mix it up with other fruits. Try strawberries or raspberries for a twist. For a tropical vibe, add mango or pineapple. You can also switch the chocolate. Use dark chocolate for a richer taste. Or try white chocolate for a sweeter treat. Create your own flavor by combining your favorites.
Add-ins and Toppings Ideas
Add fun things to your ice cream! Try crushed nuts for a crunchy bite. Chopped mint adds freshness. Consider sprinkles or cookie crumbles for fun colors and textures. Drizzle with chocolate or caramel syrup for extra sweetness. You can also add whipped cream on top for a classic touch. Experiment and find your favorite combo!
Storage Info
Best Practices for Storing Homemade Ice Cream
To keep your cherry chocolate chip ice cream fresh, store it in an airtight container. This helps prevent ice crystals from forming. Before sealing, make sure the ice cream is smooth on top. You can also press plastic wrap against the surface for extra protection. This keeps the flavor and texture just right.
Recommended Freezer Containers
Use a sturdy freezer-safe container for best results. A shallow container is great because it freezes ice cream faster. Glass or plastic containers work well. Make sure they have tight lids to keep out air. If you plan to store it long, consider using a vacuum-sealed bag.
Shelf Life of Cherry Chocolate Chip Ice Cream
Your homemade cherry chocolate chip ice cream will last about two weeks in the freezer. After two weeks, the flavor may fade. It can still be safe to eat, but the taste will not be as good. For the best experience, try to enjoy it within the first week!
FAQs
Can I use frozen cherries?
Yes, you can use frozen cherries. They work well in ice cream. Just thaw them first. This helps them soften and release juices. You might want to drain extra liquid. Otherwise, your ice cream could become too watery.
How do I make the ice cream without an ice cream maker?
You can make ice cream without an ice cream maker. After mixing your base, pour it into a shallow dish. Place it in the freezer. Every 30 minutes, stir the mixture with a fork. Do this for about 3-4 hours. This will help create a creamy texture.
What other flavors pair well with cherry chocolate chip ice cream?
Many flavors pair well with cherry chocolate chip ice cream. Vanilla is a classic choice. It helps balance the tartness of cherries. Almond also works nicely, adding a nutty depth. You can try mint for a fresh twist. Each of these flavors makes the ice cream even more delightful!
You learned about making cherry chocolate chip ice cream from fresh ingredients to storage tips. We covered how to prepare the cherry mixture, create a smooth ice cream base, and churn it to the perfect texture. Remember to avoid common mistakes and explore fun variations like vegan options. This homemade treat not only delights the taste buds but also lets you customize flavors. With the right storage practices, you can enjoy it longer. Now, you're ready to create your own delicious ice cream masterpiece!