![To make Coconut Curry Lentil Soup, you will need: - 1 tablespoon coconut oil - 1 onion, finely chopped - 3 cloves garlic, minced - 1 tablespoon fresh ginger, grated - 1 tablespoon red curry paste - 1 cup dried red lentils, rinsed - 1 (14 oz) can coconut milk - 4 cups vegetable broth - 2 cups spinach, roughly chopped - 1 tablespoon soy sauce (or tamari for gluten-free) - Juice of 1 lime - Salt and pepper to taste - Fresh cilantro, for garnish - Sliced chili (optional, for heat) If you need to swap any ingredients, here are some ideas: - Use olive oil instead of coconut oil for sautéing. - Swap red lentils for green or brown lentils, but adjust cooking time. - You can use fresh curry paste or powder instead of red curry paste. - Replace vegetable broth with chicken broth for a non-vegetarian version. Garnishes can make your soup even better. Here are some tasty options: - Fresh herbs like cilantro or basil add a burst of flavor. - Sliced green onions can add a nice crunch. - For heat, drizzle chili oil on top or add sliced chili. - A dollop of yogurt or coconut cream can add creaminess and coolness. These small touches can elevate your Coconut Curry Lentil Soup to new heights! For the complete recipe, check out the [Full Recipe]. 1. Heat the oil: Start by heating 1 tablespoon of coconut oil in a large pot over medium heat. This oil adds flavor and helps cook the onions. 2. Sauté the onion: Add 1 finely chopped onion. Cook it for about 5 minutes until it turns soft and clear. Stir often to avoid burning. 3. Add garlic and ginger: Next, mix in 3 minced garlic cloves and 1 tablespoon of grated ginger. Stir for 2 minutes to let the flavors bloom. 4. Incorporate curry paste: Add 1 tablespoon of red curry paste to the pot. This gives the soup its rich flavor. Stir well for another minute. 5. Mix in lentils: Pour in 1 cup of rinsed red lentils. Stir them to coat with the onion and spice mix. This step helps the lentils absorb flavors. 6. Add liquids: Pour in 1 can (14 oz) of coconut milk and 4 cups of vegetable broth. Bring this mixture to a boil. 7. Simmer: Once boiling, reduce the heat to low. Let it simmer uncovered for about 20-25 minutes, or until the lentils are soft. Stir occasionally to prevent sticking. 8. Add spinach and soy sauce: Stir in 2 cups of roughly chopped spinach and 1 tablespoon of soy sauce. Cook for 5 more minutes until the spinach wilts. 9. Finish with lime juice: Remove the pot from heat. Squeeze the juice of 1 lime into the soup. Season with salt and pepper to taste. 10. Serve: Ladle the soup into bowls. Garnish with fresh cilantro and optional sliced chili for heat. These steps ensure you create a delicious Coconut Curry Lentil Soup. Each step builds flavor and texture. - Prep Time: This soup takes about 10 minutes to prep. - Total Time: The entire cooking process takes around 40 minutes. Recommended tools and equipment: - A large pot for cooking - A wooden spoon for stirring - A knife and cutting board for chopping These tools help you work efficiently and safely in the kitchen. Enjoy the process and the wonderful smells! For the full recipe, refer to the earlier sections. To make your Coconut Curry Lentil Soup great, here are some tips. First, avoid overcooking the lentils. They should be soft but not mushy. Keep an eye on them as they simmer. Second, taste as you go. You can adjust the flavors to your liking. If you want more heat, add sliced chili or more curry paste. For a fresher taste, a splash of lime juice brightens the soup. To save time, start by chopping all your ingredients first. This way, you can cook faster. You can also use canned lentils to cut cooking time significantly. If you want to meal prep, this soup freezes well. Make a big batch and store it in portions. Then, you can just reheat it when you need a quick meal. For easy reheating, use the microwave or a pot on low heat. For the full recipe, check the detailed instructions. {{image_2}} You can make Coconut Curry Lentil Soup your own. Start by swapping ingredients based on your needs. If you want a creamier soup, use full-fat coconut milk instead of light. You can also use chickpeas instead of lentils for a different taste. If you're going vegan, replace soy sauce with tamari for a gluten-free option. Want more protein? Add cooked chicken, shrimp, or tofu. If you like more veggies, toss in carrots, bell peppers, or kale. These swaps add flavor and keep things fresh. Feel free to mix and match based on what you have on hand. Curry has many styles, and you can explore them in this soup. For a Thai twist, add basil and lime leaves. If you prefer Indian flavors, use garam masala and coriander. Each spice adds a unique taste, making the soup exciting. You can also adapt the soup to the seasons. In summer, add fresh tomatoes and zucchini for a light touch. In winter, try adding root vegetables like sweet potatoes or parsnips. These changes keep the soup vibrant and flavorful all year round. For the full recipe, check out the detailed instructions above. To store your leftover Coconut Curry Lentil Soup, let it cool first. Once cool, pour it into an airtight container. This keeps the soup fresh for up to five days in the fridge. When reheating, use a pot on low heat. Stir often to keep it from sticking. You can also add a splash of broth or coconut milk to help bring back the creamy texture. If you want to freeze the soup, use a freezer-safe container. Leave some space at the top for expansion. The soup stays good for about three months in the freezer. To thaw, place it in the fridge overnight or use the microwave on low. When reheating, make sure to heat it thoroughly. Stir well to mix any separated ingredients. Enjoy your cozy soup anytime you want! Can I use other lentil types? Yes, you can use other lentil types. Green or brown lentils work well. They take longer to cook, so adjust your time. Red lentils break down and thicken the soup nicely. Is this recipe suitable for meal prep? Absolutely! This soup stores well in the fridge. You can make it in advance and enjoy it later. Just cool it completely before storing. It lasts for up to five days. How to adjust for spice level? To control the spice, add less red curry paste at first. You can always add more later. For extra heat, include sliced chili when serving. Taste as you go to find your perfect level. This Coconut Curry Lentil Soup is both tasty and healthy. One serving has about 300 calories. It packs in protein from the lentils and healthy fats from the coconut milk. Health benefits of the ingredients used: - Lentils: High in protein and fiber. They help keep you full and support digestion. - Coconut milk: Contains healthy fats that boost energy. It also aids in nutrient absorption. - Spinach: Full of vitamins A and C, along with iron. It supports your immune system. - Garlic and ginger: Both are natural anti-inflammatories. They can help with digestion and boost immunity. Together, these ingredients create a comforting meal that nourishes your body and warms your soul. For the full recipe, check out the details above! Coconut Curry Lentil Soup is an easy recipe with rich flavors. We covered essential ingredients and substitutes. I shared tips to make cooking simple and quick. You can customize the soup to fit your taste and diet. Proper storage will keep leftovers tasty. With the FAQs answered, you have all the info needed to enjoy this dish. Now, get cooking and savor every bite of this delicious meal!](https://greenmealmap.com/wp-content/uploads/2025/05/64dc127f-8f4b-4413-aa50-e05c3b98b257.webp)
Coconut Curry Lentil Soup Flavorful and Healthy Meal
Looking for a warm, comforting meal that’s packed with nutrients? You’ll love my Coconut Curry Lentil Soup! It combines rich
Looking for a warm, comforting meal that’s packed with nutrients? You’ll love my Coconut Curry Lentil Soup! It combines rich

Craving a delicious meal that’s quick and easy? Get ready for mouthwatering teriyaki chicken bowls! In this guide, I’ll show

Are you ready to whip up a tasty meal in no time? My Instant Pot Chicken Tikka Masala is packed
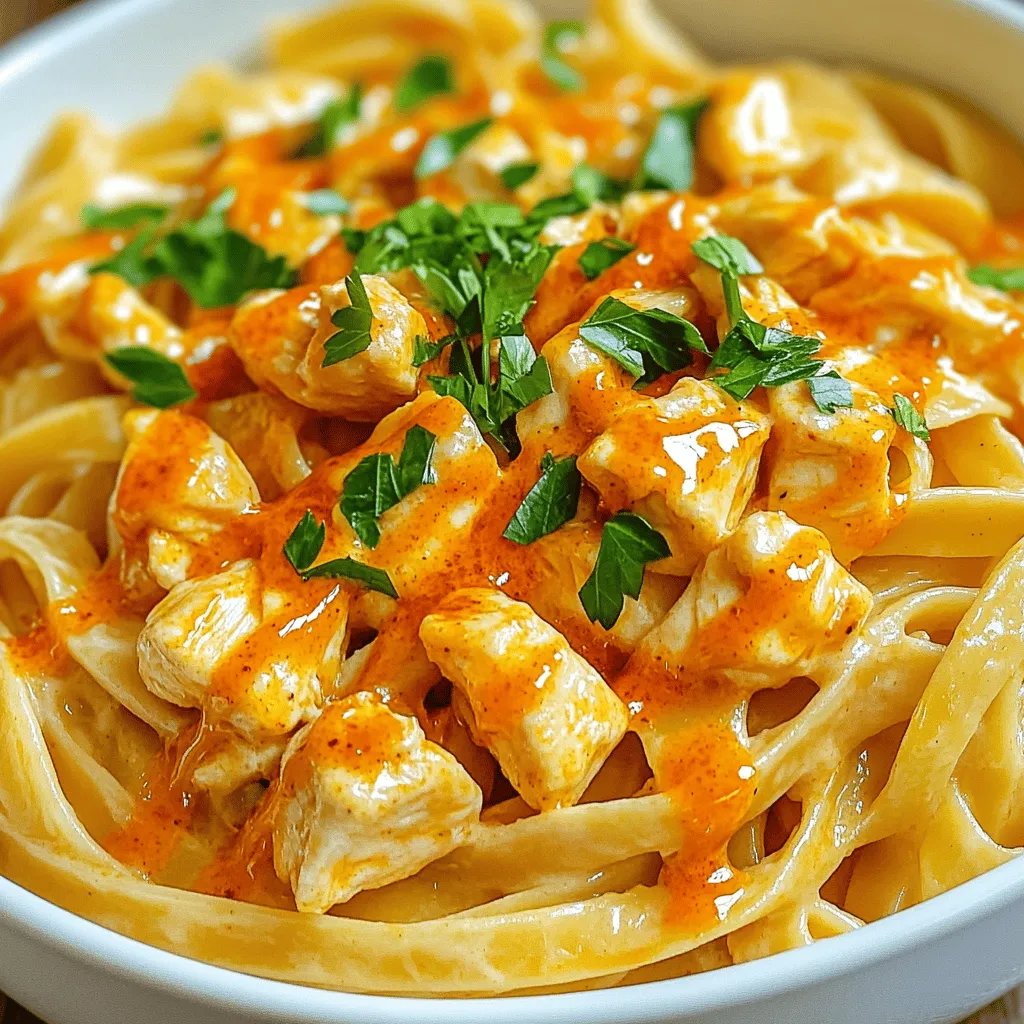
![To make Cajun Shrimp and Steak Alfredo, gather the following items: - 8 oz fettuccine pasta - 1 lb shrimp, peeled and deveined - 1 lb flank steak, sliced into thin strips - 2 tablespoons Cajun seasoning - 3 tablespoons olive oil, divided - 4 cloves garlic, minced - 1 cup heavy cream - 1 cup grated Parmesan cheese - Salt and pepper to taste - Fresh parsley, chopped (for garnish) These ingredients work together to create a rich and flavorful dish. The fettuccine pasta serves as a perfect base, while the shrimp and steak add protein and texture. Cajun seasoning gives it a spicy kick, and the creamy sauce ties it all together. Using fresh ingredients will enhance the dish's flavor, making it a delightful meal for any occasion. For the full recipe, check out the details above. To start, you need to boil the fettuccine. Fill a large pot with water and add a pinch of salt. Bring it to a rolling boil. Once the water is boiling, add the fettuccine. Follow the package directions and cook until it is al dente, which usually takes about 8 to 10 minutes. Why is it important to reserve pasta water? Reserving pasta water is key because it helps bind the sauce to the pasta. The starchy water makes the sauce smoother and creamier. So, save about 1 cup of that water before you drain the pasta. For great flavor, you need to season both the shrimp and steak. Take your shrimp and put them in a bowl. Add 1 tablespoon of Cajun seasoning and toss well. Make sure all the shrimp get a good coat. Next, do the same with the flank steak. In another bowl, add the remaining Cajun seasoning. Toss the steak strips until they are evenly coated. This helps to ensure each bite is full of flavor. Cooking flank steak just right is important. Heat 1 tablespoon of olive oil in a large skillet over medium-high heat. Add the seasoned flank steak, cooking for about 3 to 4 minutes on each side. You want it to be browned and cooked through. How do you know when it's done? The steak should be firm but not hard. A meat thermometer can help too. Aim for around 130°F for medium-rare. Once done, take the steak out of the skillet and set it aside. Now it’s time for the shrimp. Use the same skillet to keep those flavors. Add another tablespoon of olive oil and the minced garlic. Cook the garlic for about 30 seconds until it smells great. Then, add the shrimp to the skillet. Cook for 2 to 3 minutes until they turn pink and opaque. How can you tell when shrimp is cooked properly? When shrimp curl into a C shape and turn pink, they are done. Once cooked, take them out and set them aside with the steak. In the same skillet, lower the heat and add the heavy cream. Stir it well and let it warm. Then, gradually sprinkle in the Parmesan cheese while stirring. Keep stirring until the cheese melts and the sauce is creamy. If the sauce gets too thick, add some of that reserved pasta water. This keeps the sauce silky and smooth. Now it is time to bring everything together. In the skillet with the Alfredo sauce, add the drained fettuccine. Toss it well to coat the pasta in the sauce. Then, gently fold in the cooked shrimp and steak. Mix everything together until combined. This ensures every bite is packed with flavor. For the full recipe, check out the detailed steps above. For this dish, I recommend using large shrimp. They hold up well in the sauce and have great bite. Look for shrimp labeled "peeled and deveined" for ease. Flank steak is the best choice for its tenderness and flavor. Slice it thin so it cooks quickly and evenly. Cooking shrimp and steak to perfection is key. For shrimp, cook them until they turn pink and opaque, about 2-3 minutes. Do not overcook, or they will become rubbery. For steak, aim for a nice brown crust. Cook it for about 3-4 minutes on each side for medium-rare. Use a high heat to sear and keep the juices locked in. Want to elevate your dish? Try adding a pinch of smoked paprika for depth. A splash of lemon juice brightens the flavors. You can also toss in some fresh herbs like thyme or basil. If you're feeling adventurous, a dash of hot sauce can add a nice kick. {{image_2}} If you need gluten-free options, you can use gluten-free pasta. Many brands offer great taste and texture. Look for options made from rice or chickpeas. They cook similarly to regular pasta. For a dairy-free Alfredo sauce, try using coconut cream instead of heavy cream. You can also use nutritional yeast for a cheesy flavor without dairy. Almond or cashew milk can work too, but use a thickening agent like cornstarch for creaminess. If you want to switch up the flavor, try using different seasonings. Old Bay seasoning adds a nice kick, while lemon pepper gives a fresh taste. For a milder dish, use Italian herbs like basil or oregano. Each choice offers a unique twist to your meal. To boost this dish, consider adding vegetables. Spinach and bell peppers add color and nutrition. You can also serve it with a side salad or garlic bread. These sides make your meal more filling and enjoyable. For the full recipe, check out the Full Recipe section. To store leftovers of Cajun Shrimp and Steak Alfredo, let the dish cool to room temperature. Then, transfer it to an airtight container. Make sure to seal it well to keep out air. Place it in the fridge. Properly stored, it can last for up to three days. When you want to eat it, reheat in a skillet over medium heat. You can add a splash of cream or water to keep it creamy. If you want to freeze Cajun Shrimp and Steak Alfredo, it's best to do so before adding the shrimp and steak. Cook the pasta and make the sauce, then cool both items. Place them in freezer-safe bags or containers. You can freeze the shrimp and steak separately too. When ready to eat, thaw everything overnight in the fridge. Reheat in a pan over low heat, stirring often, until warmed through. In the fridge, Cajun Shrimp and Steak Alfredo lasts about three days. If frozen, it can stay good for up to three months. However, for the best taste, try to eat it within one month. Make sure to check for any signs of freezer burn before cooking. For the best quality, always store it in airtight containers. Yes, you can prep this dish in advance. Cook the pasta and set it aside. Season the shrimp and steak, then store them in the fridge. You can also make the Alfredo sauce ahead. Simply reheat it on the stove and add a bit of reserved pasta water to restore creaminess. This dish pairs well with simple sides. Consider serving it with: - Garlic bread - Steamed broccoli - A fresh garden salad - Roasted vegetables These sides complement the rich flavors of the Alfredo sauce. To increase the heat level, you can: - Add extra Cajun seasoning. - Mix in some red pepper flakes. - Include diced jalapeños or serrano peppers in the sauté. These options will give your dish a nice kick. The total cooking time is about 30 minutes. Here's the breakdown: - Prep time: 15 minutes - Cook time: 15 minutes This quick cooking time makes it a perfect weeknight meal. Absolutely! This dish is great for events like: - Date nights - Dinner parties - Celebrations Its rich flavors and beautiful presentation make it a standout choice. For the full recipe, check out [Full Recipe]. Cajun Shrimp and Steak Alfredo combines bold flavors with creamy goodness. You learned how to prepare the pasta, season the shrimp and steak, and create a rich Alfredo sauce. With these steps, you can impress anyone with this dish. Don’t forget the storage tips for leftovers. Feel free to experiment with variations to suit your taste or dietary needs. This meal is perfect for both casual dinners and special occasions. Enjoy creating this flavorful dish and share it with friends and family!](https://greenmealmap.com/wp-content/uploads/2025/05/9ab6f8d5-001c-4a1b-89f6-a68d846d9aef.webp)
Are you ready to spice up your dinner plans? Cajun Shrimp and Steak Alfredo combines rich flavors and creamy goodness
Are you ready for a dinner that packs a punch? This Buffalo Chicken Alfredo Pasta combines creamy goodness with spicy

Get ready to elevate your snack game with Oven Fried Feta Rolls! These crispy treats are packed with flavorful feta

Are you ready to make the best cast iron pizza ever? In this guide, I’ll share my favorite recipe for
![To make French toast roll-ups, gather these main items: - 8 slices of white bread - 4 ounces cream cheese, softened - 1/4 cup powdered sugar - 1 teaspoon vanilla extract - 2 large eggs - 1/4 cup milk - 1 teaspoon cinnamon - 1 tablespoon butter (for cooking) These ingredients create a creamy filling and a fluffy outer layer. The white bread is soft and perfect for rolling. Cream cheese gives a rich taste, while powdered sugar adds sweetness. The vanilla extract brings a lovely aroma. Eggs and milk create a custard mix for dipping. You can add fun extras to your roll-ups. Consider these ideas: - Fresh fruit (like strawberries or bananas) - Nutella or chocolate spread - Peanut butter - Chopped nuts (like walnuts or almonds) - Whipped cream These add-ins can change the flavors. You can also top your roll-ups with: - Extra powdered sugar - Maple syrup - Honey - Chocolate sauce These toppings make each bite even more special. Pair your French toast roll-ups with tasty sides. Here are some great options: - Fresh berries (strawberries, blueberries, or raspberries) - Yogurt (plain or flavored) - Bacon or sausage for a savory touch - A glass of fresh juice or milk These sides balance the sweetness of the roll-ups. They also add color and nutrition to your breakfast plate. For the full recipe, check out the [Full Recipe]. To start, gather your cream cheese, powdered sugar, and vanilla extract. In a bowl, combine 4 ounces of softened cream cheese with 1/4 cup of powdered sugar and 1 teaspoon of vanilla extract. Mix well until the texture is smooth. This sweet cream cheese filling adds a rich taste to your roll-ups. Next, take 8 slices of white bread and cut off the crusts. This helps make the bread easier to roll. Spread about 1 tablespoon of the cream cheese mixture on each slice of bread. Carefully roll up each slice tightly. This keeps the filling inside. Repeat until you finish all the slices. Now, whisk together 2 large eggs, 1/4 cup milk, and 1 teaspoon cinnamon in a shallow bowl. Heat a skillet over medium heat and add 1 tablespoon of butter. Dip each roll-up in the egg mixture, making sure it is fully coated. Allow any extra mixture to drip off. Place the roll-ups seam-side down in the skillet. Cook for 2-3 minutes, turning occasionally, until they are golden brown on all sides. After cooking, let them cool slightly before serving. You can dust them with powdered sugar and serve with warm maple syrup and fresh berries on the side. For the full recipe, check out the details above. To get the best texture for your French toast roll-ups, use fresh bread. I prefer white bread, as it rolls easily. Trim the crusts off first so they don’t poke through. The softness helps the roll-ups cook evenly. Spread the cream cheese mix thick but not too much. A tablespoon per slice works well. This keeps them from bursting while cooking. Heat your skillet to medium, not high. If it’s too hot, the outside burns while the inside stays cold. Add a tablespoon of butter before cooking each batch. This prevents sticking and adds flavor. Roll each piece in the egg mixture fully. Let any extra drip off before placing them seam-side down in the pan. Turn them gently to get a nice golden color on all sides. Serve your roll-ups with warm maple syrup and fresh berries. They add a sweet touch and a pop of color. You can also dust them with powdered sugar for a nice finish. If you want a twist, try adding a dollop of whipped cream on top. For a fun option, serve with chocolate sauce for dipping. Explore these choices to make your breakfast even more exciting. For a full recipe, check out the details above. {{image_2}} You can have fun with different fillings in your French toast roll-ups. Instead of cream cheese, try using Nutella or peanut butter. You can also fill them with fruits like sliced bananas or strawberries. Another idea is to mix cream cheese with lemon zest for a citrus twist. Each filling gives a new taste and makes breakfast exciting. Adding spices can change the whole flavor of your roll-ups. Along with cinnamon, try nutmeg for a warm taste. You can also mix in some cocoa powder for a chocolatey flavor. If you want a bit of zing, add a touch of ginger. These small changes can make your breakfast feel fresh and new. Toppings can really enhance your French toast roll-ups. You might sprinkle powdered sugar on top for sweetness. Drizzling maple syrup is always a classic choice. For something different, use chocolate or caramel sauce. You can also add fresh berries or whipped cream for extra fun. These toppings not only taste great but also make your dish look beautiful. For the complete recipe, check out the Full Recipe section above. To keep your leftover French toast roll-ups fresh, place them in an airtight container. Make sure they have cooled to room temperature first. Store them in the fridge for up to three days. If you want to keep them longer, freezing is a good option. Just remember, the sooner you store them, the better they will taste later. When you're ready to enjoy the roll-ups again, take them out of the fridge. You can reheat them in the oven or microwave. For the oven, preheat it to 350°F (175°C). Place the roll-ups on a baking sheet and heat for about 10 minutes. If using the microwave, heat them for 20 to 30 seconds. Check to see if they're warm enough. You want them soft but not soggy! If you have more roll-ups than you can eat, freezing is easy. Wrap each roll-up in plastic wrap. Then, place them in a freezer-safe bag or container. This way, they won’t get freezer burn. They will last for up to two months. When you're ready to eat them again, thaw them in the fridge overnight. Then, follow the reheating instructions to enjoy them warm and delicious. For the full recipe, check out the steps above! You can use gluten-free bread for this recipe. Many stores sell it now. Look for a brand that you enjoy. Check the texture to ensure it rolls well. Follow the same steps as the original recipe. You will still get that tasty flavor! You can use several types of bread. Challah or brioche adds a rich taste. Whole wheat bread gives a nutty flavor. Even sourdough works well. Just ensure the bread is soft enough to roll. Each type gives a unique twist to your French toast roll-ups! Yes, you can make the filling in advance. Store it in an airtight container in the fridge. It will stay fresh for about three days. This saves time when you're ready to cook. Just stir it well before using. Enjoy the ease of a quick breakfast! French toast roll-ups are fun and easy to make. We covered the key ingredients, from cream cheese to optional toppings. I shared step-by-step instructions to help you roll and cook them perfectly. With tips for great texture and even cooking, you'll impress anyone who tries them. Explore variations for different fillings and flavors, too. Don't forget how to store leftovers or reheat them easily. Get creative with your roll-ups, and enjoy this tasty treat any time!](https://greenmealmap.com/wp-content/uploads/2025/05/214036ee-8f97-471b-a5a9-eda62770f864.webp)
Looking for a fun breakfast idea that brings a twist to your morning routine? French Toast Roll-Ups are not just
![To make great Greek chicken gyros, you need fresh, quality ingredients. Here’s what you’ll need: - 1 lb boneless, skinless chicken thighs - 3 tablespoons olive oil - 1 tablespoon Greek yogurt - Juice of 1 lemon - 3 cloves garlic, minced - 1 teaspoon dried oregano - 1 teaspoon paprika - Salt and pepper to taste - 4 pita breads - 1 cup shredded lettuce - 1 medium tomato, diced - ½ cucumber, thinly sliced - ½ red onion, thinly sliced - ½ cup tzatziki sauce Using fresh ingredients makes a big difference. The chicken thighs stay tender and juicy when cooked. The olive oil adds a rich flavor, while Greek yogurt makes the marinade creamy. Fresh veggies like tomatoes and cucumbers add crunch and brightness. Tzatziki sauce brings it all together with its cool, tangy taste. If you want to switch up your gyros, here are some ideas: - Try lamb or beef instead of chicken for a different flavor. - For a gluten-free option, use gluten-free pita bread or lettuce wraps. These substitutions keep the dish close to the original while allowing for personal tastes and dietary needs. To start, we need to make a tasty marinade. In a large bowl, mix together: - 3 tablespoons olive oil - 1 tablespoon Greek yogurt - Juice of 1 lemon - 3 cloves garlic, minced - 1 teaspoon dried oregano - 1 teaspoon paprika - Salt and pepper to taste Whisk these ingredients until they blend well. Next, add 1 pound of boneless, skinless chicken thighs. Make sure the chicken is fully coated in the marinade. Cover the bowl and place it in the fridge. For the best flavor, let it marinate for at least 1 hour. If you can, marinate overnight. This time allows the flavors to soak in deeply. Now, it’s time to cook! Preheat your grill or grill pan over medium-high heat. Remove the chicken from the marinade and let the excess drip off. Discard the leftover marinade. Grill the chicken for about 6-7 minutes on each side. You want the internal temperature to reach 165°F (75°C). This means the chicken is safe to eat and fully cooked. Look for nice grill marks for that perfect char. Once done, take the chicken off the grill and let it rest for 5 minutes. This helps keep it juicy. Now, let’s build your gyros! Start with warm pita bread. You can warm them on the grill or in a dry skillet for about 1-2 minutes. Take a piece of pita and layer on: - Shredded lettuce - Diced tomatoes - Cucumber slices - Red onion - Sliced chicken Finally, drizzle tzatziki sauce on top. Fold the pita to wrap it tightly around the fillings. Serve fresh and warm. You can add extra tzatziki on the side for dipping. This makes every bite even better! For the full recipe, check the earlier section. Making Greek chicken gyros can be simple. However, some common mistakes can ruin the dish. - Over-marinating: If you let the chicken sit too long in the marinade, it can become mushy. Aim for 1 to 6 hours for the best flavor. - Skipping the rest time: After grilling, let the chicken rest for about 5 minutes. This step helps keep the juices inside. To achieve the best texture, use boneless, skinless chicken thighs. They remain moist and tender during cooking. If you prefer chicken breasts, be careful not to overcook them. Adding extra toppings can elevate your gyros. Here are some great ideas: - Feta cheese: Crumble feta on top for a salty kick. - Olives: Sliced Kalamata olives add a briny flavor. You can also play with seasonings. Try adding: - Cumin: It gives a warm, earthy note. - Cayenne: For a touch of heat, blend in a pinch. For more flavor, explore the [Full Recipe] for more tips and tricks. This way, you make the most out of your gyros! {{image_2}} You can switch up the marinade for your gyros to keep things fun. Try using yogurt with added herbs. This will give your chicken a fresh taste. A blend of rosemary and thyme works wonders. You can also add some spice with chili powder or cayenne pepper. This gives the chicken a bit of heat. If you want a sweeter touch, use honey in the marinade. This adds a nice glaze when you grill the chicken. You might also try a Mediterranean twist with balsamic vinegar and garlic. Many local spices can enhance your dish. Gyros are great, but what about sides? Pairing your gyros with Greek salad is a classic choice. The fresh veggies add crunch and color. You can also serve your gyros with roasted potatoes. Their crispy texture complements the soft pita. If you want to make it a full meal, add some rice on the side. A side of hummus with pita chips is also a hit! This gives you a nice variety of flavors. Don't forget to serve extra tzatziki for dipping. It adds a cool, creamy touch that everyone loves. For the full recipe, check out the details above. After enjoying your Greek Chicken Gyros, store any leftovers properly. First, let them cool to room temperature. Then, wrap the gyros tightly in plastic wrap or foil. You can also place them in an airtight container. This keeps them fresh. Store them in the fridge for up to three days. For the best taste, eat them within two days. To keep your gyros fresh, separate the chicken and vegetables from the pita. This prevents sogginess. Store the chicken in one container and the veggies in another. The pita can go in a bag with some air removed. This helps maintain their texture. To reheat the chicken, avoid the microwave if you can. Microwaving dries it out. Instead, use a skillet over medium heat. Add a splash of water to keep it moist. Heat for about 5 minutes, stirring often. You can also use the oven. Preheat it to 350°F (175°C) and warm the chicken for 10 minutes. For the pita, warm it in a dry skillet over medium heat for about 1-2 minutes. You want it soft and pliable again. Avoid using the microwave for pita as it can make it chewy. Enjoy your gyros just like they were fresh! For the full recipe, check out the details above. If you don't have Greek yogurt, try sour cream or plain yogurt. Both give a creamy texture. You can also use a vegan option, like cashew yogurt. Each choice will offer a slightly different flavor but will still work well in the marinade. Yes, you can use chicken breast. It is leaner and cooks faster. However, chicken thighs are juicier and more flavorful. If you use breasts, be careful not to overcook them to avoid dryness. To check if chicken is done, use a meat thermometer. It should read 165°F (75°C) at the thickest part. You can also cut into the chicken; the juices should run clear, not pink. Absolutely! You can marinate the chicken a day ahead. Store it in the fridge. Cooked gyros can also be assembled and kept for a few hours. Just wrap them tightly to keep them fresh. Tzatziki sauce is the classic choice. It’s creamy and cool, perfect for gyros. You can also try garlic sauce or hummus for a twist. These sauces add flavor and moisture to your dish. To find great gyros, use apps like Yelp or Google Maps. Check reviews and ratings to help you choose. You can also ask friends or family for their favorite local spots. This article covered essential ingredients and steps for making Greek chicken gyros. We explored quality ingredients and their impact on flavor. I shared tips for marinating, cooking, and assembling for best results. Common mistakes and storage options were also discussed. As you prepare your gyros, remember to get creative with flavors. Enjoy the process and make it your own! You will impress everyone with your delicious creations. Happy cooking!](https://greenmealmap.com/wp-content/uploads/2025/05/3b02b8e6-2854-42ce-93b9-3ac5299bd79e.webp)
Are you ready to bring the taste of Greece to your kitchen? In this guide, I’ll show you how to
![Here’s what you need to make these Golden Oreo strawberry cheesecake bars. - 18 Golden Oreo cookies, crushed - 4 tablespoons unsalted butter, melted - 16 oz cream cheese, softened - 1 cup granulated sugar - 1 teaspoon vanilla extract - 2 large eggs - 1 cup fresh strawberries, chopped - 1 tablespoon lemon juice - 1 tablespoon cornstarch - Whipped cream (for topping) - Extra strawberries (for garnish) Each ingredient plays an important role. The Golden Oreos give a sweet, crunchy crust. The unsalted butter helps bind it together. Cream cheese creates that rich, smooth filling you love. Granulated sugar adds sweetness, while vanilla brings out all the flavors. Fresh strawberries add a burst of fruity flavor. Lemon juice brightens the taste, making it fresh and zesty. Cornstarch helps the filling set just right. Whipped cream adds a light touch on top, and extra strawberries make it look pretty. Using this detailed ingredient list, you can create a dessert that impresses everyone. For the full recipe, check out the instructions in the next section. First, crush 18 Golden Oreos into fine crumbs. You can use a food processor or a zip-top bag with a rolling pin. Next, melt 4 tablespoons of unsalted butter in a small bowl. Mix the butter with the crushed Oreos until they look like wet sand. Press this mixture into the bottom of an 8x8-inch baking pan. Make sure it is flat and even. Bake the crust at 325°F (160°C) for 10 minutes. Let it cool slightly before adding the filling. In a large bowl, beat 16 ounces of softened cream cheese with an electric mixer. Mix until it is smooth and creamy. Gradually add 1 cup of granulated sugar and 1 teaspoon of vanilla extract. Blend well until mixed. Now, add 2 large eggs, one at a time. Mix gently until just combined. Be careful not to overmix; this keeps the filling light and fluffy. In another bowl, chop 1 cup of fresh strawberries. Add 1 tablespoon of lemon juice and 1 tablespoon of cornstarch to the strawberries. This helps keep the fruit fresh and thickens the juices. Gently fold the strawberry mixture into the cheesecake batter. Make sure to mix carefully so the strawberries stay whole. Pour this batter over the cooled Oreo crust, spreading it evenly. Bake the cheesecake bars in the oven for 40-45 minutes. Check if the edges are set, and the center should have a slight jiggle. Once done, remove the pan from the oven and let it cool on a wire rack. After cooling, refrigerate the bars for at least 4 hours, or overnight for the best texture. When they are chilled, lift the cheesecake bars out of the pan using the parchment paper. Cut them into squares. Enjoy these tasty treats! For the full recipe, click [Full Recipe]. To get the best texture, use room temperature ingredients. This helps them mix well. Cold cream cheese can lead to lumps. Always beat the cream cheese until smooth before adding other items. You should avoid overmixing the batter. Mix just until combined for a light cheesecake. The chilling time is also key. Chill the bars for at least four hours or overnight. This allows the flavors to meld and the bars to set. Slicing cheesecake bars can be tricky. Use a sharp knife dipped in hot water for clean cuts. Wipe the knife between slices to keep the edges neat. For garnishes, top each bar with whipped cream and fresh strawberries. This adds color and flavor, making the dish even more appealing. If your cheesecake cracks, it may be overbaked. Bake until just set, with a slight jiggle in the center. For a crust that is too crumbly, try adding a bit more melted butter. This will help bind the crumbs together better. Following these tips will ensure your Golden Oreo Strawberry Cheesecake Bars turn out perfect every time. For the full recipe, refer to the detailed section above. {{image_2}} You can change the fruit on top to mix things up. Try blueberries, raspberries, or peaches. Each fruit brings a new taste. You can also swap out the Golden Oreos for other cookies. For example, use chocolate sandwich cookies for a rich flavor. Or, try vanilla wafers for a lighter touch. Each choice gives a unique twist to the bars. For a vegan option, replace the cream cheese with a plant-based cream cheese. Use flax eggs instead of regular eggs. And for the crust, you can use vegan cookies with plant-based butter. If you need a gluten-free version, look for gluten-free cookies. You can find many tasty options in stores today. Just ensure all other ingredients are also gluten-free. These bars pair well with fresh fruit or a drizzle of chocolate sauce. You can also serve them with a scoop of vanilla ice cream for a fun dessert. For a creative touch, cut the bars into fun shapes using cookie cutters. This makes a great treat for kids at parties. Each way adds to the joy of eating these delicious cheesecake bars. To keep your Golden Oreo Strawberry Cheesecake Bars fresh, follow these tips: - Refrigeration tips: Store the cheesecake bars in an airtight container. This helps prevent them from absorbing other odors in the fridge. They taste best when chilled. Always let them cool completely before covering them. - Freezing the cheesecake bars: You can freeze these bars for later enjoyment. Cut them into squares and wrap each piece in plastic wrap. Place the wrapped bars in a freezer-safe bag or container. This way, they stay fresh for up to three months. - How long they last in the fridge: These cheesecake bars last about 5 to 7 days in the fridge. Always check for freshness before serving. - Signs of spoilage: Look for changes in color or texture. If they smell off or have a watery layer on top, it's time to toss them. Always trust your senses! To make Golden Oreo Strawberry Cheesecake Bars, start by preheating your oven to 325°F (160°C). You will need to crush 18 Golden Oreo cookies and mix them with 4 tablespoons of melted butter. Press this mixture into an 8x8-inch baking pan to form the crust. Bake it for 10 minutes and let it cool. Next, beat 16 oz of softened cream cheese until smooth. Gradually mix in 1 cup of granulated sugar and 1 teaspoon of vanilla extract. Add 2 large eggs, mixing until smooth. In another bowl, mix 1 cup of chopped strawberries, 1 tablespoon of lemon juice, and 1 tablespoon of cornstarch, then fold this into the cream cheese mix. Pour the filling over the crust and bake for 40-45 minutes. Cool and chill before serving. For the full recipe, refer to the detailed instructions above. Yes, you can use different types of Oreos. Each type will change the flavor and texture. For instance, using chocolate Oreos will add a rich, chocolatey taste. It can also change the color of the crust. You might find a mint Oreo adds a fresh twist. Keep in mind, the filling may taste different. Adjust sugar if you choose a sweeter cookie. If you do not have fresh strawberries, you can use frozen or canned strawberries. Drain canned strawberries well before using. You can also use other fruits like raspberries or blueberries. Each fruit will bring a unique flavor. Alternatively, consider using fruit preserves to swirl into the cheesecake for added sweetness. Yes, you can make these cheesecake bars ahead of time. Prepare them a day before serving for the best flavor. After baking, let them cool and then refrigerate for at least 4 hours, or overnight if you can wait. This will enhance the texture and taste. Just remember to cover them well to keep them fresh. To check if the cheesecake bars are done, look for set edges with a slight jiggle in the center. Insert a toothpick into the bars; it should come out mostly clean. If it has wet batter, they need more time. Remember, they will firm up as they cool. In this blog post, we explored how to make Golden Oreo Strawberry Cheesecake Bars. We covered every step, from preparing the crust to chilling the bars. I shared tips on texture, presentation, and common issues. You can even try different flavors or dietary options. Keep your bars in the fridge for the best taste. Enjoy creating this delicious dessert!](https://greenmealmap.com/wp-content/uploads/2025/05/93570fd2-fcae-4219-bb4d-5739dcd95018.webp)
Craving a sweet treat that’s both easy and delicious? Look no further! My Golden Oreo Strawberry Cheesecake Bars are a
