Skip to content
DisclaimerTerms Of UseGDPR PolicyCookie Policy

greenmealmap

  • Home
  • Drinks
  • Appetizers
  • Dinner
  • Dessert
  • About
  • Contact
  • Privacy Policy
DisclaimerTerms Of UseGDPR PolicyCookie Policy

Lauren

To make a tasty strawberry cheesecake dip, gather these key ingredients: - 8 ounces cream cheese, softened - 1/2 cup powdered sugar - 1 teaspoon vanilla extract - 1/4 cup sour cream - 1 cup fresh strawberries, hulled and diced - 1/2 cup whipped cream (store-bought or homemade) - Graham cracker crumbs for garnish - Extra fresh strawberries for serving These ingredients blend together to create a creamy and sweet dip that everyone will love. The cream cheese gives it a rich base, while the strawberries add fresh flavor. When choosing cream cheese, I suggest brands like Philadelphia or Kraft. They both offer a smooth texture. For whipped cream, I like using Cool Whip. If you want to make whipped cream at home, heavy cream from brands like Horizon or Organic Valley works great too. Using high-quality brands ensures the best taste for your dip. If you have dietary needs, some easy swaps work well. For a dairy-free option, use vegan cream cheese and coconut whipped cream. If you want less sugar, try a sugar substitute in place of powdered sugar. You can also use Greek yogurt instead of sour cream for a tangy twist. These options keep the dip delicious while catering to your needs. For the full recipe, check out the complete instructions. To start, gather your ingredients. You need 8 ounces of cream cheese, 1/2 cup powdered sugar, 1 teaspoon vanilla extract, 1/4 cup sour cream, 1 cup diced fresh strawberries, and 1/2 cup whipped cream. This will create a rich, creamy dip. First, place the softened cream cheese in a medium bowl. Use an electric mixer to beat it until smooth. This will make the base of your dip. Next, add the powdered sugar and vanilla extract. Mix until it is well combined. Then, pour in the sour cream. Continue to mix until the dip is fluffy and smooth. Finally, gently fold in the diced strawberries. This adds fresh flavor and texture to your dip. Keeping your dip smooth is key. When mixing, start at a low speed to avoid splatters. Gradually increase the speed until everything blends well. Use a spatula to scrape the sides of the bowl. This ensures that all ingredients mix evenly. When adding the whipped cream, fold it in gently. This keeps the dip light and airy. A folding motion helps to maintain that fluffy texture. You want it to be creamy, not runny. For serving, choose a nice bowl. A clear bowl shows off the dip's creamy texture and strawberry pieces. Sprinkle graham cracker crumbs on top for a fun touch. I like to arrange extra fresh strawberries and graham crackers around the bowl. It makes the dish look inviting. Guests can dip strawberries or crackers right into the dip. This adds a fresh crunch to every bite. For the full recipe, check out the details above. Enjoy! To get the best texture for your dip, start with softened cream cheese. It mixes easily and makes the dip smooth. Use an electric mixer for a creamy blend. Mix until there are no lumps left. After adding the sugar and vanilla, keep mixing. When you add sour cream, blend it well. Finally, fold in the whipped cream gently. This keeps the dip light and fluffy. You can boost the flavor in your dip with a few extras. Consider adding lemon juice for a tangy kick. A pinch of salt can balance the sweetness nicely. You might also try mixing in finely chopped nuts for a crunch. If you love chocolate, add cocoa powder or chocolate chips. Fresh mint can give your dip a fresh taste too. Each add-in can change the flavor and make it special. Avoid these common mistakes for the best dip. First, don’t skip softening the cream cheese. Hard cream cheese will not mix well and create lumps. Second, be careful with mixing speed. If you mix too fast, you can lose that fluffy texture. Also, don’t over-mix after adding strawberries. This can break them down too much. Lastly, remember to serve it cold. A warm dip will not taste as good and can spoil quickly. {{image_2}} You can easily twist the classic dip by adding chocolate. Just mix in 1/4 cup of cocoa powder or melted chocolate into the cream cheese blend. This makes a rich, tasty dip. You can also layer it. Start with a layer of chocolate dip, then add the strawberry dip on top. It looks great and tastes even better! If you want a fruity twist, swap strawberries for other fruits. Blueberries, raspberries, or peaches work well in this dip. Just use the same method. Dice the fruit and fold it into the mixture. You can also use fruit preserves for extra flavor. This way, each bite has a burst of fruit goodness. You can make a vegan version of this dip too! Use vegan cream cheese and coconut whipped cream instead. This keeps the dip creamy and light. You can also use maple syrup instead of powdered sugar for sweetness. This makes a plant-based dip that everyone can enjoy. To keep your Strawberry Cheesecake Dip fresh, store it in an airtight container. Make sure the container is sealed tightly. This helps prevent air from getting in and keeps your dip creamy. Place it in the fridge right after serving. This dip tastes best cold, so chilling is key. When stored properly, this dip lasts about three to five days in the fridge. After that, the taste and texture may change. I recommend checking for any changes in smell or look before serving leftovers. If it seems off, it’s best to toss it. You usually don’t need to reheat Strawberry Cheesecake Dip. It’s meant to be served cold. If you want it a bit softer, let it sit at room temperature for about 15 minutes. This helps bring back its creamy texture. If you are looking for the full recipe, refer to the Full Recipe. Yes, you can make Strawberry Cheesecake Dip ahead of time. I often prepare it a few hours before serving. Just store it in the fridge. This gives the flavors time to blend. The best way to serve this dip is chilled. Use a nice bowl and add fresh strawberries and graham crackers around it. This makes it look pretty and fun. Guests can dip in at their own pace. I don’t recommend freezing this dip. Freezing can change the texture. The cream cheese and whipped cream may separate when thawed. It’s best to enjoy it fresh or chilled. If you want to switch things up, try using pretzels or sliced apples. Both add a tasty contrast. You can also use vanilla wafers for a different flavor. They work well with the dip too. This blog post covered how to make a delicious strawberry cheesecake dip. We discussed key ingredients and brands to consider. I shared tips for texture, serving ideas, and common mistakes to avoid. You can even try fun variations and learn about storage best practices. In the end, this dip is easy to make and a real crowd-pleaser. Enjoy experimenting with flavors and sharing it with your friends and family. You’ll impress everyone with a simple treat!

Strawberry Cheesecake Dip Tasty and Easy Recipe

Ready to indulge in a sweet and creamy treat? My Strawberry Cheesecake Dip is not just tasty; it’s easy to

To make a delicious vegetarian three bean chili, you need the following ingredients: - 1 can (15 oz) kidney beans, drained and rinsed - 1 can (15 oz) black beans, drained and rinsed - 1 can (15 oz) pinto beans, drained and rinsed - 1 tablespoon olive oil - 1 onion, finely chopped - 2 cloves garlic, minced - 1 bell pepper (red or green), diced - 2 celery stalks, diced - 2 carrots, diced - 1 can (28 oz) crushed tomatoes - 2 tablespoons tomato paste - 2 cups vegetable broth - 1 tablespoon chili powder - 1 teaspoon cumin - 1 teaspoon smoked paprika - 1/2 teaspoon cayenne pepper (optional, for heat) - Salt and black pepper to taste - Fresh cilantro, for garnish These ingredients bring great flavors and textures to the dish. Each type of bean adds its own unique taste and protein. The vegetables not only add nutrients but also create a lovely base for the chili. The spices give it warmth and depth, making each bite satisfying. For a full recipe, check out the detailed instructions on how to bring this dish together. - Heat 1 tablespoon of olive oil in a large pot over medium heat. - Add 1 finely chopped onion and sauté for 3-4 minutes until clear. - Stir in 2 minced garlic cloves, 1 diced bell pepper, 2 diced celery stalks, and 2 diced carrots. Cook these for 5-7 minutes until they soften. - Next, add 1 can of crushed tomatoes and 2 tablespoons of tomato paste. Mix well to combine. - Pour in 2 cups of vegetable broth and add all three types of beans: 1 can of kidney beans, 1 can of black beans, and 1 can of pinto beans. - Season the mix with 1 tablespoon of chili powder, 1 teaspoon of cumin, 1 teaspoon of smoked paprika, and ½ teaspoon of cayenne pepper, if you like heat. - Stir everything together and bring it to a gentle simmer. Reduce the heat to low and let it cook for 30-35 minutes. Stir it occasionally to keep it from sticking. - Serve the chili warm, garnished with fresh cilantro on top for added taste. - For a complete meal, pair it with cornbread or crunchy tortilla chips. A dollop of sour cream or slices of avocado can make it even better. For the full recipe, check out the ingredients and cooking methods provided earlier. Enjoy your hearty meal! To make your vegetarian three bean chili stand out, focus on spices. You can adjust the chili powder to control the heat. If you want more warmth, add cayenne pepper. For a richer flavor, try adding smoked paprika. Always use fresh ingredients. Fresh onions, peppers, and garlic boost the taste. When chopping vegetables, keep them uniform in size. This helps them cook evenly and adds nice texture. Presentation matters! Serve the chili in rustic bowls for a cozy feel. Top each bowl with fresh cilantro for a pop of color. You can also add a dollop of sour cream or some avocado slices. These toppings not only look good but also add creaminess. Pair your chili with cornbread or tortilla chips. The crunch of the chips contrasts nicely with the chili's warmth. This combination satisfies both the palate and the eyes. Enjoy the full recipe for more details! {{image_2}} To make this chili fully vegan, swap the vegetable broth for water. You can also use a plant-based sour cream on top. If you want extra flavor, try using smoked salt instead of regular salt. This keeps the taste rich and bold while staying plant-based. You can boost the chili's nutrition by adding more veggies. Zucchini and corn work great in this dish. They add texture and sweetness. If you want to switch up the beans, try using chickpeas or lentils. These options add a different taste and can make the chili even heartier. For the full recipe, check out the details above. To store leftover chili, let it cool first. Once cooled, place it in an airtight container. This helps keep the chili fresh. I recommend using glass or BPA-free plastic containers. They seal well and prevent spills. Leftover chili stays good in the fridge for about 3 to 5 days. Always check for signs of spoilage before eating. Freezing chili is a great way to save it for later. To freeze, let the chili cool completely. Then, pour it into freezer-safe bags or containers. Leave some space at the top for expansion. Label the bag or container with the date. You can freeze it for up to 3 months. When you are ready to eat the chili, thaw it overnight in the fridge. Reheat it on the stove over low heat. Stir often to keep it from sticking. You can also microwave it, but stir every minute for even heating. This method helps keep the flavors and texture intact. How long does it take to make vegetarian three-bean chili? Making vegetarian three-bean chili takes about 50 minutes. You will spend 15 minutes prepping. Cooking it will take around 35 minutes. This gives you time to enjoy a hearty meal. Can I make this chili in a slow cooker or Instant Pot? Yes, you can make this chili in both a slow cooker and an Instant Pot. For the slow cooker, cook on low for 6-8 hours. In the Instant Pot, use the manual setting for about 15 minutes. Can I substitute fresh beans for canned? You can use fresh beans, but they need to be cooked first. Dried beans require soaking and longer cooking times. Canned beans are quicker and easier for a fast meal. What if I can't find one of the spices? If you can't find a spice, try using a similar one. For chili powder, you can use paprika with a hint of cayenne. If you are missing smoked paprika, regular paprika will do. Is this recipe gluten-free? Yes, this recipe is naturally gluten-free. All the ingredients are safe for a gluten-free diet. Always double-check your spice labels, just in case. Can I make it less spicy for kids? Absolutely! Simply reduce or omit the cayenne pepper. You can also serve it with toppings like sour cream to cool it down. This blog post outlined how to make a tasty three-bean chili. You learned about the ingredients, preparation, and cooking methods. I shared tips and variations to customize your dish. Storing leftovers and addressing common questions can help you enjoy this chili longer. Remember, cooking is about experimenting and finding what you love. Get creative, and enjoy your chili with friends and family. Your kitchen can bring comfort and joy. Embrace these ideas, and happy cooking!

Vegetarian Three Bean Chili Flavorful and Hearty Dish

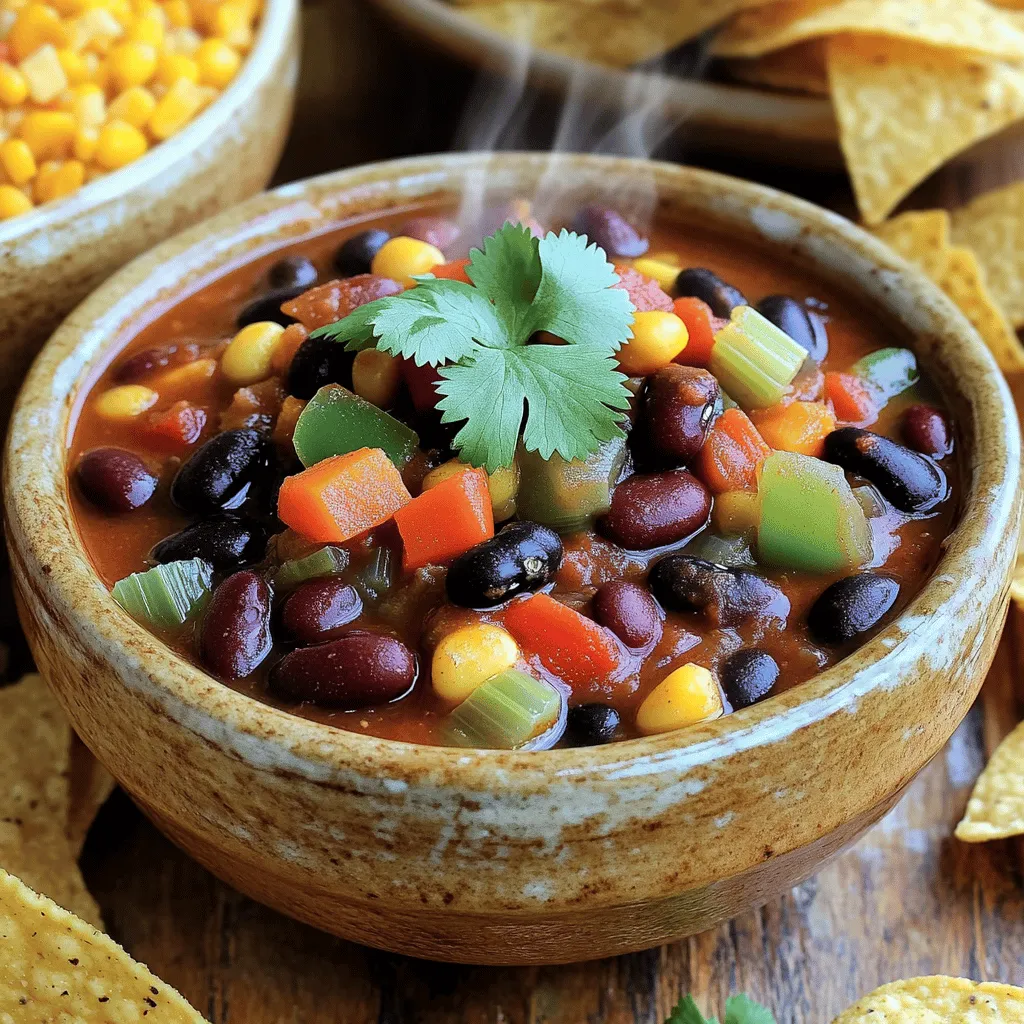
Looking for a warm, hearty meal that’s packed with flavor? My Vegetarian Three Bean Chili is just what you need.

To make a great Instant Pot beef chili, you need the following items. Each ingredient plays a key role in building the flavor. - 1 lb ground beef - 1 medium onion, diced - 2 cloves garlic, minced - 1 bell pepper, diced (red or green) - 1 can (15 oz) kidney beans, rinsed and drained - 1 can (15 oz) black beans, rinsed and drained - 1 can (28 oz) crushed tomatoes - 2 tablespoons chili powder - 1 tablespoon ground cumin - 1 teaspoon smoked paprika - 1 teaspoon salt - ½ teaspoon black pepper - 1 cup beef broth - 1 tablespoon olive oil - Optional toppings: shredded cheese, sour cream, chopped green onions, avocado Gather these ingredients before you start. Fresh vegetables and good quality beef make the best chili. The spices add warmth and depth. With these items, you are ready to create a comforting meal. Don't forget to check the Full Recipe for step-by-step cooking instructions! 1. Dicing vegetables: Start by chopping the onion and bell pepper into small pieces. You want them to cook evenly and blend well. The onion adds sweetness, while the bell pepper gives color and flavor. 2. Rinsing and draining beans: Open the cans of kidney and black beans. Pour them into a colander. Rinse them under cold water to remove extra salt and preservatives. Draining is key to avoid watery chili. 1. Sautéing vegetables and meat: Turn on your Instant Pot and set it to 'Sauté'. Add olive oil. Once hot, toss in the diced onion and bell pepper. Cook them for about 3-4 minutes until soft. Add minced garlic and cook for one more minute. Next, add the ground beef. Break it up with a spatula and cook until it's brown, which takes about 5-6 minutes. 2. Adding spices and liquids: Once the beef is browned, mix in chili powder, cumin, smoked paprika, salt, and black pepper. Stir well to coat all the meat. Then, add the crushed tomatoes, kidney beans, black beans, and beef broth. Mix everything together until it is combined. 3. Setting the Instant Pot: Close the lid of the Instant Pot and make sure the steam valve is set to 'Sealing'. Select 'Manual' mode. Set the timer for 15 minutes on high pressure. This is where the magic happens! 1. Natural release instructions: When the cooking time is up, let the pressure release naturally for 10 minutes. This step helps the flavors develop. After that, carefully switch the valve to 'Venting' to release any remaining steam. 2. Adjusting seasoning: Open the lid and give your chili a good stir. Taste it! If it needs more salt or spice, now is the time to adjust. This is your chili, so make it just right for you! Enjoy your hearty Instant Pot beef chili, and don’t forget to check out the Full Recipe for more tips! - Choosing the right ground beef: I always use 80/20 ground beef. This mix gives you great flavor and moisture. Leaner beef can taste dry. - Adjusting spice levels: Start with the amounts in the recipe. You can always add more chili powder or cumin. Taste as you go. This way, you control the heat. - Avoiding the burn notice: Make sure to scrape the bottom of the pot well. This helps prevent any food from sticking. If you do get the burn notice, add a bit more broth and stir. - Best practices for sealing: Always check that your lid is locked. The steam valve should be set to 'Sealing.' This ensures the pot builds pressure correctly. - Ideal accompaniments: Serve the chili with cornbread or tortilla chips for a fun twist. These sides add nice texture and flavor. - Presentation tips: Use colorful bowls for serving. Top with shredded cheese, a dollop of sour cream, or fresh green onions. These touches make your chili look great and taste even better. For the full recipe, check out the detailed instructions above. Enjoy cooking! {{image_2}} For a vegetarian chili, use meat alternatives like lentils or textured vegetable protein. These options add texture and protein without meat. Adjust seasonings to enhance flavor. You might need more chili powder or cumin to balance the dish. To spice things up, consider adding heat with jalapeños. Slice them and stir them in during the cooking process. You can also use spicy sausage instead of ground beef. This adds both heat and extra flavor to your chili. If you prefer a bean-free chili, substitutes for beans include more meat or mushrooms. This keeps it hearty and satisfying. Focus on using plenty of tomatoes to enhance flavor and moisture. A mix of crushed and diced tomatoes works well here. To keep your beef chili fresh, you should store it properly. First, let the chili cool down after cooking. Then, transfer it to an airtight container. This helps prevent spills and keeps the chili safe. - Refrigeration tips: Store your chili in the fridge for up to 4 days. Make sure it is in a sealed container. This keeps it tasty and safe to eat. - Freezing instructions: You can freeze your chili if you want to save it longer. Place it in a freezer-safe bag or container. It can last up to 3 months in the freezer. Label it with the date to keep track. When you want to enjoy your chili again, reheating is key. There are a few easy methods to do this. - Best ways to reheat chili: You can reheat chili on the stove or in the microwave. If using the stove, pour the chili into a pot and heat on low. Stir often to avoid burning. For the microwave, use a microwave-safe bowl. Heat in short bursts, stirring in between, until hot. - Restoring texture and flavor: If your chili seems thick after freezing, add a splash of beef broth or water. This helps bring back its creamy texture and flavor. Knowing how long your chili lasts helps keep your food safe. - How long does beef chili last in the fridge? In the fridge, beef chili lasts up to 4 days. Always check for any changes in smell or color before eating. - Signs of spoilage: If your chili has a sour smell, off-color, or mold, it's time to toss it. Safety is always the top priority when it comes to food. Yes, you can make this chili ahead of time. It tastes even better the next day! Here are some steps for meal prep: - Cook the chili as per the Full Recipe. - Allow it to cool completely. - Store it in an airtight container in the fridge for up to three days. - You can also freeze it for up to three months. - When ready to serve, reheat on the stove or in the microwave. Yes, Instant Pot Beef Chili is gluten-free. Just be mindful of the ingredients: - Use gluten-free beef broth. - Check that your spices, like chili powder and cumin, are gluten-free. - Canned beans and tomatoes are usually gluten-free, but read labels to be sure. Leftover chili is great! Here are some recipe ideas: - Make chili cheese nachos by topping tortilla chips with chili and cheese. - Use it as a filling for tacos or burritos. - Add it to pasta for a hearty dish. - Mix it into scrambled eggs for a spicy breakfast. These ideas can help you enjoy your chili in new ways! This blog post gave you a full guide to making beef chili in an Instant Pot. You learned the ingredients and step-by-step instructions for cooking. I shared helpful tips on perfecting your chili and serving ideas. You can adapt the recipe with variations, store leftovers properly, and answered common questions. With these tips, you can enjoy a delicious chili any time. Happy cooking!

Instant Pot Beef Chili Quick and Flavorful Recipe

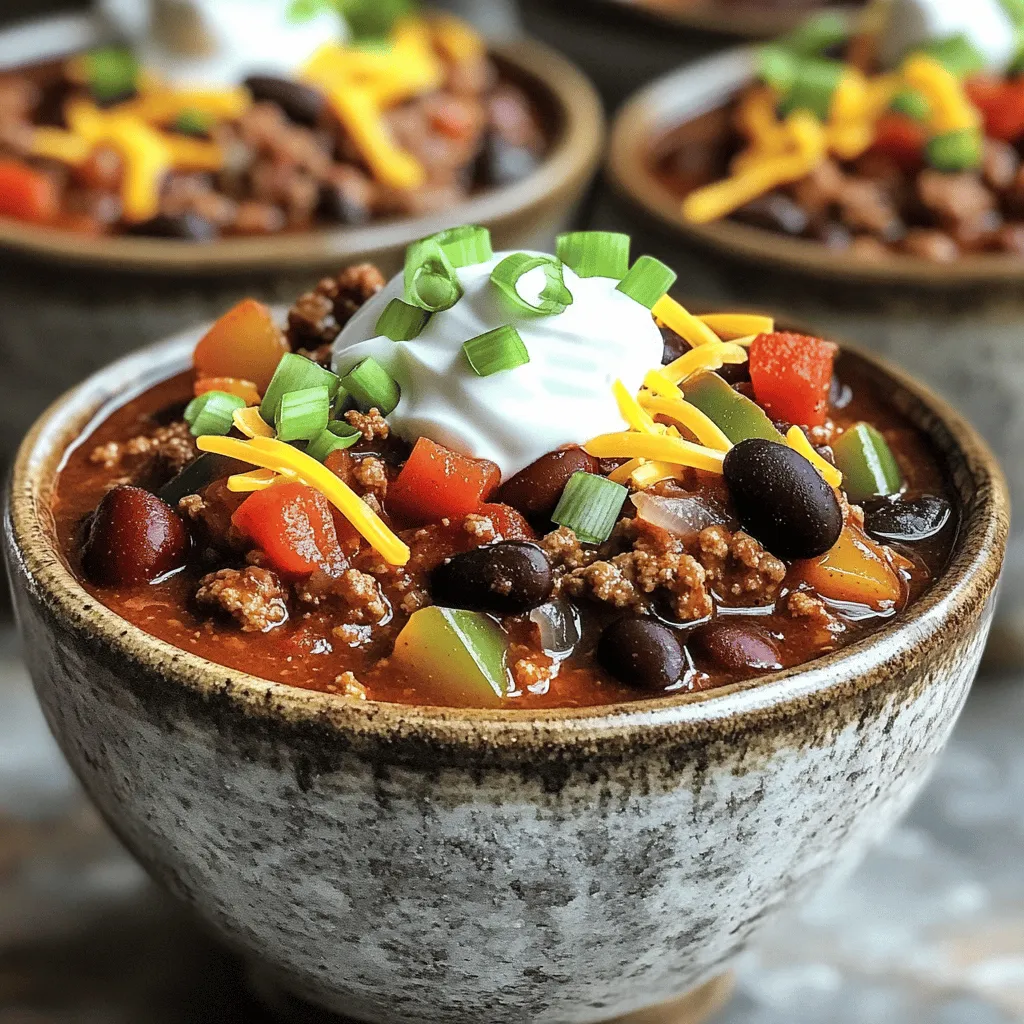
Looking for a quick and tasty meal that packs a punch? You’re in the right place! This Instant Pot Beef

- Chicken breasts: Use 1.5 lbs of boneless, skinless chicken breasts. They keep the chili moist. - Canned ingredients: You’ll need a can of white beans, a can of diced green chilies, and a can of corn. These add great flavor and texture. - Seasonings and spices: The key is to have ground cumin, paprika, dried oregano, salt, and black pepper. These spices create a warm and inviting taste. - Fresh cilantro: Chopped cilantro adds a pop of color and fresh flavor. - Sour cream: A dollop of sour cream makes the chili creamy and rich. - Tortilla chips: Serve with tortilla chips for a nice crunch and fun texture. This slow cooker white chicken chili is easy and quick to make. You can find the full recipe at the end of this article. Enjoy! First, I layer the chicken breasts at the bottom of the slow cooker. This step keeps the chicken moist and flavorful. Next, I mix the other ingredients in a bowl. I combine the white beans, diced green chilies, corn, onion, garlic, chicken broth, cumin, paprika, oregano, salt, and black pepper. This mix adds great taste to the chicken. Now, it's time to cook! I set the slow cooker to low for 6 hours or high for 3 hours. Cooking on low gives the best flavor, but high works too if you’re in a hurry. After the cooking time is up, I carefully take out the chicken. I shred it using two forks. This makes it easier to mix back into the chili. To make the chili creamy, I stir in the sour cream and cream cheese. I mix until it is well combined. This adds a nice richness to the dish. Then, I cover the slow cooker again and let it cook for another 15 minutes to heat through. Finally, I taste and adjust the seasoning if needed. If you want to explore more, check out the Full Recipe for extra tips! To make the best slow cooker white chicken chili, timing is key. I recommend cooking on low for about six hours. This lets the flavors blend well. If you're short on time, you can cook it on high for three hours. Texture matters a lot in chili. If you like a thicker chili, you can mash some of the beans. This will help create a nice, creamy base. If it's too thick, just add a splash of chicken broth to loosen it up. Spices can add a great kick to your chili. If you love heat, try adding cayenne pepper or red pepper flakes. Just a little can make a big difference in flavor. Toppings can also enhance your meal. Fresh cilantro adds brightness. A dollop of sour cream brings creaminess. You can even sprinkle some cheese on top for extra richness. Don’t forget to serve with tortilla chips for a crunchy side. For the full recipe, check out the detailed steps to make your chili perfect! {{image_2}} You can easily change the beans in this recipe. Instead of white beans, try black beans or kidney beans. Each type gives a unique flavor. You can also mix different beans for fun. If you want to swap proteins, you can use turkey or pork. These choices add new tastes. You can even use tofu for a plant-based option. Just make sure to adjust the cooking time if you switch proteins. If you need a gluten-free meal, this chili works great. All the ingredients are gluten-free. Just double-check your canned goods. Some brands may add gluten. For a dairy-free option, skip the sour cream and cream cheese. Use a dairy-free cream option instead. You can also use avocado for creaminess. It adds a fresh taste and makes the dish rich. Feel free to explore these variations to make the dish your own. For the full recipe, check out the Slow Cooker Creamy Green Chili Chicken. To keep your slow cooker white chicken chili fresh, start by storing it in an airtight container. You can refrigerate it for up to 4 days. Make sure to let it cool down before sealing the container. This helps prevent condensation, which can make the chili watery. If you want to save it for later, freezing is a great option. Portion the chili into freezer-safe bags or containers. It can last up to 3 months in the freezer. To avoid freezer burn, remove as much air as possible from the bags. For reheating, the best method is on the stovetop. Just pour the chili into a pot and heat it over medium heat. Stir often to ensure it heats evenly. You can also use a microwave. Transfer the chili to a microwave-safe bowl, cover it with a lid or plastic wrap, and heat in short bursts, stirring in between. When serving leftovers, consider garnishing with fresh cilantro and a dollop of sour cream. Add some tortilla chips on the side for a crunchy contrast. Enjoy your meal! If you want the full recipe for the slow cooker white chicken chili, check out the [Full Recipe]. How long does it take to cook in a slow cooker? This chili cooks in about 6 hours on low or 3 hours on high. The slow cooker makes it easy. You just set it, and let it work its magic. The longer cook time allows flavors to blend well. Can I use frozen chicken breasts? Yes, you can use frozen chicken breasts. Just note that cooking time may increase. Make sure the chicken reaches a safe temperature of 165°F. This way, you get a safe and delicious meal. Can I cook this chili on the stovetop? You can cook this chili on the stovetop. Start by sautéing the onion and garlic until they are soft. Then add all the other ingredients, including the chicken. Simmer for about 30-45 minutes. Shred the chicken before serving. How do I thicken my chili if it's too watery? If your chili is too watery, you have some easy options. You can add a bit more cream cheese or sour cream to thicken it. Another option is to mash some beans and stir them in. This will help create a nice, creamy texture. This post covers all you need for a great chili. We explored key ingredients, step-by-step instructions, and tips for making it perfect. I shared variations to meet dietary needs and gave advice on storing and reheating. With these ideas, you can make a delicious chili that fits your taste. Enjoy cooking and feel free to try your own twists. Keep experimenting to find what you love best. Happy cooking!

Slow Cooker White Chicken Chili Flavorful and Quick Meal

Are you ready for a tasty and simple meal? My Slow Cooker White Chicken Chili is both flavorful and quick

When making Chicken Gnocchi Soup, you need a few key ingredients. Each one adds flavor and texture. Let's break them down. - 1 pound chicken breast, boneless and skinless, cubed - 4 cups chicken broth - 1 cup heavy cream The chicken gives the soup a hearty base. I recommend using fresh chicken breast for the best taste. Chicken broth adds depth. Heavy cream turns it creamy and rich. - 2 cups fresh spinach - 2 carrots, diced - 1 celery stalk, diced - 1 small onion, finely chopped - 3 cloves garlic, minced - 1 teaspoon dried thyme - 1 teaspoon dried oregano - Salt and pepper to taste Your vegetables bring color and nutrition. Spinach adds a healthy touch. Carrots and celery give sweetness and crunch. Onions and garlic add a savory flavor. Thyme and oregano enhance the aroma. Don’t forget to season with salt and pepper to make it pop! - 2 tablespoons olive oil - Grated Parmesan cheese for garnish Olive oil is perfect for sautéing your veggies. It adds a nice flavor. Finally, top your soup with grated Parmesan cheese. It will make each bowl look fancy and taste even better. For the full recipe, check out the instructions below. 1. Sauté vegetables and seasonings: Start by heating olive oil in a large pot over medium heat. Add chopped onion, diced carrots, and diced celery. Sauté these until they soften, which takes about 5 to 6 minutes. Then, add minced garlic, dried thyme, and oregano. Cook for one more minute until the kitchen smells great. 2. Brown the chicken: Next, add cubed chicken to the pot. Season with salt and pepper. Cook the chicken until it’s browned on all sides, which takes about 7 to 8 minutes. This step builds flavor, so don’t rush it! 3. Simmer with broth and gnocchi: Pour in the chicken broth and bring the mix to a boil. Once it boils, reduce the heat and let it simmer for 10 minutes. After that, stir in the potato gnocchi and cook for another 3 to 4 minutes. The gnocchi will float when they are done, which is how you know they are ready. 1. Stir in cream and spinach: Lower the heat and add the heavy cream to the pot. Then, toss in the fresh spinach. Let the soup simmer for 2 to 3 minutes until the spinach wilts and everything is heated through. 2. Adjust seasoning: After that, taste your soup! You might want to add more salt and pepper to bring out the flavors even more. 3. Presentation tips: When you serve, make sure to ladle the soup into bowls. Top each bowl with grated Parmesan cheese for a nice finish. It adds flavor and makes it look great too! For the complete recipe, you can check out the Full Recipe section. Enjoy your warm bowl of Chicken Gnocchi Soup! To make the best Chicken Gnocchi Soup, start with sautéing the vegetables right. Use a large pot and heat olive oil over medium heat. Add onions, carrots, and celery. Cook them for 5-6 minutes until they soften. This step builds a strong base of flavor. For cooking gnocchi, it’s simple. Add the gnocchi to the soup when it’s boiling. They will float when they are done, which takes about 3-4 minutes. This means they are ready, and you can add them right into your soup. To achieve the right soup consistency, you want it creamy but not too thick. Stir in the heavy cream after the gnocchi. If the soup is too thick, add more chicken broth until it’s just right. This keeps everything smooth and tasty. Pair your Chicken Gnocchi Soup with some crusty bread. A nice sourdough or baguette works great. This adds a nice crunch and complements the soup’s creaminess well. For ideal side dishes, think about a fresh salad. A simple green salad with lemon vinaigrette can brighten the meal. You can also serve it with a light pasta dish for a fuller dinner. Enjoy your cozy meal! {{image_2}} You can easily change the protein in this soup. Try using turkey instead of chicken. Shrimp also works well for a seafood twist. Both options add unique flavors and textures. Feel free to mix up the vegetables, too. You can use peas, zucchini, or even kale. These swaps let you customize the soup to your taste. If you need a gluten-free option, look for gluten-free gnocchi. Many brands offer great tasting alternatives. You can enjoy the same comfort without the gluten. For a dairy-free version, substitute the heavy cream with coconut milk or almond milk. These alternatives keep the soup creamy while fitting your dietary needs. To keep your Chicken Gnocchi Soup fresh, first let it cool. Use airtight containers to store it. This helps keep out air and moisture. You can refrigerate the soup for up to four days. If you want to save it longer, freeze it. In the freezer, it lasts for about three months. When freezing, make sure to leave some space in the container. The soup will expand as it freezes. When it's time to enjoy your soup again, reheating is easy. Use a pot on the stove for the best result. Heat it on low to avoid burning the bottom. Stir often to help it warm evenly. If the soup seems thick, add a splash of broth or water. This will help bring back the creamy texture. Avoid the microwave if you can. It can cause the gnocchi to become mushy. Reheat just until hot, and enjoy every comforting bite! What is the origin of Chicken Gnocchi Soup? Chicken Gnocchi Soup comes from Italy. Gnocchi is a type of pasta made from potatoes. It is soft and chewy. This soup combines gnocchi with chicken and veggies in a creamy broth. Many cooks love this dish for its warmth and comfort. Can I make Chicken Gnocchi Soup in advance? Yes, you can make Chicken Gnocchi Soup ahead of time. Just store it in the fridge. It tastes even better the next day as flavors blend. When you reheat, add a splash of broth for creaminess. How do I make Chicken Gnocchi Soup in a slow cooker? To make this soup in a slow cooker, add all the ingredients except the cream and spinach. Cook on low for 6 hours or high for 3 hours. Stir in the cream and spinach just before serving. This method makes it easy and hands-off. Can I use fresh gnocchi instead of packaged? Yes, you can use fresh gnocchi. It cooks faster than packaged gnocchi. Just add it during the last few minutes of cooking. This will keep it tender and delicious. What to serve with Chicken Gnocchi Soup? This soup pairs well with crusty bread or a fresh salad. You can also serve it with garlic bread for a tasty side. Both options help soak up the creamy broth and add to the meal. For the full recipe, check out the details above. This Chicken Gnocchi Soup is easy to make and full of flavor. We explored all the key ingredients, from chicken to vegetables and seasonings. Follow the step-by-step instructions for a hearty meal. Use my cooking tips to perfect your soup and try different variations to suit your taste. Store leftovers properly to enjoy later. Overall, this dish is a tasty choice for any occasion. Now, gather your ingredients and start cooking a warm bowl of comfort.

Chicken Gnocchi Soup Comforting and Hearty Recipe

Looking for a warm, filling meal that everyone will love? My Chicken Gnocchi Soup is just the answer! This hearty

To make the creamy wild rice mushroom soup, gather these ingredients: - 1 cup wild rice, rinsed - 4 cups vegetable broth - 2 tablespoons olive oil - 1 medium onion, chopped - 3 cloves garlic, minced - 8 ounces cremini mushrooms, sliced - 1 cup carrots, diced - 1 cup celery, diced - 1 teaspoon dried thyme - 1/2 teaspoon smoked paprika - Salt and pepper to taste - 1 cup heavy cream (or coconut milk for a lighter version) - 2 tablespoons fresh parsley, chopped (for garnish) These ingredients work together to create a rich, creamy texture and deep flavors. If you have dietary needs, you can make easy swaps. - Use coconut milk instead of heavy cream for a dairy-free option. - For gluten-free needs, ensure your vegetable broth is gluten-free. - If you prefer a lighter soup, cut back on the cream or use almond milk. These changes still keep the soup tasty and satisfying. Choosing the right ingredients makes a big difference. - Pick wild rice that is whole and dark in color. This ensures great texture. - Choose fresh vegetables. Look for firm onions, vibrant carrots, and crisp celery. - Select cremini mushrooms that are firm and smooth. Avoid any with dark spots. Good ingredients lead to a comforting soup full of flavor. Check out the Full Recipe for more details! To make creamy wild rice mushroom soup, start with easy prep steps. Gather all your ingredients. Rinse the wild rice under cold water. Chop the onion, carrots, and celery into small pieces. Mince the garlic cloves. Slice the cremini mushrooms thinly. This will help them cook evenly. Measure out your spices next. You want everything ready to go. 1. Heat two tablespoons of olive oil in a large pot over medium heat. 2. Add the chopped onion and minced garlic. Sauté until the onion is soft, about 3-4 minutes. 3. Stir in the sliced mushrooms. Cook for 5-7 minutes until they soften. 4. Now, add the diced carrots and celery. Sprinkle in the dried thyme and smoked paprika. Stir well and cook for an extra 3 minutes. 5. Pour in four cups of vegetable broth and add the rinsed wild rice. Bring to a boil, then reduce to low heat. 6. Cover the pot and let it simmer for 45 minutes. The rice should be tender when done. 7. Finally, stir in one cup of heavy cream or coconut milk. Season with salt and pepper to taste. Simmer for another 10 minutes. As you cook, take note of the colors and textures. When the onions and garlic start to turn clear, you know it’s time for the mushrooms. They should be soft and fragrant after cooking. When adding the broth and rice, see how the mixture bubbles. This means you’re on the right track! When the soup is ready, the rice should be plump and creamy. Garnish with fresh parsley for a pop of color. For the full recipe, check out the detailed steps above. Happy cooking! To get that perfect creamy texture in your soup, choose high-fat cream. Heavy cream works best, but you can try coconut milk for a lighter option. Add the cream at the end of cooking. Stir it in gently to keep the soup smooth. If you want an even creamier soup, blend a portion of it. Use an immersion blender or a regular blender for this. Blending gives a nice, thick feel without losing the chunky bits. To boost flavors, add fresh herbs like thyme and parsley. They brighten the taste. Consider using smoked paprika; it adds depth and warmth. Adding a splash of lemon juice at the end can also enhance flavor. For a richer taste, sauté the mushrooms longer until they’re golden brown. This step brings out their natural sweetness. Don't forget to season well with salt and pepper. Taste as you go to adjust the flavors. One common mistake is adding the cream too early. This can cause it to curdle. Make sure to simmer your soup gently, as high heat can ruin the texture. Another mistake is not rinsing the wild rice. This step removes excess starch, keeping your soup from becoming too thick. Lastly, be careful with salt. If you use broth, it may already contain salt. Taste before adding more. Following these tips will ensure your creamy wild rice mushroom soup is a success. For the full recipe, check out the details above. {{image_2}} This soup is already a great vegetarian dish. To make it vegan, swap the heavy cream for coconut milk. This gives a rich taste without dairy. You can also use vegetable broth instead of chicken broth for an even more plant-based meal. If you want more protein, add cooked chicken or turkey. You can mix in shredded rotisserie chicken for ease. Another good option is to add beans or lentils. These not only add protein but also a nice texture. Feel free to change up the veggies based on what’s in season. In spring, add fresh peas or asparagus for a bright touch. In fall, try adding pumpkin or sweet potato for sweetness. This keeps the soup fresh and exciting all year round. For the Full Recipe, check the ingredients and instructions above. Store your leftover creamy wild rice mushroom soup in an airtight container. Make sure it cools first. This way, the soup stays fresh for up to four days in the fridge. If you want to keep it longer, freezing is a great option. To reheat the soup, pour it into a pot. Heat it on low, stirring often. This helps keep the creamy texture. You can also use the microwave. Place the soup in a microwave-safe bowl. Heat it for one to two minutes, then stir and check the temperature. If you freeze the soup, it can last up to three months. Use a freezer-safe container and leave some space at the top. This helps the soup expand. To thaw, move it to the fridge overnight. You can also microwave it for quicker thawing. Once thawed, reheat it gently on the stove for the best taste. For more tips, check out the Full Recipe. Yes, you can make this soup ahead of time. I often prepare it a day before serving. This allows the flavors to blend well. Just store it in an airtight container in the fridge. When you are ready to eat, reheat it on the stove over low heat. Stir it gently to keep it creamy. To thicken the soup, you have a few options. You can add more wild rice or use a cornstarch slurry. To make a slurry, mix one tablespoon of cornstarch with two tablespoons of cold water. Stir this into the soup and let it simmer for a few minutes. You can also mash some of the cooked rice to create a thicker texture. I love serving this soup with crusty bread or a fresh salad. A simple green salad adds a nice crunch. You could also serve it with garlic bread for a hearty meal. Pairing it with a tangy side helps balance the creamy soup. Enjoy your meal with a nice drink, like a light white wine or iced tea. This blog post covered everything you need to know about making creamy wild rice mushroom soup. We discussed key ingredients and how to choose the best ones. I shared helpful cooking steps with visual guides and tips for great texture and taste. You learned about tasty variations, proper storage, and answers to common questions. With these insights, you'll create a delicious soup that everyone will enjoy. Exploring different options makes cooking fun and easy. Enjoy your cooking adventure!

Creamy Wild Rice Mushroom Soup Flavorful Comfort Dish

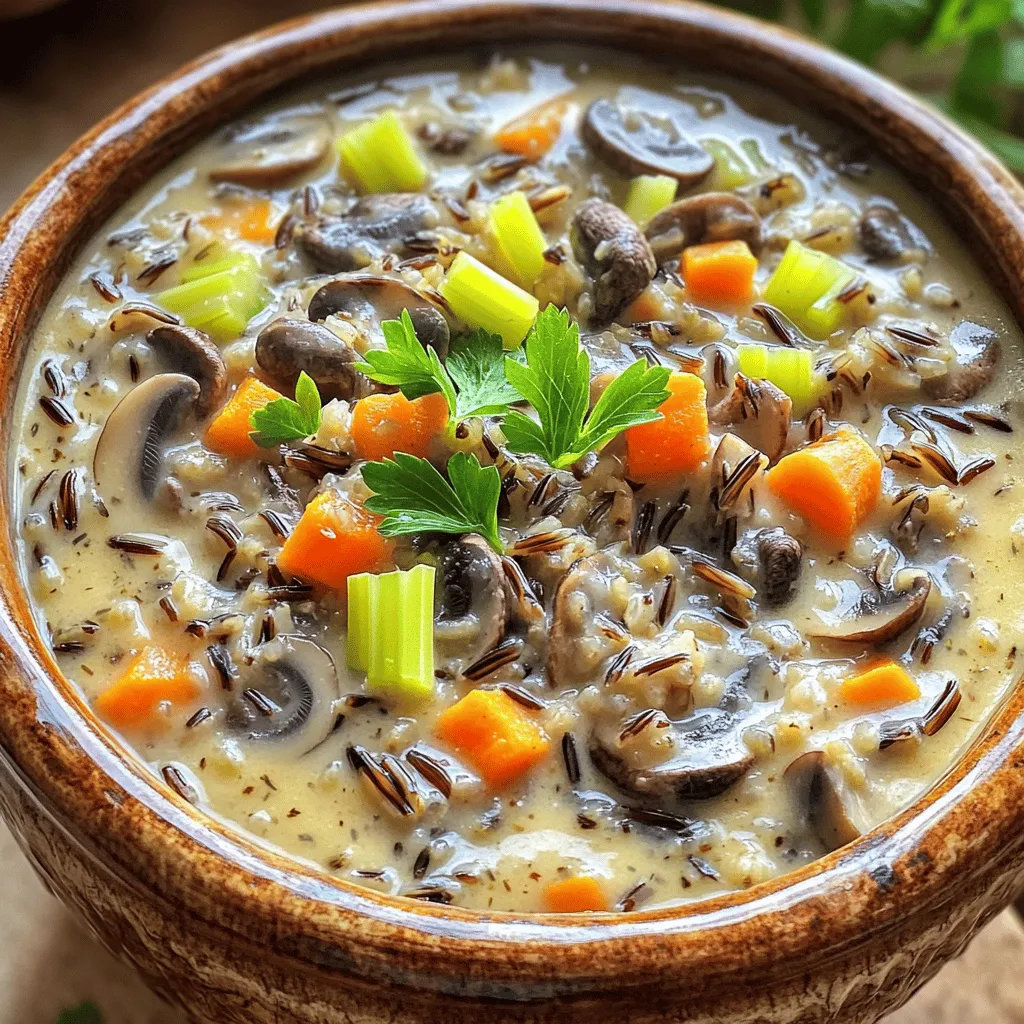
If you love a warm, cozy meal, this Creamy Wild Rice Mushroom Soup is for you. Packed with rich flavors

Making roasted tomato basil soup is simple and fun. You need fresh ingredients for the best taste. Here’s what you will need: - 4 cups ripe tomatoes, halved - 1 medium onion, chopped - 4 cloves garlic, unpeeled - 3 tablespoons olive oil - Salt and pepper to taste - 1 teaspoon sugar (optional) - 1 cup vegetable broth - 1 cup fresh basil leaves - ½ cup heavy cream or coconut cream - Fresh basil for garnish Each ingredient adds a unique flavor. The tomatoes bring sweetness, while the basil adds freshness. Garlic gives it depth, and onion adds a nice base. You can use sugar to balance the soup's acidity if needed. Heavy cream makes it rich, but coconut cream is great for a vegan option. For the full recipe, check the section above. Enjoy the process, and let your kitchen smell amazing! First, preheat your oven to 400°F (200°C). This step is key for roasting. Next, take your ripe tomatoes, chop your onion, and leave the garlic unpeeled. Arrange all these on a large baking sheet. Drizzle them with olive oil and sprinkle salt and pepper on top. If you like, add a teaspoon of sugar to balance the tomato's acidity. Roast everything in the oven for about 30-35 minutes. Look for soft, slightly charred tomatoes. Once you take the roasted ingredients out of the oven, let them cool for a bit. Peel the roasted garlic cloves. Now, grab your blender. Combine the roasted tomatoes, onions, peeled garlic, vegetable broth, and fresh basil leaves in it. Blend until the mixture is smooth. This step creates the soup's rich texture. Now, pour your blended mixture into a pot. Heat it gently over medium heat until it simmers. Stir in the cream for added richness. Allow it to simmer for about five more minutes. Before serving, taste the soup. Adjust the seasoning with salt and pepper as needed. This final touch makes all the difference. If you want to see the full recipe, check the details above. To make the best roasted tomato basil soup, use ripe, fresh tomatoes. They give the soup a rich and bright flavor. I recommend Roma or vine-ripened tomatoes. Their sweetness shines when roasted. Sometimes, tomatoes can be a bit too acidic. If that happens, add a teaspoon of sugar. This little trick balances the flavors and brings out the sweetness. Blending is key for a smooth texture. After roasting, let the veggies cool a bit. Then, blend them until they are silky and perfectly combined. This step makes the soup feel creamy, even if you skip the cream. Pair your soup with crusty bread. A warm, toasted slice is perfect for dipping. You can also serve it with a fresh salad for a light meal. For a beautiful presentation, garnish with fresh basil leaves. You can also drizzle a bit of heavy cream or coconut cream on top. This adds a lovely touch and makes the soup feel special. For the full recipe, check out the instructions I provided earlier. Enjoy your cooking! {{image_2}} You can easily make this soup vegan. Simply swap heavy cream for coconut cream. Coconut cream gives a rich and creamy texture. It also adds a hint of sweetness. This change makes the soup just as delicious and smooth. To enhance the flavor, consider adding more ingredients. Try a splash of lime juice for brightness. You can also mix in a teaspoon of nutritional yeast for a cheesy taste. These small changes can make a big difference in your soup's flavor. Want to add some heat? Just sprinkle in chili flakes. Start with a pinch and taste. You can always add more if you like it spicy. This small addition can transform your soup into a fiery delight. Also, don’t hesitate to experiment with herbs. Try mixing in oregano or thyme. Each herb brings a unique touch. You can even blend in fresh parsley for a fresh taste. The world of flavors is wide open, so have fun with it! To store leftover soup, let it cool first. Once it cools, pour the soup into an airtight container. This keeps the soup fresh and safe. You can store it in the fridge for up to five days. Before serving, check for any signs of spoilage. If it smells off or looks strange, it’s best to toss it. Freezing your soup is easy and great for meal prep. Pour the cooled soup into freezer-safe bags or containers. Leave some space at the top, as soup expands when frozen. You can keep it in the freezer for up to three months. When you want to enjoy your soup again, thaw it overnight in the fridge. For best results, reheat it on the stove over medium heat, stirring often. This helps keep the texture smooth. If the soup seems too thick, add a splash of broth or water while reheating. Roasted Tomato Basil Soup keeps well in the fridge for about 4 to 5 days. Make sure to store it in an airtight container. If you want to keep it longer, you can freeze it. In the freezer, it lasts up to 3 months. Just thaw it in the fridge before reheating. Yes, you can use canned tomatoes! They work well and save time. Choose whole or diced canned tomatoes for the best flavor. If using canned tomatoes, reduce the sugar since they are often sweeter. Use the same amount of broth and follow the rest of the recipe as is. This soup pairs well with many dishes. Grilled cheese sandwiches are a classic choice. A simple salad with mixed greens adds freshness. You could also serve it with crusty bread for dipping. Try adding a sprinkle of cheese on top for extra flavor. Yes, this recipe is gluten-free! All the ingredients used, like tomatoes, broth, and basil, do not contain gluten. Just ensure that your broth is labeled gluten-free. This soup is safe for anyone avoiding gluten. In this post, we explored how to make delicious Roasted Tomato Basil Soup. We covered the key ingredients, step-by-step instructions, and tips to perfect the dish. You learned about variations like vegan options and how to store leftovers properly. Enjoy making this soup with fresh ingredients. Share it with others, and enjoy the warmth it brings! Cooking can be fun and rewarding.

Roasted Tomato Basil Soup Flavorful and Nourishing Dish

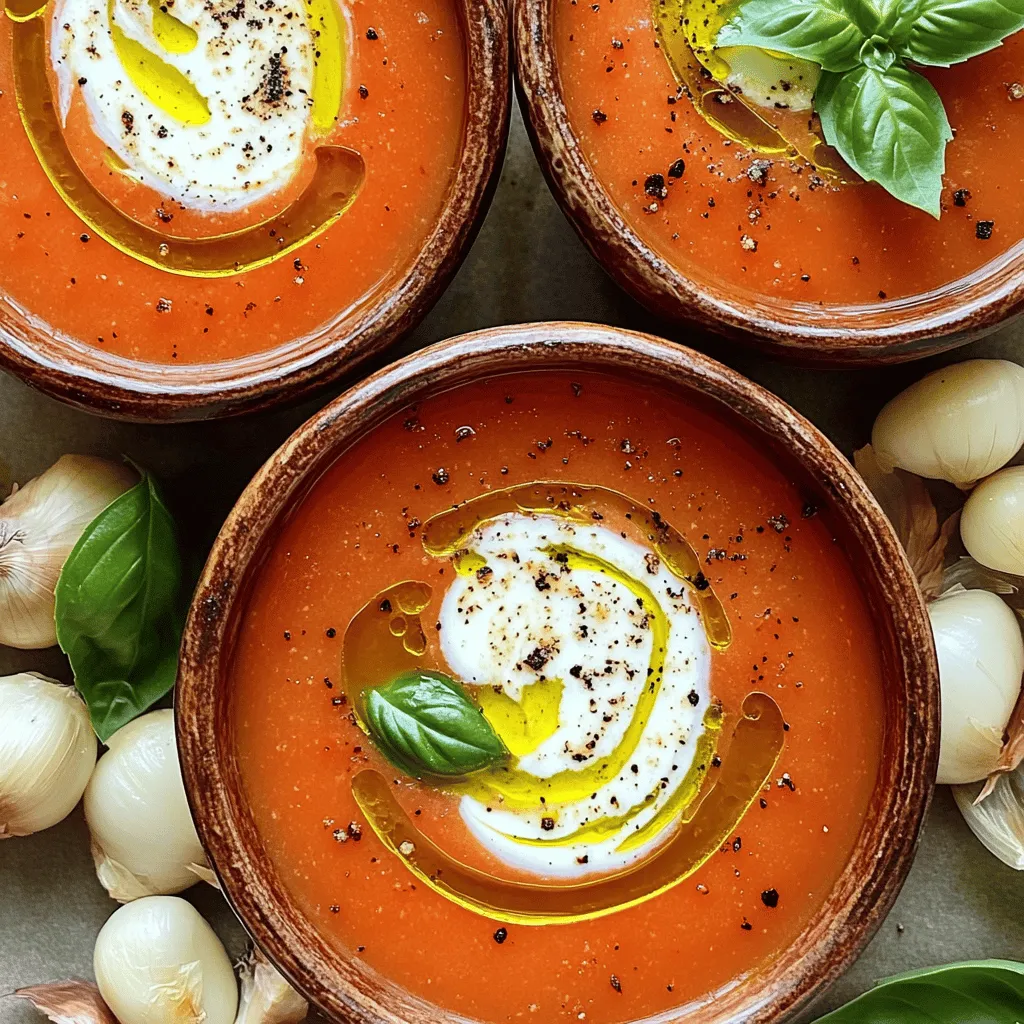
Warm up your day with my Roasted Tomato Basil Soup! This bowl of comfort bursts with fresh flavors and is

- 4 cups fresh broccoli florets - 1 cup shredded carrots - 1/2 cup diced onion - 3 cloves garlic, minced - 4 cups vegetable broth - 1 cup heavy cream - 2 cups shredded sharp cheddar cheese - 1/4 cup all-purpose flour - 1/2 teaspoon nutmeg - Salt and freshly ground black pepper to taste - 2 tablespoons olive oil To make your soup even better, try these add-ins: - Crumbled bacon for a smoky touch - A dash of hot sauce for heat - Chopped fresh herbs like parsley or chives - Extra cheese on top for richness - A swirl of sour cream for creaminess You will need a few key items to whip up this soup: - A large pot for cooking - A wooden spoon for stirring - An immersion blender for smoothness - Measuring cups and spoons for precision - A cutting board and knife for prep This list will help you gather everything you need for a perfect Panera Copycat Broccoli Cheddar Soup. You can find the full recipe above. To make the perfect Panera Copycat Broccoli Cheddar Soup, start with a big pot. Heat 2 tablespoons of olive oil on medium heat. When the oil is hot, add 1/2 cup of diced onion and 3 cloves of minced garlic. Cook this mix until the onion turns clear, about 3 to 4 minutes. Next, stir in 1 cup of shredded carrots and 4 cups of fresh broccoli florets. Sauté these for about 5 minutes. You want them to be slightly soft but still bright. After that, sprinkle 1/4 cup of all-purpose flour over the veggies. Stir this in well and cook for another 2 minutes. This will help thicken your soup. Now, it's time for the broth. Gradually pour in 4 cups of vegetable broth while whisking. This keeps lumps from forming. Bring the soup to a boil, then turn the heat down and let it simmer for 15 to 20 minutes. You want the broccoli to be tender. After simmering, grab an immersion blender. Blend the soup until it is smooth. If you don't have an immersion blender, you can carefully transfer the soup to a regular blender. Just be sure to allow steam to escape. Once smooth, mix in 1 cup of heavy cream and 2 cups of shredded sharp cheddar cheese. Stir until the cheese melts and the soup is creamy. Season with 1/2 teaspoon of nutmeg, salt, and black pepper to taste. Let it simmer for another 5 minutes to heat through. Sautéing is key to building flavor. Start with medium heat to prevent burning. Cut your vegetables into small, even pieces. This helps them cook evenly. Don't rush the process. Let the onions become clear before adding other veggies. Stir often to keep everything cooking evenly. If things start to stick, add a splash of broth or water. This will help lift any bits off the bottom of the pot, adding more flavor to your soup. Blending can change the soup's texture. For a smooth soup, blend until it is completely creamy. If you prefer some chunks, blend only half of the soup. Then, mix it back in with the unblended portion. Always blend in batches if using a regular blender. Fill it no more than halfway. This prevents hot soup from splattering. If you want a thicker soup, blend less. For a thinner soup, add extra broth or cream after blending. Check out the full recipe for all the ingredients and steps! To boost flavor, use fresh ingredients. Fresh broccoli and carrots pack more taste. I like to add a pinch of cayenne for a gentle kick. Nutmeg adds warmth, so don’t skip it. For a richer flavor, try adding a splash of white wine. This brings out the cheese and cream nicely. Avoid overcooking the broccoli. You want it tender but not mushy. If you blend too much, the soup can become too thick. Keep an eye on the heat to prevent burning the garlic. Garlic should be soft, not brown. Lastly, taste as you go. Adjust salt and pepper to get the best flavor. To make the soup thicker, add more flour or cheese. If it’s too thick, just stir in more broth or cream. For a lighter soup, swap heavy cream with half-and-half. Remember, the type of cheese matters. Sharp cheddar adds a bold flavor, while mild cheddar can make it creamier. You can find all the ingredients and steps in the Full Recipe. {{image_2}} To make this soup gluten-free, swap out the all-purpose flour. You can use cornstarch instead. Mix two tablespoons of cornstarch with cold water. Add this mixture to the soup when you add the broth. It will help thicken your soup without gluten. For a vegan version, replace the heavy cream with coconut cream. It gives a rich taste. Use nutritional yeast instead of cheddar cheese for a cheesy flavor. You can also use vegetable broth to keep it plant-based. These swaps make the soup creamy and delicious without any animal products. Experiment with different veggies to change the flavor. You can add cauliflower for a lighter taste. Spinach or kale can boost the nutrition and flavor too. Carrots add sweetness and color, while peas give a nice pop. Mixing these can make your soup unique and exciting. For the full recipe, check out the details above. After you finish your meal, let the soup cool down. Once cool, transfer it to an airtight container. This keeps the soup fresh and tasty. Store it in the fridge for up to three days. If you want to enjoy it later, freezing is a great option. To reheat your Panera Copycat Broccoli Cheddar Soup, use a pot on the stove. Heat it over medium-low heat. Stir often to prevent sticking. You can also use the microwave. Heat it in short bursts, stirring in between. This way, it warms evenly. For longer storage, freeze the soup in portions. Use freezer-safe containers or bags. Leave some space at the top, as the soup will expand. It can stay good for up to three months in the freezer. To eat, thaw it in the fridge overnight before reheating. Enjoy your delicious soup anytime! Yes, you can make this soup in advance. It tastes even better the next day! Just store it in an airtight container in the fridge. When you are ready to eat, reheat it on the stove over low heat. Stir often to ensure even warming. I recommend using sharp cheddar cheese for this recipe. It adds a rich flavor that pairs well with the broccoli. You can also mix in some mild cheddar for a creamier taste. Other options include Gruyère or Monterey Jack for a twist. To make the soup thinner, add more vegetable broth or cream. Stir it well until you reach your desired consistency. If you want it thicker, mix a bit of flour with water to make a slurry. Stir that into the soup and let it simmer until it thickens. This soup lasts about 3 to 4 days in the fridge. Just ensure it is stored in an airtight container. When ready to enjoy, always check for freshness before reheating. This blog post covered how to make Panera's Broccoli Cheddar Soup at home. We discussed the key ingredients and tools you need. The step-by-step guide offers clear cooking instructions and tips. I also shared ways to adjust flavor and texture for the best results. In the end, you have options to customize your soup based on your needs. Enjoying homemade soup can be rewarding and delicious. Dive in, and make this comforting dish your own!

Panera Copycat Broccoli Cheddar Soup Flavor Boost

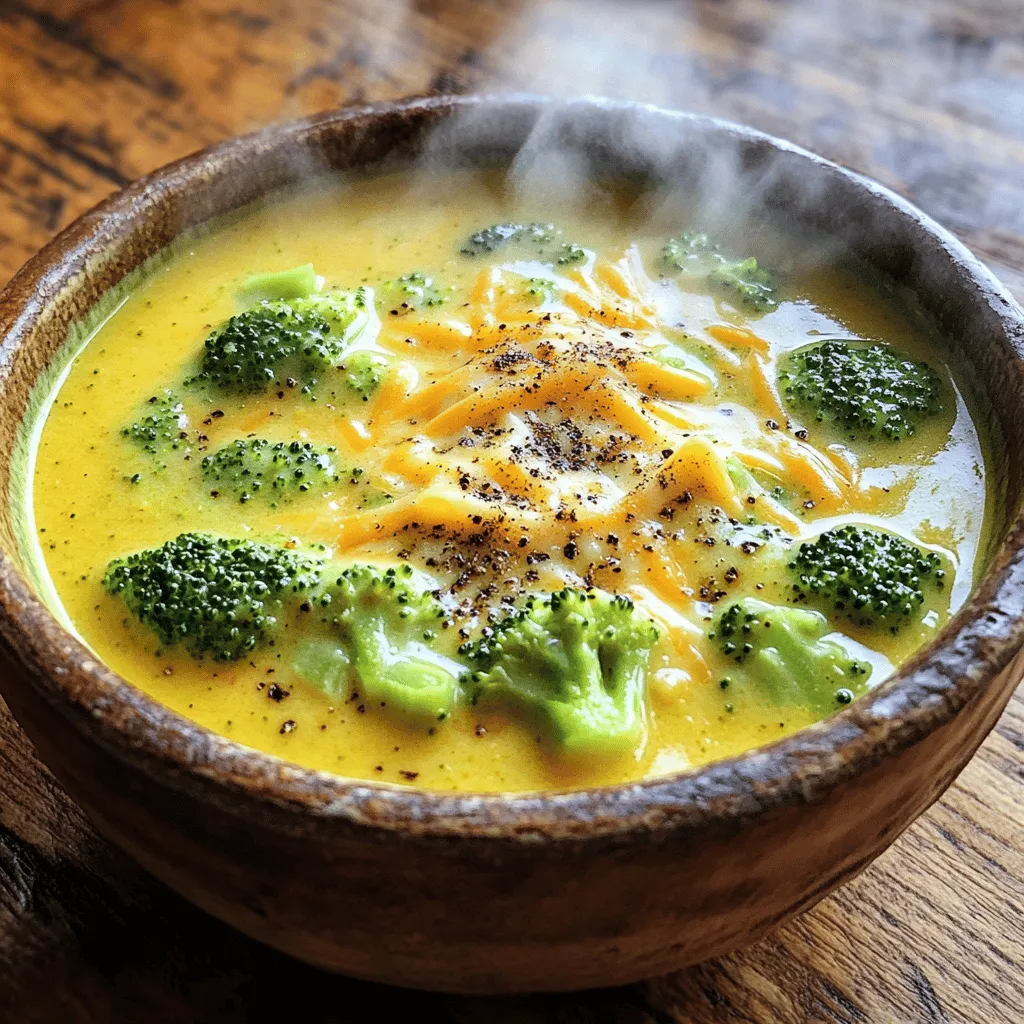
Are you craving the rich, creamy taste of Panera’s Broccoli Cheddar Soup? You’re in luck! Today, I’ll show you how

- 4 cups fresh broccoli florets - 1 medium onion, diced - 2 cloves garlic, minced - 3 cups vegetable broth - 1 cup heavy cream - 2 cups sharp cheddar cheese, grated - 1 teaspoon Dijon mustard - 1/2 teaspoon paprika - Salt and pepper to taste - 1 tablespoon olive oil - 2 tablespoons all-purpose flour (optional, for thickness) A typical serving of this soup contains about 350 calories. It provides around 25 grams of fat, 24 grams of carbohydrates, and 12 grams of protein. This makes it a rich and filling meal option. When I craft this soup, I focus on using fresh ingredients. Fresh broccoli adds a bright color and crisp taste. The onion and garlic provide a strong base. Together, these main ingredients create a hearty soup. For extra flavor, I like to add Dijon mustard and paprika. They add depth and warmth to each spoonful. Do not skip salt and pepper; they balance the flavors nicely. Using heavy cream gives the soup a rich texture. If you want a thicker soup, sprinkle in flour. This helps to make it creamy without being too heavy. This soup is not just tasty; it is also good for you. The broccoli is packed with vitamins. The cheese gives you protein. Together, these ingredients make a nutritious and comforting meal. For the full recipe, check out the Cheesy Broccoli Bliss Soup section. Enjoy! - Sauté onion and garlic: Start by heating olive oil in a large pot over medium heat. Add the diced onion. Cook it until it turns soft and clear, about five minutes. Then, add the minced garlic. Stir for one minute until you smell its nice aroma. - Cook broccoli with broth: Next, toss in the fresh broccoli florets. Pour in the vegetable broth. Bring it all to a boil. Once boiling, turn down the heat. Let it simmer for 10 to 15 minutes until the broccoli is soft. - Pureeing the soup using immersion blender: When the broccoli is soft, use an immersion blender to mix the soup until it is smooth. If you like some chunks, blend it less. - Adding cream and cheese gradually: After blending, return the pot to low heat. Slowly stir in the heavy cream. Next, add Dijon mustard and paprika for more flavor. Gradually add the grated cheddar cheese, mixing until it melts well. - Simmer for flavors to meld: Allow the soup to simmer on low heat for another five minutes. This helps all the flavors mix together nicely. - Adjust seasoning as needed: Taste the soup and add salt and pepper if needed. This is your chance to make it just right for your taste. To make your soup creamy without adding too many calories, try using low-fat milk or almond milk. You can also add more vegetables like cauliflower. When you blend these, they add a rich texture. Another option is to use Greek yogurt. This adds creaminess and boosts protein. For a lighter version, swap heavy cream with low-fat cream or milk. You can also reduce the cheese by half and still enjoy great flavor. If you want extra fiber, add chopped spinach or kale. They blend well and make the soup healthier. Serve the soup in warm bowls for a cozy feel. Top it with extra cheese or a few broccoli florets for a nice look. A drizzle of olive oil adds flavor and shine. Freshly ground pepper can enhance the taste. Pair the soup with crusty bread or a fresh salad to complete the meal. For a fun twist, serve with a side of garlic breadsticks. This makes for a lovely dinner experience. For more tips and tricks, check the Full Recipe. {{image_2}} You can switch up the cheese in this soup for fun flavors. Gruyere adds a nutty taste, while Monterey Jack gives a mild creaminess. Feel free to mix cheeses too. A combo of sharp cheddar and Gouda creates a rich, smoky flavor. Experimenting with different cheeses keeps each bowl exciting. Want to boost your veggie intake? Toss in some carrots for a hint of sweetness. Chopped cauliflower works well too, adding a nice texture. You can even add spinach or peas for a pop of color and nutrition. The key is to chop all veggies to a similar size for even cooking. To make this soup gluten-free, simply skip the all-purpose flour. Instead, you can use cornstarch. Mix one tablespoon of cornstarch with two tablespoons of water. Stir it in after blending the soup for thickness. This method keeps the texture creamy without gluten. Enjoy your meal without worries! For more details, check the Full Recipe. To keep your soup fresh, let it cool first. Pour it into an airtight container. Store it in the fridge. It will stay good for about three to four days. If you want to keep it longer, freeze it. Use freezer-safe bags or containers for best results. When you want to eat your soup again, reheat it gently. Use a pot on low heat. Stir often to prevent sticking. You can also use the microwave. Heat in short bursts, stirring in between. This way, you keep the smooth texture. Broccoli cheddar soup lasts three to four days in the fridge. In the freezer, it can last up to three months. Always check for signs of spoilage. If it smells off or looks unusual, it's best to throw it out. Enjoy your Broccoli Cheddar Soup by following the Full Recipe! Yes, you can use frozen broccoli! It is a great option when fresh isn't available. Just remember that frozen broccoli is often blanched, so it cooks faster. You can add it to the pot during the last few minutes of cooking. This helps to keep its bright color and flavor. Absolutely! To make a dairy-free version, swap the heavy cream for coconut milk or almond milk. Use a dairy-free cheese that melts well, like cashew cheese or a store-bought alternative. This keeps the rich taste without the dairy. To cook this soup in a slow cooker, start by sautéing the onion and garlic in olive oil. Then, add all ingredients, including broccoli and broth, to the slow cooker. Cook on low for about 6 hours or high for 3 hours. Blend it before serving for a creamy texture. This soup pairs well with many sides! Here are some tasty options: - Crusty bread for dipping - A fresh garden salad - Grilled cheese sandwiches - Garlic breadsticks These options add flavor and texture to your meal. To make this soup vegan, use vegetable broth, coconut milk, and a plant-based cheese. You can also skip the cheese and add nutritional yeast for a cheesy flavor. This way, you can enjoy a creamy, rich soup that fits a vegan diet. For the Full Recipe, refer to the section above. Broccoli cheddar soup is a comforting dish with simple steps. You need fresh broccoli, cheese, and a mix of spices. We’ve covered ways to adjust creaminess, add veggies, and make it healthier. Storing tips help keep your soup fresh for longer. The variations allow for creativity. Whether you prefer it creamy or lighter, this soup fits your needs. Enjoy this homemade recipe, and get creative with your ingredients. Your kitchen will smell amazing!

Broccoli Cheddar Soup Simple and Flavorful Recipe

If you’re craving a warm bowl of comfort, look no further than my Broccoli Cheddar Soup. This simple recipe blends

To make my Four Cheese Baked Mac and Cheese, gather these ingredients. Each cheese adds its own flavor, making this dish rich and creamy. - 8 ounces elbow macaroni - 1 cup sharp cheddar cheese, shredded - 1 cup mozzarella cheese, shredded - 1 cup gouda cheese, shredded - 1 cup cream cheese, softened - 3 cups milk - 4 tablespoons butter - 1/4 cup all-purpose flour - 1 teaspoon garlic powder - 1 teaspoon onion powder - 1/2 teaspoon paprika - Salt and pepper to taste - 1 cup breadcrumbs (for topping) - Fresh parsley, chopped (for garnish) Each ingredient plays an important role in the dish. The elbow macaroni gives the perfect shape to hold the cheese. The sharp cheddar brings a nice tang, while the mozzarella adds stretch. Gouda provides a deep, smoky flavor, and cream cheese makes it extra creamy. Butter and flour create a roux, which helps thicken the cheese sauce. The spices, like garlic and onion powder, add warmth. Milk makes everything smooth and rich. Breadcrumbs on top give a nice crunch when baked. Lastly, fresh parsley adds color and a fresh taste. You can find the complete cooking instructions in the Full Recipe. Enjoy making this cheesy delight! Cooking the macaroni Start by boiling a large pot of salted water. Add 8 ounces of elbow macaroni. Cook according to package instructions until al dente. Drain the pasta and set it aside. Preparing the cheese sauce In a separate pot, melt 4 tablespoons of butter over medium heat. Once melted, stir in 1/4 cup of all-purpose flour. Cook this mixture for 1-2 minutes, stirring constantly. This creates a roux, which thickens the sauce. Gradually whisk in 3 cups of milk. Keep whisking until the sauce thickens, which takes about 5-7 minutes. Add 1 teaspoon of garlic powder, 1 teaspoon of onion powder, and 1/2 teaspoon of paprika. Season with salt and pepper to taste. Remove the pot from heat and mix in 1 cup of softened cream cheese until smooth. Slowly add 1 cup of shredded sharp cheddar, 1 cup of shredded mozzarella, and 1 cup of shredded gouda. Stir until all cheese melts and the sauce is creamy. Combining the pasta with the cheese mixture Now, combine the cooked macaroni with the cheese sauce. Make sure every piece of pasta is coated in cheese. This is where the magic happens! Assembling in the baking dish Pour the mac and cheese mixture into a greased baking dish. Spread it evenly to ensure even cooking. Breadcrumb topping preparation In a small bowl, mix 1 cup of breadcrumbs with 1 tablespoon of melted butter. Stir until the breadcrumbs are evenly coated. Sprinkle this mixture over the mac and cheese. Baking time and temperature Preheat your oven to 350°F (175°C). Bake the dish for 25-30 minutes. You want the top to be golden brown and the cheese bubbly. Once baked, let it cool for a few minutes. Garnish with fresh parsley before serving. Enjoy your Four Cheese Baked Mac and Cheese! To make the best cheese sauce, you want a smooth and creamy mix. Start by making a roux. This is a mix of butter and flour. Cook it for one to two minutes over medium heat. This helps thicken your sauce. Then, slowly add the milk. Keep whisking until it thickens, which takes about five to seven minutes. For the cheese to melt well, use shredded cheese. Shredded cheese melts faster and blends better. I like to add the cream cheese first. It gives the sauce a rich and creamy texture. Once the cream cheese is smooth, add cheddar, mozzarella, and gouda. Stir until all the cheese is melted and creamy. To make your mac and cheese even better, add herbs and spices. I like garlic powder, onion powder, and paprika. These spices add depth and warmth to the dish. You can also try adding a pinch of nutmeg for a unique twist. Using a mix of cheeses can change the flavor a lot. Sharp cheddar gives a strong taste, while mozzarella adds stretch. Gouda offers a smoky flavor. You can also experiment with other cheeses like fontina or parmesan. Mixing different cheeses makes your dish more interesting and tasty. Check out the Full Recipe for more ideas. {{image_2}} You can try different types of pasta for a fun twist. Penne, fusilli, or even shells can add new shapes and textures. Each pasta style holds sauce differently, making your dish unique. Changing cheeses can also boost flavor. Try pepper jack for spice or fontina for creaminess. Mixing in blue cheese offers a bold taste. Feel free to experiment with your favorites! For a gluten-free version, swap regular pasta for gluten-free pasta. Many brands offer great options that taste just as good. Just check the cooking times, as they may vary. If you need a vegan option, use plant-based cheese and milk. Nutritional yeast can add a cheesy flavor without dairy. You can also use vegan butter to keep things rich and creamy. To store leftovers, let your Four Cheese Baked Mac and Cheese cool. Once cool, place it in an airtight container. This keeps it fresh for up to three days in the fridge. Make sure to cover it well to avoid drying out. When reheating, use a microwave or oven. If using a microwave, heat in short bursts. Stir between each burst to ensure even heating. If using an oven, preheat it to 350°F (175°C). Cover the dish with foil to keep moisture in. Bake for about 15-20 minutes until hot throughout. If you want to freeze your mac and cheese, start by letting it cool completely. Then, scoop it into freezer-safe containers. Leave some space at the top for expansion. Seal the containers tightly and label them with the date. You can freeze it for up to three months. To defrost, move your mac and cheese to the fridge overnight. If you're in a hurry, you can use the microwave. Heat it on low until it is soft. After thawing, you can reheat it like before for the best results. It takes about 45 minutes to cook Four Cheese Baked Mac and Cheese. You will spend 15 minutes prepping the ingredients and 30 minutes baking. This makes it easy for you to plan your meal. Yes, you can make it in advance. Prepare the dish up to the baking step. Cover it and store it in the fridge for a day. When you are ready, just bake it. You may need to add a few extra minutes to the baking time. The best cheeses for mac and cheese are sharp cheddar, mozzarella, gouda, and cream cheese. These cheeses blend well for a rich flavor. You can also mix in other cheeses for a unique twist. Experiment with your favorites! In this blog post, we explored the delicious world of Four Cheese Baked Mac and Cheese. You learned about key ingredients, how to make a creamy cheese sauce, and the perfect baking method. I shared tips for enhancing flavor and texture, plus fun variations like gluten-free and vegan options. Remember, you can store leftovers and even freeze them for later use. Cooking this dish is rewarding, and you can customize it to suit your taste. Enjoy your cheesy creation, and share it with friends and family!

Irresistible Four Cheese Baked Mac and Cheese Recipe

Dive into comfort food bliss with my irresistible Four Cheese Baked Mac and Cheese recipe! This creamy dish combines sharp

Older posts
Newer posts
← Previous Page1 … Page5 Page6 Page7 … Page76 Next →

dsad

© 2025 greenmealmap • Built with GeneratePress

Our Policies

  • Copyright Policy
  • Cookie Policy
  • GDPR Policy
  • Privacy Policy
  • Disclaimer
  • Terms Of Use

More Information

  • Home
  • About
  • Contact
  • Appetizers
  • Dessert
  • Dinner
  • Drinks
©2025, greenmealmap About Back To Top