Skip to content
DisclaimerTerms Of UseGDPR PolicyCookie Policy

greenmealmap

  • Home
  • Drinks
  • Appetizers
  • Dinner
  • Dessert
  • About
  • Contact
  • Privacy Policy
DisclaimerTerms Of UseGDPR PolicyCookie Policy

Lauren

- 2 lbs boneless, skinless chicken thighs - 1 packet ranch seasoning mix - 8 oz cream cheese - 1 cup chicken broth The main ingredients are simple yet crucial. The chicken thighs give the dish its rich flavor and tender texture. I always opt for boneless, skinless thighs because they cook evenly and absorb the seasoning well. The ranch seasoning mix adds a savory touch that enhances the overall taste. Cream cheese brings creaminess and richness to the dish, making it comforting. Chicken broth adds moisture and depth, ensuring the chicken stays juicy. - 1 cup shredded cheddar cheese - 6 slices cooked bacon - 1/2 cup green onions - Salt and pepper for seasoning For added flavor, I include shredded cheddar cheese. It melts beautifully, making the dish even creamier. The crispy bacon adds a crunchy texture and smoky flavor. Green onions provide a fresh bite and a pop of color. Finally, I use salt and pepper to adjust the taste. You can find the full recipe above. - Place chicken thighs in slow cooker. - Sprinkle ranch seasoning mix evenly on top. Starting with the chicken thighs, I find they bring the best flavor. Their tenderness shines through after cooking. Sprinkle the ranch seasoning mix over the chicken. This mix adds a savory kick right from the start. - Add cream cheese and chicken broth. - Cover and cook on low for 6-7 hours or high for 4 hours. Next, I add cream cheese and chicken broth. The cream cheese melts into a rich sauce. It makes the dish creamy and delicious. Cover the slow cooker and set it. Low heat cooks the chicken slowly, making it tender and juicy. If you're in a hurry, use high heat. - Shred chicken and mix with sauce. - Stir in cheese and bacon. Once the chicken is done, I shred it with two forks. Mixing it back into the sauce keeps it moist. Then, I stir in shredded cheddar cheese and crumbled bacon. These make the dish even more flavorful. The cheese melts, creating a yummy blend. Enjoy the creamy crack chicken with green onions on top for extra flavor. For the full recipe, check the earlier section. To make Creamy Crack Chicken even tastier, adjust the seasoning to your liking. You can add more ranch mix or a pinch of garlic powder. Taste it as you go. This is key for great flavor. Choosing the right chicken cut is also important. I recommend using boneless, skinless chicken thighs. They stay juicy and tender during cooking. This cut works best for this recipe. You have two main options: slow cooker or stovetop. The slow cooker gives you a hands-off approach. It lets the flavors meld beautifully. If you want to cook it faster, use the stovetop. Just watch it closely. Using a meat thermometer is a smart move. The chicken should reach an internal temperature of 165°F (74°C). This ensures your dish is safe and delicious. For side dishes, serve Creamy Crack Chicken over rice or mashed potatoes. These options soak up the creamy sauce well. You can also add a fresh salad for a nice crunch. Eye-catching garnishes make the dish pop. Top with crumbled bacon and sliced green onions. These add color and flavor. Your meal will look as good as it tastes! For the full recipe, click [Full Recipe]. {{image_2}} You can make creamy crack chicken lighter by using low-fat cream cheese. This swap cuts calories without losing the rich taste. Cream cheese alternatives like Greek yogurt work well too. If you're not a fan of cheddar, try mozzarella or pepper jack cheese. These cheeses bring a different flavor and texture. To boost flavor, think about spices. Garlic powder, onion powder, and paprika add depth. You can also use cayenne pepper for a kick. Adding vegetables to the dish can enhance nutrition and flavor. Try bell peppers, spinach, or even mushrooms. Toss them in during cooking for a tasty twist. For a quicker option, use an Instant Pot. Cook the chicken on high pressure for about 10 minutes. This method saves time while keeping the chicken juicy. If you prefer an oven-baked version, place the chicken in a baking dish. Bake it at 375°F (190°C) for about 30-40 minutes. Both methods create a delicious meal. Check the [Full Recipe] for more details. To keep Creamy Crack Chicken fresh, store it in the fridge. Place leftovers in an airtight container. This helps prevent moisture loss and keeps flavors intact. Make sure to seal the container well. You can store it for up to four days in the fridge. Always let it cool before sealing to avoid steam build-up. You can freeze Creamy Crack Chicken for later use. First, allow it to cool completely. Then, scoop portions into freezer-safe bags or containers. Be sure to remove as much air as possible before sealing. Label the bags with the date. To reheat, thaw in the fridge overnight. Then, warm it in a pot over low heat or in the microwave. Stir occasionally to ensure even heating. In the fridge, Creamy Crack Chicken lasts about four days. If frozen, it can last up to three months. Always check for signs of spoilage before eating. Look for any off smells or changes in color. If it smells strange or looks odd, it's best to toss it. Creamy Crack Chicken is a rich, savory dish. It combines chicken thighs, cream cheese, and ranch seasoning. The dish likely started in the U.S. and became popular due to its ease and flavor. You get a creamy, cheesy texture that is hard to resist. It has a unique taste from the ranch mix and bacon, making it a crowd favorite. Yes, you can easily make Creamy Crack Chicken ahead of time. Prepare it in the slow cooker as normal. After cooking, let it cool and store it in the fridge. When you are ready to eat, reheat it on low heat in the cooker. Add a splash of chicken broth if it seems too thick. Creamy Crack Chicken can be rich in calories. If you want a lighter version, use low-fat cream cheese or chicken breast. You can also add vegetables like spinach or bell peppers to boost nutrition. This way, you keep the flavor while making it healthier. Absolutely! To add heat, mix in some diced jalapeños or a dash of hot sauce. You can also try using spicy ranch seasoning. This will give the dish a nice kick without losing its creamy charm. This dish pairs well with many sides. You can serve it over rice or mashed potatoes for a filling meal. Green beans or a fresh salad make great sides, too. For drinks, a light iced tea or lemonade complements the rich flavors well. This blog post covers everything you need for Creamy Crack Chicken. You learned the main ingredients, step-by-step instructions, and helpful tips. We discussed variations for extra flavor and storage methods for leftovers. You can easily make this dish your own. Keep it simple and fun. Experiment with flavors and enjoy this tasty meal anytime. It’s a comforting dish that everyone will love. Your kitchen will feel warm and inviting with this recipe. Happy cooking!

Creamy Crack Chicken Delightful Comfort Food Recipe

Are you looking for a new comfort food that’s easy and delicious? Look no further than Creamy Crack Chicken! This

To make Mongolian beef, you need a few key ingredients. Here’s what you will need: - 1 lb flank steak, cut into thin strips - 1 cup soy sauce - 1/2 cup brown sugar - 2 cloves garlic, minced - 1-inch piece ginger, grated - 2 green onions, chopped (separate white and green parts) - 1 tablespoon cornstarch - 2 tablespoons vegetable oil - 1 tablespoon sesame oil - 1/2 teaspoon red pepper flakes (optional) - Steamed rice or noodles, for serving These ingredients create a delicious and savory flavor. The flank steak works well because it cooks quickly and stays tender. You can add some optional ingredients to make your dish even tastier. Consider these: - Red pepper flakes for heat - Bell peppers for extra crunch - Broccoli for added nutrition These additions can enhance the dish and give it a personal touch. Feel free to mix and match based on what you have at home. If you can’t find some ingredients, don’t worry! Here are some substitutes: - Use sirloin or ribeye instead of flank steak for a different taste. - Honey can replace brown sugar if you prefer a healthier sweetener. - Use tamari as a gluten-free option for soy sauce. - Fresh ginger can be swapped with ground ginger in a pinch. These substitutes will still give you a great flavor. With these ingredients, you can make Mongolian beef that is both savory and simple. For the full recipe, check out the details above. To start, you need to marinate the beef. Grab a medium bowl and mix together these ingredients: - 1 cup soy sauce - 1/2 cup brown sugar - 2 cloves garlic, minced - 1-inch piece ginger, grated - Chopped white parts of 2 green onions Add the flank steak strips to this mix. Stir it well so the beef gets coated. Let it sit for at least 30 minutes. This step makes the beef tender and flavorful. Next, heat a large skillet or wok over medium-high heat. Pour in 2 tablespoons of vegetable oil. Once the oil is hot, add the marinated beef. Don't forget to save the marinade for later! Cook the beef for about 3-4 minutes. You want it browned and cooked through. After that, remove the beef from the pan and set it aside on a plate. In the same skillet, add the saved marinade and bring it to a simmer. This will help build depth in flavor. In a small bowl, mix 1 tablespoon of cornstarch with 2 tablespoons of water to make a slurry. Stir this slurry into the simmering sauce. Cook it for 2-3 minutes until the sauce thickens. Now, return the beef to the skillet. Toss it well to coat the beef in the thickened sauce. For an extra layer of flavor, stir in 1 tablespoon of sesame oil and, if you like, 1/2 teaspoon of red pepper flakes. This adds a nice touch of spice! Just before serving, toss in the green parts of the green onions. This adds freshness and color. Now you’re ready to serve your Mongolian beef over steamed rice or noodles, drizzling some extra sauce on top. Enjoy a meal that tastes gourmet but is simple to make! For the full recipe, check out the details above. To make your Mongolian beef shine, focus on the marinade. Use fresh garlic and ginger. They add a lot of flavor. Marinate the beef for at least 30 minutes. This step is key for tender meat. If you have time, marinate it longer. The longer, the better! For a smoother sauce, mix the cornstarch with water well. This prevents lumps in your sauce. When you simmer the sauce, keep stirring. This helps the flavors blend nicely. When cooking the beef, use high heat. This gives nice browning. Sear the meat in small batches. Crowding the pan makes it steam instead of sear. Once the beef is cooked, remove it right away. This keeps it juicy. Add the beef back to the pan only when the sauce is ready. This helps keep it tender. If you prefer, slice the beef against the grain. This makes it even softer to chew. One mistake is not marinating long enough. Give your beef enough time to soak in flavors. Another common error is using low heat. This can make the beef tough. Be careful with the cornstarch slurry. If you add it too quickly, your sauce may clump. Always stir it in slowly. Lastly, avoid overcooking the beef. It should be just right, not dry. These tips will help you create a delicious Mongolian beef dish. For the full recipe, check the earlier sections! {{image_2}} If you like heat, try spicy Mongolian beef. To add spice, mix in red pepper flakes with the sauce. You can also add sliced fresh chili peppers. These will give your dish a nice kick. Adjust the amount to suit your taste. More heat means more flavor! You can make a tasty vegetarian version of Mongolian beef. Use tofu or seitan as your protein. Both options soak up the sauce well. Replace flank steak with these ingredients in the marinade. Cook them the same way as the beef. You’ll still enjoy that rich flavor without meat! Adding vegetables is a simple way to make your Mongolian beef more colorful and healthy. Try bell peppers, broccoli, or snap peas. Slice them thin and toss them in the skillet with the beef. Cook until they are just tender. This adds crunch and vitamins to your meal. You can also mix in carrots for a hint of sweetness. For the full recipe, check the [Full Recipe]. Store your Mongolian beef in an airtight container. Let it cool to room temperature first. This helps keep the meat tender. Place the container in the fridge. It will last for about 3 to 4 days. If you want to keep it longer, freezing is a good option. When reheating, the goal is to keep the beef juicy. You can use a skillet for this. Heat it over medium heat. Add a splash of water or broth to keep it moist. Stir often to heat evenly. You can also use a microwave. Place the beef in a microwave-safe dish. Add a little water, cover it, and heat in short bursts. This will prevent it from drying out. Freezing Mongolian beef is easy. First, allow it to cool completely. Then, place it in a freezer-safe bag. Make sure to remove as much air as possible. Label the bag with the date. Frozen, it will last for up to 3 months. When you are ready to eat it, thaw it overnight in the fridge. Reheat it as described above for the best taste. The best cut of beef for Mongolian Beef is flank steak. Flank steak has a great flavor and is tender when cooked right. It’s thin, which helps it absorb the marinade well. If you can’t find flank steak, you can use sirloin or ribeye. Both cuts will give you a tasty dish. Yes, you can make Mongolian Beef ahead of time. You can marinate the beef for up to 24 hours. This adds more flavor. After cooking, let it cool and store it in the fridge. It will keep for about three days. Just reheat it on the stove or in the microwave when you are ready to eat. Mongolian Beef is sweeter and has a thicker sauce than many other stir-fries. It uses a soy sauce and brown sugar mix. Other stir-fries might use more vegetables and lighter sauces. The focus in Mongolian Beef is on the beef and sauce. This makes it a unique dish that stands out in flavor. You can find the full recipe for Mongolian Beef in the earlier sections. Mongolian beef is a tasty dish made from simple ingredients. We covered what to use and how to cook it. I shared tips to make your beef tender and flavorful. Remember to try variations like spicy or vegetarian options. Store leftovers safely for later meals. With this guide, you can enjoy great Mongolian beef at home. Happy cooking!

Mongolian Beef Savory and Simple Dinner Recipe

Welcome to your new favorite dinner recipe: Mongolian Beef! This dish packs bold flavors and is simple to make. I’ll

To make these tasty treats, you will need: - 1 cup unsalted butter, softened - 1 cup brown sugar, packed - 1/2 cup granulated sugar - 1 large egg - 1 teaspoon vanilla extract - 1 1/2 cups all-purpose flour - 1 teaspoon baking soda - 1 teaspoon cinnamon - 1/2 teaspoon salt - 3 cups old-fashioned oats - 1/2 cup raisins (or chocolate chips for a twist) - 1 cup powdered sugar - 1/2 cup marshmallow fluff - 1 teaspoon vanilla extract (for filling) These ingredients create a chewy, sweet, and satisfying dessert. The oats give a lovely texture, while the filling makes each pie special. You can customize your oatmeal cream pies with a few changes: - Use chocolate chips instead of raisins for a richer flavor. - Swap in whole wheat flour to make them healthier. - Try adding nuts like walnuts or pecans for a crunch. - For a touch of spice, mix in a bit of nutmeg or ginger. These substitutions help you make the recipe your own. Feel free to experiment with flavors! Each homemade oatmeal cream pie has about 200 calories. They provide a good mix of carbs, fats, and sugars. Here’s a quick breakdown: - Calories: 200 - Total Fat: 8g - Saturated Fat: 4g - Cholesterol: 30mg - Sodium: 120mg - Total Carbohydrates: 32g - Dietary Fiber: 2g - Sugars: 14g - Protein: 2g Enjoy these treats in moderation! They’re a delightful snack or dessert. For the full recipe, check out the details above. Start by gathering all your ingredients. You will need: - 1 cup unsalted butter, softened - 1 cup brown sugar, packed - 1/2 cup granulated sugar - 1 large egg - 1 teaspoon vanilla extract - 1 1/2 cups all-purpose flour - 1 teaspoon baking soda - 1 teaspoon cinnamon - 1/2 teaspoon salt - 3 cups old-fashioned oats - 1/2 cup raisins (or chocolate chips for a twist) - 1 cup powdered sugar - 1/2 cup marshmallow fluff - 1 teaspoon vanilla extract (for filling) Make sure your butter is soft. This helps it mix well with the sugars. 1. Preheat the Oven: Set your oven to 350°F (175°C). Line two baking sheets with parchment paper. 2. Cream the Butter and Sugars: In a large bowl, cream the butter, brown sugar, and granulated sugar together. Mix until light and fluffy, about 3-5 minutes. 3. Add Egg and Vanilla: Beat in the egg and vanilla extract until well mixed. 4. Mix Dry Ingredients: In another bowl, whisk together the flour, baking soda, cinnamon, and salt. Slowly stir this into your wet mix until just combined. 5. Add Oats and Raisins: Fold in the oats and raisins (or chocolate chips) until they are evenly mixed. 6. Scoop the Cookies: Use a cookie scoop or tablespoon to drop rounded dough onto the prepared sheets. Leave about 2 inches between each scoop. 7. Bake: Place in the oven and bake for 10-12 minutes. The edges should be golden, and the centers should stay soft. 8. Cool: Let the cookies cool on the baking sheet for 5 minutes. Then, transfer them to a wire rack to cool completely. 1. Prepare the Filling: In a mixing bowl, whisk together the powdered sugar, marshmallow fluff, and vanilla extract. Mix until smooth and well combined. 2. Assemble the Pies: Once the cookies cool, spread a generous dollop of filling on the flat side of one cookie. Top it with another cookie to make a sandwich. Repeat with all cookies and filling. Making these homemade oatmeal cream pies is easy and fun. You will love how they taste! For the full recipe, check the previous section. To get those perfect chewy cookies, I have a few key tricks. First, always use room temperature butter. This helps create a soft dough. Second, do not overmix the dough after adding the flour. Mixing too much makes the cookies tough. Third, take the cookies out when they are just lightly golden. They will keep cooking on the tray. Store your oatmeal cream pies in an airtight container. This keeps them soft and fresh. If you want to serve them warm, heat them for just a few seconds in the microwave. You can also add a scoop of ice cream in between two cookies for a fun treat. It’s a great way to impress friends and family. For a beautiful presentation, dust the pies with powdered sugar. This adds a nice touch. You can also arrange them on a colorful platter. If you want to make them more fun, wrap each pie in parchment paper. This makes for a cute gift or snack to share. {{image_2}} You can make your oatmeal cream pies a bit healthier. Use whole wheat flour instead of all-purpose flour. This choice boosts fiber and nutrients. Replace some butter with unsweetened applesauce. This swap cuts fat and adds moisture. If you want less sugar, use a sugar substitute like Stevia. These changes keep your treat tasty while making it a bit better for you. You can easily change the flavors of your oatmeal cream pies. Adding chocolate chips makes them rich and sweet. Chopped nuts add crunch and a nutty taste. Try different dried fruits like cranberries or apricots for extra flavor. If you want a spicy kick, add a pinch of nutmeg or ginger. Each of these options gives a fun twist to the classic recipe. Seasonal ingredients can bring new life to your pies. In the fall, add pumpkin puree and spice for a cozy flavor. During the holidays, mix in peppermint extract for a festive touch. In summer, fresh berries like blueberries or strawberries can make a bright filling. These seasonal changes keep your oatmeal cream pies fresh and exciting all year. Check out the Full Recipe for more ideas! To keep your oatmeal cream pies fresh, store them in an airtight container. This helps maintain their chewy texture and flavor. You can place parchment paper between the pies to stop them from sticking together. If you have leftovers, they should stay good for several days at room temperature. If you want to save some for later, freezing is a great option. First, let the pies cool completely. Then, wrap each pie in plastic wrap and place them in a freezer bag. Make sure to remove as much air as possible from the bag. They will last up to three months in the freezer. When you are ready to eat them, just thaw them at room temperature. Oatmeal cream pies can last about five days when stored properly at room temperature. If you put them in the fridge, they may dry out faster. For the best taste, eat them within a few days. Always check for any signs of spoilage before enjoying your treats. Remember, these pies are best fresh but can stay tasty even after some time. To make oatmeal cream pies from scratch, follow these steps: 1. Cream Butter and Sugars: Start by creaming the butter, brown sugar, and granulated sugar. Mix until light and fluffy. 2. Add Egg and Vanilla: Beat in one large egg and a teaspoon of vanilla extract. 3. Mix Dry Ingredients: In another bowl, whisk together flour, baking soda, cinnamon, and salt. Stir this into the wet mix. 4. Add Oats and Raisins: Fold in three cups of old-fashioned oats and half a cup of raisins (or chocolate chips). 5. Bake Cookies: Drop dough onto baking sheets and bake at 350°F for 10-12 minutes. 6. Make Filling: For the filling, mix powdered sugar, marshmallow fluff, and vanilla extract until smooth. 7. Assemble: Spread the filling between two cookies to form a sandwich. You can find the full recipe included earlier to guide you through each step. Yes, you can use quick oats instead of old-fashioned oats. Quick oats are smaller and cook faster. This can change the texture of your pies. The result may be softer and less chewy. If you like a chewier bite, stick with old-fashioned oats. If you need a substitute for marshmallow fluff, try using cream cheese. Mix it with powdered sugar and vanilla for sweetness. You can also use a mix of whipped cream and powdered sugar. This will give you a light and fluffy filling, similar to marshmallow fluff. Homemade oatmeal cream pies are simple and fun to make. We covered key ingredients, baking steps, and tasty variations. You can choose healthier swaps, try different flavors, or get creative with how you present them. Remember to store them properly to keep them fresh. With these tips, you’ll have delicious treats ready to enjoy. Dive in, get baking, and share your tasty results with others!

Homemade Oatmeal Cream Pies Quick and Tasty Treat

Homemade Oatmeal Cream Pies are a delightful treat that everyone will love. If you’ve ever craved that perfect blend of

To make these tasty truffles, you will need: - 1 cup sugar cookies (store-bought or homemade, crumbled) - 1/4 cup cream cheese, softened - Zest of 1 lemon - Zest of 1 lime - 1 tablespoon lemon juice - 1 tablespoon lime juice - 1/2 teaspoon vanilla extract - 1 cup white chocolate chips - 1 tablespoon coconut oil (or vegetable oil) - Sprinkles (for decoration) When picking sugar cookies, you can choose store-bought or make your own. Homemade cookies let you control the flavor and texture. If you buy them, look for cookies that are fresh and tasty. The cream cheese should be softened to mix well. This makes the truffles smooth and creamy. Using fresh lemons and limes gives the best flavor. Zesting adds a bright taste that is hard to beat. You can swap some ingredients if needed. For cream cheese, try mascarpone for a different taste. If you can't find white chocolate chips, you can use milk chocolate instead. For a dairy-free option, use a vegan cream cheese. If you want a lower-fat version, skip the coconut oil. Just remember, these changes might change the taste a bit. Feel free to experiment and find what you love. Start by gathering your ingredients. Use either store-bought or homemade sugar cookies. Crumble them into a large mixing bowl. Add softened cream cheese to the bowl. Mix well until the two combine smoothly. Next, add the zest of one lemon and one lime. This adds bright flavor. Then, pour in the lemon juice and lime juice. Stir in the vanilla extract. Mix until everything is evenly distributed. Use a cookie scoop or your hands to form small balls. Aim for about one inch in diameter. Place these on a lined baking sheet. Chilling the truffles is key. It helps them firm up nicely. Place the shaped truffles in the refrigerator for about 30 minutes. This time allows the flavors to meld together. A well-chilled truffle is easier to coat later. While your truffles chill, melt the white chocolate chips. Use a microwave-safe bowl for this step. Add one tablespoon of coconut oil to the chips. Heat the mixture in 30-second intervals. Stir after each interval until the chocolate is smooth. This method prevents burning. Once melted, remove the truffles from the fridge. Dip each one into the melted chocolate. Make sure to coat them fully. Place the coated truffles back on the lined sheet. Sprinkle colorful decorations on top before the chocolate sets. This adds a fun touch to your truffles. To make the best lemon-lime sugar cookie truffles, here are my top tips: - Use fresh ingredients: Fresh lemon and lime zest give the best flavor. - Chill thoroughly: Ensure the truffles chill long enough to hold their shape. - Melt chocolate carefully: Heat white chocolate in short bursts to avoid burning. - Mix well: Combine the cream cheese and cookies until no dry spots remain. These tips will help you achieve perfect texture and flavor. Mistakes can happen in the kitchen. Here are some common ones and how to avoid them: - Not chilling enough: If truffles are too soft, they will not hold their shape. - Overheating chocolate: Stir often while melting to keep it smooth. - Skipping sprinkles: These add fun color and texture. Don’t skip this step! By being mindful of these points, your truffles will be a hit. To enhance the flavor of your truffles, consider these ideas: - Add a pinch of salt: Salt brings out the sweetness and makes flavors pop. - Experiment with extracts: Try almond or lemon extract for additional depth. - Use zest from both fruits: This gives a bright, fresh taste that shines through. These enhancements can elevate your truffles from good to great! If you're curious about the full recipe, check out the detailed instructions above. {{image_2}} You can change the flavor of your truffles by using different citrus fruits. Try orange or grapefruit zest for a new twist. Each fruit brings its own taste and aroma. You can mix and match zest from several fruits for a fun flavor blend. Just remember to keep the balance right so it still tastes light and bright. When it comes to coating your truffles, you have options. White chocolate is sweet and creamy, but dark chocolate gives a rich taste. You can also use milk chocolate for a middle ground. If you want to keep it fun, sprinkle colorful toppings on the truffles instead. Sprinkles add a festive look and a bit of crunch. Choose what speaks to your sweet tooth! You can easily make these truffles gluten-free. Just use gluten-free cookies instead of regular sugar cookies. For a vegan version, swap cream cheese with a dairy-free option. Also, you can use dairy-free chocolate for coating. This way, everyone can enjoy these delicious treats! For the full recipe, check out the complete recipe details above. To keep your Lemon-Lime Sugar Cookie Truffles fresh, store them in an airtight container. Place a piece of parchment paper between layers to avoid sticking. This method helps maintain their shape and taste. Keep them in a cool, dry place. If it gets warm, your truffles might melt or lose their great look. You can store these truffles for up to one week. They will taste best within the first few days. After that, the flavors may fade. Check them often to make sure they stay fresh. If you notice any changes in smell or texture, it is best to toss them. If you want to keep your truffles for a longer time, freezing works great. First, place them on a lined baking sheet and freeze for about an hour. Once they are firm, transfer them to a freezer-safe bag or container. Make sure to label them with the date. They can last for up to three months in the freezer. To enjoy, simply thaw them in the fridge overnight before serving. For the best taste, only freeze truffles once. Remember, following these storage tips will help you enjoy your Lemon-Lime Sugar Cookie Truffles at their best! For the full recipe, check the earlier section of the article. You will know the truffles are set when they feel firm to the touch. After chilling, they should not be squishy or soft. A good test is to gently press on one. If it holds its shape, it is ready. Letting them chill for about 30 minutes usually gives the best results. If you want quicker results, pop them in the fridge for about 10 to 15 minutes after coating. Absolutely! You can use dark chocolate, milk chocolate, or even colored candy melts. Each type gives a unique taste and look. If you prefer a richer flavor, dark chocolate is a great choice. For a sweeter treat, milk chocolate works well. Just remember to melt the chocolate slowly to avoid burning it. Serve these truffles on a bright, fun plate to showcase their colors. You can also arrange them in a decorative box for gifting. Pair them with slices of fresh lemon and lime for a lovely presentation. For an extra touch, consider adding a scoop of vanilla ice cream on the side. These ideas make the truffles even more enjoyable. For more detailed instructions on making these truffles, check out the Full Recipe. In this post, we explored how to make Lemon-Lime Sugar Cookie Truffles. We discussed the best ingredients to use, along with tips on choosing them. I shared step-by-step instructions for easy preparation and emphasized chilling and melting chocolate effectively. We also looked at fun variations and storage tips. Making these truffles can be simple and fun. With a few adjustments, you can create your own unique flavors. Enjoy the process and share these delightful treats with friends and family.

Lemon-Lime Sugar Cookie Truffles Delightful Sweet Treat

Get ready to delight your taste buds with Lemon-Lime Sugar Cookie Truffles! These sweet bites are bursting with zesty flavor

- 4 chicken thighs (bone-in, skin-on) - 4 chicken drumsticks - 1 cup buttermilk - 1 tablespoon hot sauce (optional) - 2 cups all-purpose flour - 1 teaspoon paprika - 1 teaspoon garlic powder - 1 teaspoon onion powder - 1 teaspoon dried thyme - 1 teaspoon salt - ½ teaspoon black pepper - ½ teaspoon cayenne pepper (adjust for spiciness) To make this oven-baked fried chicken, start with fresh chicken thighs and drumsticks. These cuts have enough fat to keep the meat juicy and flavorful. Buttermilk is essential. It helps tenderize the chicken while adding rich taste. Adding hot sauce is optional, but it gives a nice kick. Next, you need a seasoning mix. Combine flour with spices like paprika, garlic powder, and thyme. This mix adds depth to the flavor and a nice crunch. - Cooking spray or olive oil for greasing - Gluten-free options: almond flour or gluten-free bread crumbs For that golden, crispy finish, I always use cooking spray or olive oil. Lightly coat the chicken before baking. It helps achieve that fried look and texture. If you prefer gluten-free, try almond flour or gluten-free bread crumbs. Both work well and still give you that crunch. If you want the full recipe, check out Crispy Oven-Baked Fried Chicken. Start with the chicken pieces. I use bone-in, skin-on thighs and drumsticks. For the best flavor, mix buttermilk and hot sauce in a large bowl. This adds moisture and taste. Make sure the chicken is well-coated. Cover the bowl and place it in the fridge. I recommend marinating for at least two hours, but overnight gives better results. The longer you marinate, the more flavor the chicken absorbs. Next, let’s prepare the oven. Preheat it to 425°F (220°C). This high heat helps the chicken crisp up nicely. While the oven heats, line a baking sheet with aluminum foil. This makes cleanup easy. Then, place a wire rack on top of the baking sheet. The wire rack is key for getting crispy chicken all over. It allows hot air to circulate around the chicken while it bakes. Now it’s time to coat the chicken. In a separate bowl, mix flour with spices like paprika, garlic powder, and thyme. This spice mix adds great taste. Remove the chicken from the buttermilk marinade, letting excess liquid drip off. Dredge each piece in the flour mix. Press down firmly to ensure an even coat. A good coating will make your chicken super crispy. Once coated, place the chicken on the wire rack. For extra crispiness, lightly spray or drizzle olive oil over the chicken. This helps it turn golden brown as it bakes. Now you are ready to bake! If you want to see the complete recipe, check the Full Recipe link. To get that crispy texture, follow these tips: - Marinate your chicken in buttermilk. This tenderizes the meat. - Let the excess marinade drip off before coating. This prevents sogginess. - Use a wire rack on the baking sheet. It allows air to circulate. How do you know when the chicken is done? - Use a meat thermometer. Insert it in the thickest part of the chicken. - The internal temperature should reach 165°F (75°C). This ensures safety. - Look for a golden brown color on the outside. What pitfalls should you watch for? - Avoid overcrowding the baking sheet. It can lead to steaming instead of baking. - Don't skip the resting time. Let the chicken sit for 5 minutes after baking. - Ensure your oven is fully preheated before putting in the chicken. For more detailed steps and a full list of ingredients, check the Full Recipe. {{image_2}} You can change how your chicken tastes with different spices. Try using Cajun seasoning for a kick or Italian herbs like oregano and basil for a fresh twist. You can even add some lemon zest for brightness. Mixing in herbs like rosemary or parsley can also add depth. Experimenting helps you find your favorite flavor blend. If you want a change from chicken, you can use turkey or even pork. Just keep in mind that different meats need different cooking times. For turkey, you may need to bake a bit longer. Pork may cook faster, so monitor it closely. Always check the internal temperature to ensure it's safe to eat. An air fryer can make your chicken even crispier. Set it to 400°F and cook for about 25-30 minutes. This method gives you that crunch without frying in oil. You can also broil the chicken for the last few minutes of baking. This tip adds extra browning and crunch. Just watch it closely to prevent burning. You can find the full recipe in the earlier section, where I share all the steps and tips to make this dish perfect. To keep your cooked chicken fresh, let it cool first. Place the chicken in an airtight container. This helps to keep moisture in. Store it in the fridge for up to four days. Avoid stacking pieces to prevent sogginess. For best results, use glass or plastic containers with tight lids. When it’s time to reheat, keep the chicken crispy. The oven is best for this. Preheat your oven to 375°F (190°C). Place the chicken on a baking sheet. Heat it for about 15 to 20 minutes. This way, the skin stays crunchy. If using a microwave, cover the chicken with a paper towel. Heat it for one minute, then check. You may need to heat it a little longer, but the oven is still better. You can freeze leftover chicken for later. Wrap each piece in plastic wrap, then place it in a freezer bag. Make sure to remove as much air as possible. This prevents freezer burn. Label the bag with the date. You can freeze it for up to three months. When ready to eat, thaw it in the fridge overnight. To reheat, follow the oven method for the best texture. To make oven-baked fried chicken crispy, follow these tips: - Marinate the chicken in buttermilk. This adds flavor and moisture. - Use a wire rack on your baking sheet. This lets hot air circulate around the chicken. - Press the flour mixture onto the chicken. Make sure it sticks well. - Spray or drizzle with oil before baking. This helps the coating brown nicely. - Bake at a high temperature of 425°F (220°C) for that perfect crunch. These steps create a crispy texture that rivals fried chicken. You can use skinless chicken, but the results will differ. Skin adds flavor and helps keep the chicken moist. Without skin, the chicken may dry out faster. If you prefer skinless, consider these tips: - Adjust cooking time. Skinless chicken cooks quicker, so check it earlier. - Add extra fat. Brush or coat skinless pieces in oil to help with moisture. - Marinate longer. This adds flavor and helps tenderize the meat. Skinless chicken can work, but it needs a bit more care. Oven-baked fried chicken lasts about 3-4 days in the fridge. To store it properly: - Let it cool before putting it in the fridge. - Use an airtight container. This helps keep the chicken fresh. - Label and date the container for easy tracking. For best taste, eat it within the first few days. Pair your oven-baked fried chicken with these tasty sides: - Coleslaw adds crunch and freshness. - Mashed potatoes offer creaminess and comfort. - Corn on the cob gives a sweet touch. - Baked beans add a hearty flavor. These sides complement the chicken's crispy texture and flavor. For the complete recipe and detailed instructions on how to make crispy oven-baked fried chicken, visit the [Full Recipe](#). Oven-baked fried chicken is simple and delicious. We covered essential ingredients, like chicken and buttermilk, to create flavor. I shared step-by-step instructions for marinating, coating, and baking the chicken to achieve that crispy texture. Tips helped avoid common mistakes, while variations gave ideas to spice things up. Proper storage advice keeps leftovers tasty. Use these techniques for the best results. Enjoy your crispy chicken that’s full of flavor and perfect for any meal!

Oven Baked Fried Chicken Crispy and Flavorful Delight

If you crave fried chicken but want a healthier twist, you’re in the right place! This Oven Baked Fried Chicken

- 2 cups mixed berries (strawberries, blueberries, raspberries, blackberries) - 1 cup granulated sugar - 2 tablespoons cornstarch - 1 teaspoon vanilla extract - 1 tablespoon lemon juice - 1 teaspoon ground cinnamon - 1 cup all-purpose flour - 1 ½ teaspoons baking powder - ½ teaspoon salt - 1/3 cup unsalted butter, melted - 1 cup milk - 1 pinch of nutmeg - 1 tablespoon rolled oats (optional topping) When making berry cobbler, fresh fruit shines. You can use any mix of berries you like. If fresh berries are not available, frozen ones work too. Just let them thaw and drain excess juice. For those who prefer vegan options, swap milk with almond or oat milk. You can also use coconut oil instead of butter. If you need a gluten-free version, try a gluten-free flour blend. Sweeteners can change the flavor. Replace granulated sugar with maple syrup or honey. This might alter the texture slightly, but it adds a nice taste. These swaps help you customize your cobbler. You can enjoy this dessert your way. For the full recipe, check out the Berry Delight Cobbler 🫐. Preheating the oven First, set your oven to 350°F (175°C). This step is key for even baking. Preheating helps the cobbler rise and gives it a nice golden brown color. Preparing the fruit filling In a medium bowl, mix 2 cups of mixed berries with ½ cup of sugar, 2 tablespoons of cornstarch, 1 teaspoon of vanilla extract, 1 tablespoon of lemon juice, and 1 teaspoon of cinnamon. Toss gently until the berries are well coated. Then, pour this mixture into a greased 8x8-inch baking dish. Mixing dry ingredients In a large bowl, whisk together 1 cup of all-purpose flour, 1 ½ teaspoons of baking powder, ½ teaspoon of salt, and a pinch of nutmeg. This mix gives the cobbler its texture. Combining with wet ingredients Next, add 1/3 cup of melted butter and 1 cup of milk to the dry mix. Stir until just combined. It’s okay if there are a few lumps. Overmixing can make the cobbler tough. Pouring the batter over berries Carefully pour the batter over the berry mixture in the baking dish. Use a spatula to spread it evenly. For extra crunch, sprinkle 1 tablespoon of rolled oats on top. Baking time and temperature guide Place the baking dish in the preheated oven. Bake for 35-40 minutes. The cobbler should be golden brown and the berries bubbly. Let it cool for 10-15 minutes before serving. This cooling time helps the filling set. For the full recipe, check out the details above! Enjoy your Berry Cobbler Delight! To get the best texture for your berry cobbler, follow a few simple steps. First, aim for a batter that is thick but still pourable. If it is too thin, your cobbler may not rise well. If it's too thick, it might not spread over the berries. Mix your wet and dry ingredients just until combined. A few lumps are okay, and overmixing can lead to a dense texture. To avoid a soggy bottom, make sure to coat your berries in cornstarch before baking. This helps absorb excess juice. Also, bake your cobbler until the top is golden brown. This can take about 35 to 40 minutes. A well-baked cobbler will have a nice crust that keeps the filling from becoming too wet. Adding flavor to your berry cobbler is easy. You can consider using spices like cinnamon or nutmeg to bring warmth. A touch of vanilla extract enhances the berry flavor nicely. For a fresh twist, try adding citrus zest, like lemon or orange. This adds brightness and cuts through sweetness, making each bite pop. Serving your berry cobbler can be a fun experience. I recommend pairing it with a scoop of vanilla ice cream. The cold creaminess contrasts beautifully with the warm cobbler. For a lighter option, whipped cream works just as well. For presentation, consider garnishing each serving with fresh mint leaves. This adds color and a hint of freshness. You might also drizzle a little honey or maple syrup on top for extra sweetness. Using a pretty dish can make your cobbler look even more inviting. For the full recipe, check out the Berry Delight Cobbler 🫐 section. {{image_2}} Berry cobbler is so fun to make! You can change it up in many ways. Here are some ideas for you. You can use different fruits to make your cobbler shine. Try adding peaches or cherries. Mix in apples for a fall treat. Each fruit brings its own sweet taste. You can also combine different berries. Use strawberries, blueberries, raspberries, or blackberries. Mixing berries gives your cobbler a colorful look and a burst of flavors. If you want a gluten-free option, use almond flour instead of all-purpose flour. This keeps the cobbler soft and tasty. You can also use coconut sugar or stevia for a low-sugar version. These swaps make it easy to enjoy dessert while keeping your diet in mind. For the crust, you can try biscuits instead of a batter. Biscuit topping gives a nice, fluffy bite. Want something crunchier? Use a crumble topping with oats. Combine oats, brown sugar, and butter for a delicious crunch. Each topping gives your cobbler a new twist. To get the full recipe, check out the Berry Delight Cobbler. Enjoy making it your own! To keep your berry cobbler fresh, you can use two methods: refrigeration and freezing. - Refrigeration: Let the cobbler cool down to room temperature. Cover it tightly with plastic wrap or foil. Store it in the fridge for up to 3 days. This keeps the berries juicy and the topping soft. - Freezing: For longer storage, freeze the cobbler. Wrap it well in plastic wrap and then in aluminum foil. Label it with the date. It can last up to 3 months in the freezer. When you're ready to enjoy it, thaw it in the fridge overnight before reheating. To enjoy your berry cobbler again, reheating is key. You want it warm and tasty. - Best ways to reheat for the ideal texture: The oven method is best. Preheat your oven to 350°F (175°C). Place the cobbler in an oven-safe dish. Heat for about 15-20 minutes. This warms it evenly and keeps the topping crisp. - Microwave vs. oven reheating: You can use a microwave for quick heating. Place a slice on a microwave-safe plate. Heat in 20-second bursts until warm. However, the microwave can make the topping soggy. The oven method is better for keeping that perfect texture. Enjoy every bite of your berry cobbler delight! For the full recipe, check out the Berry Delight Cobbler. Can I use frozen berries instead of fresh? Yes, you can use frozen berries. They work great in this recipe. Just remember to thaw them first. This helps avoid excess water in the cobbler. How long does berry cobbler last in the fridge? Berry cobbler lasts about 3 to 5 days in the fridge. Store it in an airtight container to keep it fresh. Is it necessary to pre-cook the berries? No, there is no need to pre-cook the berries. Mixing them with sugar and cornstarch is enough. This helps them release their juices while baking. What to do if the cobbler burns on top? If your cobbler burns on top, cover it with foil. This protects it while it finishes baking. You can also lower the oven temperature next time. What ice cream flavors go well with berry cobbler? Vanilla ice cream is a classic choice. You can also try berry or cinnamon flavors for a fun twist. Should I serve it warm or cold? Serve berry cobbler warm for the best taste. Warm cobbler with ice cream is a perfect combo. For a cooler option, you can serve it cold too. You can find the Full Recipe for this delightful dessert above. Berry cobbler is a tasty dessert that brings joy and comfort. We covered key ingredients, from mixed berries to simple substitutes. You learned how to prepare, bake, and serve your cobbler perfectly. Remember to play with flavors and textures to make it your own. In the end, berry cobbler is all about enjoying fresh fruit in a warm treat. Whether for a special occasion or a cozy night in, this dish can always satisfy your cravings. Enjoy your baking!

Berry Cobbler Delight Simple and Tasty Dessert

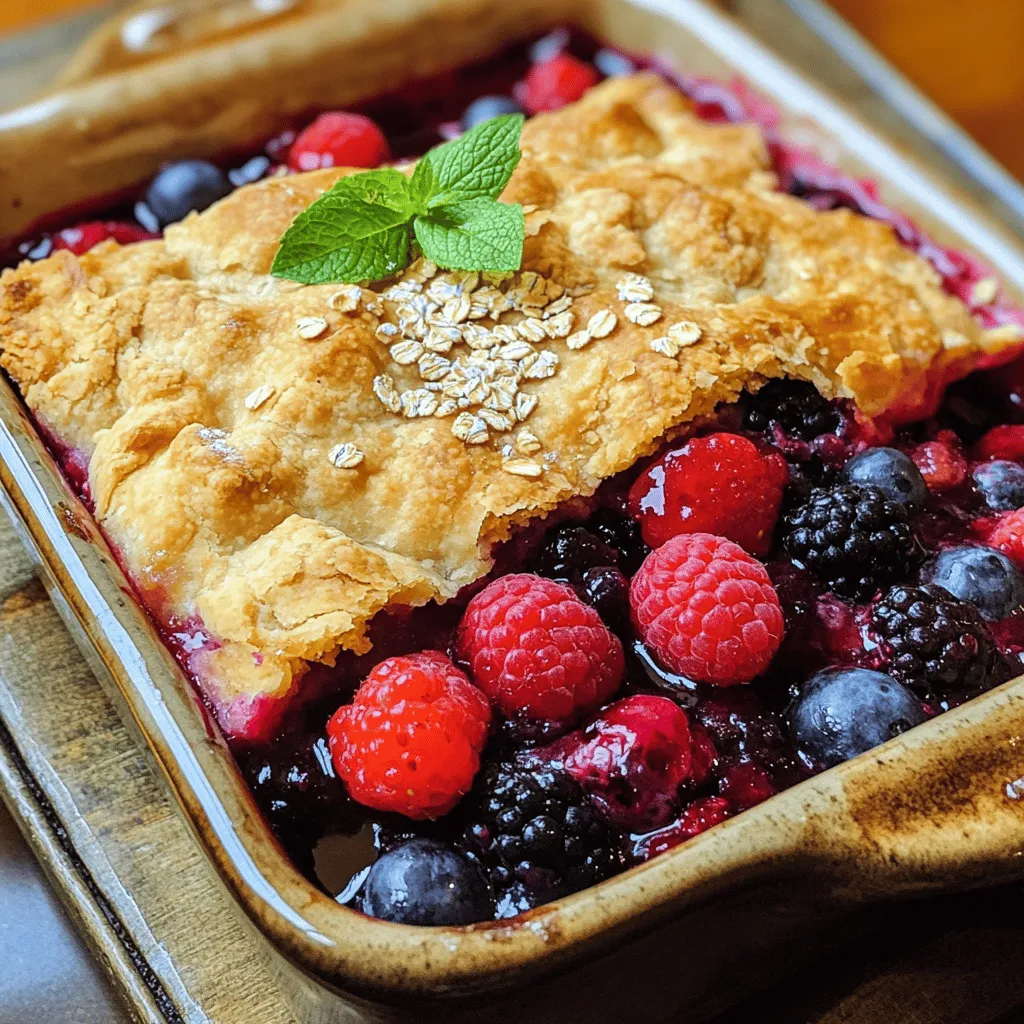
Are you ready to impress your friends and family with an easy and delicious dessert? Look no further than berry

- 1 pound large shrimp, peeled and deveined - 4 tablespoons unsalted butter - 5 cloves garlic, minced - 1 cup heavy cream - 1 teaspoon smoked paprika - 1 teaspoon lemon juice - Salt and pepper, to taste - 1 tablespoon fresh parsley, chopped - Optional: 1/2 teaspoon red pepper flakes (for heat) - Cooked pasta or rice, for serving To make creamy garlic butter shrimp, gather these fresh ingredients. The shrimp is the star here, so choose large, high-quality ones. Minced garlic adds a strong flavor that pairs well with the creamy sauce. Unsalted butter gives a rich base, while heavy cream adds depth and smoothness. The smoked paprika brings a warm, smoky note. Lemon juice brightens the dish and balances the richness. Fresh parsley adds a nice touch of color and freshness. Red pepper flakes can add heat if you like some spice. You can serve this dish over cooked pasta or rice for a complete meal. For the full recipe, follow along with the instructions provided in the article. 1. Initial preparation steps Start by gathering your ingredients. Make sure the shrimp are peeled and deveined. This saves time later. 2. Sautéing garlic and shrimp In a large skillet, melt 2 tablespoons of butter over medium heat. Add the minced garlic and sauté it for about 1 minute. You want it fragrant but not burnt. Next, add the shrimp. Season them with salt, pepper, and smoked paprika. Cook the shrimp for 2-3 minutes. They should turn pink and opaque. 3. Setting shrimp aside Once the shrimp are cooked, remove them from the skillet. Place them on a plate and set aside. This keeps them warm while you prepare the sauce. 1. Combining butter and cream In the same skillet, add the remaining 2 tablespoons of butter. Then pour in 1 cup of heavy cream. Stir them together until the mixture is smooth and starts to simmer. 2. Adding flavor enhancers Mix in 1 teaspoon of lemon juice and, if you like heat, add 1/2 teaspoon of red pepper flakes. Stir for another 2-3 minutes. This helps the sauce thicken slightly. 1. Mixing shrimp back into the sauce Return the cooked shrimp to the skillet. Stir well to coat them in the creamy sauce. Let them heat through for about 1 minute. 2. Adjusting seasoning Taste your sauce and shrimp. Add more salt or pepper if needed. This is key to ensuring the right flavor. 3. Presentation tips Serve the creamy garlic butter shrimp over cooked pasta or rice. Drizzle some extra sauce from the pan over the top. Garnish with fresh parsley and add lemon wedges on the side for an extra touch. This is how you create a flavorful dinner option with creamy garlic butter shrimp. For the complete instructions, check the Full Recipe. To cook shrimp perfectly, use high heat. This method helps shrimp cook fast and stay tender. Start by heating your skillet over medium-high heat. Add butter and let it melt, but don’t let it brown. Toss in the garlic and let it sizzle for about a minute. Then add the shrimp and season them well. To avoid overcooking, watch the color closely. Shrimp turn pink and opaque when done. This usually takes 2-3 minutes. If you leave them too long, they can become rubbery. Remember to set the shrimp aside once cooked. This keeps them tender while you make the sauce. Spices can change the whole dish. I love smoked paprika for its warmth. If you want more kick, add red pepper flakes. A touch of heat balances the creaminess well. Fresh herbs can also boost the flavor. If you don't have parsley, try basil or cilantro. Both add a nice touch. Just chop them finely and stir them in at the end for the best taste. For sides, I recommend cooked pasta or rice. They soak up the creamy sauce nicely. You can also serve it with crusty bread. This is perfect for dipping into that rich sauce. Garnishing is key for presentation. Sprinkle more chopped parsley on top. A few lemon wedges on the side add color and freshness. It’s all about making the dish look as good as it tastes. Enjoy your creamy garlic butter shrimp with these tips. Check the Full Recipe for more guidance on how to create this delightful dish! {{image_2}} You can make this dish even better by adding veggies. Great choices include: - Broccoli - Spinach - Bell peppers - Zucchini To cook the vegetables, add them to the skillet before the shrimp. Sauté them for a few minutes until tender. This way, they soak up the buttery garlic flavor. If you want a low-carb meal, skip the pasta or rice. Instead, try using: - Zoodles (zucchini noodles) - Cauliflower rice - Shirataki noodles These options keep the meal light. You can cook them quickly in a pan before adding the shrimp. This way, you enjoy a tasty meal without the carbs. For those who love heat, spice things up! You can add: - Extra red pepper flakes - Sliced jalapeños - A splash of hot sauce Add these spicy ingredients while cooking the garlic. This helps the heat blend into the dish. Adjust the spice level to your taste for a kick that excites your palate. For the full recipe, check out the [Full Recipe]. Enjoy your cooking! To keep your creamy garlic butter shrimp fresh, store leftovers in an airtight container. Make sure to let it cool down first. This helps avoid condensation, which can lead to sogginess. Properly stored, this dish lasts about 3 days in the fridge. When you're ready to eat, just reheat it gently on the stove or in the microwave. Watch it closely to avoid overcooking the shrimp. If you want to store creamy garlic butter shrimp for a longer time, freezing is a great option. First, let it cool completely. Then, place it in a freezer-safe container or bag. Be sure to expel as much air as possible before sealing. This helps prevent freezer burn. You can freeze it for up to 3 months. When you're ready to enjoy it again, thaw it overnight in the fridge. For the best quality, reheat it slowly on low heat. Stir occasionally to ensure even warming. This way, your shrimp stays tender and the sauce remains creamy. It takes about 10 minutes to prep and 20 minutes to cook. So, you can make this dish in just 30 minutes. Perfect for a quick dinner! Yes, you can use frozen shrimp. Just thaw them before cooking. Place them in cold water for about 15-20 minutes. This makes them easy to cook and keeps them tender. This dish pairs well with many sides. Here are some popular choices: - Cooked pasta - Steamed rice - Garlic bread - A fresh green salad Yes, you can! Use coconut milk or almond milk instead of heavy cream. For butter, try using olive oil or a dairy-free spread. These swaps keep the dish creamy and delicious. This blog post covered how to make creamy garlic butter shrimp. We discussed key ingredients, step-by-step cooking instructions, and tips for perfecting your dish. You can enhance flavors with spices and herbs. Serving suggestions included great side dishes to pair. Variations like adding vegetables or making it low-carb are also options. In summary, you can easily create a delicious meal that pleases everyone. Enjoy the cooking process and make it your own!

Creamy Garlic Butter Shrimp Flavorful Dinner Option

Looking for a quick, delicious dinner? Try my Creamy Garlic Butter Shrimp! This dish bursts with flavor and is easy

Shrimp and Broccoli Overview Shrimp is a great source of protein. It cooks fast and tastes amazing. Pairing it with broccoli adds crunch and fiber. This dish is colorful and full of flavor. Importance of Fresh Ingredients Fresh shrimp and broccoli make a big difference. Fresh shrimp has a sweet taste and firm texture. Fresh broccoli stays crisp and vibrant. Always look for bright green broccoli. It should feel firm and not wilted. Olive Oil and Garlic Olive oil adds richness to the dish. It helps the shrimp cook evenly and adds flavor. Garlic gives a nice kick. Use fresh minced garlic for the best taste. Soy Sauce, Sriracha, and Honey Soy sauce brings depth to the dish. It adds umami flavor that makes everything better. Sriracha gives heat, so adjust it to your liking. Honey balances the heat with sweetness. This combo makes a tasty sauce. Sesame Seeds and Green Onions Sesame seeds add crunch and flavor. They look great on top of your dish too. Chopped green onions add freshness and color. These garnishes really make the dish pop. Serving Suggestions for Added Flavor Serve this dish over rice or noodles for more texture. You can also add lime juice for a zing. A sprinkle of peanuts can add crunch and flavor too. For the full recipe, check out the [Full Recipe]. How to Prep Shrimp Start by rinsing the shrimp under cold water. This helps remove any grit. Next, pat the shrimp dry with paper towels. This step is key for a good sear. Set them aside while you prepare the other ingredients. Preparing Broccoli for Cooking If your broccoli isn’t pre-packaged, cut it into small florets. This makes it easier to cook evenly. Aim for pieces that are about the same size. This way, they all cook at the same rate. Steaming Broccoli Perfectly For perfect broccoli, use a medium saucepan. Fill it with about 1 inch of water and bring it to a boil. Place the broccoli florets in a steam basket and cover the pan. Steam for 3-4 minutes until the broccoli is bright green and tender-crisp. Remove it and set aside. Sautéing Shrimp to Perfection In a large skillet, heat olive oil over medium-high heat. Add the minced garlic and sauté for about 30 seconds. The garlic should smell good but not burn. Next, add the shrimp to the skillet. Cook the shrimp for 2-3 minutes, turning occasionally. They should turn pink and opaque when done. Creating the Flavorful Sauce In a bowl, whisk together soy sauce, Sriracha, honey, sesame oil, and grated ginger. This sauce packs a punch! Pour it over the shrimp in the skillet. This is where the magic happens. Tossing Shrimp and Broccoli Together Gently add the steamed broccoli to the skillet. Toss everything together. Allow it to cook for an additional 2 minutes. Stir to coat the shrimp and broccoli evenly with the sauce. The flavors will blend beautifully. For the complete dish, check the Full Recipe. Enjoy your meal! Achieving the Right Texture for Shrimp To make shrimp perfect, do not overcook them. Cook them for just 2-3 minutes. Look for that lovely pink color. The shrimp should be tender and juicy, not rubbery. Ensuring Broccoli Remains Crisp Steaming broccoli for just 3-4 minutes keeps it bright and crisp. Don’t steam too long, or it will turn mushy. You want it tender and vibrant, with a nice crunch. Adjusting Sriracha for Spice Level Sriracha gives this dish its kick. If you like it hot, add more. For a milder taste, use less. Start with one tablespoon and adjust to your liking. Tips for a Balanced Sauce Mix soy sauce, honey, and Sriracha for a great flavor. The honey adds sweetness to balance the heat. Taste the sauce before adding it to the shrimp. Adjust as needed for your palate. Best Skillets for Sautéing Use a large skillet for this dish. A non-stick skillet works best. It helps cook the shrimp evenly and prevents sticking. Recommended Steamers for Broccoli A simple steam basket is great for broccoli. It fits in most pots and lets steam circulate well. This keeps the broccoli bright and firm, perfect for your meal. For the full recipe, check out the [Full Recipe]. {{image_2}} Using different proteins can change the dish. Chicken or tofu works great. Chicken adds a nice texture. Tofu absorbs flavors well and is plant-based. Both options cook quickly like shrimp. You can also switch up the vegetables. Try bell peppers, snap peas, or carrots. Each adds unique taste and nutrition. Mixing in different colors makes the dish more fun and appealing. If you need a gluten-free option, use tamari instead of soy sauce. Tamari has a similar taste but no gluten. Make sure all other ingredients are gluten-free too. For vegetarian or vegan choices, replace shrimp with tofu or tempeh. Both options will soak up the sauce. You can skip honey and use a vegan sweetener like maple syrup. This keeps the dish plant-based and tasty. Want more spice? Add extra Sriracha or a pinch of cayenne pepper. If you prefer sweetness, add more honey or brown sugar. You can also explore other Asian influences. Try adding hoisin sauce for a sweeter flavor. Or use fish sauce for deeper umami. Each tweak can make your dish unique and exciting. For the full recipe, check the details provided earlier. - Best Practices for Refrigeration: Store leftovers in an airtight container. This helps keep the shrimp and broccoli fresh. Make sure the dish cools down before sealing it. Refrigerate within two hours after cooking. - How to Freeze Leftovers Safely: If you want to freeze leftovers, use freezer-safe bags. Remove as much air as possible from the bags. Write the date on the bags. This way, you can track how long they have been stored. - Recommended Reheating Methods: The best way to reheat this dish is in a skillet. Heat it over medium heat. You can also use a microwave for quick reheating. If using a microwave, use a microwave-safe dish and cover it. - Ensuring the Shrimp Remains Tender: To keep the shrimp tender, avoid overheating. Stir the dish gently while reheating. This helps warm it evenly without making the shrimp rubbery. - Duration for Refrigerated Storage: Leftovers will stay good in the fridge for about three days. After that, their quality may drop. Always check for freshness before eating. - Signs That the Dish Has Gone Bad: If you see any discoloration or an off smell, it's best to throw it away. Trust your senses; if it looks or smells strange, don't eat it. How can I make this recipe milder? To tone down the heat, you can reduce the Sriracha. Start with half a tablespoon. You can also add more honey to balance the spice. Another option is to use a milder hot sauce. Consider serving this dish with extra rice or noodles to soften the spice. What can I substitute for broccoli? If you want to swap out broccoli, try using snap peas or bell peppers. Both add a nice crunch and color. You can also use bok choy for a different flavor. Just remember to adjust cooking times, as some veggies cook faster than others. How long do I cook shrimp? Cook shrimp for about 2 to 3 minutes until they turn pink and opaque. Overcooking can make them tough. Keep an eye on them as they cook quickly. Remove them from heat once they are done to avoid this. Can I use frozen shrimp instead of fresh? Yes, you can use frozen shrimp. Just make sure to thaw them completely before cooking. Thawing can be done overnight in the fridge or under cold water for quick results. Adjust cooking times slightly if they are still a bit icy. What is the calorie count for this dish? This dish has about 300 calories per serving. This count can vary based on the amount of oil and sauce you use. Adding rice or noodles will increase the total calories. How many servings can I expect? You can expect this recipe to serve four people. If you are cooking for more, consider doubling the ingredients. This dish is great for sharing or meal prepping for the week. For the full recipe, check the details above. In this blog post, we've explored the quick and tasty recipe for 20-minute Sriracha shrimp and broccoli. We discussed key ingredients, preparation steps, and cooking tips that ensure great results. Remember to use fresh ingredients and adjust flavors to suit your taste. You can also explore variations to meet dietary needs and keep leftovers fresh with the right storage. Enjoy making this dish, knowing it is both simple and delicious!

20-Minute Sriracha Shrimp and Broccoli Flavor Boost

Looking for a quick and tasty meal? My 20-Minute Sriracha Shrimp and Broccoli packs a flavorful punch without the hassle.

To make the best cinnamon roll pancakes, you need the following: - 1 cup all-purpose flour - 2 tablespoons sugar - 1 teaspoon baking powder - 1/2 teaspoon baking soda - 1/4 teaspoon salt - 1 cup buttermilk (or 1 cup milk + 1 tablespoon vinegar) - 1 large egg - 2 tablespoons melted butter - 1 teaspoon vanilla extract Cinnamon Swirl: - 1/4 cup brown sugar - 1 tablespoon ground cinnamon - 2 tablespoons unsalted butter, softened Cream Cheese Glaze: - 4 ounces cream cheese, softened - 1/2 cup powdered sugar - 2 tablespoons milk - 1 teaspoon vanilla extract You can make these pancakes with some simple swaps: - Flour: Use whole wheat flour for a healthier option. - Sugar: Try coconut sugar or a sugar substitute for lower calories. - Buttermilk: If you don’t have buttermilk, mix regular milk with vinegar or lemon juice. - Egg: Use a flax egg or applesauce for a vegan version. - Cream Cheese: Substitute with dairy-free cream cheese for a non-dairy glaze. Each serving of cinnamon roll pancakes has about: - Calories: 350 - Protein: 8g - Carbohydrates: 50g - Fat: 15g - Fiber: 2g These pancakes are a sweet treat but still offer some nutrition. Enjoy them on special mornings without guilt! To make the cinnamon swirl, first grab a small bowl. Add 1/4 cup of brown sugar and 1 tablespoon of ground cinnamon. Mix these two until well combined. In another bowl, take 2 tablespoons of softened unsalted butter and blend it into the sugar-cinnamon mixture. It should turn into a paste. Set this mixture aside for later. This swirl will give the pancakes their delightful cinnamon flavor. Next, let's focus on the pancake batter. In a large bowl, whisk together 1 cup of all-purpose flour, 2 tablespoons of sugar, 1 teaspoon of baking powder, 1/2 teaspoon of baking soda, and 1/4 teaspoon of salt. In a separate bowl, combine 1 cup of buttermilk, 1 large egg, 2 tablespoons of melted butter, and 1 teaspoon of vanilla extract. Pour the wet ingredients into the dry ones. Mix gently until just combined. Remember, do not overmix! This will keep your pancakes light and fluffy. Now it's time to cook! Preheat a non-stick griddle or skillet over medium heat. Lightly grease it with butter or cooking spray. Pour 1/4 cup of pancake batter onto the hot surface. Immediately add a swirl of your cinnamon mixture on top. You can use a condiment bottle or a spoon to create a nice spiral pattern. Cook until bubbles form on the surface, about 2-3 minutes. Flip the pancake and cook for an additional 2 minutes, or until it turns golden brown. Repeat this process with the remaining batter. You can find the full recipe for additional details and tips. Enjoy your cooking adventure! Flipping pancakes can be tricky. Here’s how to do it right. Wait until bubbles form on the surface of the pancake. This shows it’s ready to flip. Use a wide spatula for a smooth turn. Slide the spatula under the pancake and lift it gently. Turn the pancake quickly but carefully. You want it to land flat on the pan. If you master this, you’ll have perfect pancakes every time. Serving is key to enjoying these pancakes. Stack them high on a large plate. Drizzle the cream cheese glaze generously over the top. You can add a sprinkle of powdered sugar for extra sweetness. Try placing a few pecans on top for crunch. This not only looks great but tastes amazing too. For a fun touch, serve with fresh fruit on the side, like strawberries or bananas. You can make these pancakes even better with toppings. Here are some ideas: - Maple syrup for sweetness - Whipped cream for creaminess - Chopped nuts for crunch - Fresh berries for a fruity twist - A dusting of cinnamon for warmth Feel free to mix and match these toppings! They can change the flavor and make your breakfast exciting. The full recipe gives you the base, but the toppings let you personalize your meal. {{image_2}} You can make vegan cinnamon roll pancakes easily. Replace the egg with a flax egg. To make a flax egg, mix one tablespoon of ground flaxseed with two and a half tablespoons of water. Let it sit for five minutes to thicken. Use non-dairy milk instead of buttermilk. Almond milk or oat milk works well. For the butter, you can use coconut oil or vegan butter. The taste will still be sweet and delicious. For a gluten-free twist, swap out regular flour. Use a gluten-free all-purpose flour mix. Make sure the mix has a binding agent. This will help the pancakes stick together well. If your mix lacks this, add a tablespoon of ground flaxseed or chia seeds. Follow the same steps from the Full Recipe. You will get fluffy pancakes without gluten. Add fruits or nuts to your pancakes for extra flavor. Blueberries or sliced bananas are great choices. Just fold them into the batter gently. If you like nuts, chopped pecans or walnuts add a nice crunch. You can also experiment with spices. A dash of nutmeg or cardamom can give your pancakes a unique twist. Customize them to your taste! You might have some pancakes left after a tasty breakfast. To store them, stack the pancakes in an airtight container. Place a piece of parchment paper between each pancake. This helps keep them from sticking together. You can store them in the fridge for up to three days. When you want to enjoy leftover pancakes, you have a few easy ways to reheat them. The microwave is quick. Just place a pancake on a microwave-safe plate and heat for 20-30 seconds. If you want them crispier, use a skillet. Heat the skillet on low and warm each side for about one minute. Freezing is a great option if you want to save pancakes for later. Let the pancakes cool completely first. Then, stack them with parchment paper between each one. Wrap the stack tightly in plastic wrap. Place the wrapped stack in a freezer bag. They can last up to two months in the freezer. When you're ready to eat them, thaw in the fridge overnight before reheating. Enjoy those delicious pancakes again! For the full recipe, check out the earlier section. You can use milk with vinegar. Just mix 1 cup of milk with 1 tablespoon of vinegar. Let it sit for 5 minutes. This will give you a good buttermilk substitute. To make your pancakes fluffier, use fresh baking powder. Avoid overmixing the batter. A few lumps are okay. Also, let the batter rest for 5 to 10 minutes before cooking. Yes, you can prepare the batter ahead. Store it in the fridge for up to 24 hours. Just give it a quick stir before cooking. It may thicken, so you can add a bit of milk if needed. Absolutely! Stack the pancakes with parchment paper in between. Place them in a freezer-safe bag. They can last up to 2 months in the freezer. Reheat in the toaster or microwave. Store leftover pancakes in an airtight container. They can last in the fridge for about 3 days. Just heat them up before serving. Yes, adding chocolate chips is a fun twist! Sprinkle them into the batter before cooking. They melt nicely and add a sweet touch. You can top your pancakes with maple syrup, fresh fruit, or whipped cream. A dusting of powdered sugar feels fancy too! Yes, these pancakes are simple and fun to make. Kids can help swirl the cinnamon mixture! For the full recipe, check out the detailed steps provided earlier. Cinnamon roll pancakes combine two favorite treats in one. I shared key ingredients, cooking tips, and tasty variations. You'll find options for vegan and gluten-free pancakes. Storing and reheating leftovers is easy too. Remember, the right toppings can make a big difference. These pancakes are not only fun to make but also delicious to eat. Enjoy this warm and sweet treat anytime!

Cinnamon Roll Pancakes Delightful and Easy Recipe

Get ready to enjoy a delightful breakfast with my easy cinnamon roll pancakes! These fluffy treats combine the rich flavors

- 1 lb ground beef (or ground turkey for a lighter option) - 1/2 cup breadcrumbs - 1/4 cup grated Parmesan cheese - 1/4 cup finely chopped green onions - 1 egg - 2 garlic cloves, minced - 1/4 teaspoon salt - 1/4 teaspoon black pepper - 1 teaspoon minced ginger - 1/4 cup honey - 1/4 cup sriracha - 2 tablespoons soy sauce - 1 tablespoon rice vinegar - Sesame seeds - Extra green onions To make these honey sriracha meatballs, you start with simple ingredients. You can use ground beef or turkey based on your choice. The breadcrumbs help bind the meatballs, while Parmesan adds flavor. Green onions bring some freshness. The sweet and spicy sauce comes from honey and sriracha. Soy sauce adds depth, and rice vinegar gives a nice tang. You can also use sesame seeds and extra green onions to garnish. This makes the dish look even better. For the full recipe, you can check the details above. Every ingredient plays a part in creating a balanced flavor and texture. Enjoy cooking! - Preheat the oven to 400°F (200°C). - In a large bowl, combine: - 1 lb ground beef (or turkey) - 1/2 cup breadcrumbs - 1/4 cup grated Parmesan cheese - 1/4 cup finely chopped green onions - 1 egg - 2 minced garlic cloves - 1/4 teaspoon salt - 1/4 teaspoon black pepper - 1 teaspoon minced ginger Mix these ingredients well, but don’t overwork the meat. This keeps your meatballs tender. - Shape the mixture into small meatballs, about 1 inch in diameter. - Place them on a prepared baking sheet. - Bake for 15-20 minutes, until they are cooked through and slightly browned. - In a saucepan, whisk together: - 1/4 cup honey - 1/4 cup sriracha - 2 tablespoons soy sauce - 1 tablespoon rice vinegar Cook this over medium heat for about 5 minutes. Stir often until the sauce thickens. - Remove the baked meatballs from the oven. - Drizzle the honey sriracha sauce over the meatballs. Toss gently to coat. - Return to the oven for an additional 5-7 minutes. This lets the meatballs soak up the flavors. - Garnish with sesame seeds and extra chopped green onions before serving. For the full recipe, check out the detailed instructions above. Enjoy your tasty Honey Sriracha Meatballs! When making meatballs, you want them to stay soft. Avoid overmixing the meat. Mix just enough to blend all the flavors. This keeps your meatballs tender and juicy. Use wet hands while forming the meatballs. This simple trick helps prevent the mixture from sticking to your hands. The sauce is key to great flavor! You can customize the spice level by adjusting the amount of sriracha. If you like it spicy, add more. For extra depth, consider adding minced garlic or fresh ginger. These ingredients boost the sauce’s flavor and make it even better. You have options for cooking these meatballs. You can use the stovetop, slow cooker, or grill them. Each method offers a unique taste. Baking gives them a nice crust, while grilling adds a smoky flavor. Choose the method that fits your time and taste! {{image_2}} You can change the meat in this recipe for fun. Ground chicken or pork works well. These options offer a lighter taste. If you prefer plant-based meals, try mushrooms or lentils. Both options bring a hearty texture. They soak up flavors nicely, just like beef. To make your meatballs even better, add spices. Smoked paprika gives a warm, smoky taste. Cumin adds a nice earthiness. If you want to switch things up, use maple syrup instead of honey. It adds a different sweetness and depth. These meatballs are super versatile! You can pair them with rice or noodles. Another fun idea is to serve them in lettuce wraps. They also work great as appetizers at parties. You can enjoy them as a main dish, too. For the full recipe, check out the previous sections! After you enjoy your honey sriracha meatballs, store any leftovers in an airtight container. This keeps them fresh for up to 3 days. Make sure to let the meatballs cool down before sealing them away. This helps avoid excess moisture, which can make them soggy. If you want to keep your meatballs longer, freeze them cooked. They stay good for up to 3 months. To freeze, place the meatballs in a single layer on a baking sheet. Once they are frozen, move them to a freezer bag. When you’re ready to eat, you can reheat directly from frozen in the oven. Just add a few extra minutes to the cooking time. To keep the meatballs tender, I recommend reheating them in the oven. Preheat your oven to 350°F (175°C) and bake for about 10-15 minutes. This way, they stay nice and juicy. If you need a quick option, the microwave works too. Just heat them for 1-2 minutes, but be careful, as this can make them a bit dry. For best flavor, try the oven! To make your Honey Sriracha Meatballs spicier, you can do a couple of things. First, increase the amount of sriracha in the sauce. You can also add red pepper flakes. Just a pinch can add a kick. Adjust the spice to fit your taste. Yes, you can prepare Honey Sriracha Meatballs in advance. Make the meatballs and store them in the fridge or freezer. If you freeze them, just thaw before baking. This makes meal prep easy and quick for busy days. There are many great options to serve with these meatballs. You can try steamed vegetables, fluffy rice, or a fresh side salad. Each side adds a nice touch to the meal. Choose what you enjoy most! Absolutely! To make this recipe gluten-free, use gluten-free breadcrumbs. Also, check that your soy sauce is gluten-free. These simple swaps make it easy for everyone to enjoy these tasty meatballs. For the full recipe, check out the earlier sections. You can make tasty Honey Sriracha Meatballs by following simple steps. We discussed the key ingredients, easy directions, and how to customize them. You learned storage tips to keep your meatballs fresh. Remember, you can swap proteins, adjust spices, and select your favorite sides. Enjoy making these flavorful meatballs for any meal. Try different twists and enjoy your culinary success!

Honey Sriracha Meatballs Delightful and Easy Recipe

Are you ready to spice up dinner? These Honey Sriracha Meatballs are a game changer! They combine sweet and spicy

Older posts
Newer posts
← Previous Page1 … Page18 Page19 Page20 … Page23 Next →

dsad

© 2025 greenmealmap • Built with GeneratePress

Our Policies

  • Copyright Policy
  • Cookie Policy
  • GDPR Policy
  • Privacy Policy
  • Disclaimer
  • Terms Of Use

More Information

  • Home
  • About
  • Contact
  • Appetizers
  • Dessert
  • Dinner
  • Drinks
©2025, greenmealmap About Back To Top