Skip to content
DisclaimerTerms Of UseGDPR PolicyCookie Policy

greenmealmap

  • Home
  • Drinks
  • Appetizers
  • Dinner
  • Dessert
  • About
  • Contact
  • Privacy Policy
DisclaimerTerms Of UseGDPR PolicyCookie Policy

Lauren

To make Easy Lentil Shepherd's Pie, gather these ingredients: - 1 cup green or brown lentils, rinsed - 2 cups vegetable broth - 1 medium onion, diced - 2 garlic cloves, minced - 2 carrots, diced - 2 celery stalks, diced - 1 teaspoon dried thyme - 1 teaspoon dried rosemary - 1 tablespoon soy sauce or tamari - 1 cup frozen peas - 4 medium potatoes, peeled and chopped - 1/4 cup milk (or plant-based milk) - 2 tablespoons butter (or plant-based substitute) - Salt and pepper to taste You can swap some ingredients to suit your taste. For lentils, you can use canned lentils for quicker prep. Instead of vegetable broth, chicken broth works well if you don't need it to be plant-based. If you want a richer flavor, add a splash of red wine. For veggies, use corn or bell peppers for a twist. You can also switch potatoes with cauliflower for a lighter topping. This dish serves about six people. Each serving has a balanced mix of nutrients. Lentils provide protein and fiber. Potatoes offer vitamins and minerals. Each serving has around: - Calories: 300 - Protein: 12g - Carbohydrates: 50g - Fiber: 10g - Fat: 7g This meal is hearty and good for you. You get comfort food that fills you up without guilt. Enjoy the full recipe for more details on cooking this tasty dish! Start by rinsing 1 cup of lentils under cold water. In a pot, combine the rinsed lentils with 2 cups of vegetable broth. Bring this mix to a boil over high heat. Once it boils, turn the heat down low. Cover the pot and let it simmer for about 25-30 minutes. You want the lentils to be tender but not mushy. If there's extra broth, drain it off. While the lentils cook, heat 1-2 tablespoons of olive oil in a large skillet over medium heat. Add 1 medium diced onion, 2 diced carrots, and 2 diced celery stalks. Sauté these for about 5-7 minutes until they soften. Next, add 2 minced garlic cloves, 1 teaspoon of dried thyme, and 1 teaspoon of dried rosemary. Cook for 1 more minute to bring out the flavors. Then, mix in the cooked lentils, 1 tablespoon of soy sauce, and 1 cup of frozen peas. Stir everything well, add salt and pepper to taste, and take it off the heat. In a separate pot, boil 4 peeled and chopped potatoes in salted water until they are tender. This usually takes about 15-20 minutes. Drain the potatoes and return them to the pot. Add 1/4 cup of milk and 2 tablespoons of butter. Mash until they are creamy. Season with salt and pepper to your liking. Grab a greased baking dish and spread the lentil and vegetable filling evenly across the bottom. Next, top it with the creamy mashed potatoes. Use a spatula or a fork to create texture on the surface. This will make it crispy when baked. Place the dish in your preheated oven at 400°F (200°C) and bake for 20-25 minutes. Look for a golden brown top that is slightly crispy. Enjoy this Easy Lentil Shepherd's Pie as a warm, hearty meal. For the full recipe, check out the [Full Recipe]. To enhance the flavor of your lentil shepherd's pie, use fresh herbs. Fresh thyme and rosemary bring a bright taste. Adding a splash of balsamic vinegar can deepen the flavors. You can also mix in some chopped mushrooms for umami. If you like heat, consider adding a pinch of red pepper flakes. This will give your pie a nice kick. Don’t forget to taste your filling as you go. Adjust salt and pepper to suit your palate. One common mistake is overcooking the lentils. They should be tender but not mushy. Rinse them well before cooking to remove any bitterness. Another mistake is not seasoning the vegetables enough. Proper seasoning makes a big difference. Also, make sure your mashed potatoes are creamy. Lumpy potatoes can ruin the texture of your pie. Lastly, don’t rush the baking. The top needs time to brown for the best flavor. Use starchy potatoes like Russets for fluffy mashed potatoes. After boiling, let them steam dry for a minute. This helps remove extra moisture. Use a potato masher for a smooth texture. If you want a richer flavor, warm your milk and butter before adding them. This keeps the mash creamy. Season with salt and pepper to taste. Always taste your mash before spreading it over the filling. {{image_2}} You can change the flavor by adding different vegetables. Think of spinach, corn, or bell peppers. These add color and nutrition to your dish. You can toss in zucchini or mushrooms for a hearty bite. Just chop them small, so they cook well. If you want a sweeter taste, try adding some butternut squash. Each veggie choice gives a new twist to the classic recipe. If you want a meatier flavor, use meat alternatives. Crumbled tempeh or tofu works great. You can also try veggie sausage for a spicy kick. These options blend well with lentils and add protein. Feel free to mix in some cooked quinoa for extra texture. This gives you a filling and satisfying meal. Making this dish vegan is easy. Simply use plant-based milk and butter. For a gluten-free option, ensure your soy sauce is gluten-free or switch to tamari. You can also replace mashed potatoes with mashed cauliflower for fewer carbs. These changes keep the dish tasty while meeting dietary needs. The flavor stays rich and comforting regardless of your choices. Check out the full recipe to see how to make these variations shine! After enjoying your easy lentil shepherd's pie, let it cool. Place leftovers in an airtight container. Store them in the fridge for up to three days. Make sure to cover it well to keep it fresh. This way, you can enjoy the flavors again soon! To reheat, you have a few options. You can use a microwave or an oven. If you're using a microwave, place a portion on a plate and cover it. Heat for about 2-3 minutes, checking every minute. For the oven, preheat it to 350°F (175°C). Put the pie in a dish and cover it with foil. Heat for about 15-20 minutes. Both methods work well! If you want to save some for later, freezing is a great option. Cut the pie into portions and wrap each piece in plastic wrap. Then, put them in a freezer-safe bag. Label the bag with the date. You can freeze it for up to three months. When you're ready to enjoy it, thaw in the fridge overnight before reheating. This keeps the taste and texture just right! Yes, you can use dried lentils. Dried lentils need cooking first. Rinse them well and use two cups of water for each cup of lentils. Cook them for about 25-30 minutes in a pot until they are soft. This method gives you a fresher taste. For mashing, I like using Yukon Gold or Russet potatoes. These types are creamy and fluffy when cooked. They mash well and soak up flavors nicely. Avoid waxy potatoes like red potatoes, as they don’t give the same texture. To add spice, try using chili powder or red pepper flakes. You can also add diced jalapeños or hot sauce to the lentil filling. Start with small amounts and taste as you go. This way, you find the right heat level for you. Yes, you can make this dish ahead of time. Prepare the filling and mashed potatoes separately. Store them in the fridge for up to two days. When ready to eat, layer them in a dish and bake. This keeps the flavors fresh and tasty. This article covered everything you need for a delicious pie. We looked at the best ingredients and how to make flavorful mash. I shared step-by-step instructions to guide you in cooking lentils and preparing the filling. We also discussed helpful tips to avoid mistakes and variations to suit your taste. Finally, I provided storage info for leftovers. Enjoy your cooking adventure. Make this pie your own and share it with loved ones!

Easy Lentil Shepherd’s Pie Flavorful Comfort Food

Are you craving a warm, hearty meal that’s also easy to make? Look no further than my Easy Lentil Shepherd’s

This Summer Berry Peach Cheesecake is a delightful blend of creamy goodness and fruity flavors. It features a buttery graham cracker crust paired with a rich cream cheese filling. Each slice offers vibrant colors from the peaches and mixed berries. You will love how easy it is to make! - 1 ½ cups graham cracker crumbs - ½ cup unsalted butter, melted - 2 tablespoons sugar - 16 oz cream cheese, softened - ¾ cup sugar - 2 teaspoons vanilla extract - 3 large eggs - 1 cup sour cream - 2 ripe peaches, sliced - 1 cup mixed berries (strawberries, blueberries, raspberries) - ¼ cup honey - Fresh mint leaves for garnish To make this cheesecake, you will need: - A 9-inch springform pan - Mixing bowls - An electric mixer - A small saucepan - A spatula - Measuring cups and spoons Gather these tools before you start. It makes the process smooth and fun! First, preheat your oven to 325°F (160°C). This temperature helps the cheesecake cook evenly. While it heats, grease a 9-inch springform pan. Use cooking spray or butter to ensure the cheesecake releases easily later. In a mixing bowl, combine 1 ½ cups graham cracker crumbs, ½ cup melted butter, and 2 tablespoons sugar. Mix until it looks like wet sand. Press this mixture firmly into the bottom of the springform pan. Bake the crust for 10 minutes. Let it cool completely before adding the filling. In a large bowl, beat 16 oz softened cream cheese with an electric mixer. Mix until smooth and creamy. Next, add ¾ cup sugar and beat until well blended. Add 2 teaspoons vanilla extract, and mix again. Beat in 3 large eggs, one at a time. Make sure each egg is mixed in well before adding the next. Finally, fold in 1 cup sour cream gently until just combined. Pour half of the cream cheese mixture over the cooled crust. Layer half of the sliced peaches evenly on top. Then, add the rest of the cream cheese mixture. Finish by layering the remaining peaches and 1 cup mixed berries on the top. This gives it a lovely look and taste. Place the cheesecake in the preheated oven. Bake for 50-60 minutes, or until the center is set but still slightly jiggly. Once done, turn off the oven. Leave the cheesecake inside for one hour without opening the door. This helps prevent cracks. After an hour, remove it from the oven and let it cool down to room temperature. Refrigerate for at least 4 hours, or overnight for the best texture. You can find the Full Recipe [here](#). To get a smooth and creamy cheesecake, start with room temperature cream cheese. Cold cream cheese will lead to lumps. Use an electric mixer to beat it until it is silky and light. Adding eggs one at a time ensures even mixing. Always mix gently when adding sour cream to avoid over-mixing. Cracks can happen, but you can avoid them. Bake your cheesecake at a low temperature, around 325°F (160°C). After baking, turn off the oven and let the cheesecake sit inside for one hour. This slow cooling helps prevent sudden temperature changes that cause cracks. Also, avoid opening the oven door while it cools. To serve the cheesecake, let it chill in the fridge for at least four hours or overnight. This helps the flavors blend and the texture set. When it’s time to slice, use a hot knife for clean cuts. Dip the knife in hot water and wipe it dry before each slice. Top each slice with fresh berries and a drizzle of honey for added flavor. Enjoy your delightful creation! For the full recipe, check out the [Full Recipe]. {{image_2}} You can change the fruit in this cheesecake to match your taste. Try ripe mango, tart cherries, or sweet plums. Each fruit brings a unique flavor. For a tropical twist, use pineapple and coconut. Mixing berries is great too! Blueberries, blackberries, or even cranberries can work well. Just remember to keep the balance between sweet and tart. You can make this cheesecake without dairy. Use vegan cream cheese and coconut yogurt instead of sour cream. For the crust, swap regular butter for coconut oil. Use maple syrup instead of honey for a sweet touch. This way, everyone can enjoy this treat, no matter their diet! Mini cheesecakes are fun and easy to serve. Use muffin tins or small jars. Simply divide the crust and filling into smaller portions. Bake for about 20-25 minutes. They cool faster too! Top them with fresh fruit or a drizzle of chocolate for a cute touch. These mini versions make great party treats! For the full recipe, check out the detailed instructions above. To keep your cheesecake fresh, wrap it tightly. Use plastic wrap or foil. Place it in the fridge if you plan to eat it soon. Make sure it is in an airtight container. This helps prevent drying out and keeps flavors strong. Cheesecake lasts about five days in the fridge. After that, it may lose its taste and texture. Always check for any signs of spoilage before eating. If you see any mold or smell anything off, it’s best to toss it out. You can freeze cheesecake to enjoy later. Wrap slices tightly in plastic wrap. Then place them in a freezer-safe bag or container. It can last up to three months in the freezer. When you want to eat it, move it to the fridge to thaw overnight. Enjoying a slice of summer berry peach cheesecake later on is a delightful treat! For the full recipe, check out the earlier section. Yes, you can use frozen berries and peaches. Just make sure to thaw and drain them first. This keeps the cheesecake from getting too watery. Frozen fruit works well in this recipe and still tastes great. The cheesecake is done when the edges are set, but the center is slightly jiggly. It will firm up as it cools. You can also check with a toothpick. If it comes out mostly clean, your cheesecake is ready. You can serve this cheesecake with whipped cream, fresh fruit, or a fruit sauce. A drizzle of honey is also a nice touch. Fresh mint leaves make a lovely garnish too. Yes, you can make this cheesecake a day ahead. It tastes even better after chilling overnight. Just cover it well and store it in the fridge. This gives the flavors time to blend and makes it easier to slice. For the complete recipe, check out the Full Recipe section above. You learned about making a delicious Summer Berry Peach Cheesecake. We covered the key steps: preparing the crust, cream cheese filling, and baking. I shared tips for achieving a perfect texture and how to store your cheesecake. You can even try different fruit combos or mini versions. Remember, this recipe is flexible. Enjoy making it your own. Happy baking!

Summer Berry Peach Cheesecake Delightful and Creamy

Summer is here, and what better treat than a creamy Summer Berry Peach Cheesecake? This dessert blends sweet fruits with

To make this chocolate lasagna, you will need the following ingredients: - 12 whole chocolate cookies (like Oreos) - 2 tablespoons butter, melted - 1 cup cream cheese, softened - 1 cup powdered sugar - 2 cups whipped cream (store-bought or homemade) - 1 cup chocolate pudding mix - 2 ¾ cups milk - 1 cup mini chocolate chips - 1 teaspoon vanilla extract - Cocoa powder or chocolate shavings for garnish For those with common allergens, here are some substitutions you can consider: - Gluten-Free: Use gluten-free chocolate cookies. - Dairy-Free: Replace cream cheese with a dairy-free cream cheese alternative. Use coconut whipped cream instead of regular whipped cream. - Nut-Free: This recipe is naturally nut-free, but ensure all packaged items are nut-free as well. These simple swaps help everyone enjoy this creamy and delicious dessert! To make the cookie crust, start by crushing the chocolate cookies. You can use a food processor or place them in a plastic bag and crush them with a rolling pin. Aim for fine crumbs that hold together well. Next, mix the crumbs with 2 tablespoons of melted butter. The mixture should feel like wet sand. Press this mixture firmly into the bottom of a 9x13 inch dish. Use the back of a measuring cup or your hands to create an even layer. Make sure to press down hard enough so it holds together when you add the other layers. For the cream cheese layer, blend 1 cup of softened cream cheese and 1 cup of powdered sugar in a mixing bowl. Mix until the texture is smooth and creamy. This step is crucial for a rich flavor. Next, gently fold in 2 cups of whipped cream. Use a spatula to combine them without losing the air in the whipped cream. This makes your layer light and fluffy. Spread this cream cheese mixture evenly over the cookie crust. Now, let’s make the chocolate pudding layer. In a separate bowl, whisk together 1 cup of chocolate pudding mix and 2 ¾ cups of milk. Whisk for about 2 to 3 minutes until it starts to thicken. It’s vital to let it sit for a couple of minutes to reach the right consistency. This layer adds a rich chocolate taste that complements the creamy layers perfectly. To build the lasagna, pour the thickened chocolate pudding over the cream cheese layer. Use a spatula to spread it out gently. This ensures an even layer and a delightful presentation. Next, sprinkle 1 cup of mini chocolate chips evenly over the pudding. This adds a nice texture and extra chocolate flavor. For the final layer, top your lasagna with the remaining whipped cream. Spread it out evenly to cover all the layers. You can use a spatula to smooth it out nicely. Once done, cover the dish with plastic wrap and refrigerate it for at least 4 hours. If you can, let it chill overnight. This waiting time makes the flavors meld beautifully. The longer it chills, the better the taste! Garnishing your chocolate lasagna can elevate its look. Here are some ideas: - Cocoa Powder: Dust the top with cocoa for a rich finish. - Chocolate Shavings: Use a vegetable peeler on a chocolate bar for fun curls. - Fresh Berries: Place raspberries or strawberries on top for a pop of color. - Mint Leaves: Add a sprig of mint for a fresh touch. Pairing your dessert with drinks can enhance the experience. Consider these beverages: - Coffee: A cup of strong coffee complements the chocolate well. - Milk: A classic choice, especially for kids. - Red Wine: A light red wine can offer a nice contrast. Cutting and serving your lasagna can be an art. Here’s how: - Use a Sharp Knife: A clean cut makes for neater squares. - Warm the Knife: Dip it in hot water to slice through layers smoothly. - Serve on Plates: Place each square on a dessert plate for a nice look. For parties, think creatively about serving: - Mini Portions: Use small cups or shot glasses for individual servings. - Layered Cups: Layer the ingredients in clear cups for a pretty view. - Dessert Bar: Set up a station where guests can build their own mini lasagnas. Here are two common mistakes to keep in mind: - Overmixing: When mixing layers, blend just enough. Overmixing can make your cream cheese layer too runny. - Skipping the Chilling Step: Don’t skip chilling the lasagna. It needs time to set. Chilling helps the layers meld and improves the taste. {{image_2}} You can switch up the cookie crust for your chocolate lasagna. Try using different types of cookies. Gluten-free options work well too. Look for gluten-free chocolate cookies or almond-flour cookies. Both add unique flavors. You can also add nuts or spices to the crust. Chopped walnuts or pecans give a nice crunch. A pinch of cinnamon or nutmeg can add warmth and depth to the flavor. The flavor of chocolate lasagna can be fun to change. You can use different pudding flavors. Vanilla or butterscotch pudding adds a nice twist. Mixing in fruits is also a great idea. Strawberries or bananas can bring freshness to each bite. They also add natural sweetness. Layering these fruit slices between the pudding and whipped cream makes it look lovely too. If you need to make it dairy-free, there are great options. Use dairy-free cream cheese and whipped cream. You can also find dairy-free pudding mixes. For those watching sugar intake, try using sugar substitutes. Stevia or erythritol can work well in this recipe. These small changes let everyone enjoy your chocolate lasagna without worry. To keep your chocolate lasagna fresh, store it in the fridge. Use an airtight container or cover the dish tightly with plastic wrap. This helps to prevent it from absorbing other flavors in the fridge. You can keep it for up to five days this way. If you have leftovers, follow these tips for freezing: - Cut the lasagna into squares for easy serving. - Wrap each piece in plastic wrap and then foil. - Place the wrapped pieces in a freezer-safe bag. This method helps keep the chocolate lasagna tasty for up to three months. When stored properly, chocolate lasagna stays fresh for about five days in the fridge. You can tell if it has spoiled by looking for these signs: - An off or sour smell. - Changes in texture, like excessive moisture or dryness. - Visible mold growth on the surface. If you notice any of these signs, it’s best to toss it out. Enjoy your chocolate lasagna while it’s fresh for the best taste! Yes, you can make Chocolate Lasagna in advance. In fact, it tastes better after sitting. I recommend making it the night before you plan to serve it. This gives the layers time to set and flavors to blend nicely. Your lasagna is set when it feels firm. It should hold its shape when cut. Look for a clean edge around the sides of the dish. If it jiggles too much, it needs more chilling time. Yes, you can substitute some ingredients. Here are a few ideas: - Use gluten-free cookies for a gluten-free crust. - Swap cream cheese for a dairy-free option if needed. - You can replace chocolate pudding with vanilla pudding for a different taste. These changes might alter the flavor slightly but can still work well. In this post, I shared how to make a delicious chocolate lasagna. We covered essential ingredients, step-by-step instructions, and helpful tips to avoid mistakes. You learned about variations to fit your taste and how to properly store your dessert. Remember, the secret lies in layering and chilling for the best flavor. With these steps, you can impress friends and family. Enjoy your tasty creation and let your baking journey begin!

Chocolate Lasagna Recipe Creamy and Simple Dessert

Are you ready to indulge in a sweet treat that’s as easy as it is delicious? This Chocolate Lasagna Recipe

To make this dish, you need some key ingredients. Here’s what you should gather: - 1 pound crawfish tails, peeled - 1 cup cooked white rice - 1 cup onion, finely chopped - 1 cup bell pepper, finely chopped (red or green) - 1 cup celery, finely chopped - 1 can (10.5 ounces) cream of mushroom soup - 1 can (10.5 ounces) cream of celery soup - 1 cup sharp cheddar cheese, shredded - 1 tablespoon Cajun seasoning - 2 cloves garlic, minced - 2 tablespoons vegetable oil - 1/2 cup green onions, chopped (for garnish) - Salt and pepper to taste These ingredients work together to create a rich and tasty casserole. The crawfish tails bring a unique flavor, while the rice makes it hearty. The cream soups add creaminess that makes every bite satisfying. You can play with flavors by adding more seasonings. Here are some great options to consider: - Paprika for a smoky flavor - Red pepper flakes for heat - Fresh herbs like parsley or thyme - Lemon juice for brightness Adding these can give your casserole a personal touch. Adjust these to fit your taste, and don’t be afraid to experiment! Cheese is key for a creamy texture. While sharp cheddar is classic, you can try other cheeses too. Here are some ideas: - Monterey Jack for a milder taste - Pepper Jack for some spice - Gruyère for nutty flavor Mixing different cheeses can create a unique taste. Choose what you love and make it your own! If you want to see how to combine these ingredients, check the Full Recipe. To start, gather your ingredients. You will need crawfish tails, rice, and some veggies. Chop the onion, bell pepper, and celery. This mix brings great flavor. Do not forget the garlic! Next, heat vegetable oil in a skillet over medium heat. Add the onion, bell pepper, celery, and garlic. Sauté until the onion turns clear, about 5-7 minutes. This step builds a tasty base for your dish. Add the crawfish tails and Cajun seasoning next. Cook for another 3-4 minutes until the crawfish are warm. In a large bowl, combine your sautéed mix with the cooked rice. Add both cans of soup and half of the cheddar cheese. Mix everything well until it is combined. This will create a creamy and rich filling. Now, transfer the mixture to a greased 9x13-inch baking dish. Spread it evenly across the dish. This ensures that every bite is full of flavor. Lastly, sprinkle the remaining cheddar cheese over the top. This will create a nice, cheesy crust while baking. Preheat your oven to 350°F (175°C). Baking at the right temperature is key. Place your casserole in the oven and bake for 25-30 minutes. Look for a golden and bubbly top. This shows that your casserole is ready. When done, take it out and let it cool for a few minutes. This cooling time helps set the layers. Finally, garnish your dish with chopped green onions. This adds a fresh touch and a pop of color. For the complete recipe, refer to the Full Recipe. Enjoy your flavorful Louisiana Crawfish Casserole! Choosing fresh crawfish is key for a tasty casserole. Look for live crawfish with strong, clear eyes. They should feel heavy and active. Avoid any that are dark or have a bad smell. If buying frozen, check for a bright color and no ice crystals. Fresh crawfish adds a sweet, savory flavor you will love. Cajun spices bring out the best in crawfish casserole. Use a mix of paprika, cayenne, and garlic powder. These spices add heat and depth. You can also try adding thyme or oregano for more flavor. Adjust the spice level to match your taste. This way, you can make it mild or spicy just how you like it. Avoid these mistakes to ensure perfect casserole. First, do not overcook the crawfish. They should be just heated through. Next, be careful with salt. The soups and cheese already add saltiness. Taste the mixture before adding more. Lastly, let the casserole cool a bit before serving. This helps flavors blend and makes it easier to cut. Following these tips will help you create a dish everyone will enjoy. For the full recipe, check out the details above. {{image_2}} You can easily make this dish vegetarian. Replace crawfish with mushrooms or zucchini. Both add great flavor and texture. Use vegetable broth instead of chicken broth for cooking rice. A mix of veggies like bell peppers, carrots, and corn can boost taste too. If you want to switch proteins, shrimp works well. You can also use chicken or even tofu for a different twist. Cooked sausage adds a hearty touch, too. Just remember to adjust the cooking time as needed. Each protein brings its own unique flavor to the dish. Cheese plays a big role in this casserole. While sharp cheddar is a classic, you can try pepper jack for a kick. Cream cheese adds creaminess and richness. Mozzarella creates a nice stretch when melted. Mix and match to find your favorite combo. For the full recipe, check out the details above. To keep your Louisiana crawfish casserole fresh, store leftovers in an airtight container. Let the casserole cool to room temperature before sealing it. This helps prevent moisture buildup. Place it in the fridge for up to three days. If you want to enjoy it later, freezing is a great option. When you're ready to eat your leftover casserole, preheat your oven to 350°F (175°C). Place the casserole in an oven-safe dish. Cover it with foil to keep it moist. Heat for about 20-25 minutes or until it's warm all the way through. You can also microwave single servings for 2-3 minutes, checking often to avoid overcooking. To freeze your crawfish casserole, follow these steps: First, let it cool completely. Wrap it tightly in plastic wrap, then in aluminum foil. This double layer helps prevent freezer burn. You can freeze it for up to three months. When you're ready to eat it, thaw it overnight in the fridge. Then, reheat it using the oven method mentioned above for the best texture. To make Louisiana Crawfish Casserole, start by gathering your ingredients. You will need crawfish tails, cooked rice, onion, bell pepper, celery, cream soups, cheese, Cajun seasoning, garlic, vegetable oil, green onions, salt, and pepper. Begin by heating vegetable oil in a skillet. Add the onion, bell pepper, celery, and garlic, cooking until the onion is soft. Then, stir in the crawfish and Cajun seasoning. In a bowl, mix this sautéed mix with the rice and soups. Pour it into a greased baking dish, top with cheese, and bake at 350°F until golden. For the full step-by-step details, refer to the Full Recipe. If you can't find crawfish, there are good substitutes. Shrimp works well and gives a similar flavor. You can also use crab meat for a sweeter taste. Chicken is another option if you prefer poultry. Each substitute will change the flavor slightly, but they will still create a tasty dish. Just remember to adjust cooking times based on what you choose. Yes, you can prepare this casserole in advance. Assemble the casserole, cover it, and refrigerate for up to 24 hours. This method allows flavors to blend, making the dish even tastier. When ready to bake, just remove it from the fridge and bake as directed. If you freeze it, do so before baking. Thaw it overnight in the fridge before cooking. In this post, we covered how to make a delicious Louisiana Crawfish Casserole. I shared the main ingredients and the best cheese to use. You learned step-by-step instructions for preparation, assembly, and baking. I also provided tips for fresh crawfish and common cooking mistakes. Finally, we explored tasty variations and storage tips. Now, you're ready to create this dish with confidence. Enjoy this comforting meal with family and friends!

Louisiana Crawfish Casserole Flavorful and Easy Dish

If you’re craving a flavorful dish that captures the spirit of Louisiana, look no further than crawfish casserole. This easy-to-make

- 4 boneless, skinless chicken thighs - 4 medium potatoes, diced into cubes - 1/2 cup grated Parmesan cheese - 4 cloves garlic, minced - 2 tablespoons olive oil - 1 teaspoon dried oregano - 1 teaspoon dried thyme - 1 teaspoon garlic powder - Salt and pepper to taste - Fresh parsley for garnish Let’s dive into these ingredients. First, we have the chicken. I prefer boneless, skinless thighs. They are juicy and tender. Next, we have potatoes. Dicing them into cubes helps them cook evenly. The grated Parmesan cheese adds a rich flavor. For seasonings, we use fresh garlic. It brings a punch of flavor. Olive oil helps the spices stick to everything. Oregano and thyme add depth. Garlic powder enhances the garlic taste. Don't forget salt and pepper for balance. Lastly, fresh parsley adds a pop of color. It makes the dish look nice. You can find the full recipe linked above to get all the details. - Preheat the oven to 425°F (220°C). - In a bowl, mix olive oil, minced garlic, oregano, thyme, garlic powder, salt, and pepper. This makes a tasty marinade. Add the chicken thighs. Make sure they are covered well. Let them sit for about 15 minutes to soak in the flavor. - Take your diced potatoes and put them in a separate bowl. Toss them with olive oil, salt, pepper, and a sprinkle of garlic powder. This will give them great taste and help them cook nicely. - On a large baking sheet, lay out the marinated chicken thighs. Scatter the seasoned potatoes around them. Make sure they are not piled on top of each other. This helps everything cook evenly. - Bake the dish in the preheated oven for 25 minutes. After this time, take it out and sprinkle the grated Parmesan cheese over the chicken and potatoes. - Return the baking sheet to the oven. Bake for another 10-15 minutes. Check that the chicken is cooked through. The internal temperature should be 165°F (74°C). The potatoes should look golden and crispy. For the full recipe, check the details above. Enjoy this delightful meal! To keep your chicken juicy, marinate it well. This recipe calls for a mix of olive oil, garlic, and herbs. Marinate for at least 15 minutes. This step allows the flavors to soak in and makes the chicken tender. For golden, crispy potatoes, cut them into even cubes. Toss them with olive oil, salt, and pepper. You can add more garlic powder for extra flavor. Bake them until they turn crispy on the outside. Pair this dish with a simple salad or steamed veggies. A light white wine, like Sauvignon Blanc, works great with the flavors. You can also serve iced tea for a refreshing drink. For the full recipe, check out the details above. {{image_2}} You can use different cuts of chicken for this dish. Boneless chicken thighs work well for tender meat. If you prefer breasts, they can also be used. Drumsticks offer a fun option too. Each cut adds its own flavor and texture. For cheese, you can change things up too. While Parmesan gives a nice salty touch, try mozzarella for a creamy bite. Feta brings a tangy twist. Each cheese creates a unique taste. Adding vegetables can make this dish even better. Bell peppers add sweetness and crunch. Carrots provide a nice color and a slight earthiness. Toss them in with the potatoes for extra flavor. If you enjoy spice, add red pepper flakes. They add a kick to the chicken and potatoes. You can adjust the amount based on your taste. This small change can elevate your meal. You can make this dish in different ways. An air fryer cooks the chicken and potatoes quickly. It makes them crispy without much oil. Just adjust the cooking time to about 20-25 minutes. An Instant Pot is another option. It keeps the chicken moist and tender. Cook on high pressure for about 10 minutes, then add the potatoes for 5 more minutes. Both methods offer quick and tasty meals. For the full recipe, check the section above! To keep your Garlic Parmesan Chicken and Potatoes fresh, use proper storage techniques. First, let the dish cool to room temperature. Then, transfer it to an airtight container. This helps prevent moisture loss and keeps flavors intact. Store it in the fridge for up to three days. If you notice any off smells, it’s best to discard it. For longer storage, you can freeze this dish. Cut the chicken and potatoes into smaller pieces. Place them in a freezer-safe container or a heavy-duty freezer bag. Make sure to remove as much air as possible. This will help prevent freezer burn. You can freeze it for up to three months. When ready to eat, thaw it overnight in the fridge. Reheat in the oven at 350°F (175°C) until warm, about 20-30 minutes. This method keeps the flavors rich and the texture nice. Meal prep makes weeknight dinners simpler. You can marinate the chicken and chop the potatoes a day ahead. Store them in the fridge until you are ready to cook. This cuts down on prep time when you're busy. If you have leftovers, get creative! Use the chicken and potatoes in a stir-fry or toss them in a salad. They can also be turned into a tasty wrap for lunch the next day. Garlic Parmesan Chicken and Potatoes shines with its rich flavors. The garlic brings a warm, savory taste. The Parmesan adds a creamy, salty kick. Together, they create a mouthwatering blend. The crispy potatoes soak up the juices, adding texture. This dish satisfies all ages, making it a hit at the dinner table. Yes, you can easily make this dish gluten-free. Simply ensure that the Parmesan cheese is labeled gluten-free. The other ingredients, like olive oil and herbs, are already gluten-free. This way, everyone can enjoy this tasty meal without worry. To check if the chicken is done, use a meat thermometer. The internal temperature should reach 165°F (74°C). Look for clear juices when you cut into the chicken. If the juices run pink, it needs more time. These steps ensure that you serve safe, delicious chicken. Absolutely! You can swap herbs based on your taste. For a fresh twist, try basil or rosemary. If you like heat, add a pinch of red pepper flakes. Mixing herbs lets you personalize the dish and keep it exciting. This blog covered a tasty recipe for Garlic Parmesan Chicken and Potatoes. You learned about the key ingredients, like chicken thighs, potatoes, and Parmesan cheese. The step-by-step instructions helped guide you through cooking and seasoning. Tips for juicy chicken and crispy potatoes were shared, along with cooking variations and storage tips. Remember, cooking can be fun and creative. Don’t hesitate to experiment with flavors and ingredients to make this dish your own! Enjoy your meal.

Garlic Parmesan Chicken and Potatoes Delightful Meal

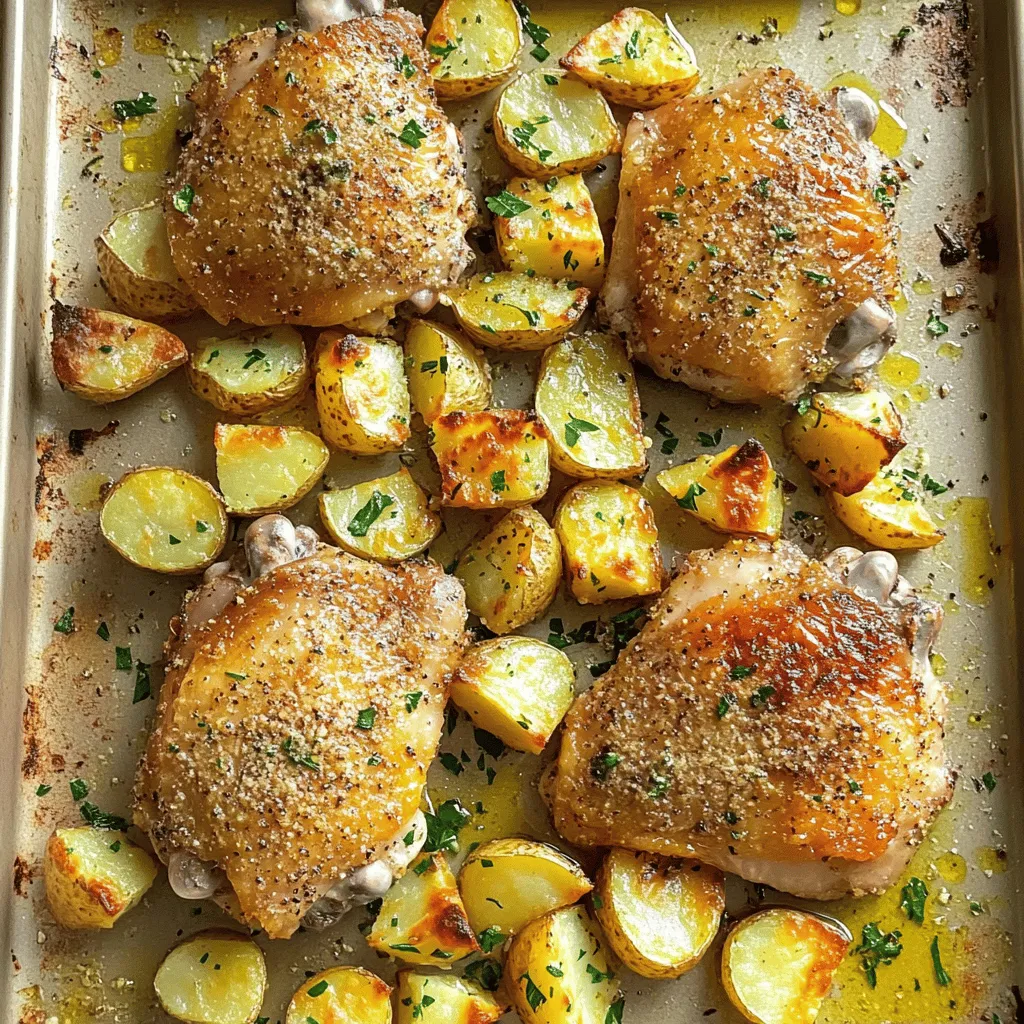
Craving a simple yet flavorful dinner? Look no further! My Garlic Parmesan Chicken and Potatoes is a delightful meal that

- 4 boneless, skinless chicken thighs - 2 tablespoons olive oil - 2 cloves garlic, minced - 1 teaspoon ground cumin - 1 teaspoon paprika - Salt and pepper, to taste - Juice of 1 lime - Fresh cilantro, for garnish - 1 cup fresh cilantro leaves - 1 jalapeño, seeded and chopped - 2 cloves garlic - 1/4 cup mayonnaise - 1/4 cup Greek yogurt - Juice of 1 lime - Salt to taste - Mixing bowl - Food processor - Grill or grill pan - Meat thermometer To make the best Peruvian grilled chicken, you need fresh, high-quality ingredients. The chicken thighs provide a rich flavor and stay moist when grilled. Olive oil adds a nice touch and helps the spices stick. Garlic, cumin, and paprika give it that distinct taste. Lime juice brightens everything up. For the green sauce, fresh cilantro is key. It brings a vibrant color and fresh taste. The jalapeño adds a slight kick, but you can adjust it based on your spice level. Mayonnaise and Greek yogurt create a creamy texture. They balance the heat and add richness. Gathering the right tools is also important. A mixing bowl will help you combine your marinade. A food processor makes the green sauce quick and easy. The grill or grill pan is where the magic happens. Finally, a meat thermometer ensures your chicken is perfectly cooked. You can find the full recipe for preparing this delicious dish in the complete article. To start, mix the marinade ingredients in a bowl. Use 2 tablespoons of olive oil, 2 minced garlic cloves, 1 teaspoon of ground cumin, 1 teaspoon of paprika, the juice of 1 lime, and salt and pepper to taste. Once it’s well mixed, add 4 boneless, skinless chicken thighs to the bowl. Coat each piece well in the marinade. Cover the bowl and refrigerate it. Letting it sit for at least 1 hour makes the chicken flavorful. For the best taste, marinate overnight. Next, let’s make the green sauce. In a food processor, combine 1 cup of fresh cilantro leaves, 1 chopped jalapeño (make sure to seed it), 2 cloves of garlic, 1/4 cup of mayonnaise, 1/4 cup of Greek yogurt, the juice of 1 lime, and a pinch of salt. Blend until smooth. Taste the sauce and adjust the seasoning if needed. Once it is ready, transfer it to a bowl and refrigerate. This sauce adds a fresh kick! Now, it’s grilling time! Preheat your grill or grill pan over medium-high heat. Take the marinated chicken out of the fridge. Grill each piece for about 6 to 8 minutes on each side. To check if it’s done, use a meat thermometer. The internal temperature should be 165°F (75°C). This will ensure your chicken is juicy and safe to eat. After grilling, remove the chicken from the grill. Let it rest for about 5 minutes. This step helps keep the juices in the meat. Once it’s rested, slice the chicken into strips. Arrange the grilled chicken on a platter, drizzle with the green sauce, and garnish with fresh cilantro. For a perfect presentation, serve on a wooden board with extra green sauce on the side. You can also add grilled vegetables or corn for a colorful meal. You can find the full recipe [here]. - For the best flavor, marinate chicken for at least 1 hour. - If you want more spice, add chili powder to the marinade. - Try yogurt or vinegar-based marinades for a tangy twist. - Preheat your grill to medium-high, around 400°F. - Oil the grill grates to stop the chicken from sticking. - Flip the chicken only once for even cooking and nice grill marks. - If you like heat, add more jalapeño to the green sauce. - You can make the sauce a day ahead and store it in the fridge. - Experiment with herbs like parsley for a different flavor. These tips will help you create a delicious Peruvian grilled chicken meal with rich flavors. For the full recipe, check out the details above. {{image_2}} You can switch chicken thighs for breasts if you prefer. Breasts are leaner and cook faster. Thighs give a juicier bite and more flavor. Both options work well in this dish. You can also try fish like salmon or halibut. Fish cooks quickly and pairs well with the green sauce. Tofu is another great choice for a plant-based meal. It absorbs flavors well, making it tasty and filling. To make the marinade more exciting, add spices like cayenne or smoked paprika. These will give an extra kick and depth to your chicken. You can also mix in fresh herbs like oregano or thyme for a fragrant touch. For the green sauce, try adding avocado for creaminess. A splash of vinegar can also give it a nice zing. You could even mix in some diced tomatoes or bell peppers for extra color and flavor. Serve your grilled chicken with rice or a fresh salad. Coconut rice adds a sweet twist. A crisp, green salad balances the flavors well. You can also pair it with grilled corn for a fun summer vibe. If you have leftovers, slice the chicken and use it in tacos or sandwiches. You can toss it with pasta for a quick meal. The green sauce can also be used as a dip or dressing. For the full recipe, check out the complete guide. You can store leftovers in the fridge for up to 3 days. Make sure to place them in an airtight container. If the chicken has a sour smell or a slimy texture, it’s no longer fresh. To freeze chicken with green sauce, first let it cool completely. Place the chicken and sauce in freezer-safe bags. Remove as much air as possible before sealing. For thawing, place the bag in the fridge overnight. Reheat gently on the stove or in the microwave until hot. You can prepare chicken thighs ahead of time. Marinate them the night before for quick grilling. Use leftover grilled chicken in tacos or salads for easy meals. You can also mix it into pasta or grain bowls for added flavor. To keep chicken juicy, marinate it well. Use olive oil, lime juice, and spices. This adds flavor and moisture. Grill the chicken on medium heat. Flip it only once to avoid drying. Cook it until the internal temperature reaches 165°F. Let it rest for five minutes before slicing. This helps the juices stay inside the meat. Yes, you can make green sauce without mayonnaise. Swap it out for Greek yogurt or avocado. Both options give a creamy texture. Greek yogurt also adds protein. For a lighter sauce, try using just yogurt and more lime juice. This keeps the flavor fresh and bright. Use a meat thermometer to check the chicken. Insert it into the thickest part. The chicken is done when it reaches 165°F. You can also look for visual cues. The juices should run clear, and the meat should not be pink. These signs ensure safe and tasty chicken. Peruvian grilled chicken goes well with many sides. Try serving it with rice or quinoa. A fresh salad with lime dressing is also great. You can add grilled vegetables for color and taste. For drinks, serve it with a light beer or a refreshing lemonade. These pairings make your meal complete and satisfying. You've learned how to make delicious grilled chicken with a vibrant green sauce. Using fresh ingredients and clear steps is key. Remember to marinate for flavor and check your chicken’s doneness with a thermometer. You can adjust spices and explore variations to fit your taste. Whether you’re meal prepping or enjoying leftovers, these tips will elevate your cooking. Enjoy your grilling and share your creations!

Peruvian Grilled Chicken with Green Sauce Delight

Are you ready to impress your family with a burst of flavor? My Peruvian Grilled Chicken with Green Sauce is

To make crispy honey garlic salmon bites, gather these simple and fresh ingredients: - 1 lb fresh salmon fillet, skin removed and cut into bite-sized cubes - 1/4 cup all-purpose flour - 1/4 cup cornmeal - 1/2 teaspoon garlic powder - 1/2 teaspoon onion powder - 1/2 teaspoon paprika - Salt and pepper to taste - 2 tablespoons vegetable oil (for frying) - 1/4 cup honey - 3 tablespoons soy sauce (low sodium) - 2 cloves garlic, minced - 1 teaspoon fresh ginger, grated - 1 tablespoon sesame seeds (optional for garnish) - 2 green onions, finely chopped (optional for garnish) When choosing salmon, look for fresh, high-quality fillets. Wild-caught salmon is best for flavor and health. Varieties like Sockeye or King salmon provide rich taste and firm texture. Farmed salmon can work too but may have a milder flavor. Always check for bright color and no fishy smell to ensure freshness. You can easily swap ingredients if needed. For the salmon, try using trout or even firm white fish like cod. If you want a gluten-free option, replace all-purpose flour with rice flour. You can also use maple syrup instead of honey for a different sweetness. If you’re out of ginger, a dash of ground ginger works in a pinch. Experiment with what you have on hand! For the full recipe, check out the steps to create this delicious treat. Start by cutting the salmon fillet into bite-sized cubes. You want them to be about one inch. Next, grab a mixing bowl. In this bowl, mix the flour, cornmeal, garlic powder, onion powder, paprika, salt, and black pepper. Stir these dry ingredients well. Now, toss the salmon cubes in this mix until they are fully coated. This will create a crispy crust when you fry them. Make sure each piece gets a nice layer, as this adds great texture and flavor. To cook the salmon bites, heat the vegetable oil in a large skillet over medium-high heat. Wait until the oil shimmers, which means it’s hot enough. Carefully add the salmon cubes in a single layer. Don't overcrowd the pan, or they won’t fry well. Cook them for about 2-3 minutes on each side. You'll know they are done when they turn golden brown and crispy. Once done, take them out and place them on a paper towel-lined plate to soak up extra oil. Now it's time for the honey garlic sauce. In a small saucepan, combine the honey, soy sauce, minced garlic, and grated ginger. Cook this mixture over medium heat. Stir it occasionally for about 3-5 minutes. You want the sauce to thicken a bit. Once it’s ready, take the salmon bites from the paper towel and return them to the skillet. Drizzle the thickened honey garlic sauce over the salmon. Gently toss the salmon bites to coat them well in the sauce. This will give them a sweet and savory flavor that is hard to resist. For the full recipe, check the earlier section. Enjoy your cooking adventure! To get the best crispiness, start with dry salmon. Pat the fish with paper towels. This helps the coating stick. Next, use a mix of flour and cornmeal. The cornmeal adds crunch. Make sure to coat each piece well. Fry in hot oil. If the oil is not hot, the salmon will soak up oil and become soggy. You can boost the flavor with a few simple tricks. Try adding cayenne pepper to the dry mix for heat. Lemon zest adds a fresh twist. You can also swap honey for maple syrup. This change gives a nice, rich flavor. Don't forget to sprinkle sesame seeds and green onions. They add texture and color. Use a heavy skillet for frying. A cast-iron skillet holds heat well. This helps fry the salmon evenly. A slotted spatula works great to flip the bites. It allows the oil to drain off easily. For the sauce, a small saucepan is best. It helps to control the heat while cooking the sauce. For the full recipe, check the detailed instructions above. {{image_2}} To add some heat, mix in chili flakes or Sriracha. This gives your bites a nice kick. You can also try using spicy honey if you can find it. It adds a sweet and spicy flavor that makes each bite exciting. Adjust the spice level to your liking. You can even serve with a side of spicy dipping sauce for more fun. If you want a healthier option, try baking your salmon bites. Preheat your oven to 400°F. Place the coated salmon on a baking sheet lined with parchment paper. Spray with a little cooking spray to help with crispiness. Bake for about 12-15 minutes, flipping halfway. This method keeps the bites tender and juicy while still offering a nice crunch. You can swap salmon for chicken or tofu if you prefer. For chicken, cut it into bite-sized pieces and follow the same steps. For tofu, press it to remove excess water, then cube it. The cooking time may vary, so check for doneness. Both proteins soak up the honey garlic sauce well, making them delicious options. To keep your crispy honey garlic salmon bites fresh, store them in an airtight container. Place them in the fridge. They stay good for about 2-3 days. Make sure they cool down first. This helps keep their texture. Reheat your salmon bites in the oven for the best results. Preheat your oven to 350°F (175°C). Spread the bites on a baking sheet. Heat them for about 10 minutes. This helps restore their crispiness. You can also use a skillet on medium heat. Just warm them for a few minutes, flipping gently. You can freeze these salmon bites for later enjoyment. First, let them cool completely. Then, place them in a freezer-safe bag or container. They last up to 2 months in the freezer. When ready to eat, thaw them overnight in the fridge. Reheat them as mentioned above for a tasty treat! You should cook salmon bites for about 2-3 minutes on each side. This timing gives you crispy, golden bites. Make sure not to overcrowd the pan. Overcrowding may lead to uneven cooking. Yes, you can use frozen salmon. Just thaw it first to ensure even cooking. Pat it dry to remove excess moisture. This helps the coating stick better and keeps the bites crispy. These bites pair well with several sides. Try serving them with rice or a fresh salad. You could also add steamed veggies for a healthy touch. For extra flavor, serve them with a dipping sauce. I recommend a soy or sweet chili sauce for a tasty twist. For the full recipe, check out the Crispy Honey Garlic Salmon Bites. In this article, we explored how to make delicious honey garlic salmon bites. We covered key ingredients and the best types of salmon. You also learned step-by-step cooking methods and tips for maximum crispiness. Variations like spicy bites and storage options were also discussed. Preparing these bites can be simple and fun. Enjoy experimenting with flavors and ingredients. Make this dish your own, and share it with friends and family!

Crispy Honey Garlic Salmon Bites Easy and Flavorful Treat

If you’re looking for a simple and tasty snack, you’ve found it! These Crispy Honey Garlic Salmon Bites pack a

- 4 boneless, skinless chicken breasts - 1 cup jalapeno chips, crushed - 1/2 cup flour - 2 large eggs - 1 teaspoon garlic powder - 1 teaspoon onion powder - 1/2 teaspoon smoked paprika - Salt and pepper to taste - 1/4 cup buttermilk (or milk) - Olive oil spray Using jalapeno chips adds a spicy crunch. They give the chicken a bold flavor. The heat from the chips makes each bite exciting. You can taste the zest without being too spicy. This flavor really sets it apart from plain chicken. Buttermilk is key in this recipe. It helps tenderize the chicken, making it juicy. The acidity in buttermilk also adds a rich flavor. This helps the coating stick better, giving it that perfect crispy bite. If you don’t have jalapeno chips, use other spicy chips. Tortilla chips or cheese puffs can work well. They will still add a nice crunch and flavor. For gluten-free options, you can swap regular flour with almond flour or a gluten-free blend. This keeps the recipe friendly for those with gluten issues. Just check the flour package to ensure it fries well. Start by preheating your oven to 400°F (200°C). This heat will help the chicken cook evenly and get crispy. You will need a few kitchen tools for this dish. Gather a baking sheet, parchment paper, three mixing bowls, a whisk, and a meat mallet or rolling pin. The parchment paper makes cleanup easy and helps the chicken crisp nicely. Now, let’s set up your dredging station. In the first bowl, mix the flour, garlic powder, onion powder, smoked paprika, salt, and pepper. This will be the first coating for your chicken. In the second bowl, beat the eggs and stir in the buttermilk. This mixture helps the next layer stick. In the third bowl, add the crushed jalapeno chips. The chips will give the chicken its spicy crunch. The coating sequence is simple: First, coat the chicken in the flour mix. Shake off any extra flour. Then, dip it into the egg mixture, letting the excess drip off. Lastly, roll the chicken in the crushed jalapeno chips. Press lightly to help the chips stick well. Place the coated chicken breasts on the baking sheet lined with parchment paper. Lightly spray the tops with olive oil spray. This step adds to the crispiness as it bakes. Cook the chicken in your preheated oven for about 20-25 minutes. To ensure it’s fully cooked, the chicken should reach an internal temperature of 165°F (74°C). You can check this with a meat thermometer. Let the chicken rest for about 5 minutes before slicing and serving. This allows the juices to settle, giving you juicy, flavorful chicken. For the full recipe, refer to the detailed instructions I shared earlier. Enjoy your crispy, flavorful Jalapeno Chip Crusted Chicken! To get that crispy texture, it all starts with the coating. First, ensure your chicken breasts are dry before you start. Pat them with a paper towel. This helps the coating stick well. Use a light hand when pressing the crushed jalapeno chips onto the chicken. If you want an extra crunch, spray the tops lightly with olive oil spray before baking. This adds a golden finish and helps the chips crisp up nicely. Adding flavor to the chicken is key. You can mix extra spices into the flour, like cayenne pepper or cumin, for a kick. For marinades, try soaking the chicken in buttermilk overnight. This makes the meat tender and juicy. You might also use a simple brine of salt and water for a few hours. Either way, flavor is important in every bite. Pair your Jalapeno Chip Crusted Chicken with tasty sides. Some great options include coleslaw, corn on the cob, or a fresh salad. For a fun twist, serve it with spicy ranch dressing or guacamole for dipping. When it comes to presentation, slice the chicken into strips and arrange it on a wooden cutting board. Add fresh cilantro on top for color, and your dish will look as good as it tastes. Check out the Full Recipe for more details! {{image_2}} You can mix things up with different chips. Try spicy barbecue chips or cool ranch chips for a new taste. Each chip adds its own flair to the chicken. You can also add cheese to the coating. Grated cheddar or pepper jack cheese adds creaminess and extra flavor. Just mix it with the crushed chips for a cheesy crunch. If you want a healthier option, try the air fryer. Set it to 375°F (190°C). Cook for about 15-20 minutes. This method gives you crispy chicken with less oil. For summer cookouts, grilling is great too. Marinate the chicken in your favorite spices before grilling. This adds smokiness and enhances the flavor. You can adjust the recipe for different diets. For gluten-free options, use almond flour instead of regular flour. This keeps the crunch without the gluten. If you want a vegan or vegetarian dish, try using tofu. Coat the tofu in the same way as the chicken. It will soak up the flavors and still be delicious. To keep your jalapeno chip crusted chicken fresh, place it in an airtight container. This helps seal in flavors and moisture. Store it in the fridge. It lasts for about 3 to 4 days. Make sure it cools down to room temperature before covering it. This way, it won't create steam and make the chicken soggy. You can freeze both uncooked and cooked chicken. For uncooked chicken, wrap it tightly in plastic wrap and then in foil. This prevents freezer burn. It can last for up to 3 months. For cooked chicken, let it cool first, then place it in a freezer-safe container. It stays good for about 2 to 3 months. To reheat frozen chicken, let it thaw in the fridge overnight. Then, bake or pan-fry it to get that crispy texture back. To keep your chicken crispy, use the oven or air fryer. Preheat your oven to 375°F (190°C). Place the chicken on a baking sheet and heat for about 15 minutes. You can also use an air fryer at the same temperature for about 10 minutes. Serve the leftover chicken with a fresh side salad or dip it in ranch dressing. You can also slice it and add it to tacos or wraps for a fun meal. For more details, check the Full Recipe. You have many great options! Side dishes can enhance your meal. Here are some popular choices: - Spicy ranch dressing: It adds a creamy kick. - Guacamole: This pairs well with the crispy chicken. - Coleslaw: A fresh, crunchy side that balances flavors. - Corn on the cob: Sweet and buttery, it complements the spice. - Rice or quinoa: These grains soak up the flavors well. These sides make your meal fun and tasty! To check if your chicken is ready, use a meat thermometer. Insert it into the thickest part of the chicken. The safe internal temperature is 165°F (74°C). Here are more tips: - Color check: Chicken should be white, not pink. - Juices: They should run clear when you cut into it. - Texture: The chicken should feel firm but not hard. Ensure you check the chicken carefully for safe eating. Yes, you can! Making this dish ahead of time works well. Here are best practices: - Cook the chicken: Let it cool, then store it in the fridge. - Reheat before serving: Use the oven to keep it crispy. - Prep the coating: You can prepare the jalapeno chips and spices ahead. This makes weeknight dinners much easier! No jalapeno chips? No problem! You can use other chips or items instead. Here are some fun ideas: - Spicy tortilla chips: They also give a nice crunch. - Panko breadcrumbs: Add spices for flavor. - Cheesy chips: These can add a different taste. Get creative with what you have in your pantry! Absolutely! This recipe works great for meal prep. Here’s how to do it: - Portion the chicken: Cut it into servings for easy meals. - Store in airtight containers: This keeps it fresh longer. - Label and date: Helps you keep track of what’s in your fridge. With these tips, you'll always have a tasty meal ready! For the full recipe, check the details above. This blog post covers how to make Jalapeno Chip Crusted Chicken. We discussed the key ingredients, like jalapeno chips and buttermilk. I shared step-by-step instructions for cooking and tips for a crispy finish. You can also try variations and enjoy helpful storage tips. In conclusion, feel free to experiment with flavors and cooking methods. This dish is perfect for sharing and satisfying everyone at the table. Enjoy your tasty creation!

Jalapeno Chip Crusted Chicken Crispy and Flavorful Dish

Are you ready to spice up your dinner? This Jalapeno Chip Crusted Chicken combines crunch and flavor in a way

To make this Creamy Tomato Tortellini Soup, you need the following ingredients: - 2 tablespoons olive oil - 1 medium onion, finely chopped - 3 cloves garlic, minced - 1 can (28 oz) crushed tomatoes - 4 cups vegetable broth - 1 teaspoon dried basil - 1 teaspoon dried oregano - 1/2 teaspoon red pepper flakes (optional) - 9 oz cheese tortellini (fresh or frozen) - 1 cup heavy cream - Salt and pepper to taste - Fresh basil leaves for garnish Using fresh ingredients makes a big difference. It enhances the flavor and aroma of the soup. Fresh herbs bring a vibrant taste that dried herbs cannot match. Fresh tortellini adds a nice texture. The cream should be fresh for the best richness. When you use fresh items, your soup will taste more alive and delicious. You can easily swap ingredients based on your needs. If you don’t have olive oil, use butter or another oil. For the onion, shallots can work well too. If you want to skip the cream, try coconut milk for a dairy-free option. You can also use any pasta instead of tortellini. Just adjust the cooking time based on the pasta you choose. These swaps help you create a soup that suits your taste and pantry. For the full recipe, check out the details above. Start by gathering all your ingredients. This makes cooking easier! Here’s what you need: - 2 tablespoons olive oil - 1 medium onion, finely chopped - 3 cloves garlic, minced - 1 can (28 oz) crushed tomatoes - 4 cups vegetable broth - 1 teaspoon dried basil - 1 teaspoon dried oregano - 1/2 teaspoon red pepper flakes (optional) - 9 oz cheese tortellini (fresh or frozen) - 1 cup heavy cream - Salt and pepper to taste - Fresh basil leaves for garnish Next, chop the onion and mince the garlic. These steps add great flavor. Heat the olive oil in a large pot over medium heat. Add the onion and sauté for about 4-5 minutes. You want the onion to be soft and clear. Then, stir in the minced garlic and cook for one more minute. This step brings out the garlic's aroma. Now, pour in the crushed tomatoes and vegetable broth. Mix well. Add the dried basil, oregano, and red pepper flakes if you like some heat. Bring the soup to a gentle simmer. Once simmering, add the cheese tortellini. Cook it according to the package instructions, usually around 5-7 minutes. The tortellini should be tender, not mushy. After the tortellini is ready, lower the heat. Stir in the heavy cream, and let the soup warm up. Taste it, adding salt and pepper as needed. Remove the pot from the heat. Ladle the soup into bowls and garnish with fresh basil leaves. For extra flavor, add some grated Parmesan cheese on top. Serve it with crusty bread for a filling meal. You can find the Full Recipe for Creamy Tomato Tortellini Soup 🥣 online if you want to keep it handy! Enjoy your delicious dish! To make your creamy tomato tortellini soup pop, focus on fresh herbs. Fresh basil adds a bright note. You can also add some thyme for depth. Try sautéing the garlic longer for a rich taste. A splash of balsamic vinegar can add a nice tang too. If you love heat, add more red pepper flakes. A dash of lemon juice brings out the tomato flavor, making the soup even better. Don’t rush the onion cooking step. If you skip this, the soup may taste flat. Avoid adding the cream too early; it should only warm through. Adding too much salt can ruin the flavor, so taste often. Don’t forget to check the tortellini package for cooking time. Overcooked tortellini can turn mushy and spoil your meal. For a lovely presentation, use shallow bowls. Ladle the soup in, then top with fresh basil leaves. You can sprinkle grated Parmesan cheese on top. This adds flavor and looks great. Serve with crusty bread on the side for a full meal. Enjoy your delicious creation! You can find the Full Recipe above to guide you step by step. {{image_2}} You can easily make this soup vegetarian or vegan. For a vegetarian version, simply use vegetable broth instead of chicken broth. This soup is already meat-free, so just focus on your choice of tortellini. Look for cheese tortellini or switch to a non-dairy option. Many brands offer vegan tortellini made with spinach or other veggies. For a vegan twist, replace the heavy cream with coconut milk or cashew cream. These options add richness without dairy. Want to add some protein? You can include cooked chicken or sausage. For chicken, use rotisserie chicken for ease. Shred the meat and stir it into the soup. If you prefer sausage, choose Italian sausage for a nice kick. Cook the sausage in the pot before adding other ingredients. This method infuses the soup with great flavor. You can also use turkey sausage for a lighter touch. If you crave more heat, try adding fresh herbs or peppers. Chili flakes add spice, but you can also use fresh jalapeños or serranos. Chop them finely and add them when you sauté the onions. Fresh herbs like thyme or parsley can enhance the soup's flavor too. Experiment with different herbs to find your favorite combo. If you want more ideas, check out the Full Recipe for Creamy Tomato Tortellini Soup 🥣. After enjoying your creamy tomato tortellini soup, store the leftovers right away. Use an airtight container to keep it fresh. Let the soup cool down before sealing it. This helps avoid condensation, which can make the soup watery. You can keep it in the fridge for about three to four days. When you’re ready to enjoy the soup again, reheating is simple. Pour the soup into a pot over medium heat. Stir it gently to warm it up evenly. You can also use a microwave. Place the soup in a microwave-safe bowl and heat it in short bursts. Stir it between sessions to avoid hot spots. If the soup seems too thick, add a splash of broth or water. If you want to save some for later, freezing is a great option. First, let the soup cool completely. Then, transfer it to freezer-safe bags or containers. Remove as much air as possible before sealing. Label the containers with the date. You can freeze the soup for up to three months. When you’re ready to eat it, thaw it overnight in the fridge. Reheat it as usual, and enjoy a tasty meal again! For the full recipe, check the earlier sections. You can make this soup gluten-free by using gluten-free tortellini. Many brands offer this option. Check the pasta aisle for choices. You can also use gluten-free broth. Just make sure all your ingredients are labeled gluten-free. This way, everyone can enjoy the soup without worry. Yes, you can use other pasta types! Bowtie, shell, or penne pasta work well. Just adjust cooking time based on the pasta you choose. Fresh pasta cooks faster than dried pasta. Tortellini adds a nice cheese flavor, but any pasta can make this soup delicious. To thicken the soup, you can add more cream or use a cornstarch slurry. Mix one tablespoon of cornstarch with two tablespoons of cold water. Stir this mixture into the soup while it simmers. Allow it to cook for a few minutes. This will give your soup that rich, creamy feel. - Full Recipe for Creamy Tomato Tortellini Soup 🥣 This blog post covered all you need for a great creamy tomato tortellini soup. You learned about key ingredients, the importance of using fresh items, and helpful substitutions. The step-by-step instructions made cooking simple. I shared tips to enhance flavor and avoid mistakes. You can also explore variations, such as vegetarian options and adding proteins. Lastly, I provided advice on storing and reheating leftovers. Enjoy crafting your perfect soup and impress your family or friends. This dish is creamy, tasty, and can be yours anytime!

Creamy Tomato Tortellini Soup Flavorful and Easy Meal

Are you craving a warm, comforting meal that’s both easy and flavorful? Look no further! My Creamy Tomato Tortellini Soup

To make your meatball subs, gather these key ingredients: - 1 pound ground beef - 1/2 pound ground pork - 1/2 cup breadcrumbs - 1/4 cup grated Parmesan cheese - 2 cups marinara sauce - 4 hoagie/sub rolls These ingredients create the rich base for your subs. The mix of ground beef and pork gives the meatballs a great taste and texture. Breadcrumbs help hold the meatballs together while adding a bit of crunch. Parmesan cheese adds a salty, nutty flavor that is hard to beat. Marinara sauce brings everything together with its tangy goodness, and hoagie rolls are perfect for holding all that deliciousness. You can enhance your meatball subs with these optional ingredients: - 1 cup shredded mozzarella cheese - Fresh parsley, chopped - Fresh basil leaves - Sliced jalapeños - Crushed red pepper Adding shredded mozzarella cheese gives a nice melt and stretch, making every bite more enjoyable. Fresh parsley and basil not only look pretty but also add freshness. If you like a little heat, sliced jalapeños and crushed red pepper will give your subs a spicy kick. Feel free to mix and match these toppings to suit your taste. For the full recipe, check out the detailed steps above! 1. Preheat the Oven: Start by preheating your oven to 375°F (190°C). This step helps the subs bake evenly and get that perfect golden color. 2. Prepare Meatball Mixture: In a large mixing bowl, combine these ingredients: - 1 pound ground beef - 1/2 pound ground pork - 1/2 cup breadcrumbs - 1/4 cup grated Parmesan cheese - 1/4 cup fresh parsley, chopped - 2 cloves garlic, minced - 1 teaspoon dried oregano - 1 teaspoon salt - 1/2 teaspoon black pepper - 1 egg, beaten Mix everything well. You want it to be smooth and well-blended. 3. Form Meatballs: Shape the mixture into about 12-15 meatballs. Each meatball should be the size of a golf ball for the best fit in the subs. 4. Cook Meatballs: Heat a drizzle of olive oil in a large skillet over medium heat. Once the oil is hot, add the meatballs. Cook them for about 6-8 minutes, turning occasionally. Look for a nice brown color on all sides. 1. Add Marinara Sauce: After the meatballs are browned, pour 2 cups of marinara sauce over them. Gently stir to coat the meatballs evenly. Let this simmer for about 10 minutes. This step allows the flavors to mix well. Ensure the meatballs reach an internal temperature of 165°F (74°C). 2. Prepare Subs: Slice the hoagie rolls lengthwise and place them on a baking sheet. If you like, use a spoon to scoop out some of the bread from the inner side. This creates more room for the tasty filling. 3. Assemble Subs: Spoon 2-3 meatballs into each hoagie roll. Make sure to drench them in the sauce. Top each sub with shredded mozzarella cheese. 4. Bake the Subs: Place the assembled subs in the oven. Bake for about 10-12 minutes. Look for the cheese to melt and bubble. The bread should be lightly toasted. 5. Garnish & Serve: Remove the subs from the oven. You can add sliced jalapeños or crushed red pepper for extra flavor. Cut the subs in half and sprinkle fresh basil leaves on top before serving. Enjoy your delicious creation! For the full recipe, please refer to the earlier section. To make the best meatballs, focus on texture and flavor. Use both ground beef and ground pork for a rich taste. The mix gives a nice balance. - Ensure your breadcrumbs are fresh. Stale breadcrumbs can make meatballs dry. - Add a beaten egg to bind the meat. This keeps them from falling apart. - Mix gently. Over-mixing can make them tough. Common mistakes include using too much salt or not enough fat. A little fat keeps meatballs juicy. Make sure to season the mix well, but don’t overdo it. Taste your mixture before cooking. The right bread and cheese can elevate your meatball sub. Hoagie rolls are ideal; they hold up well. - Try using fresh mozzarella for a creamy texture. - Provolone cheese also melts nicely and adds flavor. For serving ideas, consider a rustic wooden board. Add a bowl of marinara for dipping. It looks great and keeps the meal fun. Garnish your subs with fresh parsley or basil. This adds color and a fresh taste. For a kick, top with sliced jalapeños or crushed red pepper. These options can please those who enjoy spice. Don't forget to cut the subs in half for easy eating! If you want the full recipe, check out the Savory Sizzlin' Meatball Subs. {{image_2}} You can swap out beef and pork for turkey or chicken. These meats offer a lighter taste. They still work well in meatball subs. Just use the same amount as you would for beef and pork. For a vegetarian or vegan option, try using lentils or chickpeas. These ingredients provide great texture. You can also use store-bought meat substitutes. Just follow the package instructions for cooking. Bread choice can change your meatball sub game. Ciabatta and baguettes are great alternatives to hoagie rolls. They add a nice crunch and flavor. Feel free to experiment with different types of bread to find your favorite. The sauce also plays a big role. You can use spicy marinara for a kick. Or try flavored sauces like pesto or roasted red pepper sauce. These options can add new layers of taste to your meatball sub. For the full recipe, check out the full recipe section! To keep your meatball subs fresh, start by letting them cool down. Once cool, wrap each sub in plastic wrap or foil. Place them in an airtight container. This keeps moisture in and prevents them from getting soggy. You can store them in the fridge for up to three days. For best results, eat them within this time to enjoy their full flavor. To freeze meatball subs, first, separate the meatballs from the bread. Wrap each meatball in plastic wrap, then place them in a freezer bag. Squeeze out air before sealing. For the bread, wrap it in foil, then add it to the freezer bag. This method stops freezer burn. When you want to reheat, remove the meatballs and bread from the freezer. Let them thaw overnight in the fridge. To heat, place meatballs in a pot on low heat with some marinara sauce. Stir until warmed through. For the bread, pop it in the oven at 350°F (175°C) for about 10 minutes. This way, you’ll have a warm, tasty meal just like the first day! To make meatballs tender, mix your ingredients gently. Overmixing can make them tough. Use a blend of ground beef and pork for flavor and moisture. Adding breadcrumbs keeps them light. You can also soak the breadcrumbs in milk before mixing. This adds moisture and flavor. Always handle the meat gently and form the meatballs without squeezing too hard. Yes, you can make meatball subs in advance. Prepare the meatballs and sauce the day before. Store them in the fridge in an airtight container. You can also assemble the subs and wrap them tightly. Just keep the cheese separate until you bake them. This keeps the bread from getting soggy. When you’re ready, bake them and enjoy! Several side dishes go well with meatball subs. A simple green salad adds freshness. You can also serve potato chips for a crunchy side. Garlic bread is a classic choice that complements the flavors. For something lighter, try carrot sticks or a veggie platter. Any of these sides will enhance your meal! I covered all the important parts of making amazing meatball subs. You learned about key ingredients, easy steps, and some great tips. Remember, the right mix of meat, sauce, and bread makes a perfect sub. Don't forget to try different toppings and bread options for a fun twist. Store leftovers properly, so you can enjoy them later. Dive into this tasty world and enjoy your meatball subs with family or friends. Happy cooking!

Mouthwatering Meatball Subs Easy and Flavorful Recipe

Are you ready to dive into a world of flavor with my easy meatball sub recipe? These mouthwatering sandwiches are

Older posts
Newer posts
← Previous Page1 … Page16 Page17 Page18 … Page23 Next →

dsad

© 2025 greenmealmap • Built with GeneratePress

Our Policies

  • Copyright Policy
  • Cookie Policy
  • GDPR Policy
  • Privacy Policy
  • Disclaimer
  • Terms Of Use

More Information

  • Home
  • About
  • Contact
  • Appetizers
  • Dessert
  • Dinner
  • Drinks
©2025, greenmealmap About Back To Top